
How to Add a Dependent in Workday
Workday lets you maintain a list of dependents and beneficiaries that you can draw from whenever a benefit event occurs. This guide explains how to add a dependent in Workday, how to attach court orders to an existing dependent record, how to verify court order compliance, and how to inactivate or edit dependents and beneficiaries when circumstances change.
Video: How to Manage Dependents and Beneficiaries | Workday Benefits by Workday (2026). All credit for the demonstration goes to the creator; watch the original on YouTube. The written guide below was generated from this video by Docsie. Creator? Request a change or removal.
Workday lets you maintain a list of dependents and beneficiaries that you can draw from whenever a benefit event occurs. This guide explains how to add a dependent in Workday, how to attach court orders to an existing dependent record, how to verify court order compliance, and how to inactivate or edit dependents and beneficiaries when circumstances change.
Keep in mind that adding someone to your list of dependents or beneficiaries does not automatically enroll them as a dependent or beneficiary on a benefit plan. You still need to select them during a benefit event.
Prerequisites
- Access to Workday with permissions appropriate to your role (employee, benefits partner, or administrator).
- Familiarity with the Change Beneficiary and Dependent Event business processes, which your organization can configure to meet its own requirements.
- Awareness that security settings control who can activate, inactivate, or add court orders to dependents and beneficiaries—these settings vary by organization.
- Knowledge of your organization's documentation requirements for benefit events, such as proof of a legal marital status change.
Understanding dependent and beneficiary types
Before you add a dependent in Workday, it helps to understand the types of records you can create:
- Beneficiaries can be individuals or trusts.
- Existing dependents or emergency contacts can also be designated as beneficiaries.
Open the business process to add a dependent in Workday
Use the Workday search bar to access the correct business process for the change you need to make.
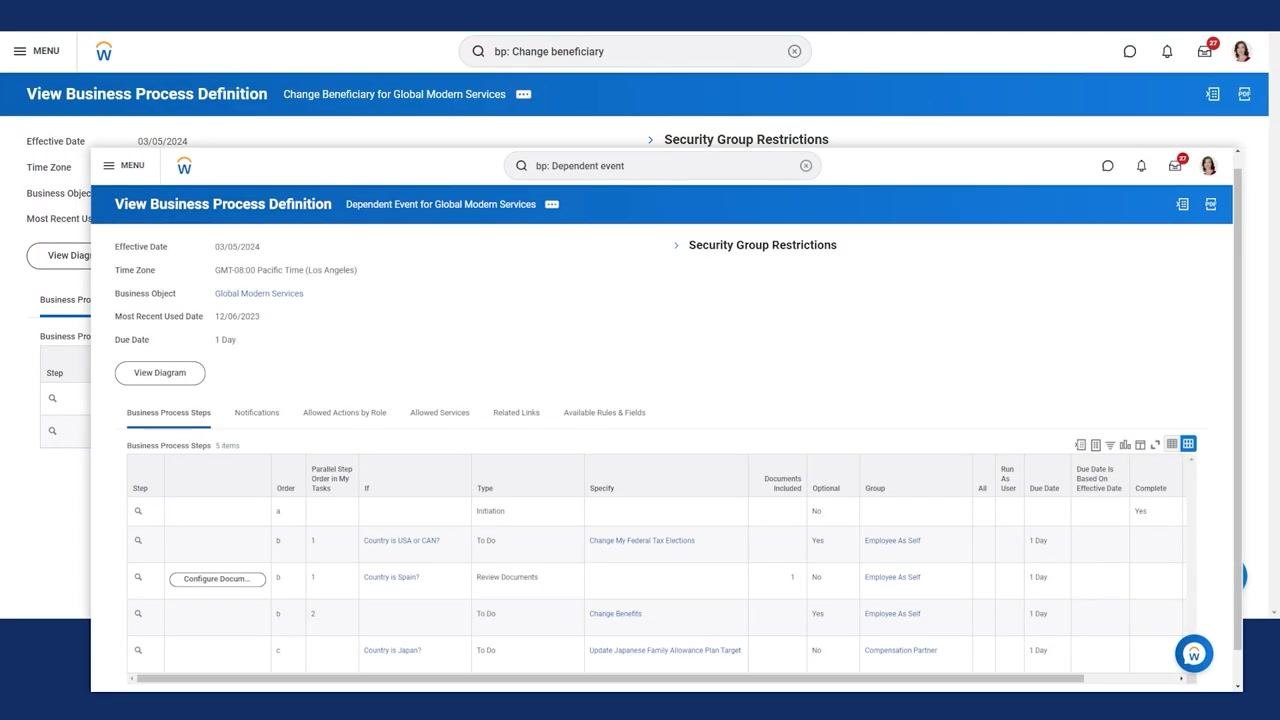
- Enter bp: Change beneficiary to open the Change Beneficiary process.
- Enter bp: Dependent event to open the Dependent Event process.
Both processes are configurable, so the exact steps and fields you see may vary depending on your organization's setup.
Review the business process definitions
Workday displays the definitions for the Change Beneficiary and Dependent Event business processes. Review these to confirm you are using the correct process for adding or updating a dependent or beneficiary.
Access dependent and beneficiary records from a worker's profile
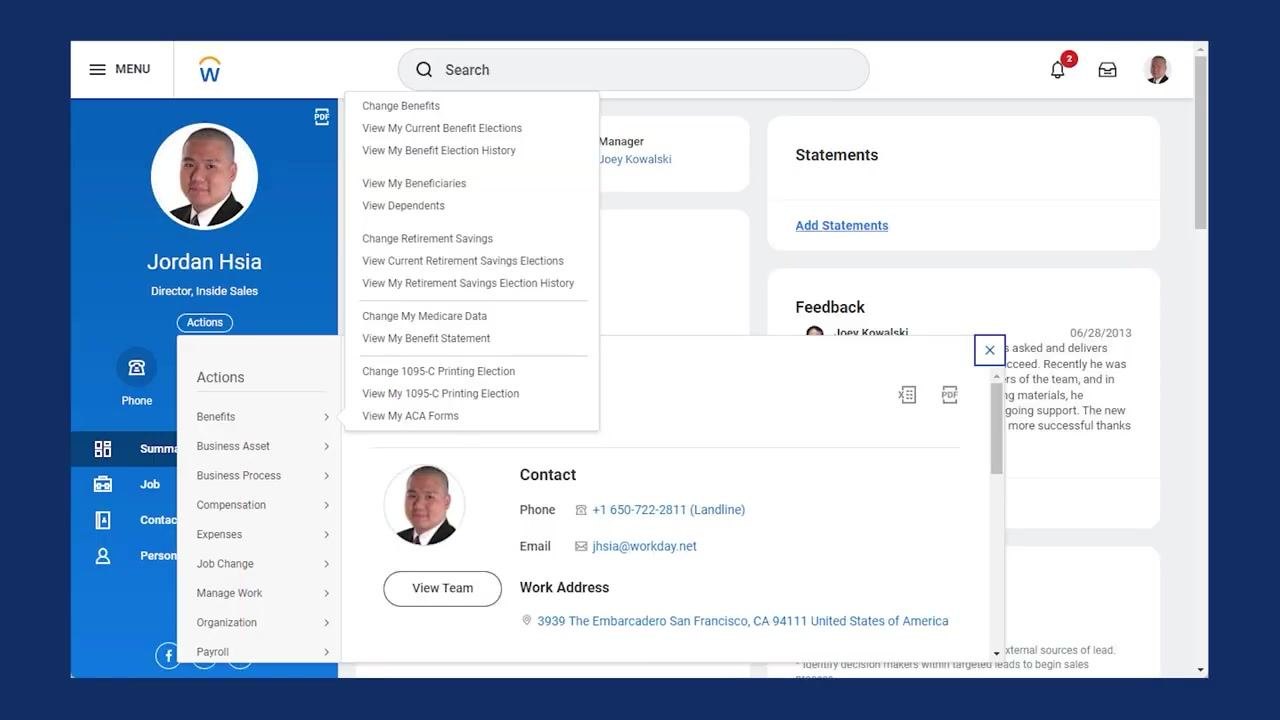
From the worker's profile, open the Actions menu to reach benefit-related options.
- Select View My Beneficiaries to manage beneficiary records.
- Select View Dependents to manage dependent records.
Adding a court order to an existing dependent
Workday lets you attach court order information to a dependent's record, but only after the dependent already exists. You cannot enter court order details while adding a brand-new dependent—you must use the edit task on the existing record instead.
A benefits partner or administrator can also activate or inactivate dependents as needed, and the security settings governing these actions are configurable and may vary by organization.
Step 4: Open the Court Orders page
Select the existing dependent or beneficiary record and use the edit task to reach the Court Orders section. Click Add to start a new court order entry.
Step 5: Enter the court order details
Fill in the required fields for the court order:
- Coverage Required (for example, Medical)
- Start Date (for example, 10/10/2018)
- End Date (for example, 02/24/2026)
Checking for active court orders before removing a dependent
If you try to remove a dependent who has an active court order, Workday displays an error message and does not allow the removal to continue.
Step 6: Run the Active Court Orders report
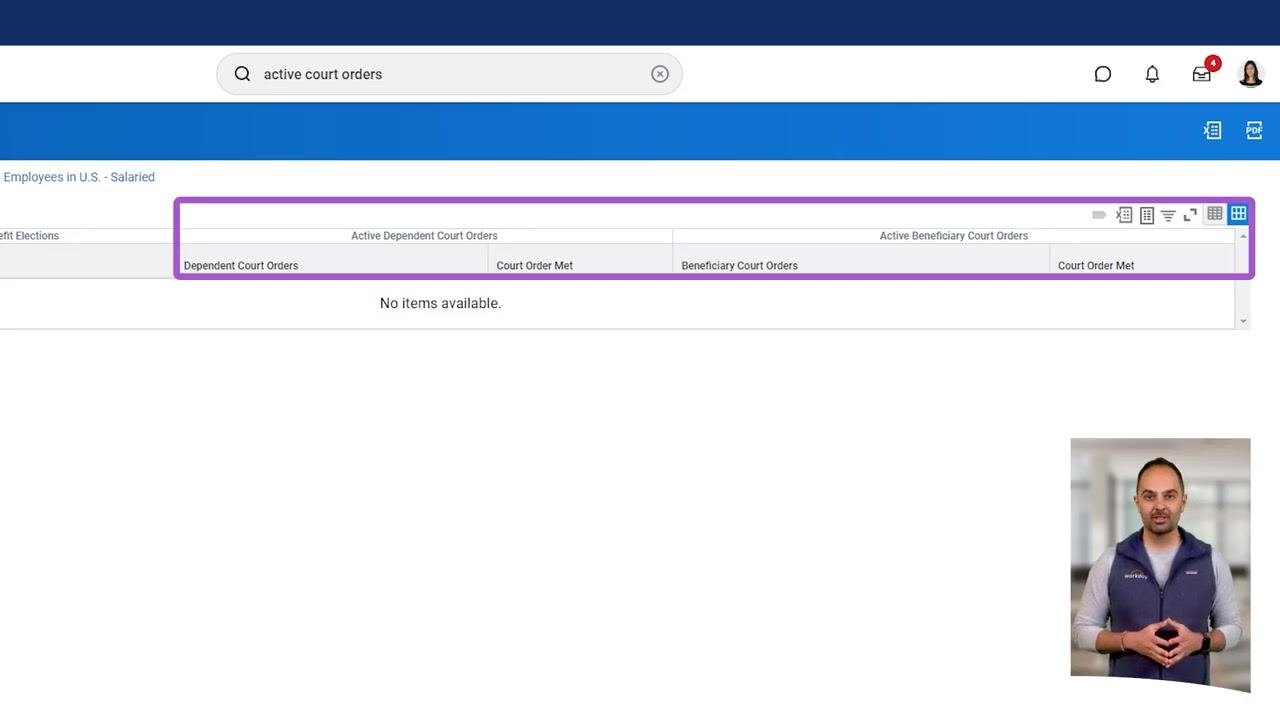
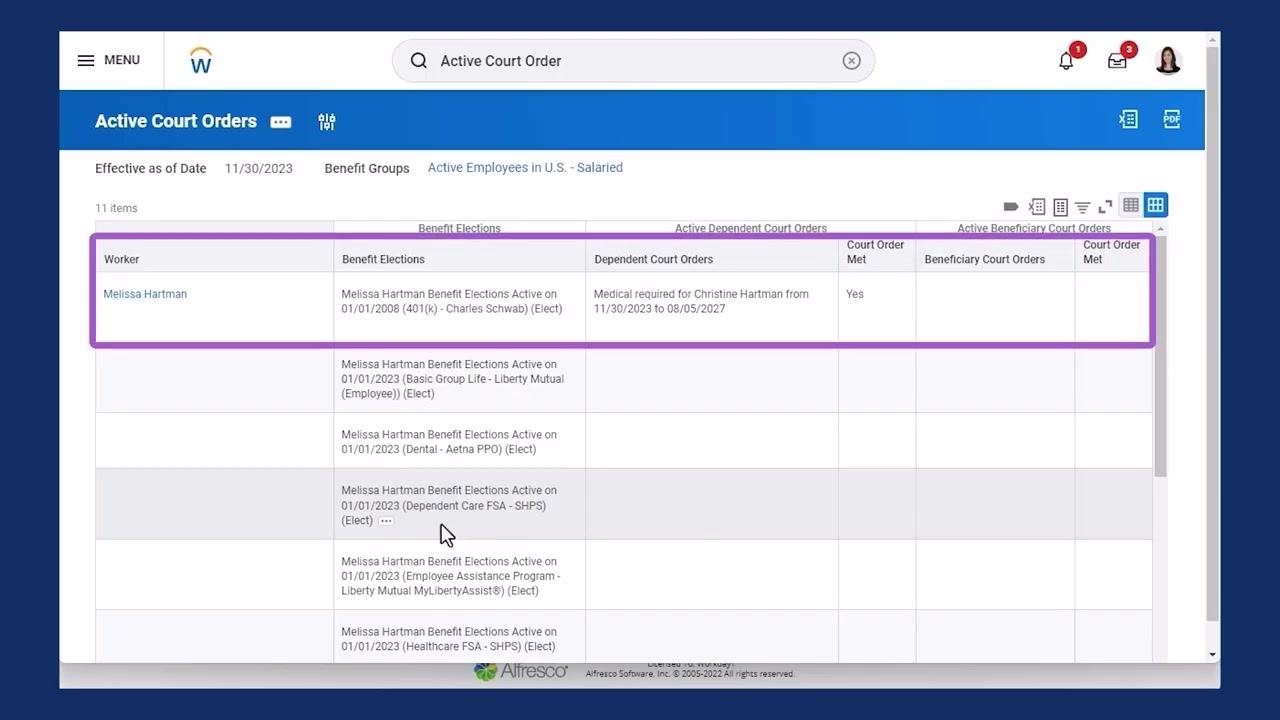
Search for and open the Active Court Orders report to view employees whose dependents or beneficiaries have active court orders.
- Filter by Benefit Group and Effective as of Date to check whether court order requirements are met.
- Review the report columns: Worker, Benefit Elections, Dependent Court Orders, Court Order Met, Beneficiary Court Orders, and Court Order Met.
Considerations before inactivating a dependent or beneficiary
Before you inactivate a dependent or beneficiary, keep the following in mind:
- Remove active benefit elections for the dependent or beneficiary before inactivation.
- Role responsibility: employees can activate or inactivate their own dependents or beneficiaries, but a benefits partner or administrator typically performs this task.
- Security permissions determine whether one or both security groups (employee or administrator) can inactivate records.
- COBRA eligibility: consider whether the dependent or beneficiary qualifies for COBRA coverage, which allows workers and their families to continue health care benefits for a limited period after a qualifying event such as a divorce.
Example walkthrough: Editing a dependent's court order information
The following steps walk through a complete example of reviewing a dependent, editing and confirming court order information, and verifying the result in a compliance report.
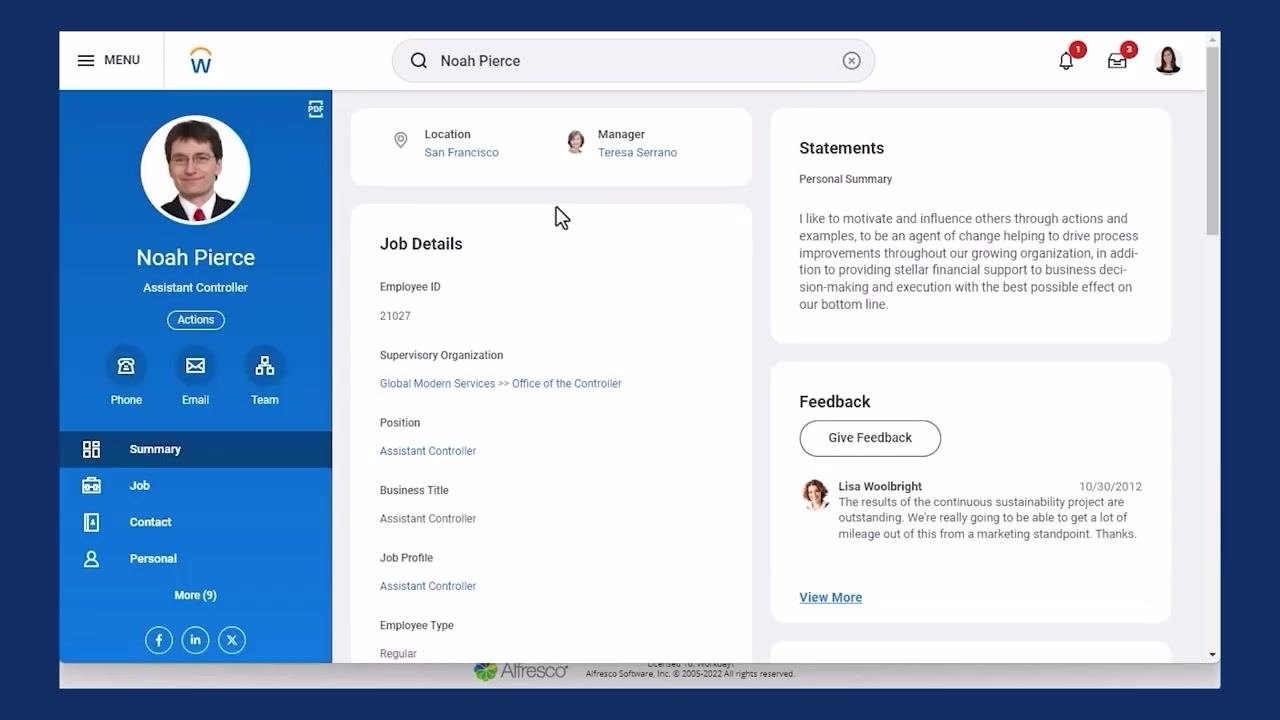
Step 7: Search for the worker's profile
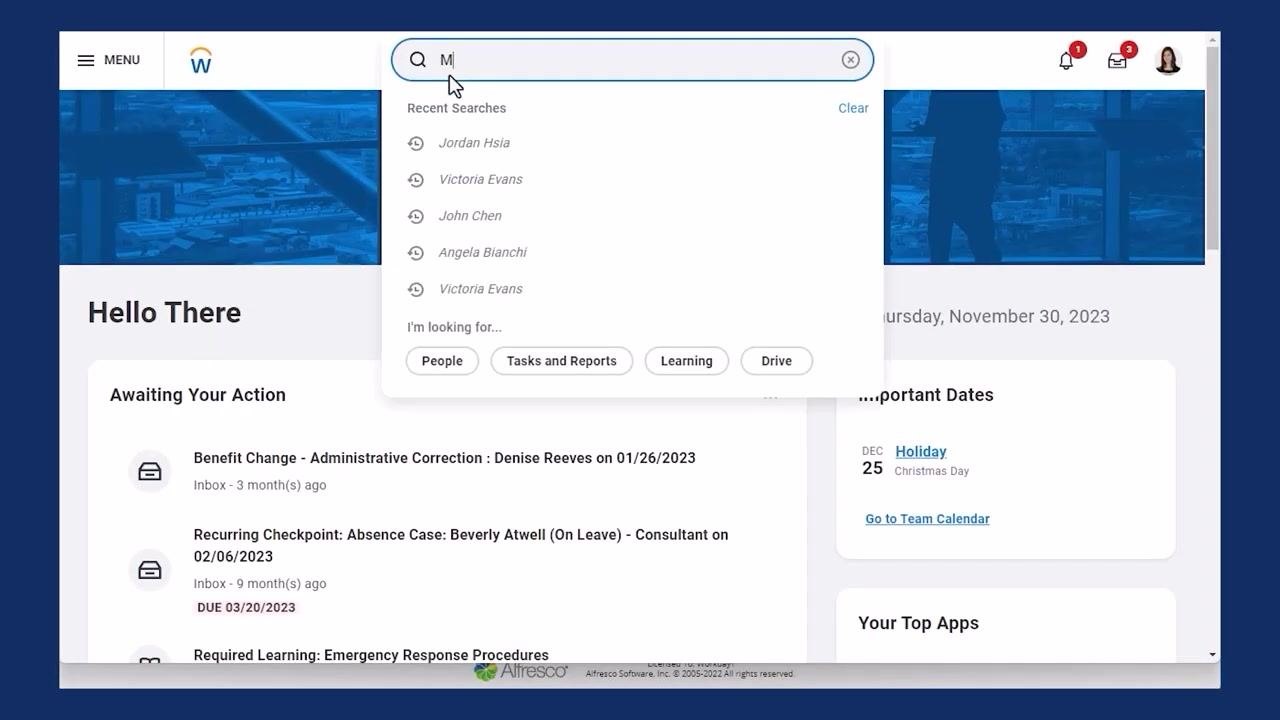
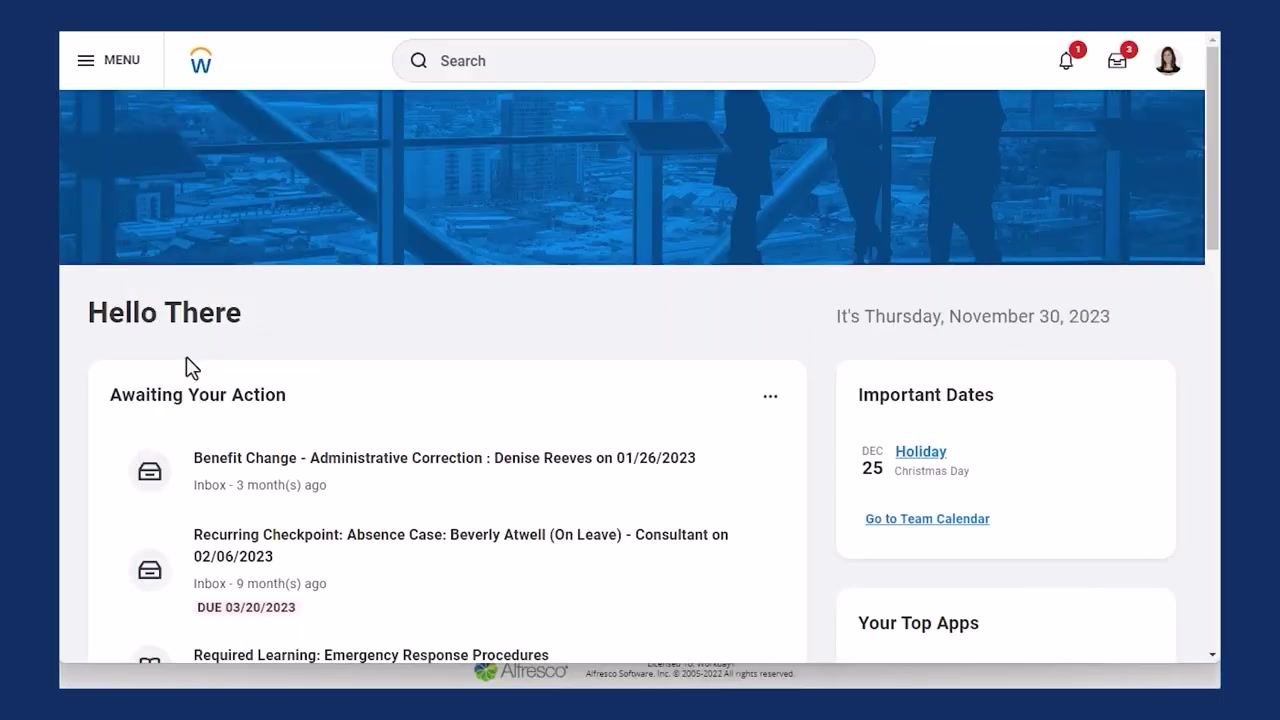
From the Workday home page, use the search bar at the top of the screen and enter the worker's name.
Step 8: Open the Benefits section and select View Dependents
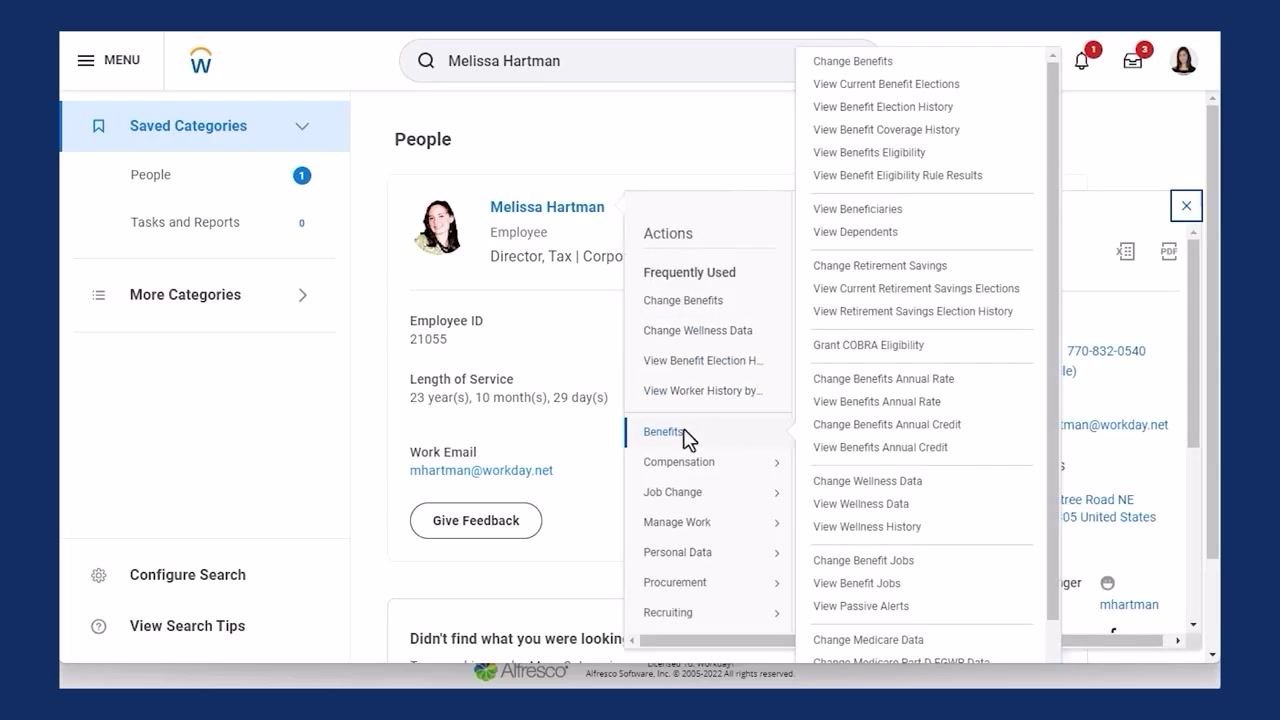
On the employee's profile page, open the Actions menu, select Benefits, and click View Dependents from the dropdown list.
Step 9: Edit the dependent and scroll to Court Orders
In the Dependents list, find the dependent you want to edit and click Edit. Scroll down to the Court Orders section and locate the Add button to begin entering new court order information.
Step 10: Specify the coverage requirement and dates
In the Coverage Required field, select the applicable Health Care Coverage Type, such as Medical. Set the coverage start date to today's date and enter the required end date.
Step 11: Submit the court order and confirm
Review the entered information, then click Submit to save the new court order. If Workday prompts you with additional tasks, you can ignore them if instructed to do so.
Step 12: Open the Active Court Orders report to verify the change
Return to the search bar, type Active Court Orders, and select the report from the dropdown.
Step 13: Run the report and confirm the court order status
Set the Effective as of Date to today's date and select the appropriate Benefit Group (for example, Active Employees in U.S. - Salaried). Click OK to generate the report, then locate the employee and confirm that the dependent shows the correct coverage type, date range, and a Court Order Met status of "Yes."
Example walkthrough: Updating dependents after a qualifying event
This example covers a legal marital status change, which affects the employee's covered dependents and benefit elections.
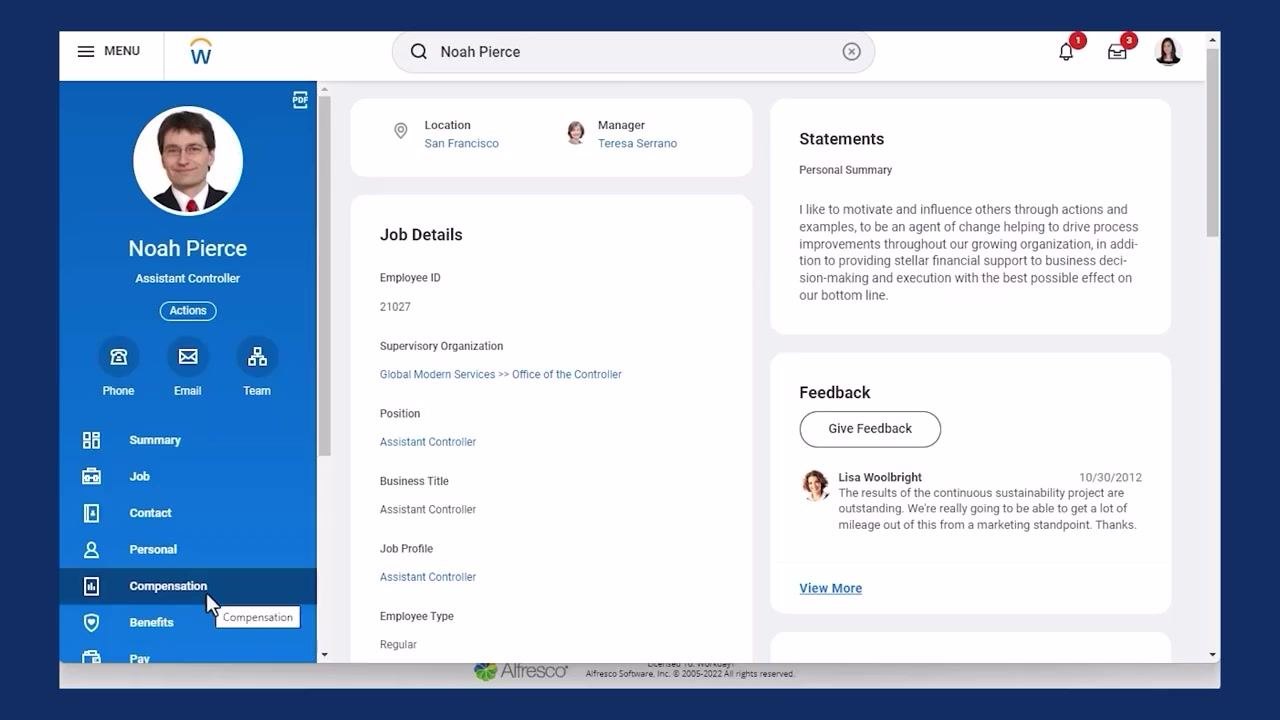
Step 14: Open the Benefits section on another worker's profile
Search for and select the employee, then locate the Benefits section group on the left panel of the worker profile.
Step 15: Review the current coverage summary
Open the Benefits section to see the employee's current coverage summary, including the plan type and the dependents covered under it.
Step 16: Open the Dependents tab
Select the Dependents tab to review the list of dependents associated with the employee's benefit plans, including the benefit plan, coverage, deduction begin date, calculated coverage, and dependents columns.
Step 17: Attempt to inactivate a dependent
Select the options menu next to the dependent's name and choose Dependent > Inactivate from the dropdown menu.
Step 18: Enter the inactivation details
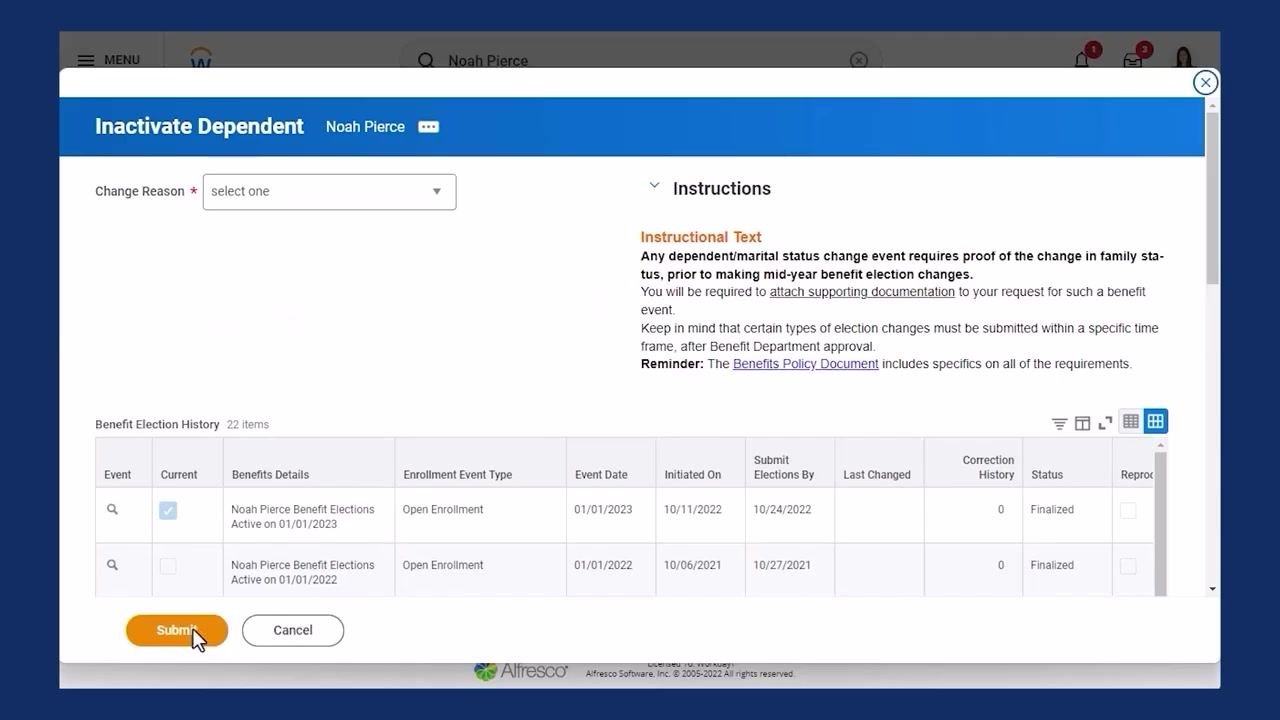
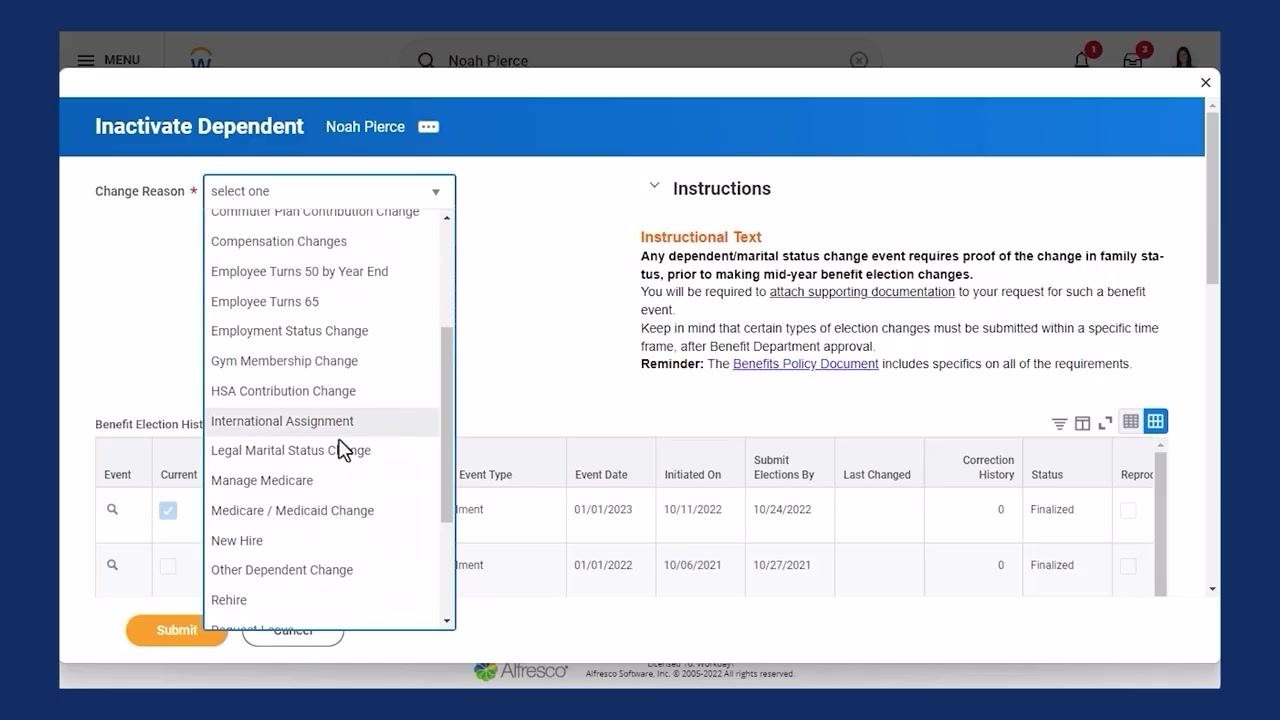
On the Inactivate Dependent page, select a Change Reason from the dropdown menu, such as Legal Marital Status Change. Review the instructional text, which states that proof of the change in family status is required, and review the Benefit Election History table for relevant events.
Step 19: Complete the change reason details and submit
With Legal Marital Status Change selected, enter the Benefit Event Date and the Submit Elections By date. Review the list of open elections affected by the change, attach any required documentation, and click Submit.
Step 20: Search for the Benefit Events Status Report
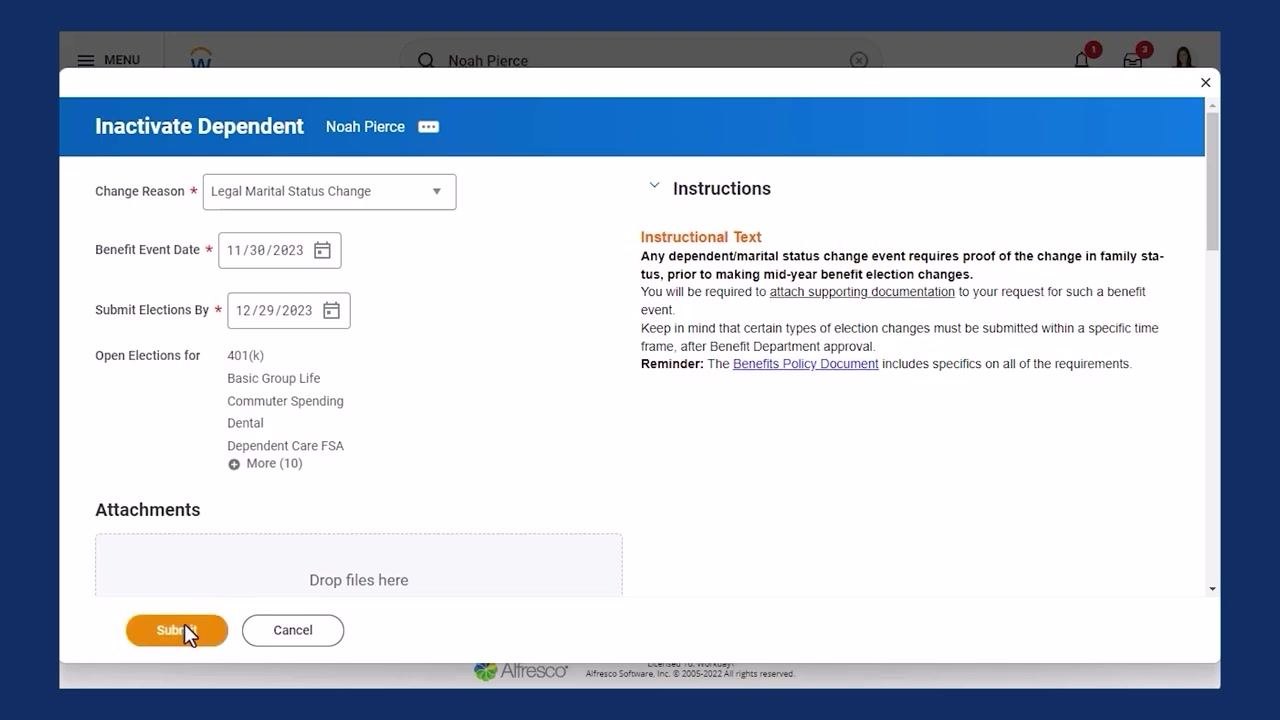
Use the search bar to enter Benefit Events Status Report and select it from the dropdown list.
Step 21: Locate the relevant benefit event
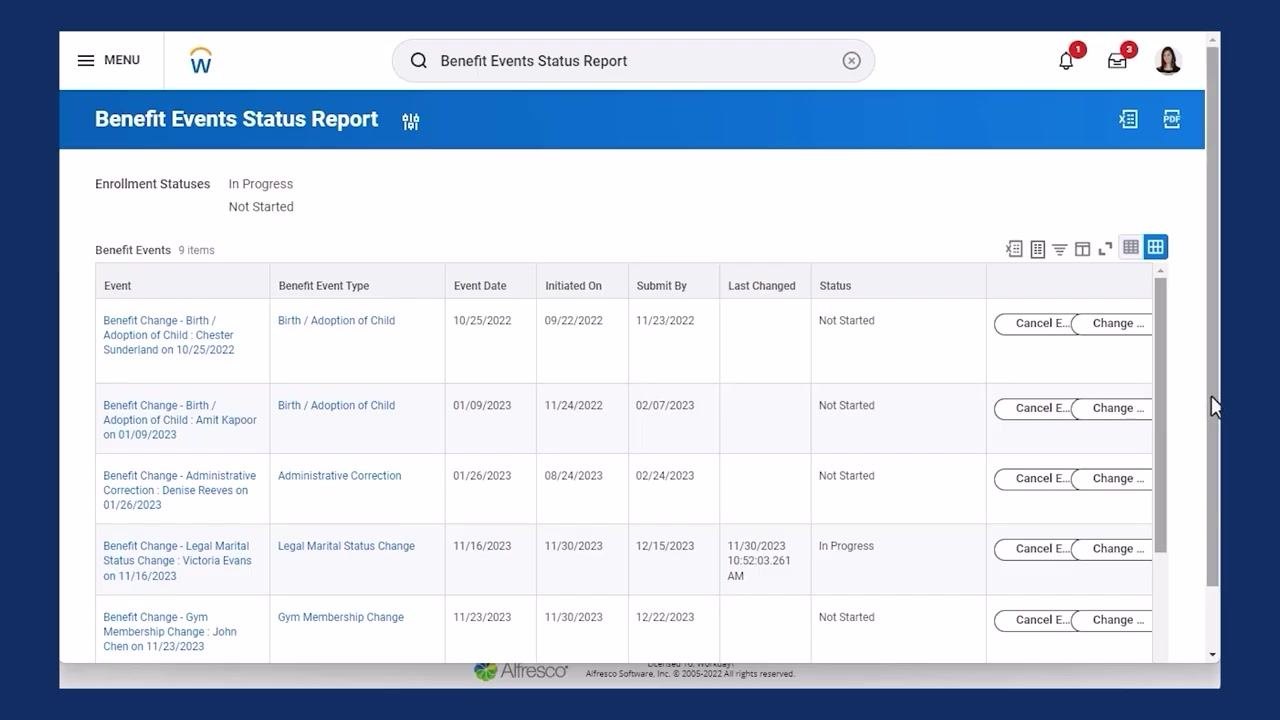
In the report, find the event labeled with the employee's name and the change type, such as "Legal Marital Status Change," and note its status (for example, In Progress).
Step 22: Start the benefit election changes
Select the action to begin the event (such as "Let's get started") to open the benefit election change workflow.
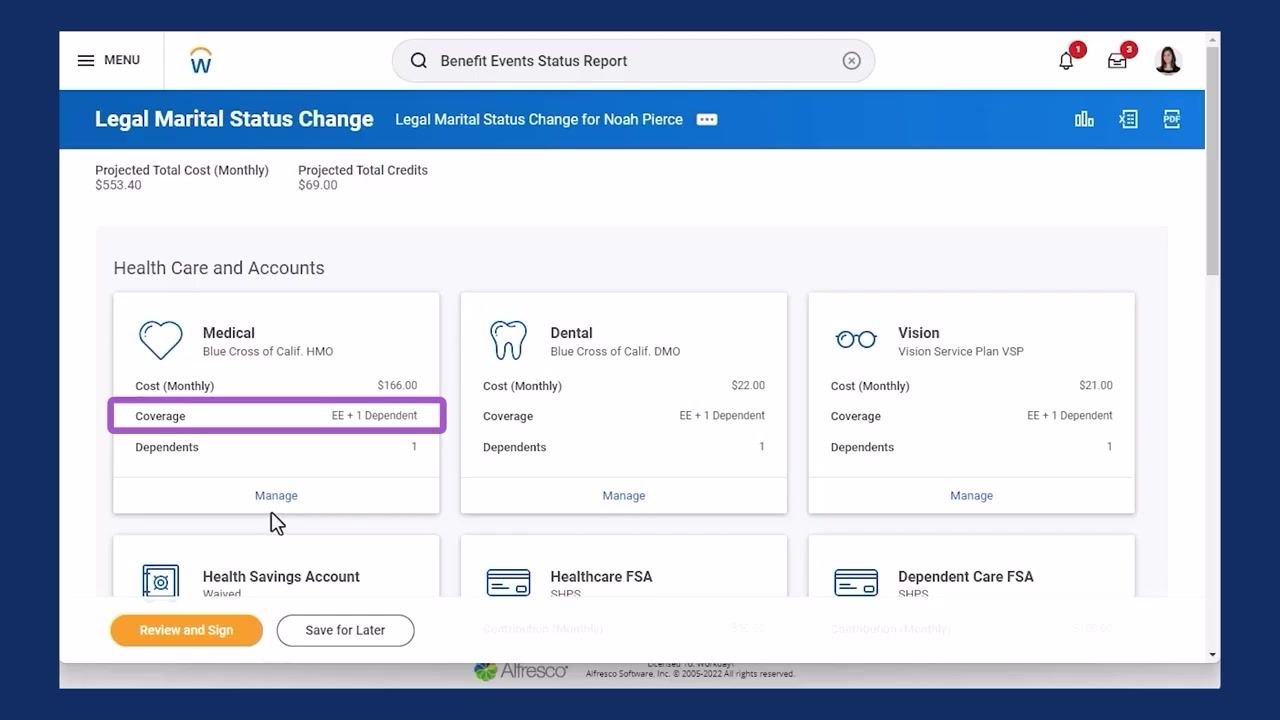
Step 23: Review the benefit cards for the event
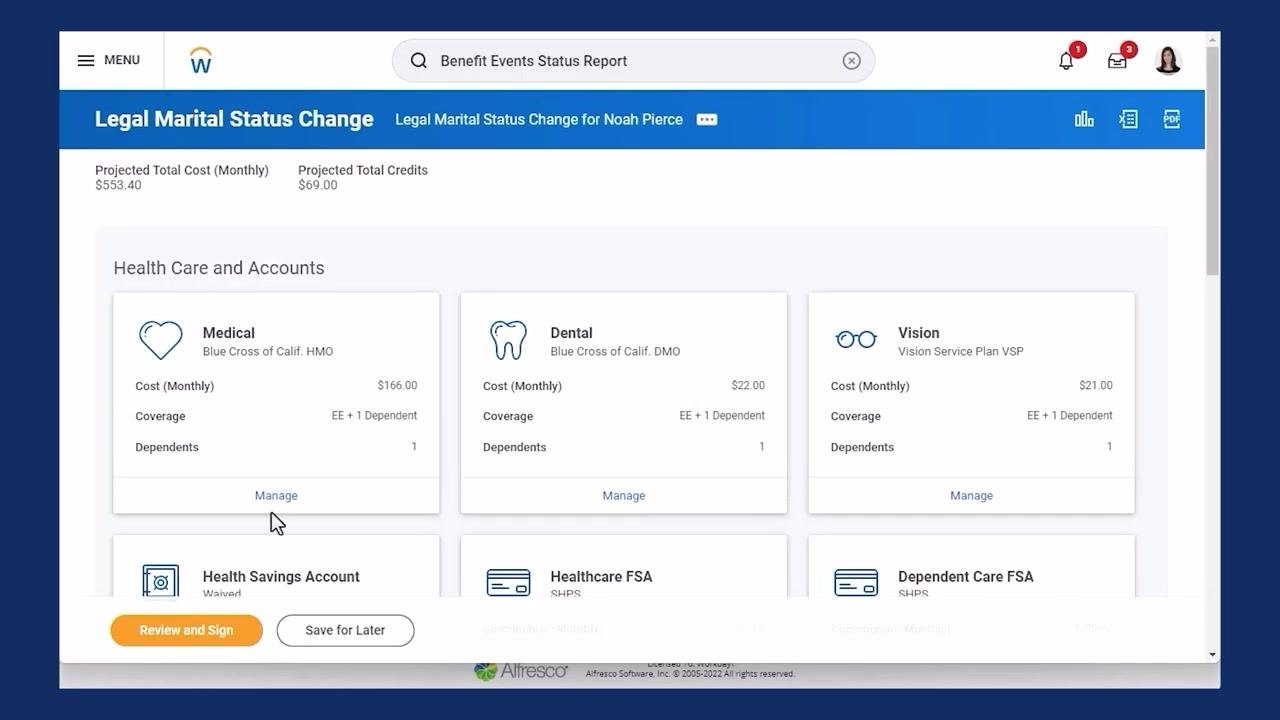
On the Legal Marital Status Change page, review the available health care and account options. Each card shows the monthly cost, coverage type, and number of dependents for plans such as Medical, Dental, and Vision.
Step 24: Manage the Medical plan and remove a dependent
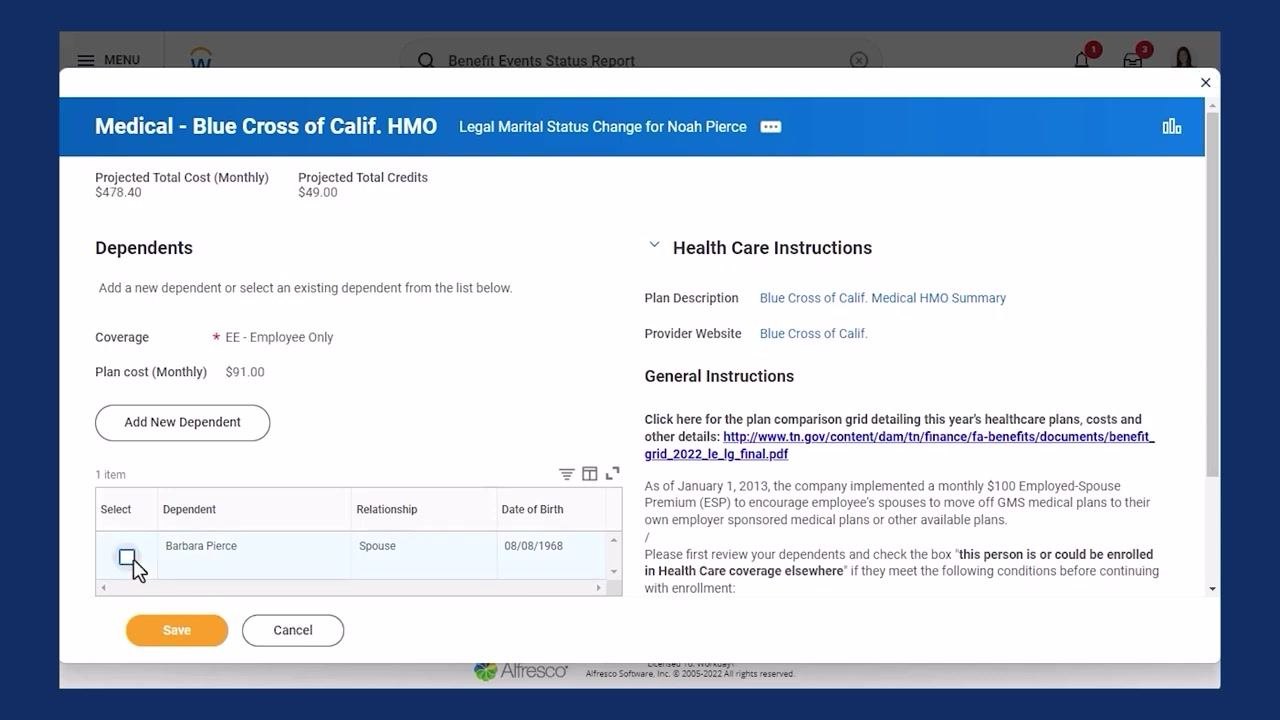
Click Manage under the Medical plan, then Confirm and Continue. Clear the checkbox next to the dependent you want to remove from the plan.
Step 25: Review the updated dependents list for the plan
On the plan's dependents screen, confirm which dependents remain listed, review the updated coverage type, and check the plan cost and projected total cost or credits. Health Care Instructions and General Instructions are available for reference.
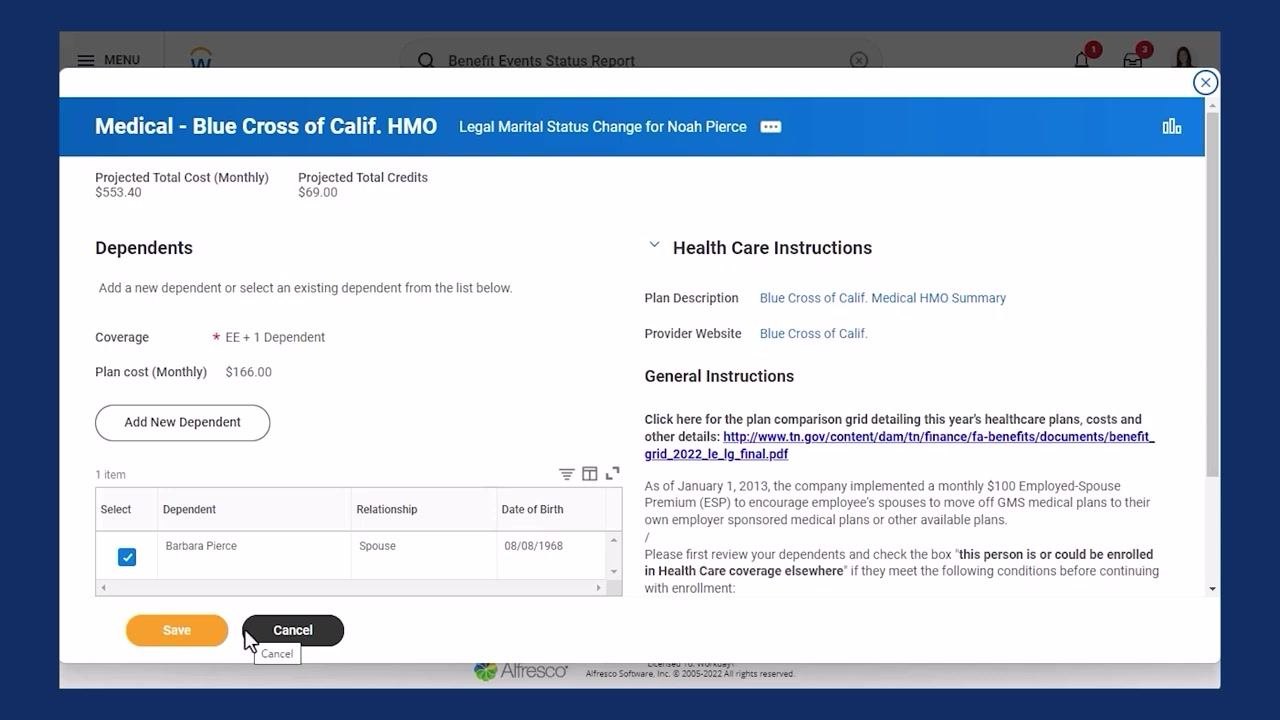
Step 26: Deselect the dependent and save
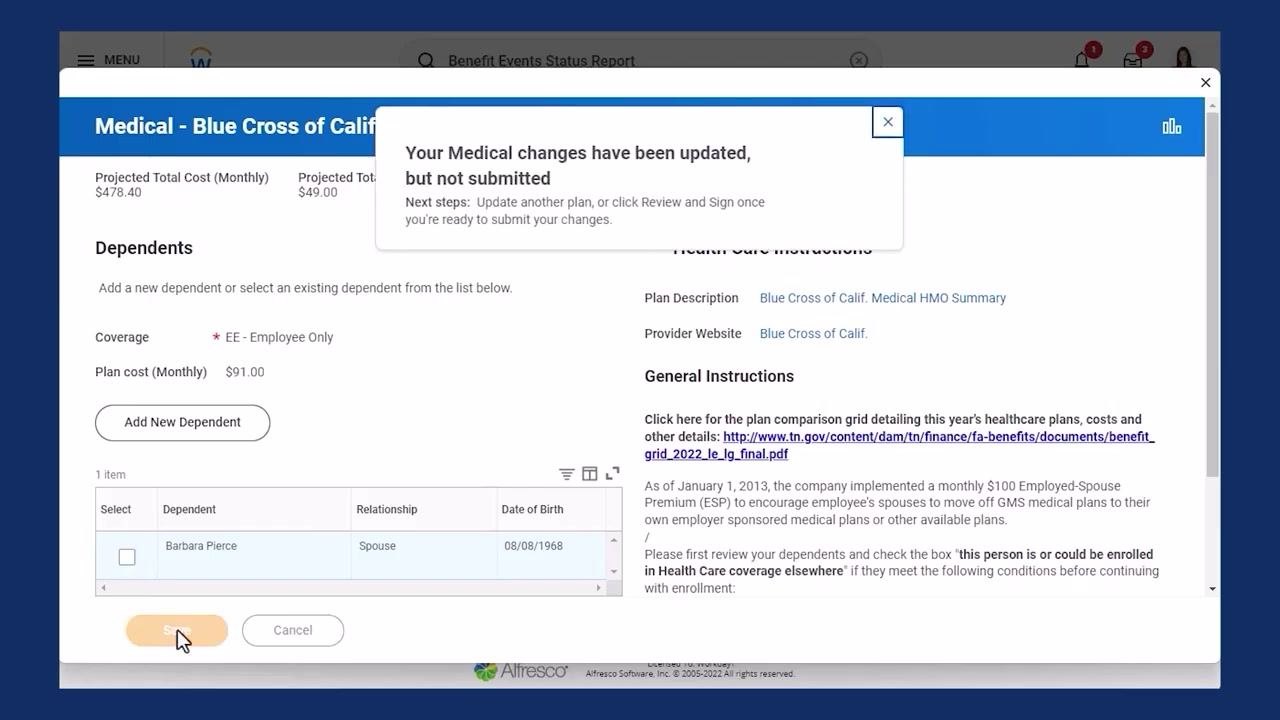
Uncheck the box next to the dependent you are removing so that only the desired dependents remain selected. Confirm the coverage type updates accordingly, then click Save.
Step 27: Confirm the update notification
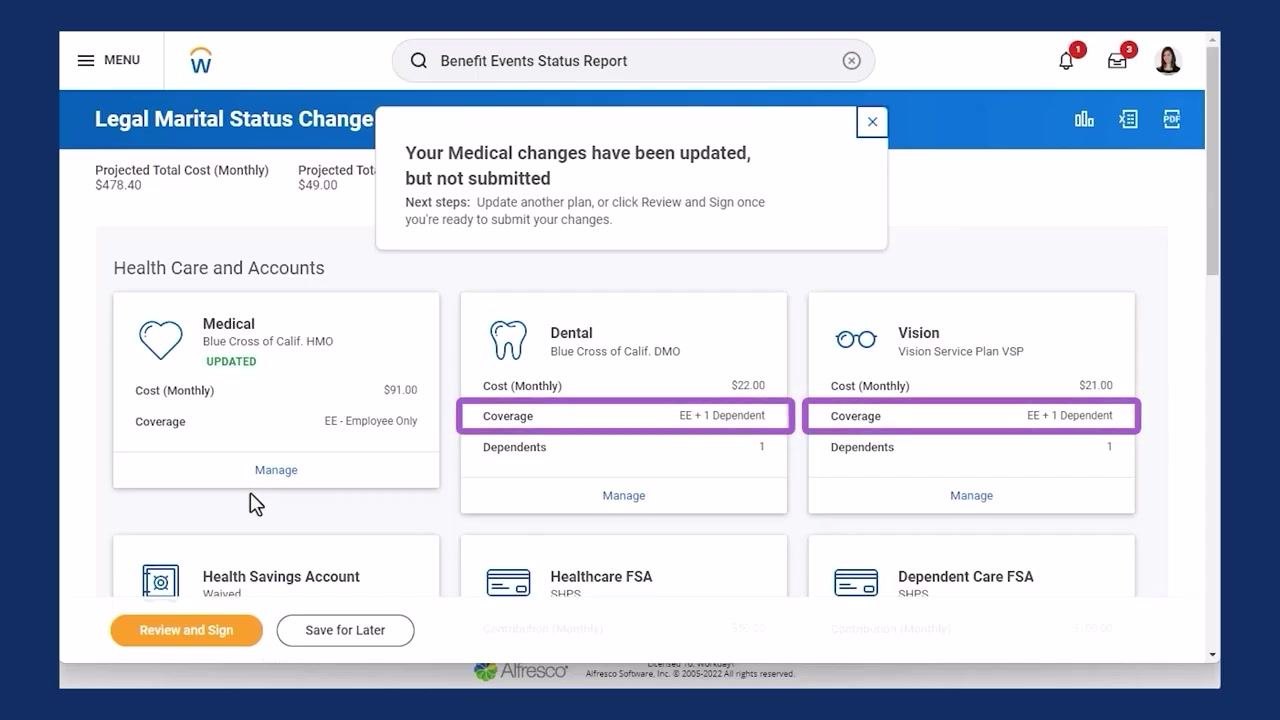
Workday displays a notification confirming that the changes have been updated but not yet submitted. From here you can update another plan or proceed to Review and Sign.
Step 28: Review coverage across all affected plans
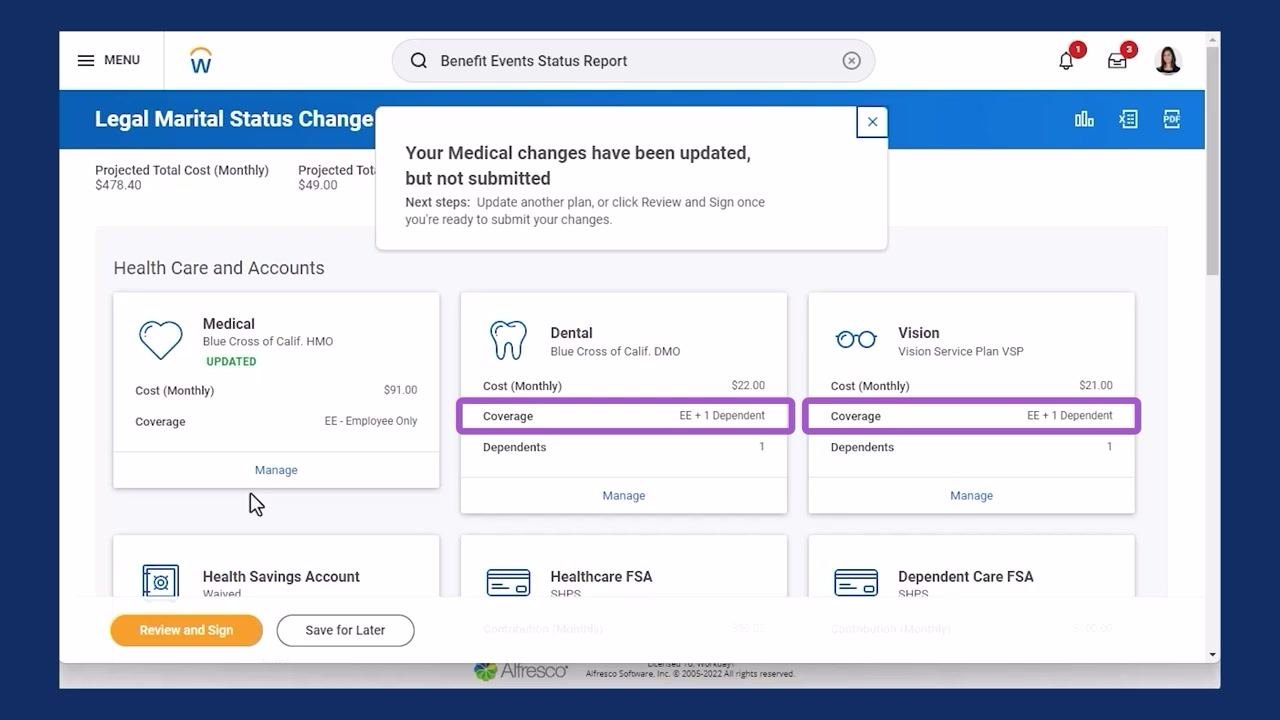
On the Legal Marital Status Change summary page, verify that coverage for Medical, Dental, and Vision plans reflects the updated dependent count. Each card shows the monthly cost and number of dependents, and the Manage button remains available for further edits.
Step 29: Confirm the coverage type change for each plan
Double-check that all relevant plans have switched from the previous coverage level to the new one, and that the dependent count is accurate for each plan.
Step 30: Attach documentation and sign electronically
On the Attachments and Electronic Signature page, attach any required documentation, read the legal notice regarding electronic signature, and check I Accept to certify your understanding and agreement. Click Submit to finalize the changes.
Step 31: Return to the Benefits section
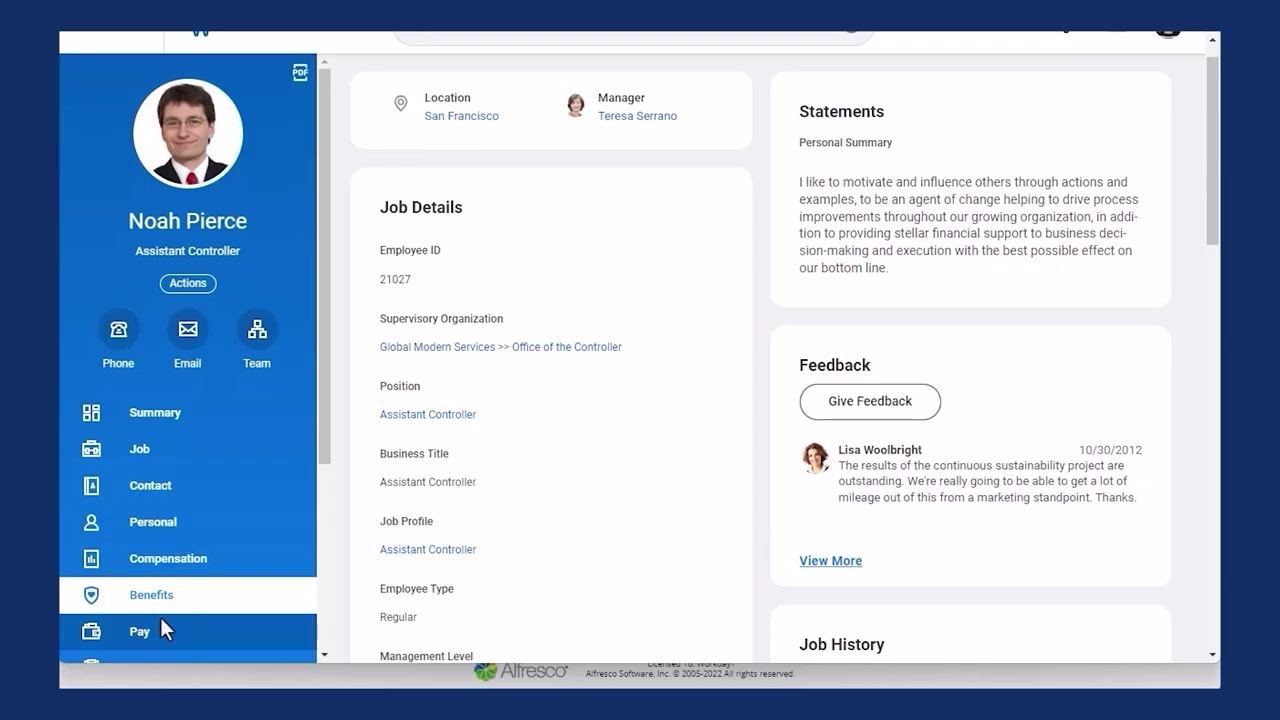
From the employee profile, click Benefits in the left navigation and select the Dependents tab to review the updated records.
Step 32: Verify the updated benefit coverage
On the Benefits summary page, confirm that Medical, Dental, and Vision coverage now reflect the updated enrollment, such as Employee Only, following the removal of the dependent.
Inactivating the dependent record
After updating benefit elections, you still need to inactivate the dependent's record itself so it no longer appears as active.
Step 33: Select Inactivate from the dependent's options menu
In the Dependents tab, locate the dependent, click the options menu next to their name, and select Inactivate from the dropdown menu.
Step 34: Enter the effective date and submit
Enter the effective date for the inactivation (for example, today's date) and click Submit to complete the process.
Step 35: Confirm the inactivation
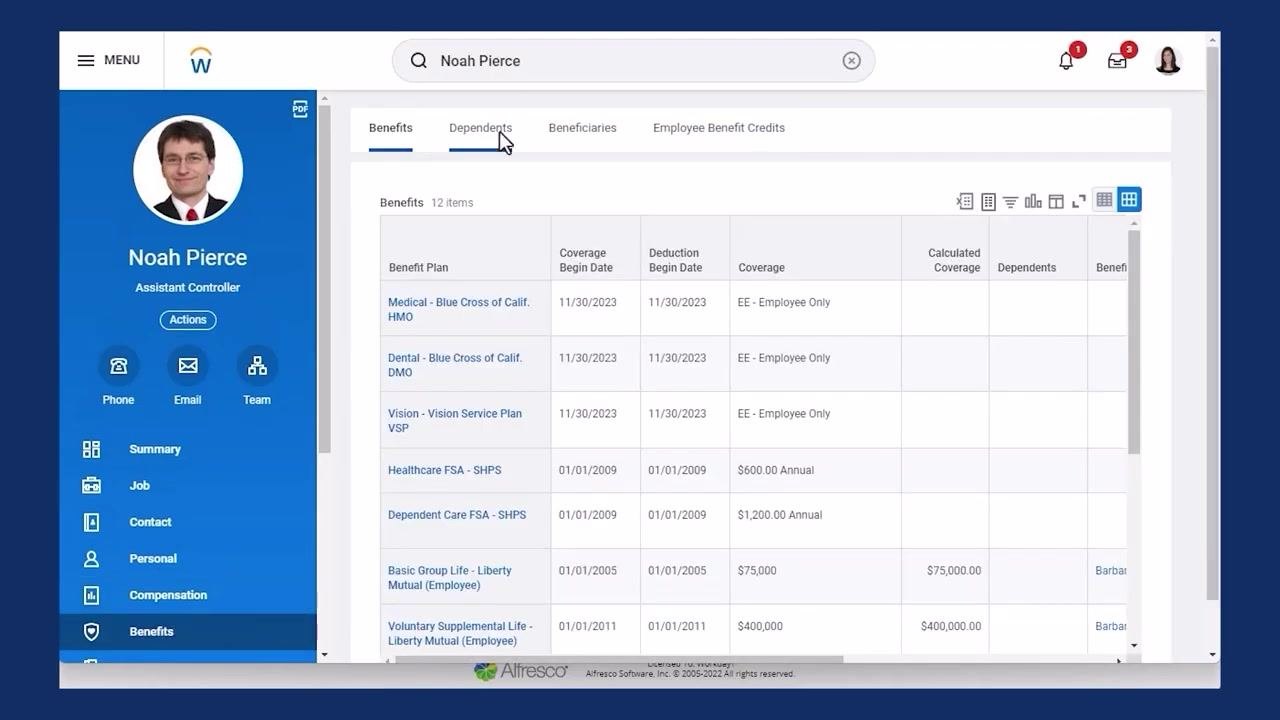
After submitting, Workday displays a confirmation message. The inactivated dependent now appears as "Inactive" in the dependents list, while remaining dependents stay active. The dependents table shows names, relationships, ages, and edit options.
Reviewing and managing beneficiaries
The process for reviewing beneficiaries closely mirrors the steps for dependents.
Step 36: Open the Beneficiaries tab
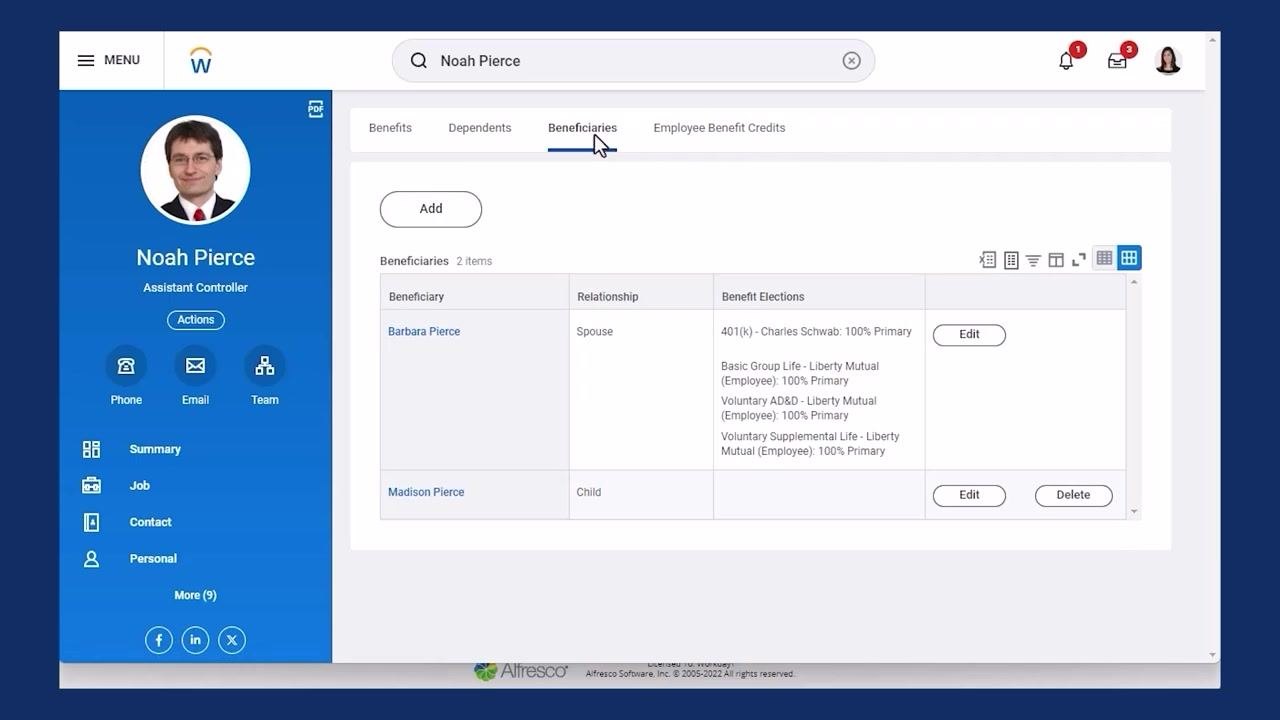
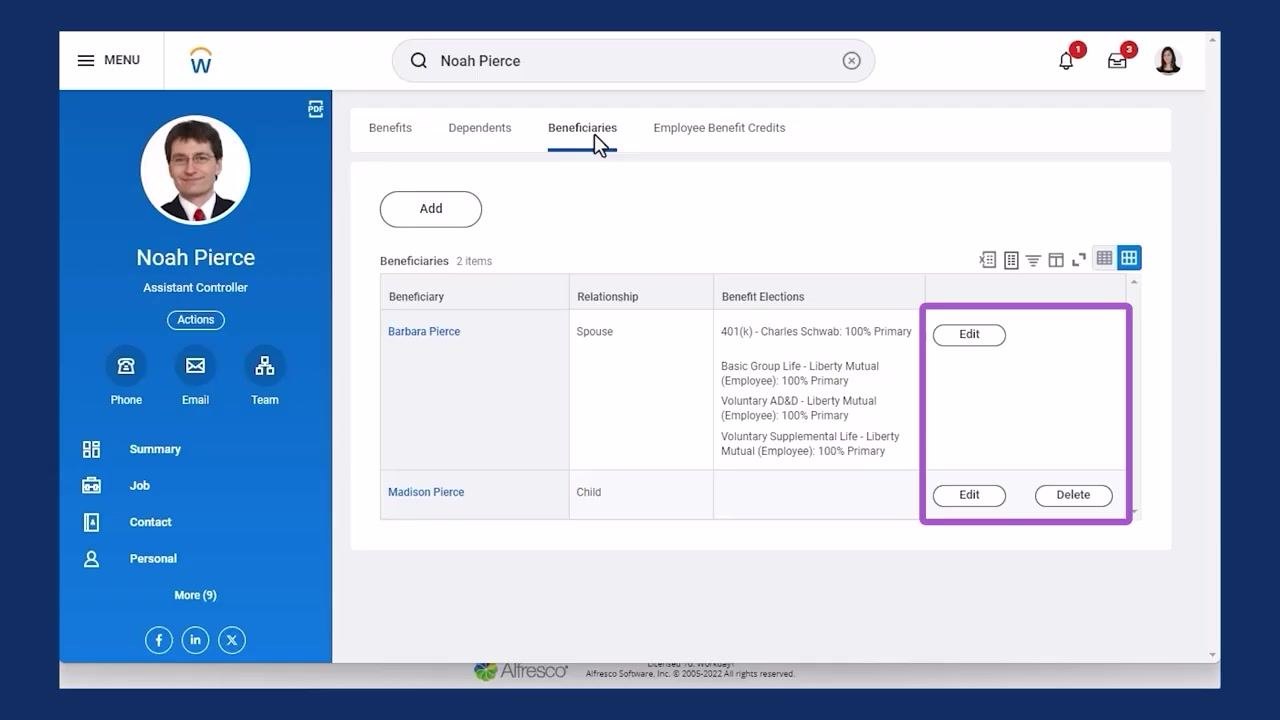
From the employee profile, select Benefits in the left navigation panel, then click the Beneficiaries tab at the top of the Benefits page. The main panel displays a list of current beneficiaries.
Step 37: Review beneficiary details and available actions
Each row in the Beneficiaries section lists the beneficiary name, relationship (such as Spouse or Child), and benefit elections (for example, 401(k), Basic Group Life, Voluntary AD&D, and Voluntary Supplemental Life, each with a percentage and primary/contingent designation).
- Click Edit next to a beneficiary's name to update their information.
- Click Delete to remove a beneficiary, where available.
- Click Add at the top of the section to add a new beneficiary.
Summary
You can add a dependent in Workday using the Change Beneficiary and Dependent Event business processes, which your organization can configure to fit its needs. Remember that adding a record to your list does not automatically enroll that person on a plan—you must select them during a benefit event.
Key points to keep in mind:
- Court orders can only be added to existing dependent or beneficiary records, not during initial creation.
- Use the Active Court Orders report to confirm compliance before making changes.
- Remove all active benefit elections before inactivating a dependent or beneficiary.
- Consider COBRA eligibility whenever a qualifying event, such as a divorce, affects a dependent's coverage.
- Security permissions determine who can activate, inactivate, or edit dependent and beneficiary records in your organization.
- Adding or editing a beneficiary follows a process very similar to managing dependents.

What's next
Always review all dependent and beneficiary information for accuracy before finalizing any changes, and attach any documentation your organization requires. If you need to make further updates, return to the Benefits section on the employee's profile and select the Dependents or Beneficiaries tab as needed.
Generation details: cost, quality tiers
Docsie billed 4,500 credits ($3.15) to analyze this 9-minute video at standard quality. The rewrite, template fill and Word/PDF exports were included. The same video at each quality tier:
| Quality | Frames sampled | Credits | Approx. cost |
|---|---|---|---|
| Draft | every 16-30 s | 2,250 | $1.57 |
| Standard (this guide) | every 8-15 s | 4,500 | $3.15 |
| Detailed | every 4-7 s | 9,000 | $6.30 |
| Ultra | every 1-3 s | 18,000 | $12.60 |
Credits priced at $0.70 per 1,000; plans include a monthly allowance. Enterprise customers on on-premise or bring-your-own-model deployments run this on their own inference and pay no per-video credits.
Generated by Docsie Video-to-Docs on 2026-10-02 from a 8-minute video. Screenshots are frames from the source video and belong to their creator, Workday, whose original is embedded above. If you own this video and want the guide removed or credited differently, contact us and we will act within one business day.