
How to Create a Page Layout in Salesforce
Page layouts control what users see on a Salesforce record — which fields appear, how they're grouped, which related lists display, and which buttons and actions are available. This guide walks you through how to create a page layout in Salesforce for the Opportunity object, starting with how existing layouts work and finishing with building, customizing, and verifying a brand-new layout.
Video: Create a New Page Layout in Salesforce | Page Layouts | Salesforce Admin Tutorials by Salesforce Emily (2022). All credit for the demonstration goes to the creator; watch the original on YouTube. The written guide below was generated from this video by Docsie. Creator? Request a change or removal.
Page layouts control what users see on a Salesforce record — which fields appear, how they're grouped, which related lists display, and which buttons and actions are available. This guide walks you through how to create a page layout in Salesforce for the Opportunity object, starting with how existing layouts work and finishing with building, customizing, and verifying a brand-new layout.
Prerequisites
- Access to a Salesforce Lightning instance with administrator or customization permissions.
- Familiarity with the Opportunity object and its standard fields (Amount, Stage, Close Date, etc.).
- Access to Setup and the Object Manager.
Exploring the Salesforce Home page and an Opportunity record
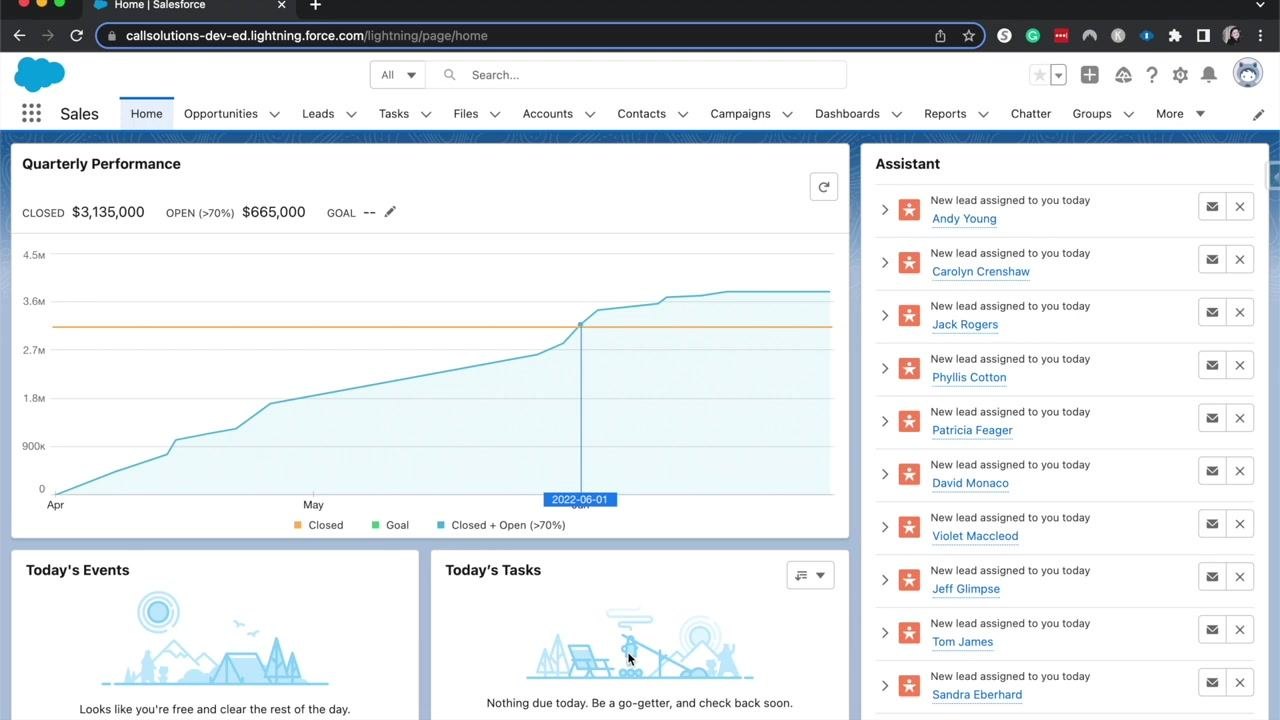
- Open the Salesforce Home page Open your web browser and sign in to your Salesforce Lightning instance. On the Home page you can view dashboards such as "Quarterly Performance," "Today's Events," and "Today's Tasks." Check the Assistant panel on the right for new leads assigned to you.
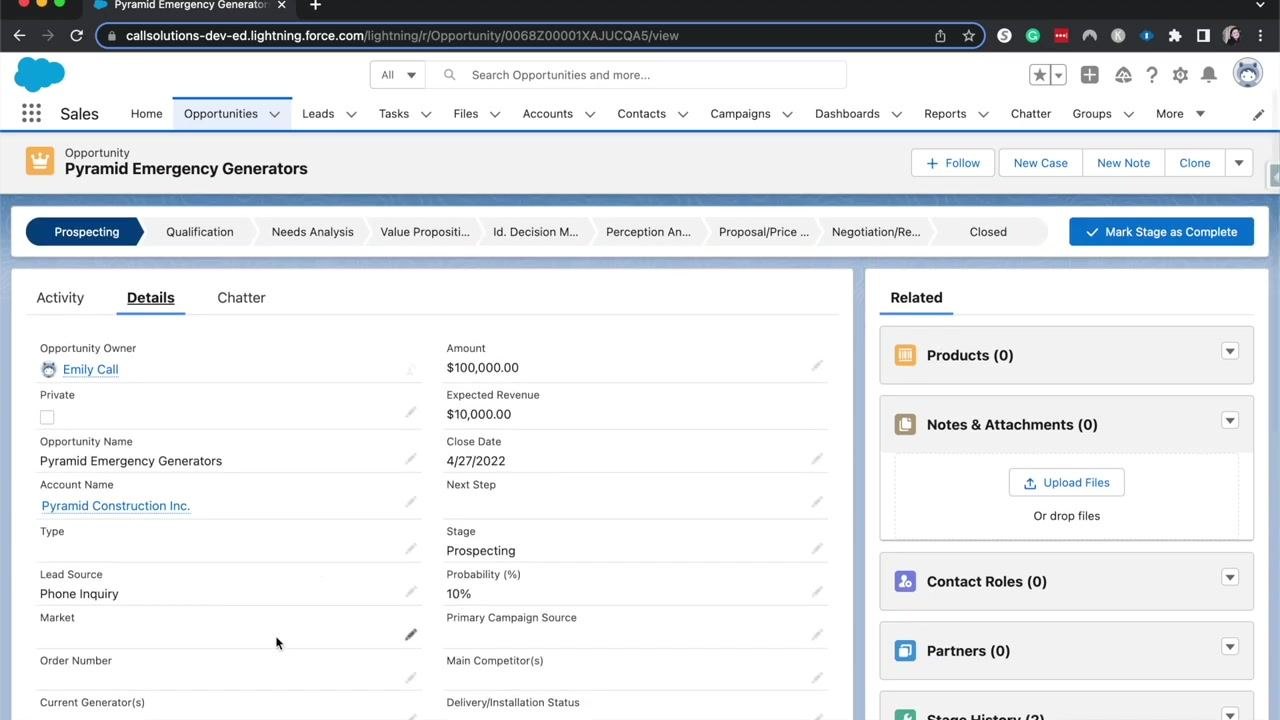
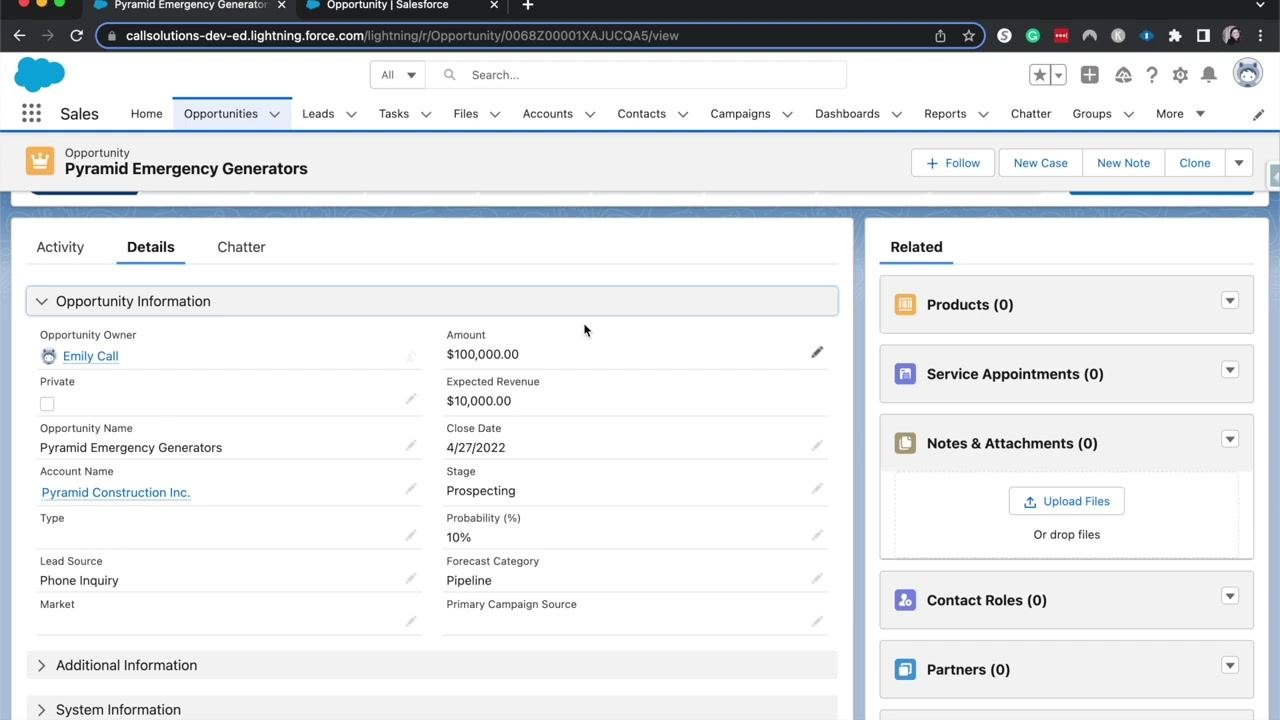
- Navigate to an Opportunity record Click the Opportunities tab in the top navigation bar to open the list of opportunities, then select one to view its details. The example below shows the "Pyramid Emergency Generators" opportunity, with stage indicators at the top, Activity, Details, and Chatter tabs, detail fields such as Opportunity Owner, Amount, and Close Date, and related lists like Products, Notes & Attachments, and Contact Roles on the right.
- Review how the page layout controls the record view The page layout determines which fields are visible and how they're arranged, which related lists appear and in what order, and which buttons, links, and actions show at the top of the record. You can also group, or "bucket," fields into collapsible sections, similar to how related lists can be expanded or collapsed.
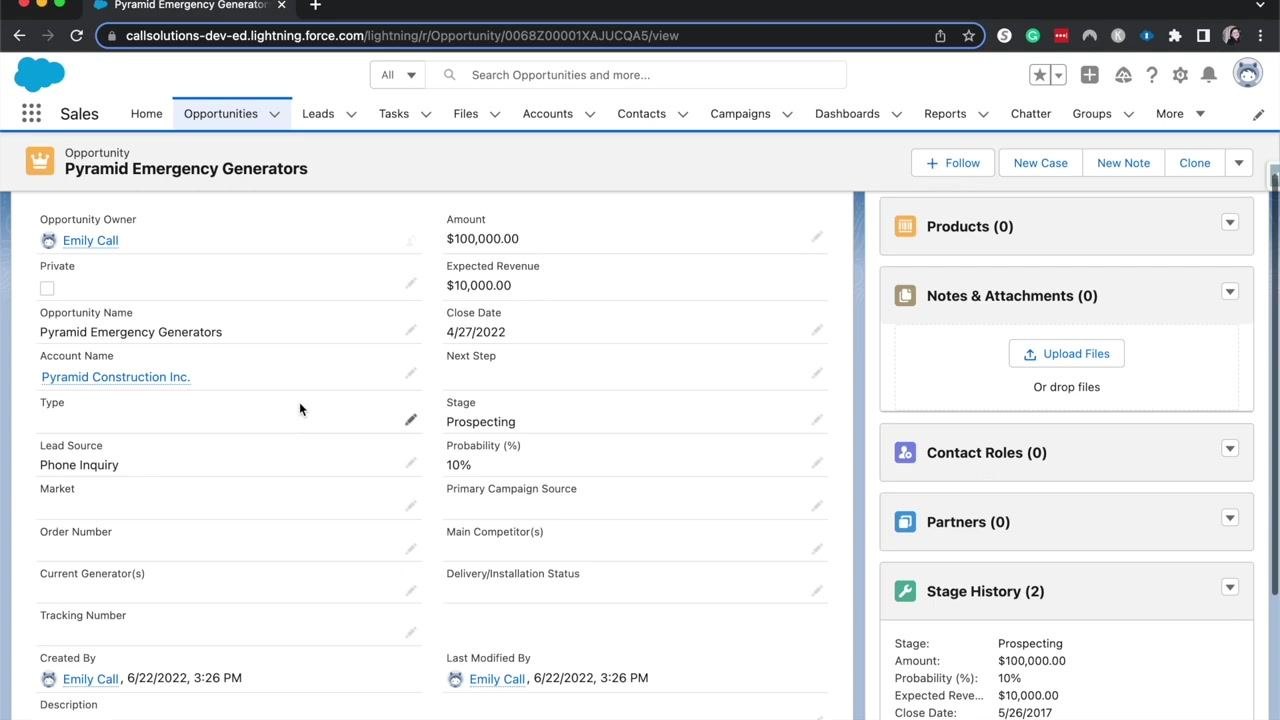
Page layouts work together with record types and user profiles: the combination of a user's record type and profile determines exactly which fields and layout they see.
Viewing page layout assignments
- Open the Object Manager for Opportunity Click the gear icon (Setup) in the upper right corner, then select Edit Object from the dropdown menu to open the Object Manager for the Opportunity object.
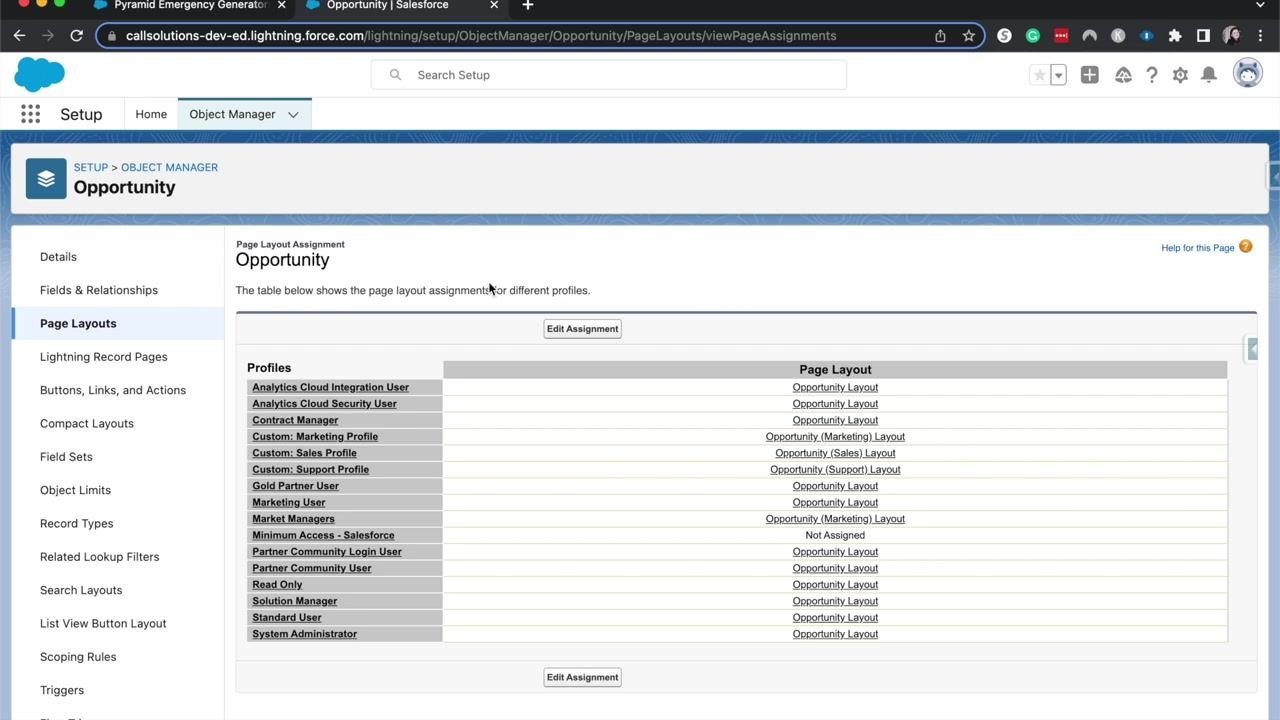
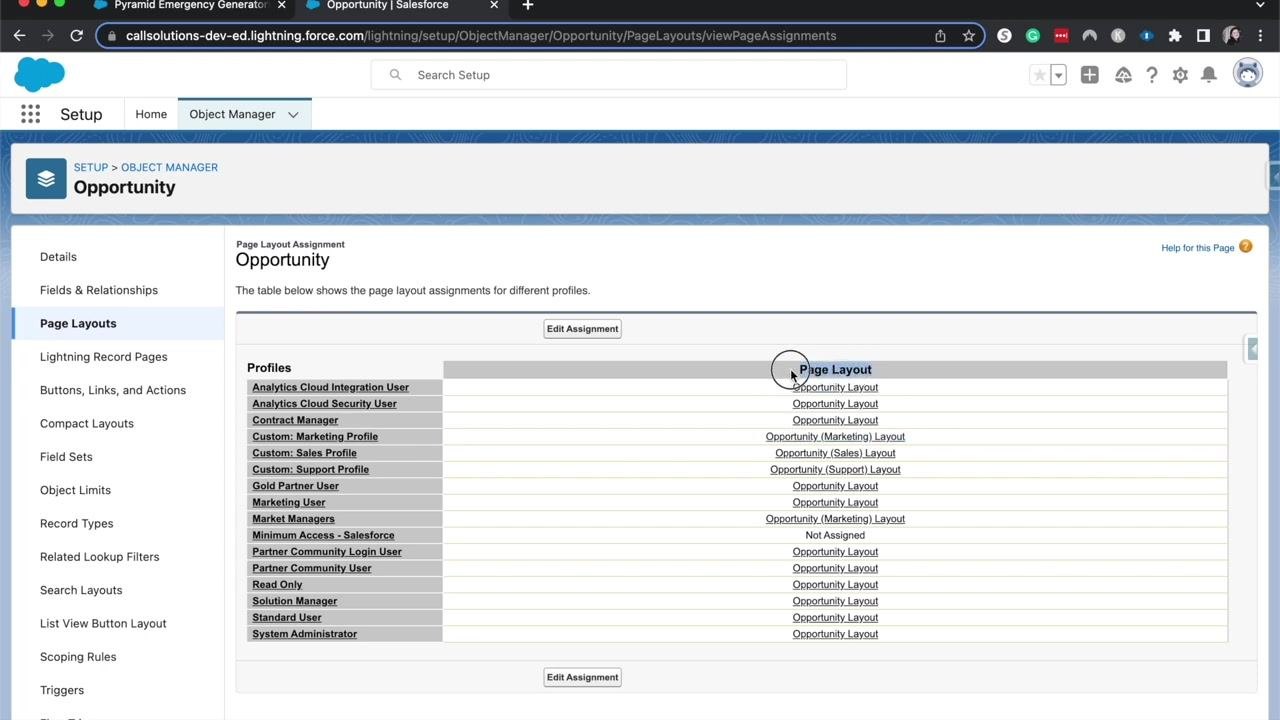
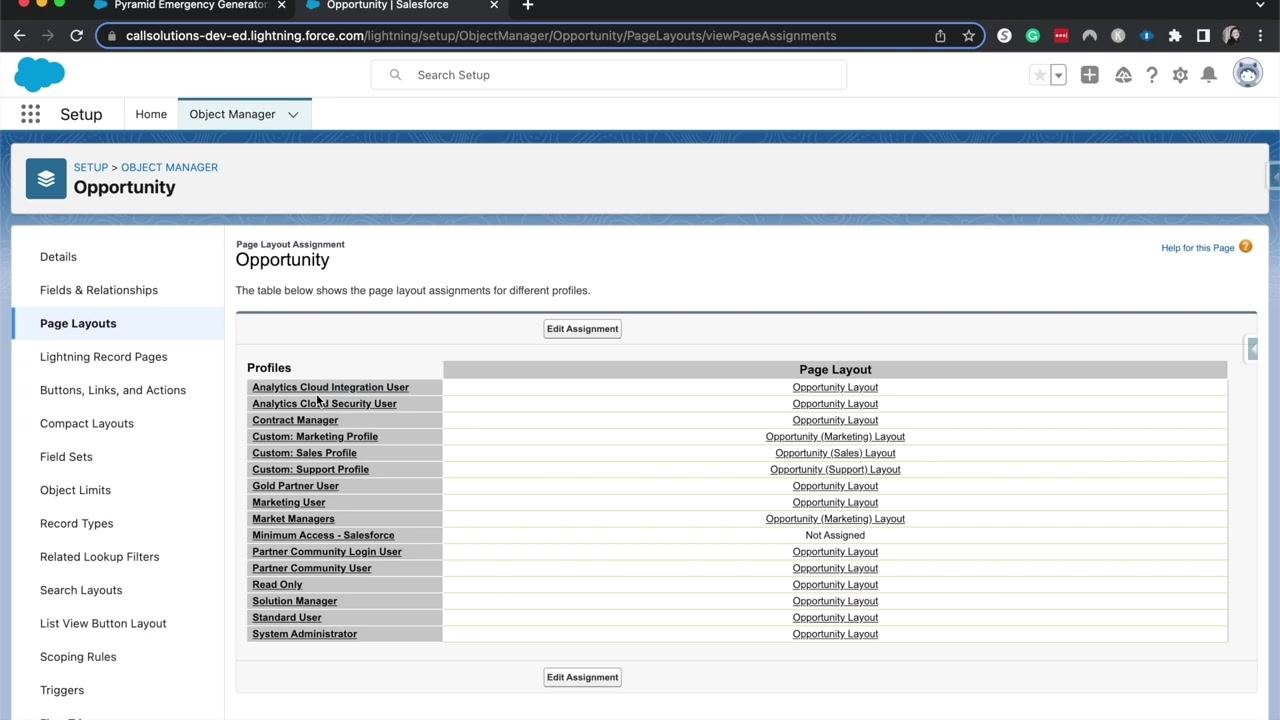
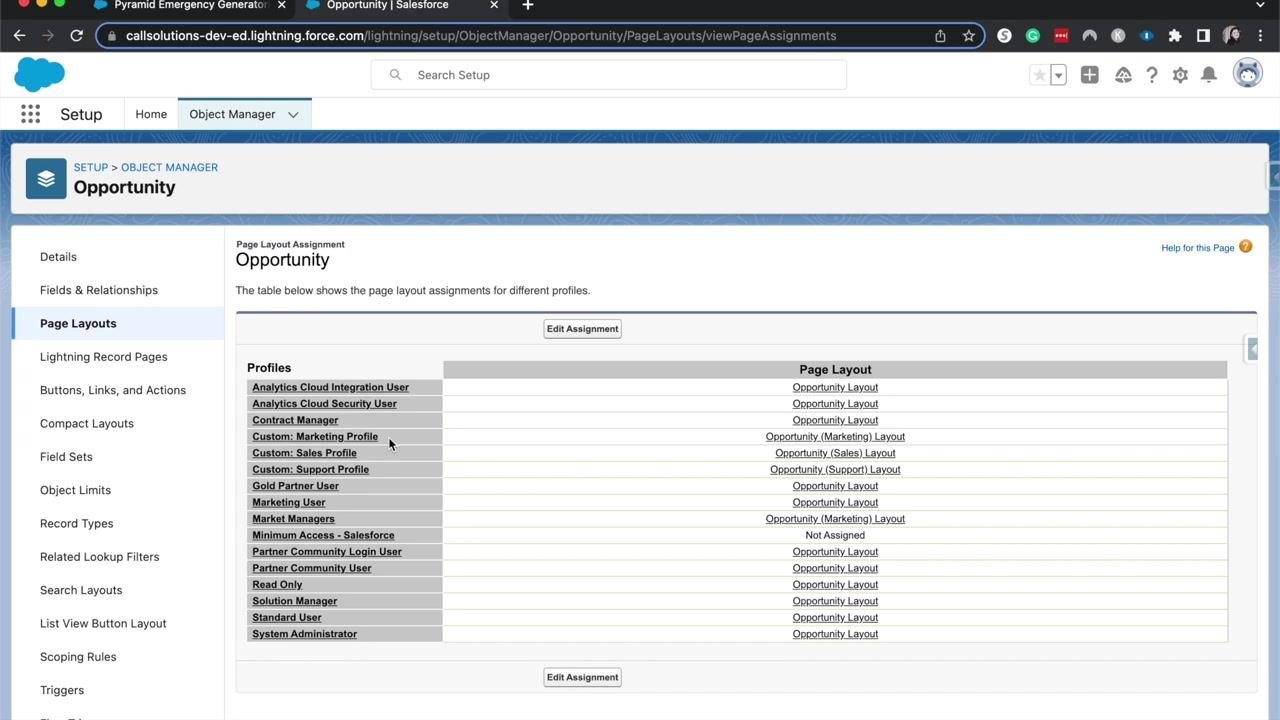
- Check which layouts are assigned to each profile In the Object Manager, select Page Layouts from the left sidebar, then click Page Layout Assignment. Review the table listing profiles (such as Analytics Cloud Integration User, Contract Manager, and Custom: Marketing Profile) alongside their assigned page layouts (such as Opportunity Layout and Opportunity (Marketing) Layout).
Assigning layouts by profile and record type
- Understand profile-based assignment Salesforce lets you assign different page layouts to user profiles based on their role. For example, Marketing users are assigned the "Opportunity (Marketing) Layout," Sales users the "Opportunity (Sales) Layout," Support users the "Opportunity (Support) Layout," and all other users the default "Opportunity Layout."
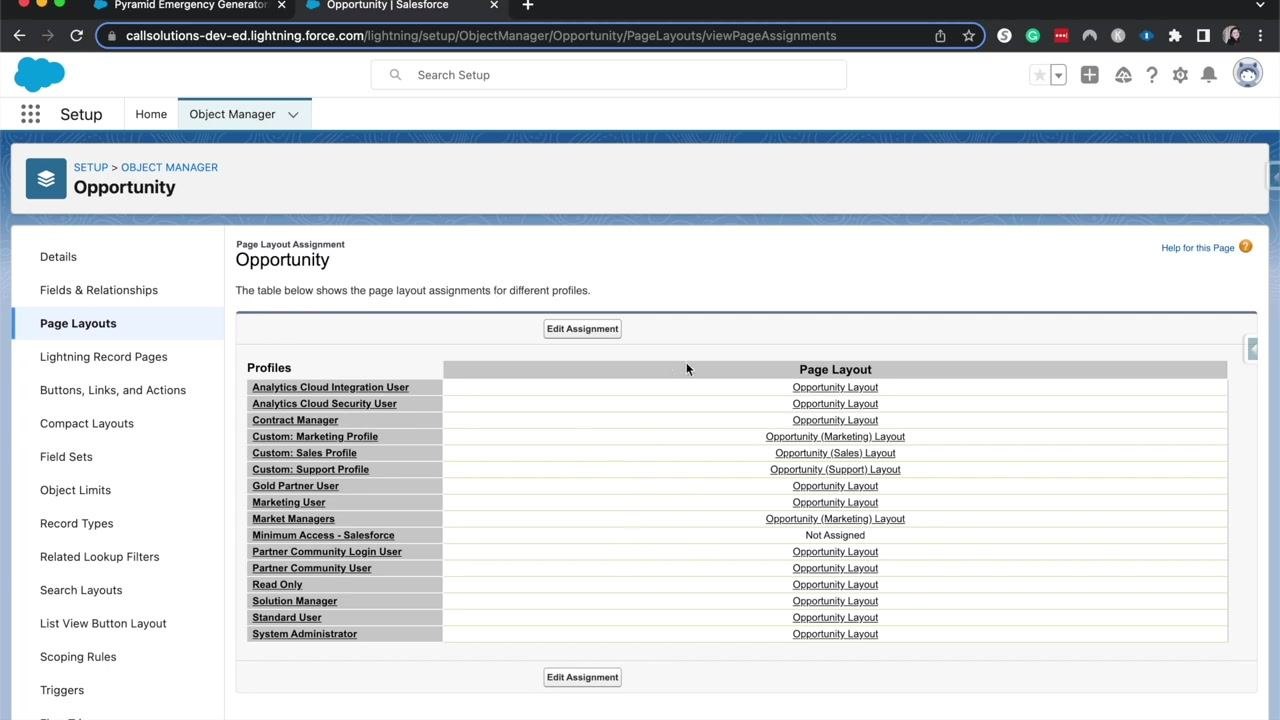
- See how record types affect the assignment table If only one record type exists, the assignment table shows a single "Page Layout" column. When multiple record types are present, an additional column appears for each one, so you can assign a different layout per profile-and-record-type combination.
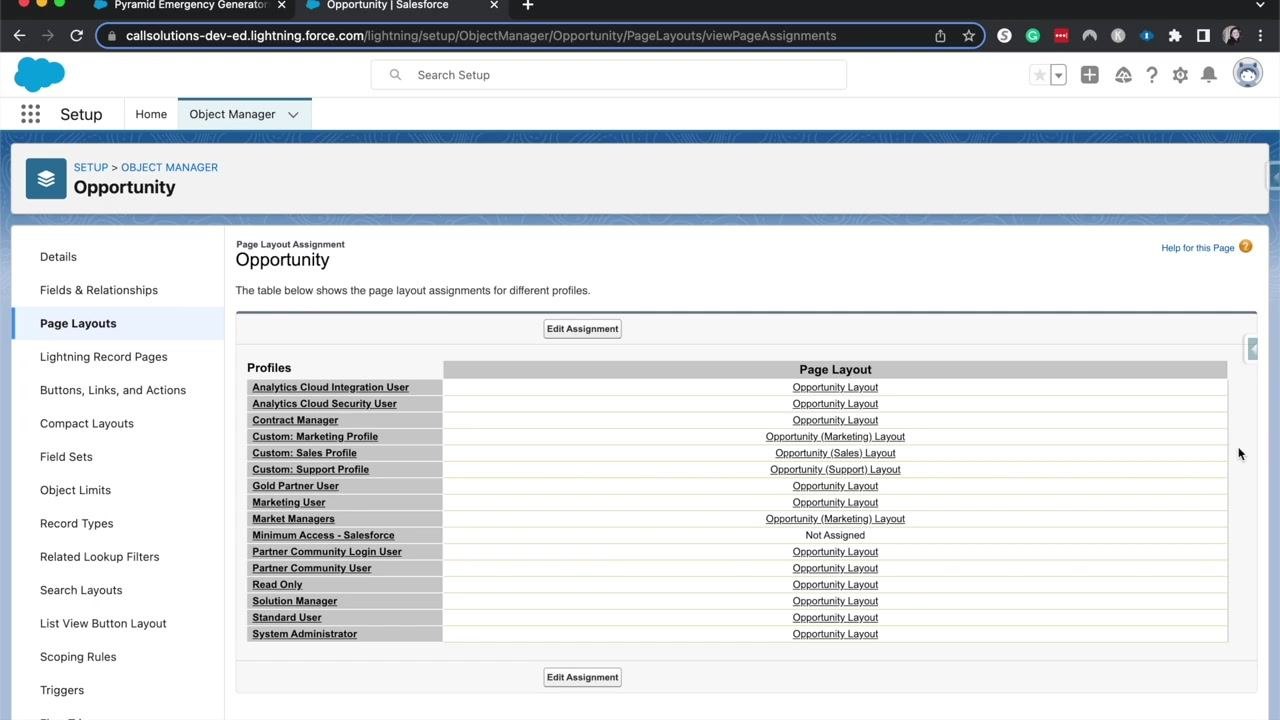
- Assign a layout for each profile and record type Use the assignment table to pick which layout each profile sees for each record type. For example, assign the "Opportunity Layout" to the Analytics Cloud Integration User profile for the first record type, the "Opportunity (Marketing) Layout" to the Marketing profile for the Marketing record type, and the "Opportunity (Sales) Layout" to the Sales profile for the Sales record type.
- Edit assignments as needed Click Edit Assignment to change which profiles map to which layouts, ensuring each user group sees the fields and actions most relevant to their role.
Creating and editing a page layout
- Start a new page layout On the Page Layouts screen, click New to open a blank layout where you can add fields, sections, and components to tailor a layout for a new business process or user group.
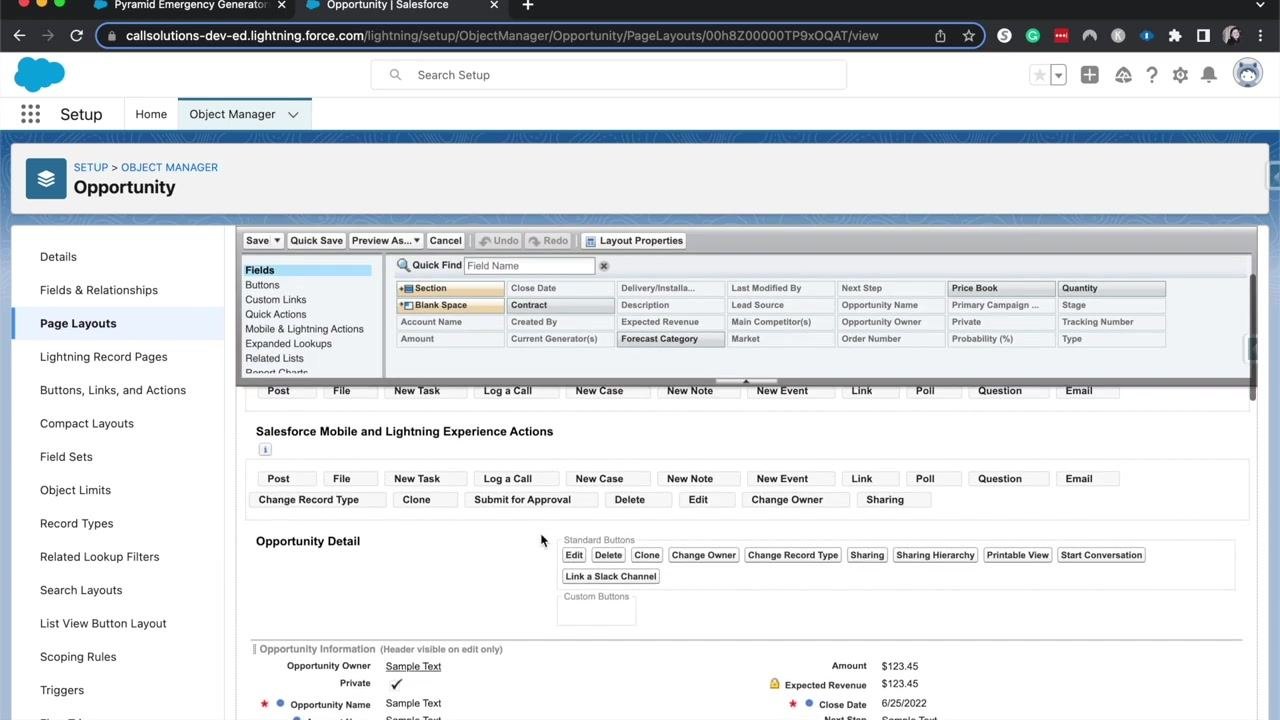
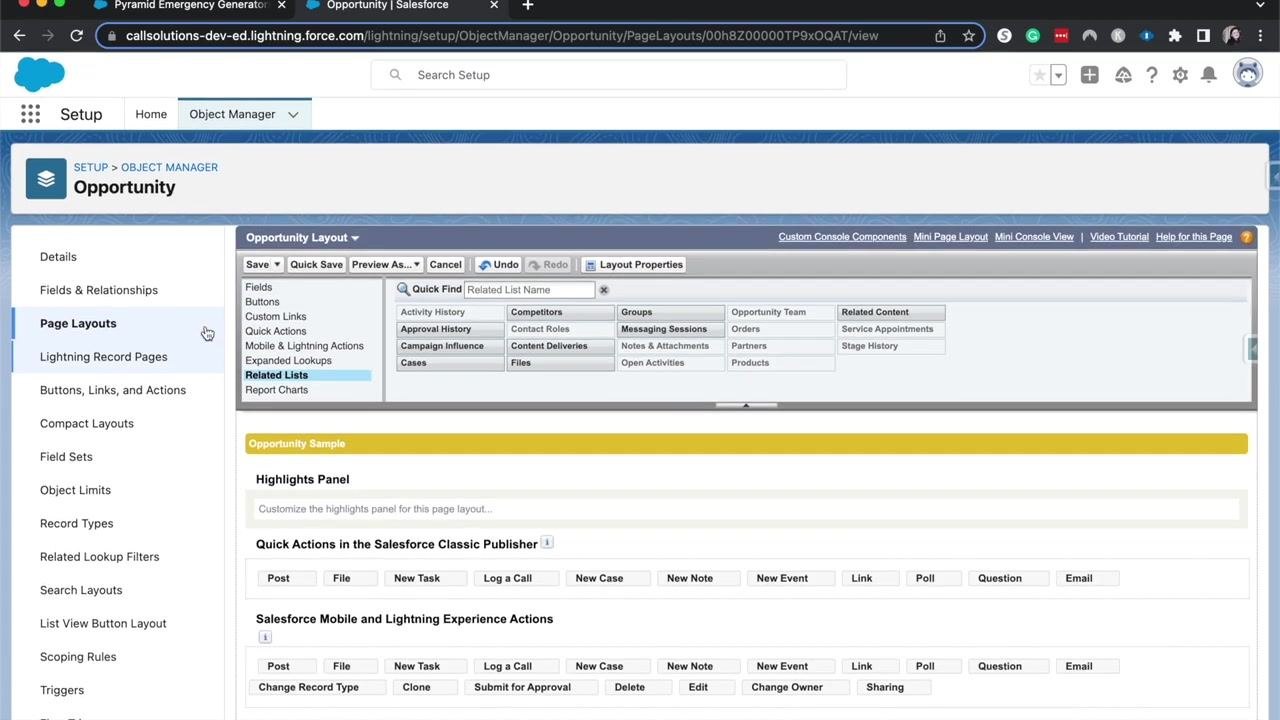
- Open the layout editor Select an existing page layout to edit its structure. The editor lets you drag and drop fields, sections, and related lists; add or remove buttons and actions; and organize the layout to match your business requirements. The Opportunity layout editor, for example, shows fields like Close Date, Account Name, Amount, Stage, and Probability, along with Salesforce Mobile and Lightning Experience Actions and standard buttons such as Edit, Delete, Clone, Change Owner, and Sharing.
Customizing sections, fields, and actions
- Make section headers visible and enable accordion sections Ensure section headers (such as "Opportunity Information," "Other Information," "Additional Information," and "System Information") are visible so users can quickly navigate the page. Use the Detail Information setting to enable accordion functionality, letting users expand or collapse sections such as "System Information" or "Additional Information" as needed. You can also rename headers — for example, changing "Additional Information" to "Order Information" — for clarity.
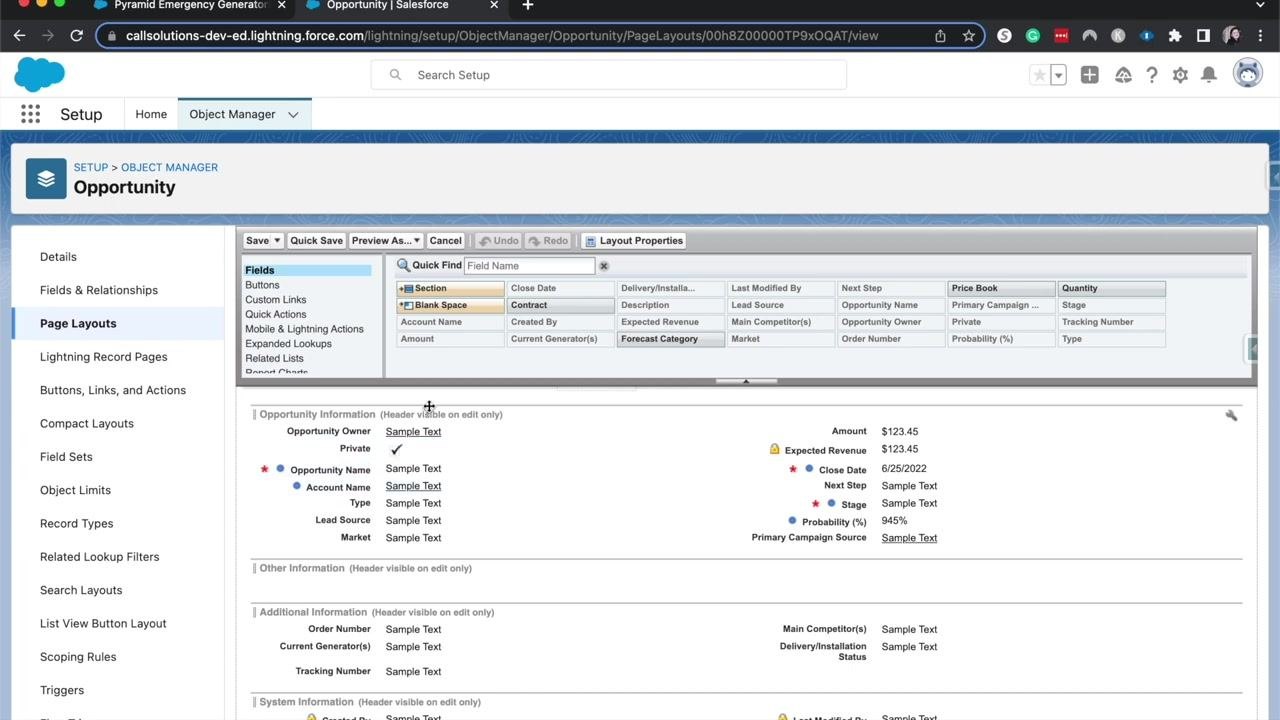
- Remove a field from the layout Locate the field you want to remove (for example, "Next Step") within its section, then click the minus icon next to it, or drag it out of the section.
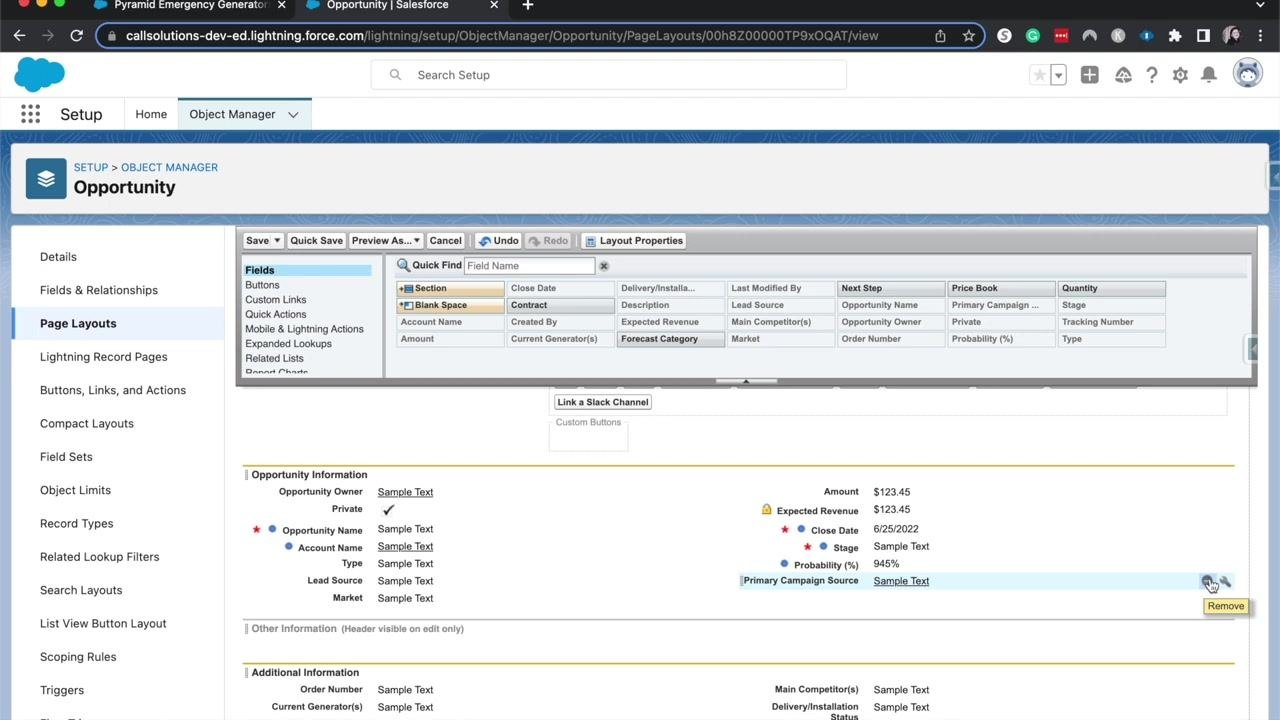
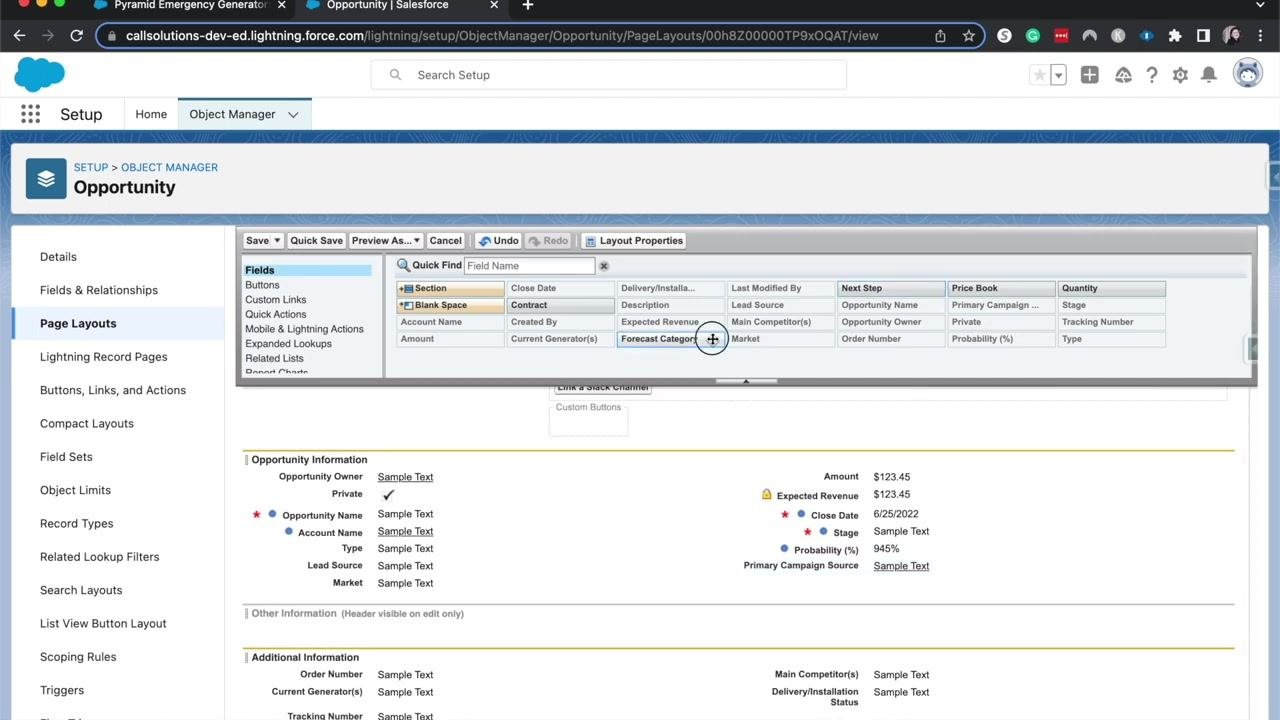
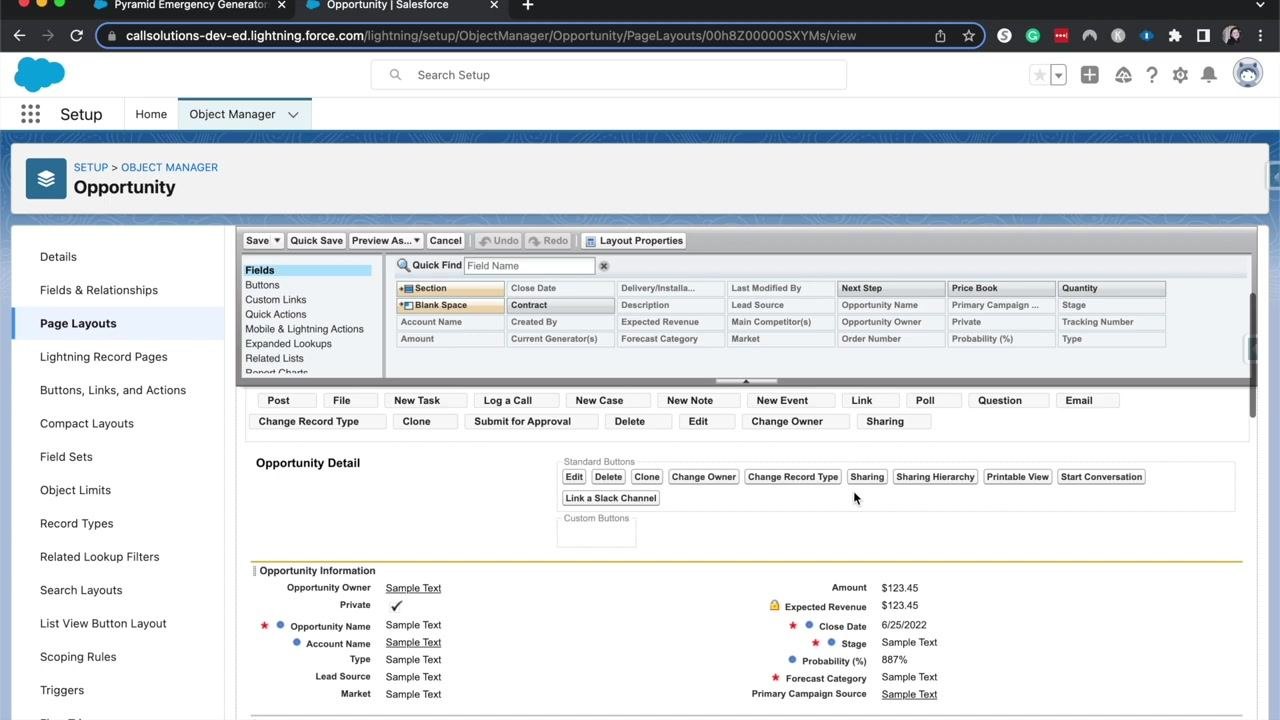
- Add a field to the layout Locate the field you want to add (for example, "Forecast Category") in the Fields palette at the top of the editor, then drag and drop it into the desired section. Only fields available on the Opportunity object appear in this palette.
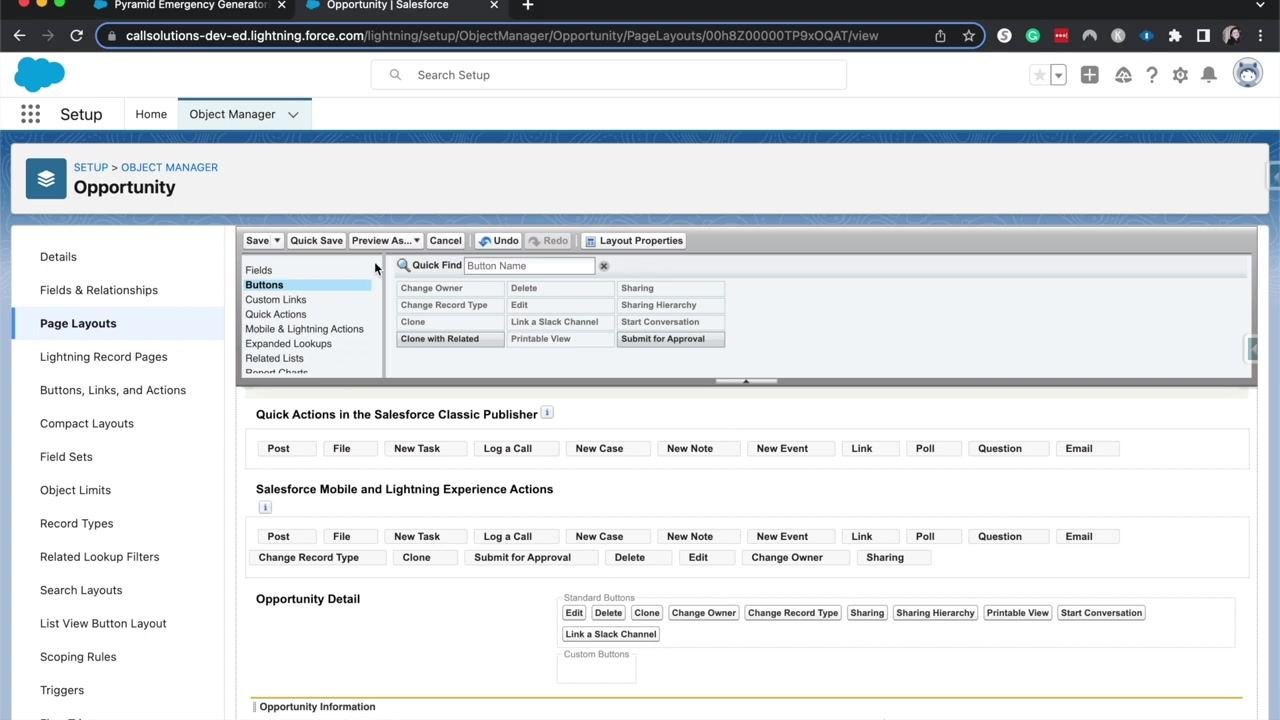
- Customize buttons and quick actions Switch to the Buttons section in the palette to add, remove, or rearrange standard and custom buttons such as Edit, Delete, Clone, Change Owner, Sharing, and custom buttons like "Link a Slack Channel." Configure Quick Actions for Salesforce Classic Publisher and for Salesforce Mobile and Lightning Experience, including actions like New Task, Log a Call, New Case, New Note, New Event, Link, Poll, Question, and Email.
Use the Mobile & Lightning Actions section to control which actions appear in the Salesforce mobile app and Lightning Experience, select Expanded Lookups to configure enhanced lookup features for related records, and use the Related Lists section to add, remove, or reorder related lists such as Activities, Contacts, and Products.
Configuring related lists
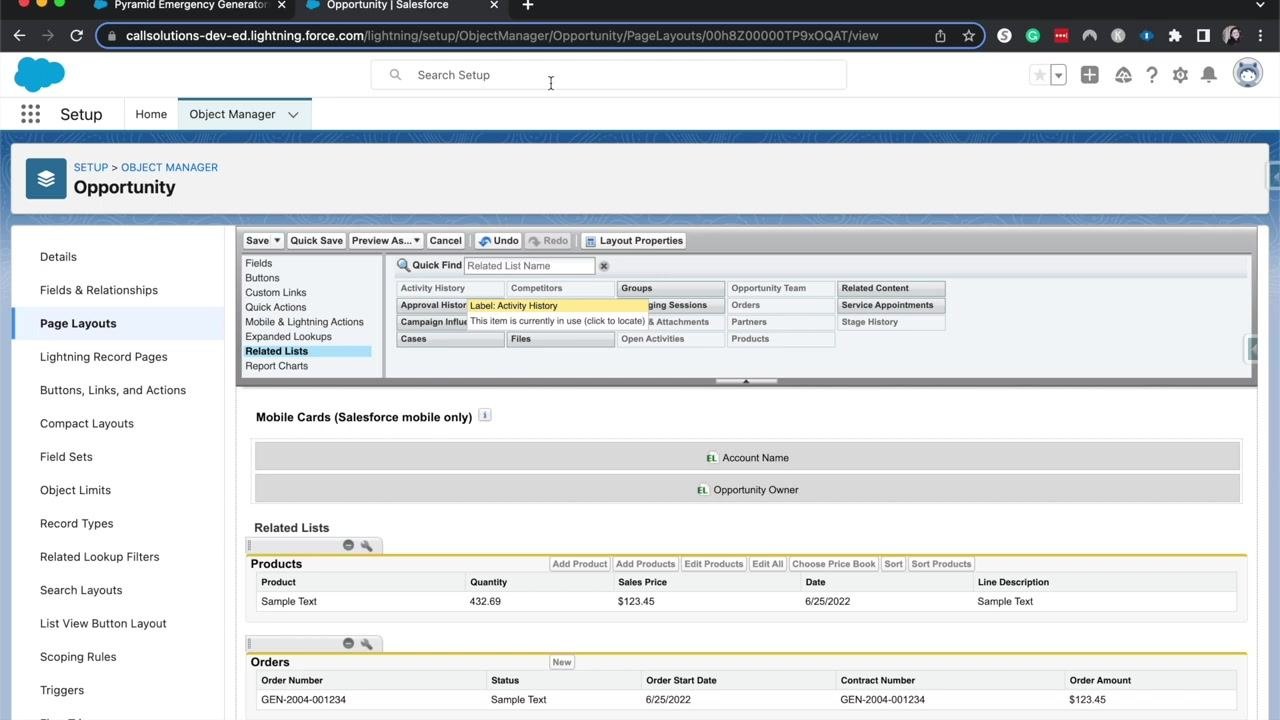
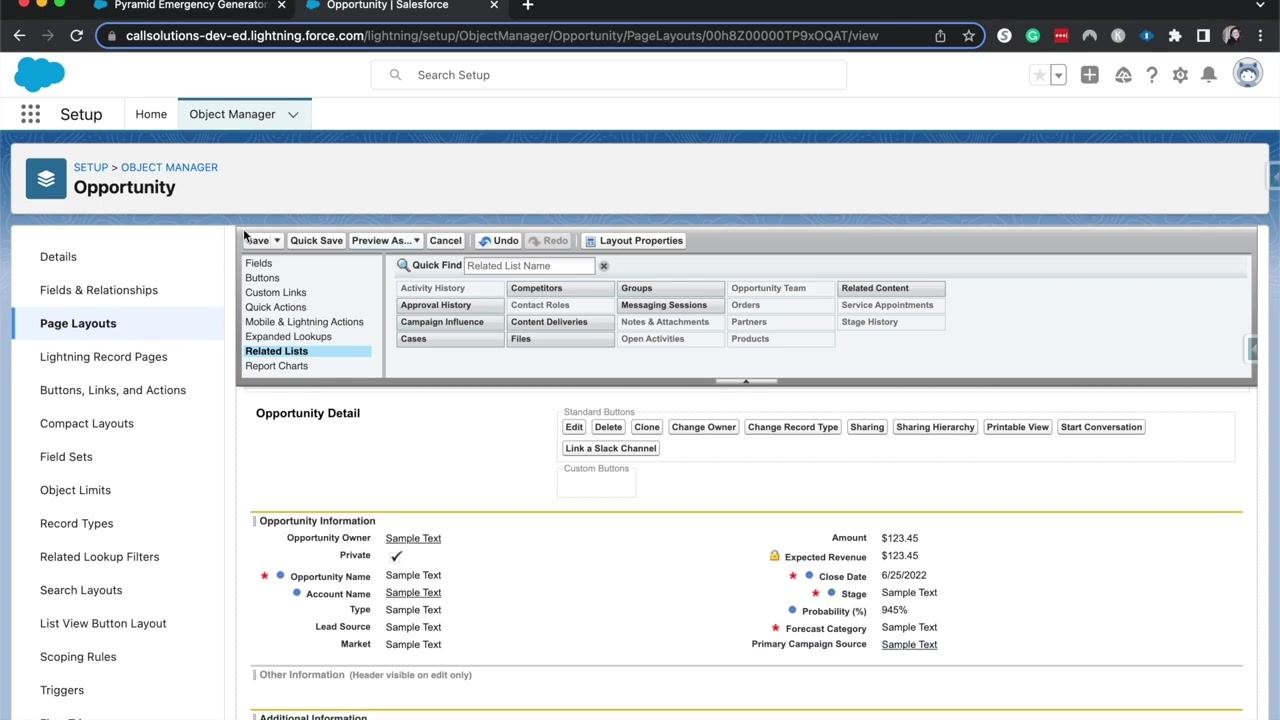
- Open the Related Lists section In Setup, navigate to Object Manager, select Opportunity, click Page Layouts in the left sidebar, and select the layout you want to edit. In the layout editor, click the Related Lists section in the palette to see available related lists such as Activity History, Cases, Files, Orders, and Products — each representing a set of records linked to the current Opportunity.
-
Review and customize related list columns and actions Scroll to the Related Lists section in the layout editor to see which lists are currently included, such as "Products" (with columns for Product, Quantity, Sales Price, Date, and Line Description) and "Orders" (with columns for Status, Order Start Date, Contract Number, and Order Amount). Click the wrench icon next to a related list to add, remove, or reorder its columns, and configure which actions — such as Add, Edit, or Sort — are available.
-
Add or remove related lists, then preview and save To add a related list, drag it from the palette into the Related Lists section; to remove one, click the minus icon or drag it out. Use Preview As... to see how the layout will appear to users, then click Save or Quick Save to apply your changes.
Managing related lists during layout customization
- Review available and included related lists In the layout editor's Related Lists section, available lists include Files, Groups, Opportunity Team, Service Appointments, Products, Orders, Activity History, Cases, Content Deliveries, Partners, Notes & Attachments, Open Activities, and Stage History. The lower section of the editor shows currently included lists, such as Products (with sample values like Product: Sample Text, Quantity: 432.69, Sales Price: $123.45, Date: 6/25/2022) and Orders (with sample values like Order Number: GEN-2004-001234, Status: Sample Text, Order Start Date: 6/25/2022, Order Amount: $123.45).
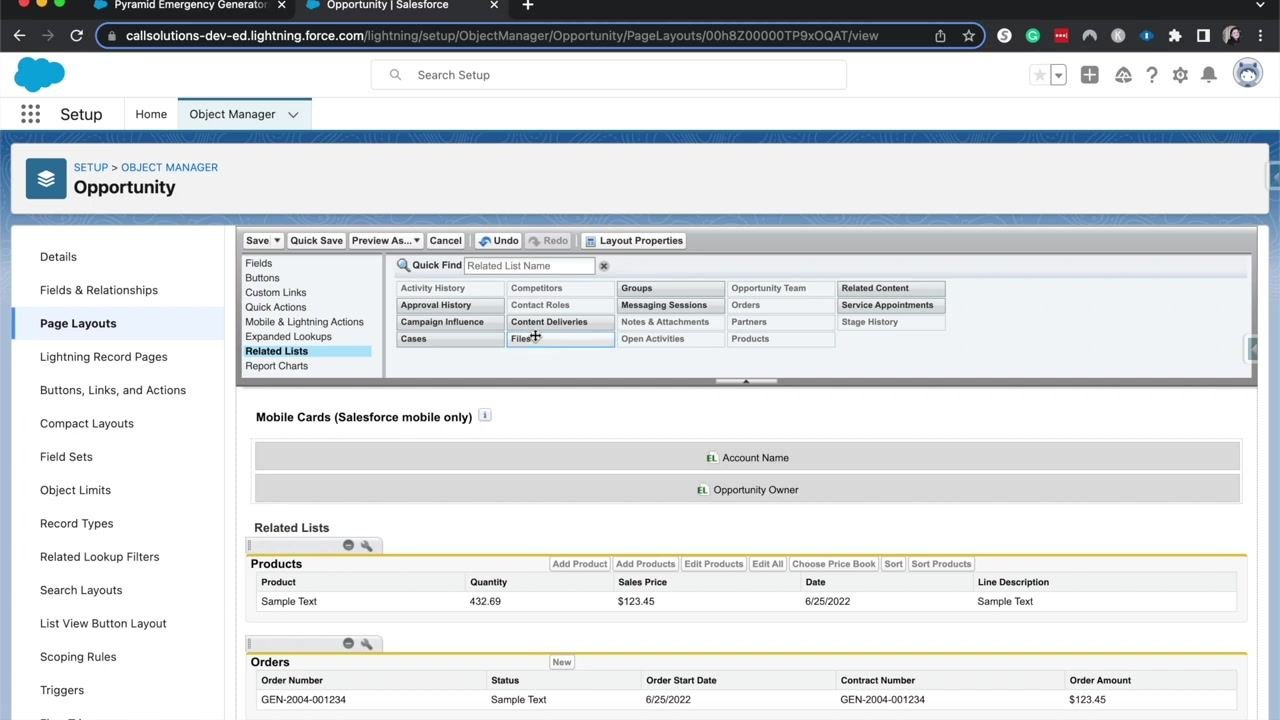
- Add or remove related lists by drag-and-drop Drag related lists — such as Service Appointments or Open Activities — from the palette into the layout, or remove them by dragging them out of the layout area. Sections highlighted in green indicate an active drag-and-drop action.
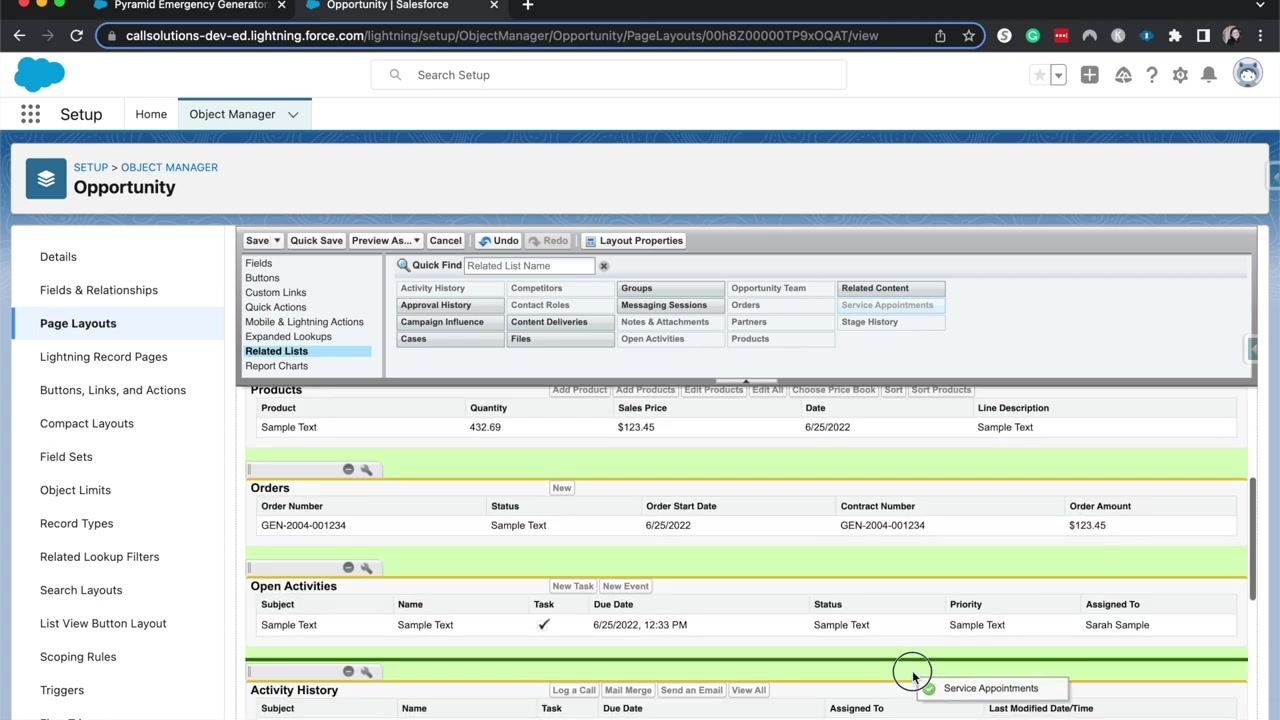
- Quick Save your progress Click Quick Save to save your changes without leaving the layout editor, so you can continue making further adjustments.
Rearranging fields and adjusting section properties
- Rearrange fields within a section Scroll to the Opportunity Detail section and drag fields — such as Probability (%) or Forecast Category — to reorder them, making important fields more visible or moving others further down.
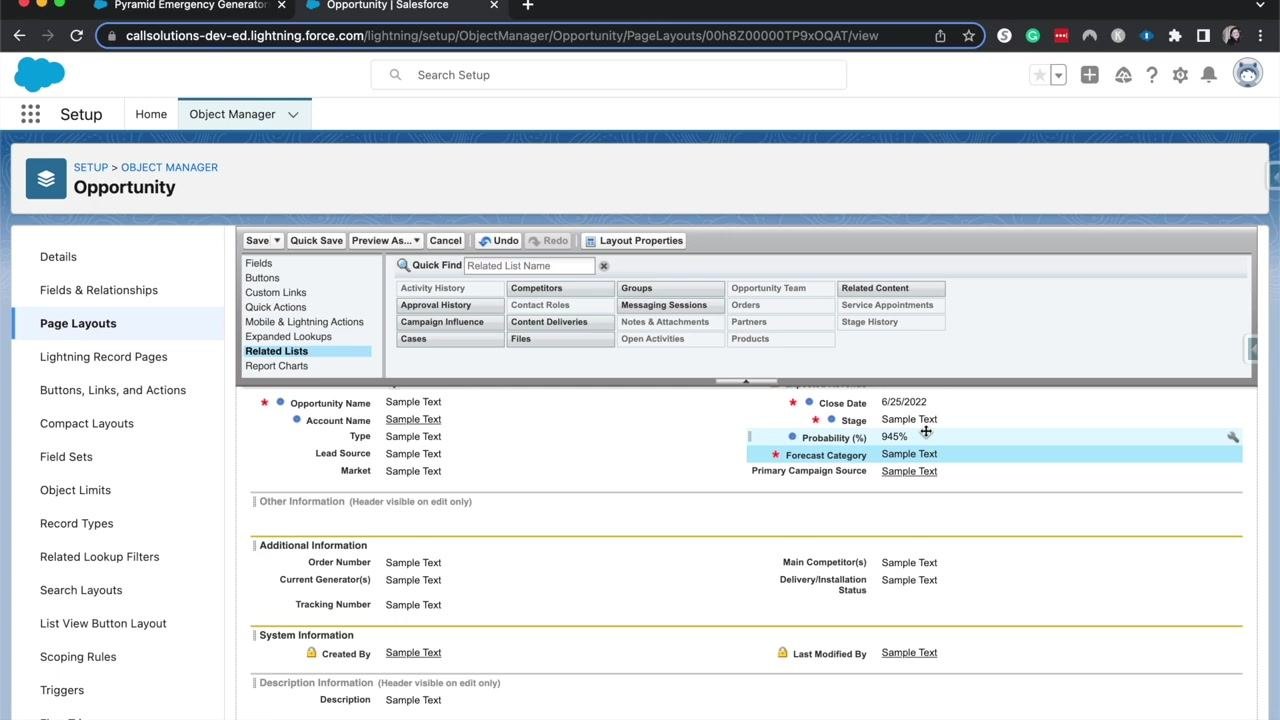
- Adjust section properties Double-click a section header (such as "Opportunity Information") to open the Section Properties dialog. Here you can change the Section Name, choose whether to display the header on the Detail Page and/or Edit Page, select a 2-Column or 1-Column Layout, and set the Tab-key Order to Left-Right or Top-Down. For example, select 2-Column layout with Left-Right tab-key order, then click OK to apply the changes.
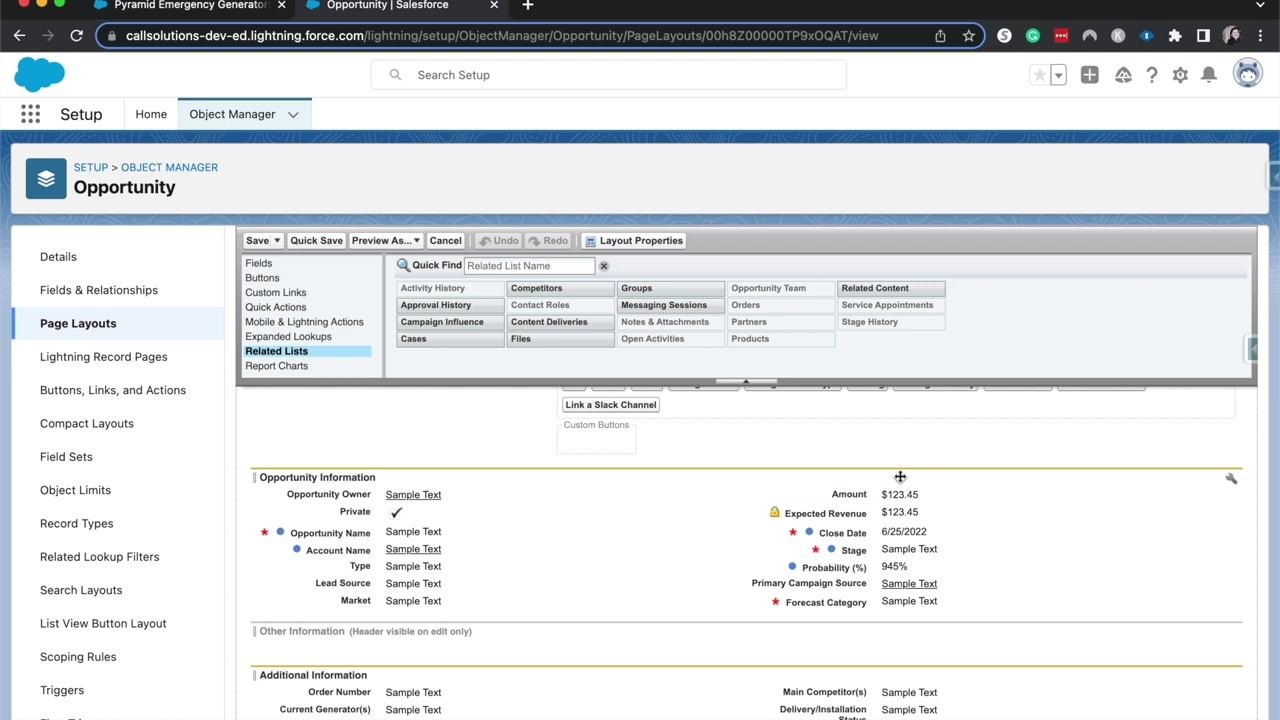
- Save your finalized layout Click Save to apply all changes. The updated layout now reflects your related list, field order, and section property adjustments.
Creating a new page layout from a clone
- Clone an existing layout to create a new one In the Opportunity object manager, navigate to Page Layouts and click New. On the Create New Page Layout screen, select Opportunity Layout from the Existing Page Layout dropdown to clone it, enter a name such as "New opportunity layo" in the Page Layout Name field, and optionally enable Feed-Based Layout. Click Save to create the new layout, which copies the selected layout so you can customize it further.
-
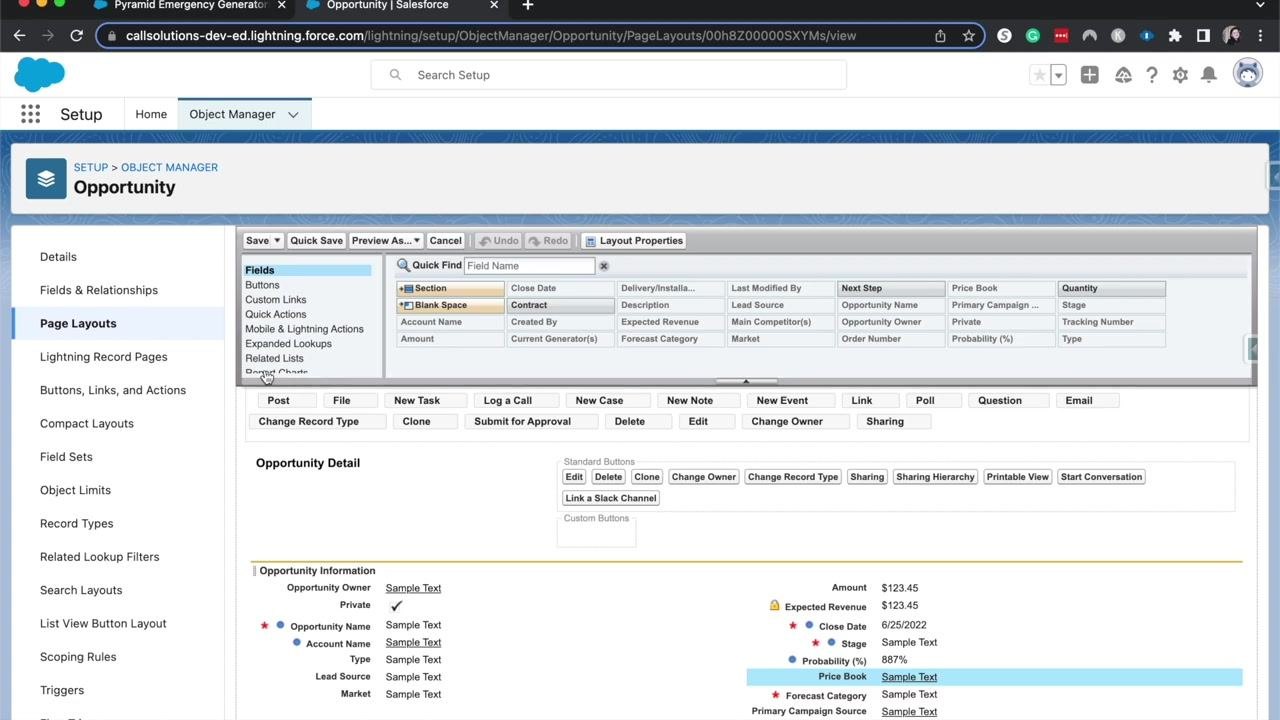
Tailor the new layout for a specific audience After saving, you land in the layout editor for the new page layout. Use it to customize the view for specific audiences, such as external partners, limiting the fields and related lists shown for privacy or simplicity. The editor displays a palette of fields and components (Section, Blank Space, Contract, Account Name, etc.), the current layout structure (Opportunity Name, Stage, Probability (%), and more), standard buttons (Edit, Delete, Clone, Change Owner, Change Record Type, Sharing), and the Opportunity Detail section with sample data.
-
Limit field visibility for restricted users Adjust the layout to show only essential information for users with restricted access, removing or hiding sensitive fields so that only limited information — such as Opportunity Name, Stage, and Probability (%) — is visible. Drag and drop fields, sections, and related lists to customize the view as needed.
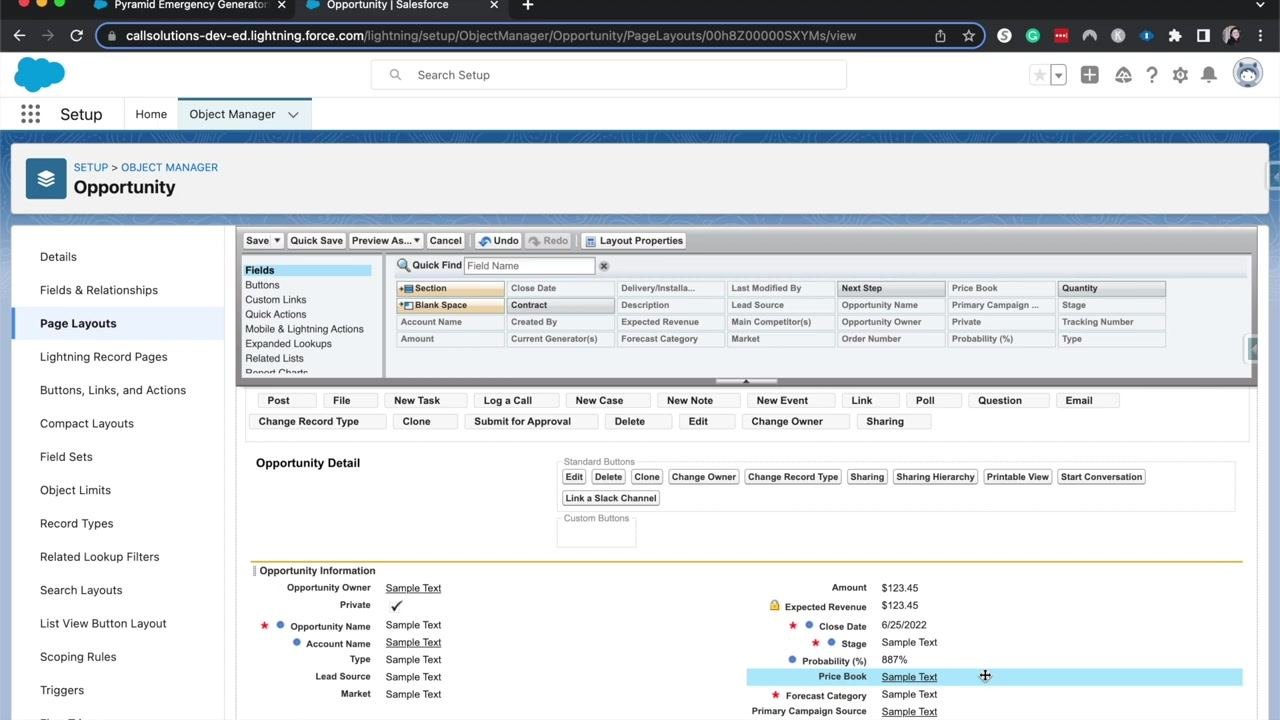
- Quick Save and return to the layout list Click Quick Save to save your changes without exiting the editor, then click Page Layouts in the sidebar to return to the list of layouts. Note that after saving, changes may take a few moments to propagate to the record view.
Verifying the new layout on a record
-
Open a record to confirm the layout Open an Opportunity record — such as "Pyramid Emergency Generators" — to review the applied layout. The record view displays Opportunity details (Account Name, Close Date, Amount, Opportunity Owner, Stage, Probability (%), etc.), related lists on the right (Products, Notes & Attachments, Contact Roles, Partners, Stage History), and the Details tab with editable fields and section headers (Opportunity Information, Additional Information, System Information). If changes aren't visible yet, refresh the page after a few moments.
-
Explore accordion sections and related lists Notice the accordion-style section headers, such as Additional Information and System Information, which help organize information and streamline the view. Expand or collapse these sections to focus on relevant details. Related lists — Products, Notes & Attachments, Contact Roles, Partners, and Stage History — appear on the right, each in its own expandable panel.
-
Confirm the final configuration Verify that the Opportunity record displays the correct fields and related lists as configured in your new layout. For example, the Related panel should show counts for Products, Service Appointments, Notes & Attachments, Contact Roles, and Partners, and the Details tab should reflect the fields and sections you arranged in the layout editor.
What's next
You now know how to create a page layout in Salesforce for the Opportunity object: viewing existing layouts and assignments, assigning layouts by profile and record type, customizing sections, fields, buttons, and related lists, and cloning a layout to build a new one for a specific audience. Revisit the Opportunity object manager and page layout editor any time you need further customization or troubleshooting.

Generation details: cost, quality tiers
Docsie billed 4,500 credits ($3.15) to analyze this 9-minute video at standard quality. The rewrite, template fill and Word/PDF exports were included. The same video at each quality tier:
| Quality | Frames sampled | Credits | Approx. cost |
|---|---|---|---|
| Draft | every 16-30 s | 2,250 | $1.57 |
| Standard (this guide) | every 8-15 s | 4,500 | $3.15 |
| Detailed | every 4-7 s | 9,000 | $6.30 |
| Ultra | every 1-3 s | 18,000 | $12.60 |
Credits priced at $0.70 per 1,000; plans include a monthly allowance. Enterprise customers on on-premise or bring-your-own-model deployments run this on their own inference and pay no per-video credits.
Generated by Docsie Video-to-Docs on 2026-10-02 from a 8-minute video. Screenshots are frames from the source video and belong to their creator, Salesforce Emily, whose original is embedded above. If you own this video and want the guide removed or credited differently, contact us and we will act within one business day.