
How to Request Time Off in UKG
This guide walks you through how to request time off in UKG Ready, from submitting a new request to checking your balances, history, and calendar. You'll see exactly what to click at each stage, including how to choose a time off type, enter hours, calculate your projected balance, and submit your request for approval.
Video: UKG Tutorial: Requesting Time Off by Professional Employment Group of Colorado (2022). All credit for the demonstration goes to the creator; watch the original on YouTube. The written guide below was generated from this video by Docsie. Creator? Request a change or removal.
This guide walks you through how to request time off in UKG Ready, from submitting a new request to checking your balances, history, and calendar. You'll see exactly what to click at each stage, including how to choose a time off type, enter hours, calculate your projected balance, and submit your request for approval.
Prerequisites
- You must be logged in to your UKG Ready account before starting this process.
Access your dashboard
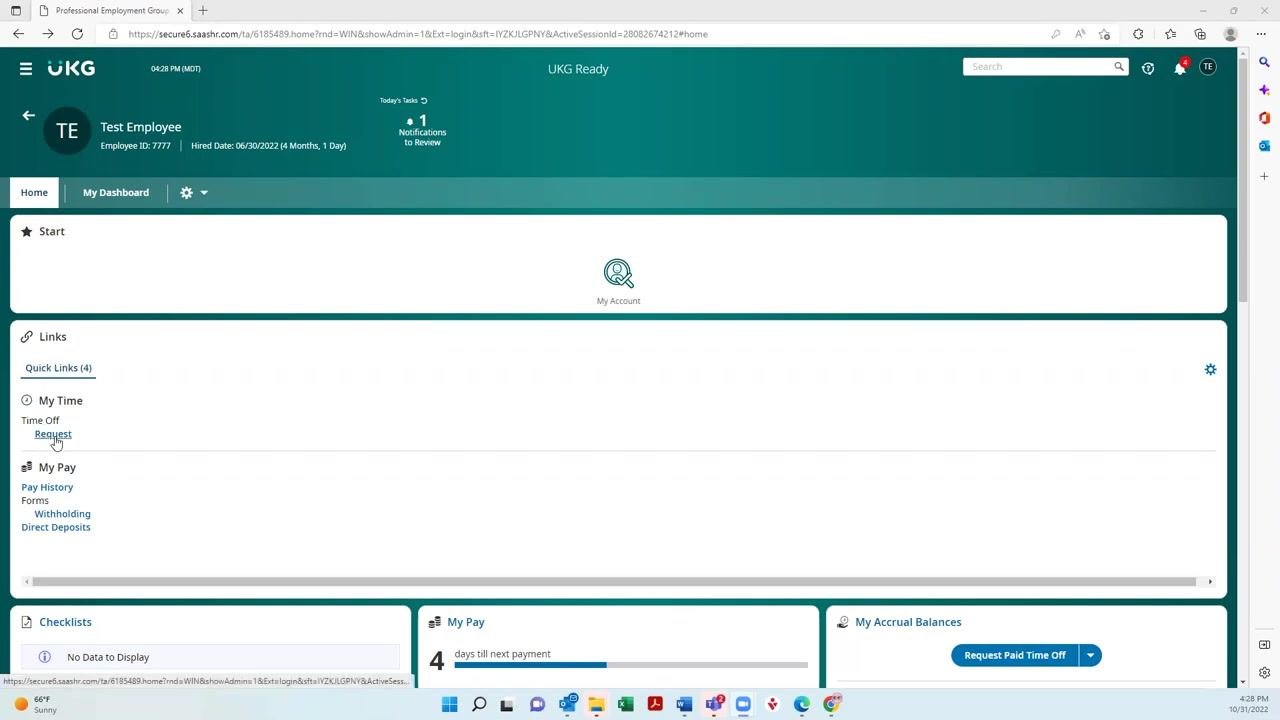
After logging in, you land on your dashboard. Locate the Quick Links section on the left side of the screen. Under My Time, find and click the Request link.
Open the Time Off Request page
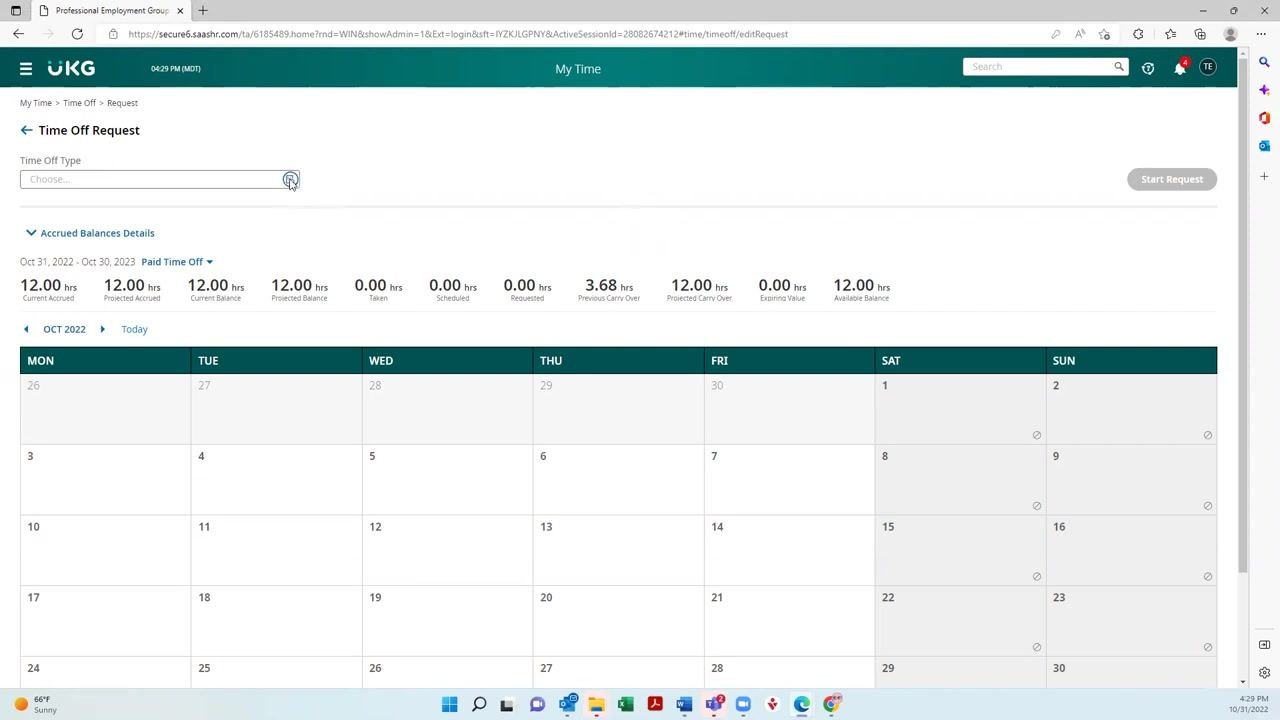
Clicking Request takes you to the Time Off Request page. At the top, find the Time Off Type field. Click the magnifying glass icon next to the Choose... field to browse the available time off types.
Select the type of time off
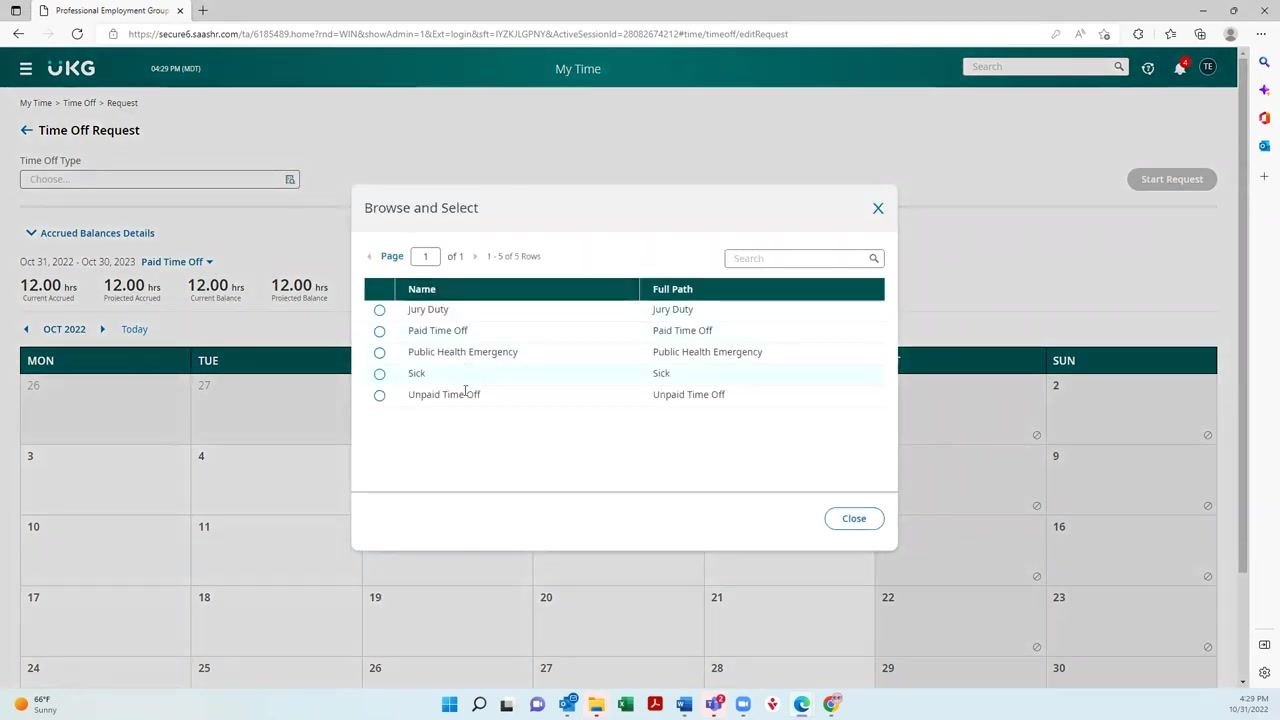
A Browse and Select window appears, listing available time off types such as Jury Duty, Paid Time Off, Public Health Emergency, Sick, and Unpaid Time Off. Select the type that applies to your request.
Note that the options shown may vary depending on your state and employer.
Start the time off request
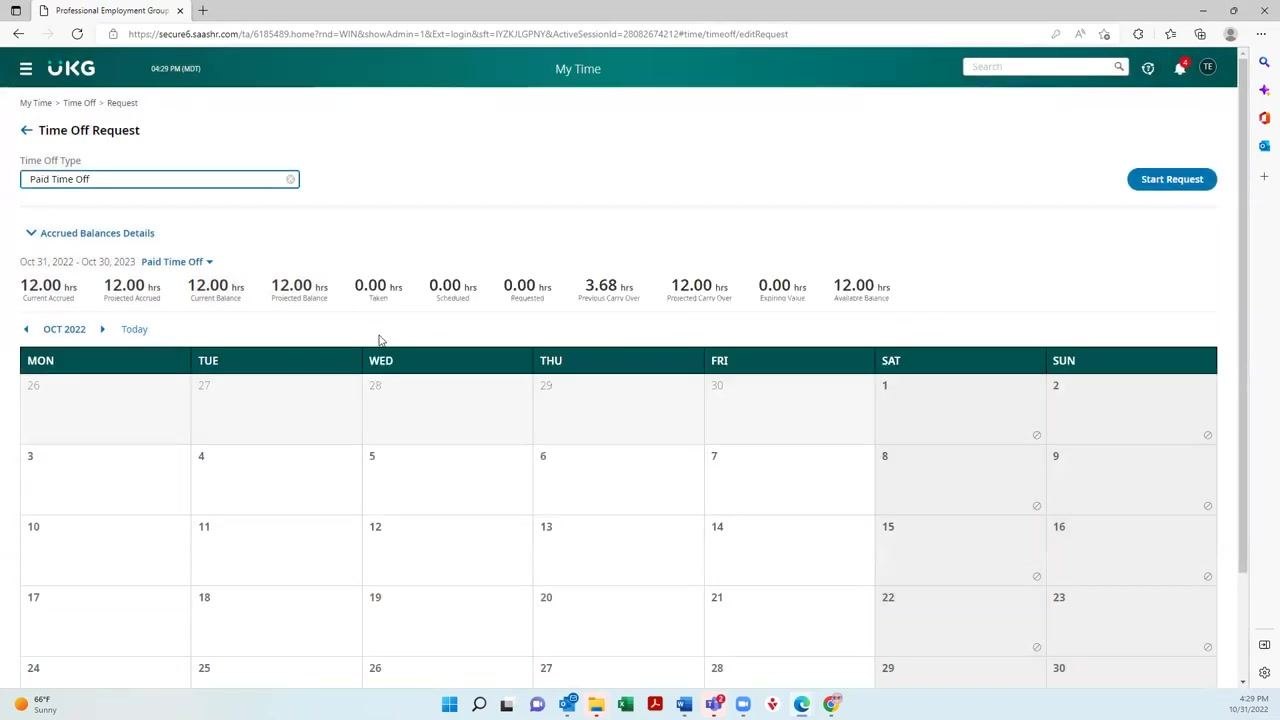
After selecting your time off type (for example, "Paid Time Off"), the main request page updates accordingly. Click the blue Start Request button on the right to continue.
If you selected the wrong type, you can still edit it in the Time Off Type field before proceeding.
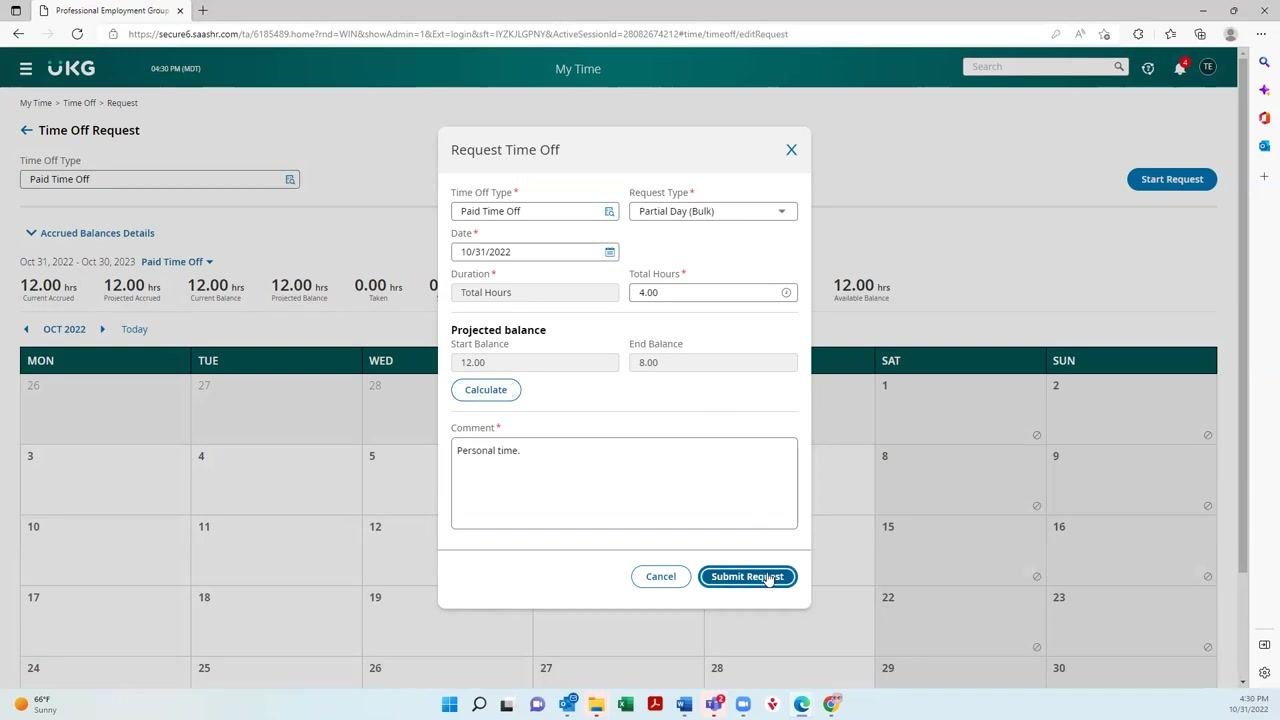
Choose the request type
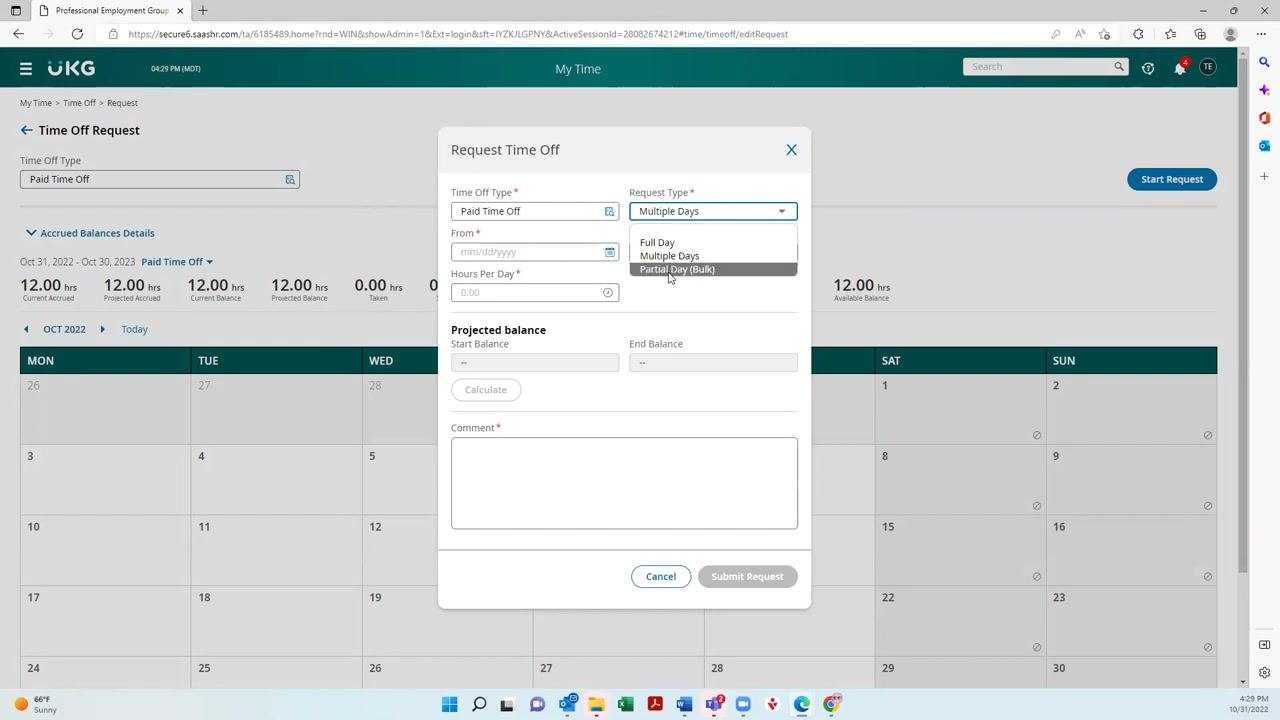
In the Request Type dropdown, select how long you will be taking off:
- Full Day: Automatically sets to 8 hours.
- Multiple Days: Lets you enter a date range.
- Partial Day (Bulk): Lets you specify the number of hours, such as 4 or 6 hours.
Select the date
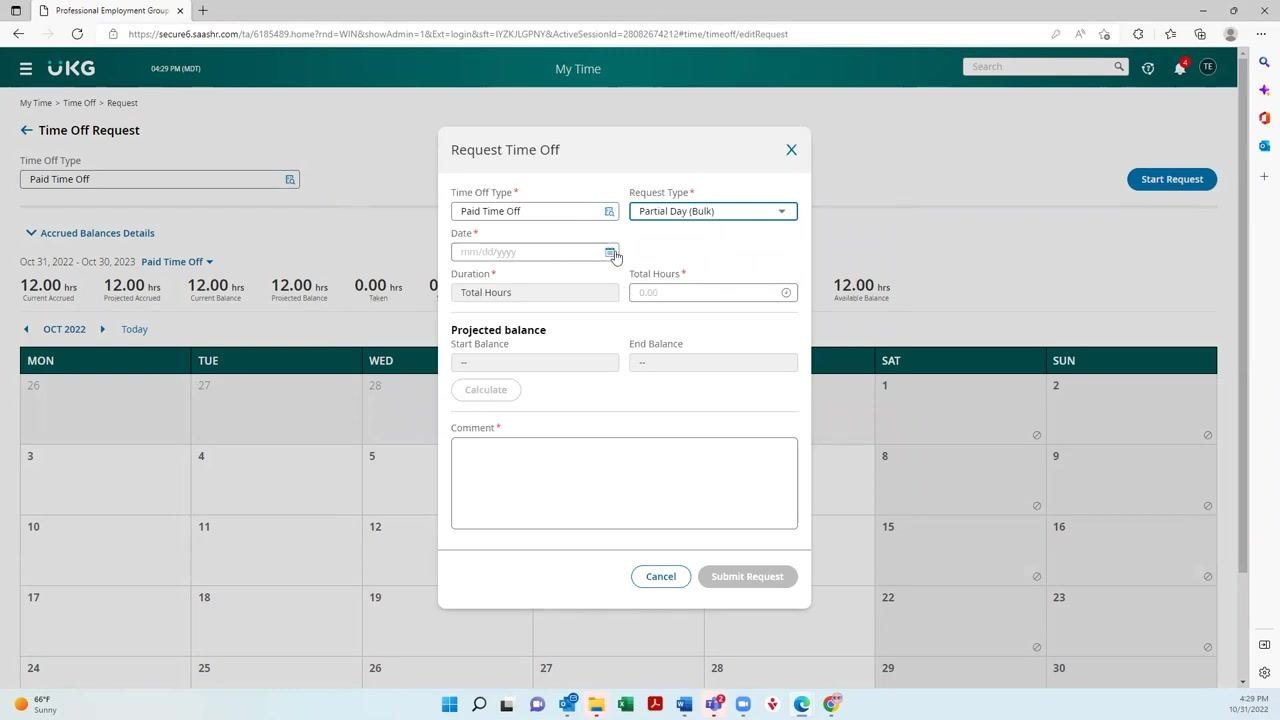
For a partial day, click the calendar icon in the Date field and select the desired date. For multiple days, select the start and end dates as needed.
Enter duration and add a comment
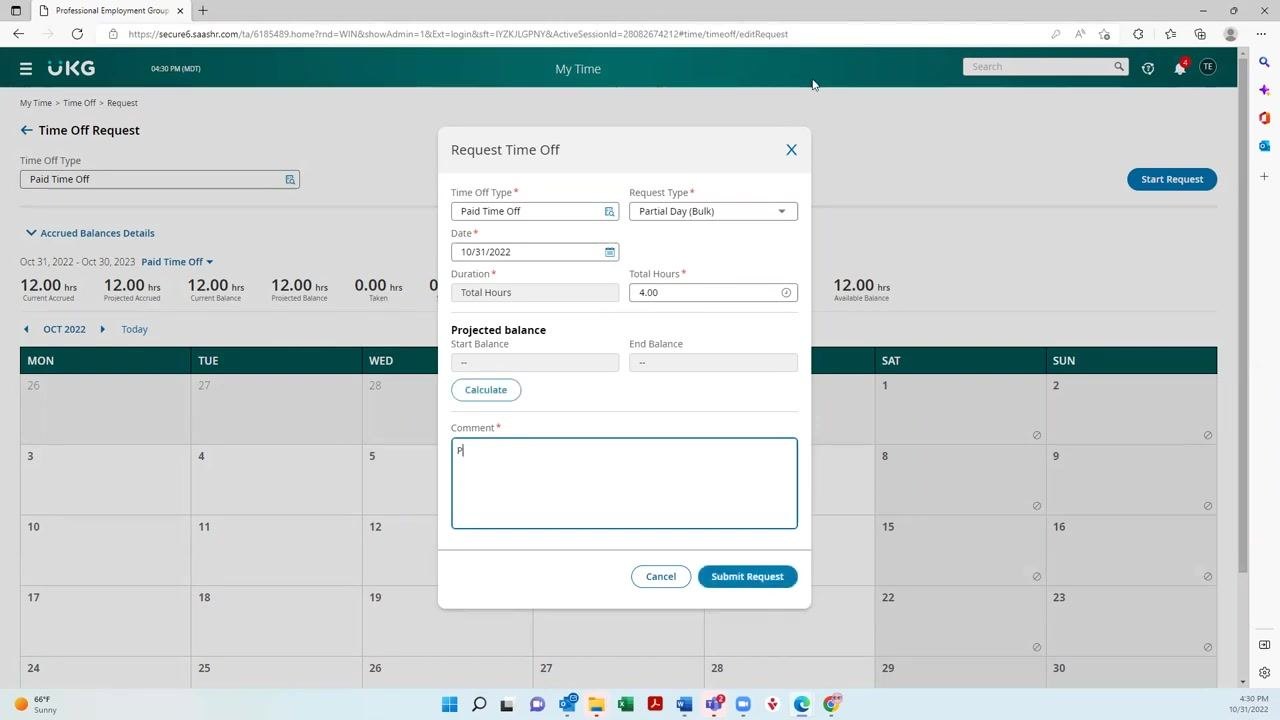
Enter the total number of hours you wish to request in the Total Hours field (for example, 4.00 for a half day). In the Comment field, enter a brief note — this is required to submit the request.
You don't need to go into detail; a note like "Personal time" is sufficient, though you may add more information if you wish.
Calculate your projected balance
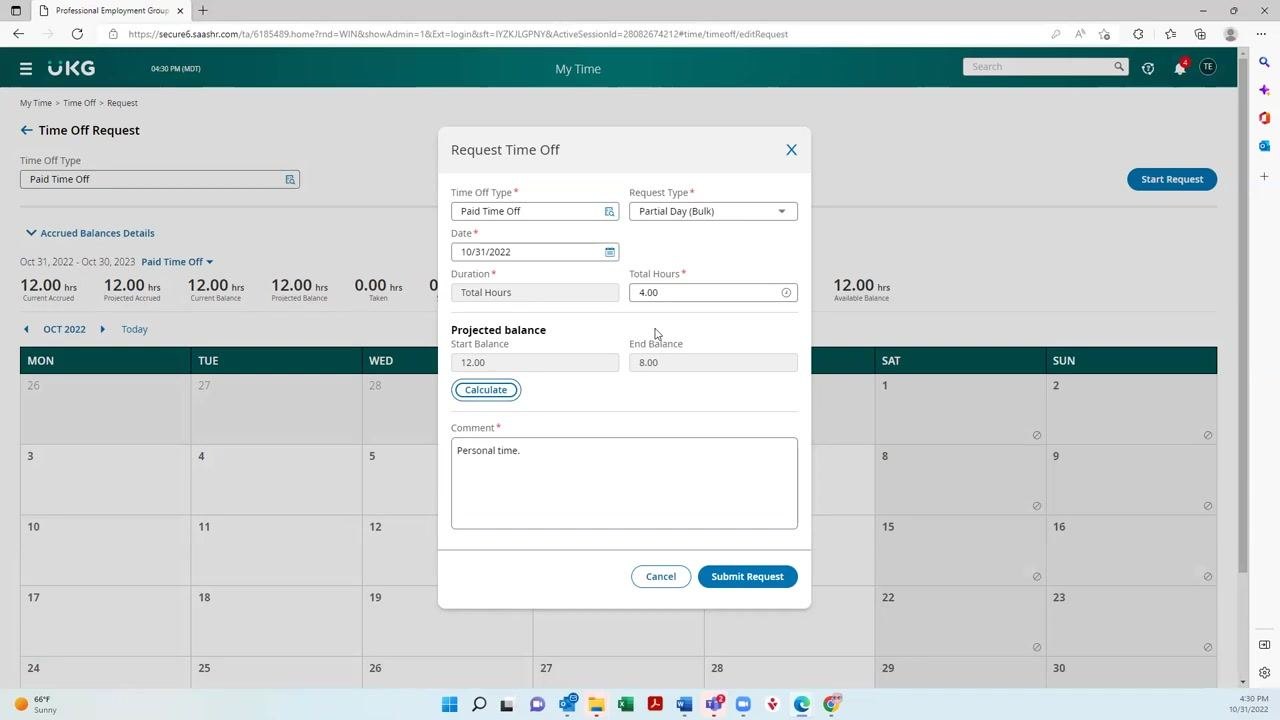
Before submitting, you can see what your balance will be after the time off is deducted. Click the Calculate button in the Projected Balance section.
For example, if you start with 12.00 hours and request 4.00 hours off, your end balance will be 8.00 hours.
Submit your request
Review all the details you entered: Time Off Type, Request Type, Date, Total Hours, and Comment. Click the Submit Request button to finalize your request.
Your request is then sent to your time card approver for approval.
Review your balances and request status
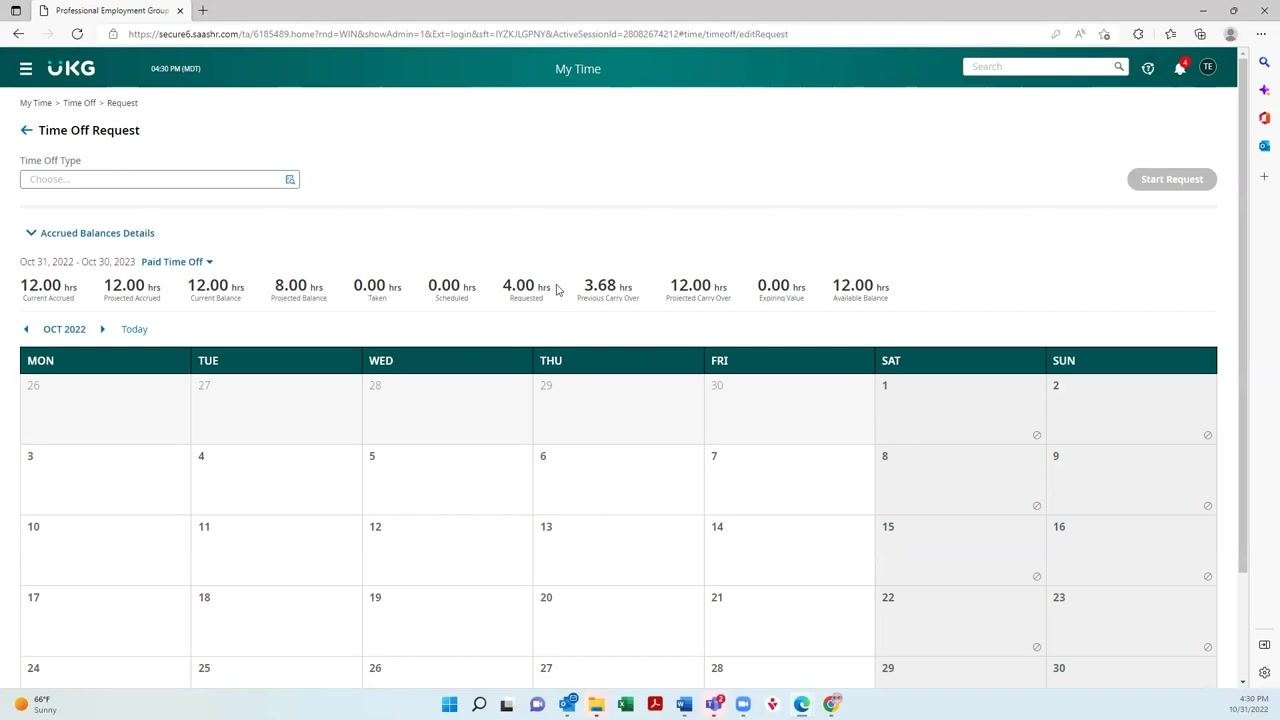
After submitting, you return to the main Time Off Request page, where you can view:
- Current Accrued: Total hours accrued to date.
- Projected Accrued: Hours expected to accrue.
- Current Balance: Hours currently available.
- Projected Balance: Hours available after pending requests.
- Taken: Hours already used.
- Scheduled: Hours scheduled for future use.
- Requested: Hours currently pending approval.
- Previous Carry Over: Hours carried over from previous periods.
- Expiring Value: Hours set to expire.
- Available Balance: Hours available for use.
For example, after requesting 4.00 hours, "Requested" shows 4.00 and "Projected Balance" shows 8.00.
Toggle between types of time off
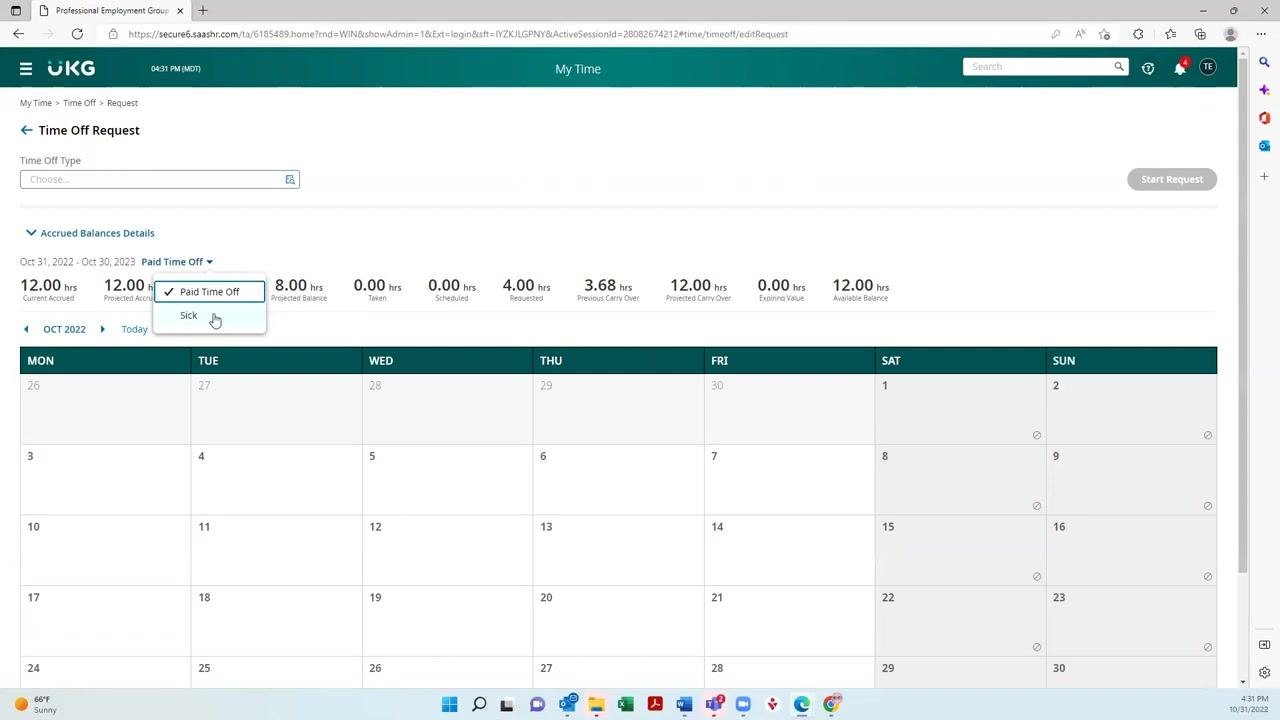
You can switch between different types of time off, such as Paid Time Off and Sick, using the dropdown menu next to the time off type label.
Note that the availability of certain types, such as Sick time, depends on your state and employer.
View details for each time off type
After selecting a different time off type, the balances and details update to reflect that category. This lets you see how many hours you have available for each type.
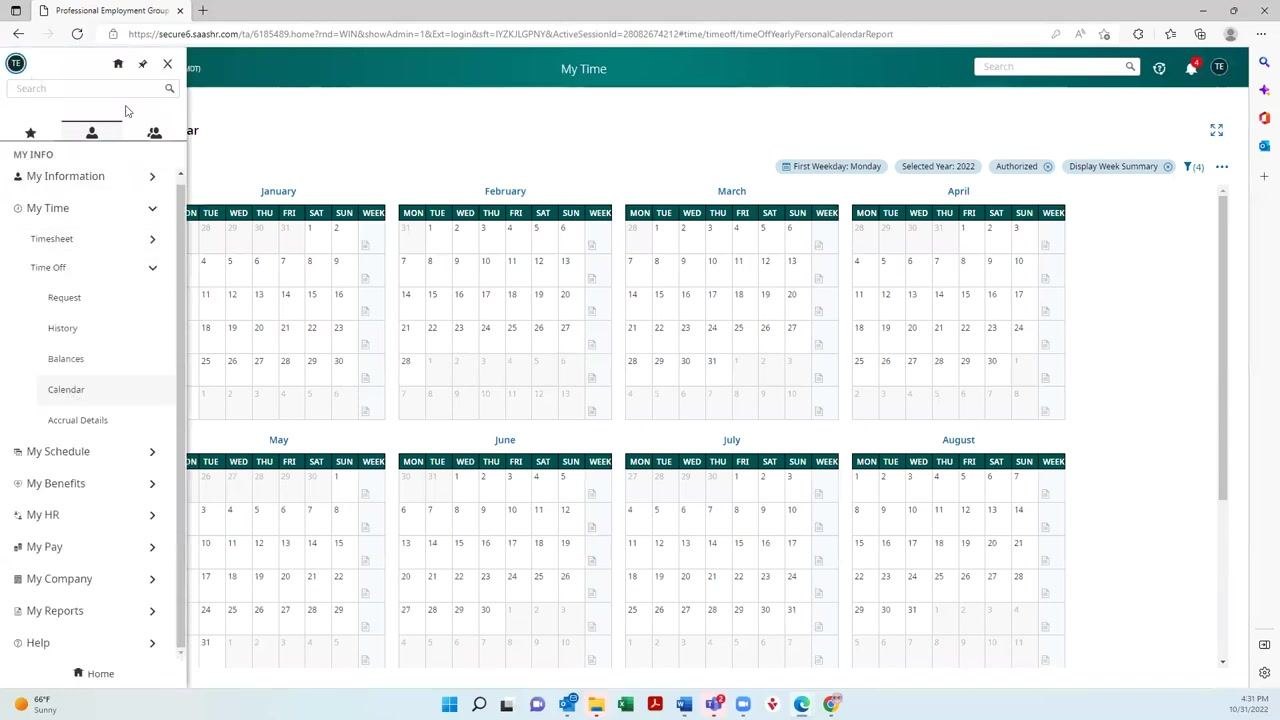
Access your time off history, balances, and calendar
Open the left navigation menu. Under My Time > Time Off, you can select:
- Request: To make a new request.
- History: To view past requests and their statuses.
- Balances: To see your current and projected balances.
- Calendar: To view your time off on a calendar.
View your personal time off calendar
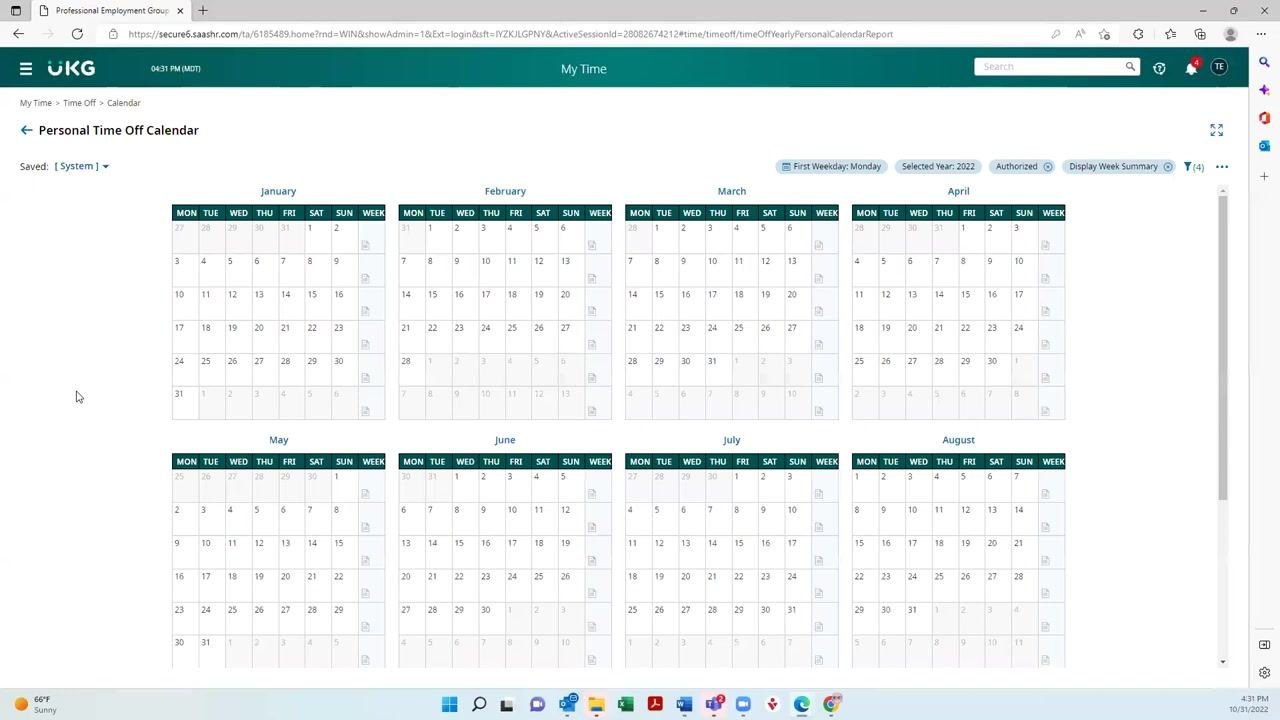
Select Calendar to see a yearly view of your time off. The calendar displays all months, letting you track your scheduled and taken time off at a glance.
Navigate back to the homepage
Use the home icon in the left navigation menu to return to the main dashboard at any time.
What's next
You have now completed the process for requesting and managing time off in UKG Ready. You can continue to monitor your balances, toggle between different types of leave, and review your time off history and calendar whenever needed. If you have any questions, contact your HR or payroll administrator for assistance.

Generation details: cost, quality tiers
Docsie billed 2,000 credits ($1.40) to analyze this 4-minute video at standard quality. The rewrite, template fill and Word/PDF exports were included. The same video at each quality tier:
| Quality | Frames sampled | Credits | Approx. cost |
|---|---|---|---|
| Draft | every 16-30 s | 1,000 | $0.70 |
| Standard (this guide) | every 8-15 s | 2,000 | $1.40 |
| Detailed | every 4-7 s | 4,000 | $2.80 |
| Ultra | every 1-3 s | 8,000 | $5.60 |
Credits priced at $0.70 per 1,000; plans include a monthly allowance. Enterprise customers on on-premise or bring-your-own-model deployments run this on their own inference and pay no per-video credits.
Generated by Docsie Video-to-Docs on 2026-10-02 from a 3-minute video. Screenshots are frames from the source video and belong to their creator, Professional Employment Group of Colorado, whose original is embedded above. If you own this video and want the guide removed or credited differently, contact us and we will act within one business day.