
How to Upload Files to SharePoint in SharePoint
This guide shows you how to upload files to SharePoint, navigate your site's document libraries, and keep your files organized. You'll learn how to upload files individually or in bulk, resolve duplicate file conflicts, create folders and new document libraries, and locate existing libraries through Site contents.
Video: How to Upload Files to a SharePoint Site | SharePoint File Management | (Step by Step Guide) by Michael Alex (2023). All credit for the demonstration goes to the creator; watch the original on YouTube. The written guide below was generated from this video by Docsie. Creator? Request a change or removal.
This guide shows you how to upload files to SharePoint, navigate your site's document libraries, and keep your files organized. You'll learn how to upload files individually or in bulk, resolve duplicate file conflicts, create folders and new document libraries, and locate existing libraries through Site contents.
Prerequisites
- Access to a SharePoint site with permission to upload and manage files.
- A web browser with your SharePoint site open.
- Files ready on your computer that you want to upload.
Open your SharePoint site
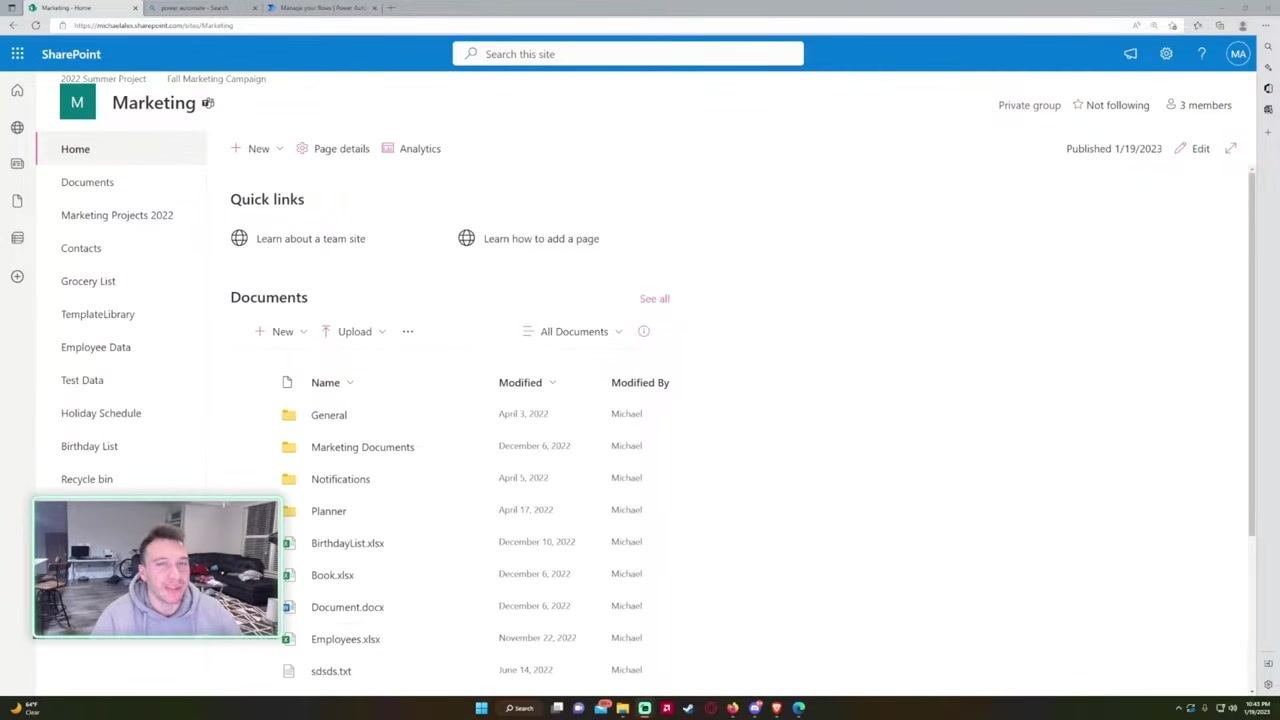
Open your SharePoint site in your web browser. The homepage layout may vary depending on your organization, but you'll typically see a navigation bar on the left with links such as Home, Documents, Marketing Projects 2022, Contacts, Grocery List, TemplateLibrary, Employee Data, Test Data, Holiday Schedule, Birthday List, and Recycle bin. The main area displays Quick links and a Documents section with folders and files.
Open the Documents library
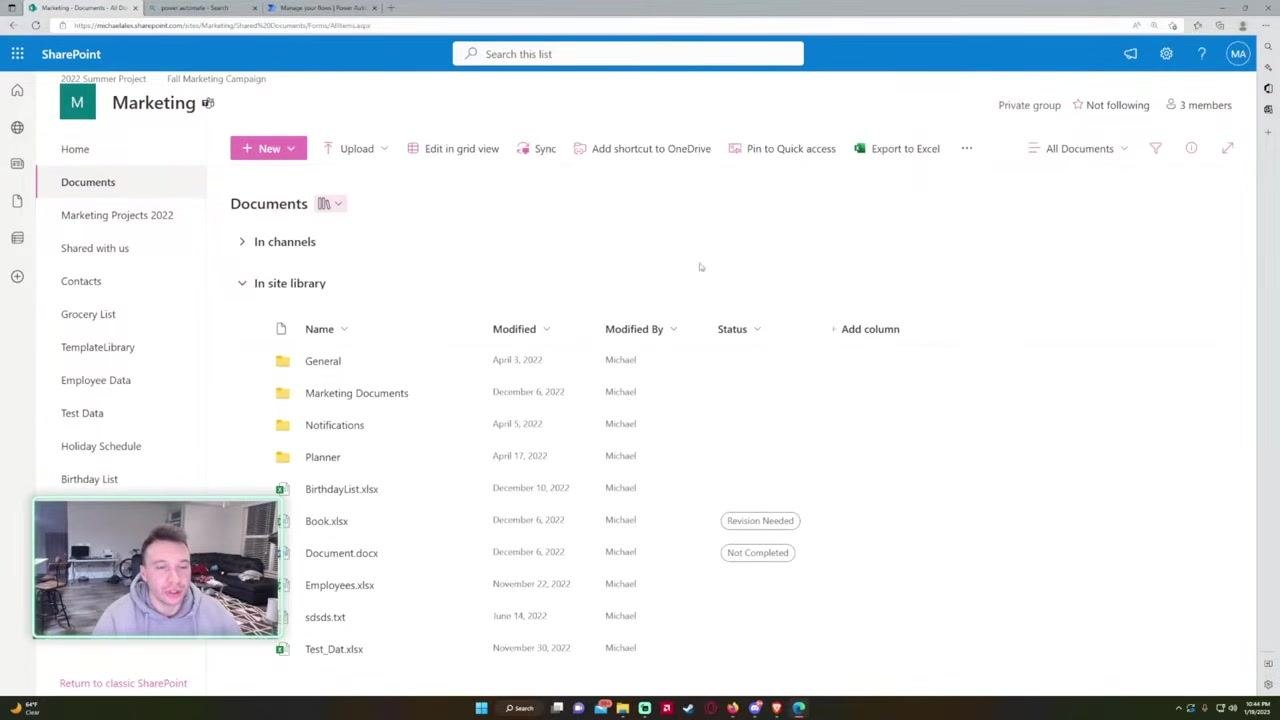
Click Documents in the navigation bar to access the shared documents folder. Every SharePoint site includes a default shared documents folder, which is shared with everyone on your site unless permissions have been changed.
The Documents library displays folders (such as General, Marketing Documents, Notifications, and Planner) and files (such as BirthdayList.xlsx, Book.xlsx, Document.docx, Employees.xlsx, sdsds.txt, and Test_Data.xlsx). Columns show Name, Modified, Modified By, and Status.
Upload files using the Upload button
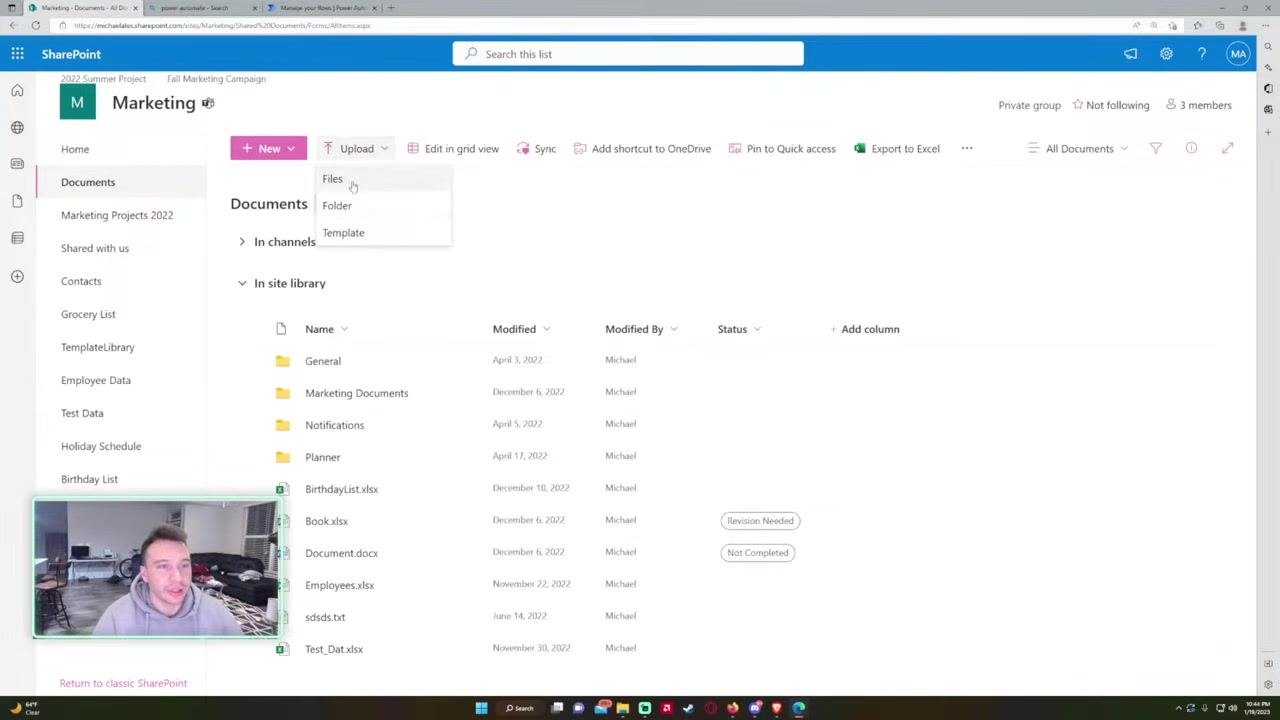
Click the Upload button at the top of the Documents section. A dropdown menu appears with three options: Files, Folder, and Template. In most cases, you'll use Files.
Select Files from the dropdown. A file picker dialog opens, letting you browse your computer for files to upload.
In the file picker dialog, navigate to the files you want to upload. To select multiple files, hold the Control key and click each file. Click Open to upload your selection.
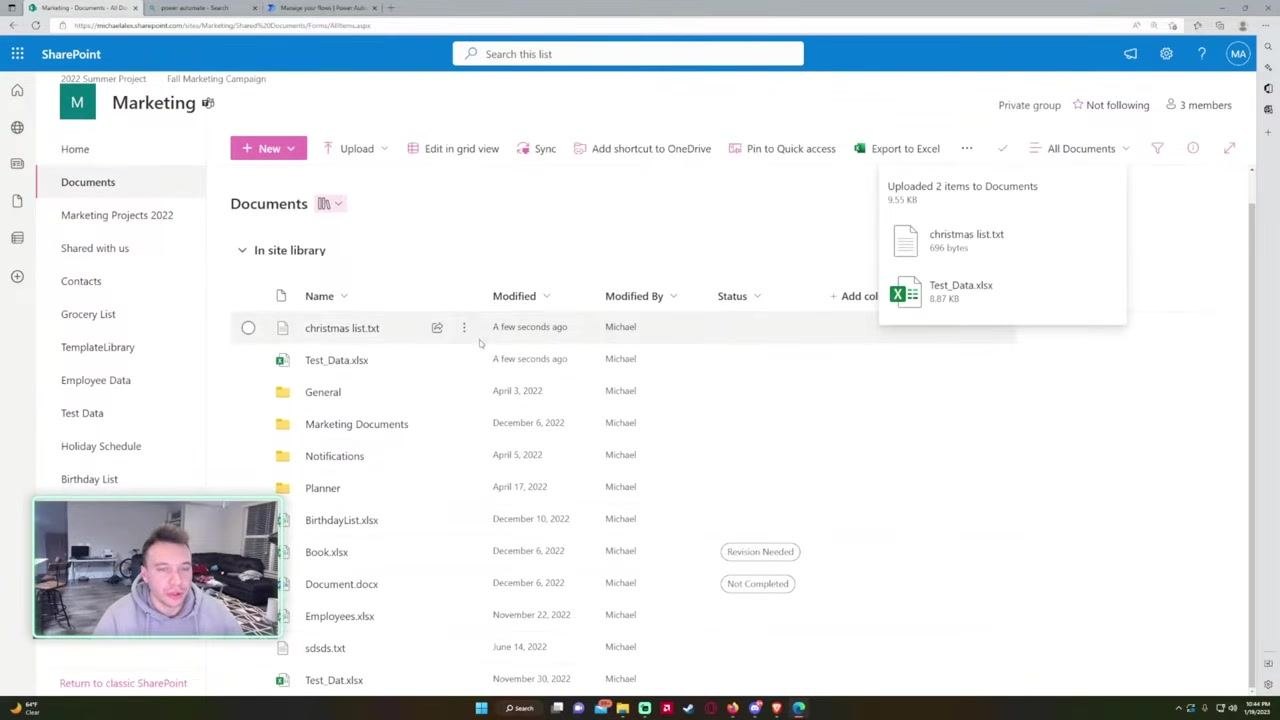
Wait for the upload to complete. A notification confirms the upload—for example, "Uploaded 2 items to Documents: christmas list.txt, Test_Data.xlsx." The new files appear in the Documents library, with Modified showing "A few seconds ago" and Modified By showing your name.
Upload files using drag and drop
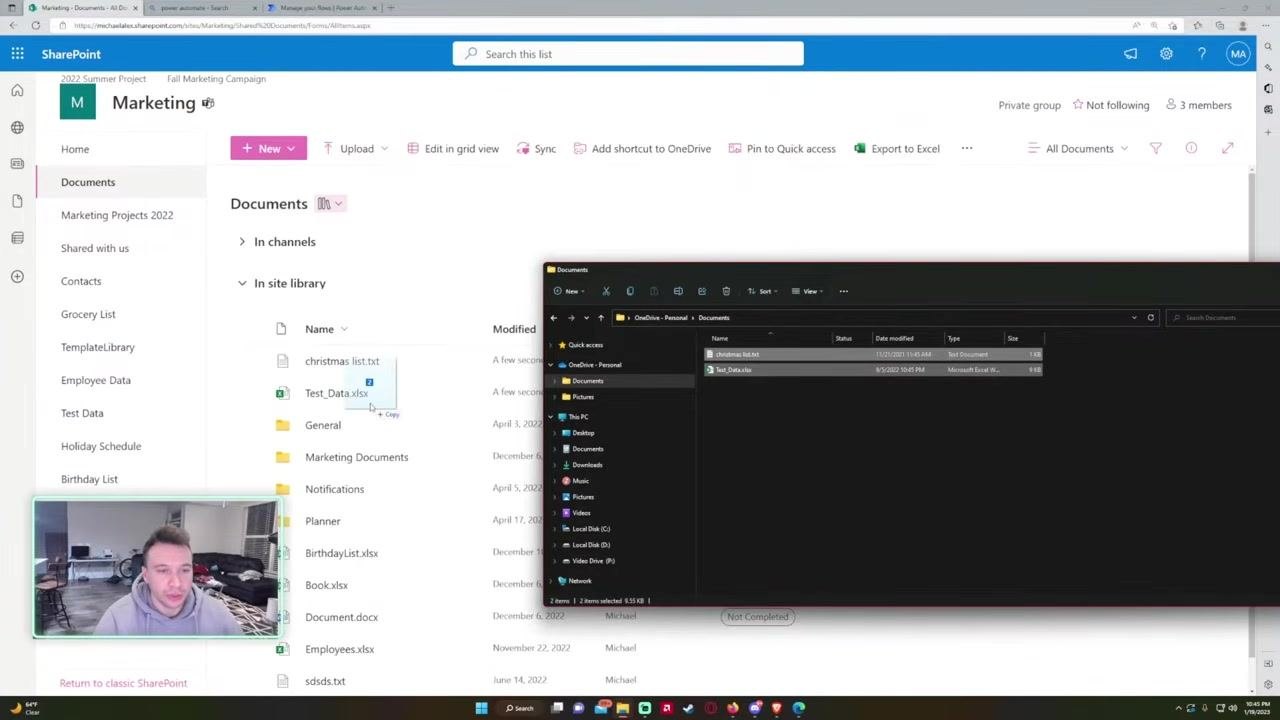
As an alternative to the Upload button, you can drag and drop files directly from File Explorer into the SharePoint Documents library. Open File Explorer, select the files you want to upload, and drag them into the Documents section of your site. The files upload and become shared with your team.
Handle duplicate file names
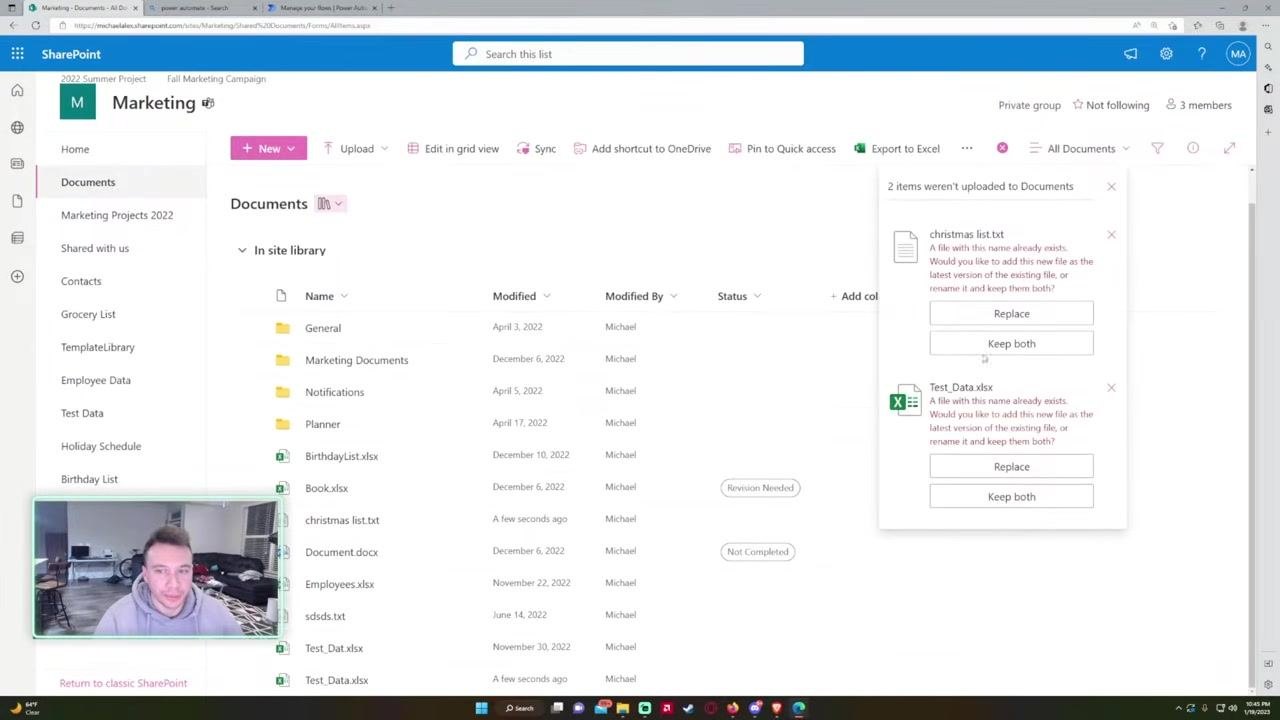
If you upload files with names that already exist in the Documents library, SharePoint prompts you with options. You'll see a notification such as "2 items weren't uploaded to Documents" listing the conflicting file names (for example, christmas list.txt and Test_Data.xlsx).
For each duplicate, choose one of the following:
- Click Replace to overwrite the existing file with the new one.
- Click Keep both to save both files—the new file is renamed automatically.
After resolving any duplicates, a confirmation popup appears—for example, "Uploaded 2 items to Documents: christmas list.txt, Test_Data.xlsx." The uploaded files are now visible in the Documents library.
Create folders to organize your files
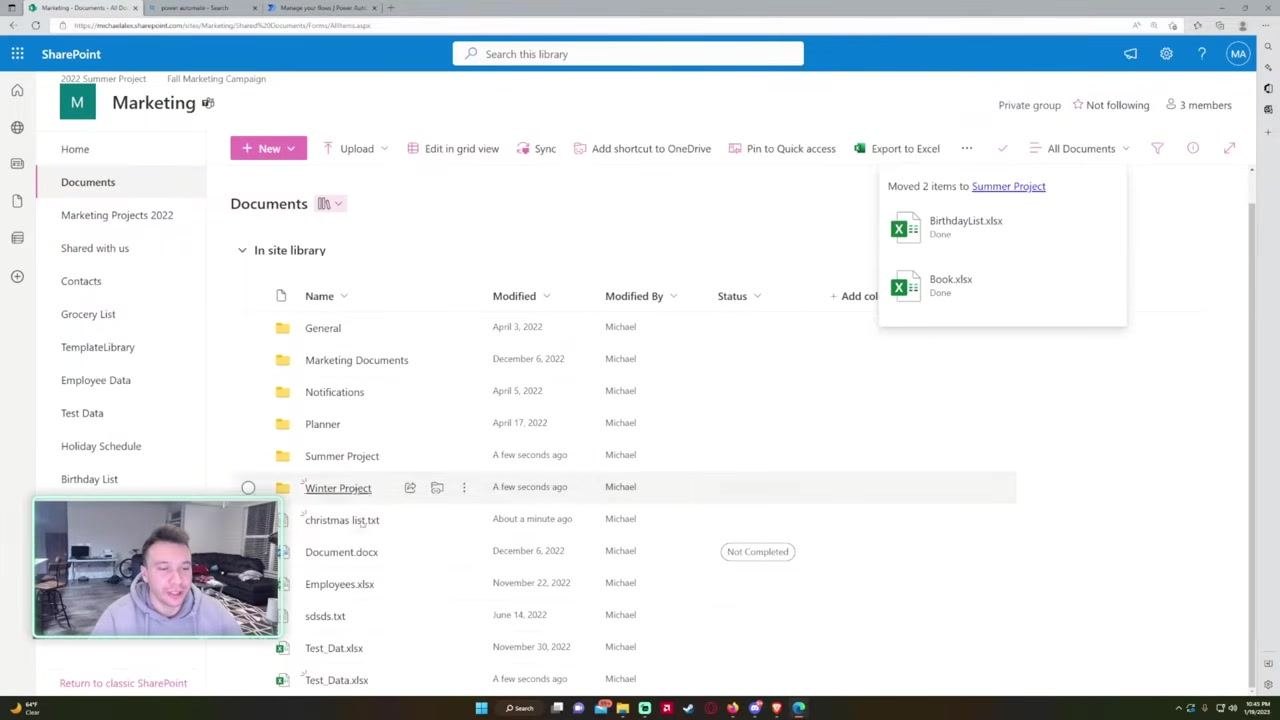
To keep your Documents library organized, create folders for different projects, such as "Summer Project" or "Winter Project." Click the New button and select Folder, then name the folder according to your project. Move relevant files into these folders by dragging and dropping them—this helps prevent clutter and makes project-specific files easier to find.
Move files into project folders
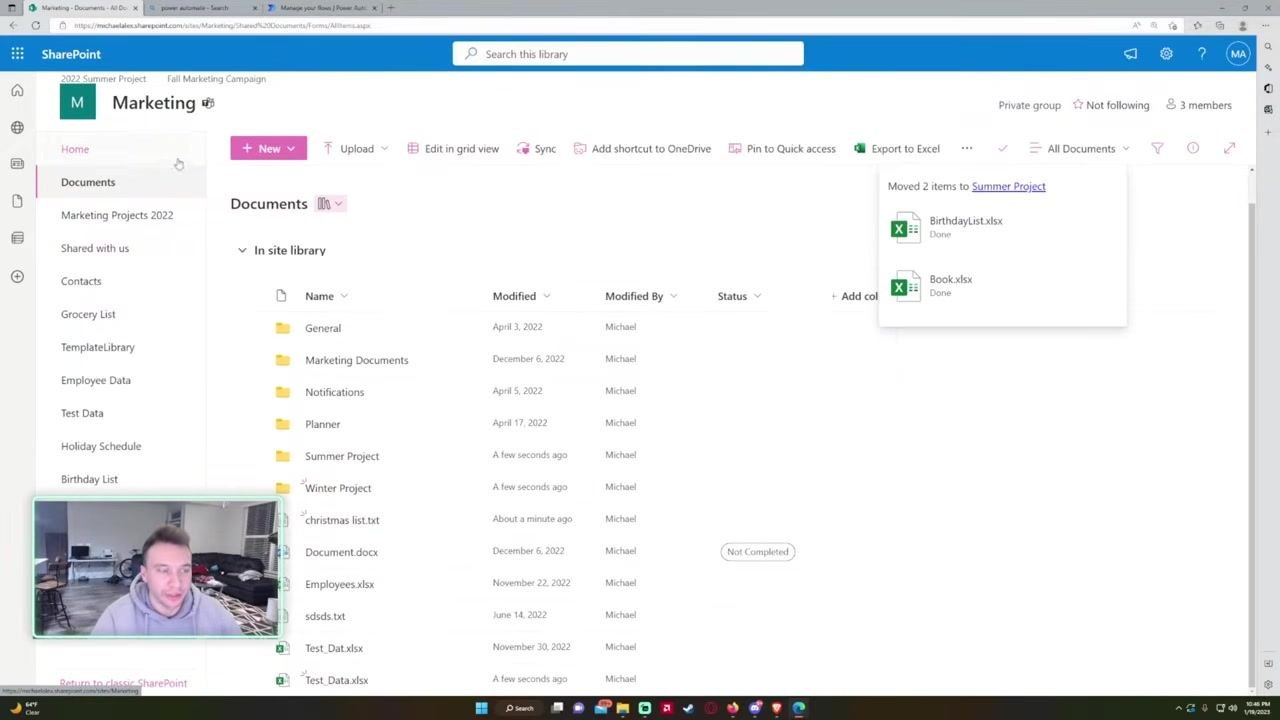
Select the files you want to organize, then drag and drop them into the appropriate project folder—for example, moving BirthdayList.xlsx and Book.xlsx into "Summer Project." A notification confirms the move, such as "Moved 2 items to Summer Project."
Create a new document library
If you have the correct permissions, you can create a new document library for a specific project or task. Click Home in the navigation bar, then click New and select Document library. The Create document library panel opens on the right.
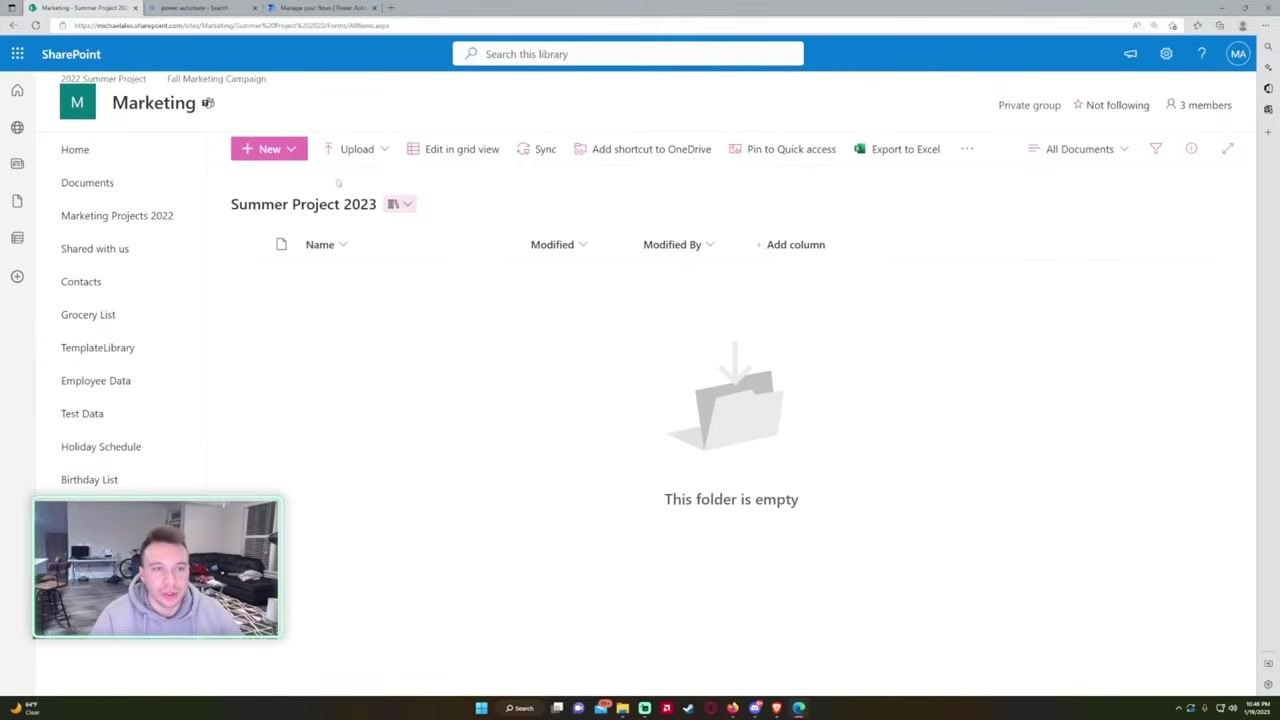
Enter a name for your new library (for example, "Summer Project 2023") and optionally add a description (for example, "Marketing Project"). Decide whether to show the library in site navigation:
- Leave the box checked to display the library in the left navigation for all users.
- Uncheck the box if you want the library to be less visible or restricted.
Click Create to add the new document library.
Once created, the new library opens empty. You can now add folders (such as "Employees" or "Rough Drafts") and upload files specific to this project.
Locate document libraries through Site contents
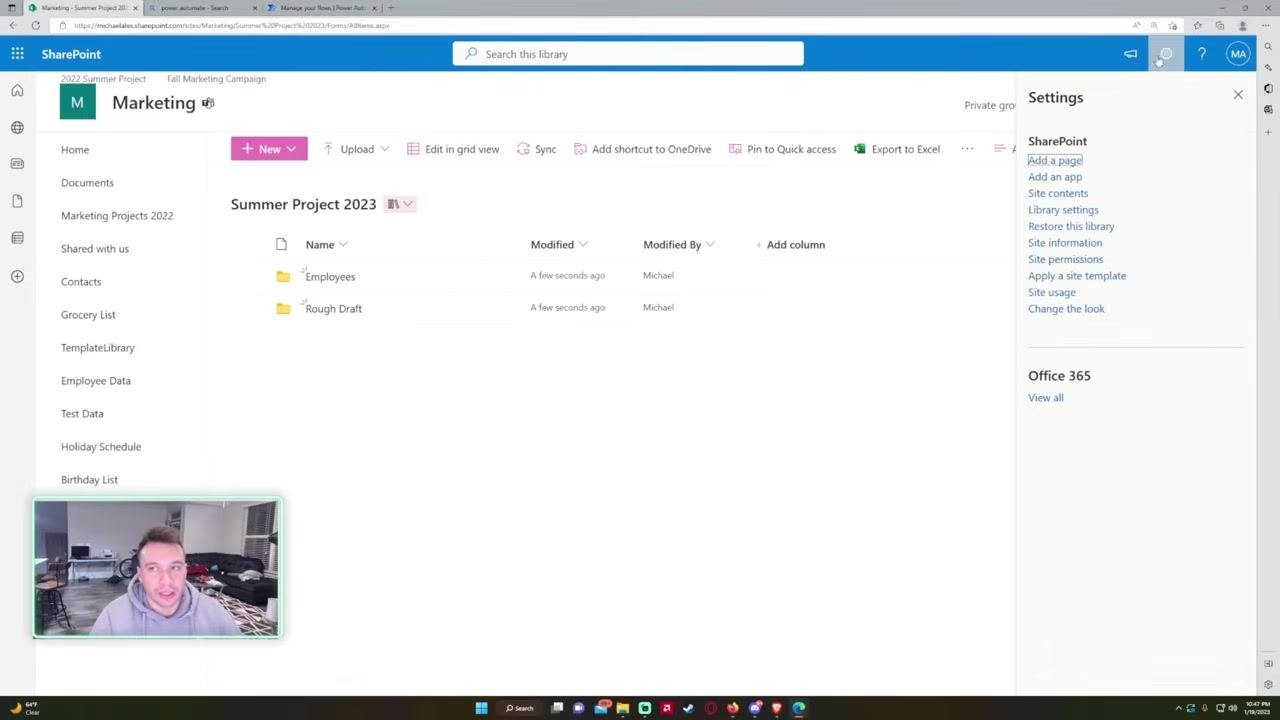
Click the cogwheel (settings) icon in the top right-hand corner of your SharePoint site. A settings panel opens on the right, showing options such as Add a page, Add an app, Site contents, and Library settings. Select Site contents.
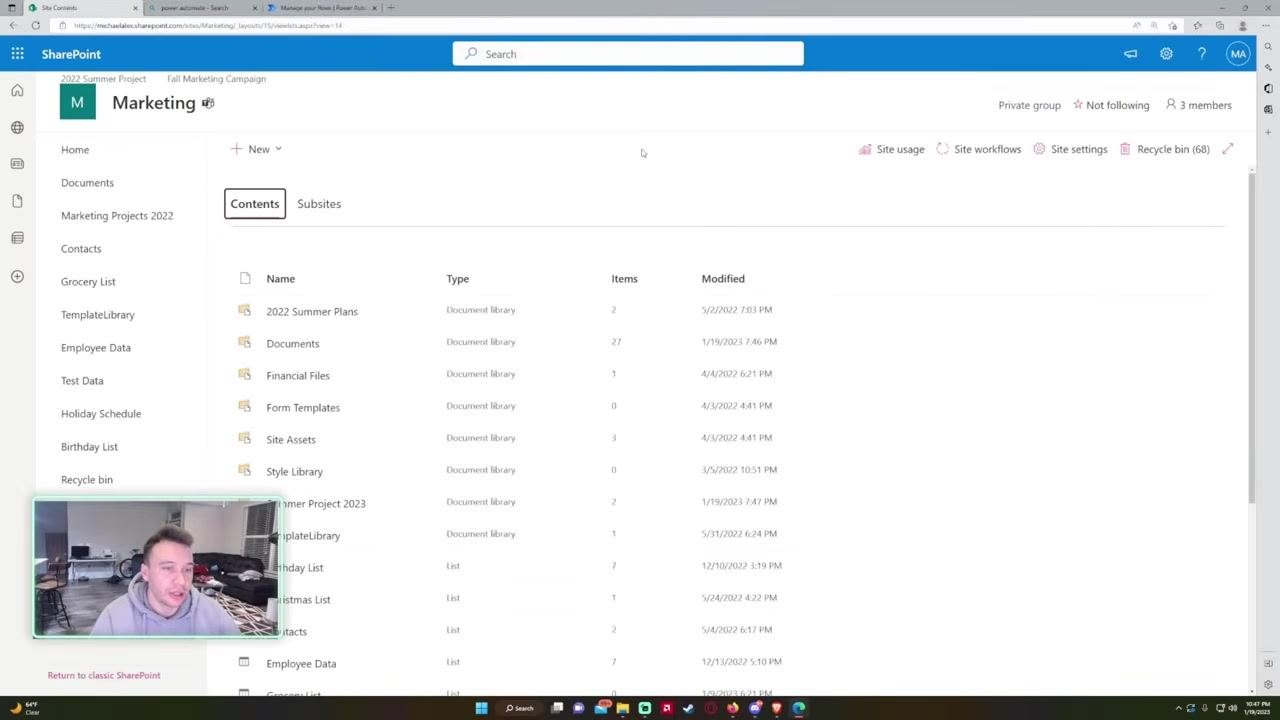
The main area updates to display a table listing all contents of your SharePoint site, with columns for Name, Type, Items, and Modified. Document libraries appear with the type "Document library"—for example, "2022 Summer Plans," "Documents," "Financial Files," "Form Templates," "Site Assets," "Style Library," and "Summer Project 2023." Lists and other content types may also appear in this view.
Access a document library
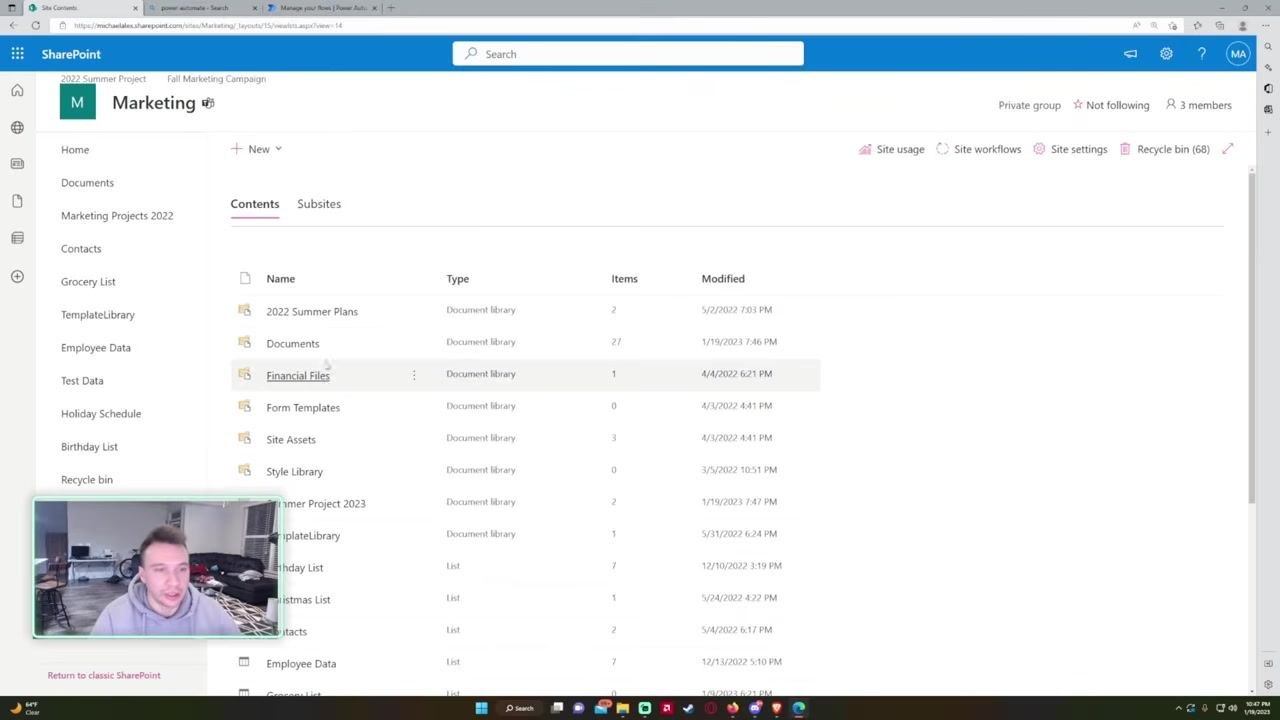
Locate the library you want to open (for example, "Documents") and hover over or click its name to select it. The row highlights to confirm your selection.
Click the library name (for example, "2022 Summer Plans") to open it. The library displays its folders and files, and you can upload, organize, or manage content within it as needed.
What's next
By following these steps, you can navigate your SharePoint site, upload files individually or via drag and drop, resolve duplicate file conflicts, and keep your workspace organized with folders and dedicated document libraries. Adjust permissions as needed if you want to restrict access to certain files or folders. If you need more advanced organization tips, consult your SharePoint administrator.
Generation details: cost, quality tiers
Docsie billed 2,500 credits ($1.75) to analyze this 5-minute video at standard quality. The rewrite, template fill and Word/PDF exports were included. The same video at each quality tier:
| Quality | Frames sampled | Credits | Approx. cost |
|---|---|---|---|
| Draft | every 16-30 s | 1,250 | $0.88 |
| Standard (this guide) | every 8-15 s | 2,500 | $1.75 |
| Detailed | every 4-7 s | 5,000 | $3.50 |
| Ultra | every 1-3 s | 10,000 | $7.00 |
Credits priced at $0.70 per 1,000; plans include a monthly allowance. Enterprise customers on on-premise or bring-your-own-model deployments run this on their own inference and pay no per-video credits.
Generated by Docsie Video-to-Docs on 2026-09-28 from a 4-minute video. Screenshots are frames from the source video and belong to their creator, Michael Alex, whose original is embedded above. If you own this video and want the guide removed or credited differently, contact us and we will act within one business day.