
How to Post a Vendor Invoice with MIRO in SAP S/4HANA
This guide explains how to post a vendor invoice with MIRO in SAP, covering the complete Materials Management (MM) workflow that leads up to the posting. You'll see how to open the MIRO transaction, enter the invoice header data, match the invoice against a purchase order, simulate the accounting entries, and confirm that the invoice has been saved in SAP.
Video: Invoice verification : MIRO : How to book Vendor Invoice in SAP by SAP Information with Rahul sahu (2022). All credit for the demonstration goes to the creator; watch the original on YouTube. The written guide below was generated from this video by Docsie. Creator? Request a change or removal.
This guide explains how to post a vendor invoice with MIRO in SAP, covering the complete Materials Management (MM) workflow that leads up to the posting. You'll see how to open the MIRO transaction, enter the invoice header data, match the invoice against a purchase order, simulate the accounting entries, and confirm that the invoice has been saved in SAP.
Prerequisites
Before you post a vendor invoice with MIRO, the earlier steps in the SAP MM process must already be completed, since each one depends on the one before it:
- Purchase Requisition (T-code: ME51N)
- Purchase Order (T-code: ME21N)
- Goods Receipt Note (GRN) (T-code: MIGO, movement types 103 and 105)
Only after these steps are finished can you move on to Invoice Verification (T-code: MIRO).
Before you start booking an invoice, make sure you have the following information on hand:
- Purchase Order details
- Goods Receipt Note (GRN) details
- The invoice received from the vendor
- The quantity and amount as recorded on both the GRN and the invoice
Why invoice verification matters
Invoice verification confirms that an invoice received from a vendor is accurate before it's booked in SAP. During verification, you check:
- The content of the invoice
- Price and arithmetic accuracy
- Quantity and material details
You also match the invoice against the corresponding purchase order and goods receipt to validate the transaction.
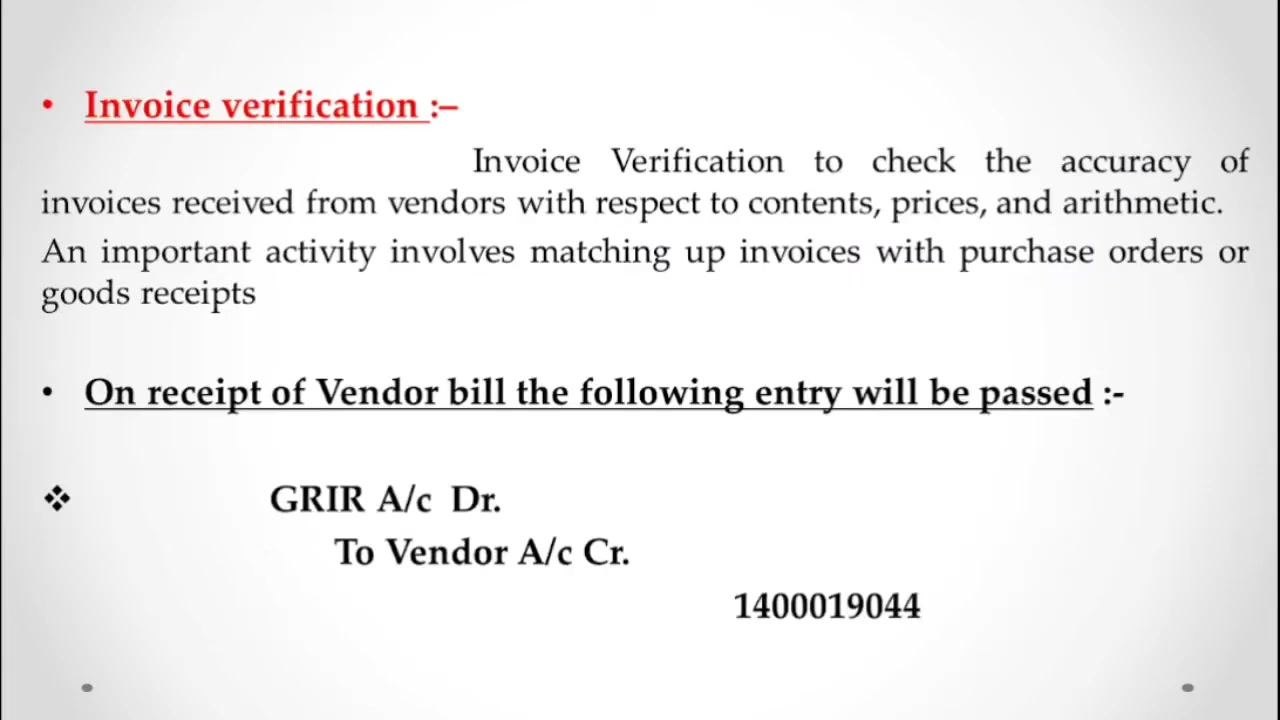
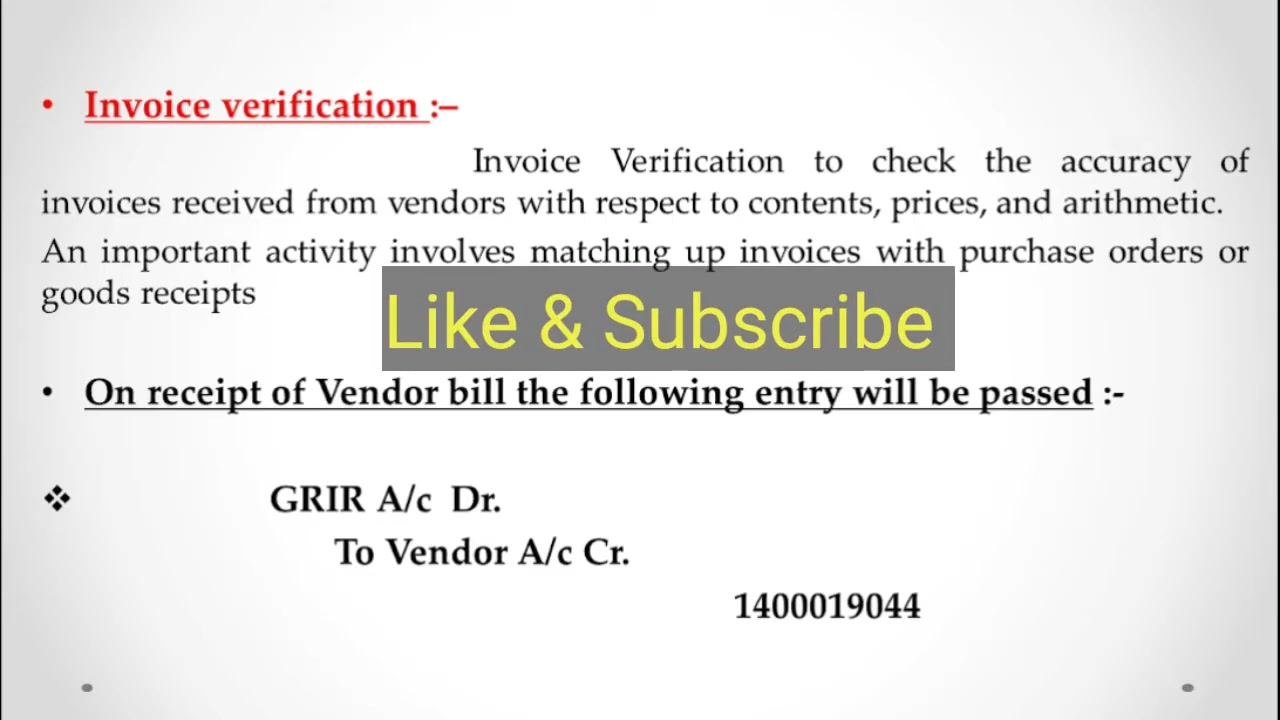
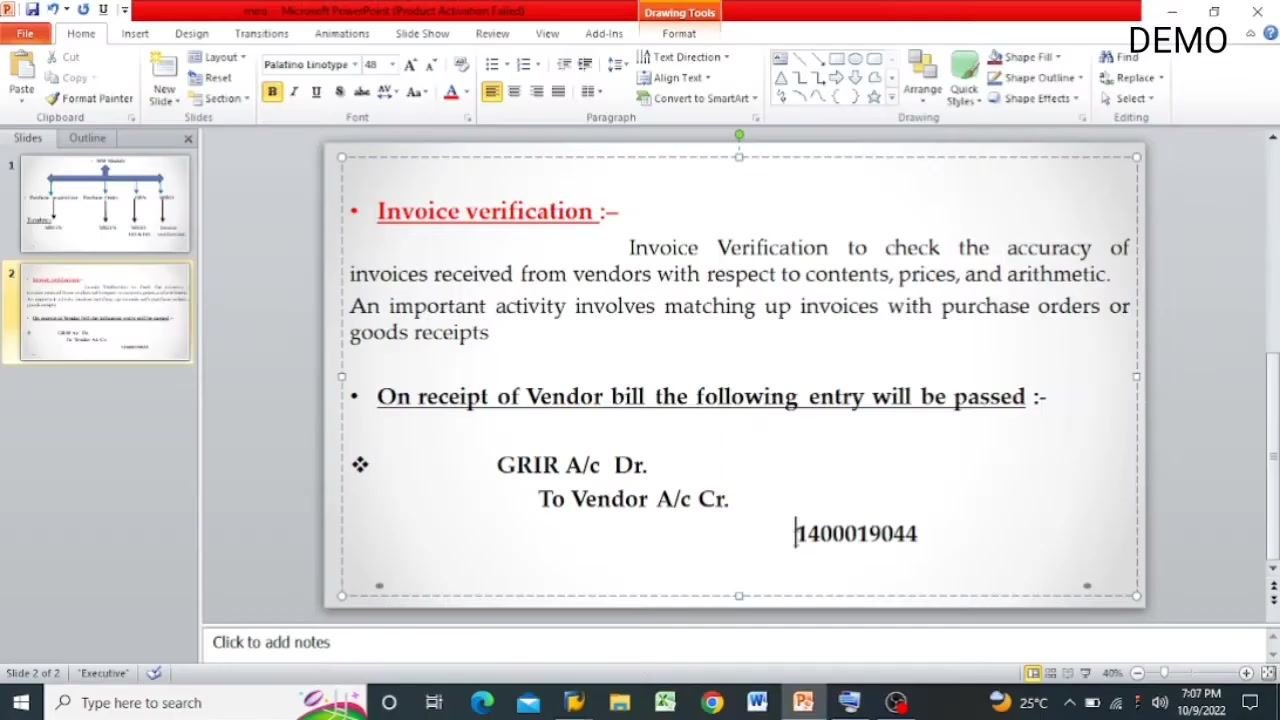
When a vendor bill is received and verified, SAP posts the following accounting entry:
- GRIR Account – Debit
- Vendor Account – Credit (example account number: 1400019044)
Book the invoice for the total amount and quantity received, as recorded on the GRN. If you haven't received the full quantity, book only the quantity actually received.
Handling debit notes for discrepancies
If there's a discrepancy such as material damage or shortage, book a debit note against the vendor and deduct the corresponding amount from the invoice. The accounting entry works the same way as a standard invoice booking:
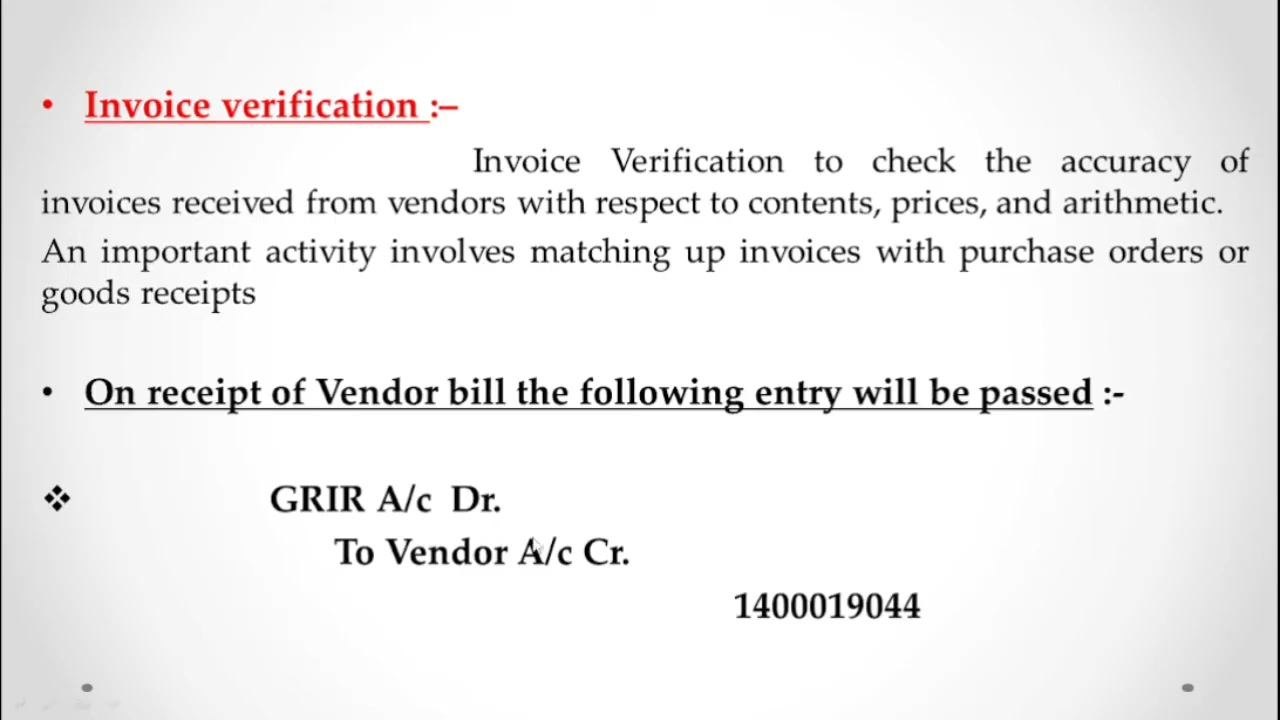
- Debit: GRIR Account
- Credit: Vendor Account (example account number: 1400019044)
Once the vendor is credited, the outstanding amount is reflected in SAP, and you can proceed to make payment to the vendor after verification.
Steps to post a vendor invoice with MIRO in SAP
Open the MIRO transaction
Type miro in the SAP command field and press Enter. SAP opens the Enter Incoming Invoice: Company Code screen, with the relevant company code shown in the title bar.
Enter the company code and invoice header data
Select or confirm your Company Code (for example, 2000 – SOM Distilleries Pvt Ltd Sehatganj). Then fill in the main header fields:
- Invoice date: the date you're booking the invoice (e.g., 09.10.2022)
- Posting date: usually the same as the invoice date
- Amount: the invoice amount as per the vendor bill
- Reference: optional — any reference number from the invoice
- Text: optional — any relevant notes
Check that the Balance field at the top reads zero before you continue.
Select the source document for the invoice
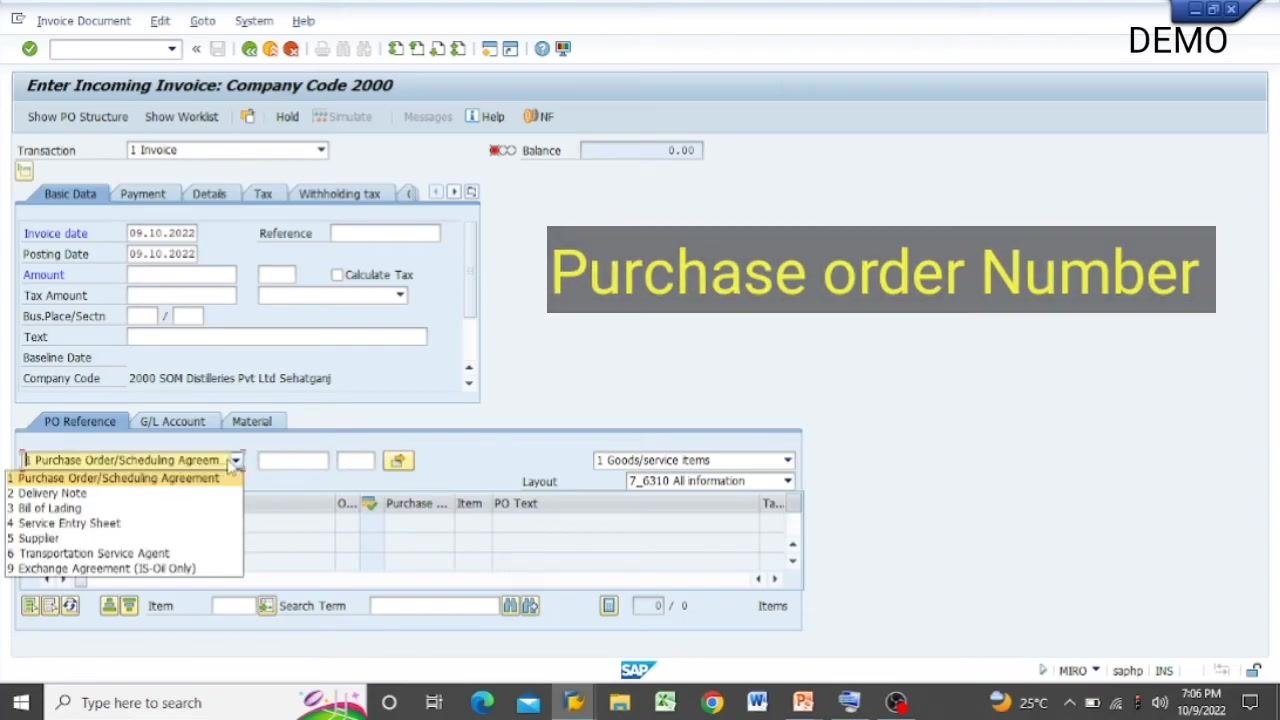
Open the PO Reference tab and choose which type of source document the invoice is based on:
- Purchase Order/Scheduling Agreement
- Delivery Note
- Bill of Lading
- Service Entry Sheet
- Supplier
- Transportation Service Agent
- Exchange Agreement (IS-Oil Only)
Purchase Order/Scheduling Agreement is selected by default, but you can change it depending on your invoice source.
Confirm the reference type
You can book the invoice using any of the available reference types, depending on your business process. Enter the Purchase Order Number or select another reference type that matches your invoice source.
Select Purchase Order/Scheduling Agreement as the reference
With Purchase Order/Scheduling Agreement selected in the PO Reference tab, SAP pulls in all related material and quantity details once you provide the purchase order number.
Enter the purchase order number
Type the Purchase Order Number (for example, 1400019044) in the field next to the reference type, then press Enter. SAP fetches the purchase order and displays all of its associated materials and quantities.
Verify the populated purchase order details
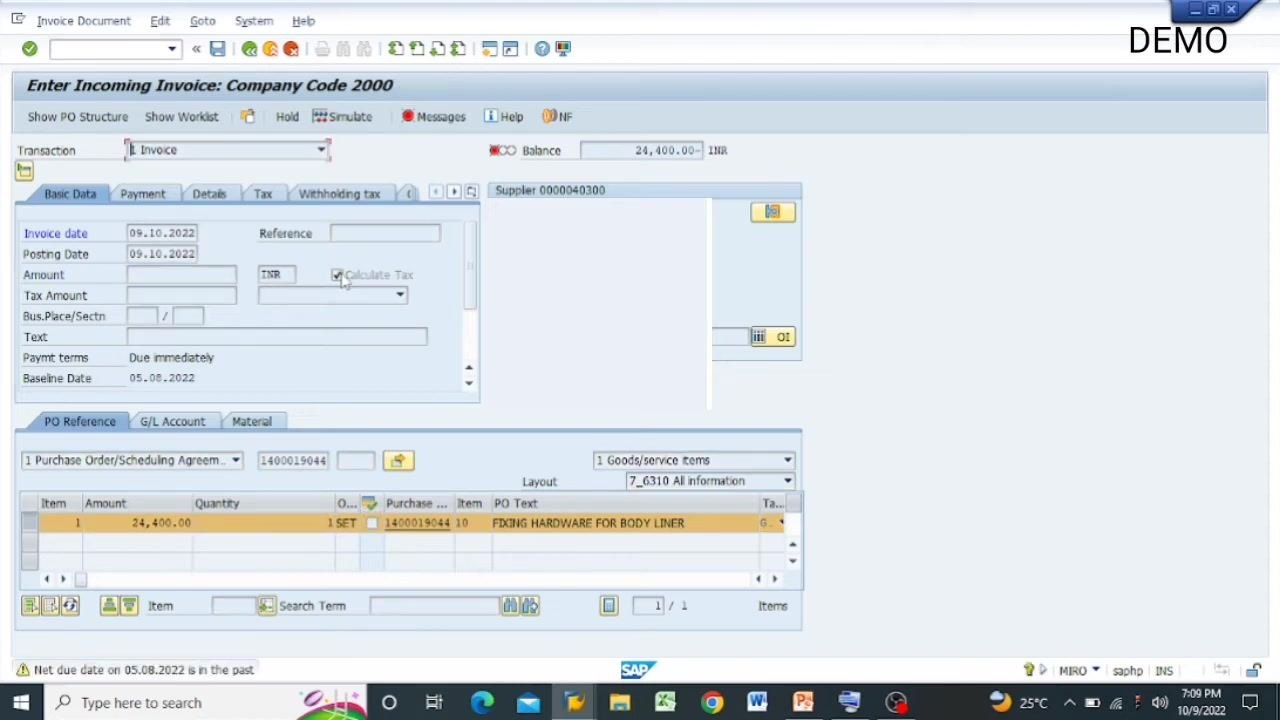
Confirm that the Amount (e.g., Rs. 24,400) and Quantity (e.g., 1 SET) shown in the item overview are correct. The Balance field at the top should reflect the invoice amount (e.g., 24,400.00 INR), and the material description (e.g., FIXING HARDWARE FOR BODY LINER) should appear in the item text.
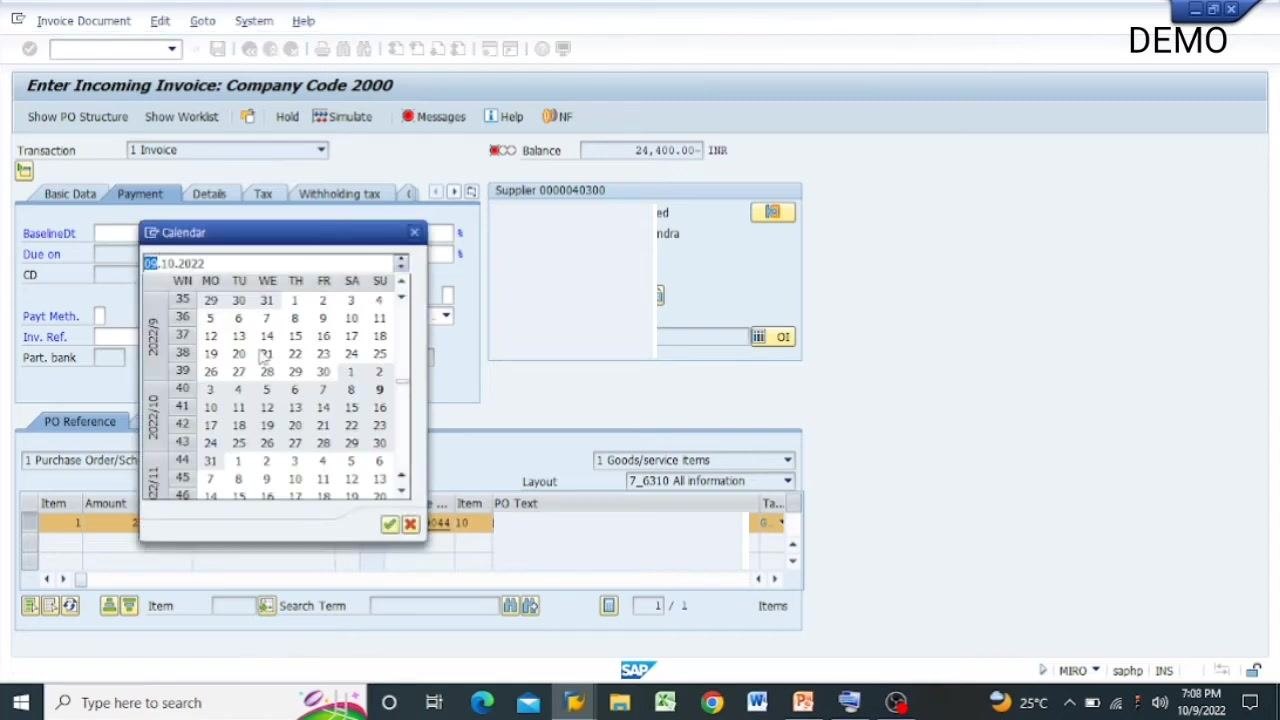
Enter the baseline date
If prompted, enter the Baseline Date used for payment calculation — typically the current date. Use the calendar popup to select the date (e.g., 09.10.2022), then press Enter to confirm.
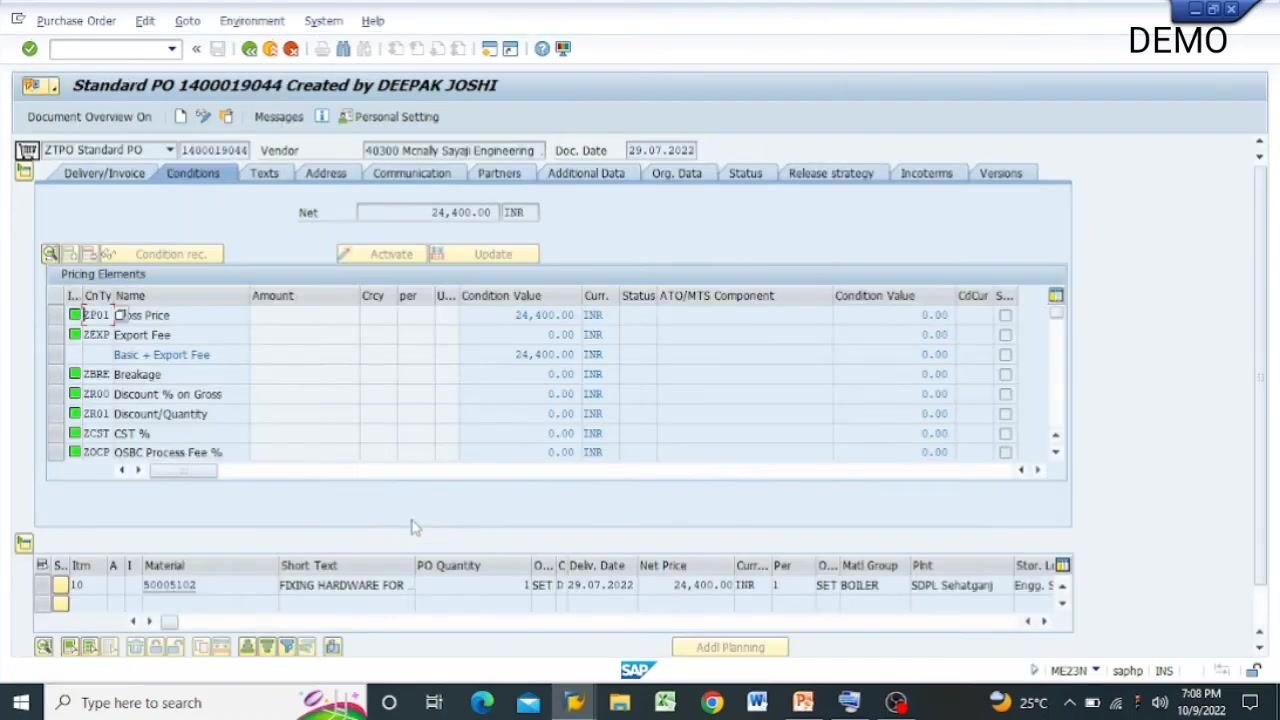
Review the purchase order conditions
Double-click the purchase order line to open its detailed view, then go to the Conditions tab. Check the pricing elements to confirm the invoice amount matches the purchase order (for example, Gross Price = 24,400.00 INR), and review any discounts, taxes, or additional charges listed.
Confirm consistency between the PO and the invoice
Make sure the amount shown in the Conditions tab (e.g., 24,400.00 INR) matches the amount entered in the MIRO invoice entry. Once the figures align, return to the MIRO screen to continue.
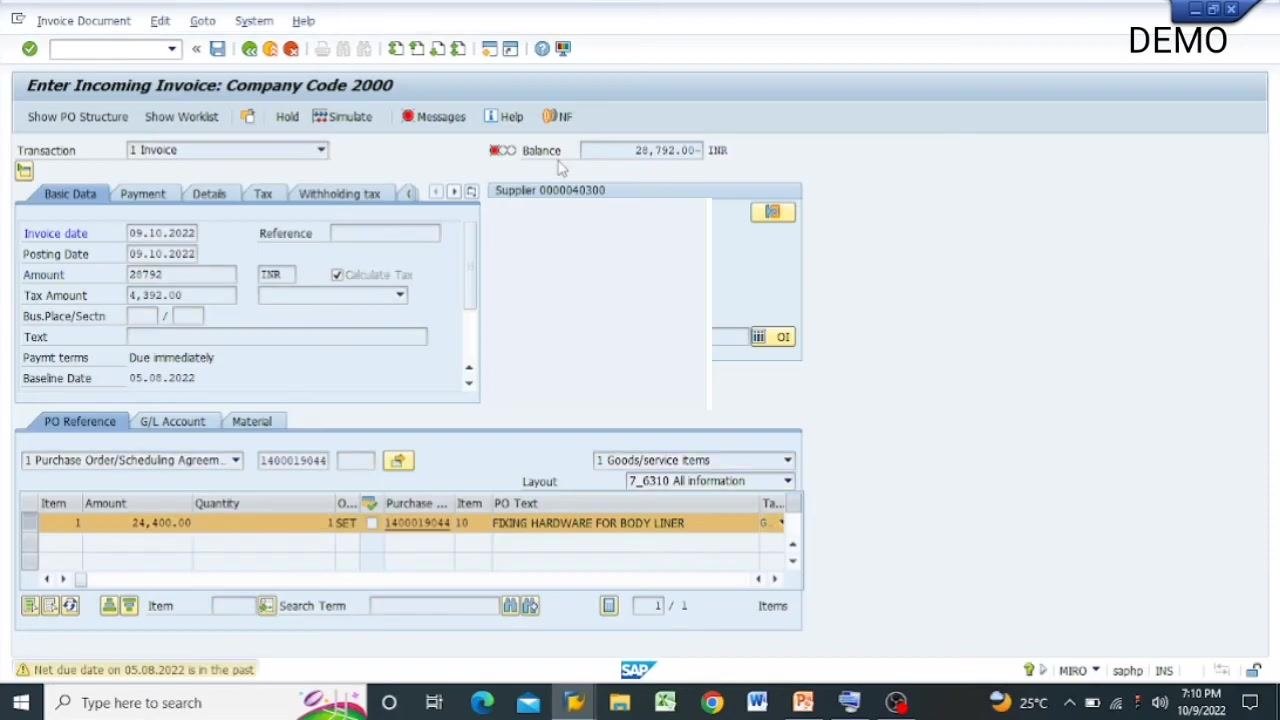
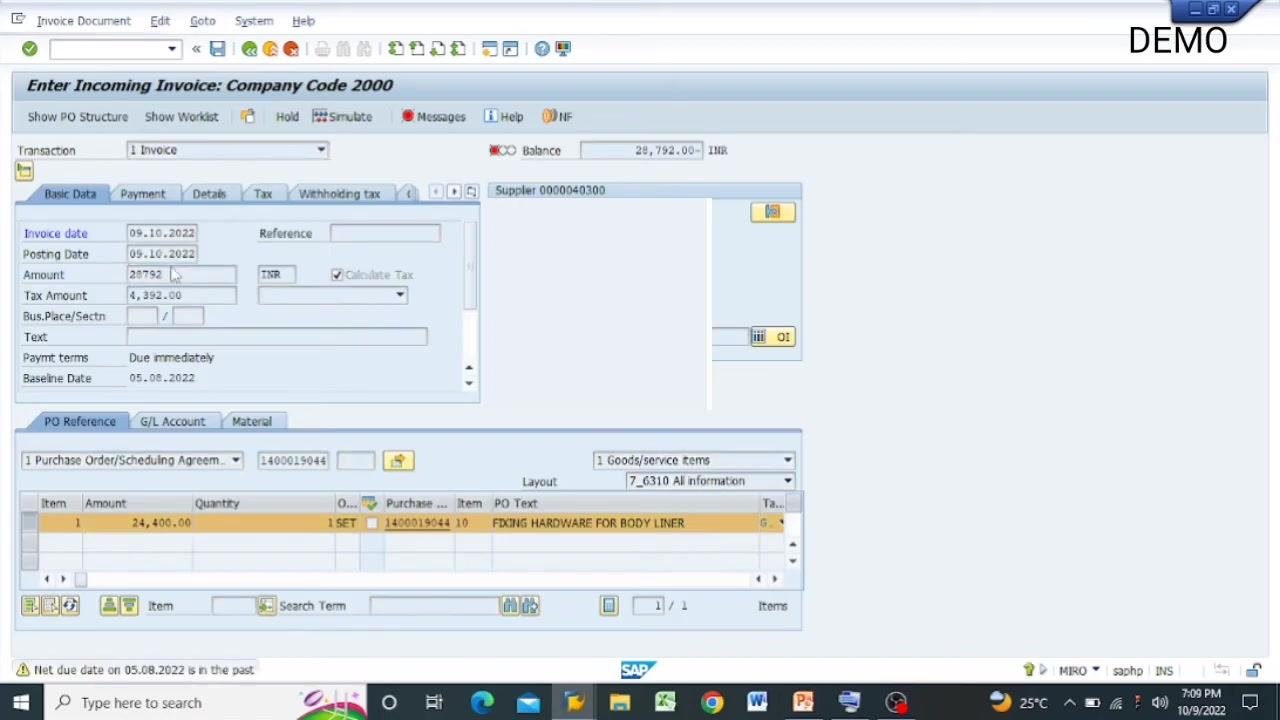
Enter the tax amount
Tick the Calculate Tax checkbox if applicable, and enter the Tax Amount (e.g., 4,392) in the relevant field. SAP updates the total amount and shows any resulting difference (e.g., total difference = 28,792).
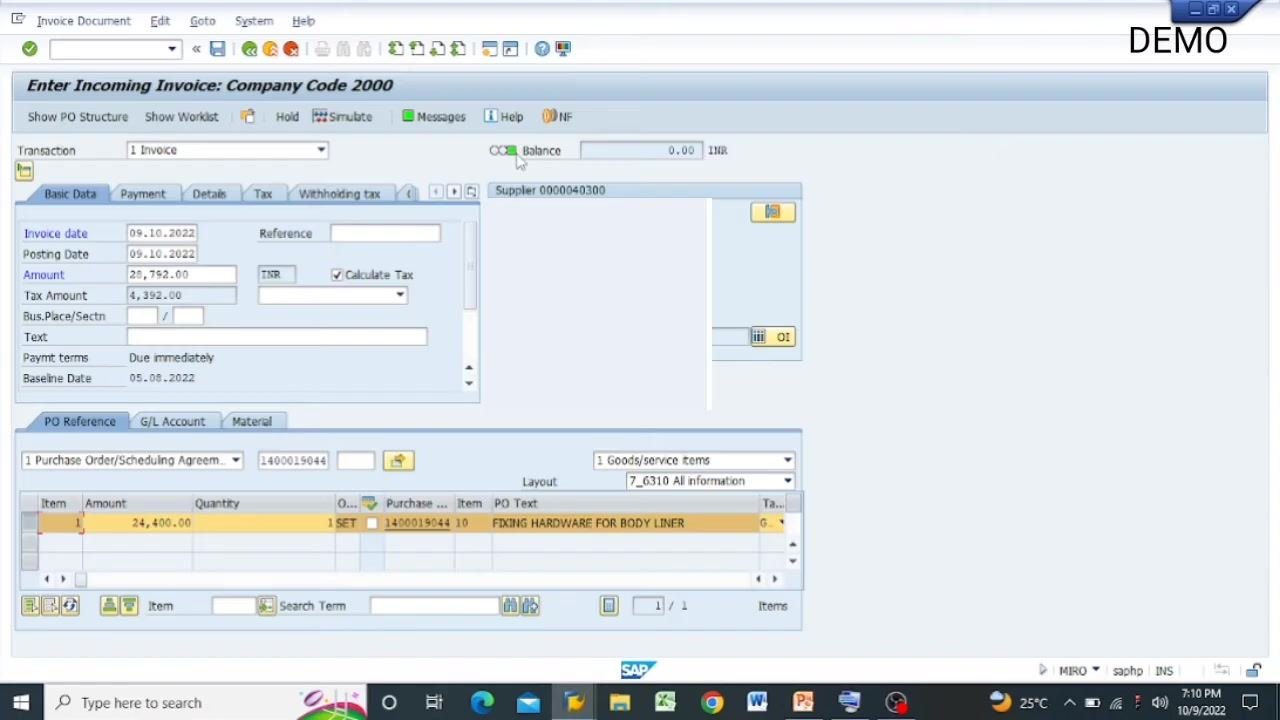
Review the invoice entry screen
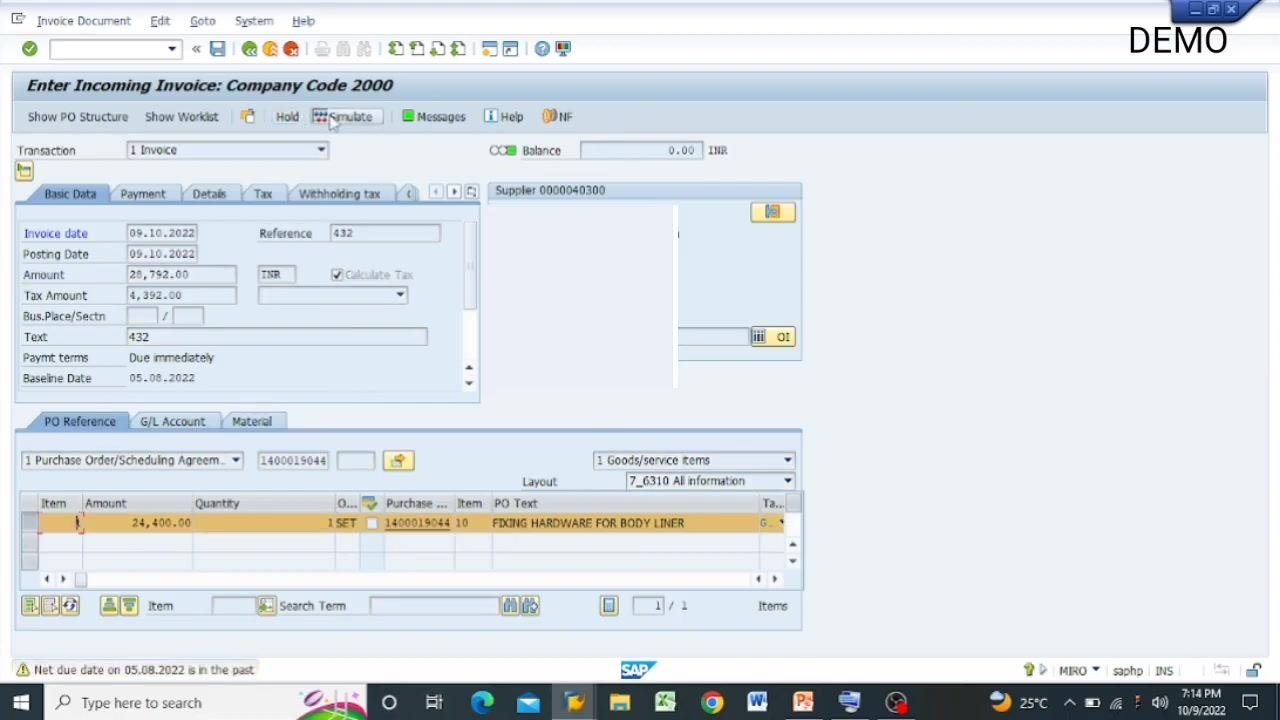
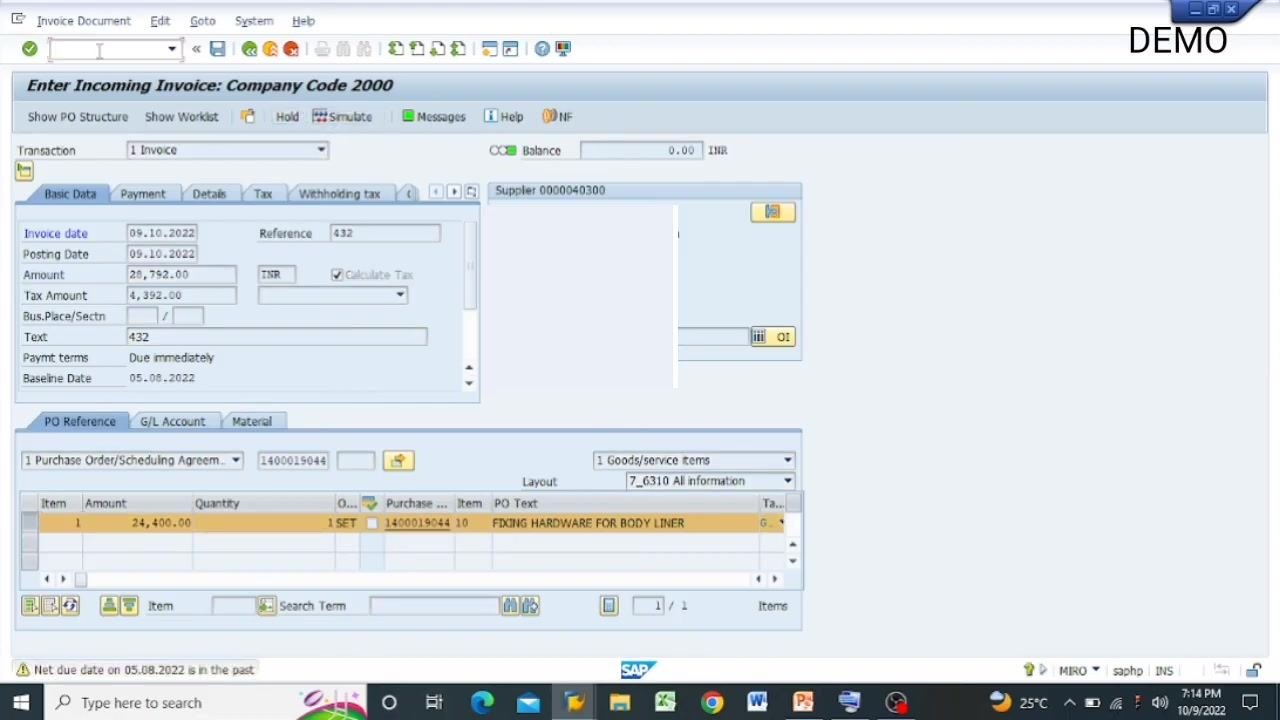
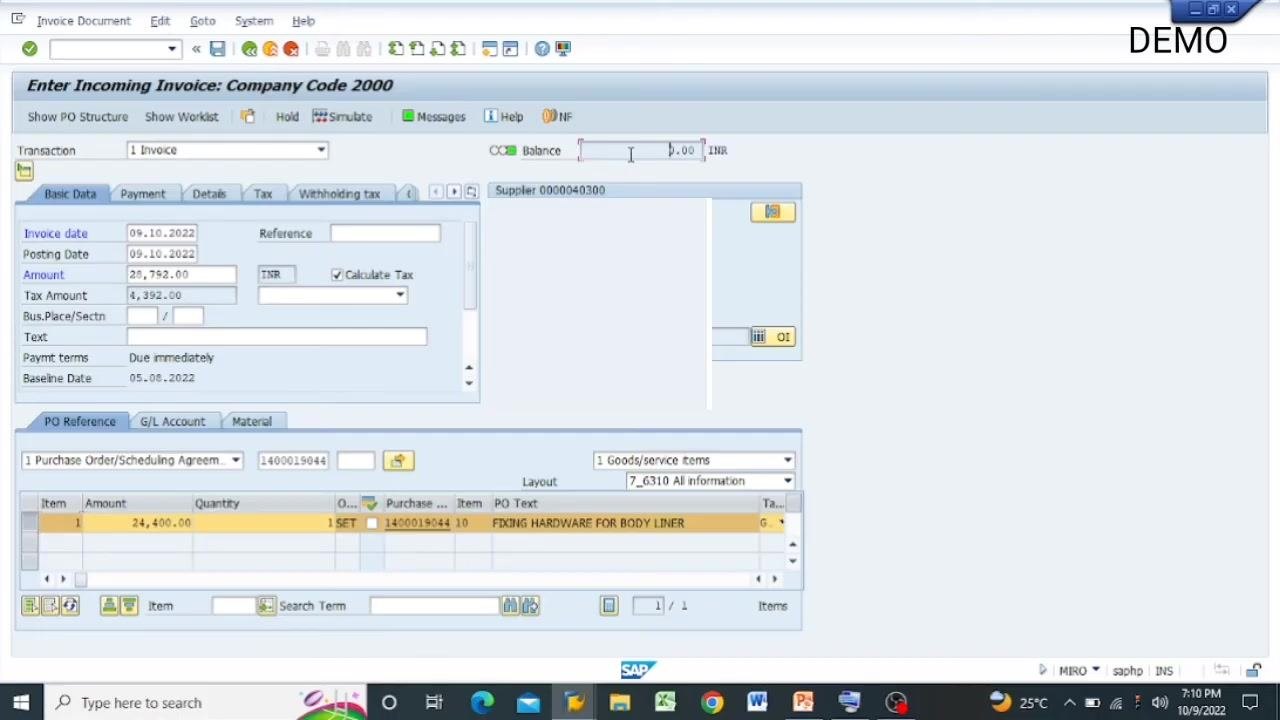
The Enter Incoming Invoice: Company Code 2000 screen displays tabs for Basic Data, Payment, Details, Tax, and Withholding tax, with the PO Reference, G/L Account, and Material tabs at the bottom. Confirm the header shows transaction type "Invoice" and the correct supplier code.
Key fields to check:
- Invoice date: 09.10.2022
- Posting date: 09.10.2022
- Amount: 28,792.00 INR
- Tax Amount: 4,392.00
- Payment terms: Due immediately
- Baseline date: 05.08.2022
- Purchase order: 1400019044
- PO text: FIXING HARDWARE FOR BODY LINER
The PO item shows an amount of 24,400.00 and a quantity of 1 SET. You may see a note that the net due date is in the past — this is informational and doesn't prevent posting.
Check the balance indicator
Look for the green indicator next to the Balance label at the top of the screen. It confirms the balance status of your entry, which should read 0.00 INR once the amounts are correctly matched.
Enter the invoice amount and tax amount
Under Basic Data, confirm the Amount field holds the invoice value (e.g., 28,792.00 INR) and the Tax Amount field holds the correct tax figure (e.g., 4,392.00). The PO item amount (e.g., 24,400.00) should correspond to the goods or services received.
Verify amount consistency
Confirm that the amount entered in the invoice matches the amounts in your GRIR (Goods Receipt/Invoice Receipt) and MIRO records. SAP requires these figures to match before you can post the invoice.
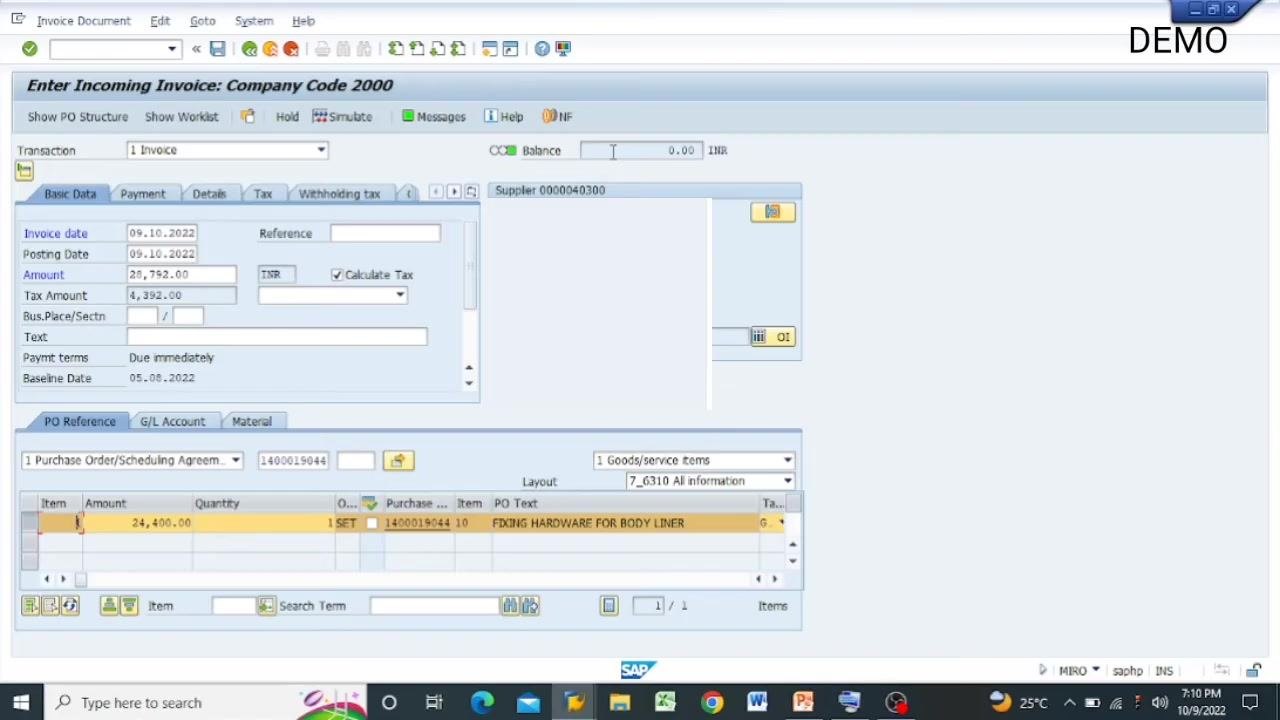
Ensure the balance is zero before posting
Check that the Balance field at the top reads exactly 0.00 INR. If it doesn't, you can't proceed to post the invoice — adjust the amounts as needed until the balance reaches zero.
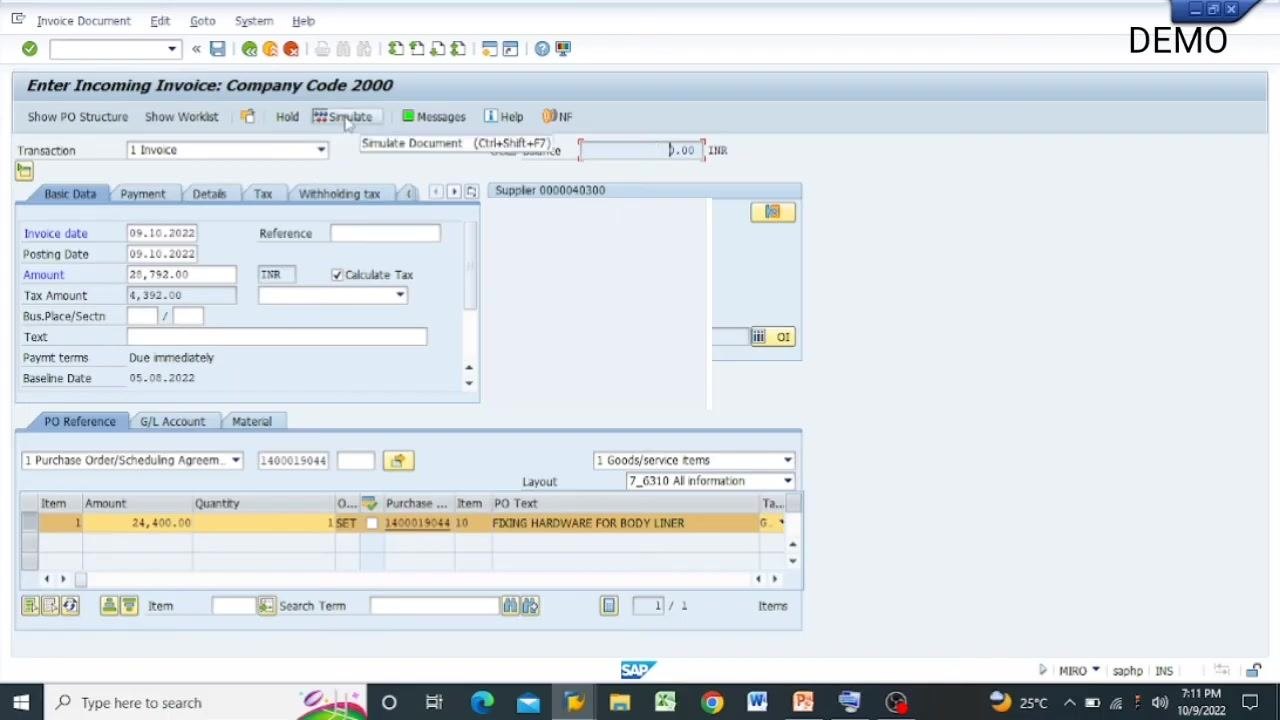
Simulate the document
Click Simulate in the toolbar (tooltip: Simulate Document, Ctrl+Shift+F7) to preview the accounting entries before you post the invoice.
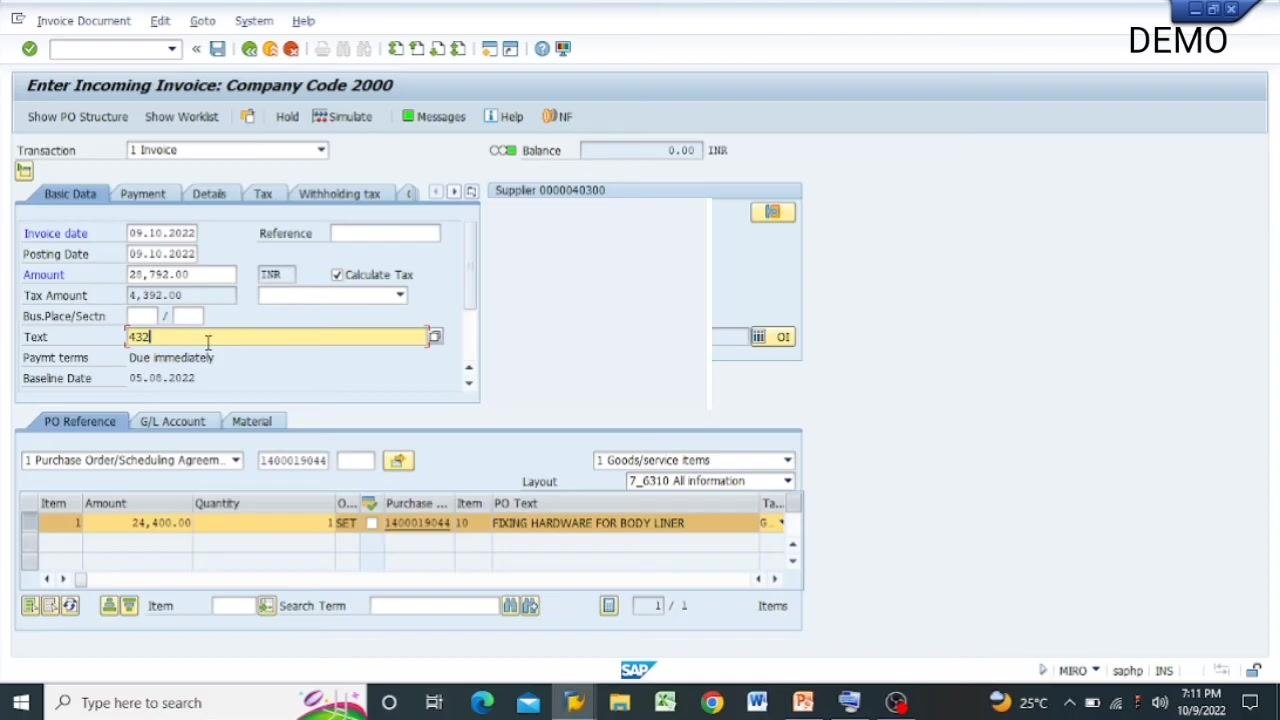
Enter reference information
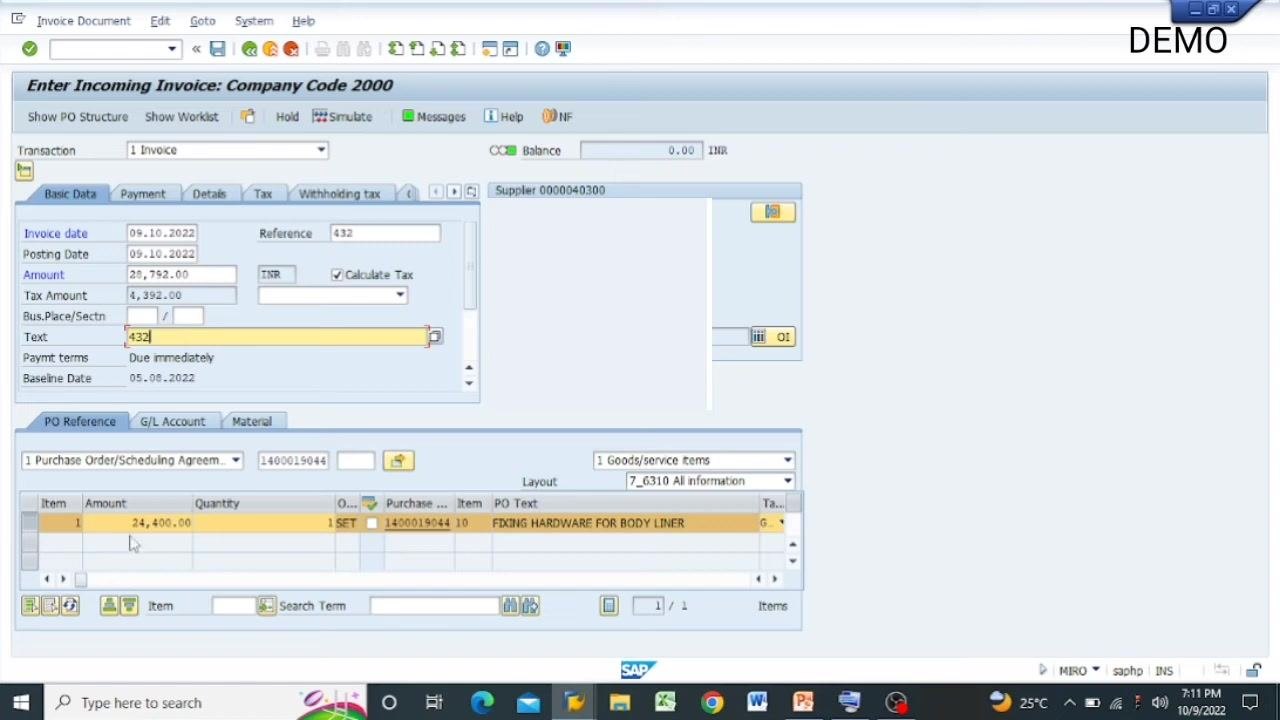
In the Reference field, enter the invoice number or another relevant reference (e.g., 432) for tracking and audit purposes. You can also add the same reference in the Text field if required.
Review all entered details
Before proceeding, double-check:
- Quantity (e.g., 1 SET)
- Amount (e.g., 24,400.00)
- Balance (should read 0.00 INR)
- Supplier details (e.g., Supplier 0000040300)
Make sure every detail matches the physical invoice and the purchase order.
Re-simulate if you made changes
If you changed any values, click Simulate again to confirm the balance stays at zero and all entries remain correct. This step helps you avoid posting errors.
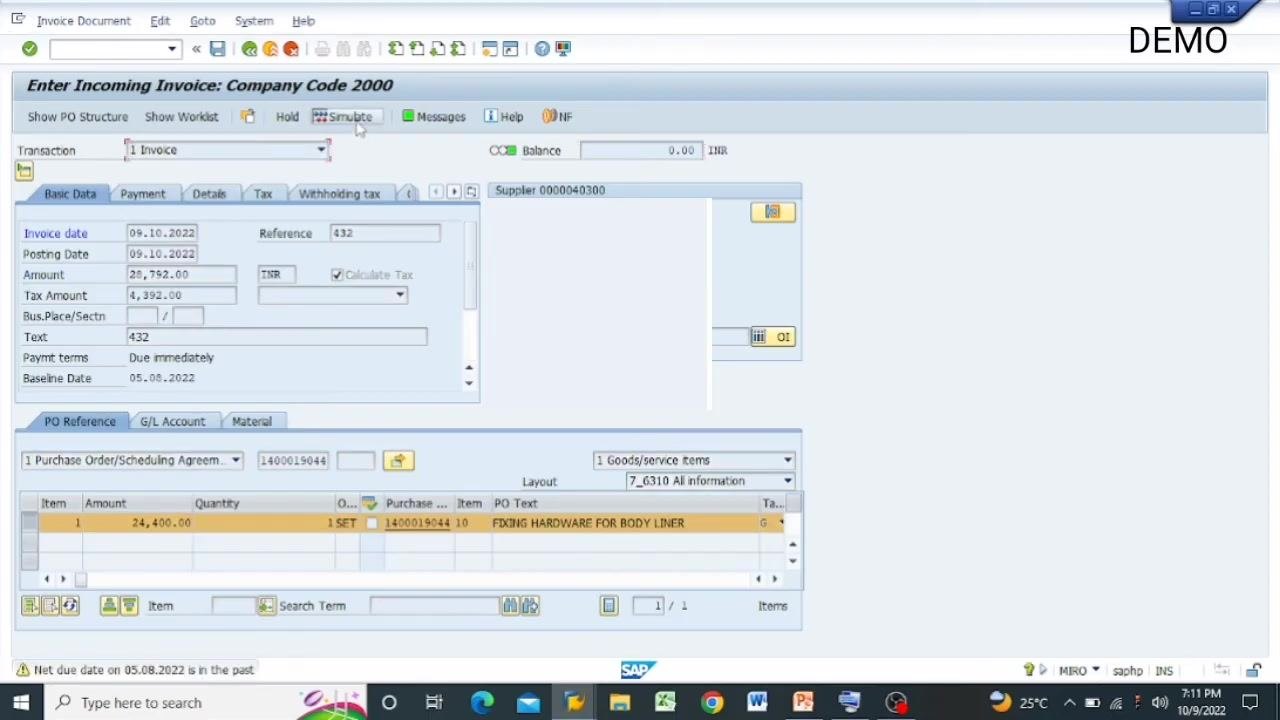
Review the debit and credit entries
Clicking Simulate opens the Simulate Document in INR (Document currency) window. Review the entries:
- The first line (G/L account 1190020) shows a debit of 28,792.00 INR
- The second line (G/L account 1240080, GRIR Cfg-Spare Parts D) shows a credit of 28,792.00 INR
- The Purchasing Document column references PO 1400019044, item 10
- The Tax Code column shows "GF"
- The balance at the bottom reads 0.00, confirming the entries are balanced
Confirm every value matches your invoice and purchase order, including the tax code and tax date.
Post the invoice
Once the debit and credit amounts are equal and the balance reads 0.00, click Post at the bottom right of the simulation window to finalize the invoice entry in SAP.
Reconfirm entry details if corrections are needed
If you're prompted to make corrections, return to the main invoice entry screen and verify these fields:
- Invoice date: 09.10.2022
- Posting date: 09.10.2022
- Amount: 28,792.00 INR
- Reference: 432
- Tax Amount: 4,392.00
- Text: 432
- Payment terms: Due immediately
- Baseline date: 05.08.2022
- Purchase order: 1400019044
- PO text: FIXING HARDWARE FOR BODY LINER
Adjust any field as necessary before posting.
Confirm the entry
After verifying all details, press Enter to confirm the data. SAP validates your entries and prepares them for posting.
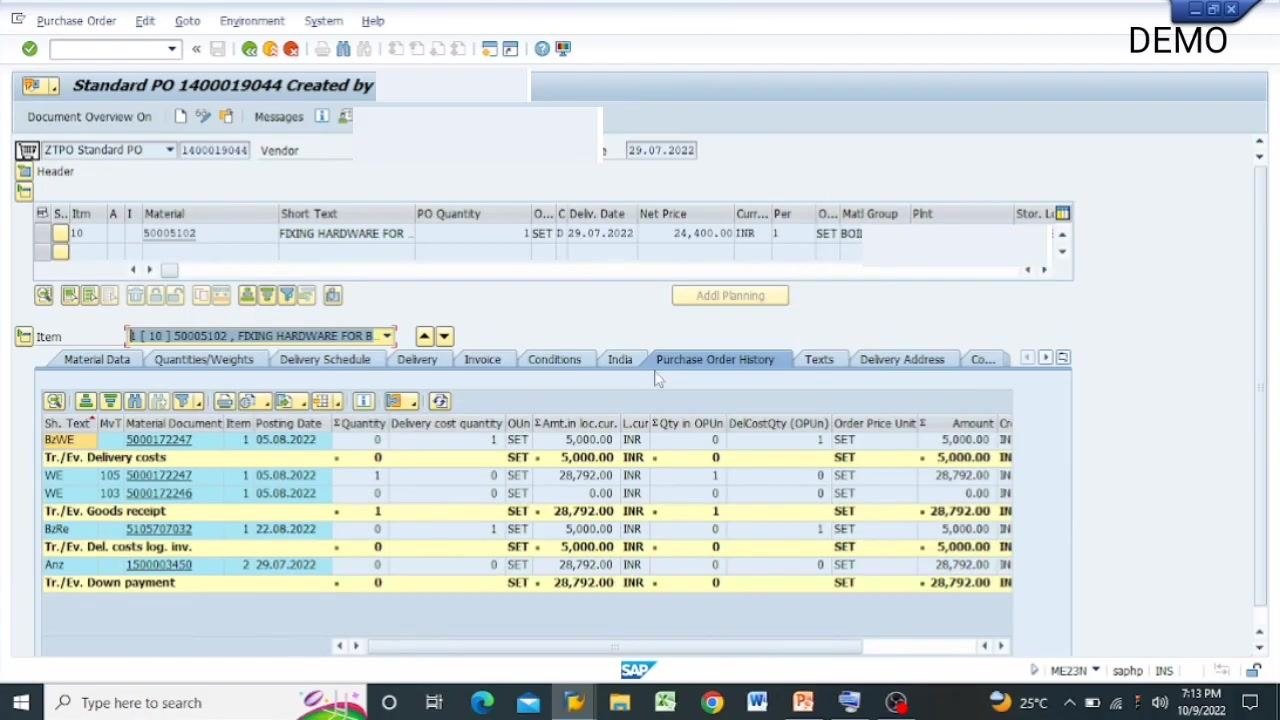
Review the purchase order history
Open the Purchase Order History tab in the purchase order display (transaction ME23N) to review related transactions, including delivery costs, goods receipts, invoice postings, and down payments. Check the amounts, posting dates, and document numbers, and confirm the invoice amount (e.g., 28,792.00 INR) is reflected correctly.
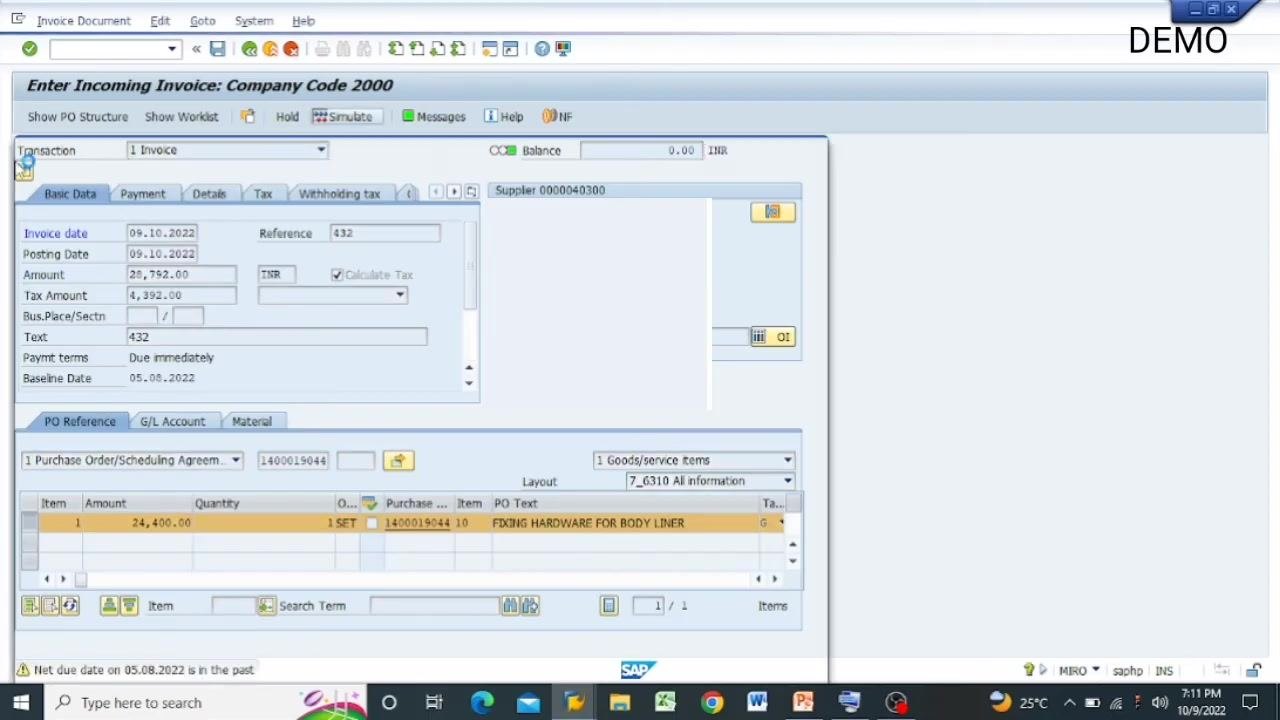
Analyze the goods receipt event
In the purchase order history, find the line with movement type 105 (Goods Receipt). Review its material document number, posting date, quantity, and amount to confirm the goods receipt and invoice postings are properly linked.
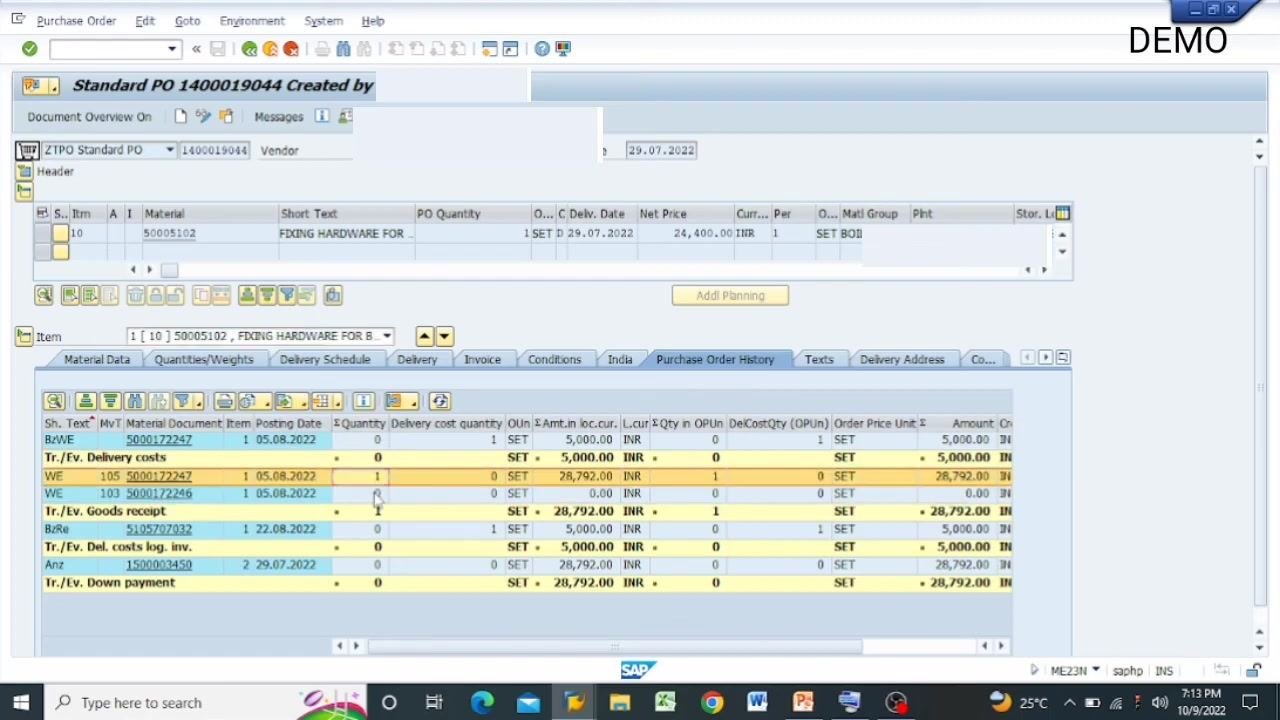
Return to the invoice entry screen
After reviewing the purchase order history, go back to the invoice entry screen to continue or finalize the process.
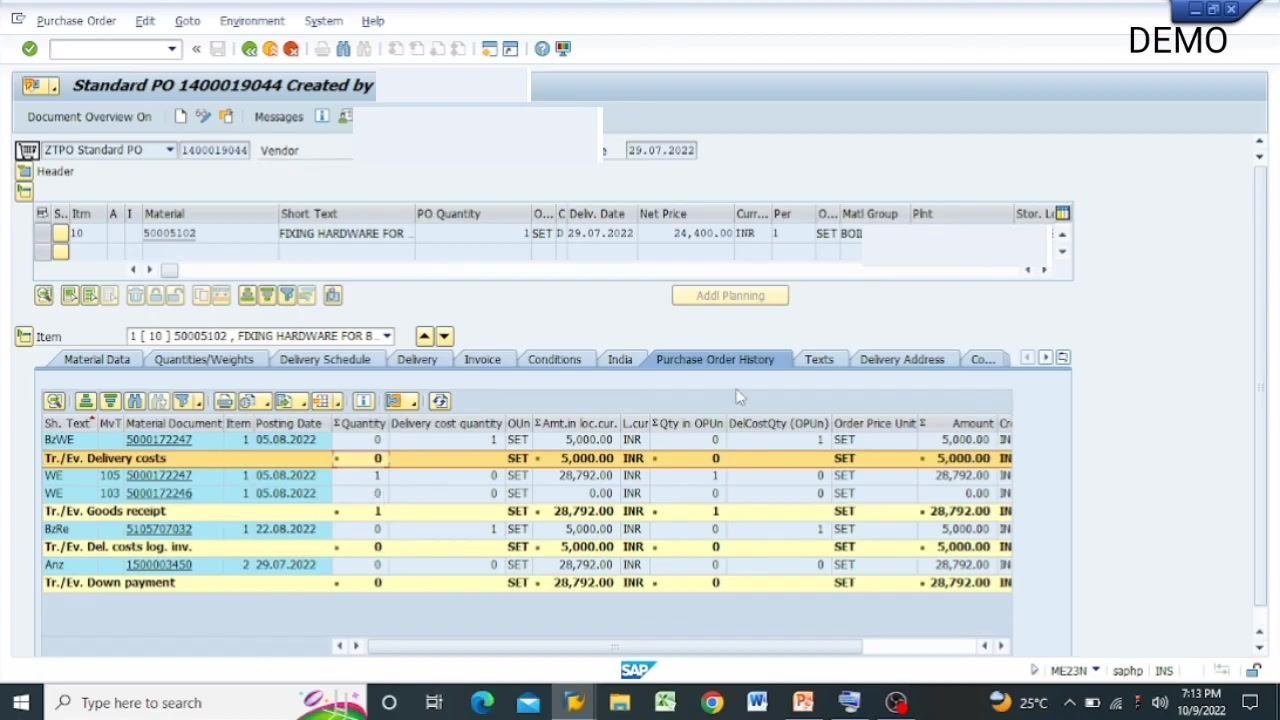
Post the invoice after simulation
With the simulation and review complete, click Post to finalize the invoice entry. SAP processes the posting and updates the relevant ledgers.
Confirm the data is saved
After posting, SAP displays a confirmation message that the data has been saved, along with a document number shown at the top of the screen. The invoice is now officially recorded in SAP.
Review the final invoice entry
On the finalized Enter Incoming Invoice: Company Code 2000 screen, confirm the balance at the top reads 0.00 INR and the key fields show the posted values:
- Invoice date: 09.10.2022
- Posting date: 09.10.2022
- Amount: 28,792.00 INR
- Tax Amount: 4,392.00
- Reference: 432
- Text: 432
- Payment terms: Due immediately
- Baseline date: 05.08.2022
- Supplier: 0000040300
- Purchase order: 1400019044, item 10
- PO text: FIXING HARDWARE FOR BODY LINER
- Item amount: 24,400.00, quantity: 1 SET
Process flow recap
The process flow diagram summarizes the full sequence you followed, from requisition to invoice verification: Purchase Requisition (ME51N), Purchase Order (ME21N), Goods Receipt Note (MIGO, movement types 103 and 105), and Invoice Verification (MIRO). Each arrow represents the logical progression between steps.
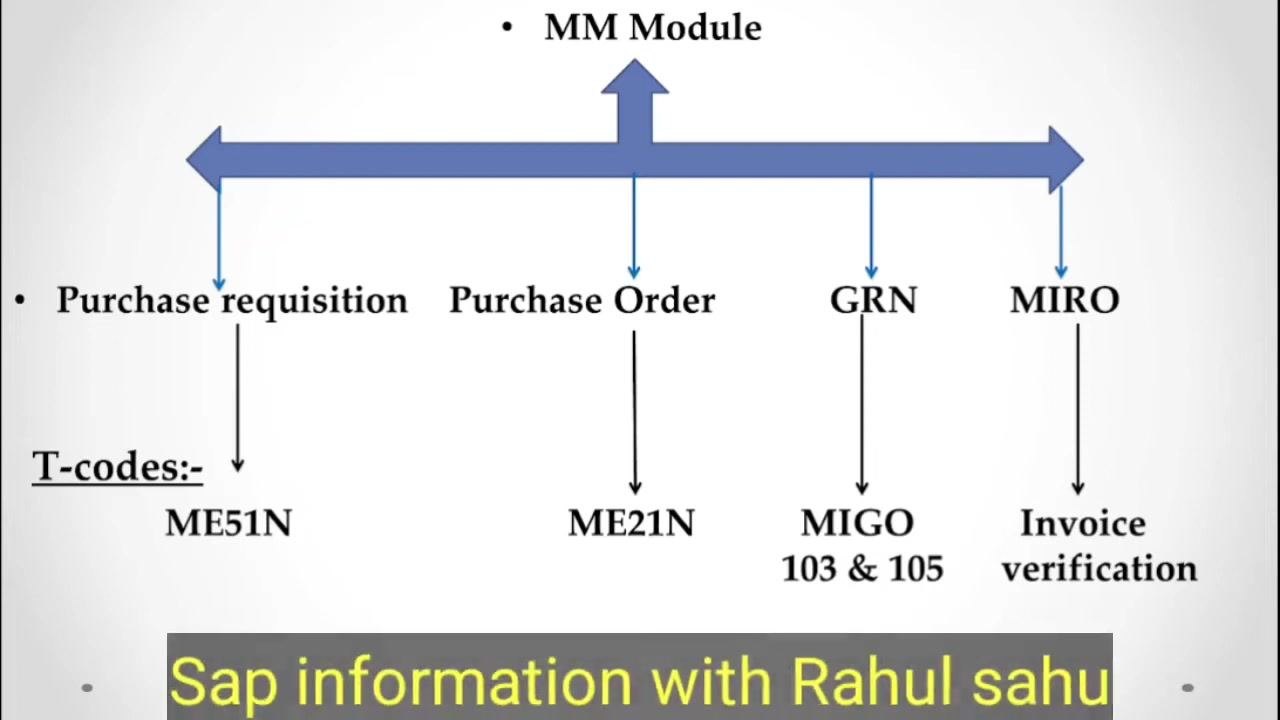
The vendor process is complete once you have:
- Created the vendor purchase order
- Received the vendor invoice
- Performed invoice verification using MIRO
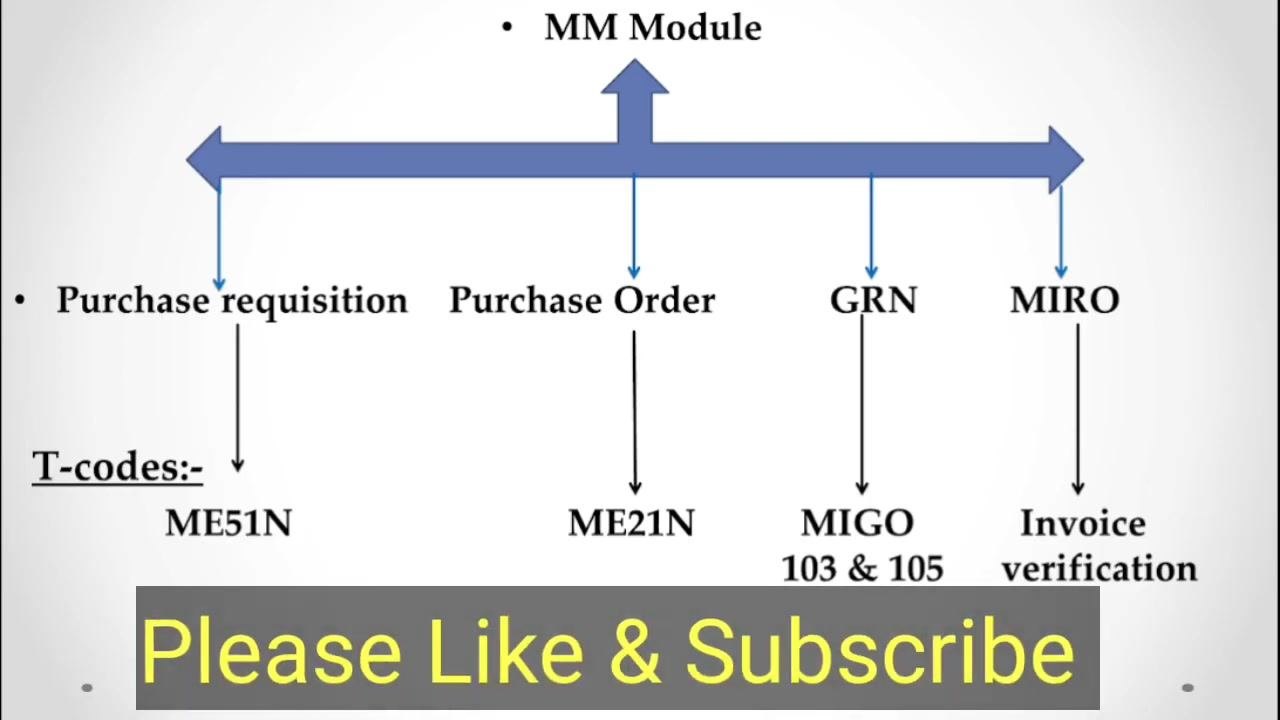
This sequence ensures every procurement and financial step is properly linked and documented in SAP.
With the MM module process and vendor invoice workflow complete, consult your SAP support resources if you have any questions about any step.
What's next
- Proceed to pay the vendor now that the invoice is verified and posted.
- If a discrepancy such as damage or shortage comes up, book a debit note against the vendor rather than posting the full invoice amount.
- Keep the key T-codes — ME51N, ME21N, MIGO, and MIRO — handy as a reference for future vendor transactions.
Generation details: cost, quality tiers
Docsie billed 5,000 credits ($3.50) to analyze this 10-minute video at standard quality. The rewrite, template fill and Word/PDF exports were included. The same video at each quality tier:
| Quality | Frames sampled | Credits | Approx. cost |
|---|---|---|---|
| Draft | every 16-30 s | 2,500 | $1.75 |
| Standard (this guide) | every 8-15 s | 5,000 | $3.50 |
| Detailed | every 4-7 s | 10,000 | $7.00 |
| Ultra | every 1-3 s | 20,000 | $14.00 |
Credits priced at $0.70 per 1,000; plans include a monthly allowance. Enterprise customers on on-premise or bring-your-own-model deployments run this on their own inference and pay no per-video credits.
Generated by Docsie Video-to-Docs on 2026-10-02 from a 9-minute video. Screenshots are frames from the source video and belong to their creator, SAP Information with Rahul sahu, whose original is embedded above. If you own this video and want the guide removed or credited differently, contact us and we will act within one business day.