
How to Activate Availability Control in SAP
This guide shows you how to activate availability control in SAP for cost center budgets. You configure the backend in SAP Customizing (SPRO), create a cost center with budget availability control switched on, upload a budget, and test the result with purchase orders, goods receipts, and budget supplements.
Video: Mastering Cost Center Budget Availability Control in SAP S/4HANA: Customizing and Process by ERPBrew (2025). All credit for the demonstration goes to the creator; watch the original on YouTube. The written guide below was generated from this video by Docsie. Creator? Request a change or removal.
This guide shows you how to activate availability control in SAP for cost center budgets. You configure the backend in SAP Customizing (SPRO), create a cost center with budget availability control switched on, upload a budget, and test the result with purchase orders, goods receipts, and budget supplements.
Prerequisites
Before you start, make sure you have the following:
- Access to the SAP GUI and the
SPROtransaction. - Access to the SAP Fiori Launchpad in your browser.
- The Excel template for cost center budgeting (for example, "TemplateForCostCenterBudgeting").
- A supplier you can use when you create a purchase order.
The examples use controlling area A000, company code 1010, and cost center 1010_TEST. Replace these values with your own where needed.
Configure budget availability control in customizing
Step 1: Open SAP Customizing
- Open the SAP GUI.
- Enter transaction code
SPRO. - Click SAP Reference IMG.
Step 2: Go to the budget availability control settings
In the IMG structure, expand Controlling > Cost Center Accounting > Budget Availability Control for Cost Centers.
Click Budget Availability Control for Cost Centers. You can review the information section for additional details and relevant SAP notes.
Step 3: Create a budget availability control profile
- Click Maintain Budget Availability Control Profile for Cost Centers.
- Click New Entries to create a new profile.
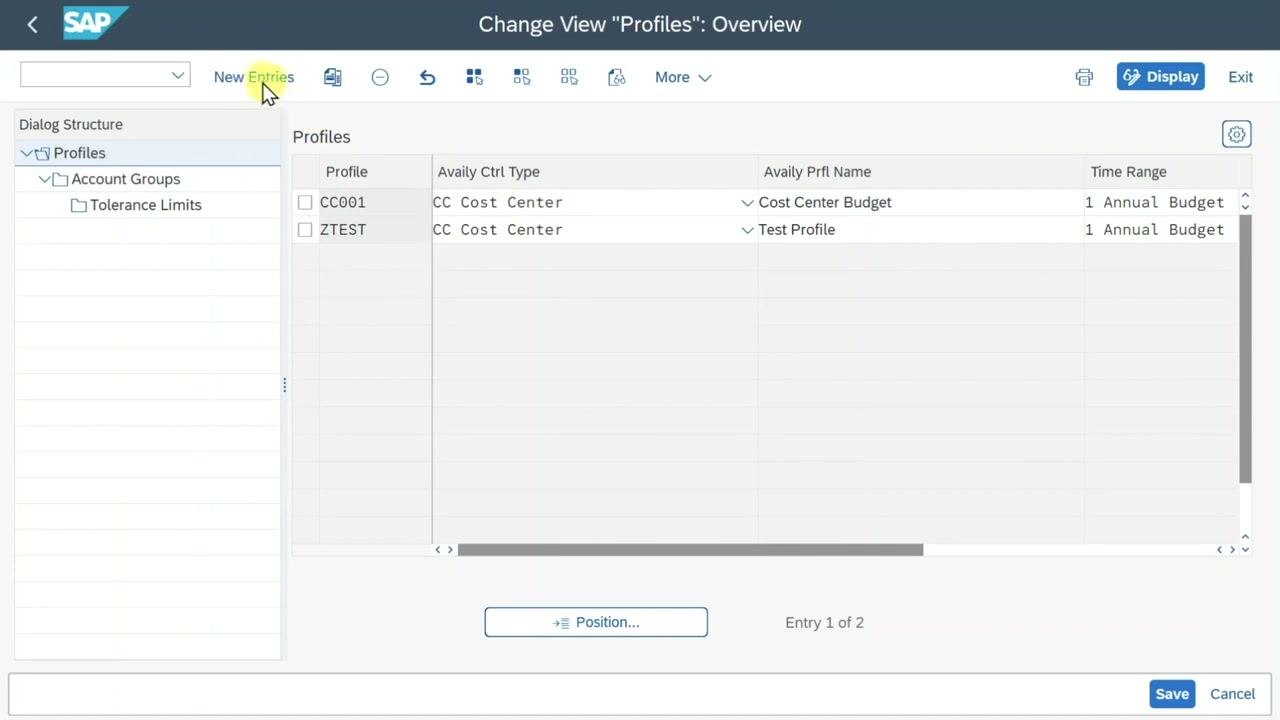
Enter the following details:
- Profile:
Z123 - Availability Control Type:
CC Cost Center - Profile Name:
Cost Center Budget Test - Time Range:
1 Annual Budget(select "Annual Budget" to compare posted costs to the annual budget) - Budget Currency Type:
10 Company Code Currency
Save the entry.
Step 4: Find the Manage Global Hierarchies app in Fiori
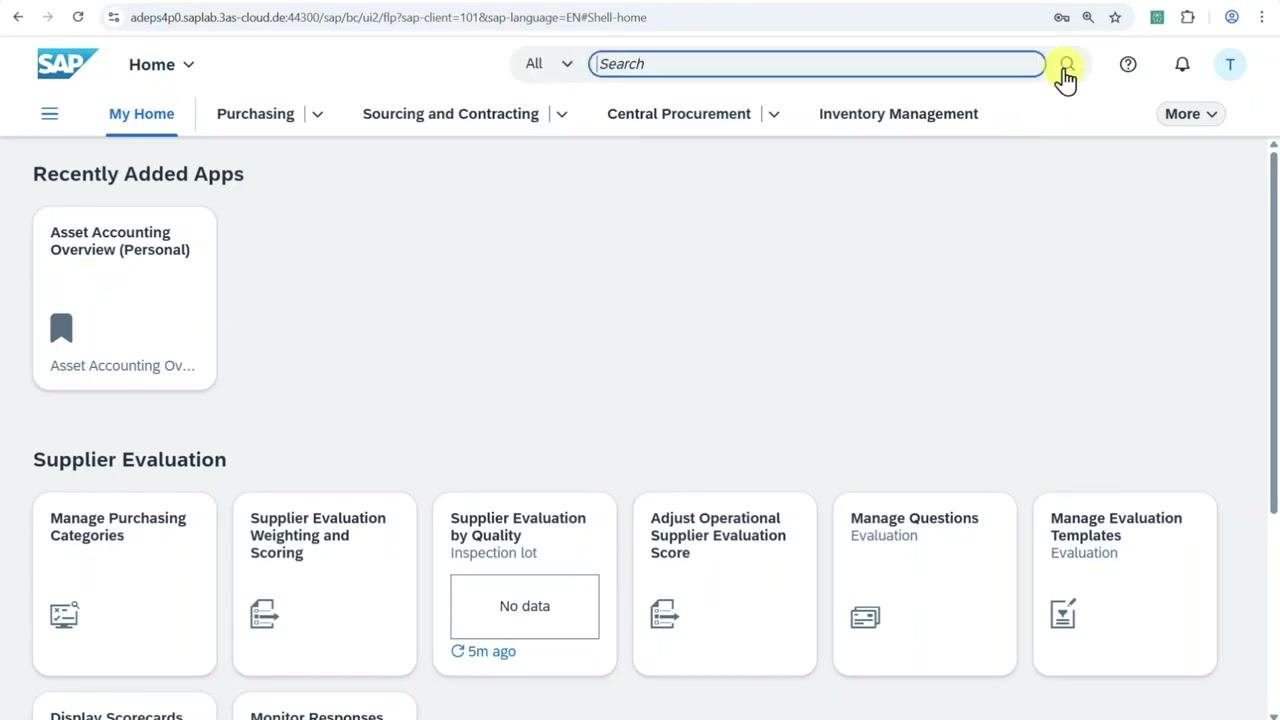
- Open the SAP Fiori Launchpad in your browser.
- Use the search bar at the top to search for "Manage Global Hierarchies".
- Select the Manage Global Hierarchies app.
Step 5: Review the G/L account hierarchy
- In the Manage Global Hierarchies app, search for the relevant hierarchy (for example, enter
ycoa). - Select the hierarchy (for example,
YCOA_ALL - G/L Account Hierarchy). - Review the nodes, such as
40000000 - 89999999 (Umlage allg.), to confirm that all profit and loss accounts are included.
Step 6: Assign account groups to the profile
- Select the new profile (
Z123). - In the left navigation pane, double-click Account Groups.
Click New Entries to add account groups. Then:
- In the G/L Account Hierarchy field, enter the hierarchy you manage in Fiori (for example,
YCOA_ALL). - Enter the G/L Account Group and G/L Account Group Name as appropriate.
Step 7: Define the activity group for tolerance limits
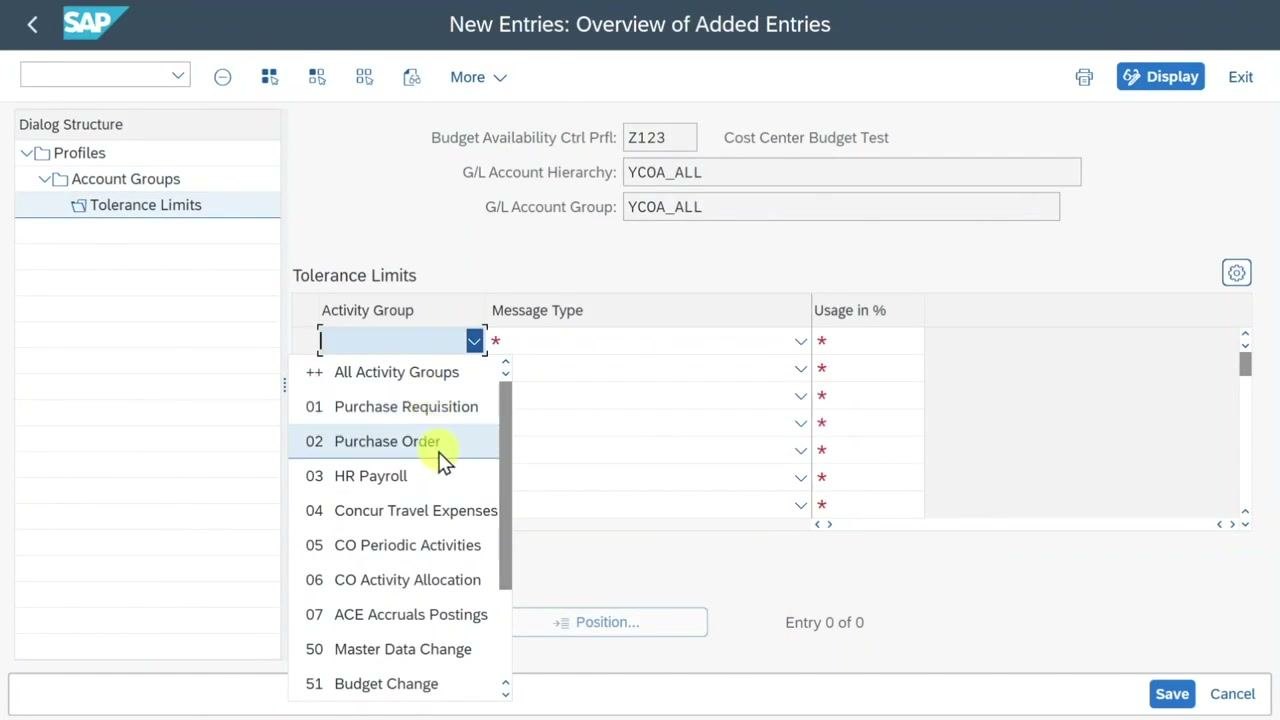
In the SAP GUI, make sure you are in the Tolerance Limits section for profile Z123. Click New Entries to add a tolerance limit.
In the Activity Group dropdown, choose the group the budget check should apply to. The options are:
- All Activity Groups
- 01 Purchase Requisition
- 02 Purchase Order
- 03 HR Payroll
- 04 Concur Travel Expenses
- 05 CO Periodic Activities
- 06 CO Activity Allocation
- 07 ACE Accruals Postings
- 50 Master Data Change
- 51 Budget Change
For this example, select All Activity Groups.
Step 8: Set the warning message type and threshold
In the Message Type dropdown, select the type of system message to display when the threshold is reached:
- E (Error)
- W (Warning)
For the first entry, select W (Warning).
In the Usage in % field, enter 90. This triggers a warning when 90% of the budget is used.
Step 9: Add the error tolerance limit and save
- Add another entry for All Activity Groups.
- Set Message Type to E (Error).
- Enter 100 in the Usage in % field. This triggers an error when the budget is fully used.
- Click Save.
Confirm that these tolerance limits are set:
- All Activity Groups | W Warning | 90,00
- All Activity Groups | E Error | 100,00
The message "Data was saved" appears.
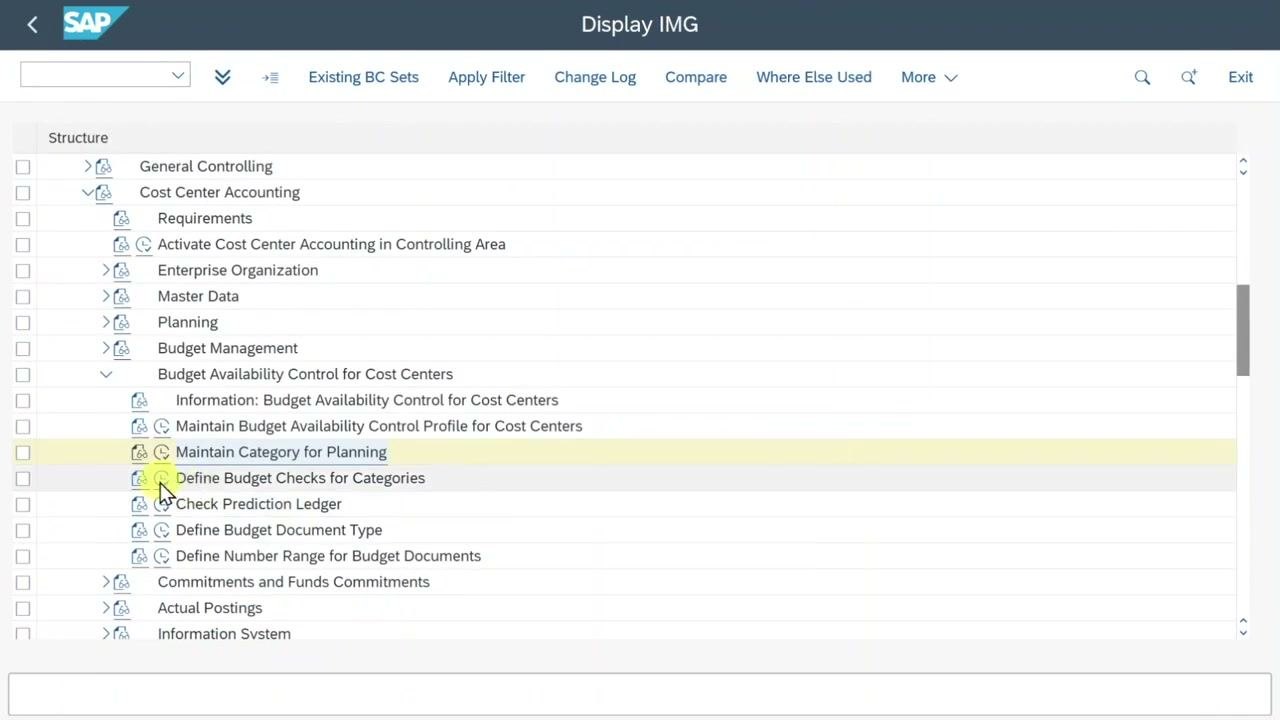
Step 10: Open the plan category maintenance
In the IMG structure, go to Controlling > Cost Center Accounting > Budget Availability Control for Cost Centers. Select Maintain Category for Planning.
Step 11: Find the BUDGET02 plan category
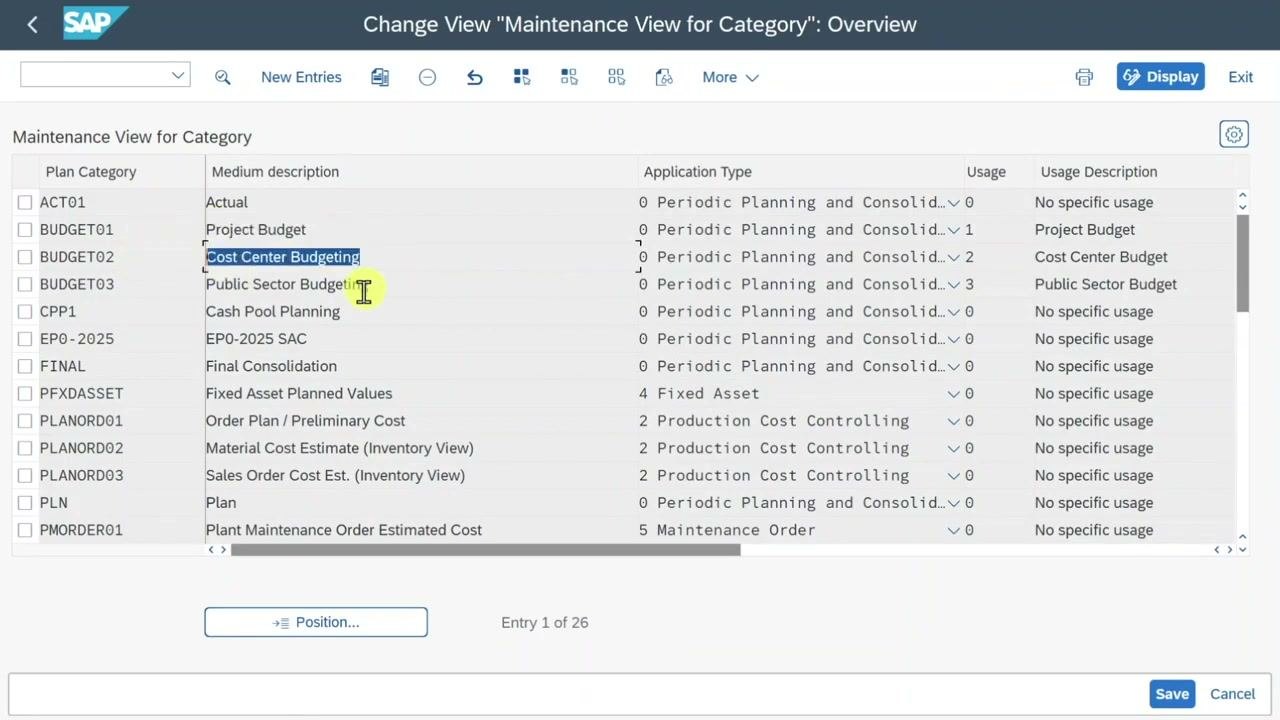
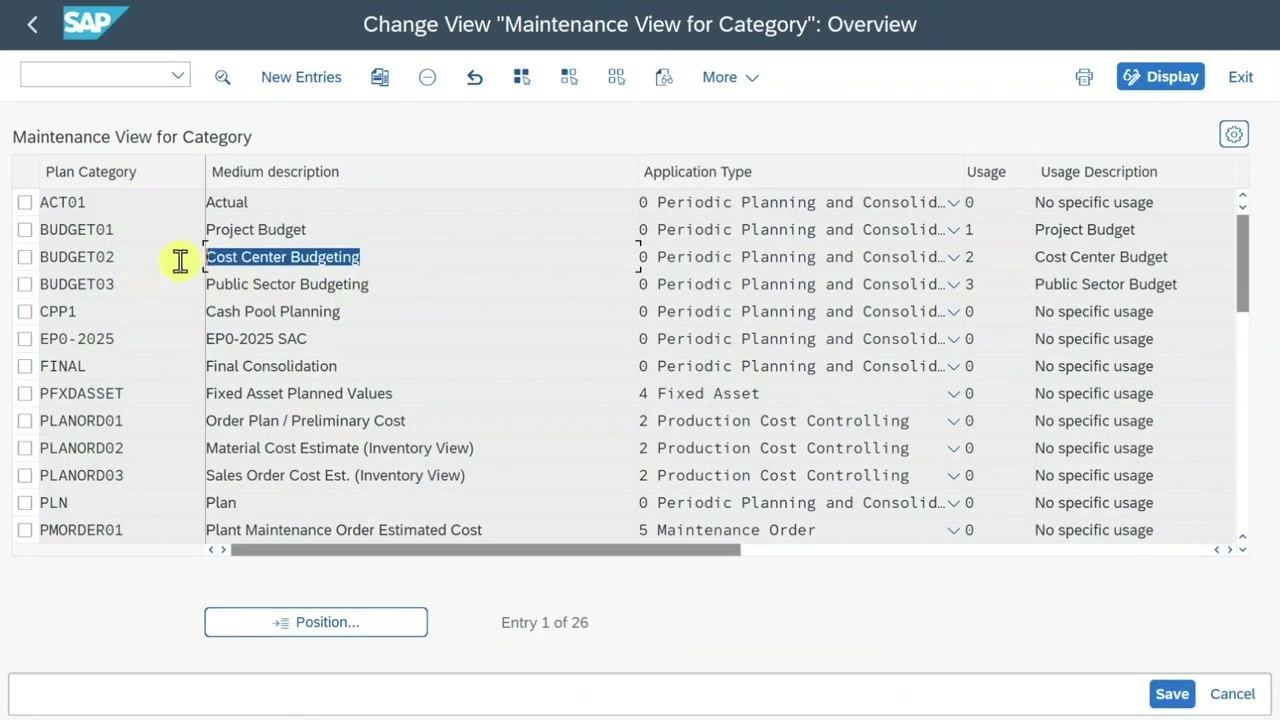
- In the "Change View 'Maintenance View for Category': Overview" screen, review the list of plan categories.
- Locate BUDGET02 with the medium description Cost Center Budgeting.
SAP pre-ships BUDGET02, and it is typically used for cost center budgeting.
Step 12: Review the BUDGET02 details
Double-click BUDGET02 to view its details. Review these fields:
- Medium description: Cost Center Budgeting
- Application Type: 0 Periodic Planning and Consolidation
- Exchange Rate Type: P
- Usage: 2 Cost Center Budget
Under "Allow Entry/Delete of Plan Data," note the available options:
- By Importing Financial Plan Data (checked)
- By Copying Another Plan Category
- By Deleting Financial Plan Data
- By Compressing Financial Plan Data
Step 13: Check the application types and usage codes
Click the dropdown for Application Type to see the available types:
- 0 Periodic Planning and Consolidation
- 1 Project Management
- 2 Production Cost Controlling
- 3 Revenue Recognition
- 4 Fixed Asset
- 5 Maintenance Order
- 6 Service Document
- 7 Accrual Object
- 8 Virtual Plan Category
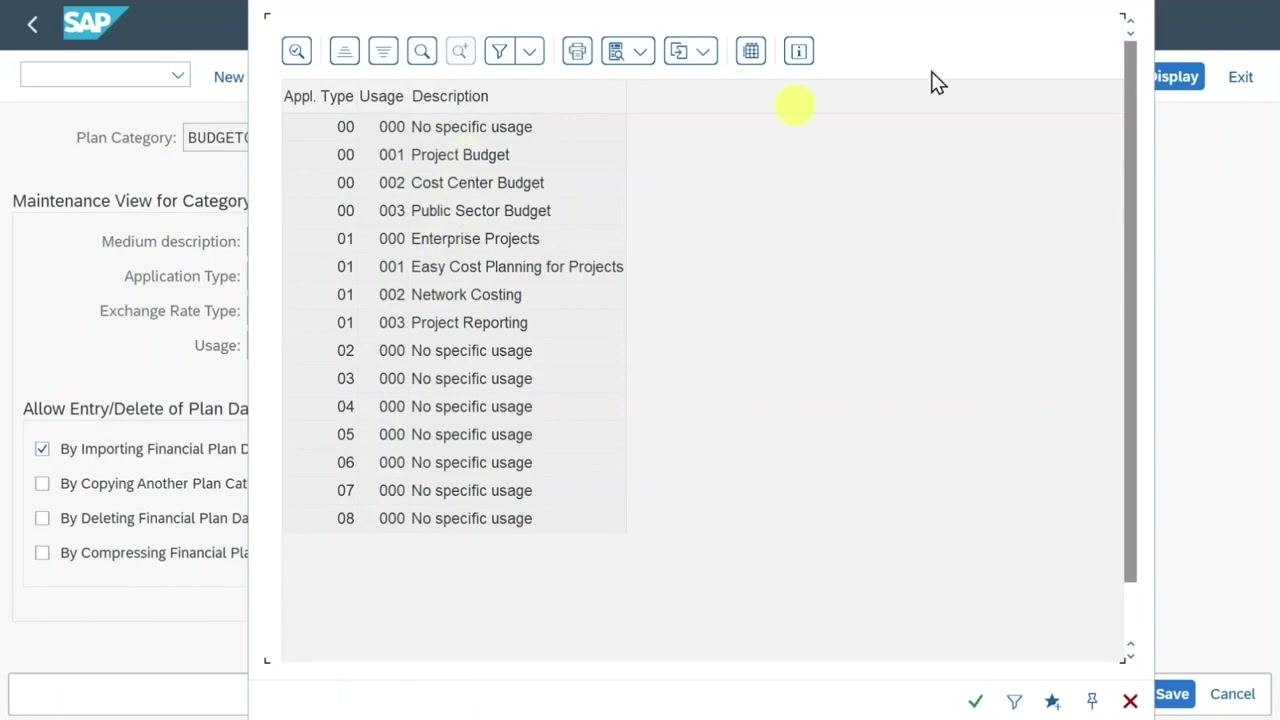
Click the Usage field to view the available usage codes:
- 000 No specific usage
- 001 Project Budget
- 002 Cost Center Budget
- 003 Public Sector Budget
- 010 Enterprise Projects
- 011 Easy Cost Planning for Projects
- 012 Network Costing
- 013 Project Reporting
At this point, you have set up tolerance limits for budget availability control and reviewed the plan categories for cost center budgeting. Budget checks are enforced at your chosen thresholds, and the correct plan data categories are available for planning and control.
Step 14: Confirm the plan category settings
In the Change View "Maintenance View for Category": Details screen, review plan category BUDGET02 and confirm these values:
- Medium description: Cost Center Budgeting
- Application Type: 0 Periodic Planning and Consolidation
- Exchange Rate Type: P
- Usage: 2 (Cost Center Budget)
Under Allow Entry/Delete of Plan Data, verify that only By Importing Financial Plan Data is checked. The options for copying, deleting, or compressing plan data must not be selected. With this configuration, only importing financial plan data is permitted for this plan category.
If you don't need any changes, click Back to return to the previous menu.
Step 15: Open Define Budget Checks for Categories
On the main customizing screen, under Budget Availability Control for Cost Centers, locate Define Budget Checks for Categories and click it.
Step 16: Activate availability control and consistency checks
- Open the "Change View 'Category Extension for Budgeting': Overview" screen.
- In the "Category Extension for Budgeting" table, locate the row for "Cost Center Budget".
- Make sure the "Availability Control" checkbox is selected for "Cost Center Budget".
- Select the "Budget Consistency Check" checkbox for "Cost Center Budget". This activates consistency checks against the actual amount when you enter plan data.
Step 17: Check the prediction ledger step
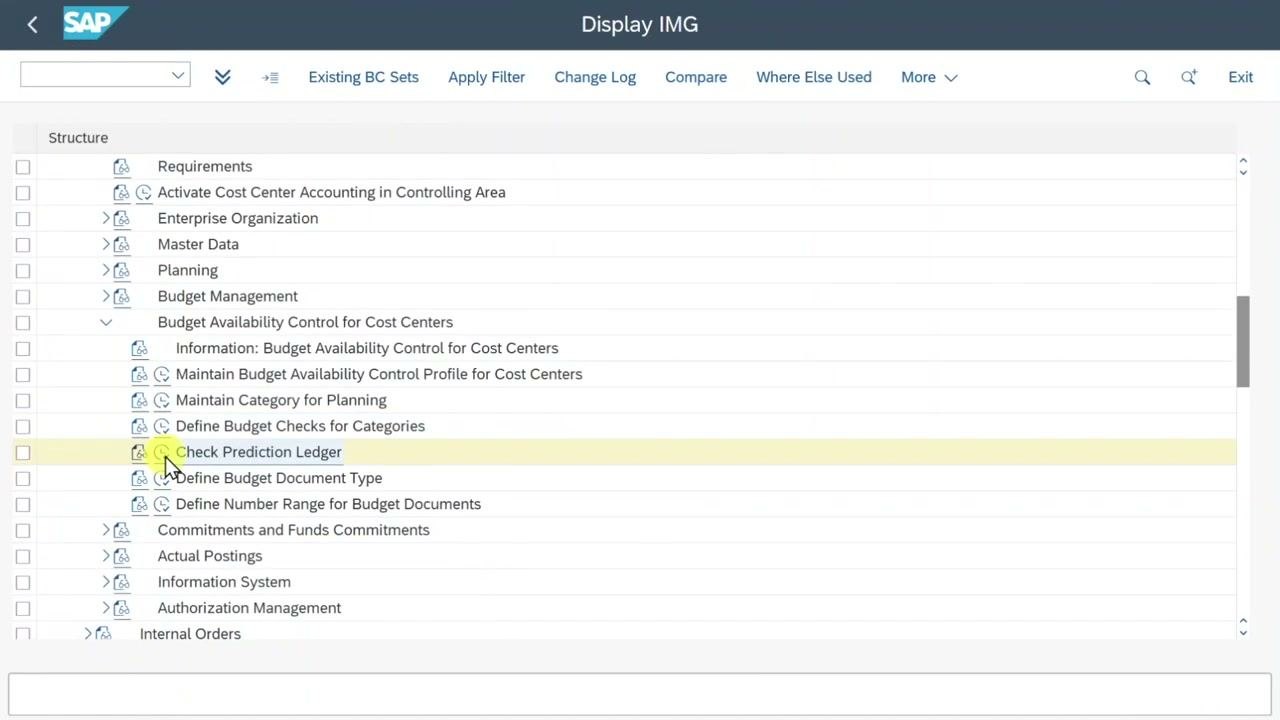
- Go to the "Display IMG" screen in SAP.
- In the navigation structure, expand "Budget Management" > "Budget Availability Control for Cost Centers".
- Locate and highlight the "Check Prediction Ledger" step.
You activate this step if you want to use the prediction ledger functionality.
Step 18: Define the budget document type
In the same "Display IMG" screen, select "Define Budget Document Type". Here you assign a number range to the standard budget document type (for example, "_BT").
Step 19: Define the number range for budget documents
Still in the "Display IMG" screen, select "Define Number Range for Budget Documents". Insert the number range you want for budget documents.
Activate availability control on a cost center
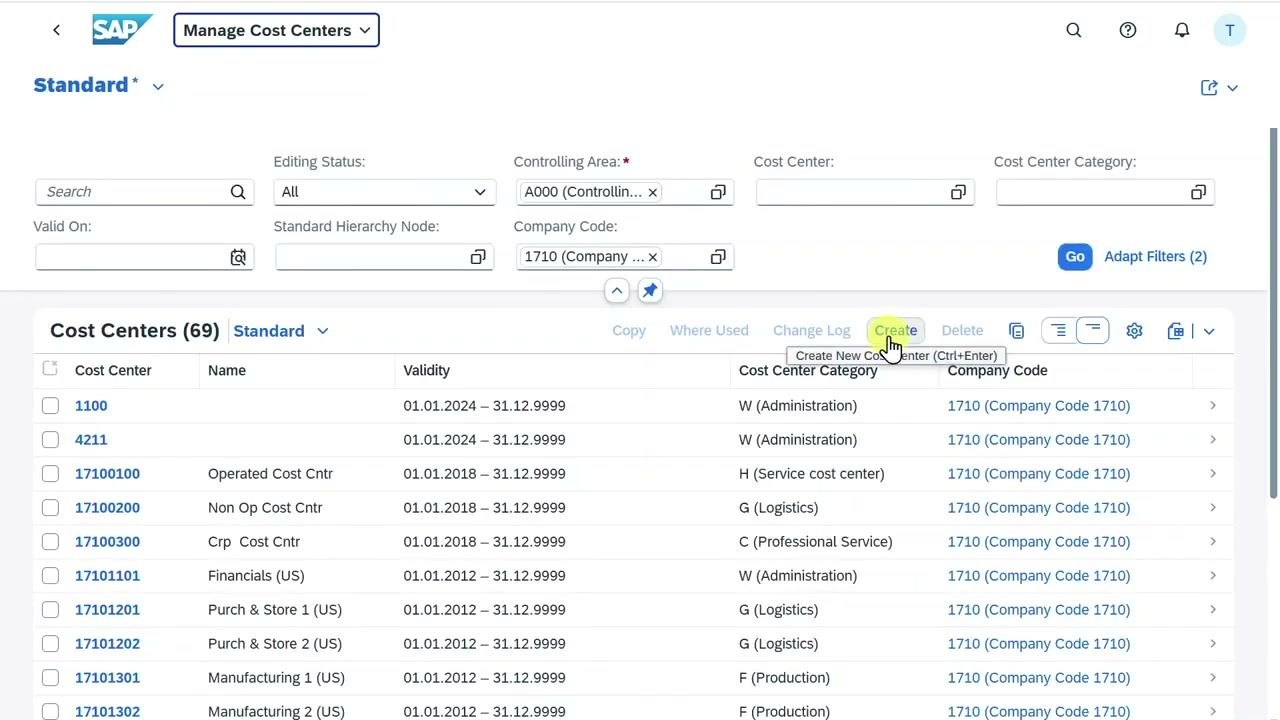
Step 20: Create a new cost center
- Navigate to the "Manage Cost Centers" screen.
- Click the "Create" button at the top of the cost center list.
- Fill in the required fields:
- Controlling Area: A000 (Controlling Area A000)
- Cost Center: 1010_TEST
- Name: Test
- Description: Test
- Valid From: 17.05.2025
- Valid To: 31.12.9999
- Person Responsible: Test
- Cost Center Category: select as appropriate
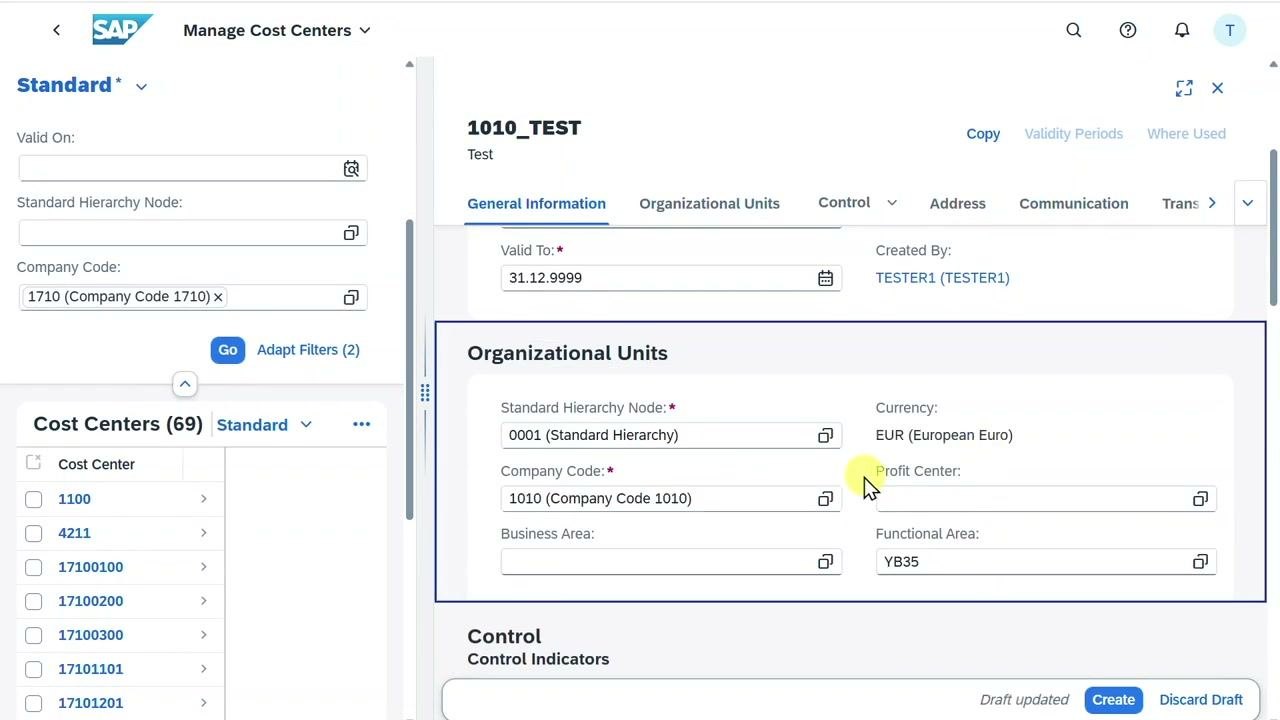
Step 21: Enter the organizational unit details
In the "Organizational Units" section, enter:
- Standard Hierarchy Node: 0001 (Standard Hierarchy)
- Company Code: 1010 (Company Code 1010)
- Currency: EUR (European Euro)
- Profit Center: select as appropriate
- Functional Area: YB35
Step 22: Activate budget availability control for the cost center
This step activates availability control in SAP for the cost center. Switch to the "Control" tab. In the "Budget Availability Control" section, enter:
- Budget-Carrying Cost Center: 1010_TEST (Test)
- Budget Availability Control Profile: Z123 (Cost Center Budget Test)
Set Budget Availability Control is Active to ON.
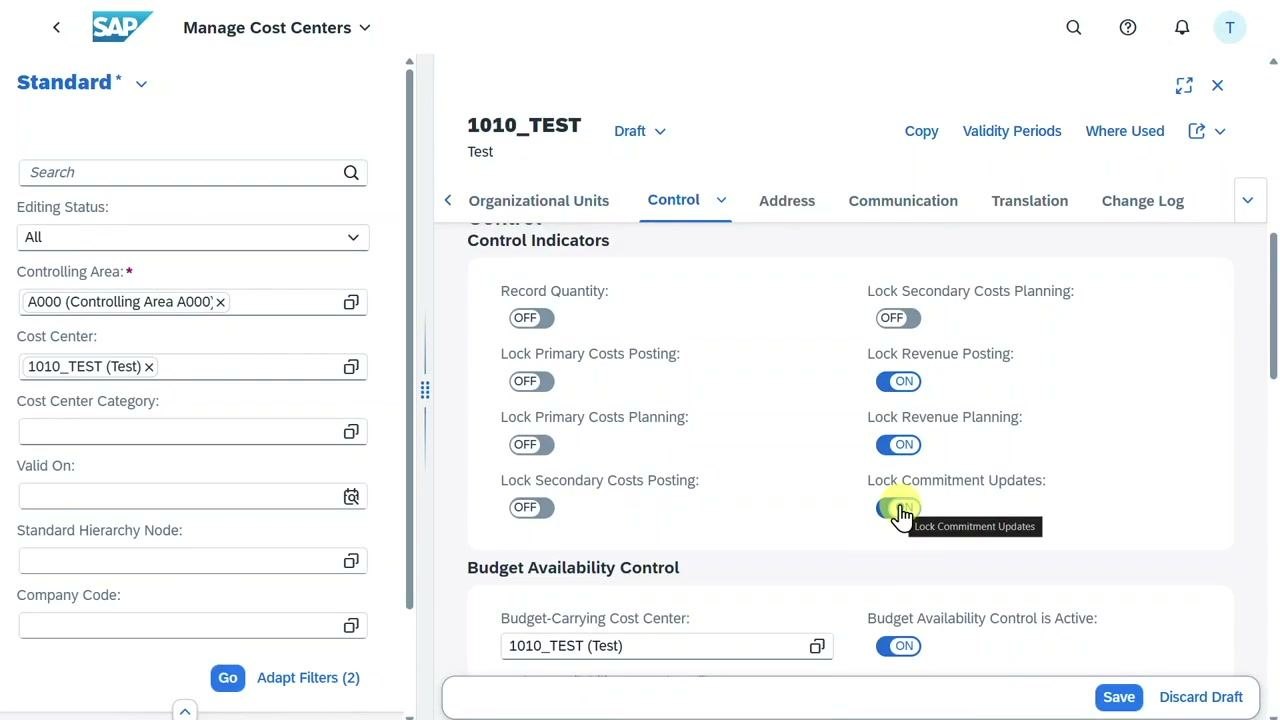
Step 23: Adjust the control indicators and save
In the "Control Indicators" section, set the switches as required:
- Lock Revenue Posting: ON
- Lock Revenue Planning: ON
- Lock Commitment Updates: ON
You can set the other switches to OFF unless you need them. These are Lock Primary Costs Posting, Lock Primary Costs Planning, Lock Secondary Costs Posting, Lock Secondary Costs Planning, and Record Quantity.
Click "Save" to finalize the cost center setup.
You have now configured budget consistency checks, defined document types and number ranges, and created a new cost center with active budget availability control.
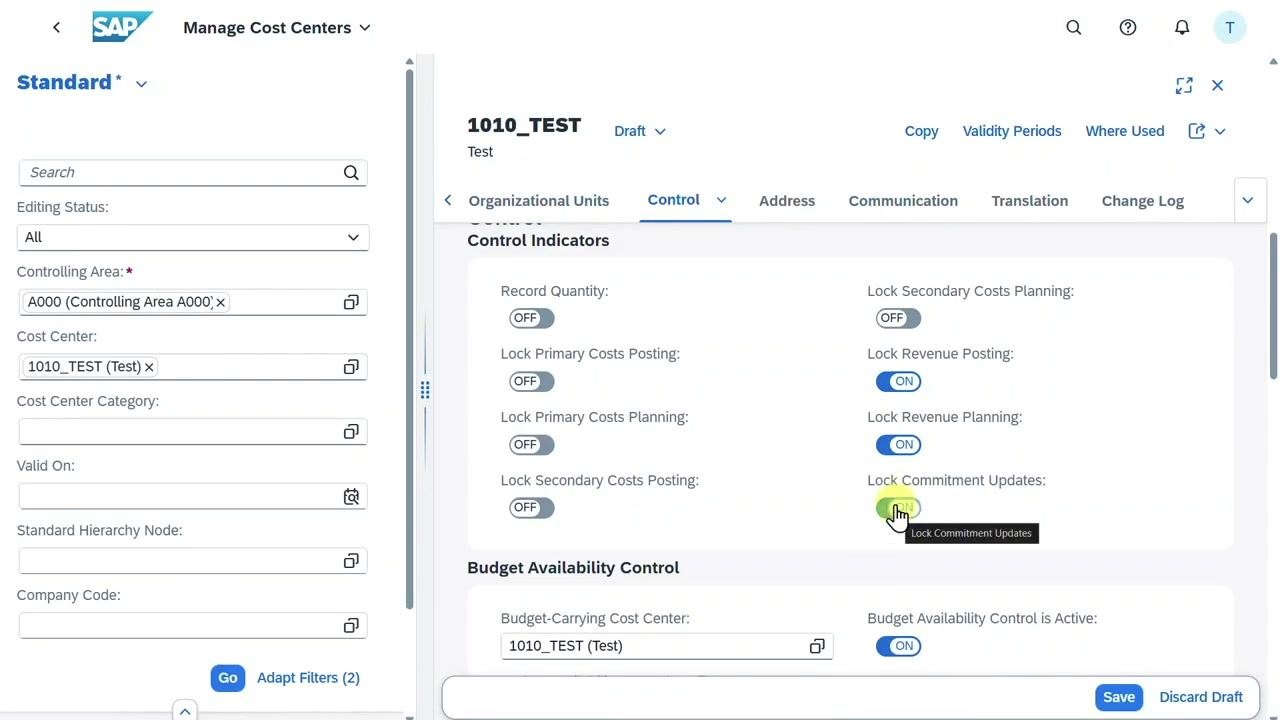
Step 24: Deselect Lock Commitment Updates and save
- In the "Manage Cost Centers" screen, go to the "Control" tab for cost center 1010_TEST.
- Locate the "Control Indicators" section.
- If Lock Commitment Updates is ON, click the toggle switch to set it to OFF.
- Click the Save button at the bottom right.
Upload a budget
Step 25: Open the budget upload template
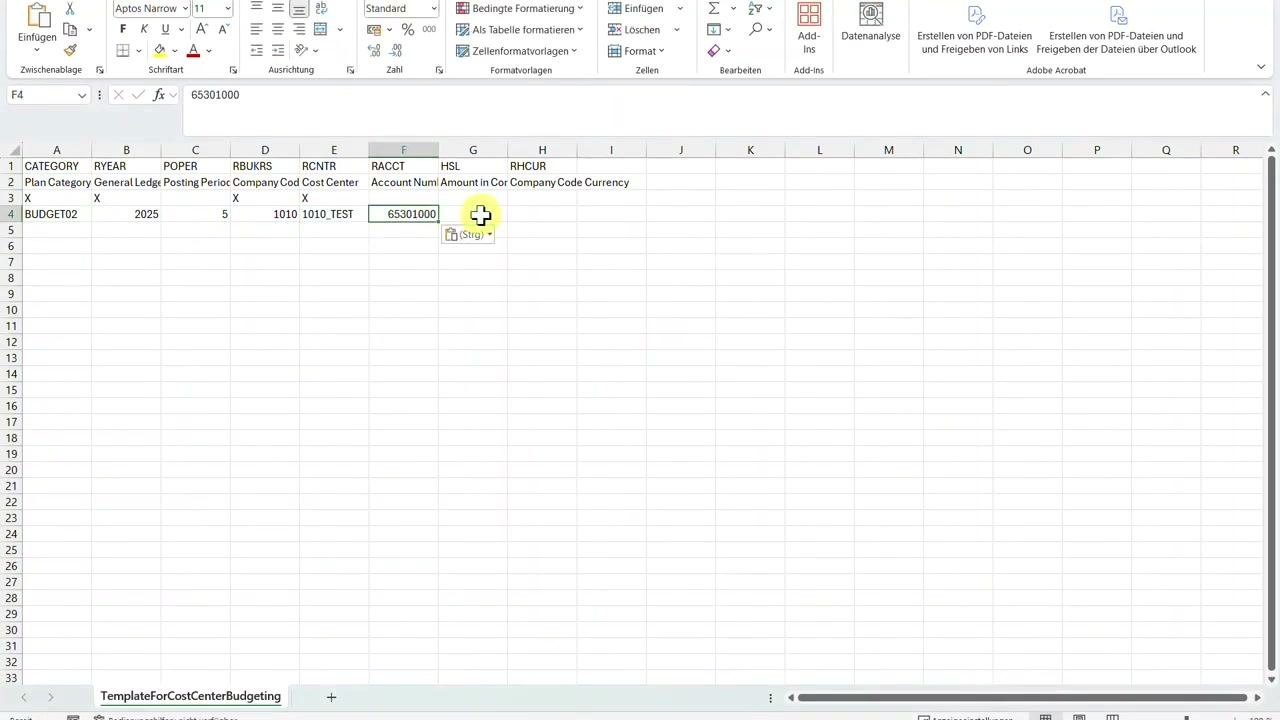
- Open the Excel template for cost center budgeting (for example, "TemplateForCostCenterBudgeting").
- Check that the template has these columns: CATEGORY, RYEAR, POPER, RBUKRS, RCNT, RACCT, HSL, RHCUR.
- Prepare to enter budget data for plan category BUDGET02, fiscal year 2025.
Step 26: Enter the budget data
In the first available row of the template, enter:
- CATEGORY: BUDGET02
- RYEAR: 2025
- POPER: 5
- RBUKRS: 1010
- RCNTR: 1010_TEST
- RACCT: 65301000
- HSL: 10,000 (amount)
- RHCUR: EUR (currency)
Save the completed template file.
Step 27: Test import the budget source file
- In SAP, navigate to the budget upload interface.
- Click Test Import Source File.
- In the file dialog, select your saved template file (for example, "TemplateForCostCenterBudgeting").
- Click Open to upload the file.
- Confirm that a success message appears, indicating the file was accepted.
Step 28: Run the Cost Center Budget Report
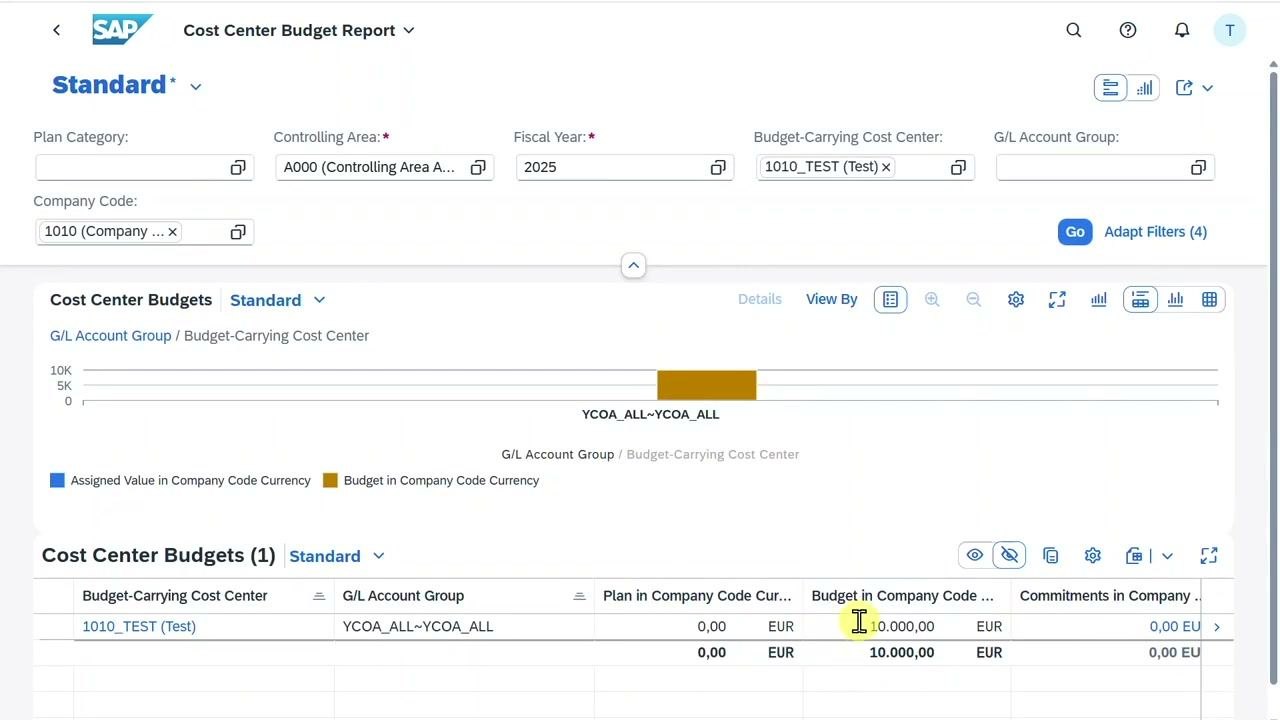
Go to the "Cost Center Budget Report" screen in SAP and set these filters:
- Controlling Area: A000 (Controlling Area A000)
- Fiscal Year: 2025
- Budget-Carrying Cost Center: 1010_TEST (Test)
- Company Code: 1010 (Company Code 1010)
Click Go to generate the report.
Step 29: Verify the uploaded budget
In the report results, confirm that the Budget in Company Code Currency for cost center 1010_TEST is 10,000.00 EUR. The budget appears in both the summary chart and the detailed table.
Test availability control with a purchase order
Step 30: Start a new purchase order
Navigate to the "New Purchase Order" screen in SAP. In the "General Information" tab, enter:
- Purchasing Doc. Type: Standard PO (NB)
- Currency: European Euro (EUR)
- Supplier: enter or select a supplier (required field)
- Purchasing Group: Group 001 (001)
- Purchasing Organization: Purch. Org. 1010 (1010)
- Company Code: Company Code 1010 (1010)
If prompted, make sure you enter a supplier before you continue.
Step 31: Enter the supplier
- Enter the supplier (for example, "Test Quota new (1000451)") in the Supplier field.
- Confirm that the red error indicator disappears.
- Proceed to the "Items" section.
Step 32: Open the item creation menu
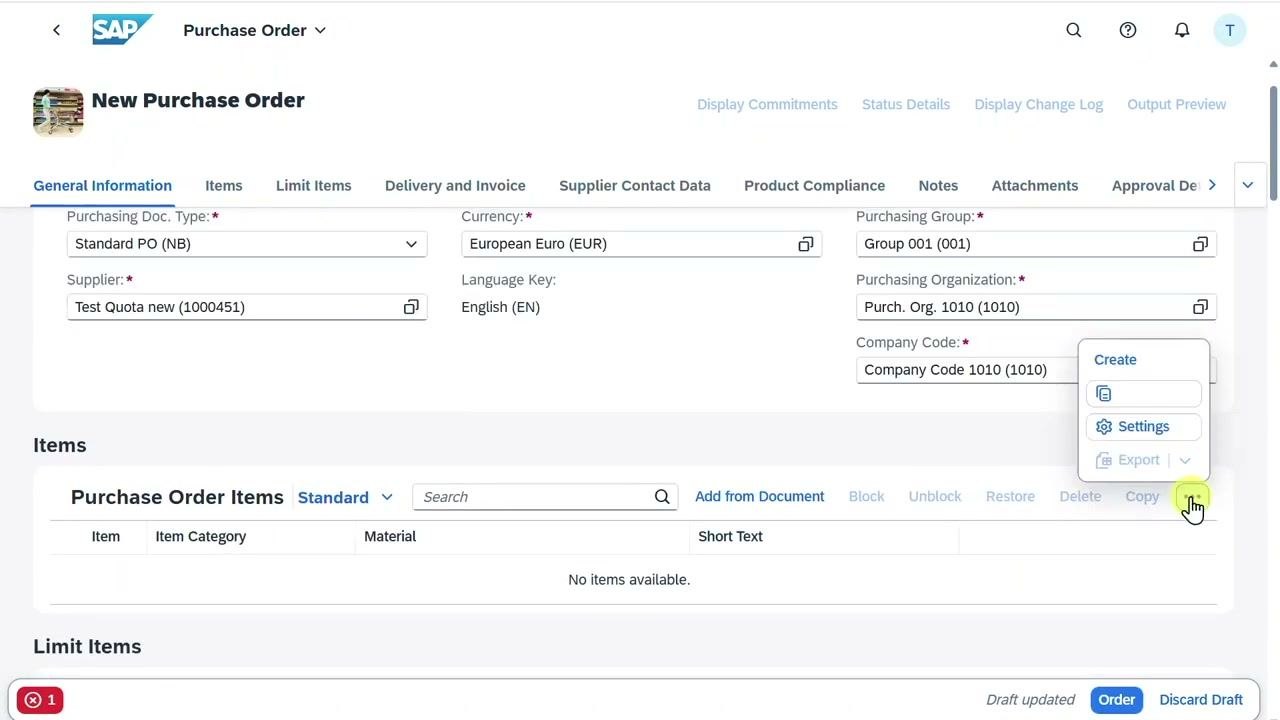
Make sure all required fields in the "General Information" tab are filled:
- Purchasing Doc. Type: Standard PO (NB)
- Currency: European Euro (EUR)
- Supplier: Test Quota new (1000451)
- Purchasing Group: Group 001 (001)
- Purchasing Organization: Purch. Org. 1010 (1010)
- Company Code: Company Code 1010 (1010)
Click the three-dot menu (⋮) in the "Items" section and select Create to add a new item.
Step 33: Enter material and pricing details
In the "Purchase Order Item" screen, under the "General Information" tab, enter:
- Material: High speed turbo pump (25)
- Short Text: High speed turbo pump
- Plant: Plant 1 DE (1010)
- Order Quantity: 1 PC
- Net Order Price: 9,000.00 EUR
- Price Unit: 1 PC
Confirm that the Net Order Value is calculated automatically as 9,000.00 EUR.
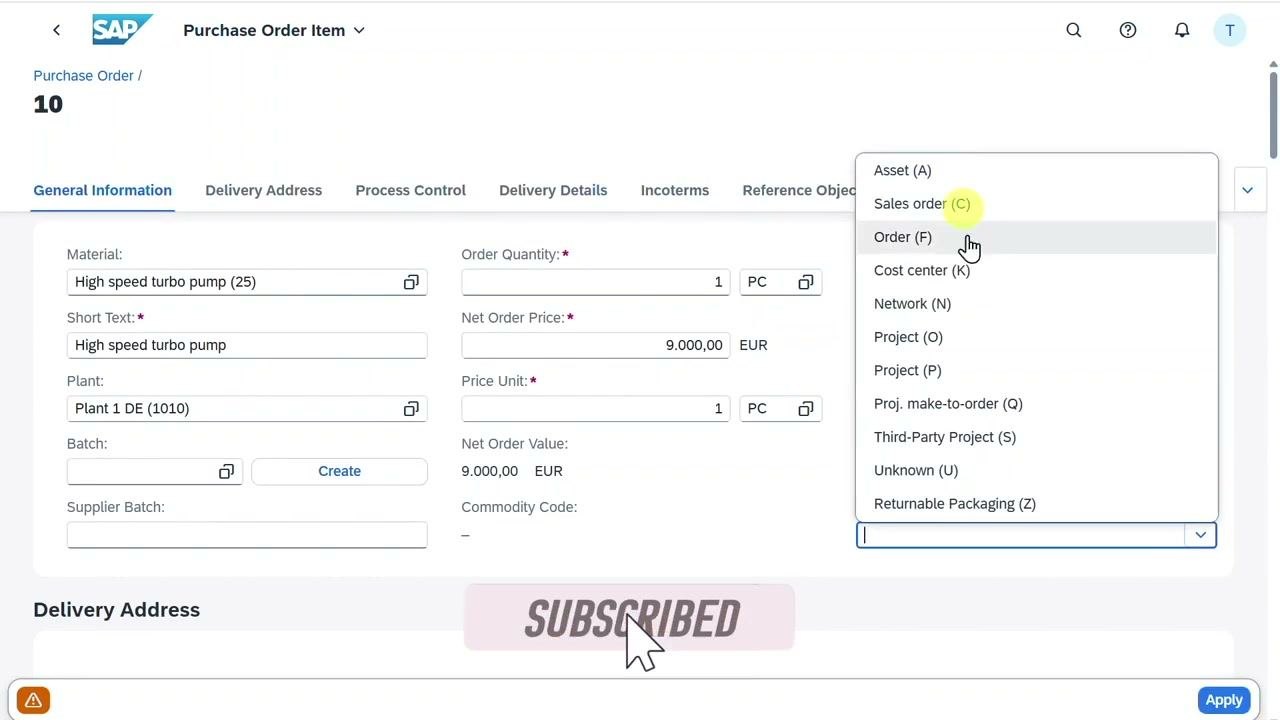
Step 34: Assign the account assignment category
- In the same "Purchase Order Item" screen, locate the account assignment category field.
- Click the dropdown menu to display the available categories.
- Select Cost center (K) to assign the item to a cost center.
Step 35: Enter the cost center and G/L account
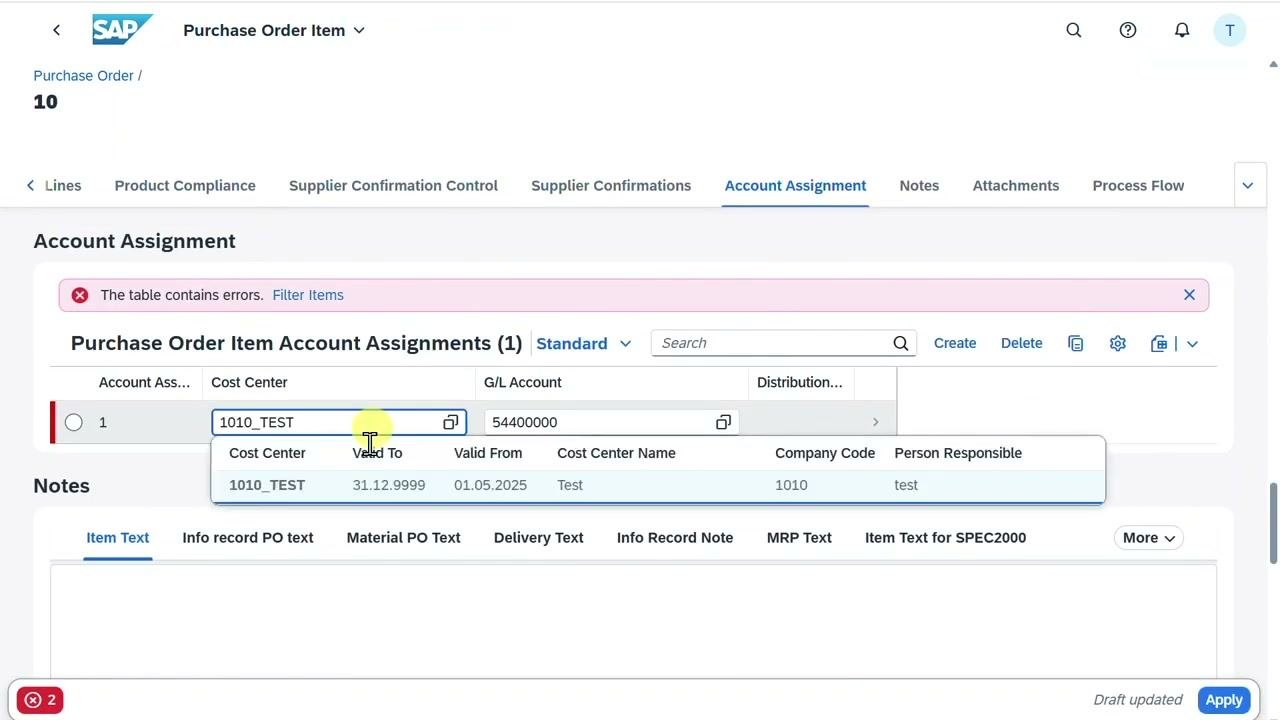
Go to the "Account Assignment" tab for the item. In the "Purchase Order Item Account Assignments" section, enter:
- Cost Center: 1010_TEST
- G/L Account: 54400000
Confirm that the system displays these cost center details:
- Valid To: 31.12.9999
- Valid From: 01.05.2025
- Cost Center Name: Test
- Company Code: 1010
- Person Responsible: test
Make sure there are no errors in the table before you continue.
Step 36: Apply the item and verify the purchase order
Click Apply to save the purchase order item. The system processes the order and displays a confirmation screen.
On the "Purchase Order" summary screen, confirm the following:
- Purchase Order Number: for example, 4500003218
- Status: In Approval
- Purchase Order Date: 17.05.2025
- Net Value: 9,000.00 European Euro (EUR)
- Purchasing Doc. Type: Standard PO (NB)
- Supplier: Test Quota new (1000451)
- Purchasing Group: Group 001 (001)
- Purchasing Organization: Purch. Org. 1010 (1010)
- Company Code: Company Code 1010 (1010)
- Created By: TESTER1
- Approval Status: Approved automatically
- Approver Name: Approved automatically
Review all entered data for accuracy.
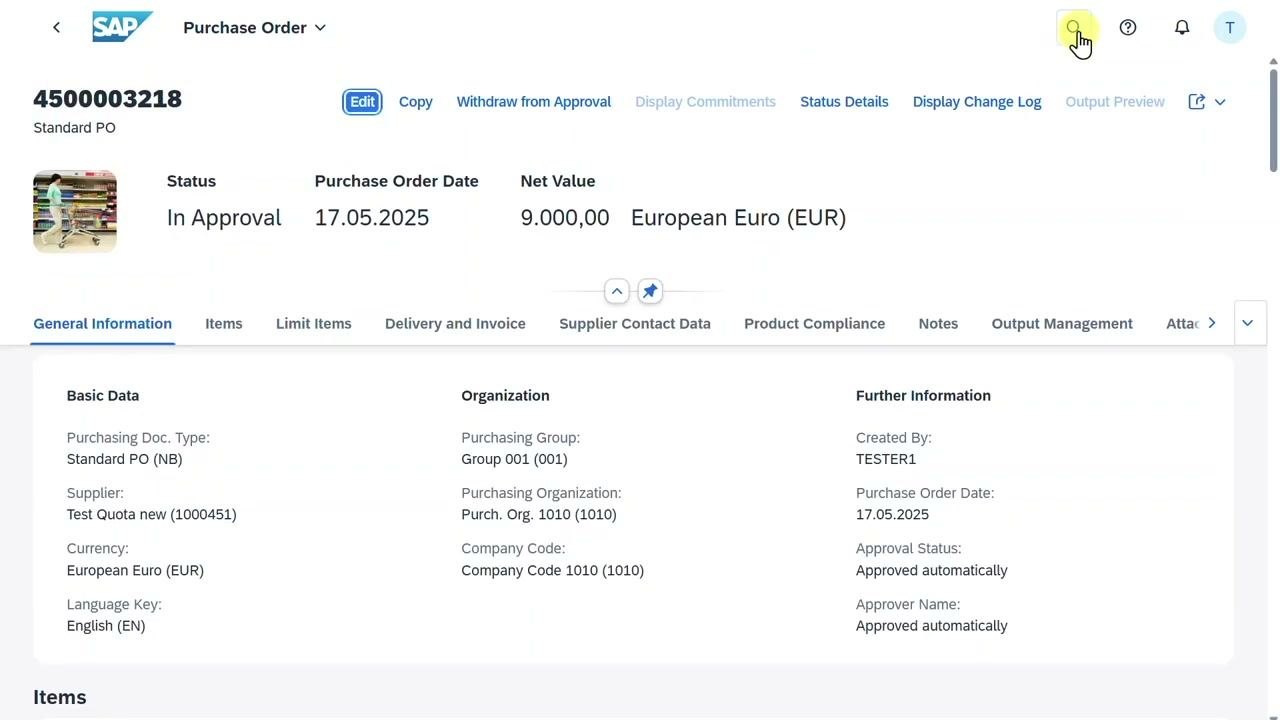
You have now created a purchase order item, assigned it to the cost center and G/L account, and verified the order's creation and approval status.
Check commitments and actual costs in the budget report
Step 37: Set the report filters and run the report
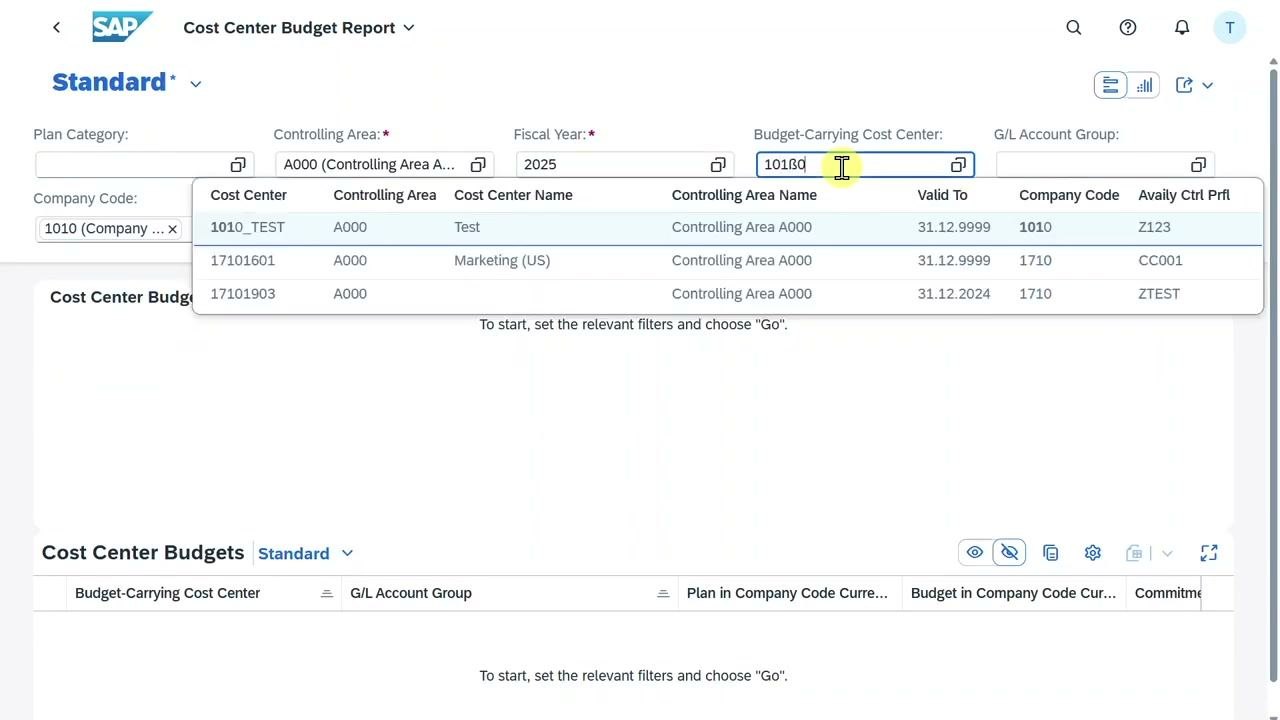
Open the "Cost Center Budget Report" application. In the filter section at the top, enter:
- Controlling Area: A000 (Controlling Area A000)
- Fiscal Year: 2025
- Company Code: 1010 (Company Code 1010)
- Budget-Carrying Cost Center: 1010_TEST (Test)
Select the cost center from the dropdown list and make sure all required fields (marked with ) are filled. Click Go* to display the report.
Step 38: Review the commitments
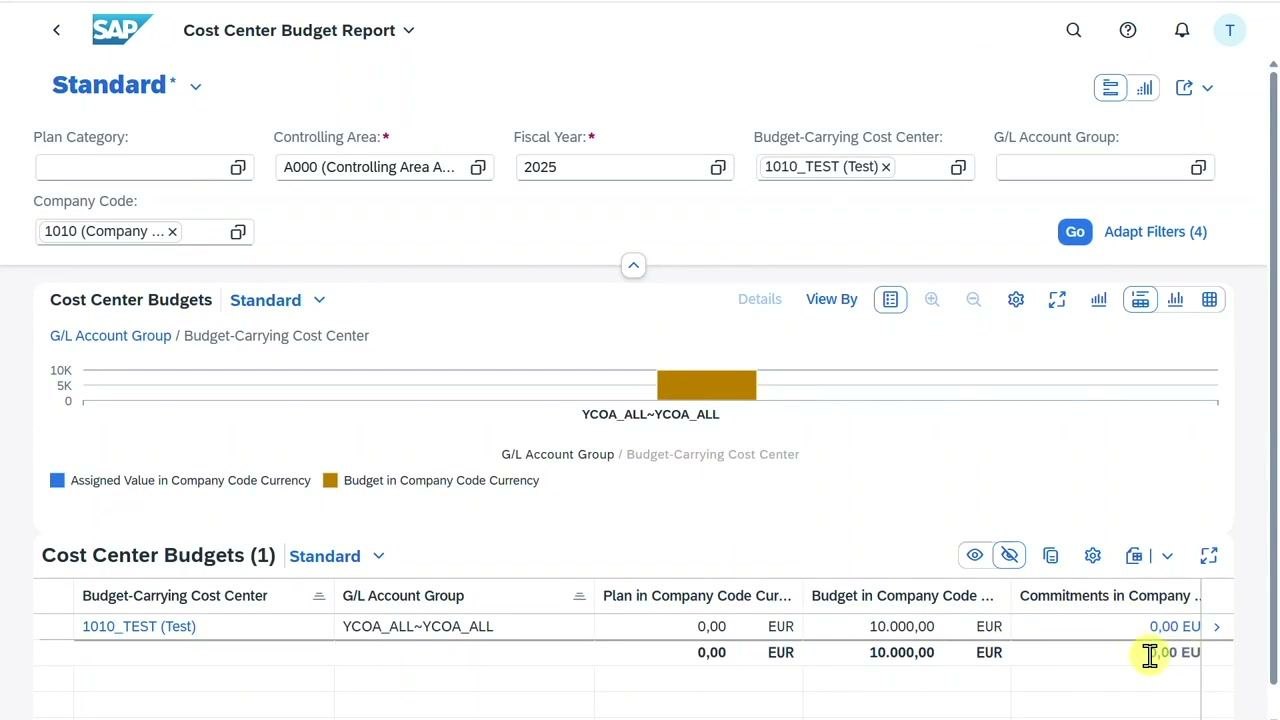
After you click "Go," review the "Cost Center Budgets" section. The "Commitments in Company Code Currency" column shows 9,000.00 EUR.
This shows the system has already considered the postings to this cost center, even though no financial documents exist yet.
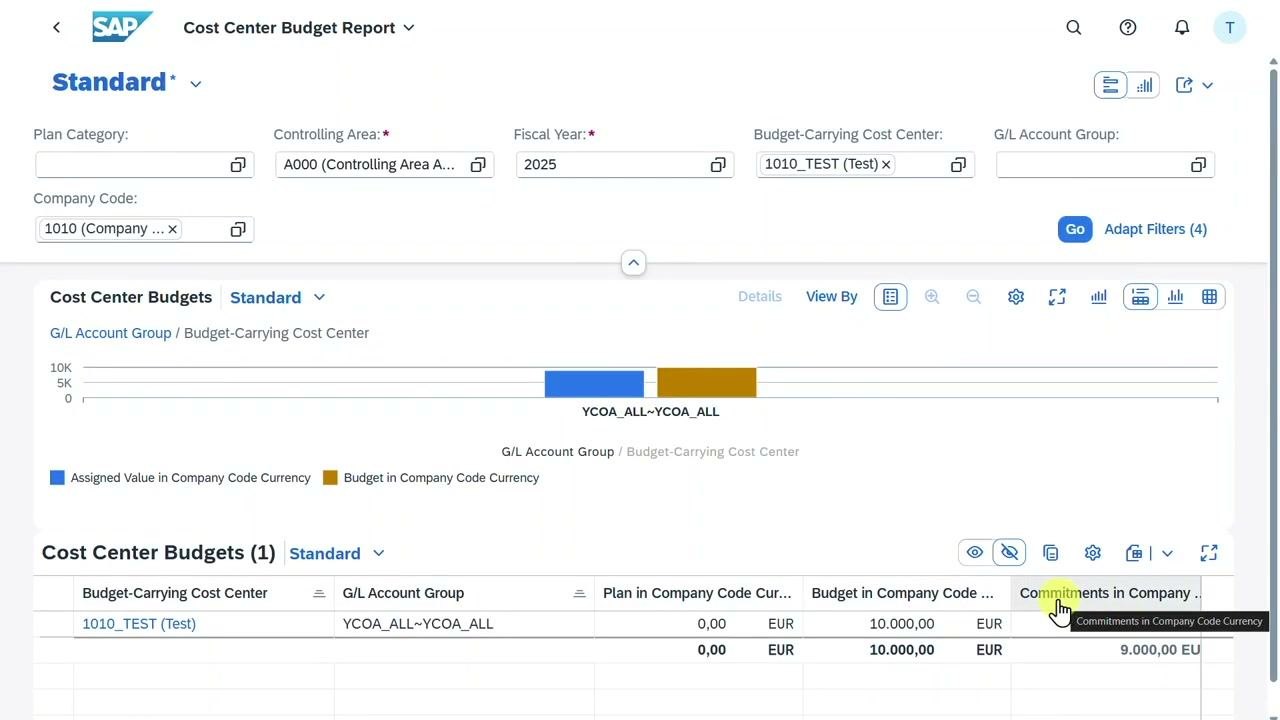
Step 39: Open the Commitments by Cost Center app
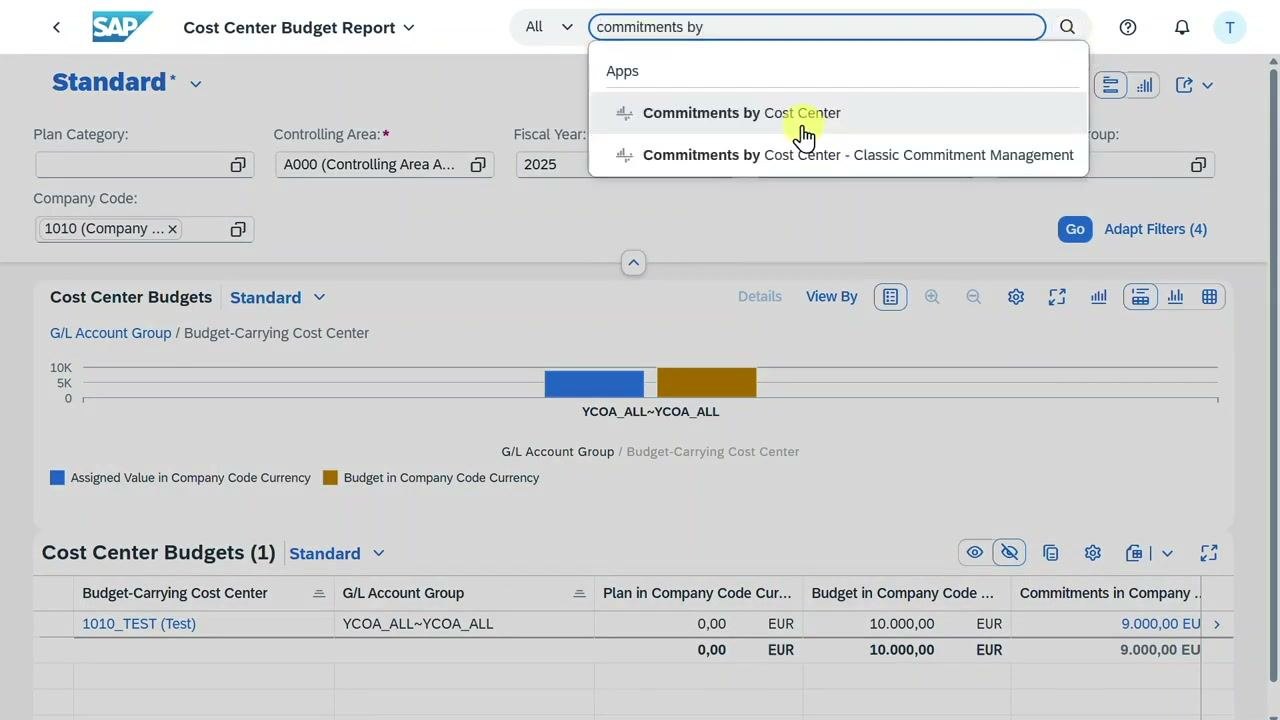
Use the search bar at the top of the SAP screen. Type "commitments by" and select "Commitments by Cost Center" from the dropdown list. This application lets you check commitments for the selected cost center.
Step 40: Open Post Goods Receipt for Purchasing Document
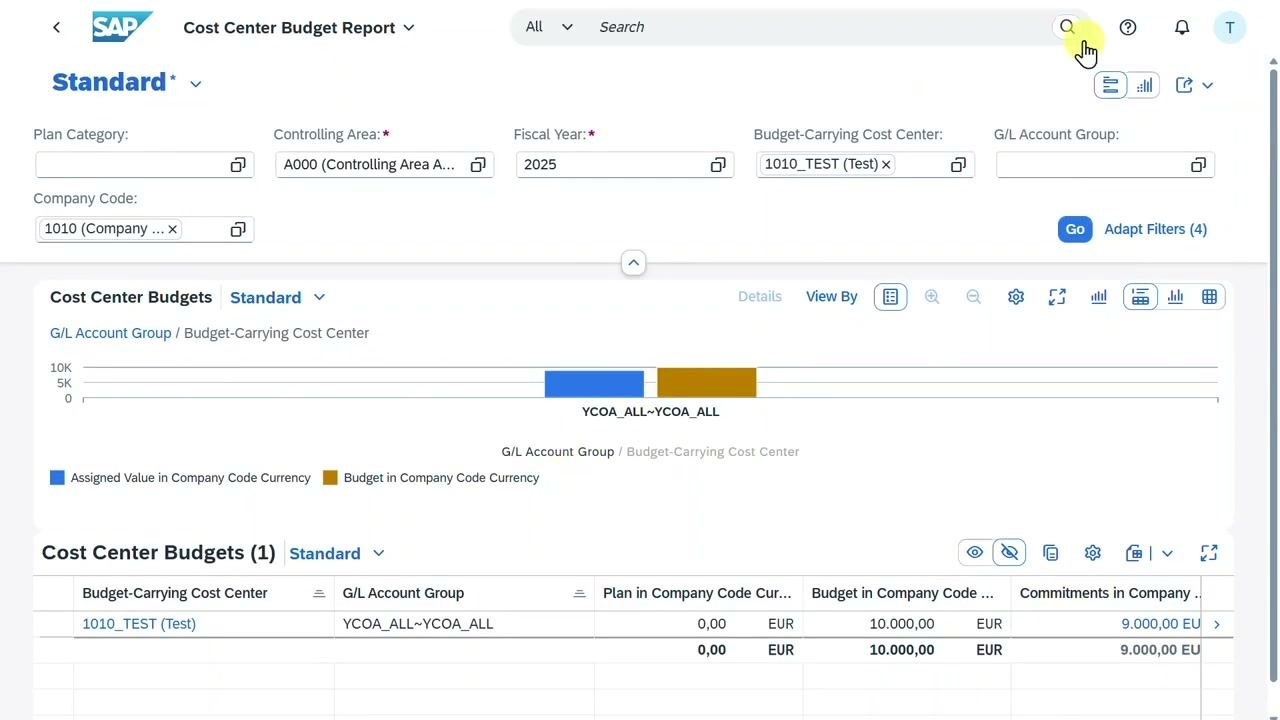
In the "Commitments by Cost Center" app, use the search bar again. Type "post good" and select "Post Goods Receipt for Purchasing Document" from the dropdown. This lets you post the goods receipt for the purchasing document.
Step 41: Post the goods receipt
In the "Post Goods Receipt for Purchasing Document" screen:
- Enter the Purchasing Document Number: 4500003219.
- Confirm that the Document Date and Posting Date are both 17.05.2025.
- In the "Items" section, make sure the material (for example, "High speed turbo pump") is selected.
- Confirm that the Open Quantity and Delivered fields are correct (for example, 1,000 PC delivered).
- Click Post to complete the goods receipt.
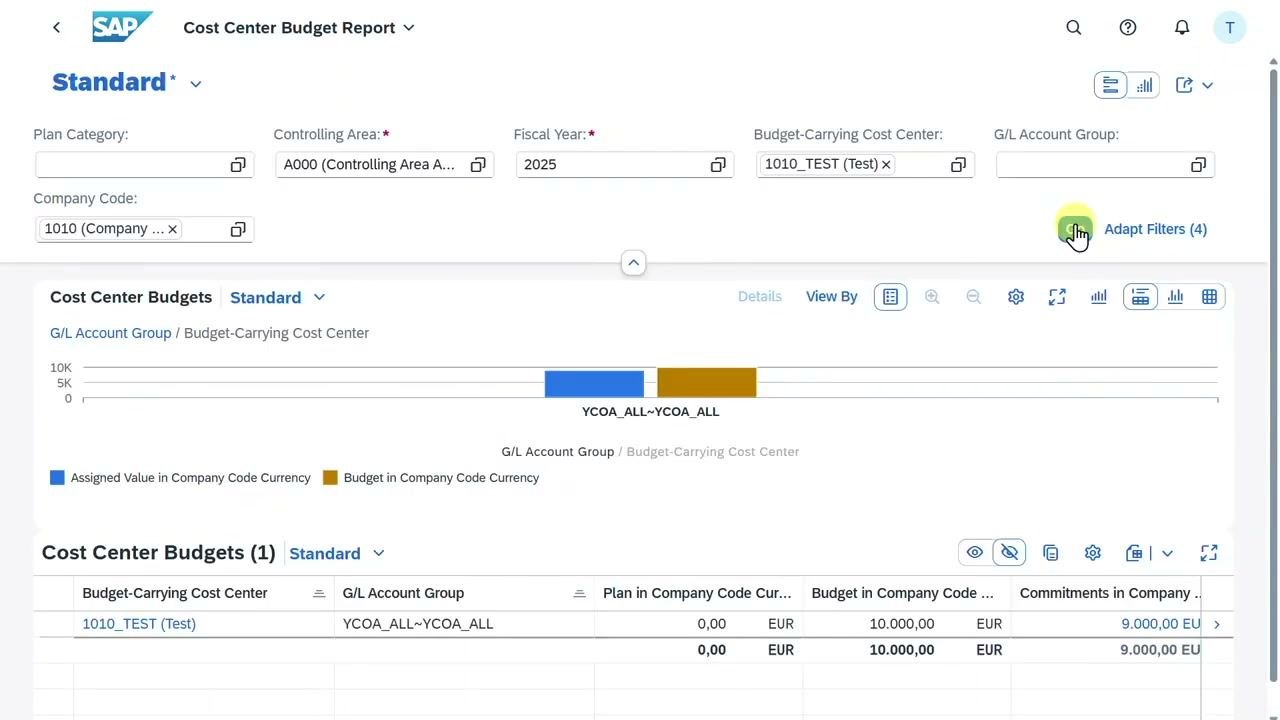
Step 42: Verify that commitments are zero
- Return to the "Cost Center Budget Report" application.
- Click Go to refresh the report.
- Confirm that the "Commitments in Company Code Currency" column now shows 0.00 EUR.
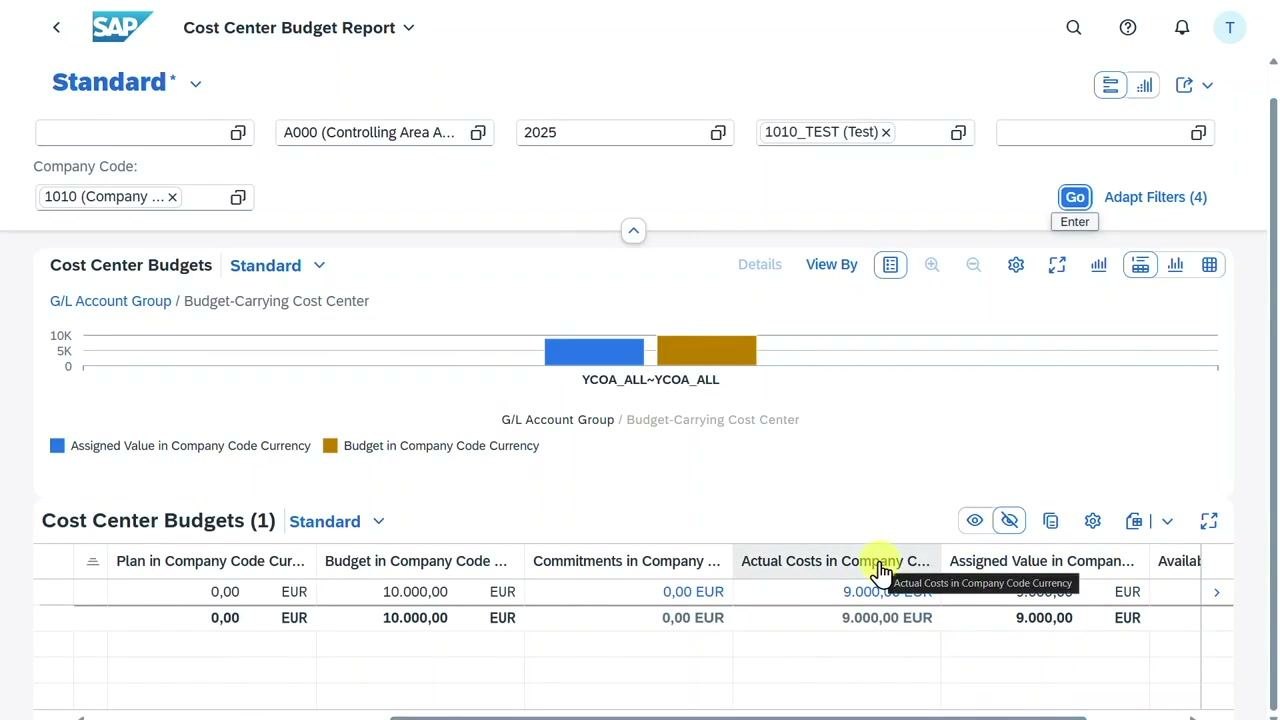
Step 43: Check the actual costs
Scroll to the right in the "Cost Center Budgets" table. Verify that the "Actual Costs in Company Code Currency" column now shows 9,000.00 EUR.
Step 44: Review the available budget
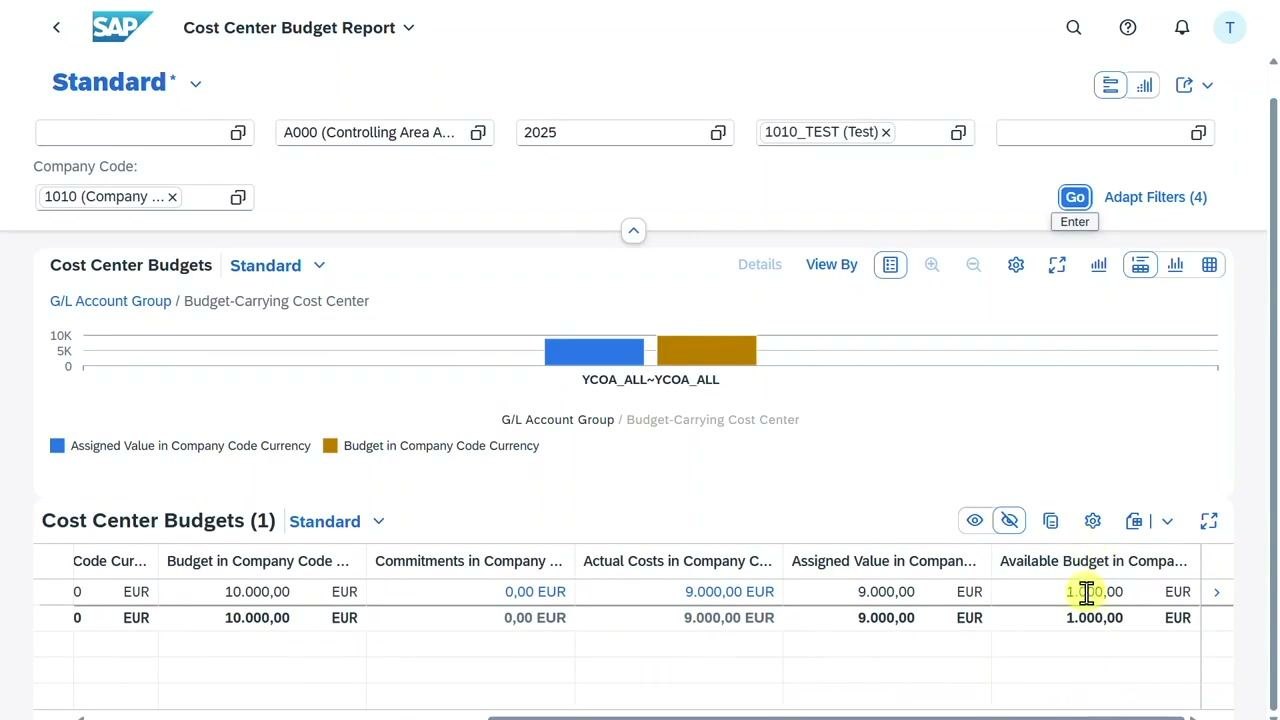
In the same table, check the "Available Budget in Company Code Currency" column. Confirm that the available budget is now 1,000.00 EUR.
Test the budget tolerance limit
Step 45: Try to create a purchase order that exceeds the budget
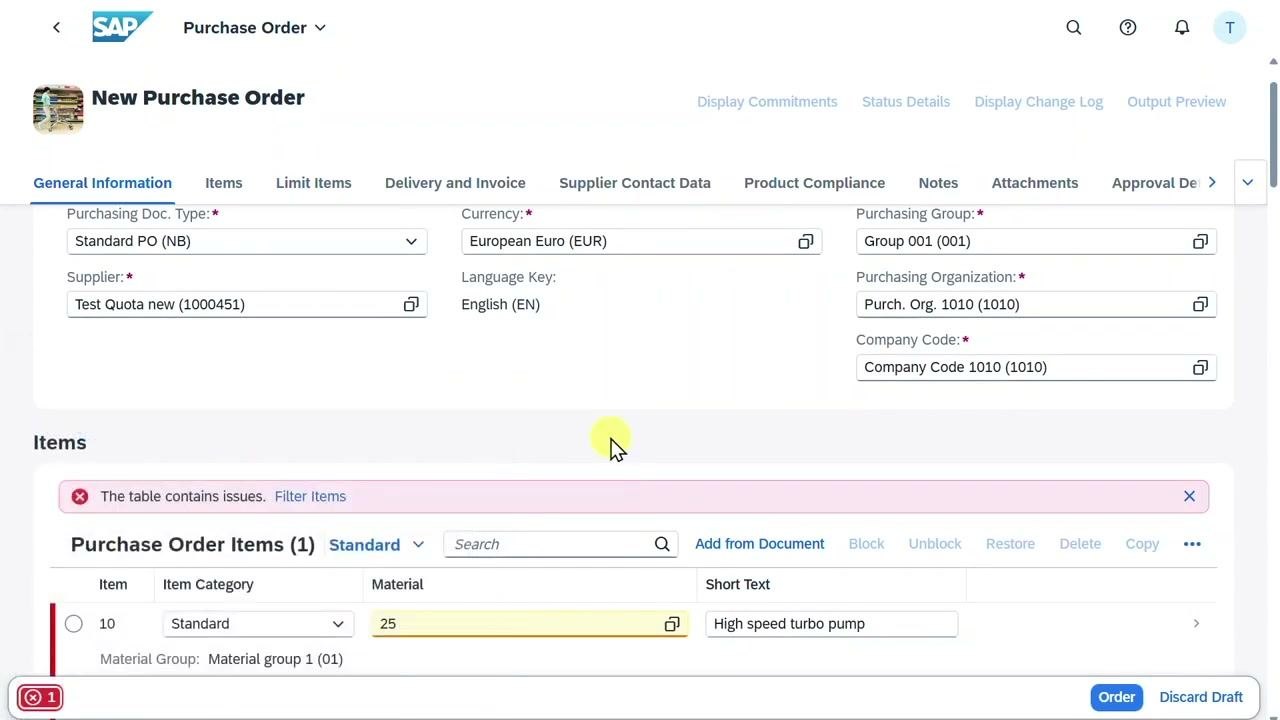
Open the "New Purchase Order" screen in SAP and enter:
- Purchasing Doc. Type: Standard PO (NB)
- Currency: European Euro (EUR)
- Supplier: Test Quota new (1000451)
- Purchasing Group: Group 001 (001)
- Purchasing Organization: Purch. Org. 1010 (1010)
- Company Code: Company Code 1010 (1010)
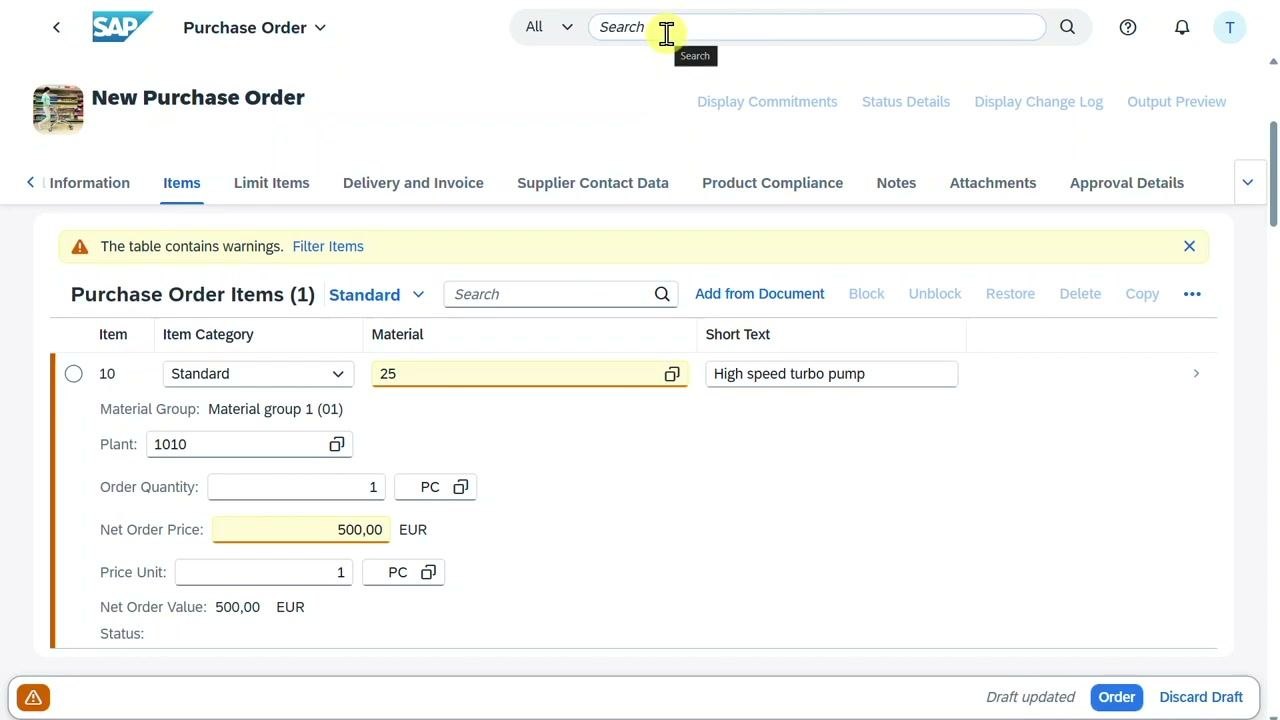
In the "Items" section, add an item with Material: 25 and Short Text: High speed turbo pump. The system displays the message "The table contains issues." Attempt to proceed with the order.
Step 46: Review the budget tolerance warning
When you attempt to order, these warning messages appear:
- "Enter Reason for ordering, customer"
- "Enter Requester, customer"
- "The budget tolerance limit of 90.00% for cost center 1010_TEST, YCOA_ALL~YCOA_ALL has been reached."
- Additional warnings about material procurement and pricing.
The system prevents the order because it exceeds the budget tolerance.
Step 47: View the specific budget tolerance warning
Click the warning to view its details. The message states: "The budget tolerance limit of 90.00% for cost center 1010_TEST, YCOA_ALL~YCOA_ALL has been reached."
This indicates that the cost center cannot be used for further orders until the budget is increased or the items are adjusted.
Increase the budget with a supplement
Step 48: Open Manage Cost Center Budgets
Open the "Manage Cost Center Budgets" application. Use the filters at the top to search by Fiscal Year, Document Number, Budgeting Process, Posting Date, or Plan Category as needed.
To adjust budgets, click the Create button and select one of these options:
- Budget Transfer
- Budget Return
- Budget Supplement
In this example, select Budget Transfer to move budget between cost centers.
Step 49: Enter the budget document details
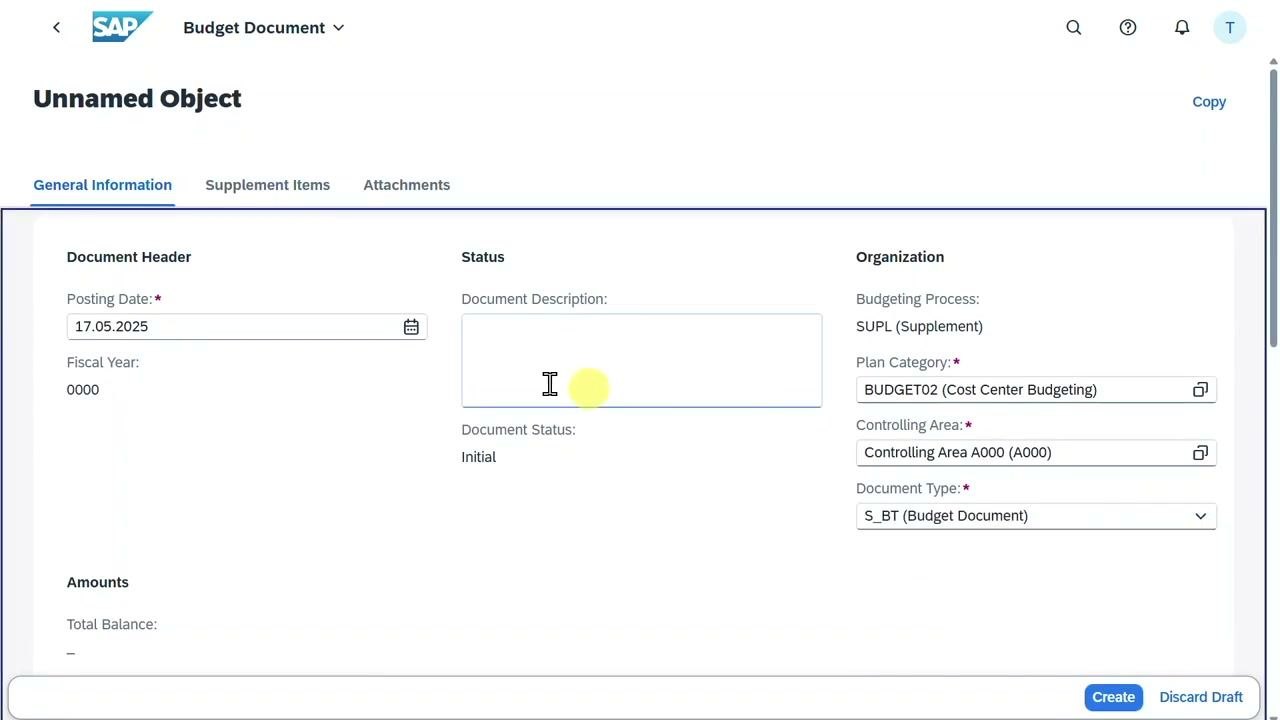
In the "Budget Document" screen, fill in:
- Posting Date: 17.05.2025
- Plan Category: BUDGET02 (Cost Center Budgeting)
- Controlling Area: Controlling Area A000 (A000)
- Document Type: S_BT (Budget Document)
Optionally, enter a document description. Make sure all required fields are completed before you continue.
Step 50: Specify the supplement items
In the "Supplement Items" section, enter:
- Company Code: 1010
- Cost Center: 1010_TEST
- Account Number: 65301000
- Amount in Company Code Currency: 2,000.00 EUR
- Budgeting Item Description: optional
- Budget Process Type: SUPL (Supplement)
Click Create to finalize the budget supplement.
Step 51: Review the updated Cost Center Budget Report
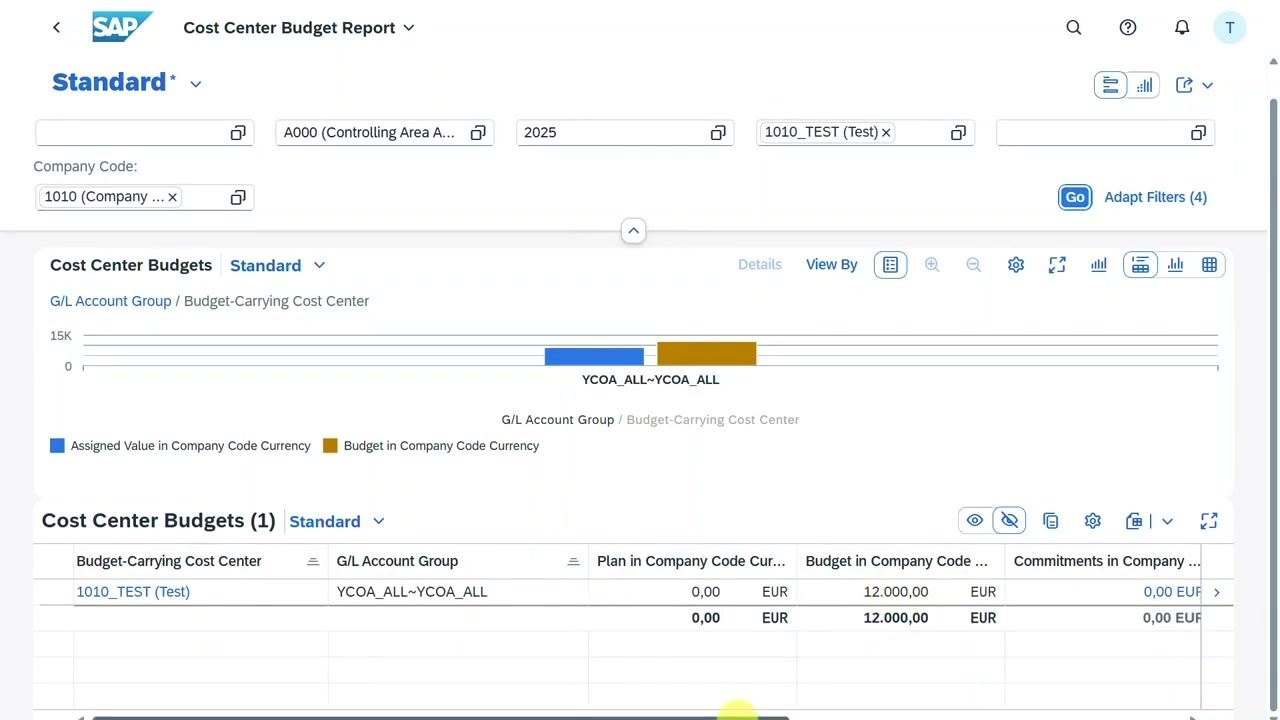
Open the "Cost Center Budget Report" screen and confirm that these filters are set:
- Controlling Area: A000 (Controlling Area A000)
- Fiscal Year: 2025
- Company Code: 1010 (Company Code 1010)
- Budget-Carrying Cost Center: 1010_TEST (Test)
The bar chart displays the assigned value (blue) and the budget in company code currency (yellow) for the cost center group YCOA_ALL~YCOA_ALL.
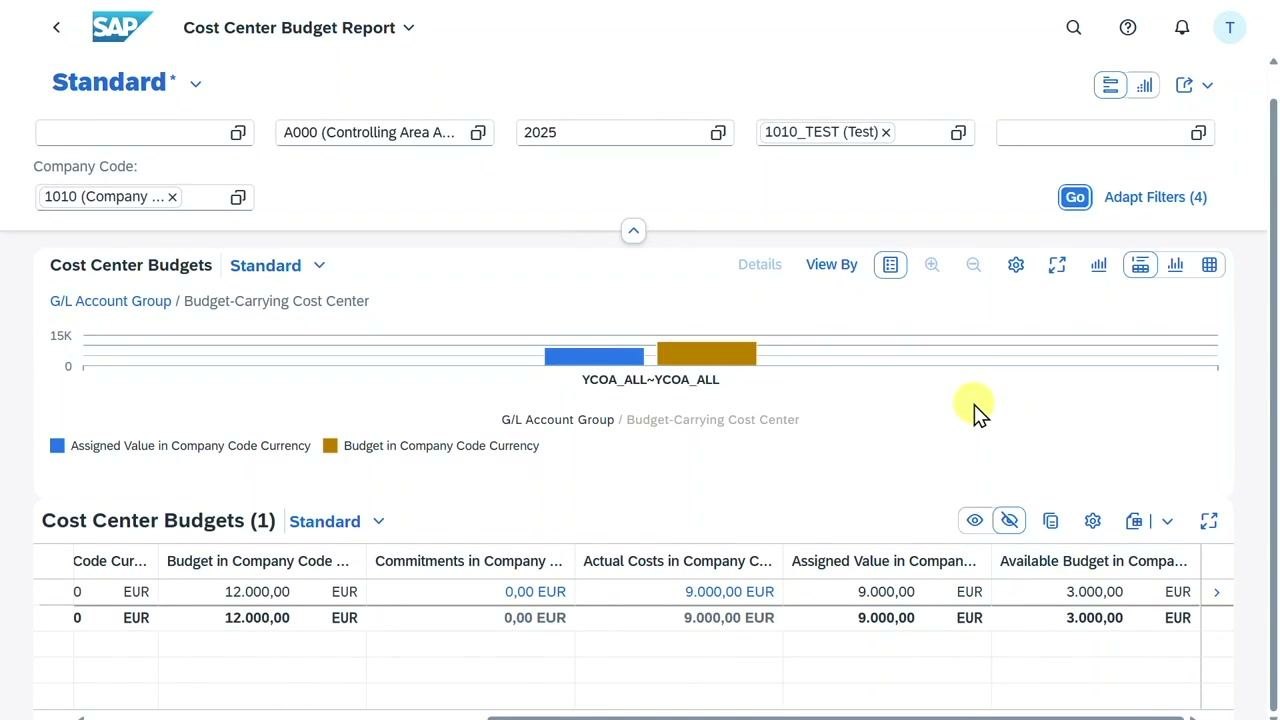
In the "Cost Center Budgets" table, verify these values:
- Budget in Company Code Currency: 12,000.00 EUR
- Commitments in Company Code Currency: 0.00 EUR
- Actual Costs in Company Code Currency: 9,000.00 EUR
- Assigned Value in Company Code Currency: 9,000.00 EUR
- Available Budget in Company Code Currency: 3,000.00 EUR
The available budget reflects the recent supplement and is now higher.
Summary
You now know how to activate availability control in SAP for cost center budgets. You created budget availability control profile Z123 with account groups and tolerance limits (a warning at 90% and an error at 100%). You reviewed plan category BUDGET02, enabled availability control and consistency checks, and defined the budget document type and number range.
You then created cost center 1010_TEST with budget availability control switched on and uploaded a budget of 10,000.00 EUR. You tested the setup with a purchase order and a goods receipt, watched commitments and actual costs update in the Cost Center Budget Report, and saw the tolerance warning at 90%. Finally, you increased the budget by 2,000.00 EUR with a budget supplement, which raised the available budget to 3,000.00 EUR.
Generation details: cost, quality tiers
Docsie billed 7,000 credits ($4.90) to analyze this 14-minute video at standard quality. The rewrite, template fill and Word/PDF exports were included. The same video at each quality tier:
| Quality | Frames sampled | Credits | Approx. cost |
|---|---|---|---|
| Draft | every 16-30 s | 3,500 | $2.45 |
| Standard (this guide) | every 8-15 s | 7,000 | $4.90 |
| Detailed | every 4-7 s | 14,000 | $9.80 |
| Ultra | every 1-3 s | 28,000 | $19.60 |
Credits priced at $0.70 per 1,000; plans include a monthly allowance. Enterprise customers on on-premise or bring-your-own-model deployments run this on their own inference and pay no per-video credits.
Generated by Docsie Video-to-Docs on 2026-11-15 from a 13-minute video. Screenshots are frames from the source video and belong to their creator, ERPBrew, whose original is embedded above. If you own this video and want the guide removed or credited differently, contact us and we will act within one business day.