
How to Activate Fiori Apps in SAP
Activating SAP Fiori apps in SAP S/4HANA involves identifying the correct business role in the SAP Fiori Apps Reference Library, then using the Task Manager for Technical Configuration to generate and assign that role automatically. This guide walks you through the complete process—from researching available apps to confirming that a user can access them in the SAP Fiori Launchpad.
Video: Activating Fiori Apps Via Rapid Activation SAP S/4 HANA by Secure SAP (2022). All credit for the demonstration goes to the creator; watch the original on YouTube. The written guide below was generated from this video by Docsie. Creator? Request a change or removal.
Activating SAP Fiori apps in SAP S/4HANA involves identifying the correct business role in the SAP Fiori Apps Reference Library, then using the Task Manager for Technical Configuration to generate and assign that role automatically. This guide walks you through the complete process—from researching available apps to confirming that a user can access them in the SAP Fiori Launchpad.
Prerequisites
- Access to the SAP Fiori Apps Reference Library at https://fioriappslibrary.hana.ondemand.com, with appropriate login credentials.
- Access to SAP GUI with authorization to run transaction STC01 (Task Manager for Technical Configuration).
- Access to user and role maintenance transactions in your SAP S/4HANA system.
- Knowledge of your SAP S/4HANA system version (for example, SAP S/4HANA 2020 FPS02).
Part 1: Find the right business role in the SAP Fiori Apps Reference Library
Open the SAP Fiori Apps Reference Library
Navigate to the SAP Fiori Apps Reference Library in your web browser and log in with your credentials. You will see the welcome screen with the message "Welcome to the SAP Fiori Apps Reference Library!" along with options to explore, plan, and implement SAP Fiori.
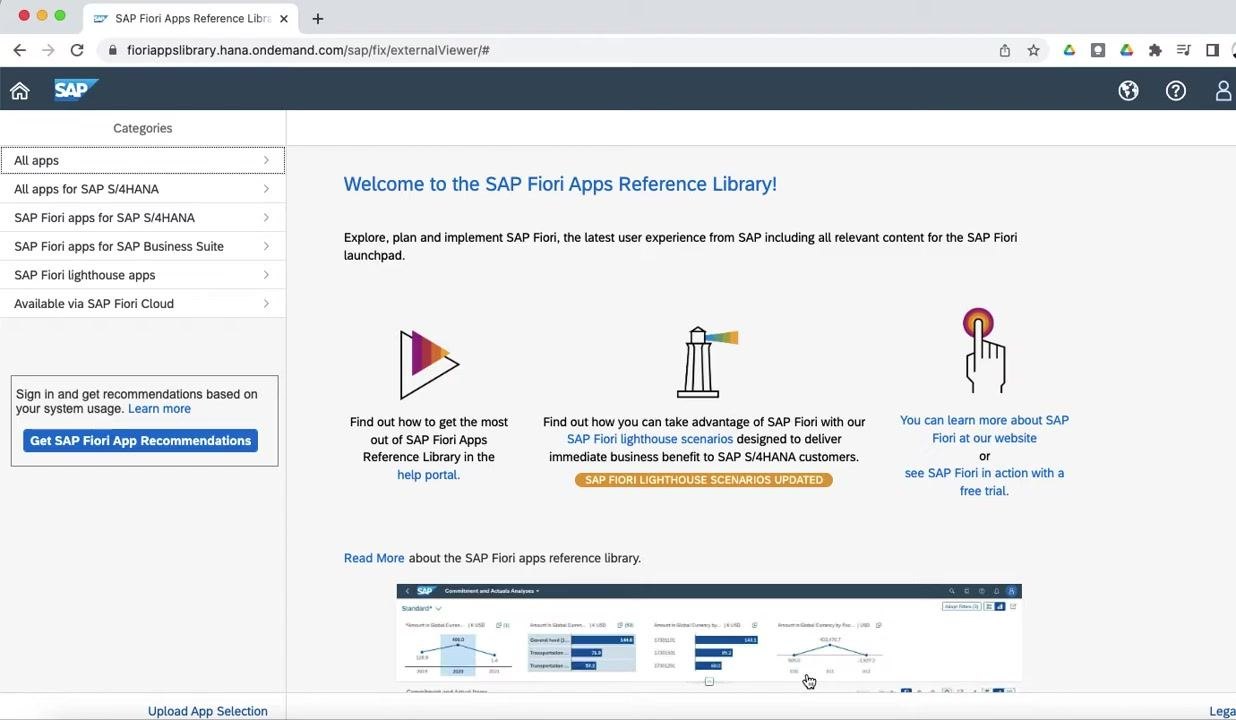
Navigate to All apps for SAP S/4HANA
In the left sidebar, under Categories, click All apps for SAP S/4HANA. This displays all Fiori apps available for your SAP S/4HANA system.
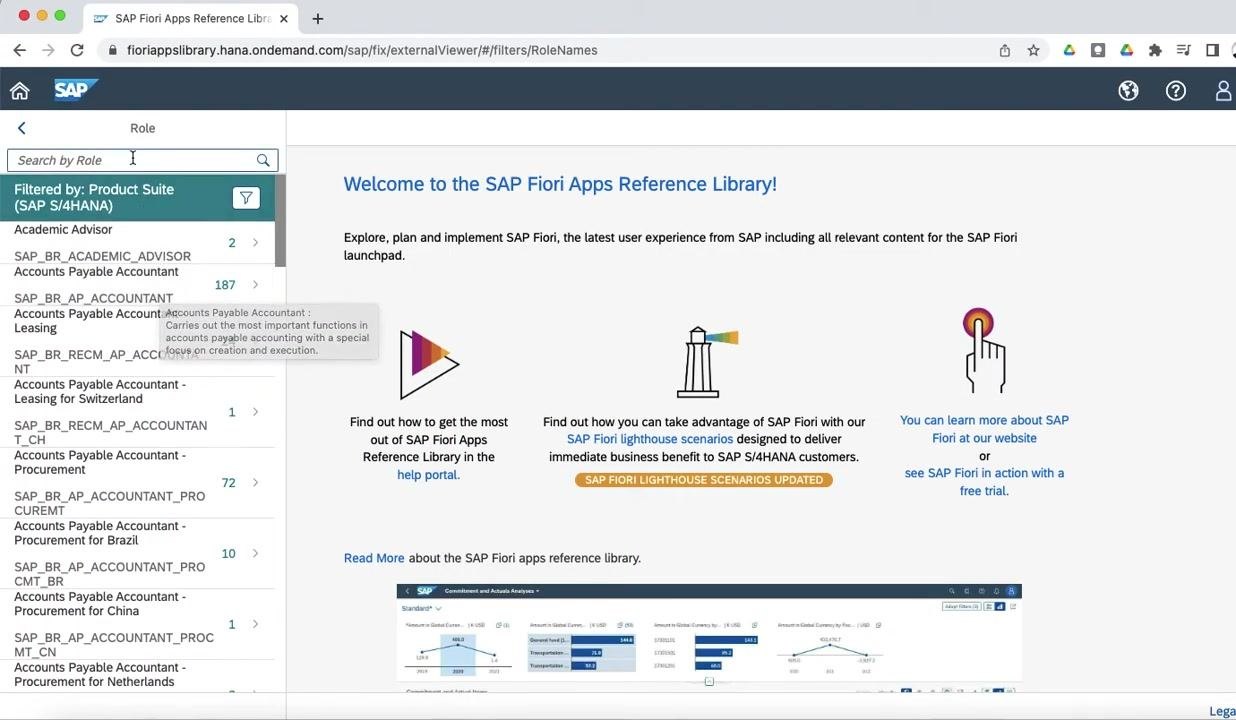
Open the filter panel
Click the filter icon or Filter button to open the filter panel. Confirm that the following fields are available: Product Suite (SAP S/4HANA), Application Type, UI Technology, Line of Business, Role, Industry, and SAP Fiori lighthouse apps.
Set your filter criteria
Set the Line of Business field to Finance to display all SAP business roles related to finance.
Search and select the desired role
In the Role field or search bar, type or scroll to find the business role you want to activate. For this example, locate and select SAP Business Role for Account Payable Manager, or the role relevant to your scenario. Review the list of available roles and their descriptions to confirm you have the correct one.
After selecting the role, click OK to confirm your selection. The system then displays all Fiori apps and classic UIs associated with that business role.
By completing these steps, you have filtered and selected the appropriate SAP business role in the SAP Fiori Apps Reference Library, preparing you for the rapid activation of all relevant Fiori apps and classic UIs for that role.
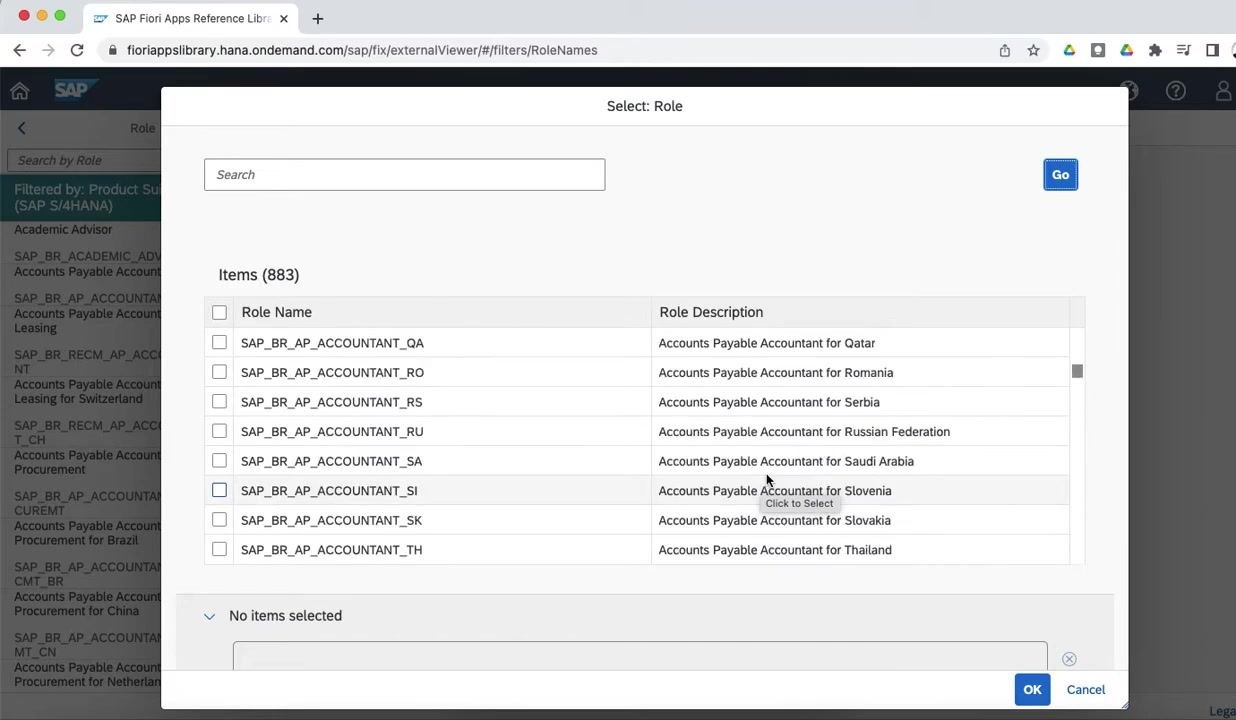
Review the list of available apps
After selecting the Accounts Payable Manager role, note that 27 apps are associated with this business role. These apps may include both Web GUI and classic UI5 applications.
In the left panel, review the list of SAP Fiori apps available for the selected role. Example apps include:
- Accounts Payable Overview
- Aging Analysis (S/4HANA)
- Approve Bank Payments
- Approve Bank Payments (Version 2)
- Cash Discount Forecast (S/4HANA)
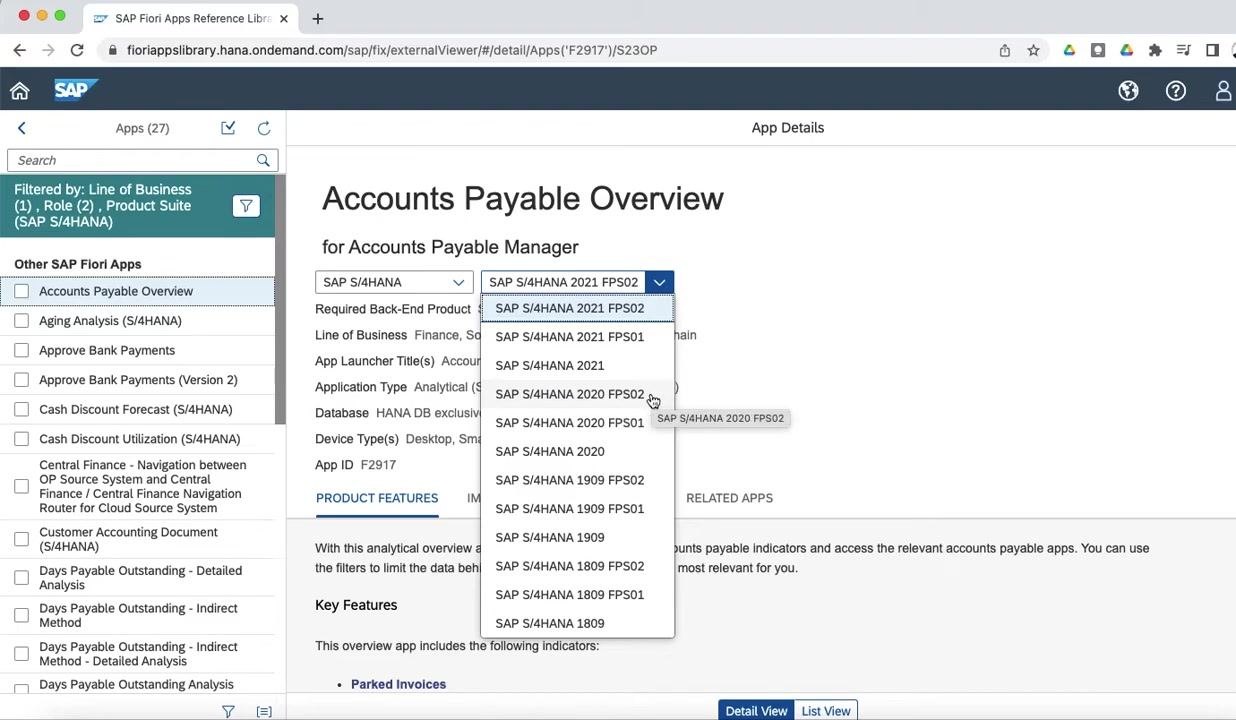
Select Accounts Payable Overview from the list to proceed.
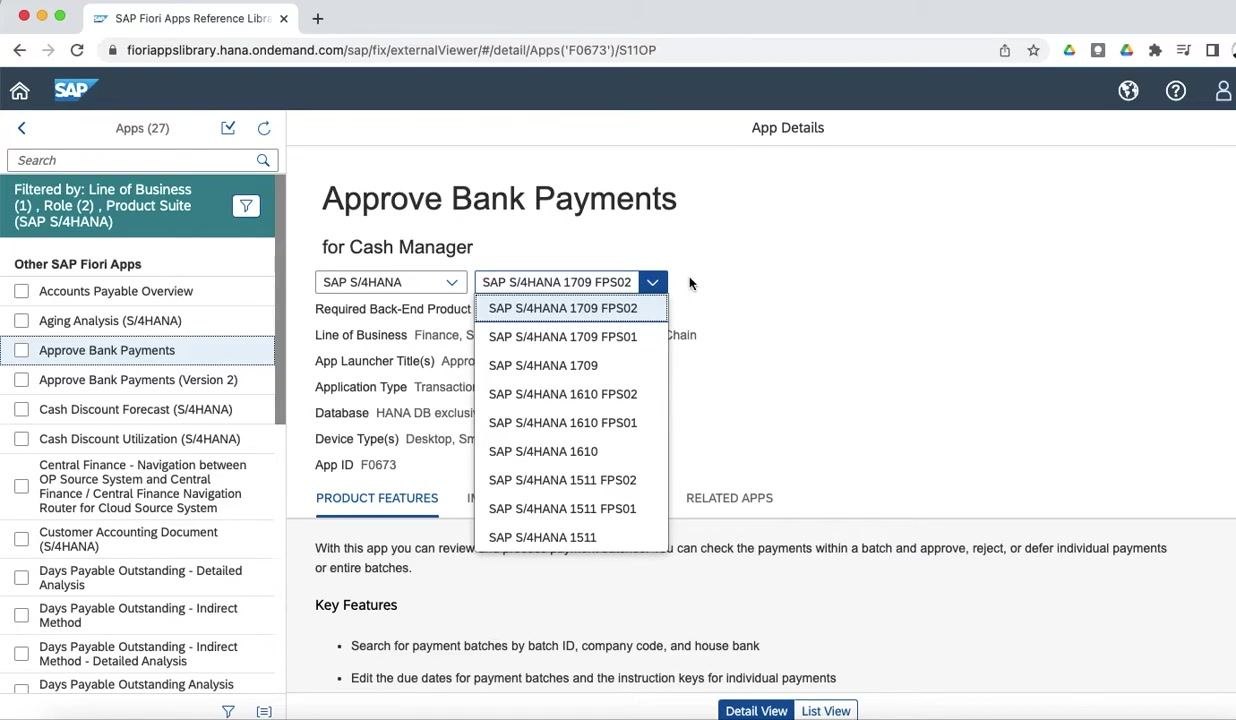
Check app compatibility with your system version
In the app details, open the system version dropdown and select your current system version. For this example, select SAP S/4HANA 2020 FPS02 to confirm the app is compatible with your system.
Access implementation and configuration information
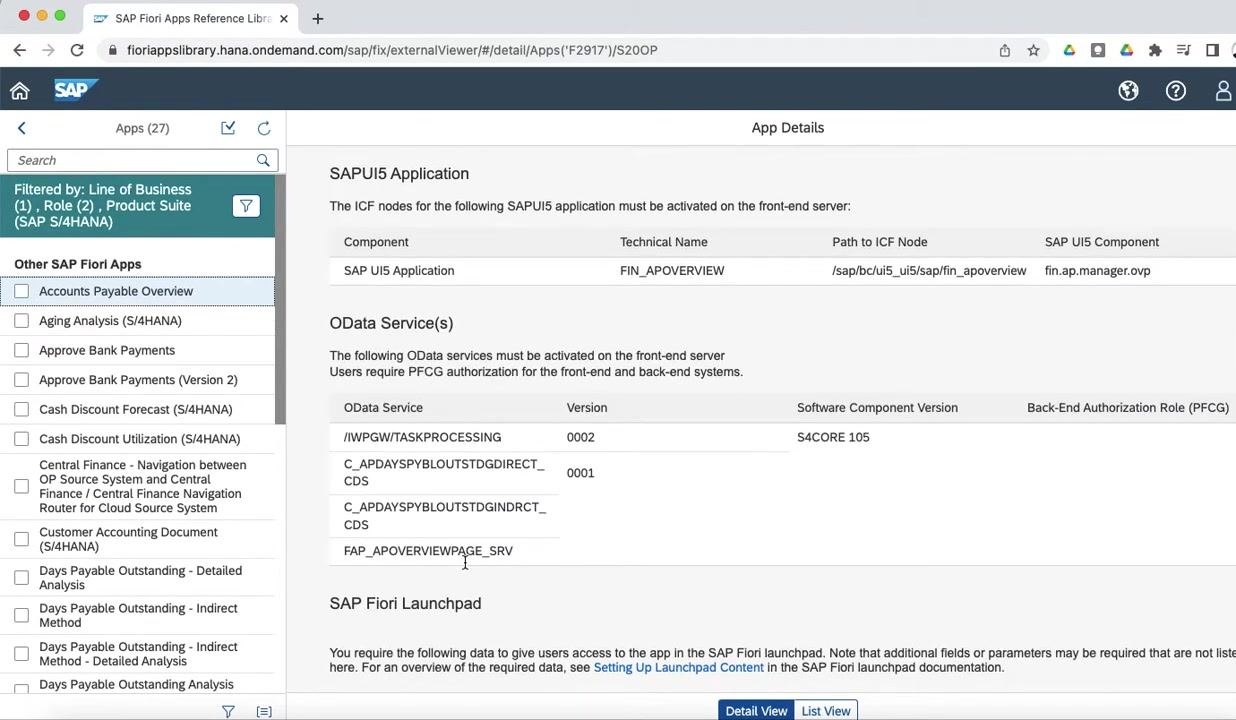
Navigate to the Implementation Information or Configuration section of the app details. Review the following technical details:
- SAPUI5 Application: component, technical name, path to ICF node, SAP UI5 component
- OData Services: service names, versions, software component versions, and required PFCG roles
- SAP Fiori Launchpad: information required for launchpad access
Review catalogs and business role information
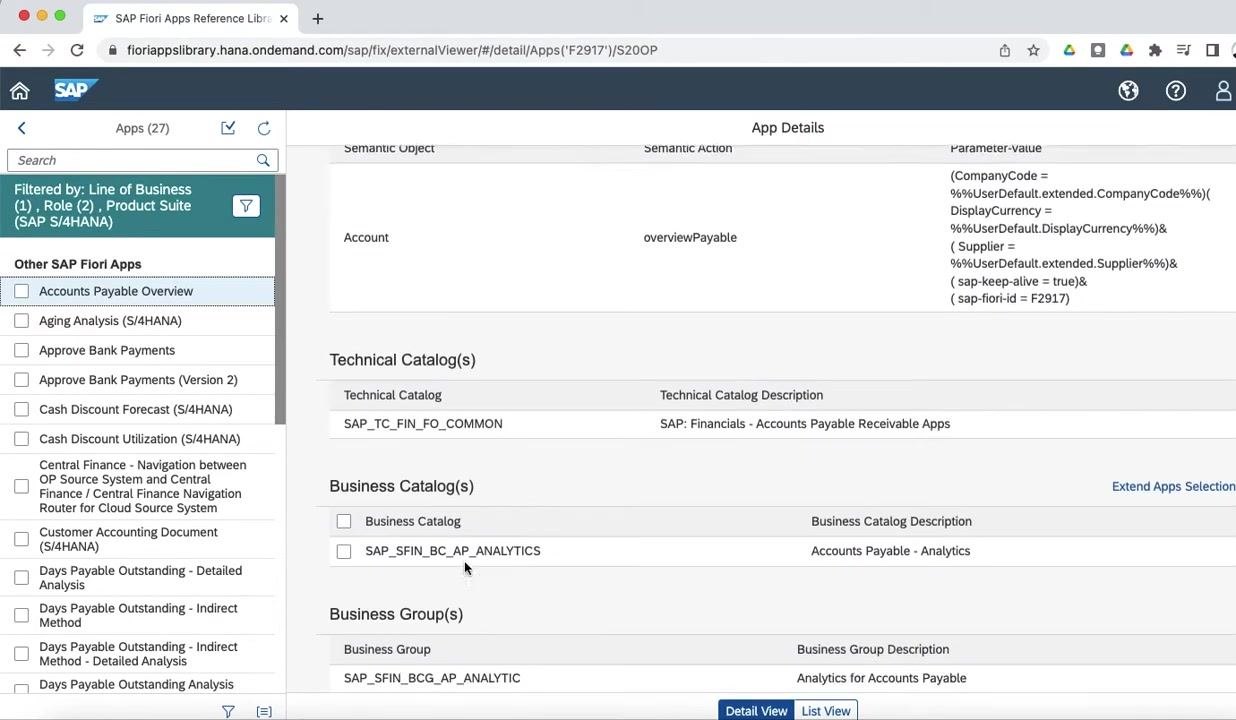
Scroll down to view the technical catalog, business catalog, business group, and business role details:
- Technical Catalog: SAP_TC_FIN_FO_COMMON (SAP: Financials - Accounts Payable Receivable Apps)
- Business Catalog: SAP_SFIN_BC_AP_ANALYTICS (Accounts Payable - Analytics)
- Business Group: SAP_SFIN_BCG_AP_ANALYTIC (Analytics for Accounts Payable)
- Business Role: SAP_BR_AP_MANAGER (Accounts Payable Manager)
Copy the SAP business role for reference
Highlight and copy the SAP_BR_AP_MANAGER business role. You will use this value in SAP GUI during activation.
Part 2: Activate the business role using Task Manager for Technical Configuration
Open SAP GUI and launch Task Manager for Technical Configuration
Open SAP GUI and execute transaction code STC01 to open the Task Manager for Technical Configuration. In the Task List field, begin typing SAP_FIORI_CONTENT_ACTIVATION and select it from the dropdown list.
By completing these steps, you have reviewed the technical and business details for the selected SAP Fiori app, confirmed compatibility with your system version, and prepared the information needed for rapid activation using SAP GUI.
Select or confirm the SAP business role for FLP content activation
After executing the task list, review the steps displayed for activating the business role. The task list includes phases such as scope definition, preparation, configuration, and postprocessing, with key steps including selecting/confirming SAP business roles, determining OData/ICF services, activating services, generating new business roles with a prefix, and creating users.
Locate the step labeled Select/Confirm SAP Business Roles for FLP content activation, then click the parameter field labeled Selected 0 of 502 roles to open the selection dialog.
Enter and select the required SAP business role
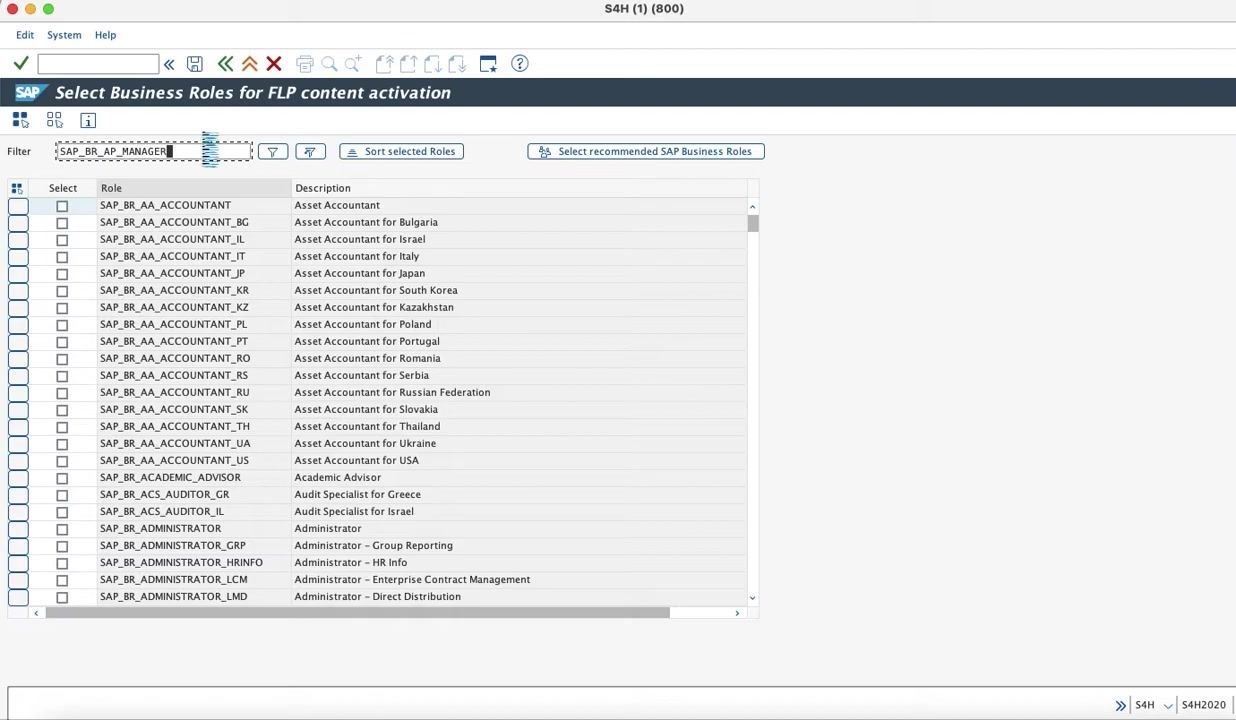
In the Select Business Roles for FLP content activation dialog, use the filter field to enter the business role SAP_BR_AP_MANAGER. Locate SAP_BR_AP_MANAGER (Accounts Payable Manager) in the list and check the box next to it. Click the green checkmark (✔) or equivalent button to confirm your selection and return to the main task list.
Verify the selected business role
Confirm that the parameter field now displays Selected 1 of 502 roles for this step, and ensure the correct business role is selected before proceeding.
Set a prefix for the new business role
Locate the step Generate new Business Roles with Prefix and click the parameter field (for example, Prefix: Z) to open the prefix entry dialog. In the Edit Variants screen, enter the prefix for the new business role—for this example, ZB. Click the green checkmark (✔) to save the prefix and return to the main task list.
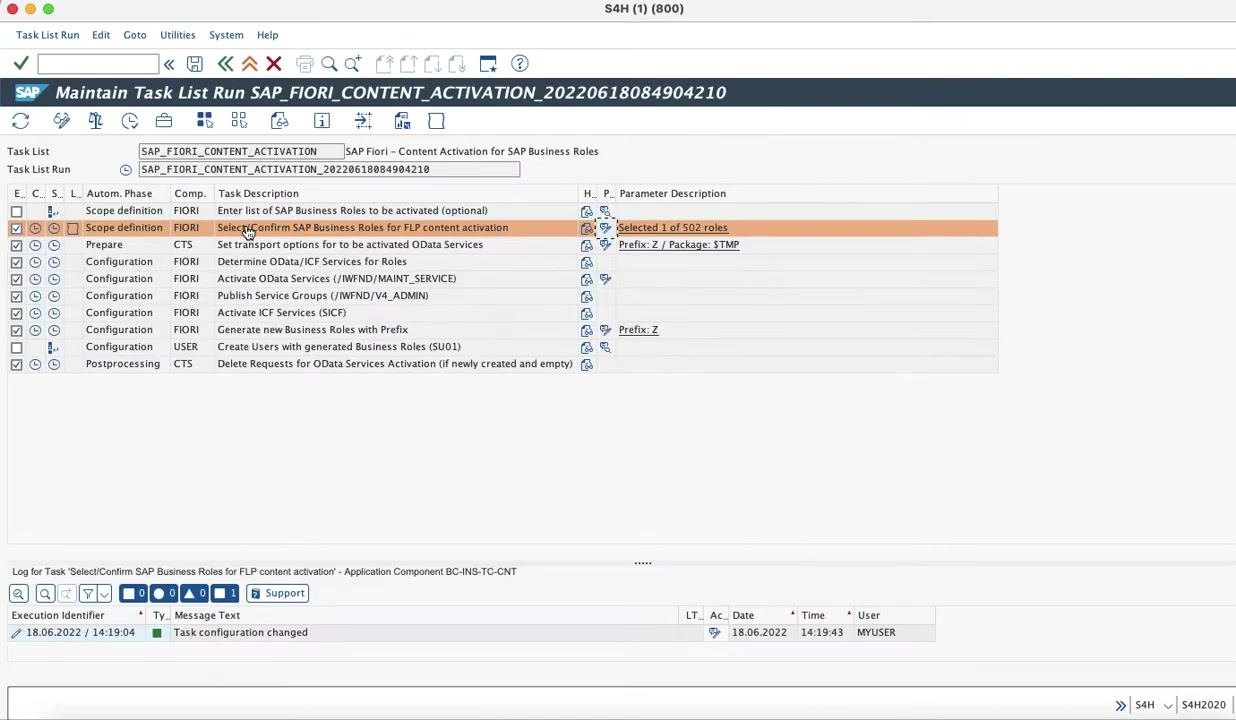
Execute the task list to activate the business role
With the business role selected and the prefix set, execute the task list to begin the activation process. The system processes each step, including generating the new business role with the specified prefix (for example, ZB_BR_AP_MANAGER).
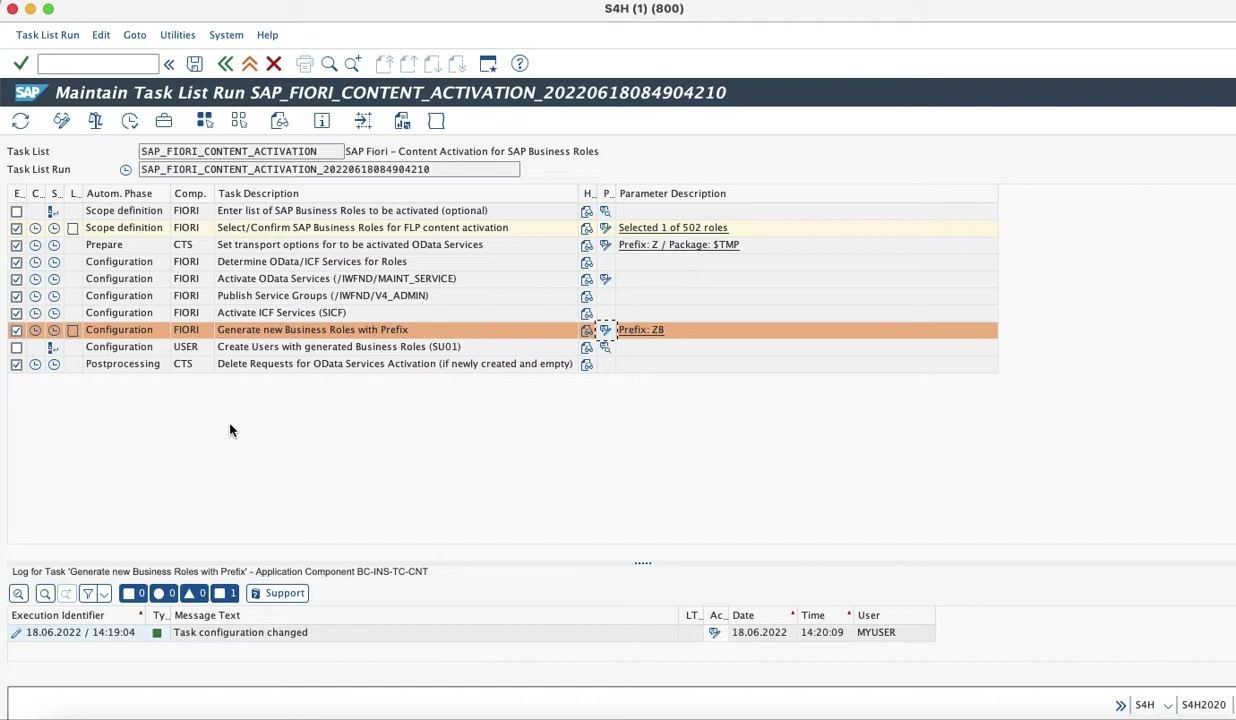
Monitor task execution and review logs
Expand the log section at the bottom of the screen to monitor progress and review messages for each step. The log displays status updates, such as "Task configuration changed" and processing messages for each task. Confirm that the Generate new Business Roles with Prefix step completes successfully.
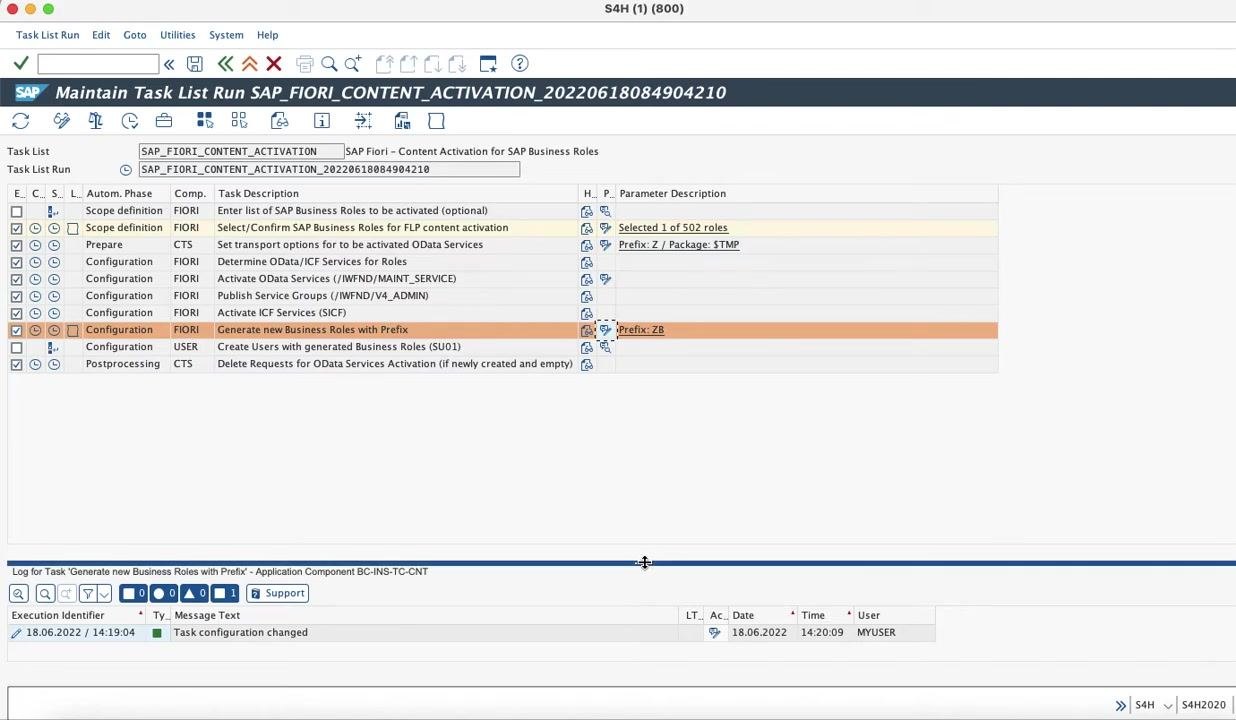
Part 3: Confirm business role creation
Review the task list run for business role creation
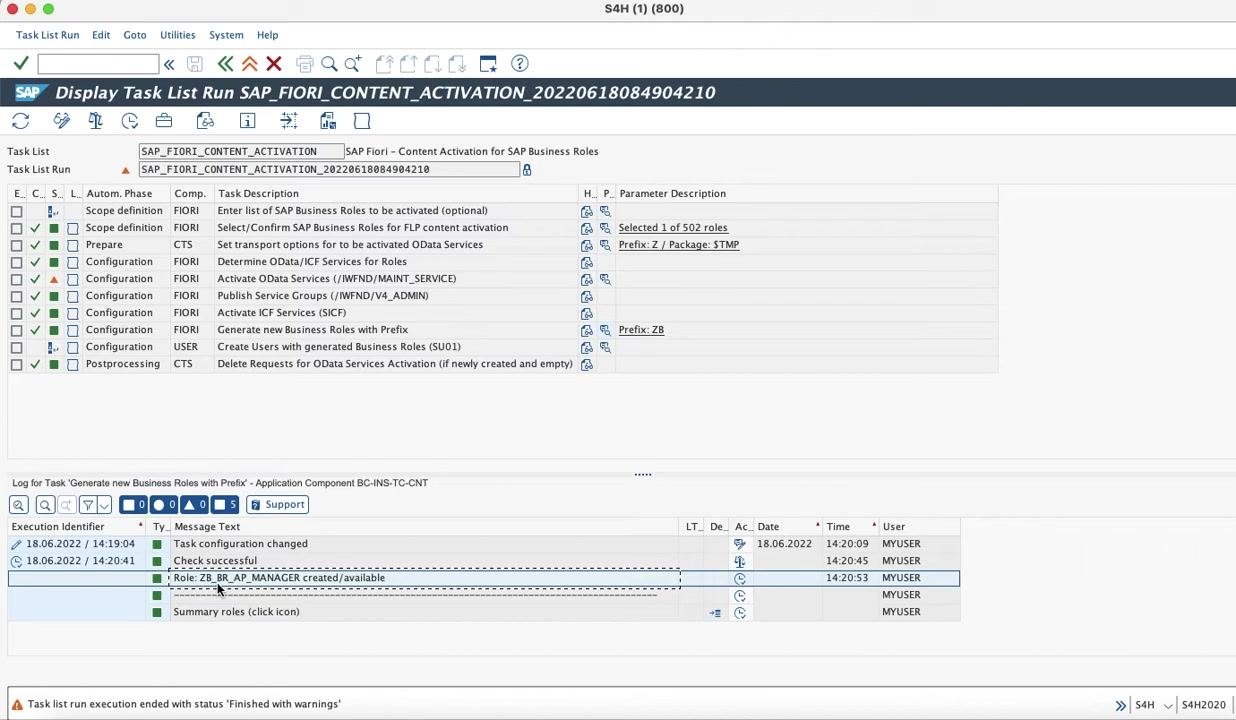
Open SAP GUI and navigate to the Display Task List Run screen for SAP_FIORI_CONTENT_ACTIVATION. Confirm the task list run includes the following steps:
- Enter list of SAP Business Roles to be activated (optional)
- Select/Confirm SAP Business Roles for FLP content activation (Selected 1 of 502 roles)
- Set transport options for OData Services (Prefix: Z / Package: $TMP)
- Determine OData/ICF Services for Roles
- Activate OData Services (/IWFND/MAINT_SERVICE)
- Publish Service Groups (/IWFND/V4_ADMIN)
- Activate ICF Services (SICF)
- Generate new Business Roles with Prefix (Prefix: ZB)
- Create Users with generated Business Roles (SU01)
- Delete Requests for OData Services Activation (if newly created and empty)
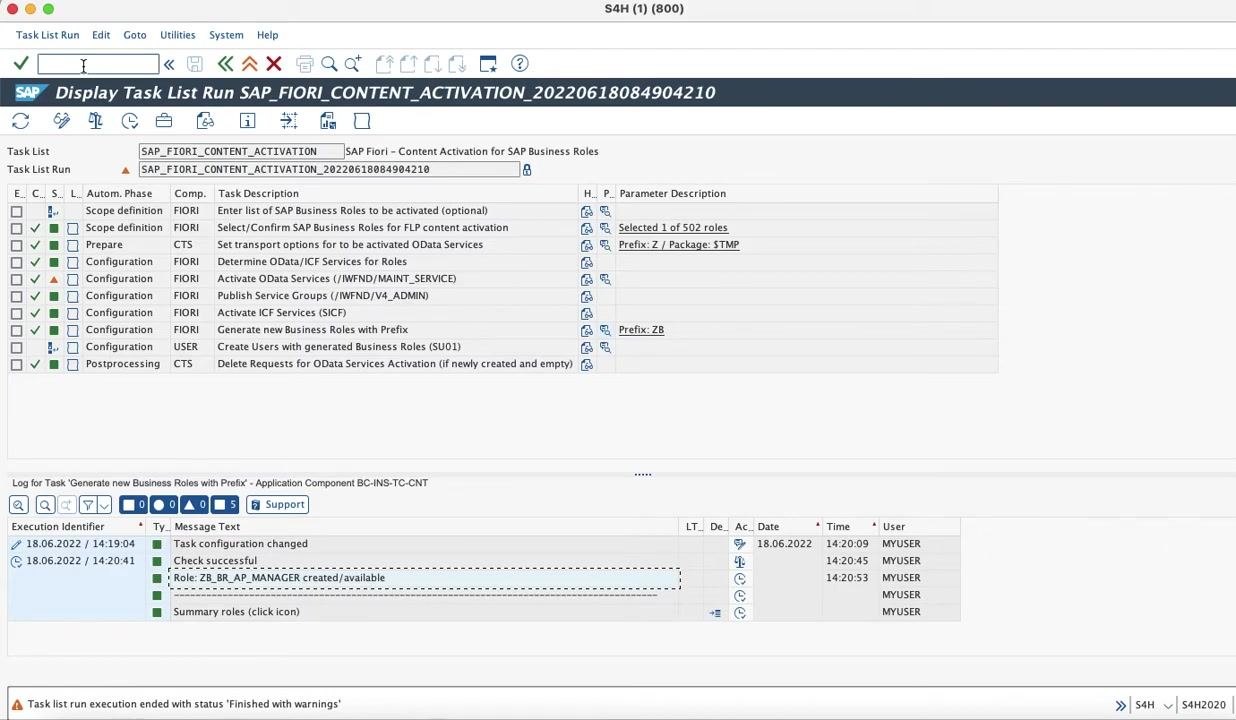
Check the log at the bottom for the message Role: ZB_BR_AP_MANAGER created/available. Note that the task list run may end with status "Finished with warnings"—review any warnings if necessary.
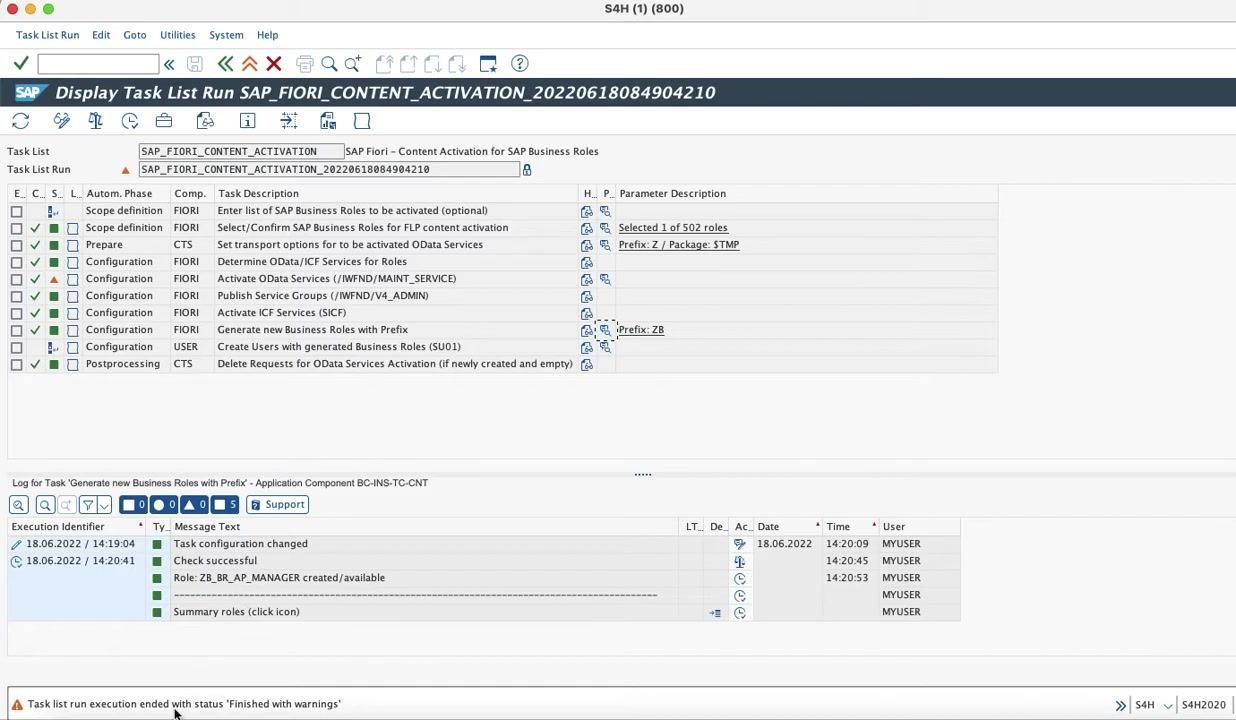
Copy the created business role
In the log section, locate the entry for the newly created role: Role: ZB_BR_AP_MANAGER created/available. Select and copy the role name ZB_BR_AP_MANAGER for use in subsequent steps.
Verify the business role in Role Maintenance
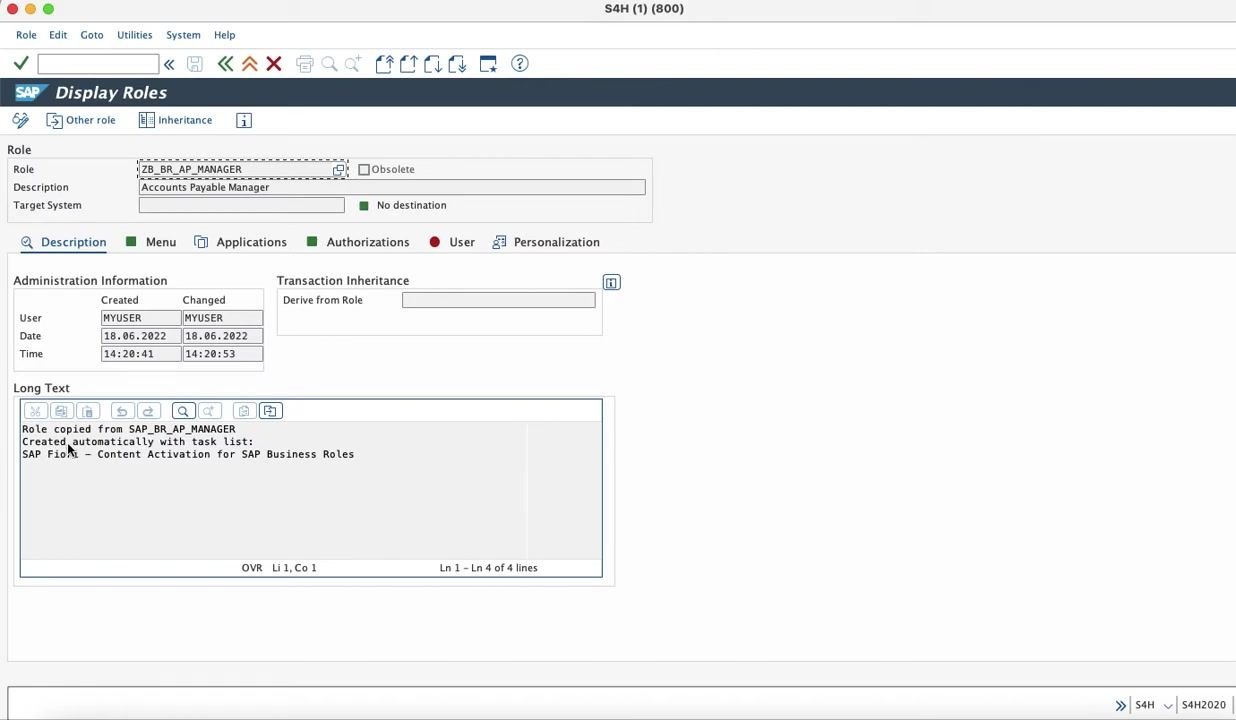
Open the Role Maintenance screen in SAP and enter the role name ZB_BR_AP_MANAGER in the Role field. Confirm that the role appears as a "Single Role" and is available for further configuration.
Open the Display Roles screen for ZB_BR_AP_MANAGER and review the following details:
- Description: Accounts Payable Manager
- Created and Changed by: MYUSER
- Creation and change date/time: 18.06.2022, 14:20:41 / 14:20:53
- Long text: "Role copied from SAP_BR_AP_MANAGER. Created automatically with task list: SAP Fiori - Content Activation for SAP Business Roles"
Confirm that the role is not marked as obsolete and has no destination set.
Part 4: Assign the business role to a user
Open User Maintenance and review user details
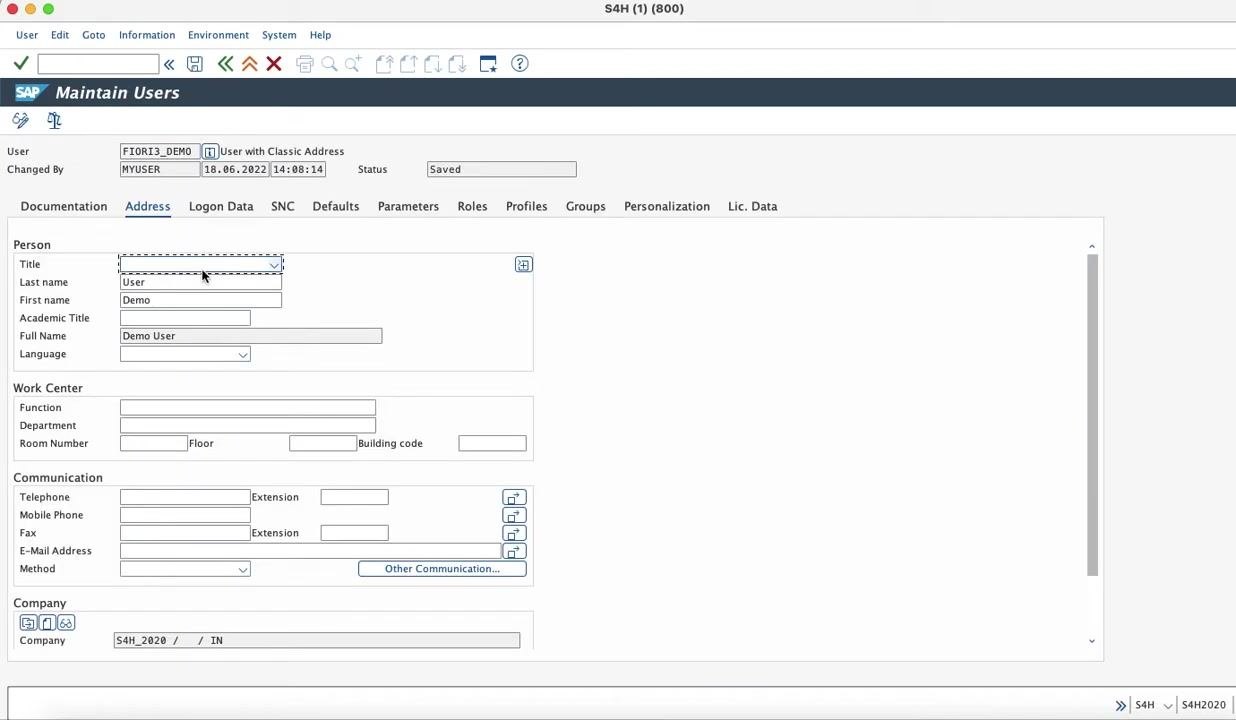
Navigate to the Maintain Users screen and select the user to whom the business role will be assigned (for example, FIORI3_DEMO). Review the user's address and personal information:
- Last name: User
- First name: Demo
- Full Name: Demo User
- Company: S4H_2020 / IN
Ensure the user record is saved and up to date.
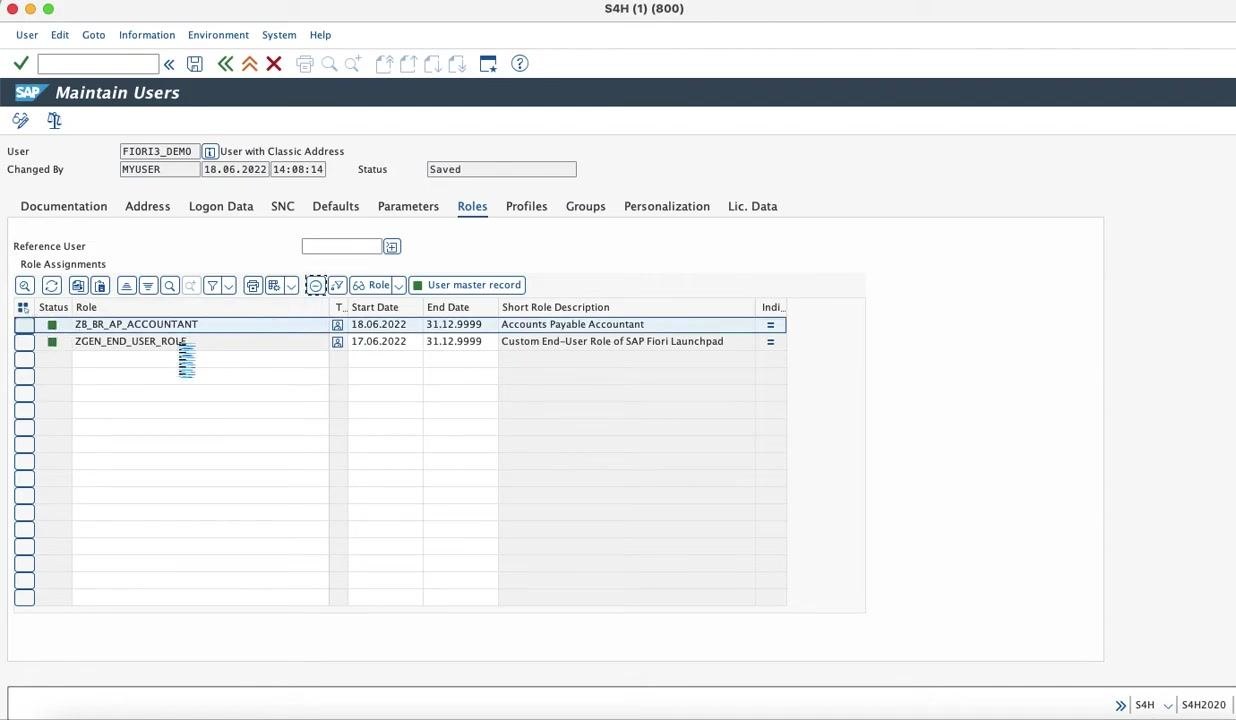
Switch to the Roles tab for the user and confirm that the user already has a general end-user role assigned:
ZGEN_END_USER_ROLE(Custom End-User Role of SAP Fiori Launchpad)- Any other relevant roles (for example,
ZB_BR_AP_ACCOUNTANT)
Assign the newly created business role to the user
In the Roles tab, add the new business role ZB_BR_AP_MANAGER to the user's role assignments. Set the appropriate start and end dates (for example, Start Date: 18.06.2022, End Date: 31.12.9999). Save the changes to ensure the user has the required authorizations for the SAP Fiori Launchpad and the new business role.
Note: Ensure the user has all necessary authorizations to access the SAP Fiori Launchpad. The business role
ZB_BR_AP_MANAGERis now available and assigned to the user, enabling access to the relevant Fiori applications and functionalities.
Confirm role assignment in User Maintenance
Open the Maintain Users screen and navigate to the Roles tab for the user FIORI3_DEMO. Verify that the following roles are assigned, each with a green status indicator:
ZGEN_END_USER_ROLE(Custom End-User Role of SAP Fiori Launchpad), Start Date: 17.06.2022, End Date: 31.12.9999ZB_BR_AP_MANAGER(Accounts Payable Manager), Start Date: 18.06.2022, End Date: 31.12.9999
Part 5: Verify access in the SAP Fiori Launchpad
Launch the SAP Fiori Launchpad
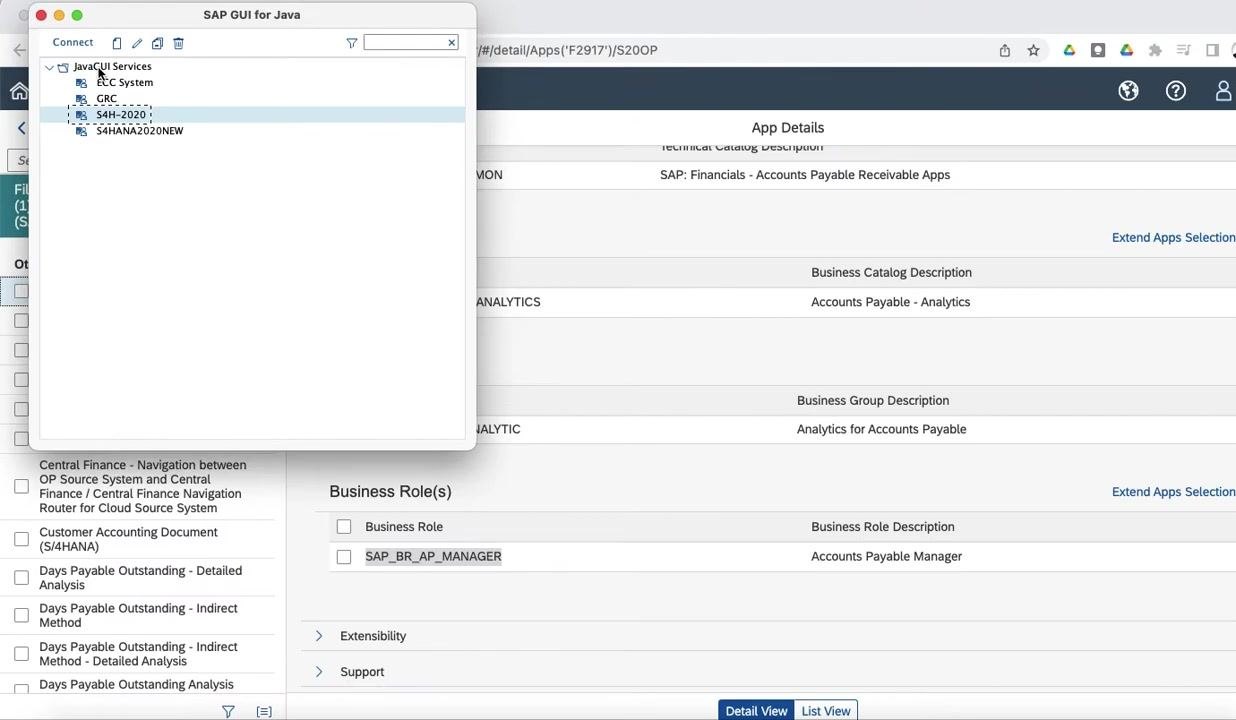
Select the SAP Fiori Launchpad option from the user menu, or alternatively use the transaction code UI2/FLP to launch the Fiori Launchpad. Confirm that the selection is highlighted and the application is starting.
Authenticate in the SAP Fiori Launchpad
When prompted, enter the following credentials:
- User:
FIORI3_DEMO - Password: (as set for the demo user)
- Language: EN - English
Click Log On to proceed.
Verify access to business role apps
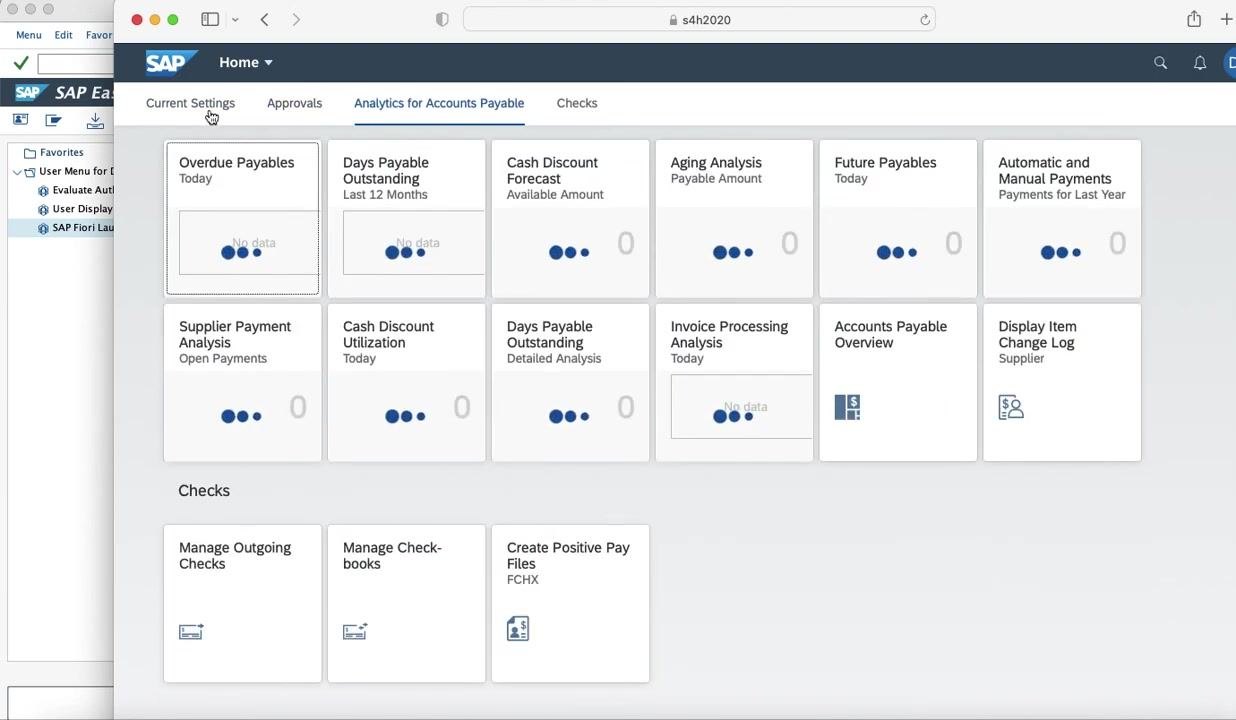
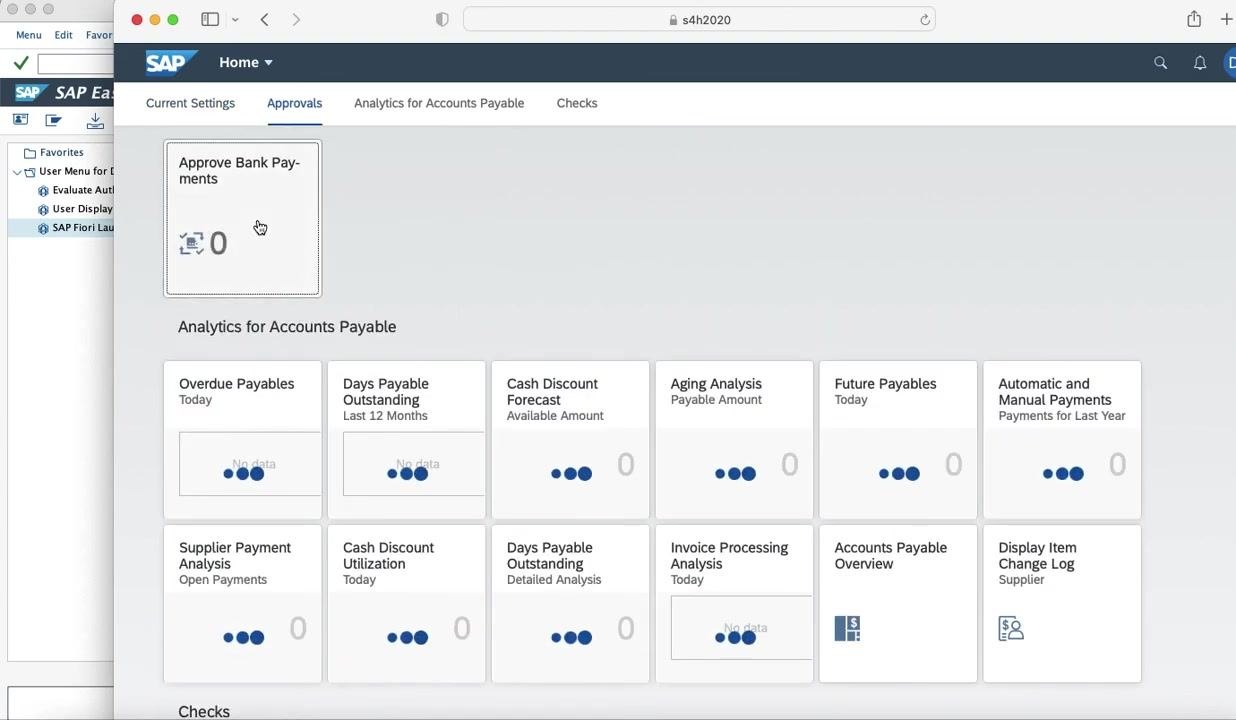
Upon successful login, the SAP Fiori Launchpad home page appears. Confirm the presence of tiles and tabs associated with the "Accounts Payable Manager" business role, such as:
- Edit Options for Journal Entries
- Define Accounting Clerks
- Approve Bank Payments
- Analytics for Accounts Payable (for example, Overdue Payables, Days Payable Outstanding, Cash Discount Forecast, Aging Analysis, Future Payables, Automatic and Manual Payments)
Ensure the apps are grouped under relevant sections like "Current Settings," "Approvals," "Analytics for Accounts Payable," and "Checks."
Explore and use the available apps
Click any available app tile to launch and use the application. For example, select Approve Bank Payments or Overdue Payables to access those functionalities. Confirm that the apps open without authorization errors, which indicates that the role assignment is correct.
Summary
The successful display of all relevant SAP Fiori apps confirms that the business role ZB_BR_AP_MANAGER has been correctly created, assigned, and activated for the user. You can now use the SAP Fiori Launchpad to perform tasks associated with the Accounts Payable Manager role.
What's next
You have learned how to activate Fiori apps in SAP using rapid activation, from identifying a business role in the SAP Fiori Apps Reference Library through to verifying app access in the SAP Fiori Launchpad. You can repeat this process for any other SAP business role by selecting a different role in the Fiori Apps Reference Library and running the same Task Manager for Technical Configuration steps with the appropriate prefix and role name.
Generation details: cost, quality tiers
Docsie billed 4,500 credits ($3.15) to analyze this 9-minute video at standard quality. The rewrite, template fill and Word/PDF exports were included. The same video at each quality tier:
| Quality | Frames sampled | Credits | Approx. cost |
|---|---|---|---|
| Draft | every 16-30 s | 2,250 | $1.57 |
| Standard (this guide) | every 8-15 s | 4,500 | $3.15 |
| Detailed | every 4-7 s | 9,000 | $6.30 |
| Ultra | every 1-3 s | 18,000 | $12.60 |
Credits priced at $0.70 per 1,000; plans include a monthly allowance. Enterprise customers on on-premise or bring-your-own-model deployments run this on their own inference and pay no per-video credits.
Generated by Docsie Video-to-Docs on 2026-10-14 from a 8-minute video. Screenshots are frames from the source video and belong to their creator, Secure SAP, whose original is embedded above. If you own this video and want the guide removed or credited differently, contact us and we will act within one business day.