
How to Import a PSE Certificate in SAP
This guide explains how to import a PSE certificate in SAP by using the Trust Manager (transaction strust). You add the required SSL certificates to the SSL client (Standard) and SSL client (Anonymous) PSEs, then save them so the Internet Communication Manager (ICM) is notified.
Video: STRUST:How to Import/Deploy SSL Client Certificates in SAP System - Anonymous & Standard#TheSAPBasis by The SAP Basis (2020). All credit for the demonstration goes to the creator; watch the original on YouTube. The written guide below was generated from this video by Docsie. Creator? Request a change or removal.
This guide explains how to import a PSE certificate in SAP by using the Trust Manager (transaction strust). You add the required SSL certificates to the SSL client (Standard) and SSL client (Anonymous) PSEs, then save them so the Internet Communication Manager (ICM) is notified.
This process applies only to SAP ABAP systems. SAP Java systems use a different certificate management mechanism, which this guide does not cover.
Prerequisites
Before you begin, make sure you have:
- Access to an SAP ABAP system through SAP GUI, with authorization to use the Trust Manager.
- The four required certificate files, downloaded from the relevant SAP Note for SAP backbone connectivity. Examples include
DigiCertGlobalRootCA.cer,DigiCertGlobalRootG2.cer, andDigiCertHighAssuranceEVRootCA.cer. - A local folder that contains the certificate files (for example,
SAP Backbone > Final Certs).
Open the Trust Manager
Step 1: Open transaction STRUST
- Launch SAP GUI and log in.
- On the SAP Easy Access screen, locate the command field at the top of the window.

- Type
strustin the command field and press Enter. The Trust Manager opens.

Step 2: Switch to change mode
Click the Change (pencil) button to enable editing. You need change mode to modify the certificate store.

Import PSE certificates for the SSL client (Standard)
Step 3: Select the SSL client node
In the left pane under System PSE, you can select either SSL client SSL Client (Anonymous) or SSL client SSL Client (Standard). Start with SSL client SSL Client (Standard) to deploy a standard client certificate.
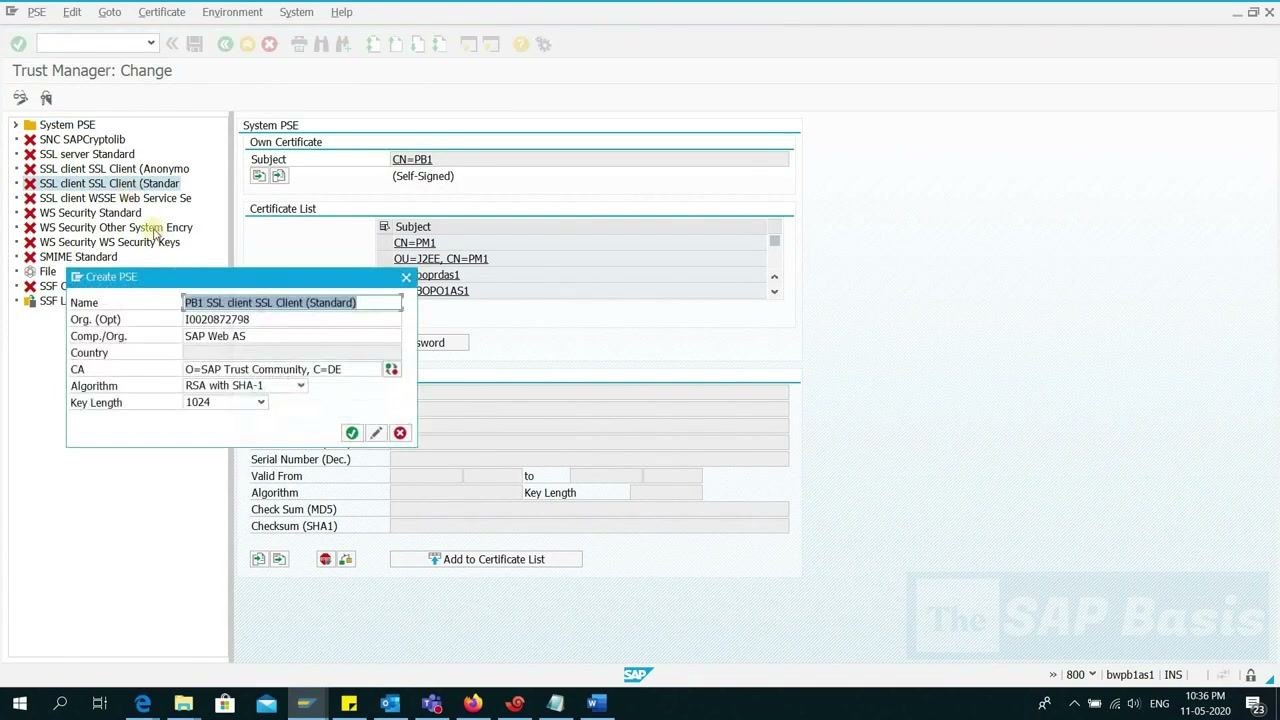
Step 4: Create a new PSE
- Right-click
SSL client SSL Client (Standard)and select Create. - In the Create PSE dialog, review the fields. Keep the default values unless you are instructed otherwise.
The dialog shows these values:
- Name: PB1 SSL client SSL Client (Standard)
- Org. (Opt): 10020872798
- Comp./Org.: SAP Web AS
- Country: as shown
- CA: O=SAP Trust Community, C=DE
- Algorithm: RSA with SHA-1
- Key Length: 1024
- Click the green checkmark (Continue) button.
Step 5: Open the new PSE
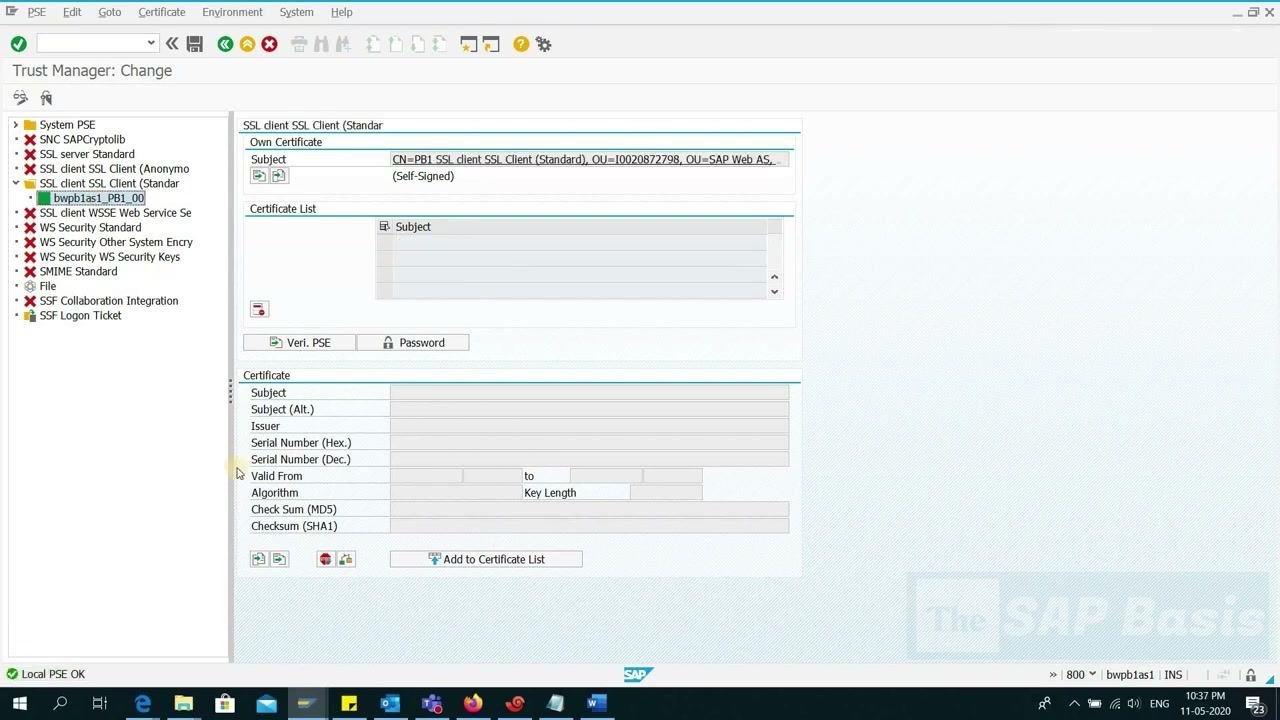
After you click Continue, the system creates the new PSE and selects it. Double-click the new entry (for example, bwpb1as1_PB1_00) to view its details.
Step 6: Start importing a PSE certificate
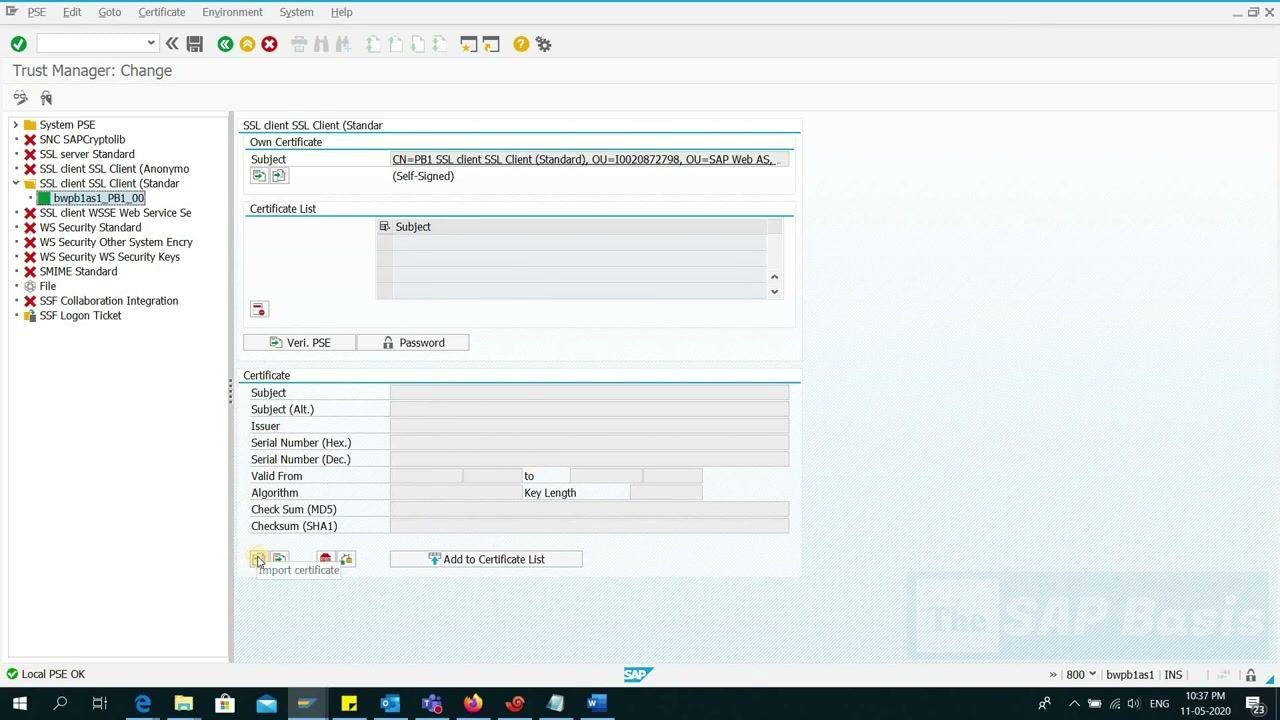
- In the right pane, find the Certificate List section.
- Click the Import certificate button (the certificate icon with a green arrow) at the bottom left of the certificate section.
A file dialog opens so you can select a certificate file from your local system.
Step 7: Select the certificate file
- In the Select File dialog, navigate to the folder that contains your certificates (for example,
SAP Backbone > Final Certs). - Identify the four certificate files to upload.
- Select the first certificate file and click Open.
Step 8: Add the certificate to the certificate list
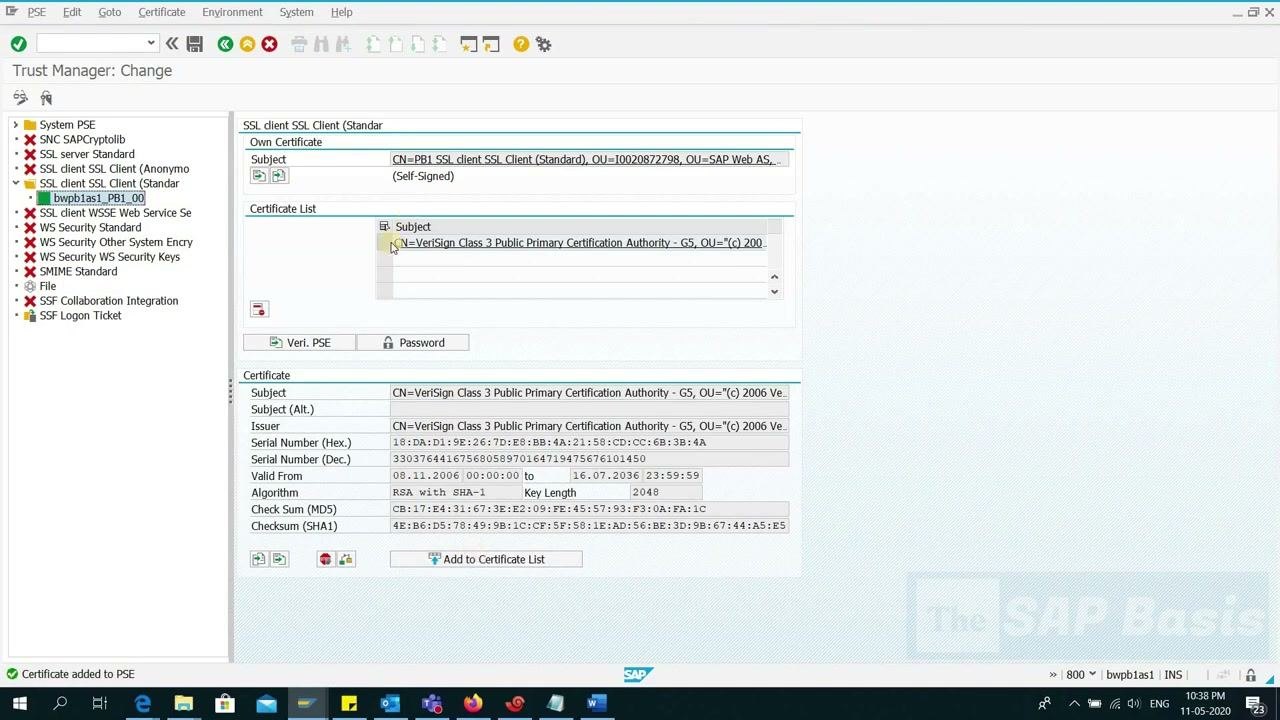
- Review the certificate details in the lower pane.
- Click Add to Certificate List.
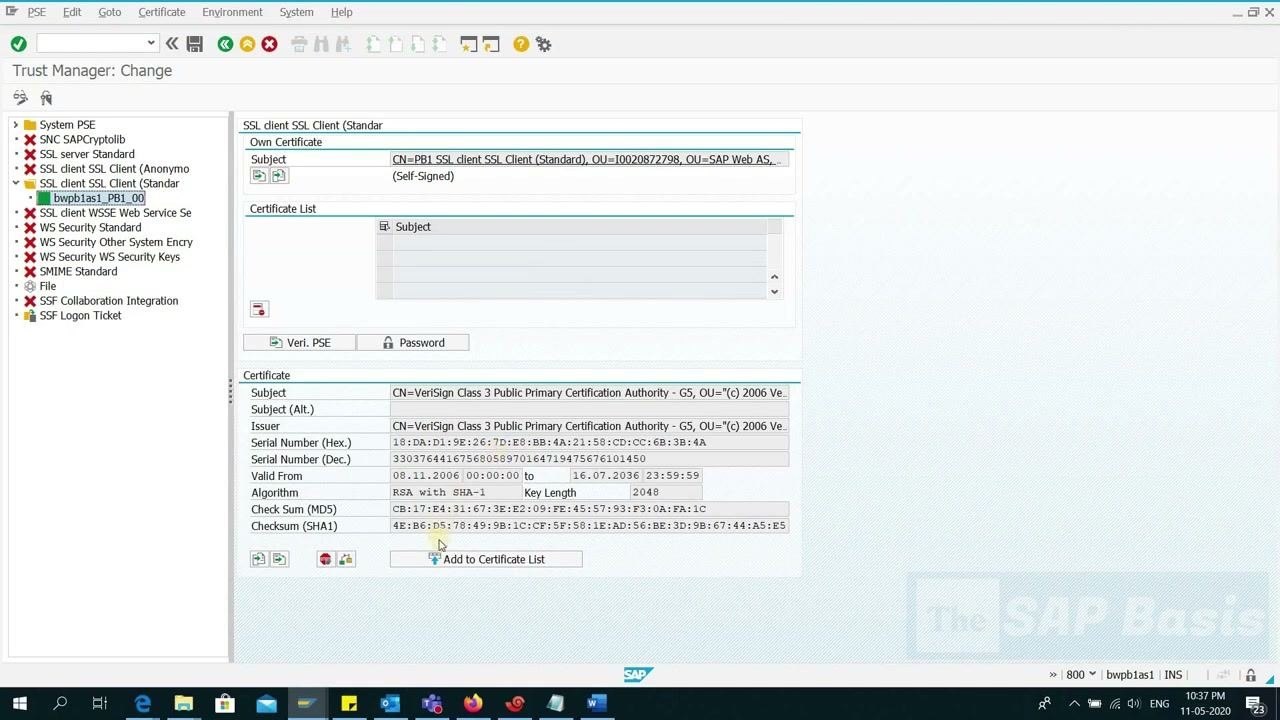
Step 9: Repeat for the remaining certificates
For each additional certificate, complete these actions:
- Click Import certificate again.
- Select the next certificate file from the folder.
- Click Open.
- Review the certificate details.
- Click Add to Certificate List.
Check that each certificate appears in the Certificate List section as you go.
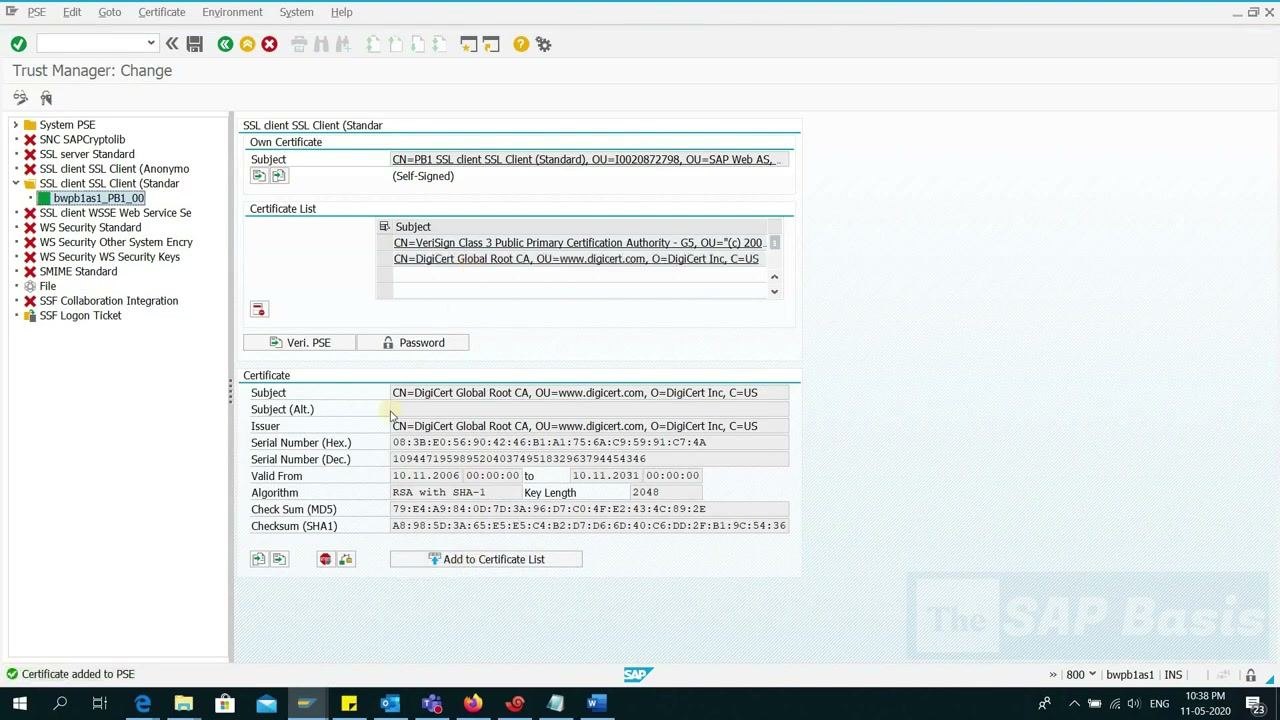
Step 10: Verify all certificates are added
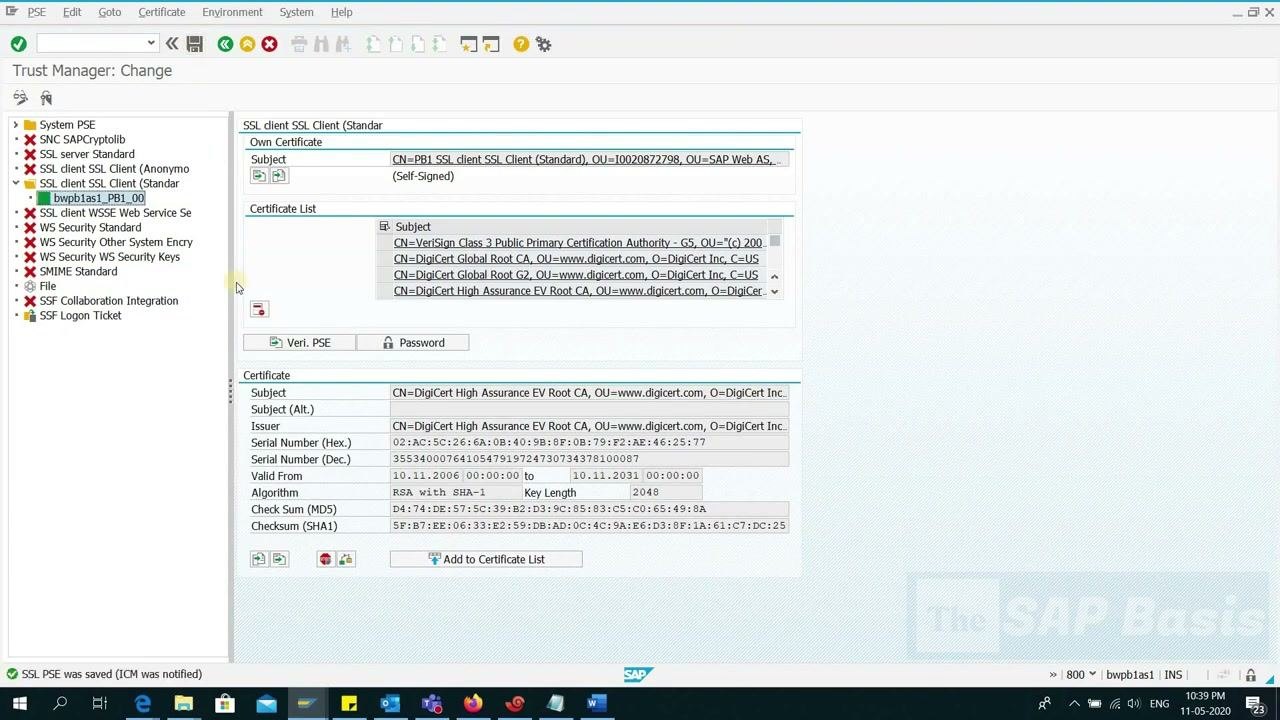
Confirm that all four certificates appear in the Certificate List section. Each certificate shows its subject and issuer details.
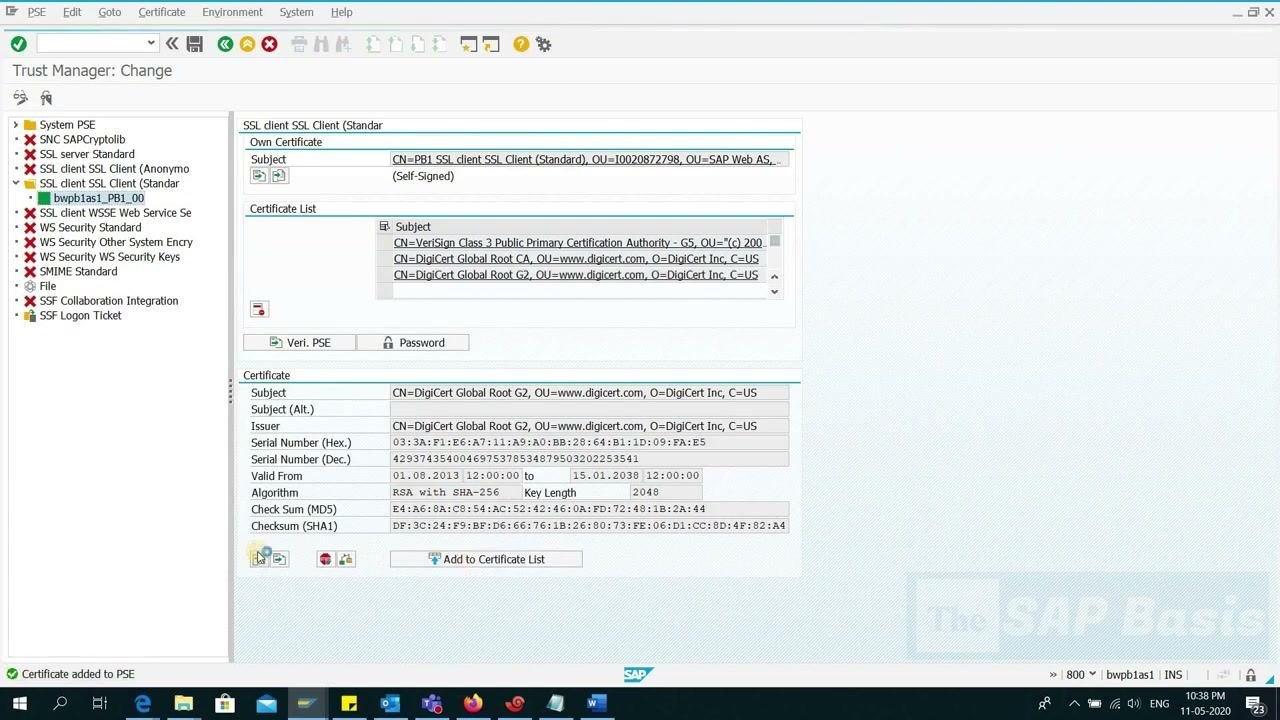
Step 11: Save the changes
Click the Save (disk) icon at the top of the Trust Manager window. This saves the updated certificate list to the SSL client PSE.
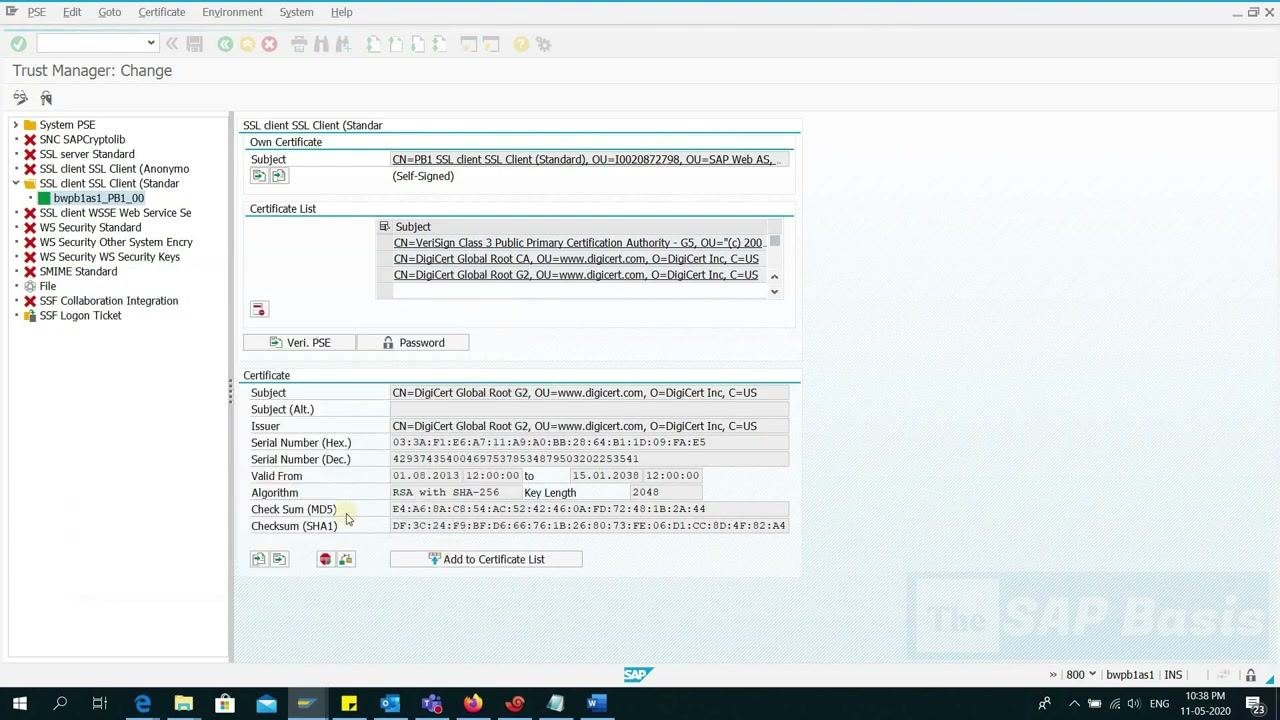
Step 12: Verify the ICM notification
Check the status bar at the bottom of the Trust Manager window. It should display "SSL PSE was saved (ICM was notified)". This message confirms that the Internet Communication Manager (ICM) was notified of the changes automatically.
Import PSE certificates for the SSL client (Anonymous)
Step 13: Select the anonymous SSL client
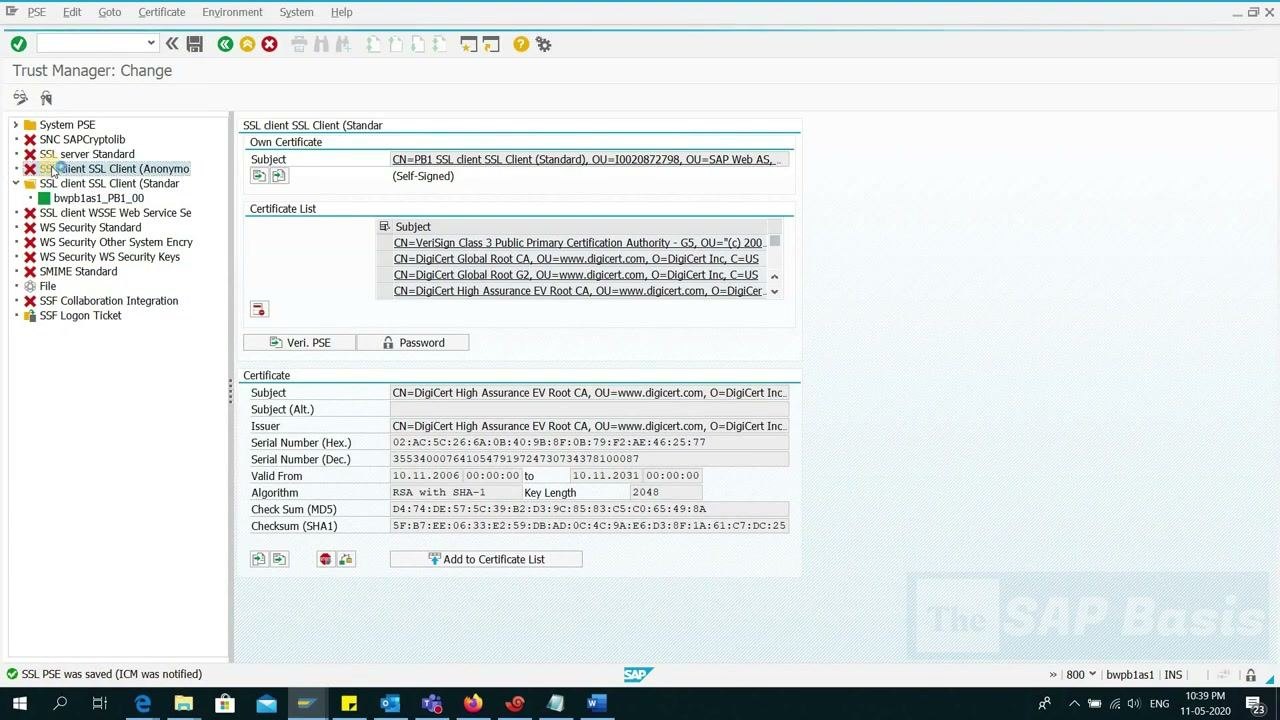
- In the left navigation pane, locate
SSL client SSL Client (Anonymous)under the System PSE tree. - Select the relevant client node (for example,
bwpb1as1_PB1_00) to begin configuring the anonymous SSL client.
Step 14: Create the anonymous SSL client PSE
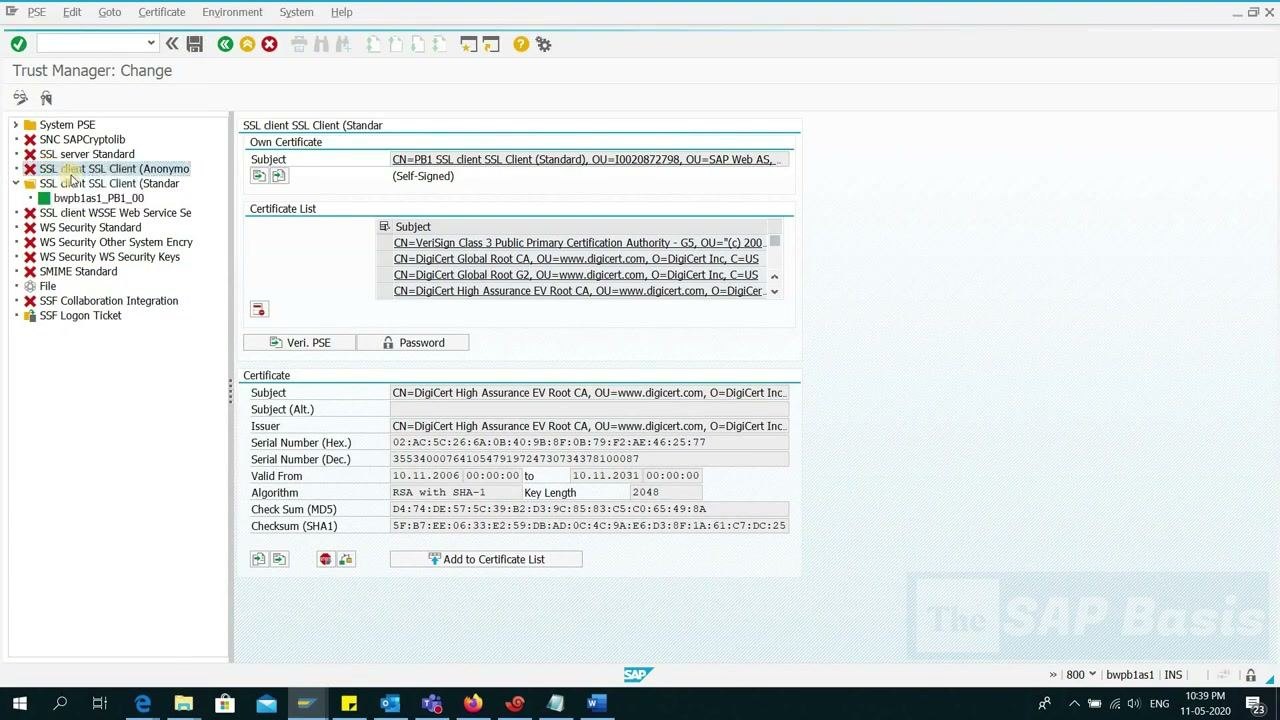
- Right-click the
SSL client SSL Client (Anonymous)node and select Create, if it is not already initialized. - In the configuration dialog, keep all options at their default values.
- Click Continue.
Step 15: Import the PSE certificates for the anonymous client
Double-click the bwpb1as1_PB1_00 node under SSL client SSL Client (Anonymous) to open its details. Then import the same four certificates you imported for the standard client. For each certificate:
- Click Import certificate.
- Select the certificate file from your folder.
- Click Open.
- Review the certificate details in the lower pane.
- Click Add to Certificate List.
- When prompted, click Allow to confirm the addition.
Repeat this process for all four certificates, then click Save.
Verify the configuration
Step 16: Check the completed setup
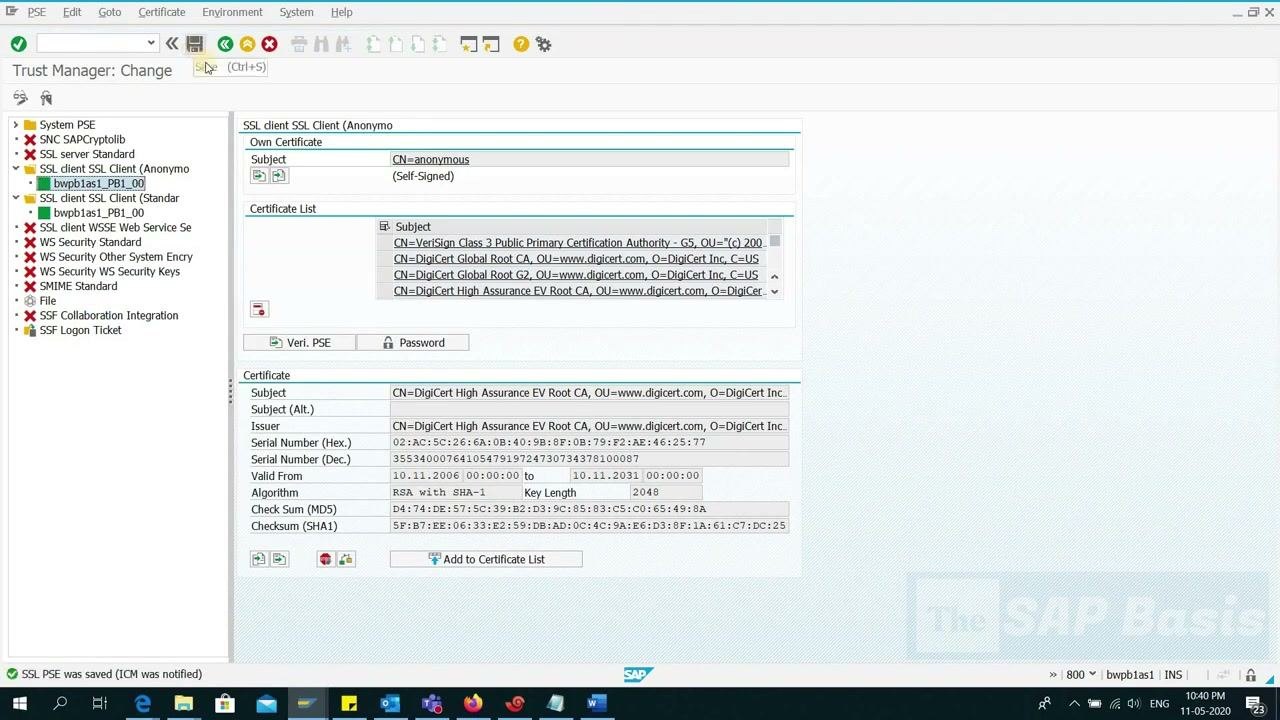
After you import and save the certificates for both the standard and anonymous SSL clients, verify the following:
- All certificates are listed under the appropriate client nodes.
- The status bar displays "SSL PSE was saved (ICM was notified)".
The Trust Manager window should show the selected SSL client node (for example, bwpb1as1_PB1_00 under SSL client SSL Client (Anonymous)). The Own Certificate section shows CN=anonymous (Self-Signed). The Certificate List section shows all imported certificates, with details such as subject, issuer, serial number, validity, and algorithm.
No further actions are required in the Trust Manager for ABAP systems at this stage.
Step 17: Exit the Trust Manager
Make sure no unsaved changes remain, then close the Trust Manager window.
Summary
You now know how to import a PSE certificate in SAP for both SSL client nodes in the Trust Manager. You created the PSEs, added all four required certificates to each certificate list, and saved the changes. The status bar message "SSL PSE was saved (ICM was notified)" confirms that the ICM received the update. This configuration supports secure SAP backbone connectivity.
Generation details: cost, quality tiers
Docsie billed 3,000 credits ($2.10) to analyze this 6-minute video at standard quality. The rewrite, template fill and Word/PDF exports were included. The same video at each quality tier:
| Quality | Frames sampled | Credits | Approx. cost |
|---|---|---|---|
| Draft | every 16-30 s | 1,500 | $1.05 |
| Standard (this guide) | every 8-15 s | 3,000 | $2.10 |
| Detailed | every 4-7 s | 6,000 | $4.20 |
| Ultra | every 1-3 s | 12,000 | $8.40 |
Credits priced at $0.70 per 1,000; plans include a monthly allowance. Enterprise customers on on-premise or bring-your-own-model deployments run this on their own inference and pay no per-video credits.
Generated by Docsie Video-to-Docs on 2026-11-15 from a 5-minute video. Screenshots are frames from the source video and belong to their creator, The SAP Basis, whose original is embedded above. If you own this video and want the guide removed or credited differently, contact us and we will act within one business day.