
How to Create a Database View in SAP
This guide shows you how to create a database view in SAP ABAP by joining an order header table and an order item table in the ABAP Dictionary. You define the view, set up the join conditions, select fields, and then save, check, and activate the view. You then create a projection view and a database view on a single table, and compare the two.
Video: 24 - ABAP Dictionary - Views - Database View and Projection View by SAP ABAP by Rahul Mehta (2022). All credit for the demonstration goes to the creator; watch the original on YouTube. The written guide below was generated from this video by Docsie. Creator? Request a change or removal.
This guide shows you how to create a database view in SAP ABAP by joining an order header table and an order item table in the ABAP Dictionary. You define the view, set up the join conditions, select fields, and then save, check, and activate the view. You then create a projection view and a database view on a single table, and compare the two.
Prerequisites
- Access to SAP GUI and the ABAP Dictionary.
- An order header table (
ZORDH_28) and an order item table (ZORDI_28) with a primary-foreign key relationship between them. - The exercise spreadsheet that lists the fields to include in each view.
Create the database view
Step 1: Open the ABAP Dictionary initial screen
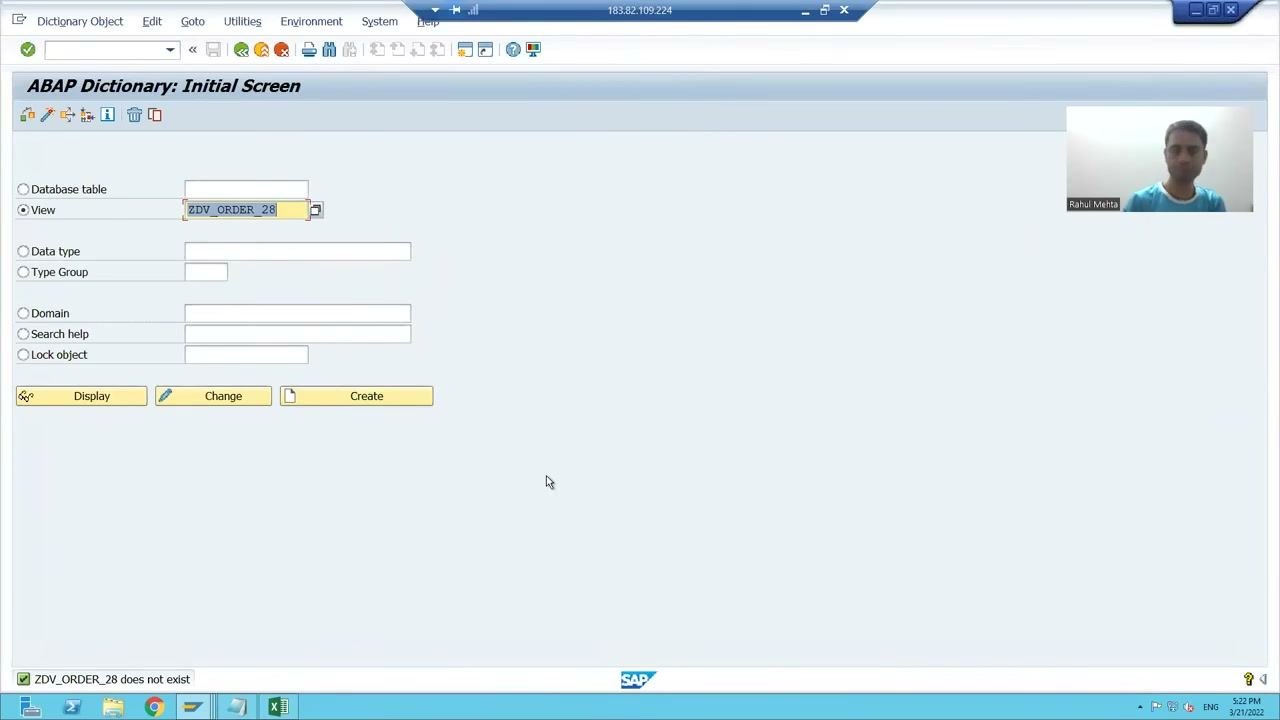
Launch SAP GUI and go to the ABAP Dictionary. The ABAP Dictionary: Initial Screen shows options for Database table, View, Data type, Type Group, Domain, Search help, and Lock object. It also has Display, Change, and Create buttons.
Step 2: Enter the transaction command
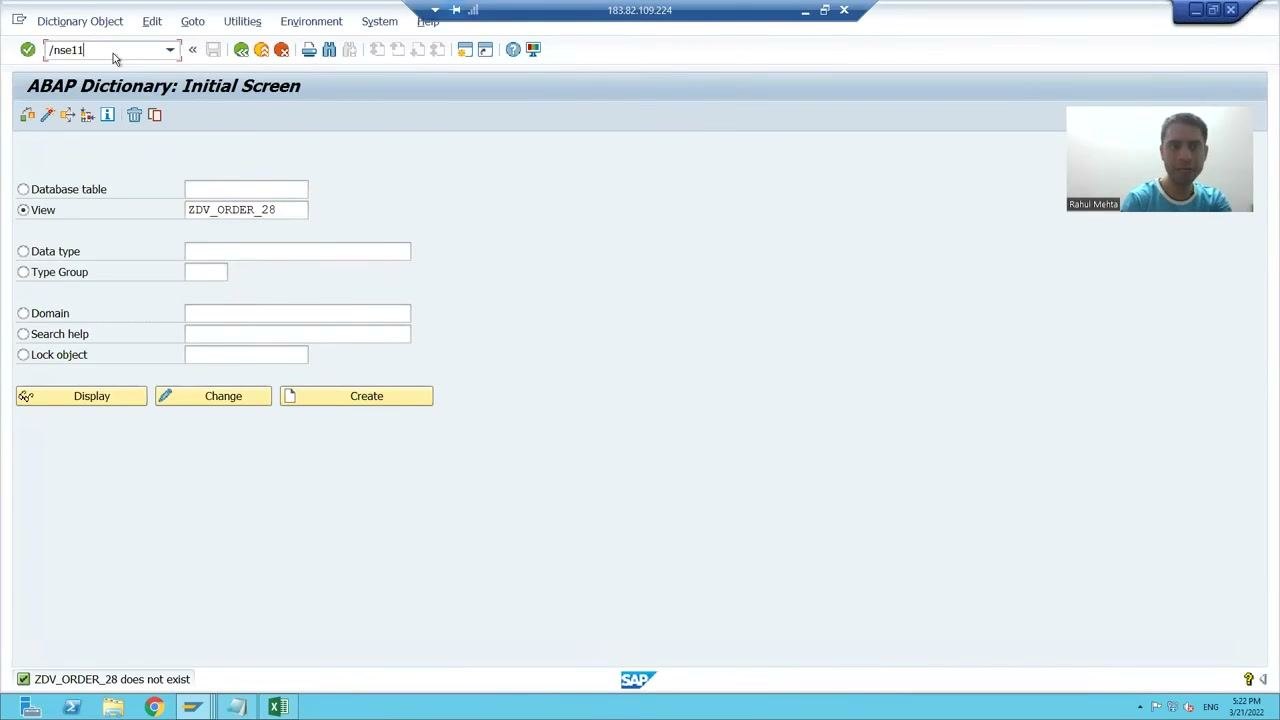
In the command field at the top, enter /nse11 and press Enter to open the ABAP Dictionary initial screen.
Step 3: Select View, name it, and click Create
Select the View radio button. In the adjacent field, enter the name of your database view, ZDV_ORDER_28. A dropdown may show previously used view names for reference.
Then click the yellow Create button at the bottom right of the section.
Step 4: Choose the view type
A dialog lists four view types. Select Database View.
Step 5: Enter a short description and review the required fields
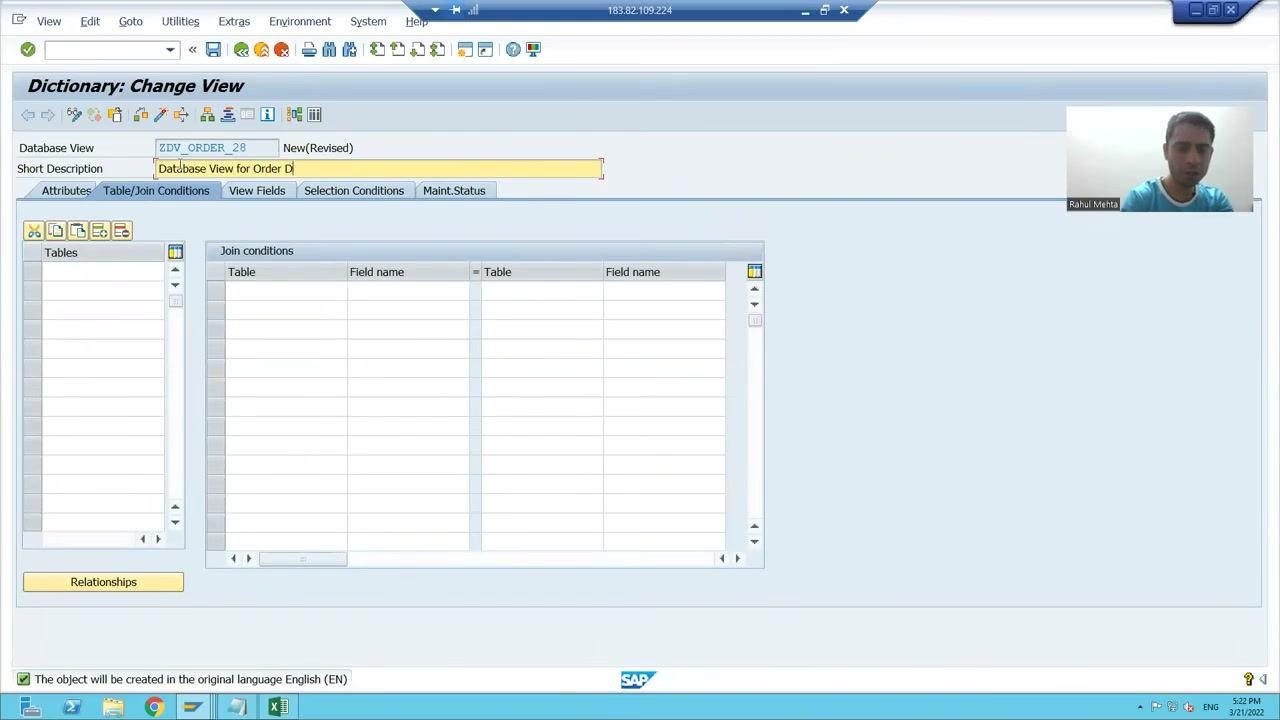
In the Short Description field, enter Database View for Order Details. The screen now shows these tabs:
- Attributes
- Table/Join Conditions
- View Fields
- Selection Conditions
- Maint. Status
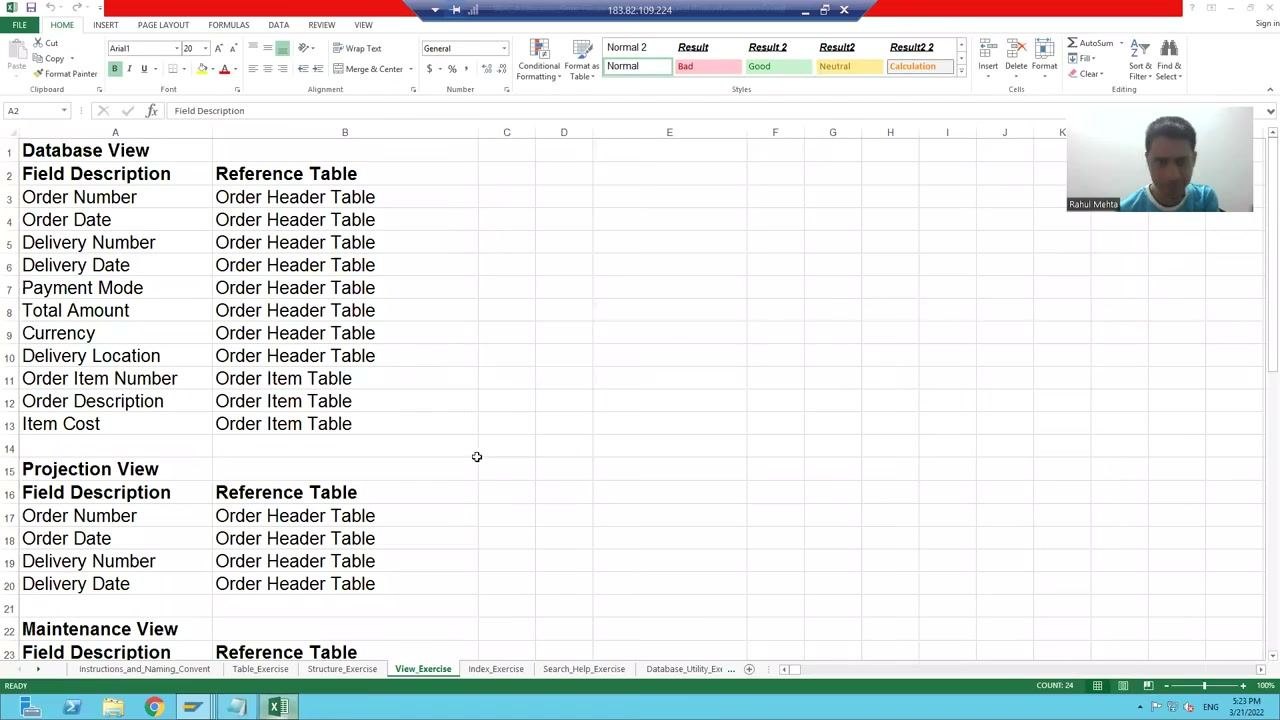
Then open the exercise spreadsheet to see which fields the view needs:
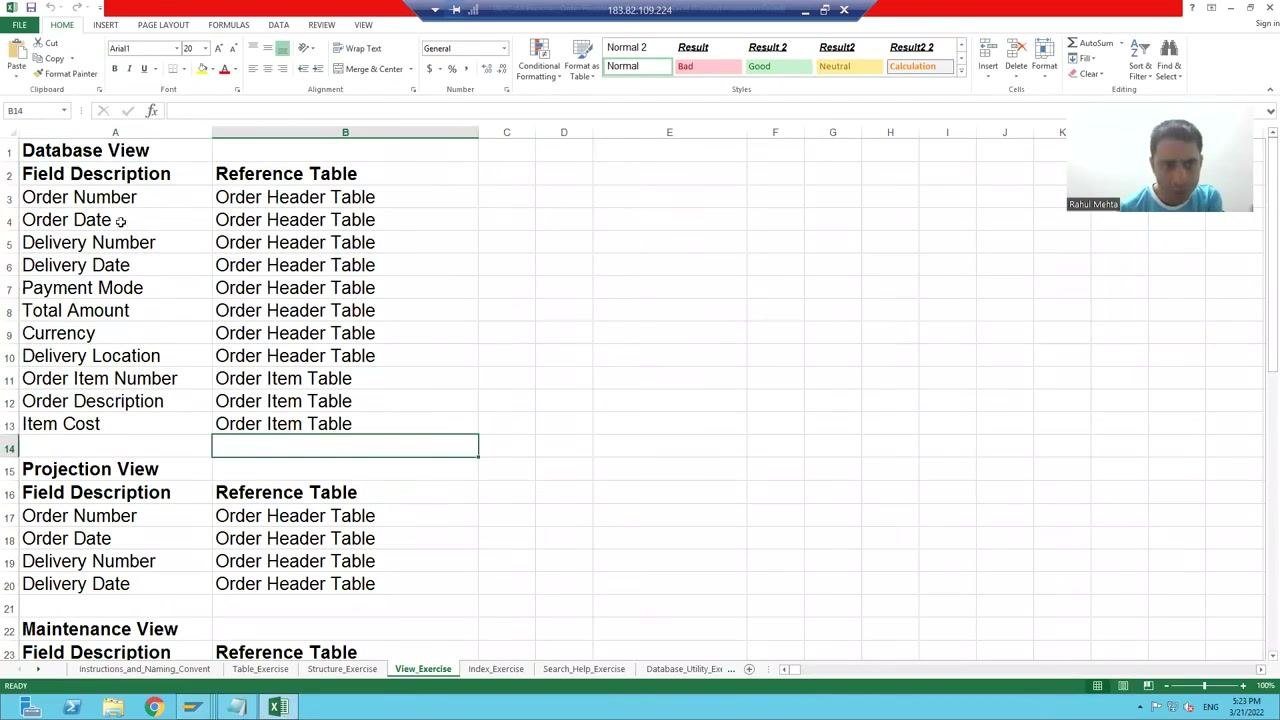
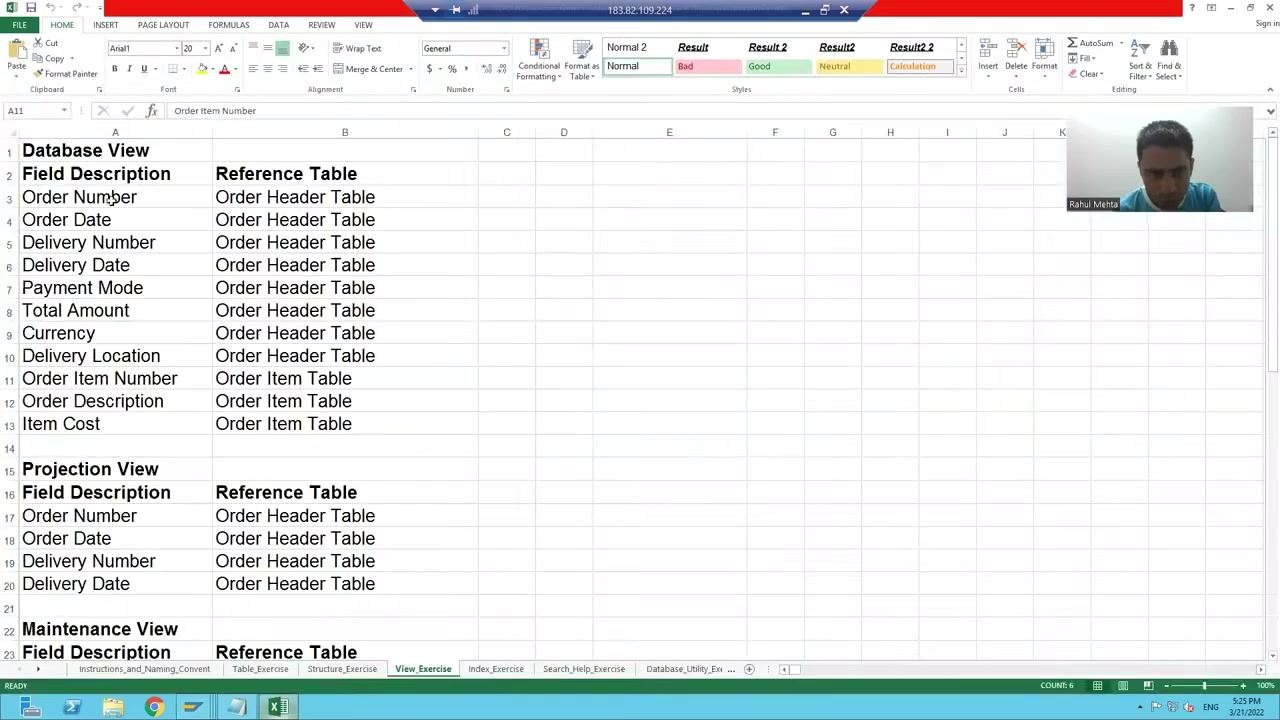
- Order header table fields: Order Number, Order Date, Delivery Number, Delivery Date, Payment Mode, Total Amount, Currency, Delivery Location.
- Order item table fields: Order Item Number, Order Description, Item Cost.
Step 6: Enter the order header table
In the Tables section on the left of the Dictionary: Change View screen, enter the name of your order header table, for example ZORDH_28. This table is the primary source for the view.
Step 7: Open the relationships dialog
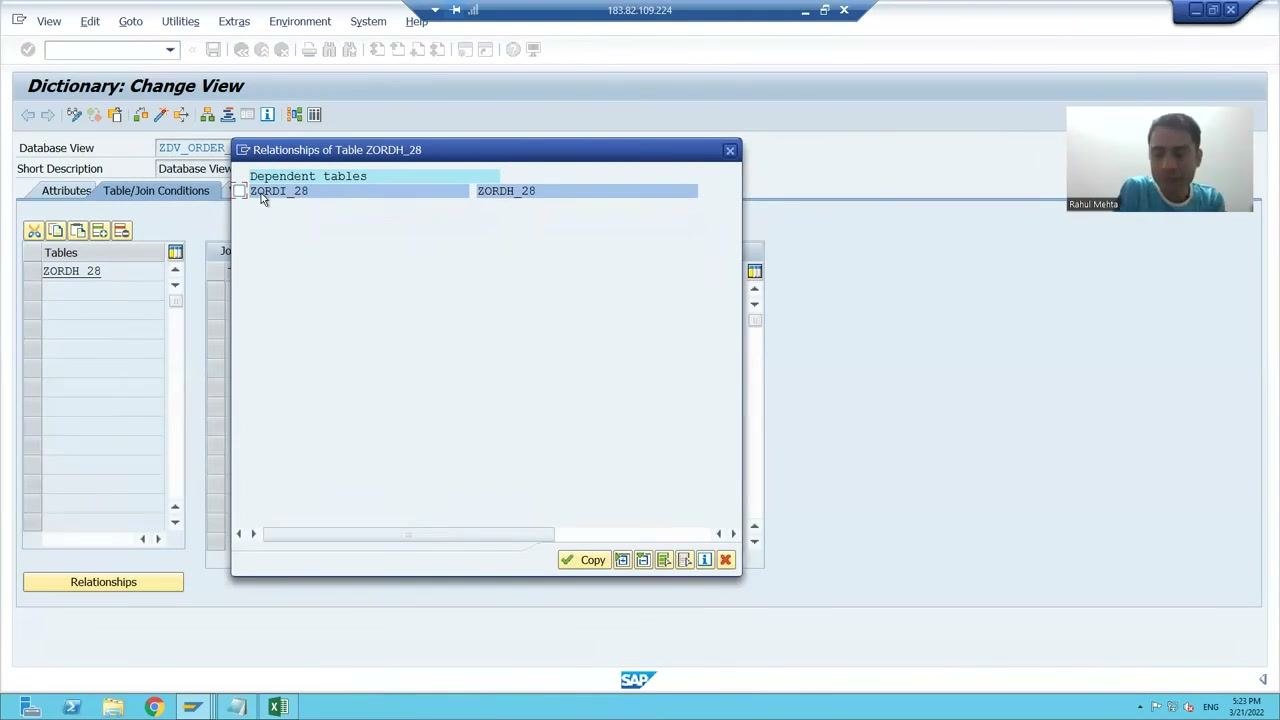
Click the Relationships button below the Tables section to define the join between your tables.
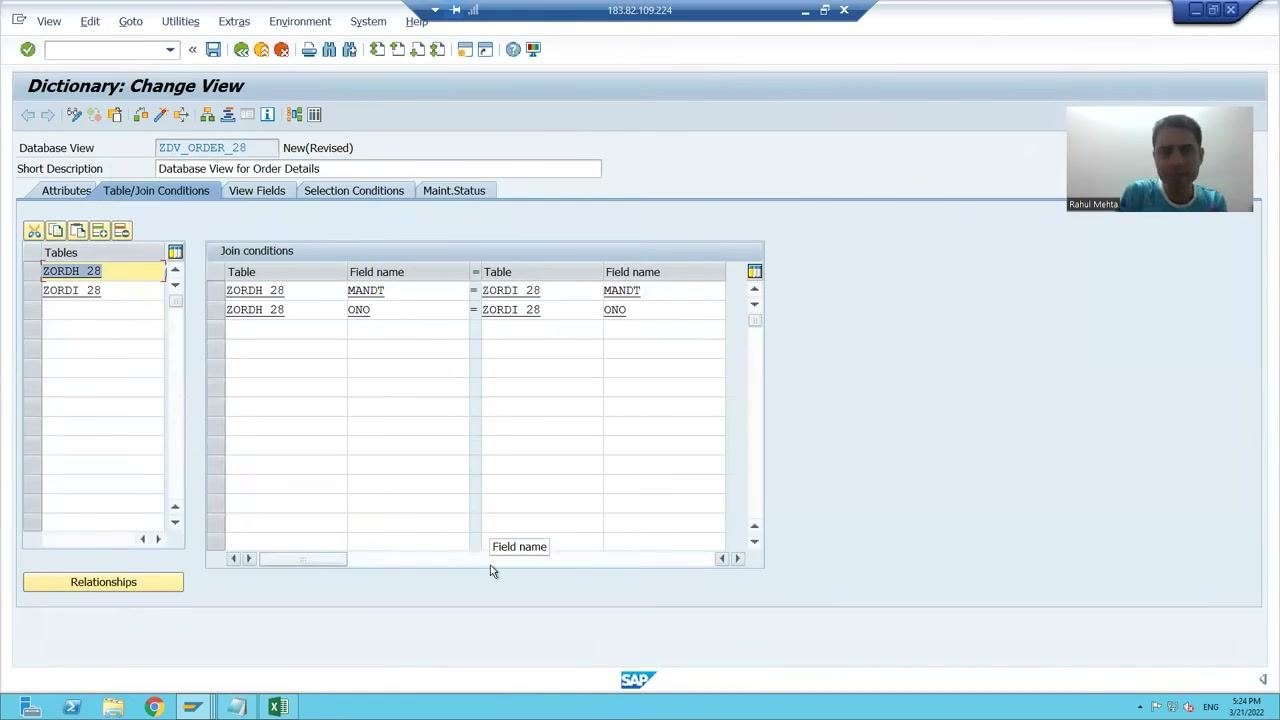
The Relationships of Table ZORDH_28 dialog appears. It lists ZORDI_28, the order item table, under Dependent tables. SAP shows it automatically because a primary-foreign key relationship exists between the two tables. The header table is the independent (primary key) table, and the item table is the dependent table.
Step 8: Select the dependent table
In the dialog, click the row for the dependent table ZORDI_28 to select it.
Step 9: Copy the relationship and review the join conditions
Click the yellow Copy button at the bottom of the dialog. SAP generates the join conditions automatically:
ZORDH_28.MANDT = ZORDI_28.MANDTZORDH_28.ONO = ZORDI_28.ONO
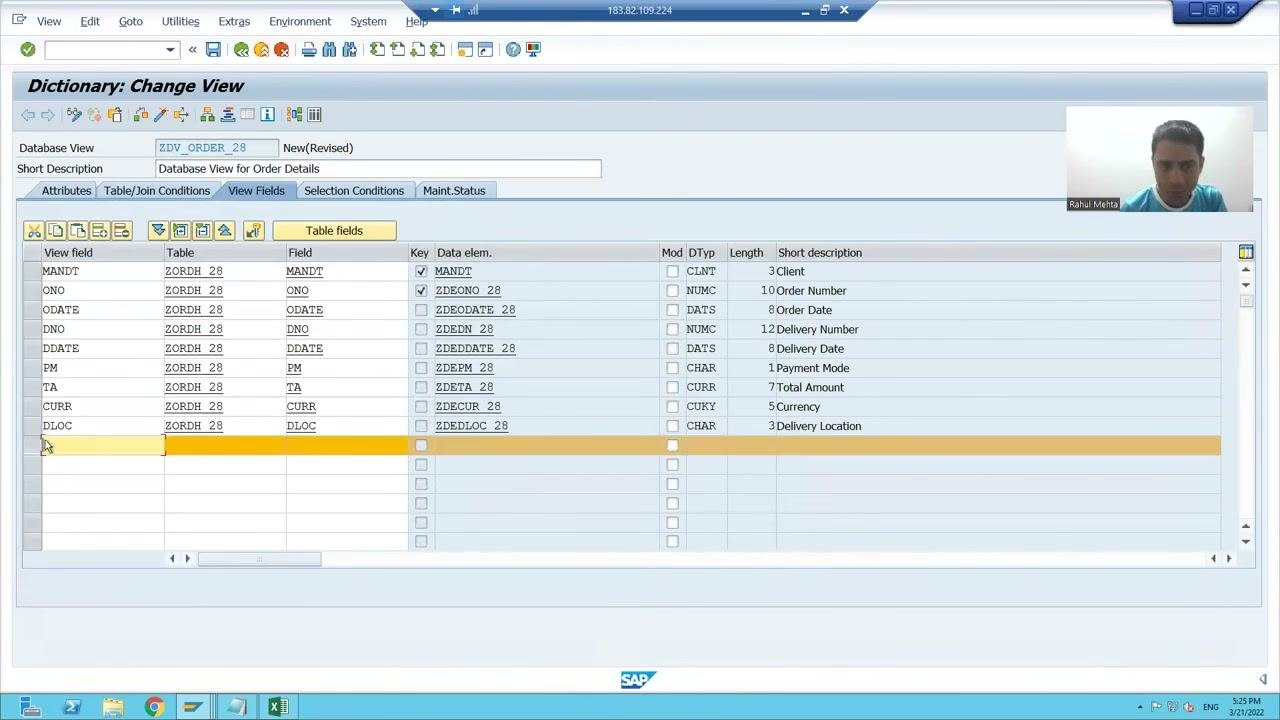
The conditions now appear in the Join conditions section of the Dictionary: Change View screen. Confirm that the join uses the client (MANDT) and order number (ONO) fields.
Select fields for the database view
Step 10: Select fields from the header and item tables
Click the View Fields tab. In the Table fields section, select all required columns from the header table (ZORDH_28):
- MANDT (Client)
- ONO (Order Number)
- ODATE (Order Date)
- DNO (Delivery Number)
- DDATE (Delivery Date)
- PM (Payment Mode)
- TA (Total Amount)
- CURR (Currency)
- DLOC (Delivery Location)
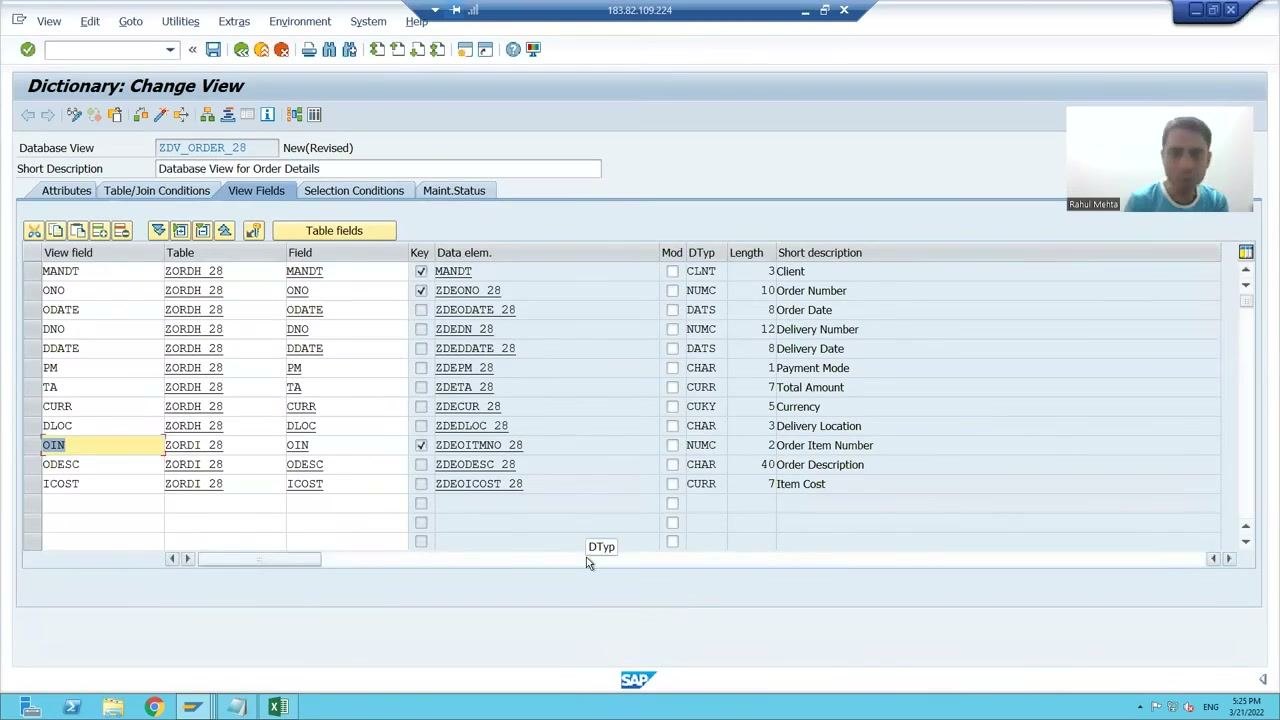
These fields are now listed in the view field table.
Next, open the field selection dialog for the item table (ZORDI_28) and select these fields:
- OIN (Order Item Number)
- ODESC (Order Description)
- ICOST (Item Cost)
Do not select ONO again, because the header table already provides it. Click Copy to add the fields to your view.
Step 11: Review the fields, then save, check, and activate the view
Confirm that the view contains the nine header table fields and the three item table fields, and that no field is duplicated. Verify that MANDT (Client) is included. Do not add "MA" and "DT" separately, because MANDT already represents the client number.
Click the Save icon. When prompted, save the view as a local object if you are not transporting it to another system.
Click the Check button to run the syntax check, and make sure there are no errors or warnings. Then click Activate (or press Ctrl+F3) and wait for confirmation that activation succeeded.
Step 12: Display the contents of the view
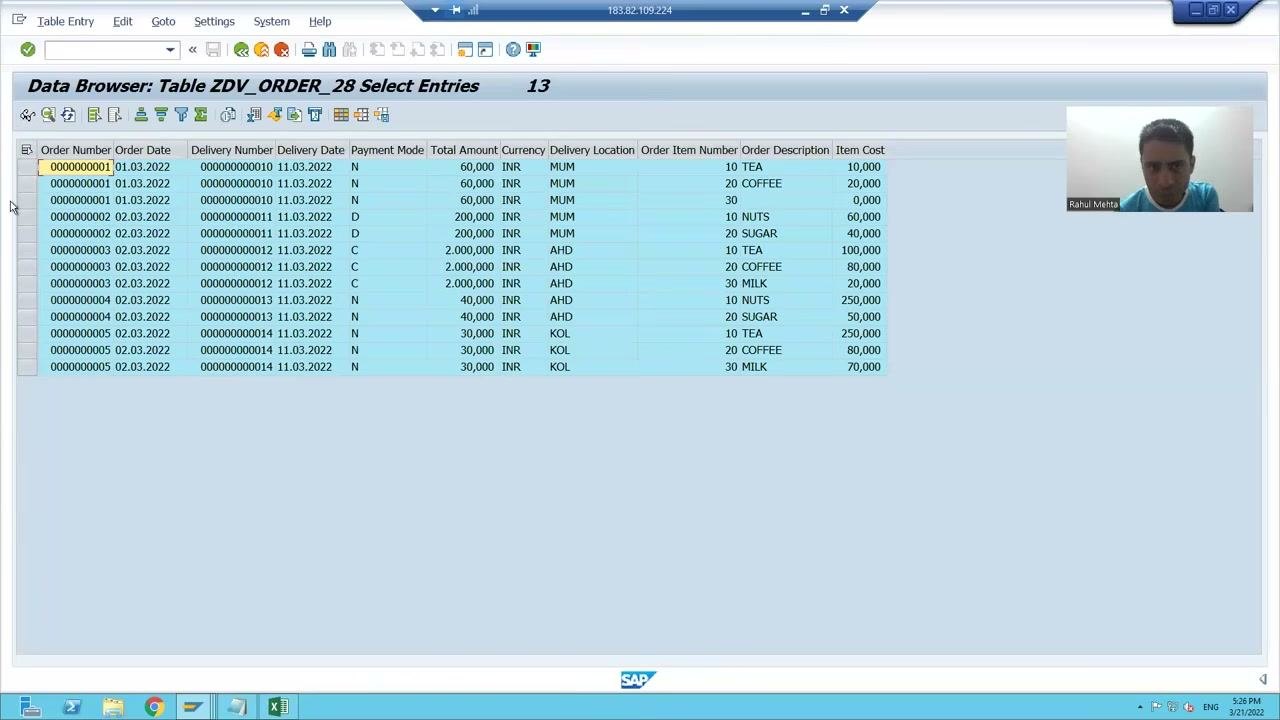
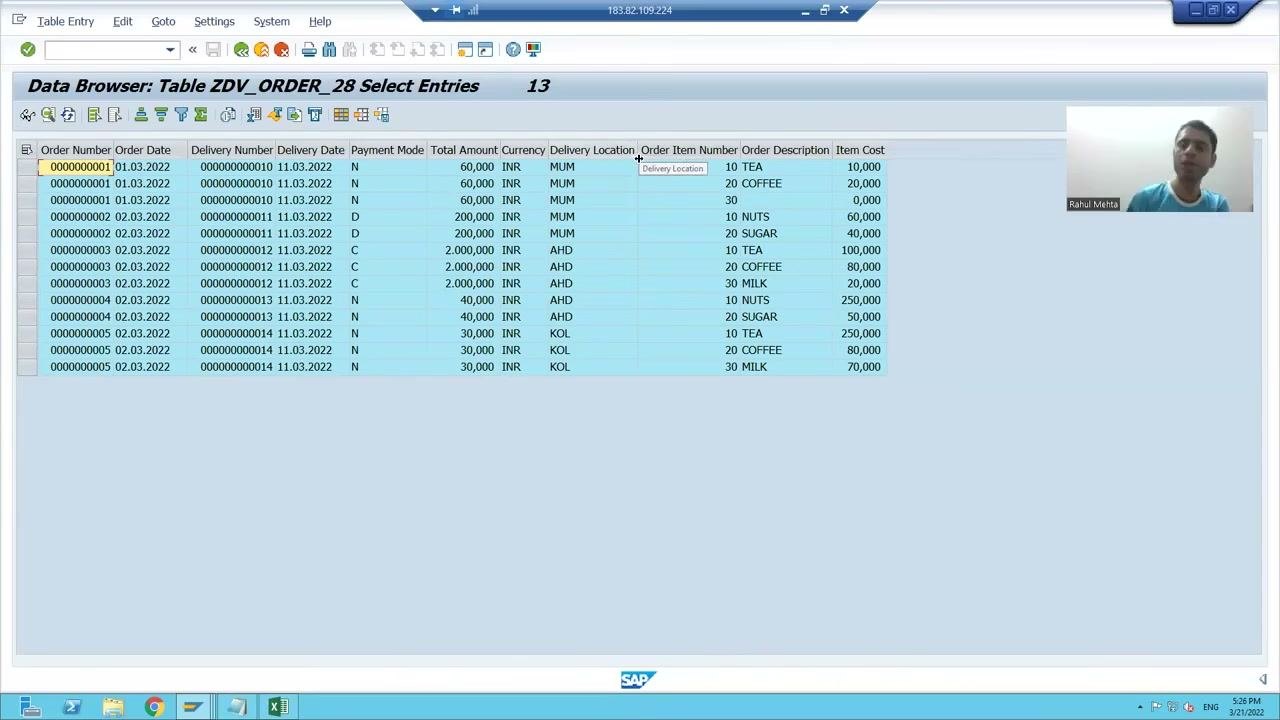
Click the Contents button to open the Data Browser for your view, and execute the view. The output combines data from both tables:
- Columns up to "Delivery Location" come from the order header table.
- The last three columns ("Order Item Number," "Order Description," and "Item Cost") come from the order item table.
Step 13: Verify the combined data
Confirm that the view shows data from both tables in one result set, and that each row has the correct values for all selected fields. Without the view, you would have to check each table individually.
Create a projection view
Step 14: Review the requirements and inspect the table entries
Open the Excel sheet that describes the database view, projection view, and maintenance view, and note the fields and reference tables for each. For the projection view, include only these fields:
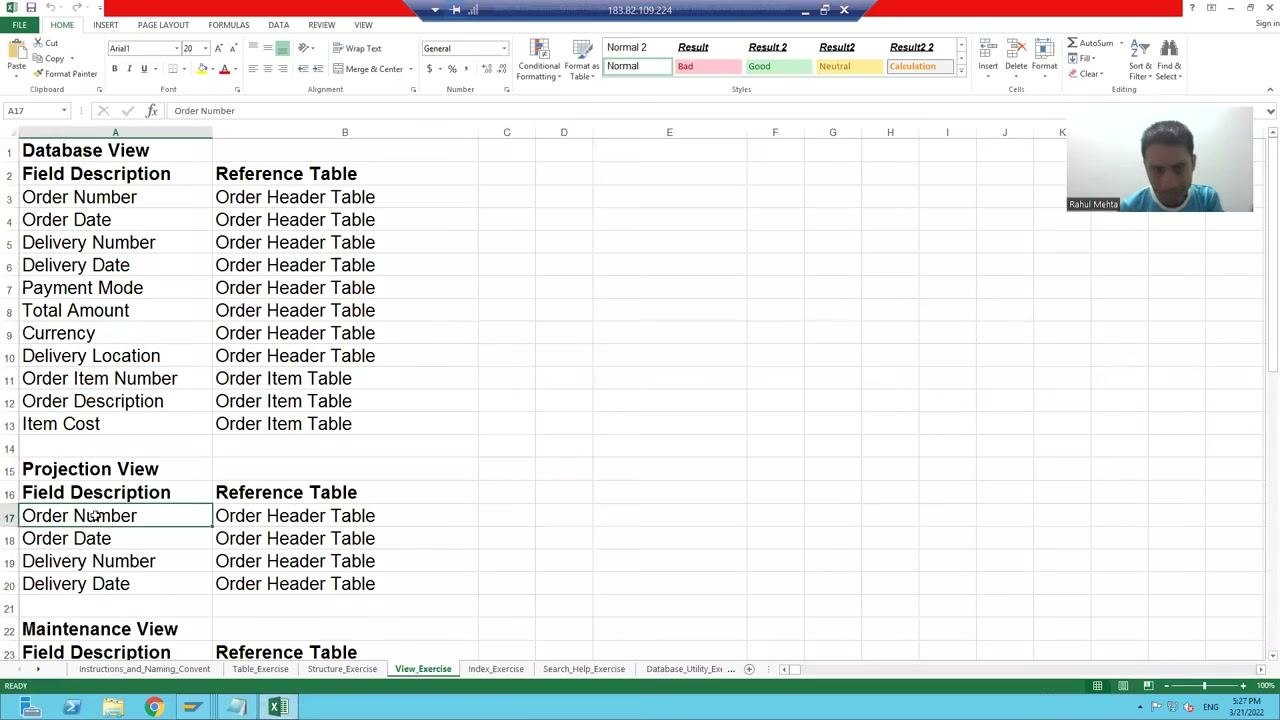
- Order Number
- Order Date
- Delivery Number
- Delivery Date
Then open the Data Browser for the relevant table (for example, ZDV_ORDER_28) and review the entries. The columns are Order Number, Order Date, Delivery Number, Delivery Date, Payment Mode, Total Amount, Currency, Delivery Location, Order Item Number, Order Description, and Item Cost.
Step 15: Name the projection view, set the basis table, and select fields
Open the Dictionary: Change View screen and enter a name for the projection view, for example ZPV_ORDER_28. Enter a short description such as Projection View for Order Details. Make sure the Basis Table field is checked, which means a single table is the source.
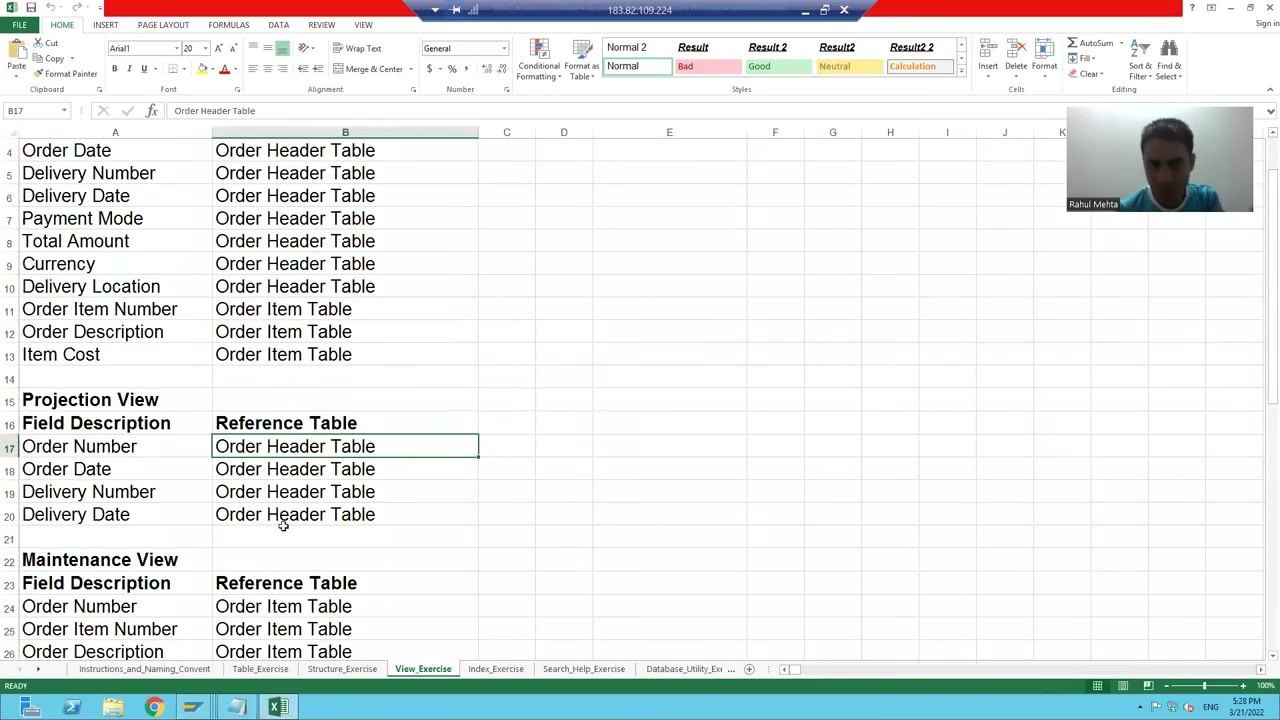
In the Basis Table field, enter your order header table, for example ZORDH_28.
Click the Table fields button. In the Field Selection from Table window, select only these columns:
- Order Number (
ONO) - Order Date (
ODATE) - Delivery Number (
DNO) - Delivery Date (
DDATE)
Click Copy to confirm.
Step 16: Verify and activate the projection view
Check that the View fields section contains only ONO, ODATE, DNO, and DDATE, and that their data elements, types, and descriptions are correct. Then activate the projection view.
Compare view types and create a database view for a single table
Step 17: Review the differences between SAP views and start a single-table database view
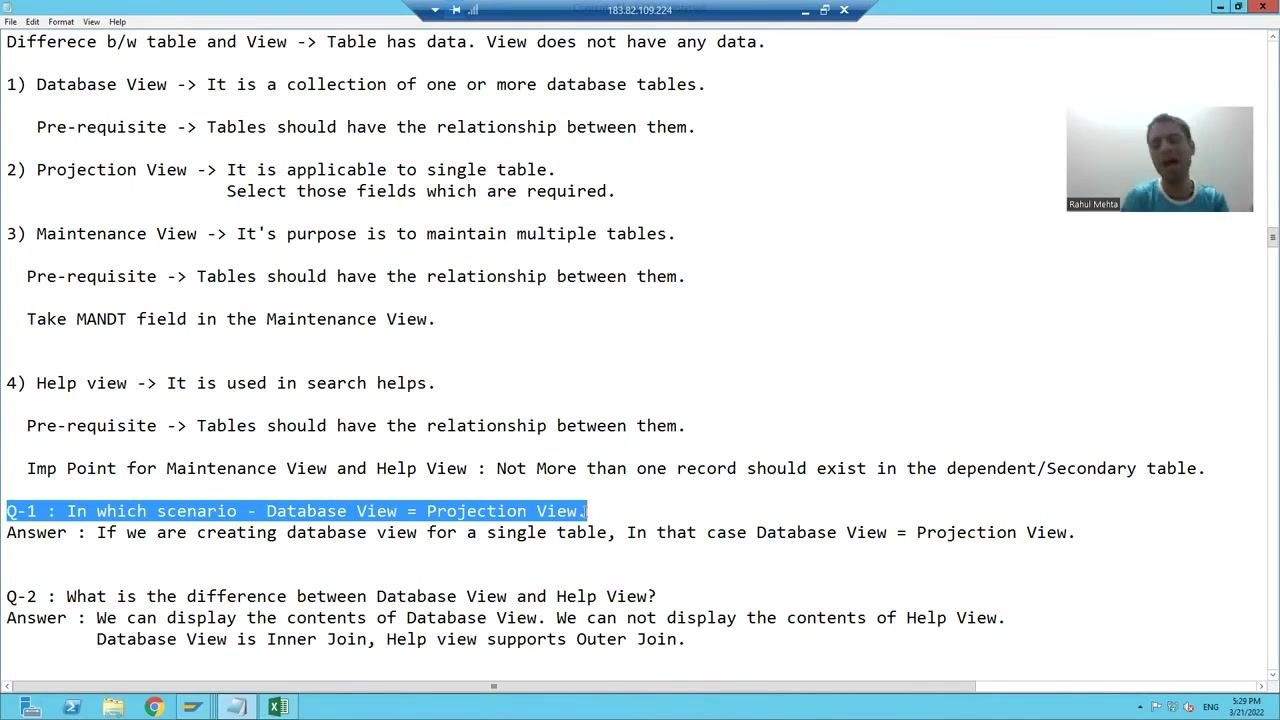
Review the reference notes on the differences between SAP views:
- Database View: A collection of one or more database tables. The tables must have relationships.
- Projection View: Applies to a single table. You select only the fields you need.
- Maintenance View: Maintains multiple tables. The tables must have relationships.
- Help View: Used in search helps. The tables must have relationships.
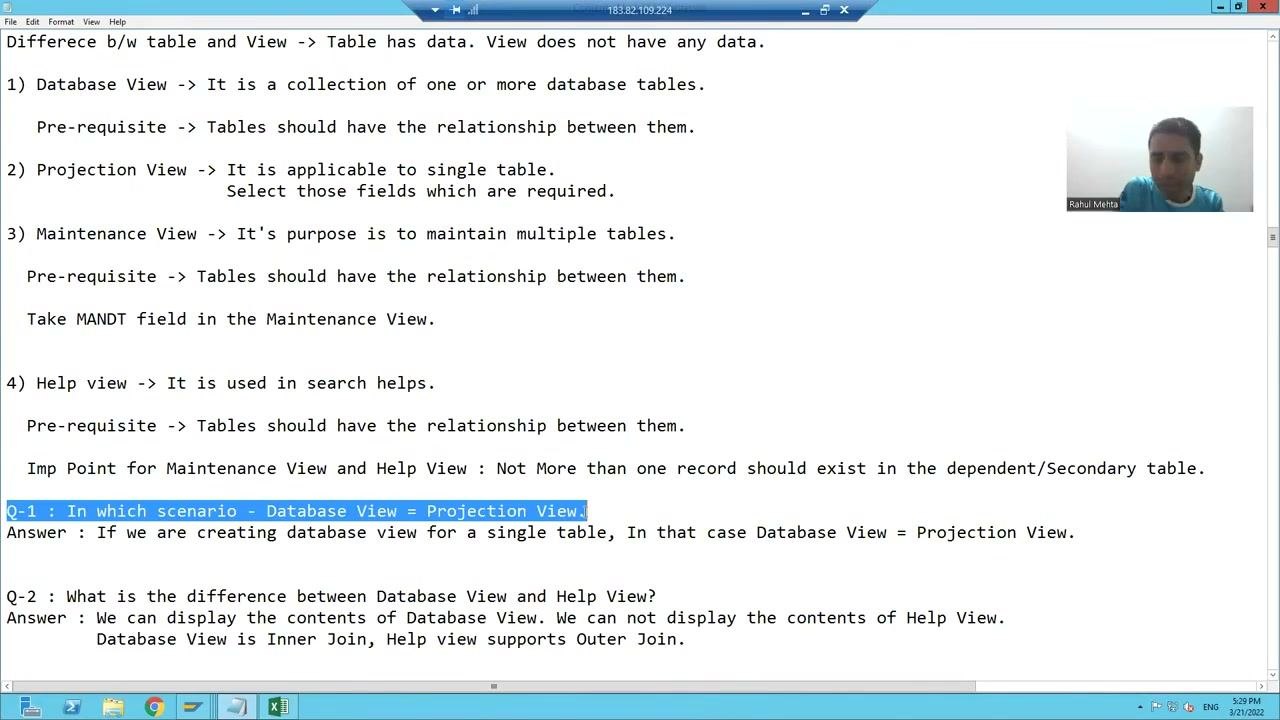
If you create a database view for a single table, it is functionally equivalent to a projection view.
To test this, go to the ABAP Dictionary: Initial Screen. Enter your header table (for example, ZORDH_28) in the Database table field and a new view name (for example, ZDB_ORDER_28_1) in the View field. Click Create to begin.
Step 18: Configure the view without relationships
On the Dictionary: Change View screen, enter a short description such as Database View. In the Tables section, add only your header table (for example, ZORDH_28).
Do not click Relationships or add any other tables. Leave the Join conditions section empty, because only one table is involved.
Step 19: Select the fields
Switch to the View Fields tab and click Table fields. Select these columns from the header table, then confirm to add them:
- ONO (Order Number)
- ODATE (Order Date)
- DNO (Delivery Number)
- DDATE (Delivery Date)
Step 20: Activate the single-table database view
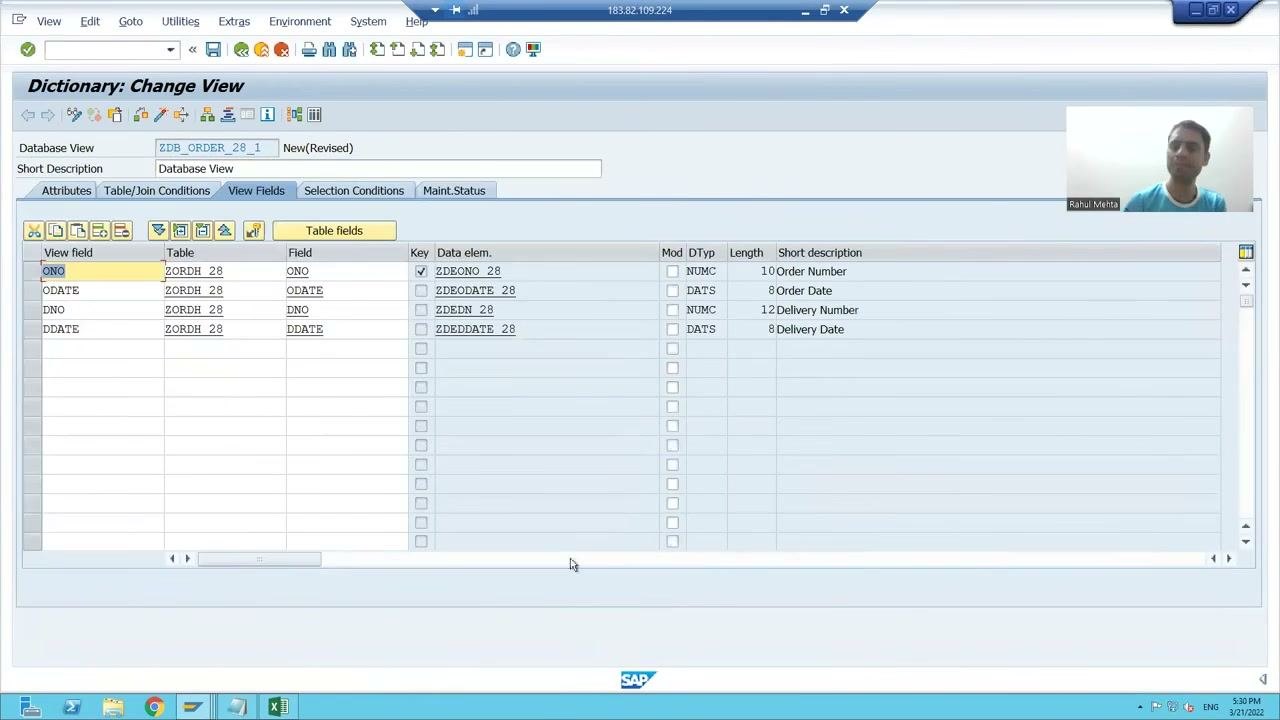
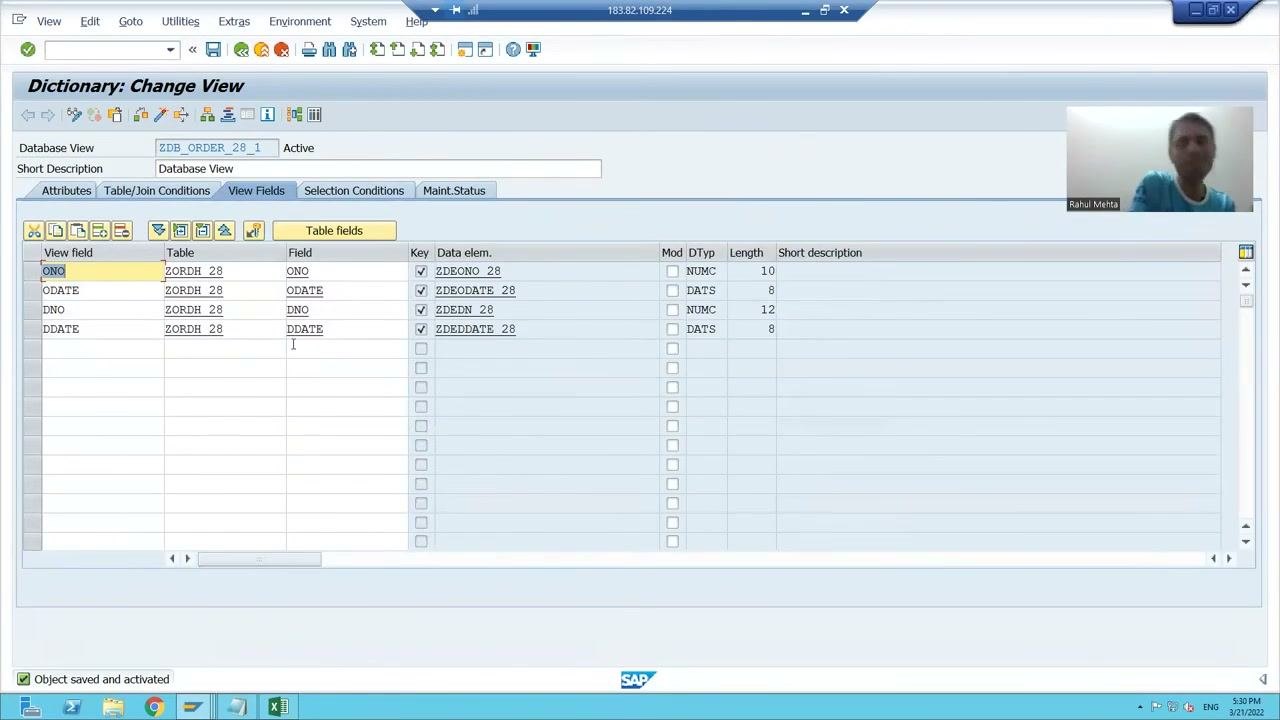
Make sure the View Fields section lists the selected fields with the correct data elements and types:
- ONO (
ZDEONO_28, NUMC, length 10) - ODATE (
ZDEODATE_28, DATS, length 8) - DNO (
ZDEDN_28, NUMC, length 12) - DDATE (
ZDEDDATE_28, DATS, length 8)
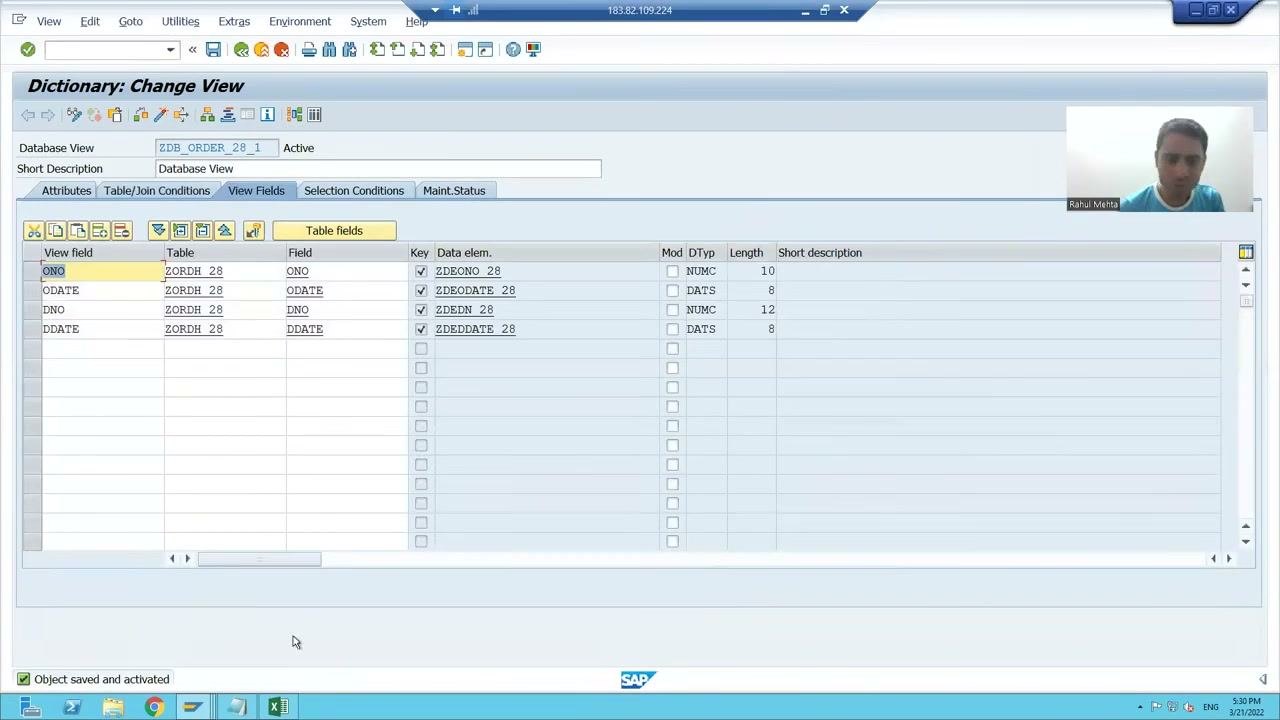
Activate the view and check the message at the bottom of the screen to confirm it is saved and activated.
Step 21: Apply the best practice
When you need specific columns from a single table, create a projection view. A database view normally combines multiple tables. Used with one table, it behaves the same as a projection view.
Summary
You created a database view in SAP ABAP that joins an order header table and an order item table. You defined the join conditions, selected fields from both tables, then saved, checked, activated, and displayed the view. You also created a projection view for a single table and saw that a single-table database view works the same way. For selecting specific columns from one table, use a projection view.
Generation details: cost, quality tiers
Docsie billed 5,000 credits ($3.50) to analyze this 10-minute video at standard quality. The rewrite, template fill and Word/PDF exports were included. The same video at each quality tier:
| Quality | Frames sampled | Credits | Approx. cost |
|---|---|---|---|
| Draft | every 16-30 s | 2,500 | $1.75 |
| Standard (this guide) | every 8-15 s | 5,000 | $3.50 |
| Detailed | every 4-7 s | 10,000 | $7.00 |
| Ultra | every 1-3 s | 20,000 | $14.00 |
Credits priced at $0.70 per 1,000; plans include a monthly allowance. Enterprise customers on on-premise or bring-your-own-model deployments run this on their own inference and pay no per-video credits.
Generated by Docsie Video-to-Docs on 2026-11-15 from a 9-minute video. Screenshots are frames from the source video and belong to their creator, SAP ABAP by Rahul Mehta, whose original is embedded above. If you own this video and want the guide removed or credited differently, contact us and we will act within one business day.