
How to Configure an Audit Log in SAP
Audit logging lets you monitor what users do in your SAP system. It matters most when you assign broad access, such as the SAPALL profile, during an emergency. This guide explains how to configure an audit log in SAP using transaction SM19, how to review the results with SM20 and the remote analysis screen, and how to manage the RSAU parameters that control filters and file sizes.
Video: 11. Audit Logging - SM19 and SM20 by SAP Security Step by Step (2020). All credit for the demonstration goes to the creator; watch the original on YouTube. The written guide below was generated from this video by Docsie. Creator? Request a change or removal.
Audit logging lets you monitor what users do in your SAP system. It matters most when you assign broad access, such as the SAP_ALL profile, during an emergency. This guide explains how to configure an audit log in SAP using transaction SM19, how to review the results with SM20 and the remote analysis screen, and how to manage the RSAU parameters that control filters and file sizes.
Prerequisites
- You have SAP GUI installed and can log in to your SAP system.
- You can open the SAP Easy Access screen and run transaction codes from the command field.
- You have enough disk space at the operating system level for audit log files, because they can grow large over time.
Open the SAP Easy Access screen
- Launch SAP GUI and log in to your SAP system.
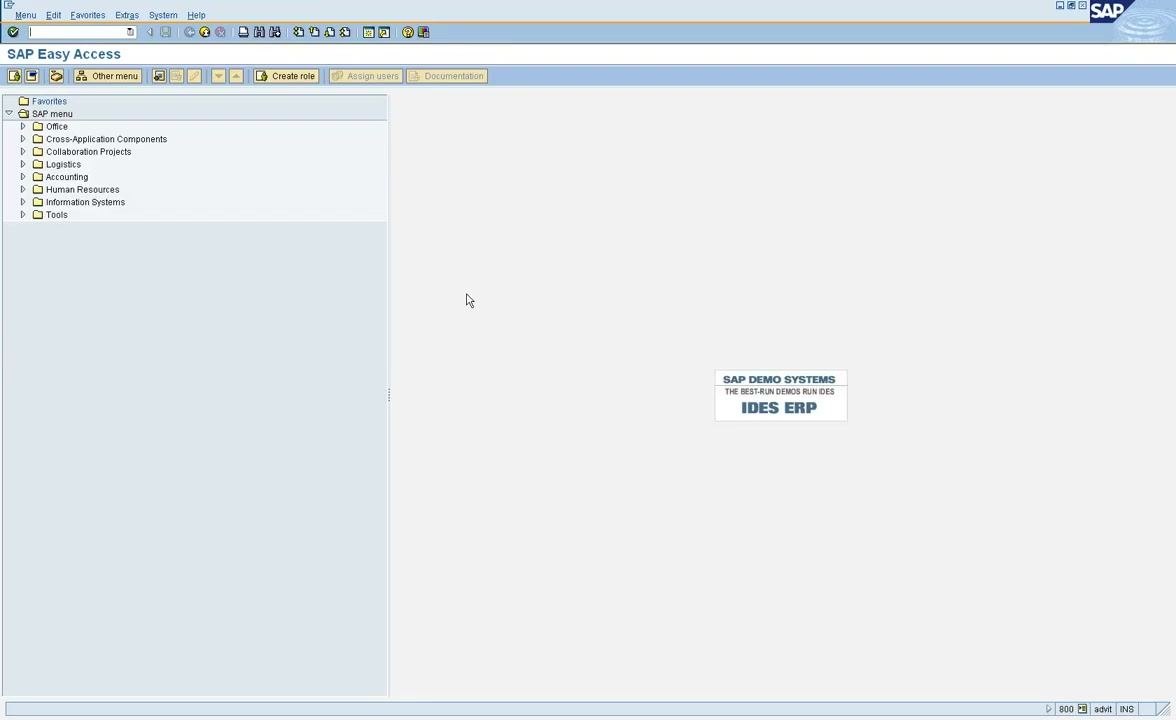
- Confirm that the SAP Easy Access screen appears. The left panel shows the SAP menu with folders such as Office, Cross-Application Components, Collaboration Projects, Logistics, Accounting, Human Resources, Information Systems, and Tools.
- Check that the main area displays "SAP DEMO SYSTEMS – THE BEST-RUN DEMOS RUN IDES – IDES ERP".
Open the Security Audit Log tool
SAP provides a dedicated tool to configure an audit log in SAP. You access it with transaction code SM19.
- Enter
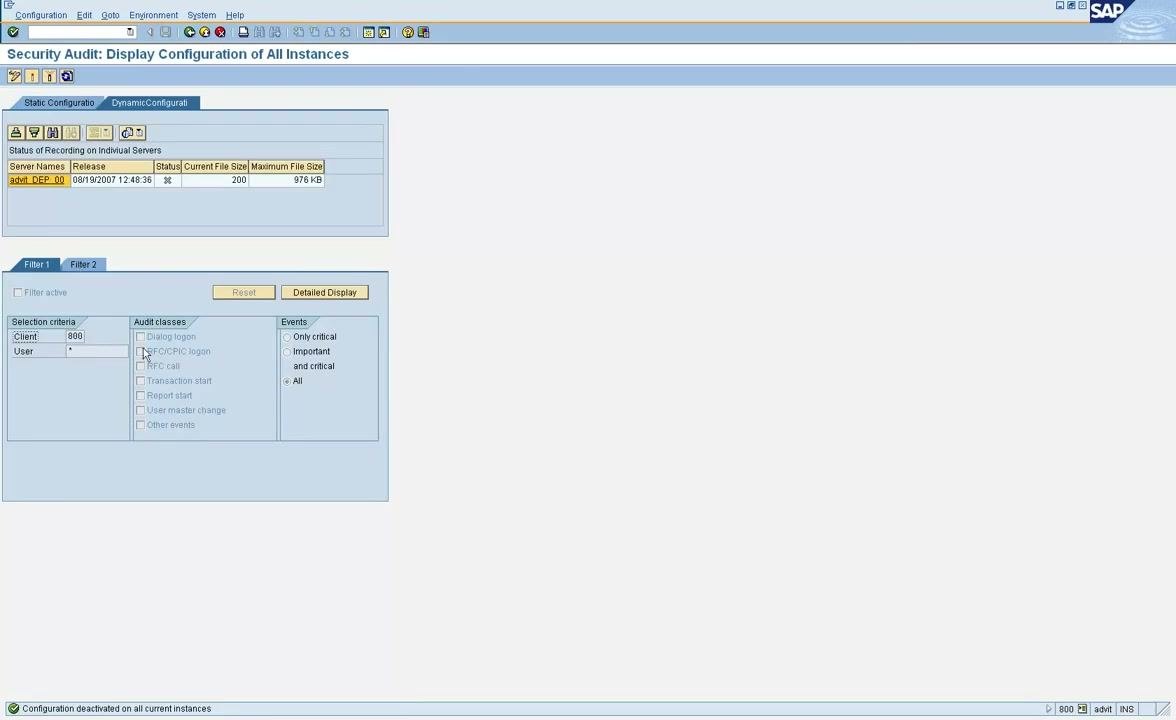
SM19in the command field and press Enter. - Wait for the Security Audit: Display Configuration of All Instances screen to appear.
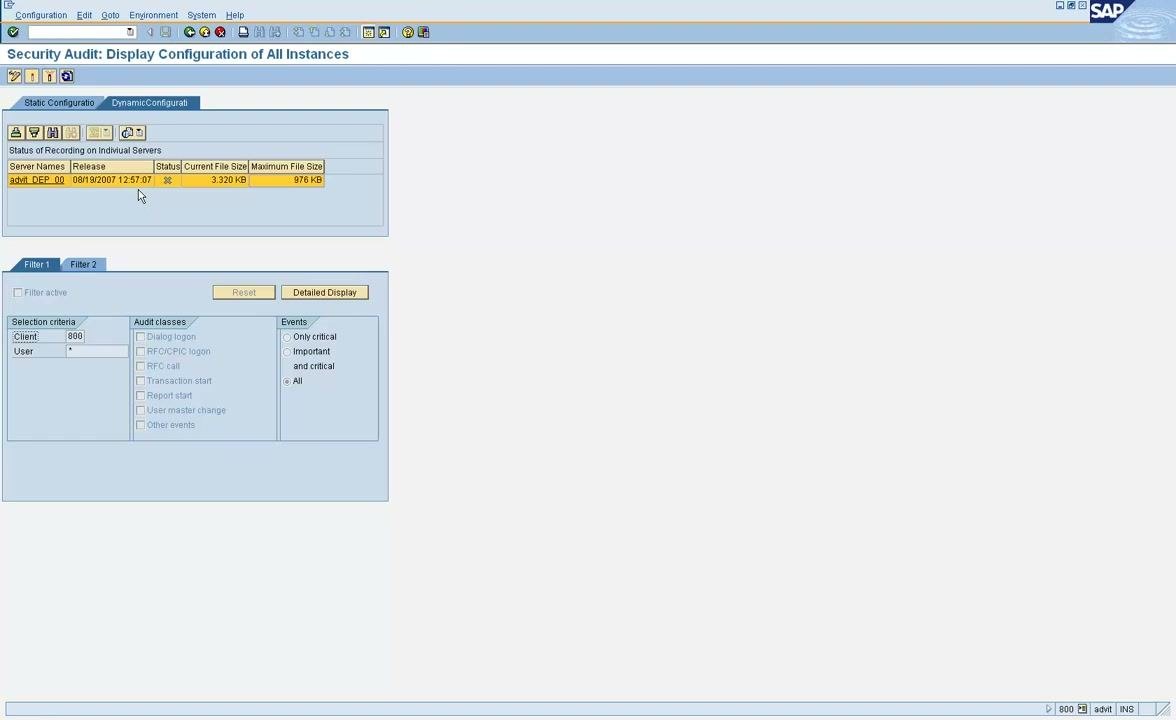
The screen has two main sections:
- Status of Recording on Individual Servers: shows the server name, release, status, current file size, and maximum file size.
- Filter section: lets you set selection criteria (Client, User), choose audit classes, and select event types.
The audit classes are Dialog logon, RFC/CPIC logon, RFC call, Transaction start, Report start, User master change, and Other events. The event types are Only critical, Important and critical, and All.
Set the filter criteria
Filters let you specify which users and clients to monitor. Each filter has its own selection criteria:
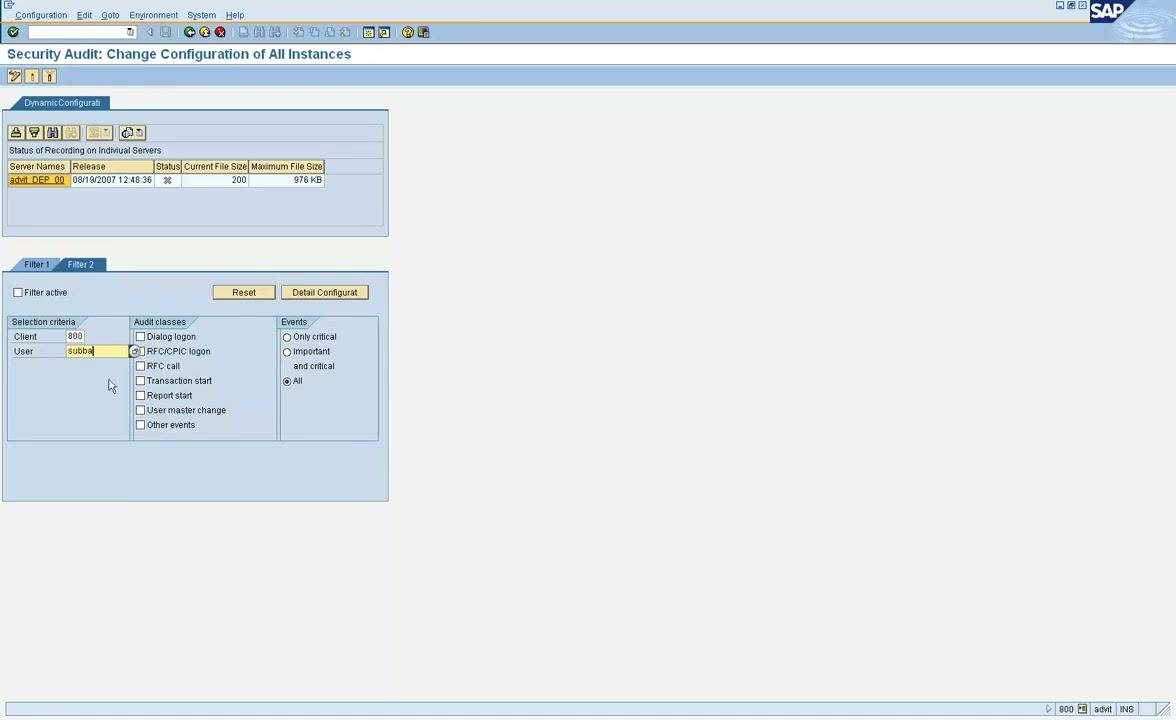
- Client: Enter a specific client number, such as
800, to monitor all users in that client. - User: Leave the field blank to monitor all users, or enter a username to monitor only that user.
The combination of Client and User determines what the filter monitors:
- If both fields are set to
*(wildcard), the filter monitors all users in all clients. - If Client is
800and User is blank, the filter monitors all users in client 800. - If Client is
*and User issubba, the filter monitors user "subba" across all clients. - If both Client and User are specified, the filter monitors only that user's activities in that client.
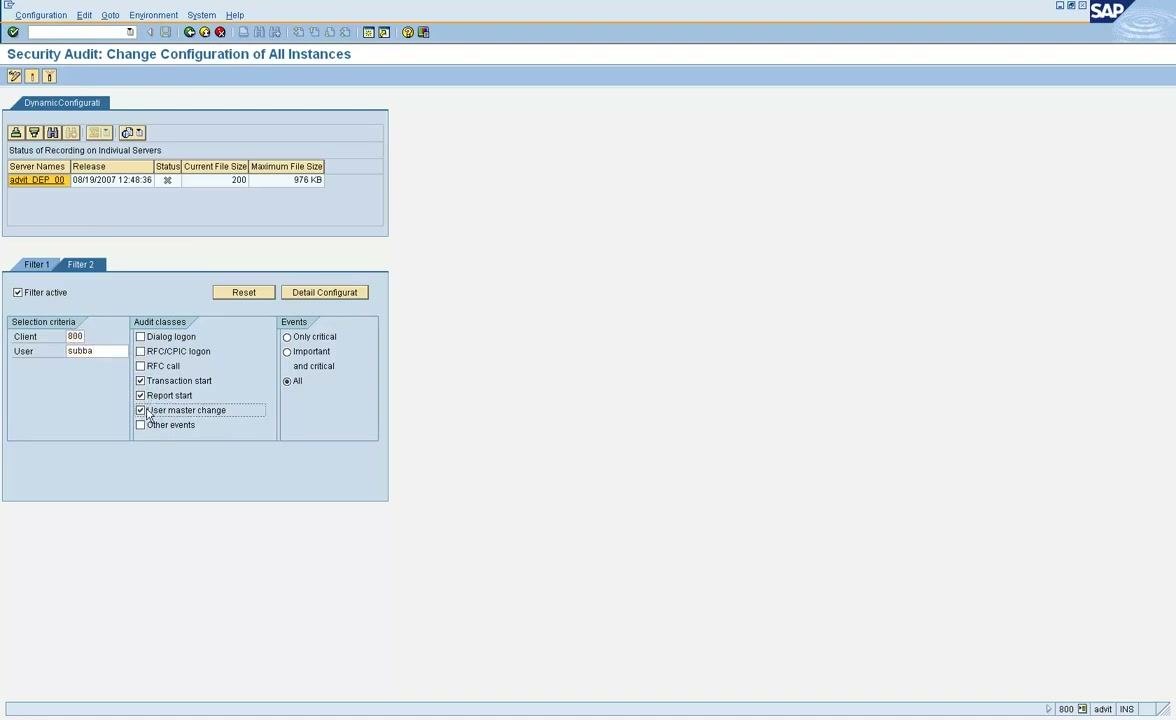
For this example, set Client to 800 and User to subba. This configuration monitors only the activities of user "subba" in client 800.
Use filters to tailor audit logging to your organization's monitoring needs. You can adjust the number of filters for more detailed monitoring. Always review your filter settings before you activate audit logging.
Activate the filter
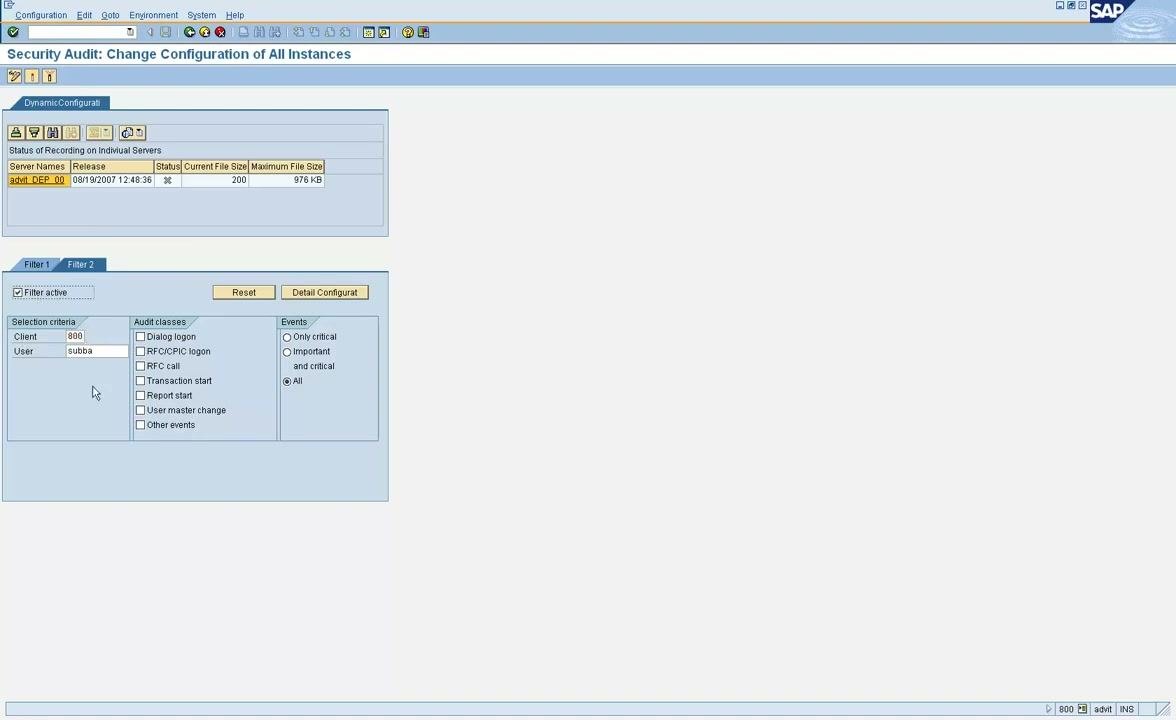
After you configure the filter (for example, Client = 800, User = subba), select the Filter active checkbox. This ensures the system uses the criteria you set for monitoring.
Select the audit classes to monitor
Choose the types of activity you want to monitor for the specified user and client:
- Transaction start: Monitors which transaction codes the user starts in this client.
- Report start: Monitors which reports the user executes in this client.
- User master change: Monitors the changes the user makes to user master records in client 800.
You can also select other audit classes, such as Dialog logon, RFC/CPIC logon, RFC call, and Other events, as needed.
Choose the event severity to log
In the Events section, select the level of events to log:
- Only critical
- Important and critical
- All (recommended for comprehensive monitoring)
Open the detailed configuration
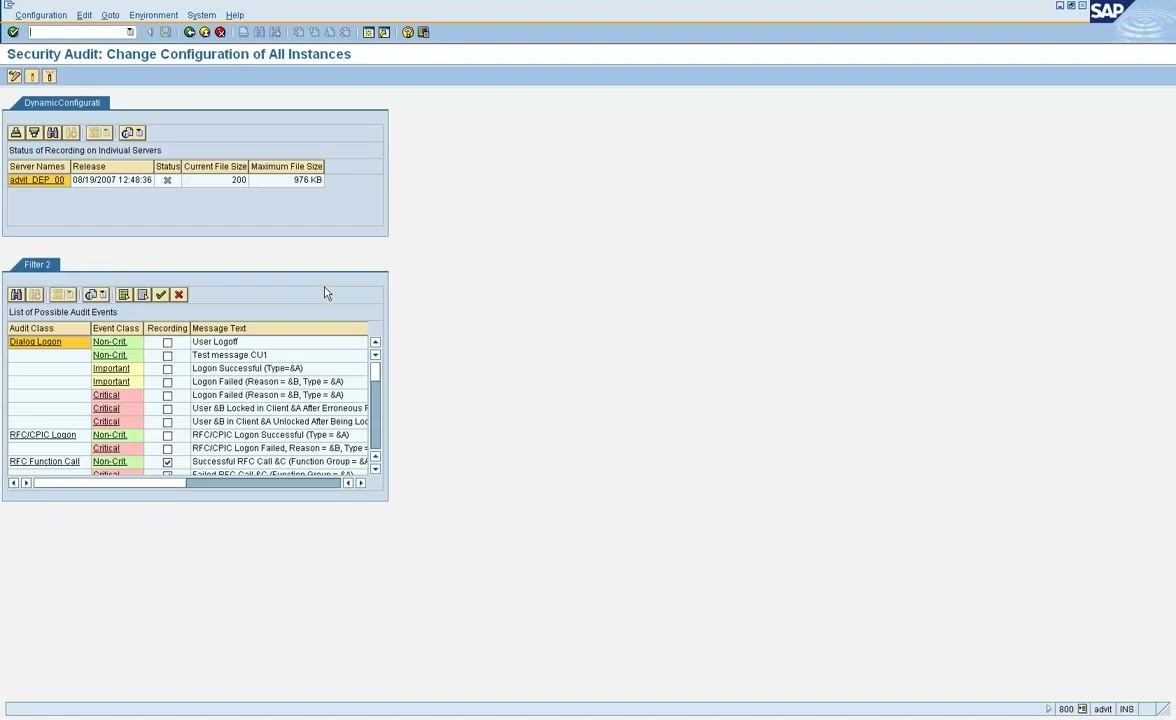
Click the Detail Configuration button to review and fine-tune which specific events the system monitors. A window opens with a list of possible audit events for the selected audit classes.
Review and select specific audit events
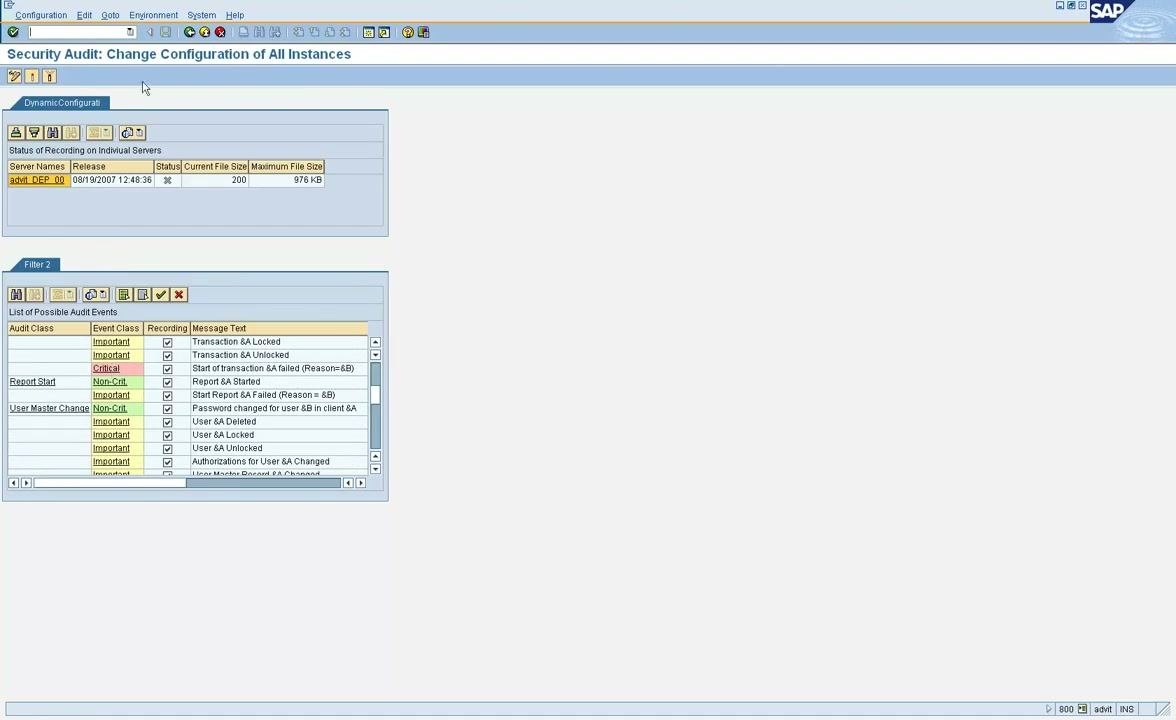
In the detailed configuration window, review the list of possible audit events. For each audit class, such as Dialog Logon, RFC/CPIC Logon, RFC Function Call, Report Start, or User Master Change, you can:
- See the Event Class (Non-Critical, Important, or Critical).
- Read the Recording Message Text, for example "User Logoff", "User 6A Locked in Client 6A after erroneous password checks", or "User 6A Deleted".
- Select or clear the checkbox to enable or disable logging for each event.
Examples of events you can monitor include:
- User logoff
- Failed logons, with reasons
- User locked or unlocked
- Transaction and report starts and failures
- User master record changes, such as a password change or a deleted user
Save and distribute the audit log configuration
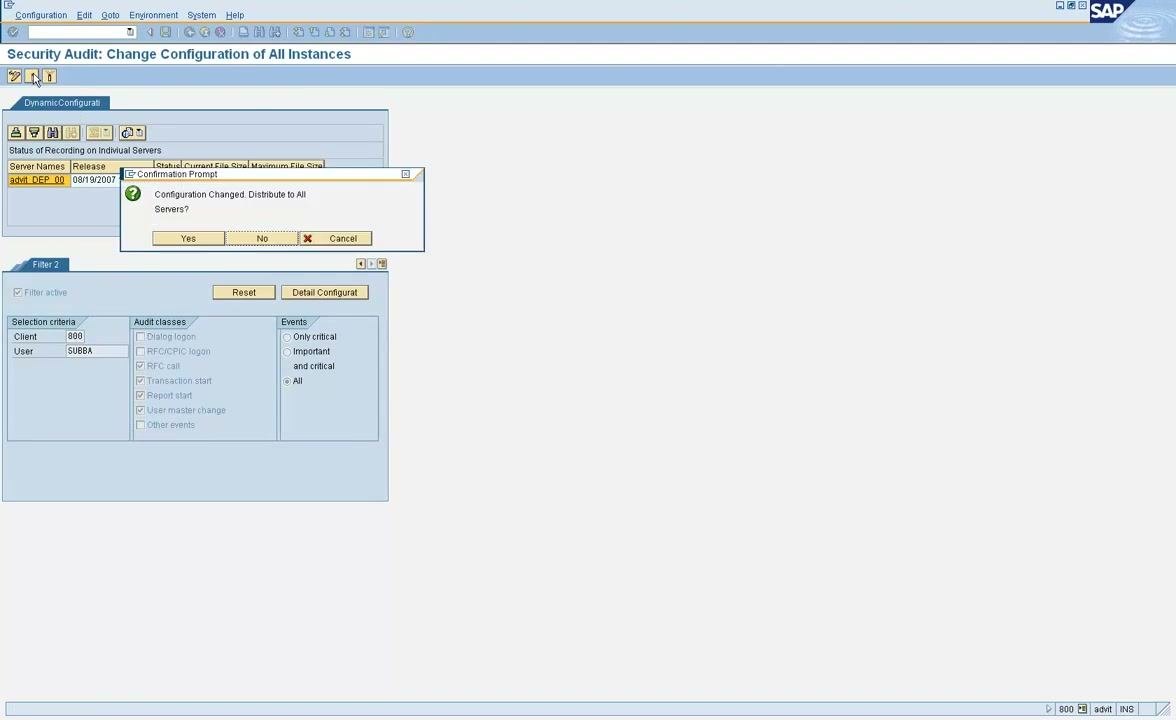
- After you finalize your filter and event selections, click the Save icon (floppy disk) in the toolbar.
- In the Confirmation Prompt window, read the message "Configuration Changed. Distribute to All Servers?"
- Choose one of the three options:
- Yes: Distributes the configuration to all servers in your SAP landscape. The settings you defined (for user "SUBBA" in client 800) then apply consistently across all servers.
- No: Applies the configuration to the current server only.
- Cancel: Aborts the distribution and returns you to the configuration screen without saving changes.
Generate user activity to monitor
With the filter active, user activity is now recorded. To perform user-related actions, run transaction codes such as SU01 or SU10. To run a specific program, use transaction code SU38.
- Go to the SAP Easy Access screen.
- Enter the transaction code in the command field and press Enter.
Review the security audit configuration after the activity
Return to the Security Audit: Display Configuration of All Instances screen to check the updated status. Look for changes in Current File Size or other audit indicators. For example, the file size may increase, which indicates new log entries.
Check the audit log locally with SM20
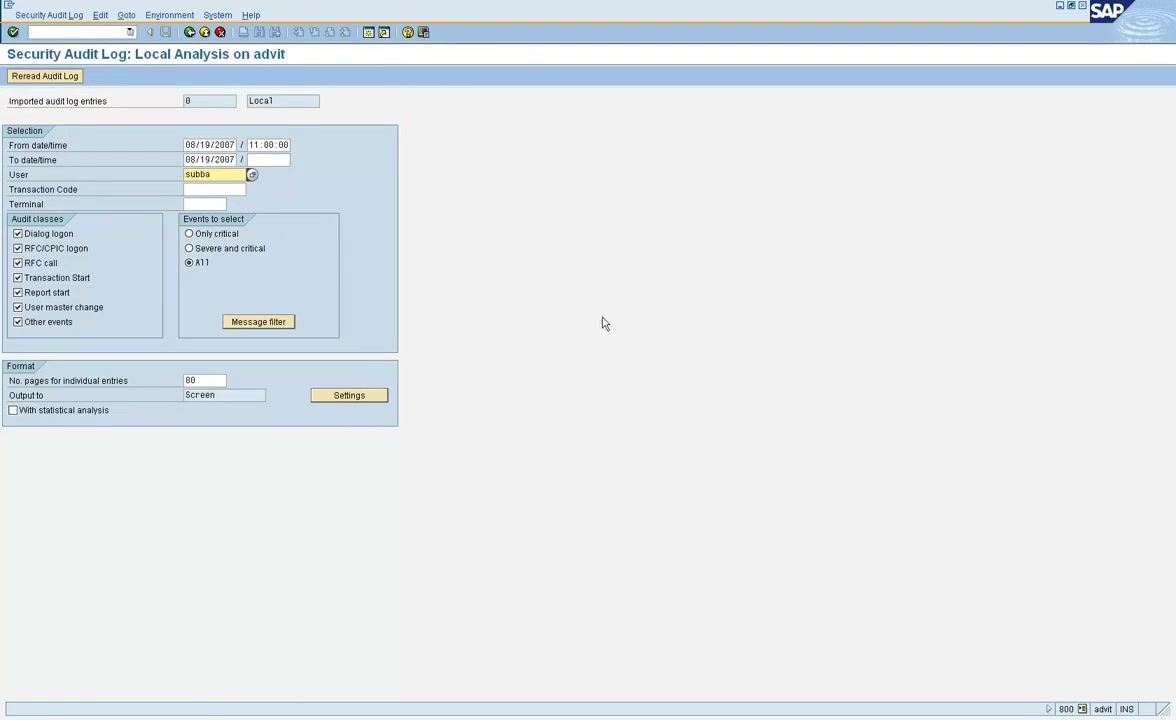
To check what actions a user has performed, use transaction code SM20. On the Security Audit Log: Local Analysis screen:
- Enter the date and time range, for example
08/19/2007 11:00:00. - Enter the User, for example
subba. - Optionally, specify a transaction code or terminal.
- Select the Audit classes, such as Dialog logon, RFC/CPIC logon, Transaction Start, Report start, User master change, and Other events.
- Under Events to select, choose "All".
- Set the number of pages for individual entries, for example
80. - Set Output to: "Screen".
- Click "Settings" or "Message filter" as needed to refine your search.
Set the criteria for a systemwide analysis
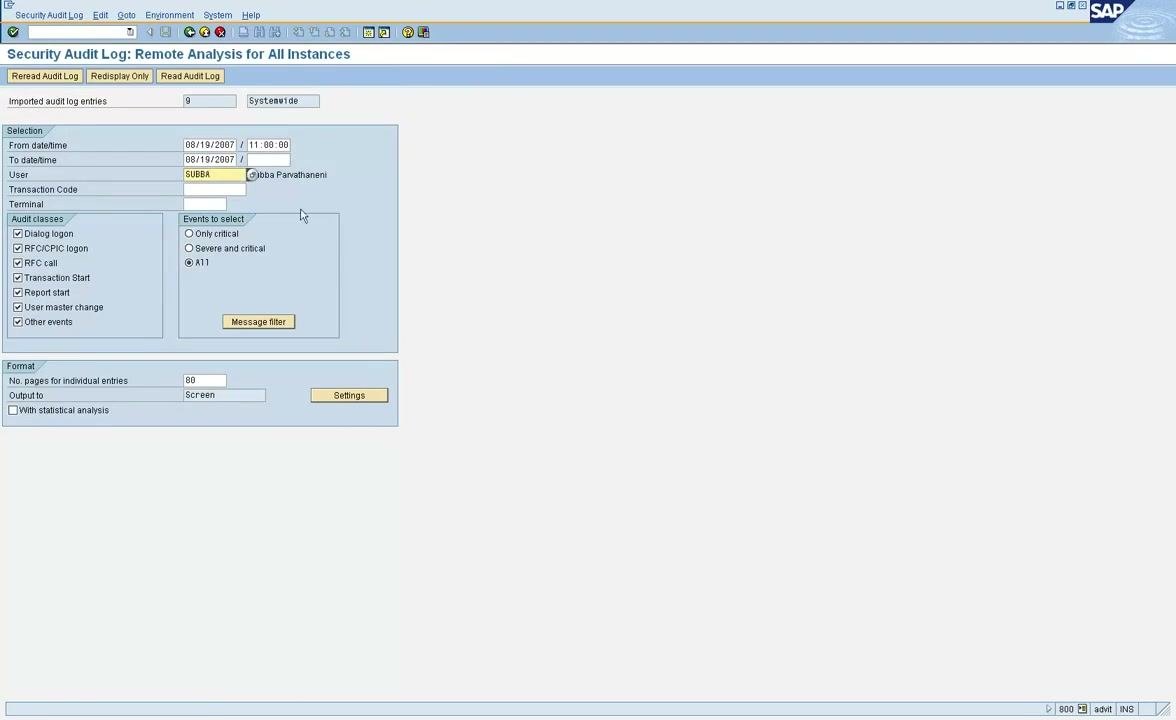
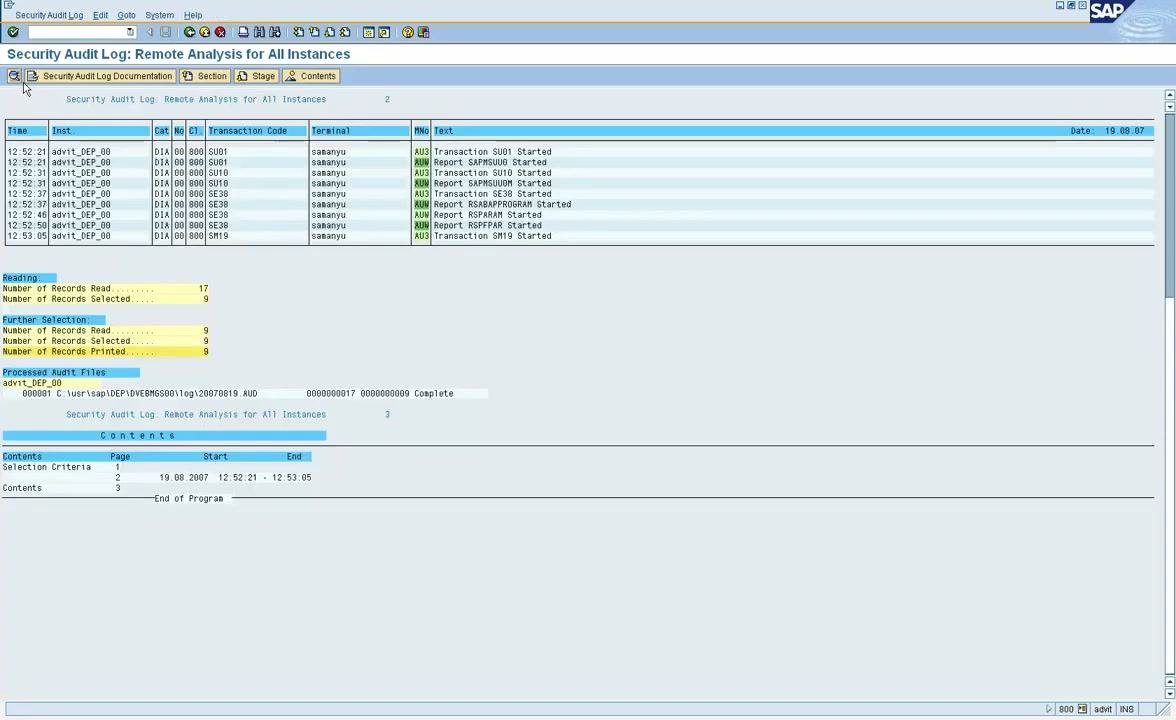
To analyze the audit log across all application servers, open the Security Audit Log: Remote Analysis for All Instances screen. It offers options to reread, redisplay, or read the audit log. The "Imported audit log entries" field shows the number of entries, for example 9.
- In the "Selection" section, enter
08/19/2007 11:00:00as From date/time and08/19/2007as To date/time. - Enter
SUBBAas the User. You can also use the Transaction Code and Terminal fields for further filtering. - In the "Audit classes" section, select Dialog logon, RFC/CPIC logon, RFC call, Transaction Start, Report start, User master change, and Other events.
- In "Events to select", choose "All".
- Set the number of pages for individual entries to
80. - Set Output to: "Screen".
- Optionally, click "Settings" or "Message filter" to refine your search.
Include all application servers
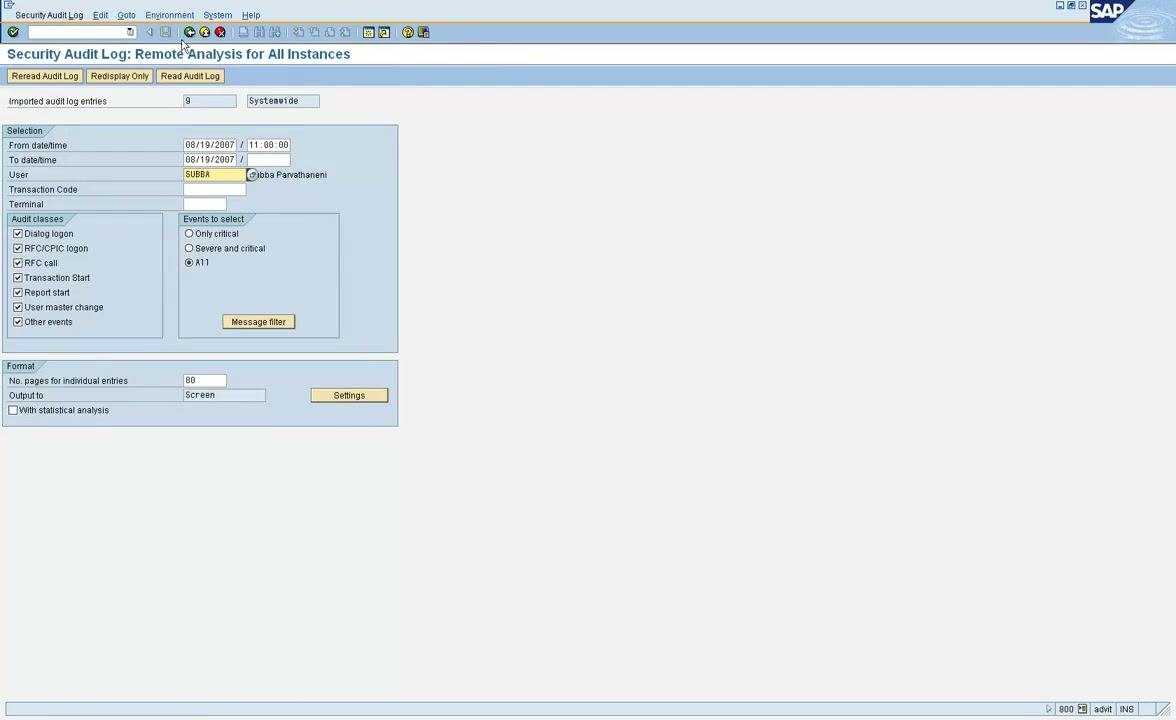
Click the "Systemwide" button to include logs from all application servers. This matters if your SAP system has multiple application servers, because checking only one server may not give you a complete picture.
Run the log analysis
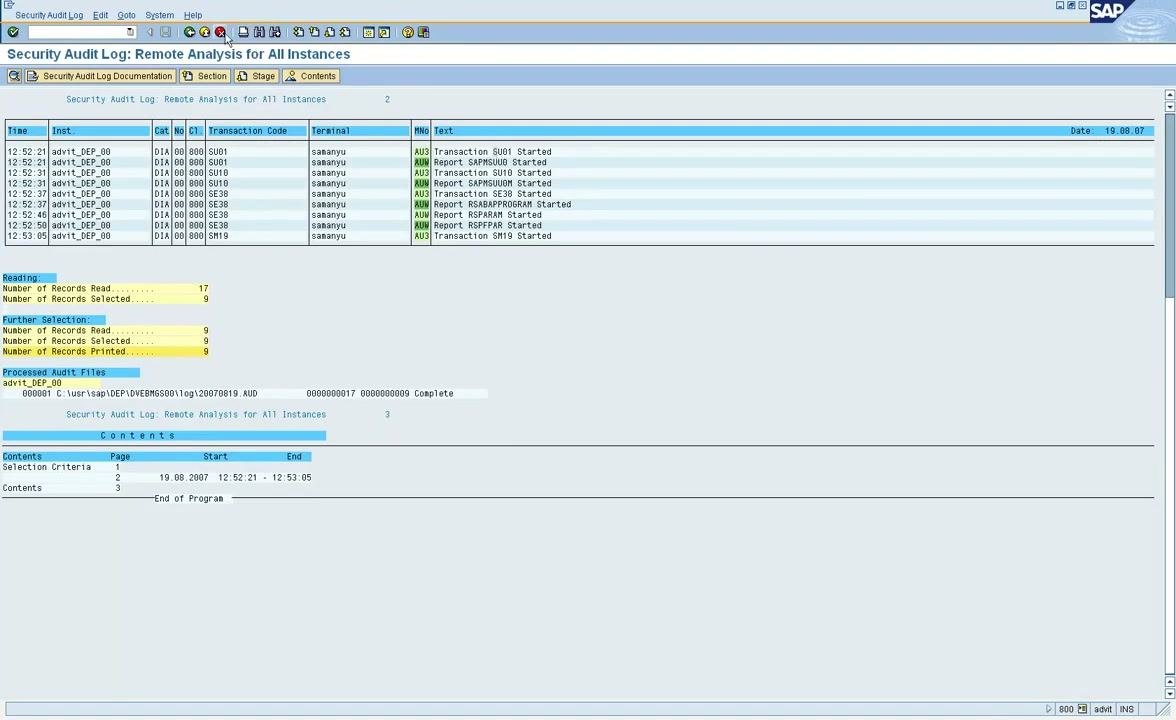
After you set your criteria, click the appropriate button (for example, "Read Audit Log") to run the analysis. The system processes your request and displays the results.
Review the audit log results
The results screen shows a table with these columns:
- Time: Timestamp of the event, for example
12:52:51. - Server: Server name, for example
advit_DEP_00. - Cat: Category, for example
DIA. - No: Number, for example
800. - Transaction Code: The code executed, for example
SU01,SU10,SU38, orSM19. - Terminal: Terminal or user, for example
samanyu. - MNo: Message number, for example
AU3. - Text: Description, for example
Transaction SU01 StartedorReport SAPMSUUU Started.
The lower section summarizes the number of records read, selected, and printed. It also lists the processed audit files with their paths, and the selection criteria and contents.
Use the results to determine which transaction codes were executed, which programs or reports were started, and the sequence and timing of user actions. The audit log shows the program or transaction name, but not the detailed actions performed within each transaction.
Deactivate the filter when you no longer need it
To stop logging further actions, return to transaction SM19 and deactivate the filter.
Understand the SM19 filter limits
In SM19, you typically see only two filters: Filter 1 and Filter 2. These filters define which activities to log based on client, user, audit classes, and event types.
You could keep a filter active indefinitely and use wildcards (* *) to log all activities for all users and clients. This requires enough disk space at the operating system level, because audit logs can grow large over time.
The Status of Recording on Individual Servers section in this example shows:
- Server Name: advit_DEP_00
- Status: *
- Current File Size: 3,320 KB
- Maximum File Size: 976 KB
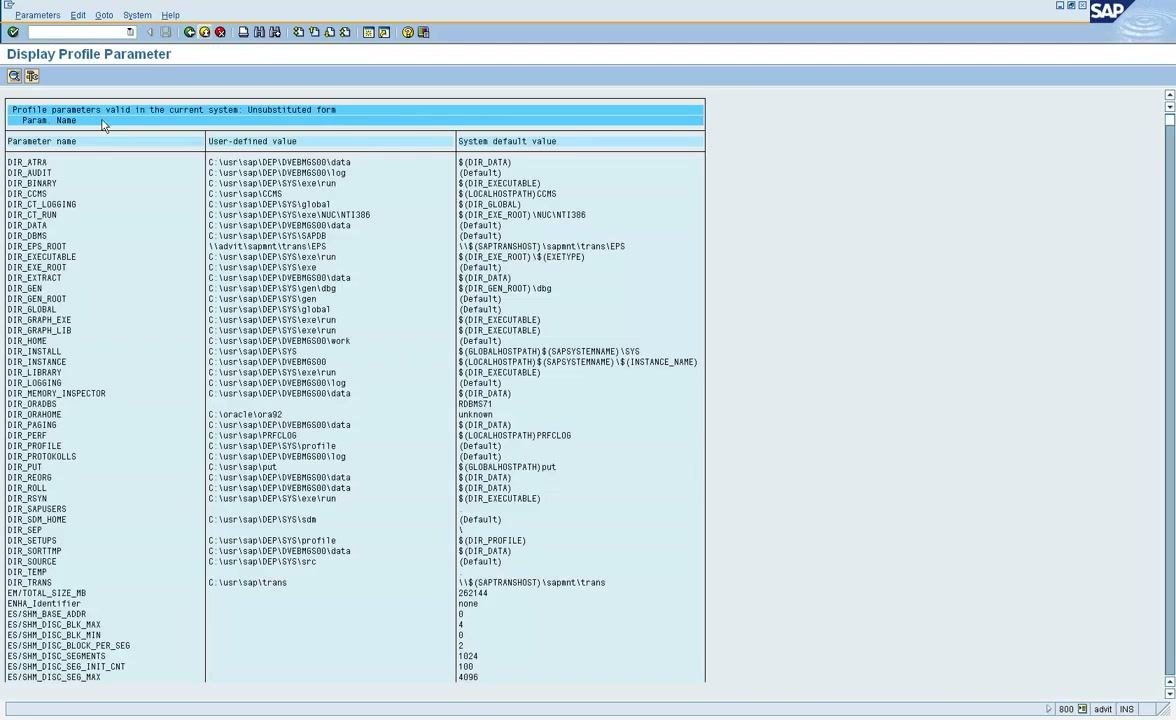
Review the RSAU parameters
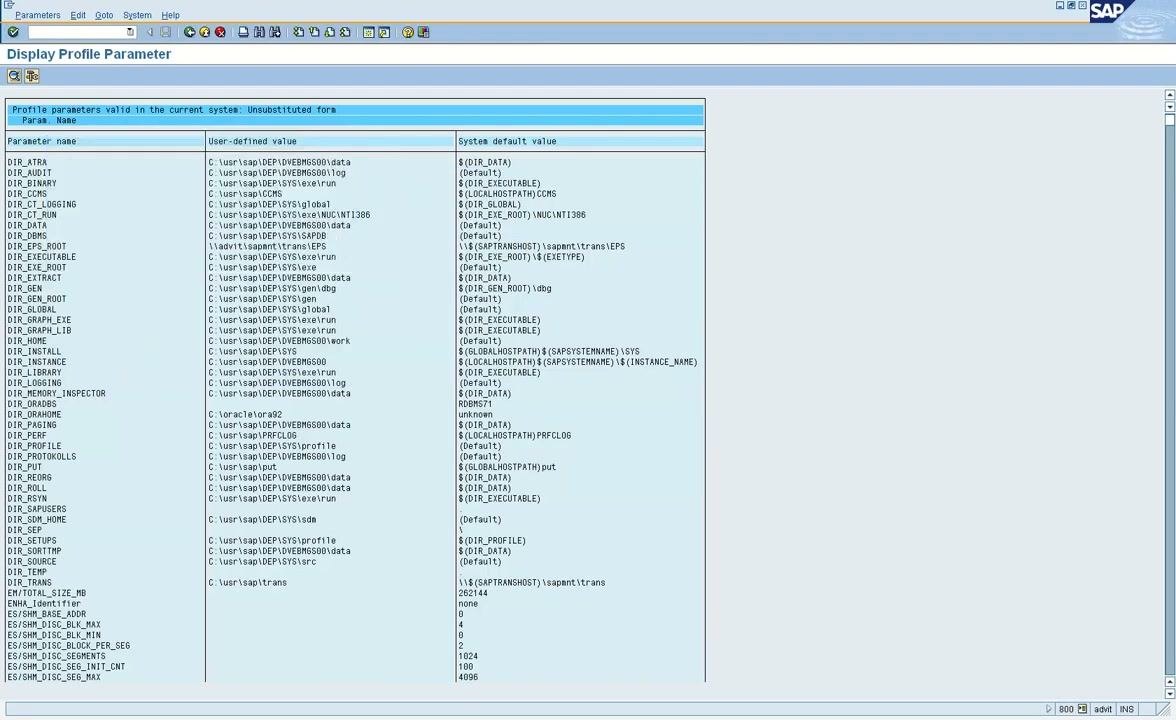
- Open the Display Profile Parameter screen in SAP.
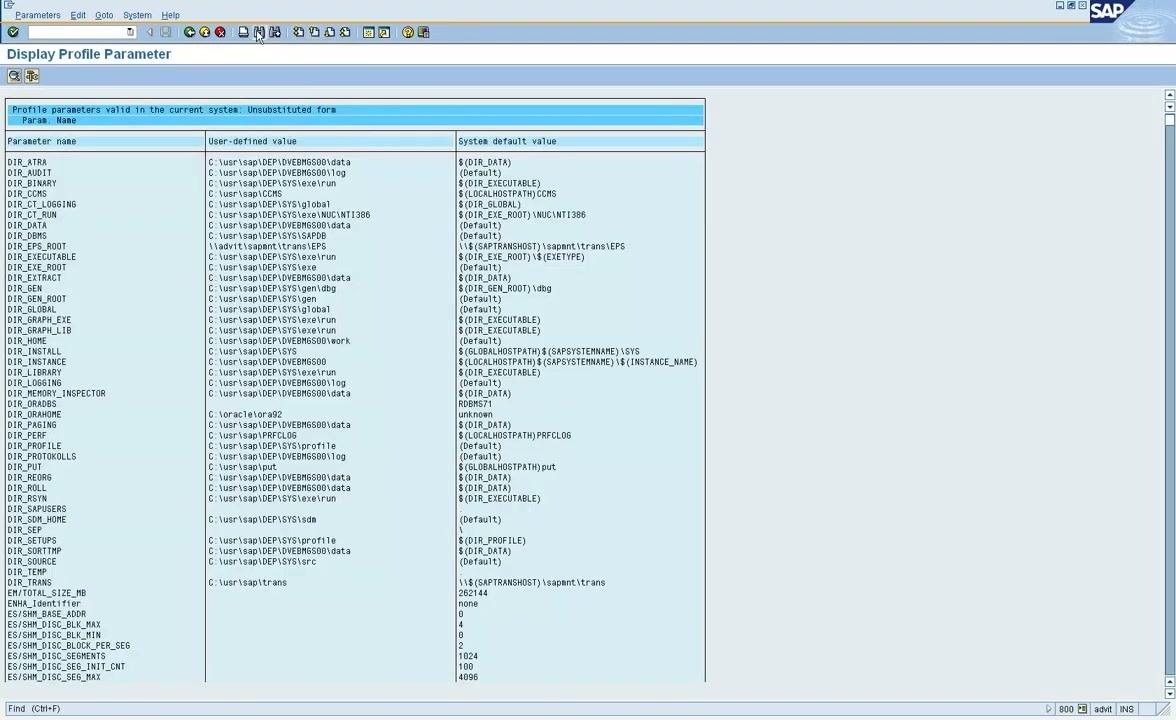
- Use the Find function to search for
rsauparameters. - Review the parameters related to audit logging, such as:
rsau/max_diskspace/localrsau/max_diskspace/per_dayrsau/max_diskspace/per_filersau/selection_slotsrsau/user-selectionrsau/SQL-Audit/filenamersau/SQL-Audit/filesizersau/SQL-Audit/logdirrsau/SQL-Audit/switchrsau/enable
Note the current values and paths, such as the log directory C:\usr\sap\DEP\DVEBMGS00\log.
Adjust the number of selection slots
The parameter rsau/selection_slots controls how many filter tabs SM19 displays. If you set rsau/selection_slots = 10, SM19 displays 10 filter tabs. If you set it to 12, SM19 displays 12 tabs. Adjust this value according to your audit requirements.
Apply and verify the parameter changes
- After you adjust the RSAU parameters, save your changes.
- Restart the SAP instance if required for the changes to take effect.
- Return to SM19 and verify that the number of filter tabs matches the value in
rsau/selection_slots.
Test parameter changes in a non-production environment before you apply them to live systems.
Monitor audit log file growth
If audit logging is enabled for all users, the audit log files grow rapidly. The more users you log, the faster the files reach their maximum size. When the maximum is reached, additional log files are created as configured, but performance issues can still occur if you don't manage this.
- Return to the Security Audit: Display Configuration of All Instances screen.
- Check the Current File Size and Maximum File Size columns for each server. In this example, server
advit_DEP_00shows a current size of3,320 KBand a maximum of976 KB. - If the current size exceeds the maximum, the log files are growing too quickly, likely because of high user volume.
If audit log files exceed their maximum size, the system may experience errors, dumps, or degraded performance. Customers may encounter performance-related problems if log file management is not properly configured.
Keep the configuration available for audits
The audit log settings and file size monitoring are essential from an audit point of view. Make sure the configuration is documented and available to auditors as needed.
Summary
You now know how to configure an audit log in SAP. You set filters in SM19, activated them, selected audit classes and events, saved and distributed the configuration, and reviewed user activity with SM20 and the systemwide remote analysis. You also learned how the RSAU parameters control the number of filters and how to watch file sizes. Monitor disk usage and adjust your filter settings to balance audit requirements with system performance and storage.
What's next
- Review the audit log results regularly to see which transactions and reports users started.
- Adjust
rsau/selection_slotsif you need more filters for detailed monitoring. - Check the current and maximum file sizes on a regular basis.
- Deactivate filters in SM19 when you no longer need to log activity.
Generation details: cost, quality tiers
Docsie billed 7,000 credits ($4.90) to analyze this 14-minute video at standard quality. The rewrite, template fill and Word/PDF exports were included. The same video at each quality tier:
| Quality | Frames sampled | Credits | Approx. cost |
|---|---|---|---|
| Draft | every 16-30 s | 3,500 | $2.45 |
| Standard (this guide) | every 8-15 s | 7,000 | $4.90 |
| Detailed | every 4-7 s | 14,000 | $9.80 |
| Ultra | every 1-3 s | 28,000 | $19.60 |
Credits priced at $0.70 per 1,000; plans include a monthly allowance. Enterprise customers on on-premise or bring-your-own-model deployments run this on their own inference and pay no per-video credits.
Generated by Docsie Video-to-Docs on 2026-11-15 from a 13-minute video. Screenshots are frames from the source video and belong to their creator, SAP Security Step by Step, whose original is embedded above. If you own this video and want the guide removed or credited differently, contact us and we will act within one business day.