
How to Extract a Trial Balance in SAP Business One
This guide shows you how to extract a trial balance in SAP Business One. You open the Trial Balance report, set the selection criteria and posting date range, and review the Account Balance results. You can then customize the visible columns and start an export to a plain text file.
Video: How to view Trial Balance in SAP B1 ? by 2KBasics (2022). All credit for the demonstration goes to the creator; watch the original on YouTube. The written guide below was generated from this video by Docsie. Creator? Request a change or removal.
This guide shows you how to extract a trial balance in SAP Business One. You open the Trial Balance report, set the selection criteria and posting date range, and review the Account Balance results. You can then customize the visible columns and start an export to a plain text file.
Prerequisites
- Access to the main application window and the Modules menu.
- Access to the Financials module and its financial reports.
- The posting date range you want to report on.
Steps
Open the Trial Balance report
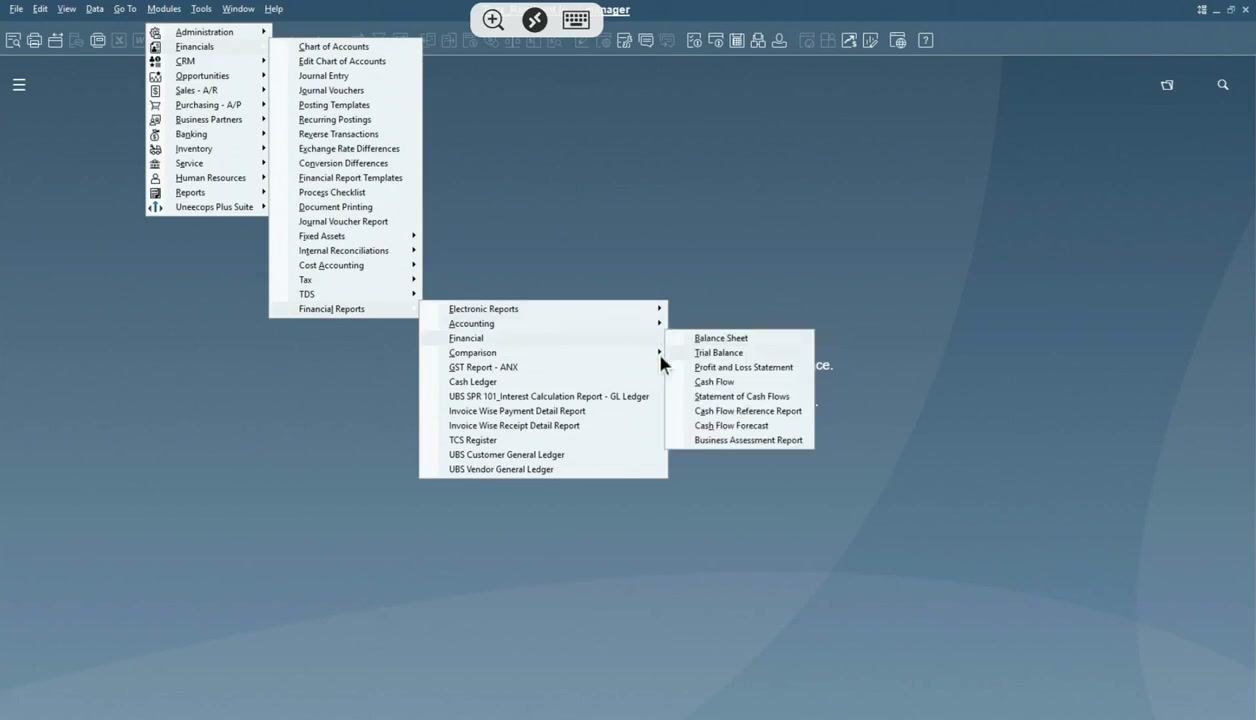
- In the main application window, hover over the top menu and select Modules.
- Choose Financials > Financial Reports > Comparison > Trial Balance.
The submenu lists reports such as Balance Sheet, Trial Balance, Profit and Loss Statement, and Cash Flow. Select Trial Balance from the list.
Set the selection criteria for the trial balance
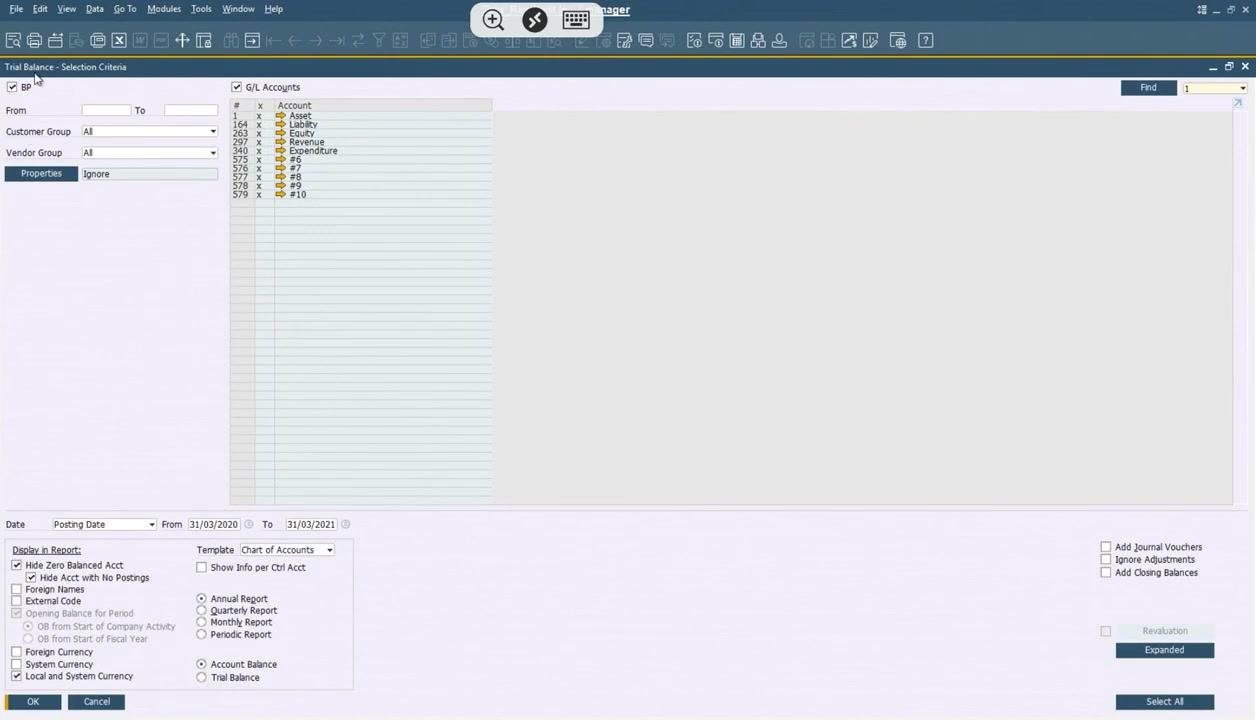
The Trial Balance - Selection Criteria window opens. Set it up as follows:
- Make sure the G/L Accounts checkbox is selected.
- In the Date section at the bottom left, set the Posting Date range. This example uses From
31/03/2020and To31/03/2021. - Under Display in Report, review the available options: Hide Zero Balanced Acct, Hide Acct with No Postings, and Opening Balance for Period.
- Confirm that the Template dropdown is set to Chart of Accounts.
- Choose Trial Balance as the report type.
Click OK to proceed.
View the account balance summary
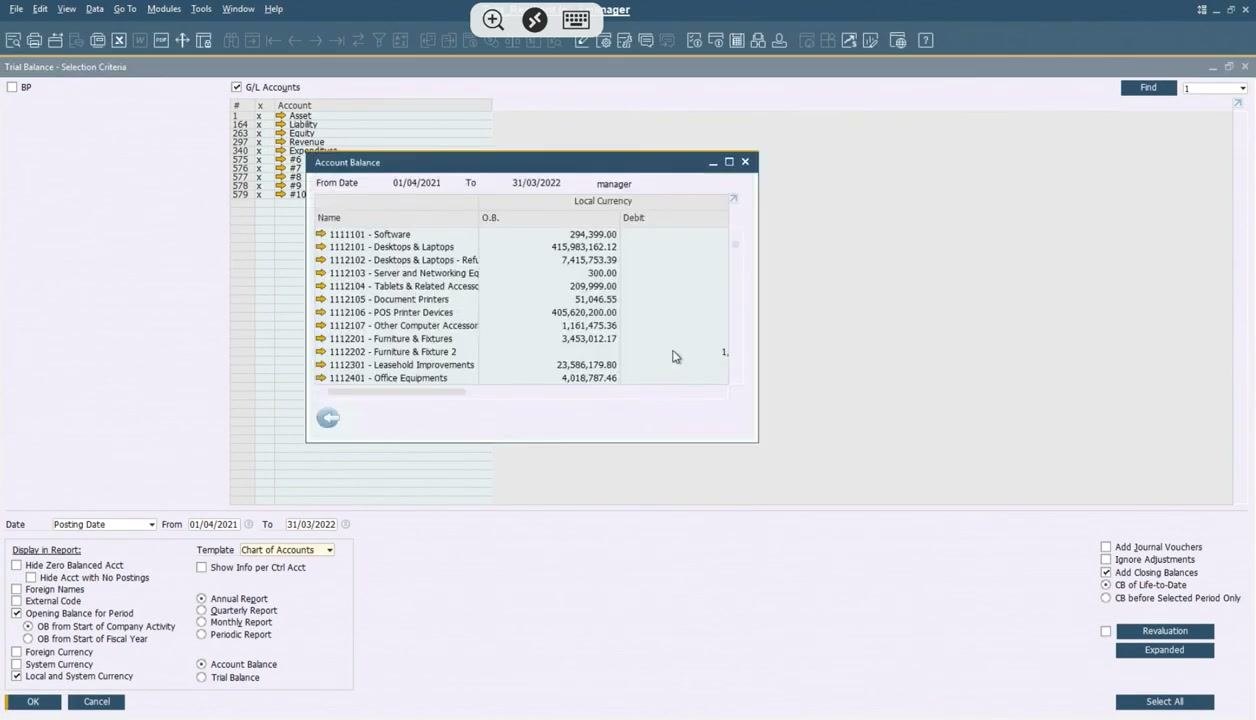
After you confirm the criteria, the Account Balance summary window appears. It lists account names and codes, opening balances (O.B.), and debit values in local currency for the selected period.
Example accounts in the summary include:
- 1111101 - Software
- 1112102 - Desktops & Laptops - Refurbished
- 1112103 - Server and Networking Equipments
- 1112201 - Furniture & Fixtures
- 1112401 - Office Equipments
Review the detailed account balance report
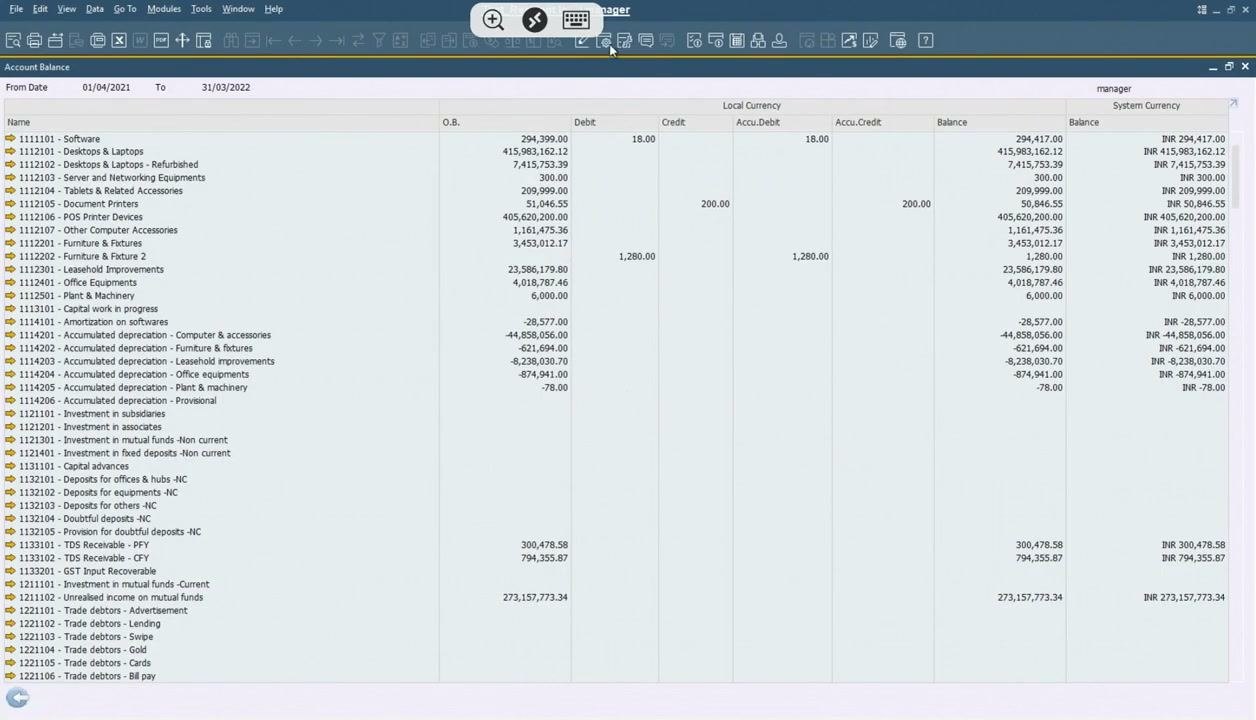
The main window now shows the detailed account balance report. Each row is a different account, with values in each of these columns:
- Name (account code and description)
- O.B. (Opening Balance)
- Debit
- Credit
- Accu.Debit (Accumulated Debit)
- Accu.Credit (Accumulated Credit)
- Balance (Local Currency)
- Balance (System Currency)
Adjust the reporting period
To extract the trial balance for a different period, return to the selection criteria and update the dates:
- Change the From date to
01/04/2021. - Change the To date to
31/03/2022. - Confirm that the G/L Accounts checkbox is still selected.
- Review and adjust any other display options you need.
Modify the display options
Select or clear display options such as Hide Zero Balanced Acct to exclude or include accounts with zero balances. Make sure all other settings match what you want in the report.
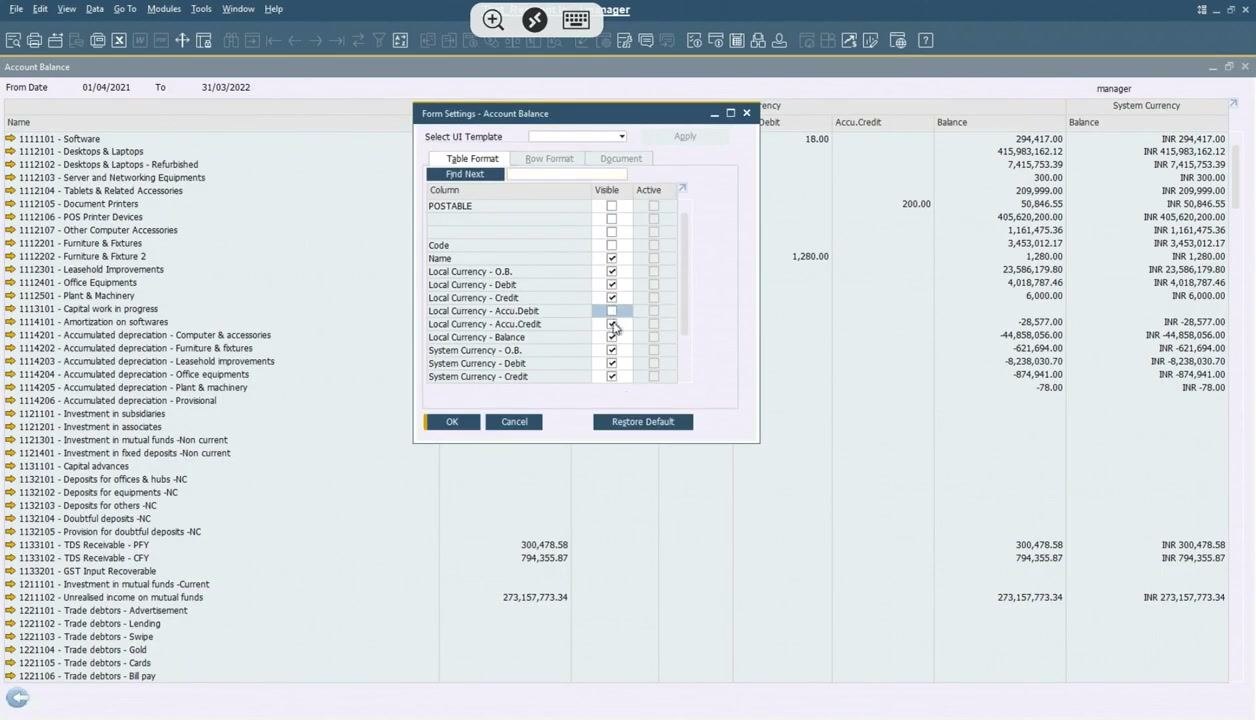
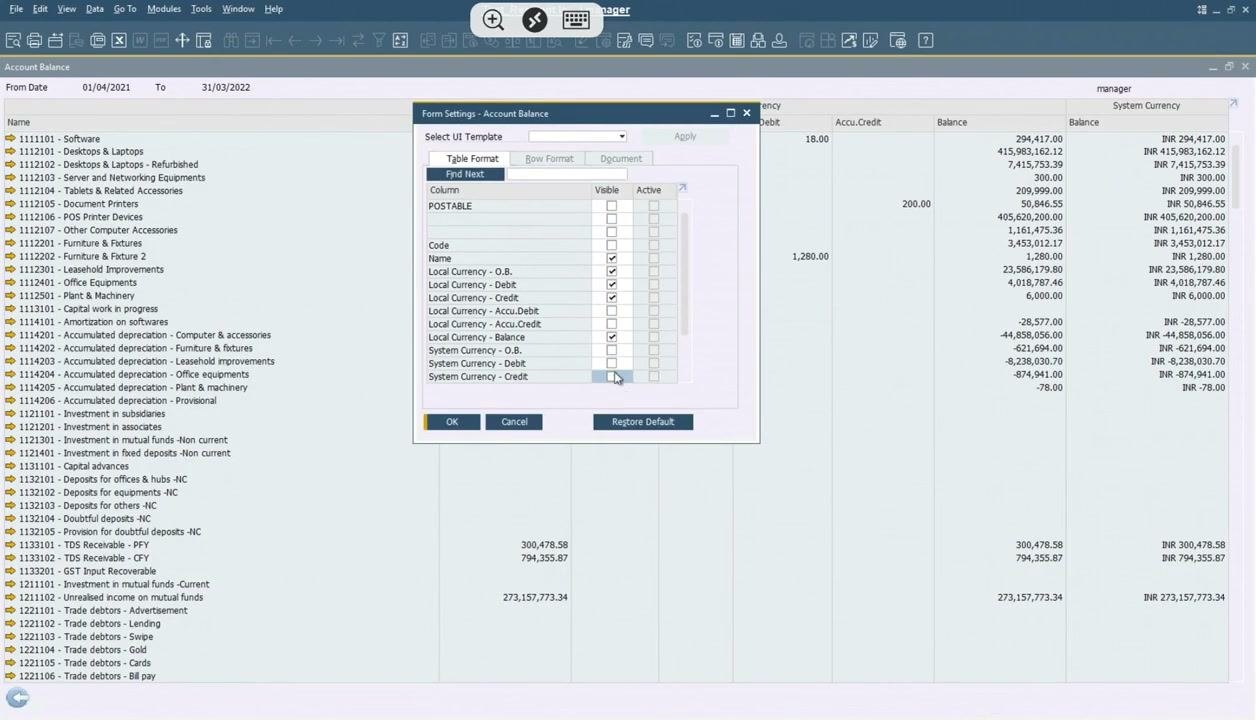
Customize the visible columns
- Open the Form Settings - Account Balance dialog.
- On the Table Format tab, select or clear columns to control what appears in the report.
- Use the checkboxes under Visible and Active to choose which columns are shown.
- Click OK to apply your changes, or click Restore Default to revert.
The available columns are:
- Code
- Name
- Local Currency (O.B., Debit, Credit, Accu.Debit, Accu.Credit, Balance)
- System Currency (O.B., Debit, Credit)
Review the updated account balance report
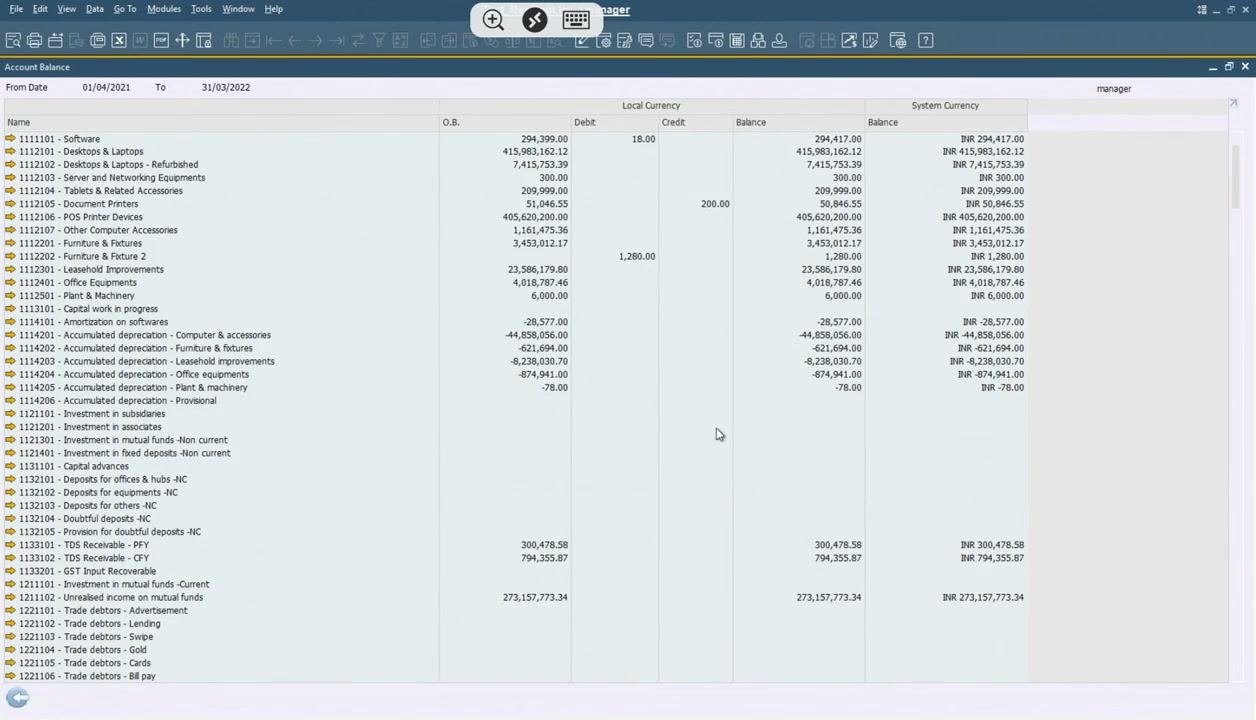
The account balance report updates to show the columns you selected. Check that it displays everything you need, including balances in both local and system currency.
Scroll through additional accounts
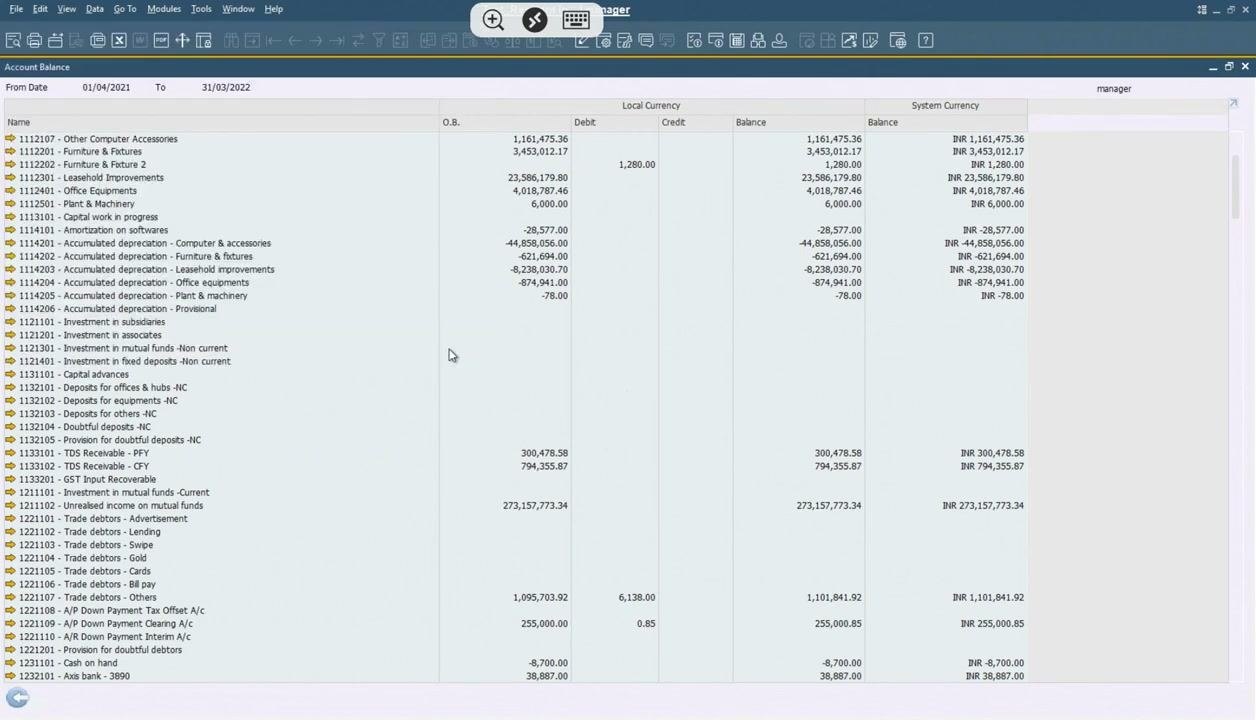
Scroll down to view more accounts and their balances. Make sure all relevant accounts and data are included in the final report.
Start the export of the trial balance
With the Account Balance report open and customized, start the export. A standard Save As dialog appears over the report with these details:
- The current folder path is
ExclDocs > TEST_RESILIENT_DB. - The file name is pre-filled as
Account Balance. - The Save as type dropdown is set to Plain Text File (*.txt).
- The Save and Cancel buttons are available.
Save or cancel the export
Decide whether to save the report. Click Save to export it, or click Cancel to close the dialog and return to the report without saving.
After the dialog closes, the full Account Balance report is visible again. It shows:
- The reporting period at the top, From Date
01/04/2021to To31/03/2022. - Columns for account code and name, opening balance (O.B.), debit, credit, and balances in both local and system currency.
- Account entries such as 1112107 - Other Computer Accessories, 1112201 - Furniture & Fixtures, 1112401 - Office Equipments, 1132101 - Capital advances, and 1223101 - Axis bank - 3890.
You can scroll through the report to review all account balances and details.
Summary
You now know how to extract a trial balance in SAP Business One. You opened the Trial Balance report, set the posting date range and display options, and reviewed the account balance results. You then customized the visible columns and used the Save As dialog to export the report as a plain text file or cancel the export.
Generation details: cost, quality tiers
Docsie billed 1,500 credits ($1.05) to analyze this 3-minute video at standard quality. The rewrite, template fill and Word/PDF exports were included. The same video at each quality tier:
| Quality | Frames sampled | Credits | Approx. cost |
|---|---|---|---|
| Draft | every 16-30 s | 750 | $0.52 |
| Standard (this guide) | every 8-15 s | 1,500 | $1.05 |
| Detailed | every 4-7 s | 3,000 | $2.10 |
| Ultra | every 1-3 s | 6,000 | $4.20 |
Credits priced at $0.70 per 1,000; plans include a monthly allowance. Enterprise customers on on-premise or bring-your-own-model deployments run this on their own inference and pay no per-video credits.
Generated by Docsie Video-to-Docs on 2026-11-15 from a 2-minute video. Screenshots are frames from the source video and belong to their creator, 2KBasics, whose original is embedded above. If you own this video and want the guide removed or credited differently, contact us and we will act within one business day.