
How to Add a User Defined Field (UDF) in SAP Business One
User Defined Fields (UDFs) let you capture additional information in SAP Business One that isn't included by default. You can add UDFs at the document header level, at the row (line item) level, and then control where and how they display across your documents. This guide walks you through creating a header-level UDF, a row-level UDF, displaying both in a transaction, managing their visibility, and verifying that they work correctly.
Video: How to Create a User-Defined Field (UDF) in SAP Business One | Step-by-Step Guide by Maruf Rahman (2020). All credit for the demonstration goes to the creator; watch the original on YouTube. The written guide below was generated from this video by Docsie. Creator? Request a change or removal.
User Defined Fields (UDFs) let you capture additional information in SAP Business One that isn't included by default. You can add UDFs at the document header level, at the row (line item) level, and then control where and how they display across your documents. This guide walks you through creating a header-level UDF, a row-level UDF, displaying both in a transaction, managing their visibility, and verifying that they work correctly.
Prerequisites
- You must be logged into SAP Business One with access to the main cockpit screen.
- You need permissions to access the Tools menu and Customization Tools.
Open SAP Business One
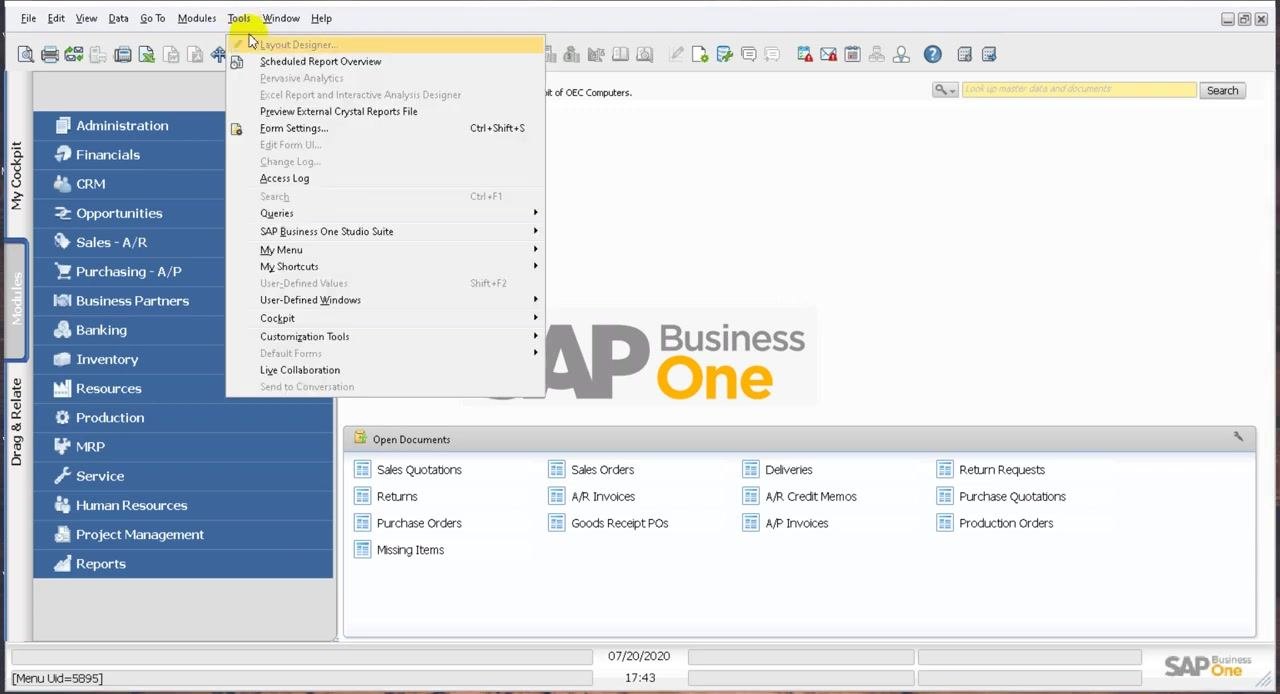
Make sure you are logged into SAP Business One and have reached the main cockpit screen. The main menu and available modules appear on the left side, with the SAP Business One logo centered on the screen.
Open the customization tools
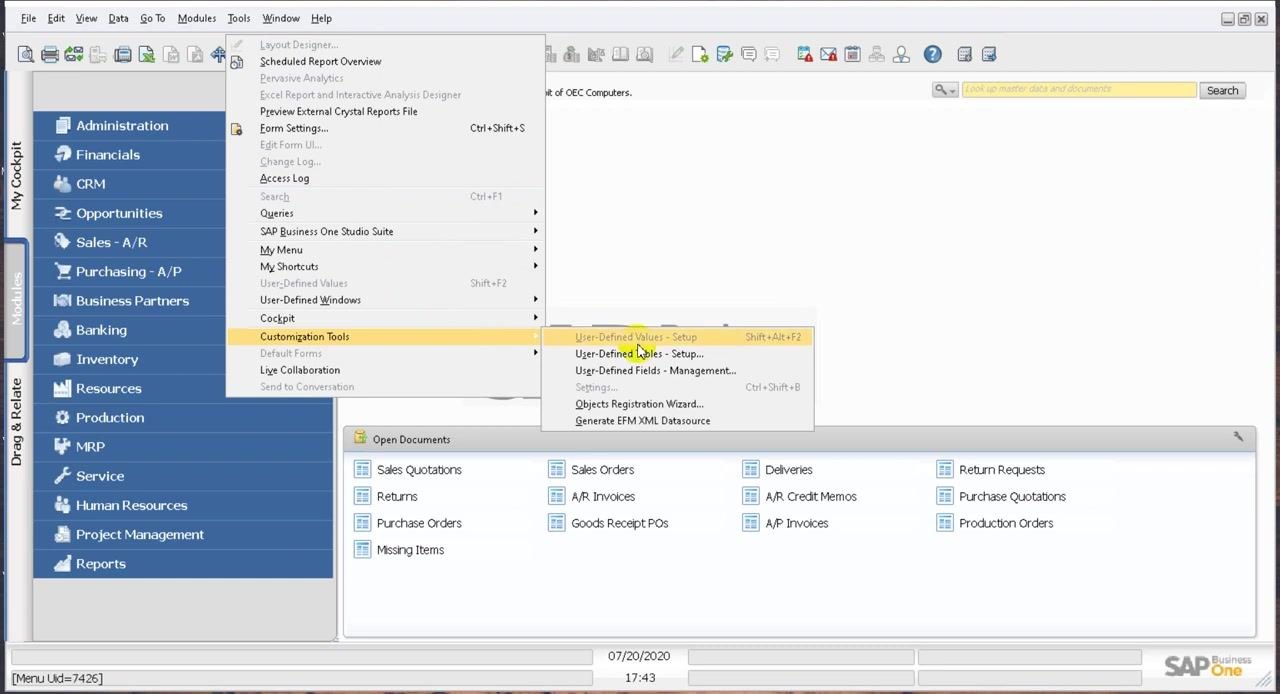
At the top menu bar, click Tools. A dropdown menu opens, displaying several options including Customization Tools.
From this dropdown, hover over Customization Tools, then click User-Defined Fields – Management... in the submenu that appears.
Select the module and level for your new UDF
In the User-Defined Fields – Management window, select the module where you want to add the UDF. For example, expand Marketing Documents. You can then choose whether the UDF applies at the Title (header) level or the Rows (line item) level — Title refers to the document header, while Rows refers to the tabular section of the document.
Click Title under the document type you selected (for example, Marketing Documents), then click the Add button at the bottom right of the window to start creating the field.
Enter the header-level UDF details
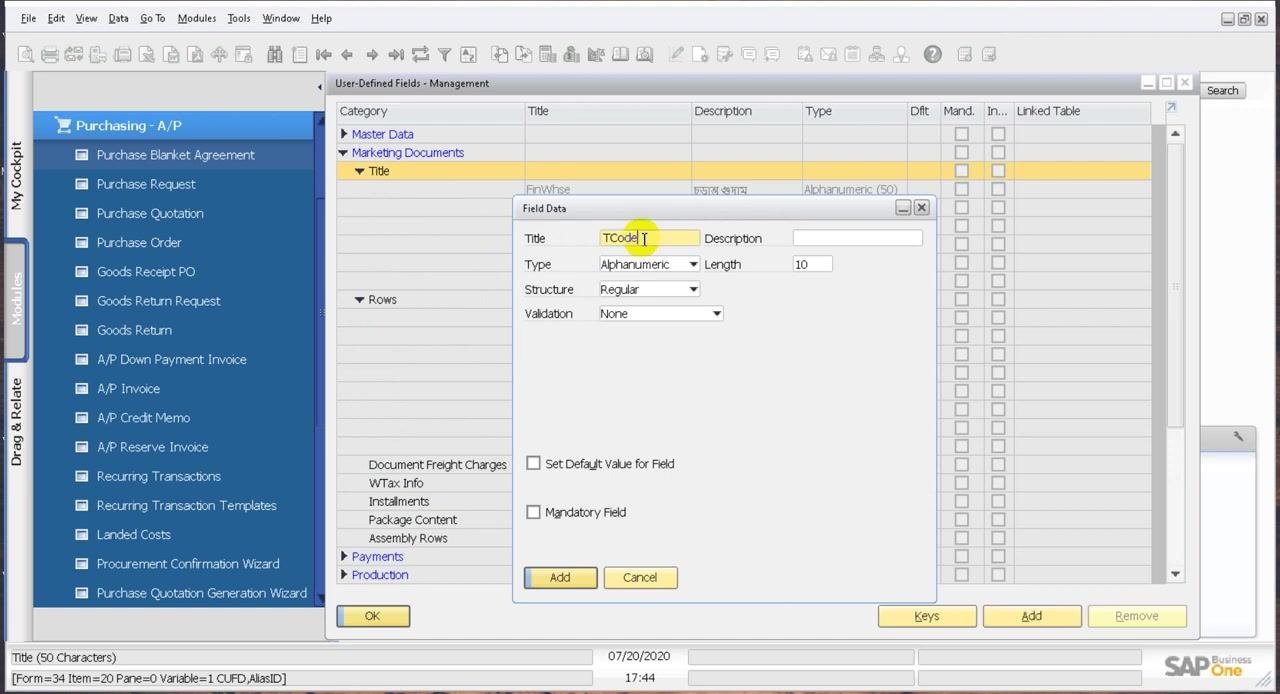
In the Field Data dialog, fill in the following fields:
- Title: Enter a unique name for the UDF (for example,
TCode). - Description: Optionally, enter a description.
- Type: Select the data type for the UDF. For this example, keep it set to
Alphanumeric. - Length: Set the maximum length (for example,
10). - Structure: Leave as
Regularunless a different structure is needed. - Validation: Leave as
Noneunless validation is required.
Do not check the boxes for Set Default Value for Field or Mandatory Field unless you specifically need to enforce those options.
Review and create the header-level UDF
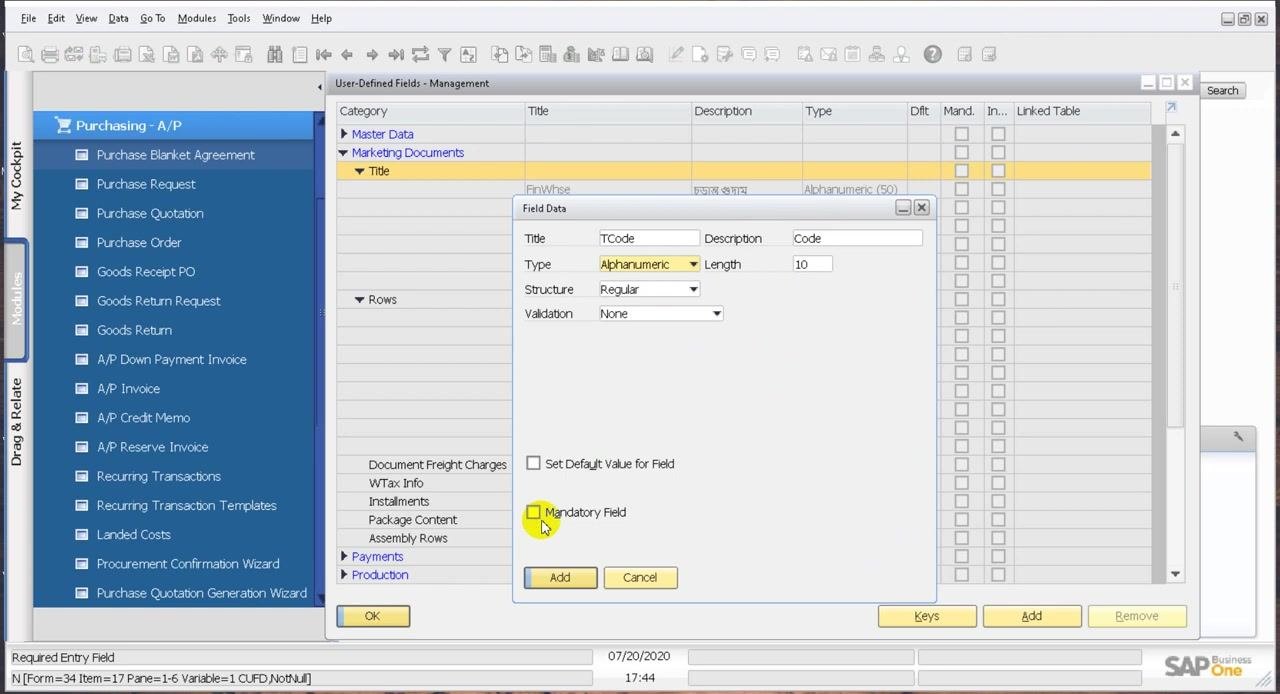
Double-check all the details you entered, then click Add to create the UDF.
Here is a summary of the settings used in this example:
- Title: TCode
- Type: Alphanumeric
- Length: 10
- Structure: Regular
- Validation: None
- Mandatory Field: Not checked
- Set Default Value for Field: Not checked
Following these steps creates a new User Defined Field at the document header level.
Add a row-level UDF
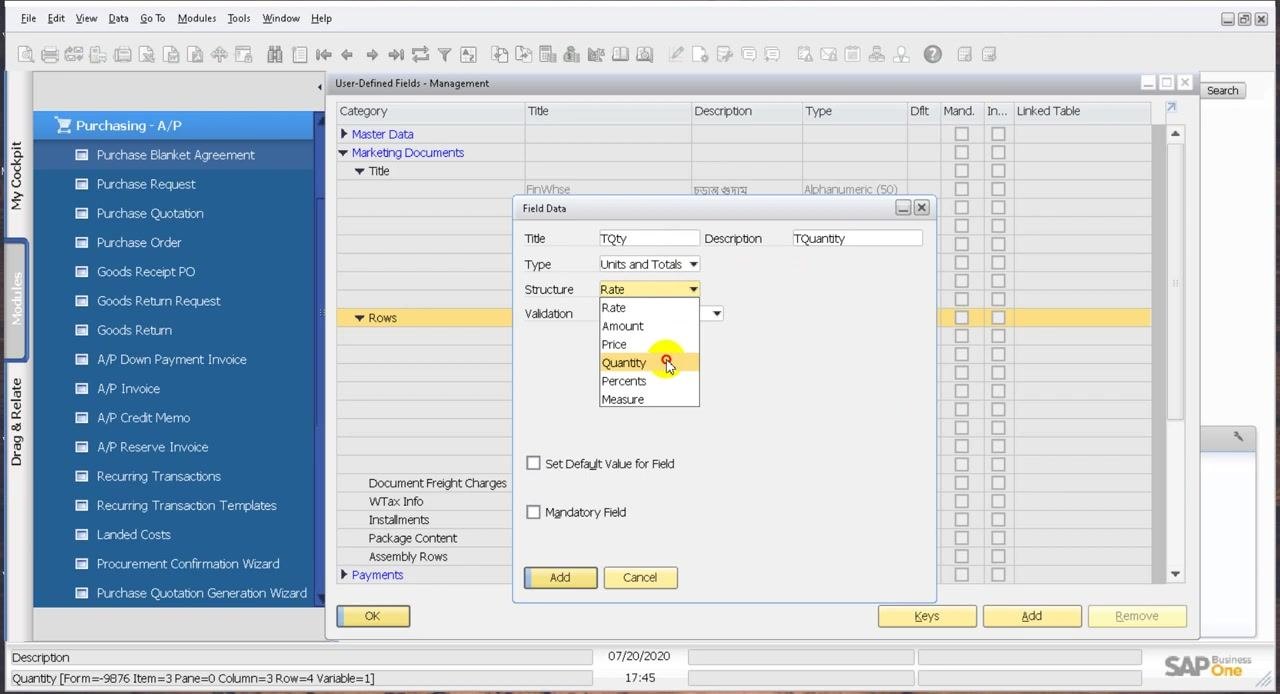
In the User-Defined Fields – Management window, select the Rows node under your desired module (for example, Marketing Documents), then click Add at the bottom right. In the Field Data dialog, enter:
- Title:
TQty - Description:
TQuantity - Type: Select
Units and Totalsfrom the dropdown. - Structure: Select
Quantityfrom the dropdown. - Validation: Leave as
None.
Do not check Set Default Value for Field or Mandatory Field unless required. Click Add to create the row-level UDF.
Confirm the database structure change
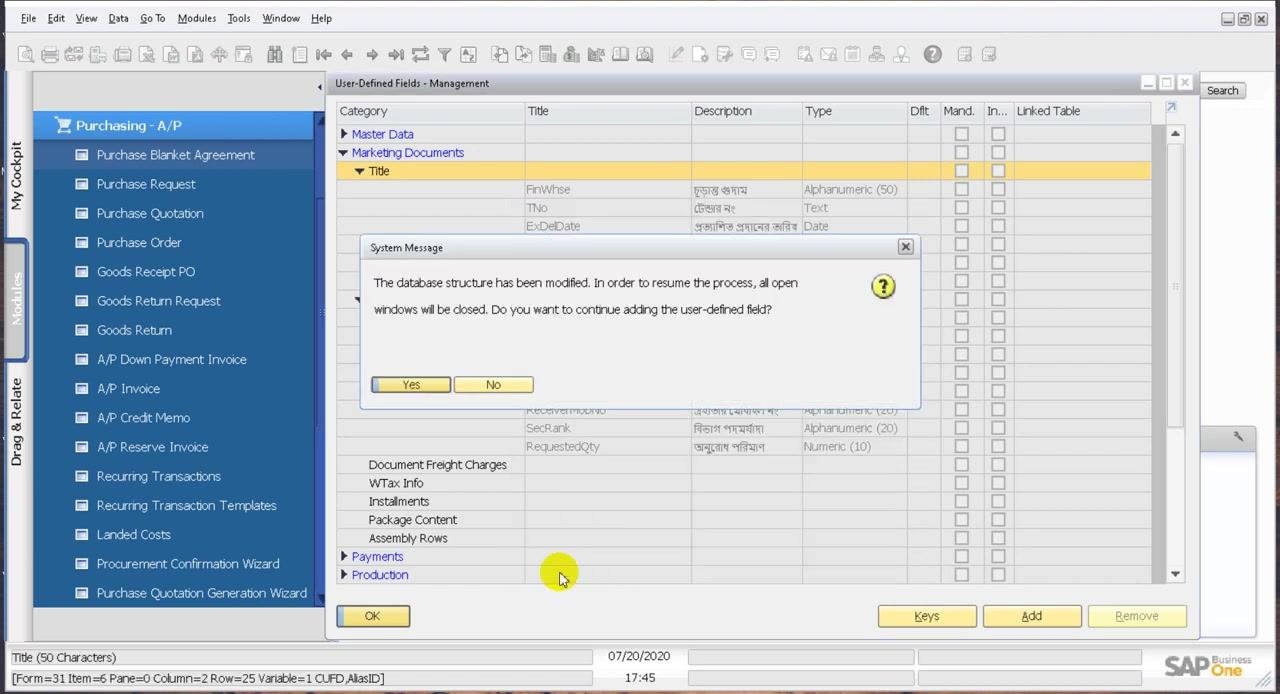
A System Message appears, stating that the database structure has been modified and all open windows will be closed to resume the process. Click Yes to continue adding the user-defined field.
Display the UDF in a document
Open a document where the UDF should appear, such as an A/P Invoice. If the UDF columns are not visible, go to the top menu, click View, and select User-Defined Fields (or press Ctrl+Shift+U).
Verify the UDF columns appear in the document
The UDF columns (for example, Code and TQuantity) now appear in the document grid. Confirm that your new UDF shows up as a column in the rows section of the document.
Open settings to manage UDF visibility and order
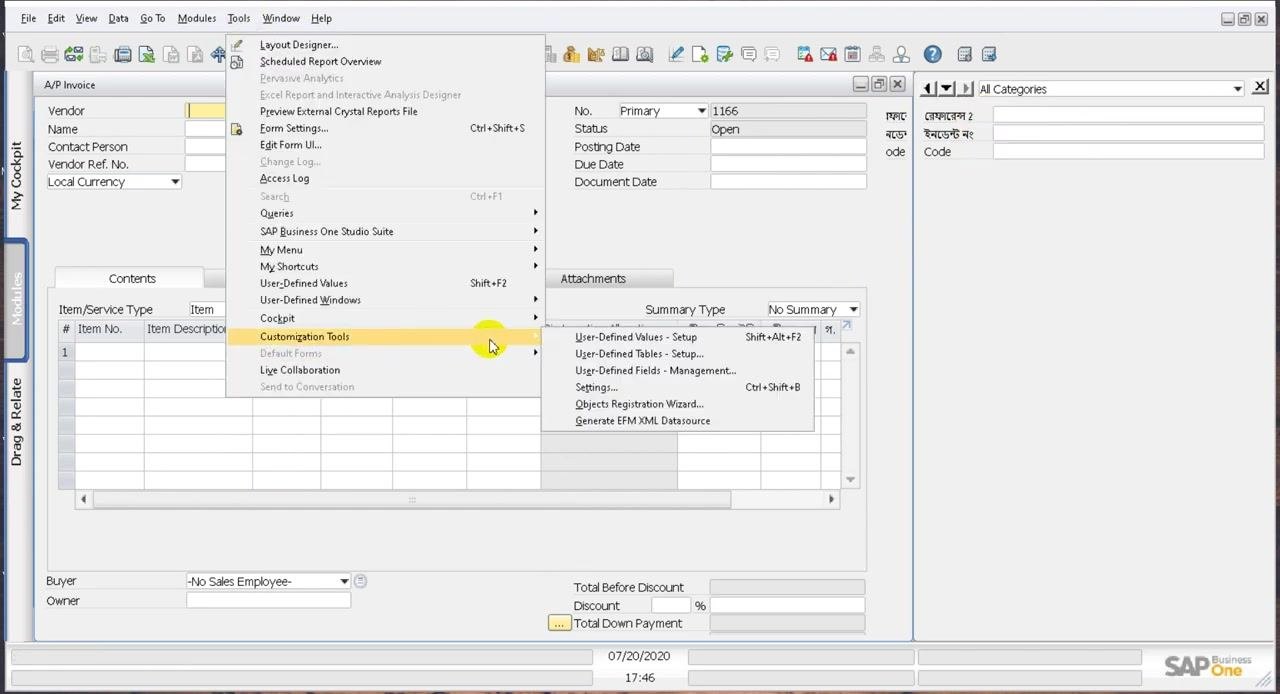
If you want to hide or reorder UDFs, go to Tools in the top menu, hover over Customization Tools, and select Settings....
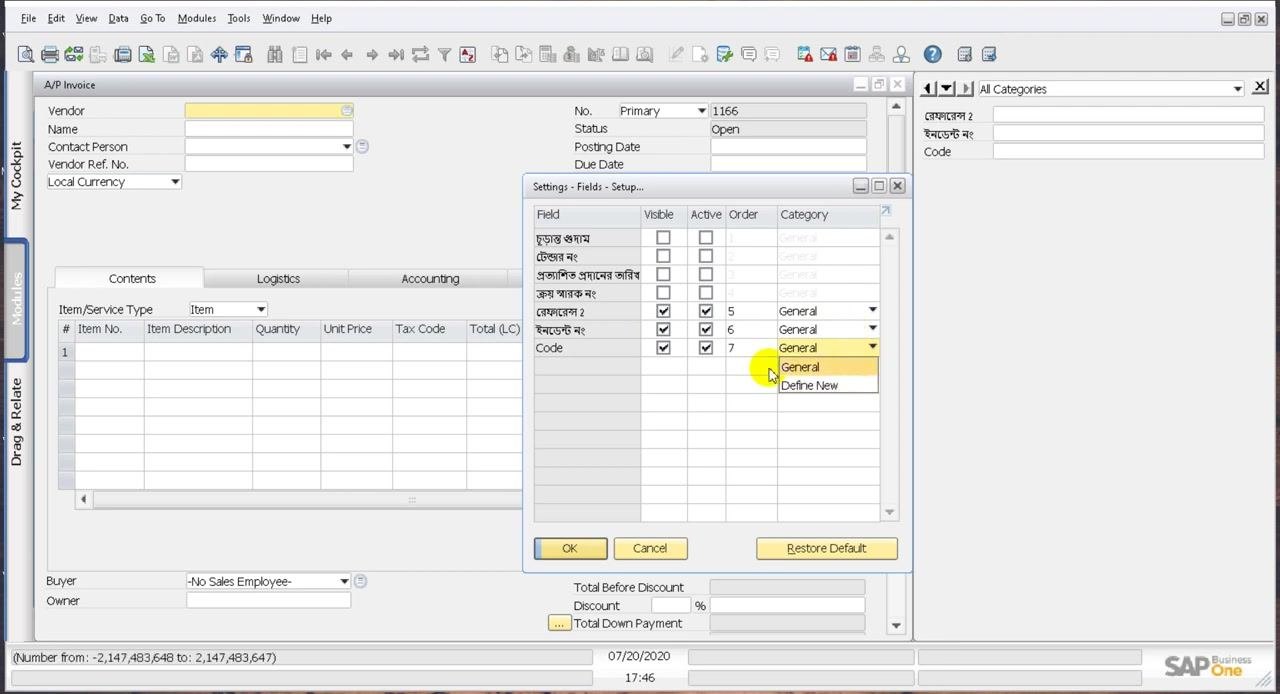
Adjust visibility, order, and category
In the Settings – Fields – Setup dialog, use the Visible checkbox to show or hide fields, the Order column to set their display sequence, and the Category dropdown to assign fields to categories. Click OK to save your changes.
Here is a summary of the row-level UDF settings used in this example:
- Title: TQty
- Description: TQuantity
- Type: Units and Totals
- Structure: Quantity
- Validation: None
- Visibility/Order: Managed via Tools > Customization Tools > Settings
Following these steps lets you create, display, and manage row-level User Defined Fields in your documents.
Hide unnecessary UDFs
Open the Settings – Fields – Setup dialog again. For each UDF you do not want to display, uncheck the Visible checkbox next to the field name, ensuring only the newly created UDF (for example, Code) remains visible. Leave the Category as General. Click OK to apply the changes.
Clean up the table format
Open the Form Settings – A/P Invoice dialog and go to the Table Format tab. Uncheck the Visible checkbox for any columns you do not need, ensuring only the relevant columns, such as TQuantity, remain visible. Click OK to save your changes.
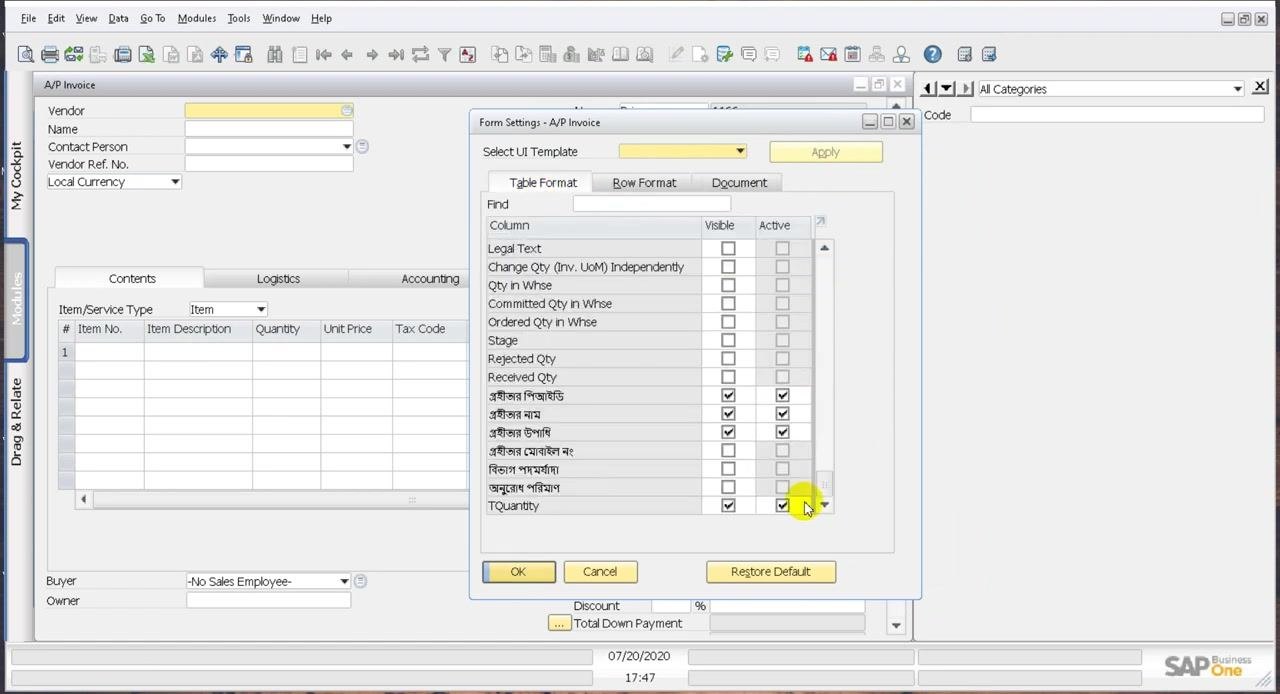
Fit columns to the table area
Go to the top menu, click View, and select Fit Column Width to automatically adjust the width of all columns so they fit the table area.
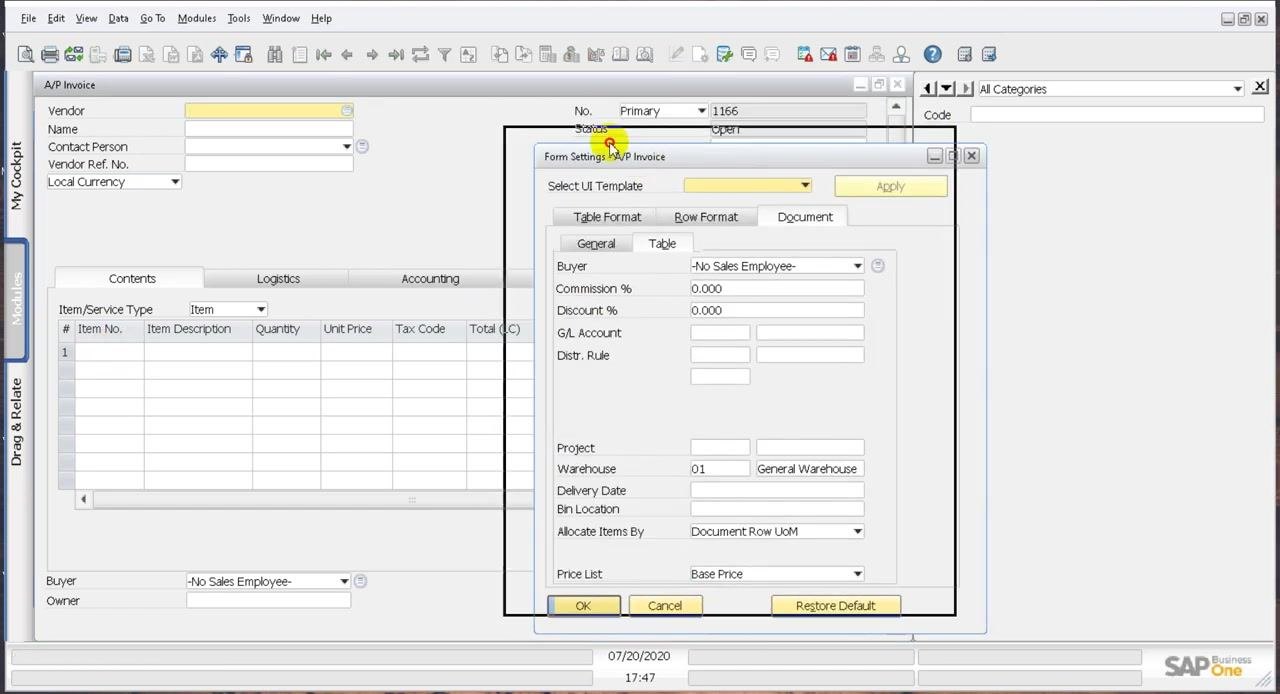
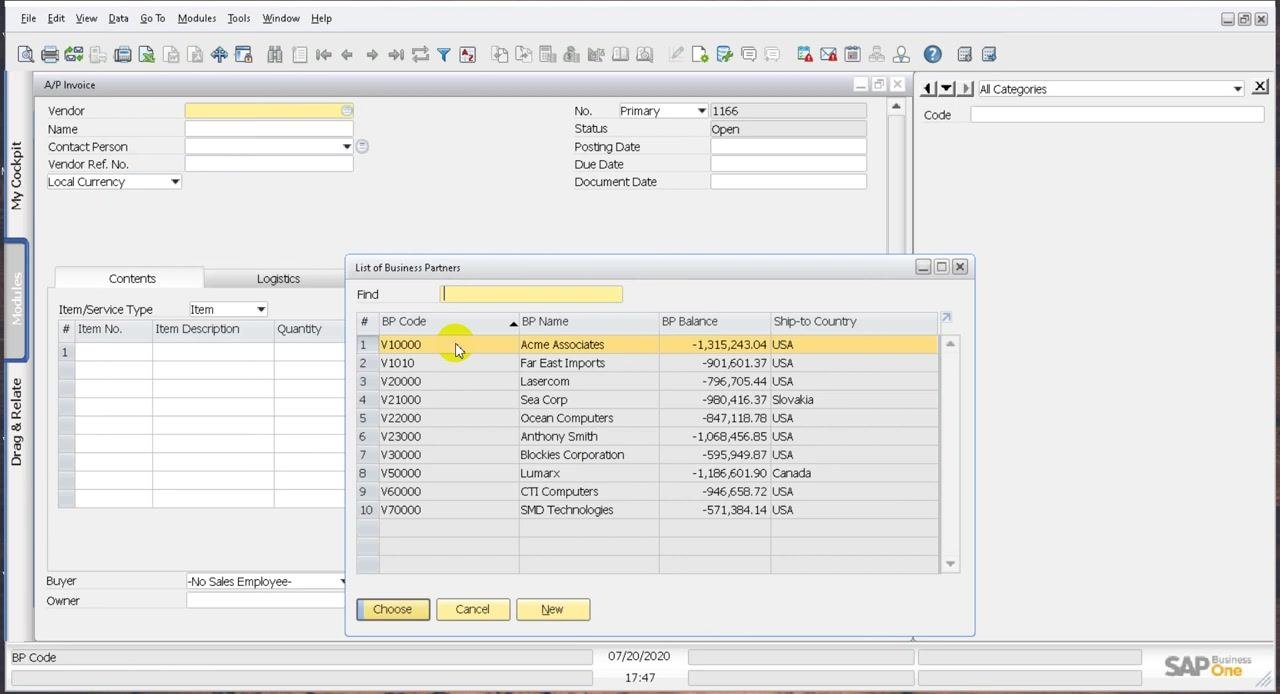
Select a business partner for your test transaction
Set the Posting Date for the transaction. Click the yellow arrow or selection button next to the Vendor field to open the List of Business Partners, select a business partner (for example, V10000 - Acme Associates), and click Choose.
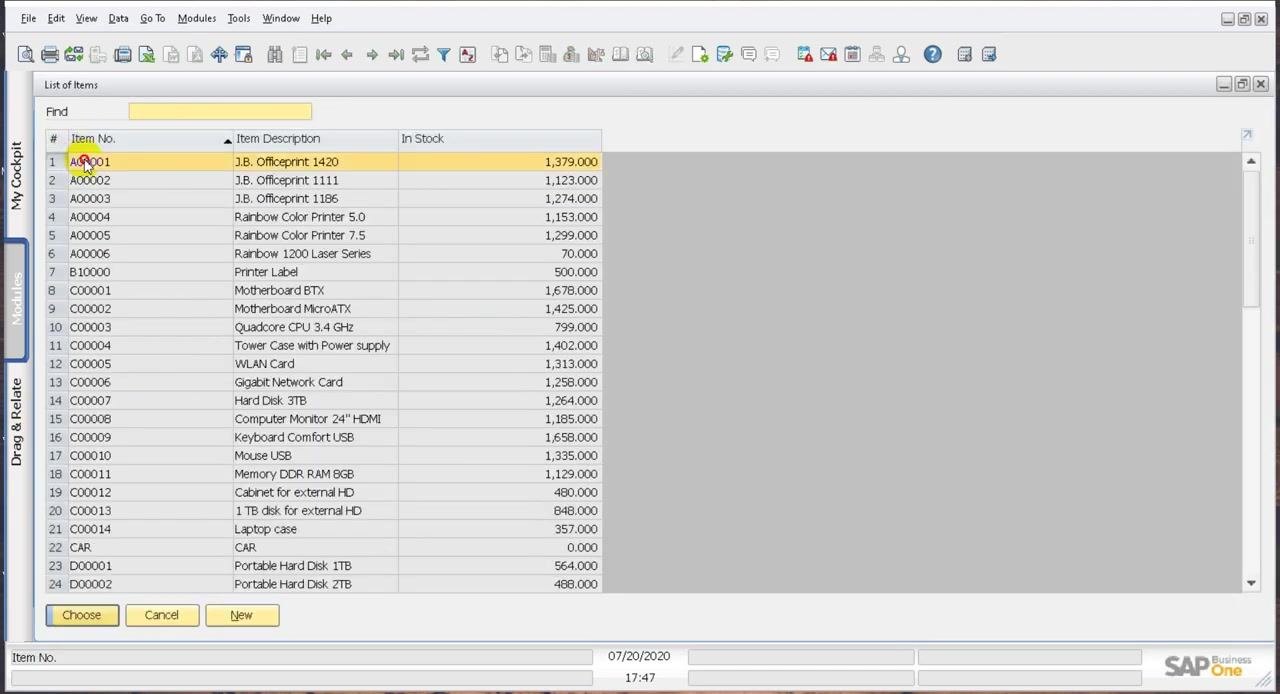
Select an item for your test transaction
In the item grid, click the selection button to open the List of Items, select an item (for example, A00001 - J.B. Officeprint 1420), and click Choose.
Enter the following values in the grid to test your UDFs:
- Quantity: 1
- Unit Price: 400.00
- TQuantity: 1
- Code: Enter a meaningful alphanumeric code (for example,
TA00001).
Review the transaction details to confirm all values are correct.
Add and verify the transaction
Click Add to save the transaction, and confirm the operation when prompted. After the operation completes, verify that the grid displays the item with Quantity = 1, Unit Price = 400.00, TQuantity = 1, and your entered Code, and that the right panel shows the Code value.
Navigate records to confirm saved data
Use the navigation arrows at the top right to move between records: click the rightmost arrow to go to the last record, the leftmost arrow to go to the first record, and the middle arrows to move to the previous or next record. Confirm that the TQuantity and Code values you entered are correctly saved and displayed.
Confirm UDF functionality
Review the completed A/P Invoice to confirm the UDFs are working as intended:
- The
TQuantitycolumn in the item grid displays1. - The
Codefield in the right panel displaysTA00001. - All other transaction details are correct: Vendor
V10000 - Acme Associates, ItemA00001 - J.B. Officeprint 1420, Quantity1, Unit Price400.00, Tax CodeNY, BuyerJames Chan, OwnerChan, James. - The document status is
Openand the posting date is07/20/2020.
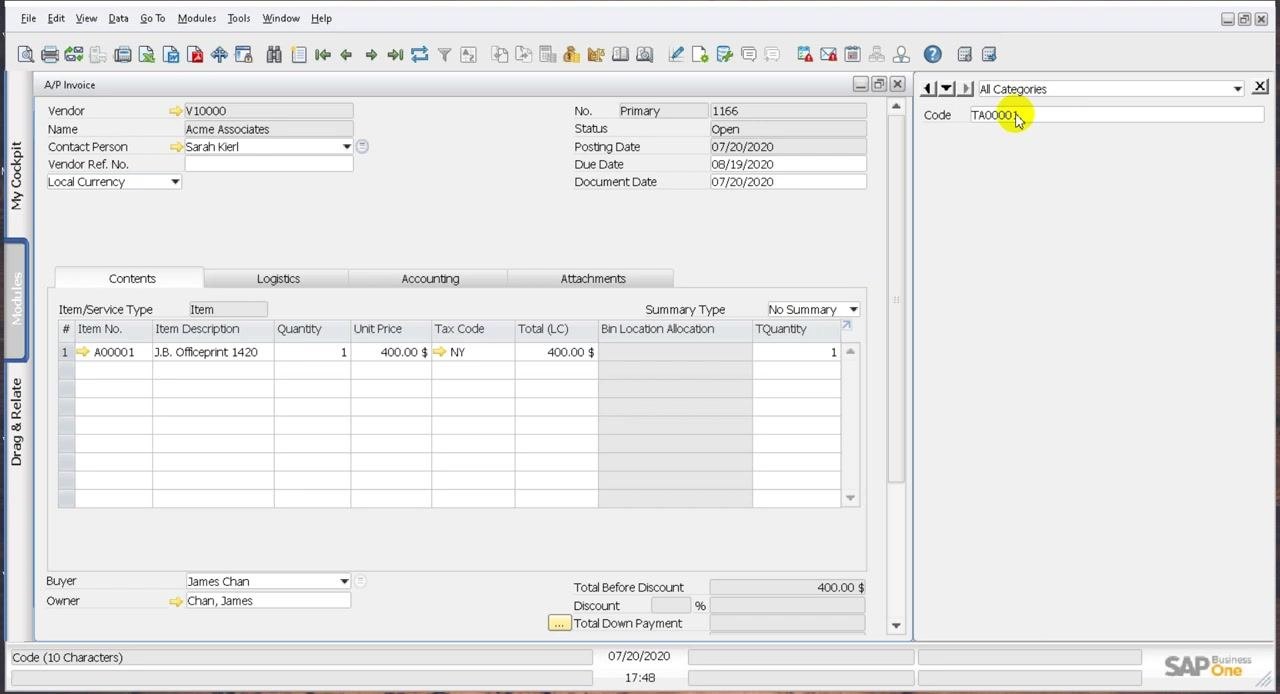
Review the UDF field in context
Check the Code UDF field, showing the entered value TA00001 highlighted in the document.
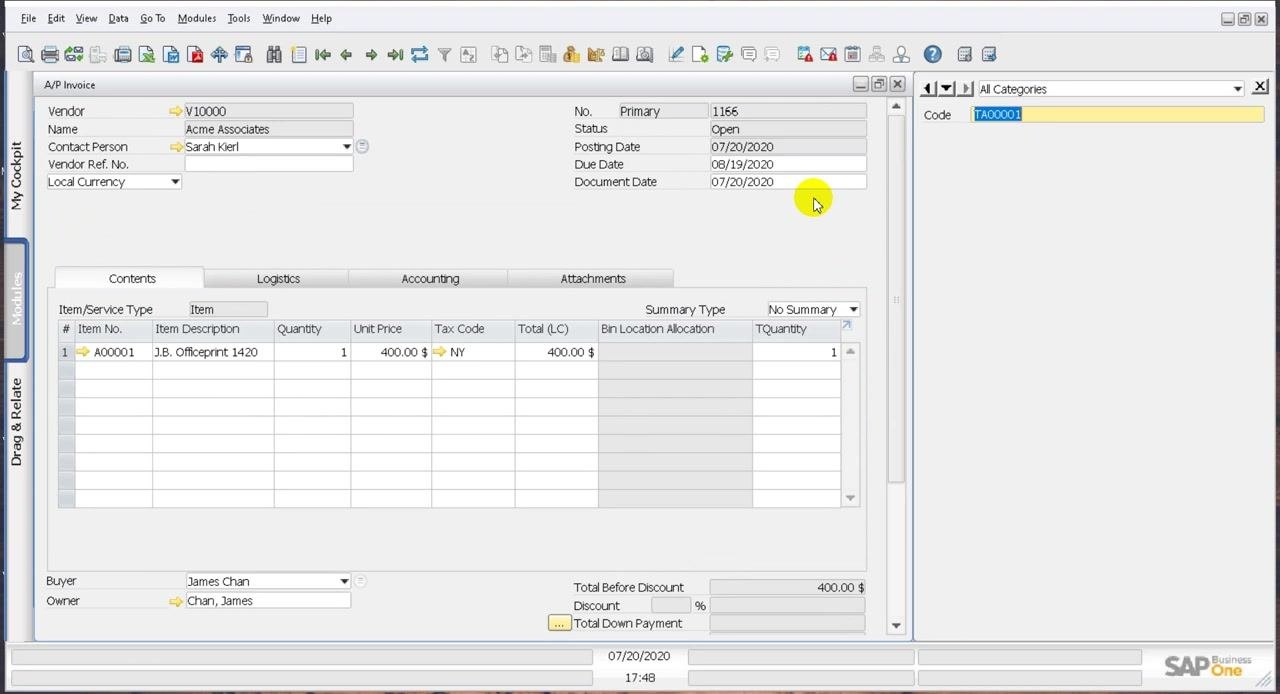
Summary
UDFs in SAP Business One let you add any additional fields your business processes require that aren't included by default. You can create as many UDFs as needed to capture information specific to your organization, and these fields can be customized, displayed, or hidden to fit your workflow. Review and adjust your UDFs regularly to make sure they continue to meet your business needs as your processes evolve.
Generation details: cost, quality tiers
Docsie billed 3,000 credits ($2.10) to analyze this 6-minute video at standard quality. The rewrite, template fill and Word/PDF exports were included. The same video at each quality tier:
| Quality | Frames sampled | Credits | Approx. cost |
|---|---|---|---|
| Draft | every 16-30 s | 1,500 | $1.05 |
| Standard (this guide) | every 8-15 s | 3,000 | $2.10 |
| Detailed | every 4-7 s | 6,000 | $4.20 |
| Ultra | every 1-3 s | 12,000 | $8.40 |
Credits priced at $0.70 per 1,000; plans include a monthly allowance. Enterprise customers on on-premise or bring-your-own-model deployments run this on their own inference and pay no per-video credits.
Generated by Docsie Video-to-Docs on 2026-10-11 from a 5-minute video. Screenshots are frames from the source video and belong to their creator, Maruf Rahman, whose original is embedded above. If you own this video and want the guide removed or credited differently, contact us and we will act within one business day.