
How to Create a Queue in Salesforce
Salesforce Queues help teams organize, split, and assign work without relying on a single record owner. This guide walks you through how to create a queue in Salesforce, configure its members, build a lead assignment rule to route records into it automatically, and verify that everything works as expected.
Video: Ultimate Tutorial for Salesforce Queues & Assignment Rules by Salesforce Ben. All credit for the demonstration goes to the creator; watch the original on YouTube. The written guide below was generated from this video by Docsie. Creator? Request a change or removal.
Salesforce Queues help teams organize, split, and assign work without relying on a single record owner. This guide walks you through how to create a queue in Salesforce, configure its members, build a lead assignment rule to route records into it automatically, and verify that everything works as expected.
Understanding Salesforce queues
A Salesforce Queue is a dynamic tool that distributes and assigns records among a group of users based on predefined criteria. Queues function as holding areas in your CRM, where records wait to be picked up by either the record owner or another user. They help prioritize, distribute, and assign records for teams that share responsibilities.
Queues offer several benefits for teams with shared workloads:
- They bring together a group of users, making it easier to manage work with fluctuating capacity.
- They provide visibility into outstanding work and notify all queue members.
- They keep work moving even when team members are unavailable due to sickness or vacation.
Where to find queues in Salesforce Setup
You manage queues from the Salesforce Setup Home. Use the Quick Find search bar to locate setup options such as Queues, along with other tools like the Service Setup Assistant and the Multi-Factor Authentication Assistant.
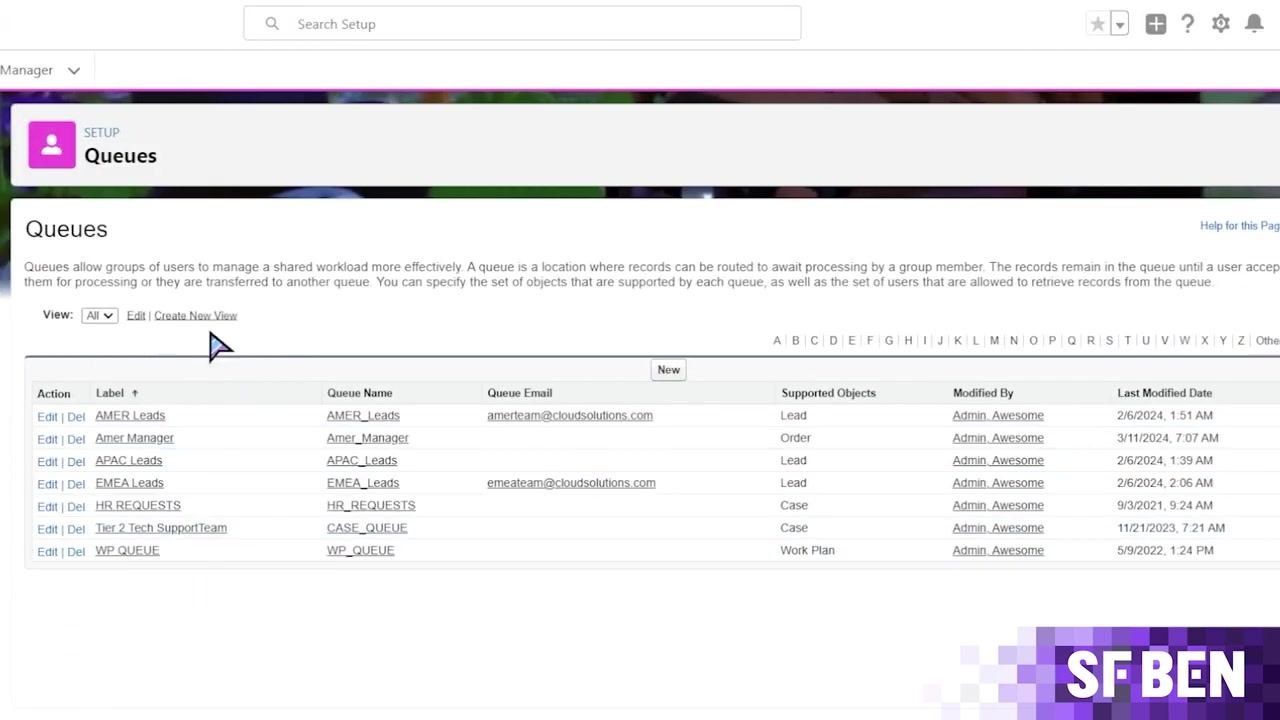
Searching for Queues in Setup opens a page listing all existing queues, including their Queue Name, Queue Email, Supported Objects, who last modified them, and when. Example entries include AMER Leads (Lead), Amer Manager (Order), APAC Leads (Lead), HR Requests (Case), Tier 2 Tech Support Team (Case), and WP Queue (Work Plan). From this page you can create a new queue or edit an existing one.
Key components of a queue
Every queue is built from four parts:
- Queue Members: Users or groups who can accept records owned by the queue.
- Queue Email (optional): An email address for notifications.
- Record Assignment Rule: Criteria that determine which records are routed to the queue.
- Quick Actions: Actions you can perform on records held in the queue.
The two most important parts are members and the record assignment rule. Queue members can accept records owned by the queue, and users with a higher role than the queue members can also take ownership of those records. You can add members individually or in bulk.
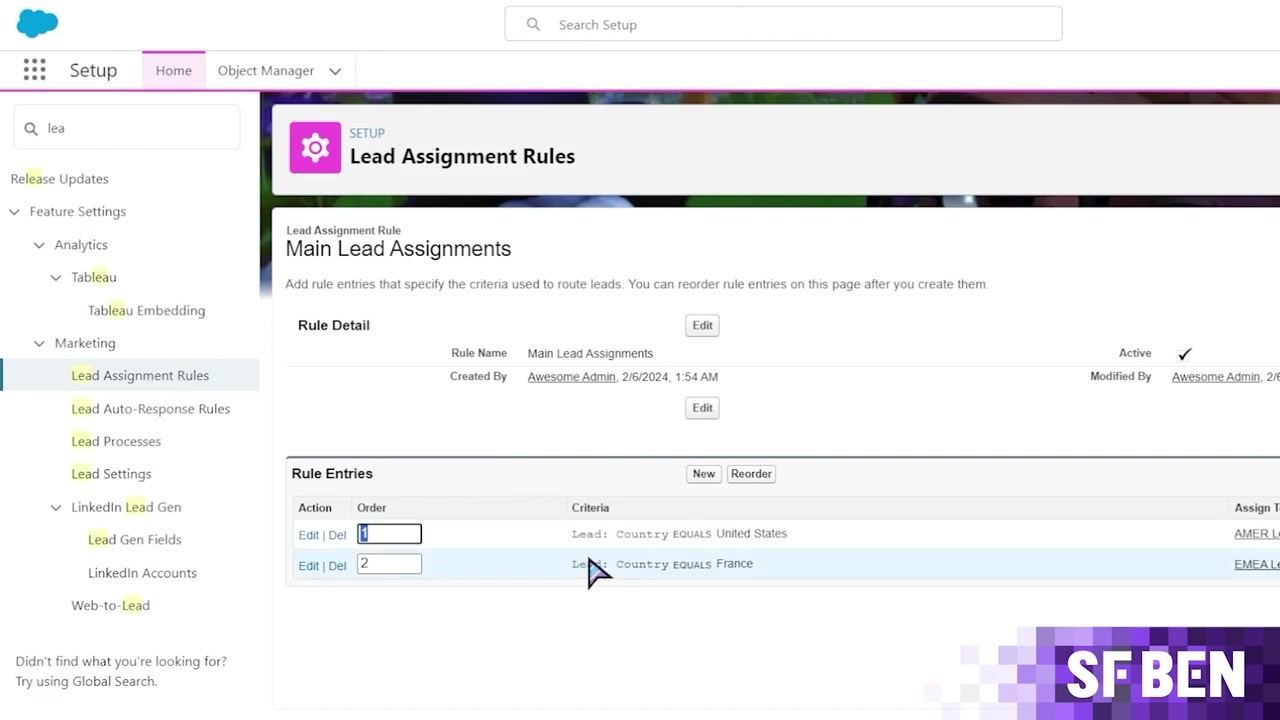
To add a record to a queue, you update the record's owner field to the queue, either automatically through assignment rules or manually by changing the record owner. For example, Lead Assignment Rules can route leads based on criteria such as Lead: Country equals United States to the "AMER Leads" queue, or Lead: Country equals France to the "EMEA Leads" queue.

You can also change ownership manually: open the record, click to change the owner, search for and select the desired queue (for example, "APAC Leads"), and confirm the change.
To see records currently owned by a queue, open the relevant object's list view (such as Leads) and filter or sort by owner.
Queues vs. public groups
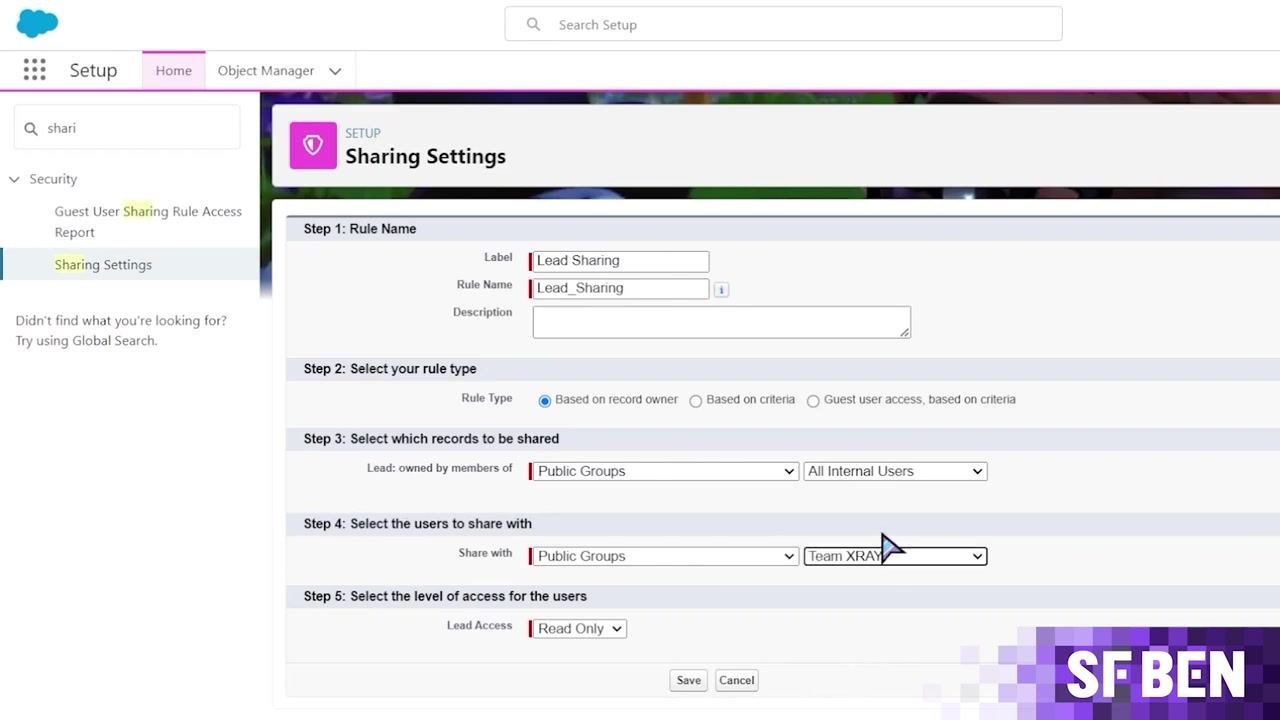
Queues and public groups are both collections of users, but they serve different purposes. Public Groups extend record visibility and are used for sharing data — they do not let users change record ownership. Queues allow users to take ownership of records and are used for distributing work.
You use sharing rules to extend visibility of records owned by public groups. For example, in Sharing Settings you can create a rule that shares leads owned by members of a public group with "Team XRAY" as Read Only access.
Prerequisites
Before you create a queue, make sure you have:
- Access to Salesforce Setup with permissions to manage queues and assignment rules.
- A clear plan for which object (for example, Lead or Case) the queue will support.
- The criteria you want to use to route records into the queue (for example, a region such as EMEA, APAC, or AMER).
- A queue name, label, and optional notification email ready to enter.
How to create a queue in Salesforce
The following steps show how to create a queue in Salesforce for a regional team — in this example, a queue named "EMEA Leads" for the Europe region.
Step 1: Navigate to queues setup
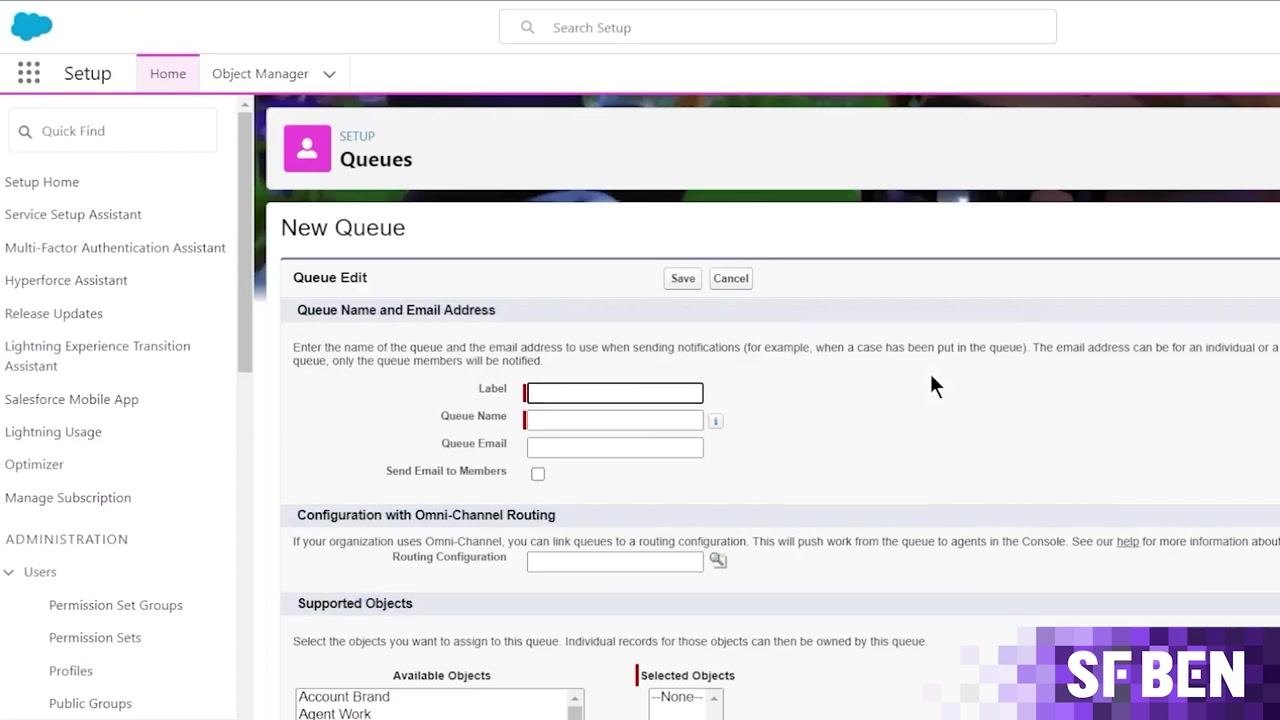
From the Salesforce Setup page, type "queues" into the Quick Find box on the left sidebar, then click Queues under the Users section.
Step 2: Create a new queue
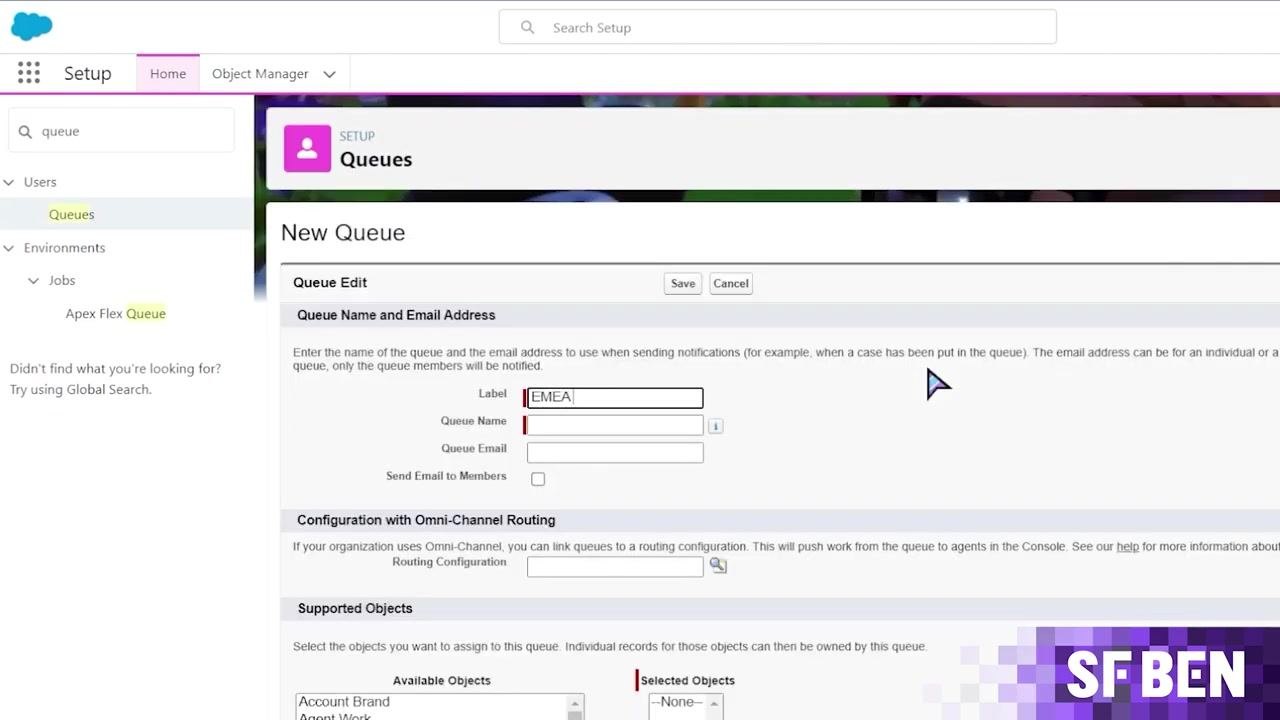
Click the New button to start creating a queue. On the New Queue screen, enter:
- Label: EMEA Leads
- Queue Name: EMEA_Leads
- Queue Email (optional): a shared inbox address if you want notifications sent there
- Send Email to Members: check this box if you want all queue members notified when a new record is added
Step 3: Select the supported object
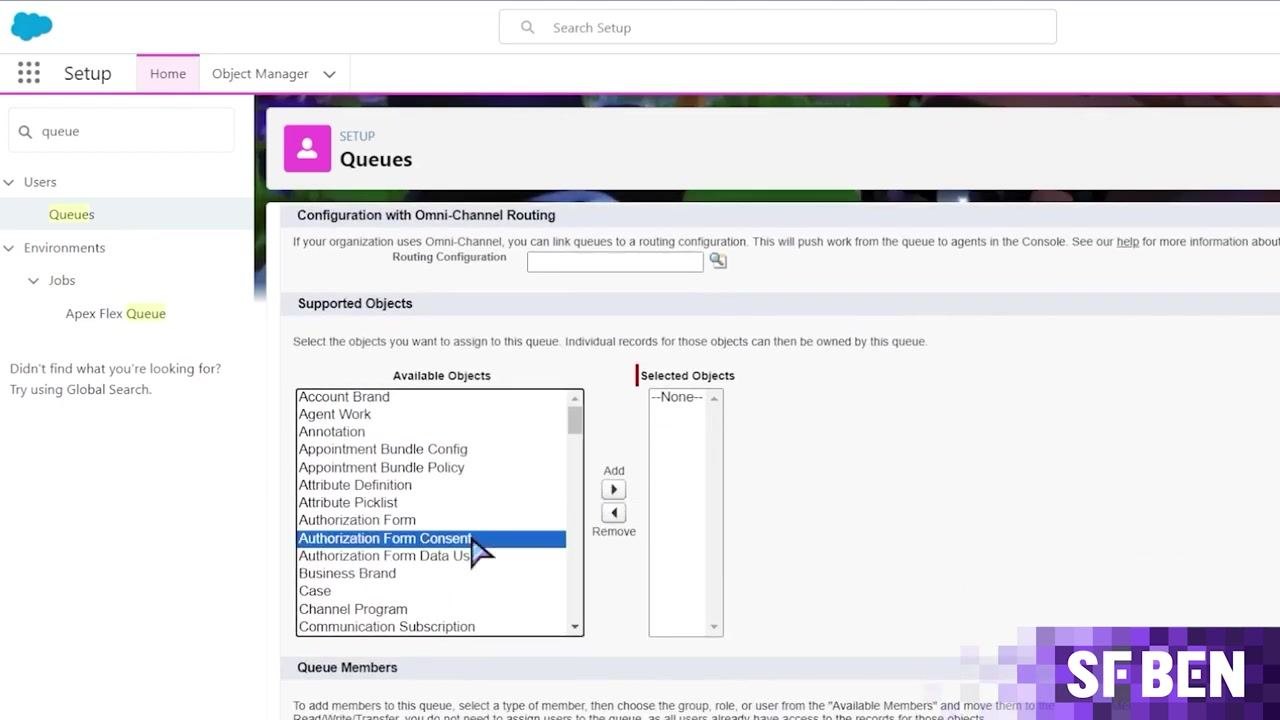
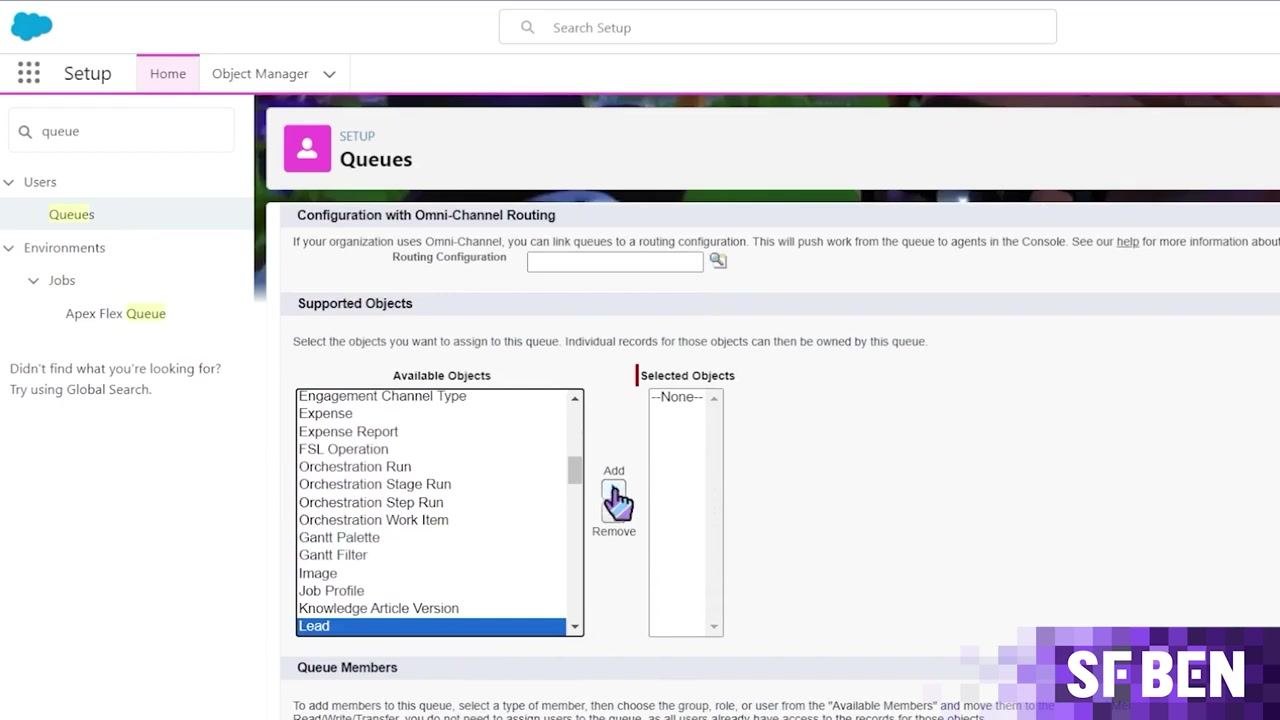
Scroll down to the Supported Objects section. In the Available Objects list, click Lead to highlight it.
Step 4: Add the object to the queue
Click the Add button (the right arrow) to move Lead from the Available Objects list to the Selected Objects list. This ensures the queue can own Lead records. Confirm that Lead now appears in the Selected Objects list before moving on.
Step 5: Add queue members
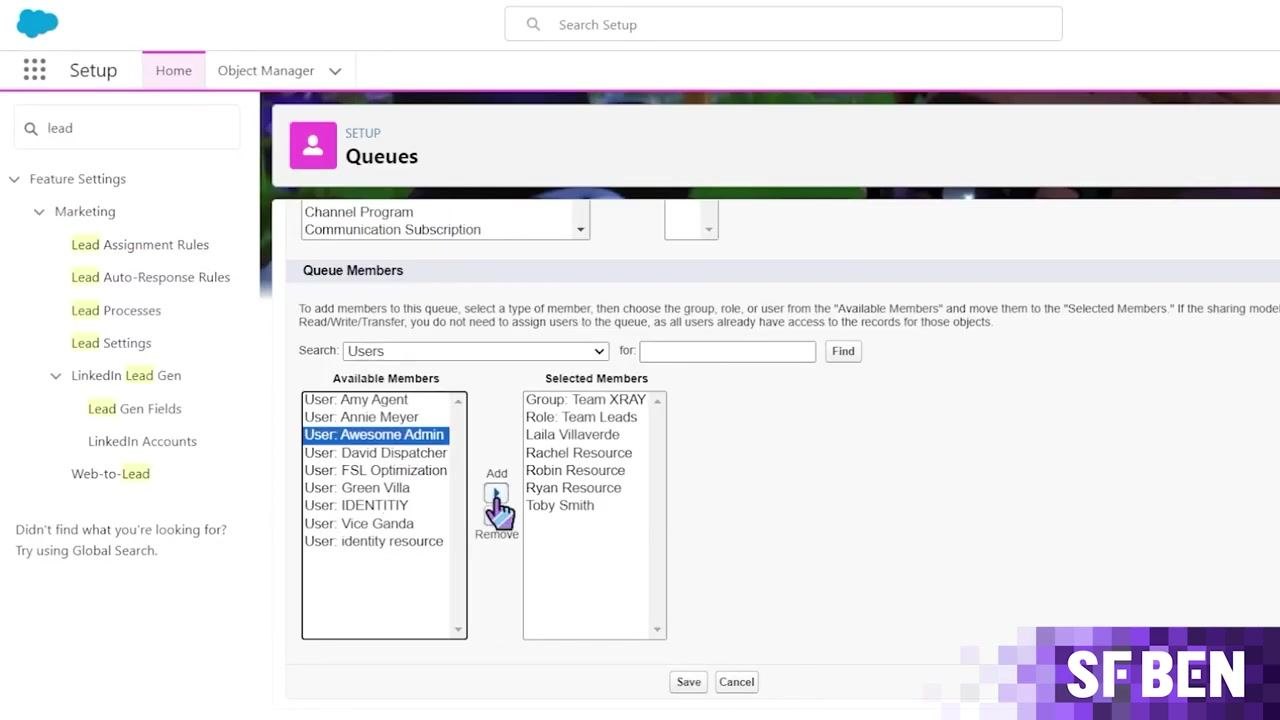
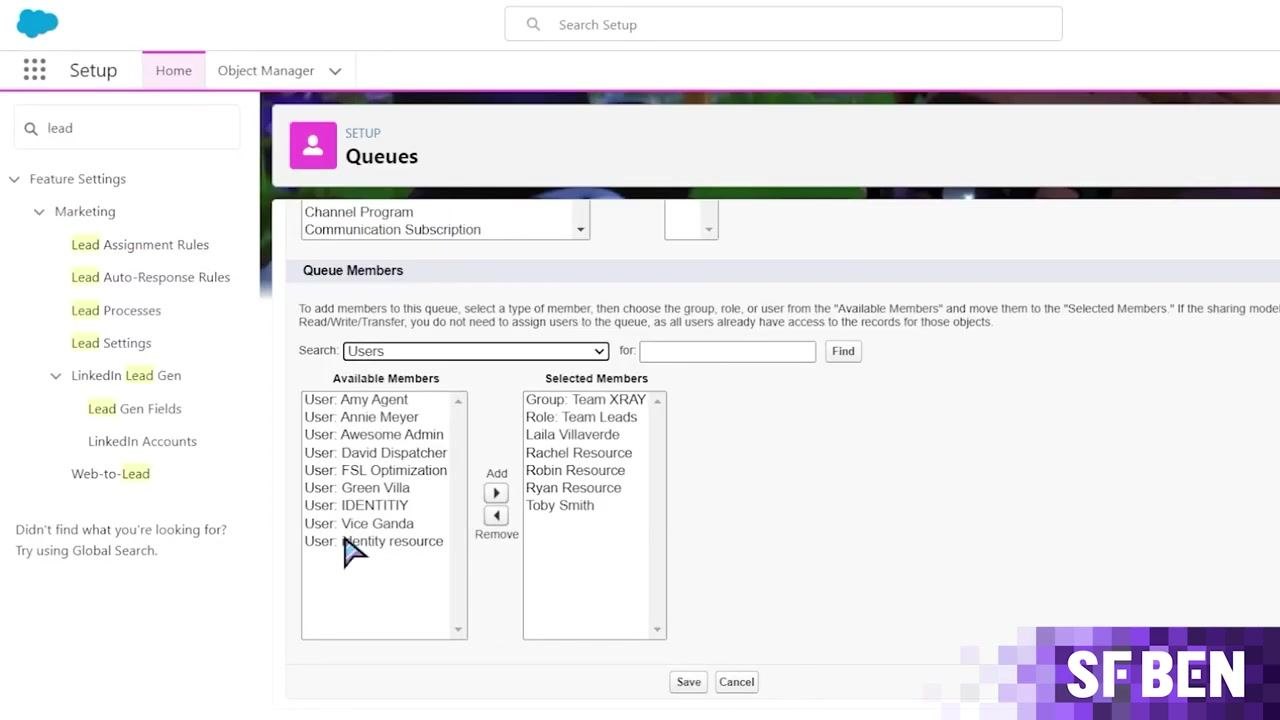
Scroll down to the Queue Members section and select the users, roles, or groups who should be members of the queue. In this example, the Selected Members list includes individual users, the role "Team Leads," and the group "Team XRAY."
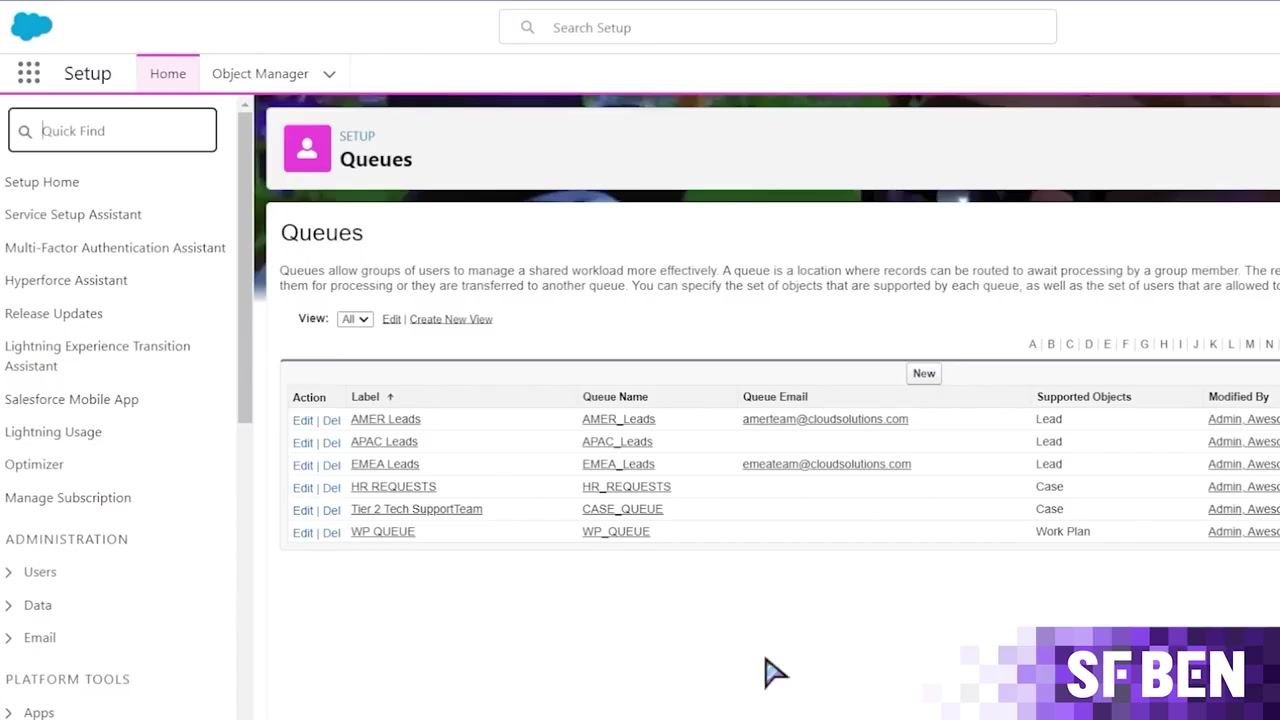
With members added and Lead selected as a supported object, your "EMEA Leads" queue is ready to receive records.
How to create a lead assignment rule for a queue
Assignment rules automatically add records to a queue based on specific criteria. Use the following steps to route leads to the correct regional queue.
Step 1: Search for lead assignment rules
In Setup, type "lead assignment rules" into the Quick Find box, then under Feature Settings > Marketing, click Lead Assignment Rules.
Step 2: Open the rule you want to edit
On the Lead Assignment Rules page, each rule shows its name, whether it is active, and who created it. Click the rule you want to edit, such as "Main Lead Assignments."
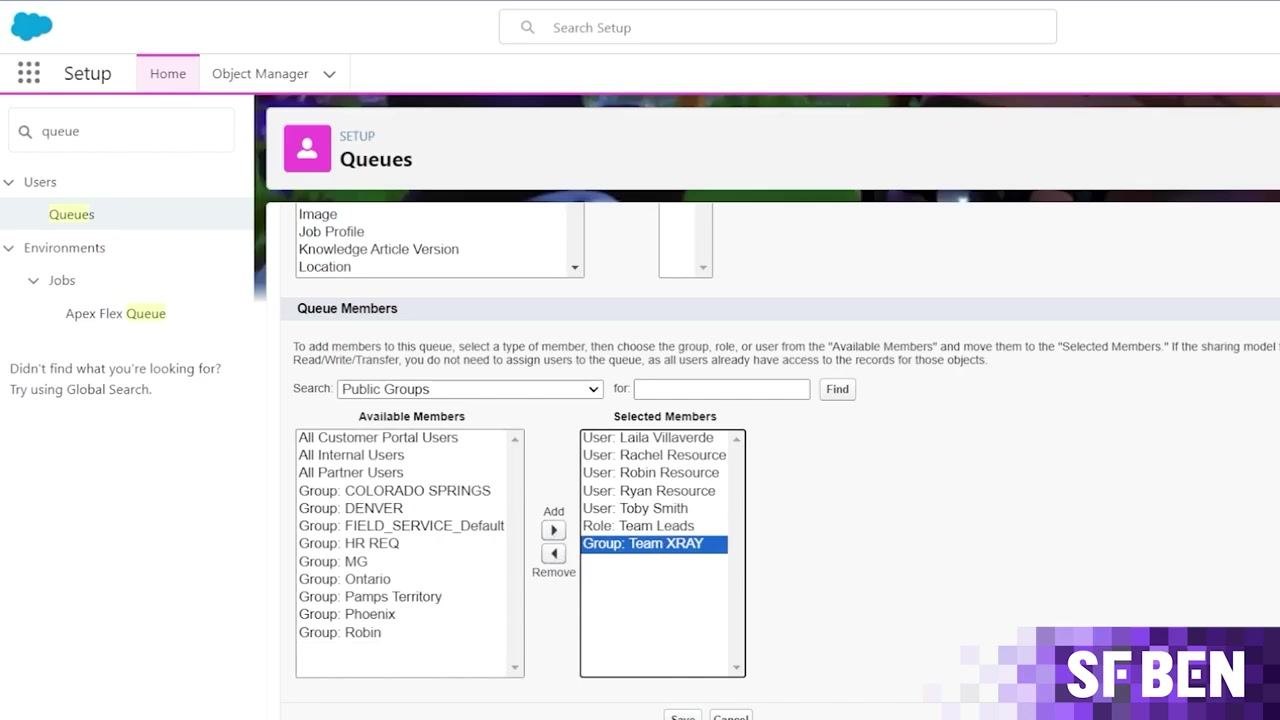
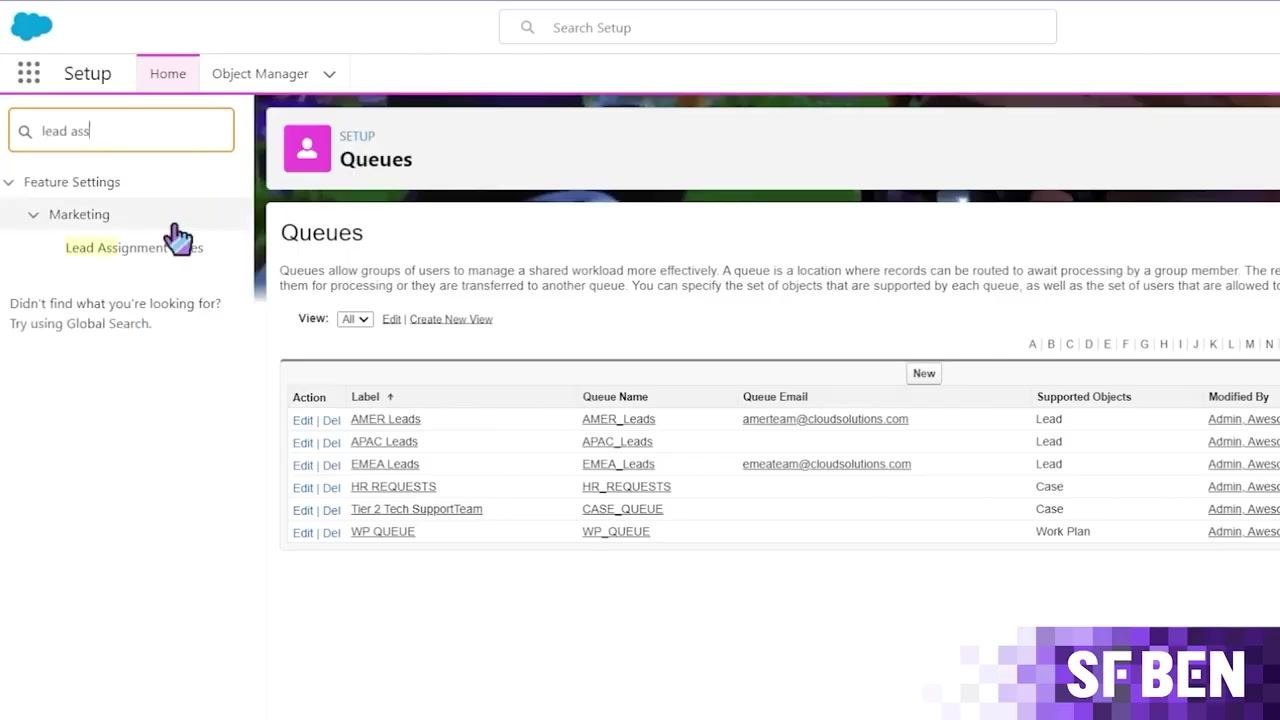
Step 3: Review rule entries and add a new one
Inside the rule, review existing entries. For example, one entry assigns leads where Lead: Country equals United States to the "AMER Leads" queue. Click the New button to add another entry.
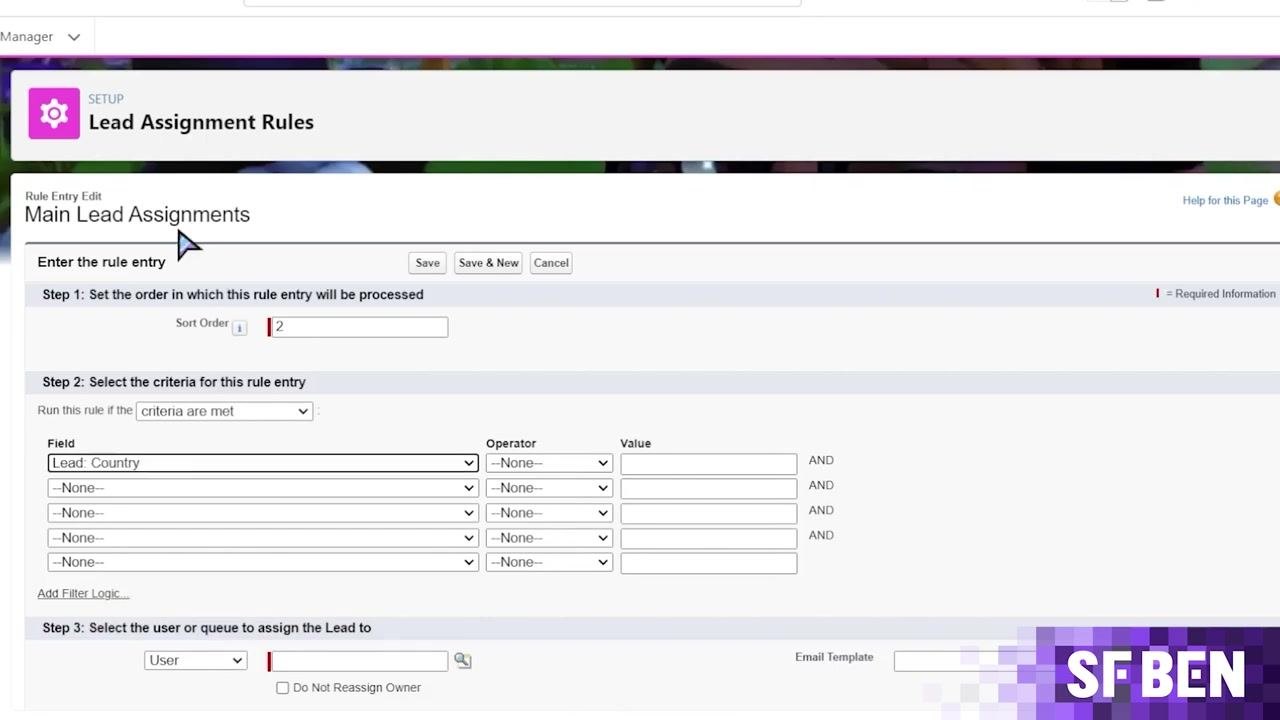
Step 4: Set the sort order and criteria field
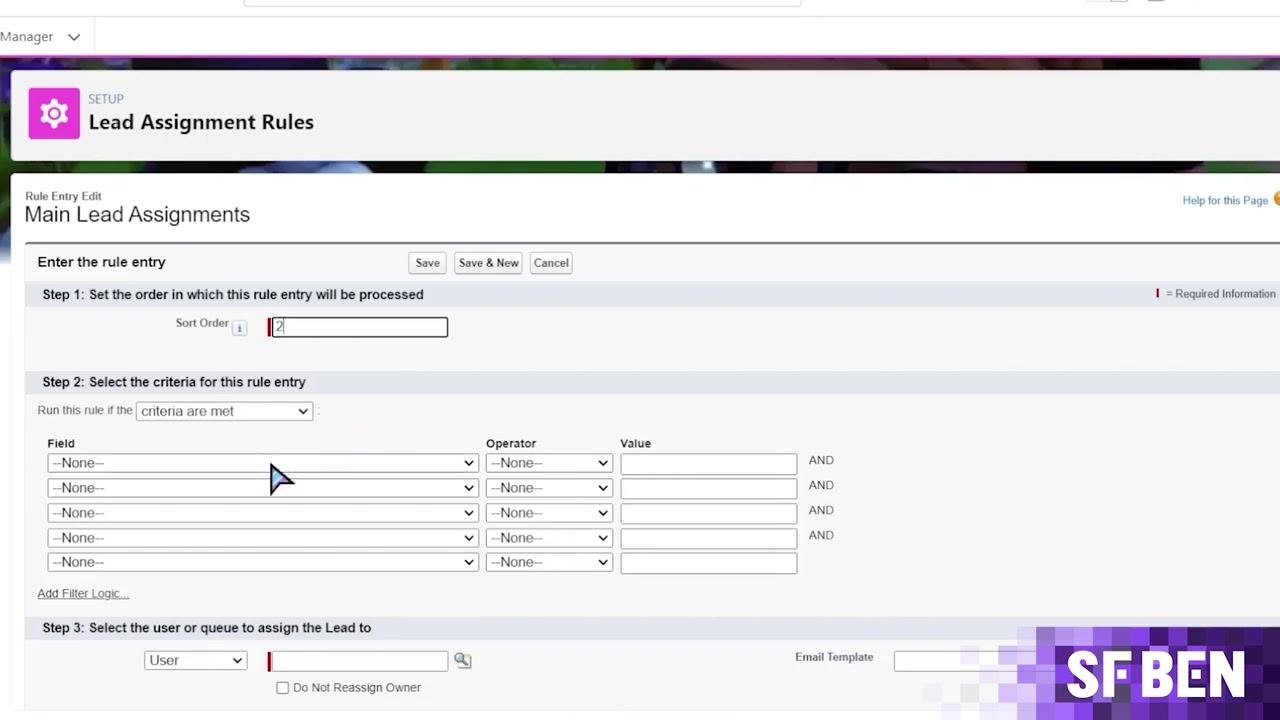
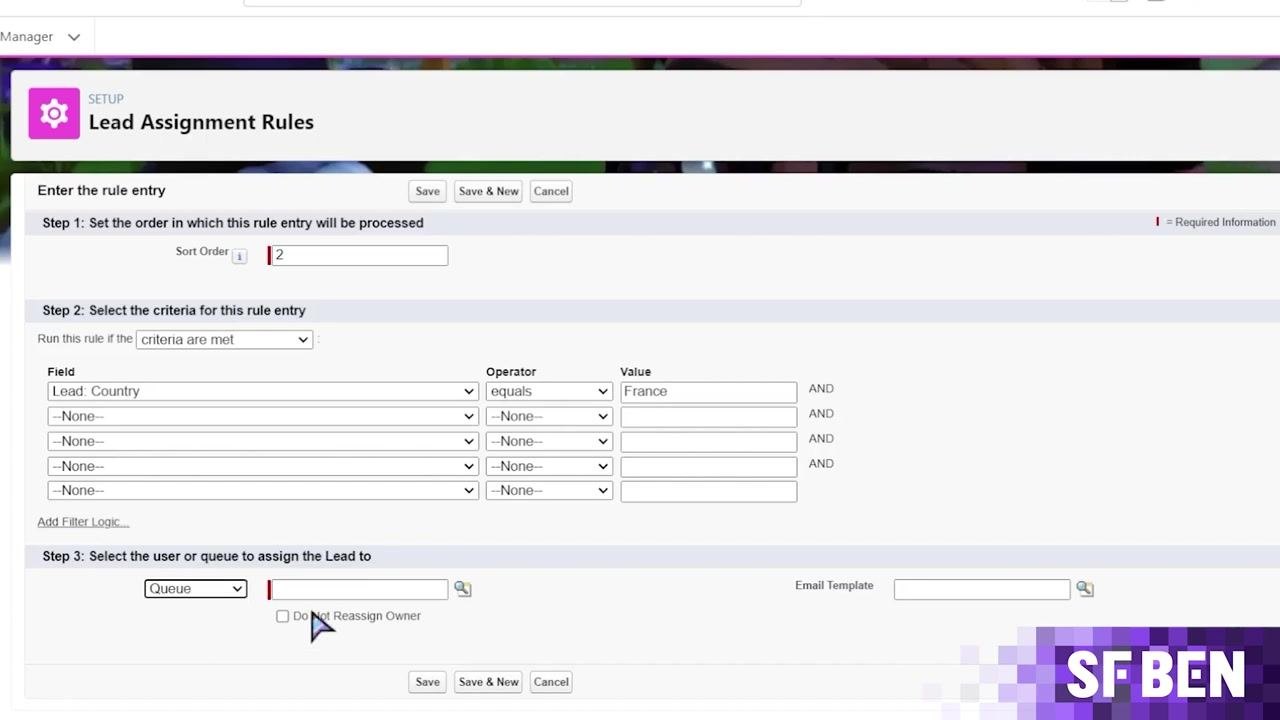
On the Enter the rule entry screen, set the Sort Order field (for example, 2) to control when this entry is processed, then select the criteria field, such as Lead: Country.
Step 5: Set the criteria value and assign the queue
Set the operator to equals and the value to France. Then, in the assignment section, select Queue and choose "EMEA Leads" as the destination queue. Click Save.
Testing the assignment rule
Step 1: Open the EMEA Leads list view
Go to the Leads section in Salesforce, open the list view dropdown, and select "EMEA Leads" to see leads currently assigned to this queue.
Step 2: Create a test lead
Create a new lead with a Salutation, First Name, Last Name, Company, and Email filled in. Ensure Assign using active assignment rule is checked so the rule applies immediately, then save the lead.
Verifying lead assignment and queue functionality
Step 1: Confirm lead creation
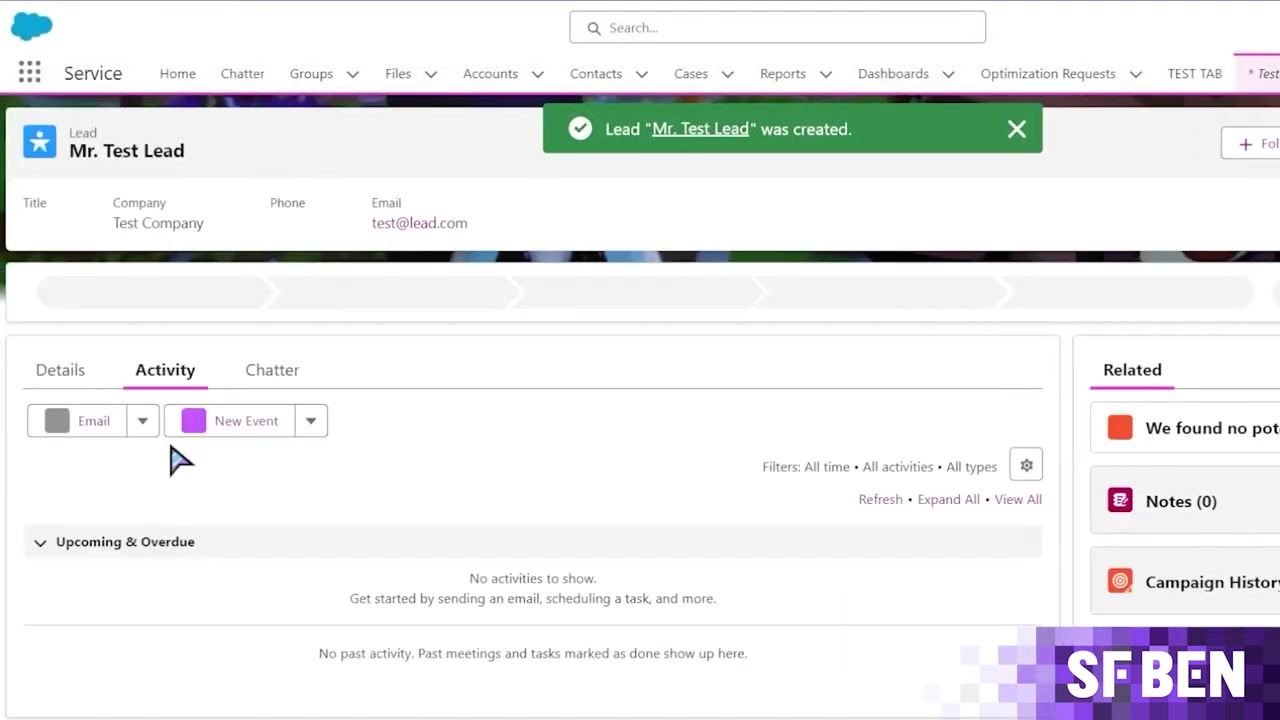
After saving, check for a confirmation banner at the top of the lead record page confirming the lead was created. Review the lead details and check the Activity tab for available actions.
Step 2: Check the queue list view
Go back to the Leads section, open the list view dropdown, and select "EMEA Leads." Confirm the new test lead appears with its Owner Alias set to "EMEA Leads."
Step 3: Log in as a queue member
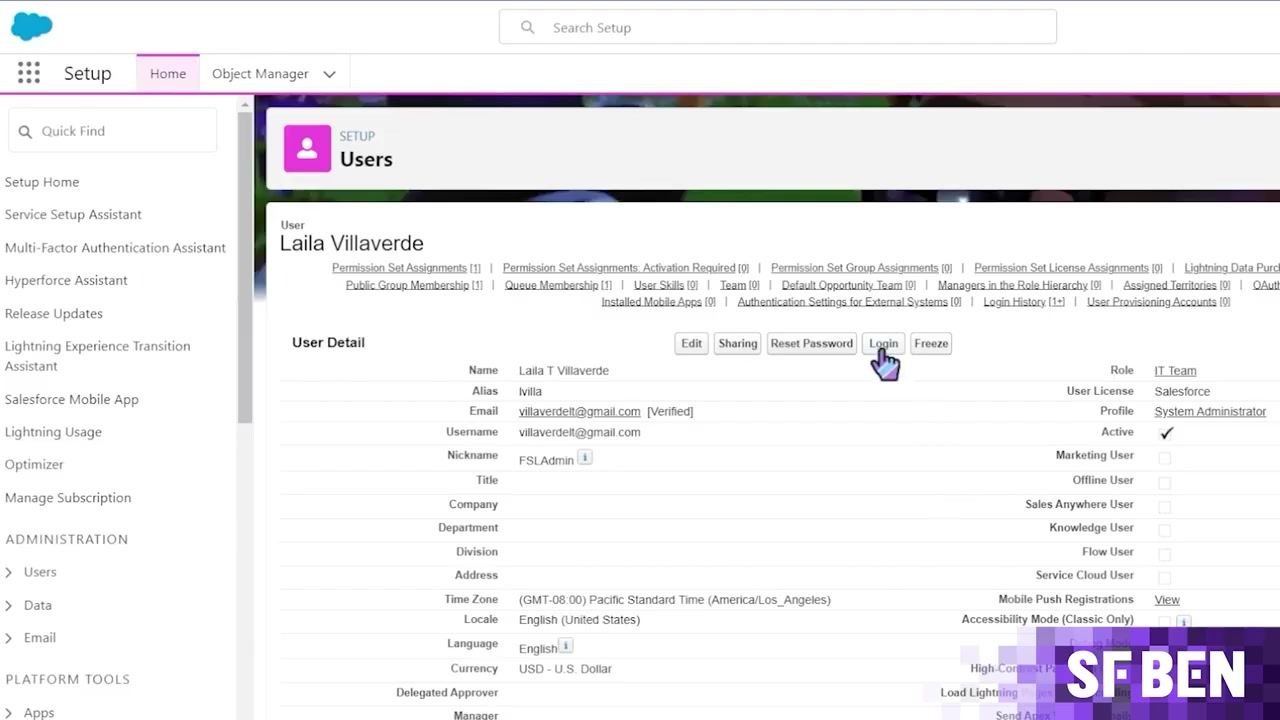
To test member actions, go to Setup > Users, select a user who is a member of the queue, and click the Login button to access Salesforce as that user.
Step 4: View the queue as a member
While logged in as the queue member, open the "EMEA Leads" list view and confirm that the test lead is visible and selectable.
Step 5: Check unread leads
Switch to the "My Unread Leads" list view to confirm that the test lead also appears there as unread.
Step 6: Understand ownership restrictions
Be aware that some actions may be restricted on queue-owned records. If an action is not allowed, a red error banner appears — for example, "You encountered some errors when trying to save this record. Owner ID: Do not work on Queue-owned Leads!" This type of restriction is typically enforced by a validation rule or a flow.
Expanding queue usage to other objects
Queues are not limited to leads. Once you understand the pattern, you can apply it to other Salesforce objects.

Step 1: Review supported objects across queues
In Setup, navigate to Queues to see all existing queues, their labels (such as AMER Leads, APAC Leads, and EMEA Leads), queue names and emails, supported objects (Lead, Case, Work Plan, and others), and who last modified them.
Step 2: Create a new queue for other objects
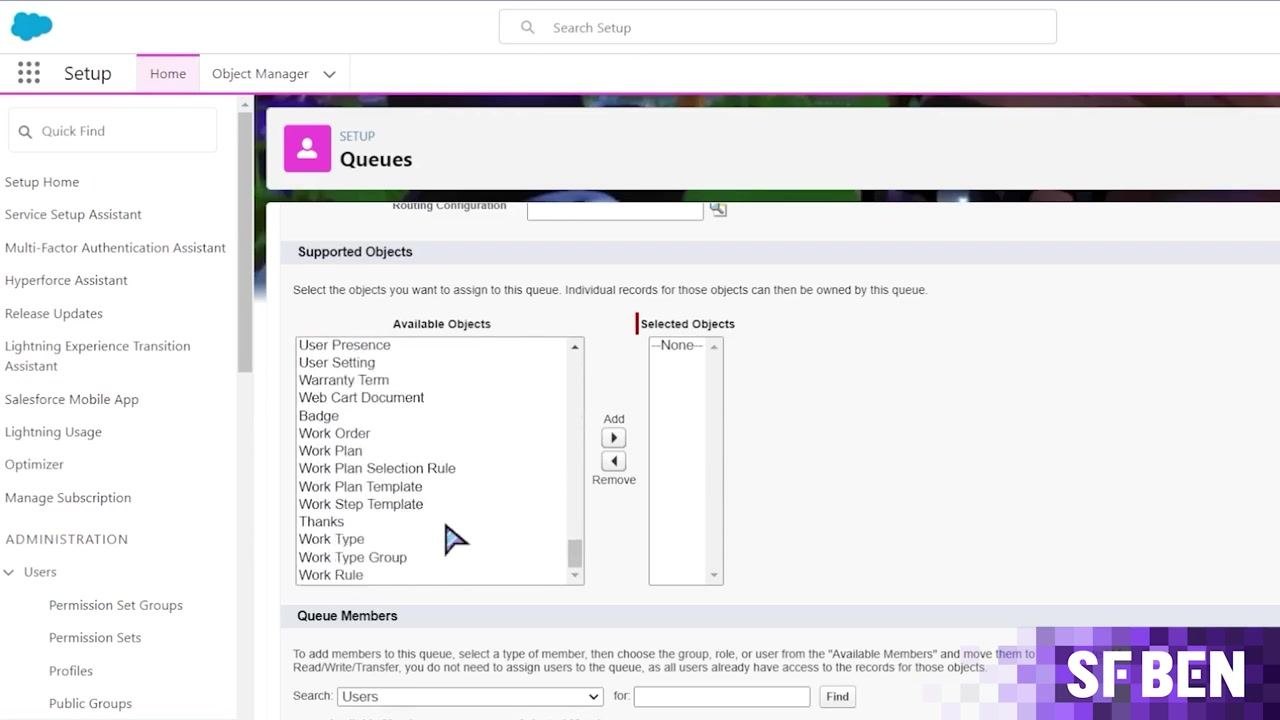
Click New and enter a Label, Queue Name, and optional Queue Email. Check Send Email to Members if you want notifications sent, and configure Omni-Channel Routing if your organization uses it. Under Supported Objects, choose the objects this queue will manage, such as Account Brand, Work Order, or Work Plan.
Step 3: Assign objects and members
In the Supported Objects section, move the objects you need — for example, User Presence, Work Order, Work Plan, or Work Type — from Available Objects to Selected Objects using the Add button. Then add users, roles, or groups as members in the Queue Members section.
Additional resource
For a broader view of how organizations are using Salesforce, you can download the State of Salesforce report, created in partnership with IBM, at salesforceben.com/ibm. The report covers trends such as 360-degree customer view, innovation, process efficiency, time to market, cost savings, and employee experience.

What's next
Queues help ensure work is not missed, even when some team members are unavailable — tasks remain in a shared pool that any available member can pick up, keeping work moving. Once your first queue is running smoothly, consider:
- Reviewing the needs of other teams or departments in your organization.
- Extending queues to additional teams to streamline workload distribution and improve efficiency.
- Configuring queues for objects beyond leads, such as cases, work orders, and custom objects.
With queues, assignment rules, and member configuration in place, you have a repeatable process for routing and managing shared work across your Salesforce organization.
Generation details: cost, quality tiers
Docsie billed 4,500 credits ($3.15) to analyze this 9-minute video at standard quality. The rewrite, template fill and Word/PDF exports were included. The same video at each quality tier:
| Quality | Frames sampled | Credits | Approx. cost |
|---|---|---|---|
| Draft | every 16-30 s | 2,250 | $1.57 |
| Standard (this guide) | every 8-15 s | 4,500 | $3.15 |
| Detailed | every 4-7 s | 9,000 | $6.30 |
| Ultra | every 1-3 s | 18,000 | $12.60 |
Credits priced at $0.70 per 1,000; plans include a monthly allowance. Enterprise customers on on-premise or bring-your-own-model deployments run this on their own inference and pay no per-video credits.
Generated by Docsie Video-to-Docs on 2026-10-01 from a 8-minute video. Screenshots are frames from the source video and belong to their creator, Salesforce Ben, whose original is embedded above. If you own this video and want the guide removed or credited differently, contact us and we will act within one business day.