
How to Create a Work Schedule in Oracle Fusion
This guide shows you how to create a work schedule in Oracle Fusion, from the supporting setup to the employee assignment. You first create a calendar event category, a calendar event, work shifts, and a workday pattern. Then you build the work schedule, assign it to a department, and assign it to an employee with schedule exceptions.
Video: Creating and Assigning a Work Schedule Activity in Oracle Fusion HCM by apps2fusion (2015). All credit for the demonstration goes to the creator; watch the original on YouTube. The written guide below was generated from this video by Docsie. Creator? Request a change or removal.
This guide shows you how to create a work schedule in Oracle Fusion, from the supporting setup to the employee assignment. You first create a calendar event category, a calendar event, work shifts, and a workday pattern. Then you build the work schedule, assign it to a department, and assign it to an employee with schedule exceptions.
Prerequisites
Before you begin, make sure you can:
- Open the Oracle application and reach the Setup and Maintenance screen.
- Open Person Management from the Navigator menu under Workforce Management. You need it for the final employee assignment.
Open Setup and Maintenance
Open the Setup and Maintenance screen
Open the Oracle application and go to the Setup and Maintenance screen.
- The left panel lists task categories such as Implementations, Setup Data Export and Import, Implementation Objects, and Topology Objects.
- The main panel shows the Overview tab with options for Implementation Projects, Assigned Implementation Tasks, All Tasks, and Applications Administration.
- Use the Search section to look up "Task Lists and Tasks" by name or business object.
- The Search Results section shows the matching business objects.
Add a calendar event category
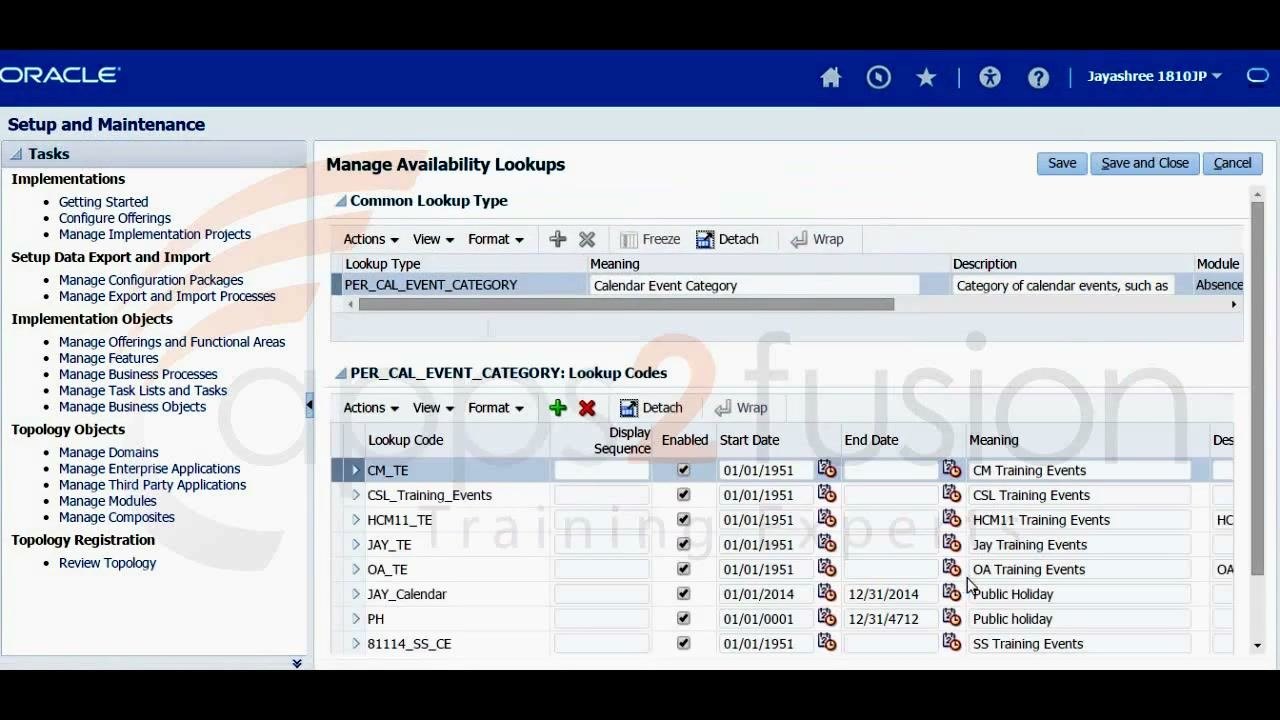
Open Manage Availability Lookups
Navigate to Manage Availability Lookups. Make sure Common Lookup Type is set to PER_CAL_EVENT_CATEGORY. This lookup type is used for the Calendar Event Category.
The table lists the existing lookup codes with their enabled status, start and end dates, and meanings, such as CM Training Events and Public Holiday.
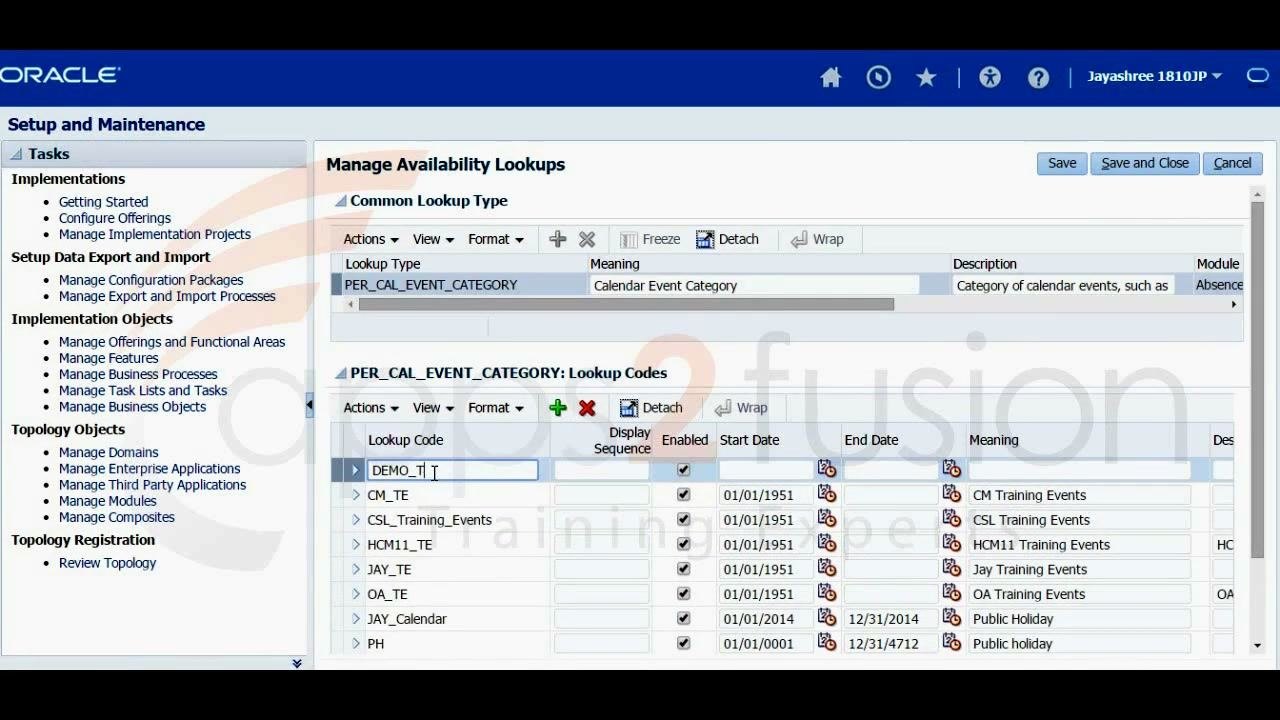
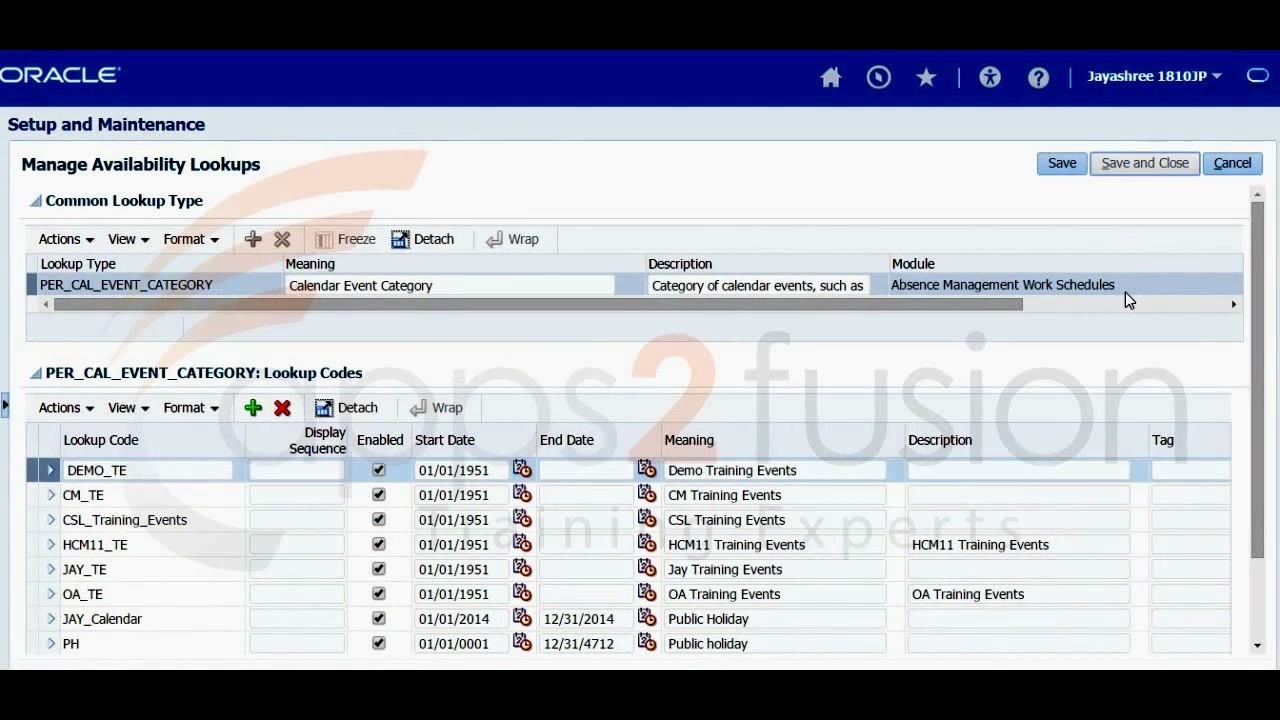
Add the new category row
Click the green plus (+) icon to add a new row to the lookup codes table. Enter these details for the new event category:
- Lookup Code:
DEMO_TE - Enabled: Checked
- Start Date:
01/01/1951 - Meaning:
Demo Training Events
Create a calendar event
Find the Manage Calendar Events task
On the Setup and Maintenance screen, stay on the Overview tab and use the search panel.
- Set Search to "Task Lists and Tasks".
- In the Name field, enter
Manage Calendar Events. - In the Business Object field, enter
Manage Calendar Events. - Click Search.
- In Search Results, find the row with Name "Manage Calendar Events" and Business Objects "Calendar Event".
- Click the Go to Task icon in that row.
Start the new calendar event
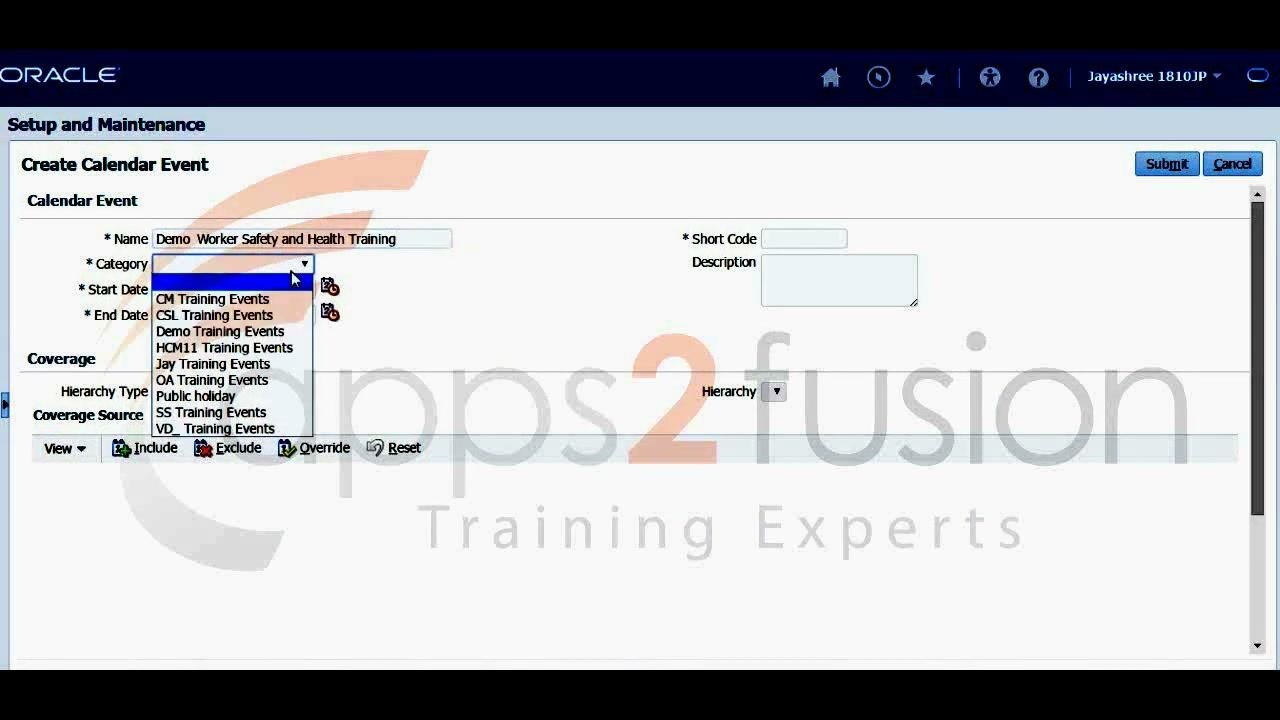
On the Create Calendar Event screen, find the Calendar Event section.
- In the Name field, enter
Demo Worker Safety and Health Training. - Leave the Short Code field blank for now.
- Click the Category dropdown to expand the list of categories.
Select the event category
From the Category dropdown, select Demo Training Events.
Set the event start date
- Click the calendar icon next to the Start Date field.
- In the date picker, select May 14, 2015.
- Set the time to 12:00.
- Click OK to confirm the date and time.
Set the event end date
Click the calendar icon next to the End Date field. Enter 05/15/2015 05:00 as the end date and time.
Enter the short code
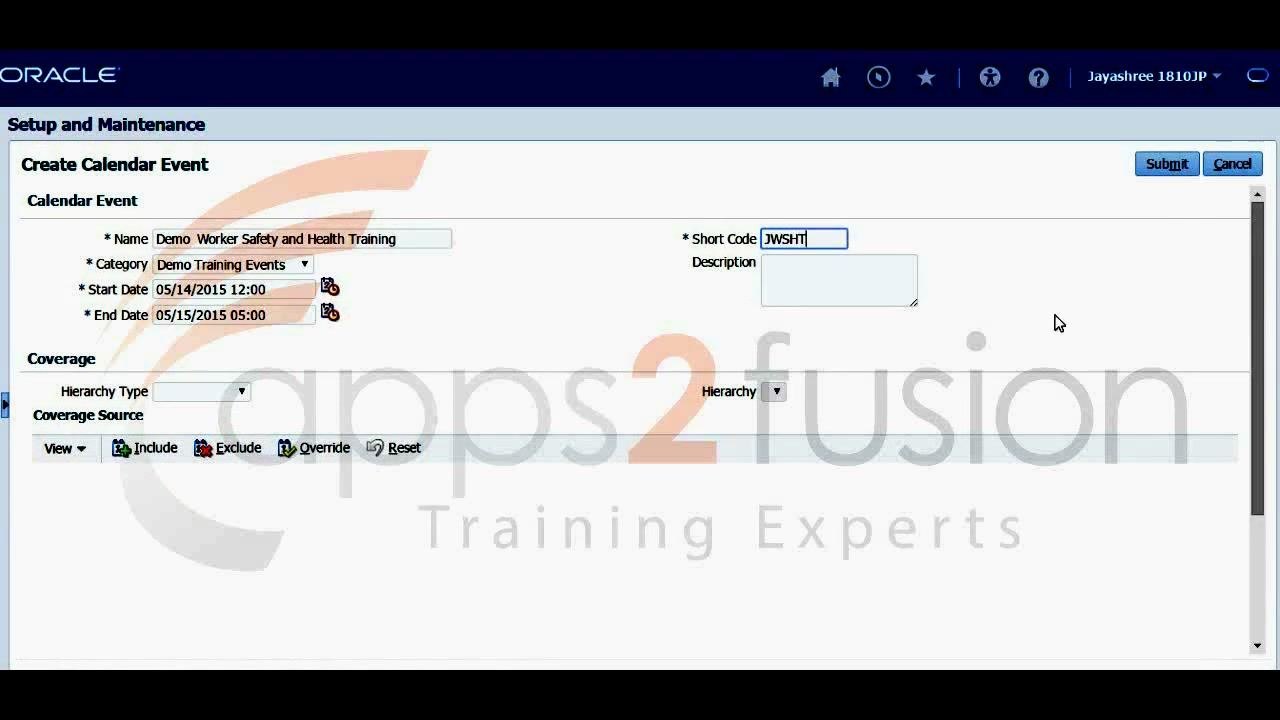
In the Short Code field, type JWSHT.
Review the event details
Make sure these fields are complete:
- Name: Demo Worker Safety and Health Training
- Category: Demo Training Events
- Start Date: 05/14/2015 12:00
- End Date: 05/15/2015 05:00
- Short Code: JWSHT
Leave the Description, Hierarchy Type, and Coverage Source fields blank or at their default values unless you are told otherwise.
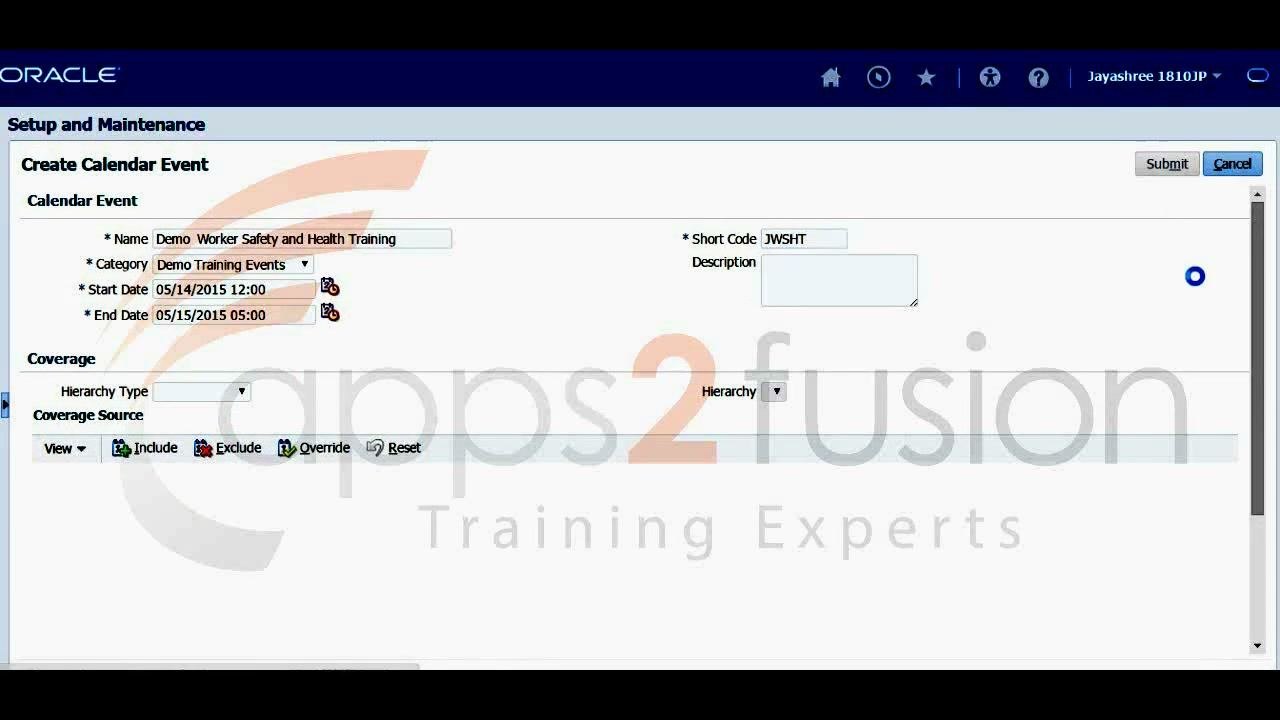
At this point you have found the Manage Calendar Events task and filled in the new calendar event. The next sections cover the work shifts, and later sections cover the remaining scheduling configuration.
Create work shifts
Find the Manage Work Shifts task
On the Setup and Maintenance screen, stay on the Overview tab.
- Set Search to "Task Lists and Tasks".
- In the Name field, enter
Manage Work Shifts. - Leave the Business Object field blank.
- Click Search.
- In Search Results, find the row with Name "Manage Work Shifts" and Business Objects "Shift".
- Click the Go to Task icon in that row.
Review the existing work shifts
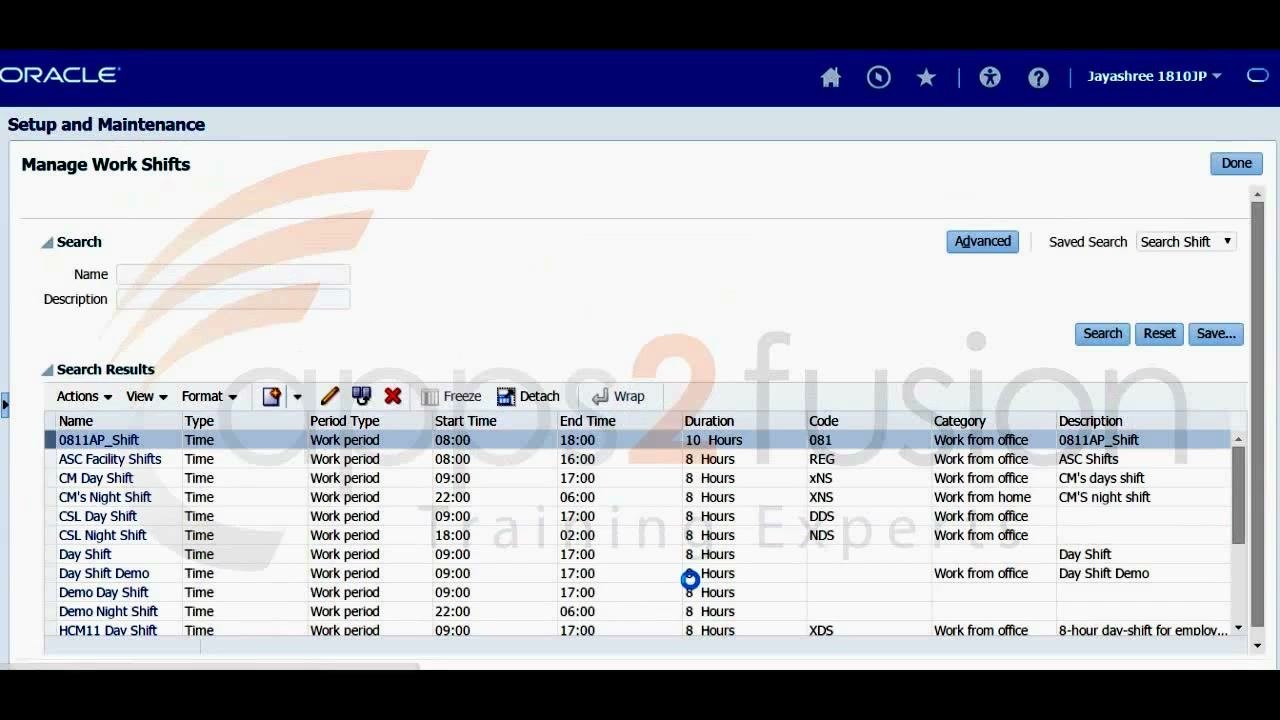
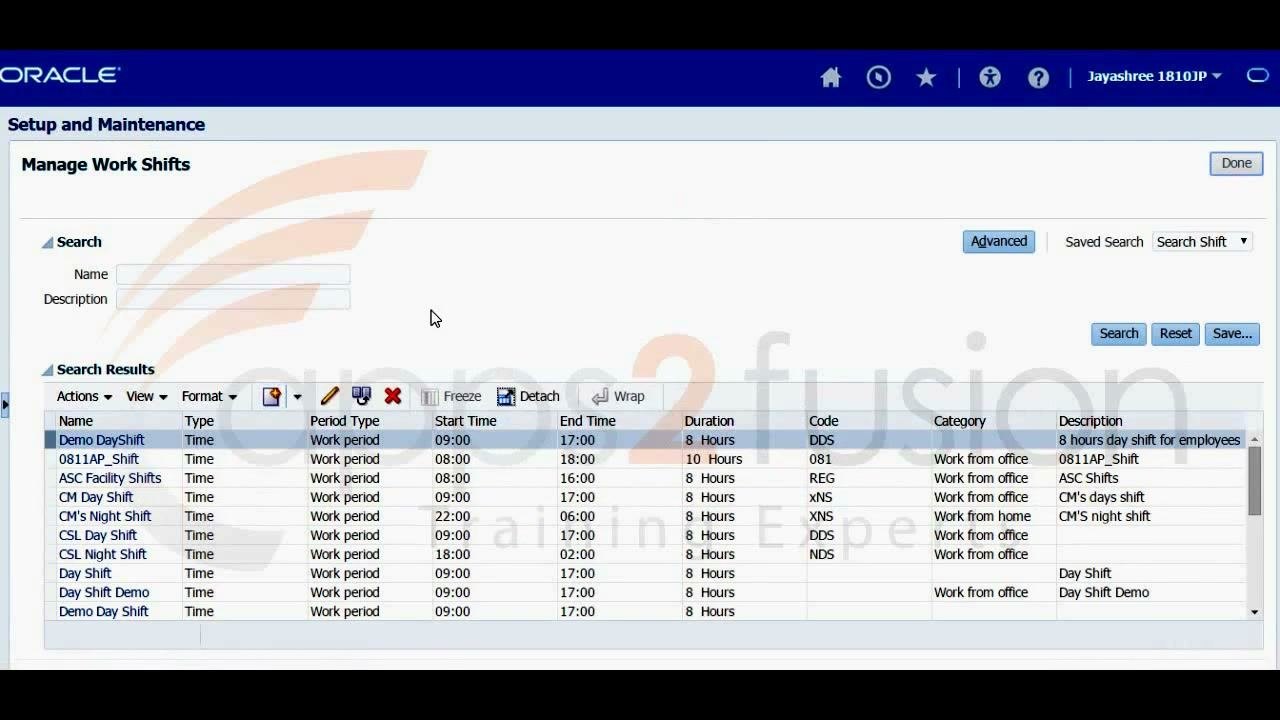
On the Manage Work Shifts screen, review the existing shifts in the Search Results table. The columns are Name, Type, Period Type, Start Time, End Time, Duration, Code, Category, and Description.
Example entries:
0811AP_Shift: Start Time 08:00, End Time 18:00, Duration 10 Hours, Category Work from officeCM Day Shift: Start Time 09:00, End Time 17:00, Duration 8 Hours, Category Work from office
Start a new day shift
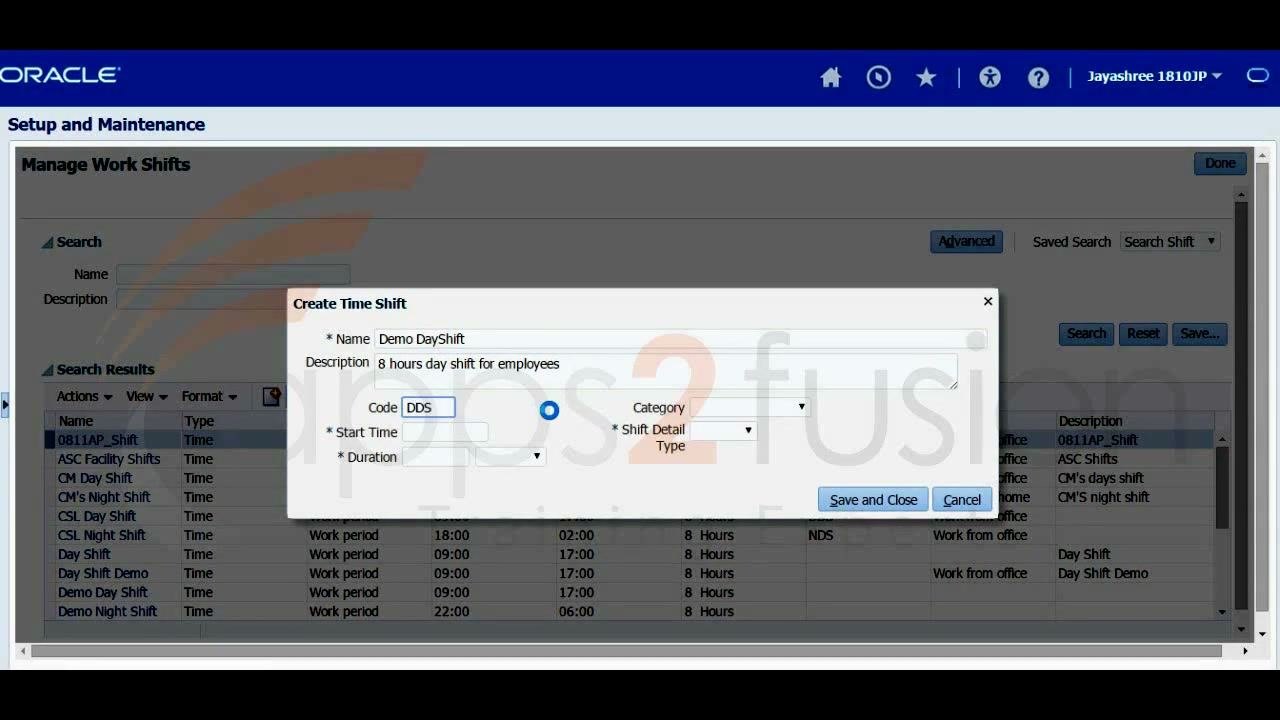
Click the Create (plus) icon above the search results table. The Create Time Shift dialog opens.
- In the Name field, enter
Demo DayShift. - In the Description field, enter
8 hours day shift for employees.
Enter the day shift code
In the Code field, enter DDS.
Select the day shift category
In the Category dropdown, select Work from office or Work from home, as appropriate. This example uses Work from office.
Set the day shift start time and duration
- In the Start Time field, enter
09:00. - In the Duration field, enter
8. - In the duration unit dropdown, select
Hours.
Save the day shift and verify it
Click Save and Close to add the new shift to the list. Confirm that Demo DayShift appears in the Search Results table with these details:
- Name: Demo DayShift
- Type: Time
- Period Type: Work period
- Start Time: 09:00
- End Time: 17:00
- Duration: 8 Hours
- Code: DDS
- Category: Work from office
- Description: 8 hours day shift for employees
Start an evening shift
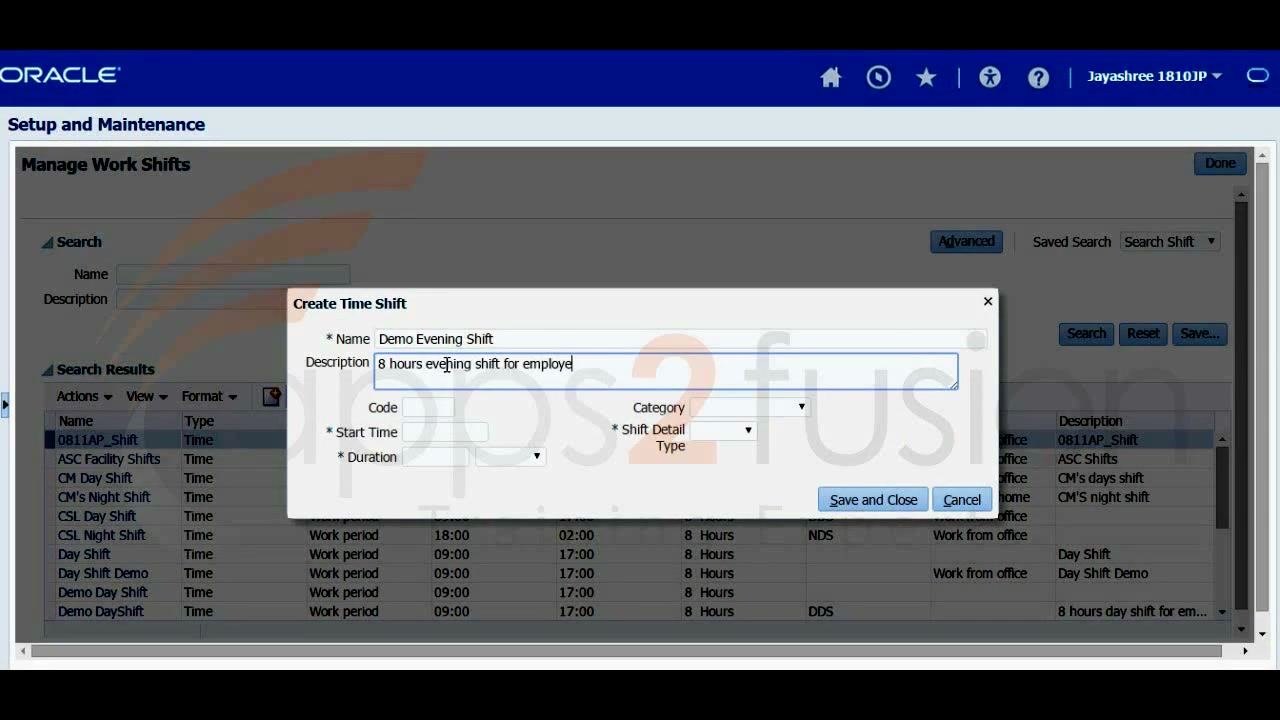
Click the option to create a new time shift. The Create Time Shift dialog appears. Enter these details:
- Name:
Demo Evening Shift - Description:
8 hours evening shift for employees
Enter the evening shift code
In the Code field, enter DES.
Select the evening shift category
Click the dropdown next to Category. Choose Work from home or Work from office, as appropriate.
Set the evening shift start time
In the Start Time field, enter 15:00.
Select the shift detail type
Click the dropdown next to Shift Detail Type. Choose from Flexible, None, or Punch.
Enter the evening shift duration
In the Duration field, enter 8 Hours.
Save the evening shift and verify it
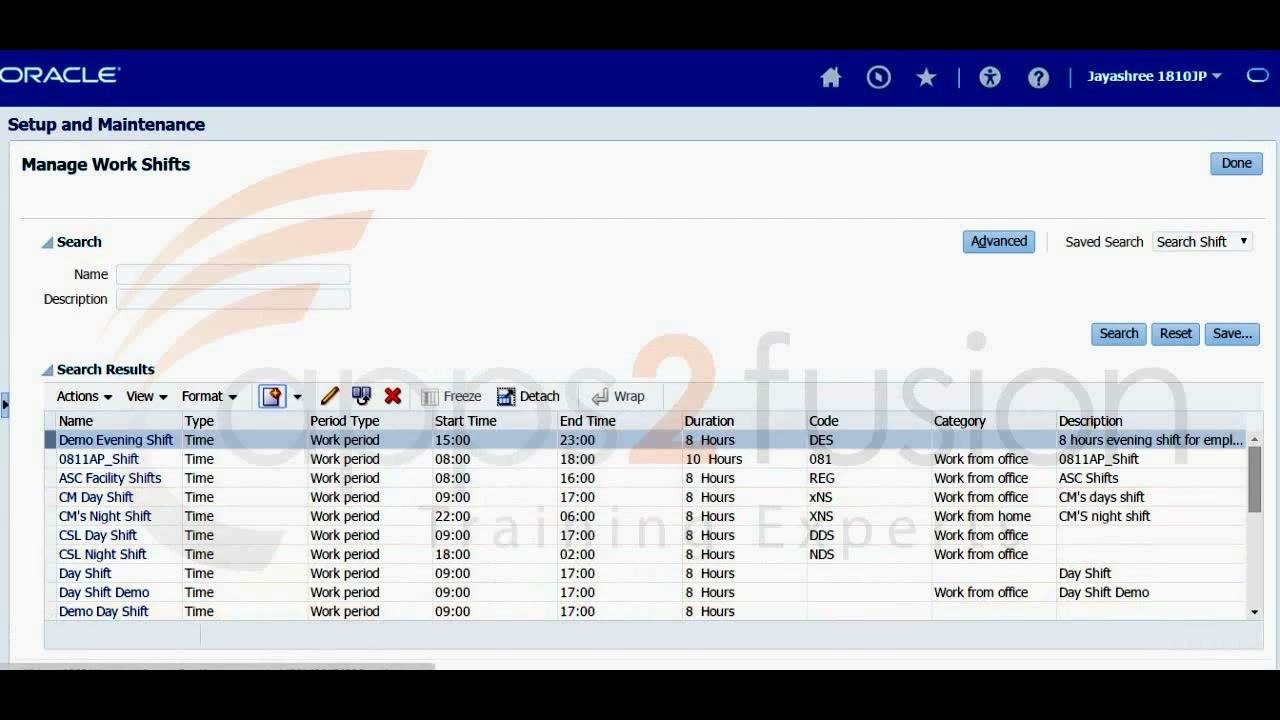
Click Save and Close to create the new time shift. Verify that the shift appears in the Search Results table with these details:
- Name: Demo Evening Shift
- Period Type: Work period
- Start Time: 15:00
- End Time: 23:00
- Duration: 8 Hours
- Code: DES
- Category: Work from office (or as selected)
- Description: 8 hours evening shift for employees
Create a workday pattern
Open Manage Work Workday Patterns
Navigate to the Manage Work Workday Patterns section.
Start a new workday pattern
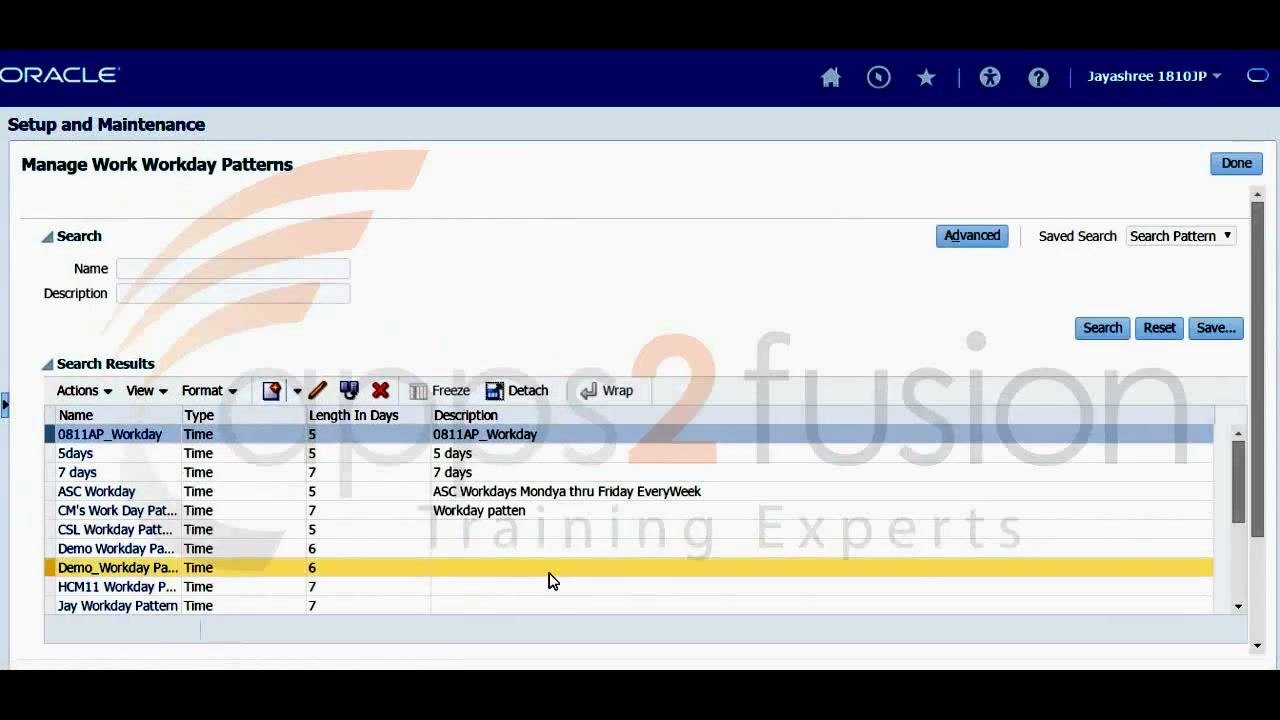
Click the option to create a new workday pattern. The Create Time Workday Pattern dialog appears.
Enter the pattern name
In the dialog, in the Name field, enter Demo Workday Pattern.
Enter the pattern description
In the Description field, enter 7 Days Workday Pattern.
Review the pattern details
Review the details you entered:
- Name: Demo Workday Pattern
- Description: 7 Days Workday Pattern
- Length in Days: 5
The Length in Days value is set to 5, not 7. The Workday Pattern Details section is empty at this stage.
Add the first workday pattern detail
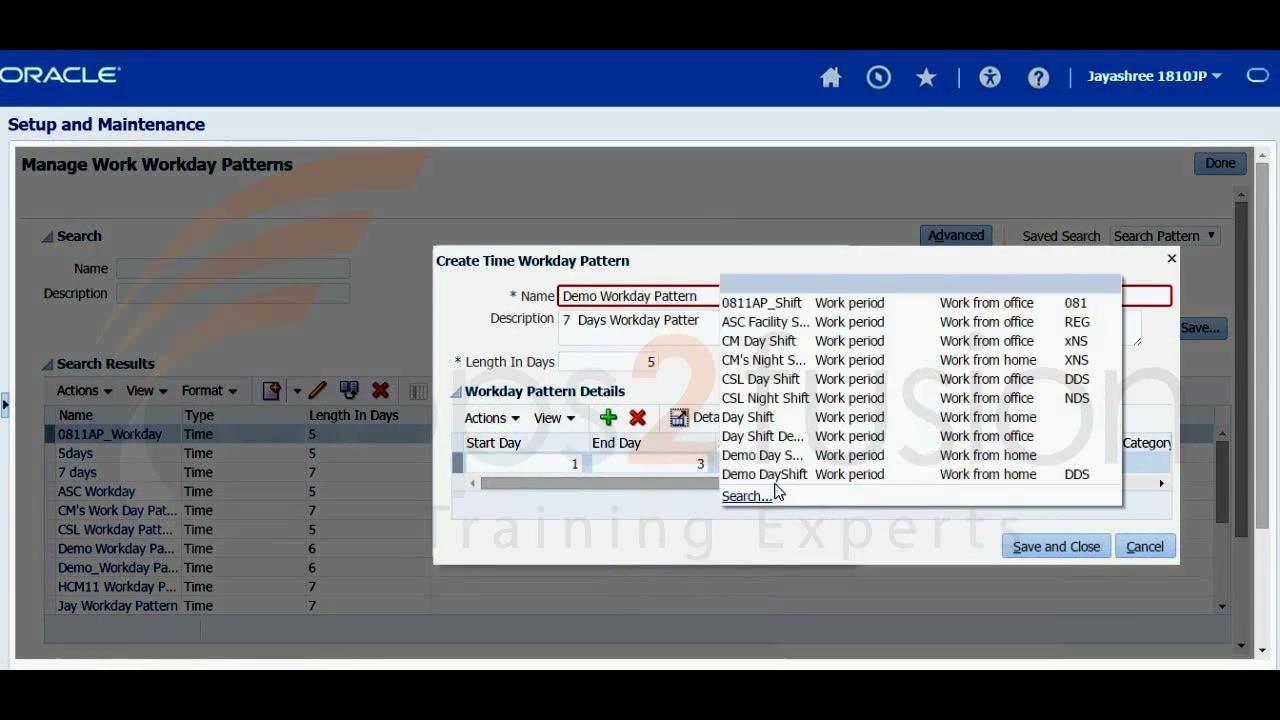
- Click the green plus icon (+) under Workday Pattern Details. A new row appears with editable fields for Start Day, End Day, and Shift Name.
- Enter Start Day
1and End Day3. - Click the dropdown in the Shift Name column. A list of available shifts appears, with columns for Shift Name, Shift Period Type, Shift Category, and Code.
Select the day shift
From the dropdown, choose Demo DayShift (Work period, Work from home, DDS). The row now shows:
- Start Day: 1
- End Day: 3
- Shift Name: Demo DayShift
- Shift Type: Time
- Shift Period Type: Work period
Add the second workday pattern detail
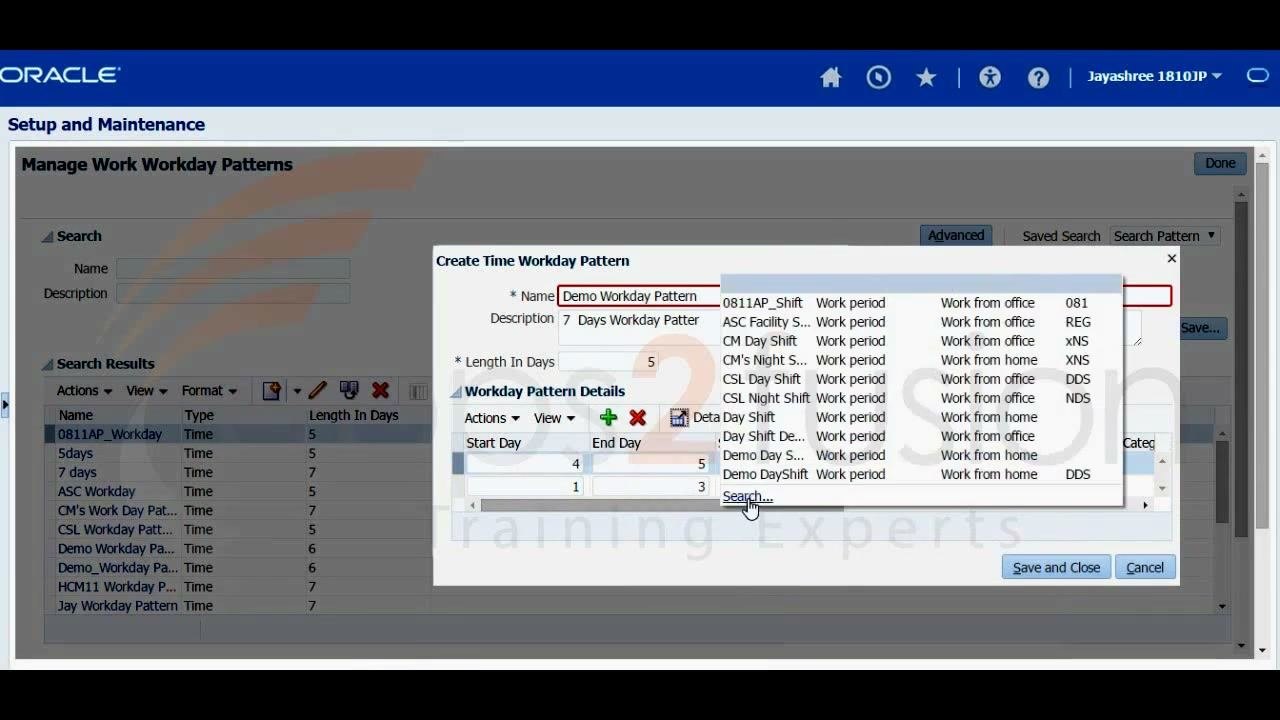
- Click the green plus icon (+) again to add a second row.
- Enter Start Day
4and End Day5. - Click the dropdown in the Shift Name column.
- If the shift you want is not visible, click Search... at the bottom of the dropdown. The Search and Select: Shift Name dialog appears.
- Set Name to Starts with
Demo, and set Period Type to EqualsWork period. - Click Search to display the matching shifts.
- Select
Demo Evening Shift(Work period, Work from home, DES) from the results.
Save the workday pattern
Click Save and Close. If a record with the same name already exists, this error appears: "A record with the value Demo Workday Pattern already exists. Enter a unique value."
Update the Name field to a unique value, such as Demo Workday Pattern test. Make sure both workday pattern details are present:
- Row 1: Start Day 4, End Day 5, Shift Name Demo Evening, Shift Type Time, Shift Period Type Work period
- Row 2: Start Day 1, End Day 3, Shift Name Demo DayShift, Shift Type Time, Shift Period Type Work period
Create the work schedule
Open Manage Work Schedules
In the Setup and Maintenance module, search for "Manage Work Schedules".
- On the Overview tab, under All Tasks, enter
Manage Work Schedulesin the Name field. - Click Search.
- In the search results, find the "Manage Work Schedules" task.
- Click the Go to Task icon (a green arrow) to open the task.
Enter the work schedule details
On the Create Work Schedule screen, enter these details:
- Name:
Jay Demo Work Schedule - Type: Select
Timefrom the dropdown. - Category: Leave blank or select as appropriate.
- Description: Leave blank or enter as needed.
- Effective from Date:
04/04/2015 - Effective to Date:
04/04/2015
The Patterns and Exceptions sections are empty for now.
Set the effective dates
- Click the calendar icon next to the Effective from Date field.
- In the calendar popup, select April 2015 from the dropdown and choose the date you want.
- Repeat the process for the Effective to Date field.
The example in this step shows Effective from Date 05/01/2015 and Effective to Date 04/04/2015. Later, when you search for the schedule, it appears with effective dates of 05/01/2015 to 12/31/2015.
Add a pattern to the work schedule
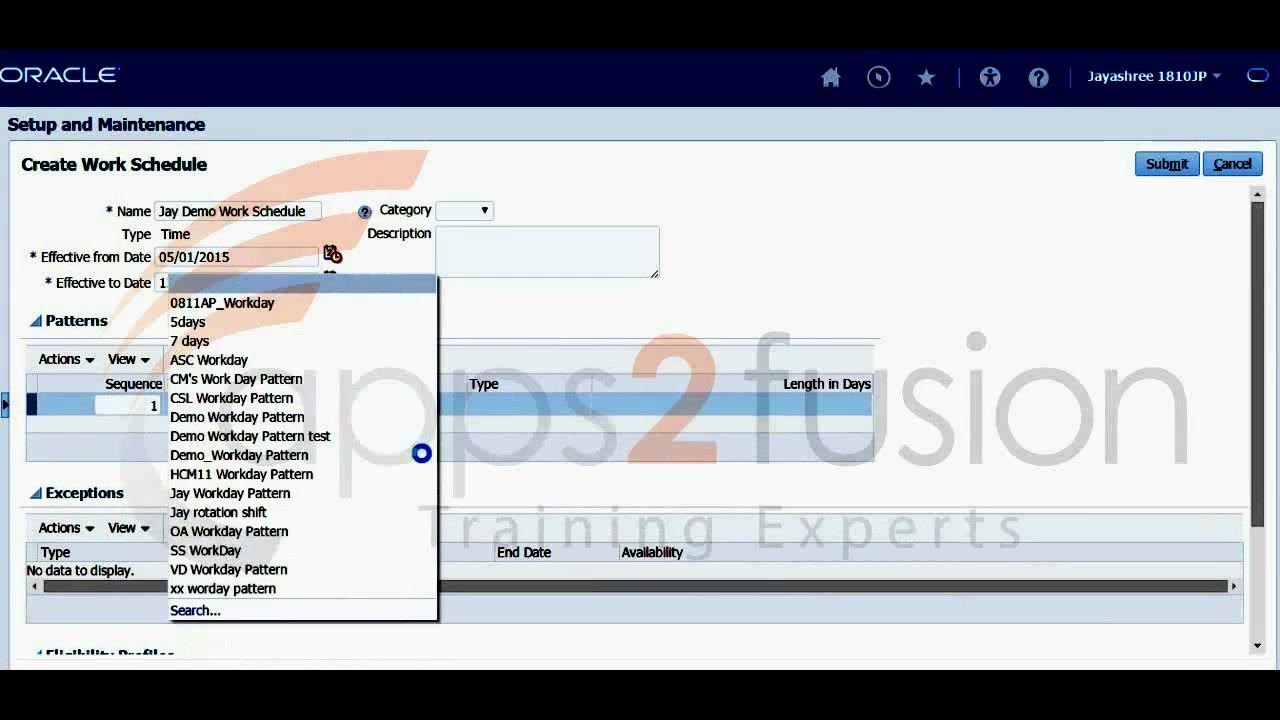
- In the Patterns section, click the green plus icon (+) to add a new row.
- Enter Sequence
1. - Click the dropdown in the Name column to select a workday pattern.
The Type and Length in Days columns are available for input. Example format guidance appears for the sequence field.
Select the workday pattern
In the Name dropdown, choose Demo Workday Pattern test from the list of available patterns. The row now shows:
- Sequence: 1
- Name: Demo Workday Pattern test
- Type: Time
- Length in Days: 5
Submit the work schedule
Click the Submit button in the upper right corner of the screen to save the work schedule. The schedule is now created with the selected pattern and effective dates.
Administer the work schedule assignment
Open Manage Work Schedule Assignment Administration
In the Setup and Maintenance module, go to the Overview tab.
- In the All Tasks section, search for
Manage Work Schedule Assignment. - In the search results, find "Manage Work Schedule Assignment Administration".
- Click the Go to Task icon (a green arrow) to open the assignment administration screen.
Search for the new work schedule
On the Manage Work Schedule Assignment Administration screen:
- Enter
Jayin the Name field. - Set Type to
Time. - Click Search.
- In the results, find
Jay Demo Work Schedulewith Type Time, Effective from Date 05/01/2015, and Effective to Date 12/31/2015. - Select that row.
Add a resource assignment
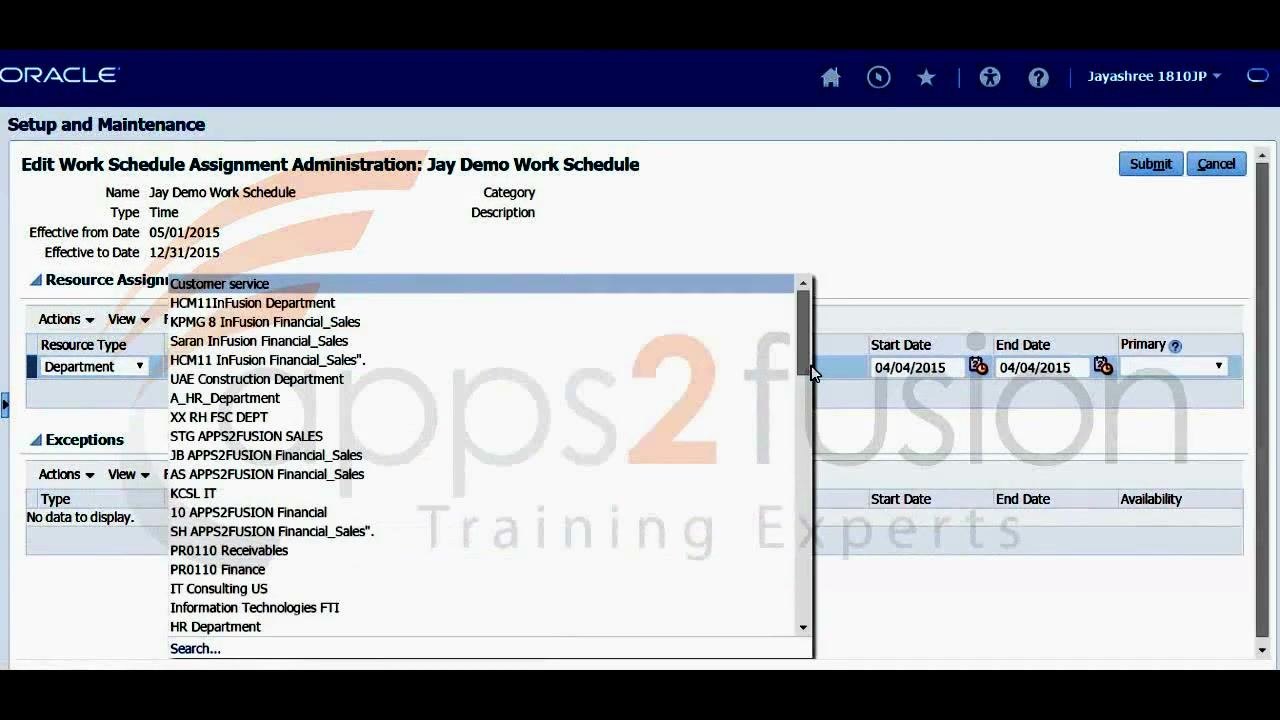
With Jay Demo Work Schedule selected, the Edit Work Schedule Assignment Administration screen opens. The schedule details appear at the top, including name, type, effective dates, and category.
- In the Resource Assignments section, click the green plus icon (+) to add a new assignment row.
- In the new row, set Resource Type from the dropdown. The options are Assignment, Department, Employment term, Enterprise, Job, Legal employer, Location, and Position. This example uses
Department. - Set Start Date to
04/04/2015. - Set End Date to
04/04/2015. - Mark the assignment as Primary if applicable.
Select the department
In the Name column, click the dropdown to view the available departments. Scroll through the list and select the department you want. This example uses IT Consulting US.
Confirm the assignment dates
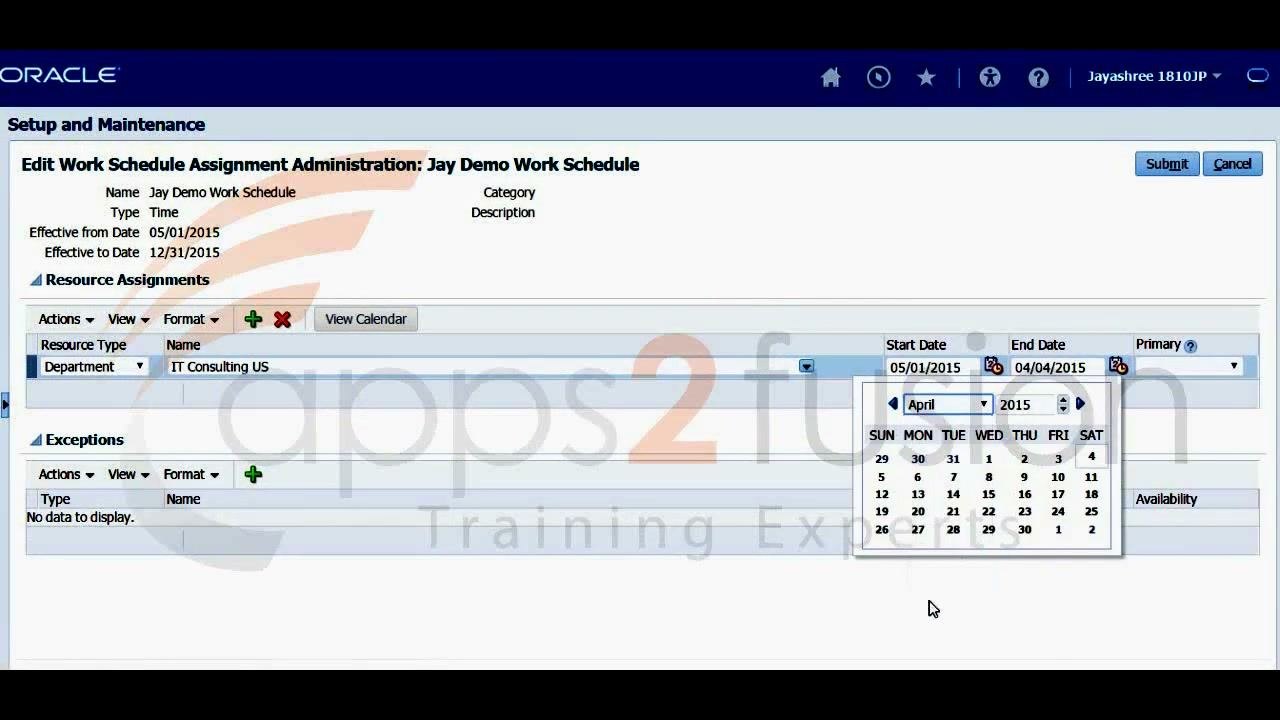
On the Edit Work Schedule Assignment Administration: Jay Demo Work Schedule screen, find the Resource Assignments section.
- Confirm that Resource Type is Department and Name is IT Consulting US.
- In the Start Date and End Date columns, click the calendar icon to open the date picker.
- In the calendar popup, make sure the month is April and the year is 2015.
- Select the date you want from the calendar grid. In this example, End Date is set to
04/04/2015. - Verify that Start Date is
05/01/2015and End Date is04/04/2015. - Optionally, check the Primary box to mark the assignment as primary.
Assign the work schedule to an employee
Open Person Management
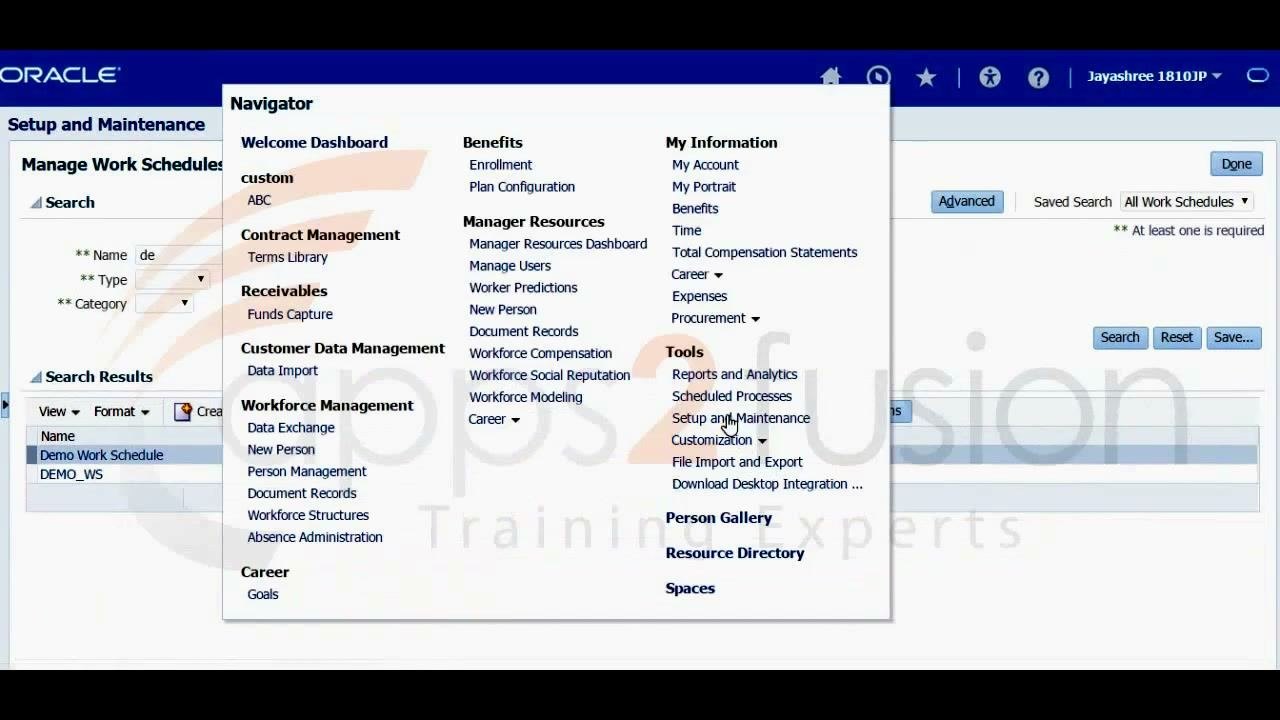
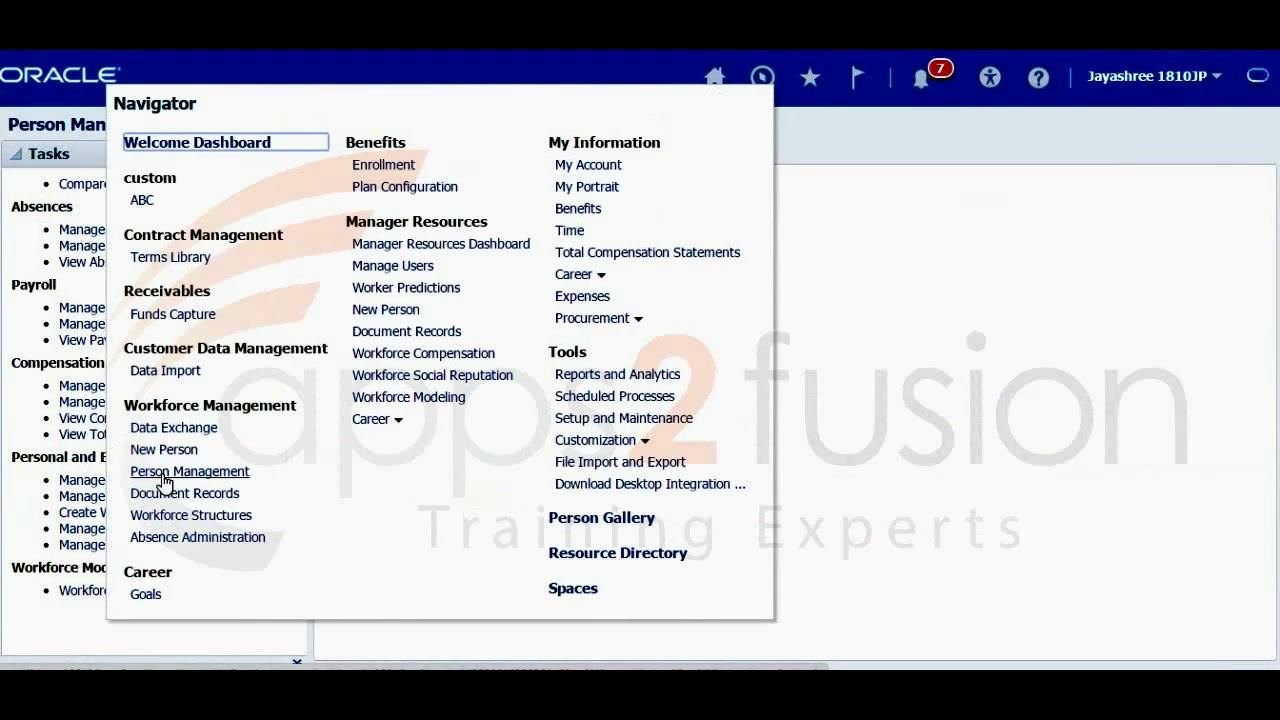
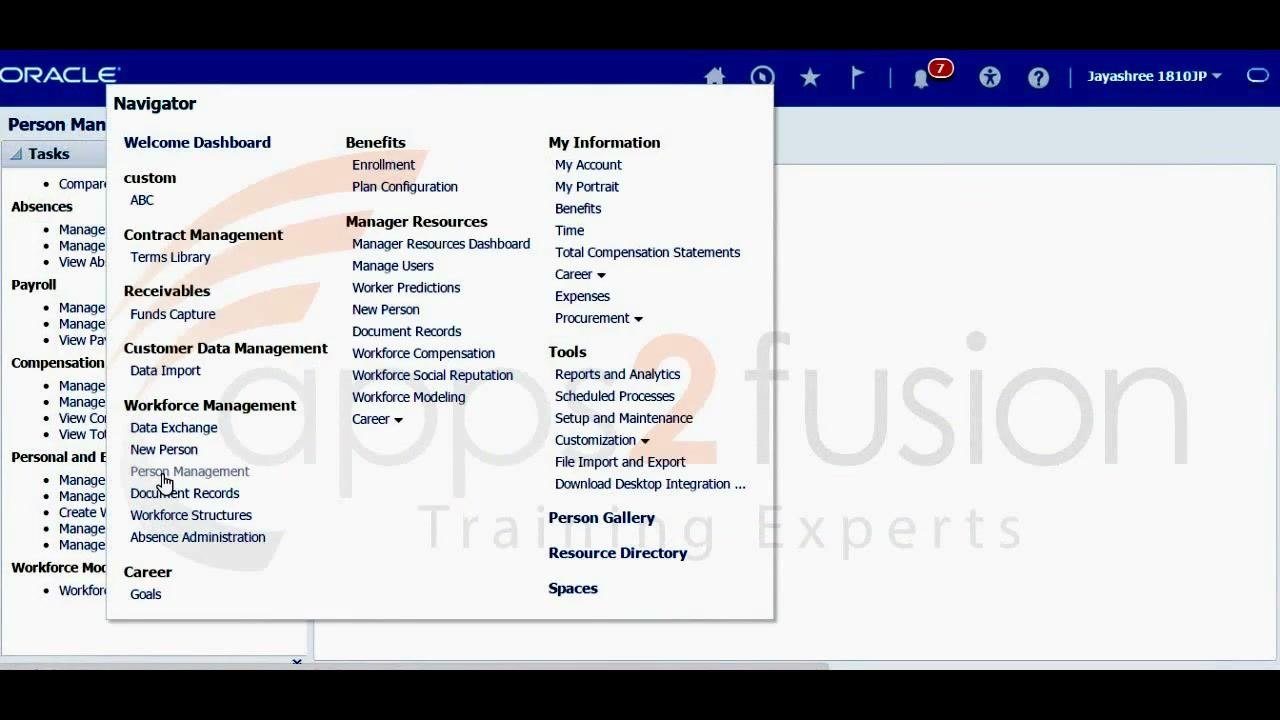
Click the Navigator icon in the Oracle Fusion HCM interface. The Navigator menu shows modules and options such as Welcome Dashboard, Workforce Management, and Manager Resources. Under Workforce Management, select Person Management.
Open Manage Work Schedule Assignment
The Person Management screen loads.
- The Tasks pane on the left lists Absences, Payroll, Compensation, Personal and Employment, and Workforce Modeling.
- The main panel shows the selected employee's information, for example Name: employee demo, Person Number: 8897.
- Under the Absences section in the Tasks pane, click Manage Work Schedule Assignment.
Select a work schedule
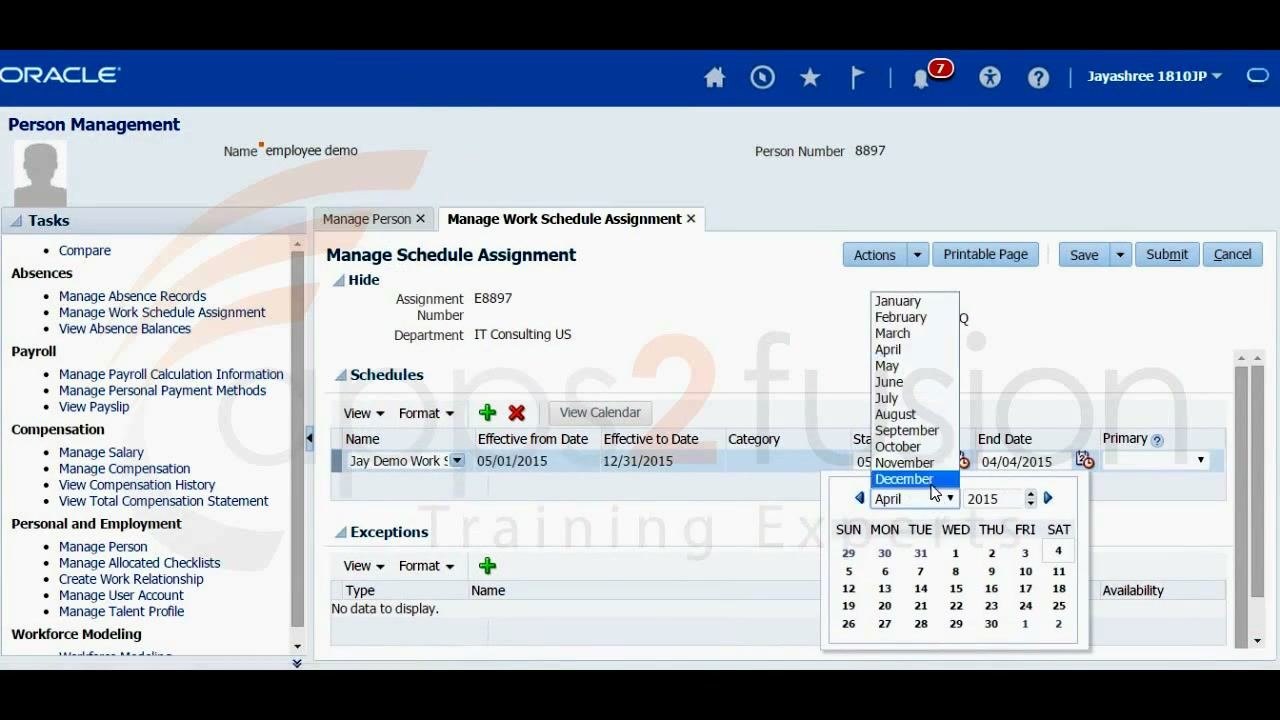
The Manage Work Schedule Assignment tab opens. In the Schedules section, click the dropdown under Name to select a work schedule.
A list of available schedules appears, such as "CSL Work Schedule", "Jay rotation", and "DEMO_WS". Select the appropriate work schedule from the list.
Set the schedule effective dates
In the Schedules section, set Effective from Date and Effective to Date for the selected work schedule.
- Click the calendar icon next to the date fields to open the date picker.
- Select the month and year you want, for example May 2015 to December 2015.
- Confirm each date by clicking the day in the calendar.
Add schedule exceptions
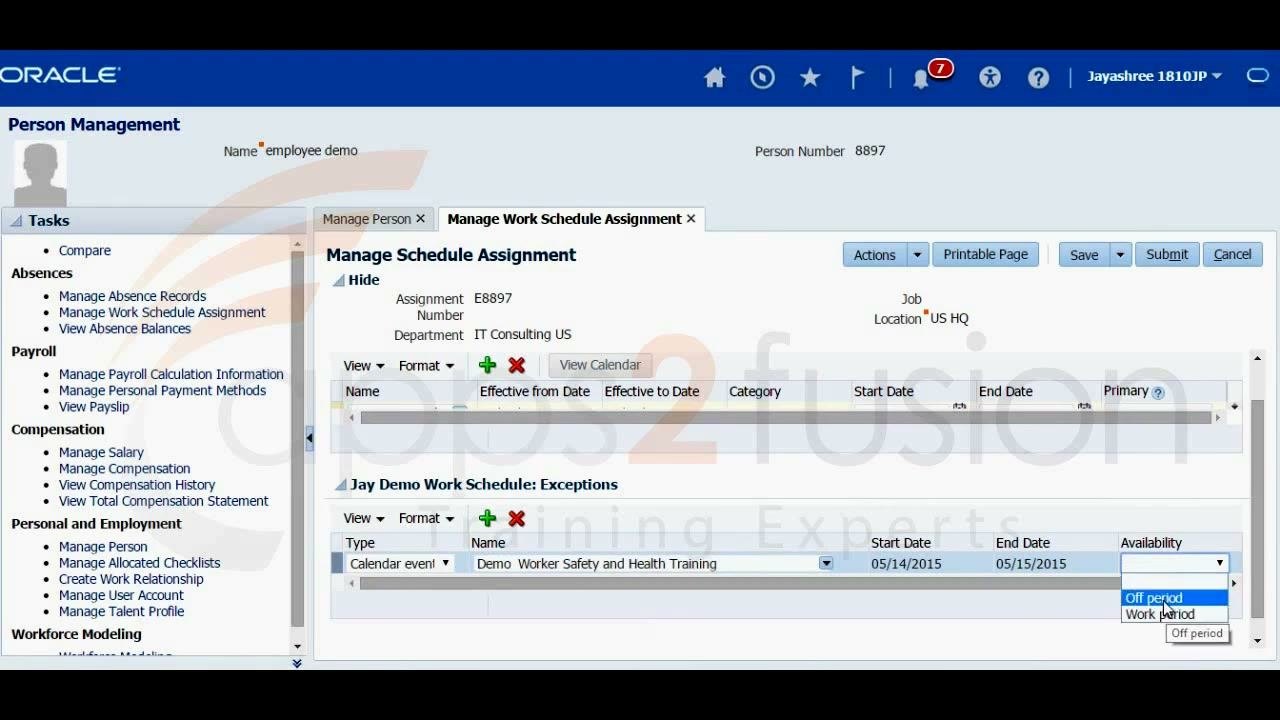
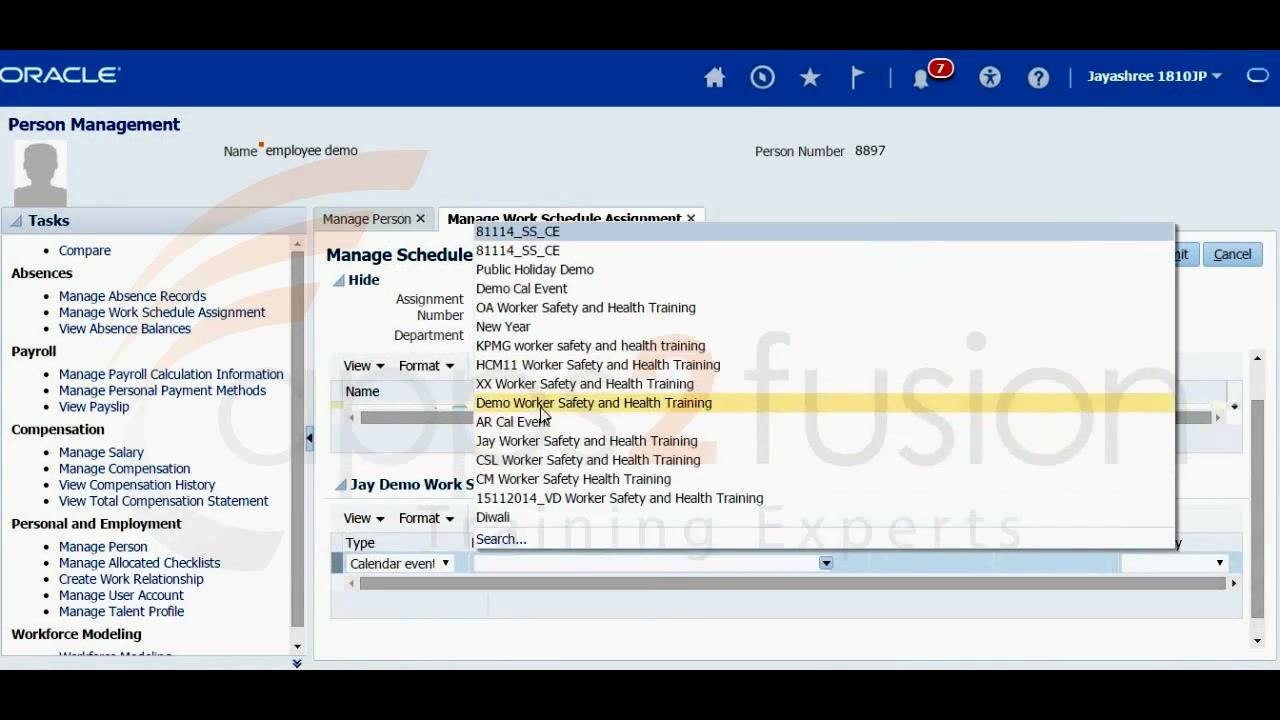
In the Jay Demo Work Schedule: Exceptions section, click the green plus (+) icon to add a new exception.
- In the Name dropdown, select the exception type, for example "Demo Worker Safety and Health Training".
- Set Start Date and End Date for the exception, for example 05/14/2015 to 05/15/2015.
- In the Availability dropdown, choose the appropriate value, for example "Off period" or "Work period".
Save and submit the assignment
After you enter all the schedule and exception details, click Save to store your changes. Then click Submit to finalize the work schedule assignment for the employee. The system processes the changes and updates the employee's schedule.
Summary
You now know how to create a work schedule in Oracle Fusion from start to finish. You did the following:
- Added the
DEMO_TEcalendar event category and created theDemo Worker Safety and Health Trainingcalendar event. - Created the
Demo DayShiftandDemo Evening Shiftwork shifts. - Built a workday pattern that combines both shifts, using a unique name such as
Demo Workday Pattern test. - Created
Jay Demo Work Schedulewith that pattern and submitted it. - Assigned the schedule to a department in Manage Work Schedule Assignment Administration.
- Assigned the schedule to an employee in Person Management, added an exception, and submitted the assignment.
Generation details: cost, quality tiers
Docsie billed 6,000 credits ($4.20) to analyze this 12-minute video at standard quality. The rewrite, template fill and Word/PDF exports were included. The same video at each quality tier:
| Quality | Frames sampled | Credits | Approx. cost |
|---|---|---|---|
| Draft | every 16-30 s | 3,000 | $2.10 |
| Standard (this guide) | every 8-15 s | 6,000 | $4.20 |
| Detailed | every 4-7 s | 12,000 | $8.40 |
| Ultra | every 1-3 s | 24,000 | $16.80 |
Credits priced at $0.70 per 1,000; plans include a monthly allowance. Enterprise customers on on-premise or bring-your-own-model deployments run this on their own inference and pay no per-video credits.
Generated by Docsie Video-to-Docs on 2026-11-15 from a 12-minute video. Screenshots are frames from the source video and belong to their creator, apps2fusion, whose original is embedded above. If you own this video and want the guide removed or credited differently, contact us and we will act within one business day.