
How to Add the Security Console in Oracle Fusion
This guide shows you how to add the Security Console in Oracle Fusion to your administration workflow. You sign in with a user that has the right role, open the console from the Tools menu, and then manage user accounts, roles, and security settings. It also covers importing user and role data, reviewing each console area, querying user and role data with SQL, and troubleshooting user access.
Video: Security Console Access - In Oracle Fusion ERP by Ora Trainings (2025). All credit for the demonstration goes to the creator; watch the original on YouTube. The written guide below was generated from this video by Docsie. Creator? Request a change or removal.
This guide shows you how to add the Security Console in Oracle Fusion to your administration workflow. You sign in with a user that has the right role, open the console from the Tools menu, and then manage user accounts, roles, and security settings. It also covers importing user and role data, reviewing each console area, querying user and role data with SQL, and troubleshooting user access.
Prerequisites
Before you begin, make sure you have the following:
- A browser and the URL of your Oracle Fusion ERP instance.
- A user account with the IT Security Manager role, which is required to access the Security Console. The example user in this guide is FAS16 student.
- Permission to schedule processes, so you can run Import User and Role Application Security Data.
- Access to a SQL query tool if you want to run the example queries in the user and role data sections.
Understand role-based access control
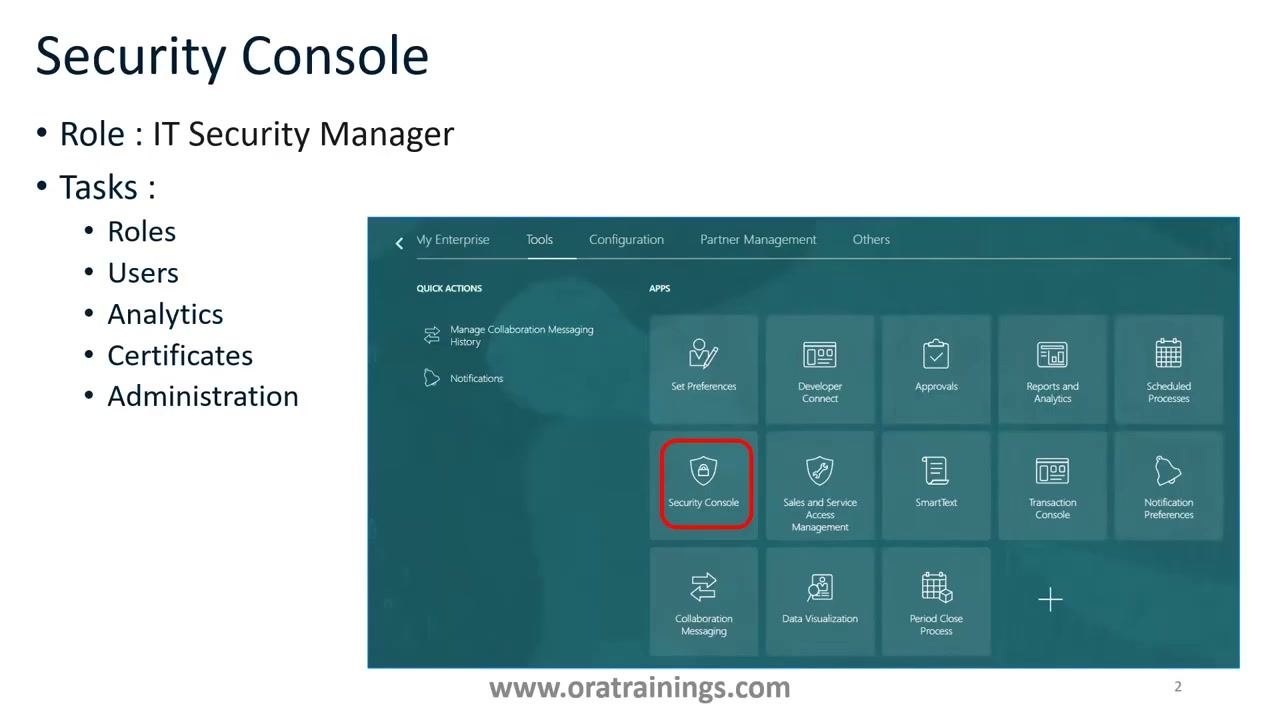
Step 1: Understand what the Security Console controls
The Security Console is a key functionality within Oracle Fusion ERP. You use it to control:
- Creation and management of user roles
- API certification
- LDAP synchronization
- Other critical security and administrative tasks
All of these functions are governed by role-based access control (RBAC). Every action and page access in Oracle Fusion ERP is determined by the roles assigned to a user. Without the appropriate role, users cannot access specific pages or views.
Step 2: Review what you can manage with the Security Console
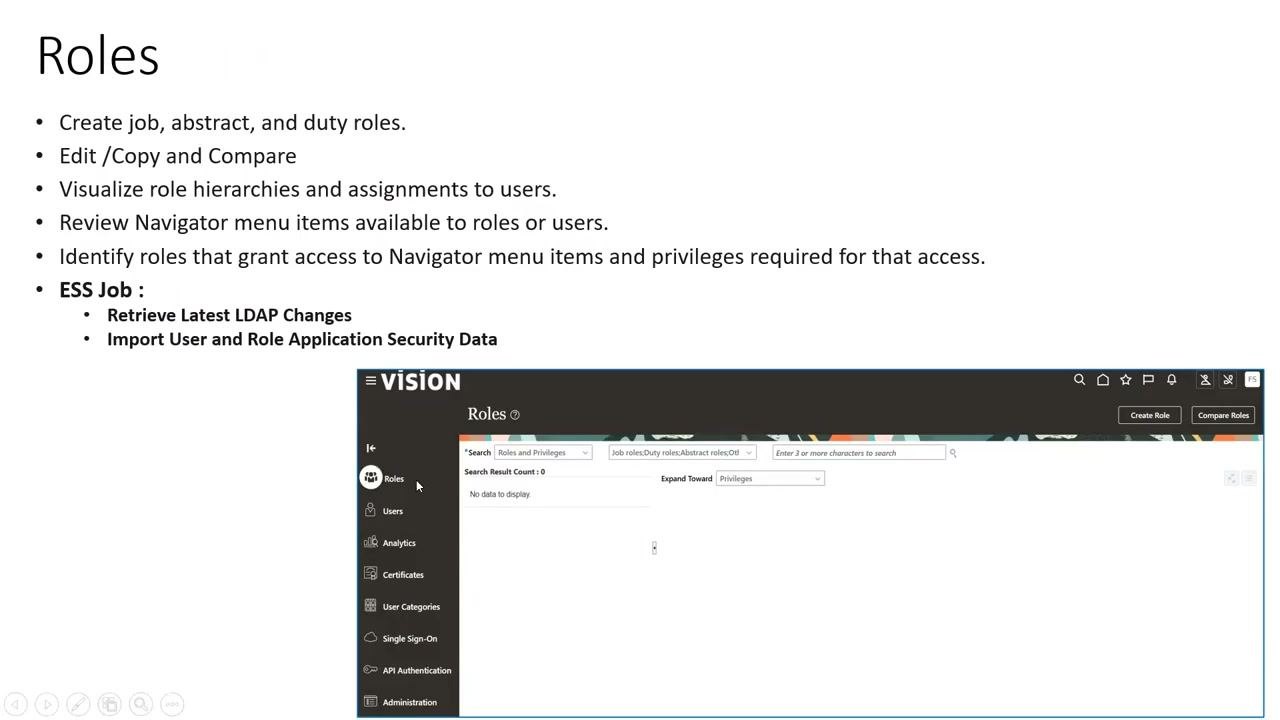
Use the Security Console to manage roles, including:
- Creating job, abstract, and duty roles
- Editing, copying, and comparing roles
- Visualizing role hierarchies and assignments to users
- Reviewing Navigator menu items available to roles or users
- Identifying roles that grant access to specific Navigator menu items and the required privileges
Add the Security Console in Oracle Fusion: sign in and open it
Step 3: Sign in with Security Console access
- Open your browser and go to your Oracle Fusion ERP instance.
- Sign in with a user account that has the necessary role, such as IT Security Manager. The example user is FAS16 student.
- Confirm that the user has the IT Security Manager role. This role is required to access the Security Console.
Step 4: Open the Security Console from the Tools menu
- After you sign in, click the Tools menu.
- Select Security Console from the available options.
Only users with the IT Security Manager role see this option.
Manage user accounts in the Security Console
Step 5: Open the User Accounts screen
- In the left sidebar, click Users to open the User Accounts screen.
- To add a new user, click the Add User Account button in the upper right.
If users exist, the list appears under "Search Results". Otherwise, the screen shows "No data to display."
Step 6: Add a new user account
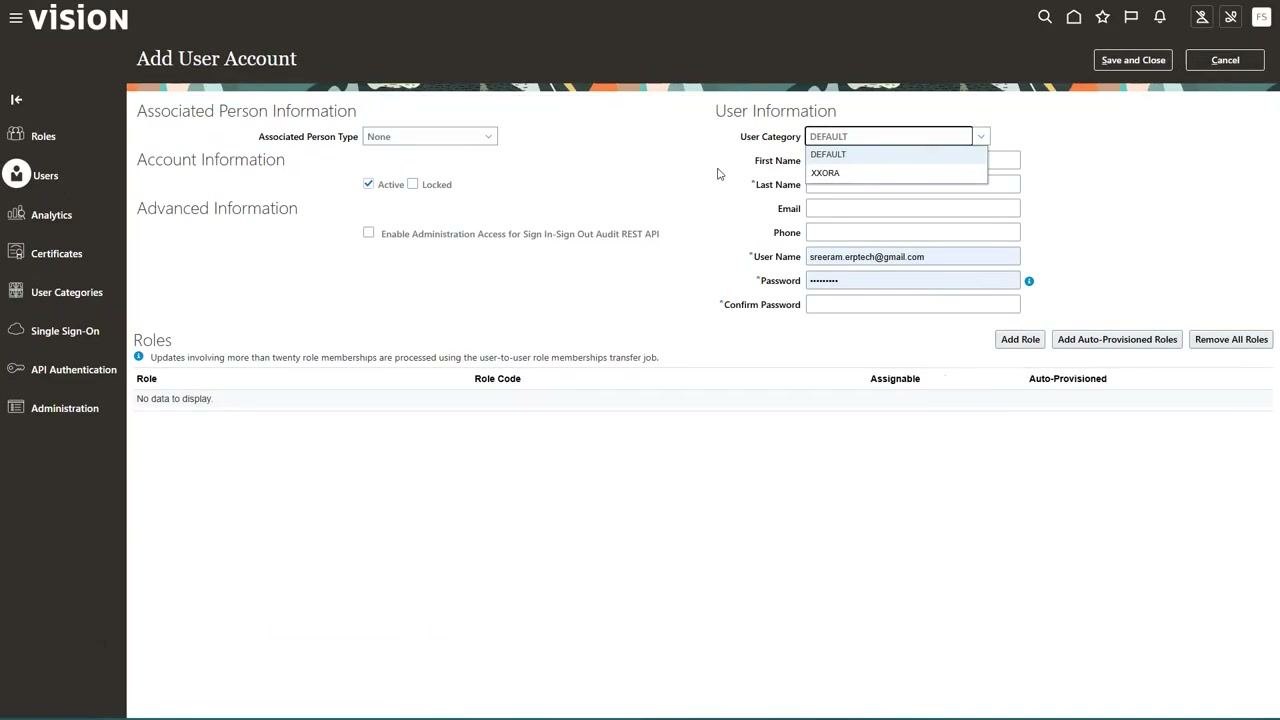
On the Add User Account screen, fill in the following details:
- Associated Person Information: Select the associated person type, if applicable.
- Account Information: Select Active to enable the account. Select Locked if you want to lock the account initially.
- Advanced Information: Optionally, enable administration access for the Sign In/Sign Out Audit REST API.
- User Category: Select a category from the dropdown, for example DEFAULT or XXORA.
- First Name: Enter the user's first name, for example erpuser.
- Last Name: Enter the user's last name, for example XXORA.
- Email: Enter the user's email address.
- Phone: Enter the user's phone number.
- User Name: Enter the username, for example sreeram.erptech@gmail.com.
- Password: Enter the password.
- Confirm Password: Re-enter the password.
In the Roles area, click Add Role or Add Auto-Provisioned Roles to assign roles. Use Remove All Roles to clear assigned roles.
Click Save and Close to create the user, or Cancel to discard your changes.
Step 7: Test the new user's sign-in in a separate browser
- Open a new browser window or an incognito window.
- A window switcher or application overview may appear as you prepare to sign in. You don't need to take any action in the Oracle interface for this.
- On the Oracle Applications Cloud sign-in page, enter erp.user as the User ID.
- Enter the password you set for the user.
- Click Sign In.
Step 8: Assign roles to the user
To grant access to additional functionality, assign roles to erp.user:
- On the Edit User Account screen, click Add Role or Add Auto-Provisioned Roles.
- Select the appropriate roles from the available list.
- Click Save and Close to apply the changes.
A user without assigned roles has minimal or no access to application features. Always assign at least one role to enable the necessary permissions.
Step 9: Review the user account details and role synchronization
After you assign a role, review the User Account Details screen for erp.user. This is a review step, so you don't need to change anything.
- User Information: User Category is DEFAULT, User Name is erp.user, First Name is erp, and Last Name is user. Email and Phone are not specified.
- Account Information: Password Expiration Date is 6/14/25, Active is checked, and Locked is not checked.
- Roles: The IT Security Manager role is now listed, with Role Code ORA_FND_IT_SECURITY_MANAGER_JOB, Assignable set to Yes, and Auto-Provisioned set to No.
- The top right of the screen offers Reset Password, Edit, and Done.
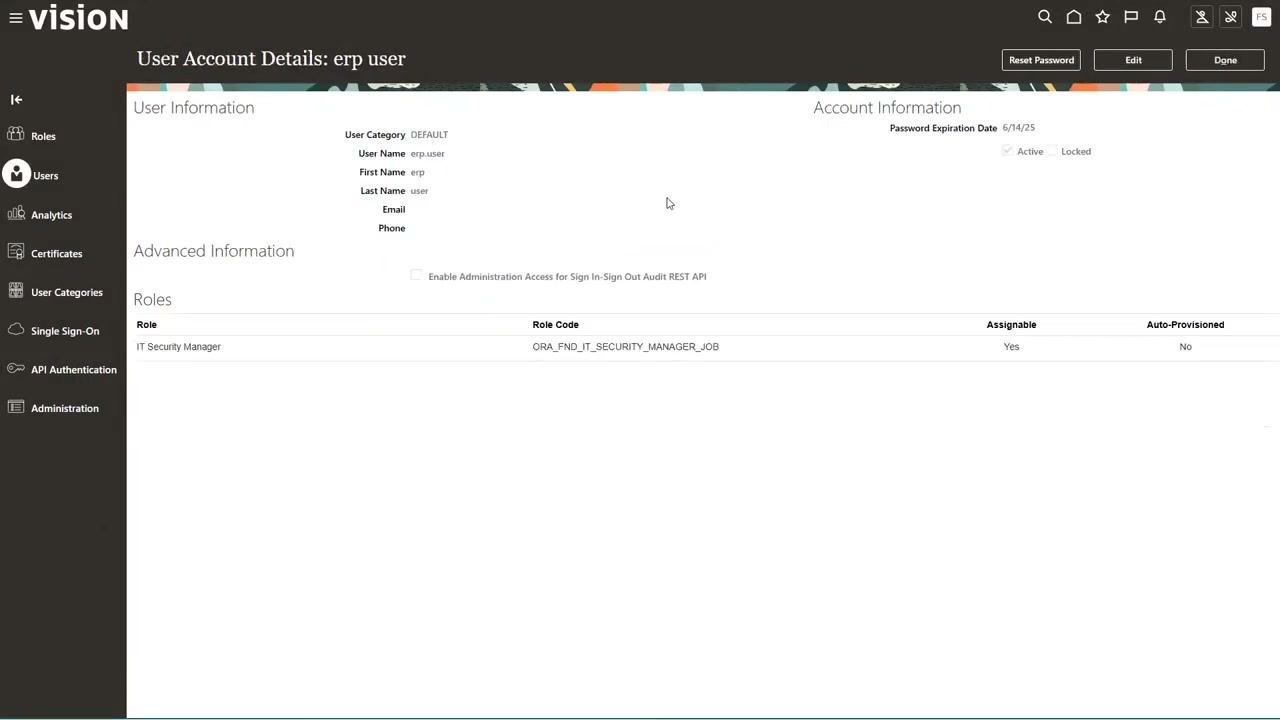
If you refresh the user screen immediately after you assign a role, it may not show the updated roles. Synchronization delays in the instance cause this.
Click Done in the upper right to exit the user account details screen.
Import user and role application security data
Step 10: Open the Scheduled Processes overview
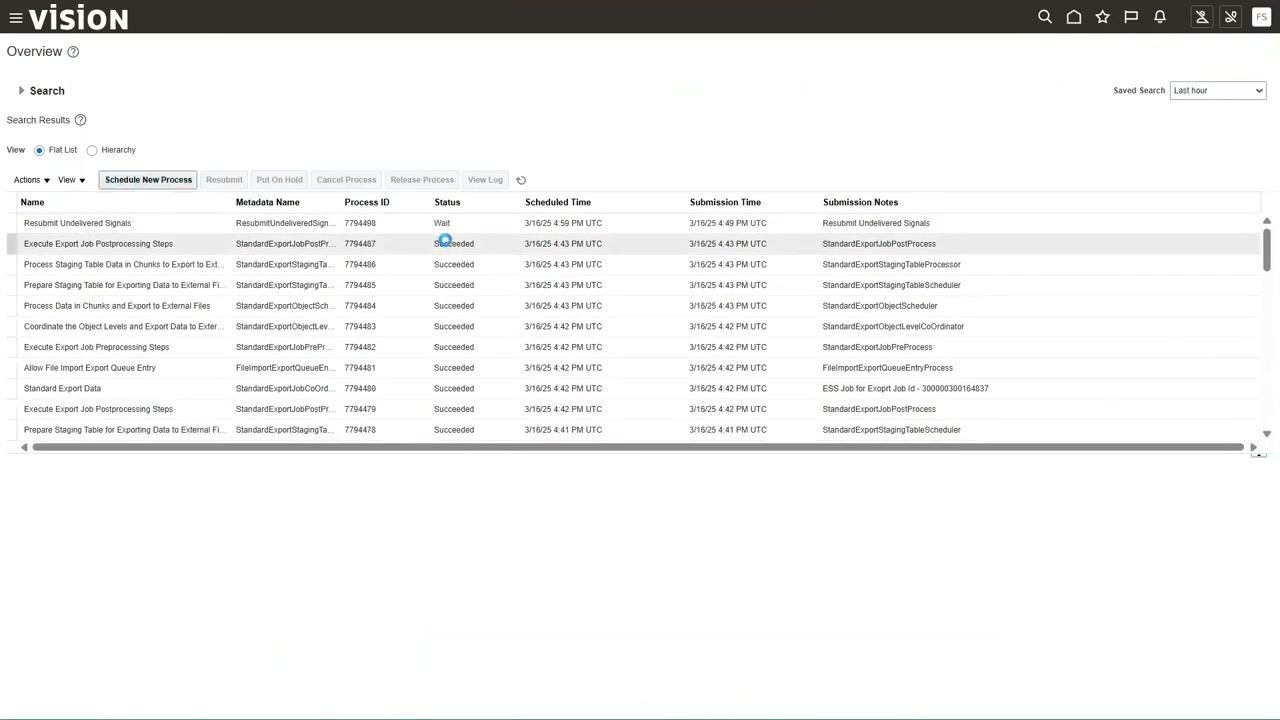
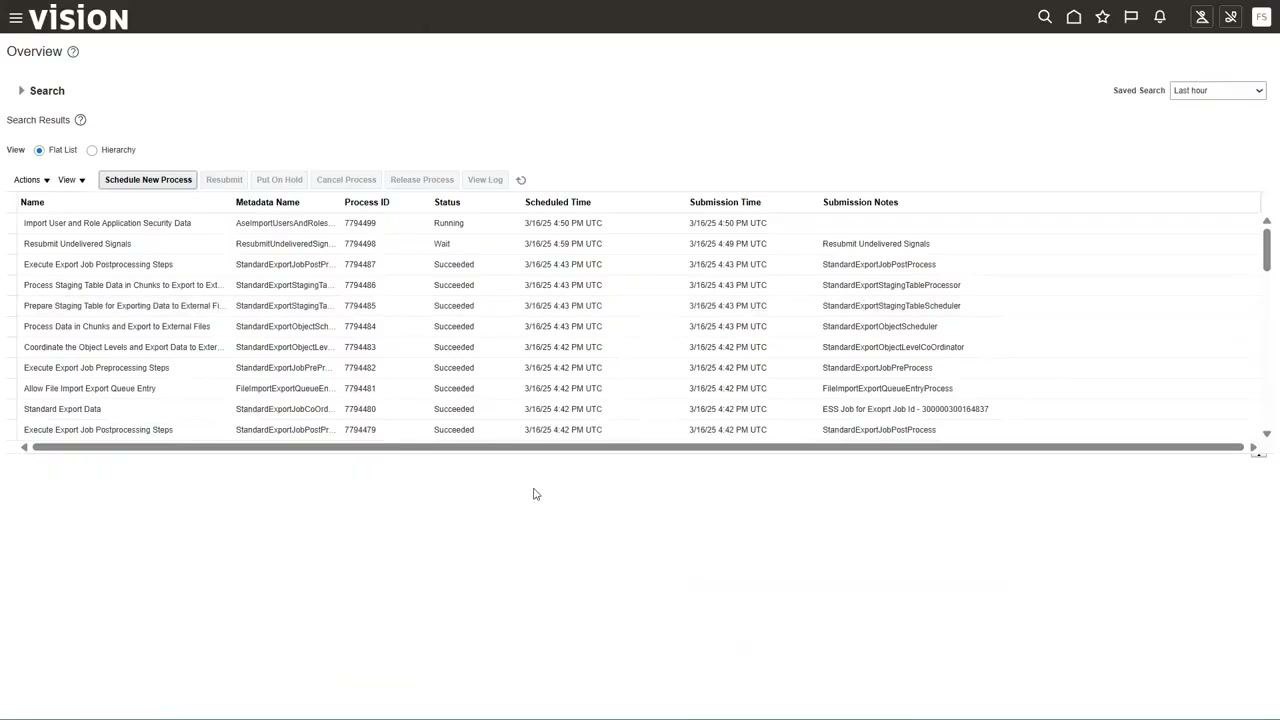
Go to the Overview screen for scheduled processes. The screen lists processes with these columns: Name, Metadata Name, Process ID, Status, Scheduled Time, Submission Time, and Submission Notes.
Example processes include:
- "Execute Export Job Postprocessing Steps" (Status: Succeeded)
- "Process Staging Table Data in Chunks to Export to External Files" (Status: Succeeded)
- "Resubmit Undelivered Signals" (Status: Wait)
This is the process monitoring area, so you don't need to take any action yet.
Step 11: Schedule the import process
- Click Schedule New Process.
- In the Search and Select: Name dialog, search for and select Import User and Role Application Security Data. Its description is "Import user and role data."
- Click OK to proceed.
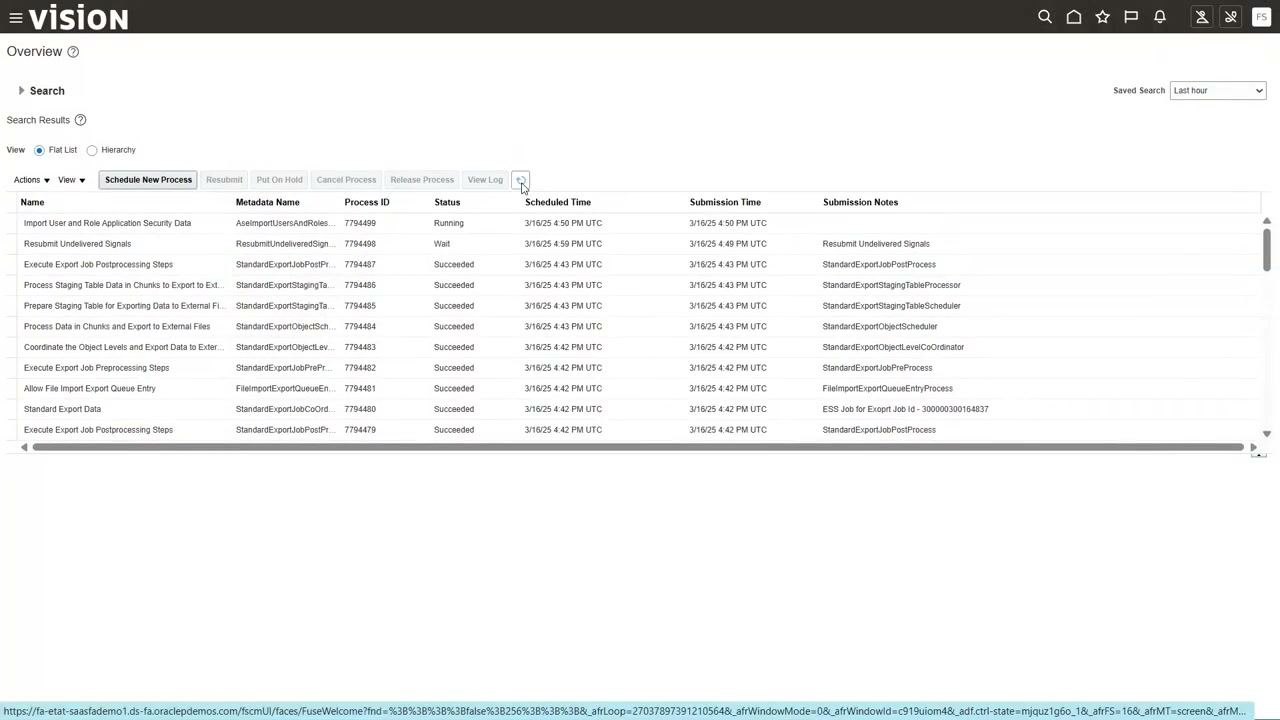
Step 12: Monitor the import process
- Return to the Overview screen.
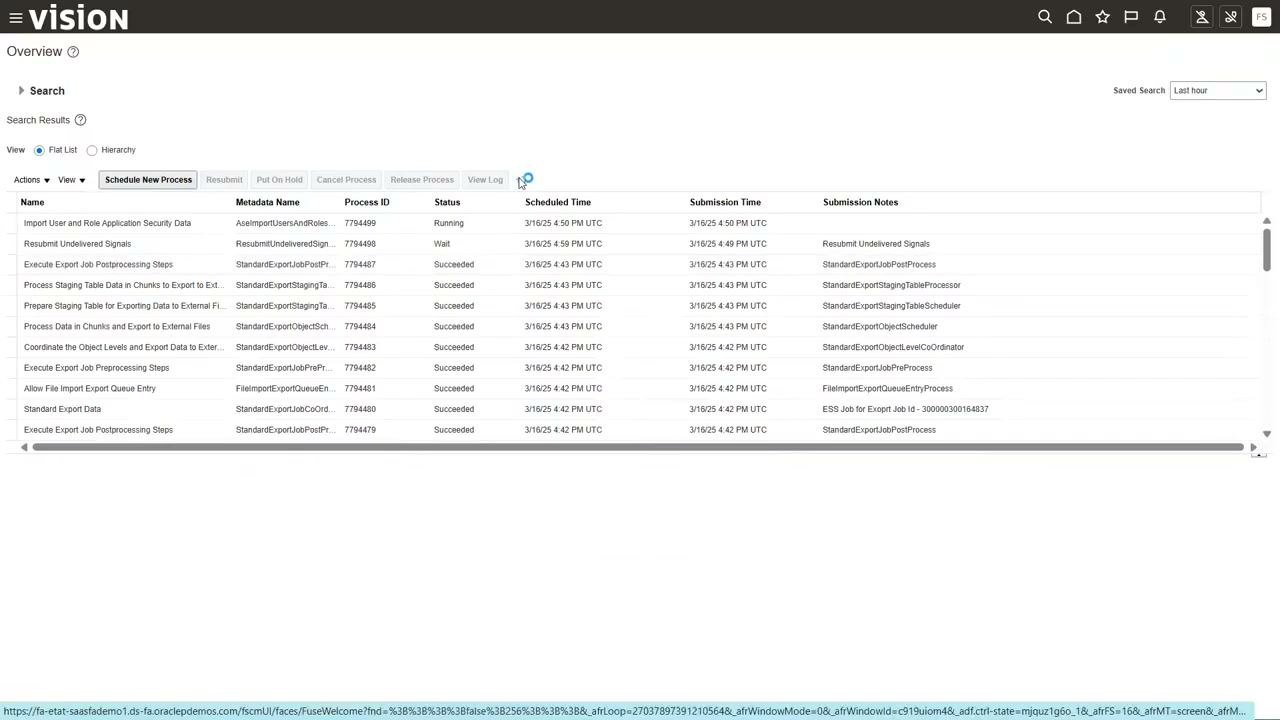
- Find Import User and Role Application Security Data in the list. Its Status is Running at first. Other processes may show as Succeeded or Wait.
- Click View Log if you want to monitor progress.
The import process may take some time to complete, so don't expect immediate results.
Step 13: Verify user access in Oracle Fusion Cloud Applications
Switch to the browser window where you are signed in as erp.user, and check the dashboard:
- The greeting reads "Good evening, erp user".
- The available apps are Set Preferences, Approvals, and Reports and Analytics.
- There are no open notifications or assigned tasks.
This confirms that the user can now access modules based on the assigned role.
After you assign roles, always run Import User and Role Application Security Data to synchronize permissions. Allow time for the process to complete before you expect new roles to be reflected in user access.
Explore the other Security Console areas
Step 14: Review role statistics in Analytics
Open the Analytics section in the Security Console to review statistics about roles and their categories. Use this screen to:
- View the number of roles in each category.
- Visualize the hierarchy and distribution of roles using graphical representations, such as pie charts.
- Review data security policies, roles, and users associated with each data resource.
This section is primarily for system administrators and doesn't provide backend table details.
Step 15: Manage encryption keys in Certificates
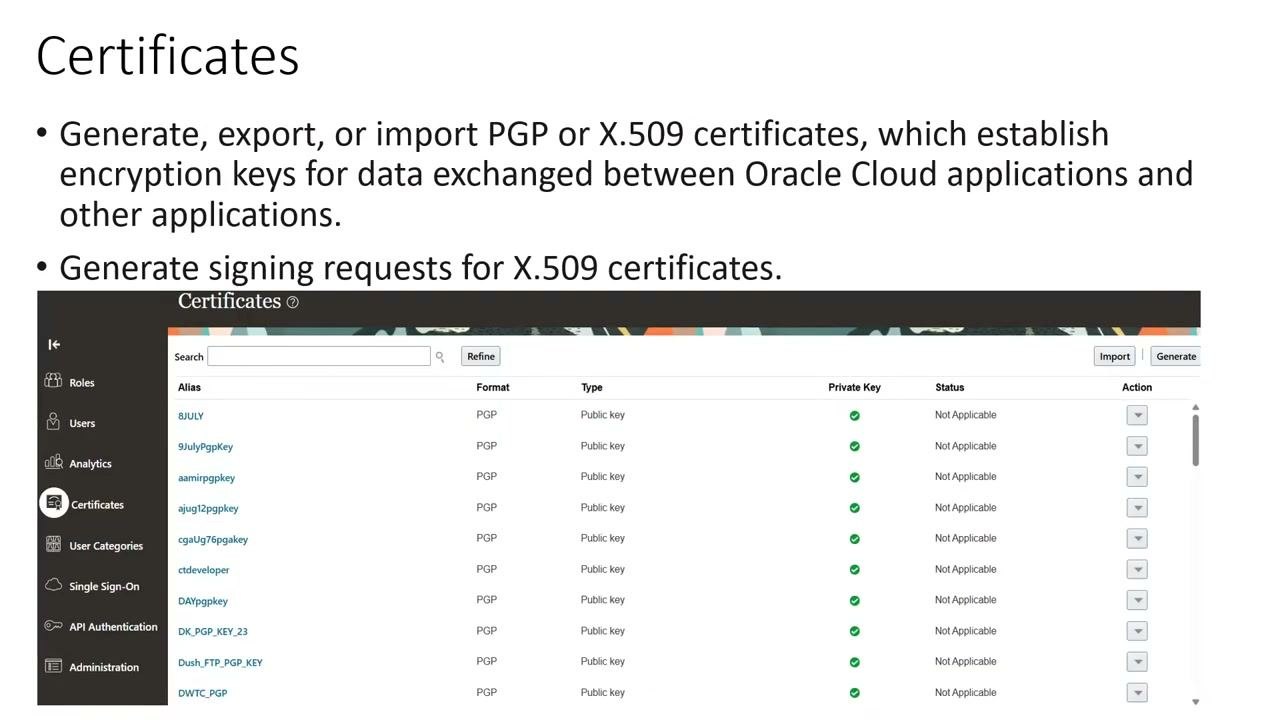
Use the Certificates section to manage encryption keys for integrating Oracle Fusion ERP with third-party systems. You can:
- Generate, export, or import PGP or X.509 certificates.
- Establish encryption keys for secure data exchange between Oracle Cloud applications and external applications.
- Generate signing requests for X.509 certificates.
- Upload the required security keys for integration scenarios.
No backend table details are provided for certificates.
Step 16: Use User Categories
Use User Categories to assign specific categories or naming conventions to users during account creation.
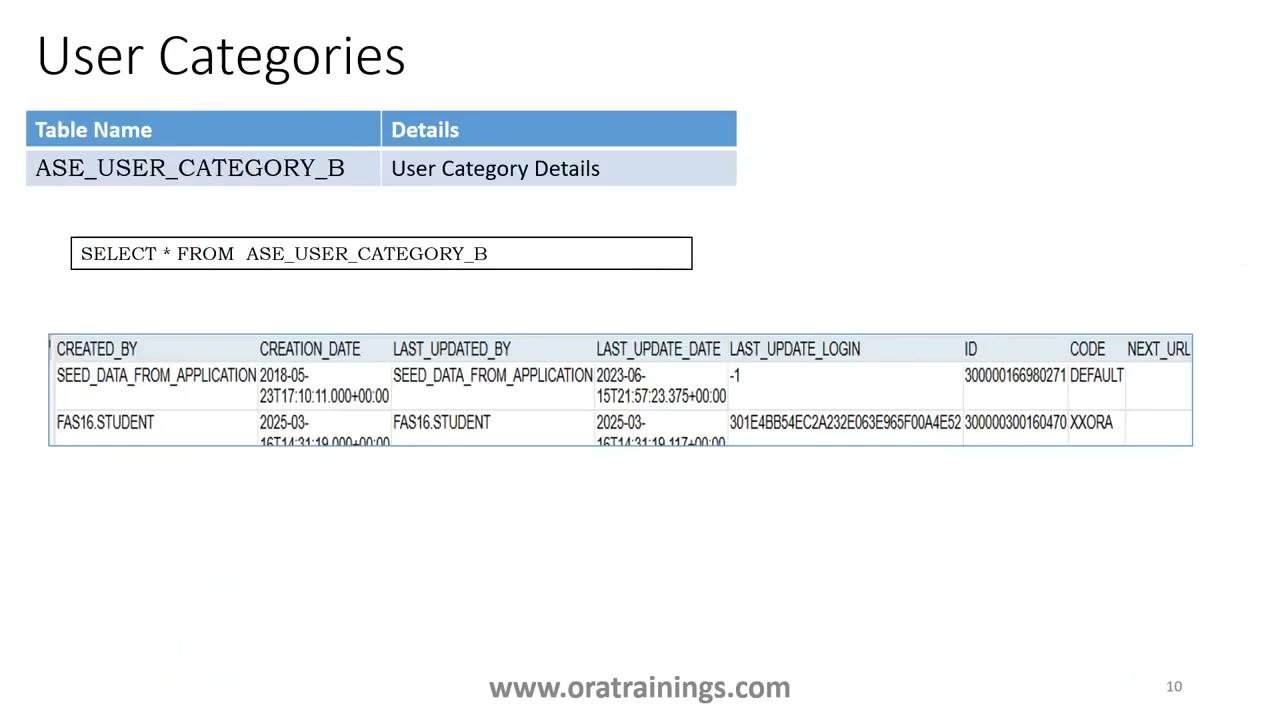
Step 17: Retrieve user category details
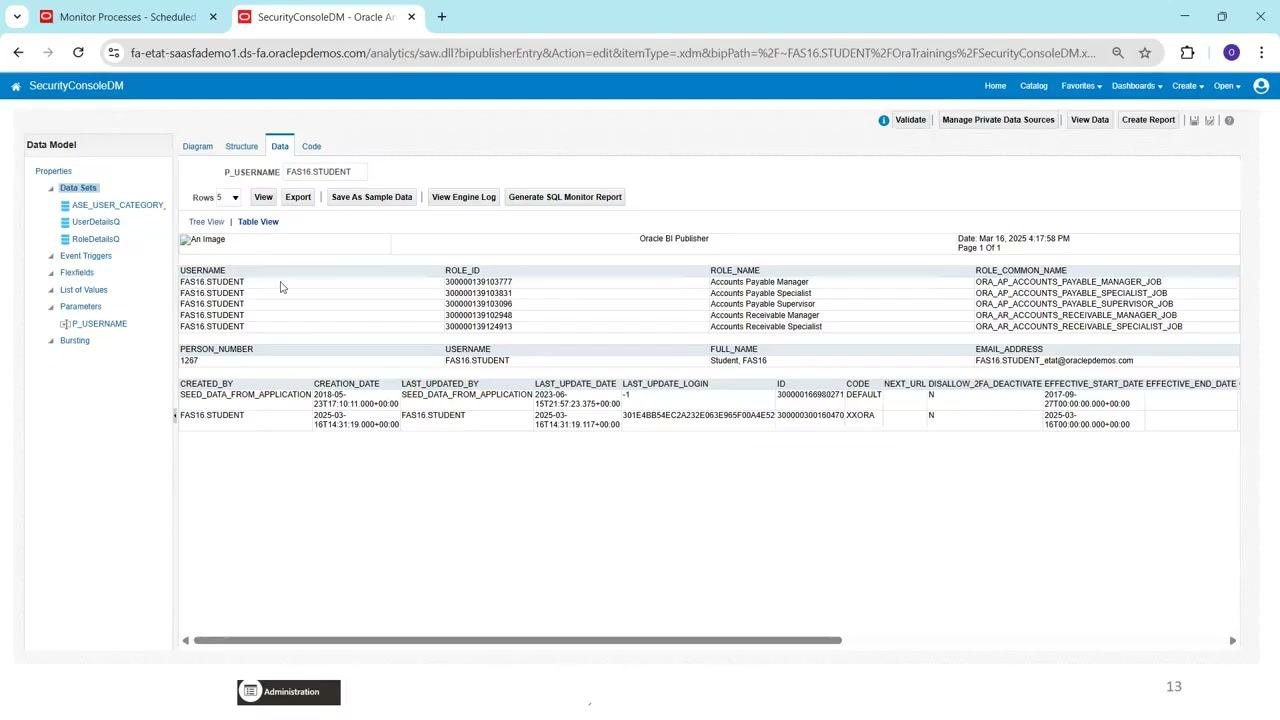
The data for user categories is stored in the ASE_USER_CATEGORY_B table. Retrieve the details with this SQL query:
SELECT * FROM ASE_USER_CATEGORY_B
The example output has these columns: CREATED_BY, CREATION_DATE, LAST_UPDATED_BY, LAST_UPDATE_DATE, LAST_UPDATE_LOGIN, ID, CODE, NEXT_URL. Example values are CREATED_BY: FAS16.STUDENT and CODE: DEFAULT, XXORA.
Step 18: Configure Single Sign-On
- Select Single Sign-On from the left sidebar menu.
- In the Single Sign-On Configuration panel, locate the Sign Out URL, Enable Chooser Login Page, and Single Sign-On Enabled fields.
- Under Service Provider Details, note the Federation Metadata value:
https://login-etat-saassfademo1.ds-fa.oracledemos.com:443/oamfed/sp/metadata?signid=osts_signing_sha256&encid=osts_encryption_sha256&sigalgm=SHA-256 - Download the Signing Certificate and Encryption Certificate from the links provided.
- To make changes, click Edit in the upper right of the configuration panel.
- To add a new identity provider, click + Create Identity Provider.
If the table shows "No data to display.", no identity providers are currently listed.
Step 19: Configure API Authentication
- Select API Authentication from the left sidebar.
- Review the list of existing API authentication providers. Each entry shows the provider URL (for example,
https://identity.oraclecloud.com), the provider type (for example, Oracle API Authentication Provider), and the certificate common name (CN). - To add a new provider, click Create External Client Application or Create Oracle API Authentication Provider at the top.
- To view logs or certificates, click View Diagnostic Logs or Oracle Public Certificate.
- Use the Sort By dropdown to organize providers by type or name.
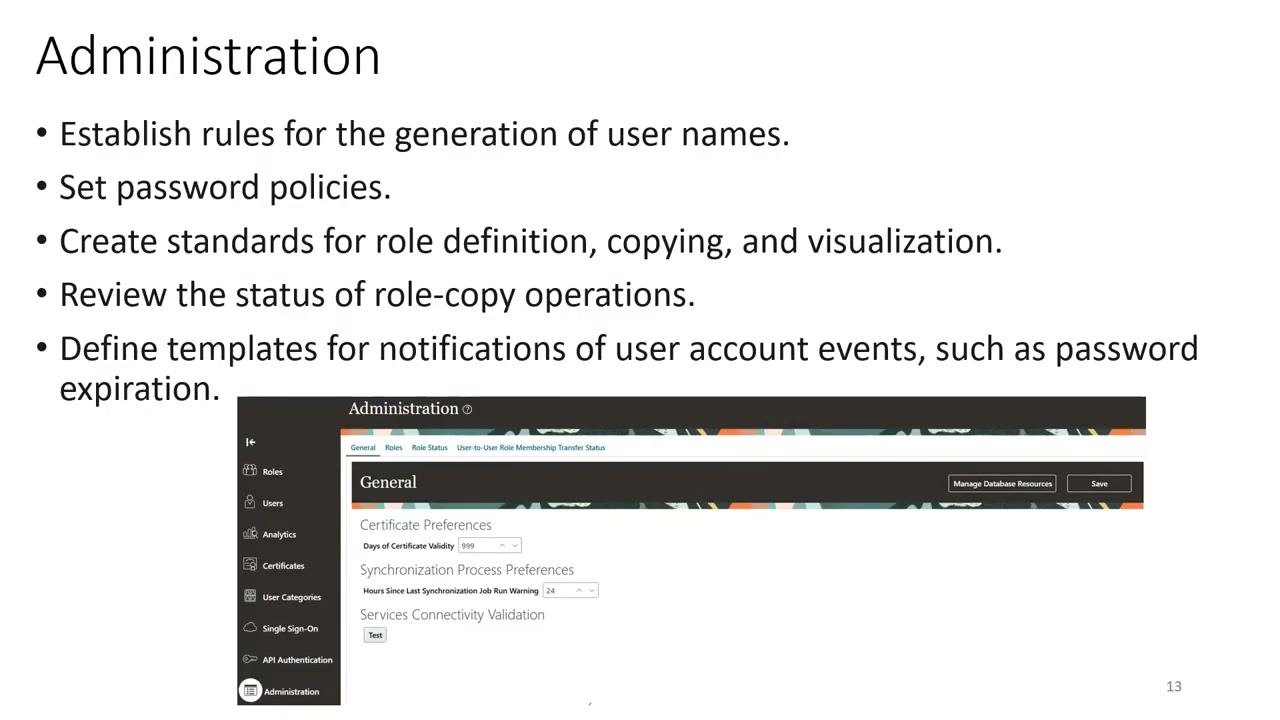
Step 20: Use Administration for user and role management
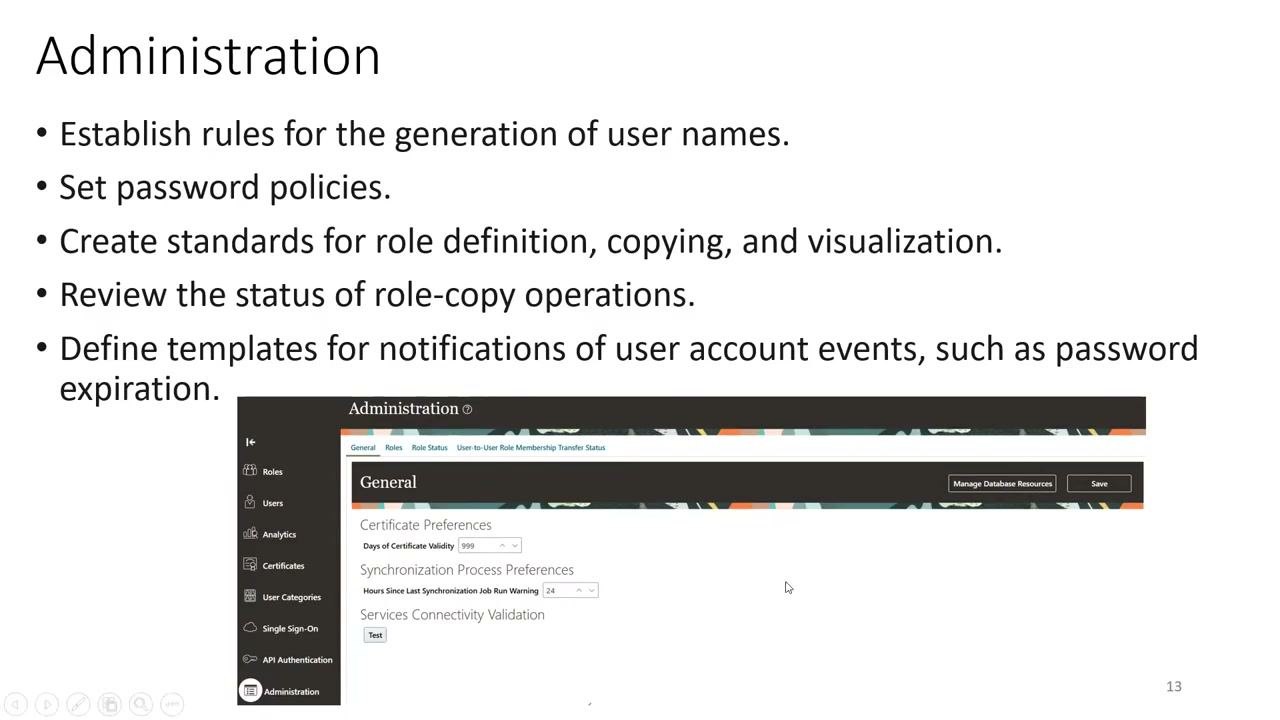
Go to Administration from the sidebar. You can perform these administrative tasks:
- Establish rules for the generation of user names.
- Set password policies.
- Create standards for role definition, copying, and visualization.
- Review the status of role-copy operations.
- Define templates for notifications of user account events, such as password expiration.
In the General tab, configure the following:
- Certificate Preferences: Set "Days of Certificate Validity", for example 999.
- Synchronization Process Preferences: Set "Hours Since Last Synchronization Job Run Warning", for example 24.
- Services Connectivity Validation: Use the Test button to validate.
Click Save to apply your changes.
Query user and role data
Step 21: Understand role assignment tables
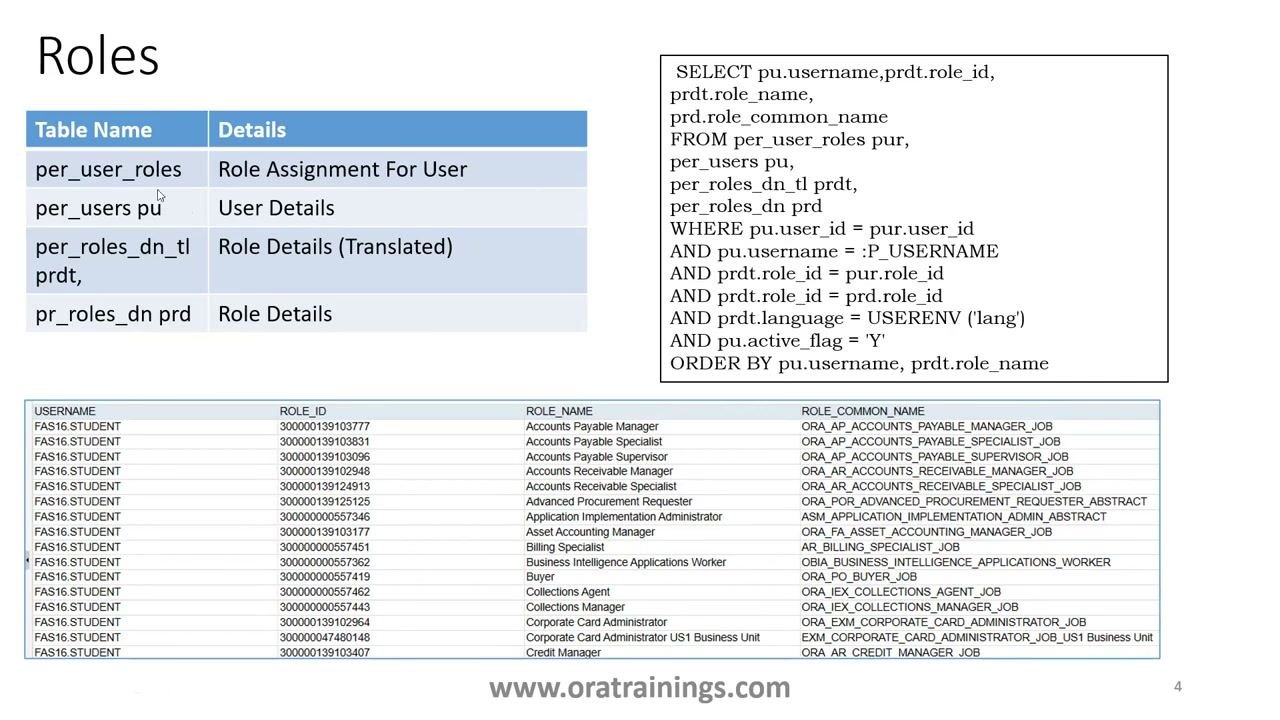
Four primary tables determine whether a role is assigned to a user:
per_user_roles: Stores role assignments for users.per_users(aliaspu): Contains user details.per_roles_dn_tl(aliasprdt): Holds translated role details.pr_roles_dn(aliasprd): Contains role details.
The tables relate to each other as follows:
- The
pu.user_idfield is joined withpur.user_idto link user details with their role assignments. - The
pur.role_idfield is joined withprdt.role_idandprd.role_idto retrieve role names and details. - When a role is assigned to a user, the assignment is recorded in
per_user_roleswith bothuser_idandrole_id.
Step 22: Retrieve user roles and details
Use the following SQL query to retrieve user roles and details:
SELECT pu.username, prdt.role_id, prdt.role_name, prd.role_common_name
FROM per_user_roles pur,
     per_users pu,
     per_roles_dn_tl prdt,
     pr_roles_dn prd
WHERE pu.user_id = pur.user_id
  AND pu.username = :P_USERNAME
  AND prdt.role_id = pur.role_id
  AND prdt.role_id = prd.role_id
  AND prdt.language = USERENV('lang')
  AND pu.active_flag = 'Y'
ORDER BY pu.username, prdt.role_name
The query returns the username, role ID, role name, and role common name for each assigned role.
Step 23: Verify role assignments in the output
Review the sample output to verify role assignments. The example output columns are USERNAME, ROLE_ID, ROLE_NAME, and ROLE_COMMON_NAME. Each row shows a user and their assigned roles.
Step 24: Understand application users and HCM persons
A "user" in Fusion ERP is an application login account, not necessarily an HCM (Human Capital Management) person. When you create a user, you can optionally link that user to an HCM person by associating the user account with a person ID.
The mapping works like this:
- Application user: Username from
PER_USERS. - HCM person: Person number, full name, and email from HCM tables.
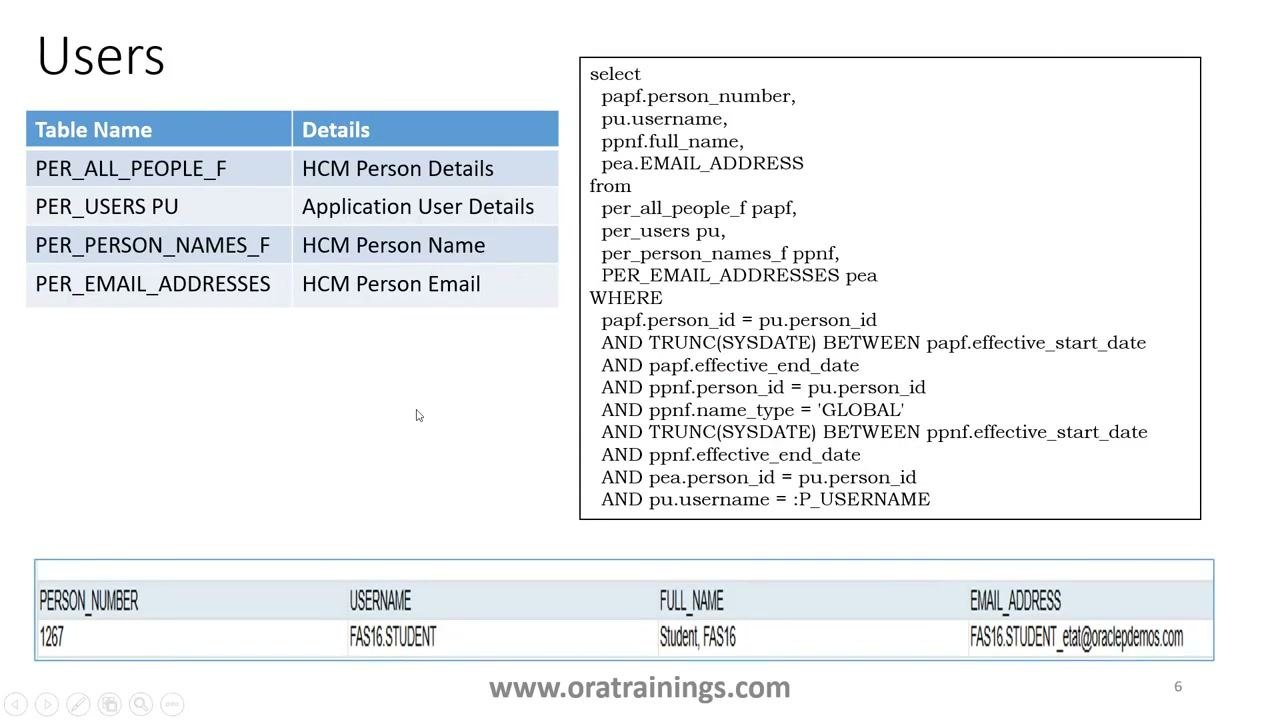
Step 25: Identify the user and HCM person tables
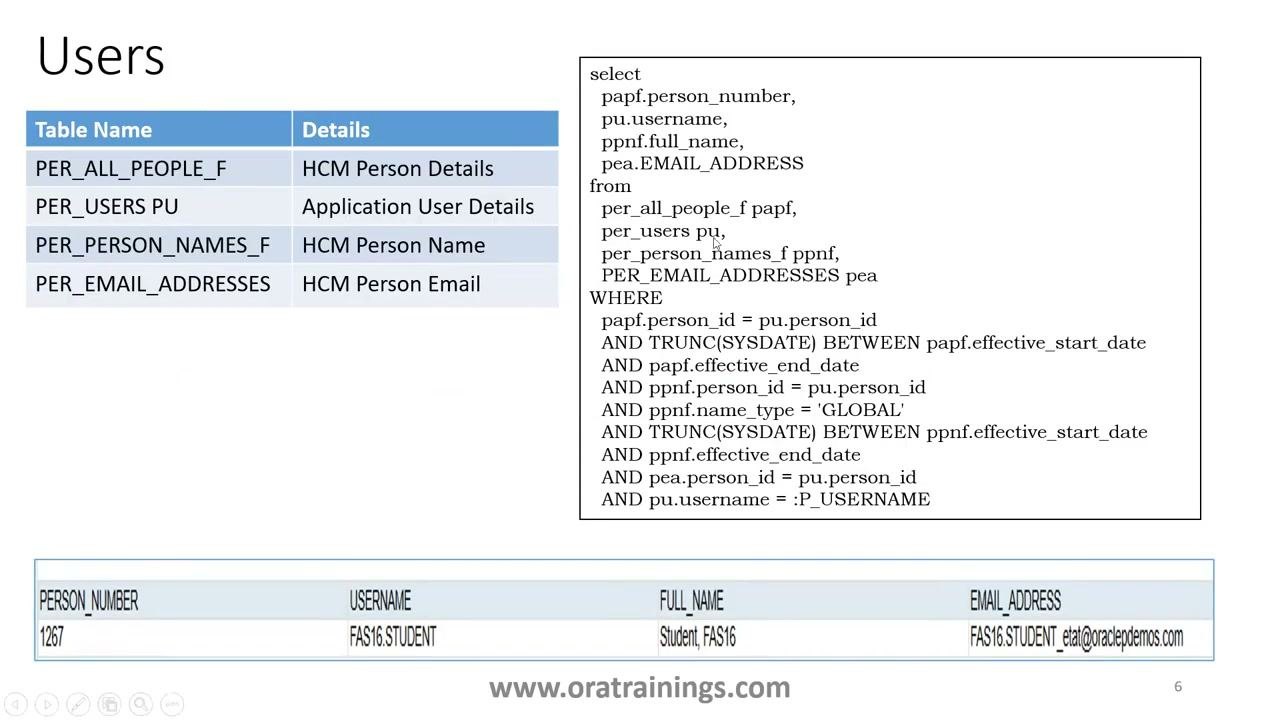
The main tables for user and HCM person data are:
PER_ALL_PEOPLE_F: HCM person details.PER_USERS(aliasPU): Application user details.PER_PERSON_NAMES_F: HCM person names.PER_EMAIL_ADDRESSES: HCM person email addresses.
To obtain the username and email address for an application user, join the tables using the person_id field:
- Join
PER_USERSwithPER_ALL_PEOPLE_Fonperson_id. - Join
PER_PERSON_NAMES_FandPER_EMAIL_ADDRESSESusingperson_id.
This lets you retrieve the application username, HCM person number, full name, and email address for a given user.
Step 26: Retrieve user and HCM person details
Use the following SQL query to retrieve these details:
SELECT papf.person_number,
       pu.username,
       ppnf.full_name,
       pea.EMAIL_ADDRESS
FROM   per_all_people_f papf,
       per_users pu,
       per_person_names_f ppnf,
       PER_EMAIL_ADDRESSES pea
WHERE  papf.person_id = pu.person_id
  AND TRUNC(SYSDATE) BETWEEN papf.effective_start_date AND papf.effective_end_date
  AND ppnf.person_id = pu.person_id
  AND ppnf.name_type = 'GLOBAL'
  AND TRUNC(SYSDATE) BETWEEN ppnf.effective_start_date AND ppnf.effective_end_date
  AND pea.person_id = pu.person_id
  AND pu.username = :P_USERNAME
The query returns these columns: PERSON_NUMBER, USERNAME, FULL_NAME, EMAIL_ADDRESS. With these queries, you can retrieve both user and role data in Oracle Fusion ERP and check user access and identity information.
Troubleshoot user access
Step 27: Verify user access to Reports and Analytics
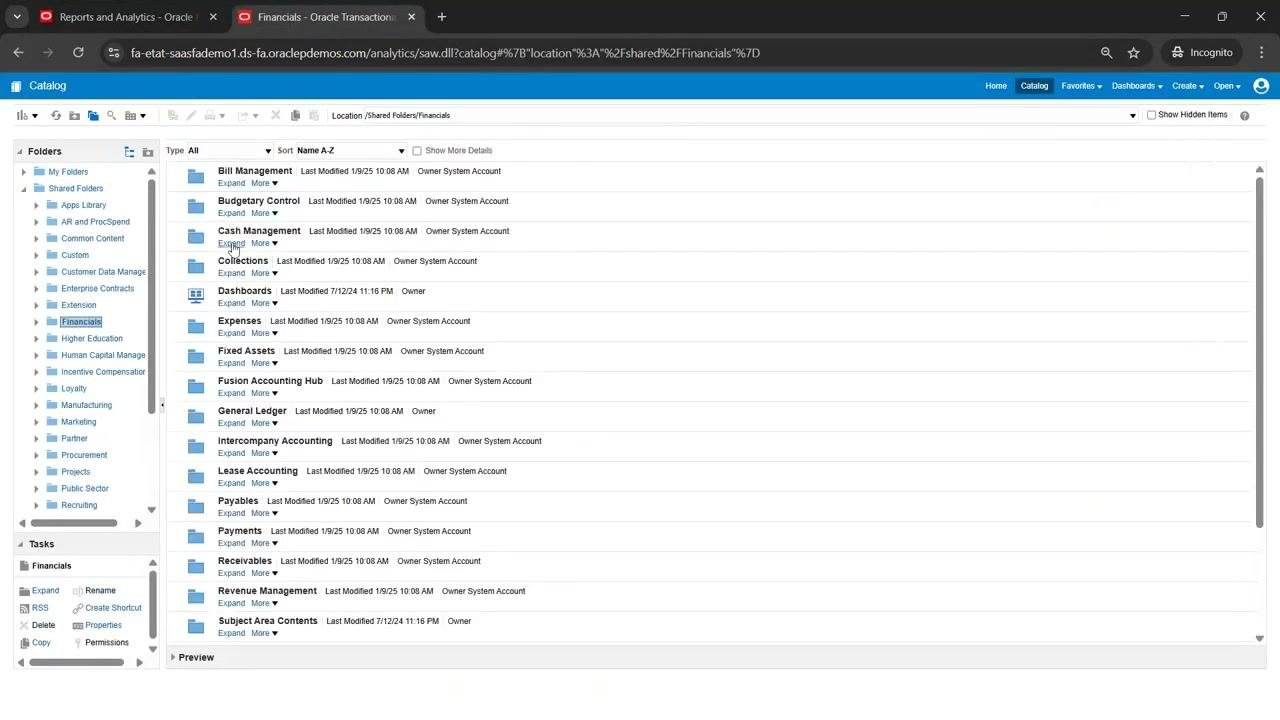
- Open the Oracle Fusion Cloud application and go to the Reports and Analytics section.
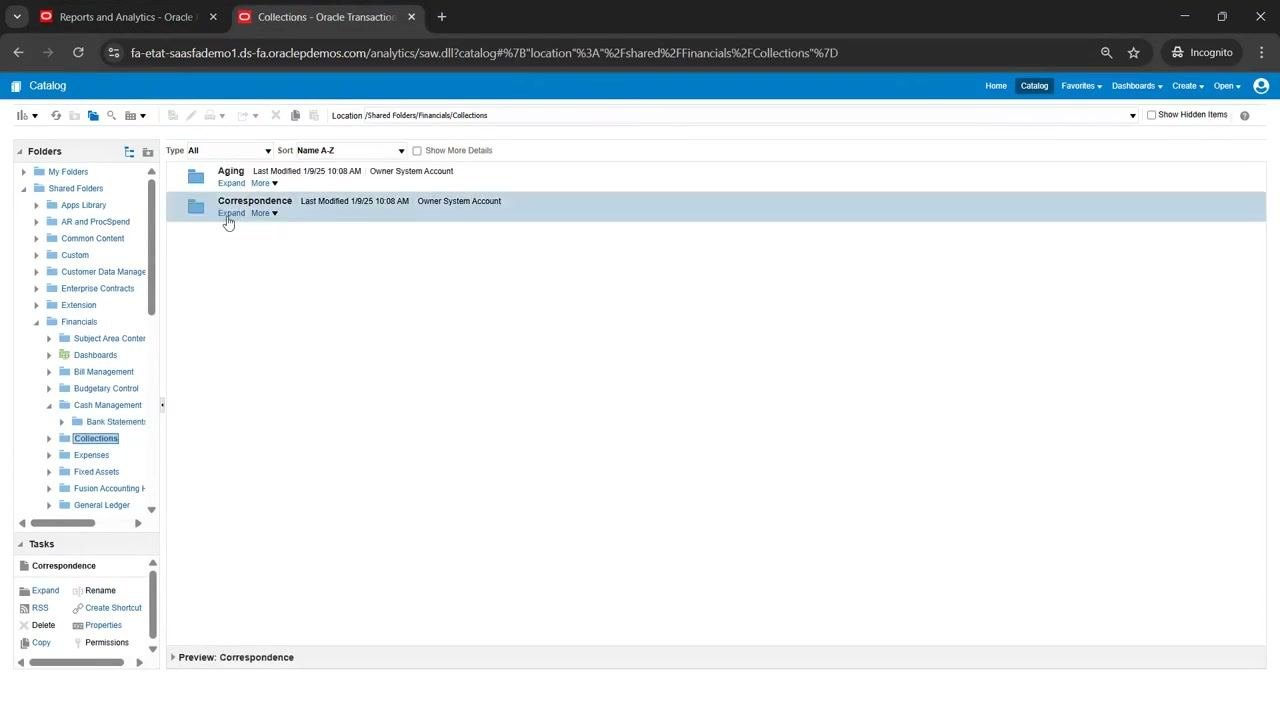
- Expand the Financials folder in the left navigation pane.
- Review the available subfolders: Bill Management, Budgetary Control, Cash Management, Collections, Dashboards, Expenses, Fixed Assets, Fusion Accounting Hub, General Ledger, Intercompany Accounting, Lease Accounting, Payables, Payments, Receivables, Revenue Management, and Subject Area Contents.
If you don't see the expected reports or folders, you may not have the proper functionality or permissions for execution.
Step 28: Check for missing reports
- Select the Collections folder under Financials.
- Observe the contents. If you see only subfolders such as "Aging" and "Correspondence" and no reports, access or permissions are missing.
Step 29: Validate Workflow Reports access
- In the folder structure, go to Workflow Reports > Payables.
- Check for subfolders such as "Invoices" and "Payments".
If these folders contain no reports or only minimal content, the user likely lacks the proper functionality.
Step 30: Sign out and sign in to refresh permissions
If you recently updated user roles or permissions, sign out of the Oracle Fusion Cloud application:
- Click your user icon (for example, "EU" in the top right corner).
- Select Sign Out from the Settings and Actions menu.
- Wait for the sign-in screen to appear.
Then sign in again to Oracle Applications Cloud:
- On the sign-in page, enter your User ID (for example, erp.user) and password.
- Select your preferred language, for example English.
- Click Sign In to log back into the system.
Step 31: Verify updated access
After you sign in, confirm that your dashboard displays the correct set of applications and tools:
- Look for modules such as Set Preferences, Approvals, Reports and Analytics, Scheduled Processes, Security Console, and Sales and Service Access Management.
- Make sure the Tools tab is selected and that all expected applications are visible.
Step 32: Use APIs for roles and users management
Use the available APIs to automate and streamline the management of roles and users within Oracle Fusion Cloud. You can use APIs to:
- Create, update, or delete user accounts programmatically.
- Assign or revoke roles for users in bulk.
- Retrieve current user and role configurations for auditing or reporting purposes.
- Integrate user and role management with external systems or identity providers.
Make sure API access is secured and follows your organization's governance and compliance requirements. Refer to the Oracle Fusion Cloud documentation for detailed API endpoints and usage examples.
Summary and what's next
You now know how to add the Security Console in Oracle Fusion to your workflow. You sign in with the IT Security Manager role and open Security Console from the Tools menu. From there you can create users, assign roles, and run Import User and Role Application Security Data to synchronize permissions. You can also review Analytics, Certificates, User Categories, Single Sign-On, API Authentication, and Administration, and query user and role data.
As next steps, you can automate user and role management with the Oracle APIs. Always validate your changes and make sure they comply with your organization's security standards. For further automation or integration needs, consult the official Oracle API documentation.
Generation details: cost, quality tiers
Docsie billed 6,000 credits ($4.20) to analyze this 12-minute video at standard quality. The rewrite, template fill and Word/PDF exports were included. The same video at each quality tier:
| Quality | Frames sampled | Credits | Approx. cost |
|---|---|---|---|
| Draft | every 16-30 s | 3,000 | $2.10 |
| Standard (this guide) | every 8-15 s | 6,000 | $4.20 |
| Detailed | every 4-7 s | 12,000 | $8.40 |
| Ultra | every 1-3 s | 24,000 | $16.80 |
Credits priced at $0.70 per 1,000; plans include a monthly allowance. Enterprise customers on on-premise or bring-your-own-model deployments run this on their own inference and pay no per-video credits.
Generated by Docsie Video-to-Docs on 2026-11-15 from a 11-minute video. Screenshots are frames from the source video and belong to their creator, Ora Trainings, whose original is embedded above. If you own this video and want the guide removed or credited differently, contact us and we will act within one business day.