
How to Enable Audit Trail in Oracle EBS
This guide shows you how to enable audit trail in Oracle EBS (Oracle E-Business Suite) and verify that it works. You activate the AuditTrail profile, choose the table and columns to audit, set up an audit group, run the AuditTrail Update Tables report, and validate the group. You then change a receipt's customer and read the change history in the shadow table.
Video: Oracle eBS R12 - enable Audit Trail in 6 steps by Adrian Argatu (2014). All credit for the demonstration goes to the creator; watch the original on YouTube. The written guide below was generated from this video by Docsie. Creator? Request a change or removal.
This guide shows you how to enable audit trail in Oracle EBS (Oracle E-Business Suite) and verify that it works. You activate the AuditTrail profile, choose the table and columns to audit, set up an audit group, run the AuditTrail Update Tables report, and validate the group. You then change a receipt's customer and read the change history in the shadow table.
The example audits the PAY_FROM_CUSTOMER column of the AR_CASH_RECEIPTS_ALL table in the Receivables application.
Prerequisites
Before you start, make sure you have the following:
- Access to the System Administrator responsibility in Oracle Applications.
- Access to Oracle SQL Developer, to review the setup script and run verification queries.
- A table to audit that has a primary key. This guide uses
ar_cash_receipts_allwith the columnpay_from_customer. - Access to a Receivables responsibility that lets you open the Receipts form, if you want to test the audit trail with a real change.
Part 1: Set up audit trail
Step 1: Review the steps to enable audit trail
In Oracle SQL Developer, open the file 00_steps_enable_audit_trail.sql. The script lists the six key steps for enabling audit trail:
- Activate AuditTrail profile: Set to Yes (site level).
- Setup Table and columns to audit: Ensure the table has a primary key.
- Setup audit group.
- Verify that the application (module) is Audit enabled.
- Run AuditTrail Update Tables report to enforce the setup.
- Run AuditTrail Report for Audit Group Validation to check if all objects are valid.
At the bottom of the script, note the test configuration:
- Table:
ar_cash_receipts_all - Column:
pay_from_customer
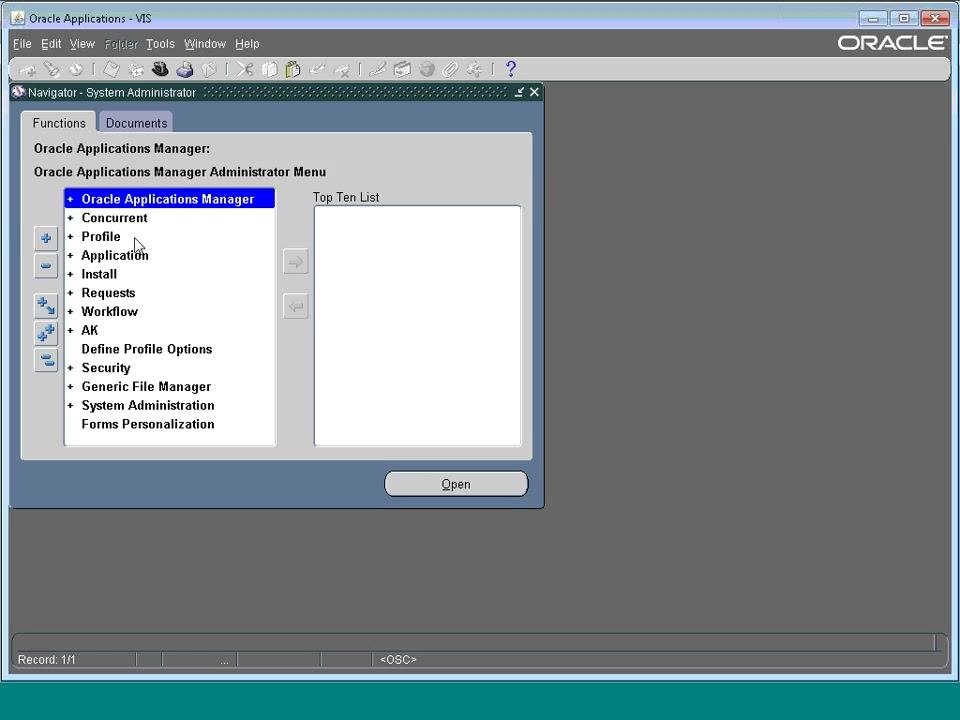
Step 2: Open Oracle Applications Manager
- Launch the Oracle Applications interface.
- Select the System Administrator responsibility.
- In the Navigator window, select Oracle Applications Manager from the menu.
- Click Open.
Step 3: Enable audit trail by setting the AuditTrail profile option
- In the Oracle Applications window, open the Profile System Values form.
- In the Find System Profile Values dialog, make sure the Site checkbox is selected under Display.
- Enter
AuditTrail%in the Profile field. - Click Find.
- In the results, set the value for AuditTrail:Activate at the Site level to Yes.
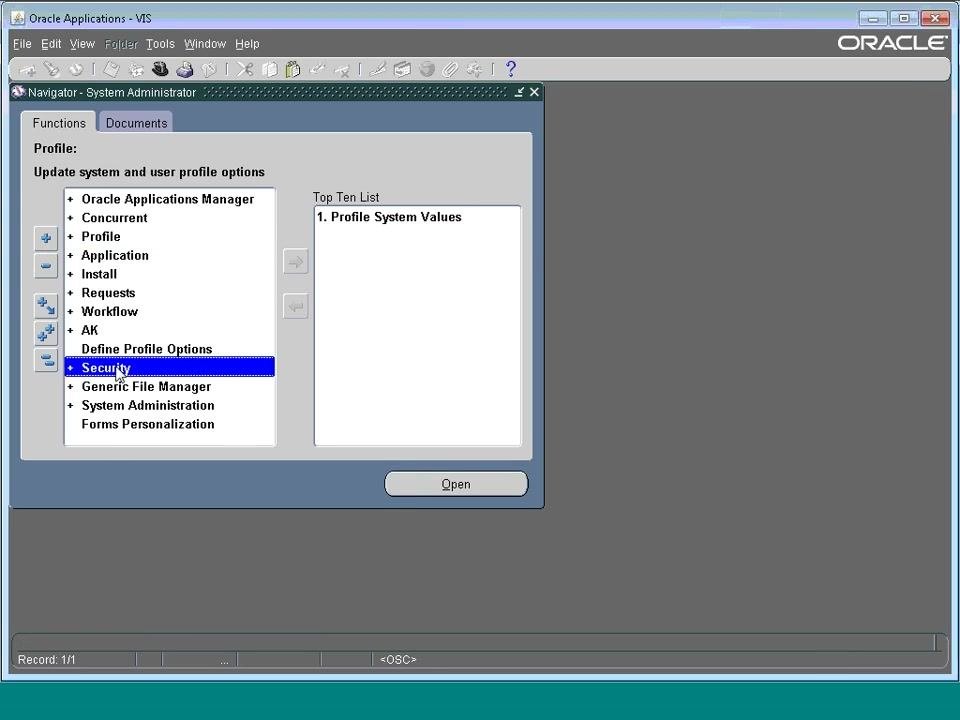
Step 4: Open the Audit Tables setup
- Return to the Navigator window.
- Select Security > AuditTrail > Tables.
- Click Open to access the Audit Tables setup.
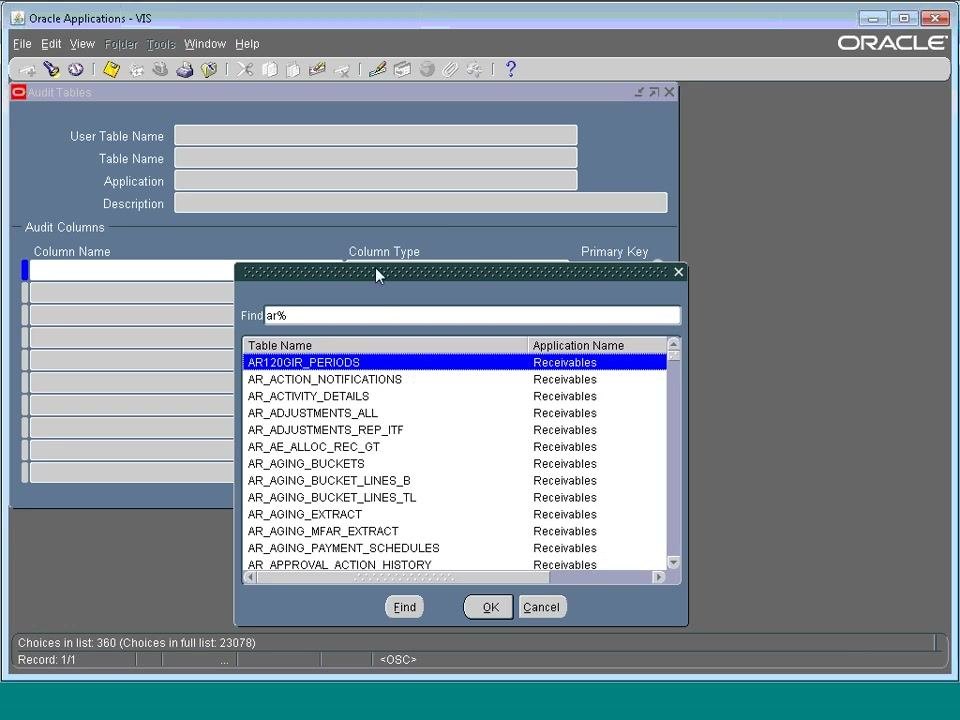
Step 5: Select the table to audit
- In the Audit Tables form, click the search icon or field next to Table Name.
- In the Find dialog, enter
ar%to filter the tables. The list shows tables under the Receivables application. - Refine the search by entering
ar%cash_rece%to locate theAR_CASH_RECEIPTS_ALLtable.
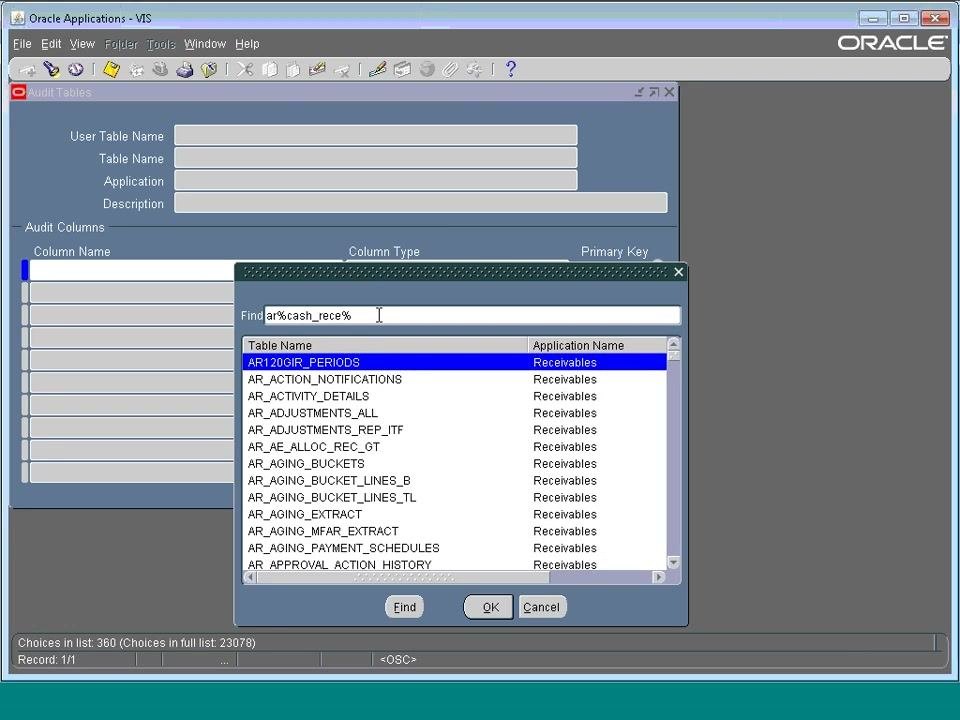
Select AR_CASH_RECEIPTS_ALL from the list and confirm. The Audit Tables form populates with these values:
- User Table Name:
AR_CASH_RECEIPTS_ALL - Table Name:
AR_CASH_RECEIPTS_ALL - Application:
Receivables - Description:
Detailed receipt information
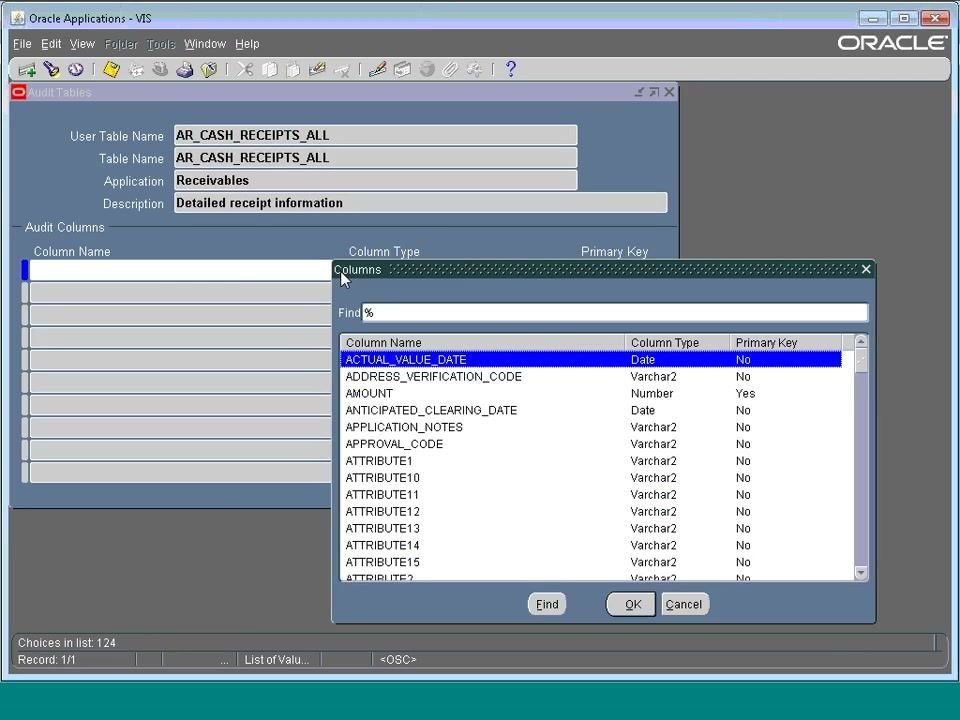
Next, in the Audit Columns section, click to select columns for auditing. In the Columns dialog, search for columns (for example, enter % to list all). The dialog shows the available columns, their types, and their primary key status.
Step 6: Configure the audit columns
In the Audit Tables form, verify that the correct table is selected:
- User Table Name:
AR_CASH_RECEIPTS_ALL - Table Name:
AR_CASH_RECEIPTS_ALL - Application:
Receivables - Description:
Detailed receipt information
In the Audit Columns section, confirm that the column PAY_FROM_CUSTOMER is listed with these values:
- Column Name:
PAY_FROM_CUSTOMER - Column Type:
Number - Primary Key: Checked (✓)
The status message at the bottom reads FRM-40400: Transaction complete: 1 records applied and saved. This message indicates the audit column selection has been saved.
Step 7: Add more columns to audit (optional)
- In the Audit Columns section, click the search field.
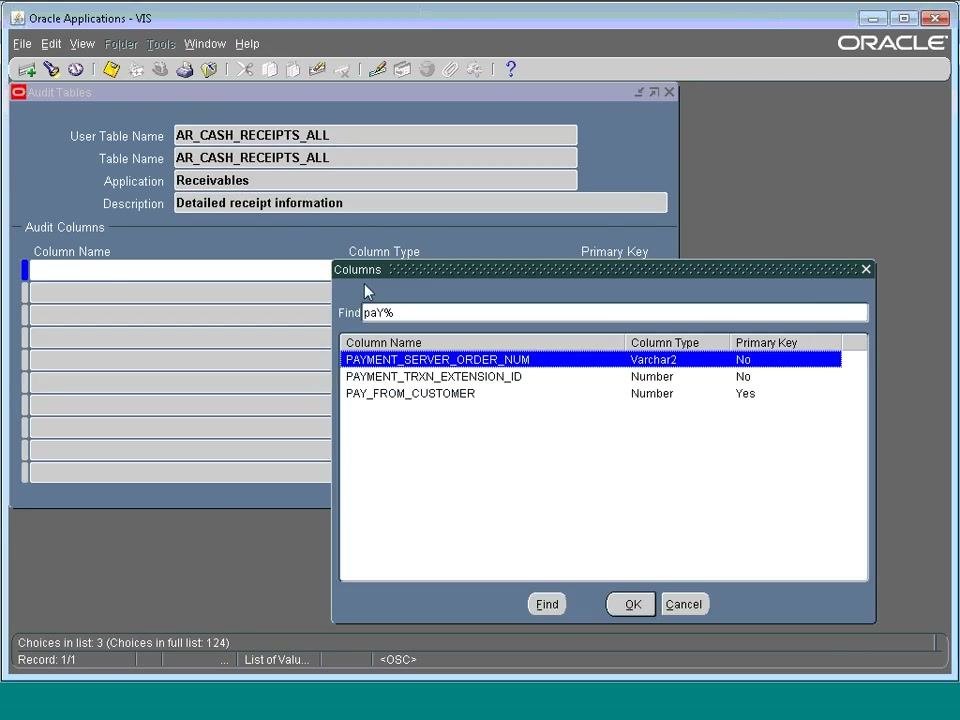
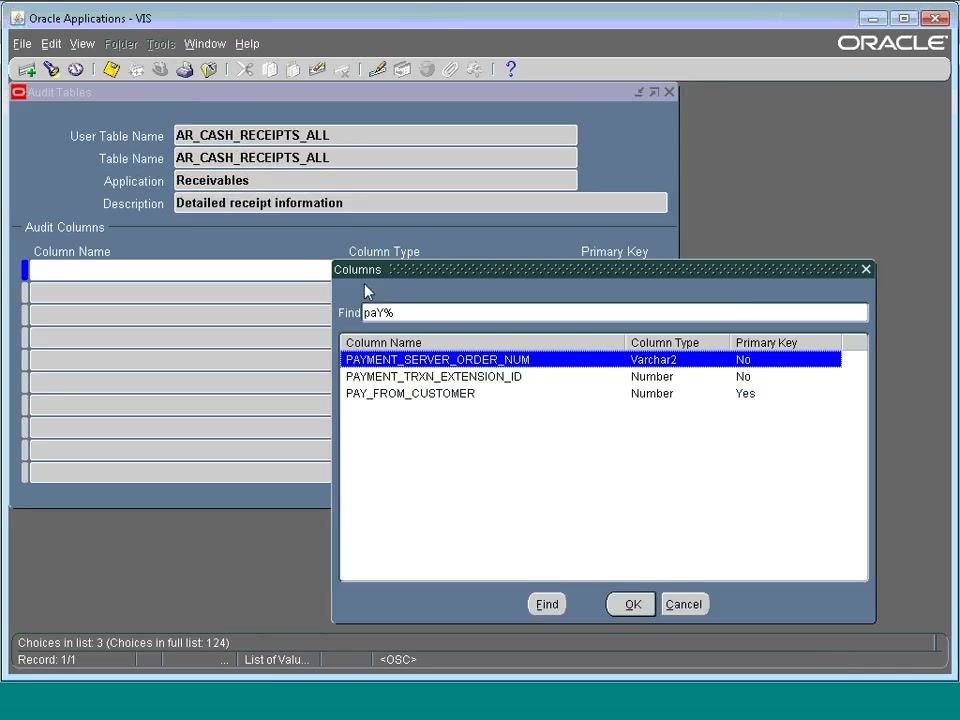
- In the Columns dialog, use the Find field to filter columns. For example, enter
paY%. - Review the filtered list:
PAYMENT_SERVER_ORDER_NUM(Varchar2, not a primary key)PAYMENT_TRXN_EXTENSION_ID(Number, not a primary key)PAY_FROM_CUSTOMER(Number, primary key)
- Select the columns you want and click OK to add them to the audit list.
Step 8: Create or assign an audit group
Open the Audit Groups form and enter the following details:
- Application Name:
Receivables - Audit Group:
Demo AR_CASH_RECEIPTS_ALL - Group State:
Enable Requested - Description: Leave blank or enter a relevant description.
The Audit Tables section lists the tables associated with this group once configured.
Step 9: Open AuditTrail Installations
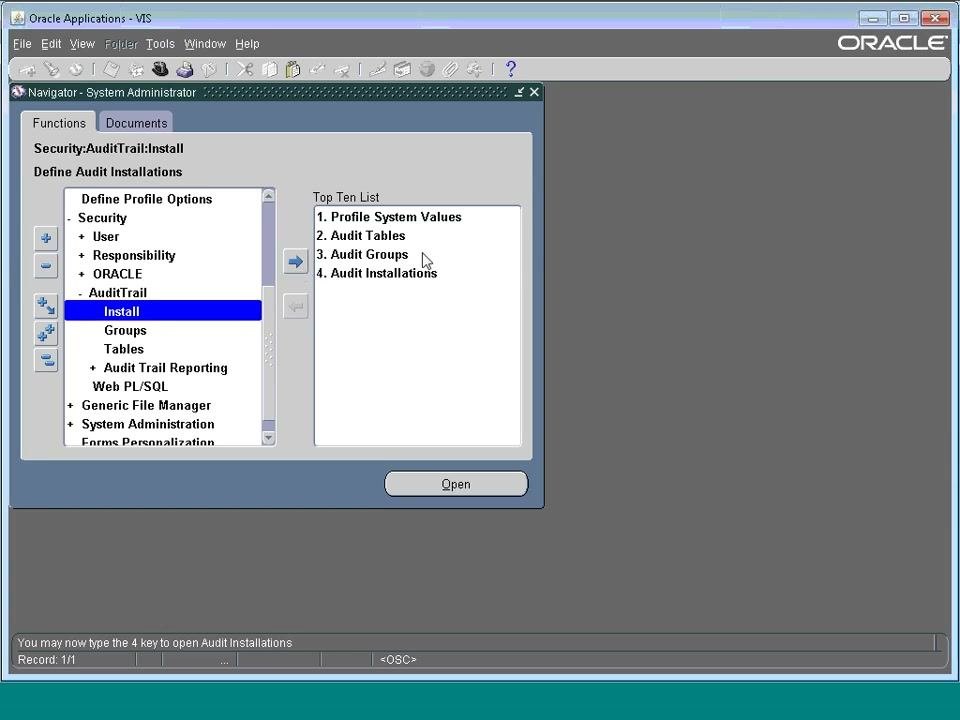
- In the Navigator - System Administrator window, expand Security > AuditTrail > Install.
- Select Install and click Open to go to the Audit Installations setup.
The Top Ten List on the right highlights these items:
- Profile System Values
- Audit Tables
- Audit Groups
- Audit Installations
Confirm that Audit Installations is highlighted in the Top Ten List, then click Open to access the Audit Installations form.
Part 2: Apply and validate the audit setup
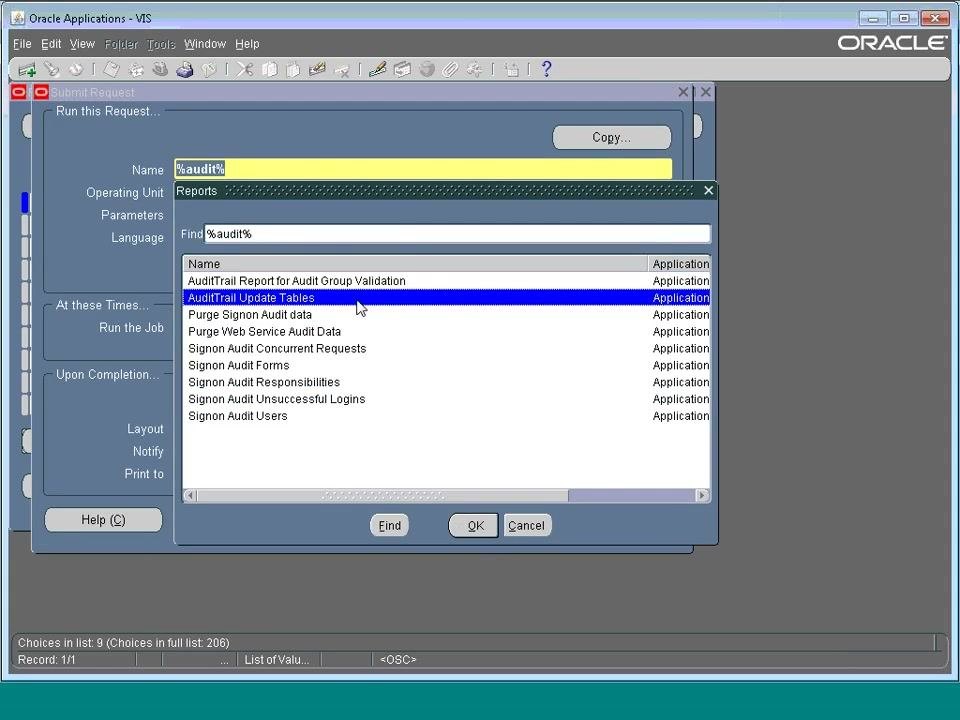
Step 10: Run the AuditTrail Update Tables report to enforce the setup
- Open the Submit Request form.
- In the Reports section, enter
%audit%in the Find field to filter the available reports. - Select AuditTrail Update Tables from the filtered list.
- Click OK to proceed.
Step 11: Monitor the AuditTrail Update Tables request
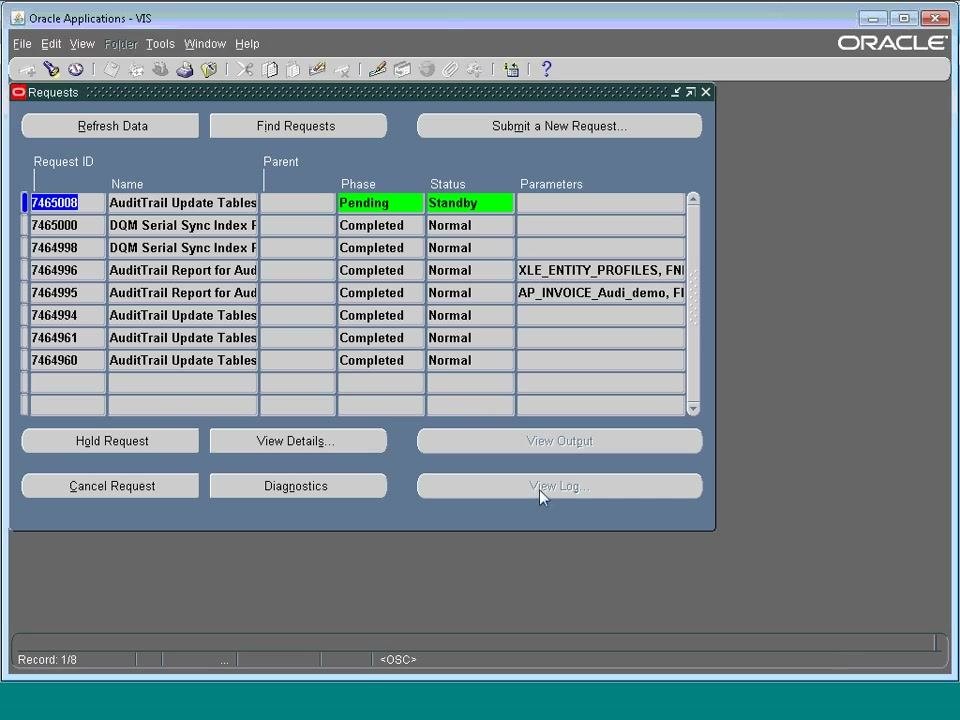
In the Requests window, monitor the status of the submitted request. Initially it shows these values:
- Request ID: 7465008
- Name: AuditTrail Update Tables
- Phase: Pending
- Status: Standby (highlighted in green)
Review the other requests in the list for their completion status. Once the request completes, use the View Log button to check the log details.
Step 12: Confirm the request completed
In the Requests window, verify that the AuditTrail Update Tables request (Request ID: 7465008) now shows these values:
- Phase: Completed
- Status: Normal
Review the list of recent requests to make sure all relevant AuditTrail jobs finished successfully. If you need more information, use the View Details, View Output, or View Log buttons.
Step 13: Submit the audit group validation report
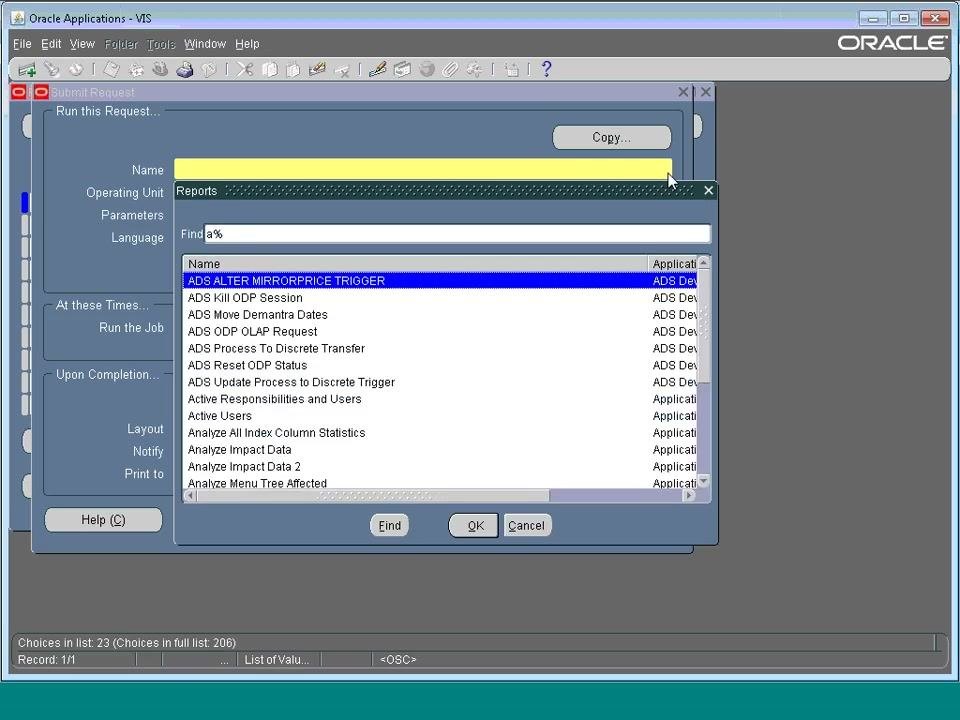
- Open the Submit Request form.
- In the Reports dialog, use the Find field to filter reports. For example, enter
a%. - Review the filtered list of available reports, such as
ADS ALTER MIRRORPRICE TRIGGER,ADS Kill ODP Session,Analyze All Index Column Statistics, andAnalyze Impact Data. - Select the report for audit group validation, AuditTrail Report for Audit Group Validation, and click OK.
Step 14: Monitor the audit group validation request
- Return to the Requests window.
- Locate the AuditTrail Report for Audit Group Validation request (Request ID: 7465010). It shows Phase: Running (highlighted in green), Status: Normal, and Parameters: Demo AR_CASH_RECEIPTS.
- Click Refresh Data to update the request status.
- Wait for the request to complete before you continue.
Step 15: Review the validation report output
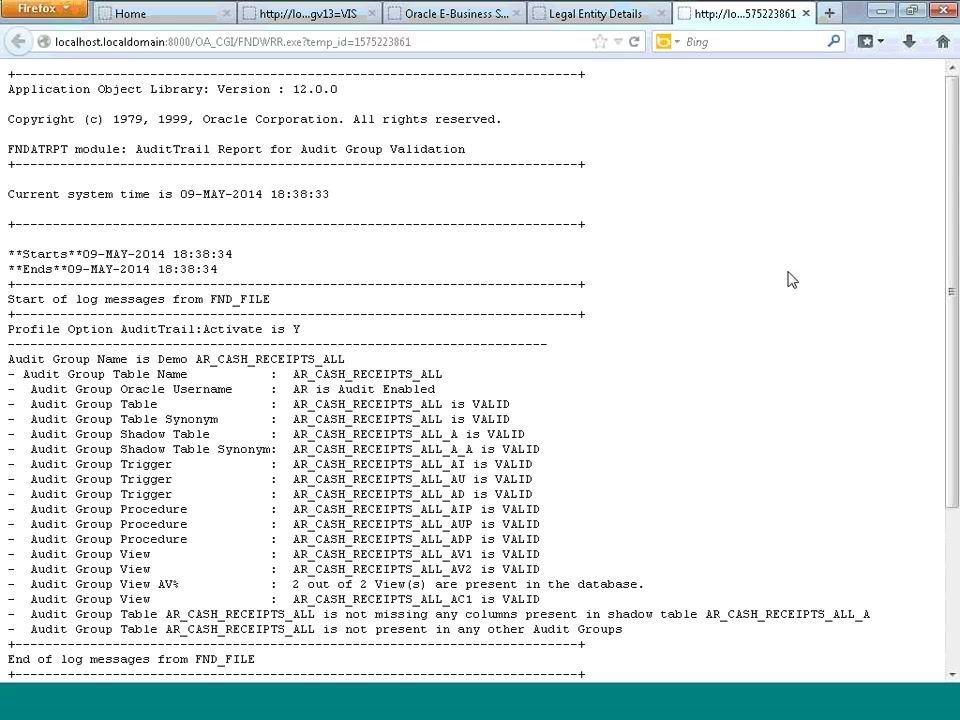
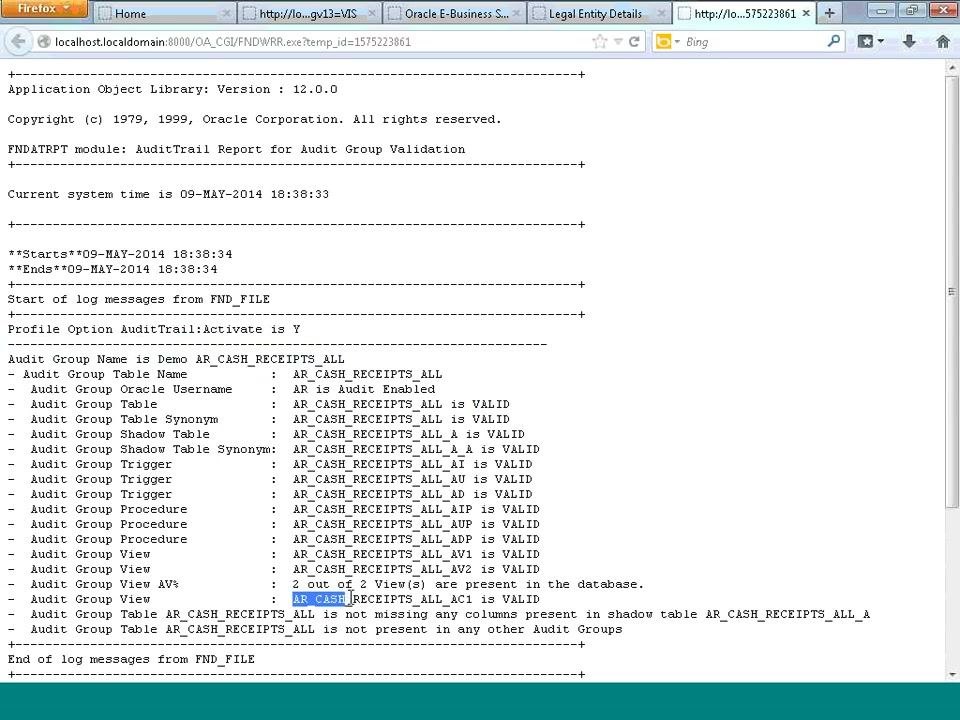
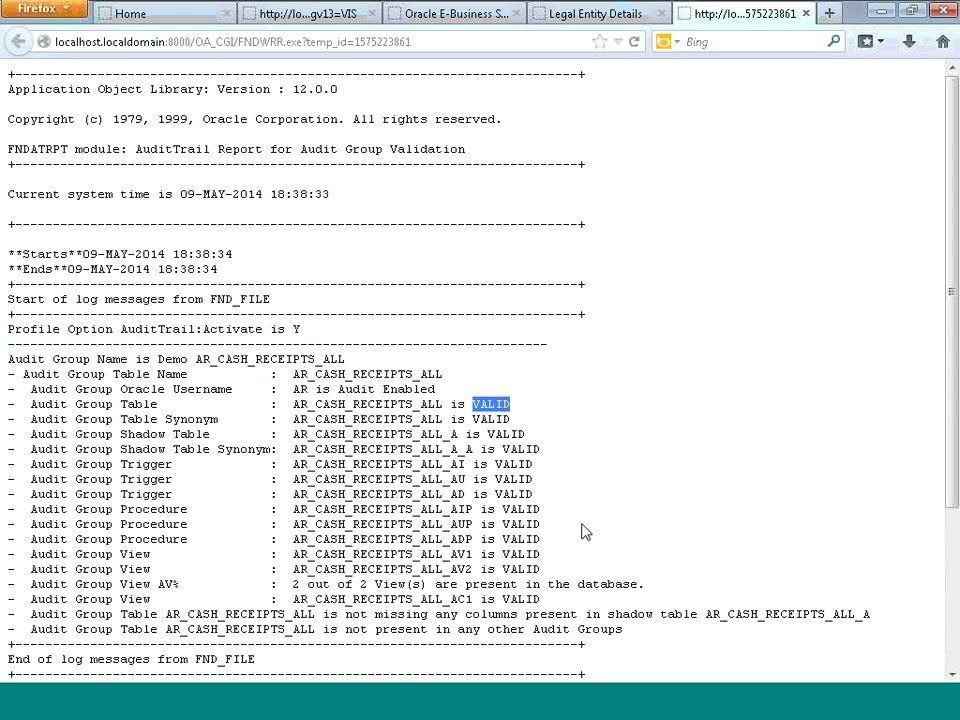
Once the request completes, open the output log in a web browser. In the AuditTrail Report for Audit Group Validation, review these results:
- Application Object Library Version: 12.0.0
- Module: AuditTrail Report for Audit Group Validation
- Current system time: 09-MAY-2014 18:38:33
- Profile Option AuditTrail:Activate: Y
- Audit Group Name: Demo AR_CASH_RECEIPTS_ALL
- Audit Group Table Name: AR_CASH_RECEIPTS_ALL is VALID
- Audit Group Oracle Username: AR is audit enabled
- Audit Group Table Synonym: AR_CASH_RECEIPTS_ALL is VALID
- Audit Group Shadow Table: AR_CASH_RECEIPTS_ALL_A is VALID
- Audit Group Shadow Table Synonym: AR_CASH_RECEIPTS_ALL_A is VALID
- Audit Group Triggers and Procedures: All listed as VALID
- Audit Group Views: AR_CASH_RECEIPTS_ALL_AC1 and AR_CASH_RECEIPTS_ALL_AV2 are VALID
- Audit Group Table: Not missing any columns in shadow table
- Audit Group Table: Not present in any other Audit Groups
Confirm that all statuses are VALID and that the report shows no errors.
Part 3: Test the audit trail with a receipt change
Step 16: Select a responsibility
In the Responsibilities dialog, use the Find field (for example, enter %) to search the available responsibilities. The list includes entries such as:
- Alert Manager, Progress UK
- Application Developer
- Application Diagnostics
- Approvals Management Administrator
- Cash Management Vision France
- General Ledger Supervisor
- Human Resources Vision France
Select the responsibility you want and click OK.
Step 17: Open the Receipts entry form
Open the Receipts entry form. It provides these fields:
- Receipt Method
- Receipt Number
- Receipt Amount
- Receipt Type: Standard
- Receipt Date: 09-MAY-2014
- GL Date: 09-MAY-2014
- Maturity Date: 09-MAY-2014
- Balances: Unidentified, Applied, On Account, Unapplied, Cash Claims, Prepayments
- Customer: Name, Number, Location, Taxpayer ID
- Customer Bank: Name, Account, PSON
- Remittance Bank: Name, Branch, Account
- Reference, Postmark Date, Comments
The form is ready for receipt entry and further transaction processing.
Step 18: Find the receipt to change
- Open the Find Receipts window.
- Leave Operating Unit blank, or enter a value as required.
- Enter
1in both Receipt Numbers fields. - Leave Receipt Dates blank, or enter a value as required.
- Enter
09-MAY-2012in GL Dates. - Leave the other fields blank unless you need specific filtering.
- Click Find.
Step 19: Review the receipt details
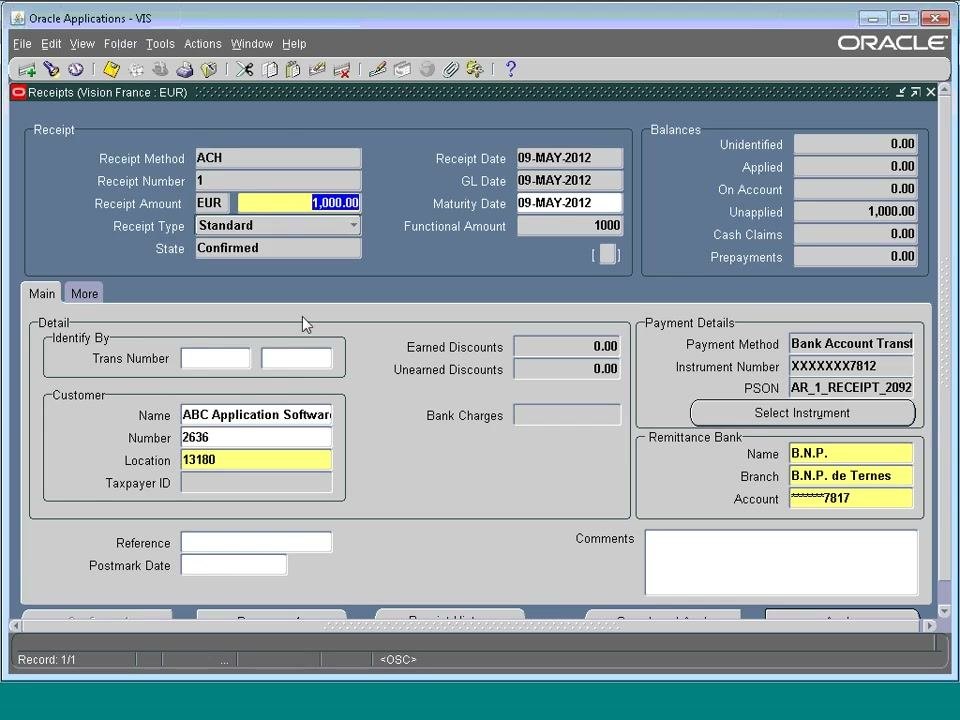
The Receipts window displays the receipt you found. Review these fields:
- Receipt Method: ACH
- Receipt Number: 1
- Receipt Amount: EUR 1,000.00
- Receipt Type: Standard
- State: Confirmed
- Receipt Date, GL Date, Maturity Date: 09-MAY-2012
- Balances: Unapplied = 1,000.00; all other balances = 0.00
In the Customer section, you see:
- Name: ABC Application Software
- Number: 2636
- Location: 13180
In the Payment Details section, you see:
- Payment Method: Bank Account Transfer
- Instrument Number: XXXXXX7812
- PSON: AR_1_RECEIPT_2092
In the Remittance Bank section, you see:
- Name: B.N.P.
- Branch: B.N.P. de Ternes
- Account: **7817
You make no changes in this step. Review the information for accuracy.
Step 20: Record the value before the change
Open Oracle SQL Developer and navigate to the relevant SQL script. Run a query to select the receipt data:
select CASH_RECEIPT_ID, CREATION_DATE, LAST_UPDATE_DATE, RECEIPT_DATE, RECEIPT_NUMBER, AMOUNT, CURRENCY_CODE, PAY_FROM_CUSTOMER
from ar_cash_receipts_all
where cash_receipt_id = 209296;
Review the query result:
- CASH_RECEIPT_ID: 209296
- CREATION_DATE: 09-MAY-14
- LAST_UPDATE_DATE: 09-MAY-14
- RECEIPT_DATE: 09-MAY-12
- RECEIPT_NUMBER: 1
- AMOUNT: 1000 EUR
- PAY_FROM_CUSTOMER: 5453
Note the value before any changes: PAY_FROM_CUSTOMER = 5453.
Step 21: Change the customer on the receipt
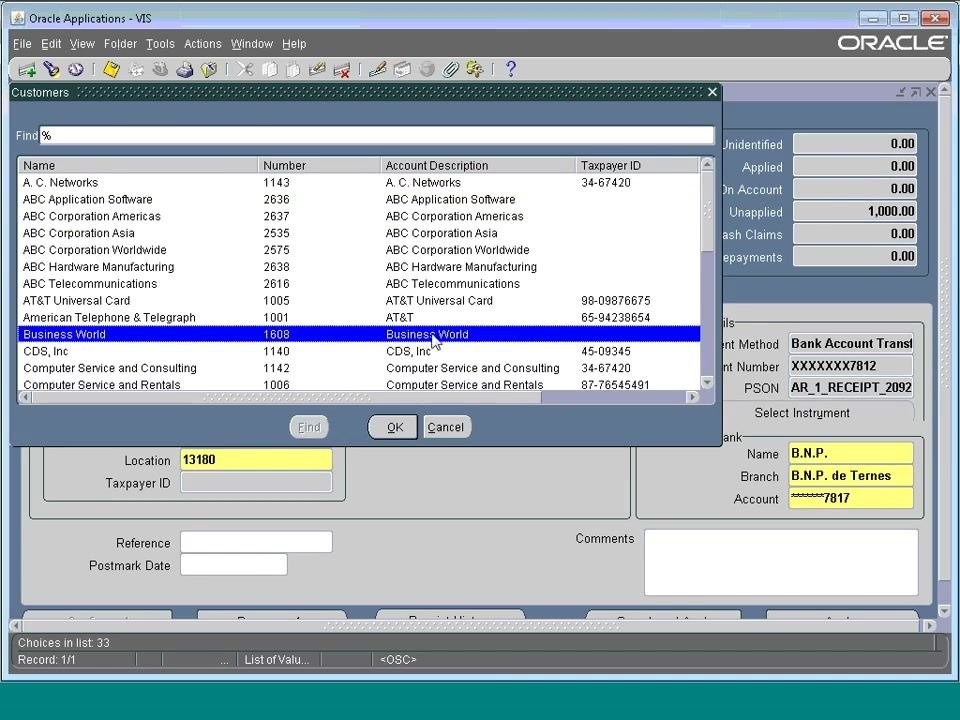
- In the Receipts window in Oracle Applications, click the ellipsis (
...) next to the Name field in the Customer section. The Customers selection window appears. - Search for and select the new customer:
- Name: Business World
- Number: 1608
- Account Description: Business World
- Taxpayer ID: 45-09345
- Click OK to confirm the selection.
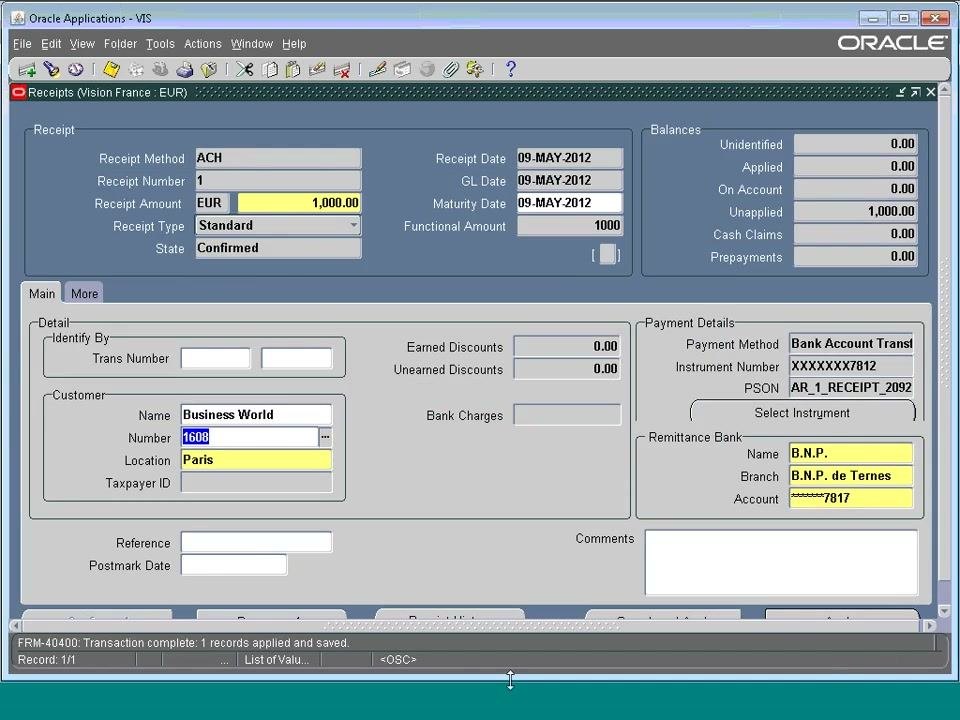
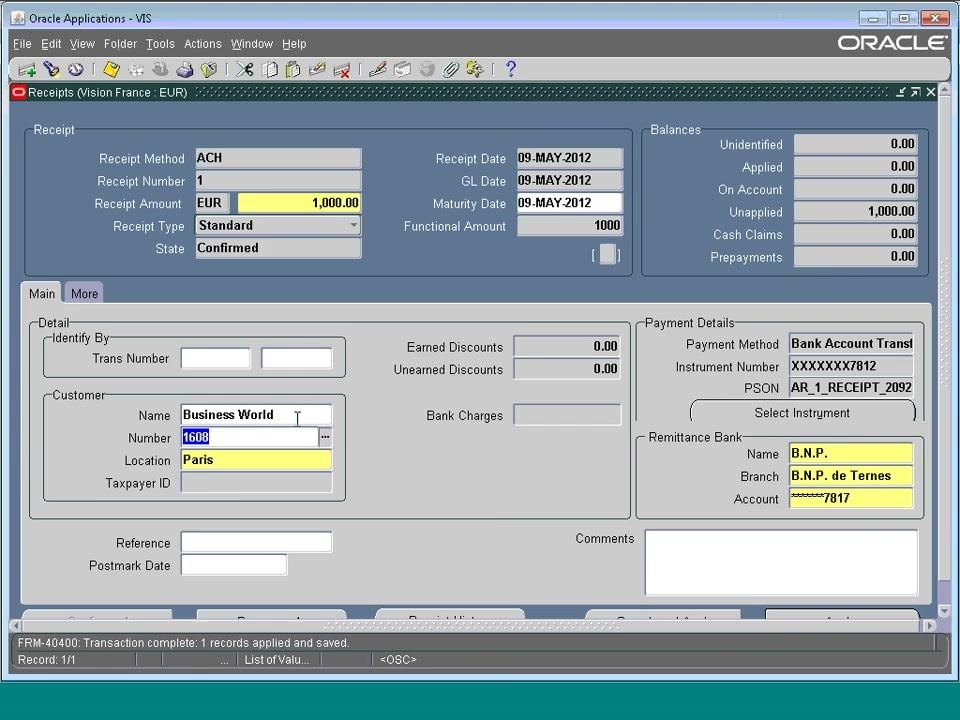
The Receipts window updates to show the new customer:
- Name: Business World
- Number: 1608
- Location: Paris
The status bar displays FRM-40400: Transaction complete: 1 records applied and saved. All other receipt and payment details remain unchanged.
Step 22: Check the changed value in the database
Return to Oracle SQL Developer and rerun the query for the same receipt ID. The result shows PAY_FROM_CUSTOMER: 3347, changed from 5453.
The script comments record the value before the change (5453) and the new value (3347). This confirms the database recorded the customer change.
Step 23: Review the audit trail for the change
Run an audit query against the shadow table to verify the change history:
select * from AR_CASH_RECEIPTS_ALL_A where cash_receipt_id = 209296;
Review the audit trail result:
- AUDIT_TIMESTAMP: 09-MAY-14
- AUDIT_TRANSACTION_TYPE: U (Update)
- AUDIT_USER_NAME: ADRIAN.ARGATU
- AUDIT_SESSION_ID: 1728640
- AUDIT_SEQUENCE_ID: 1
- AUDIT_COMMIT_ID: 1
- ROW_KEY: 2014050918
This confirms that the update was performed and logged by the user ADRIAN.ARGATU.
Part 4: Continue auditing receipt and customer changes
These steps show how further customer updates appear in Oracle Applications and in Oracle SQL Developer.
Step 24: Observe the update entry in the audit trail
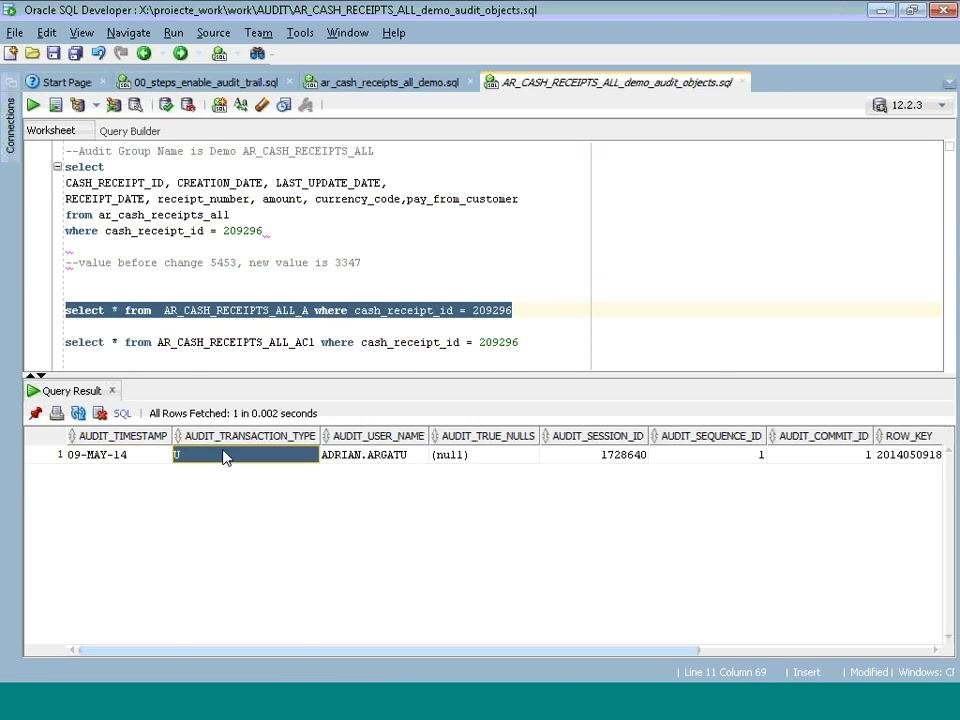
In Oracle SQL Developer, observe the audit trail for the receipt update. The query result displays:
- AUDIT_TIMESTAMP: 09-MAY-14
- AUDIT_TRANSACTION_TYPE: U (Update)
- AUDIT_USER_NAME: ADRIAN.ARGATU
- AUDIT_SESSION_ID: 1728640
- AUDIT_SEQUENCE_ID: 1
- AUDIT_COMMIT_ID: 1
- ROW_KEY: 2014050918
This confirms the update action and the user who performed it.
Step 25: Retrieve more audit details
Run a query to retrieve more audit details from the AR_CASH_RECEIPTS_ALL_A1 table. The result shows:
- CASH_RECEIPT_ID: 209296
- AUDIT_TRANSACTION_TYPE: U (Update)
- AUDIT_USER_NAME: ADRIAN.ARGATU
- AUDIT_SESSION_ID: 1728640
- AUDIT_SEQUENCE_ID: 1
- AUDIT_COMMIT_ID: 1
- ROW_KEY: 201405091843340001828640
- PAY_FROM_CUSTOMER: 5453
This gives you a detailed record of the update, including the previous customer value.
Step 26: View the creation and update entries together
Run or refresh the audit query to display multiple audit entries. The result now shows two rows:
- The first row (sequence 1) is an update (U) by ADRIAN.ARGATU.
- The second row (sequence 0) is a creation (C) with no user name.
This confirms both the creation and the subsequent update of the receipt record.
Step 27: Review the customer in the Receipts window
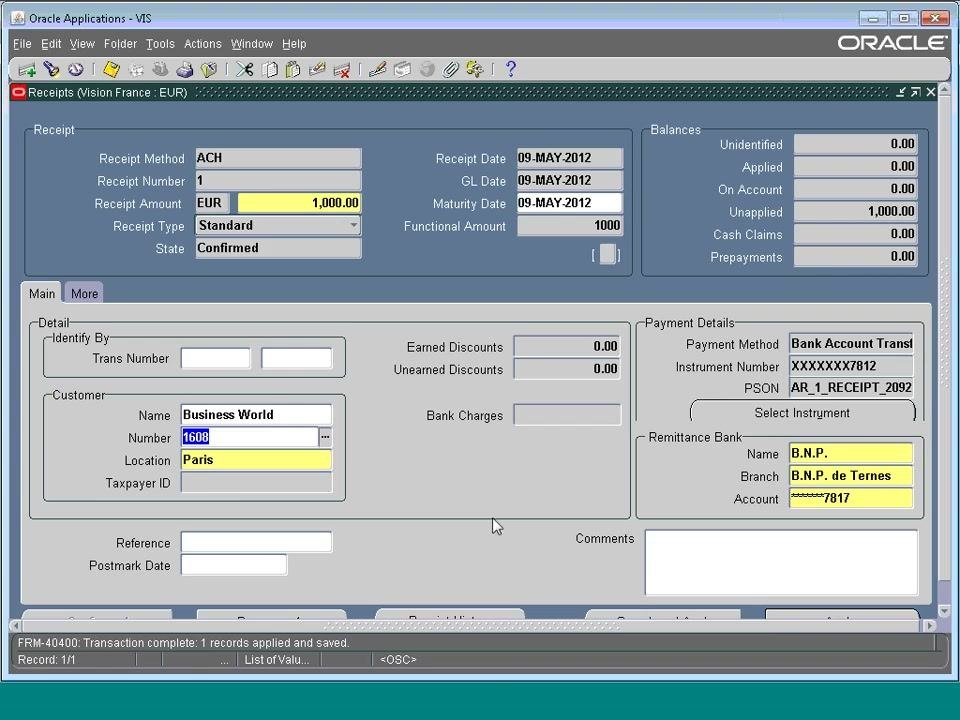
Switch to Oracle Applications and review the Receipts window. Confirm the customer details:
- Name: Business World
- Number: 1608
- Location: Paris
The status bar displays FRM-40400: Transaction complete: 1 records applied and saved. All other receipt and payment details remain unchanged.
Step 28: Confirm the customer data is stable
Continue reviewing the Receipts window in Oracle Applications. Make sure the customer information is still Name: Business World, Number: 1608, and Location: Paris. You make no changes in this step, and the data remains stable.
Step 29: Change the customer again
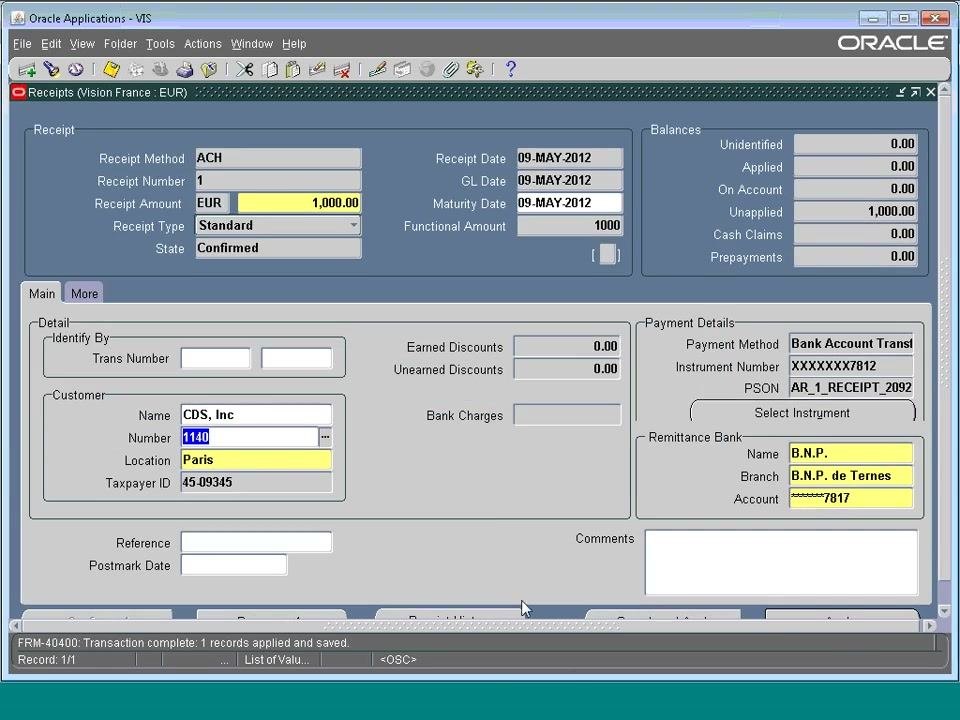
In the Receipts window, change the customer details:
- Name: CDS, Inc
- Number: 1140
- Location: Paris
- Taxpayer ID: 45-09345
The status bar again displays FRM-40400: Transaction complete: 1 records applied and saved. All other receipt and payment details remain unchanged.
Step 30: Check the latest value in the database
Return to Oracle SQL Developer and rerun the query for the receipt. The result now shows PAY_FROM_CUSTOMER: 1287, which reflects the latest customer change.
The script comment is updated to read: "value before change 5453, new value is 3347, last value 1287". This confirms the most recent customer update is recorded in the database.
Step 31: Review the audit entries for both updates
Run or refresh the audit query to display all audit entries for the receipt. The result shows two entries, both by ADRIAN.ARGATU:
- AUDIT_SEQUENCE_ID: 1, PAY_FROM_CUSTOMER: 5453
- AUDIT_SEQUENCE_ID: 2, PAY_FROM_CUSTOMER: 3347
This provides an audit trail of the customer changes for the receipt.
Step 32: Include the creation entry
Run or refresh the audit query to display all audit entries, including the creation entry. The result now shows three entries:
- AUDIT_SEQUENCE_ID: 1, AUDIT_TRANSACTION_TYPE: U, PAY_FROM_CUSTOMER: 5453
- AUDIT_SEQUENCE_ID: 2, AUDIT_TRANSACTION_TYPE: U, PAY_FROM_CUSTOMER: 3347
- AUDIT_SEQUENCE_ID: 0, AUDIT_TRANSACTION_TYPE: C, PAY_FROM_CUSTOMER: not shown
This confirms the full history of creation and updates for the receipt.
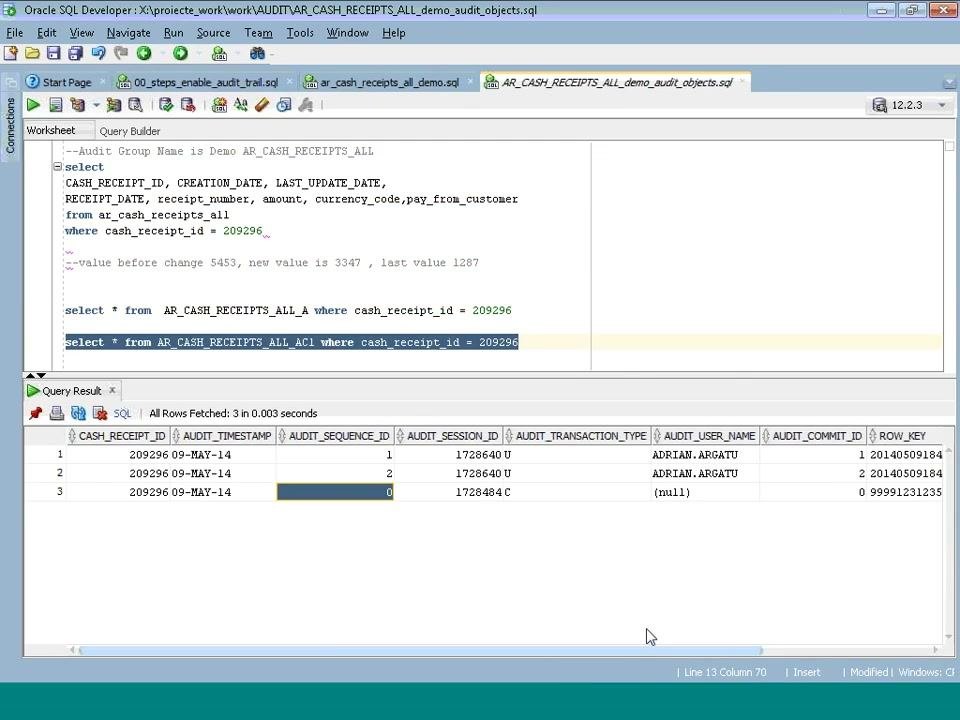
Step 33: Review the final audit trail query results
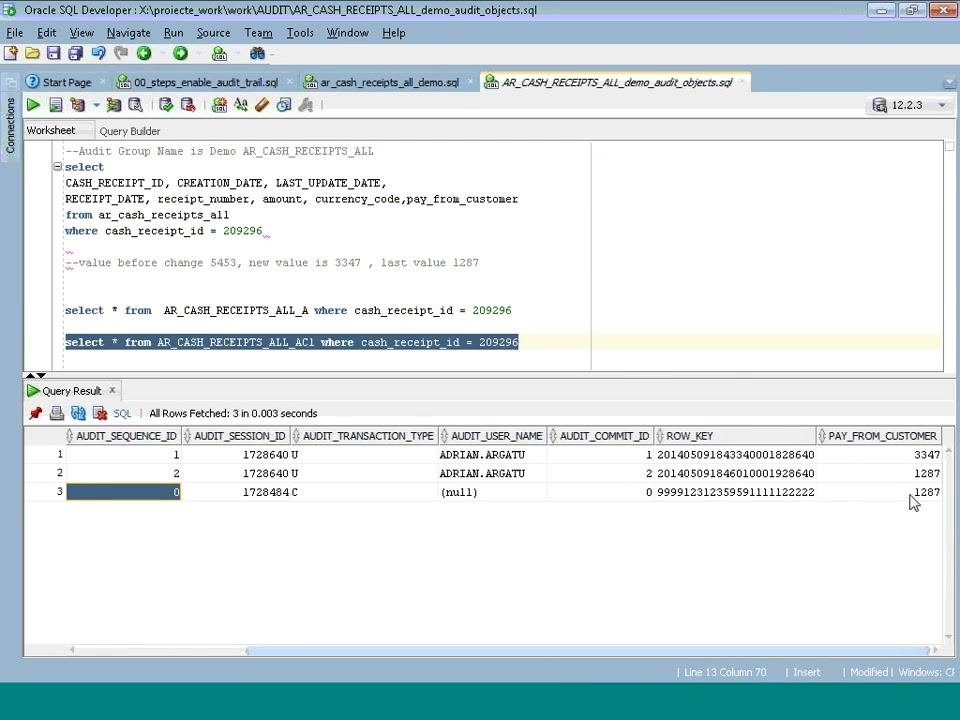
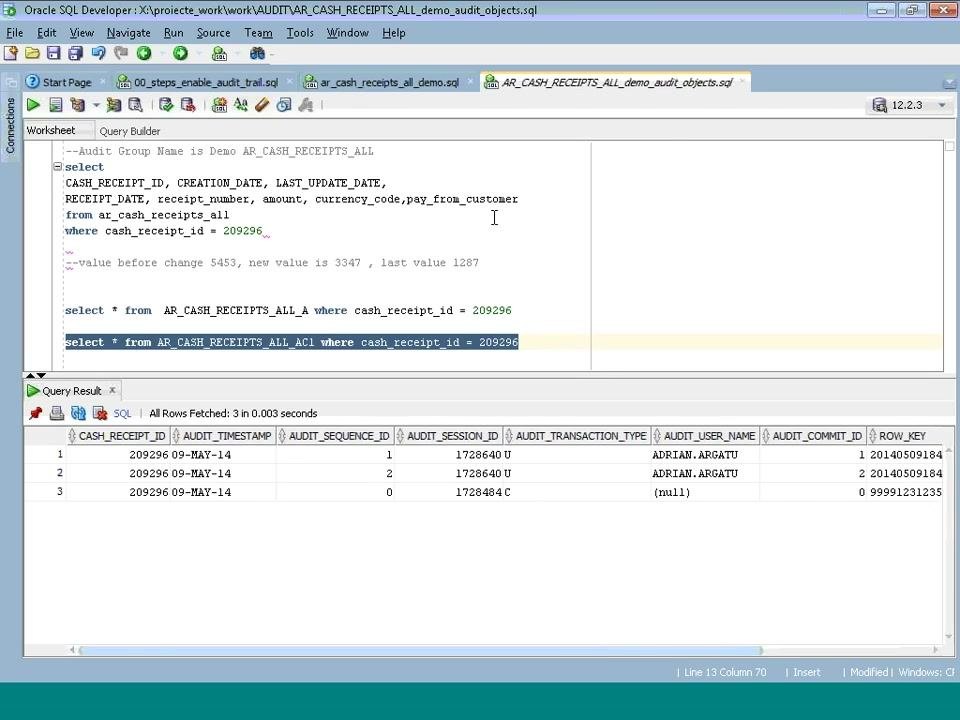
In Oracle SQL Developer, observe the final audit trail query results. The SQL worksheet displays a query selecting from AR_CASH_RECEIPTS_ALL_A where cash_receipt_id = 209296. It also shows the comment "value before change 5453, new value is 3347, last value 1287".
The Query Result pane shows three audit entries:
- AUDIT_SEQUENCE_ID 1: Session 1728640, Update (U), User ADRIAN.ARGATU, Commit 1, PAY_FROM_CUSTOMER 3347.
- AUDIT_SEQUENCE_ID 2: Session 1728640, Update (U), User ADRIAN.ARGATU, Commit 2, PAY_FROM_CUSTOMER 1287.
- AUDIT_SEQUENCE_ID 0: Session 1728484, Creation (C), no user, Commit 0, PAY_FROM_CUSTOMER 1287.
This confirms the sequence of customer changes and the creation for the receipt.
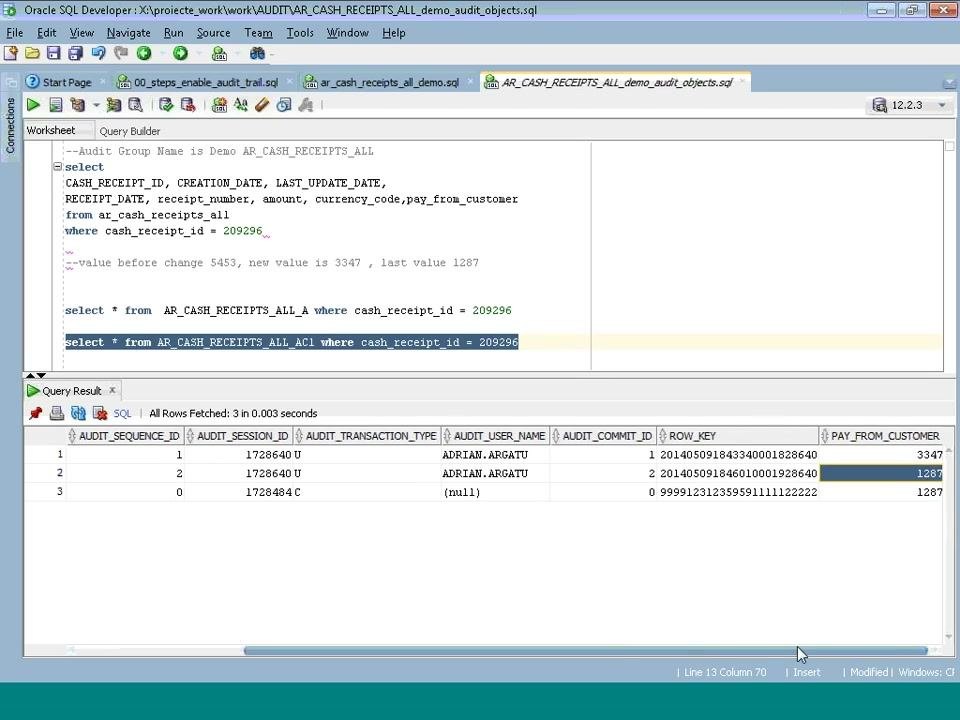
Step 34: Inspect a specific audit entry
In the Query Result pane, click to highlight the row with AUDIT_SEQUENCE_ID 2 (PAY_FROM_CUSTOMER 1287). Highlighting the row lets you inspect that update entry more closely. All other details in the worksheet and query remain unchanged.
Step 35: Add timestamp details to the audit query
Run or refresh the audit query to include timestamp details. The Query Result pane now displays:
- CASH_RECEIPT_ID: 209296
- AUDIT_TIMESTAMP: 09-MAY-14
- AUDIT_SEQUENCE_ID: 1, 2, 0
- AUDIT_SESSION_ID: 1728640, 1728640, 1728484
- AUDIT_TRANSACTION_TYPE: U, U, C
- AUDIT_USER_NAME: ADRIAN.ARGATU, ADRIAN.ARGATU, (null)
- AUDIT_COMMIT_ID: 1, 2, 0
- ROW_KEY: as previously shown
This gives you a view of the audit trail, including when each action occurred.
Step 36: Use the checklist to confirm your setup
Switch to the SQL worksheet tab titled 00_steps_enable_audit_trail.sql. Review the documented steps for enabling audit trail in Oracle Applications:
- Activate profile: Set to Yes (site level).
- Setup table and columns to audit: Ensure the table has a primary key.
- Setup audit group.
- Verify application/module is audit enabled.
- Run AuditTrail Update Tables report to enforce the setup.
- Run AuditTrail Report for Audit Group Validation to check if all objects are valid.
The test section specifies Table: ar_cash_receipts_all and Column: pay_from_customer. This gives you a concise checklist for setting up and validating audit trails.
Summary
To enable audit trail in Oracle EBS, you:
- Set AuditTrail:Activate to Yes at the Site level.
- Select the table and columns to audit (the table needs a primary key).
- Set up an audit group.
- Run the AuditTrail Update Tables report.
- Run the AuditTrail Report for Audit Group Validation and confirm every object is VALID.
You then tested the setup by changing the customer on a receipt and reading the history in the AR_CASH_RECEIPTS_ALL_A shadow table. That history showed the creation entry and each update with the user name, session, sequence, and commit IDs.
What's next
- Add more columns to your audit group using the optional column step.
- Repeat the validation report after any change to your audit setup.
- Use the shadow table queries in this guide to review changes to other audited columns.
Generation details: cost, quality tiers
Docsie billed 4,500 credits ($3.15) to analyze this 9-minute video at standard quality. The rewrite, template fill and Word/PDF exports were included. The same video at each quality tier:
| Quality | Frames sampled | Credits | Approx. cost |
|---|---|---|---|
| Draft | every 16-30 s | 2,250 | $1.57 |
| Standard (this guide) | every 8-15 s | 4,500 | $3.15 |
| Detailed | every 4-7 s | 9,000 | $6.30 |
| Ultra | every 1-3 s | 18,000 | $12.60 |
Credits priced at $0.70 per 1,000; plans include a monthly allowance. Enterprise customers on on-premise or bring-your-own-model deployments run this on their own inference and pay no per-video credits.
Generated by Docsie Video-to-Docs on 2026-11-15 from a 8-minute video. Screenshots are frames from the source video and belong to their creator, Adrian Argatu, whose original is embedded above. If you own this video and want the guide removed or credited differently, contact us and we will act within one business day.