
How to Create an Operating Unit in Oracle EBS
This guide shows you how to create an operating unit in Oracle EBS (E-Business Suite), from the HR security profile setup through the Accounting Setup Manager check. You then add an inventory organization to it, which Accounts Payable (AP) setup requires. The examples use an operating unit named ABC OU, a business group named ABC BG, and a primary ledger named ABC PL Ledger.
Video: Training How to Create Operating unit in Oracle R12 - Part 13 by Sohatech World (2021). All credit for the demonstration goes to the creator; watch the original on YouTube. The written guide below was generated from this video by Docsie. Creator? Request a change or removal.
This guide shows you how to create an operating unit in Oracle EBS (E-Business Suite), from the HR security profile setup through the Accounting Setup Manager check. You then add an inventory organization to it, which Accounts Payable (AP) setup requires. The examples use an operating unit named ABC OU, a business group named ABC BG, and a primary ledger named ABC PL Ledger.
Prerequisites
Before you begin, make sure you have:
- Completed the initial Oracle E-Business Suite installation and setup.
- Access to the System Administrator responsibility and a Purchasing responsibility (for example, "Purchasing, ABC").
- Your business group, primary ledger, and legal entity ready to enter. The examples use
ABC BG,ABC PL Ledger, andABC Company.
Assign your business group to the responsibilities
If you skip this section, your operating unit is created under the default Vision Corporation business group. That is incorrect for your actual transactions and causes configuration issues.
Step 1: Open the System Administrator responsibility
- Log in to Oracle Applications.
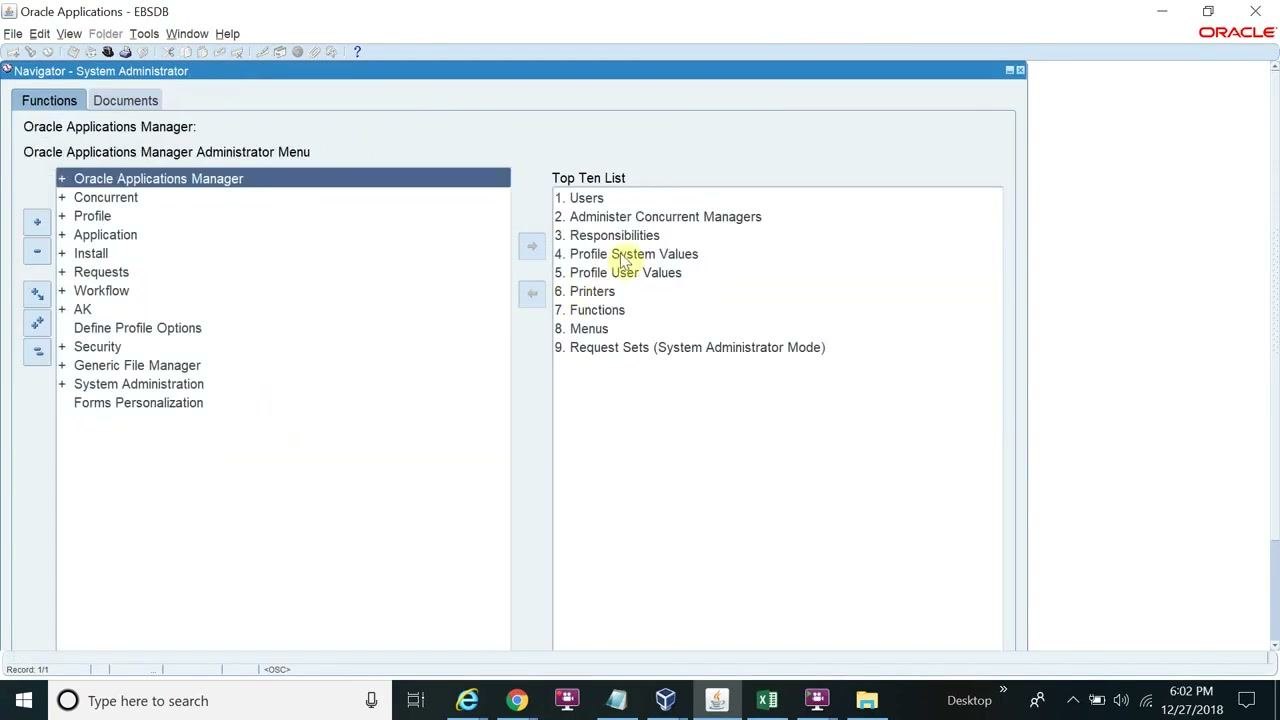
- From the main menu, select the System Administrator responsibility.
Step 2: Open Profile System Values
- In the System Administrator navigator, expand Oracle Applications Manager and then Profile.
- Select System Values from the Top Ten List.
Step 3: Find the Payables, Vision Operations responsibility
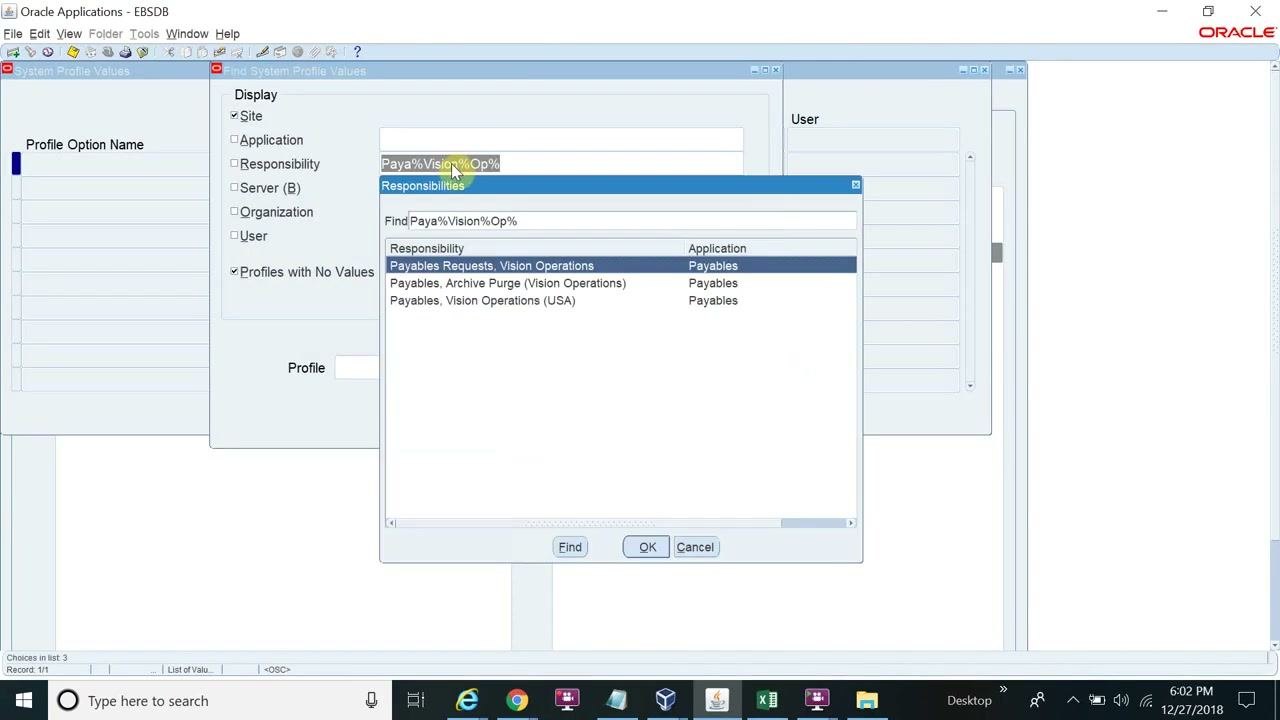
- In the Profile System Values window, set the display to filter by Responsibility.
- Enter the search criteria
Paya%Vision%Op%. - Click Find.
- Select Payables, Vision Operations (USA) from the list.
Step 4: Set the HR security profile for Payables
- In the Profile Option Name field, enter or select HR: Security Profile.
- Confirm that the Site column is set to Vision Corporation.
- Confirm that the Responsibility column is set to Payables, Vision Operations.
- In the value field for this responsibility, enter your business group (for example, ABC BG).
- Save your changes.
Look for a confirmation message at the bottom of the window, such as "FRM-40400: Transaction complete. 1 records applied and saved."
Step 5: Assign the business group to the Purchasing responsibility
When you create a new operating unit, do not leave the HR Security Profile for the Purchasing responsibility on the default Vision Corporation business group. Make sure your business group (for example, ABC BG) is assigned to the Purchasing responsibility as well. This prevents misconfiguration and keeps the operating unit tied to the correct business group.
Create the operating unit
Step 6: Switch to Purchasing and open Organizations
- Change your responsibility to the appropriate Purchasing responsibility (for example, "Purchasing, ABC"). Do not use the Payables responsibility for this step.
- In the Purchasing navigator, expand Setup and then Organizations.
- Select Organizations from the list.
Step 7: Start a new organization
The Organizations window shows your existing business groups. You cannot view operating units at this stage.
Click the New button or tab to start defining a new organization, which will become your operating unit.
Step 8: Enter the basic organization details
In the Organization form, enter the following:
- Name:
ABC OU - Type: Leave blank, or select the value that fits your organization.
- From Date:
01-JAN-1951(or the date you require). - Location: Start typing the location (for example,
ABC Company Address), then select it from the list of values. - Internal or External: Set to
Internal. - Location Address: Enter the full address (for example,
LA Street, New York, NY, 10017, United States). - Internal Address: Enter if applicable.
Step 9: Assign the Operating Unit classification
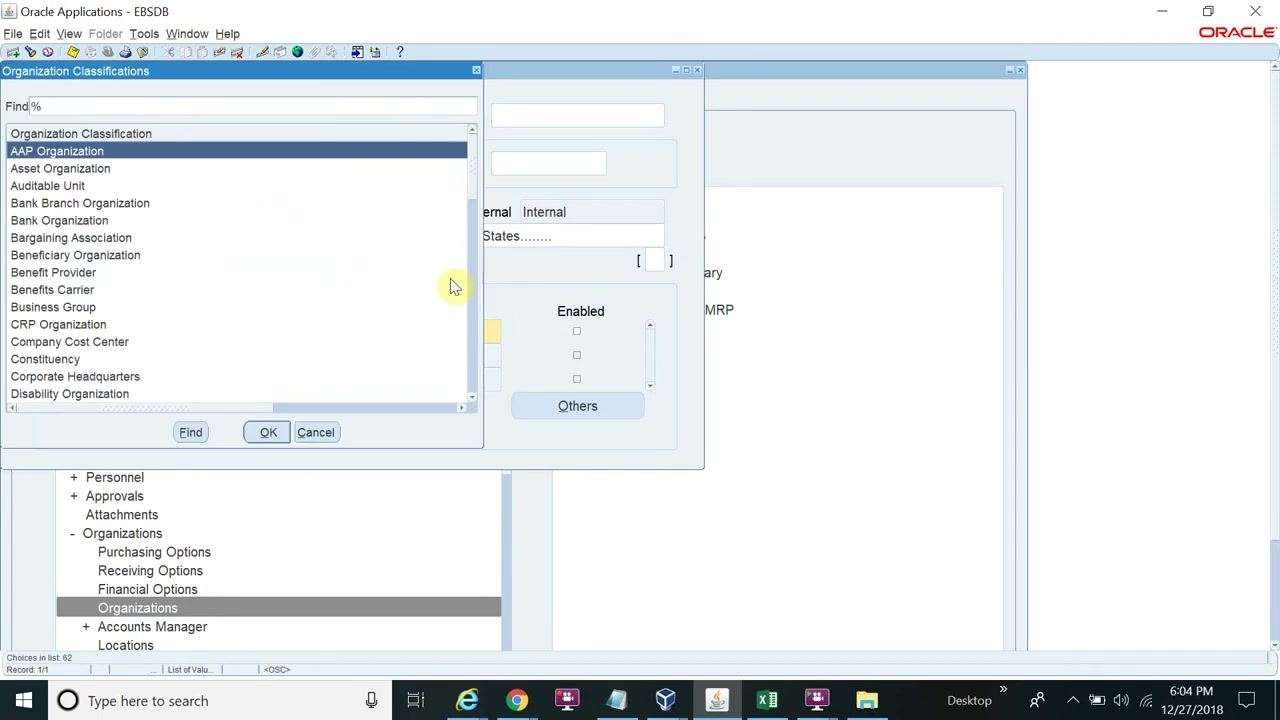
- In the Organization Classifications section, click the list of values (LOV) for Name.
- Select Operating Unit from the list of classifications.
- Click OK.
Step 10: Open Operating Unit Information
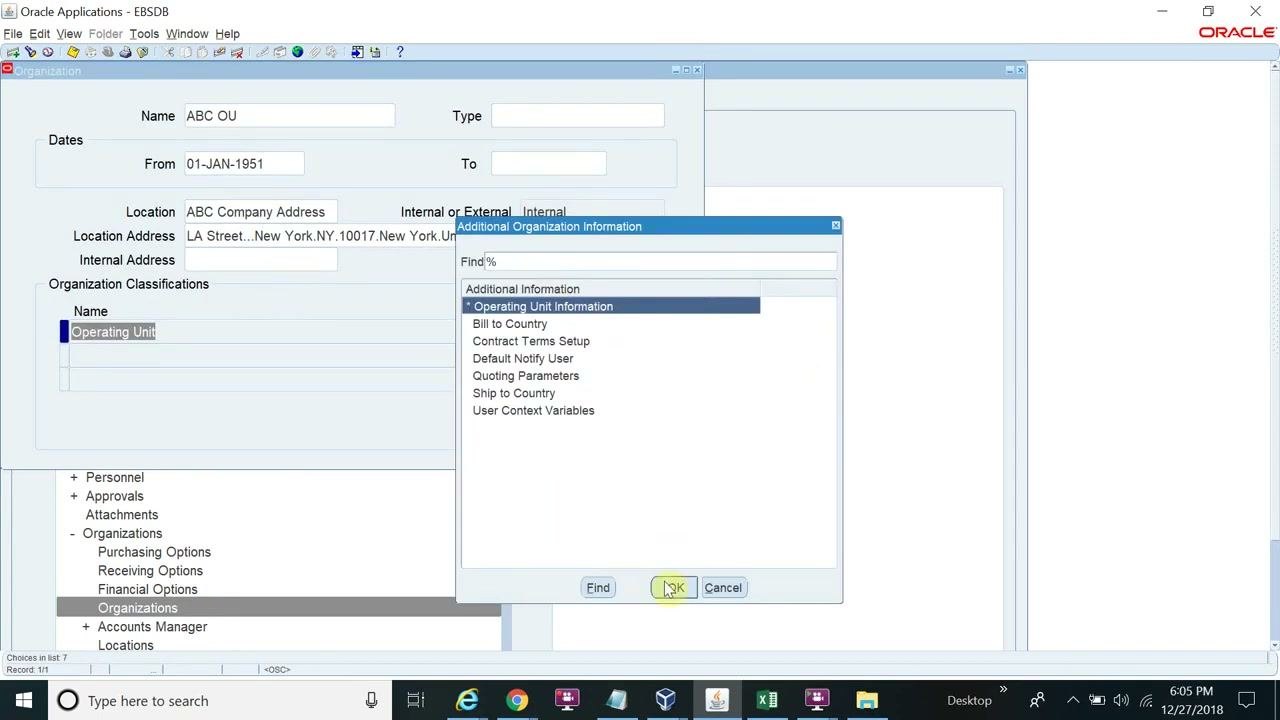
- In the Additional Organization Information window, select Operating Unit Information.
- Click OK.
Step 11: Enter the ledger, legal context, and short code, then save
- In the Operating Unit Information window, enter these values:
- Primary Ledger:
ABC PL Ledger - Default Legal Context:
ABC Company - Operating Unit Short Code:
AVC
- Primary Ledger:
- Confirm all fields are correct.
- Click OK.
- Click Save in the main Organization form to finish creating the operating unit.
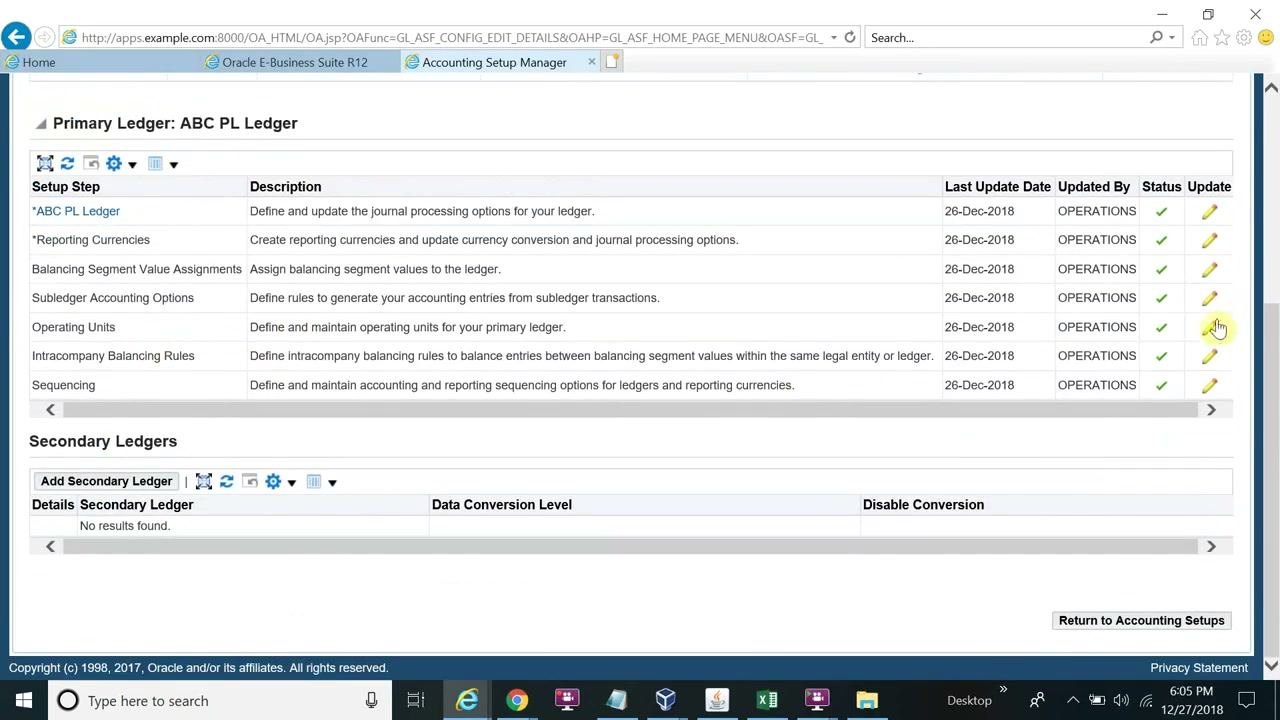
Step 12: Verify the operating unit in Accounting Setup Manager
After you save, the new operating unit exists. The system automatically populates its information in the ledger setup.
- Open the Accounting Setup Manager.
- Locate your primary ledger (for example,
ABC PL Ledger). - Confirm that
ABC OUappears under the Operating Units section.
Check that these details are visible:
- Operating Unit Name:
ABC OU - Operating Unit Short Code:
ABC OU - Business Group:
ABC BG - Default Legal Context:
ABC Company
Verify that the business group assigned to the operating unit is correct. A different business group (for example, AVC for the vision) indicates a setup issue. Be careful during legal entity setup to avoid business group mismatches.
Add an inventory organization for AP setup
Your next step is to create an inventory organization. AP must be linked to an inventory organization, so this is required for AP setup.
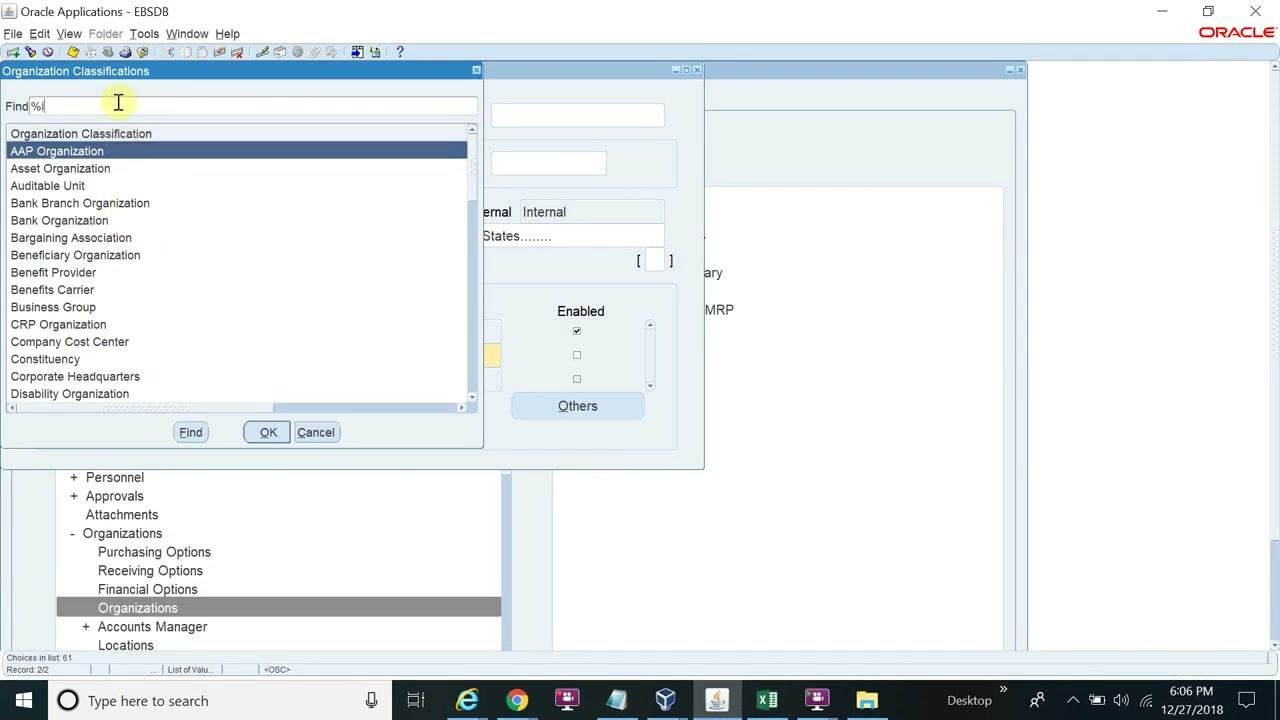
Step 13: Add the Inventory Organization classification
- Click the blank row under Organization Classifications.
- Click the Others button to open the Organization Classifications selection window.
- In the Find field, enter
%to list all available classifications. - Select Inventory Organization and click OK.
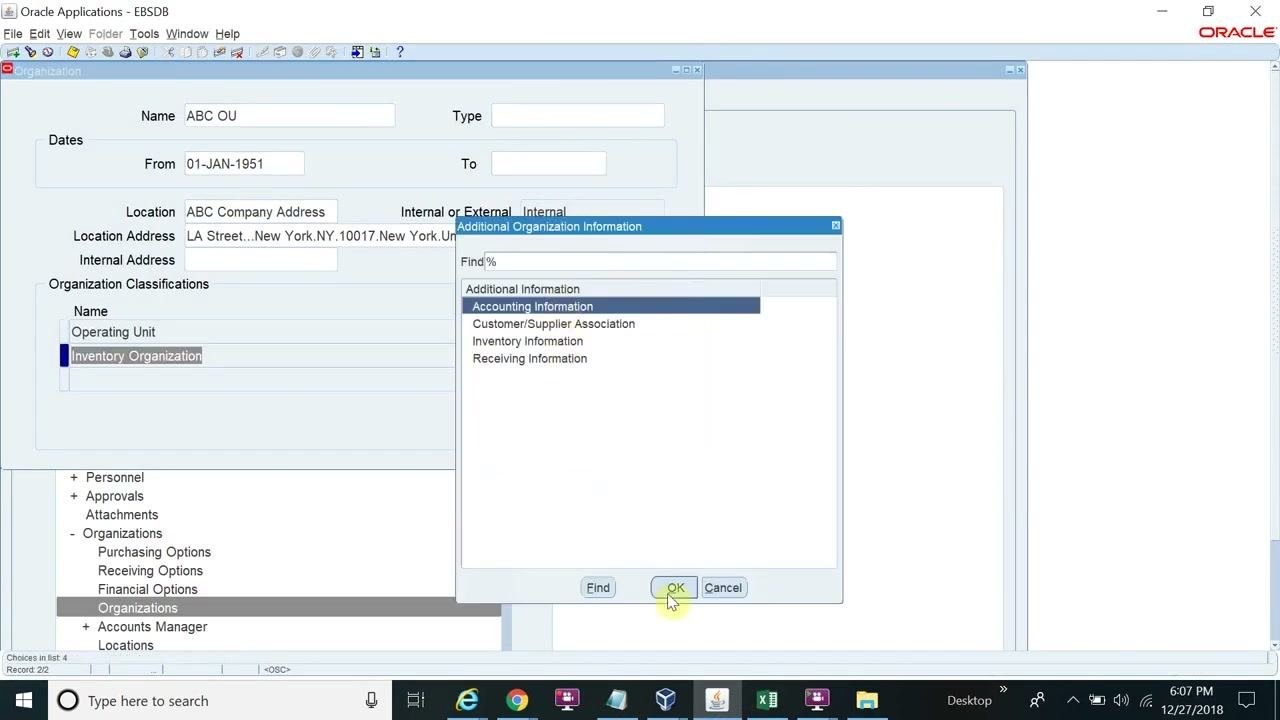
Step 14: Enter the accounting information
After you add Inventory Organization, the Additional Organization Information window appears.
- Select Accounting Information from the list.
- Click OK.
In the Accounting Information window, enter:
- Primary Ledger:
ABC PL Ledger - Legal Entity:
ABC Company - Operating Unit:
ABC OU
Click OK to save and close the window.
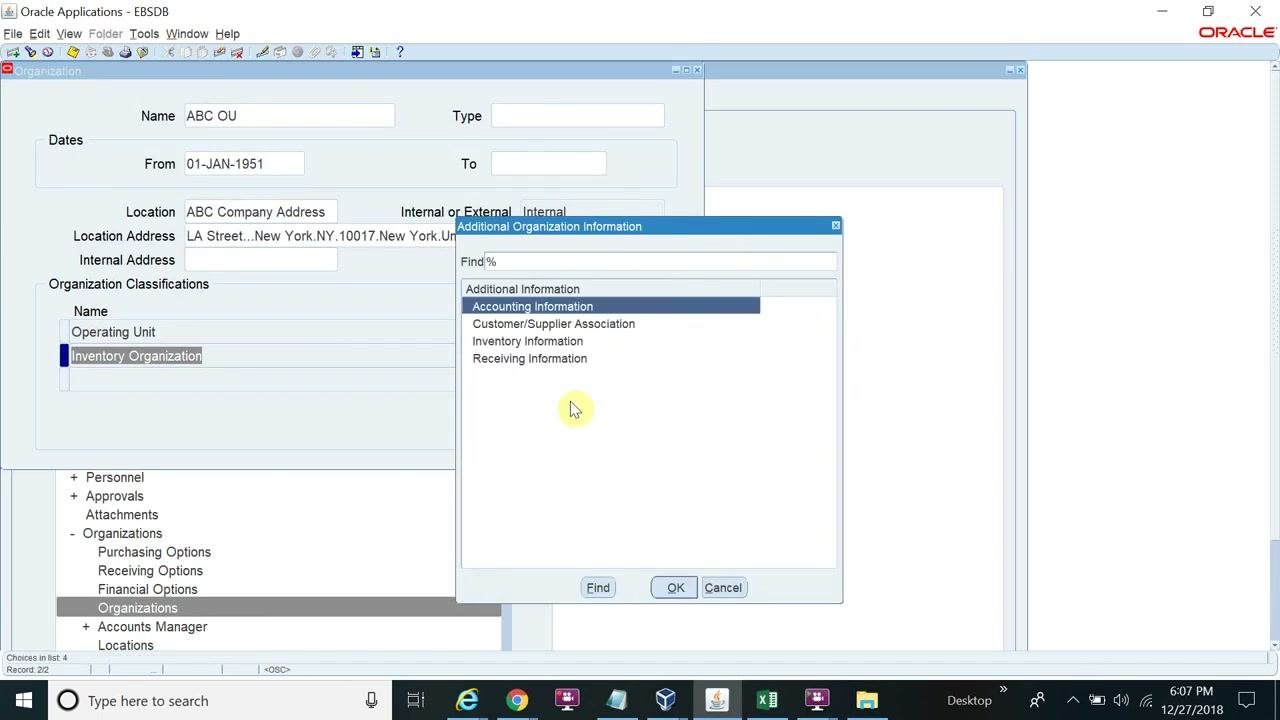
Step 15: Enter the inventory information
- In the Additional Organization Information window, select Inventory Information.
- Click OK.
Step 16: Confirm both classifications are enabled
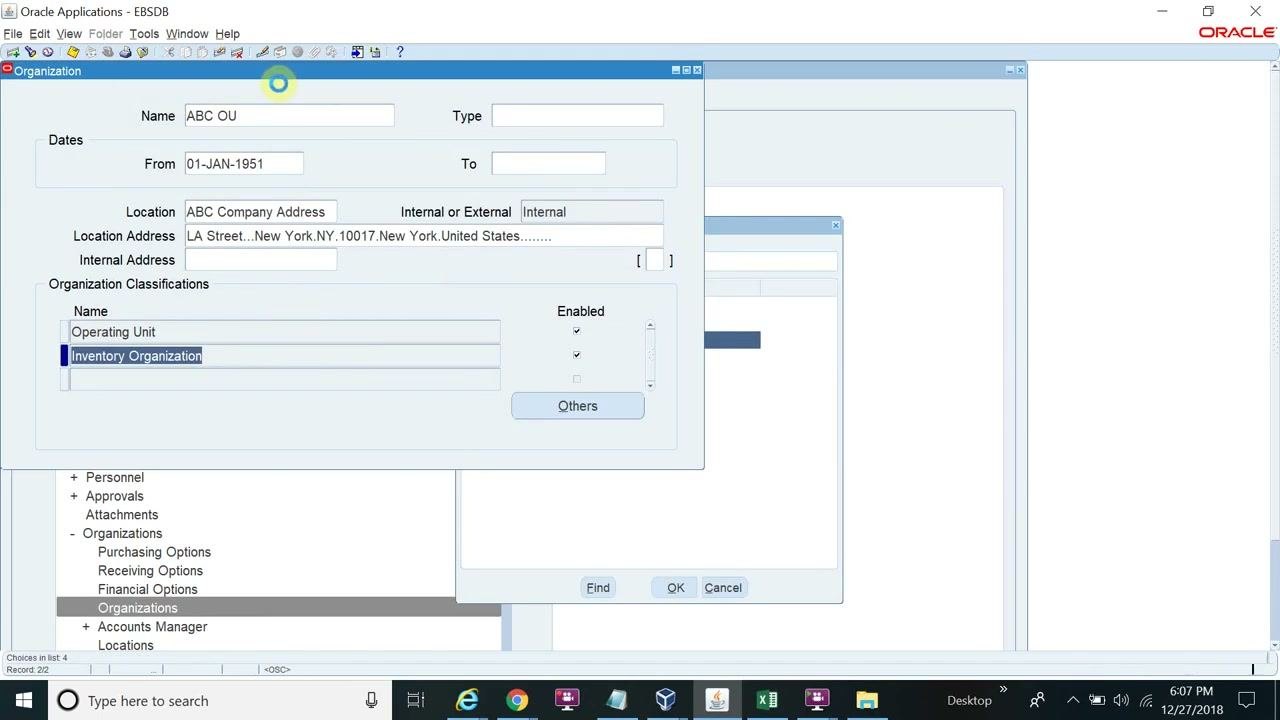
The Organization form now shows both the Operating Unit and Inventory Organization classifications enabled. You can select this inventory organization during Payables setup.
Step 17: Complete the inventory parameters
The Organization Parameters window opens with several tabs, including Inventory Parameters and Costing Information. On the Inventory Parameters tab, fill in:
- Organization Code: for example,
ABC - Item Master Organization: leave blank for now
- Calendar: leave blank for now
- Move Order Timeout Action:
Approve automatically - Locator Control:
None
Additional checkboxes and fields are available for further configuration.
Step 18: Select the item master organization
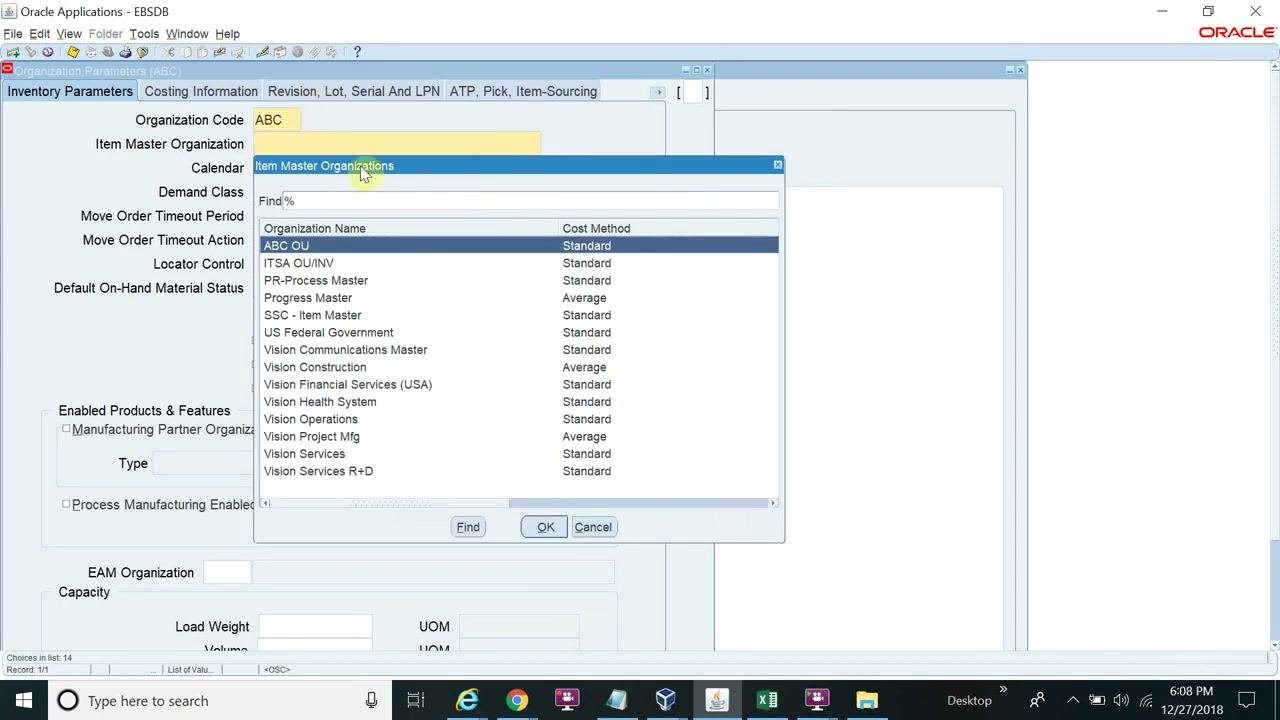
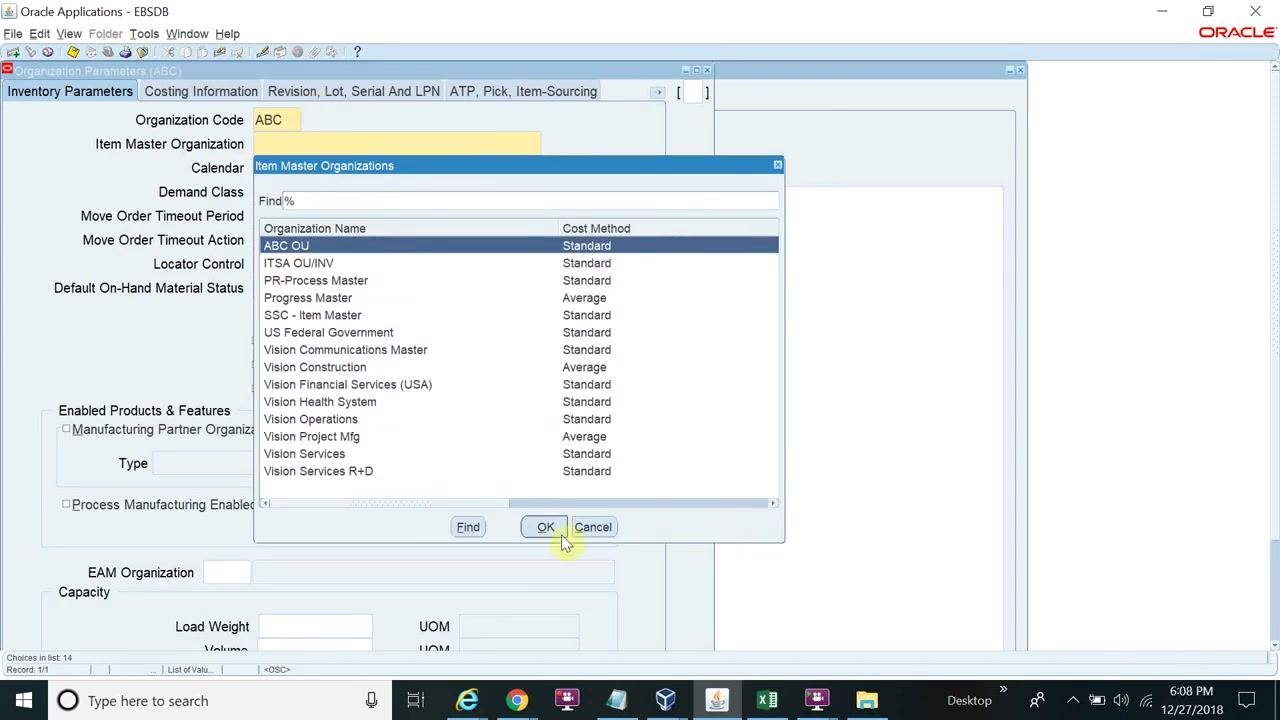
- In the Item Master Organization field, click the list of values (LOV) button.
- In the Item Master Organizations window, select the appropriate organization (for example,
ABC OU) with the cost method you want (for example,Standard). - Click OK.
The Organization Parameters window now shows these values:
- Organization Code:
ABC - Item Master Organization:
ABC OU - Calendar:
Vision01 - Move Order Timeout Action:
Approve automatically - Locator Control:
None - Allow Negative Balances: checked
Options for enabled products and features are visible but not selected.
Step 19: Open the Material valuation account
- On the Costing Information tab, click into the Material field under Valuation Accounts.
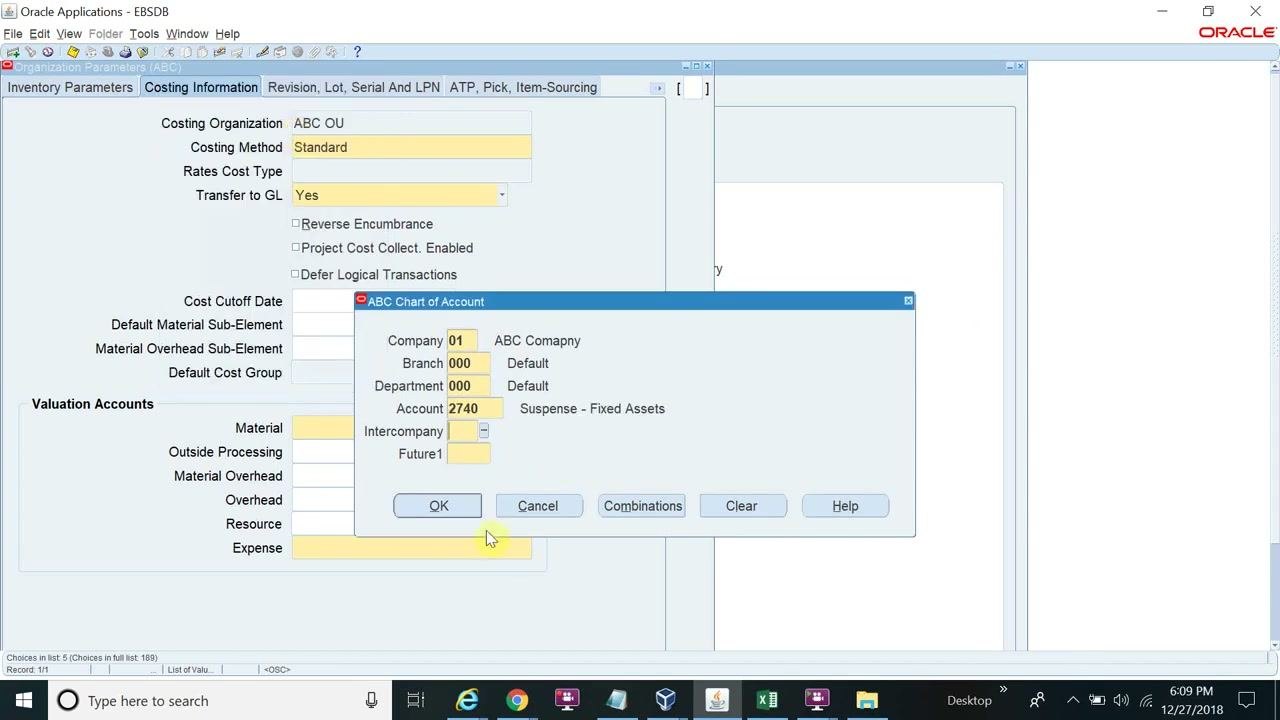
- In the "ABC Chart of Account" window that appears, enter:
- Company:
01(ABC Company) - Branch:
000(Default) - Department:
000(Default) - Account:
0000(None) - Intercompany: leave blank
- Future1: leave blank
- Company:
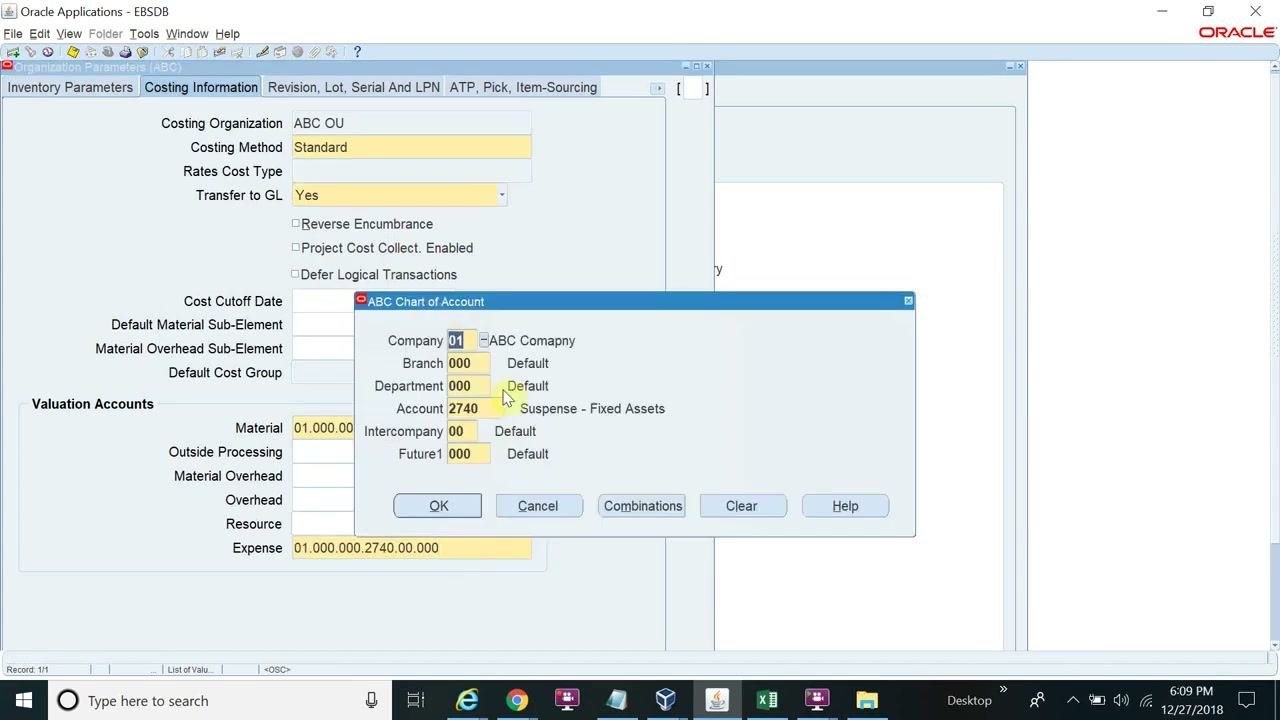
Step 20: Update the Account field
If you need a specific account, update the Account field. For example, change it to 2740 (Suspense - Fixed Assets). Then click OK.
Step 21: Complete the account combination
Make sure all required fields are filled:
- Company:
01 - Branch:
000 - Department:
000 - Account:
2740(Suspense - Fixed Assets) - Intercompany:
00(Default) - Future1:
000(Default)
Click OK to save the account combination.
Step 22: Enter the remaining valuation accounts
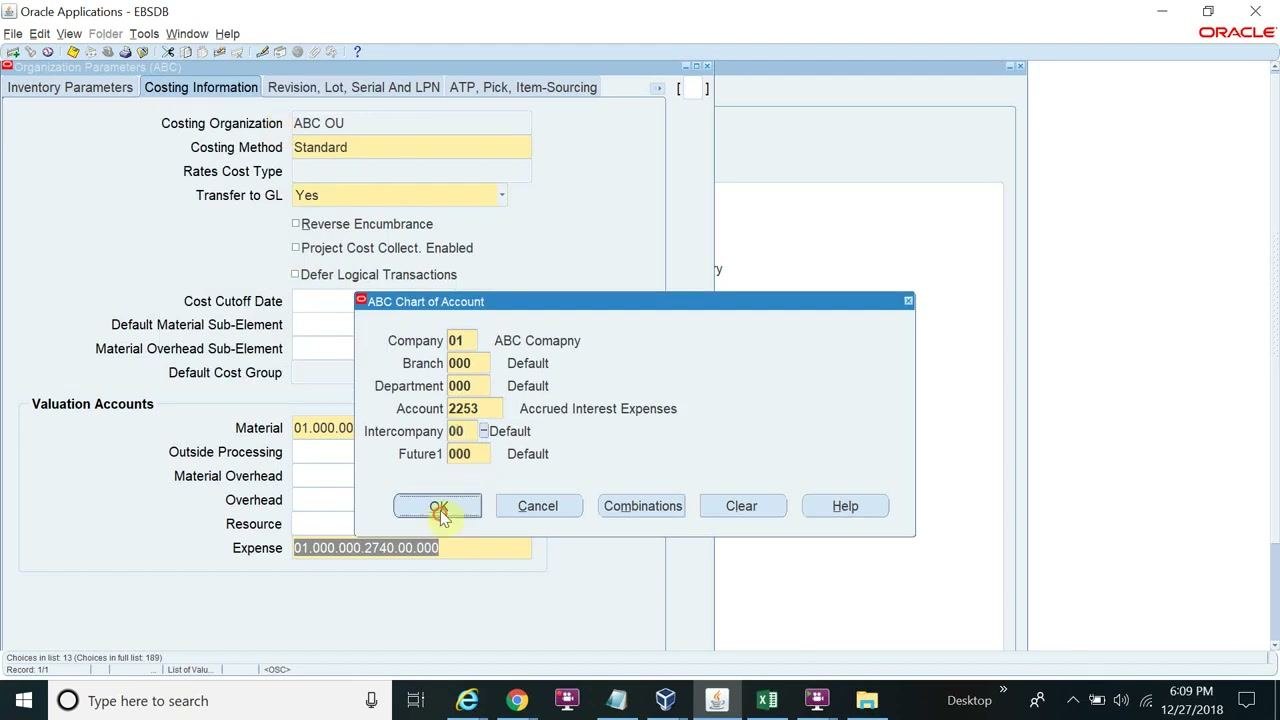
Repeat the process for the other fields: Outside Processing, Material Overhead, Overhead, Resource, and Expense.
- Click the field.
- Enter or select the appropriate account combination. For Expense, for example, use Account
2253(Accrued Interest Expenses). - Click OK to confirm each entry.
Step 23: Configure revision, lot, serial, and LPN parameters
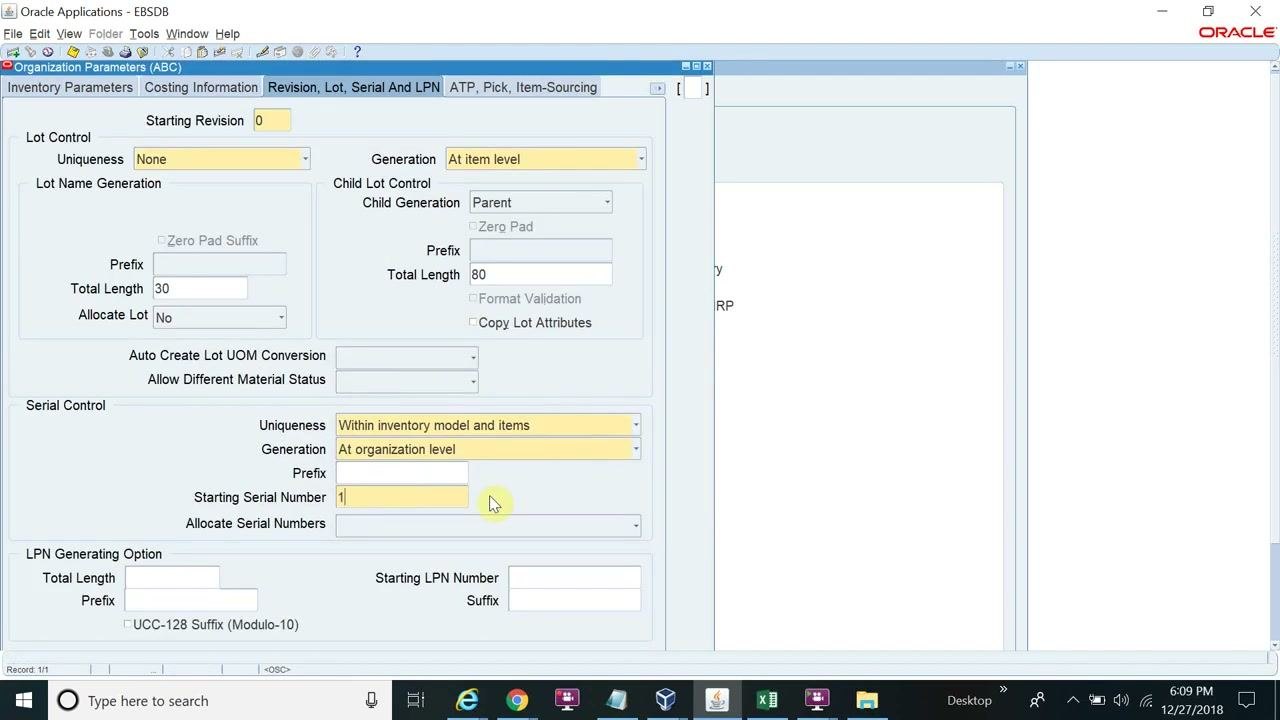
Open the Revision, Lot, Serial And LPN tab and set these values:
- Starting Revision:
0 - Lot Control, Uniqueness:
None - Lot Control, Generation:
At item level - Total Length:
30 - Prefix: leave blank
- Allocate Lot:
No - Serial Control, Uniqueness:
Within inventory model and items - Serial Control, Generation:
At organization level - Prefix: leave blank
- Starting Serial Number:
1
The LPN Generating Option settings are available but left unfilled in this example.
Step 24: Enter the other accounts
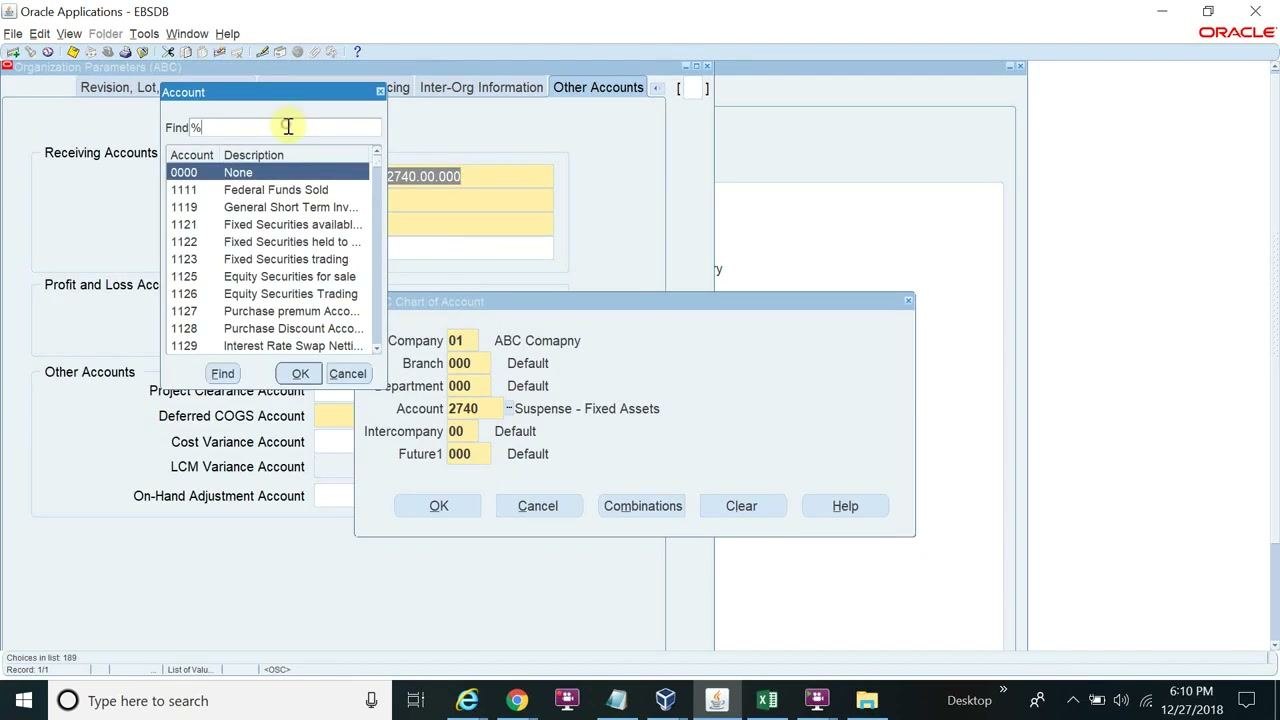
- On the Other Accounts tab, click into each required account field (for example, Project Clearance Account, Deferred COGS Account, Cost Variance Account, LCM Variance Account, and On-Hand Adjustment Account).
- In the Account selection window that appears, use the Find% search box to filter account codes by description or number. For example, enter
Find%PriceorFind%Varie%. - Select the appropriate account from the list (for example,
0000 None,1111 Federal Funds Sold, or2740 Suspense - Fixed Assets). - Click OK.
If no accounts match your search, the list is empty. Click OK or Cancel to exit the search.
Step 25: Confirm and save each account combination
After you select an account, review the "ABC Chart of Account" window to confirm all fields are filled:
- Company:
01(ABC Company) - Branch:
000(Default) - Department:
000(Default) - Account: for example,
2720(Suspense - Accounts Receivable) - Intercompany:
00(Default) - Future1:
000(Default)
Click OK to save the combination.
Step 26: Review all entered account information
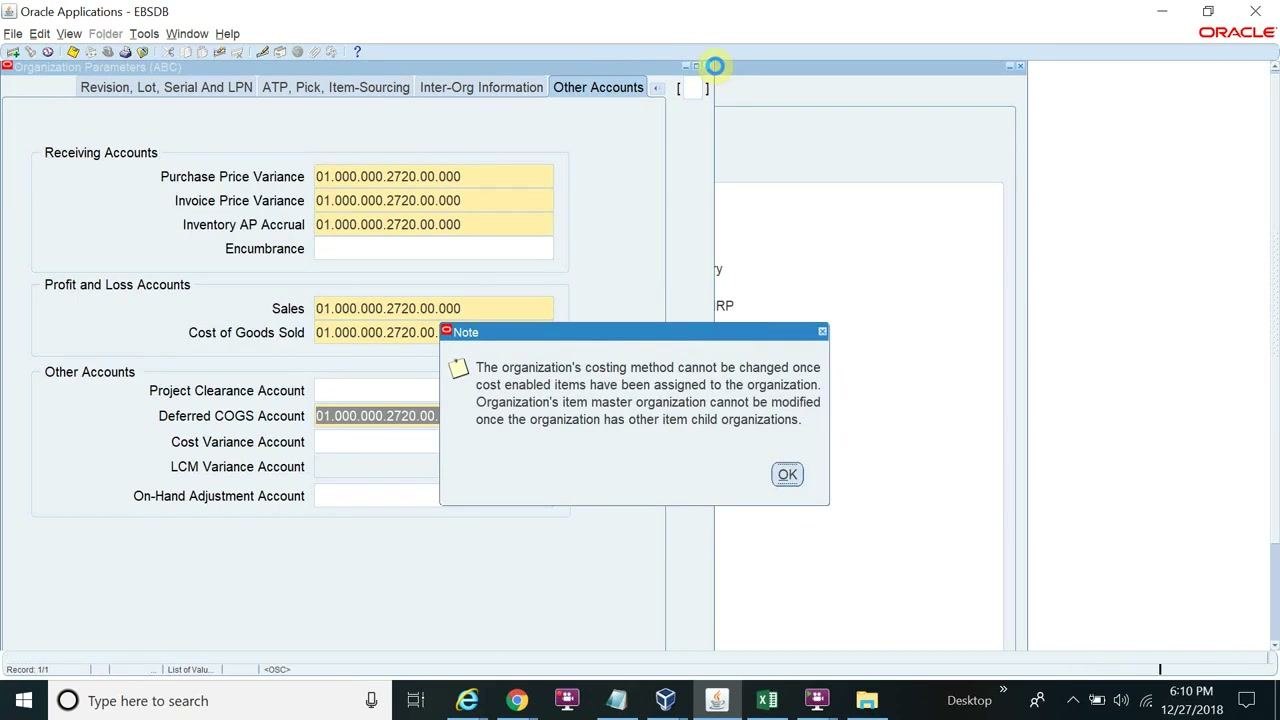
Make sure all required fields under Receiving Accounts, Profit and Loss Accounts, and Other Accounts contain the correct account combinations. For example:
- Purchase Price Variance:
01.000.000.2720.00.000 - Invoice Price Variance:
01.000.000.2720.00.000 - Inventory AP Accrual:
01.000.000.2720.00.000 - Sales:
01.000.000.2720.00.000 - Cost of Goods Sold:
01.000.000.2720.00.000 - Deferred COGS Account:
01.000.000.2720.00.000
You can leave other fields blank if they are not required.
Step 27: Save the organization parameters
Click the Save icon, or select File > Save, to save your changes.
A note may appear stating that the organization's costing method cannot be changed once cost-enabled items have been assigned to the organization. It also states that the item master organization cannot be modified once the organization has other item child organizations. Read the message carefully, then click OK to continue.
Step 28: Return to the navigator and confirm the organization
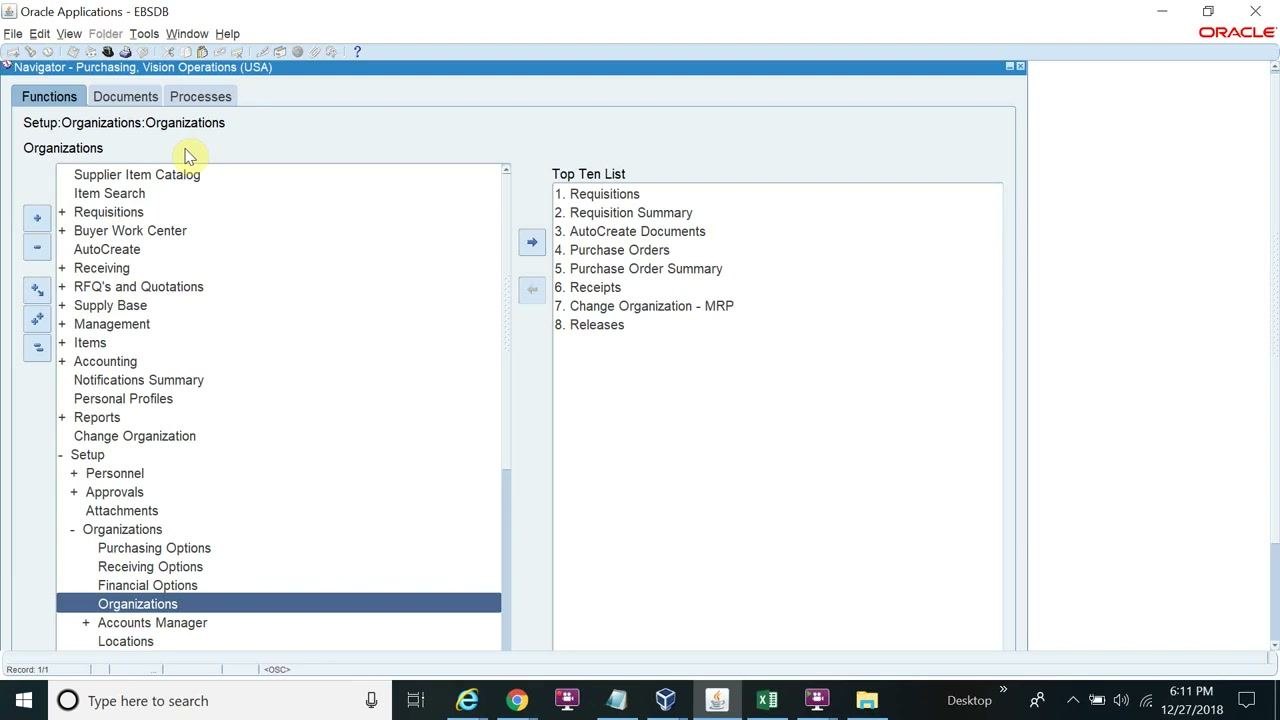
- Return to the main "Navigator - Purchasing, Vision Operations (USA)" window.
- Confirm that the Organizations setup screen reflects your newly created inventory organization.
The left pane lists options such as Supplier Item Catalog, Requisitions, Buyer Work Center, Receiving, RFQ's and Quotations, Supply Base, Management, Items, Accounting, Reports, Change Organization, and Setup. The right pane shows the Top Ten List for quick access to common functions.
Make sure you have entered the calendar, currency, value set, and any other configuration details you need. The organization is then available for further configuration or use in Oracle Applications.
Step 29: Review the mandatory fields for AP setup
Confirm that all required organization information is entered:
- Organization Code:
ABC - Item Master Organization:
ABC - Operating Unit:
ABC
Also confirm that the inventory organization is saved and its accounting information is complete. Verify that you can select the organization during Payables setup.
Summary
You have now created an operating unit in Oracle EBS and:
- Associated the operating unit with your intended business group by setting the HR Security Profile.
- Entered the ledger, legal entity, and short code, and verified the result in the Accounting Setup Manager.
- Added an inventory organization with its accounting, inventory, valuation, and other account information.
- Prepared the organization for selection during Accounts Payable setup.
What's next
Continue with your Payables setup and select the new inventory organization when prompted. If the Accounting Setup Manager shows an unexpected business group for the operating unit, review your HR Security Profile settings and your legal entity setup.
Generation details: cost, quality tiers
Docsie billed 5,500 credits ($3.85) to analyze this 11-minute video at standard quality. The rewrite, template fill and Word/PDF exports were included. The same video at each quality tier:
| Quality | Frames sampled | Credits | Approx. cost |
|---|---|---|---|
| Draft | every 16-30 s | 2,750 | $1.92 |
| Standard (this guide) | every 8-15 s | 5,500 | $3.85 |
| Detailed | every 4-7 s | 11,000 | $7.70 |
| Ultra | every 1-3 s | 22,000 | $15.40 |
Credits priced at $0.70 per 1,000; plans include a monthly allowance. Enterprise customers on on-premise or bring-your-own-model deployments run this on their own inference and pay no per-video credits.
Generated by Docsie Video-to-Docs on 2026-11-15 from a 10-minute video. Screenshots are frames from the source video and belong to their creator, Sohatech World, whose original is embedded above. If you own this video and want the guide removed or credited differently, contact us and we will act within one business day.