
How to Change Your Benefit Elections in Workday
This guide walks you through how to change your benefit elections in Workday at UChicago. You'll learn how to log in to Workday, start a benefit change based on a qualifying life event, elect or waive coverage, add dependents and beneficiaries, and submit your final elections for review.
Video: Workday@Uchicago - Changing Your Benefits Elections by Workday UChicago. All credit for the demonstration goes to the creator; watch the original on YouTube. The written guide below was generated from this video by Docsie. Creator? Request a change or removal.
This guide walks you through how to change your benefit elections in Workday at UChicago. You'll learn how to log in to Workday, start a benefit change based on a qualifying life event, elect or waive coverage, add dependents and beneficiaries, and submit your final elections for review.
Prerequisites
Before you begin, make sure you have the following:
- A supported web browser. Firefox is recommended for the best experience with Workday.
- Google Chrome or Safari also work if Firefox isn't available.
- Internet Explorer version 9 or above, if you use IE.
- Your CNET ID to sign in.
- Documentation for your qualifying event (such as a marriage certificate, birth certificate, or adoption documents), if applicable.
Open Workday in your browser
Open your supported browser and go to workday.uchicago.edu.

Sign in
Sign in to Workday using your CNET ID.
Open the Benefits Worklet
On your Workday dashboard, locate the Benefits Worklet and click on it to view your benefit information.
Start a benefit change
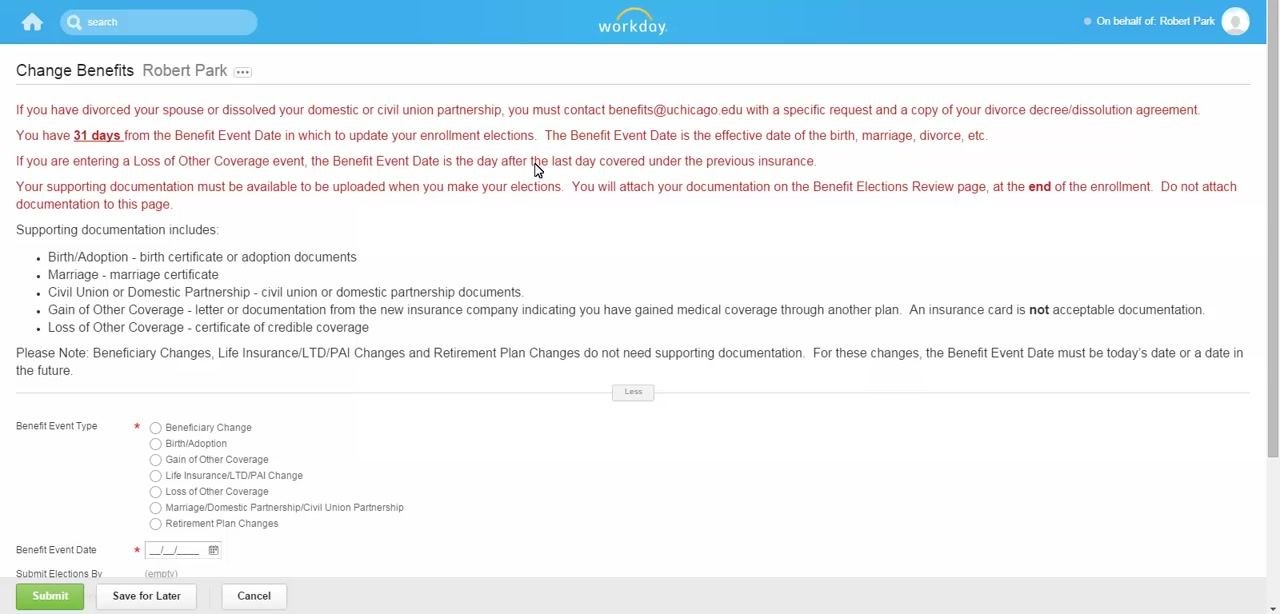
If you're changing your benefit elections because of a qualified change—such as a birth, adoption, marriage, or loss of other coverage—click Benefits under the Change column.
Select your benefit event type and date
Click the benefit event type that matches your situation, such as Birth/Adoption, Marriage, or Loss of Other Coverage. Then use the calendar prompt to select the benefit event date.
The benefit event date depends on your situation:
- For a birth, adoption, or marriage, use the effective date of that event.
- For loss of other coverage, use the day after the last day you were covered under your previous insurance.
Submit the benefit event
Scroll down and click Submit to submit your benefit event.
Open your benefit elections
After submitting the benefit event, click Open to begin changing your benefit elections.
Elect or waive health care plans
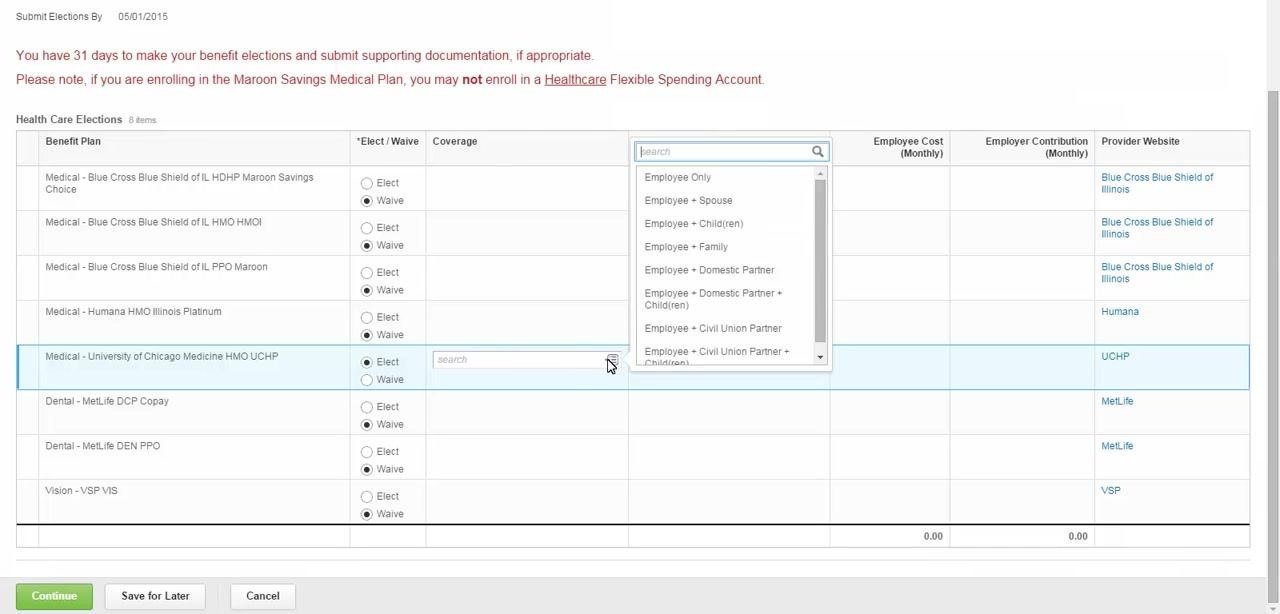
Review the benefit plans displayed. In the Elect or Waive column, select Elect or Waive for each plan. Then click the prompt in the Coverage column to select your coverage level, such as Employee Only, Employee + Spouse, Employee + Child(ren), or Employee + Family.
Add or select a dependent
To enroll a dependent, click the prompt in the Enroll Dependents column. If you're creating a new dependent, select Add My Dependent From Enrollment. If your dependent is already listed in Workday as a beneficiary or emergency contact, select the Yes radial button and use the prompt to locate them.
Create a new dependent record
On the Add My Dependent From Enrollment screen, indicate whether your new dependent is already a beneficiary or emergency contact by selecting Yes or No. If Yes, use the search prompt to select the existing contact. To also designate your new dependent as a beneficiary, select Yes under Use your new dependent as a beneficiary? Click OK to proceed.
Enter dependent details
Fill in the required fields for your new dependent:
- Country (for example, United States of America)
- First Name
- Last Name
- Relationship
- Date of Birth
- Gender
Optional fields include prefix, middle name, suffix, citizenship status, student status, disability status, and contact information. Click OK to save your entry.
Continue electing or waiving benefit plans
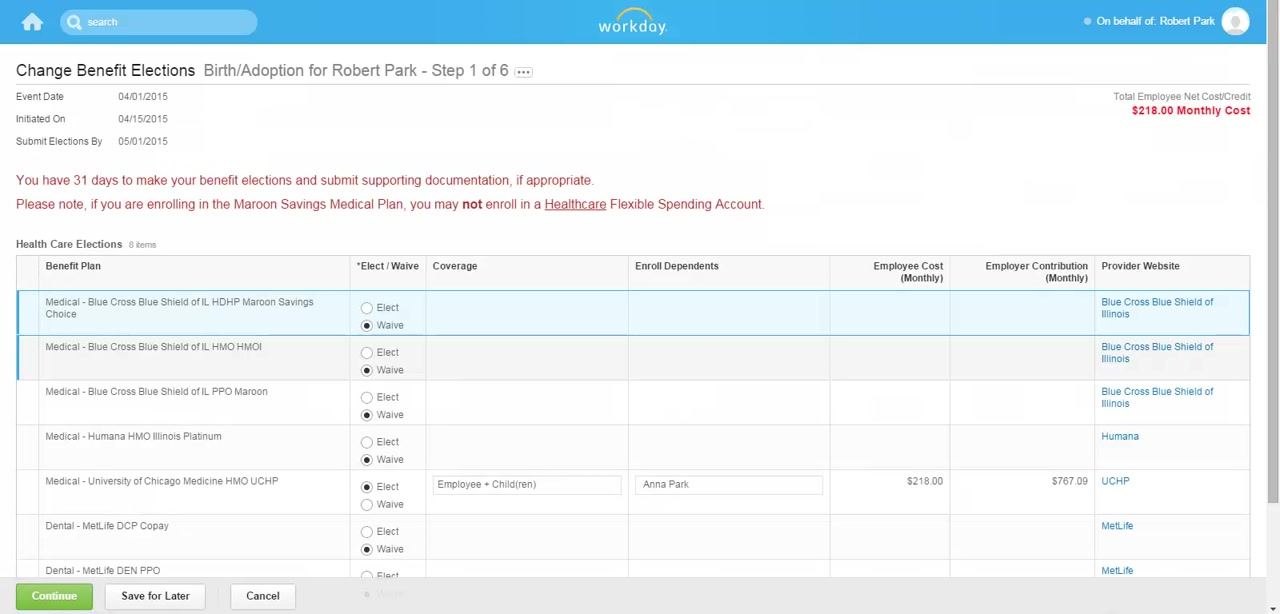
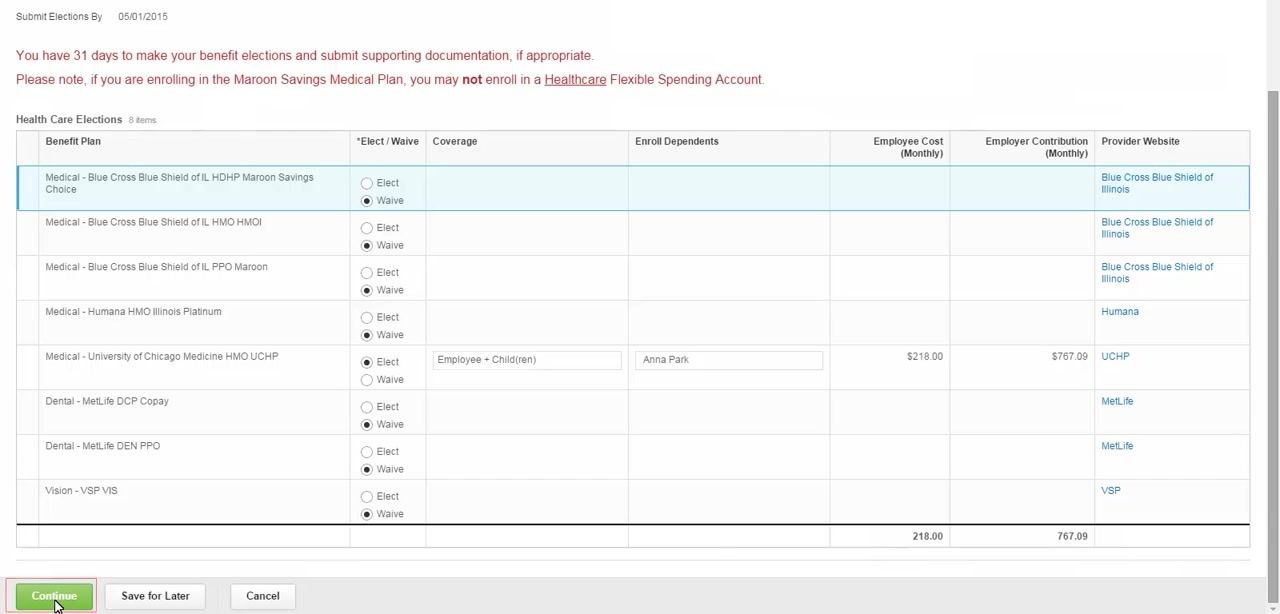
For each benefit plan listed, select Elect or Waive in the Elect/Waive column, then use the Coverage prompt to choose the appropriate level, such as Employee + Child(ren). If you're enrolling dependents, confirm their names appear in the Enroll Dependents column. Click Continue when you're finished.
Provide a Social Security Number or reason
If you enrolled a dependent without a Social Security Number (SSN), either enter the SSN in the Identification # field, or select Reason ID is Not Available and provide a reason in the text box. Click Continue to proceed.
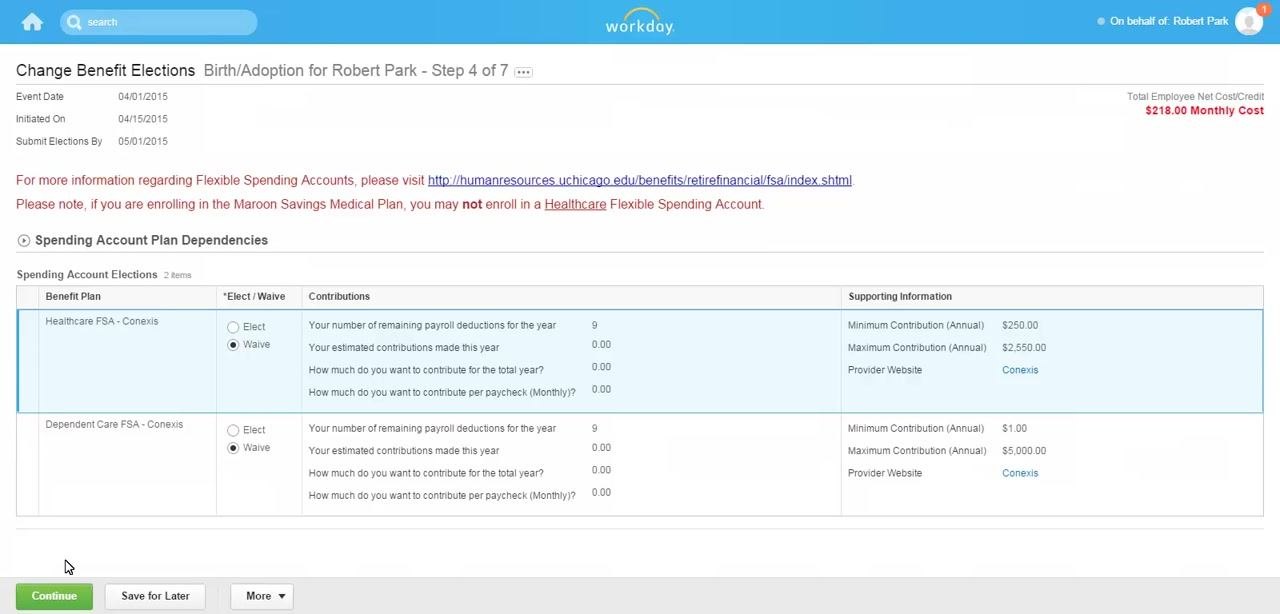
Elect or waive a Health Savings Account
If you're eligible, elect or waive a Health Savings Account (HSA) for each HSA plan listed. If electing, enter your desired annual or per-paycheck contribution amount. Click Continue to proceed.
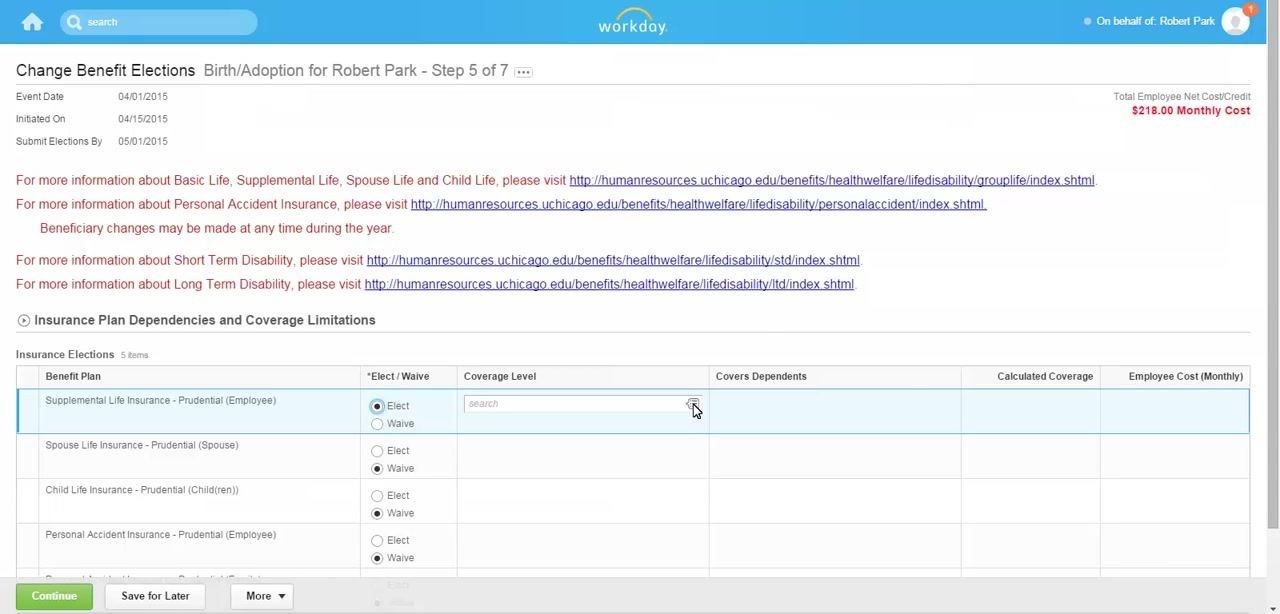
Elect or waive spending accounts
On the Spending Account Elections page, select Elect or Waive for each plan, such as Healthcare FSA or Dependent Care FSA. If electing, enter your desired annual or per-paycheck contribution amount. Click Continue to proceed.
Make life insurance elections
On the Insurance Elections page, review the available plans, such as Supplemental Life Insurance, Spouse Life Insurance, Child Life Insurance, and Personal Accident Insurance. Select Elect or Waive for each plan, and use the Coverage Level prompt to choose the appropriate level, such as 2X Salary. Click Continue to proceed.
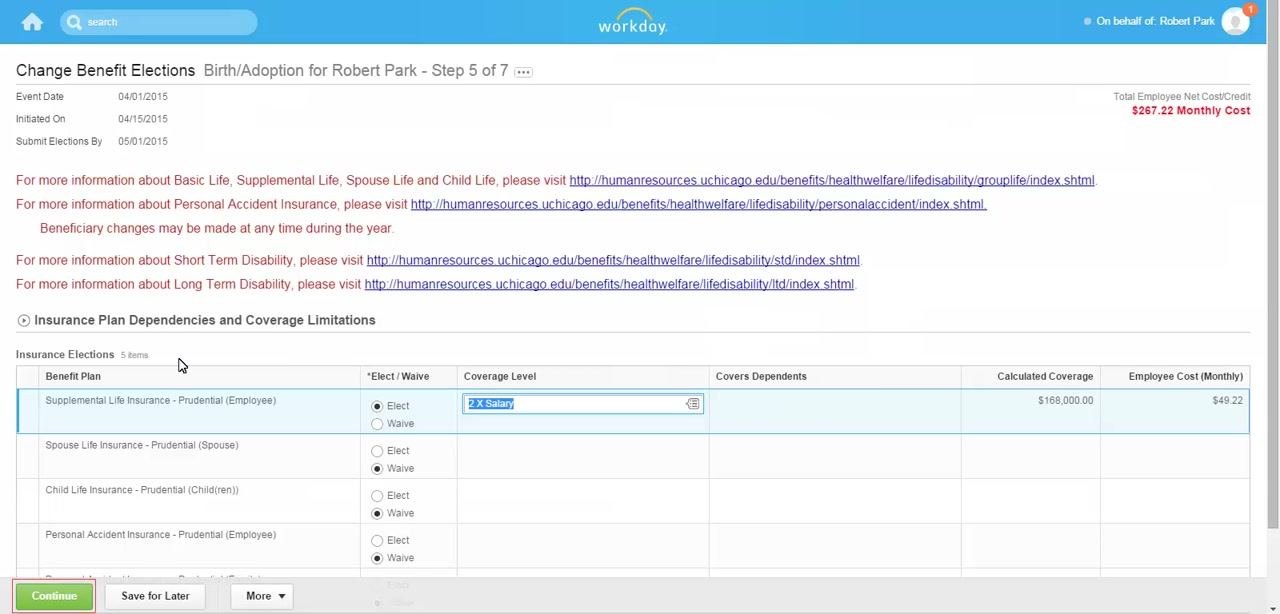
Designate beneficiaries
If your selected plan requires a beneficiary designation, click the plus icon (+) to add one. Use the prompt to select an existing beneficiary or create a new one, then assign the primary and/or contingent percentage for each beneficiary. Click Continue to proceed.
Confirm beneficiary allocations
On the Change Benefit Elections screen, locate the Beneficiary Designations section. For each plan requiring a beneficiary (for example, Supplemental Life Insurance - Prudential (Employee)), click the plus icon (+) to add a beneficiary, then use the search prompt to select an existing beneficiary, trust, or create a new one. Select Primary or Contingent for each designation and enter the percentage amount, such as 100% Primary and 0% Contingent. Click Continue to proceed.
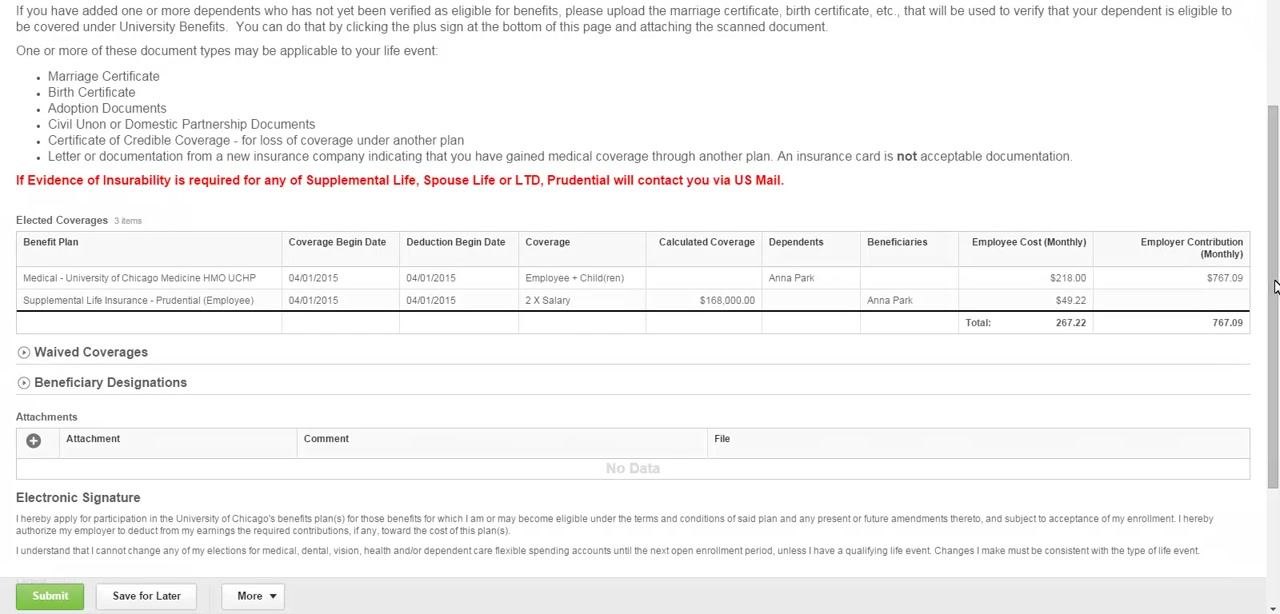
Review your benefit elections
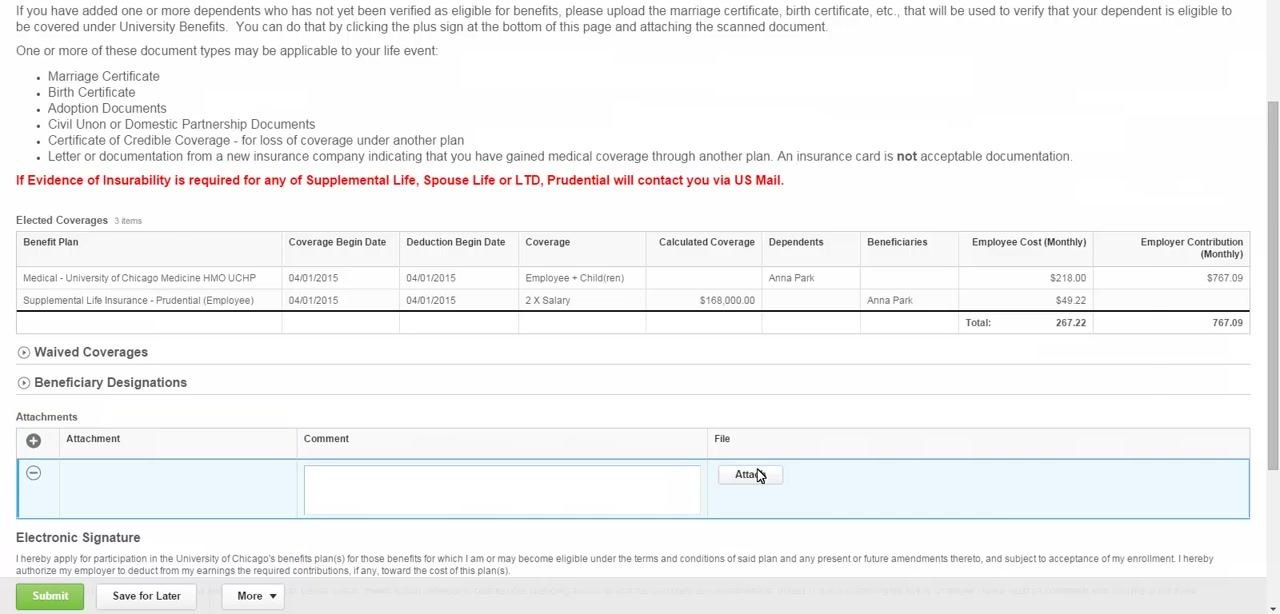
After completing all elections, review the Benefit Elections Review summary screen. Check all information carefully, including elected coverages (plan names, coverage levels, dependents, beneficiaries, and costs), waived coverages, and beneficiary designations. Make sure any required documentation is ready to upload if you added dependents or made changes requiring verification.
Attach required documentation
If you need to provide supporting documents, such as a marriage certificate, birth certificate, or adoption documents, scroll to the Attachments section. Click the plus icon (+) to add an attachment, enter an optional comment describing the document, and click Attach to upload the file from your computer. Confirm the file is successfully attached before proceeding.
Acknowledge the electronic signature statement
Read the statement under the Electronic Signature section, which outlines your agreement to the terms and conditions of the University of Chicago's benefit plans. When ready, click the I Agree checkbox to provide your electronic signature.
Submit your benefit elections
Click Submit at the bottom of the page to finalize your benefit elections. Wait for confirmation that your elections have been submitted.
Print a copy for your records
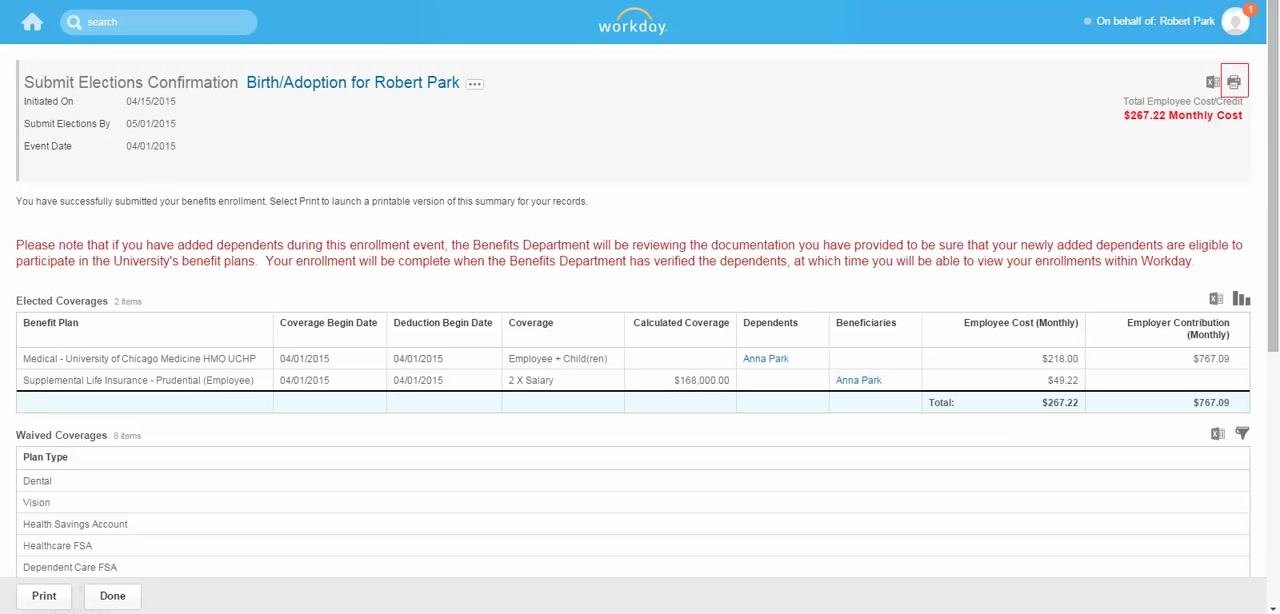
On the Submit Elections Confirmation screen, review the summary of your submitted elections. To print a copy for your records, click the Print icon in the upper right corner, or click the Print button at the bottom of the page. Click Done to exit the confirmation screen.
What's next
Your benefit elections are now submitted. The Benefits Department will review any attached documentation to verify eligibility for your dependents and coverage. You will be notified once your enrollment is complete and verified.
Summary
- Use a supported browser and sign in with your CNET ID to access Workday.
- Access your benefit information and start changes through the Benefits Worklet.
- Select the correct benefit event type and date based on your qualifying event, then submit it.
- Elect or waive health care, HSA, spending account, and life insurance plans, and choose coverage levels.
- Add dependents and provide their required details, including SSN or a reason it's unavailable.
- Designate primary and contingent beneficiaries with percentage allocations.
- Review your elections, attach required documentation, and acknowledge the electronic signature.
- Submit your elections and print a copy for your records.
Generation details: cost, quality tiers
Docsie billed 2,500 credits ($1.75) to analyze this 5-minute video at standard quality. The rewrite, template fill and Word/PDF exports were included. The same video at each quality tier:
| Quality | Frames sampled | Credits | Approx. cost |
|---|---|---|---|
| Draft | every 16-30 s | 1,250 | $0.88 |
| Standard (this guide) | every 8-15 s | 2,500 | $1.75 |
| Detailed | every 4-7 s | 5,000 | $3.50 |
| Ultra | every 1-3 s | 10,000 | $7.00 |
Credits priced at $0.70 per 1,000; plans include a monthly allowance. Enterprise customers on on-premise or bring-your-own-model deployments run this on their own inference and pay no per-video credits.
Generated by Docsie Video-to-Docs on 2026-10-06 from a 4-minute video. Screenshots are frames from the source video and belong to their creator, Workday UChicago, whose original is embedded above. If you own this video and want the guide removed or credited differently, contact us and we will act within one business day.