
How to Fix a Missed Punch in UKG
When an employee forgets to clock in or out, UKG flags the entry as an exception on their timecard. This guide shows you how to fix a missed punch in UKG for employees on your assigned projects, from locating the exception in your dashboard to correcting the timecard and verifying the fix.
Video: UKG Correcting Missed Punches by HRPayroll DAVACO. All credit for the demonstration goes to the creator; watch the original on YouTube. The written guide below was generated from this video by Docsie. Creator? Request a change or removal.
When an employee forgets to clock in or out, UKG flags the entry as an exception on their timecard. This guide shows you how to fix a missed punch in UKG for employees on your assigned projects, from locating the exception in your dashboard to correcting the timecard and verifying the fix.
Prerequisites
- Access to the UKG system with login credentials for your account.
- A Hyperfind filter set up for your project or area (for example, a project manager filter).
- Knowledge of the pay period dates you need to review.
Accessing the UKG dashboard and locating missed punches
Step 1: Access the UKG dashboard
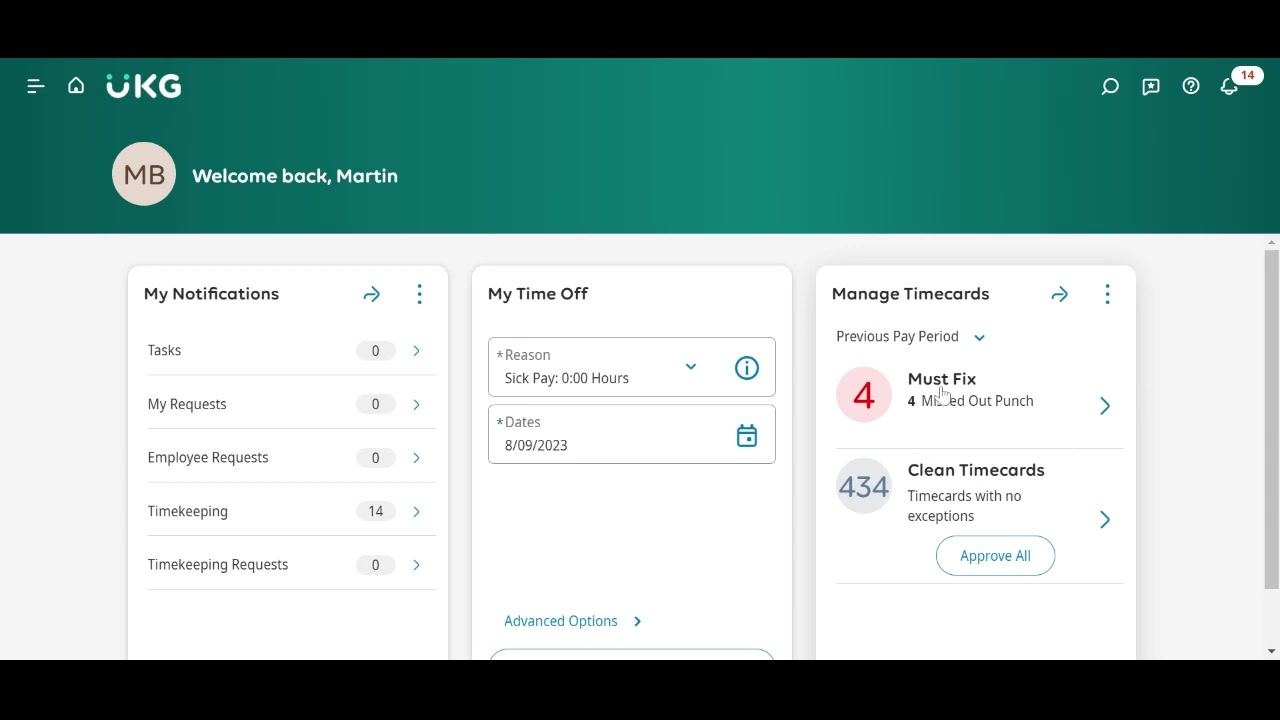
Log in to the UKG system. On the main dashboard, you'll see three key sections:
- My Notifications: Tasks, Requests, Employee Requests, Timekeeping, and Timekeeping Requests.
- My Time Off: Reason (for example, Sick Pay: 0:00 Hours) and Dates (for example, 8/09/2023).
- Manage Timecards: Shows "Must Fix" items (for example, 4 Missed Out Punch) and "Clean Timecards" (for example, 434 Timecards with no exceptions).
The "Must Fix" number tells you how many missed punches need attention.
Step 2: Avoid the "Must Fix" link
Do not click the Must Fix link under Manage Timecards. Clicking this link shows all field employees across the organization, not just those on your projects.
Step 3: Navigate to the Dataview Library
Open the main menu on the left side of the screen. Under Dataviews & Reports, select Dataview Library.
Step 4: Open the Exception Summary
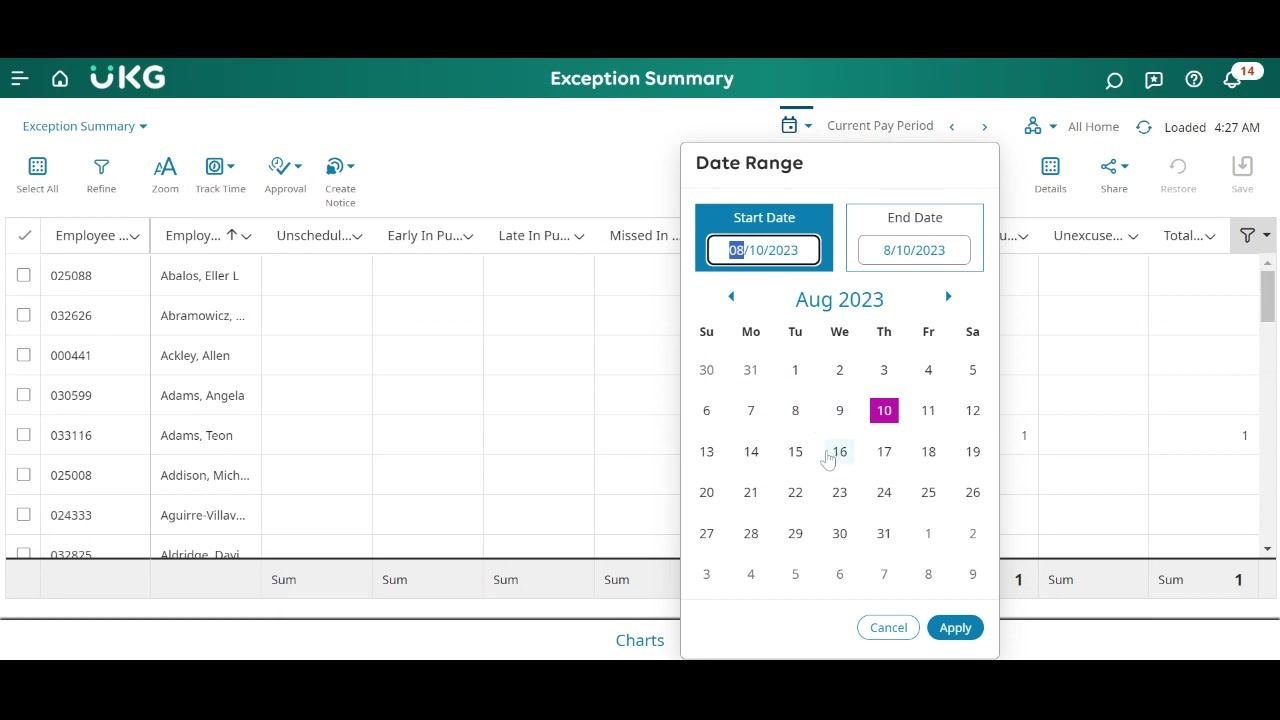
In the Dataview Library, scroll down and select Exception Summary. This view displays a table of employees with their exception counts for the current pay period. In the example shown, only one missed punch appears for the current group.
Step 5: Set the correct date range
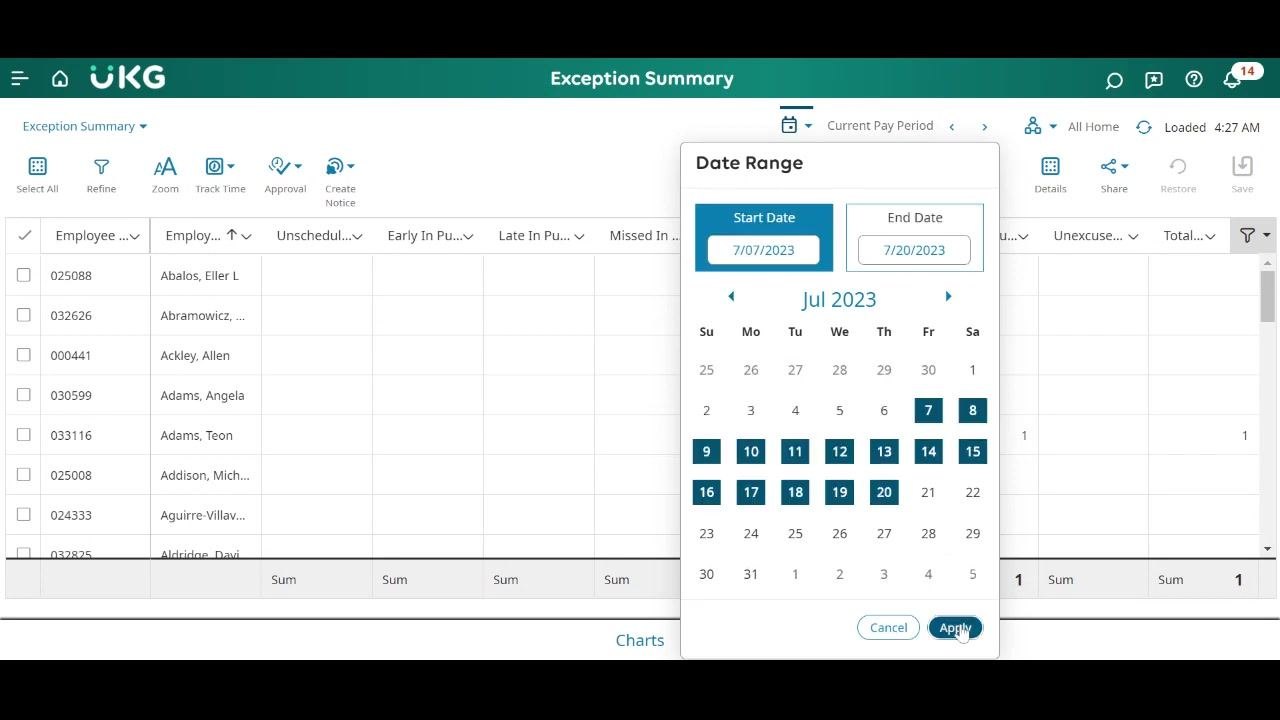
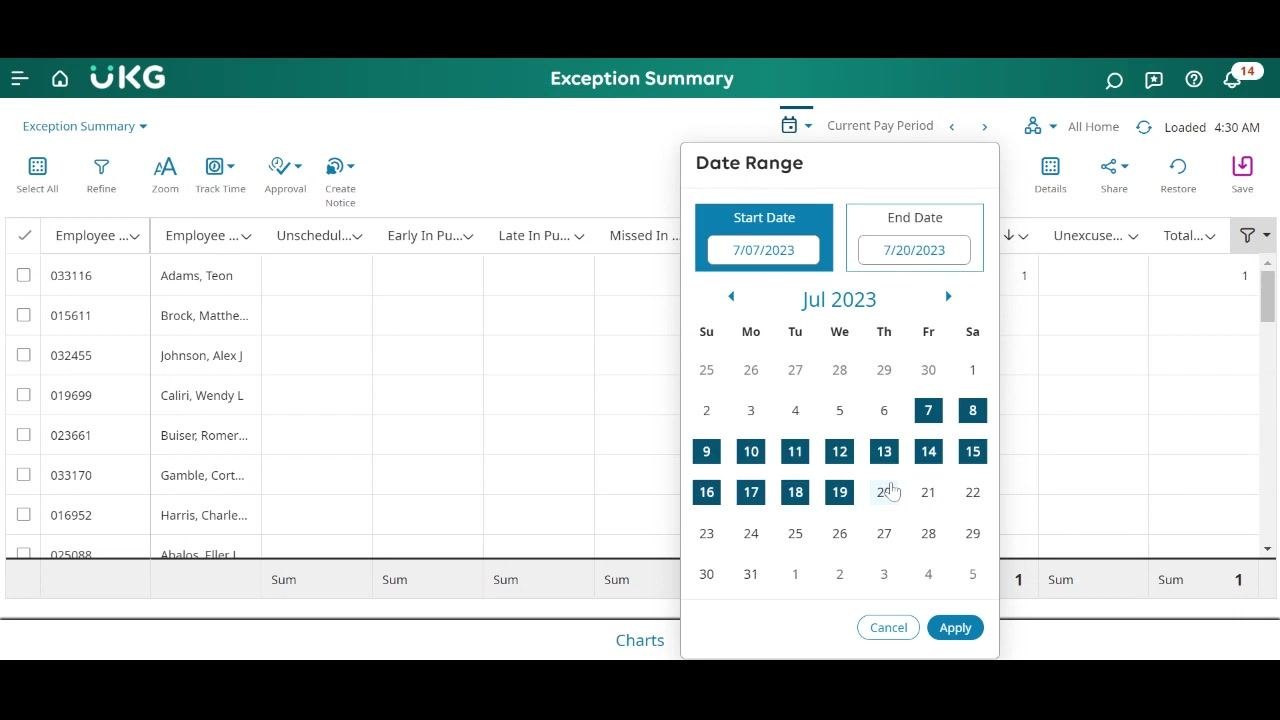
Click the date range selector (calendar icon) and confirm you're viewing the correct pay period. For example, set the Start Date to 7/07/2023 and the End Date to 7/20/2023, then click Apply to update the data.
Step 6: Review exception data
After applying the date range, review the updated Exception Summary. The table now shows the total missed punches for the selected period (for example, 7 missed out punches and 1 missed in punch). Sort the table by the "Missed Out" or "Missed In" columns to bring employees with exceptions to the top.
Step 7: Filter by project using Hyperfind
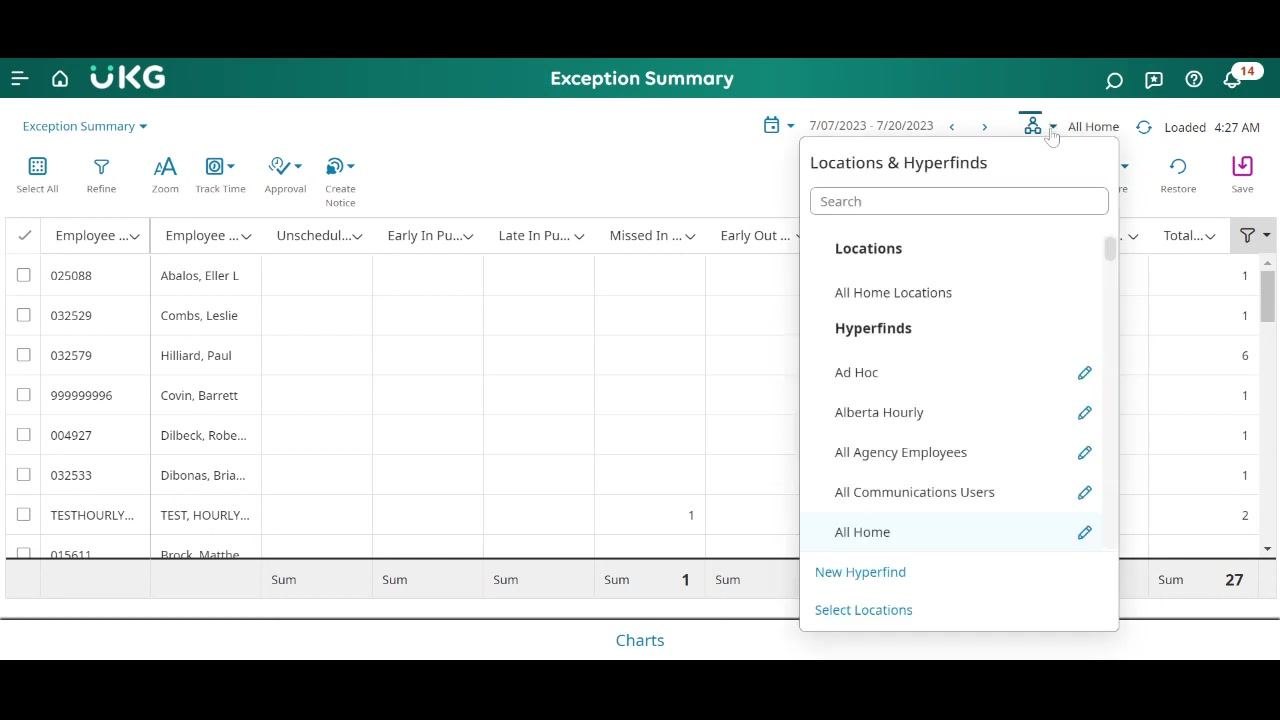
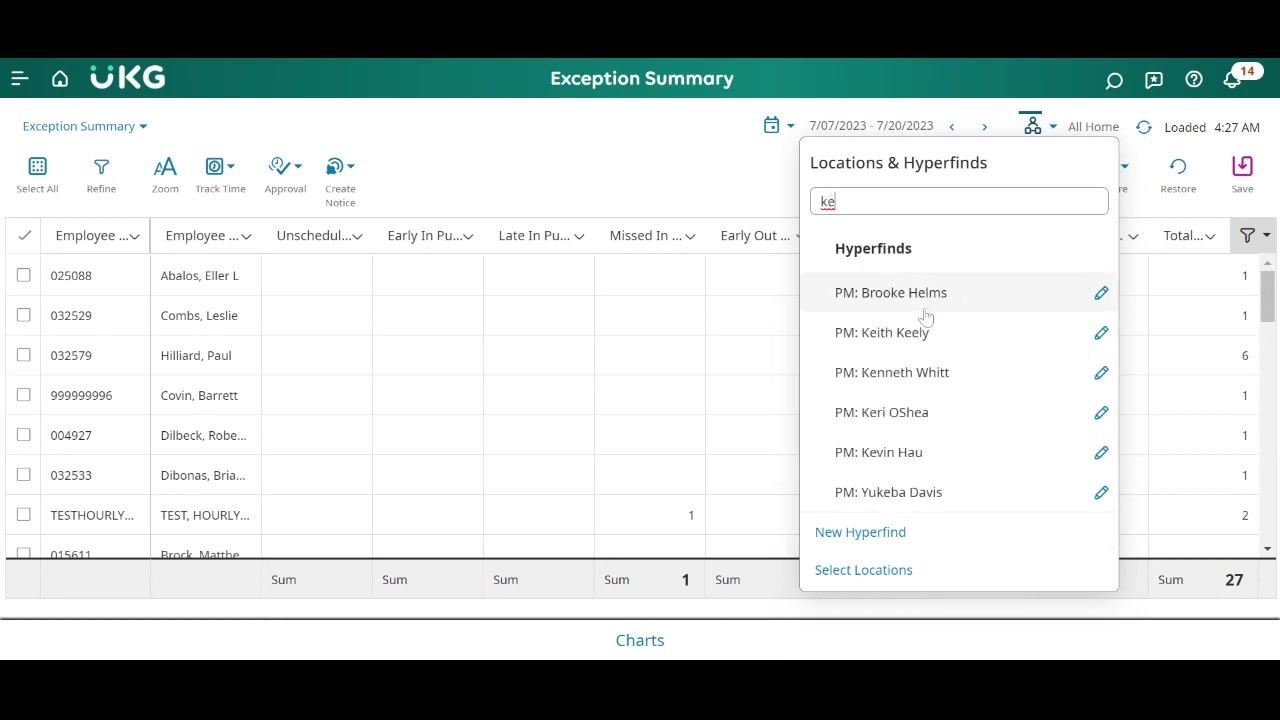
Click the Locations & Hyperfinds icon at the top right of the Exception Summary. Select the appropriate Hyperfind filter for your project or location (for example, "All Home," "Alberta Hourly," or create a new Hyperfind). This ensures you only see exceptions for employees assigned to your projects.
Filtering exceptions and selecting employees to correct
Step 8: Apply the Hyperfind filter and identify employees with exceptions
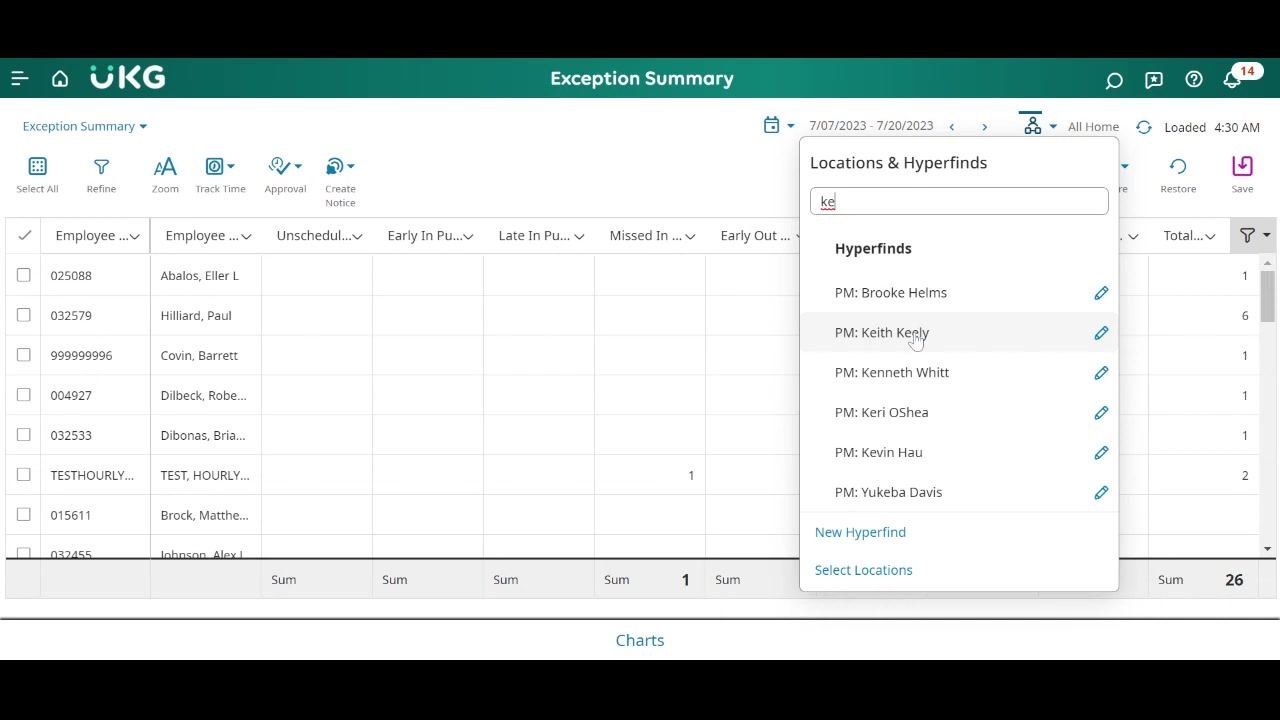
Select the Hyperfind filter for your designated area (for example, "PM: Keith Keely") and save the selection to keep it active for your session. Review the filtered Exception Summary table, which now shows only employees in your area with missing data. In the example, three employees appear with missed punches.
Step 9: Select employees with missed punches
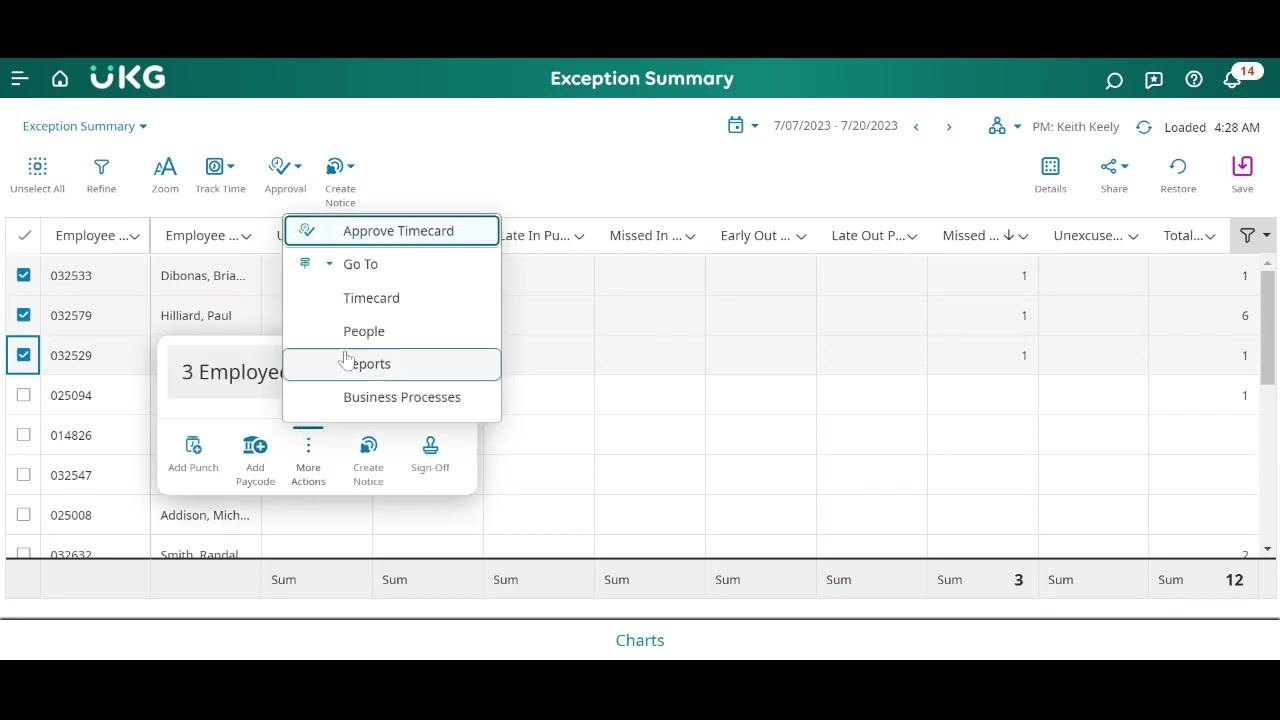
Check the boxes next to the employees who have missed punches in the Exception Summary. Right-click the selected employees to open the context menu, then hover over More Actions and select Go To > Timecard to open their timecards for correction.
Step 10: Review employee timecard details
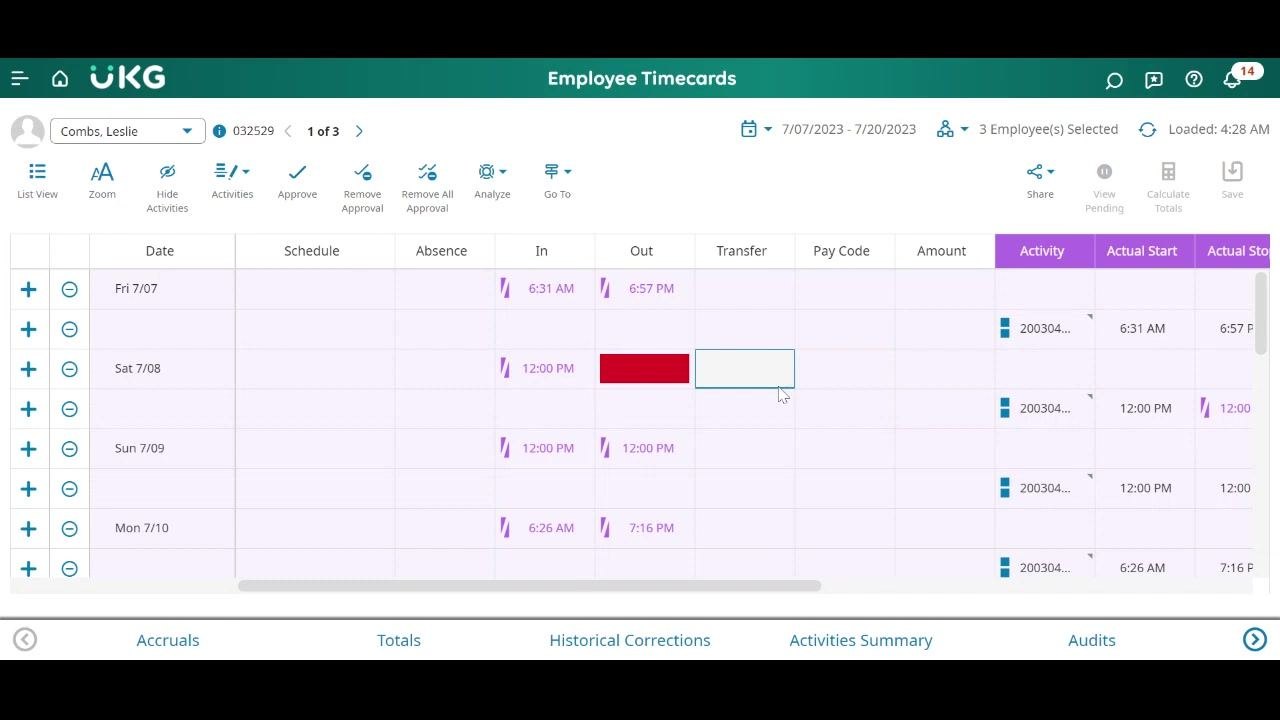
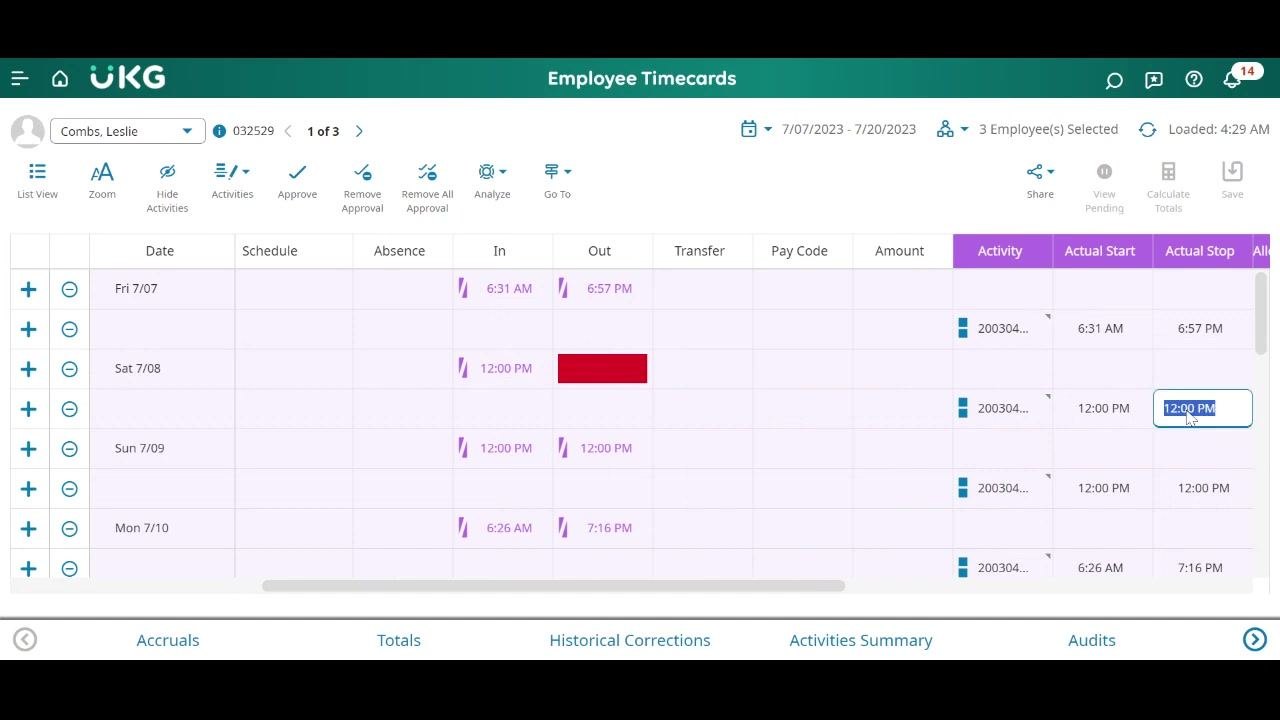
In the Employee Timecards view, carefully review each selected employee's timecard entries. Rows with missing punches are highlighted in red. Review the existing time entries before making any corrections to avoid introducing errors.
Step 11: Avoid entering corrections in the wrong field
Do not correct the missed punch in the standard "Out" field if the employee is activity-based and uses project numbers. Entering a value (for example, "2") in the wrong field can worsen the exception status, as shown by the red highlight remaining.
Step 12: Cancel incorrect changes
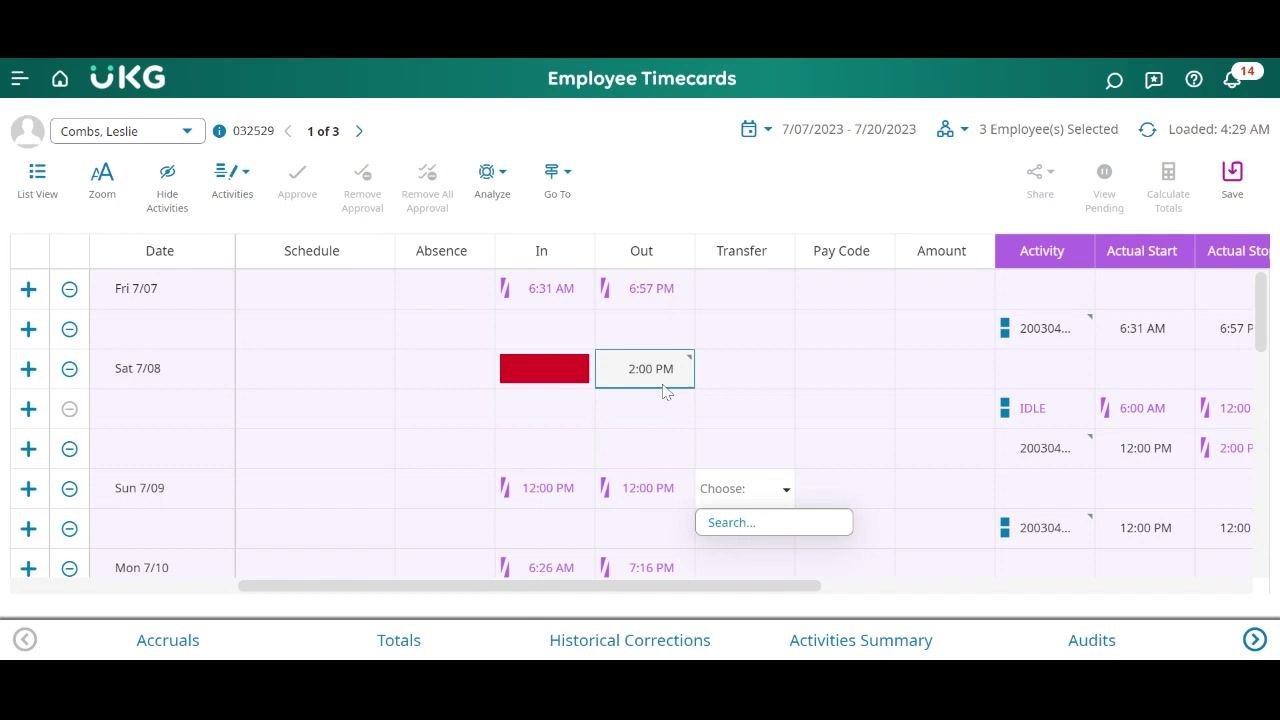
If you enter data in the wrong field by mistake, refresh the page. When prompted, confirm you want to cancel the changes to avoid saving incorrect data. The timecard reverts to its previous state.
Step 13: Enter the correct out time in the activity field
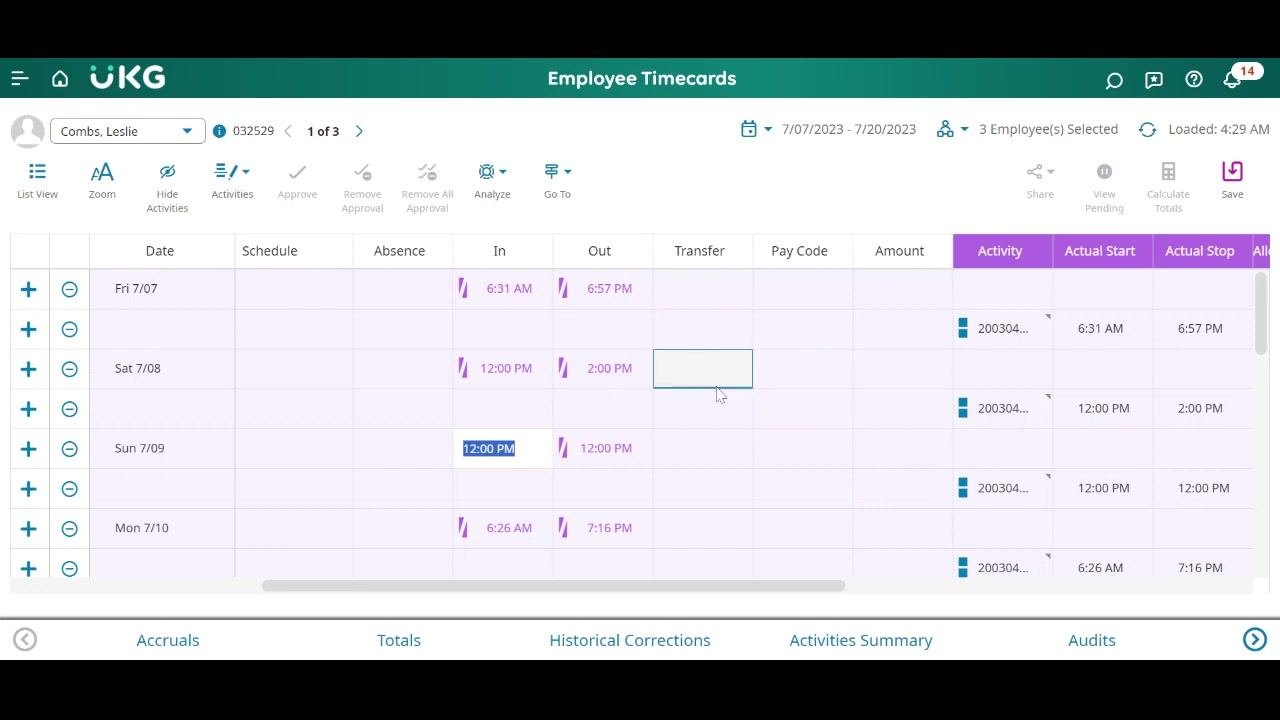
Locate the "Activity Out" or corresponding project/activity field for the missed punch. Enter the correct out time (for example, "2:00 PM") in the activity-based field, making sure it aligns with the correct project number or activity code.
Step 14: Understand the purple highlight
A purple highlight in the timecard indicates the time has been approved, possibly during training. As a project manager or operations manager, you can still edit these fields even when they appear purple.
Step 15: Verify and save corrections
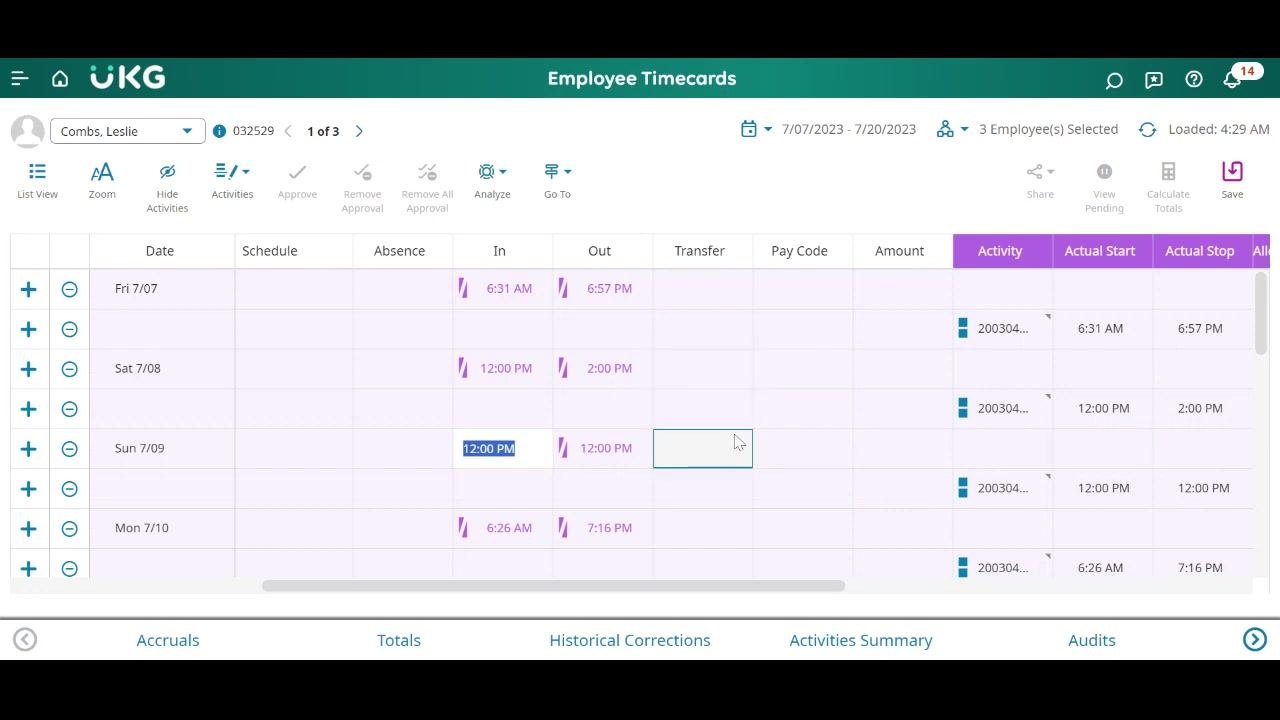
Double-check all corrections for accuracy. Confirm the "Actual Stop" and "Activity" columns reflect the correct times and project numbers before saving your changes.
Finalizing and auditing exception corrections
Step 16: Save your corrections
Click the Save button in the Employee Timecards view after entering the correct out time. If you're locked out of the current pay period, confirm you're working within the correct date range before saving, then verify your changes saved successfully.
Step 17: Return to the data view
Navigate back to the main data view and access the Dataview Library to continue auditing exceptions.
Step 18: Open the Exception Summary
In the Dataview Library, select Exception Summary under the Timekeeping section. This displays the current list of exceptions for your selected employees and date range.
Step 19: Set the correct date range
Click the date range selector at the top of the Exception Summary screen. Set the Start Date to 7/07/2023 and the End Date to 7/20/2023, then click Apply to filter the exceptions to the correct pay period.
Step 20: Review updated exception counts
Verify the Exception Summary now reflects the updated counts after your corrections. For example, you should see 6 total exceptions and 1 missed in punch in the summary row.
Step 21: Apply the Hyperfind filter for your project
Click the Hyperfind filter dropdown at the top right of the Exception Summary. Search for and select your project manager filter (for example, "PM: Keith Keely") to limit the view to employees in your assigned project.
Step 22: Identify remaining exceptions to correct
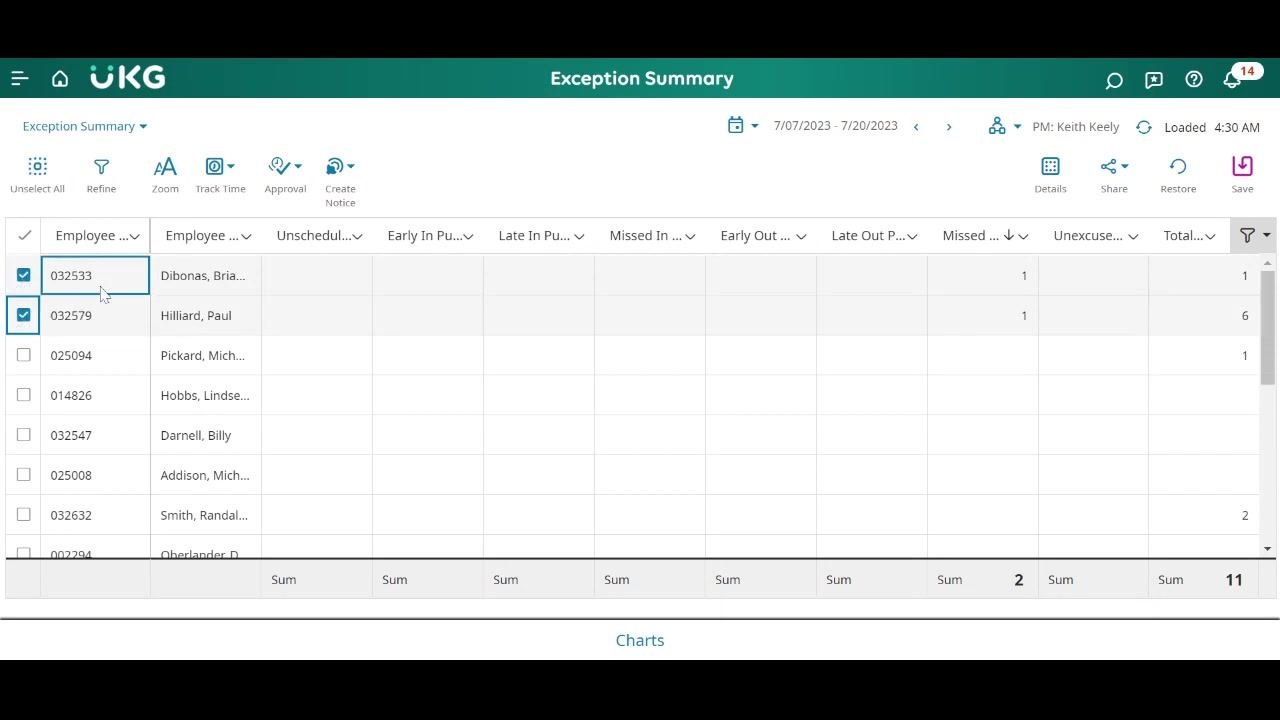
Review the filtered Exception Summary to see which employees still have missed punches. In the example, only two employees (Brian Dibonas and Paul Hilliard) show exceptions that still need correction.
Step 23: Select employees for further correction
Check the boxes next to the employees who still have missed punches. These employees are highlighted for further review or correction.
Step 24: Access employee timecards for final corrections
With the employees selected, right-click and choose Go To > Timecard to return to their timecards, then review and correct any remaining missed punches.
Step 25: Review the employee timecard for overnight shifts
Examine the Employee Timecards screen for the selected employee (for example, Brian Dibonas) across the pay period from 7/07/2023 to 7/20/2023. Identify overnight shifts by looking for "In" times late in the evening (for example, 7:30 PM) and "Out" times in the early morning of the next day (for example, 6:30 AM).
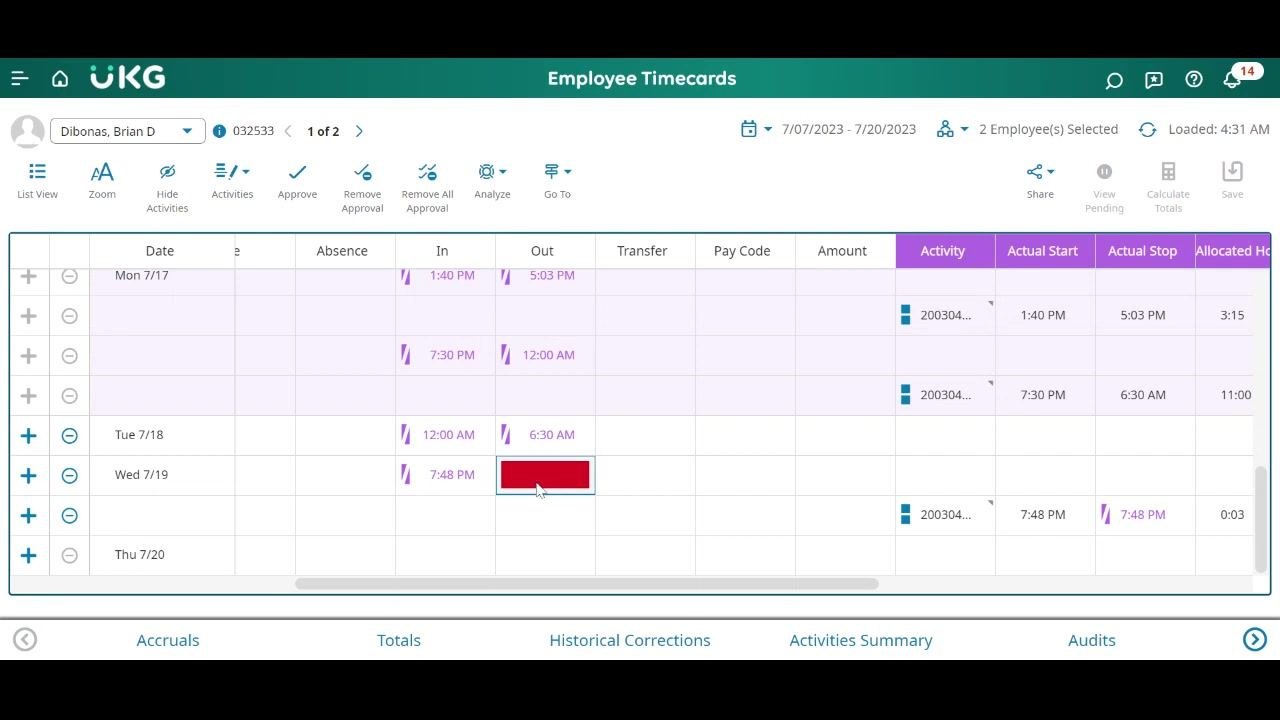
Note any missing punches, such as a missing "Out" time highlighted in red for a shift that started at 7:48 PM. Confirm that the Activity, Actual Start, and Actual Stop columns are populated for completed shifts to verify overnight work is recorded accurately.
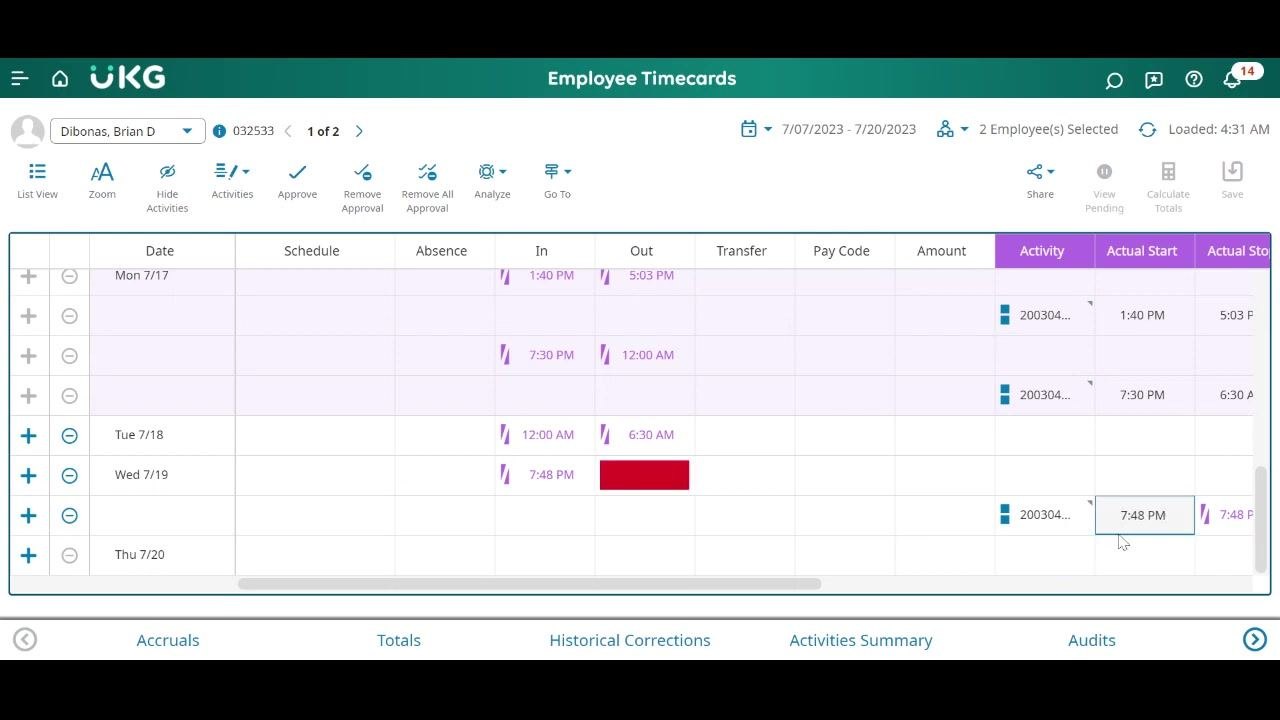
Carefully reviewing the timecard for overnight shifts ensures all hours worked are properly documented, supporting accurate payroll and compliance with labor regulations.
Reviewing and editing timecard activity events
Step 1: Open the Employee Timecards screen
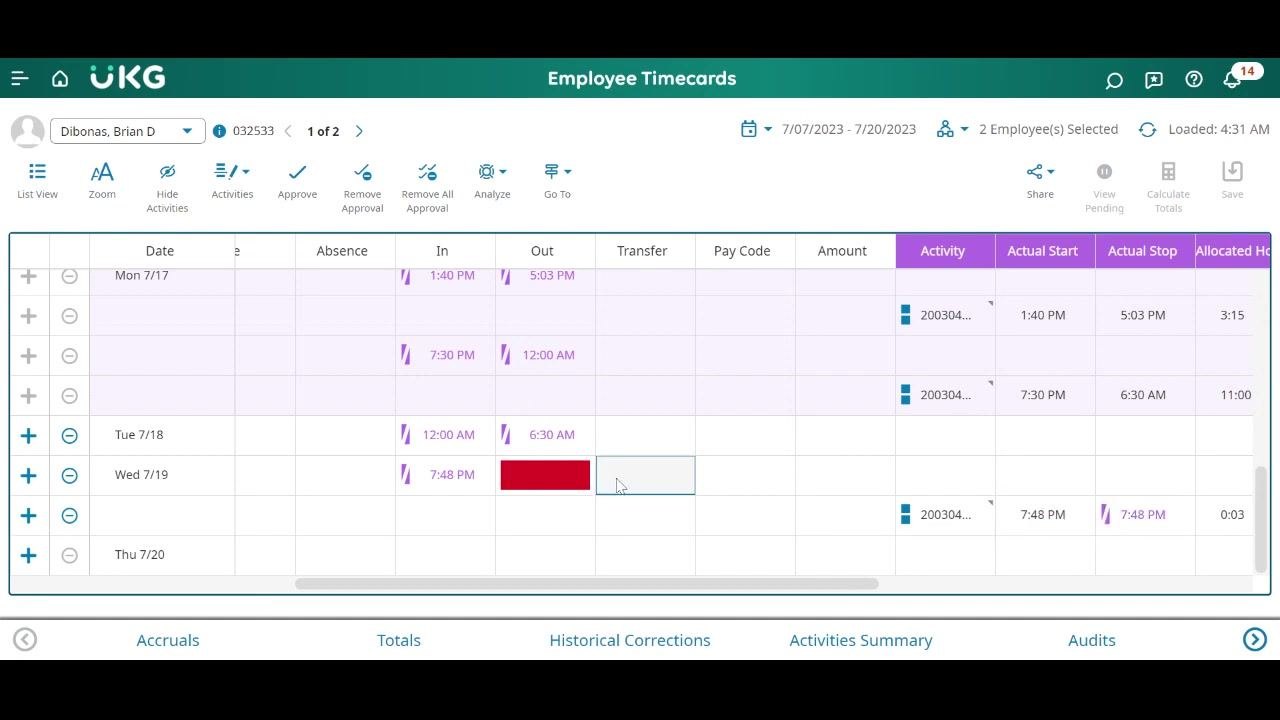
Confirm you're on the Employee Timecards screen with the correct employee selected (for example, "Dibonas, Brian D") and the correct date range shown at the top right (for example, 7/07/2023 - 7/20/2023). The table columns include Date, Absence, In, Out, Transfer, Pay Code, Amount, Activity, Actual Start, Actual Stop, and Allocated Hours.
For example, on Mon 7/17 the employee clocked in at 1:40 PM and out at 5:03 PM, and on Tue 7/18 clocked in at 12:00 AM and out at 6:30 AM. On Wed 7/19, the employee clocked in at 7:48 PM, but the "Out" field is highlighted in red, indicating a missing or problematic entry.
Step 2: Identify system-generated entries
The system may automatically populate certain fields, such as clock-in or clock-out times. For example, the system entered "7:48" as the clock-in time and "midnight" as the clock-out time for a shift. A red highlight indicates an error or missing data that needs attention.
Step 3: Verify midnight cutover handling
The system may not immediately register a "midnight cutover" for shifts that span two days. For example, the midnight cutover for 7/19 hasn't occurred yet, and the entry shown is still for 7/18.
Step 4: Check actual vs. system time
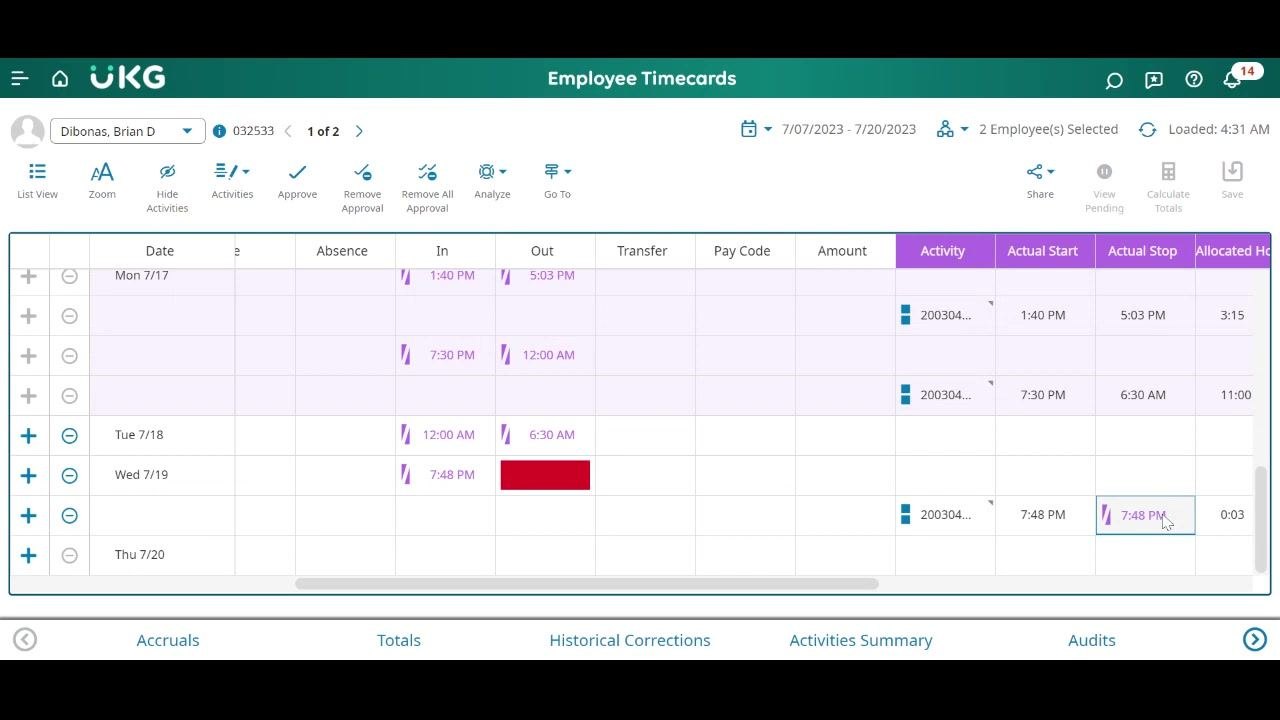
Displayed times may not always reflect actual worked hours, so pay close attention to ensure recorded times match the employee's actual work schedule. For example, the system may show a clock-in at 7:48 PM and a clock-out at 7:48 PM, resulting in only 0:03 allocated hours, which may not be correct.
Step 5: Review and edit activity events
Click the relevant "Activity" cell for the date you want to correct. A Manage Activity Event dialog appears on the right side of the screen, where you can review or edit:
- Activity: Select the appropriate activity code (for example, "200304/100/On Site").
- Actual Start Time: Enter the correct start time (for example, "7:48 PM").
- Actual Stop Time: Enter the correct stop time (for example, "3:00 AM").
- Concurrent With Previous: Check this box if the activity overlaps with a previous one.
- Start/End Time Zone: Confirm the correct time zone (for example, "GMT -06:00 Central Time (USA; Canada)").
- Per Diem: Enter the value if applicable (for example, "1").
Click Cancel to discard changes, or Apply to save them.
Step 6: Verify corrections and allocated hours
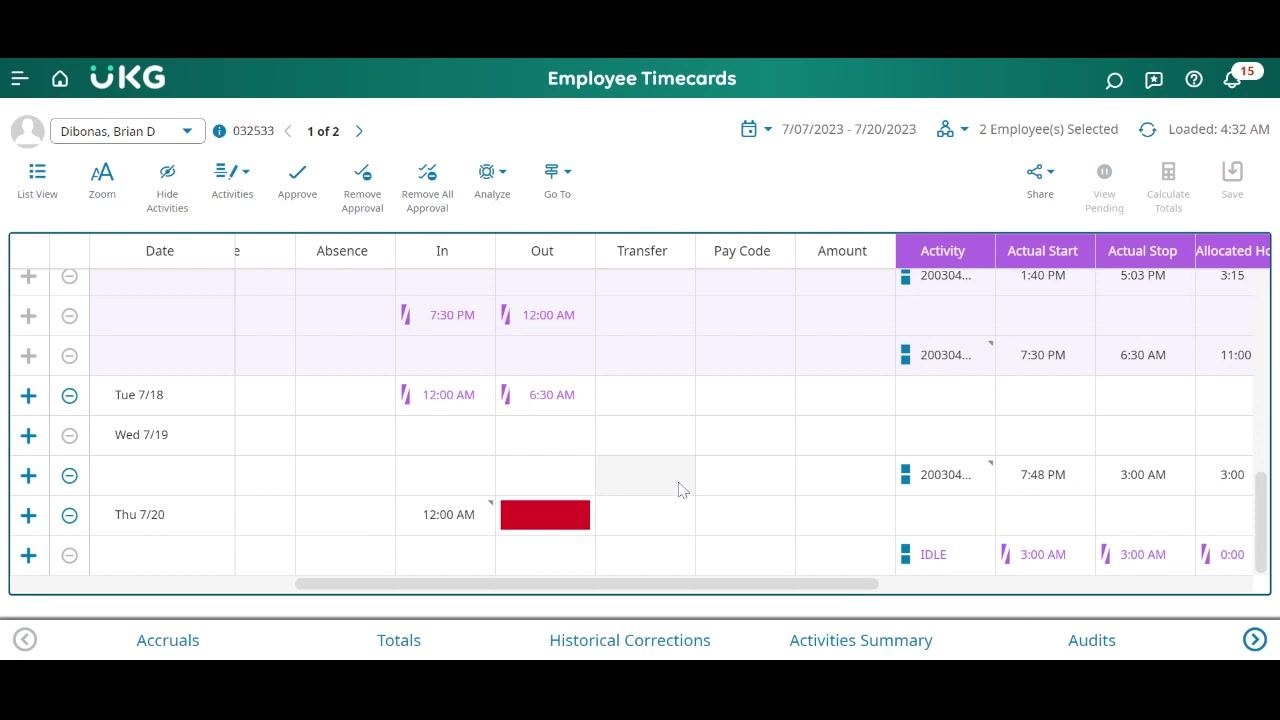
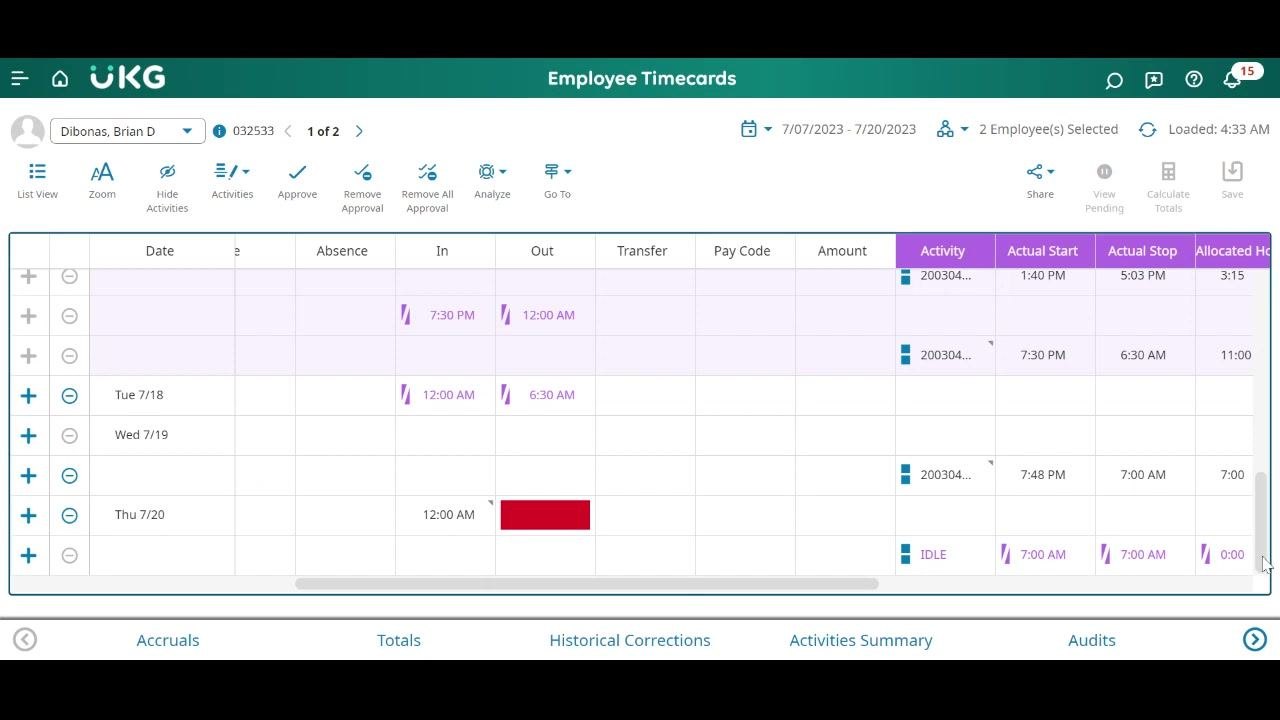
After editing, confirm the timecard reflects the correct "Actual Start," "Actual Stop," and "Allocated Hours." For example, for Wed 7/19 after correction, the actual start is "7:48 PM," actual stop is "3:00 AM," and allocated hours are "3:00." For Thu 7/20, an "IDLE" activity is recorded from "3:00 AM" to "3:00 AM" with "0:00" allocated hours.
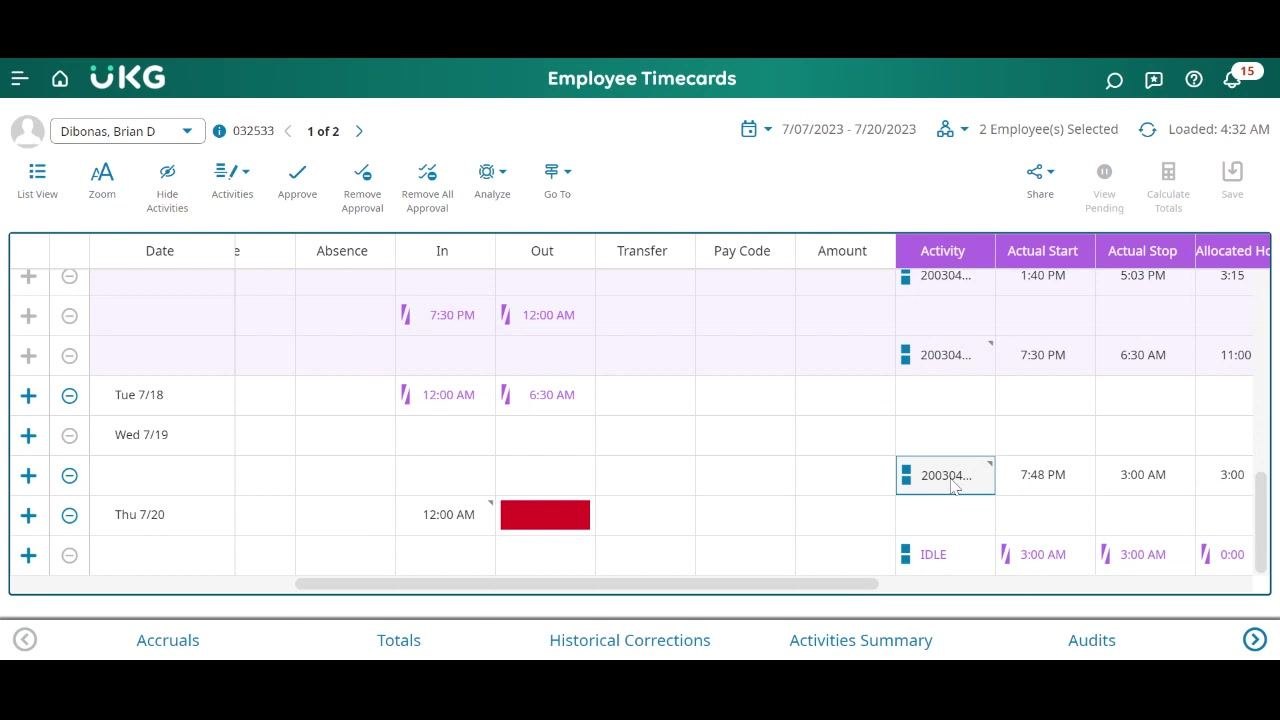
Always review red-highlighted cells, as they indicate missing or problematic entries, and double-check that actual start and stop times match the employee's real work hours before saving.
Finalizing and verifying timecard corrections
Step 1: Review corrected timecard entries
Examine the Employee Timecards screen to confirm all corrections have been applied. Verify the employee name (for example, "Dibonas, Brian D") and date range (for example, 7/07/2023 - 7/20/2023) are correct, and check that all "In" and "Out" times, activities, and allocated hours reflect the actual work performed.
Confirm any previously red-highlighted cells have been resolved. For Wed 7/19, confirm the "Actual Start" is "7:48 PM," "Actual Stop" is "3:00 AM," and "Allocated Hours" is "3:00." For Thu 7/20, confirm the "IDLE" activity is recorded from "3:00 AM" to "3:00 AM" with "0:00" allocated hours.
Step 2: Verify all calculated totals
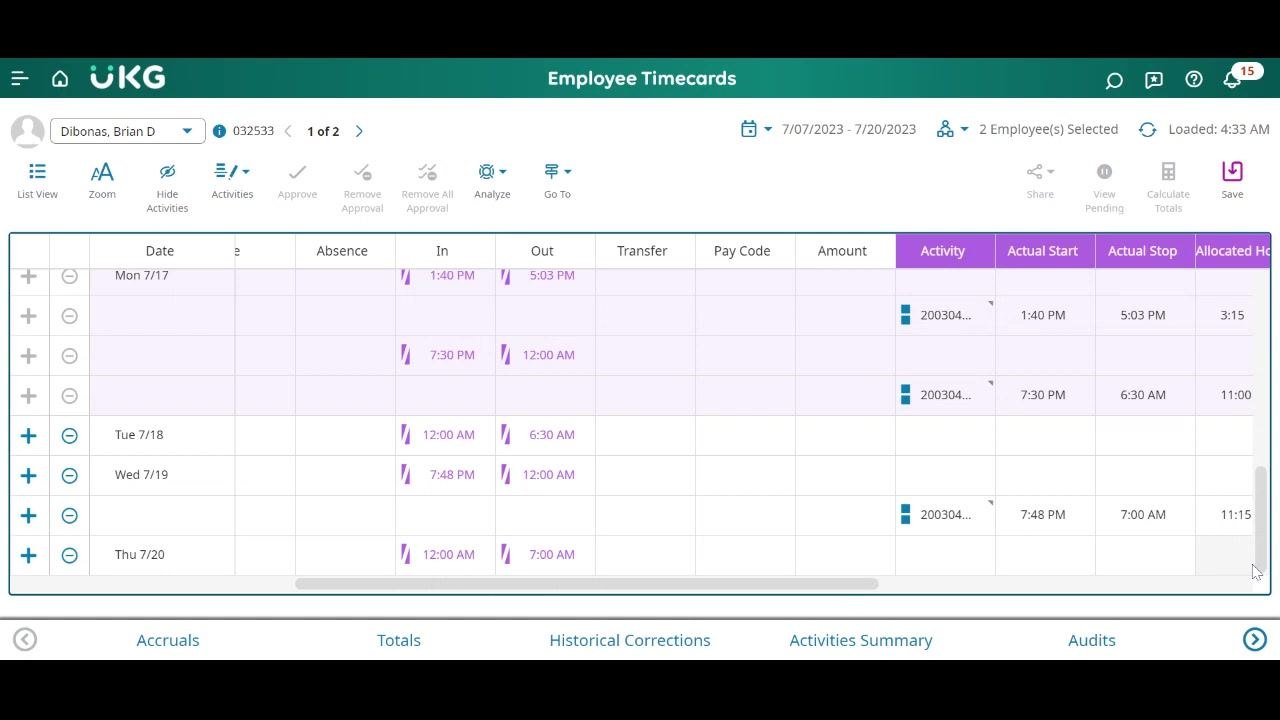
Review the "Allocated Hours" column for each date to confirm the totals match expected work hours, and verify the "Actual Start" and "Actual Stop" times are accurate for each activity. For example, for Wed 7/19 after further correction, "Actual Stop" is updated to "7:00 AM" and "Allocated Hours" is "7:00." For Thu 7/20, "Actual Start" and "Actual Stop" are both "7:00 AM," resulting in "0:00" allocated hours.
Step 3: Perform a final audit of all entries
Scroll through the timecard to check all dates within the selected range. Confirm there are no remaining red-highlighted cells or discrepancies, and that all activities, start/stop times, and allocated hours are consistent and accurate across each date from Mon 7/17 through Thu 7/20.
Step 4: Save the timecard
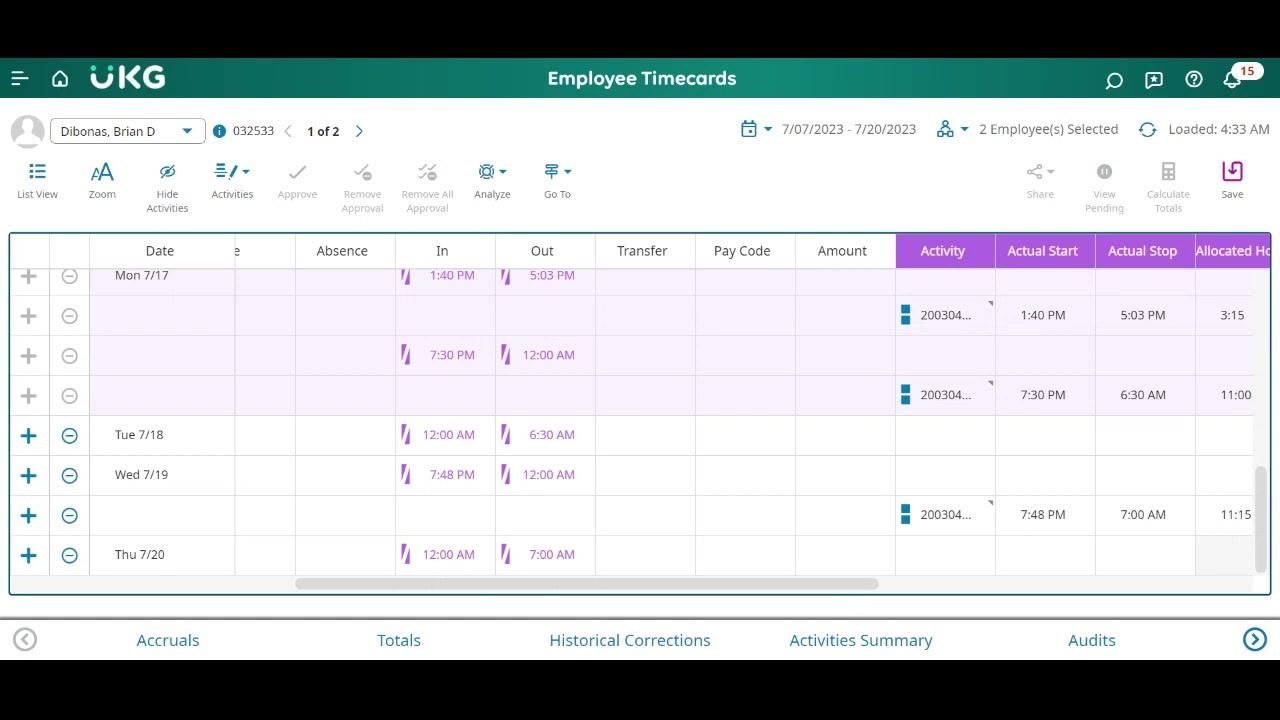
Once all corrections and verifications are complete, click the Save icon (floppy disk) in the upper right corner of the screen. Wait for confirmation that the timecard has saved successfully, which records all changes in the system for payroll processing.
Step 5: Confirm the final state
After saving, review the timecard one last time to confirm all data is correct and no further edits are needed. The timecard should display accurate "In," "Out," "Activity," "Actual Start," "Actual Stop," and "Allocated Hours" values for each date. For example, for Wed 7/19, "In" is "7:48 PM," "Out" is "12:00 AM," "Actual Start" is "7:48 PM," "Actual Stop" is "7:00 AM," and "Allocated Hours" is "11:15."
What's next
- Always double-check for remaining red-highlighted cells before saving a timecard.
- Use the scroll bar to review all dates in the selected pay period range.
- Confirm the "Allocated Hours" column accurately reflects the employee's worked hours.
- Save your changes before exiting the timecard screen to prevent data loss.
By following these steps, you can consistently fix a missed punch in UKG, ensuring all work hours and activities are correctly recorded and any system-generated errors are resolved to support accurate payroll processing and compliance.
Generation details: cost, quality tiers
Docsie billed 4,000 credits ($2.80) to analyze this 8-minute video at standard quality. The rewrite, template fill and Word/PDF exports were included. The same video at each quality tier:
| Quality | Frames sampled | Credits | Approx. cost |
|---|---|---|---|
| Draft | every 16-30 s | 2,000 | $1.40 |
| Standard (this guide) | every 8-15 s | 4,000 | $2.80 |
| Detailed | every 4-7 s | 8,000 | $5.60 |
| Ultra | every 1-3 s | 16,000 | $11.20 |
Credits priced at $0.70 per 1,000; plans include a monthly allowance. Enterprise customers on on-premise or bring-your-own-model deployments run this on their own inference and pay no per-video credits.
Generated by Docsie Video-to-Docs on 2026-10-06 from a 7-minute video. Screenshots are frames from the source video and belong to their creator, HRPayroll DAVACO, whose original is embedded above. If you own this video and want the guide removed or credited differently, contact us and we will act within one business day.