
How to Hire an Employee in SuccessFactors
This guide shows you how to hire an employee in SuccessFactors using the Add New Employee action in the Admin Centre. You enter identity, personal, job, time, employment, payroll and compensation details, submit the form, and then verify the new employee's record. The examples use a hire dated 01 Feb 2019.
Video: Hire Employee - SAP Successfactors Employee Central by Web World Design (2020). All credit for the demonstration goes to the creator; watch the original on YouTube. The written guide below was generated from this video by Docsie. Creator? Request a change or removal.
This guide shows you how to hire an employee in SuccessFactors using the Add New Employee action in the Admin Centre. You enter identity, personal, job, time, employment, payroll and compensation details, submit the form, and then verify the new employee's record. The examples use a hire dated 01 Feb 2019.
Prerequisites
Before you start, make sure you have the following:
- Your SuccessFactors username and password.
- The necessary permissions in Manage Permission Roles to add a new employee. If you do not have them, contact your system administrator.
- The position you want to hire for already created in the system. If it does not exist, create it before you reach the Job Information section.
Fields marked with a red asterisk (*) are mandatory.
Access the Admin Centre
Step 1. Log in to SuccessFactors
- Open your web browser and go to the SuccessFactors login page.
- Enter your username and password in the respective fields.
- Click the orange Log in button.
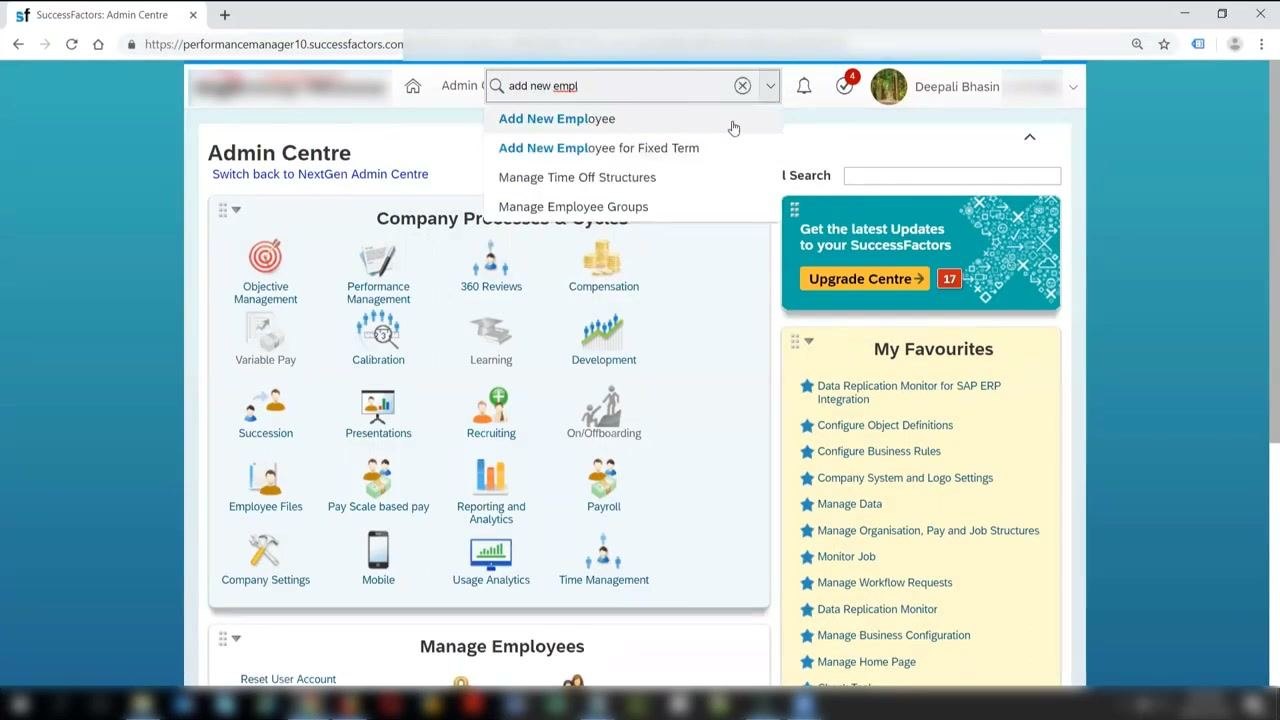
Step 2. Search for the Add New Employee action
After you log in, the Admin Centre opens.
- Locate the search bar at the top, labeled Search for actions or people.
- Type
add new empl. - Select Add New Employee from the dropdown.
Enter identity and biographical details
Step 3. Fill in the mandatory hire fields
Under the Identity section, provide the following:
- Hire Date: Enter the date the employee will be hired. In this example, enter 01 Feb 2019.
- Legal Entity: Click the dropdown and select the organization in which the employee will be hired. In this example, choose Administration Pty Limited (11).
- Event Reason: Click the dropdown and select the reason for the hire.
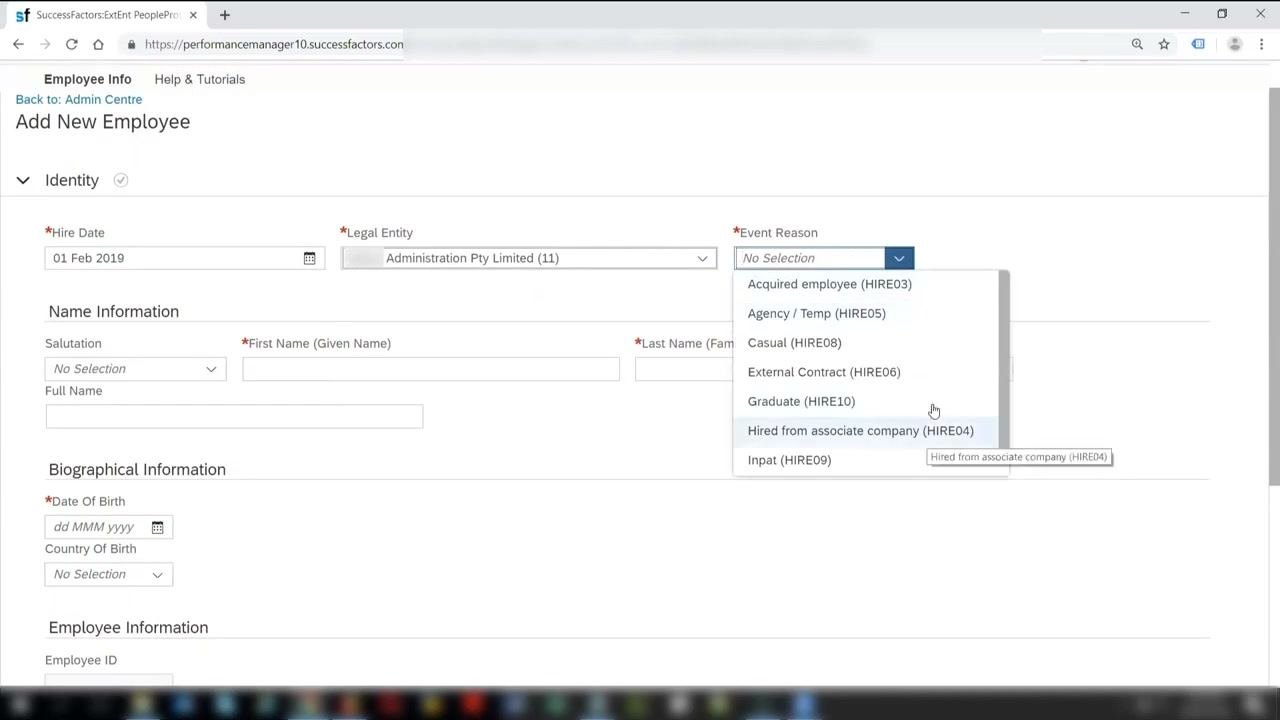
Step 4. Select the event reason for the hire
The Event Reason dropdown includes these options:
- Acquired employee (HIRE03)
- Agency / Temp (HIRE05)
- Casual (HIRE08)
- External Contract (HIRE06)
- Graduate (HIRE10)
- Hired from associate company (HIRE04)
- Inpat (HIRE09)
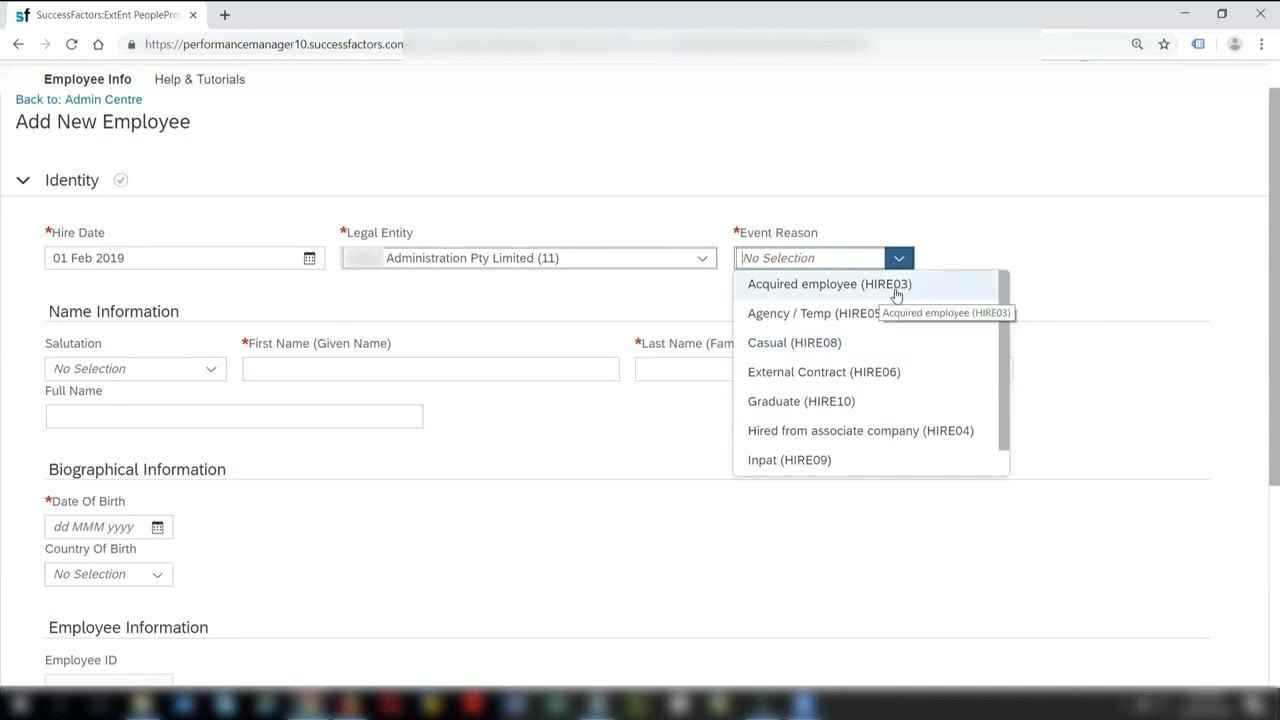
Select Acquired employee (HIRE03) to indicate the employee is being hired as an acquired employee. Review the other options if needed.
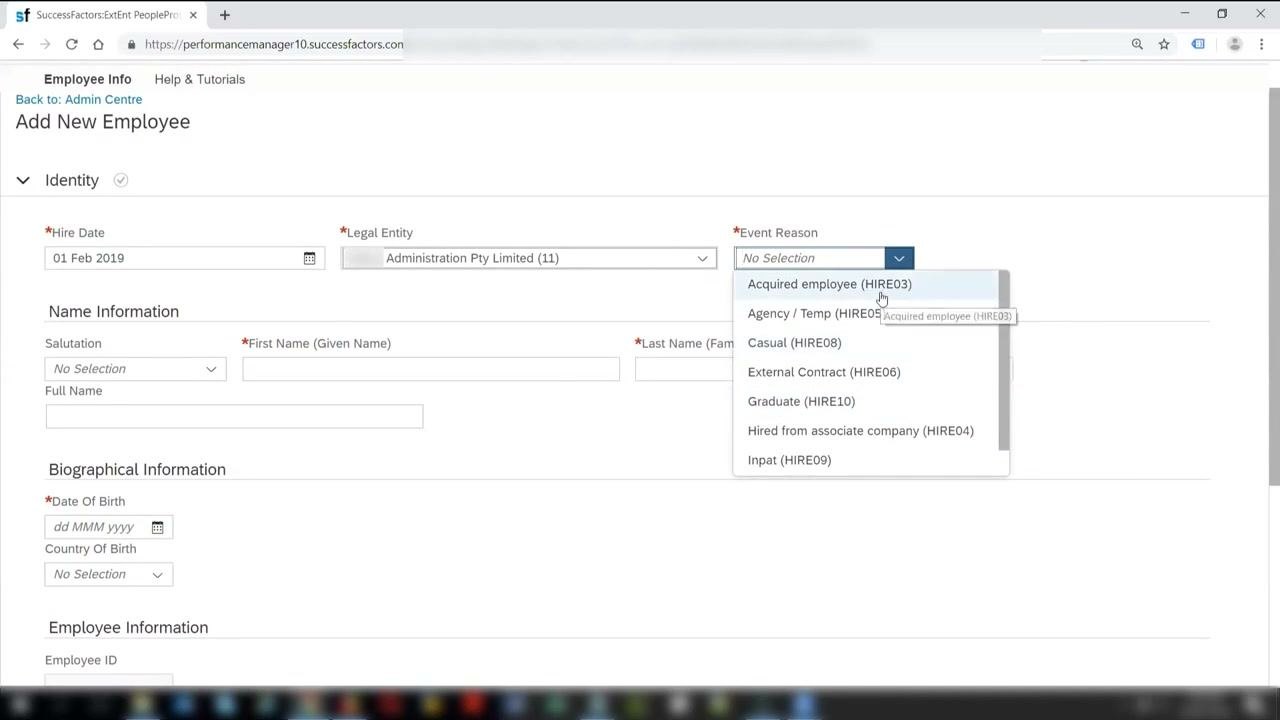
Step 5. Enter the employee's name
- In the First Name (Given Name) field, enter
Adam. - In the Last Name (Family Name) field, enter
Smith.
The Full Name field populates automatically as Adam Smith.
Step 6. Provide biographical information
- In the Date Of Birth field, enter
01 Jul 1987. This field is marked with a red asterisk. - In the Country Of Birth dropdown, select
Australia.
Step 7. Add national ID information
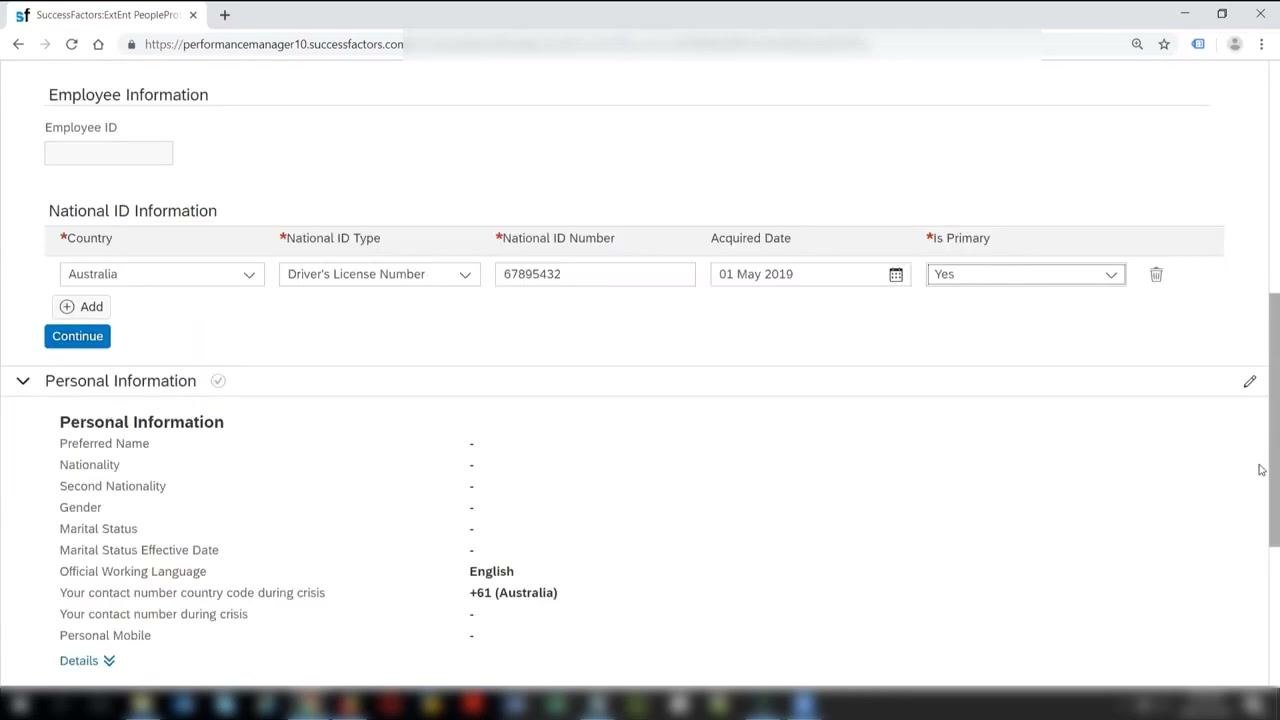
- In the National ID Information section, click Add.
- For Country, select
Australia. - For National ID Type, select
Driver's License Number. - For National ID Number, enter
67895432. This is an example 8-digit Australian driver's license number. - For Acquired Date, select the relevant date, for example
01 Jul 2019. - For Is Primary, select
Yesif this is the employee's primary identification.
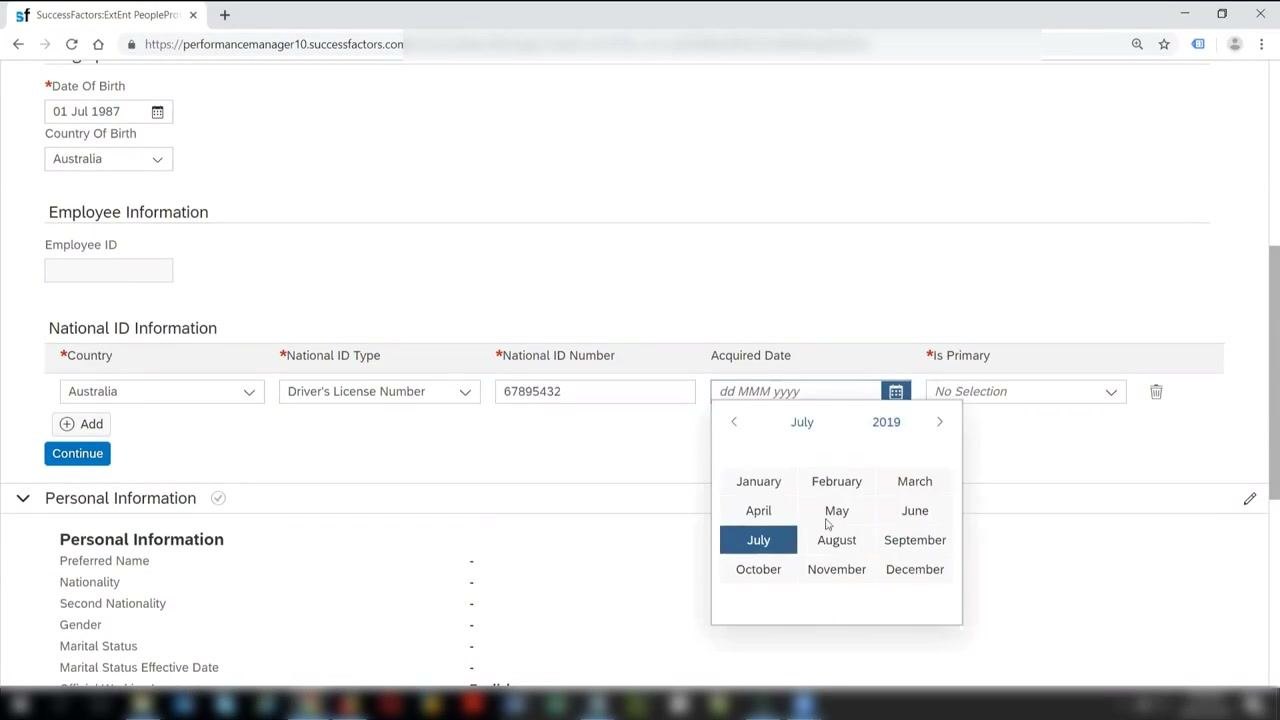
Step 8. Review the entered information
- Make sure all mandatory fields (marked with a red asterisk) are completed.
- Double-check that the Name, Biographical Information and National ID details are correct and formatted as required.
Step 9. Handle the duplicate employee warning
After you click Continue in the National ID Information section, review the Duplicate Check popup. If the system finds an existing employee with matching identification information, such as the same name and date of birth, a warning appears.
- Review the details of the matched employee, for example Adam Smith, Active, Date of Birth 01/06, Network Engineer.
- If you are hiring a different individual with the same name, click Ignore Matches to proceed.
- If you intend to rehire the matched employee, select Rehire with new employment instead.
Enter personal information
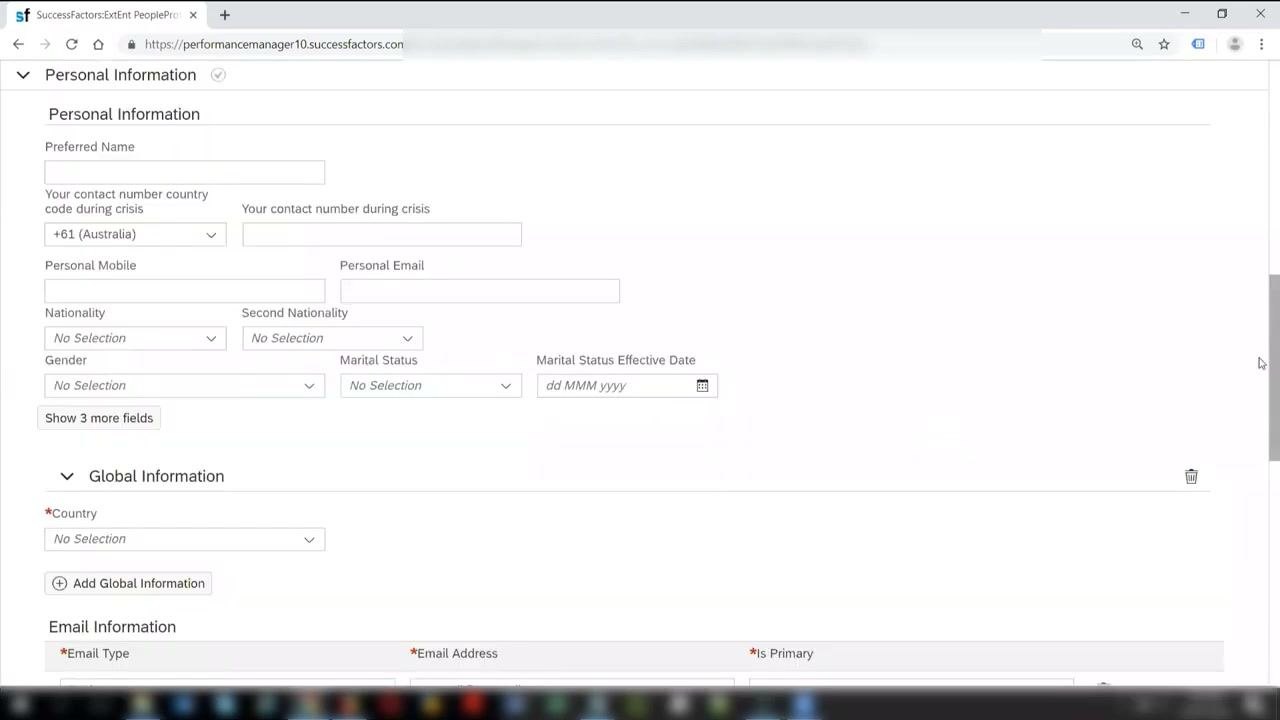
Step 10. Fill in the Personal Information section
Complete the following fields as required:
- Preferred Name (optional): Enter it if applicable.
- Your contact number country code during crisis: Select
+61 (Australia)if the employee is based in Australia. - Your contact number during crisis: Enter the relevant phone number if required.
- Personal Mobile: Enter the employee's mobile number if available.
- Personal Email: Enter the employee's email address if available.
- Nationality: Select the employee's nationality from the dropdown.
- Second Nationality: Select it if applicable.
- Gender: Choose the appropriate gender.
- Marital Status: Select the current marital status.
- Marital Status Effective Date: Enter the date if you provided a marital status.
Click Show 3 more fields to expand the section and enter additional details if needed.
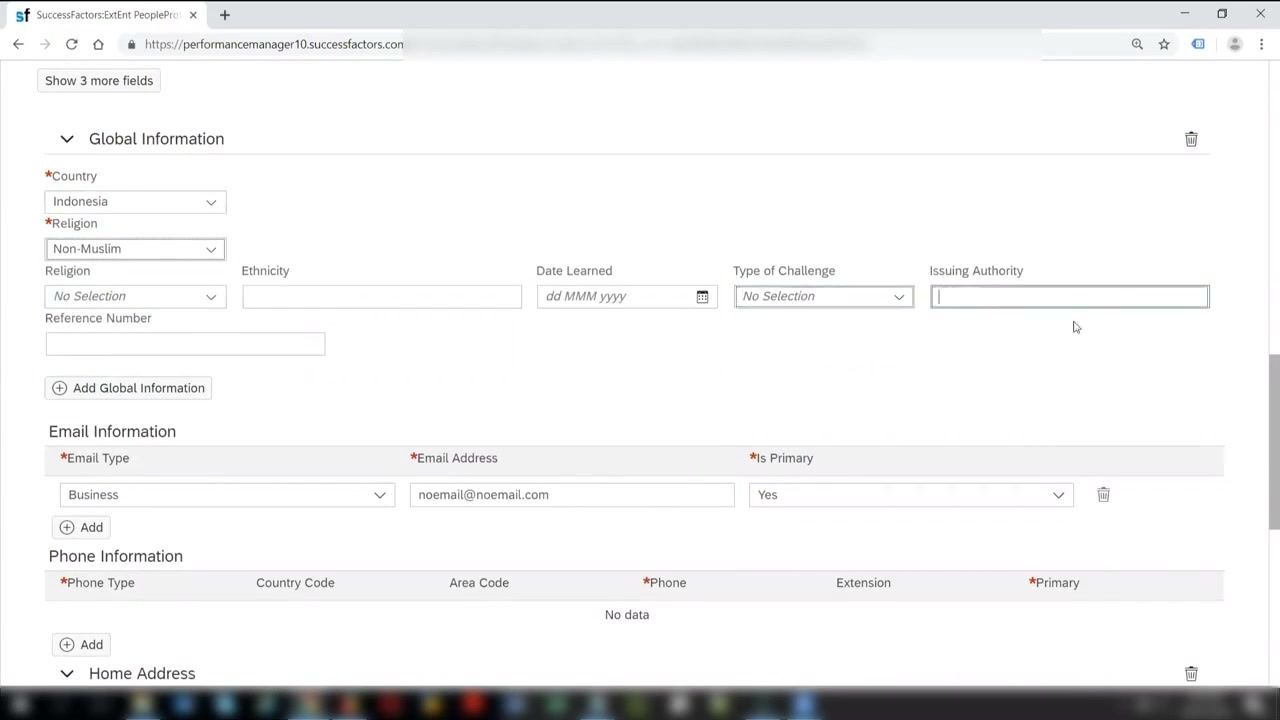
Step 11. Provide global information (optional)
Expand the Global Information section if you want to add more details, then enter the following:
- Country: Select the relevant country, for example
Indonesia. - Religion: Choose the appropriate religion, for example
Non-Muslim. - Ethnicity: Enter it if required.
- Reference Number: Enter it if applicable.
- Date Learned: Enter the date if relevant.
- Type of Challenge: Select it if the employee has any physical or other challenges, for example cannot speak or visual impairment.
- Issuing Authority: Enter the authority if required.
Step 12. Enter email information
In the Email Information section:
- For Email Type, select
Business. - For Email Address, enter the employee's email, for example
noemail@noemail.com. - For Is Primary, select
Yesto mark it as the primary email address.
Step 13. Add phone information
In the Phone Information section:
- For Phone Type, select
Business Mobile. - For Country Code, select
+61for Australia. - Enter the Phone number, for example
432856987. - For Primary, select
Yesto mark it as the primary phone number.
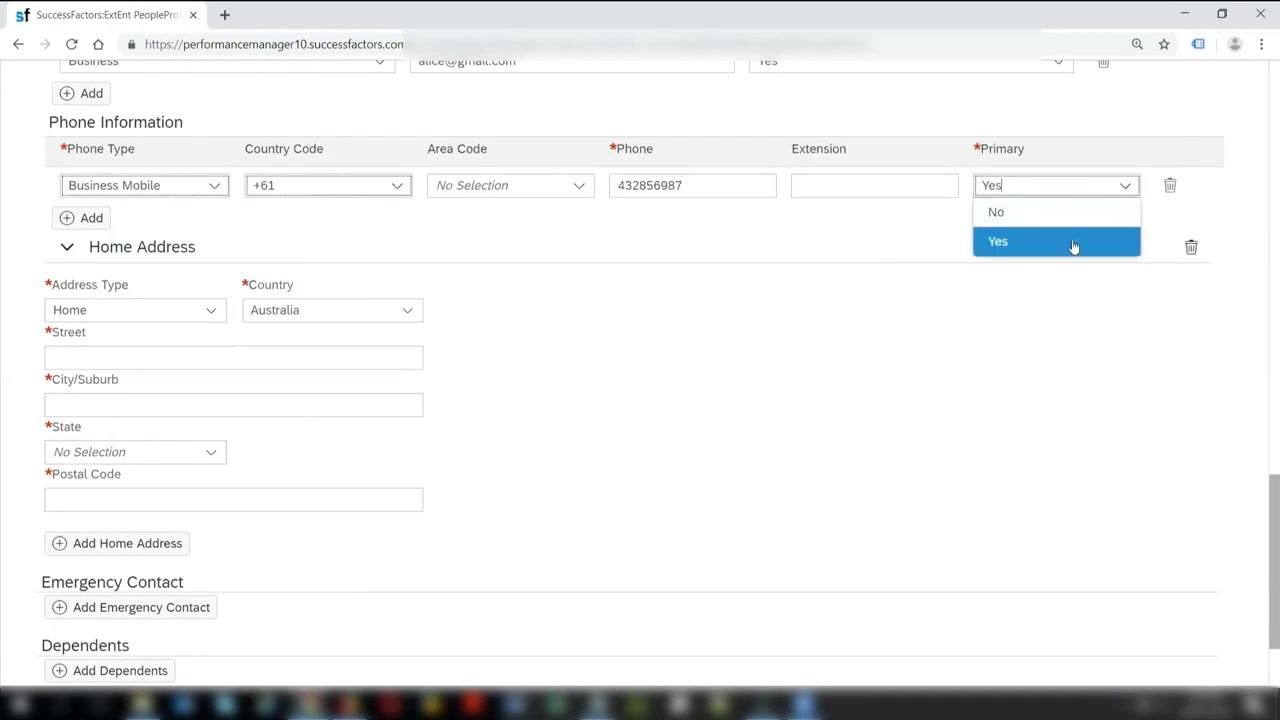
Step 14. Enter the home address
Enter the following details:
- Address Type: Home
- Country: Australia
- Street: Castle Sterr
- City/Suburb: Masden Park
- State: New South Wales
- Postal Code: 3456
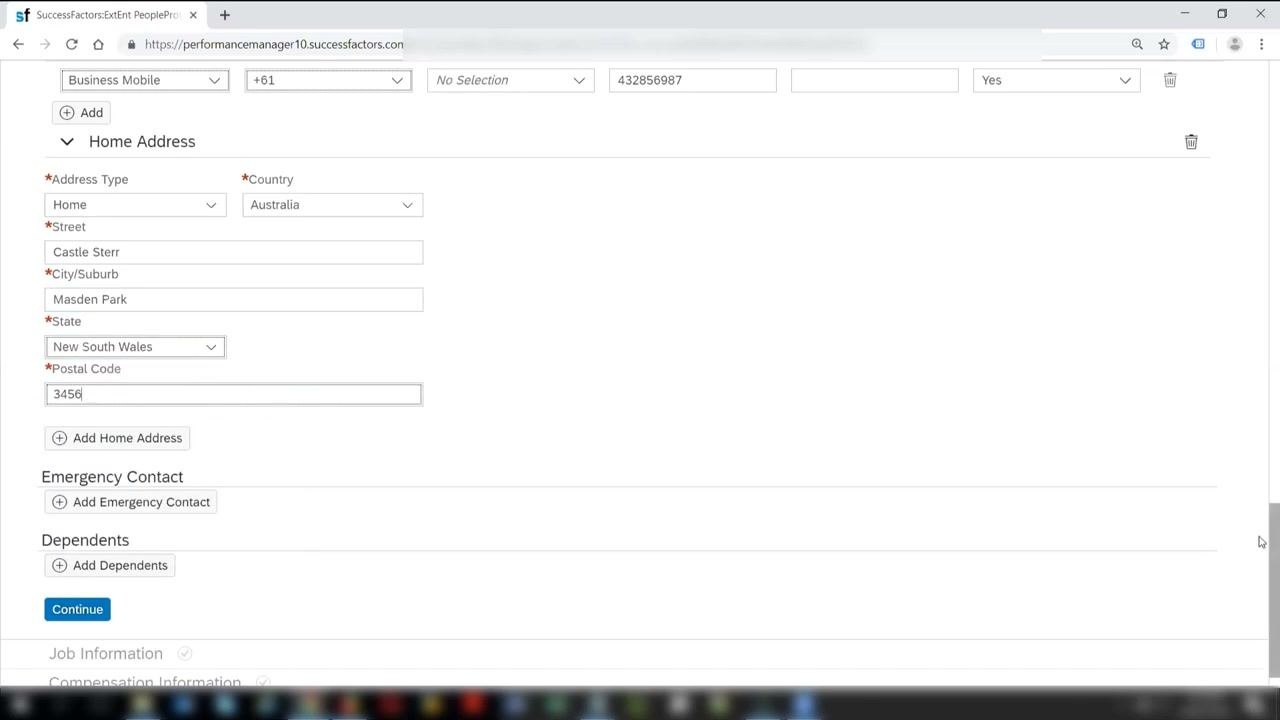
Step 15. Add an emergency contact
Click Add Emergency Contact, then enter the following details:
- Relationship: Other
- Primary: Yes
- Name: Anil
- Phone: 9019563345
- Email: Leave blank if not available.
Step 16. Add dependents (optional)
Click Add Dependents if you need to add dependent information.
Step 17. Continue to the next section
Click Continue to proceed.
Enter job information
Step 18. Confirm the position exists
Make sure the position you want to hire for is already created in the system. If it is not, create the position before you proceed.
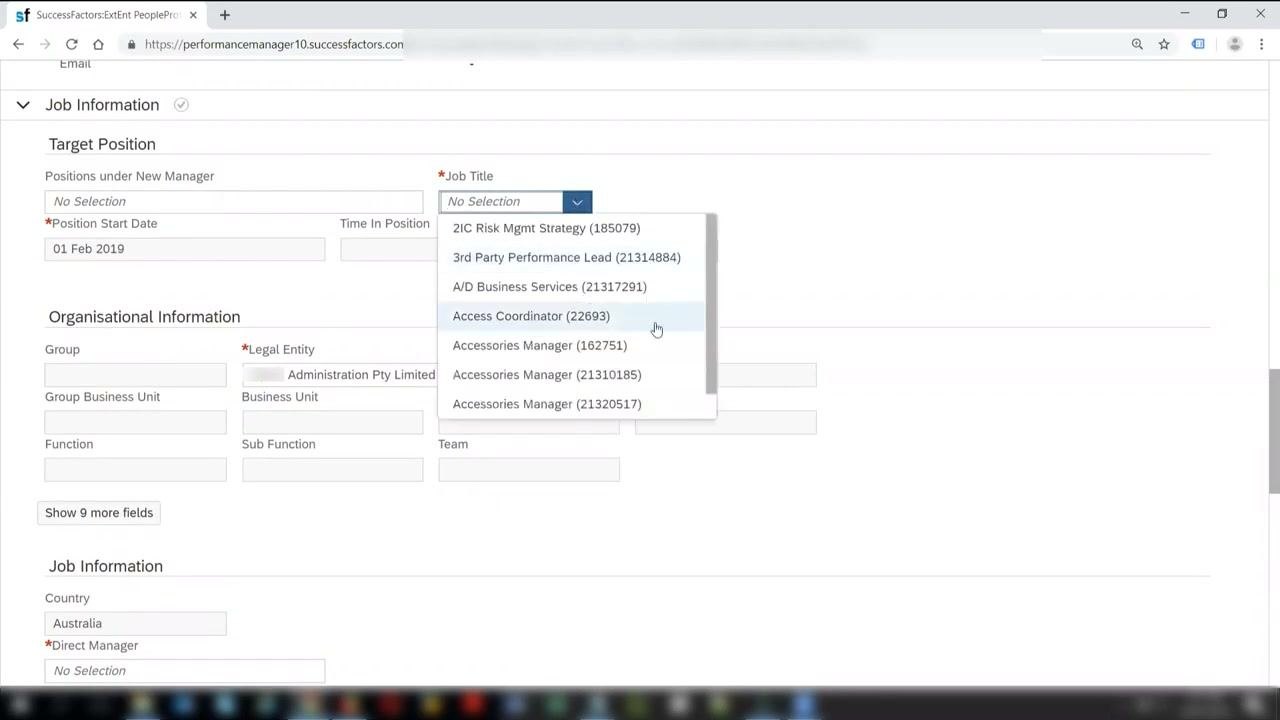
Step 19. Set the position and job title
Set the following:
- Positions under New Manager: No Selection
- Job Title: Click the dropdown and select the appropriate job title from the list. For example, select "ACCOUNT MANAGER (100480)".
- Position Start Date: 01 Feb 2019, or as required
- Time In Position: Leave blank if not specified.
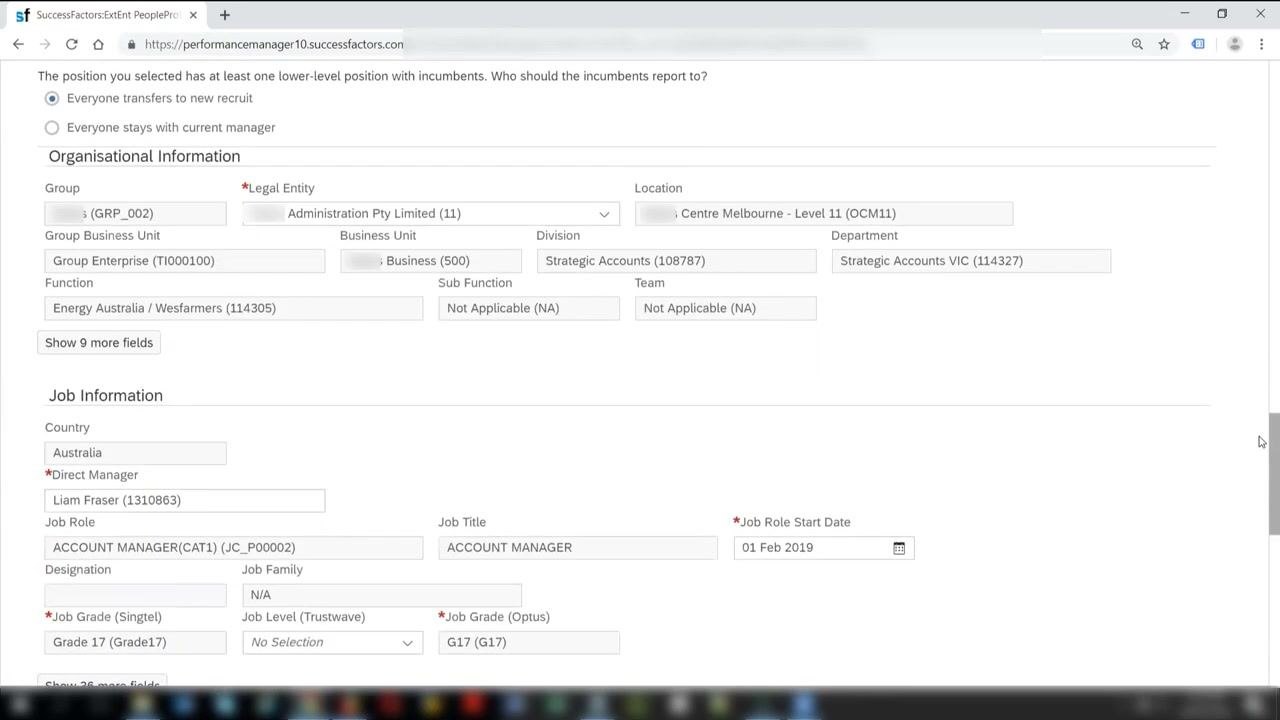
Step 20. Review the auto-populated fields
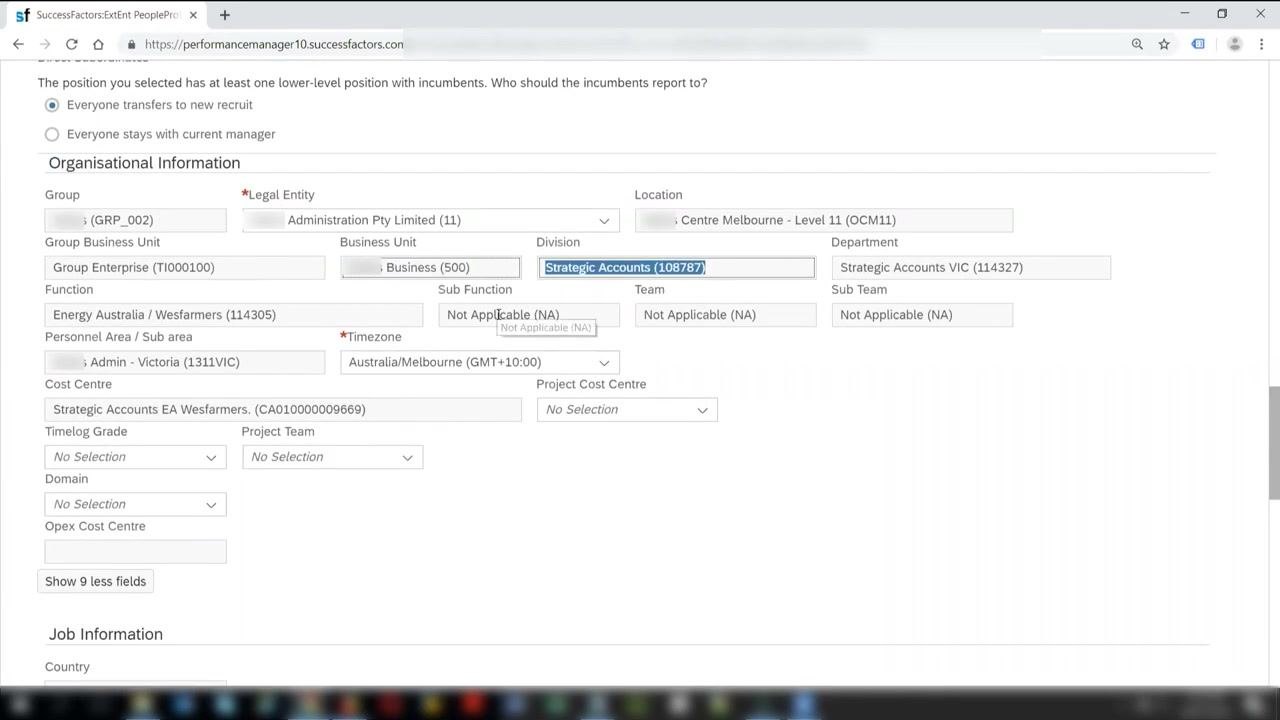
After you select the job title, the system fills the following fields in Organisational Information and Job Information based on the selected position:
- Group
- Legal Entity
- Location
- Group Business Unit
- Business Unit
- Division
- Department
- Function
- Sub Function
- Team
- Sub Team
- Personnel Area / Sub area
- Timezone
- Cost Centre
- Direct Manager
- Job Role
- Job Title
- Job Role Start Date
- Job Grade (Singtel)
- Job Grade (Optus)
Review all of these fields for accuracy. Rules tied to the selected position determine the values.
Step 21. Adjust fields if necessary
If necessary, adjust any fields that require manual input or correction.
System rules linked to the selected position govern the auto-population of fields. Configuring these rules is covered separately.
Step 22. Confirm the probationary period end date
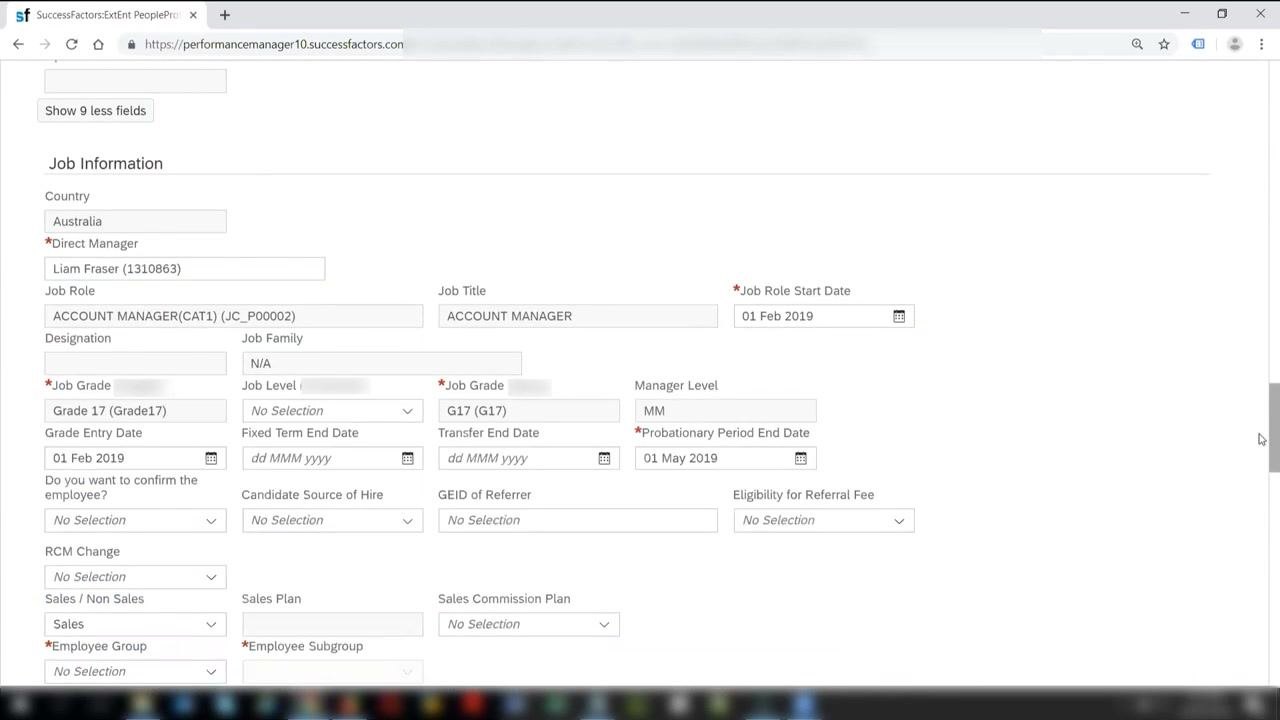
- Locate the Probationary Period End Date field in the Job Information section.
- Make sure the date is set to 01 May 2019, as defined by your business rules.
The system calculates this date automatically from the hire date and the configured business rules.
Step 23. Verify the job role start date and grade entry date
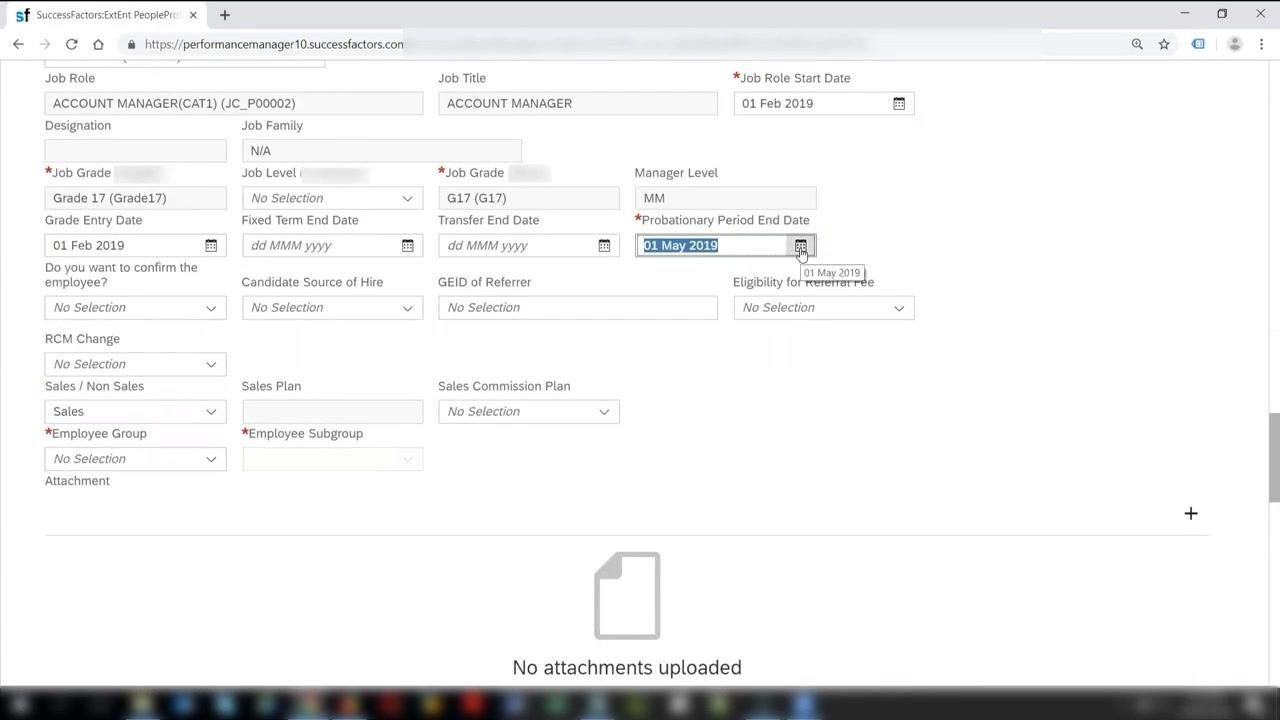
Confirm that Job Role Start Date and Grade Entry Date are both set to 01 Feb 2019. These dates should match the employee's official hire date.
Set the employee group and subgroup
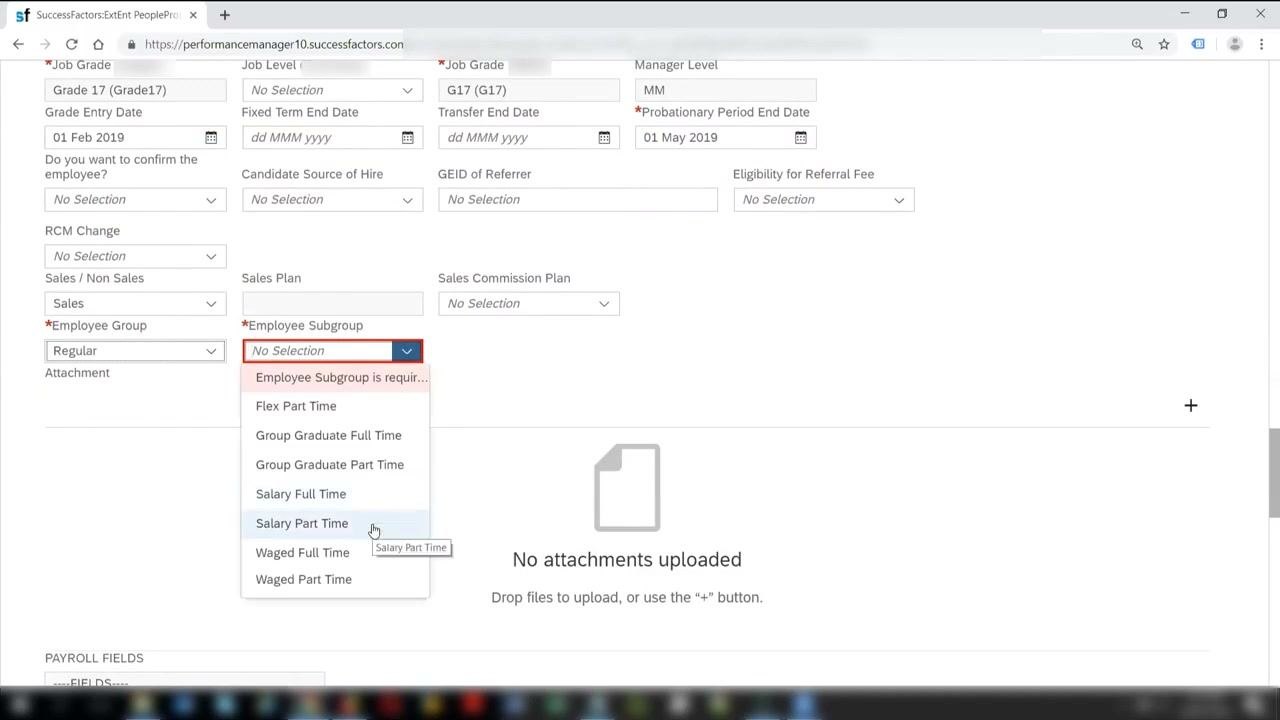
Step 24. Complete Employee Group and Employee Subgroup
Both fields are mandatory.
- Select Regular for Employee Group.
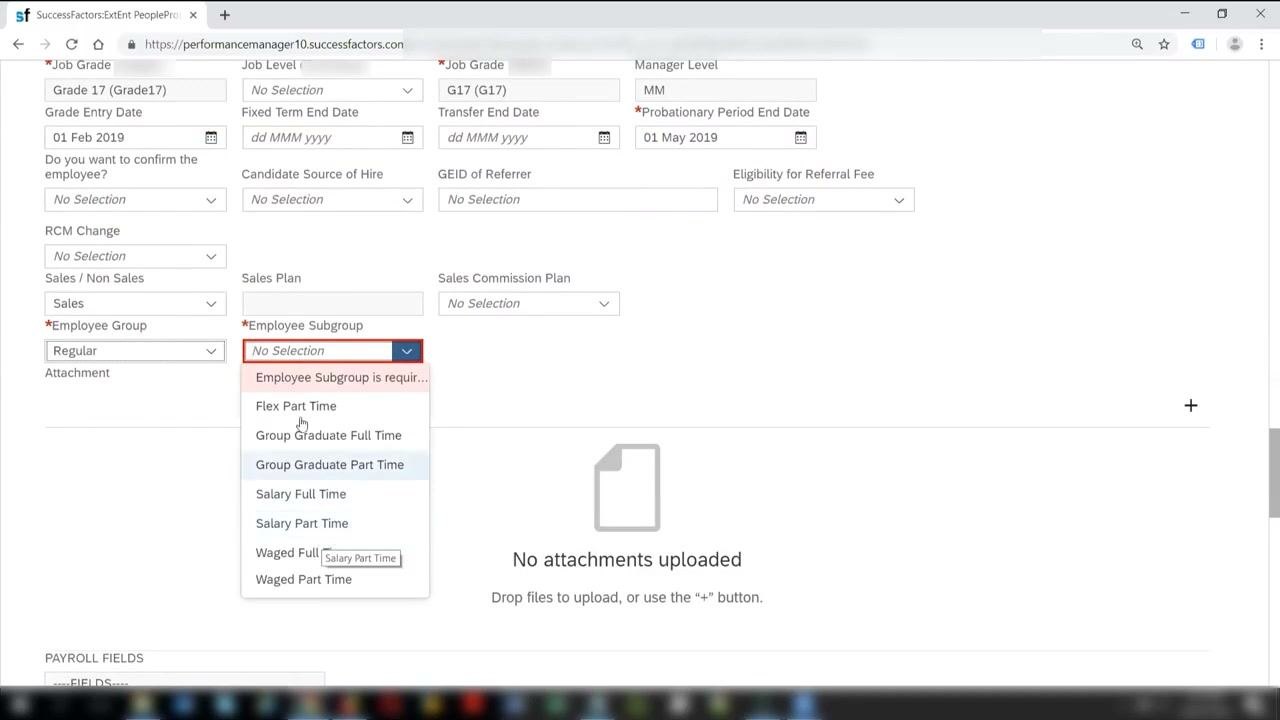
- Click the Employee Subgroup dropdown. The options are Flex Part Time, Group Graduate Full Time, Group Graduate Part Time, Salary Full Time, Salary Part Time, Waged Full Time and Waged Part Time.
Step 25. Select Salary Full Time
Click Salary Full Time in the Employee Subgroup dropdown. You must make this selection to proceed.
Step 26. Upload attachments (optional)
If you need to upload identity documents or other attachments, use the Attachment section. Click the "+" button, or drag and drop files into the area labeled "No attachments uploaded".
Enter time information
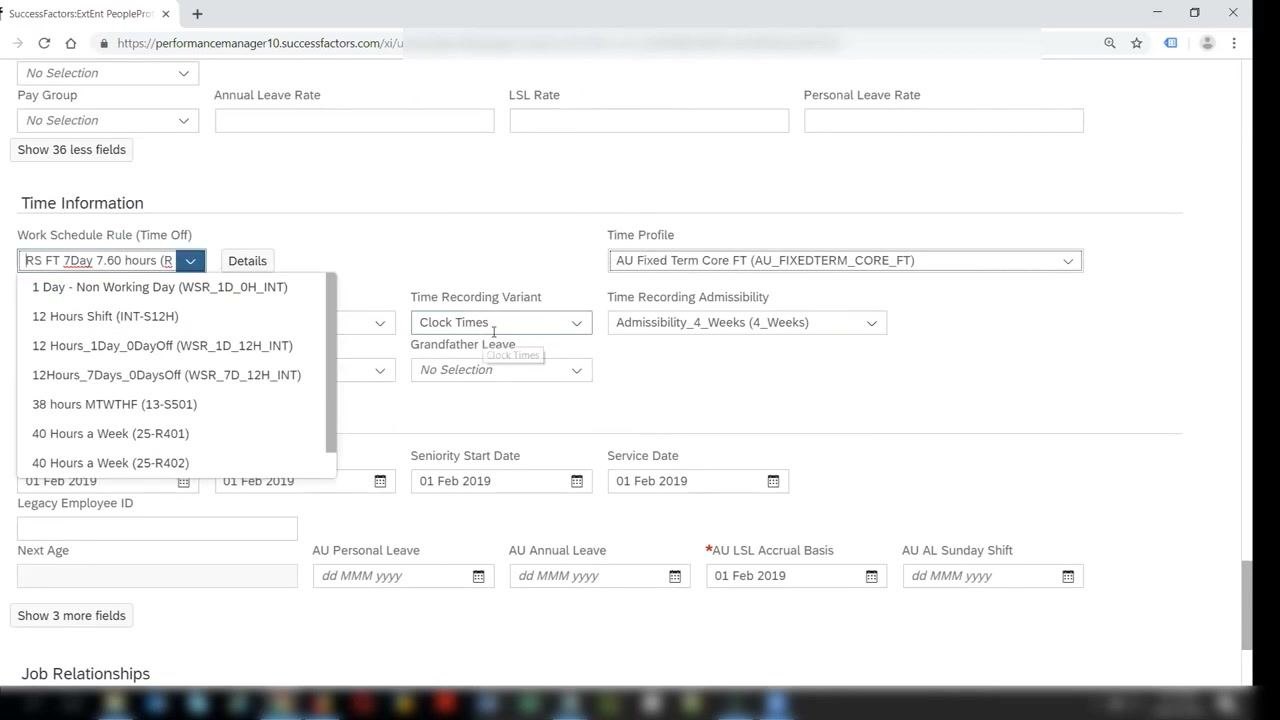
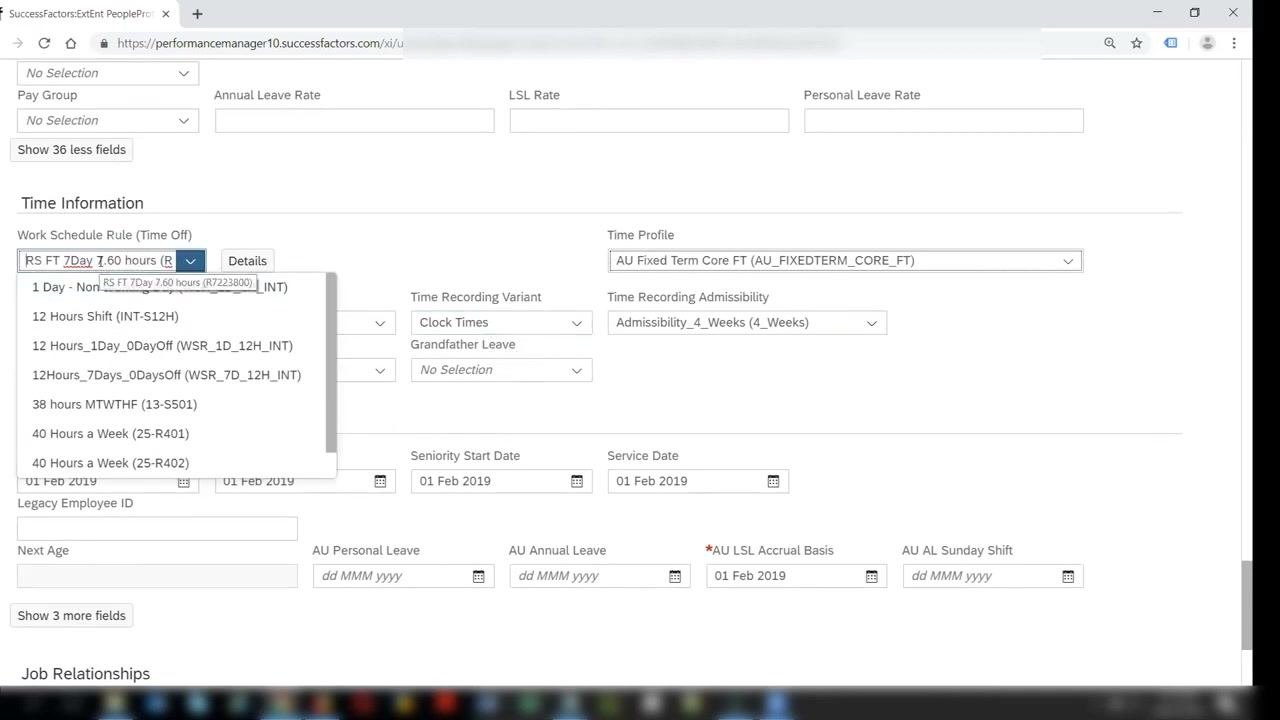
Step 27. Select the work schedule rule
- In the Time Information section, click the Work Schedule Rule (Time Off) dropdown.
- Review the available options, such as FT 38 hours Mon-Fri (F5013800), FT 5d 38 hr/wk (13-F501), RS FT 7Day 7.60 hours (R7223800), SFT 38 hours Mon-Fri (S5013800), SFT 6 days 7.6 hours (S6763800) and SFT 7 day 10.85 hrs (13-S710).
- Select the rule that matches the employee's working arrangement.
For a full-time employee, choose a rule such as FT 38 hours Mon-Fri (F5013800) or SFT 38 hours Mon-Fri (S5013800), as applicable. The rule determines the employee's standard working hours and days.
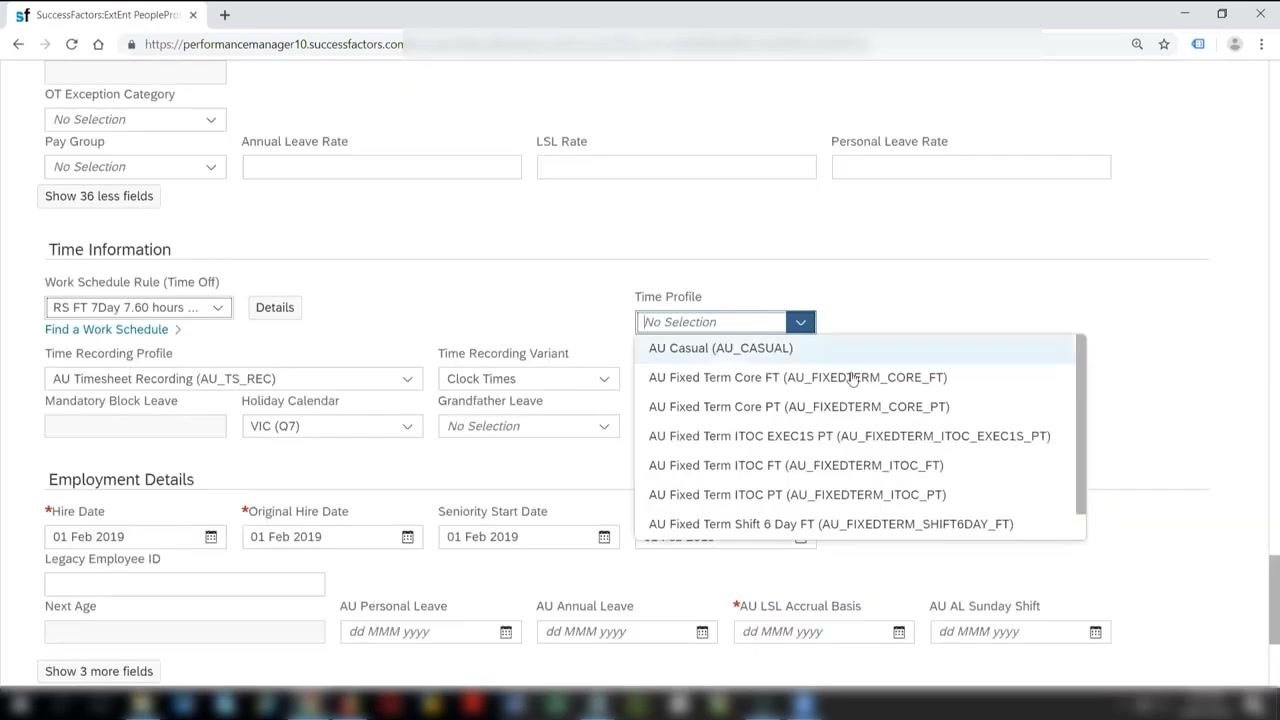
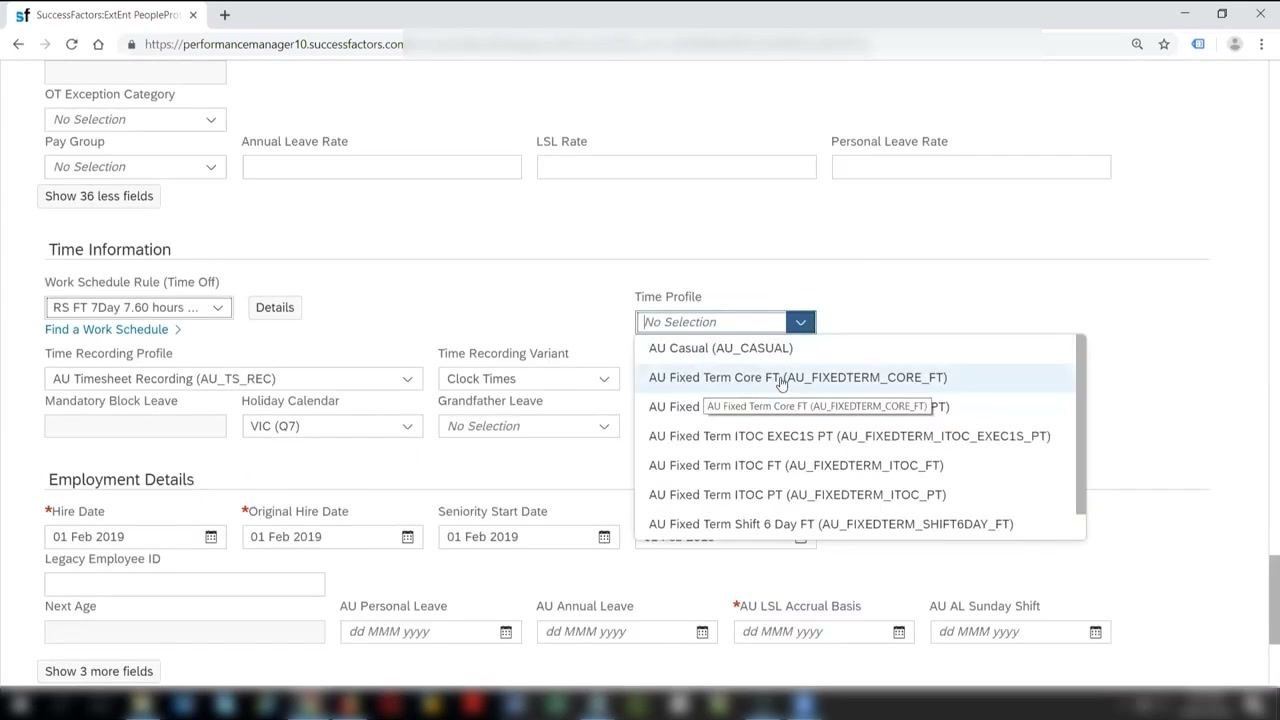
Step 28. Choose the time profile
- Click the Time Profile dropdown.
- Review the options, such as AU Casual (AU_CASUAL), AU Fixed Term Core FT (AU_FIXEDTERM_CORE_FT), AU Fixed Term Core PT (AU_FIXEDTERM_CORE_PT), AU Fixed Term ITOC EXEC1S PT (AU_FIXEDTERM_ITOC_EXEC1S_PT), AU Fixed Term ITOC FT (AU_FIXEDTERM_ITOC_FT), AU Fixed Term ITOC PT (AU_FIXEDTERM_ITOC_PT) and AU Fixed Term Shift 6 Day FT (AU_FIXEDTERM_SHIFT6DAY_FT).
- Select the appropriate profile for the employee.
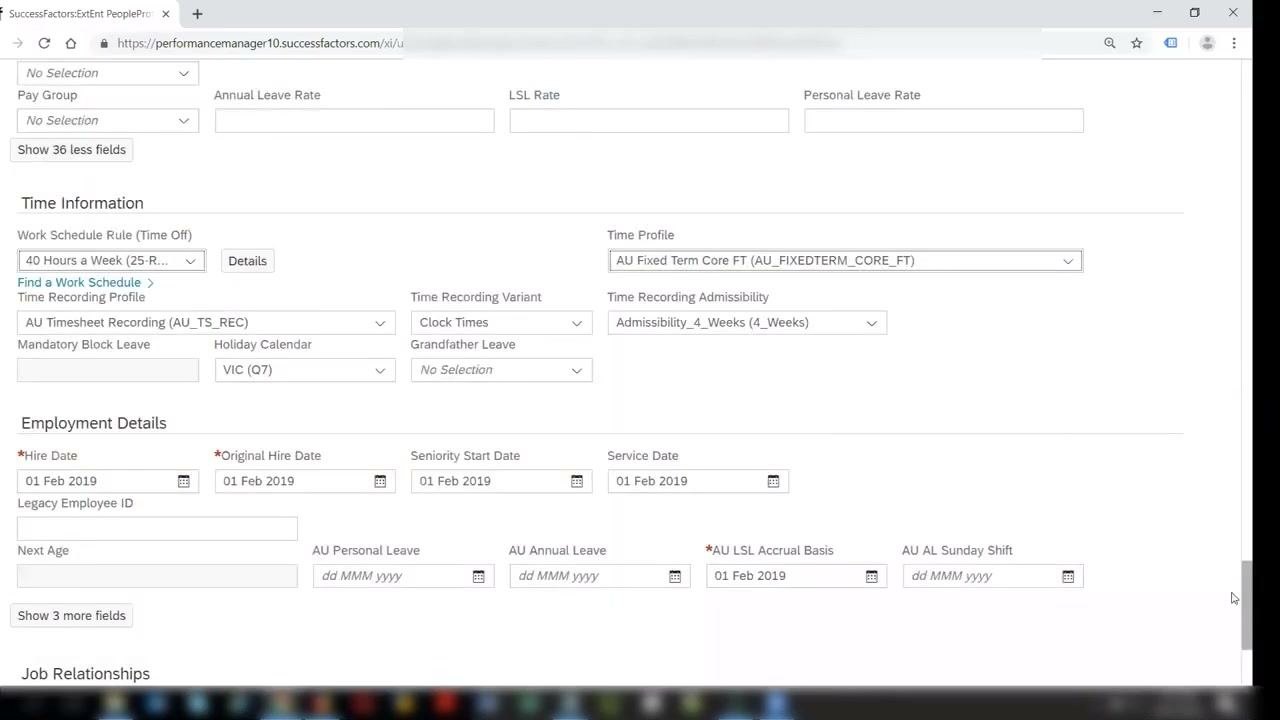
Step 29. Set the remaining time information fields
- Time Recording Profile: Select AU Timesheet Recording (AU_TS_REC).
- Time Recording Variant: Select Clock Times.
- Time Recording Admissibility: Select Admissibility_4_Weeks (4_Weeks).
- Mandatory Block Leave: Select Holiday Calendar.
- Grandfather Leave: Select No Selection.
- Holiday Calendar: Select VIC (Q7).
Complete employment details and job relationships
Step 30. Complete the employment details
Make sure the following fields are set to 01 Feb 2019:
- Hire Date
- Original Hire Date
- Seniority Start Date
- Service Date
Leave Legacy Employee ID and Next Age blank unless required. Enter leave dates if applicable:
- AU Personal Leave
- AU Annual Leave
- AU LSL Accrual Basis (mandatory, marked with a red asterisk)
- AU AL Sunday Shift
Step 31. Set the AU LSL Accrual Basis date
- Click the calendar icon next to AU LSL Accrual Basis.
- Select the date that matches the hire date, 01 Feb 2019.
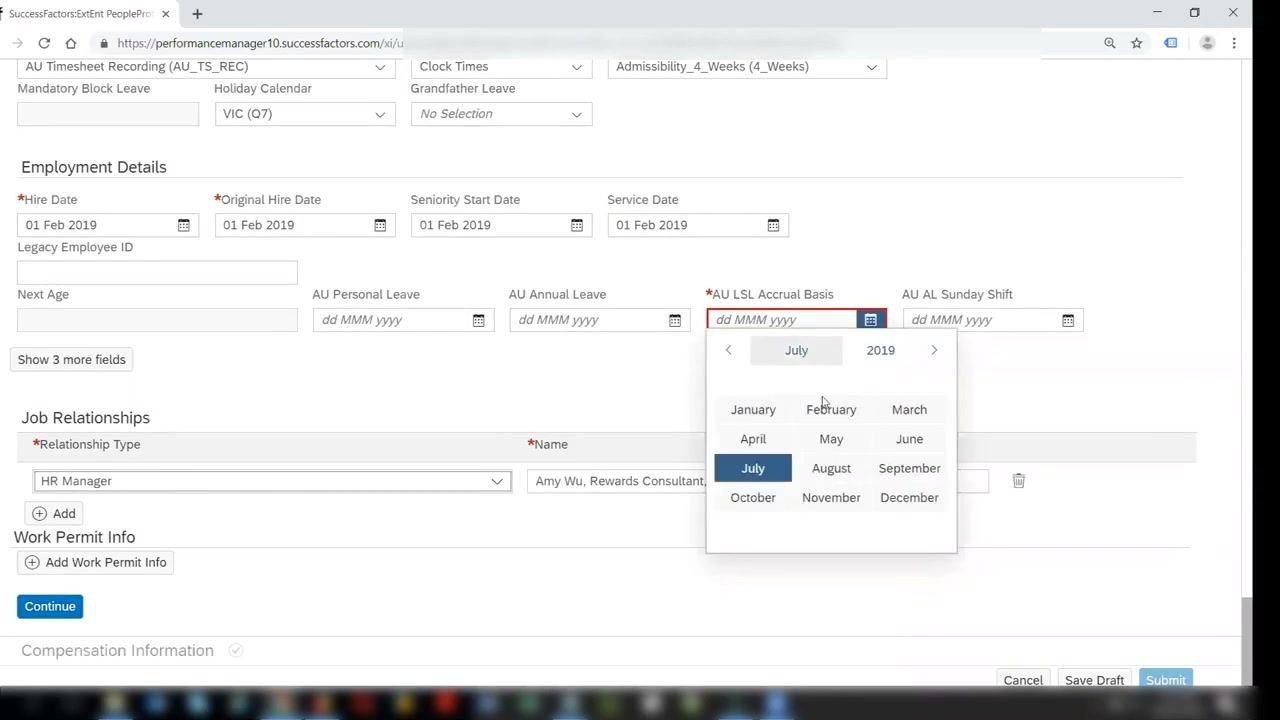
Confirm that the field now displays 01 Feb 2019.
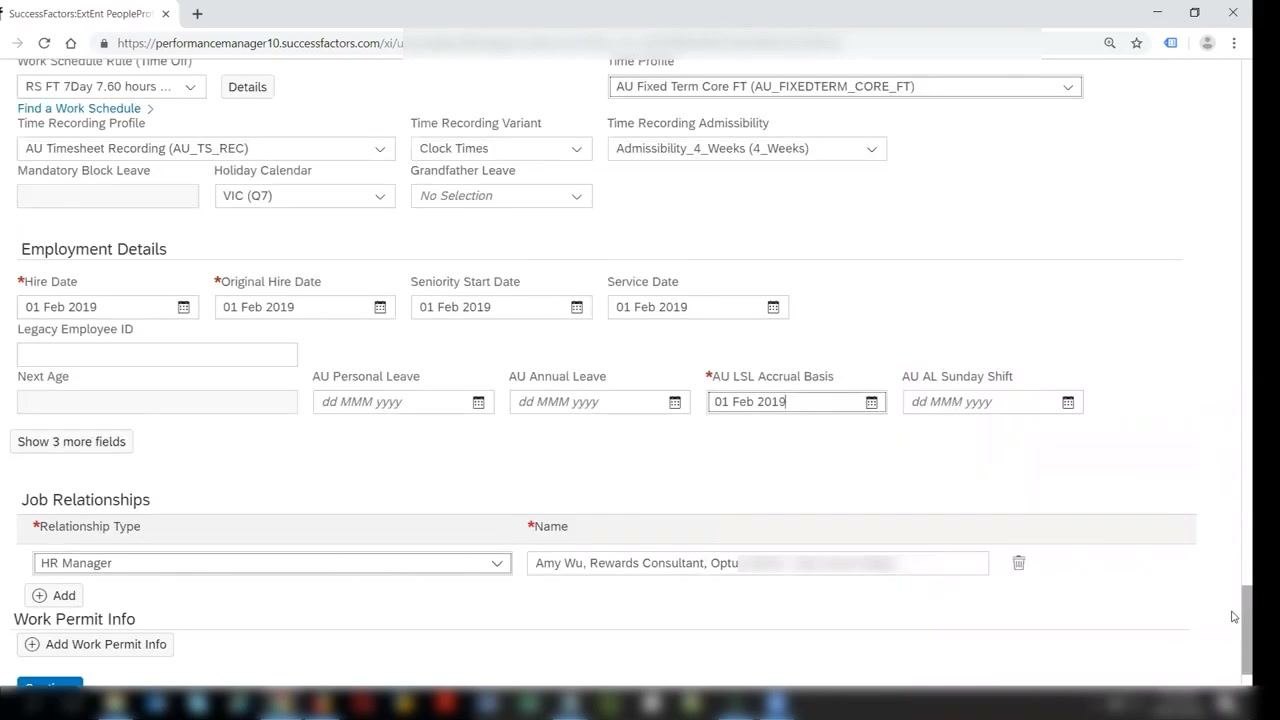
Step 32. Select the job relationship type
- Scroll to the Job Relationships section.
- For Relationship Type, click the dropdown and select HR Manager.
The other available options are Comp Review HR Manager, Learning BP, Line Director/EMM, Matrix Manager and Timesheet/Timeoff Manager.
Step 33. Assign the HR Manager
- In the Name field next to HR Manager, enter the manager's name, for example Amy Wu, Rewards Consultant, Optu....
- Make sure you select the correct person from the suggestions.
Complete payroll fields
Step 34. Enter the payroll fields
Scroll to the Payroll Fields section and enter the following:
- Work Schedule Rule: (R7223800) RS FT 7Day 7.6 Hours
- Time Mgmt Status: Evaluation of planned times (auto pay)
- Standard Weekly Hours: 40
- Working Days Per Week: 7
- FTE: 1
- Part-time employee: No
For Pay Scale Type, Pay Scale Area and Pay Scale Group, select or enter the appropriate values as per company policy.
Step 35. Complete additional payroll and assignment fields (optional)
Fill in Pay Scale Level, Annual Leave Entitlement Regular, Annual Leave Entitlement Fixed and any other required fields. Use the "+" button to upload attachments if needed.
Before you move on, keep these points in mind:
- Mandatory fields are marked with a red asterisk (*).
- Make sure all required fields are completed before you proceed to the next section.
- If errors occur, review the highlighted fields and correct any missing or invalid entries.
Finish how to hire an employee in SuccessFactors
Step 36. Continue and review any Time Recording Variant error
Click Continue after you enter all required information. If an error appears regarding the Time Recording Variant and the job, read the error message for details.
If you receive an error, check whether the selected Time Recording Variant matches the requirements of the chosen work schedule. The current selection is Clock Times. The correct variant for this work schedule might be Duration.
Step 37. Change the Time Recording Variant if necessary
- Open the Time Recording Variant dropdown.
- Select Duration if that matches your work schedule requirements.
- Make sure all other fields are filled in as required, such as Work Schedule Rule, Time Profile, Time Recording Profile, Holiday Calendar and Employment Details.
Step 38. Continue to the final section
After you correct any errors and provide all required fields, click Continue. This takes you to the final section of the hiring process.
Step 39. Specify the payroll frequency
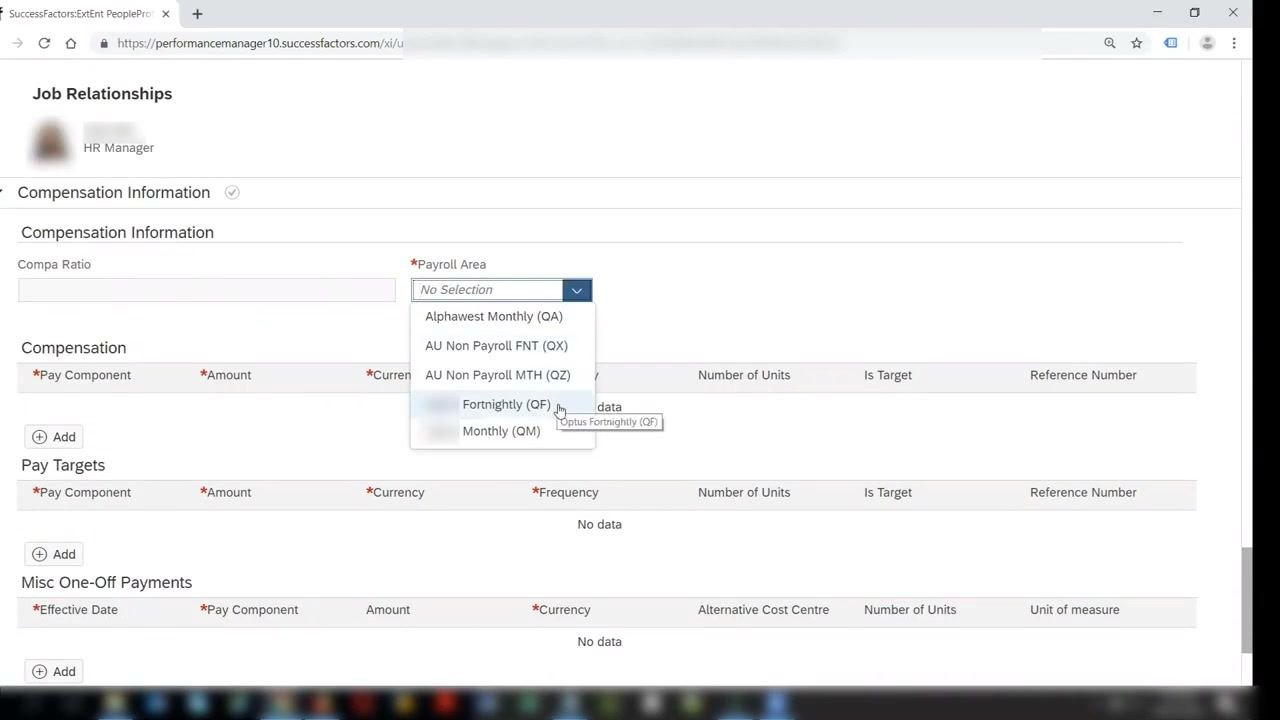
- In the Compensation Information section, locate the Payroll Area dropdown.
- Select the appropriate payroll frequency for the employee. In this example, choose Fortnightly (QF).
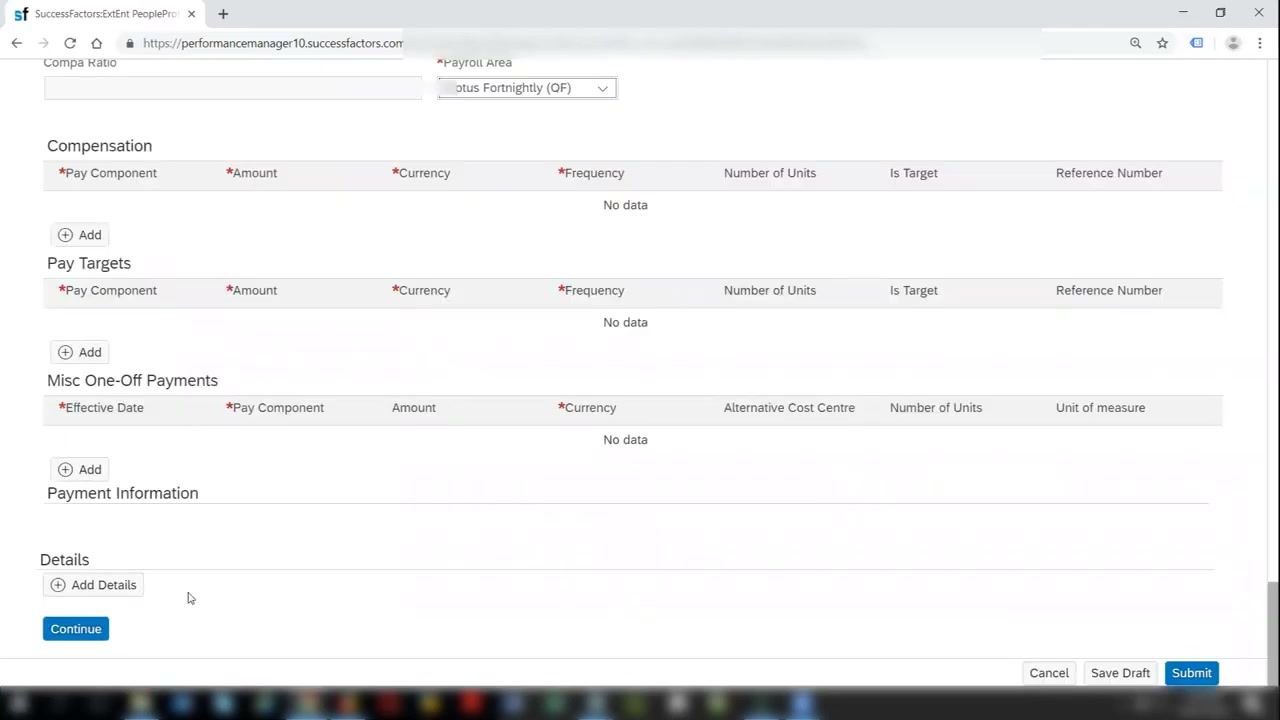
- Click Continue to proceed.
Step 40. Submit the hiring form
- Review all entered information for accuracy.
- Click Submit to finalize the hire.
A confirmation message indicates that the employee has been successfully hired in the system.
Step 41. Verify the new employee's record
- Use the search bar to locate the newly hired employee by name.
- Confirm that the employee's profile appears in the system, showing details such as name, email, position, manager and organizational information.
Step 42. View the employee's profile
- Click the employee's name to open the full profile.
- Review the profile to make sure all information is correct, including the HR Manager and legal entity details.
Summary
You now know how to hire an employee in SuccessFactors from start to finish. You searched for Add New Employee, entered identity, biographical and national ID details, and handled the duplicate check. You then completed personal, job, time, employment, payroll and compensation information, submitted the form, and verified the new employee's profile.
Generation details: cost, quality tiers
Docsie billed 6,000 credits ($4.20) to analyze this 12-minute video at standard quality. The rewrite, template fill and Word/PDF exports were included. The same video at each quality tier:
| Quality | Frames sampled | Credits | Approx. cost |
|---|---|---|---|
| Draft | every 16-30 s | 3,000 | $2.10 |
| Standard (this guide) | every 8-15 s | 6,000 | $4.20 |
| Detailed | every 4-7 s | 12,000 | $8.40 |
| Ultra | every 1-3 s | 24,000 | $16.80 |
Credits priced at $0.70 per 1,000; plans include a monthly allowance. Enterprise customers on on-premise or bring-your-own-model deployments run this on their own inference and pay no per-video credits.
Generated by Docsie Video-to-Docs on 2026-11-15 from a 11-minute video. Screenshots are frames from the source video and belong to their creator, Web World Design, whose original is embedded above. If you own this video and want the guide removed or credited differently, contact us and we will act within one business day.