
How to Schedule a Report in ServiceNow
ServiceNow lets you schedule reports so they are generated and emailed automatically to users, groups, or email addresses on a recurring basis. This guide walks you through how to schedule a report in ServiceNow, from creating a new scheduled report to verifying that it was delivered correctly, and shows you how to combine multiple reports into a single email.
Video: How to schedule reports in ServiceNow by Hardit Singh. All credit for the demonstration goes to the creator; watch the original on YouTube. The written guide below was generated from this video by Docsie. Creator? Request a change or removal.
ServiceNow lets you schedule reports so they are generated and emailed automatically to users, groups, or email addresses on a recurring basis. This guide walks you through how to schedule a report in ServiceNow, from creating a new scheduled report to verifying that it was delivered correctly, and shows you how to combine multiple reports into a single email.
Prerequisites
- You must be logged in with system administrator rights. Only admins can schedule reports.
Navigate to scheduled reports
In the left navigation pane, type scheduled report, or expand the Reports section and select Scheduled Reports. You will see a list of existing scheduled reports. If none exist yet, the message "No records to display" appears.
Create a new scheduled report
Click the New button at the top of the Scheduled Reports list to open the Scheduled Email of Report form.
Enter the report name and basic details
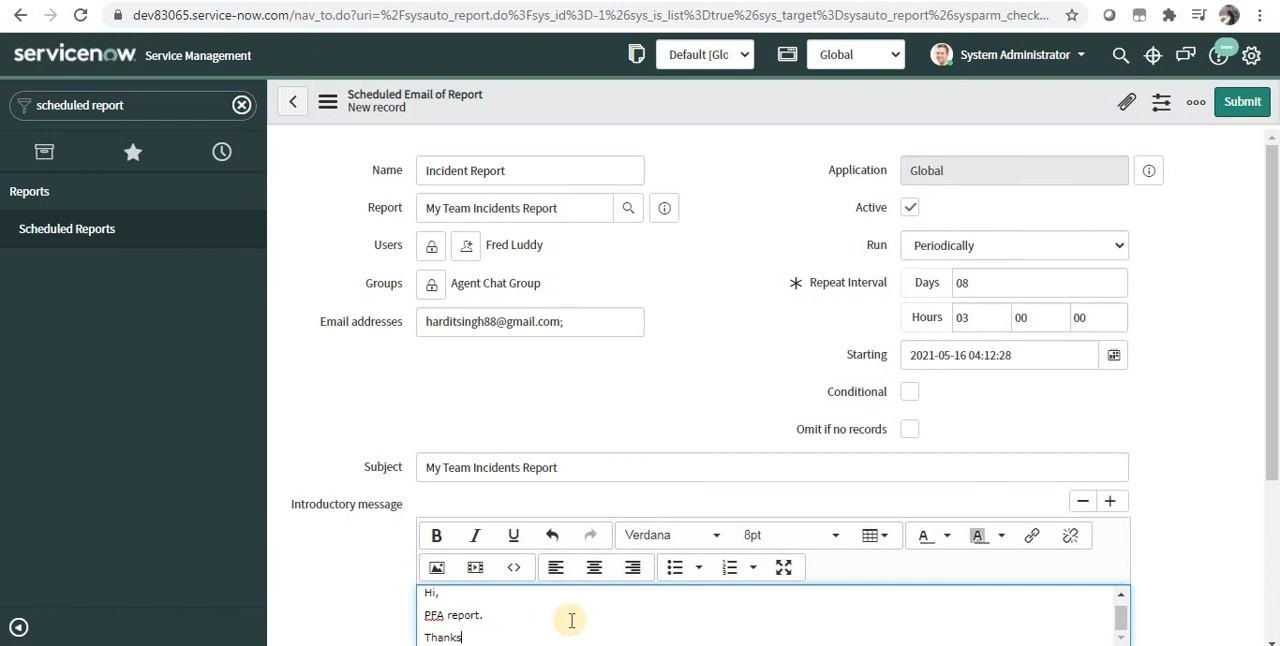
In the Name field, enter a name for your report, for example Incident Report. Confirm the Application field is set to Global, and make sure the Active checkbox is selected. In the Run dropdown, select how often the report should run (for example, Daily), and set the Time for when it should be generated (for example, 00:00:00 for midnight).
Select the report to schedule
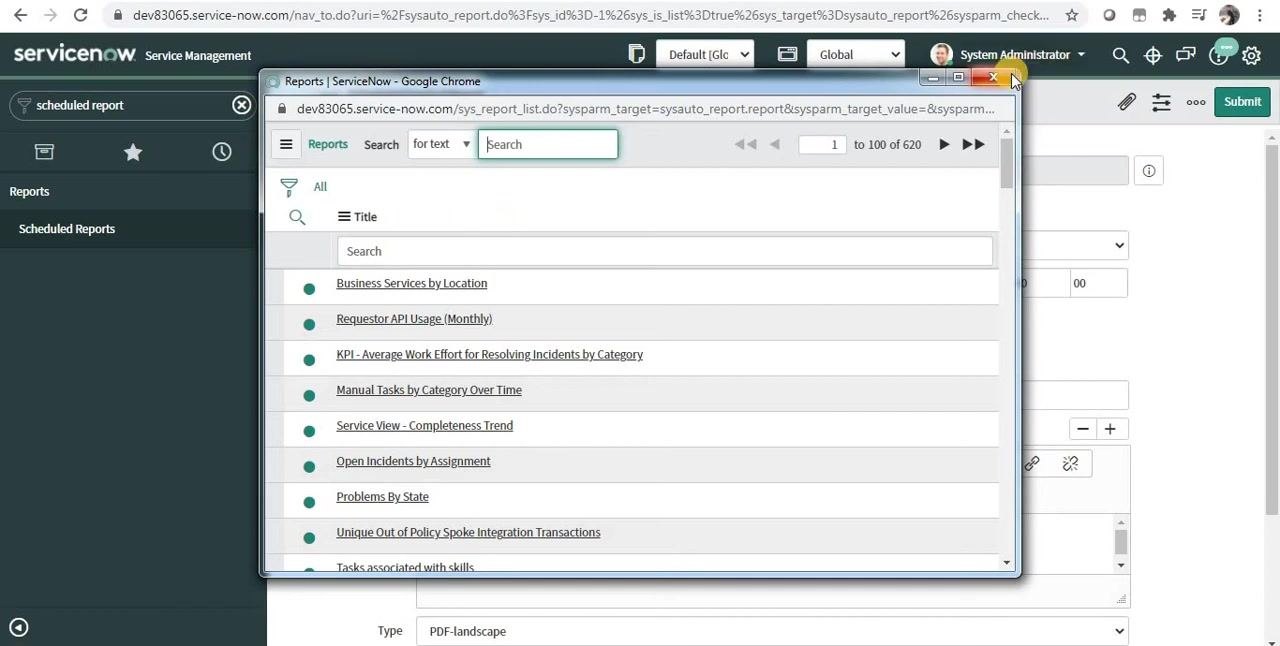
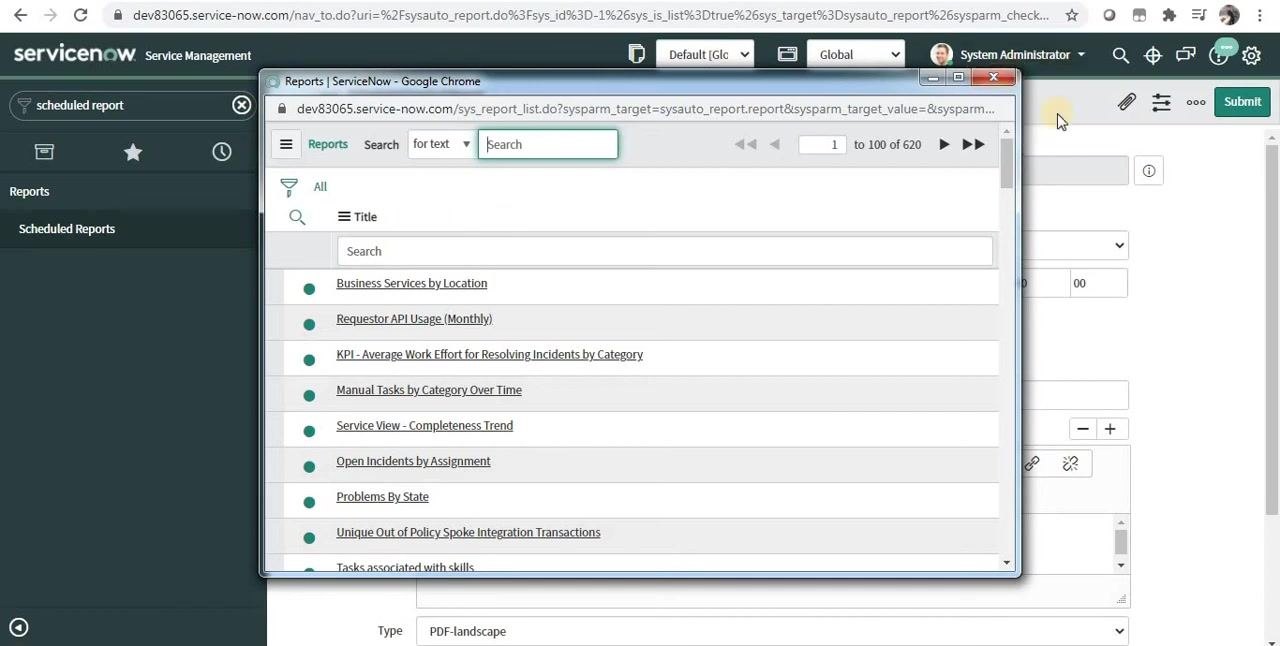
Click the magnifier (lookup) icon next to the Report field to open the list of available reports. You can scroll through the list, use the search bar, or type the report name directly into the field if you already know it.
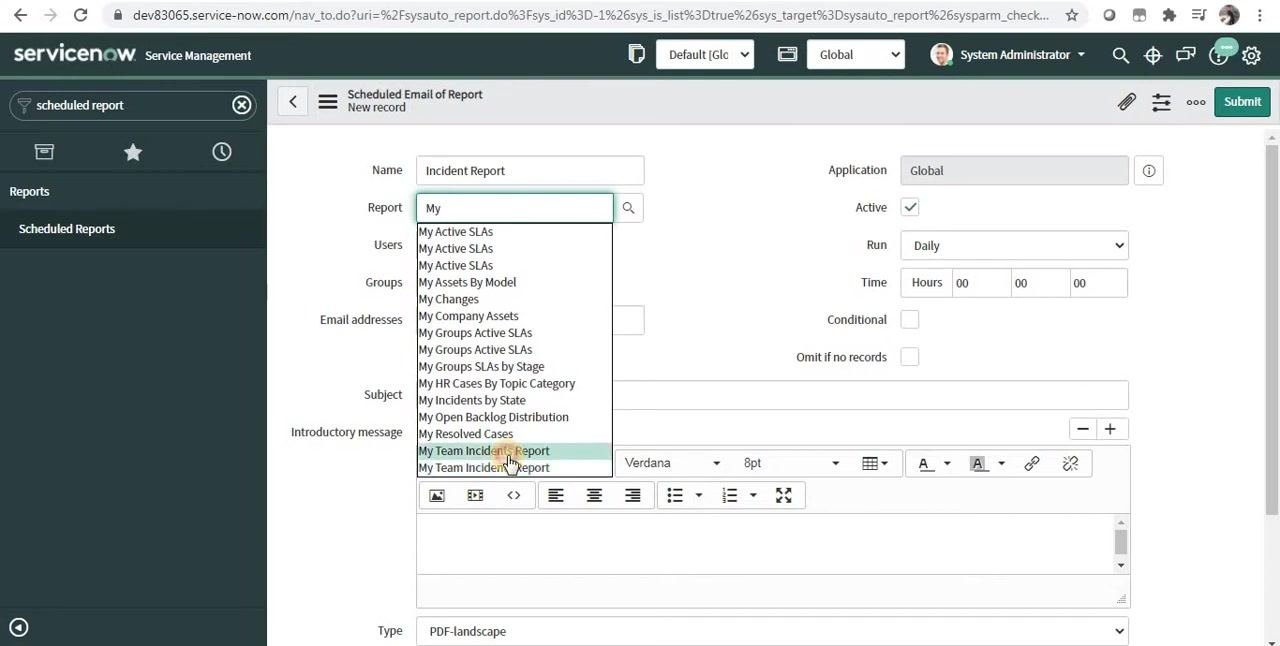
Select the appropriate report from the list — for example, My Team Incidents Report.
Specify recipients
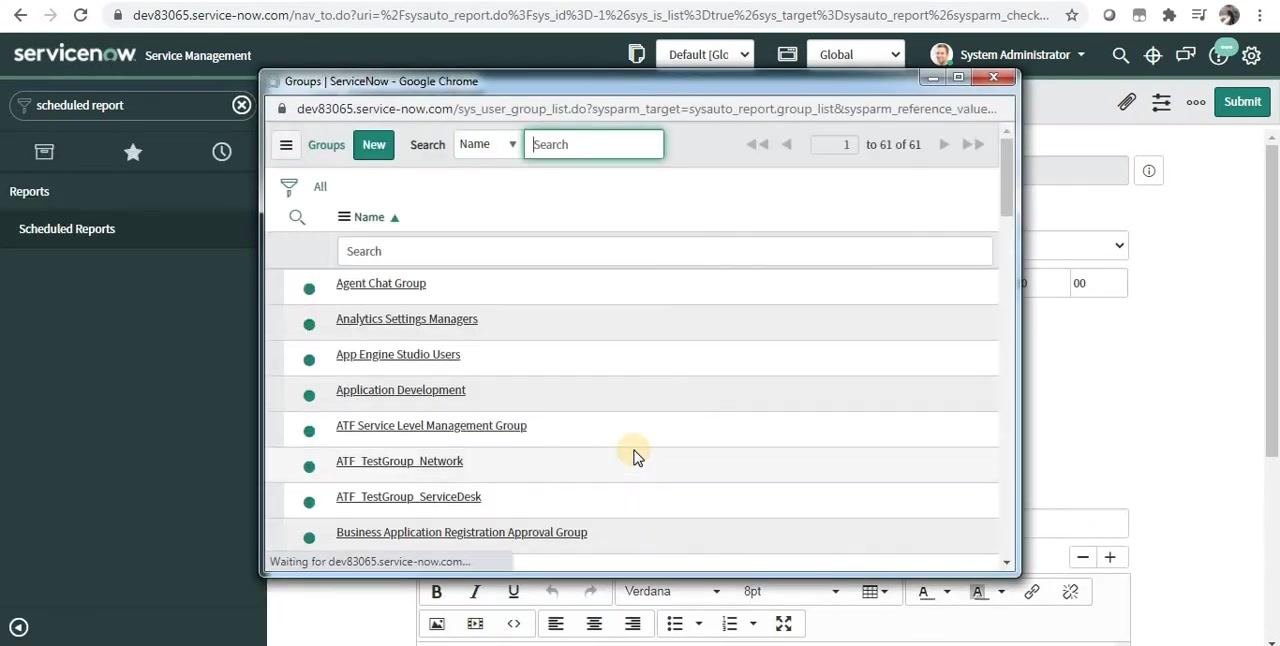
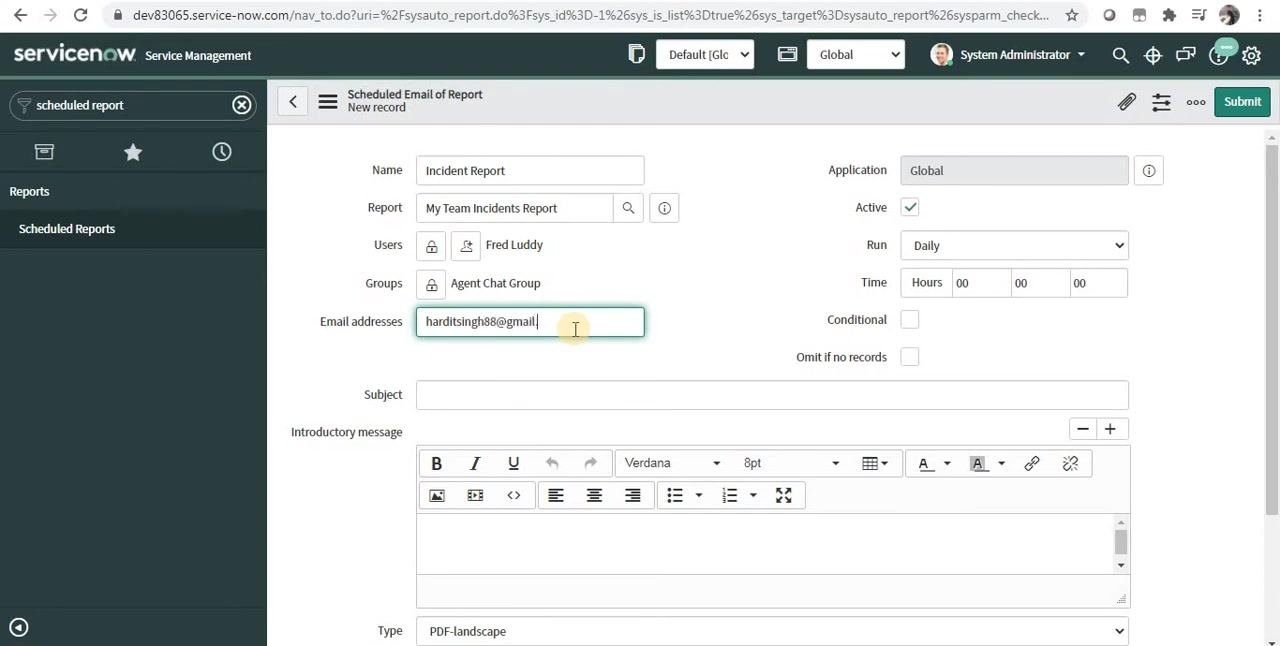
In the Users field, enter the name of the user who should receive the report — for example, type Fred Luddy and select the user from the dropdown. You can also enter an email address directly in the Email addresses field. To send the report to a group, click the lookup icon next to the Groups field and select the desired ServiceNow group.
Make sure at least one valid email address is specified in the Email addresses field to ensure report delivery.
Add third-party email recipients
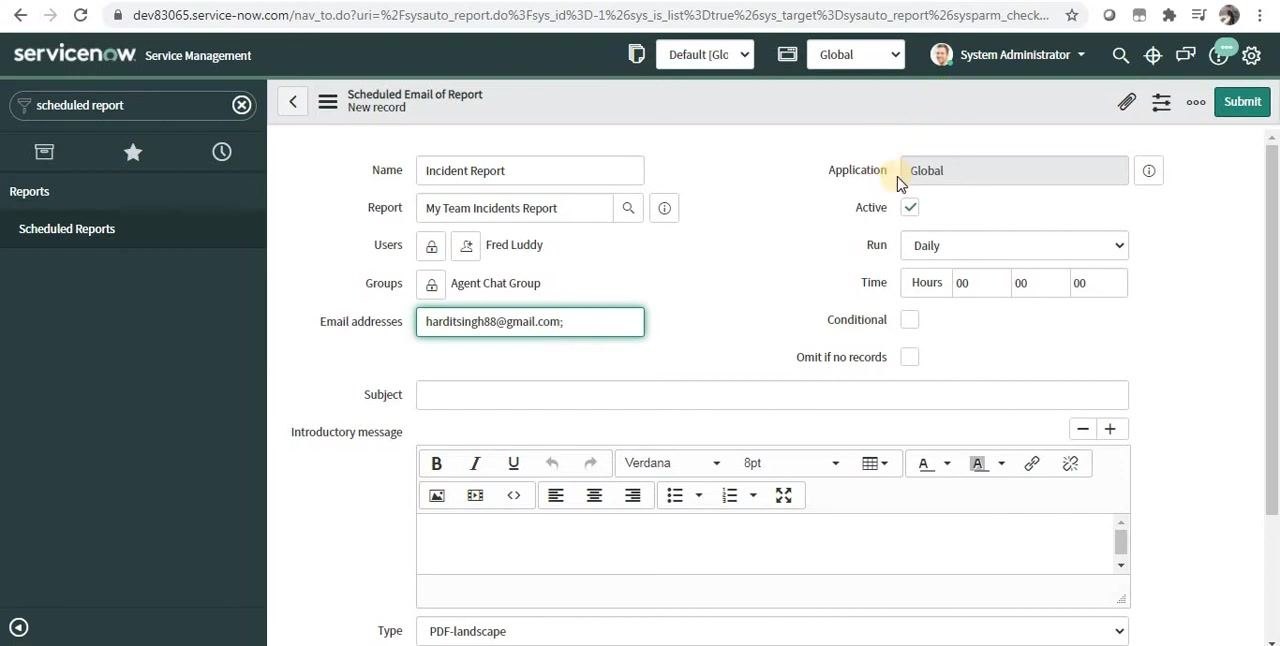
In the Email addresses field, type the email address of any third-party recipient, for example harditsingh88@gmail.com. To add multiple addresses, separate each one with a semicolon (;).
Verify application and active status
On the right-hand side of the form, confirm the Application field is set to Global, the default global application context. Keep the Active checkbox selected to keep the scheduled report enabled. If you want to deactivate the schedule later, uncheck Active.
Configure the report schedule frequency
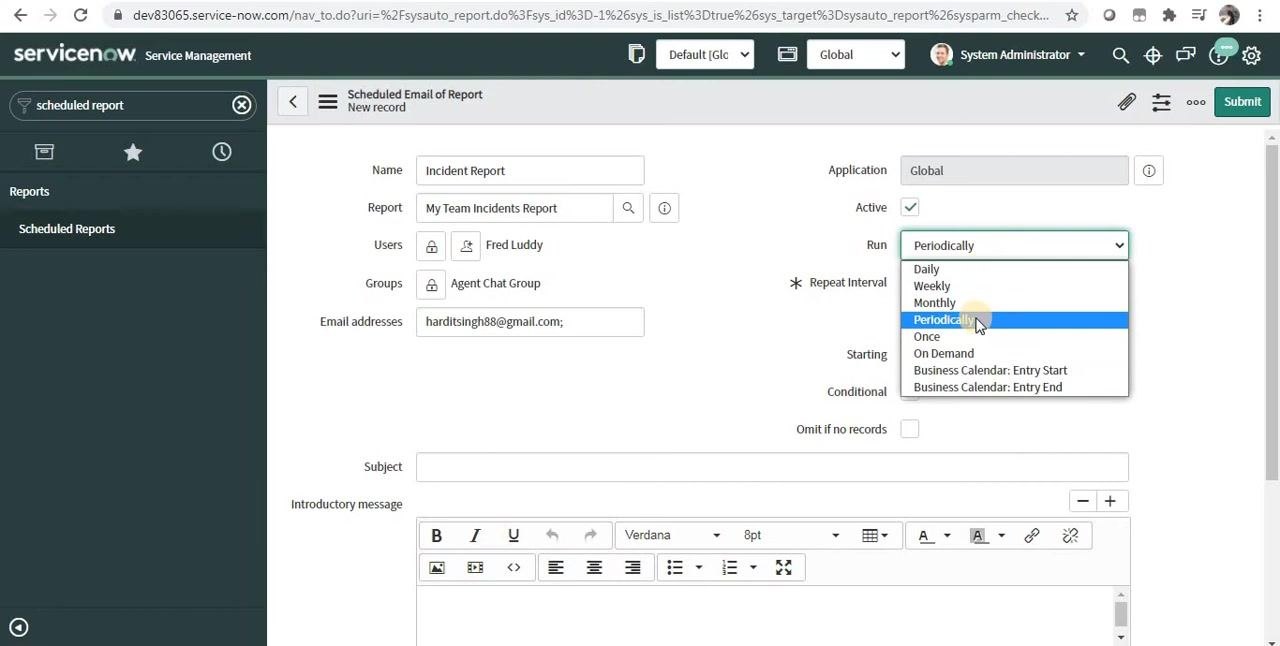
In the Run dropdown, choose how often the report should be sent:
- Daily: Specify the time (for example, 03:00 for 3 AM).
- Weekly: Specify the day (for example, Monday) and time.
- Monthly: Specify the date (for example, the 1st of every month) and time.
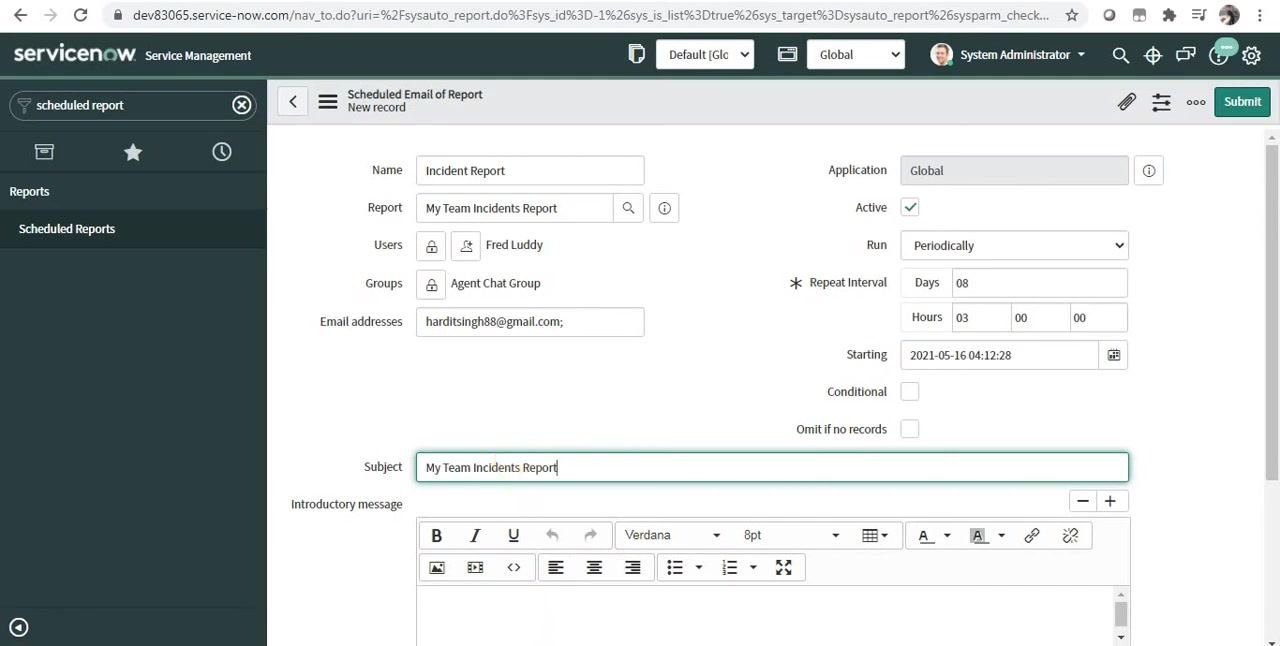
- Periodically: Set the repeat interval (for example, every 8 days at 3 AM).
- Once: Schedule the report to be sent only one time at a specified date and time.
- On Demand: The report is sent only when you manually execute it by clicking Execute Now.
- Business Calendar: Entry Start/Entry End: Schedule the report based on business calendar entry spans.
For this example, select Periodically and set the interval as needed, for example every 2 minutes for demonstration purposes.
You can also configure two optional settings at this stage:
- Conditional: Enter a script if you want the report sent only under certain conditions.
- Omit if no records: Check this box to skip sending the report when there are no records to include.
Specify the email subject
In the Subject field, enter the subject line for the scheduled report email. For this example, type My Team Incidents Report.
Compose the introductory message
In the Introductory message field, enter the body of the email, for example:
Hi,
PFA report.
Thanks
Use the formatting toolbar to adjust text style, size, or add other formatting as needed.
Select the report output type
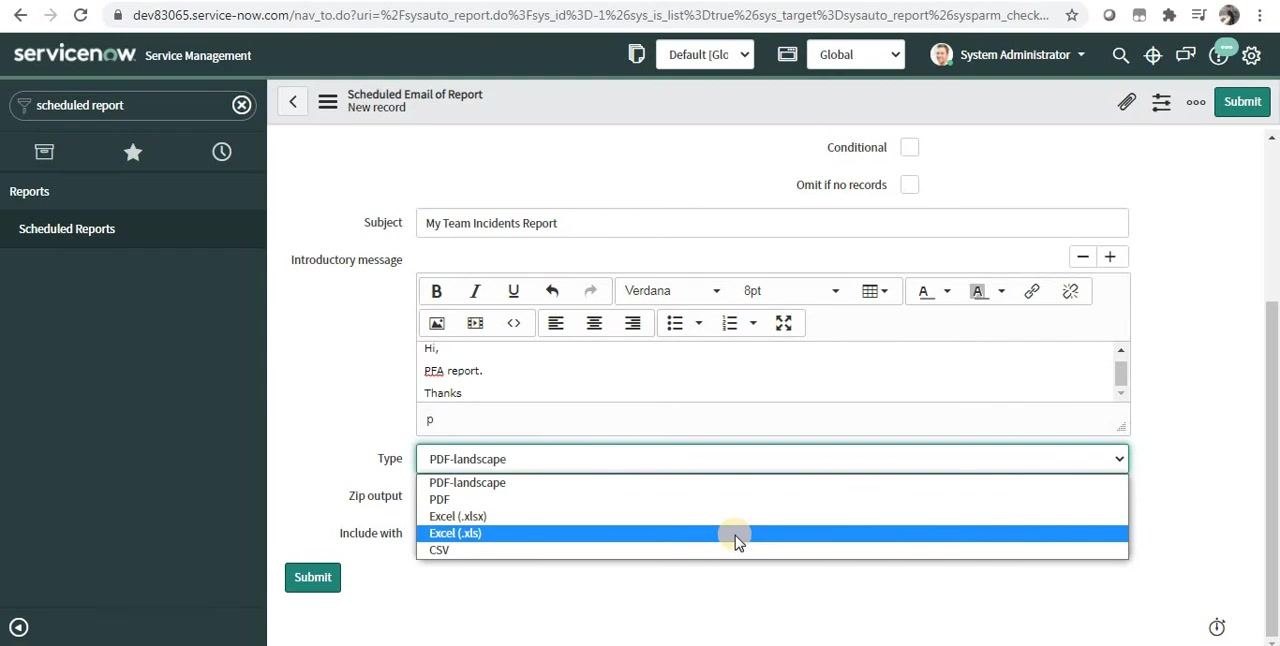
In the Type dropdown, choose the format in which the report will be sent to recipients. Options include PDF-landscape, PDF, Excel (.xlsx), Excel (.xls), and CSV. For this example, select Excel (.xlsx).
Set optional output and bundling options
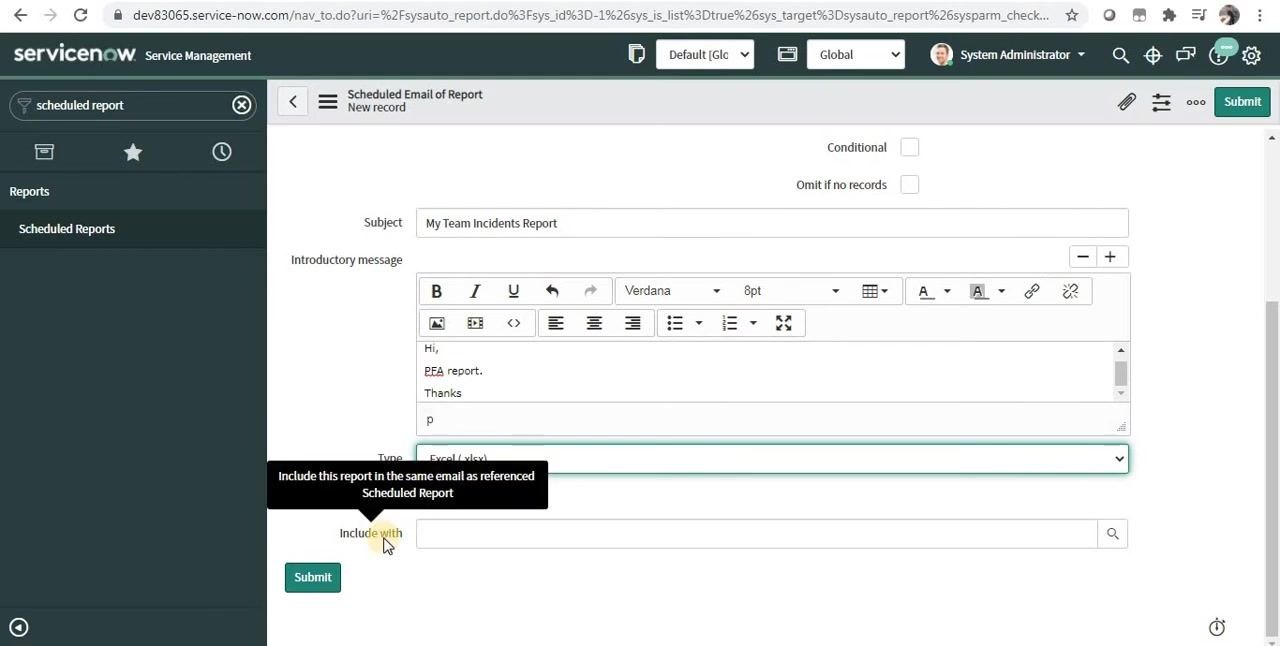
If the report is large and you want to compress the file, check the Zip output box; otherwise leave it unchecked.
In the Include with field, you can specify another scheduled report to include this report in the same email. Hovering over the field shows the tooltip "Include this report in the same email as referenced Scheduled Report." Leave this field empty if you don't need it.
Submit and verify the scheduled report
Click Submit to save and activate your scheduled report configuration. Navigate back to the Scheduled Reports list to confirm your new report appears with the correct name, run frequency, time, subject, and active status.
Check that the email was sent
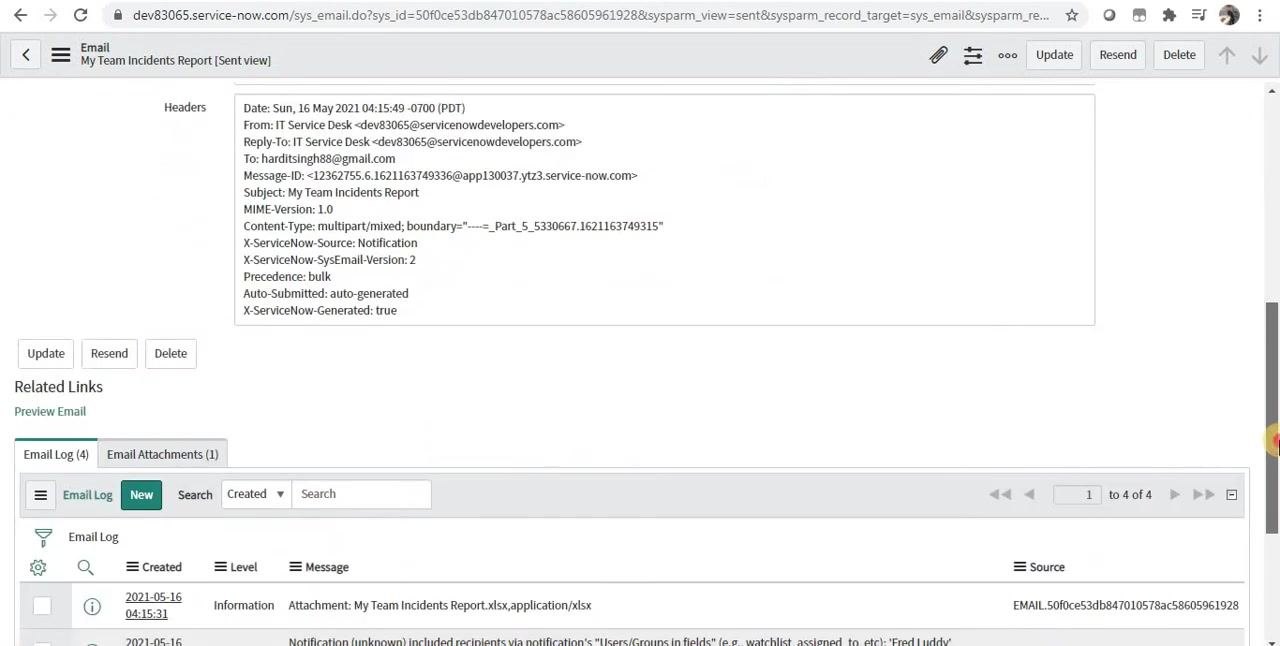
Go to System Mailboxes > Outbound > Sent to verify that the scheduled report email was sent, and locate the entry corresponding to your report.
Click on the email entry to view its details and confirm:
- The State is set to Processed.
- The Recipients field lists all intended recipients (for example,
fred.luddy@example.com; harditsingh88@gmail.com; rob.phillips@example.com; admin@example.com). - The Subject matches your specified subject.
- The Body contains your introductory message.
- The report file (for example,
My Team Incidents Report.xlsx) is attached.
Use the Preview Email link or button to view the email as received by recipients, and confirm the subject, body, and attachment are correct.
Combine multiple reports into one email
ServiceNow lets you send multiple scheduled reports in a single email, which is useful when recipients should receive several related reports together instead of in separate messages.
To set this up, create a second scheduled report. Navigate to the Scheduled Email of Report form, enter a unique name in the Name field (for example, XYZ), and select the report you want to include in the Report field (for example, Business Services by Location).
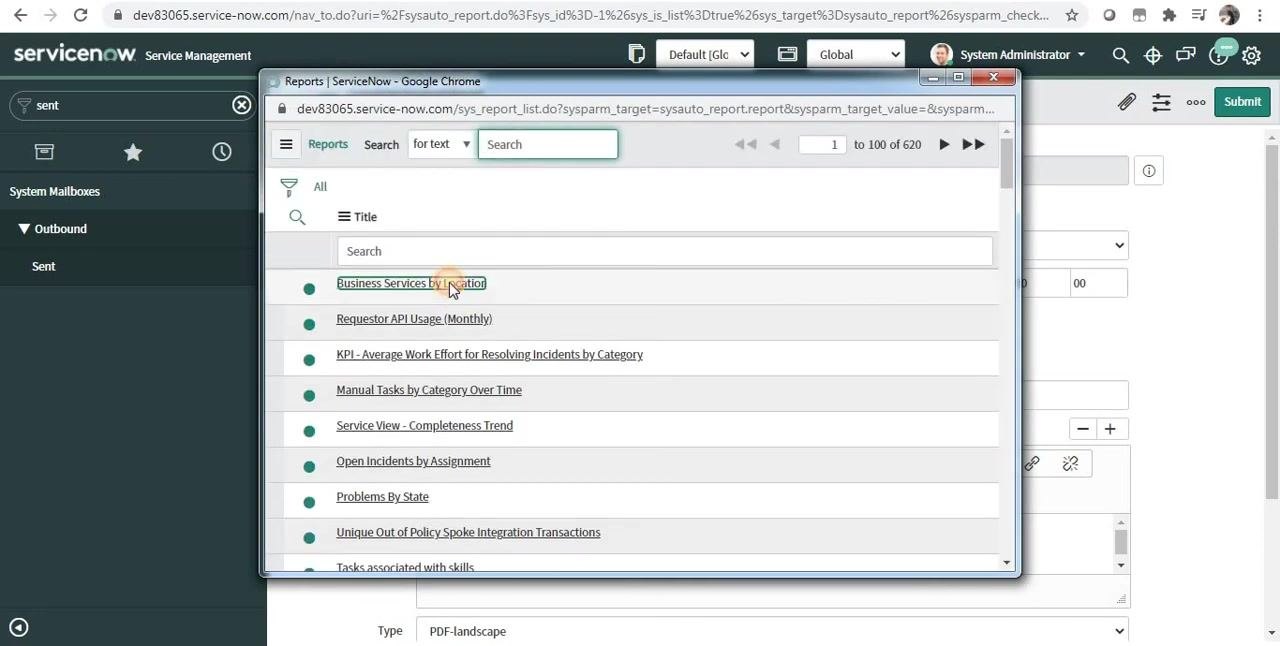
In the Include with field, click the lookup icon and select the previously created scheduled report (for example, Incident Report). This links the new scheduled report with the existing one so both are sent together in a single email.
Complete the rest of the form as usual: enter recipient users, groups, or email addresses, specify the subject and introductory message, choose the output type, and set the run frequency and time. Click Submit to save and activate the combined scheduled report configuration. Both reports will now be sent together to the specified recipients.
After the scheduled time, check System Mailboxes > Outbound > Sent to confirm the email contains both reports as attachments and was sent to the intended recipients.
What's next
Now that you know how to schedule a report in ServiceNow, you can set up additional scheduled reports for different teams or stakeholders, experiment with the various Run frequency options, and combine related reports using the Include with field to streamline delivery.
Generation details: cost, quality tiers
Docsie billed 3,000 credits ($2.10) to analyze this 6-minute video at standard quality. The rewrite, template fill and Word/PDF exports were included. The same video at each quality tier:
| Quality | Frames sampled | Credits | Approx. cost |
|---|---|---|---|
| Draft | every 16-30 s | 1,500 | $1.05 |
| Standard (this guide) | every 8-15 s | 3,000 | $2.10 |
| Detailed | every 4-7 s | 6,000 | $4.20 |
| Ultra | every 1-3 s | 12,000 | $8.40 |
Credits priced at $0.70 per 1,000; plans include a monthly allowance. Enterprise customers on on-premise or bring-your-own-model deployments run this on their own inference and pay no per-video credits.
Generated by Docsie Video-to-Docs on 2026-10-01 from a 5-minute video. Screenshots are frames from the source video and belong to their creator, Hardit Singh, whose original is embedded above. If you own this video and want the guide removed or credited differently, contact us and we will act within one business day.