
How to Create a Business Rule in ServiceNow
This guide walks you through how to create a business rule in ServiceNow, specifically a "before" business rule that runs before a record is saved to the database. You'll learn how to configure the rule, write scripting logic to automatically set field values, and add validation that aborts an update when a field value doesn't meet your criteria.
Video: ServiceNow Before Business Rule Training Videos | Before Business Rule in ServiceNow with Examples by Basico ServiceNow Learning (2019). All credit for the demonstration goes to the creator; watch the original on YouTube. The written guide below was generated from this video by Docsie. Creator? Request a change or removal.
This guide walks you through how to create a business rule in ServiceNow, specifically a "before" business rule that runs before a record is saved to the database. You'll learn how to configure the rule, write scripting logic to automatically set field values, and add validation that aborts an update when a field value doesn't meet your criteria.
Prerequisites
- Access to a ServiceNow Personal Developer Instance.
- Login credentials with System Administrator privileges.
Understanding before business rules
A business rule is a server-side script in ServiceNow. It runs when a record is displayed, inserted, updated, deleted, or when a table is queried.
A before business rule executes before data is saved to the database. The actions you define in the script run first, and only afterward does the form get updated or inserted. This ensures that any logic or validation you want to apply happens before the record is committed.
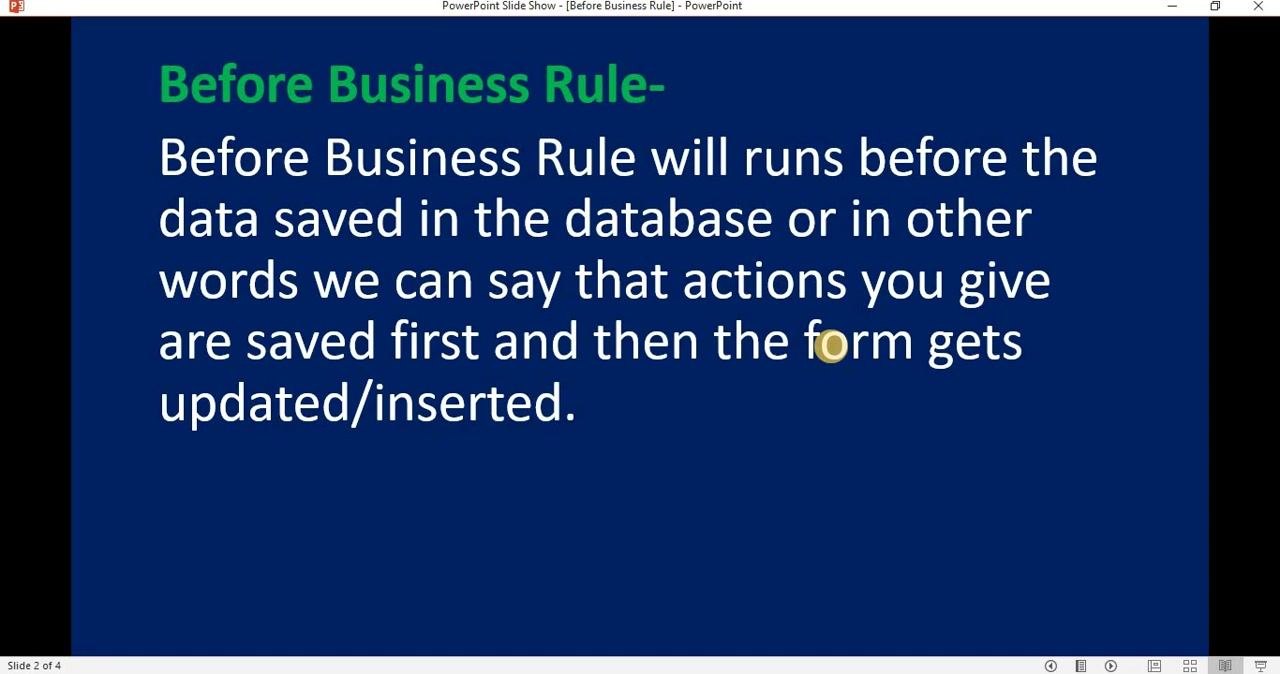
When a user clicks Save or Update on a record such as an incident form, the before business rule script executes first, and the record is then saved to the database or table.
Open your ServiceNow instance
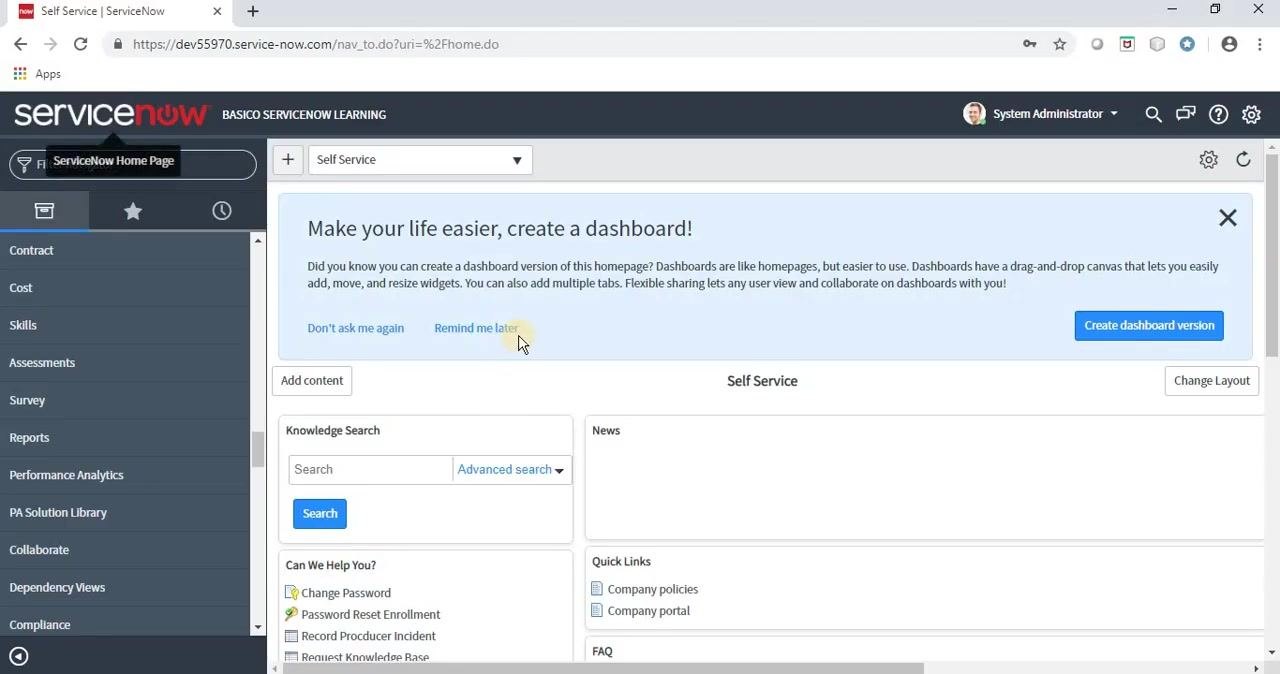
Open your ServiceNow Personal Developer Instance. The dashboard displays navigation options on the left and a main workspace in the center, with the logged-in user shown as System Administrator. You may see a prompt to create a dashboard version of the homepage.
Create a before business rule in ServiceNow
Follow these steps to create the business rule and configure its basic settings.
Step 1: Navigate to Business Rules
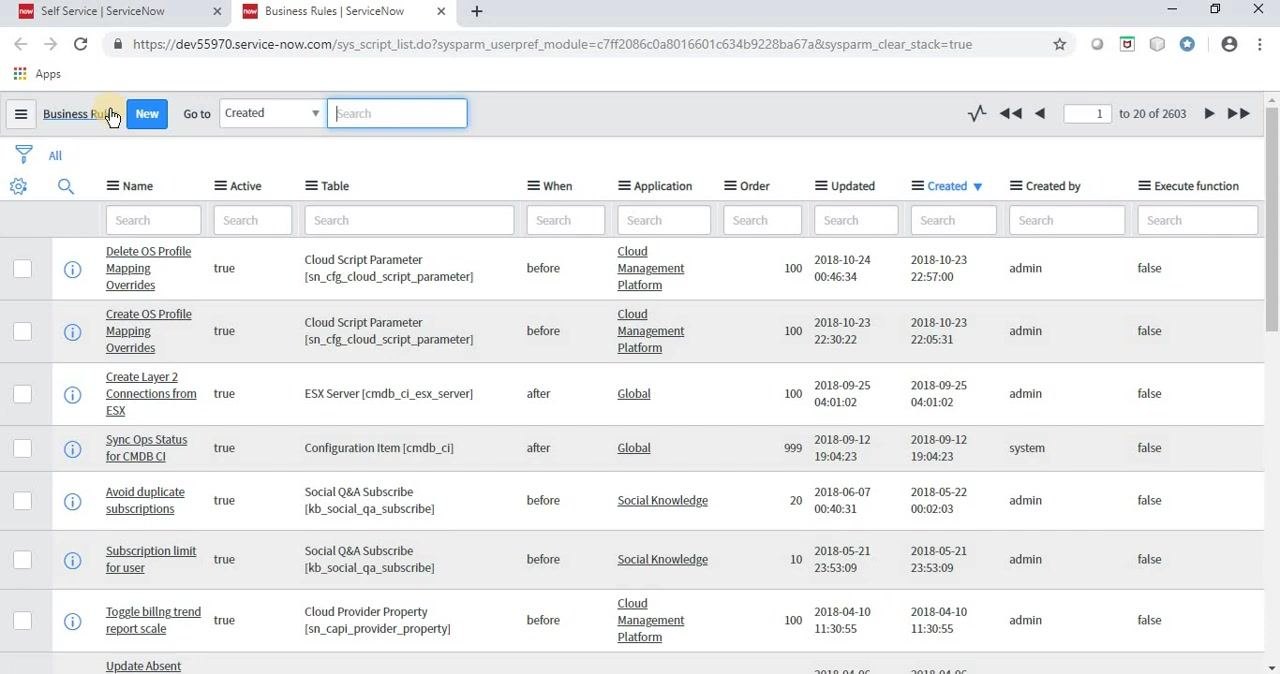
In the left navigation filter, search for "business rule" and click Business Rules under the System Definition section.
Step 2: Open the Business Rules list
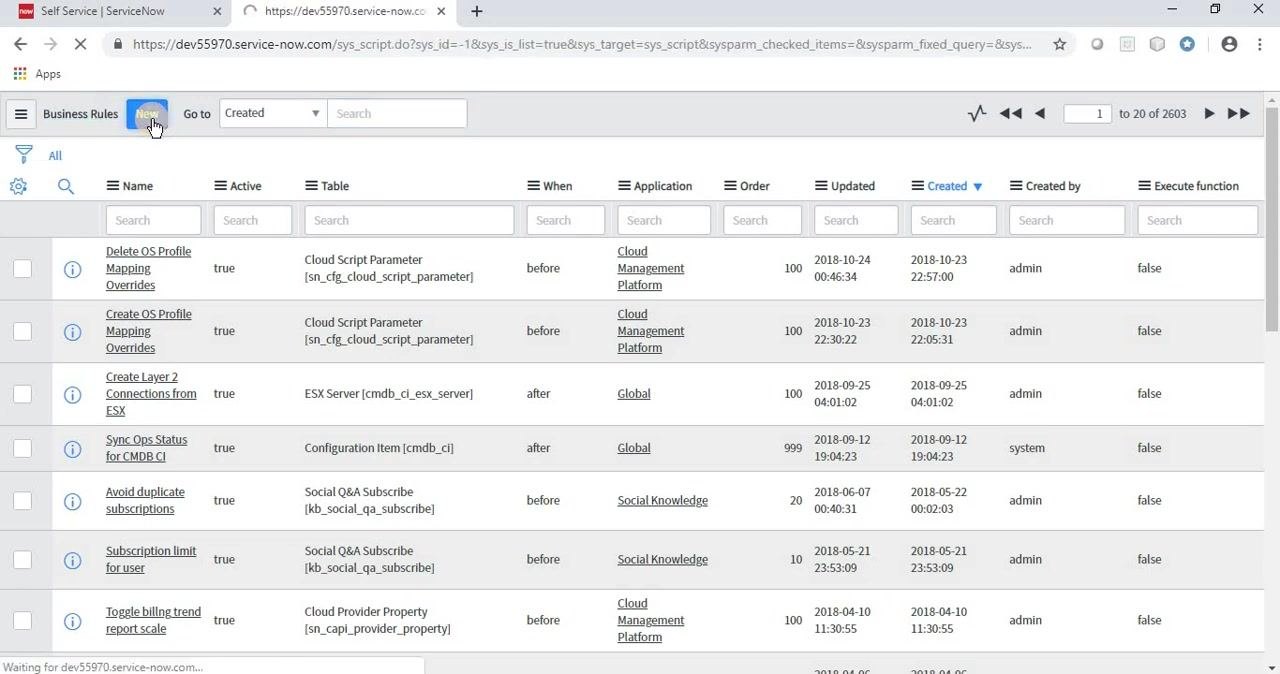
The Business Rules list displays all existing rules, with columns for Name, Active, Table, When, Application, Order, Updated, Created, Created by, and Execute function. Click the blue New button at the top left to create a new rule.
Step 3: Name the business rule
In the Name field, enter a name for your rule — for this example, demoBeforBusinessRule. Confirm that Global is selected in the Application field, that the Active checkbox is checked, and leave the Advanced checkbox unchecked for now.
Step 4: Select the target table
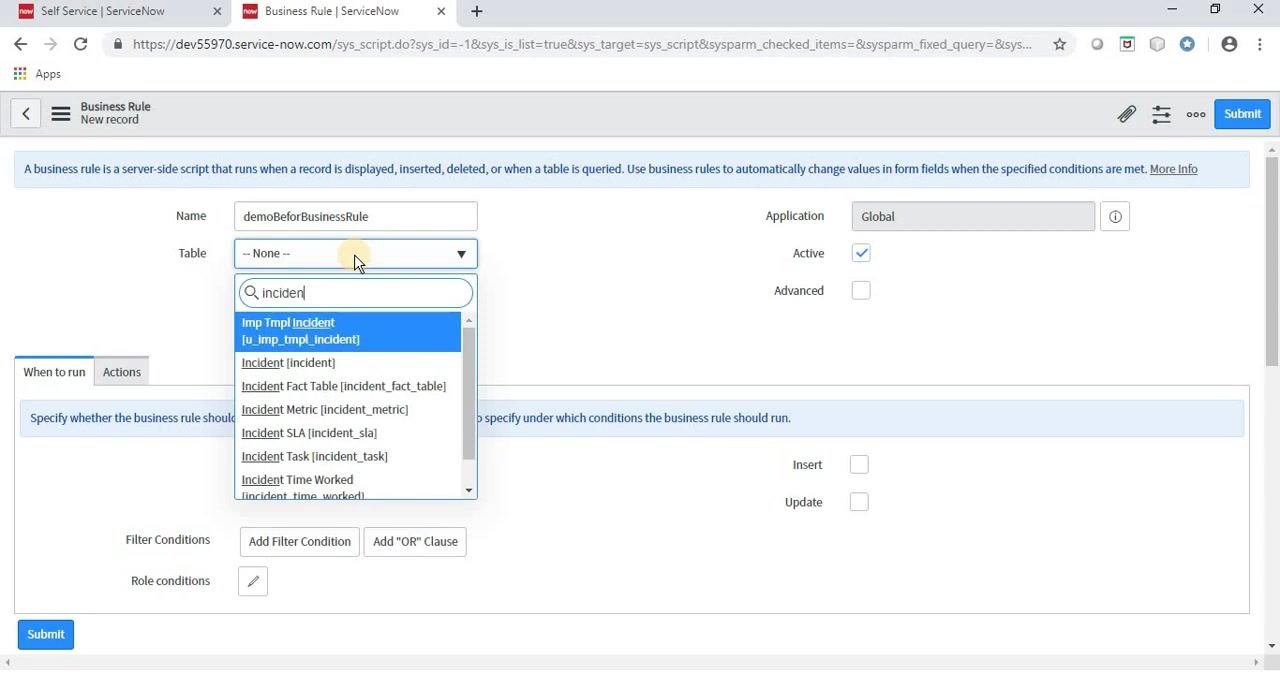
Click the dropdown for the Table field, type "incident" in the search box, and select Incident [incident] from the list.
Step 5: Enable advanced options
Check the Advanced checkbox to enable scripting and additional configuration options. New tabs, including When to run, Actions, and Advanced, appear once this is enabled.
Step 6: Set when the rule should run
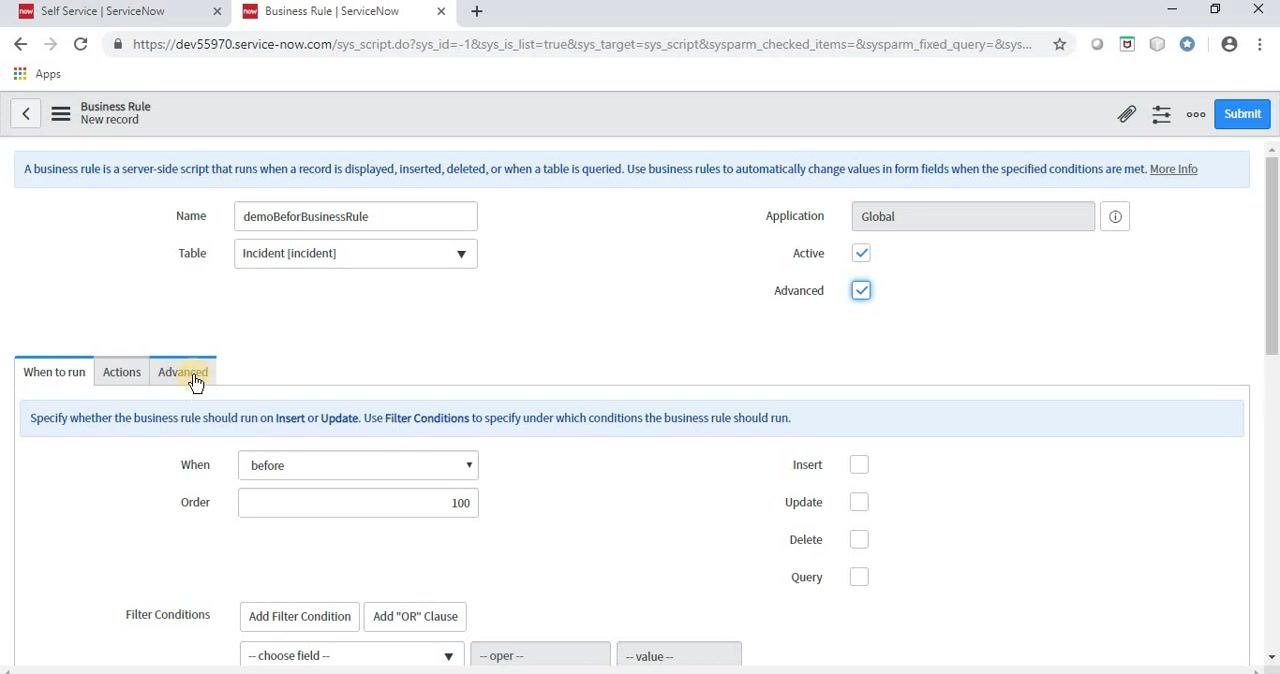
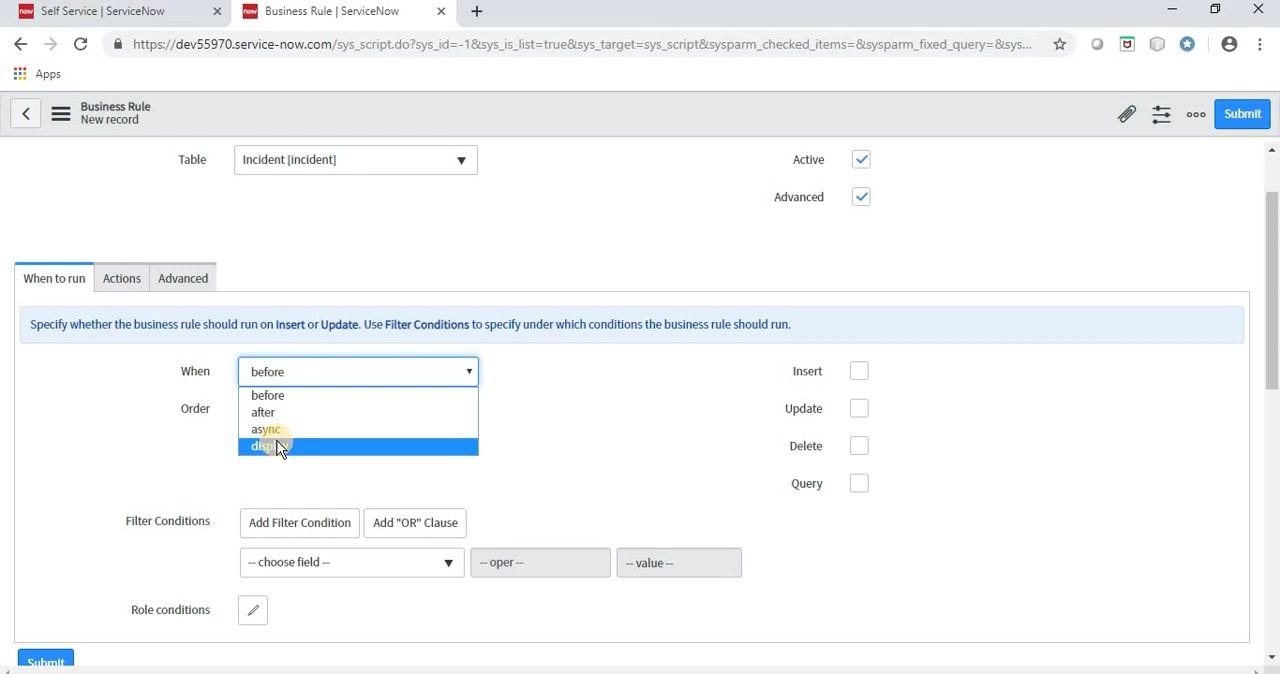
In the When dropdown, select before to specify that this is a before business rule. In the Order field, enter 100 to control the execution order relative to other rules. Leave the Insert, Update, Delete, and Query checkboxes unchecked for now.
Step 7: Add optional filter and role conditions
Use the Filter Conditions section to specify conditions under which the rule should run, such as only for certain field values. Click Add Filter Condition or Add 'OR' Clause as needed. In the Role conditions section, click the pencil icon to select specific roles that can trigger the rule.
Step 8: Choose the execution triggers
Review the Insert, Update, Delete, and Query checkboxes, which determine when the rule executes:
- Insert: Runs when a new record is created.
- Update: Runs when an existing record is modified.
- Delete: Runs when a record is deleted.
- Query: Runs when a record is queried.
You can select one or multiple options. For this example, select Update so the rule runs only when a record is updated.
Step 9: Review the Actions tab
Click the Actions tab. Here you can set field values directly using the Set field values dropdown, add messages, or configure abort actions without writing a script. This guide uses scripting instead of these direct actions.
Step 10: Open the Advanced tab for scripting
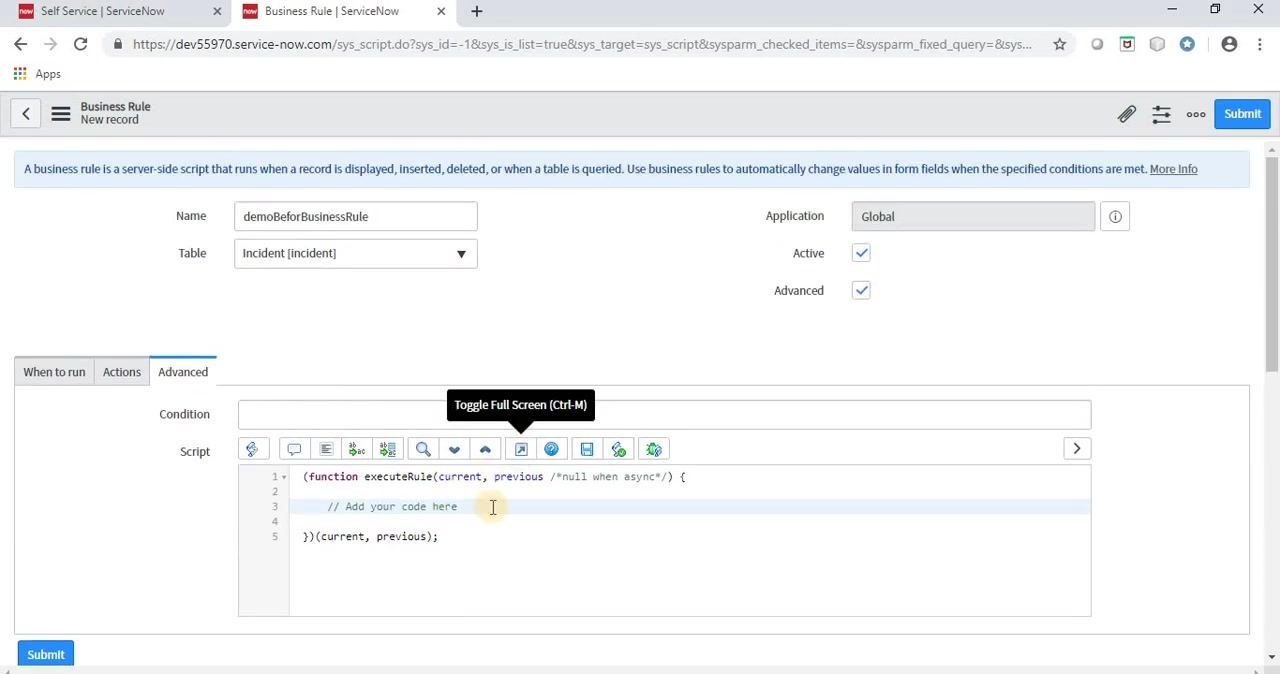
Click the Advanced tab. The Script section is pre-populated with a function template:
(function executeRule(current, previous /*null when async*/) {
    // Add your code here
})(current, previous);
You can add conditions either in the Condition field or directly within the script using if statements.
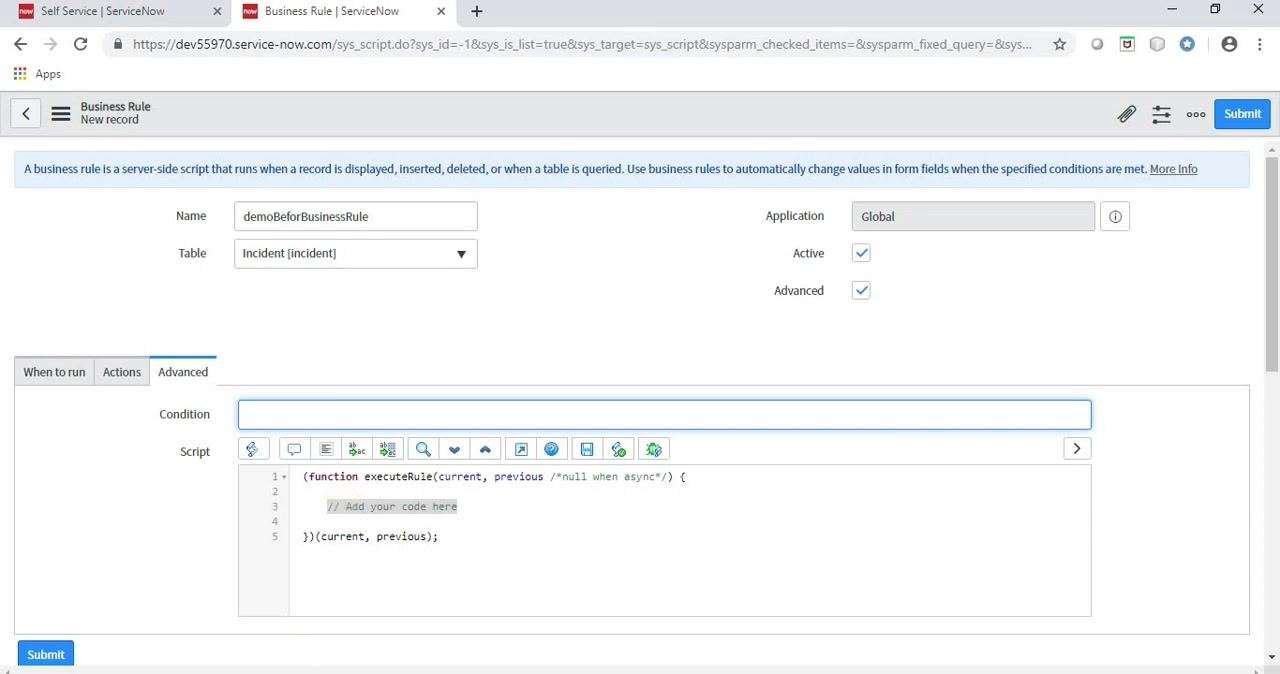
The two use cases covered in this guide are setting field values using scripting, and aborting the action by validating a field value.
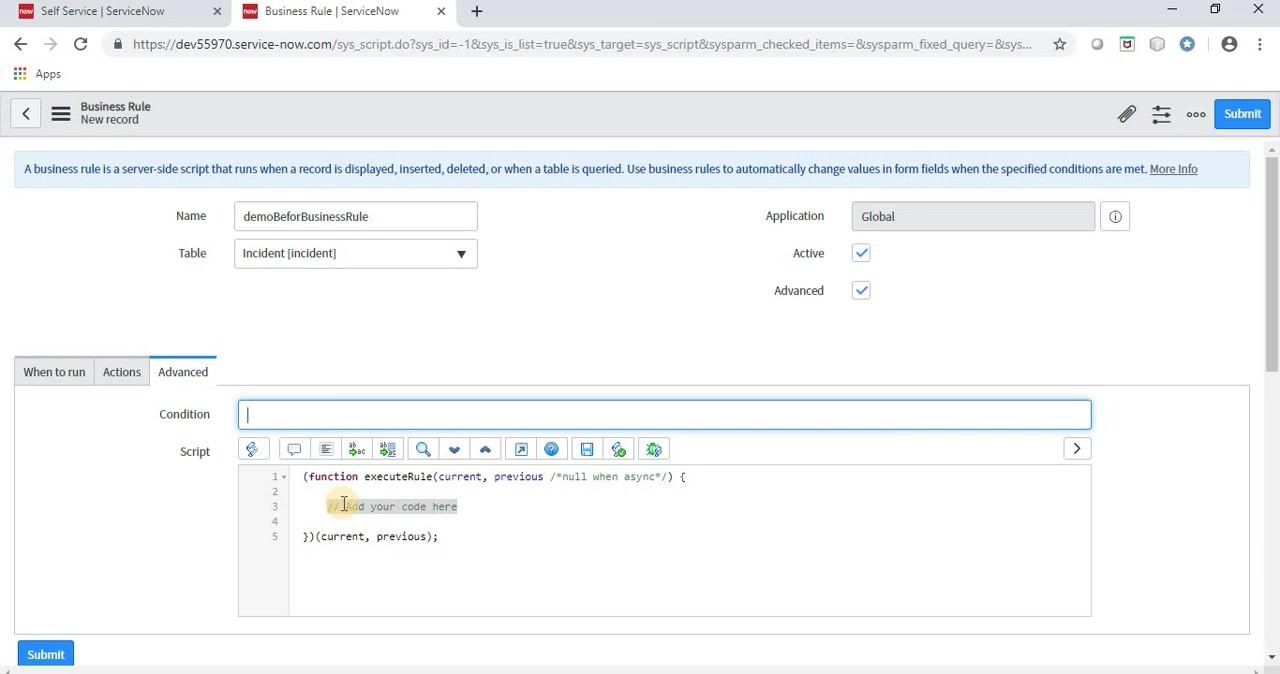
Step 11: Confirm the target table
Ensure the Table field remains set to Incident [incident], so the business rule applies to the Incident table.
Write a script to set the email field automatically
These steps show how to use scripting to automatically populate a field with the current user's email address.
Step 1: Open an existing incident record
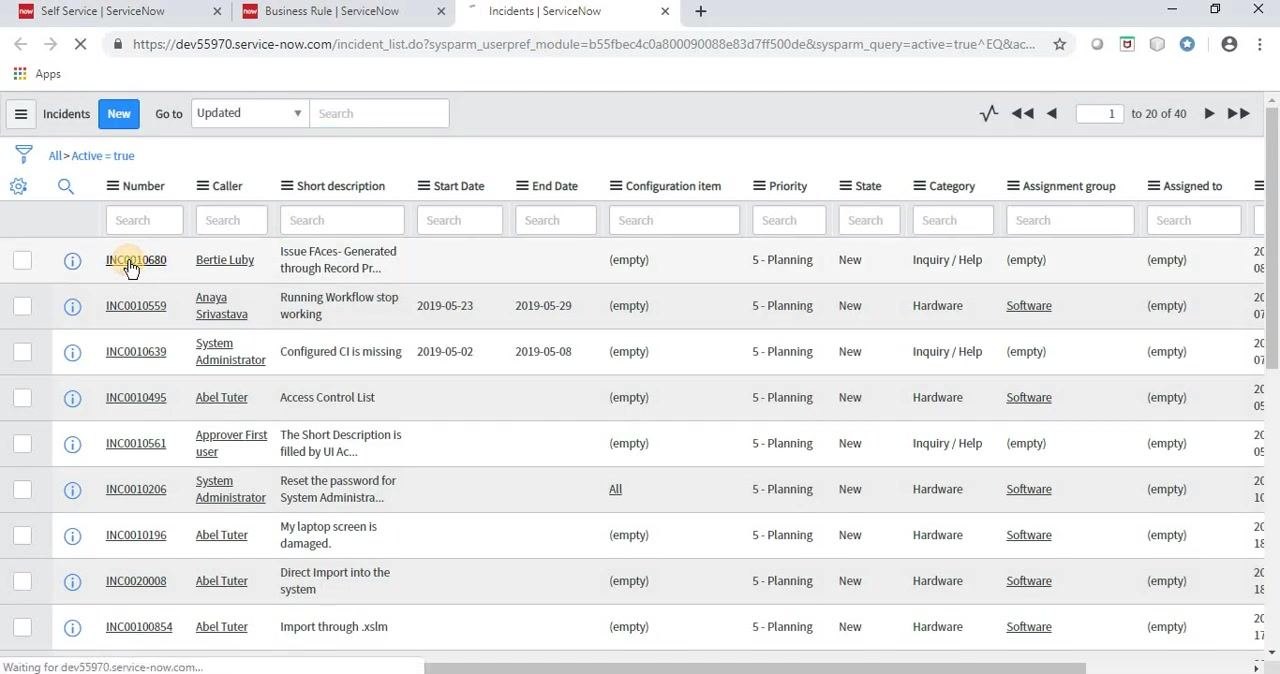
Navigate to the Incidents list and locate the incident with number INC0010680. Click the incident number to open the record.
Step 2: Review the incident record details
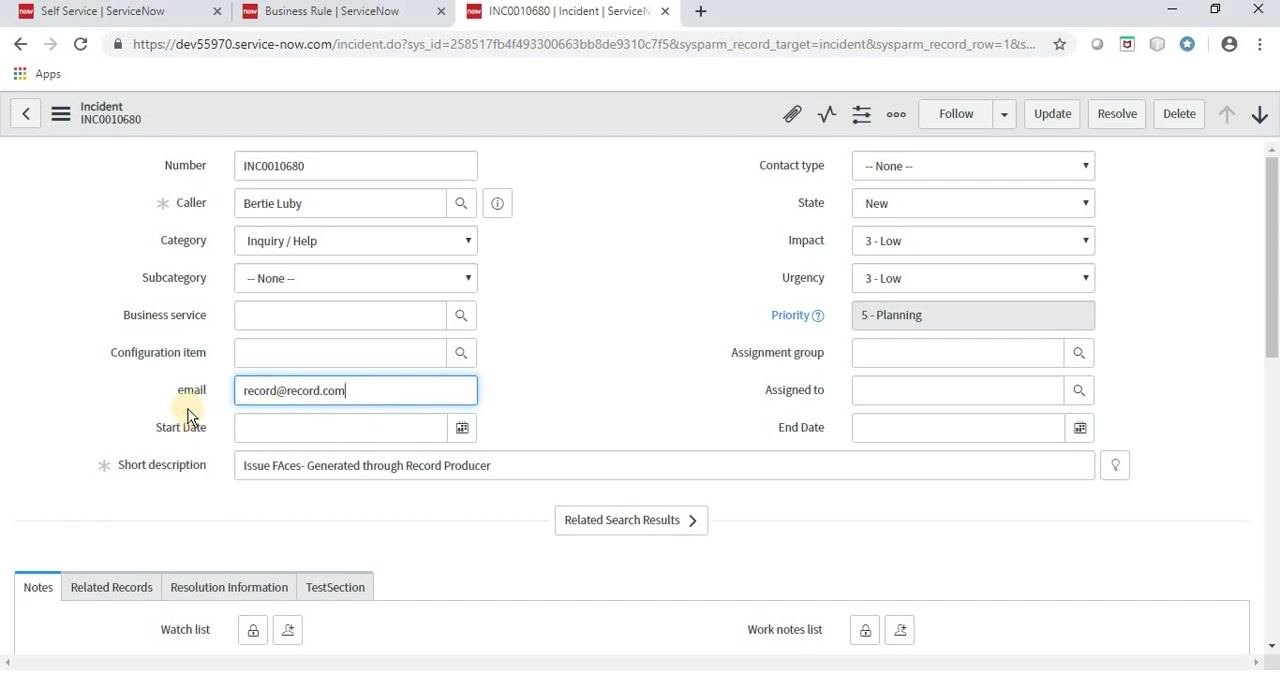
Confirm the record details, including Number INC0010680, Caller Bertie Luby, Category Inquiry / Help, Email record@record.com, Priority 5 - Planning, State New, and the short description. Review other fields such as Subcategory, Business service, Configuration item, Assignment group, Assigned to, Start Date, and End Date.
Step 3: Prepare to update the record
Make any necessary changes to the record's fields, such as Category or Email. Updating the record will trigger any before business rules configured for the Incident table.
Step 4: Edit the email field
Click into the email field and enter or update its value, for example record@record.com.
Step 5: Identify the email field's column name
Right-click the email field label to open the context menu and select Show - 'u_email' to reveal the column name used for scripting. The column name for the email field is u_email.
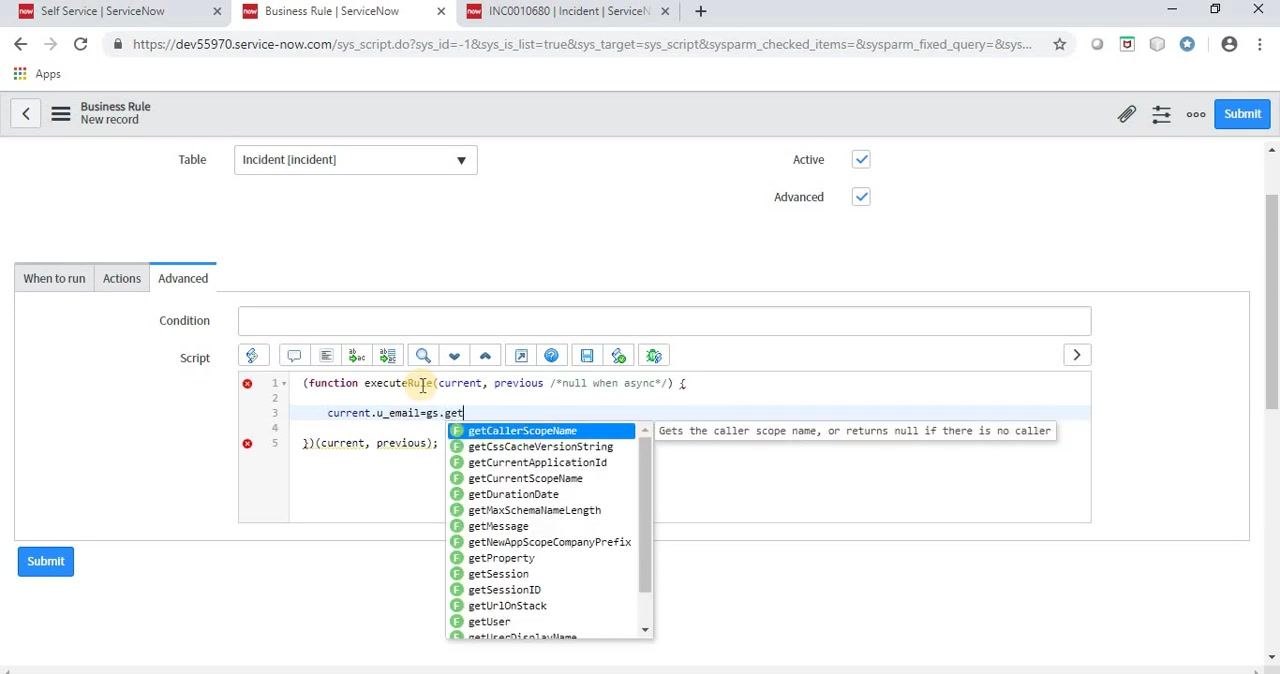
Step 6: Write a script to set the email field to the current user
In the Advanced tab of the business rule for the Incident table, enter code to set u_email to the current user's email. Use the code completion suggestions to select the correct method:
(function executeRule(current, previous /*null when async*/) {
    current.u_email = gs.getUser(). // continue with appropriate method
})(current, previous);
Step 7: Finalize the script
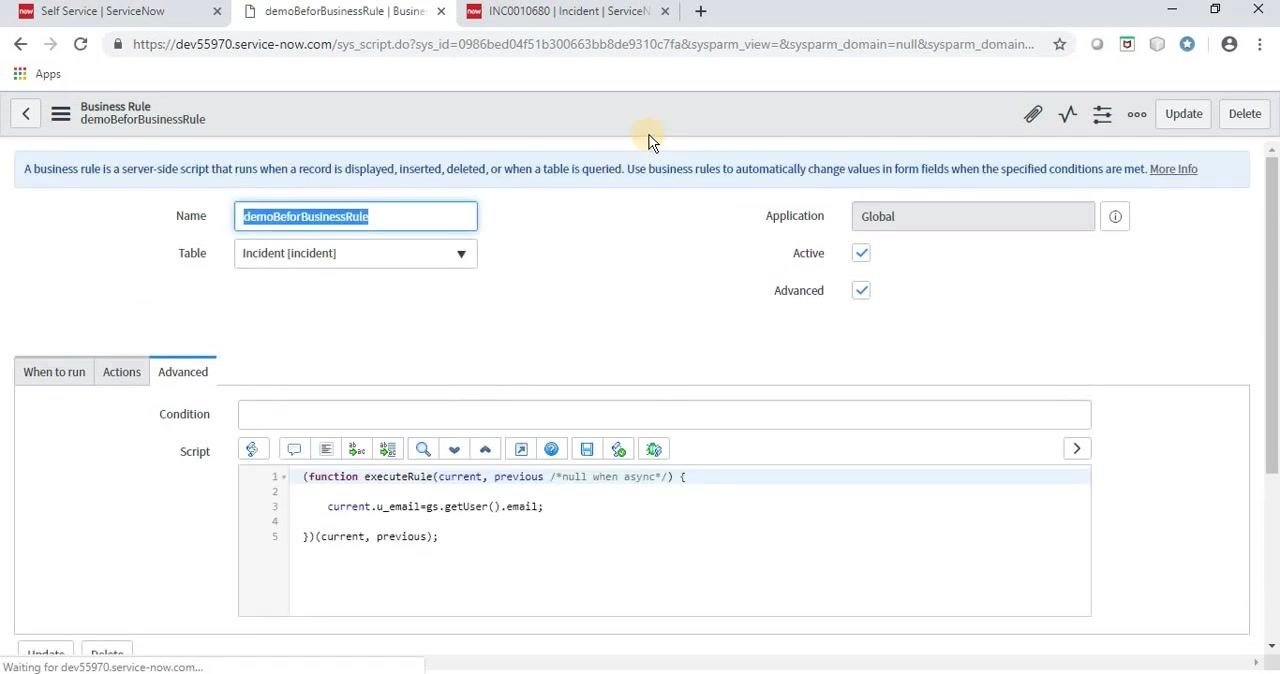
Complete the script so it sets the email field to the current user's email address:
(function executeRule(current, previous /*null when async*/) {
    current.u_email = gs.getUser().email;
})(current, previous);
Confirm that both Active and Advanced checkboxes are checked, and leave the Condition field blank unless you want to restrict when the rule runs.
Step 8: Name and save the business rule
Enter a name such as demoBeforBusinessRule, confirm the Table is set to Incident [incident] and Application is set to Global, then click Submit or Update to save the rule.
Step 9: Test the rule by refreshing the incident record
Return to the incident record and refresh the page to trigger the before business rule. Observe whether the email field updates to the current user's email address.
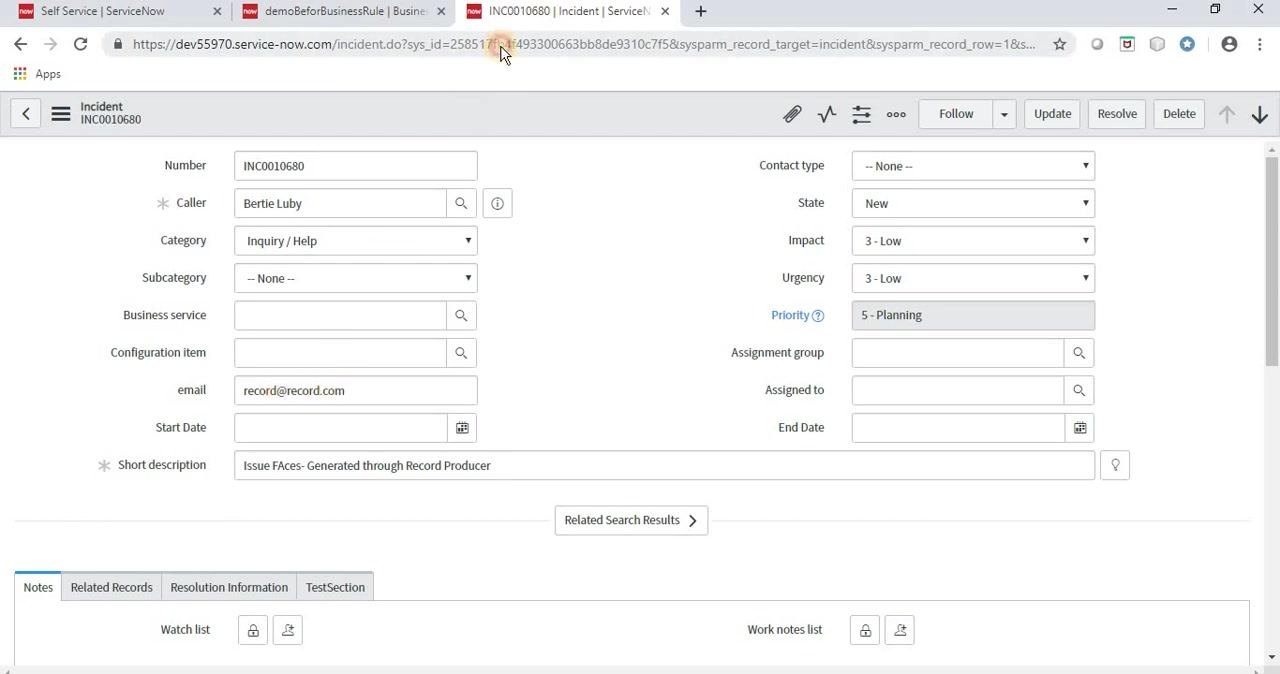
Step 10: Observe the email field update
After refreshing, check the email field. Its value should update to the email address of the currently logged-in user, for example record@business.com.
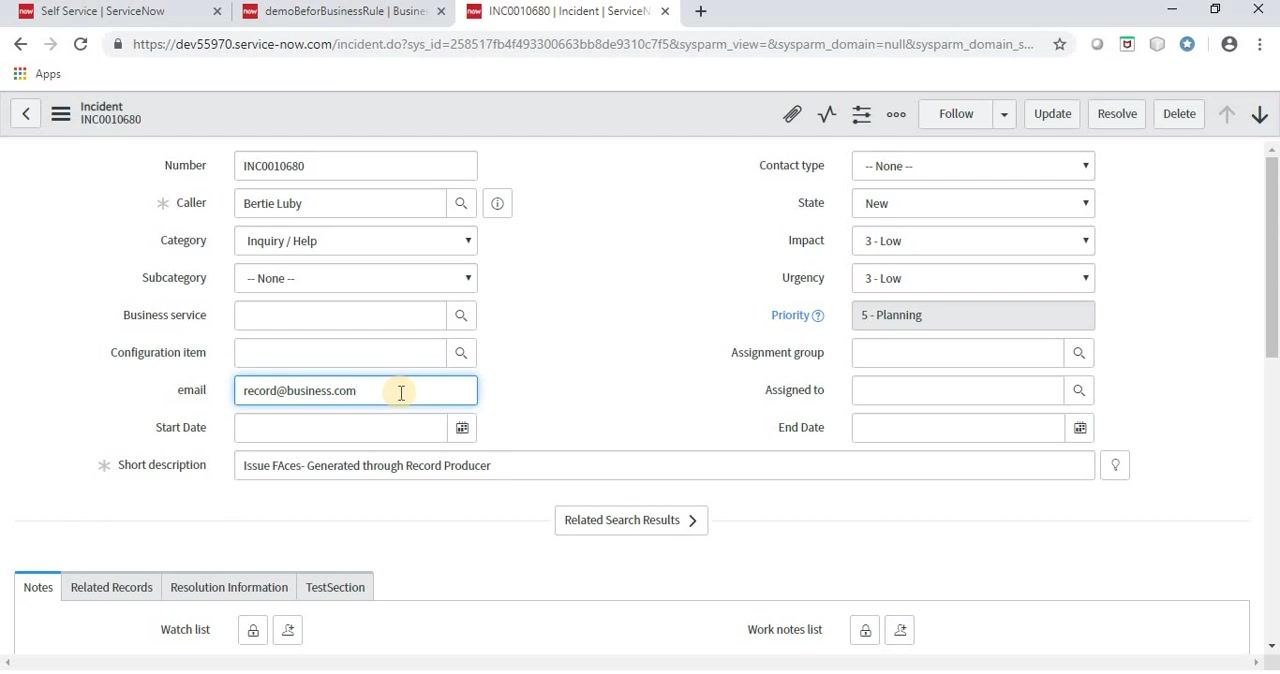
Step 11: Verify the email field value
Confirm the email field now displays the correct value, such as record@business.com. If you're logged in as a different user, the field reflects that user's email address instead.
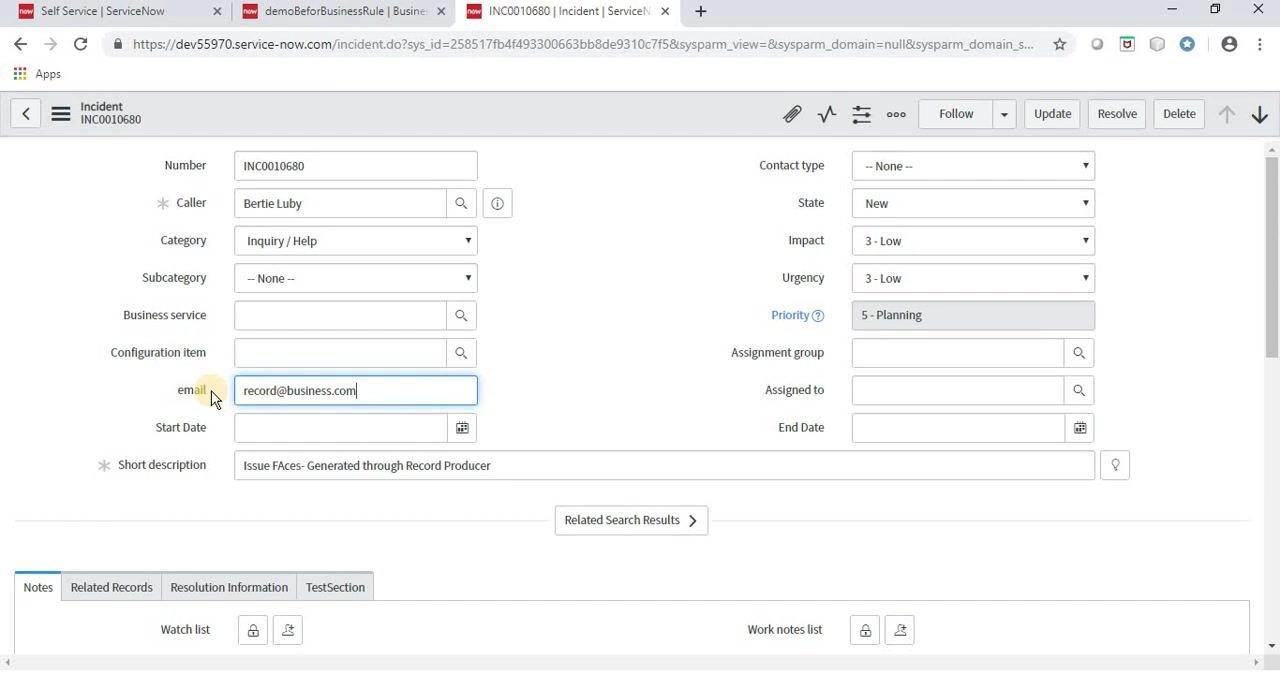
Step 12: Check for further updates
Refresh again or save the record another time. The email field should continue to reflect the current user's email, for example admin@example.com if you're logged in as admin.
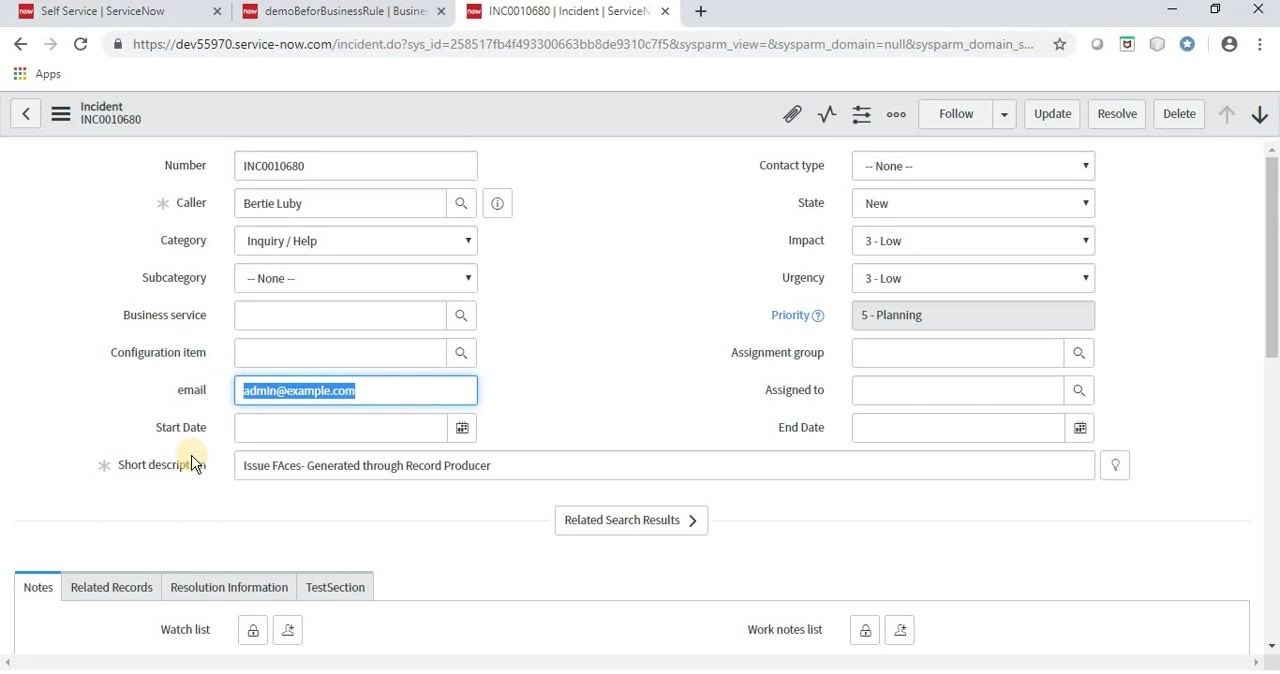
Step 13: Understand the rule's flexibility
The business rule sets the email field to the current user's email regardless of its previous value, whether blank or otherwise. This ensures consistent, automated population of the email field on incident records.
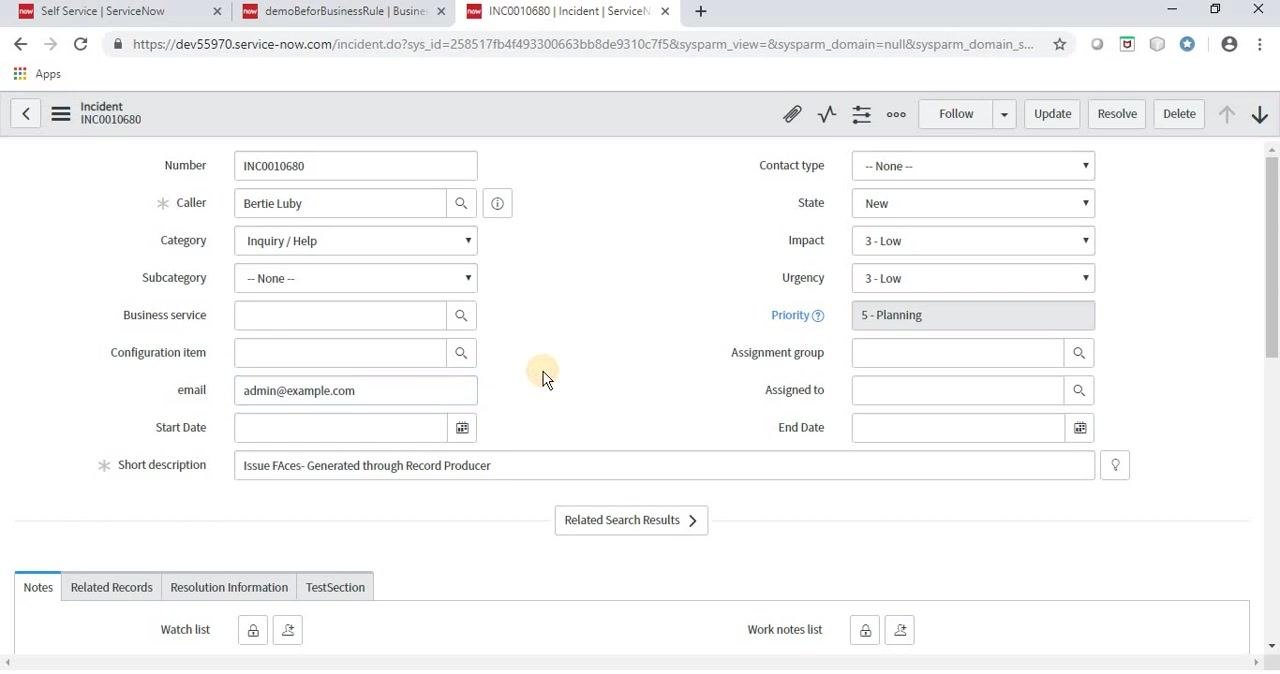
Validate field values and abort invalid actions
This section shows how to use a business rule to validate a field's value and abort the record action if validation fails, while displaying informational messages based on the outcome.
Step 1: Review the incident record for validation
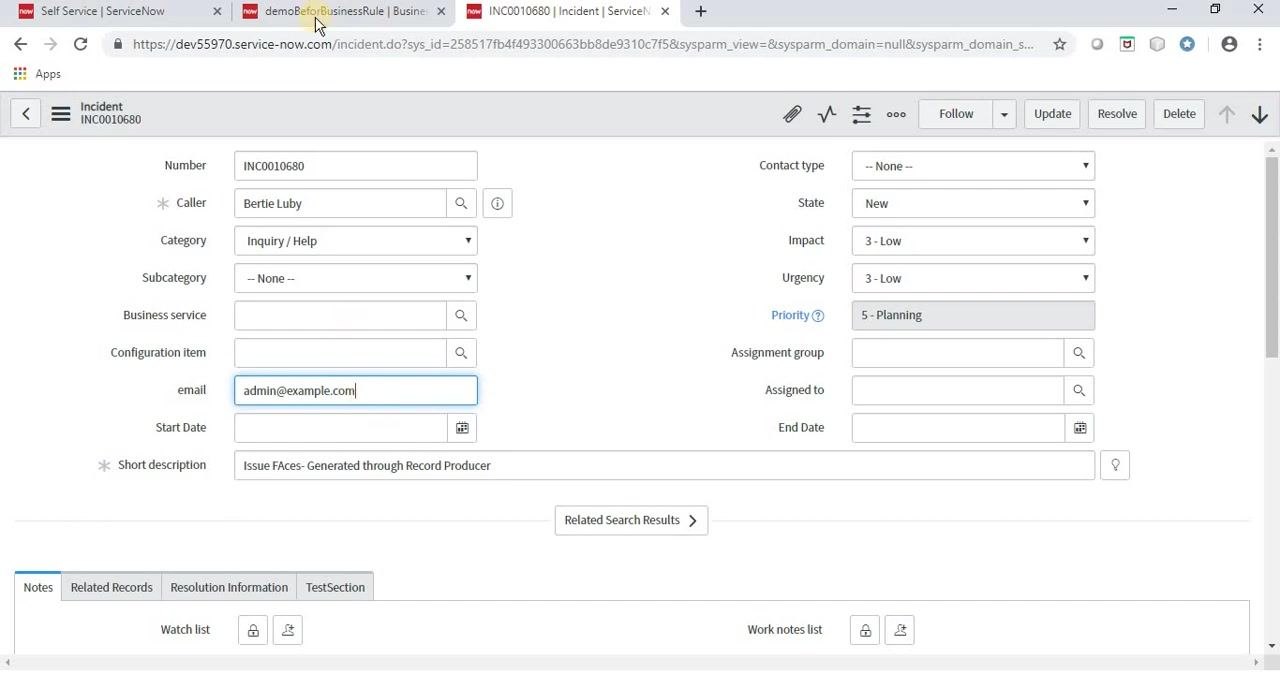
Open the incident record (INC0010680) and locate the email field, currently set to admin@example.com. This value will be used for validation in the business rule.
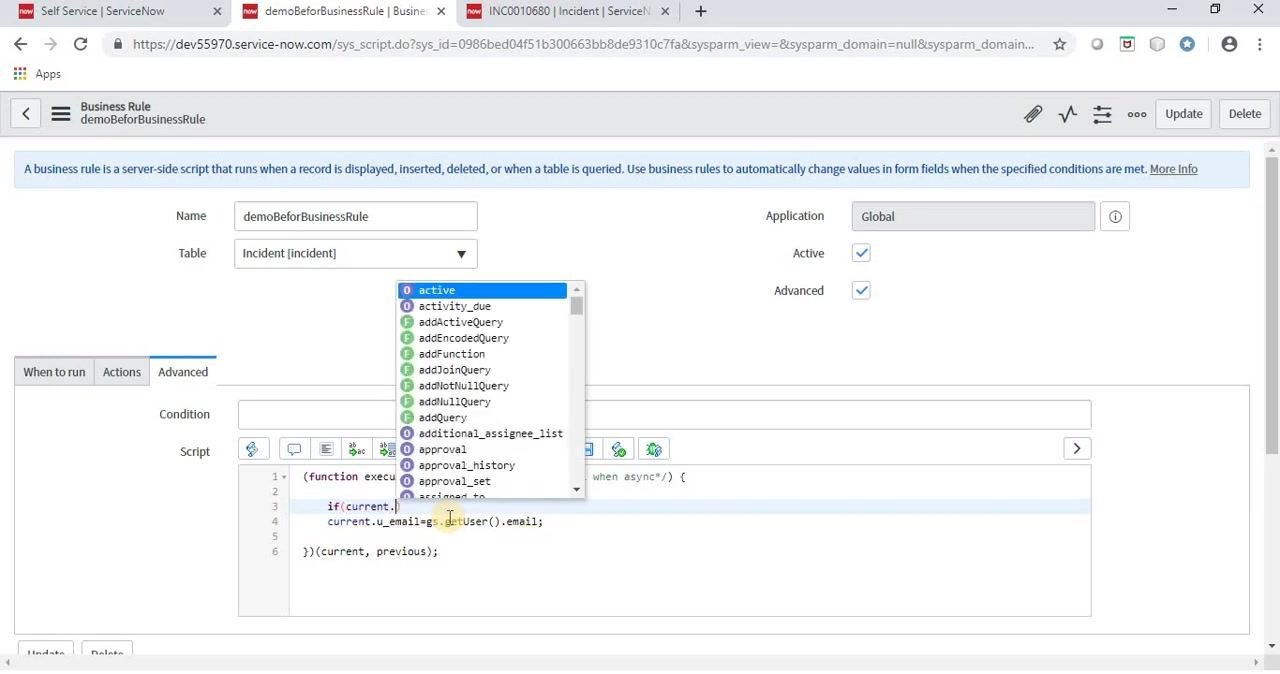
Step 2: Add validation logic to the business rule
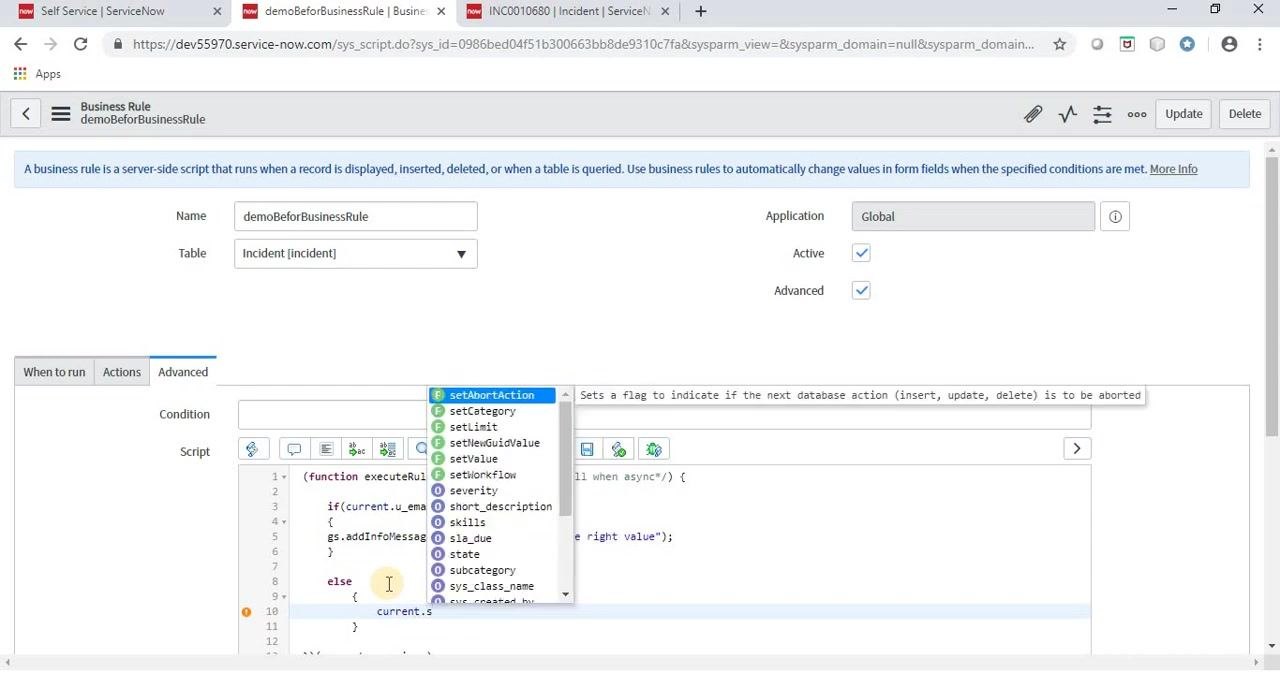
Open the demoBeforBusinessRule rule for the Incident [incident] table and go to the Advanced tab. Begin editing the script to add a conditional check comparing current.u_email to "admin@example.com", using the code completion dropdown to assist with field and method selection.
Step 3: Add an informational message for a valid email
Inside the if block, use gs.addInfoMessage() to display a message when the email matches the expected value:
if(current.u_email == 'admin@example.com') {
    gs.addInfoMessage("You are submitting the right value");
}
Step 4: Abort the action for an invalid email
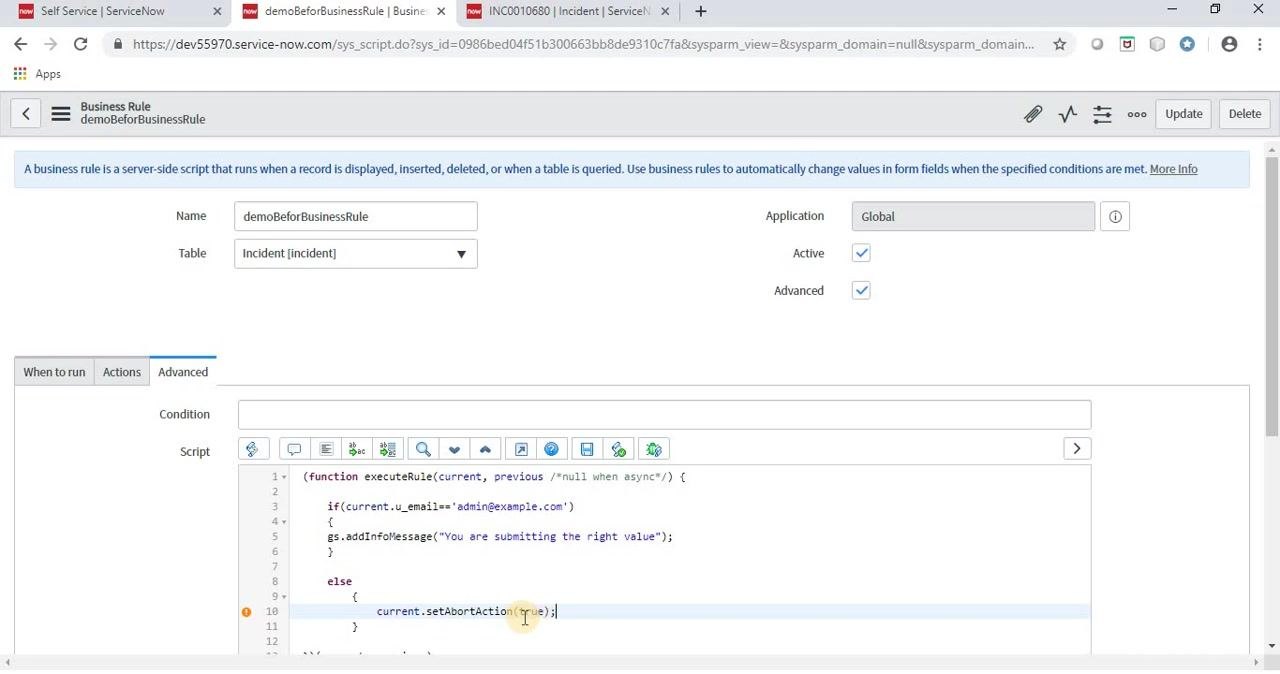
Add an else block that uses current.setAbortAction(true); to abort the database action if the validation fails:
else {
    current.setAbortAction(true);
}
Step 5: Finalize the validation script
Ensure the complete script looks like this:
(function executeRule(current, previous /*null when async*/) {
    if(current.u_email == 'admin@example.com') {
        gs.addInfoMessage("You are submitting the right value");
    }
    else {
        current.setAbortAction(true);
    }
})(current, previous);
This script allows the form to submit and displays a success message when the email matches, and aborts the action — preventing the record from saving — when it doesn't.
Step 6: Test the validation logic
Return to the incident record and attempt to submit the form with the email field set to admin@example.com. If the email matches, the form submits and displays a message; if it doesn't match, the action aborts and an error is shown.
Step 7: Observe the validation result
If the email doesn't match the logged-in user's email, the business rule aborts the action and displays a message at the top of the form indicating an invalid record. This ensures only valid email values are accepted according to your business logic.
Set the email field automatically on update
Once validation is in place, you can update the script so it automatically populates the email field with the logged-in user's address whenever the record is updated.
Step 1: Update the script and save the rule
Open the demoBeforBusinessRule rule for the Incident [incident] table and confirm it's set to run before an update action. Go to the Advanced tab and update the script logic:
current.u_email = gs.getUser().getEmail();
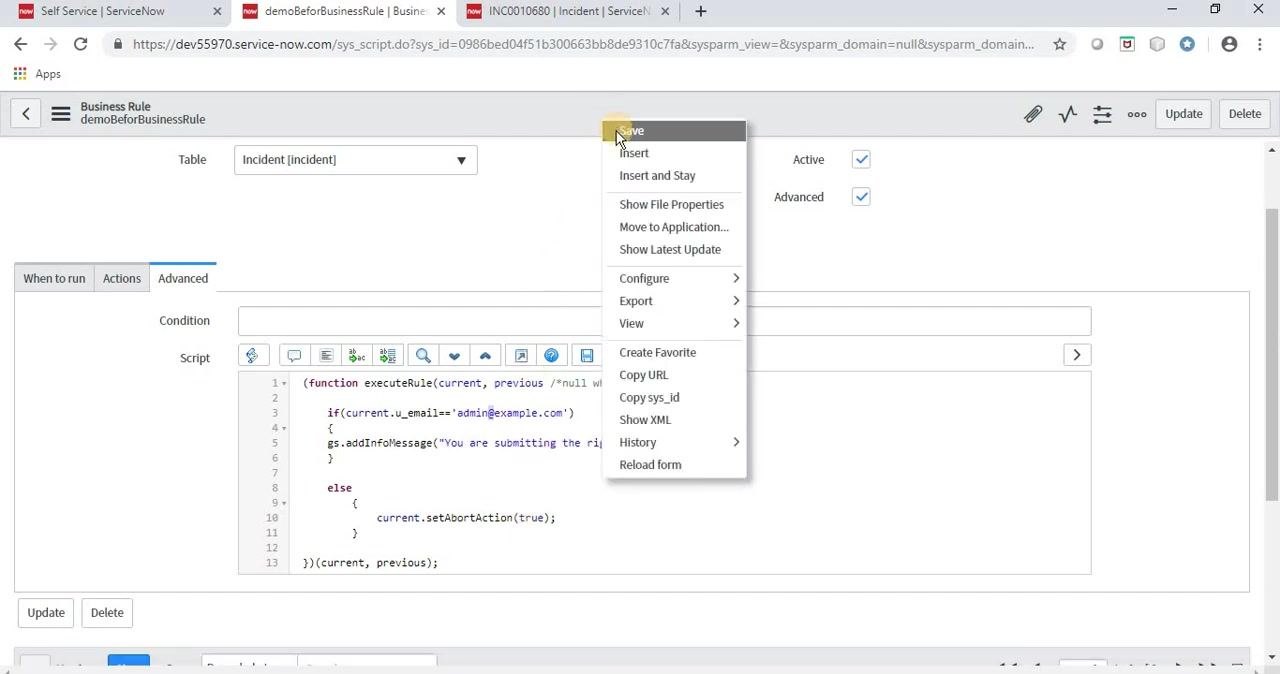
Here, current refers to the record being updated, u_email is the field to be populated, and gs.getUser().getEmail() retrieves the logged-in user's email address. Right-click the form header and select Save from the context menu to save the rule.
Refresh the incident record and update it, for example by changing a field value or simply saving. The u_email field is automatically populated with the logged-in user's email address on update.
Test how the business rule handles an invalid email format
These steps demonstrate how the system responds when the email field contains a value the business rule doesn't recognize as valid.
Step 1: Open the incident record
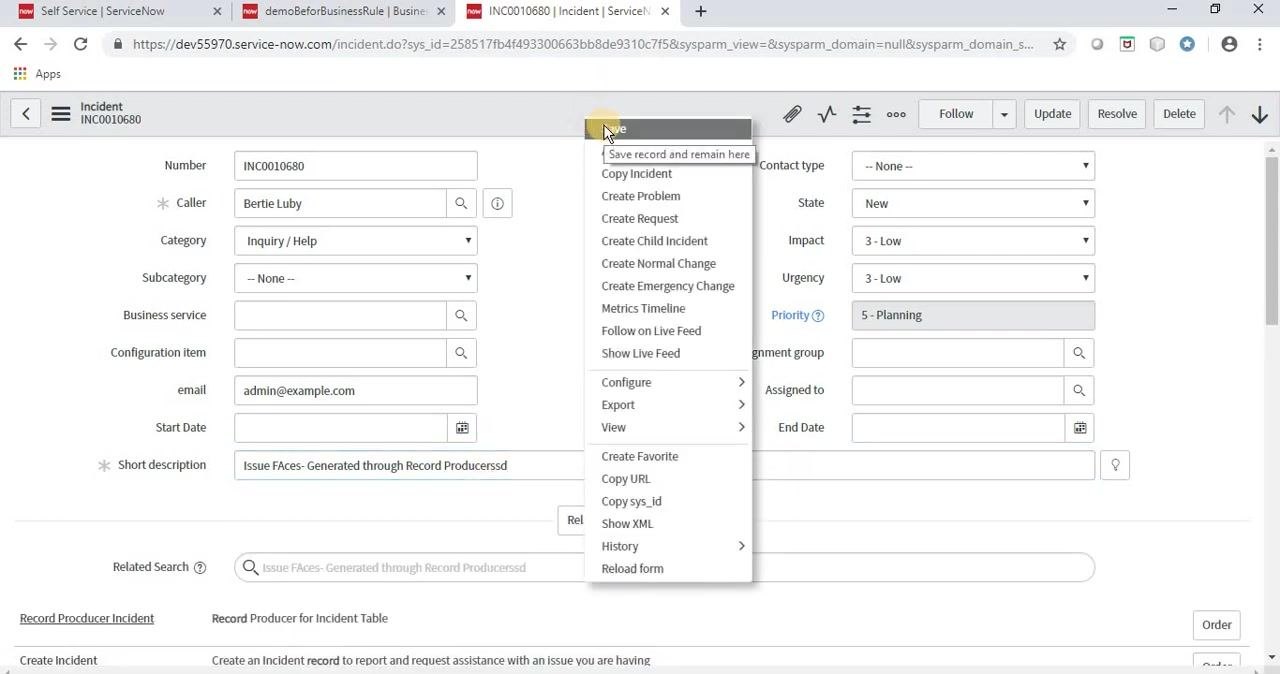
Open the incident form with fields including Number INC0010680, Caller Bertie Luby, Category Inquiry / Help, Email admin@example.com, and the short description.
Step 2: Modify the email field
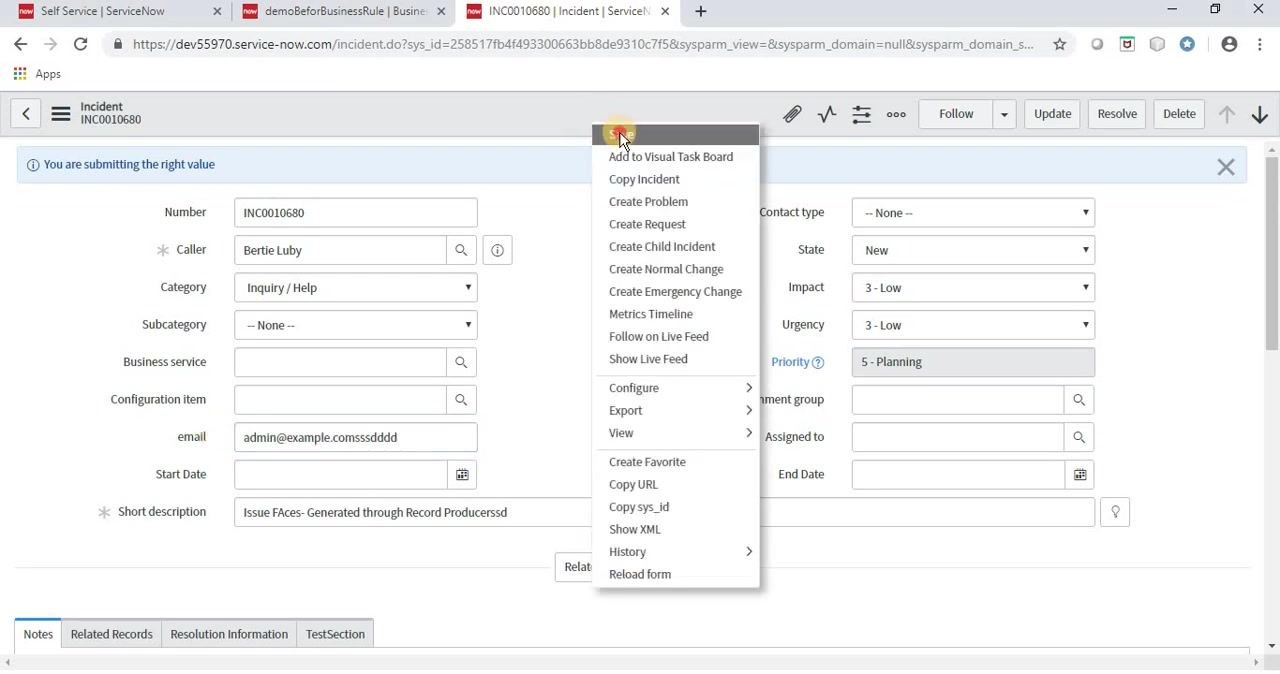
Click into the email field and change the value from admin@example.com to an invalid format, such as admin@example.comsssdddd.
Step 3: Attempt to save the record
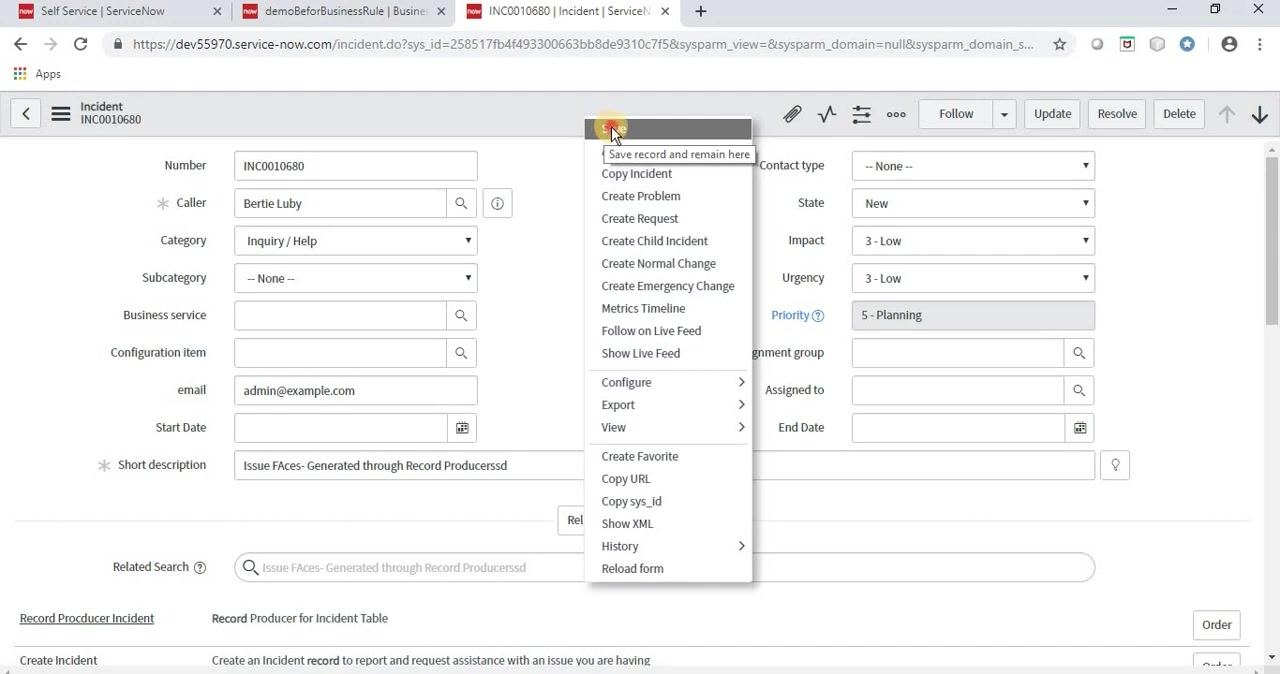
Click the menu icon (three horizontal lines) at the top of the form and select Save from the dropdown menu to save the record and remain on the page.
Step 4: Observe the system's response
After the save attempt, a blue notification appears at the top of the form stating "You are submitting the right value," while the email field still contains the invalid value admin@example.comsssdddd.
Step 5: Attempt to save again
Click the menu icon and select Save once more.
Step 6: Review the error message
A red error notification appears at the top of the form stating "Invalid update." The system prevents the record from saving because of the invalid email format, and the record remains unsaved until the email field is corrected.
What's next
Now that you know how to create a business rule in ServiceNow, you can extend this pattern to other tables and fields by adjusting the When, Order, filter conditions, and script logic to fit your validation or automation needs. Consider testing additional scenarios, such as different trigger types (Insert, Delete, Query) or more complex validation conditions, to further automate record handling in your instance.
Generation details: cost, quality tiers
Docsie billed 6,000 credits ($4.20) to analyze this 12-minute video at standard quality. The rewrite, template fill and Word/PDF exports were included. The same video at each quality tier:
| Quality | Frames sampled | Credits | Approx. cost |
|---|---|---|---|
| Draft | every 16-30 s | 3,000 | $2.10 |
| Standard (this guide) | every 8-15 s | 6,000 | $4.20 |
| Detailed | every 4-7 s | 12,000 | $8.40 |
| Ultra | every 1-3 s | 24,000 | $16.80 |
Credits priced at $0.70 per 1,000; plans include a monthly allowance. Enterprise customers on on-premise or bring-your-own-model deployments run this on their own inference and pay no per-video credits.
Generated by Docsie Video-to-Docs on 2026-09-14 from a 11-minute video. Screenshots are frames from the source video and belong to their creator, Basico ServiceNow Learning, whose original is embedded above. If you own this video and want the guide removed or credited differently, contact us and we will act within one business day.