
How to Create an Incident in ServiceNow
This guide walks you through how to create an incident in ServiceNow, from opening the dashboard to filling in the required fields and saving the record. Follow these steps to ensure your incident is logged with complete information and routed to the correct support group.
Video: How to create incident in ServiceNow | #createincident by SAASWITHSERVICENOW. All credit for the demonstration goes to the creator; watch the original on YouTube. The written guide below was generated from this video by Docsie. Creator? Request a change or removal.
This guide walks you through how to create an incident in ServiceNow, from opening the dashboard to filling in the required fields and saving the record. Follow these steps to ensure your incident is logged with complete information and routed to the correct support group.
Prerequisites
- Access to your organization's ServiceNow instance
- Valid login credentials to reach the main dashboard
Access the ServiceNow dashboard
Open your web browser and navigate to your ServiceNow instance. Log in and confirm you are on the main dashboard, where widgets such as Users by Location and Open Items by Escalation are visible.
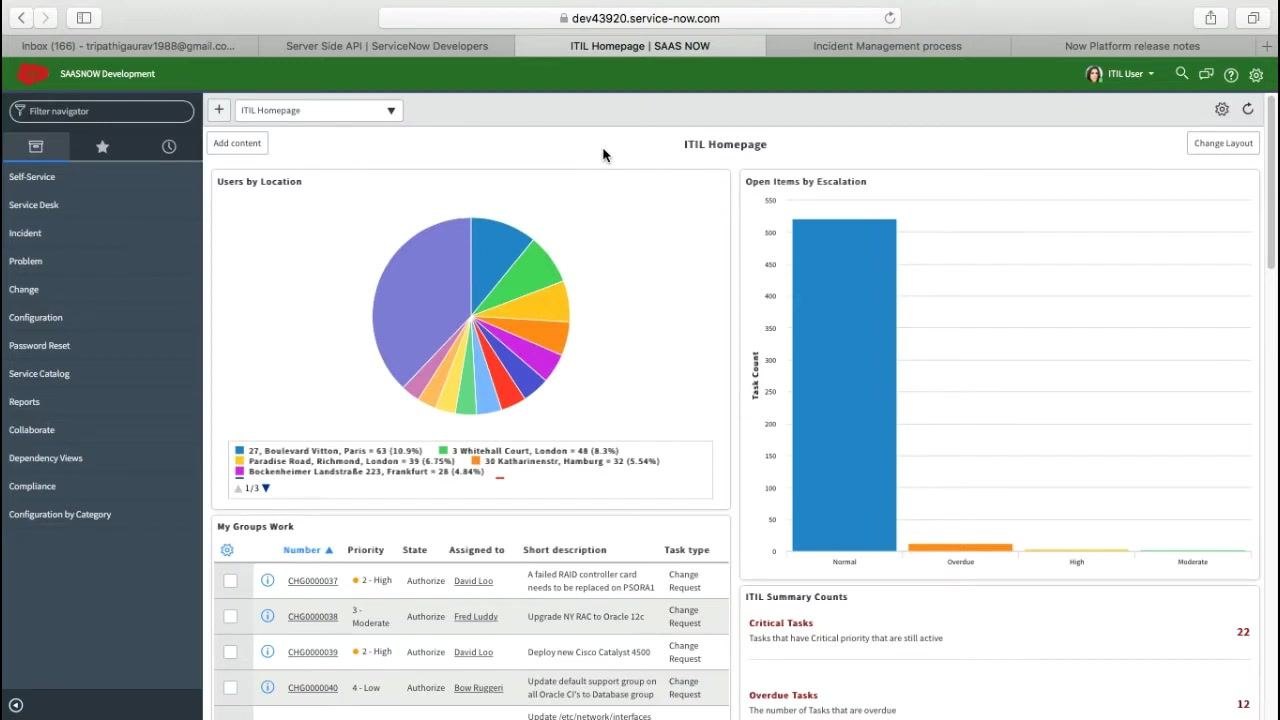
Navigate to the Incident application
In the left-hand navigation pane, scroll down to find the Incident section under the Service Desk category. Click Incident to expand its sub-options.
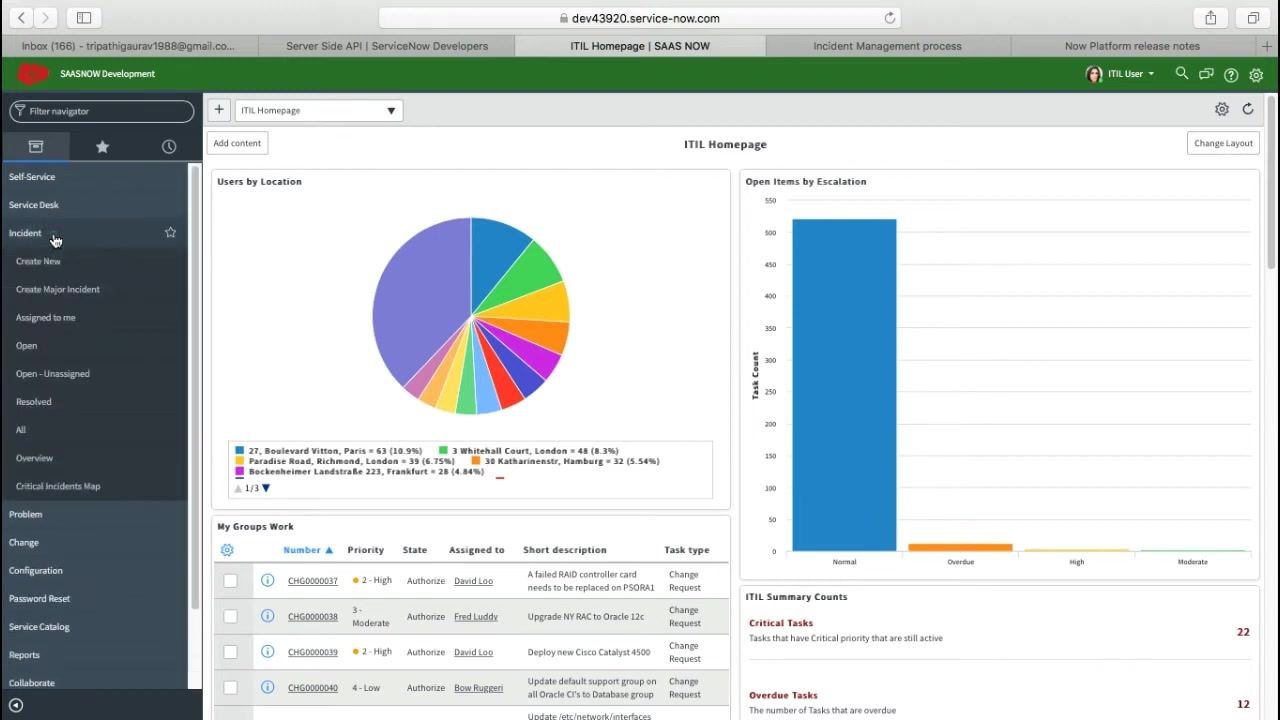
Open a new incident form
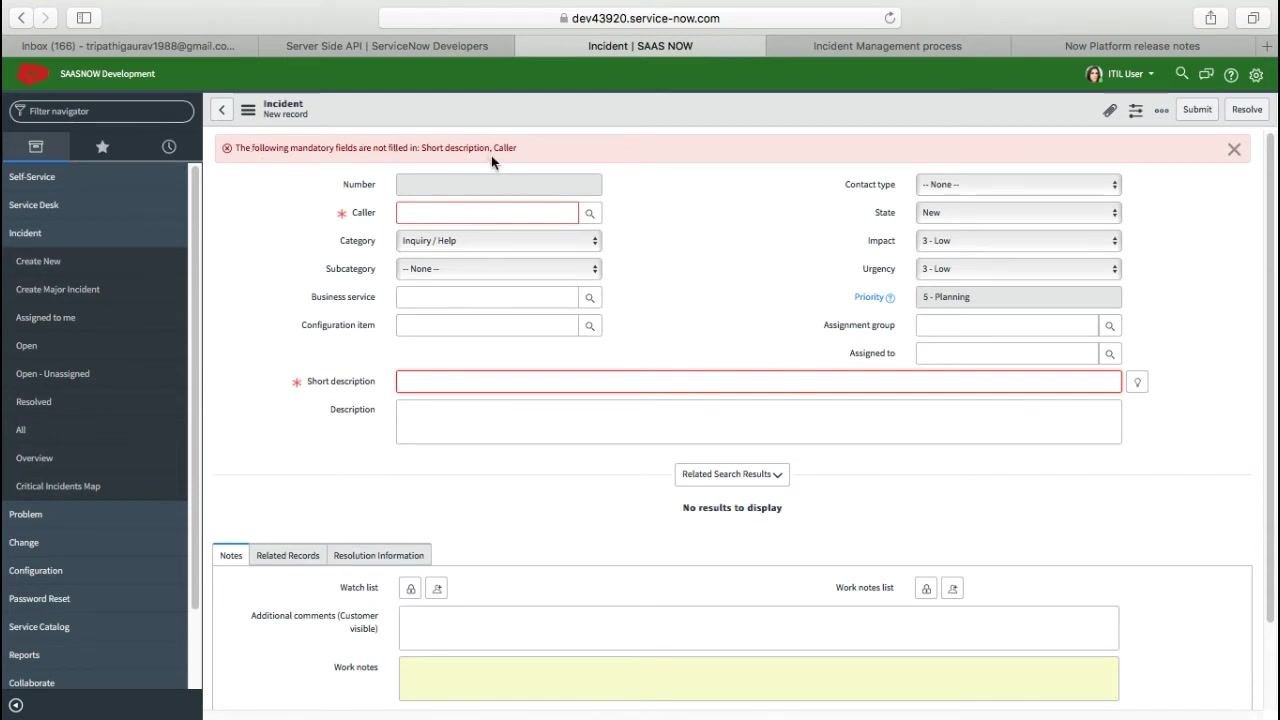
Under the expanded Incident section, click Create New. This opens a blank incident form where you can enter the details of your issue.
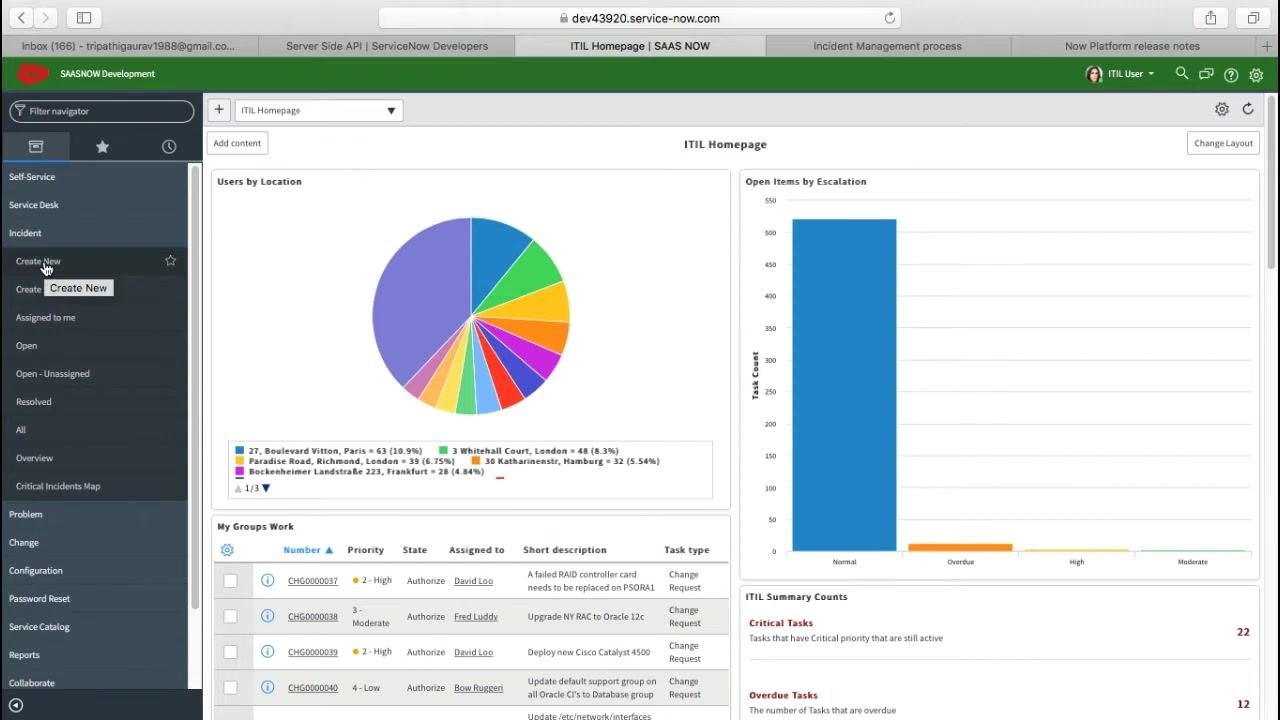
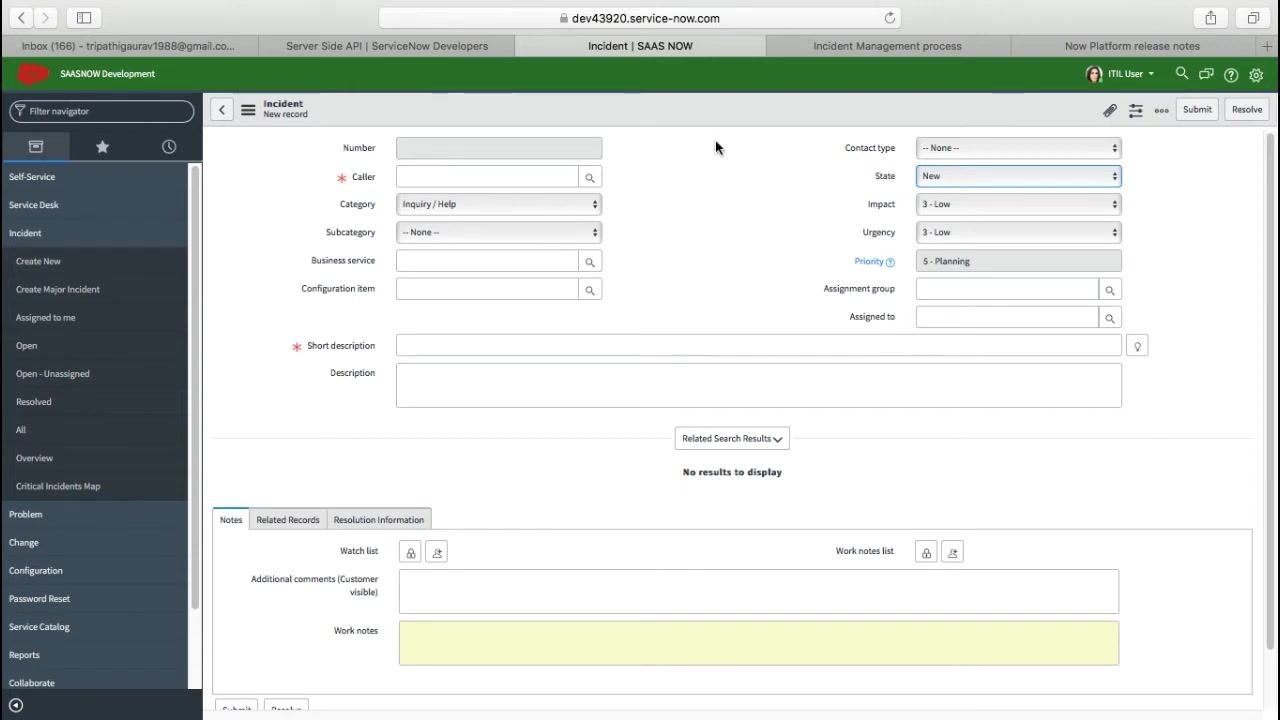
Review the incident form fields
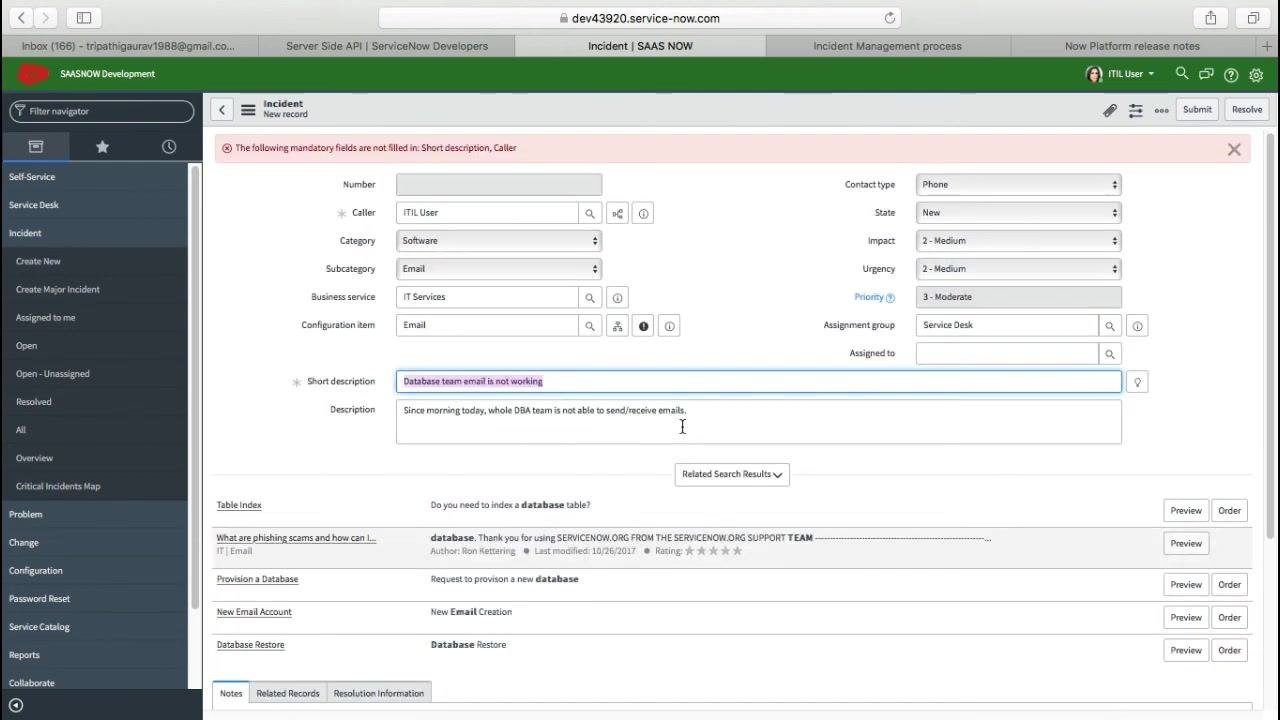
The form displays several fields, including:
- Number (auto-generated)
- Caller (mandatory)
- Category (default: Inquiry / Help)
- Subcategory
- Business service
- Configuration item
- Short description (mandatory)
- Description
- Additional fields such as Contact type, State, Impact, Urgency, Priority, Assignment group, and Assigned to
Fields marked with a red asterisk (*) are mandatory.
Understand mandatory field validation
If you click Submit without entering values for the mandatory fields (Caller and Short description), an error message appears at the top of the form: "The following mandatory fields are not filled in: Short description, Caller." Fill in these fields before submitting.
Fill in the caller and classification fields
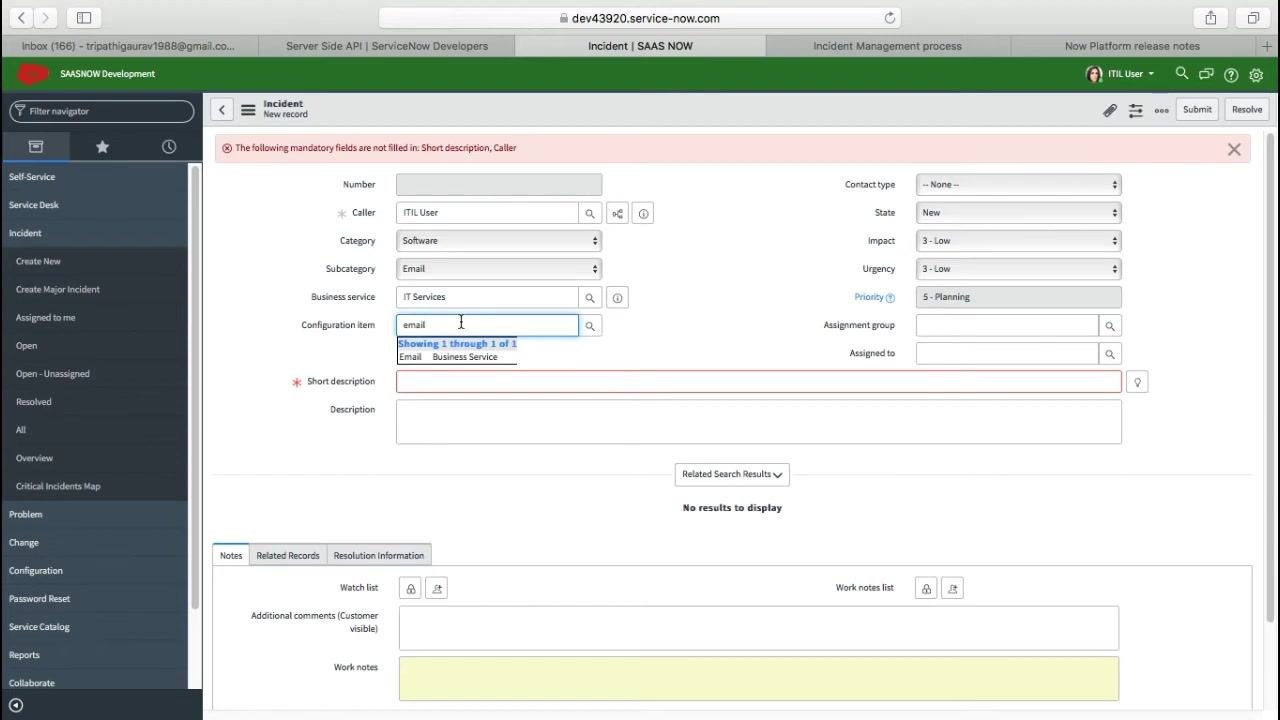
- In the Caller field, enter your name or select your user account (for example, "ITIL User").
- In the Category dropdown, select the appropriate category (for example, "Software").
- In the Subcategory dropdown, select the relevant subcategory (for example, "Email").
- In the Business service field, type and select the relevant service (for example, "IT Services").
- In the Configuration item field, type and select the relevant item (for example, "Email").
Specify the contact type
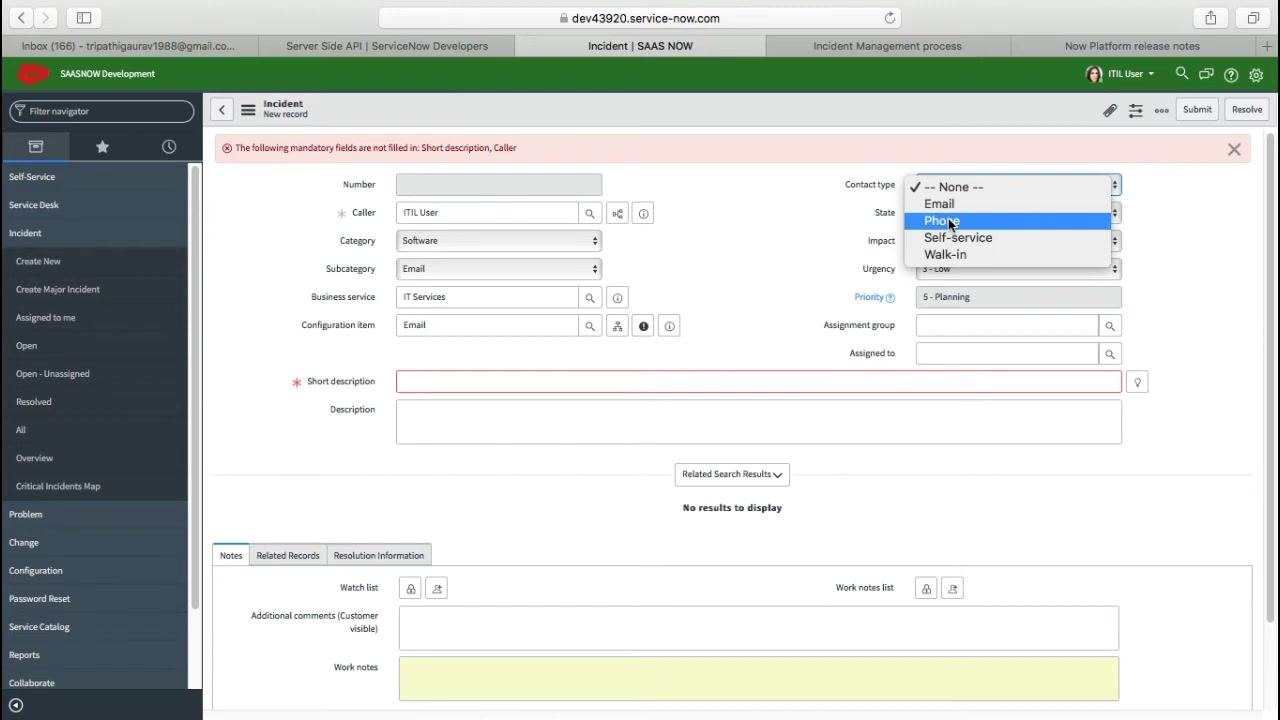
In the Contact type dropdown, select how the incident was reported. For example, choose "Phone" if you were contacted by phone. Other available options include "Email," "Self-service," and "Walk-in."
Leave the State field as default
Do not modify the State field. It remains set to "New" by default and does not require any action from you.
Set impact and urgency
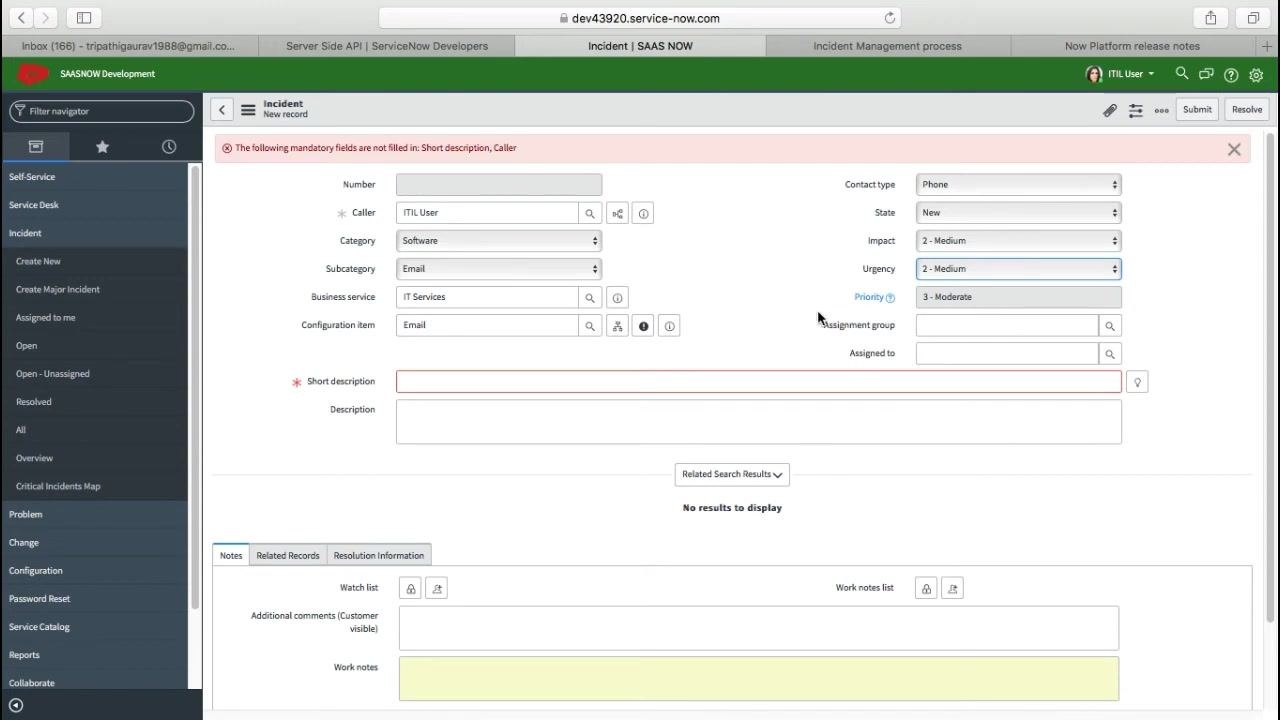
- In the Impact dropdown, select the level of business criticality. For example, select "2 - Medium" if the issue affects a single team, such as the database team being unable to send emails.
- In the Urgency dropdown, select the urgency level. For example, select "2 - Medium" if the issue is important but not critical.
- The Priority field updates automatically based on your Impact and Urgency selections. You cannot edit Priority directly, as it is system-calculated.
Assign the incident (optional)
In the Assignment group field, type and select the appropriate group, such as "Service Desk." If you know the specific person to assign the incident to, enter their name in the Assigned to field; otherwise, leave it blank.
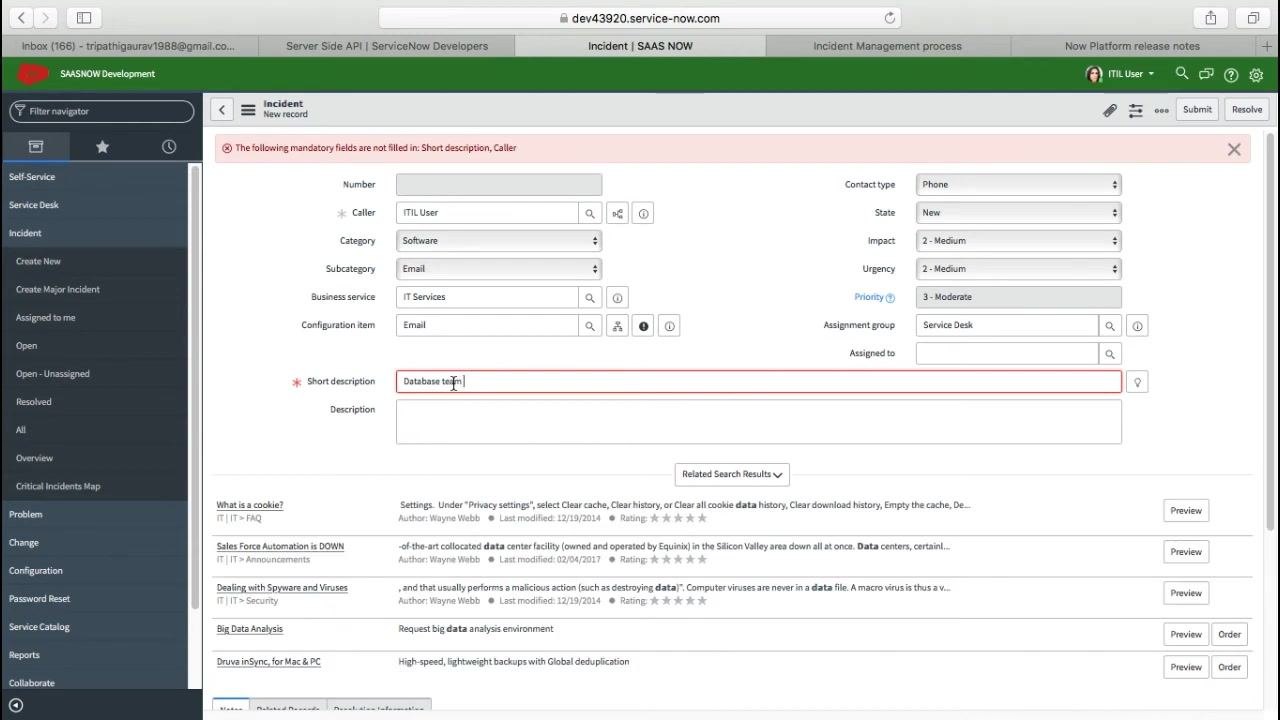
Enter a short description
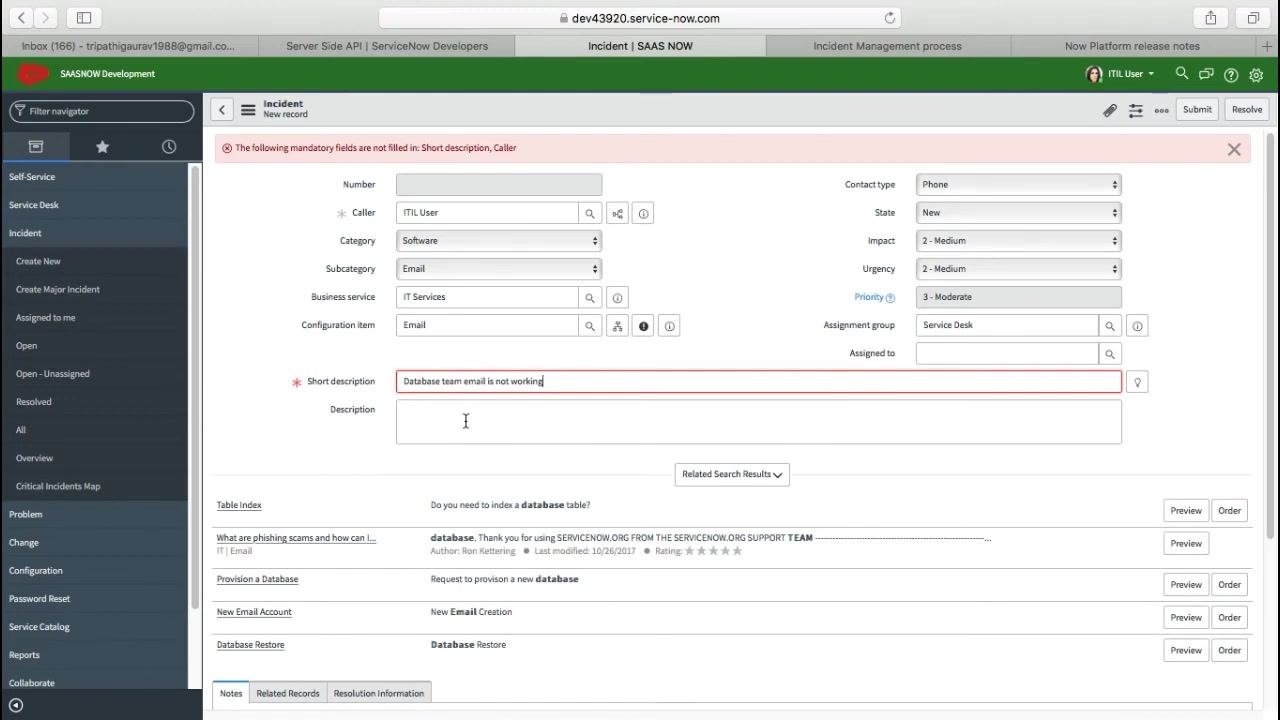
In the Short description field (mandatory), enter a concise summary of the issue. For example: "Database team email is not working."
Provide a detailed description
In the Description field, explain the issue in detail, including any error messages or symptoms observed. For example: "Database team is unable to send or receive emails. Error message: 'Unable to connect to mail server.' Issue started this morning and affects all team members."
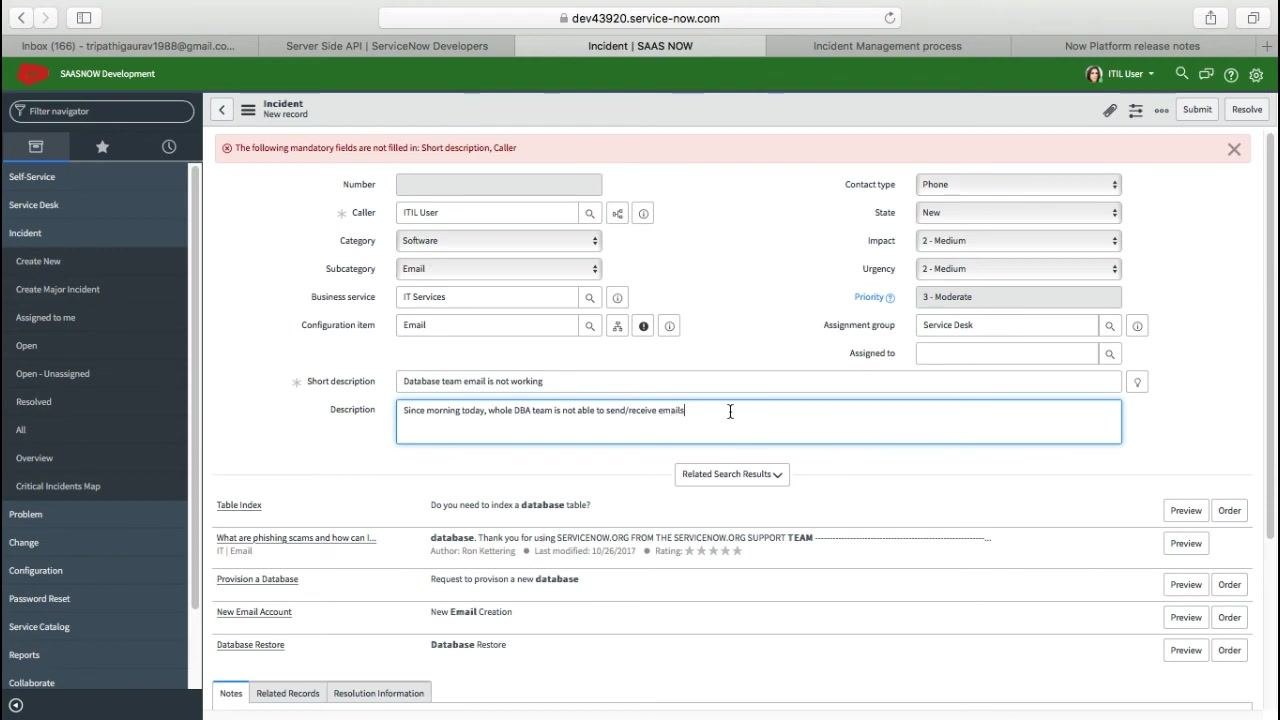
Refine the detailed description
Expand on the description with clear details, including the timeframe and affected users. For example: "Since morning today, whole DBA team is not able to send/receive emails."
Review related search results
Below the description field, the Related Search Results section automatically searches for knowledge base (KB) articles and solutions related to keywords in your short description, such as "database." Review any suggested articles and preview or order them directly from this section if they help resolve the issue.
Save the incident
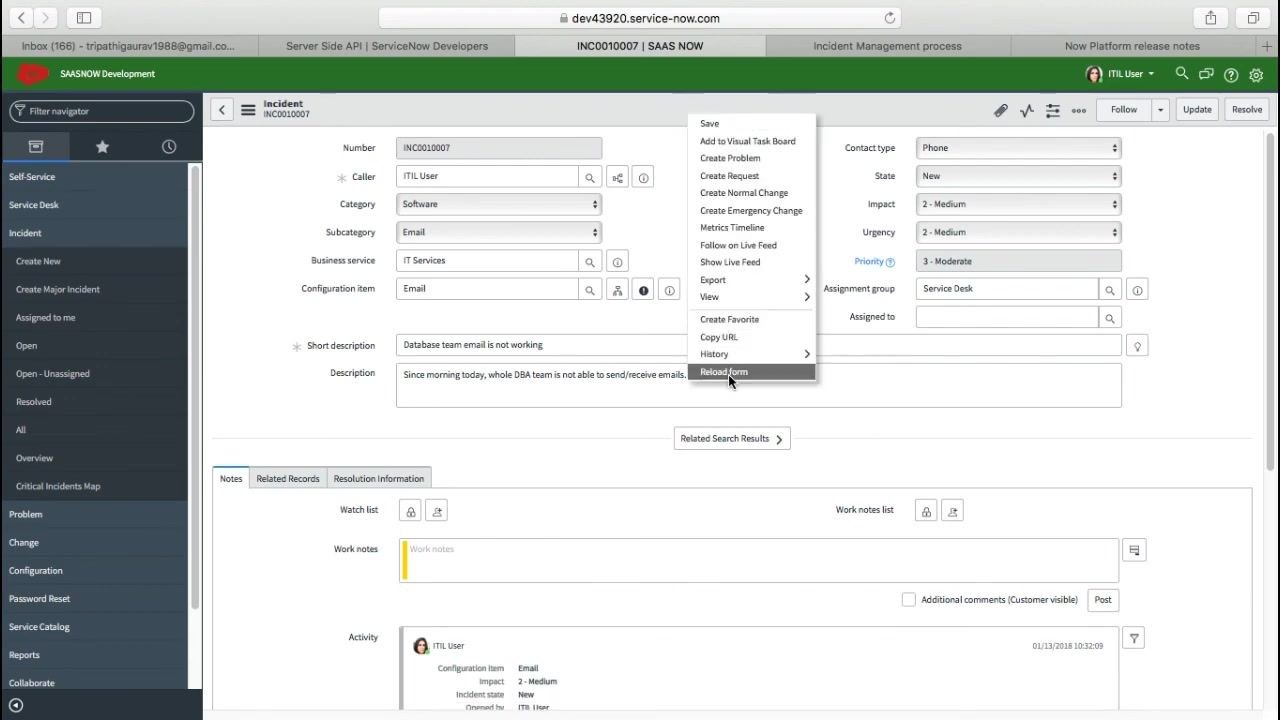
Click the menu icon (three horizontal lines) at the top right of the form, then select Save from the dropdown menu to save the incident record.
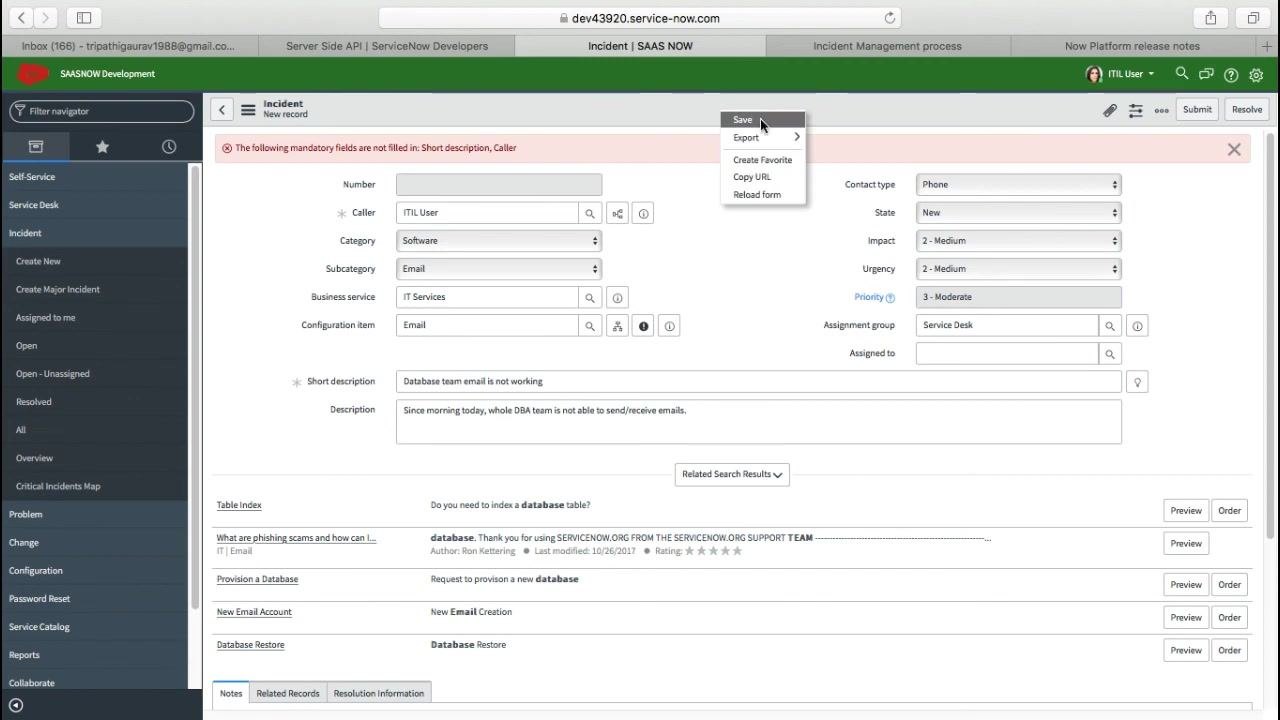
Confirm incident creation
After saving, verify that the system has assigned a unique incident number (for example, "INC0010007") and confirm that the incident is assigned to the correct group, such as "Service Desk." Check that all entered details are correct and visible on the record.
Check for email notification (optional)
Depending on your organization's ServiceNow configuration, check whether the system has sent an email notification regarding the incident creation or assignment.
Confirm submission is complete
Your incident is now logged and assigned for resolution. You can follow up or update the incident as needed using the incident number provided.
What's next
With your incident submitted, the support team can begin triage using the information you provided. Use the incident number to track progress or add updates as the issue is resolved.
Generation details: cost, quality tiers
Docsie billed 2,500 credits ($1.75) to analyze this 6-minute video at standard quality. The rewrite, template fill and Word/PDF exports were included. The same video at each quality tier:
| Quality | Frames sampled | Credits | Approx. cost |
|---|---|---|---|
| Draft | every 16-30 s | 1,500 | $1.05 |
| Standard (this guide) | every 8-15 s | 3,000 | $2.10 |
| Detailed | every 4-7 s | 6,000 | $4.20 |
| Ultra | every 1-3 s | 12,000 | $8.40 |
Credits priced at $0.70 per 1,000; plans include a monthly allowance. Enterprise customers on on-premise or bring-your-own-model deployments run this on their own inference and pay no per-video credits.
Generated by Docsie Video-to-Docs on 2026-10-01 from a 5-minute video. Screenshots are frames from the source video and belong to their creator, SAASWITHSERVICENOW, whose original is embedded above. If you own this video and want the guide removed or credited differently, contact us and we will act within one business day.