
How to Create a Group in ServiceNow
Groups in ServiceNow let you assign roles and permissions collectively, so that every member inherits the group's access rather than requiring individual configuration. This guide walks you through how to create a group in ServiceNow, from opening the Groups module to verifying that your new group has been saved correctly.
Video: How to Create a Custom Group in ServiceNow by Beyond20. All credit for the demonstration goes to the creator; watch the original on YouTube. The written guide below was generated from this video by Docsie. Creator? Request a change or removal.
Groups in ServiceNow let you assign roles and permissions collectively, so that every member inherits the group's access rather than requiring individual configuration. This guide walks you through how to create a group in ServiceNow, from opening the Groups module to verifying that your new group has been saved correctly.
Prerequisites
- An administrative ServiceNow account. Only admins can create and manage groups.
- An understanding that roles should be assigned to groups, not to individual users, as a best practice for security and ease of management.
- Awareness that even when users are created automatically, group and role assignments should still be managed manually for accuracy.
Why groups matter
Groups let users inherit roles and permissions collectively instead of having them assigned one by one. Assigning roles to groups rather than directly to individual users is considered a best practice in ServiceNow, since it keeps access consistent and easier to audit.
Access the ServiceNow dashboard
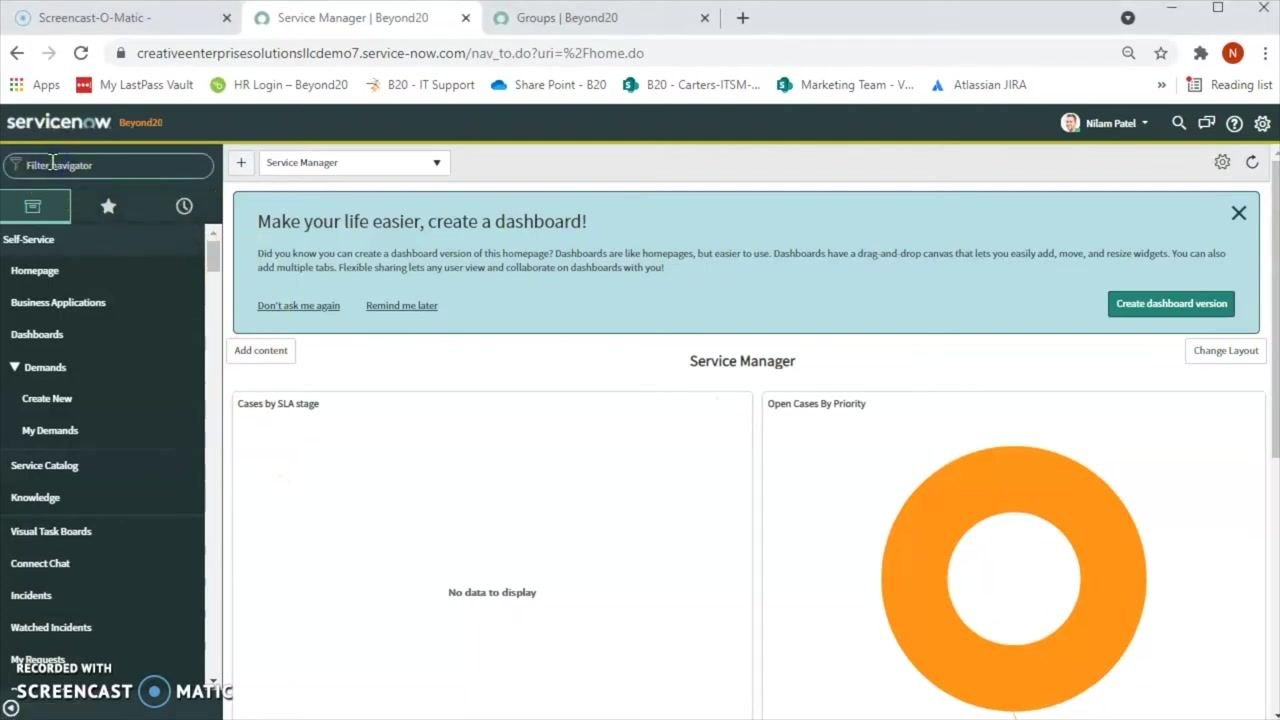
Log in to your ServiceNow instance. You will land on the dashboard, which shows navigation options on the left and widgets such as "Service Manager" and "Open Cases By Priority" on the main screen.
Open the application navigator
Locate the left navigation panel labeled Filter navigator. Click inside the Filter navigator search box to begin searching for modules.
Search for the Groups module
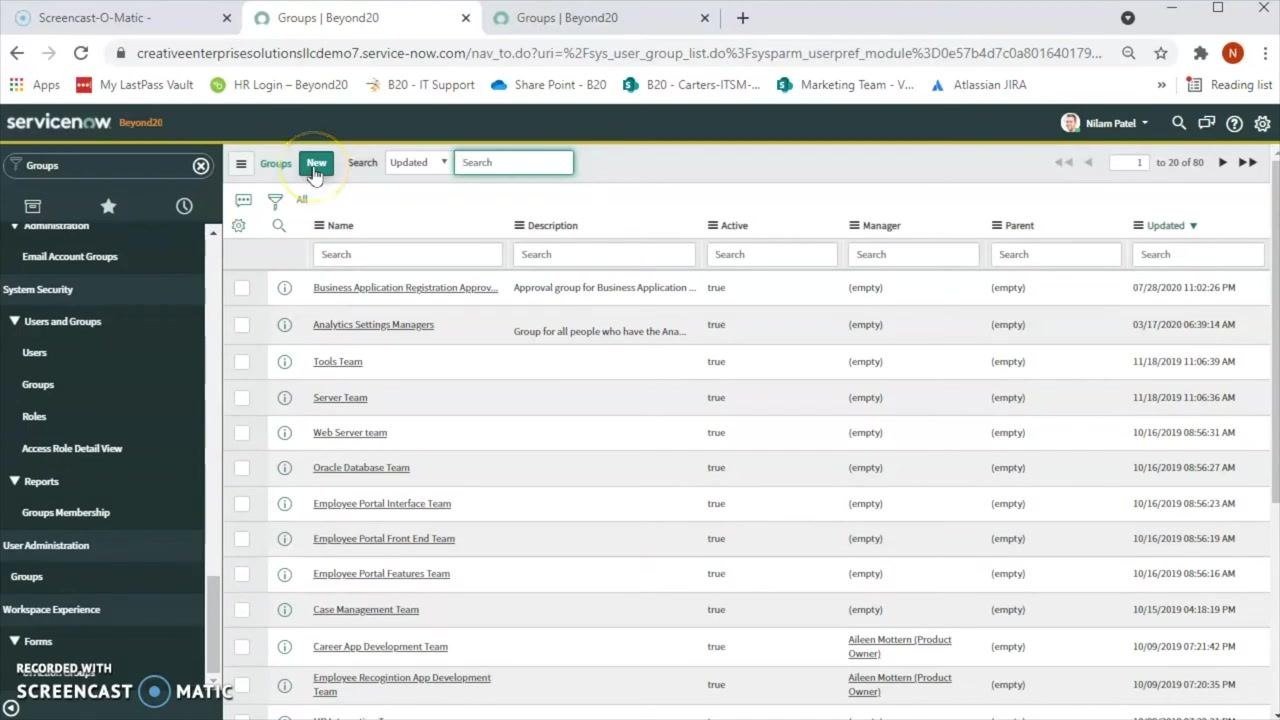
Type Groups into the Filter navigator. The Groups module will appear under the User Administration section.
Open the Groups module
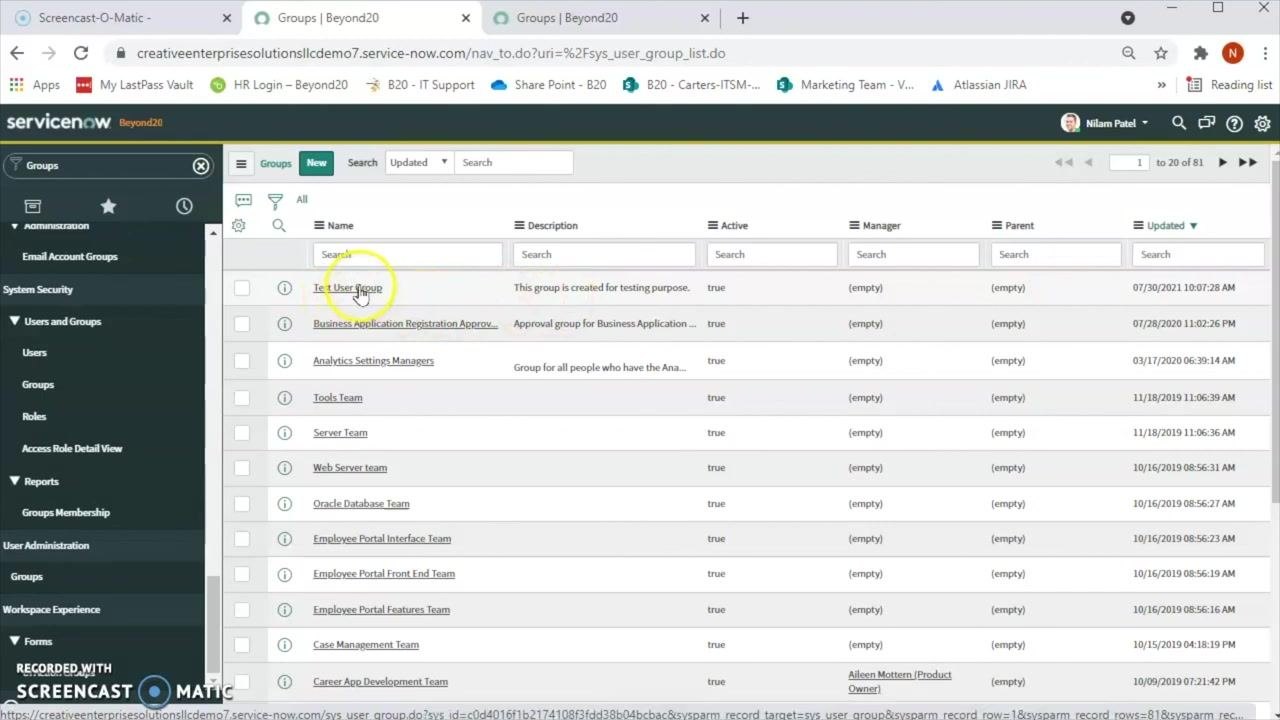
Click Groups under User Administration. The main panel displays a list of existing groups, with columns for Name, Description, Active status, Manager, Parent, and Updated date.
Start creating a new group
At the top of the Groups list, click the New button to begin creating your group.
Before filling out the form, keep these group management best practices in mind:
- Create a dedicated group for administrators and assign the admin role only to that group.
- Create as many groups as your organization needs, such as groups by staff, location, skill, or function. Examples include Building Maintenance, Building Security, Audit and Compliance, and Test Users.
- Assign users to the appropriate groups, then assign roles to those groups rather than directly to users.
- For audit and compliance groups, assign only read-only roles to ensure limited access during audits.
Review the New Group form
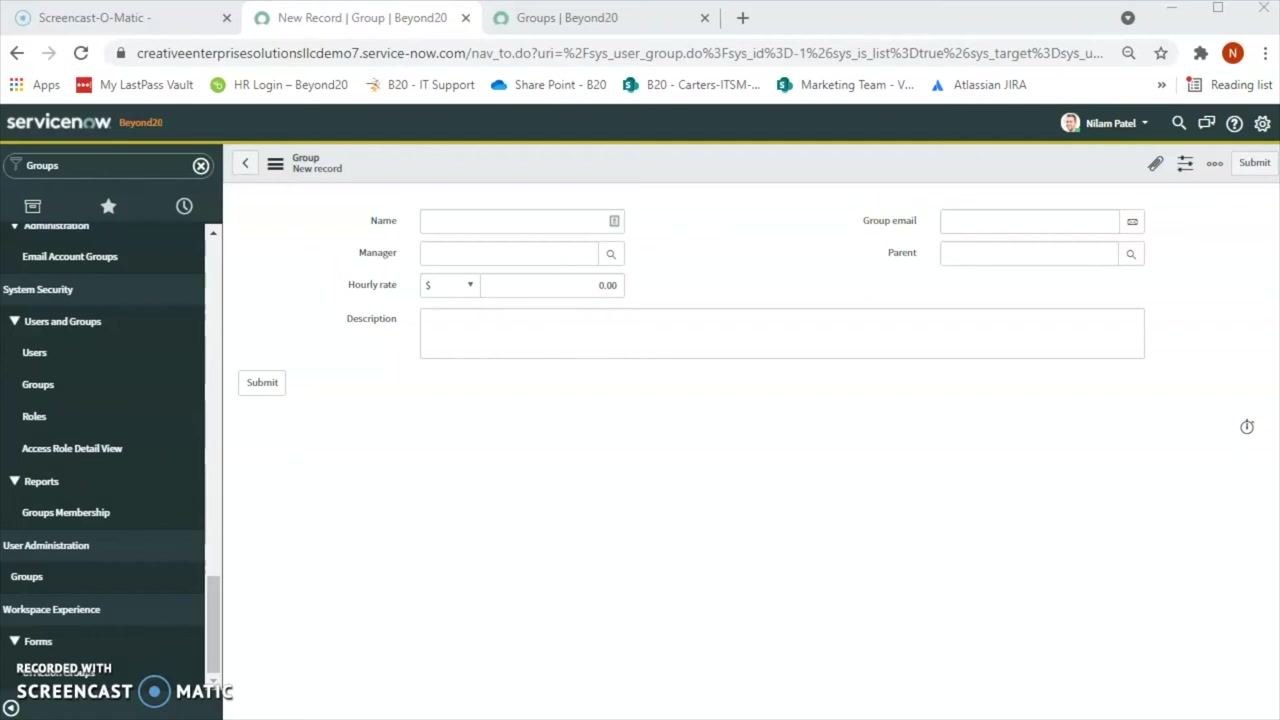
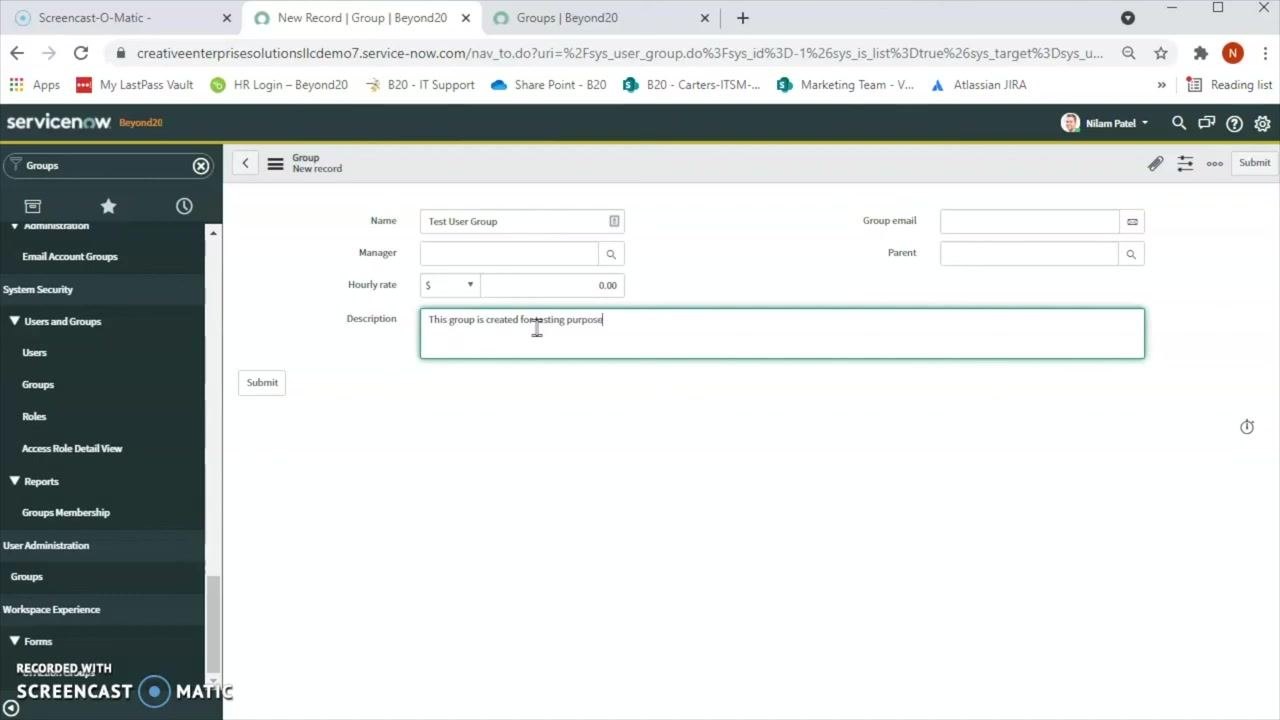
After clicking New, the New Record | Group form opens. It includes fields for Name, Manager, Hourly rate, Description, Group email, and Parent. The left navigation panel remains visible so you can quickly access other modules.
Enter the group name
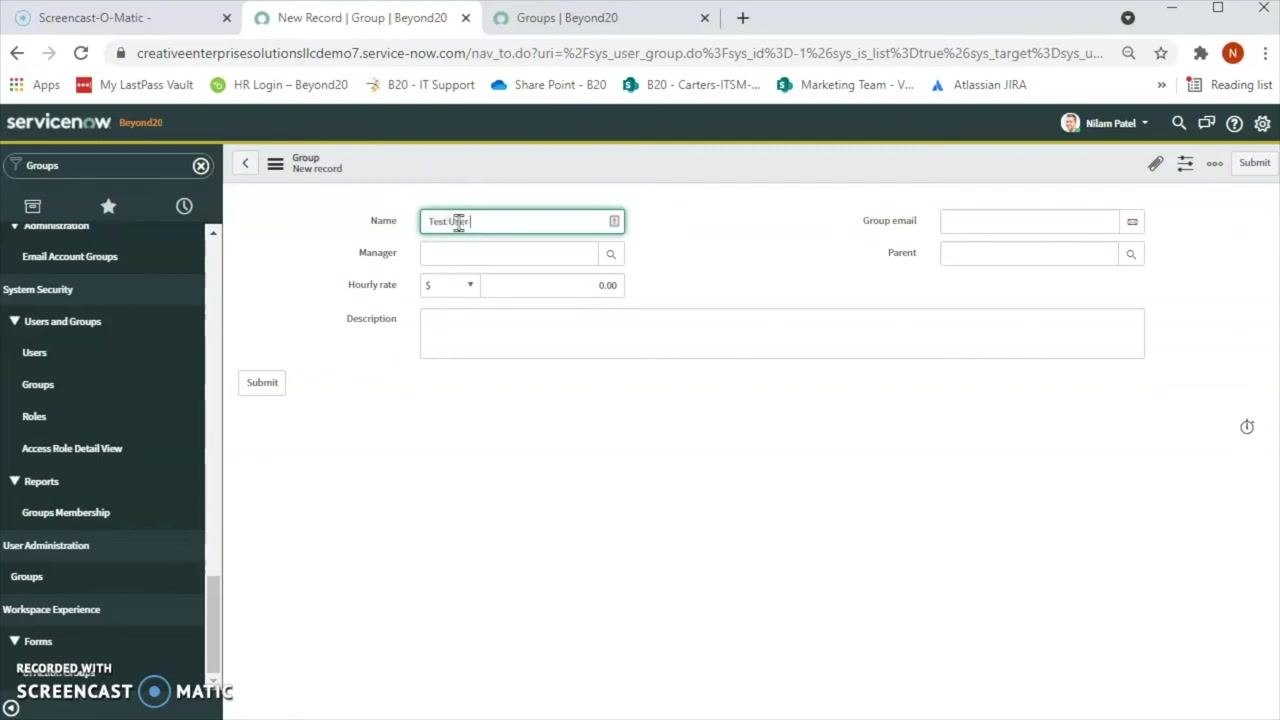
In the Name field, type the name you want to give the group. For this example, enter Test User Group. This name identifies the group throughout ServiceNow.
Fill in optional fields
Complete any of the following optional fields as needed for your organization:
- Manager: Search for and select a user to assign as the group's manager. This is optional but recommended for accountability.
- Hourly rate: Enter an hourly rate if relevant; the default value is $0.00.
- Group email: Enter a dedicated email address if the group has one.
- Parent: Select a parent group if this group is a sub-group.
Add a description
In the Description field, explain the group's purpose clearly. For this example, enter This group is created for testing purpose. Adding a description is a best practice for clarity and future reference.
Submit the group
Review all the information you entered for accuracy, then click Submit at the bottom left of the form. ServiceNow creates the group and returns you to the Groups list, where you can later assign users and roles as needed.
Verify the group was created
After submitting, ServiceNow returns you to the Groups list, which shows all groups with their Name, Description, Active status, Manager, Parent, and Updated date. Locate the group you just created — in this example, Test User Group — and confirm its details:
- Name: Test User Group
- Description: This group is created for testing purpose.
- Active: true
- Manager: empty, if not set
- Parent: empty, if not set
The group should appear alongside other existing groups, such as "Business Application Registration Approval," "Analytics Settings Managers," and "Tools Team." The Updated date and time reflect when the group was created.
You can optionally click the group name to review or edit its details and confirm that everything entered during creation is accurate.
Summary
- Admin privileges are required to create and manage groups in ServiceNow.
- Always assign roles to groups rather than to individual users for easier management and stronger security.
- Use the Groups module under User Administration to create new groups, giving each one a descriptive name and a clear description.
- Use the optional fields — Manager, Hourly rate, Group email, and Parent — as needed to reflect your organization's structure.
- After submitting, verify that the new group appears correctly in the Groups list with the expected details.
What's next
Now that you know how to create a group in ServiceNow, the next step is to add users to your newly created group.
Generation details: cost, quality tiers
Docsie billed 2,000 credits ($1.40) to analyze this 4-minute video at standard quality. The rewrite, template fill and Word/PDF exports were included. The same video at each quality tier:
| Quality | Frames sampled | Credits | Approx. cost |
|---|---|---|---|
| Draft | every 16-30 s | 1,000 | $0.70 |
| Standard (this guide) | every 8-15 s | 2,000 | $1.40 |
| Detailed | every 4-7 s | 4,000 | $2.80 |
| Ultra | every 1-3 s | 8,000 | $5.60 |
Credits priced at $0.70 per 1,000; plans include a monthly allowance. Enterprise customers on on-premise or bring-your-own-model deployments run this on their own inference and pay no per-video credits.
Generated by Docsie Video-to-Docs on 2026-10-01 from a 3-minute video. Screenshots are frames from the source video and belong to their creator, Beyond20, whose original is embedded above. If you own this video and want the guide removed or credited differently, contact us and we will act within one business day.