
How to Create a Catalog Item in ServiceNow
This guide walks you through the full process of building a service catalog item in ServiceNow — from setting up a catalog and categories, to creating the catalog item itself, adding variables to collect user input, and verifying that the finished item works correctly when a user submits a request. If you are learning how to create a catalog item in ServiceNow for the first time, follow the steps below in order, since each stage depends on the one before it.
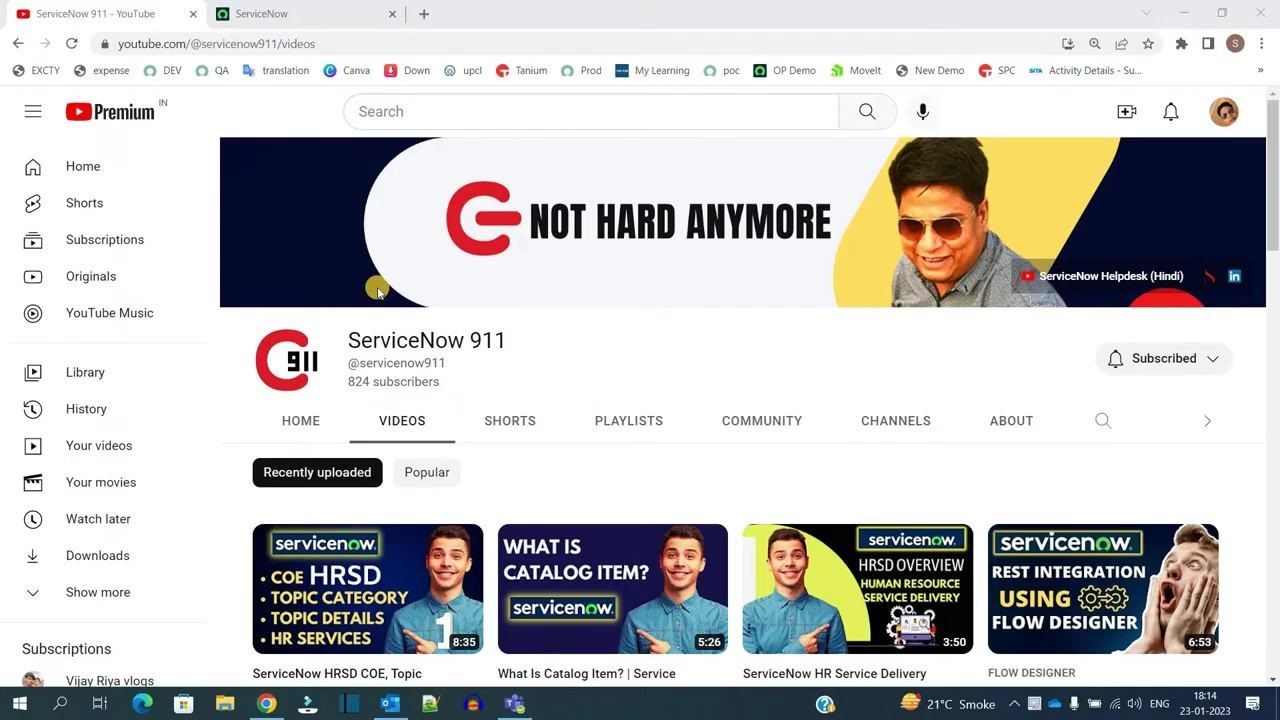
Video: Created New Catalog- Category- Catalog Item- Variables | ServiceNow Service Catalog by ServiceNow 911. All credit for the demonstration goes to the creator; watch the original on YouTube. The written guide below was generated from this video by Docsie. Creator? Request a change or removal.
This guide walks you through the full process of building a service catalog item in ServiceNow — from setting up a catalog and categories, to creating the catalog item itself, adding variables to collect user input, and verifying that the finished item works correctly when a user submits a request. If you are learning how to create a catalog item in ServiceNow for the first time, follow the steps below in order, since each stage depends on the one before it.
Prerequisites
- Access to a ServiceNow instance with permissions to use the Service Catalog application.
- Administrator-level access (or an equivalent role) to create catalogs, categories, catalog items, and variables.
Navigate to the Service Catalog application
Open your web browser and go to your ServiceNow instance. In the left-hand navigation pane, open the Service Catalog application. From here you can access Catalog Builder or the Service Catalog section to begin building your catalog.
Review existing catalogs
Go to Maintain Catalogs under the Service Catalog section to see the catalogs that already exist in your instance. In this example, there are three catalogs available before a new one is added.
Create a new catalog
Click New to start a new catalog record. Fill in the following fields:
- Title: Enter
ServiceNow 911. - Manager: Optional — assign a manager if required.
- Editors: Optional — add editors if needed.
- Description: Optional — provide a description for the catalog.
- Background Color: Enter
white. - Desktop Image: Optional — click to add an image.
- 'Catalog Home' Page: Optional — specify a home page if needed.
- 'Continue Shopping' Page: Optional — specify a page if needed.
- Active: Make sure this checkbox is selected.
- Wish List: Optional — enable if required.
Click Submit to create the catalog.
View the created catalog
After submission, the catalog details page displays. Note the catalog ID shown at the bottom of the page — you are now ready to create categories for this catalog.
Create categories for the catalog
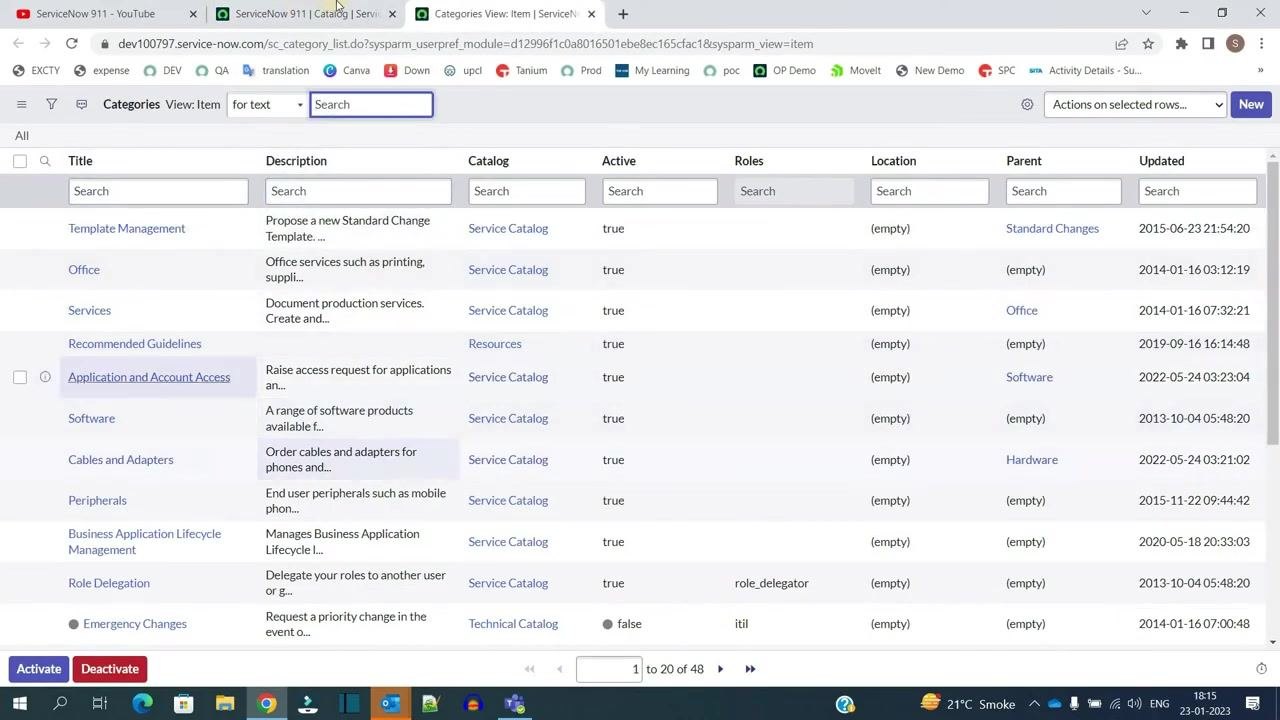
You can create categories directly from the catalog details page or by navigating to Maintain Categories. Open the Categories tab within the catalog, then click New to add a category.
Enter the following details for the first category:
- Title: Enter
Tech Topics. - Catalog: Confirm it is set to
ServiceNow 911. - Optional fields: Location, Description, Desktop Image, and Icon.
Save the category, then add a second one:
- Title: Enter
Non-Tech Topics. - Catalog: Confirm it is set to
ServiceNow 911.
Use the form menu's Insert and Stay option to save the category quickly while remaining on the page.
Verify the categories
Return to the catalog details page and confirm that both Tech Topics and Non-Tech Topics appear under the Categories tab.
Open the catalog items list
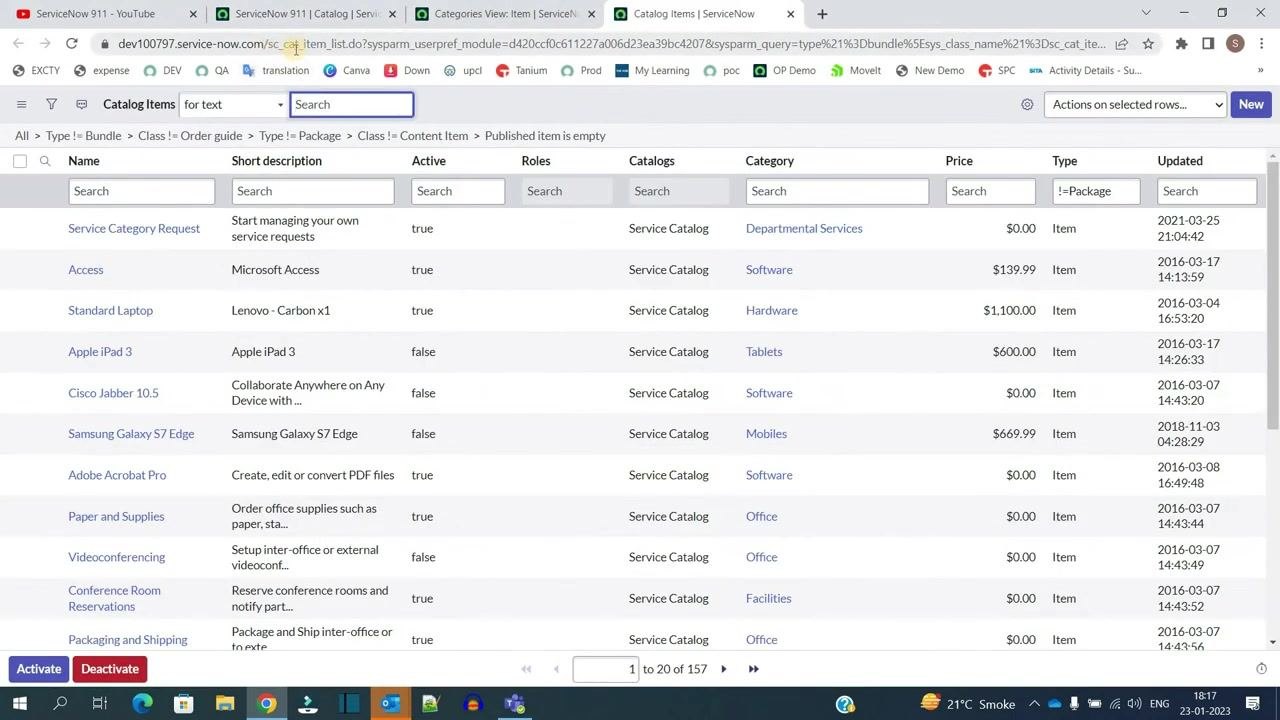
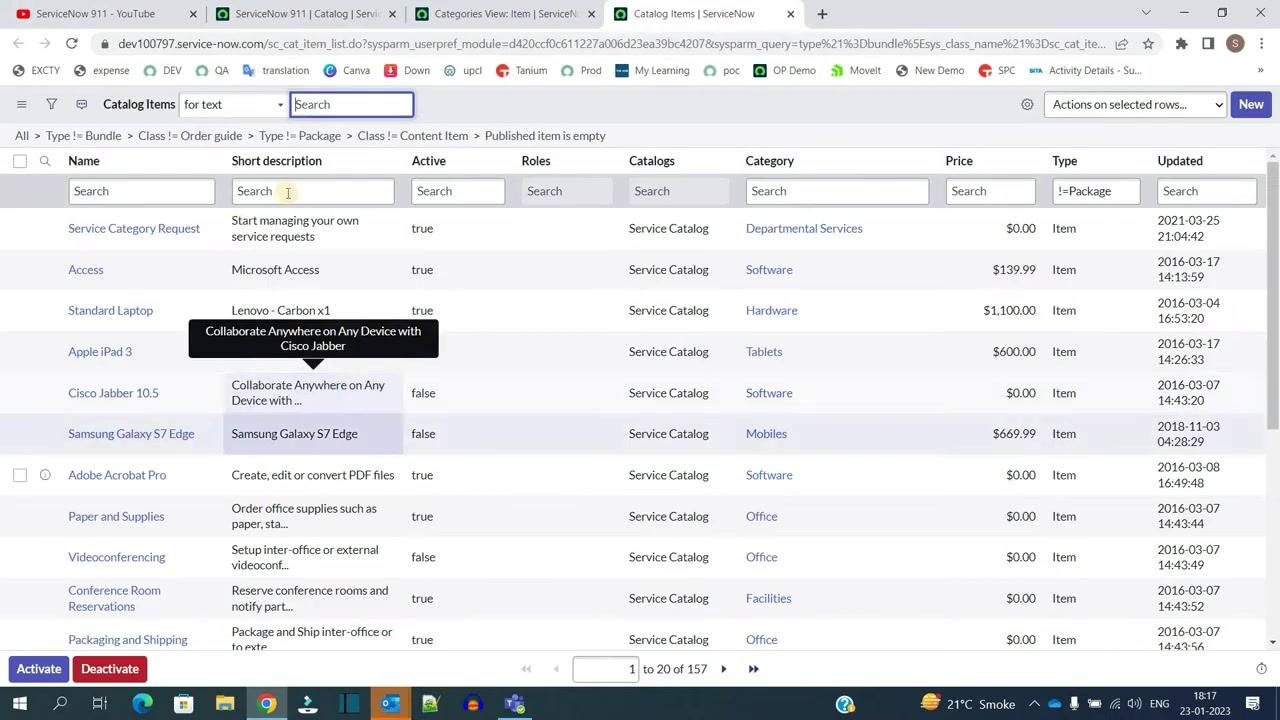
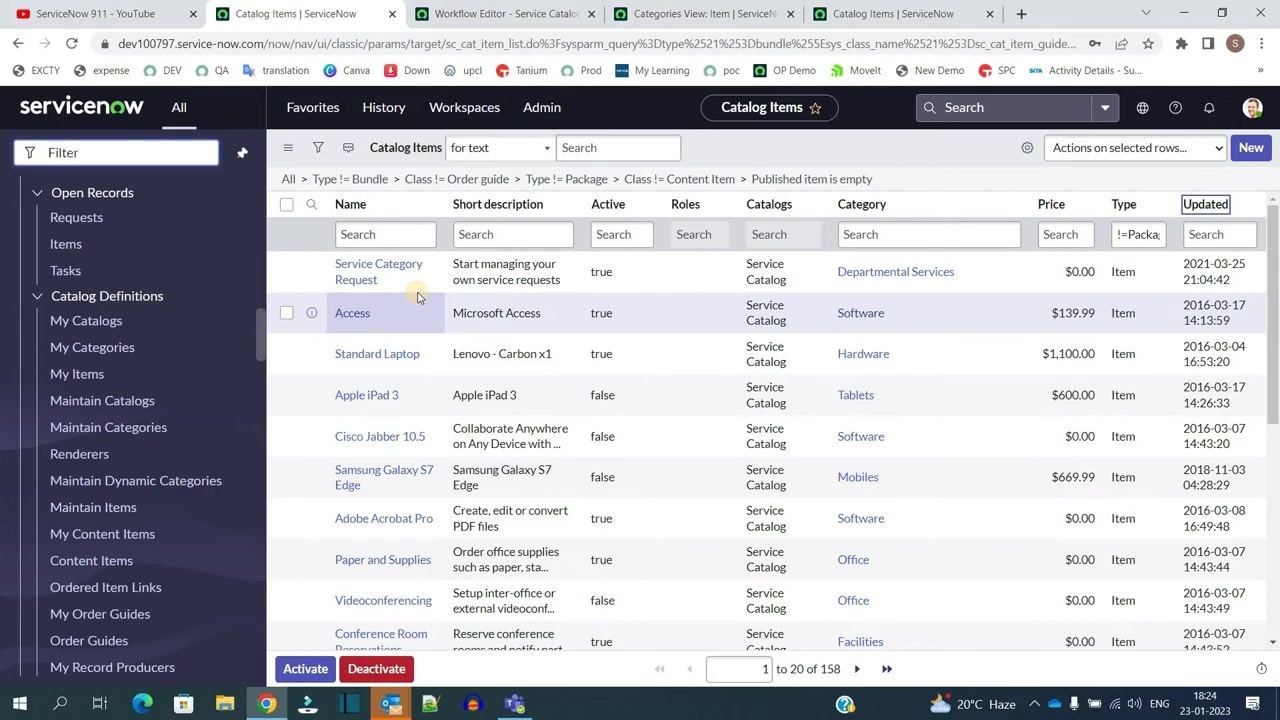
To add catalog items, navigate to Maintain Items or use the Catalog Items tab within your catalog. This opens the sc_cat_item table, which lists all catalog items along with their Name, Short Description, Active status, Roles, Catalogs, Category, Price, Type, and Updated date.
Create a new catalog item in ServiceNow
From the Catalog Items list, use the search and filter options at the top of each column if you need to locate a specific existing item first.
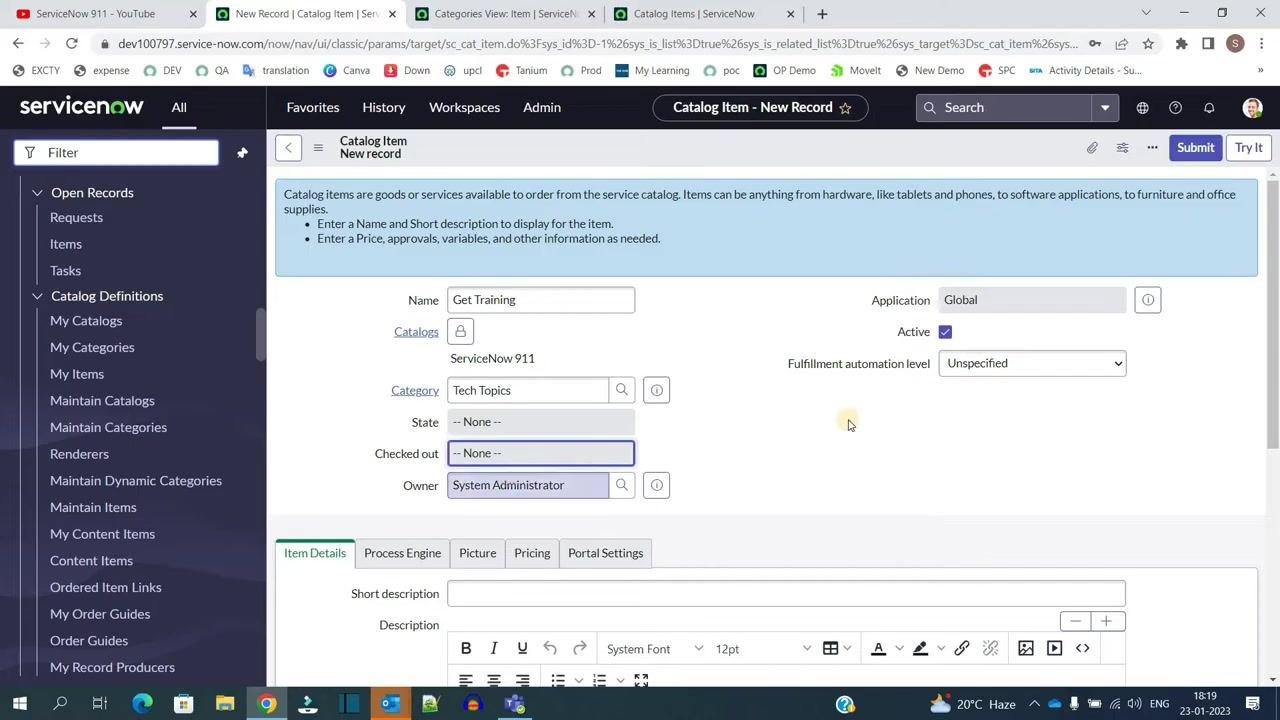
Click New in the Catalog Items list to create the item. In the Catalog Item - New Record form, fill in:
- Name: Enter
Get Training. - Catalogs: Confirm it is set to
ServiceNow 911(this field is locked by default). - Category: Click the lookup icon to select a category — only categories linked to the selected catalog are available. Choose
Tech Topics. - Active: Make sure this checkbox is selected.
- Fulfillment automation level: Leave as
Unspecifiedunless a specific level is required. - Owner: Set to
System Administratoror another appropriate owner. - State and Checked out: Optional.
Add descriptions and metadata
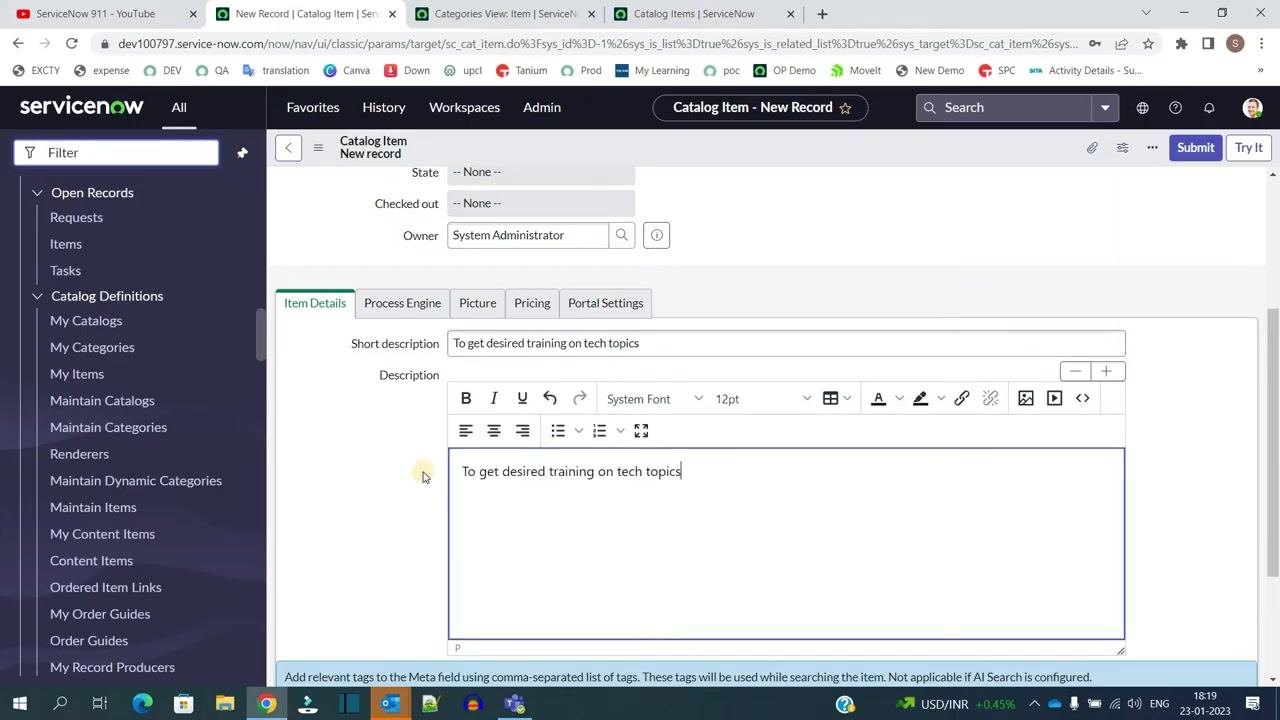
In the Item Details tab, fill in:
- Short description: Enter
To get desired training on tech topics. - Description: Enter a detailed description, such as
To get desired training on tech topics. Use the rich text editor to format it as needed. - Meta: Add comma-separated keywords, such as
tech trainings, c plus plus, to improve searchability.
Configure the process engine (workflow)
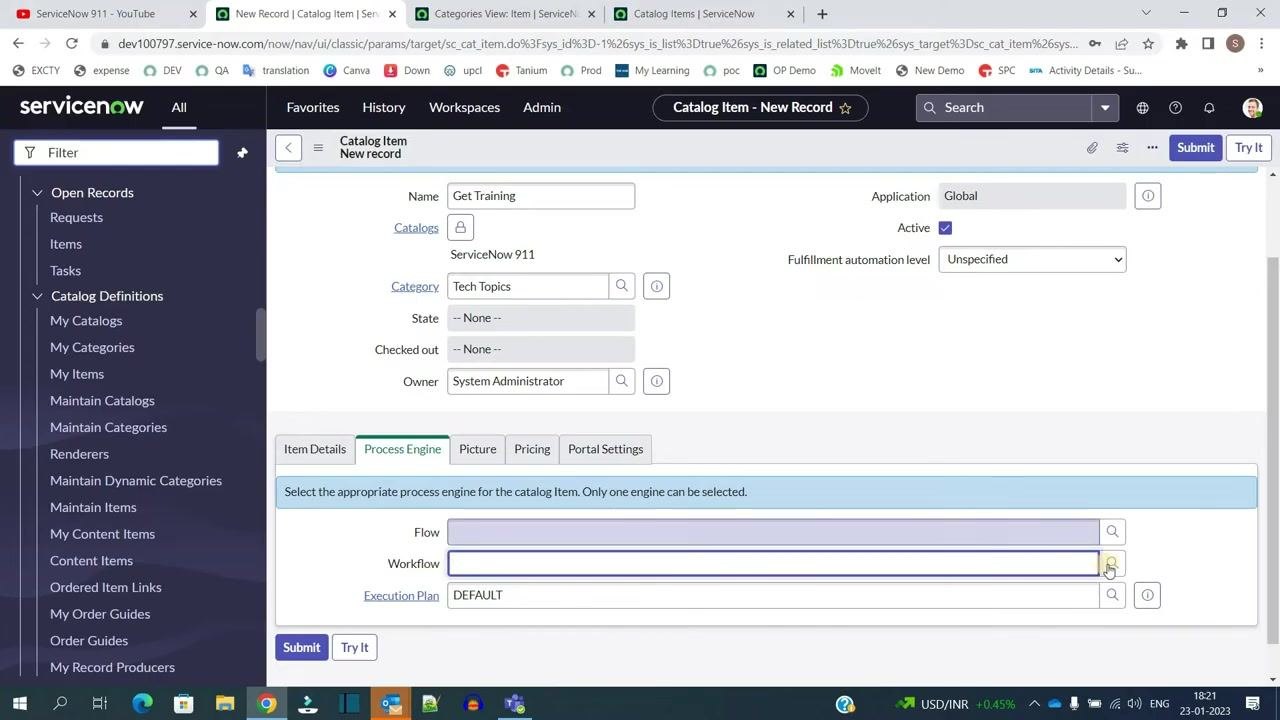
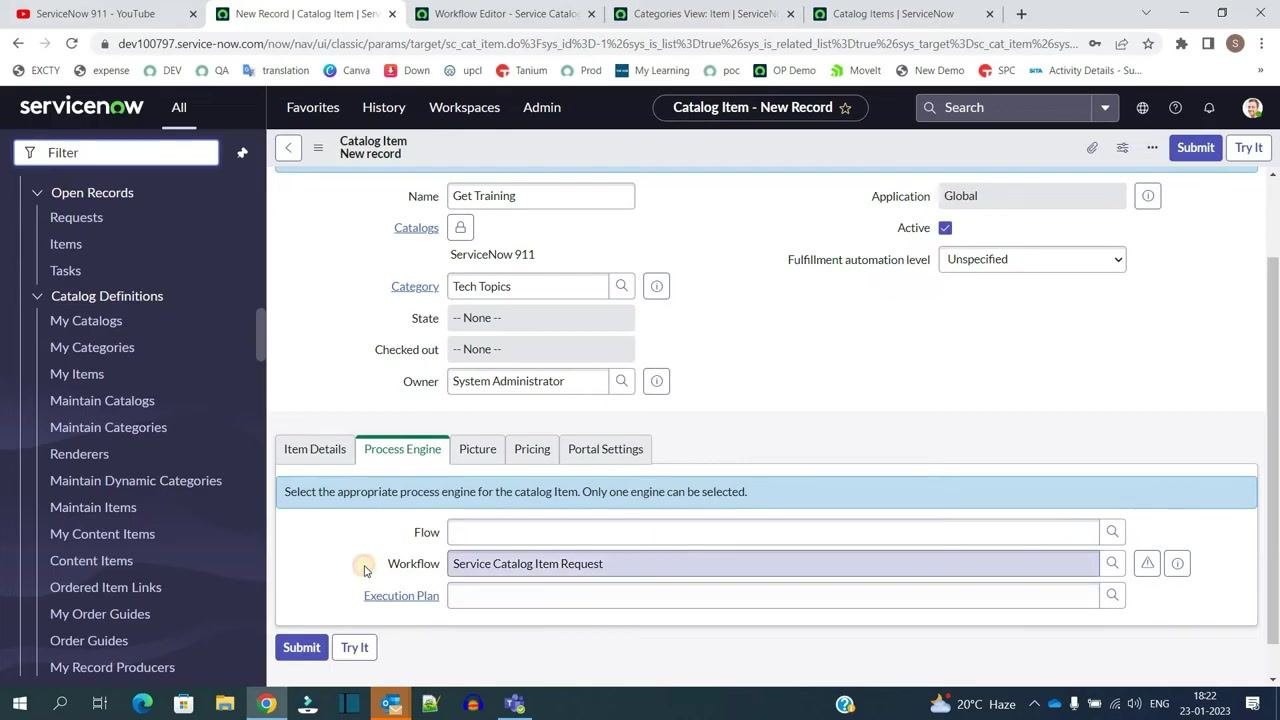
Open the Process Engine tab. You can choose either a Workflow or an Execution Plan for the item — workflows are generally used to define the steps required to fulfill the service request.
Click the lookup icon in the Workflow field to select a workflow from the available list. You can also configure a Flow, or use the default Execution Plan if required.
Review and customize the workflow
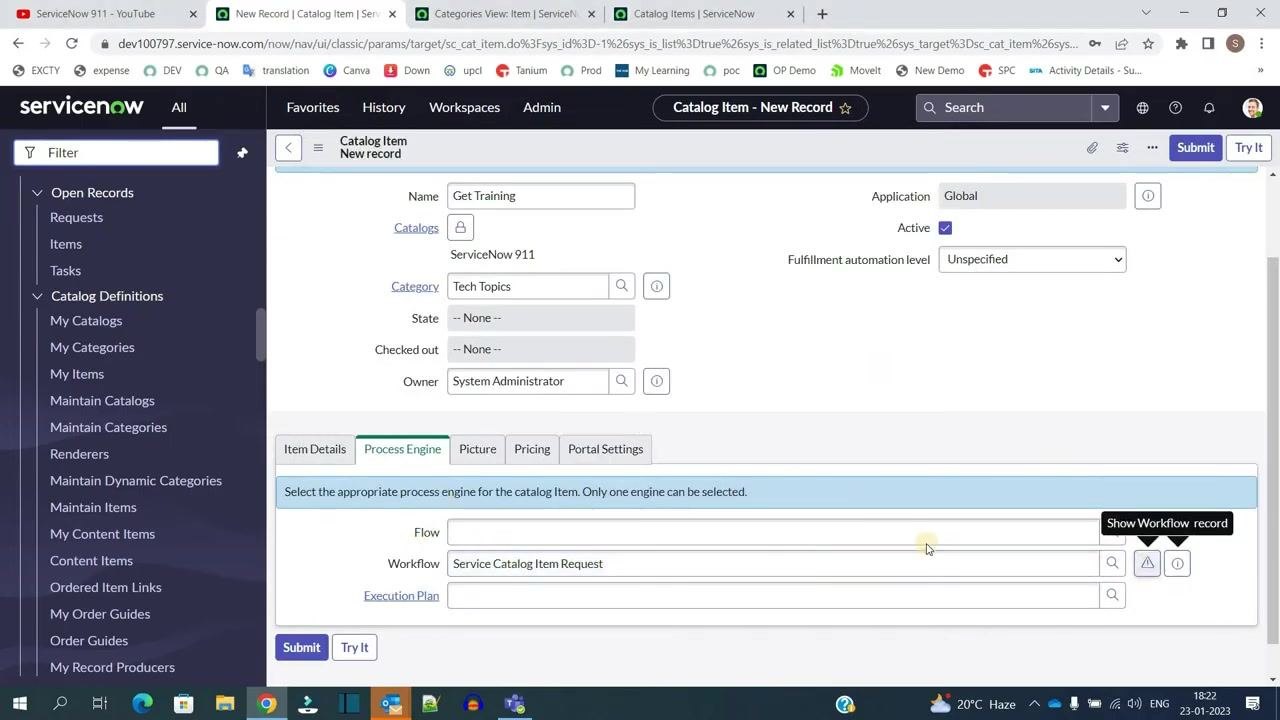
Click the Show Workflow record icon next to the Workflow field to open the workflow associated with your catalog item.
Review the workflow diagram. A typical workflow includes:
- Begin and End nodes.
- Approval steps, such as Dept. Head Approval and CIO Approval.
- Approval Actions, such as Mark item approved and Mark Rejected.
- Catalog Tasks, such as Order Fulfillment and Deployment.
- Notifications, such as Inform of Backordered Status, Rejection Notification, and Inform Completion.
- Log Messages, such as Item Deployed.
You can add further steps, including scripting, additional tasks, or notifications. Workflow customization is a complex topic and may require a dedicated session to cover in depth.
Once reviewed, return to the catalog item form — the selected workflow now appears in the Workflow field.
Add a picture or icon
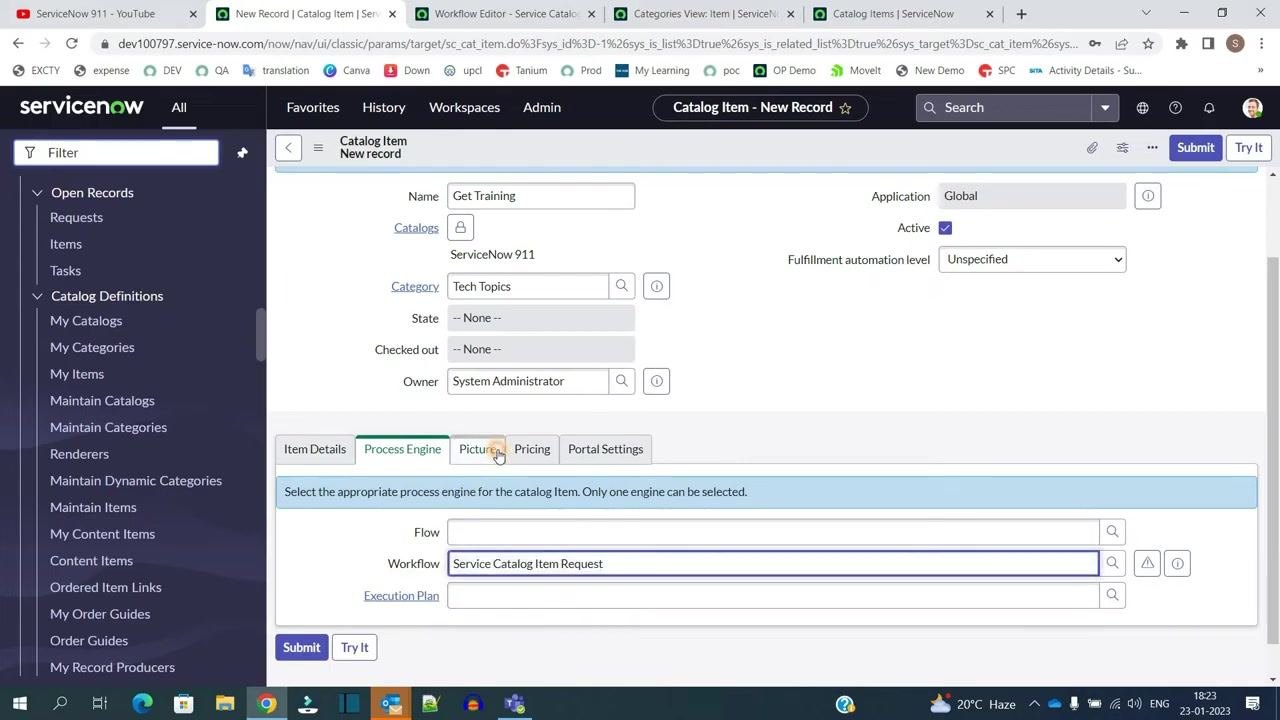
Click the Picture tab to add an image or icon for the catalog item. Any icon you add will appear in the item's display within the portal.
Set pricing options
Click the Pricing tab and configure:
- Price: Enter
10.00(USD). - Recurring price: Optional — enter a value if the item has a recurring cost.
- Recurring price frequency: Select from Daily, Weekly, Every 2 Weeks, Monthly, Every 2 Months, Quarterly, Semi-Annual, or Annually.
Configure portal settings
Click the Portal Settings tab to control how the item appears and behaves in the service portal:
- Request method: Set to
Order. - Hide 'Add to Cart'
- Hide Quantity
- Hide Delivery time
- Hide Attachment
- Mandatory Attachment
- Hide 'Add to Wish List'
These options determine the visibility and requirements users see when ordering the item.
Submit the catalog item
Once all details are filled in and reviewed, click Submit at the top right of the form to save and publish the new catalog item.
Verify the catalog item in the list
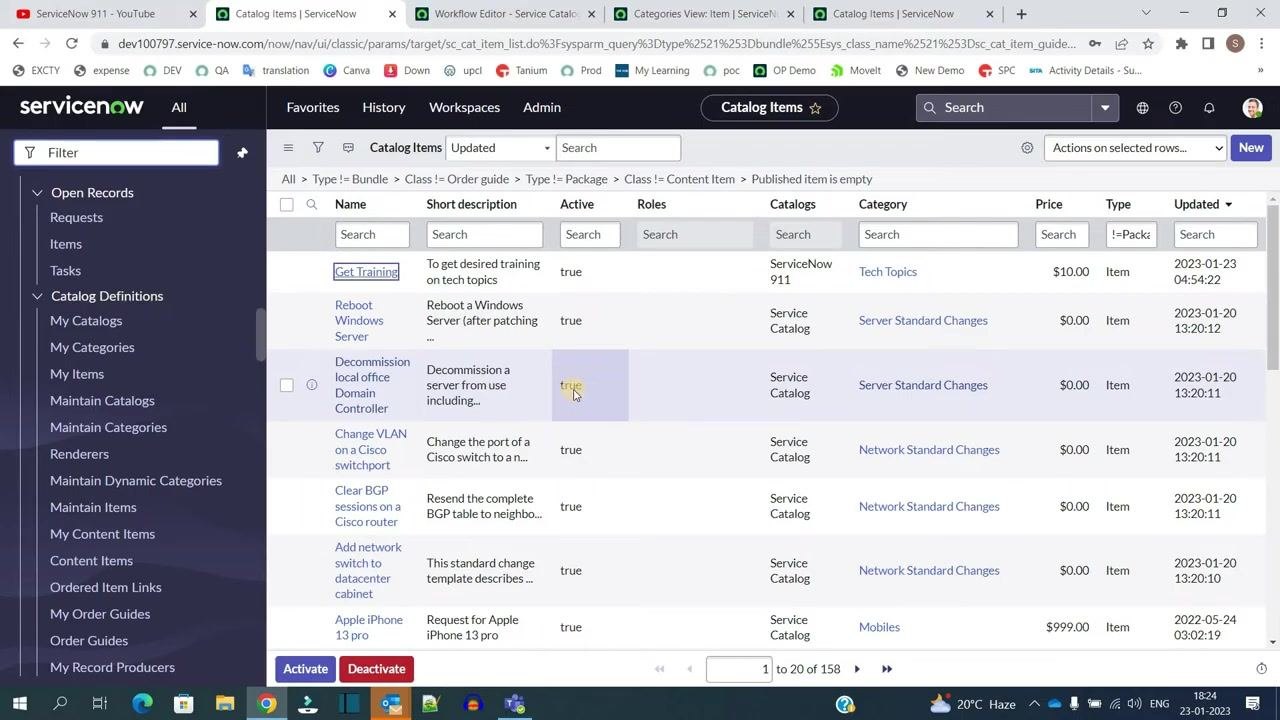
Return to the Catalog Items list. Use search or sort (for example, sort by Updated) to find your new item, Get Training, and confirm it shows the correct Short description, Active status, Catalog, Category, and Price.
Add a variable to collect user input
With your catalog item open, scroll to the Variables tab and click New to add a variable.
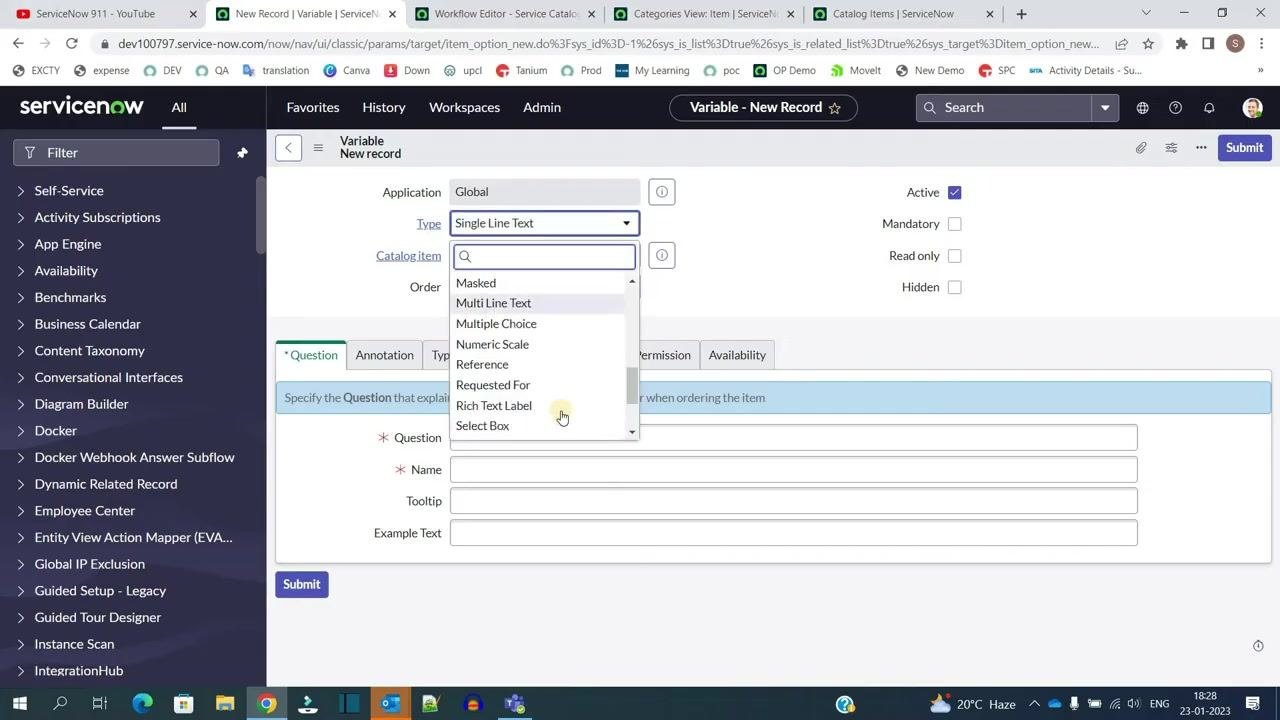
Variables work similarly to fields on a form: they let you display information to users or collect input such as text, choices, or dates. When adding a variable, you must select a Type, such as multiple choice, single line text, or checkbox. Review the available types to choose the one that fits your data collection needs.
Configure the new variable's type and question
In the Variable - New Record form:
- Application: Confirm
Globalis selected. - Type: Click the dropdown to choose a type. Available options include Single Line Text, Masked, Multi Line Text, Multiple Choice, Numeric Scale, Reference, Requested For, Rich Text Label, and Select Box. For example, choose Single Line Text for a short response or Multiple Choice for predefined options.
- Active: Check to make the variable active.
- Mandatory: Check if the variable must be completed by the user.
- Read only: Check if the variable should display but not be editable.
- Hidden: Check if the variable should not be visible to users.
- Question: Enter the prompt shown to users, for example "Please specify your training topic."
- Name: Enter a unique name for the variable.
- Tooltip and Example Text: Optional — add extra guidance for users.
Click Submit to save the variable.
Configure the Question tab details
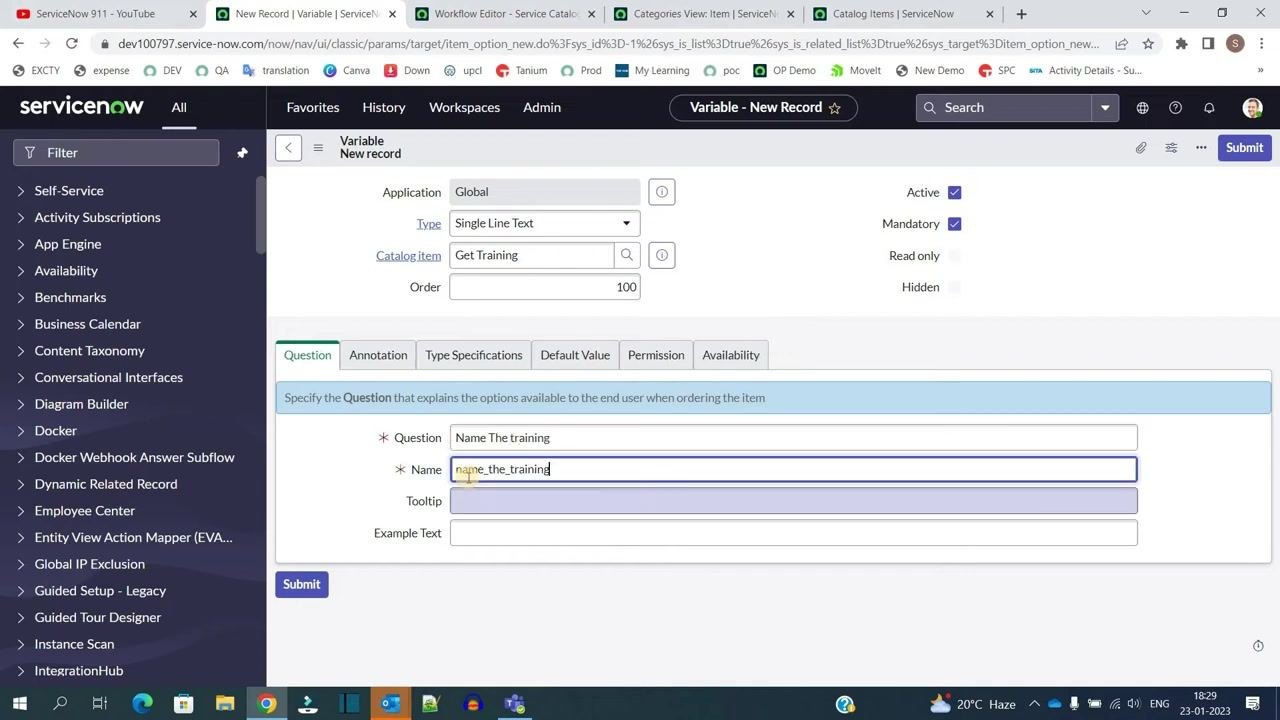
For the Get Training item, open the Variable - New Record form again and confirm the base settings:
- Application: Global
- Type: Single Line Text
- Catalog item: Get Training
- Order: 100
- Active: Checked
- Mandatory: Checked
- Read only: Unchecked
- Hidden: Unchecked
In the Question tab, enter:
- Question:
Name The training - Name:
name_the_training(this auto-populates from the question but can be edited) - Tooltip: Optional guidance for users.
- Example Text: Optional sample reference for users.
Add annotation (help text)
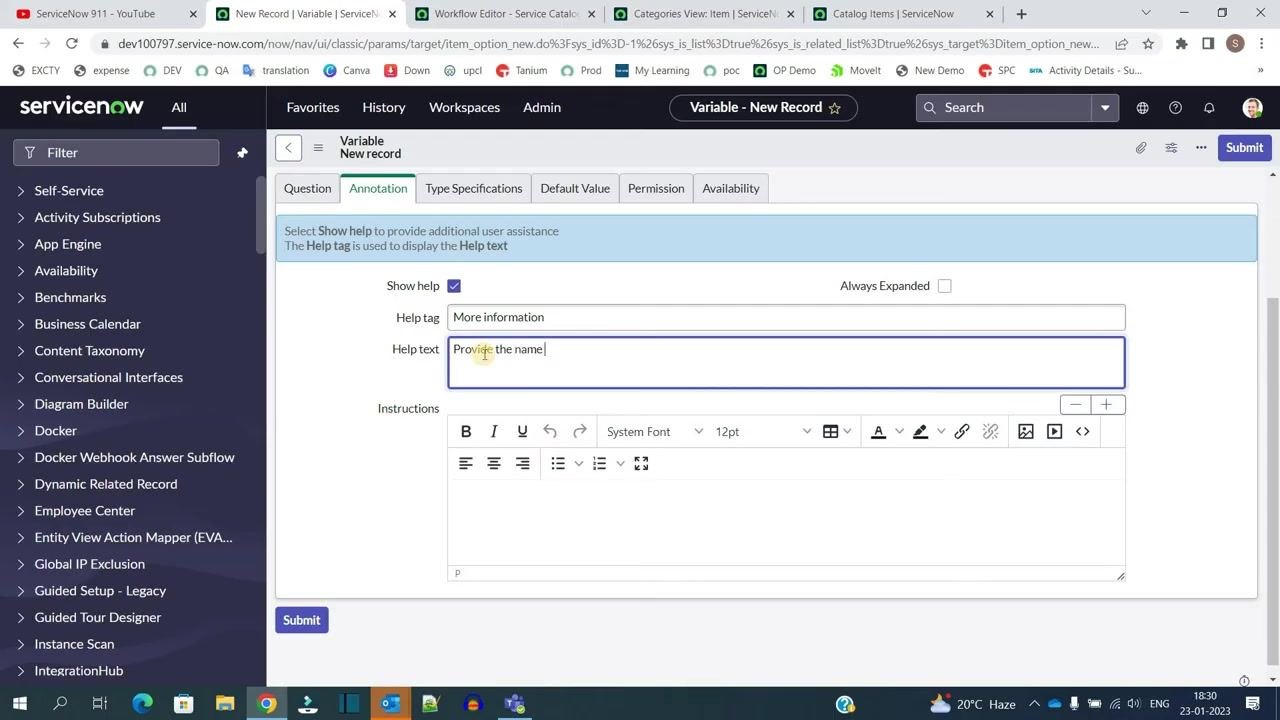
Switch to the Annotation tab and check Show help to provide additional user assistance. Set:
- Help tag: More information
- Help text: Enter
Provide the name. - Instructions: Optional — add formatted instructions using the rich text editor.
Set type specifications
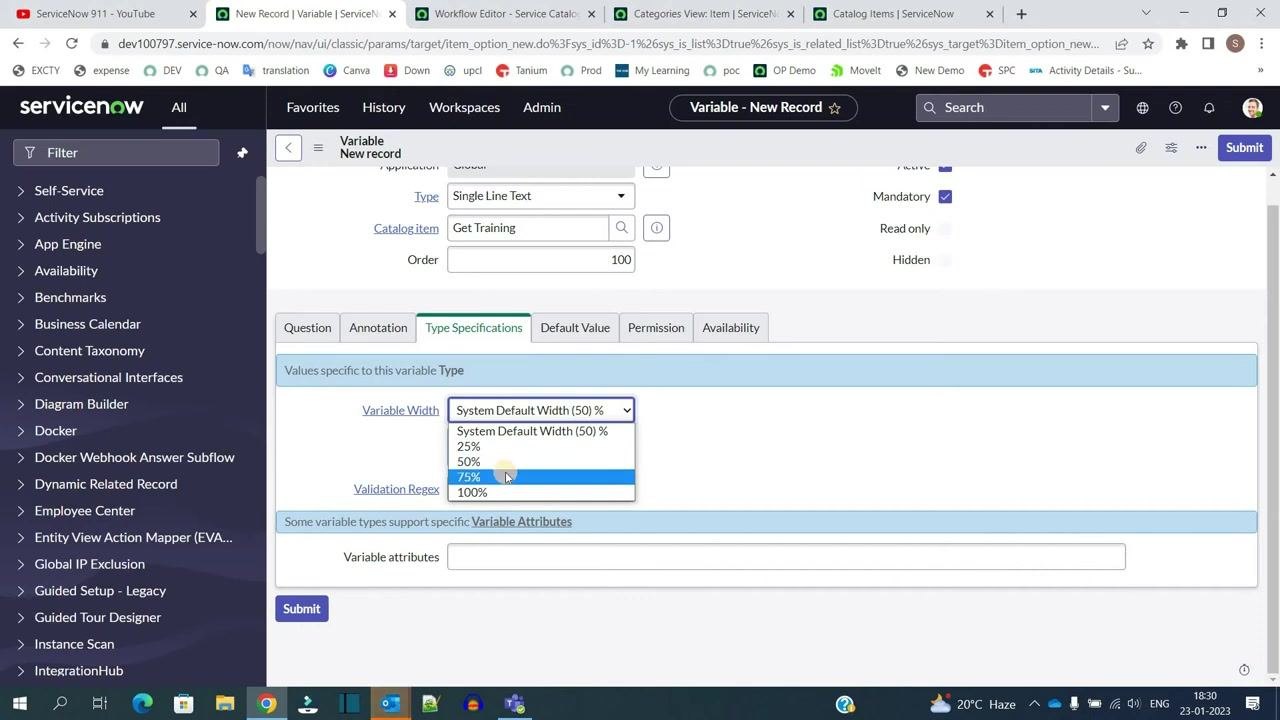
Go to the Type Specifications tab and configure:
- Variable Width: Select System Default Width (50%), or choose 25%, 75%, or 100% as needed.
- Validation Regex: Leave as
-- None --unless you need specific input validation, such as email, IP address, or URL formatting. - Variable attributes: Optional — enter additional attributes if required.
Set permissions
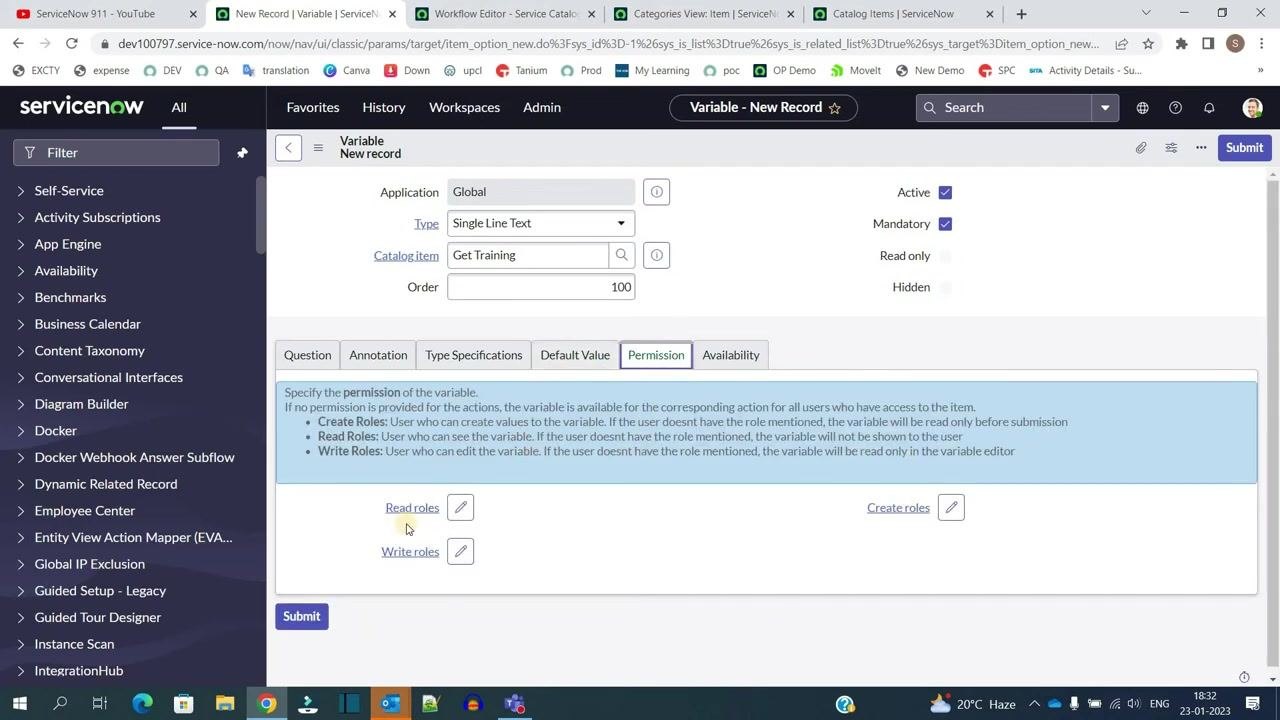
Click the Permission tab to specify which roles can read, write, or create the variable:
- Read roles: Optional — roles that can view the variable.
- Write roles: Optional — roles that can edit the variable.
- Create roles: Optional — roles that can create values for the variable.
If no roles are specified, the variable is available to all users with access to the item.
Set availability
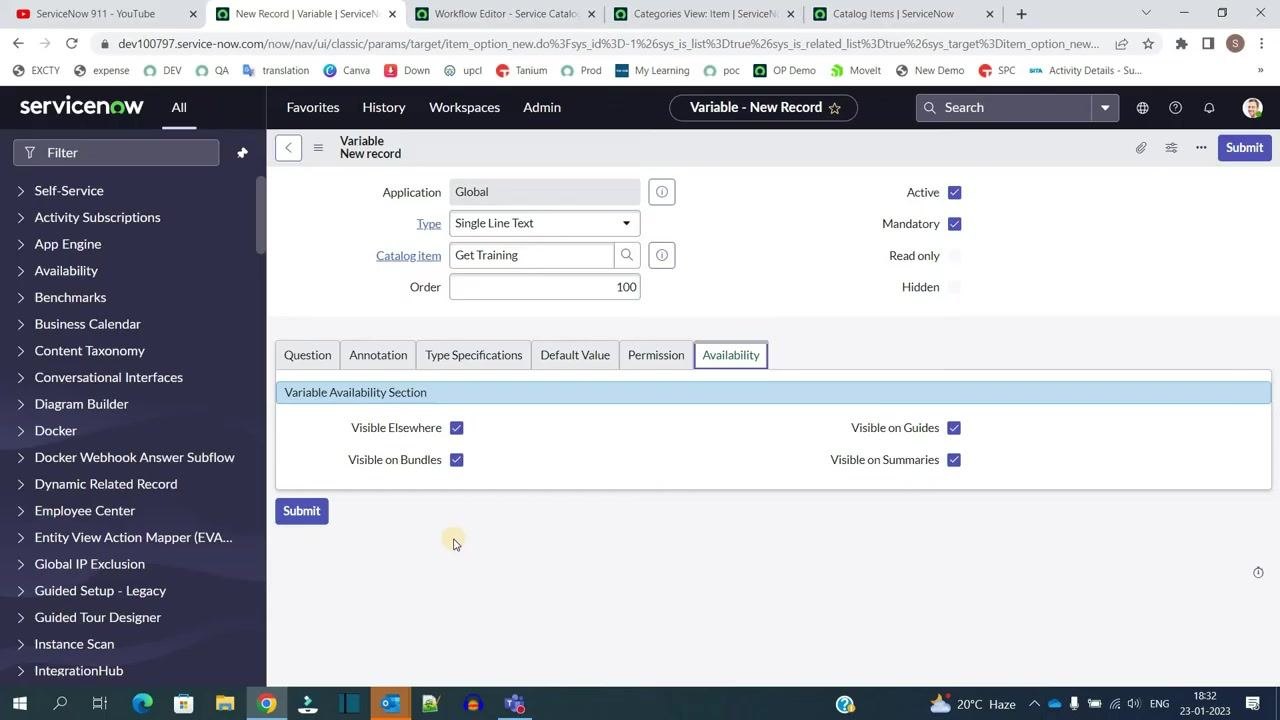
Open the Availability tab. In the Variable Availability section, check as needed:
- Visible Elsewhere
- Visible on Bundles
- Visible on Guides
- Visible on Summaries
This ensures the variable displays in all relevant contexts.
Submit the variable
After configuring all tabs, click Submit to save the new variable. Repeat these steps for each additional variable your catalog item requires.
Review the finished catalog item configuration
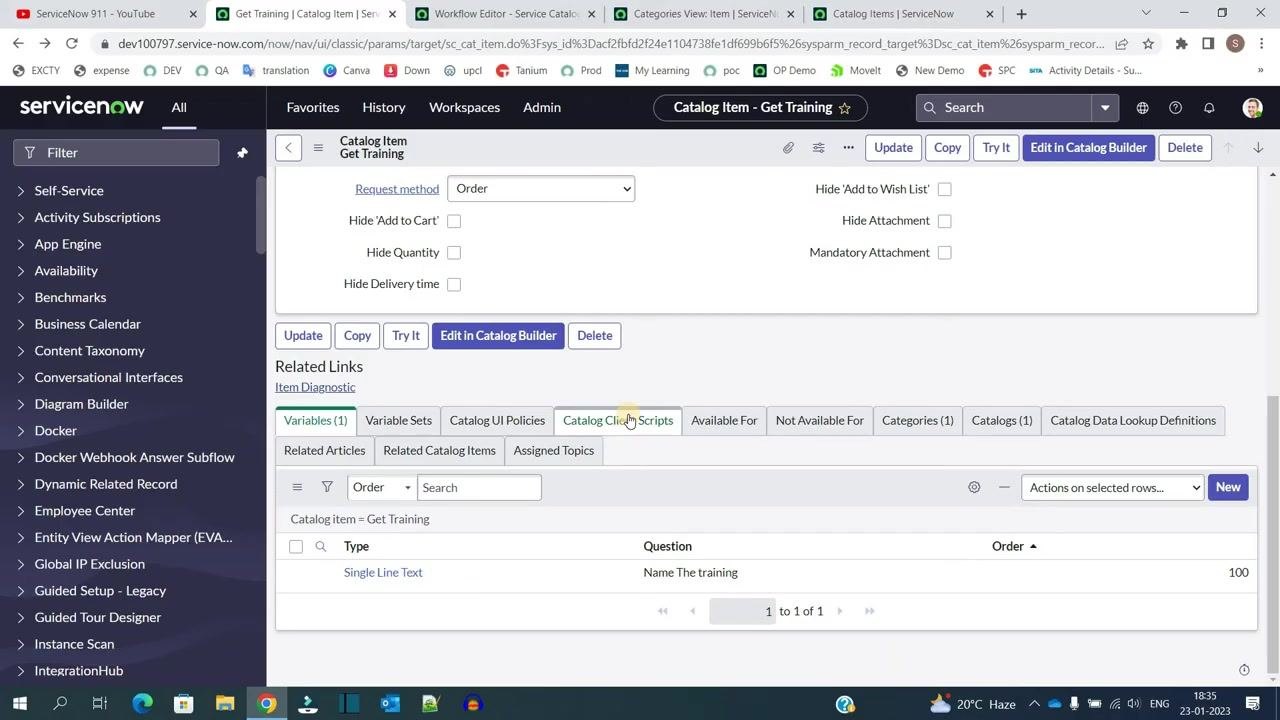
Open the Catalog Item - Get Training form and confirm the core details:
- Name: Get Training
- Application: Global
- Active: Checked
- Catalogs: ServiceNow 911
- Category: Tech Topics
- Owner: System Administrator
- Fulfillment automation level: Unspecified
Under Portal Settings, verify:
- Request method: Order
- Hide 'Add to Cart': Unchecked
- Hide Quantity: Unchecked
- Hide Delivery time: Unchecked
- Hide 'Add to Wish List': Unchecked
- Hide Attachment: Unchecked
- Mandatory Attachment: Unchecked
Under Variables, confirm: Type = Single Line Text, Question = Name The training, Order = 100.
Check the catalog in the Service Catalog view
Use the left navigation pane to search for and select Catalogs under Service Catalog. The main panel lists available catalogs, including Service Catalog, Technical Catalog, and ServiceNow 911. In the Sections dialog, select ServiceNow 911 and confirm it appears as a selectable catalog.
Check category assignment
On the main catalogs page, you may see that ServiceNow 911 is listed but currently has no category assigned, meaning the item is not yet grouped under a specific category within the catalog.
Assign the catalog item to a category
Open the ServiceNow 911 catalog. In the Sections dialog, select Tech Topics under Catalog Categories, then click Add here to assign the category to the catalog. Confirm that Tech Topics now appears under the catalog's categories.
Return to the main catalogs page and select ServiceNow 911 again to confirm Tech Topics is now listed as a category under this catalog.
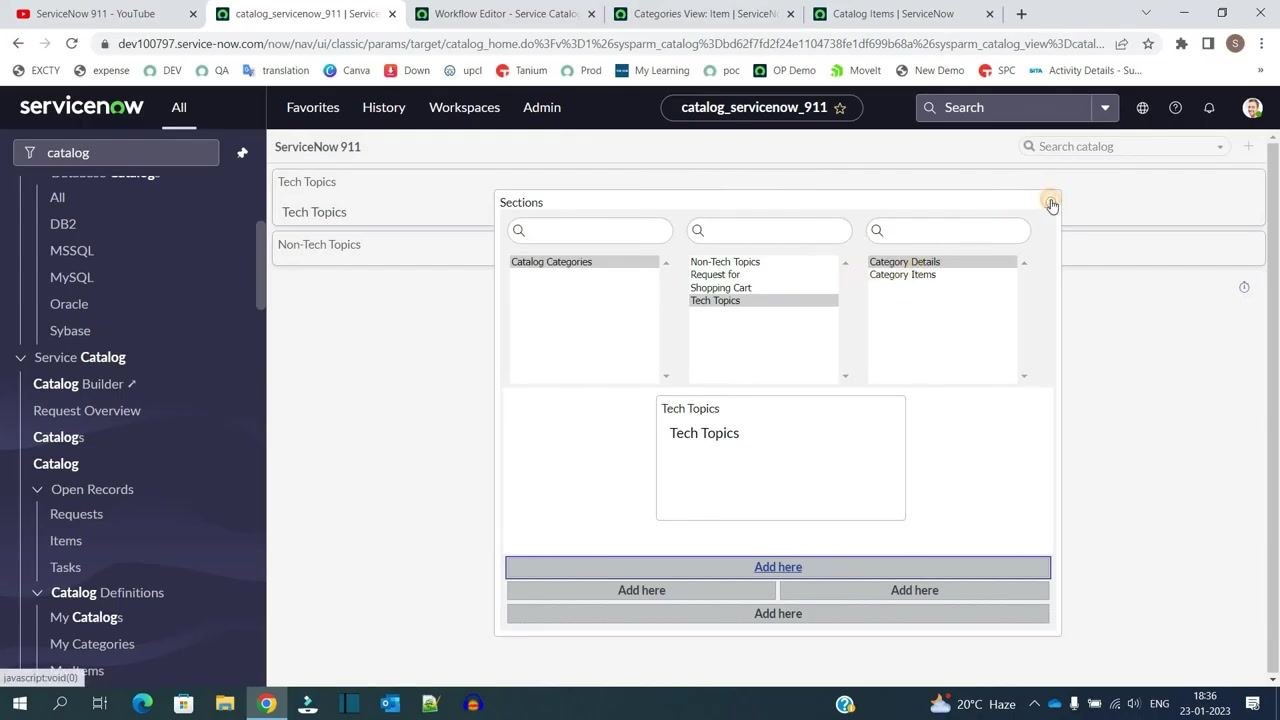
Open and review the catalog item as an end user
Navigate to Tech Topics within the ServiceNow 911 catalog, then locate and select the Get Training item. The item details page displays:
- Short Description: To get desired training on tech topics
- Variable: Name The training (marked with a required asterisk)
- Help Text/Annotation: The "More information" section is visible, providing additional guidance.
- Order Options: Price, quantity, subtotal, delivery time, and Order Now or Add to Cart buttons.
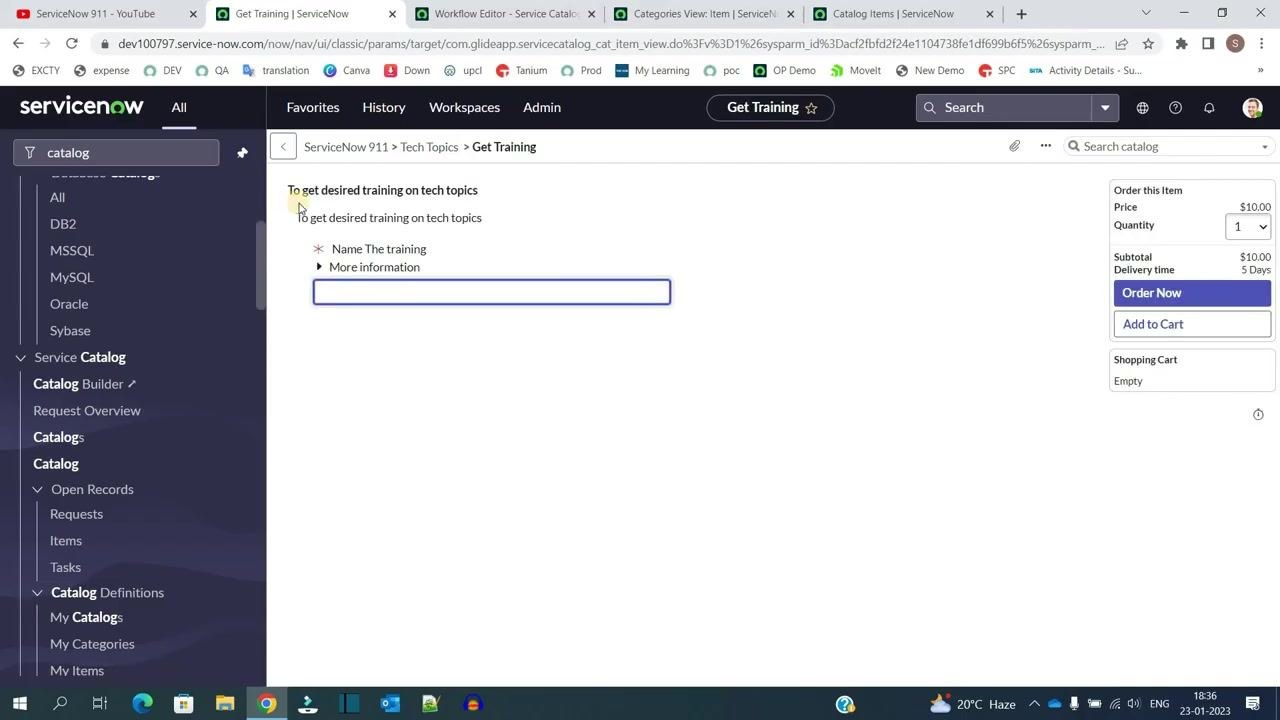
Test the variable and help text
Click the More information dropdown to view the help text added during annotation setup, and confirm text such as "such as c, c++ etc" appears as expected. Enter a sample value, such as c++, in the Name The training field to test input functionality.
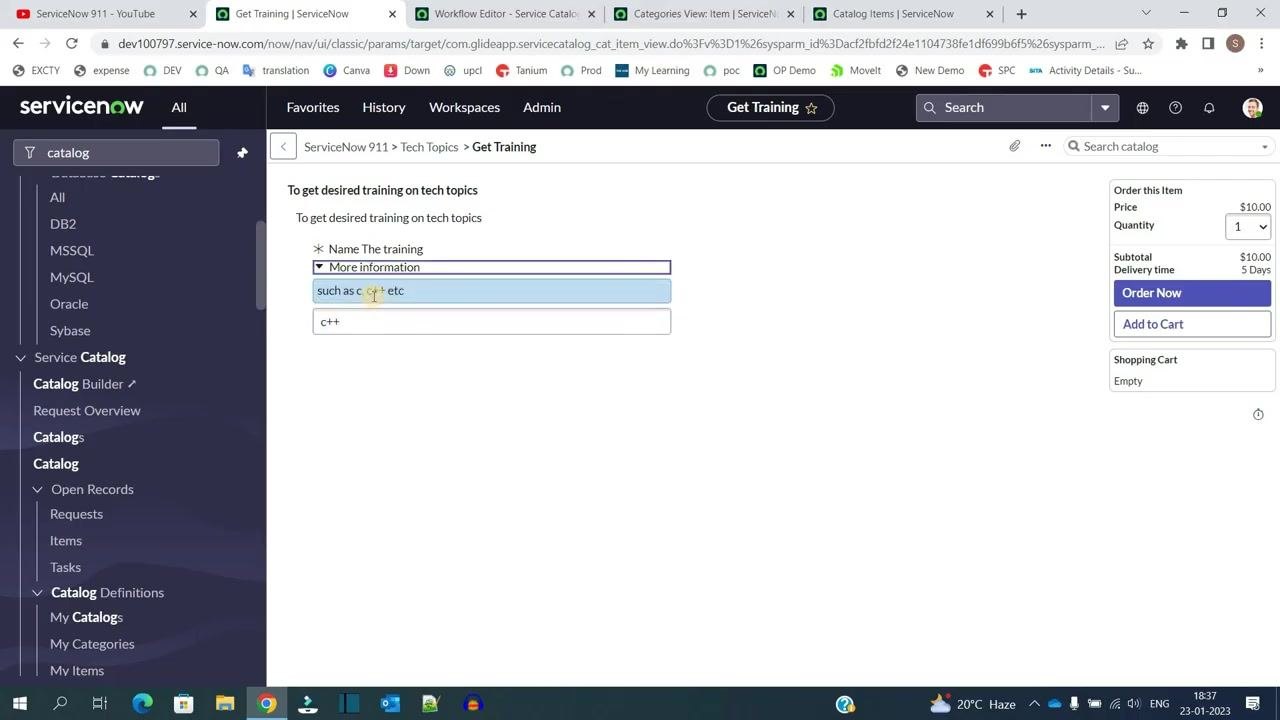
Submit the catalog item request
Re-confirm the help text and sample input are correct.
On the right panel, review the order summary: Price $10.00, Quantity 1, Subtotal $10.00, Delivery time 5 Days. Choose Order Now to submit the request immediately, or Add to Cart to save it for later checkout. In this example, Order Now is selected.
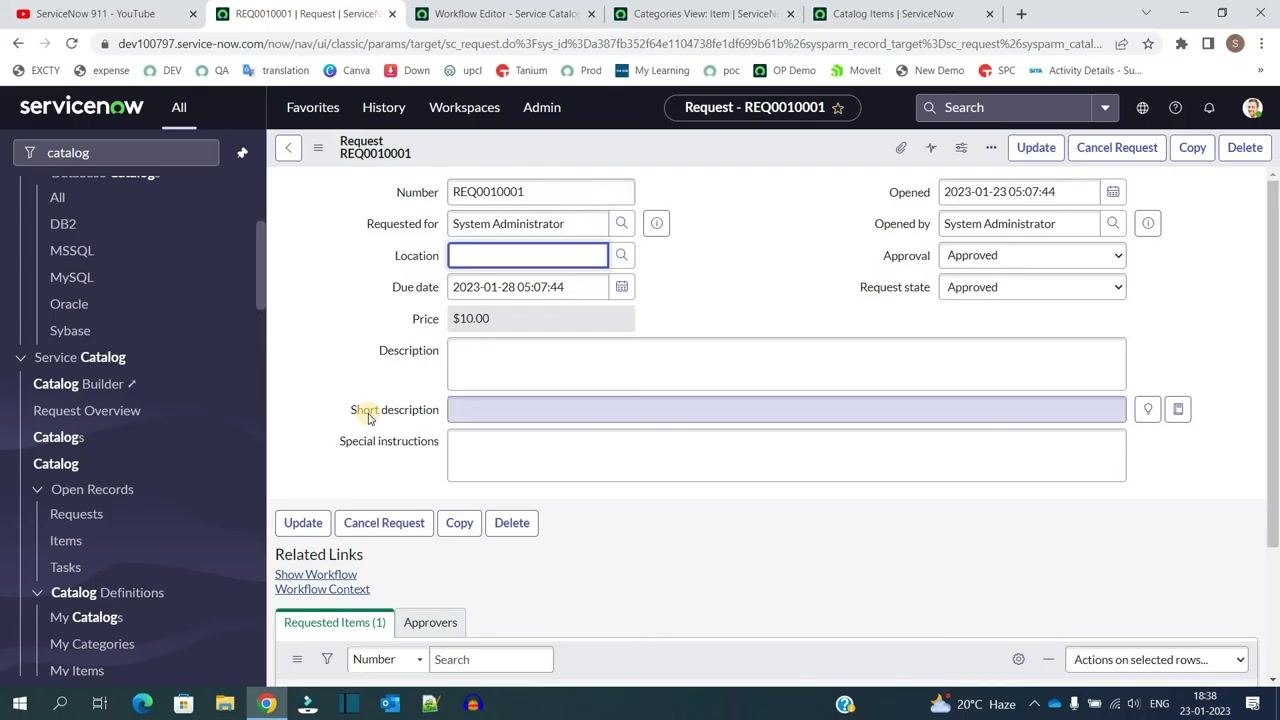
View the created request record
After submitting, you are redirected to the request record page, which shows:
- Number: REQ0010001
- Requested for: System Administrator
- Due date: 2023-01-28 05:07:44
- Price: $10.00
- Approval: Approved
- Request state: Approved
- Short description and Special instructions fields are available for further detail.
Use the buttons at the top to Update, Cancel Request, Copy, or Delete the request.
Inspect the requested item (RITM) details
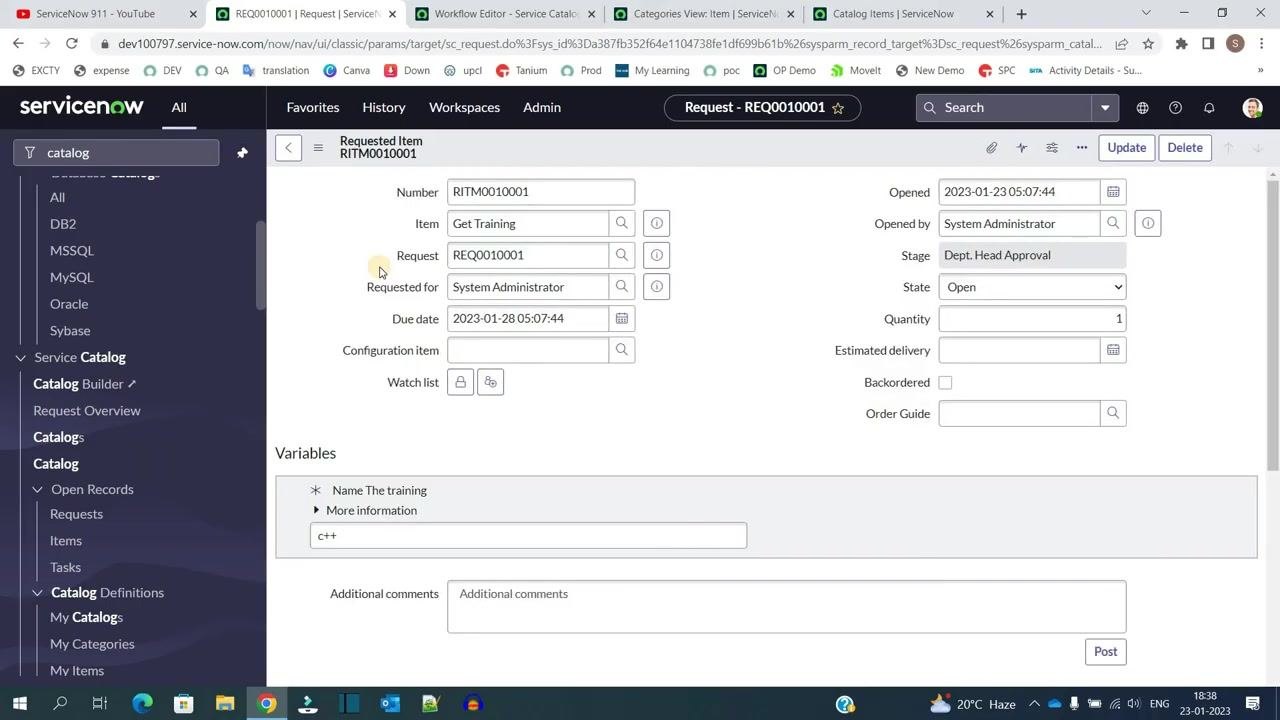
Navigate to the Requested Item (RITM) record linked to your request. Review:
- Number: RITM0010001
- Item: Get Training
- Request: REQ0010001
- Requested for: System Administrator
- Stage: Dept. Head Approval (or the current approval stage)
- State: Open
- Quantity: 1
- Variables: Displays the value entered for "Name The training" (for example, "c++")
- Additional comments field is available for customer-visible notes.
Track approval and workflow progress
In the Requested Item record, observe the current workflow stage, such as Dept. Head Approval or CIO Approval. The Activities section lists actions taken, including who opened the request and its current state. Use Update or Delete as needed, and use related links to access the workflow and context. The Approvers tab lists pending or completed approvals.
Visualize the workflow
Open the workflow context to view a graphical representation of the approval and fulfillment process. The diagram includes:
- Begin node
- Approval steps, such as Dept. Head Approval and CIO Approval
- Catalog Tasks, such as Order Fulfillment and Deployment
- Notifications, for rejection, backorder, or completion
- End node
Follow the arrows to understand the sequence of steps and possible outcomes — approved, rejected, backordered, or completed.
Monitor approval status and item progress
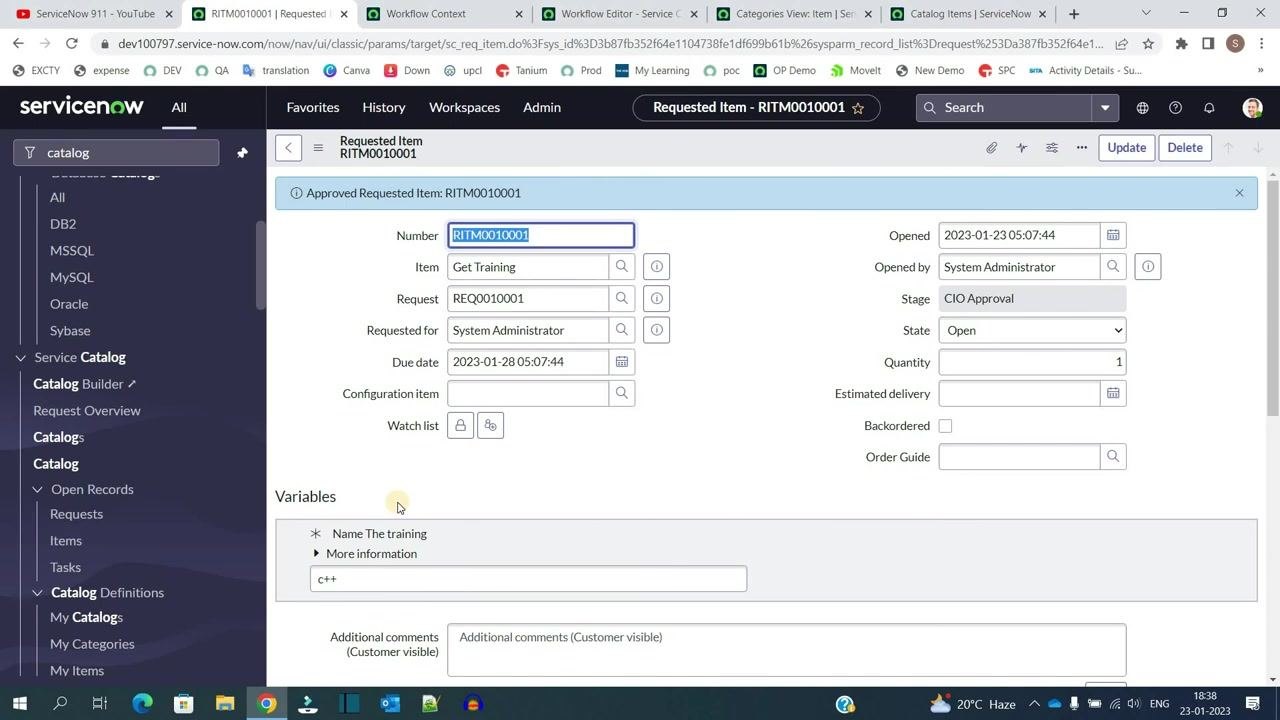
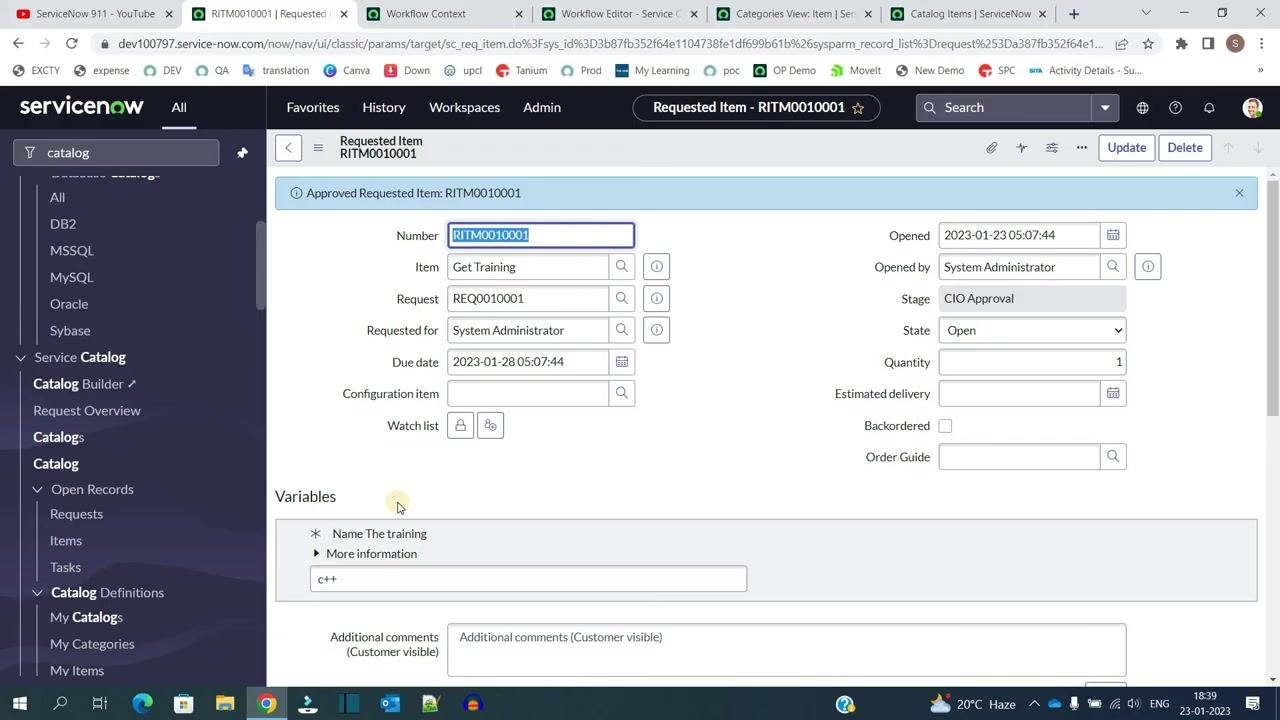
Return to the Requested Item record to check for updates. The approval stage may advance, for example from Dept. Head Approval to CIO Approval, as approvals are granted. The variable value and any additional comments remain visible for reference.
What's next
Now that you know how to create a catalog item in ServiceNow, keep in mind the overall structure: a catalog can contain multiple categories, and each category can hold multiple catalog items. Variables let you collect specific information from users on any catalog item, and subcategories let you further organize items within a category. This flexible structure supports scalable, well-organized service catalog management as you add more catalogs, categories, items, and variables.
Generation details: cost, quality tiers
Docsie billed 5,000 credits ($3.50) to analyze this 10-minute video at standard quality. The rewrite, template fill and Word/PDF exports were included. The same video at each quality tier:
| Quality | Frames sampled | Credits | Approx. cost |
|---|---|---|---|
| Draft | every 16-30 s | 2,500 | $1.75 |
| Standard (this guide) | every 8-15 s | 5,000 | $3.50 |
| Detailed | every 4-7 s | 10,000 | $7.00 |
| Ultra | every 1-3 s | 20,000 | $14.00 |
Credits priced at $0.70 per 1,000; plans include a monthly allowance. Enterprise customers on on-premise or bring-your-own-model deployments run this on their own inference and pay no per-video credits.
Generated by Docsie Video-to-Docs on 2026-10-01 from a 9-minute video. Screenshots are frames from the source video and belong to their creator, ServiceNow 911, whose original is embedded above. If you own this video and want the guide removed or credited differently, contact us and we will act within one business day.