
How to Open a Posting Period in SAP
This guide explains how to open a posting period in SAP MM (Materials Management) and other modules using transaction code OB52. You will learn how to review existing posting period settings, open or close periods for specific account types, copy settings to a new company code, and save your configuration as a customizing request.
Video: T-Code "OB52" Define Open and Close Posting Period in SAP by NEW AURA. All credit for the demonstration goes to the creator; watch the original on YouTube. The written guide below was generated from this video by Docsie. Creator? Request a change or removal.
This guide explains how to open a posting period in SAP MM (Materials Management) and other modules using transaction code OB52. You will learn how to review existing posting period settings, open or close periods for specific account types, copy settings to a new company code, and save your configuration as a customizing request.
Prerequisites
- You must be logged into SAP with access to the SAP Easy Access main menu.
- You need authorization to run transaction OB52 and to create customizing requests.
- Know your company code (for example,
0001orAH01) before you begin.
Access the SAP Easy Access screen
Log in to SAP and confirm you are on the SAP Easy Access main menu. The left panel shows the SAP Menu with folders such as Office, Logistics, Accounting, and Human Resources. The main area displays the SAP Easy Access logon screen.
Open the posting periods maintenance screen
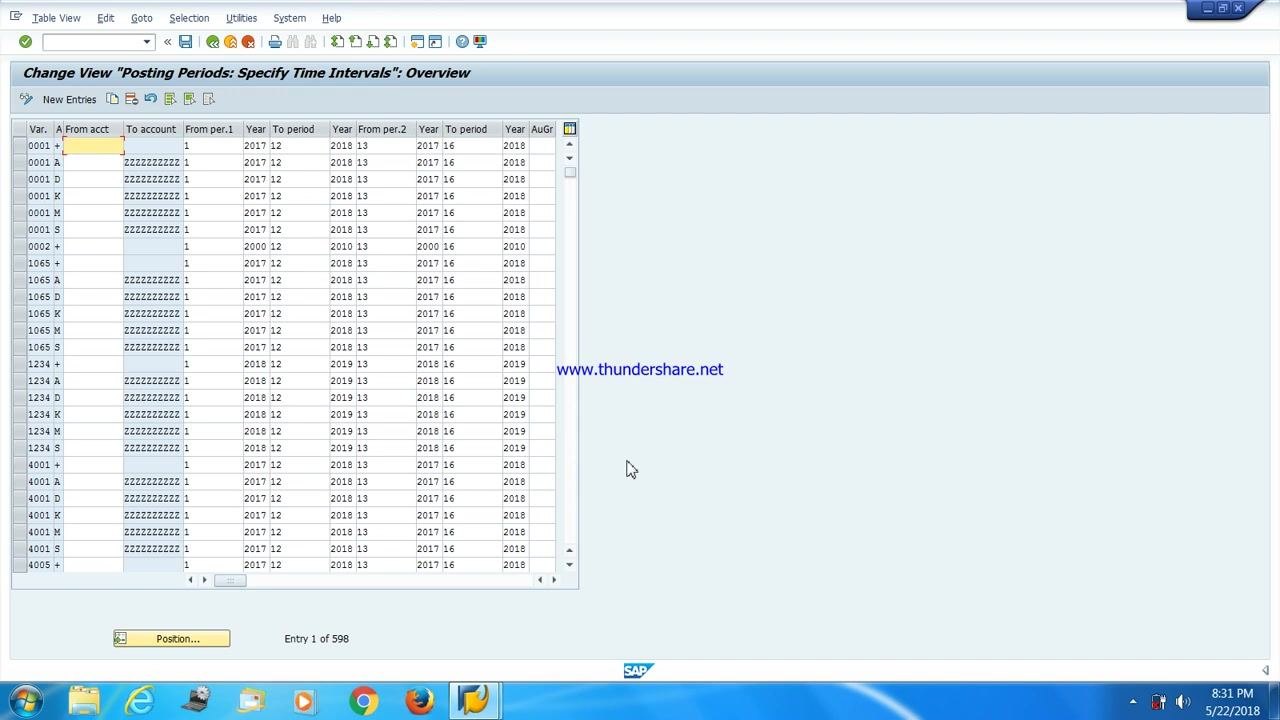
In the command field at the top of the screen, enter the transaction code OB52 and press Enter. The system opens the "Change View 'Posting Periods: Specify Time Intervals': Overview" screen, which lists existing posting period intervals for various company codes.
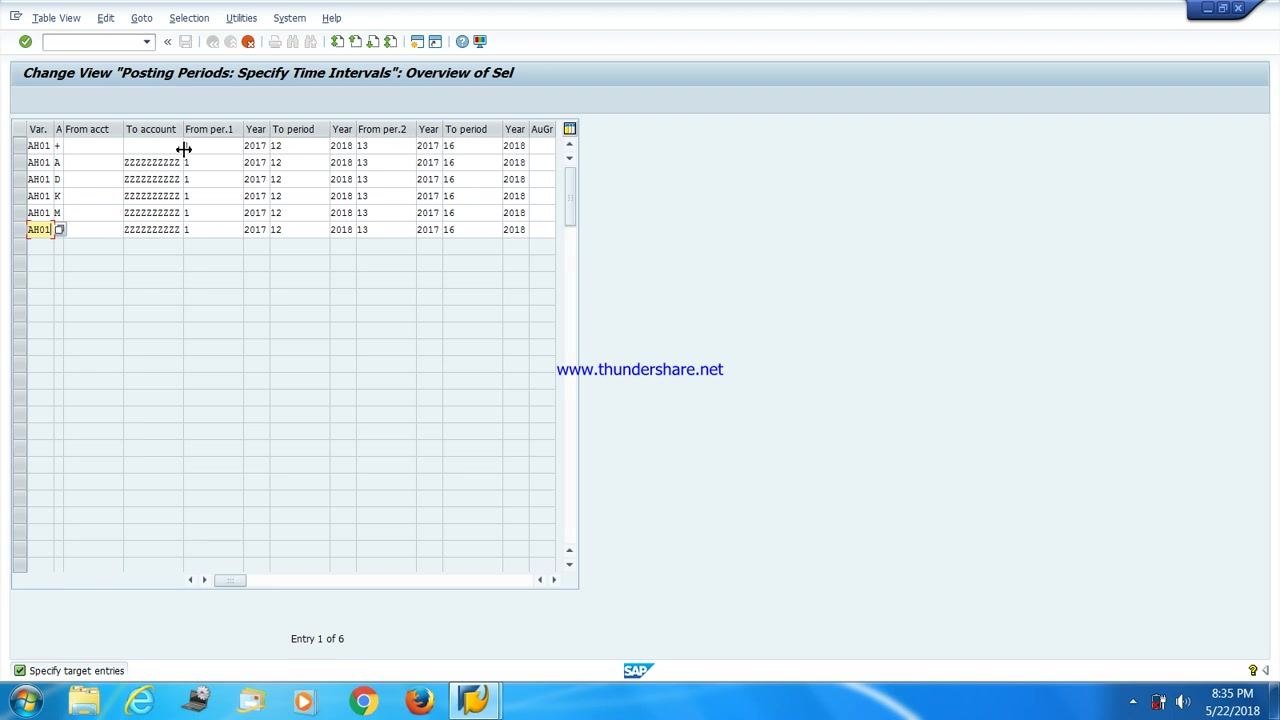
The overview table includes the following columns: Var., A (Account Type), From acct, To account, From per.1, Year, To period, Year, From per.2, Year, To period, Year, AuGr. Each row represents a posting period configuration for a specific company code and account type.
Select the data for your company code
Locate the rows that correspond to your company code (for example, 0001). Click to highlight the relevant rows for that company code before making any changes.
Check account type validity
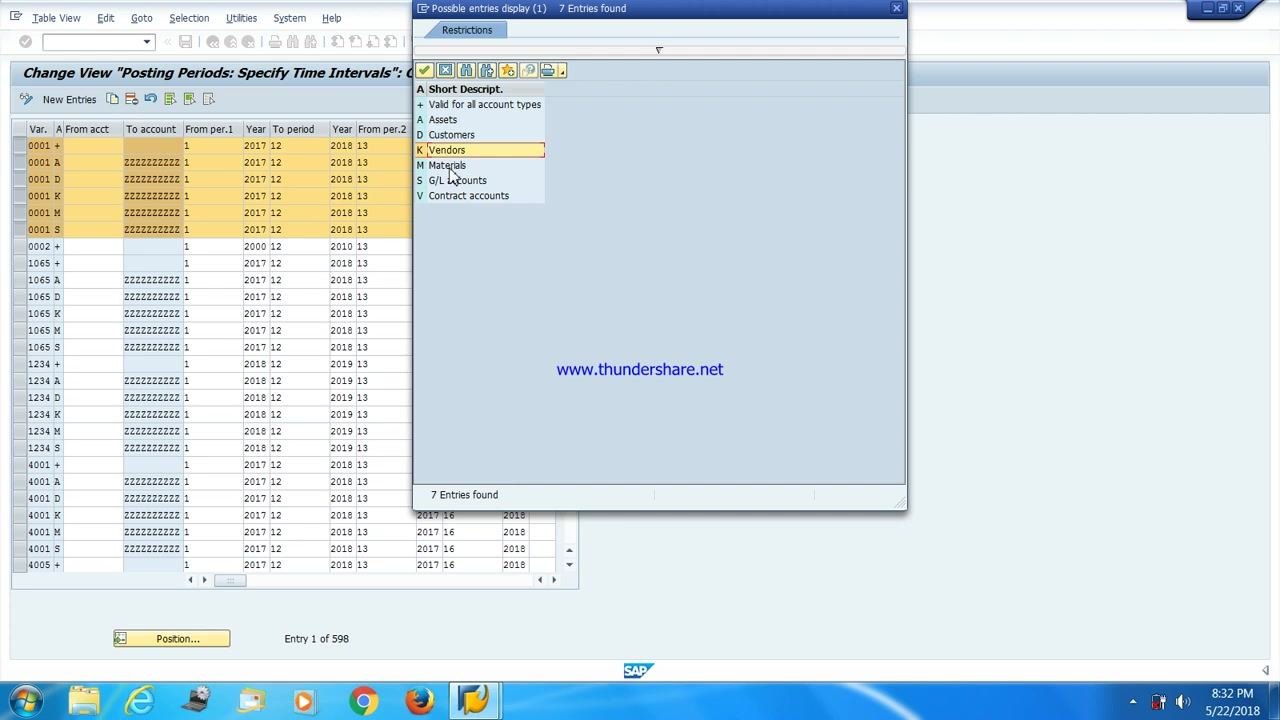
Each row for your company code may represent a different module or account type. The A column indicates the account type:
- Blank: valid for all account types
- A: Assets
- D: Customers (Accounts Receivable)
- K: Vendors (Accounts Payable)
- M: Materials
- S: G/L accounts
- V: Contract accounts
Click the account type field to see the available options. A pop-up displays choices such as Valid for all account types, Assets, Customers, and Vendors. Selecting Valid for all account types opens the posting period for all modules.
Open or close posting periods for specific modules
You can open or close posting periods individually for each module by selecting the matching account type:
- To keep only the Asset module open, select Assets.
- To open the AR module for customers, select Customers.
- To keep the AP module open for vendors, select Vendors.
- To open the posting period for the MM (Materials Management) module, select the row with account type M (Materials) and ensure the desired period is open.
- To open or close the posting period for the General Ledger, select the row with account type S (G/L accounts) and adjust the period as needed.
Each module—Assets, Customers, Vendors, Materials, G/L accounts, and Contract accounts—is segregated by account type, so you can control periods for each one independently.
Copy posting periods to a new company code
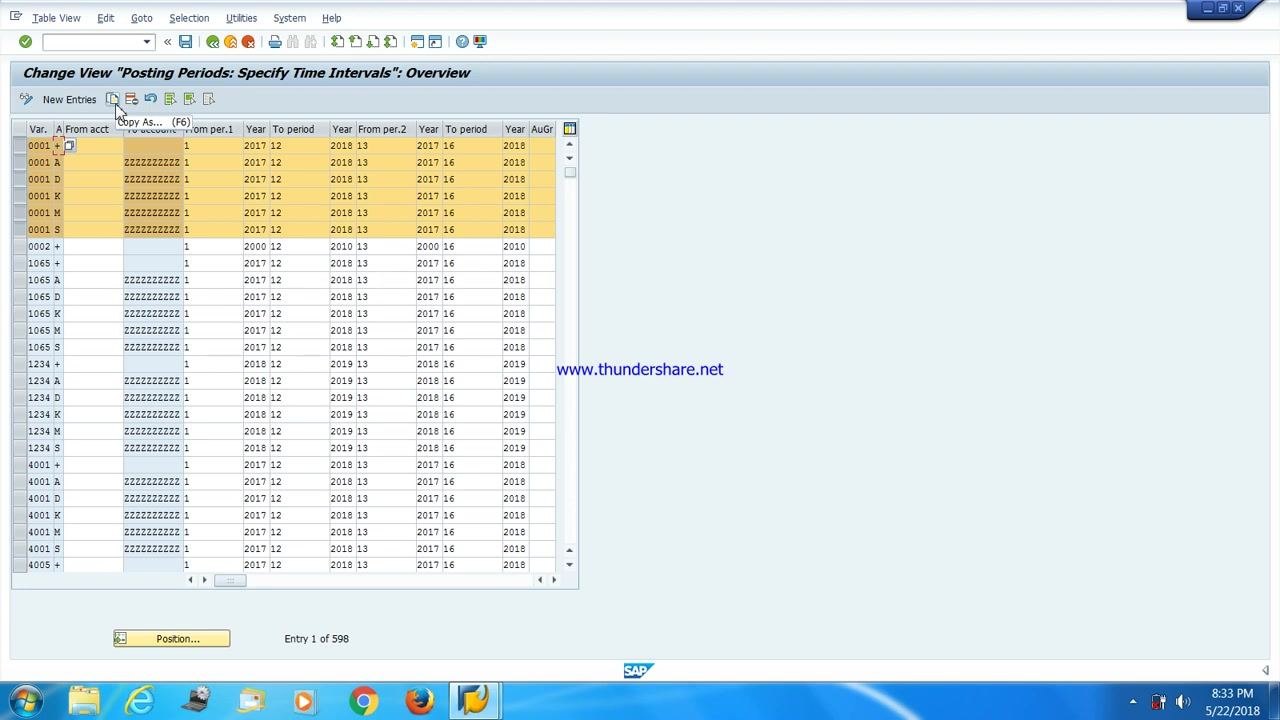
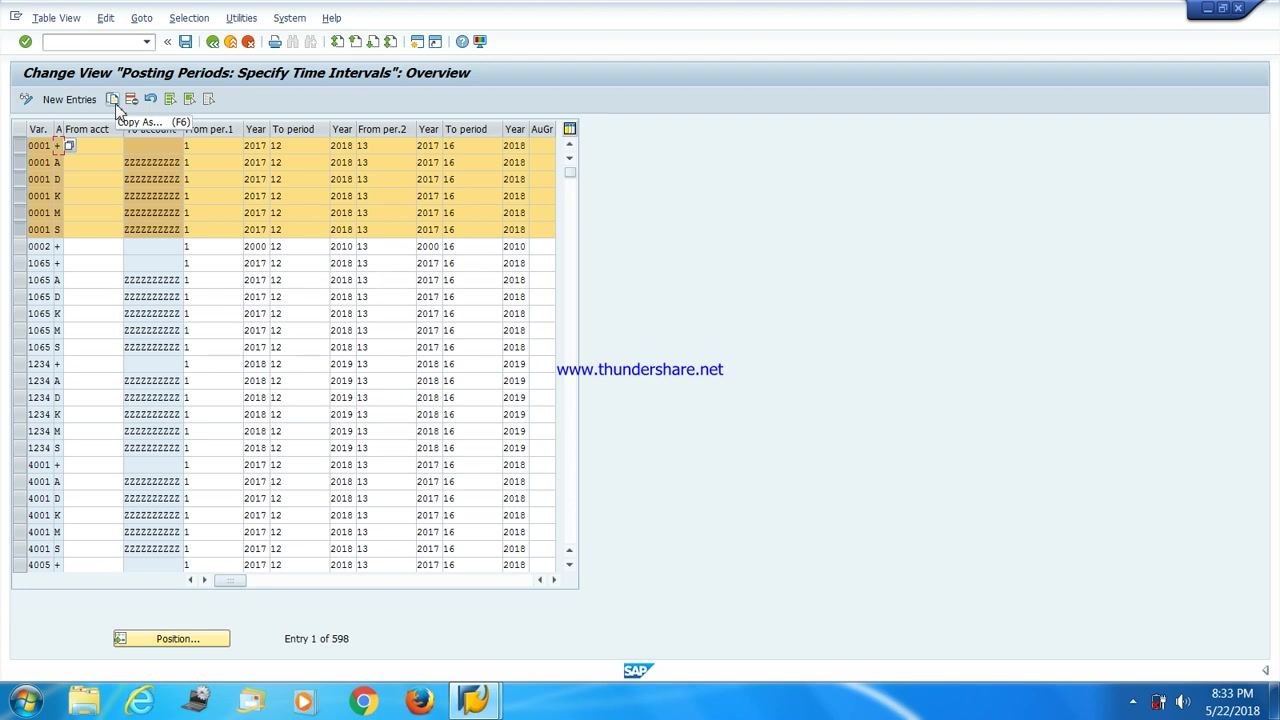
If you want to replicate the open and close posting period settings from one company code to another, use the Copy As... function. Select the rows for the source company code (for example, 0001), then press Shift + F6 or click Copy As... in the toolbar. This copies all open and close posting period settings from the selected company code.
Assign the variant to your company code
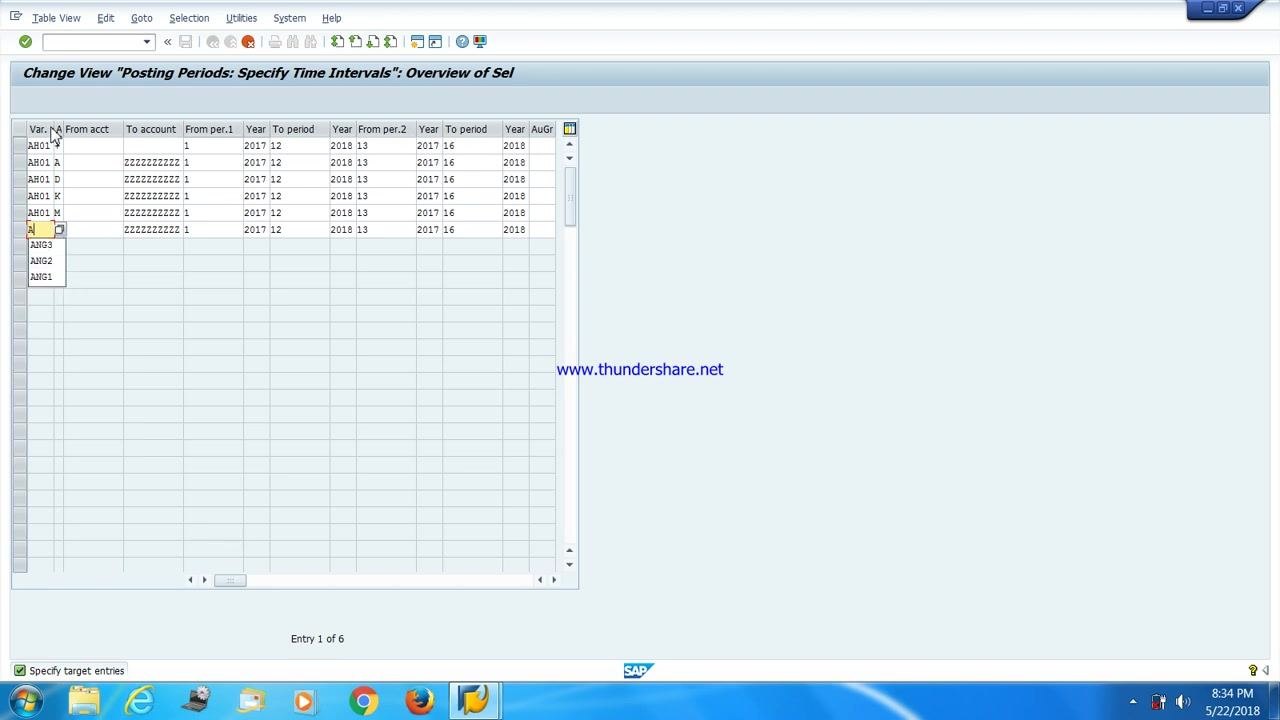
After copying, a new screen appears where you can assign the variant to your own company code. In the Var. column, select or enter the variant you created (for example, AH01). Use the dropdown list to choose your variant if needed.
Update all rows with your company code
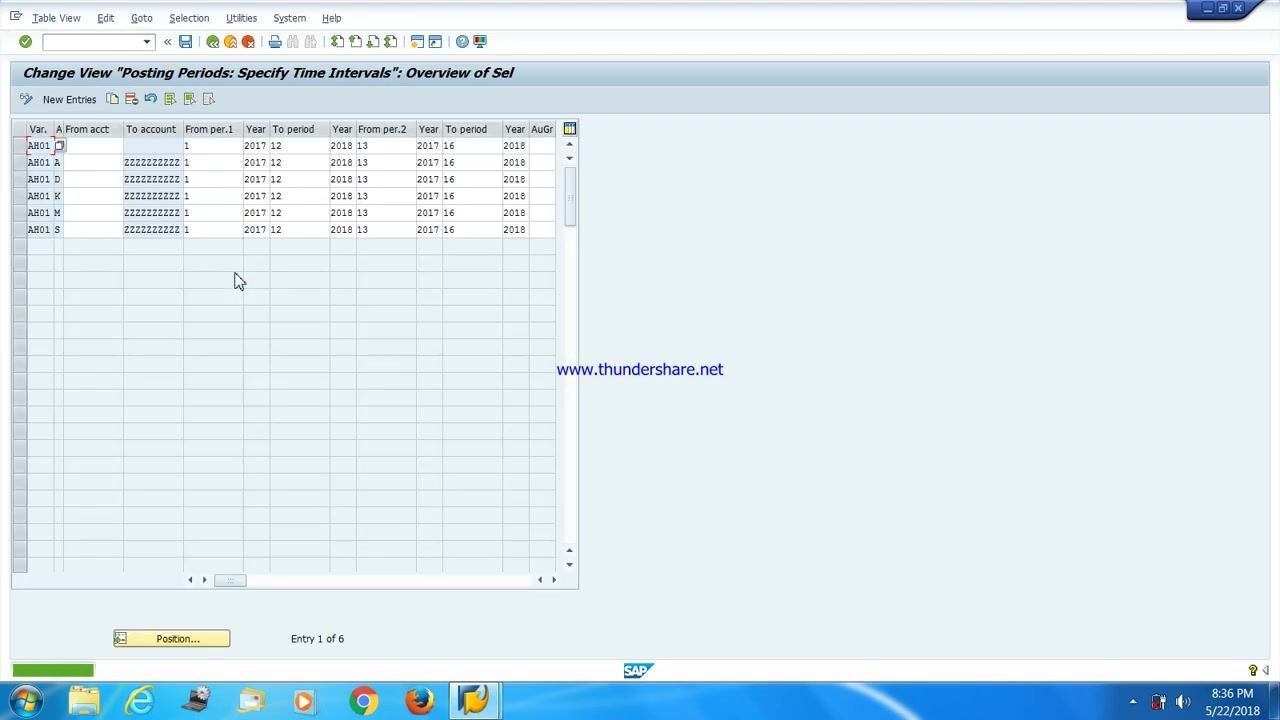
Change the Var. column for every relevant row to your company code (for example, AH01). Make sure each row for the different account types (A, D, K, M, S, V, or blank) reflects your company code. Leave the A column blank if you want the period to be valid for all account types, or set it to a specific type as needed.
Understand the account and period fields
Before finalizing your entries, review how the account and period fields affect posting:
- When From account and To account are left blank or set to
ZZZZZZZZZZ, the posting period settings apply to all G/L accounts. A blank orZZvalue makes the period "infinite," covering all G/L codes without restriction. - If you enter specific account numbers, the open or close period applies only to those accounts.
- The From period and To period fields define which posting periods are open. For example, setting From period to
1and To period to12opens all 12 months for posting. - Setting To period to
2opens only periods 1 and 2 for posting. - Confirm that the correct variant (for example,
AH01) is entered in the Var. column for all relevant rows.
Save and create a customizing request
Once all rows are correctly filled in for your company code and account types, click the save icon in the toolbar. The system prompts you to create a new customizing request for the change.
In the Create Request dialog, enter a short description such as "Creation of Open and Close Posting Period." Confirm that the Owner, Project, and Source client fields are correctly populated (for example, Owner: IV028, Source client: 001). Click the save icon in the dialog to complete the request creation.
Enter your company name in the customizing request
In the Create Request dialog, locate the Short Description field and enter text such as Creation of Open and Close Posting Period for AH01, replacing AH01 with your actual company code. Confirm that Owner is set to IV028 and Source client is 001. Review all fields for accuracy before proceeding.
Save the customizing request and verify
Click the save icon at the bottom of the Create Request dialog to confirm and save your customizing request. Wait for the system to process the request and return you to the main configuration screen.
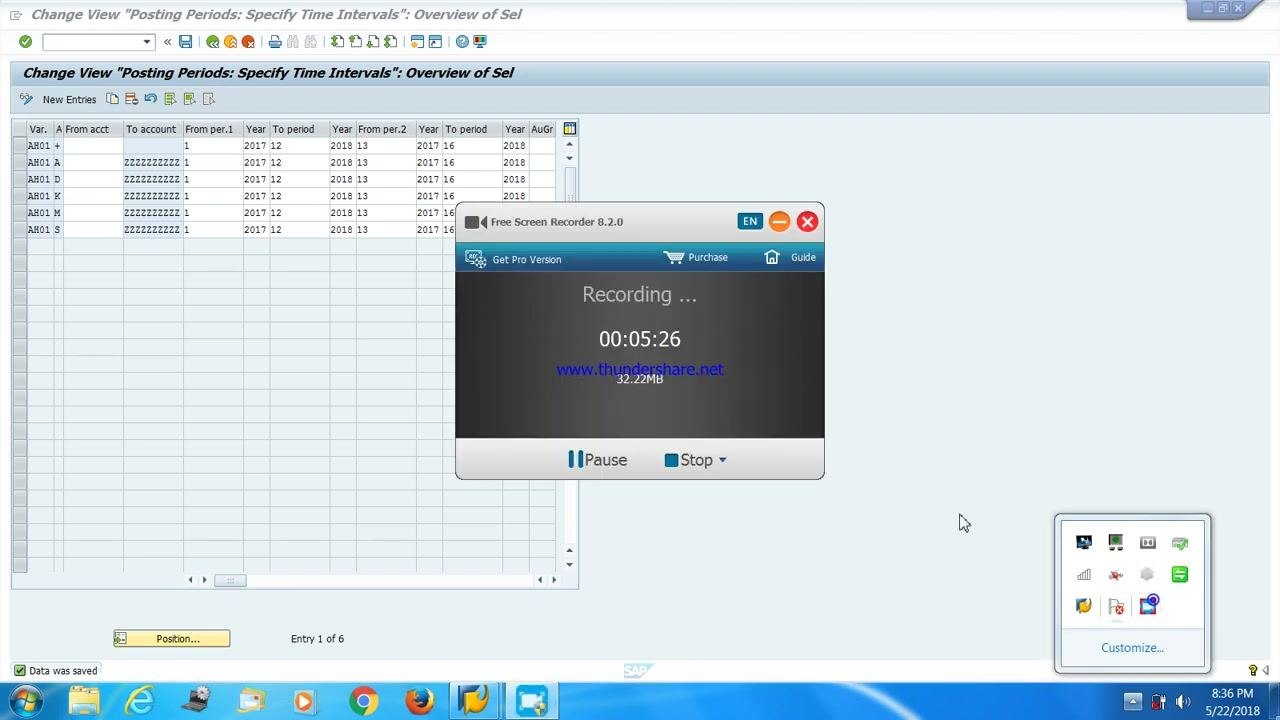
Look for the confirmation message "Data was saved" at the bottom left of the SAP window. Confirm that all your posting period intervals for your variant (for example, AH01) appear correctly in the overview table.
Summary
By following these steps, you can define which posting periods are open or closed for specific modules and company codes in SAP using transaction OB52. This gives you precise control over financial postings for each account type—including the MM module—and ensures your posting periods are correctly configured, copied where needed, and saved as a customizing request to support accurate financial management and compliance.
Generation details: cost, quality tiers
Docsie billed 3,000 credits ($2.10) to analyze this 6-minute video at standard quality. The rewrite, template fill and Word/PDF exports were included. The same video at each quality tier:
| Quality | Frames sampled | Credits | Approx. cost |
|---|---|---|---|
| Draft | every 16-30 s | 1,500 | $1.05 |
| Standard (this guide) | every 8-15 s | 3,000 | $2.10 |
| Detailed | every 4-7 s | 6,000 | $4.20 |
| Ultra | every 1-3 s | 12,000 | $8.40 |
Credits priced at $0.70 per 1,000; plans include a monthly allowance. Enterprise customers on on-premise or bring-your-own-model deployments run this on their own inference and pay no per-video credits.
Generated by Docsie Video-to-Docs on 2026-10-01 from a 5-minute video. Screenshots are frames from the source video and belong to their creator, NEW AURA, whose original is embedded above. If you own this video and want the guide removed or credited differently, contact us and we will act within one business day.