
How to Create a Warehouse in SAP
This guide shows you how to create a warehouse in SAP Warehouse Management by copying a standard reference warehouse number. You define the new warehouse number in the Customizing Implementation Guide (IMG), save it under a Customizing request, and verify it in the table view. The guide ends with an introduction to linking the warehouse number to a plant and storage location.
Video: How to create a new Warehouse Number in SAP - WM Org Structure Part1 by BHUPAL REDDY (2017). All credit for the demonstration goes to the creator; watch the original on YouTube. The written guide below was generated from this video by Docsie. Creator? Request a change or removal.
This guide shows you how to create a warehouse in SAP Warehouse Management by copying a standard reference warehouse number. You define the new warehouse number in the Customizing Implementation Guide (IMG), save it under a Customizing request, and verify it in the table view. The guide ends with an introduction to linking the warehouse number to a plant and storage location.
Prerequisites
Before you begin, make sure you have the following:
- A running SAP session with access to the SAP Easy Access main menu.
- A standard reference warehouse number to copy from, such as
001(Ind Central warehouse). - The details for your Customizing request: a request name, short description, owner, and source client.
SAP recommends copying an existing standard warehouse, such as 001, rather than creating a new entry from scratch. Copying ensures that all necessary configuration and reference data are included.
Open the warehouse number configuration
Step 1: Open the SAP Easy Access screen
Launch SAP and make sure you are on the SAP Easy Access main menu. The left navigation pane shows folders such as Favorites, SAP menu, Logistics, and Accounting.
Step 2: Open SPRO
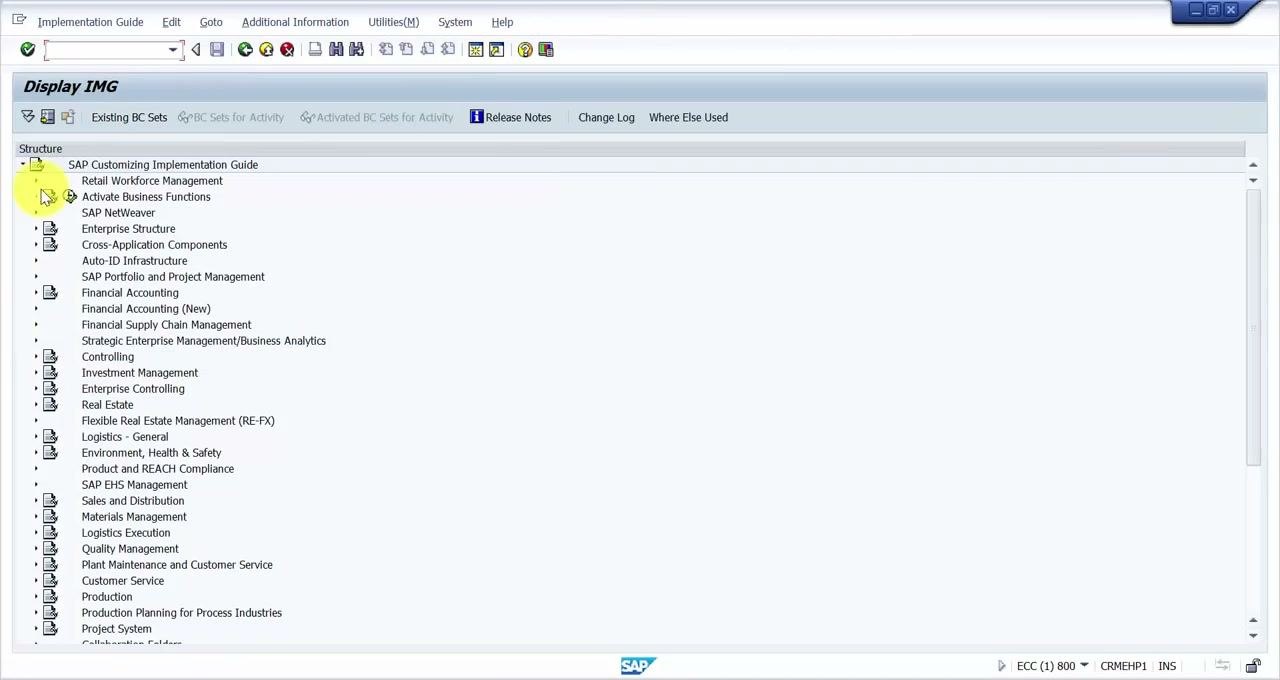
Enter the transaction code SPRO, or select the matching menu option, to open the SAP Customizing Implementation Guide (IMG).
Step 3: Expand Enterprise Structure, Definition, and Logistics Execution
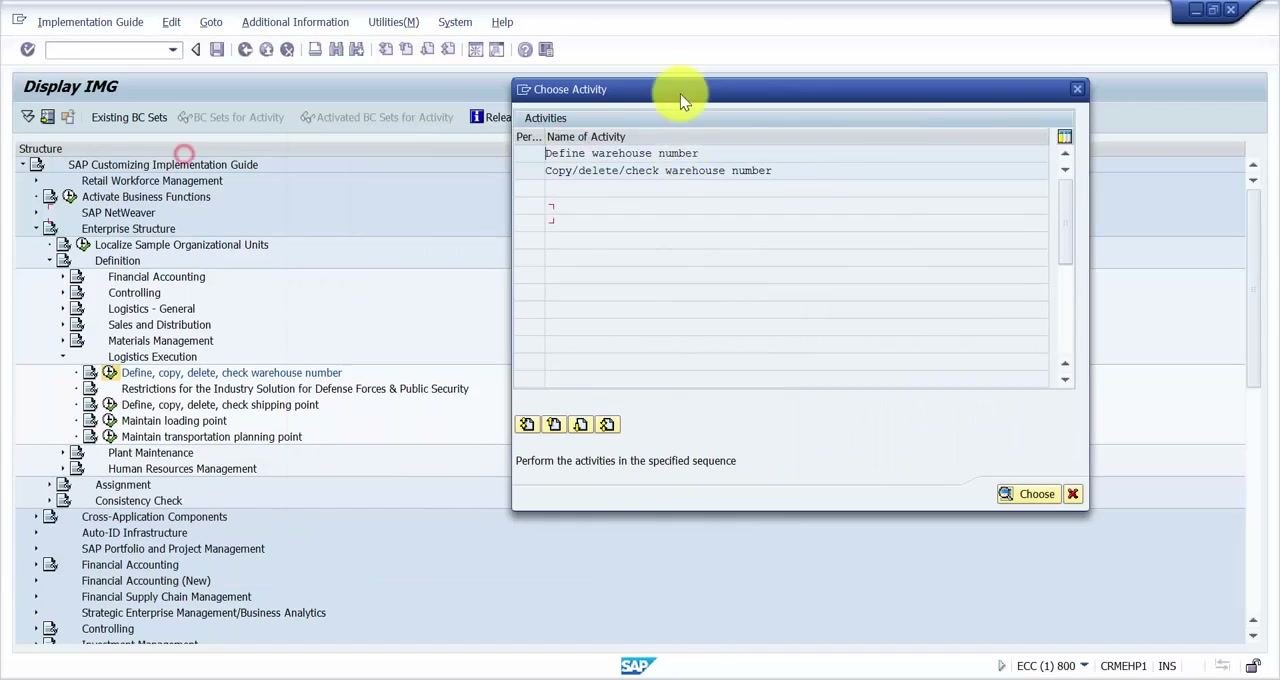
To start creating a warehouse in SAP, find the warehouse number settings in the IMG navigation tree:
- Expand the Enterprise Structure node.
- Expand the Definition sub-node.
- Expand the Logistics Execution node.
Step 4: Select the warehouse number activity
Under Logistics Execution, click Define, copy, delete, check warehouse number.
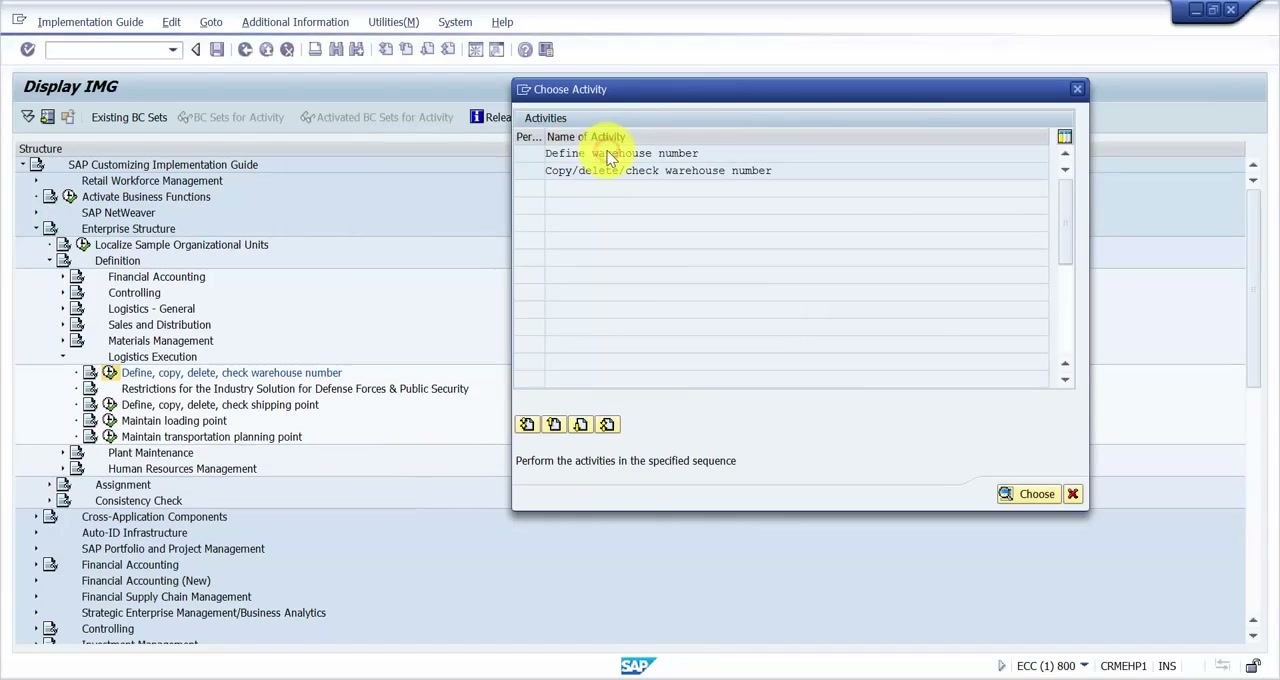
Step 5: Choose the activity
In the Choose Activity dialog, select either Define warehouse number or Copy/delete/check warehouse number, depending on your requirement. Then click Choose.
Copy the reference warehouse
Step 6: Locate the reference warehouse
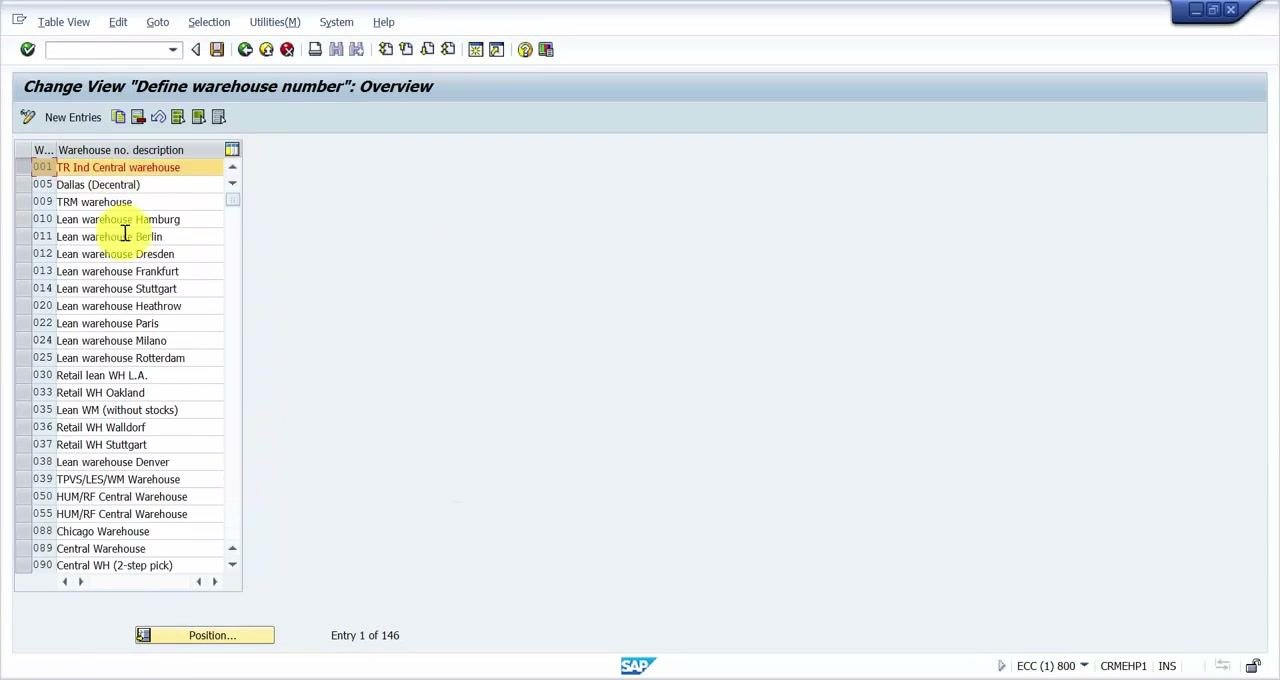
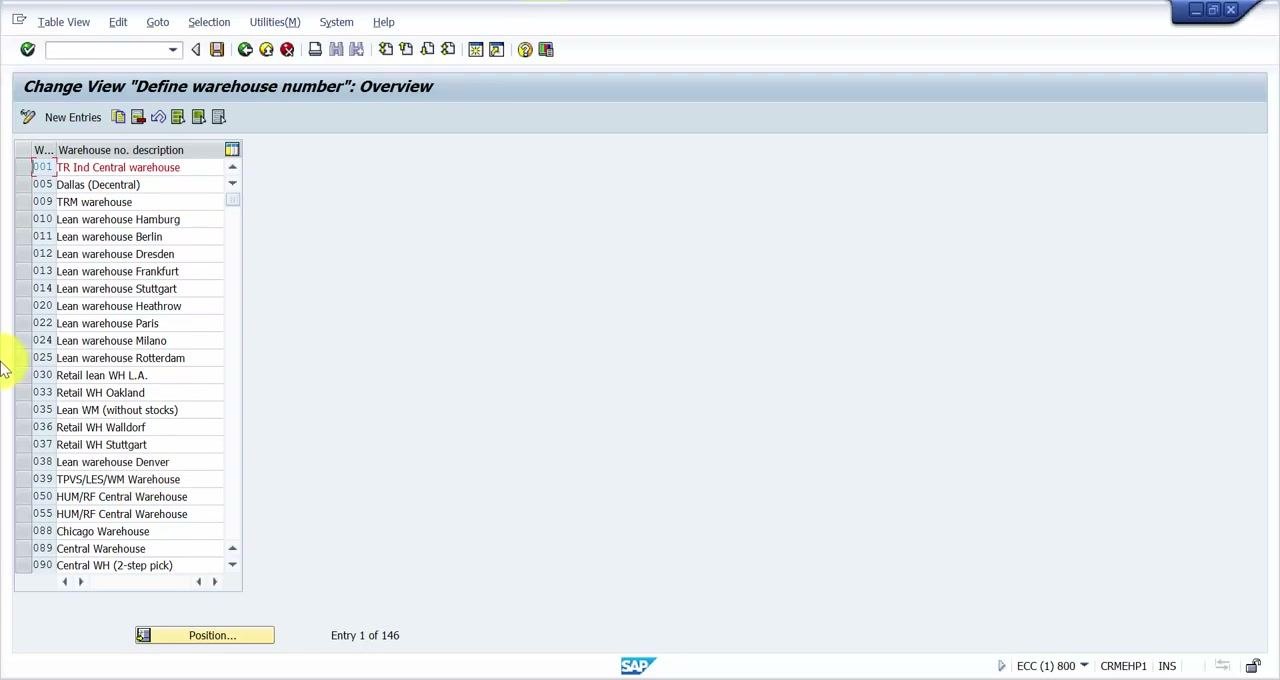
Scroll through the list, or use the Position... function, to find the standard reference warehouse number. This is commonly 001 Tr Ind Central warehouse. Confirm that this is the warehouse you want to use as a template for your new warehouse.
Step 7: Start the copy
Select the reference warehouse number (for example, 001). Then choose the Copy as function. You can click the Copy as button directly, or right-click and select the copy option.
Step 8: Enter the source and target warehouse numbers
In the copy dialog, fill in the following fields:
- From Warehouse No.: the warehouse number to copy from (for example,
W012). - To Warehouse No.: the new warehouse number to create (for example,
TIPorPIP, depending on your requirement).
Click the green checkmark button to continue.
Step 9: Acknowledge the transport number ranges information
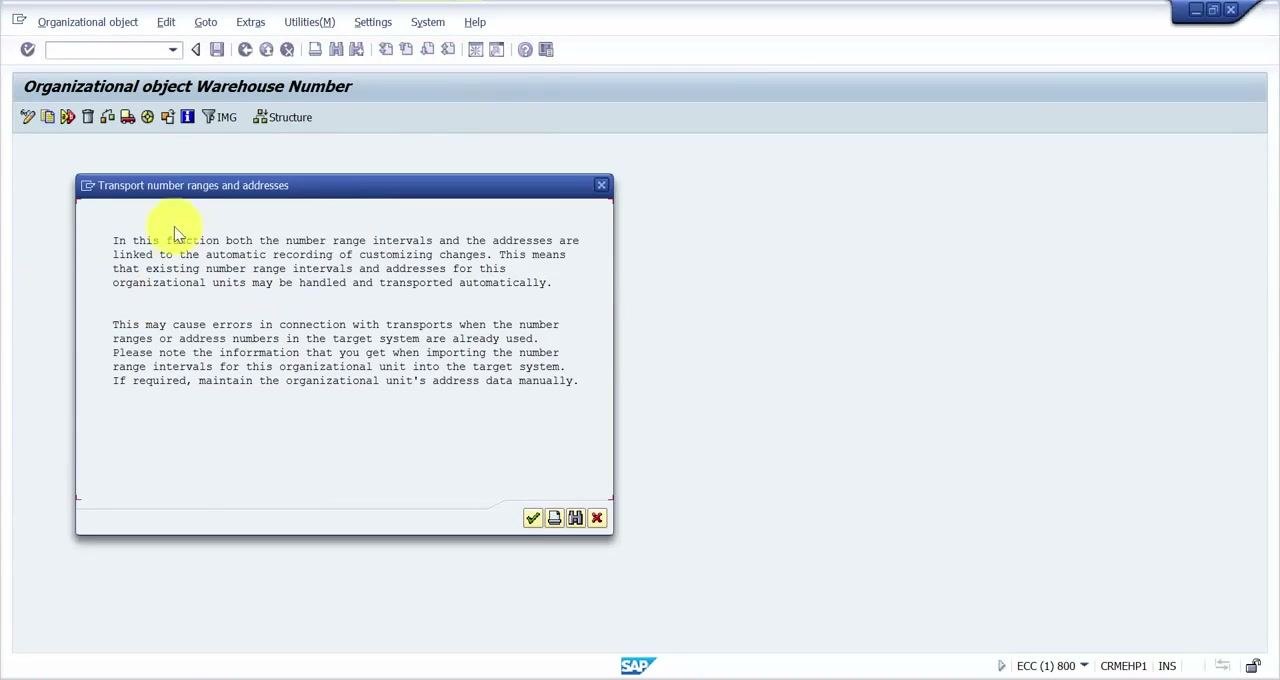
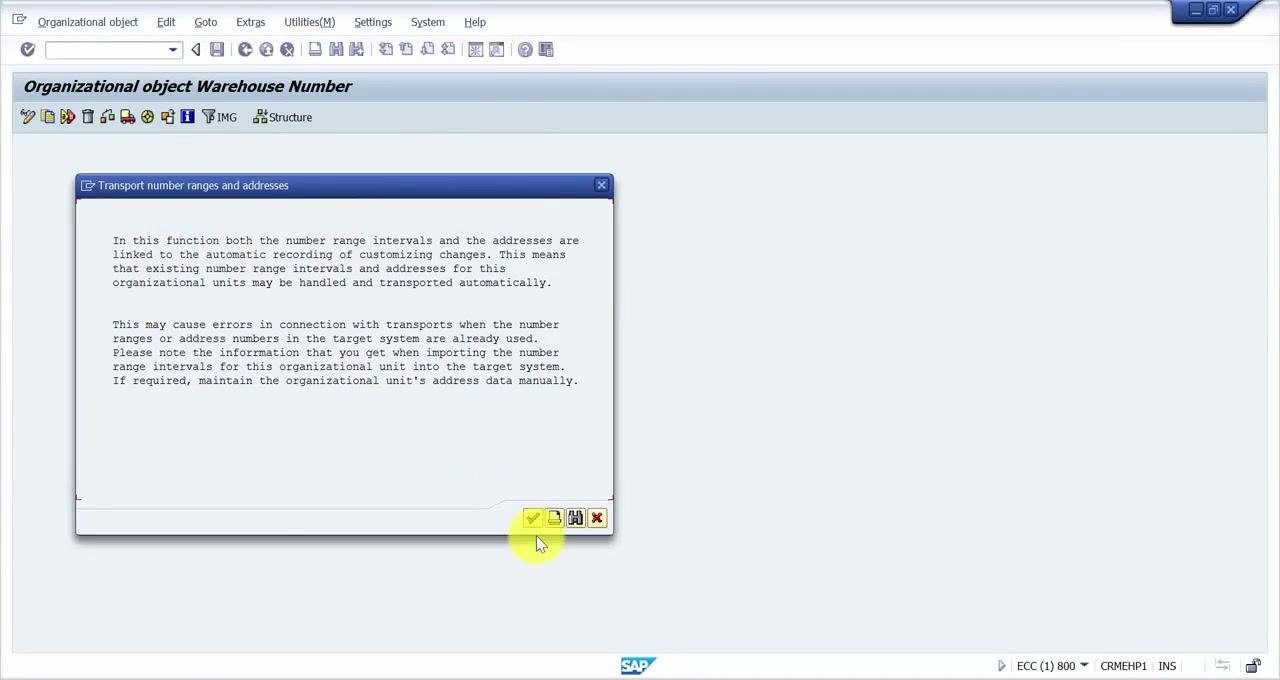
A dialog titled Transport number ranges and addresses explains that number range intervals and addresses are linked to the automatic recording of Customizing changes. Read the information, then click the green checkmark button to continue.
Step 10: Answer No to the number range transport prompt
When the system asks "Do you really want to transport number ranges?", click No. SAP recommends always selecting No so that transport numbers are not copied.
Step 11: Wait for the tables to be copied
The system copies the tables in the background. A progress indicator at the bottom of the screen shows the status, for example "39% of tables copied..." or "68% of tables copied...". Wait until the copying is complete.
Step 12: Confirm the Customizing request
The Prompt for Customizing request dialog shows the request number (for example, BCCK900743) and a short description (for example, sss warehouse - complete structure). Click the green checkmark button to continue.
Step 13: Acknowledge the copy confirmation
An information dialog confirms the copy, for example: "Warehouse Number 001 copied to TIP without 4 number range objects." Click the green checkmark button to close the message.
Step 14: Check that the new warehouse number exists
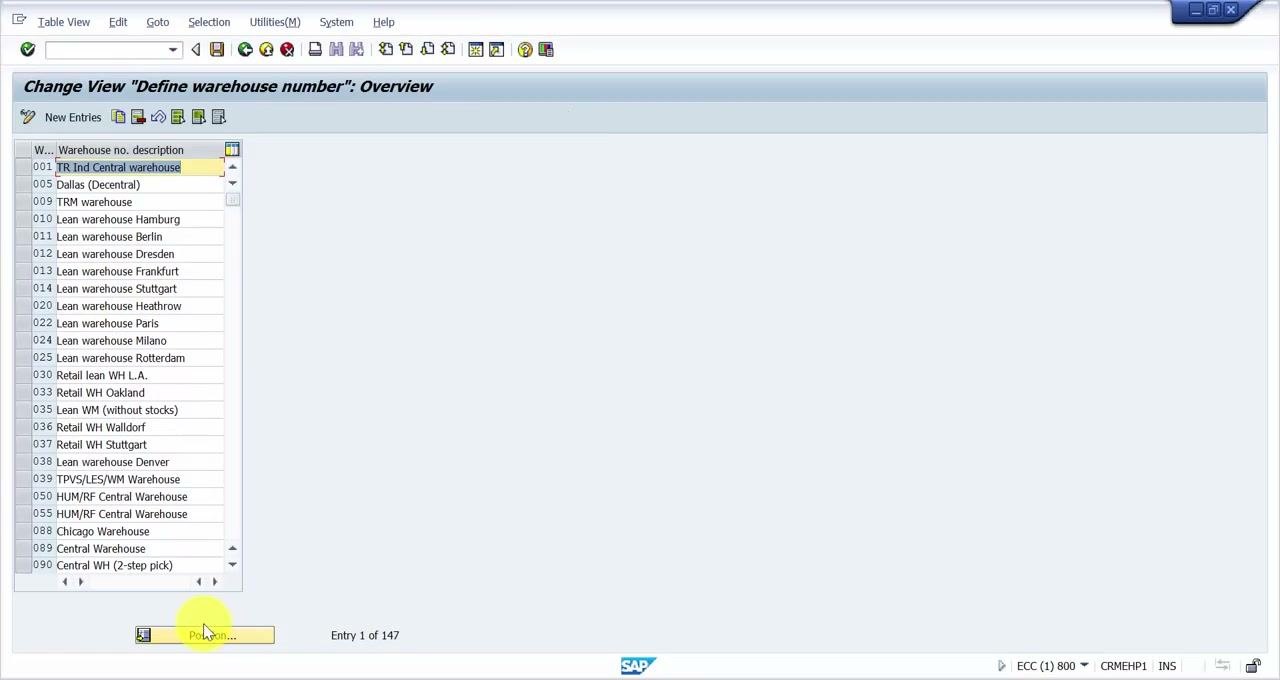
Return to the Change View "Define warehouse number": Overview screen. Click Position... at the bottom to find your new warehouse number (for example, TIP). Confirm that it appears in the list.
Save and verify the new warehouse number
Step 15: Edit the description and save
On the Change View "Define warehouse number": Overview screen, find your new warehouse number (for example, TIP). Edit the description field to the value you want, such as "New CENTRAL WAREHOUSE". Then click the save icon (floppy disk) in the toolbar.
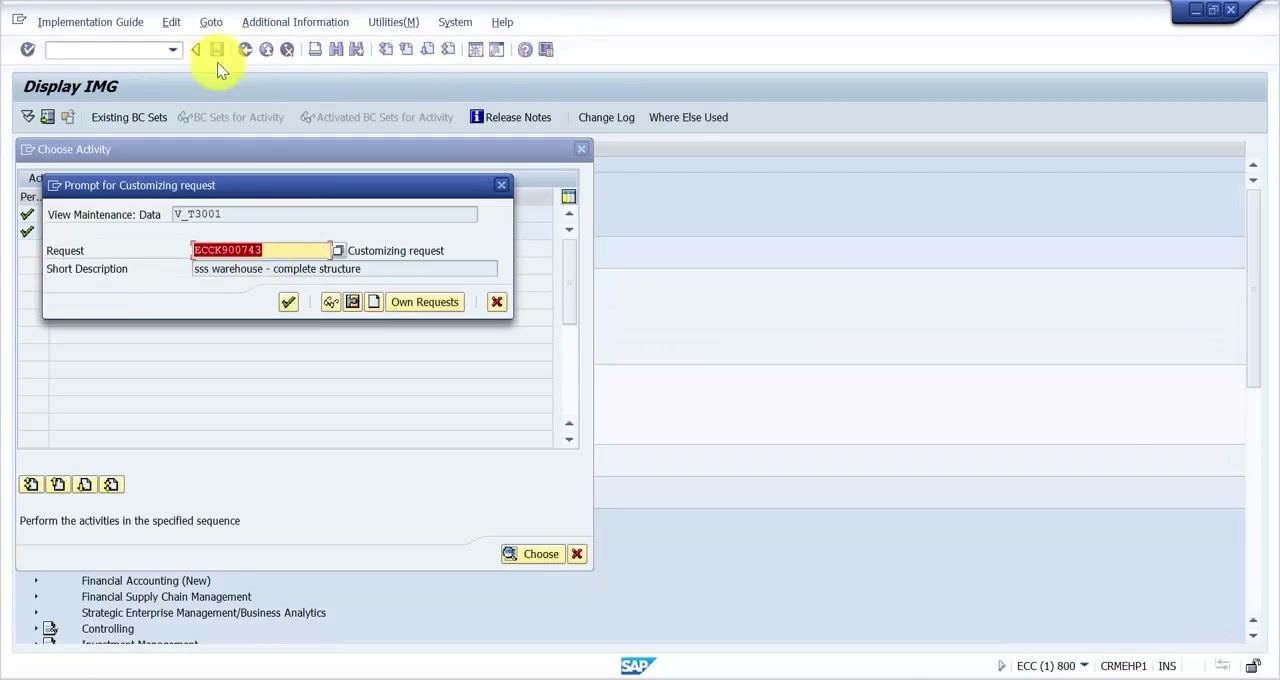
Step 16: Create a new Customizing request
When the Prompt for Customizing request dialog appears, click the icon to create a new request. In the Create Request dialog, enter the following details:
- Request: for example,
TIP : New Central Warehouse - Short Description: for example,
TIP : New Central Warehouse - Owner: for example,
BHUPAL - Source client: for example,
800
Click the save icon to create the request.
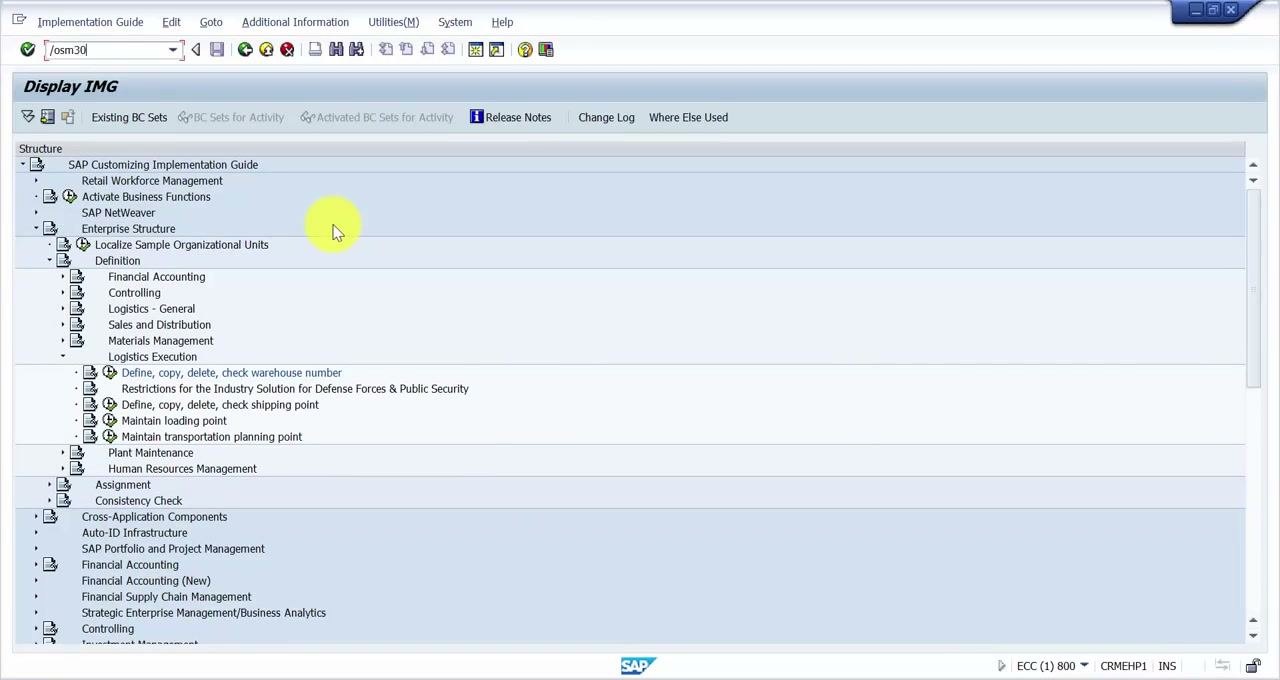
Step 17: Confirm the new request
The Prompt for Customizing request dialog appears again, now showing your new request number (for example, ECCR901860) and its description. Click the green checkmark button to continue.
Step 18: Open transaction SM30
To confirm the configuration was applied, open the table view:
- In the SAP GUI command field, enter
/nsm30and press Enter. The Maintain Table Views: Initial Screen opens. - In the Table/View field, enter the relevant table or view name (for example,
V_T320). - Click Display.
Step 19: Verify the new warehouse number in the table view
On the overview screen, review the list of warehouse numbers and descriptions. Use Position... if needed to find your new warehouse number (for example, TIP). Confirm that the number and its description (for example, "New CENTRAL WAREHOUSE") appear in the list.
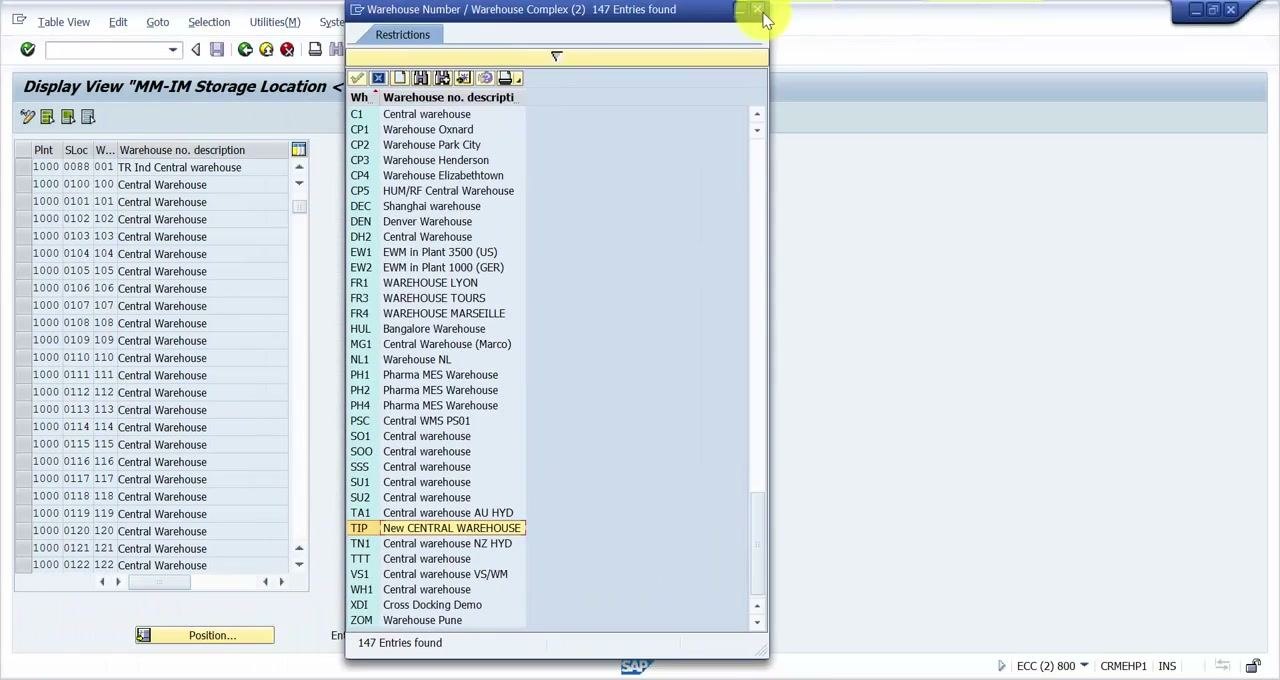
Always save your changes and confirm the creation of the Customizing request. Verifying the new warehouse number in the table view confirms that the configuration was applied.
Start linking the warehouse number to a plant and storage location
After you create a warehouse in SAP, you can begin linking it to a plant and storage location.
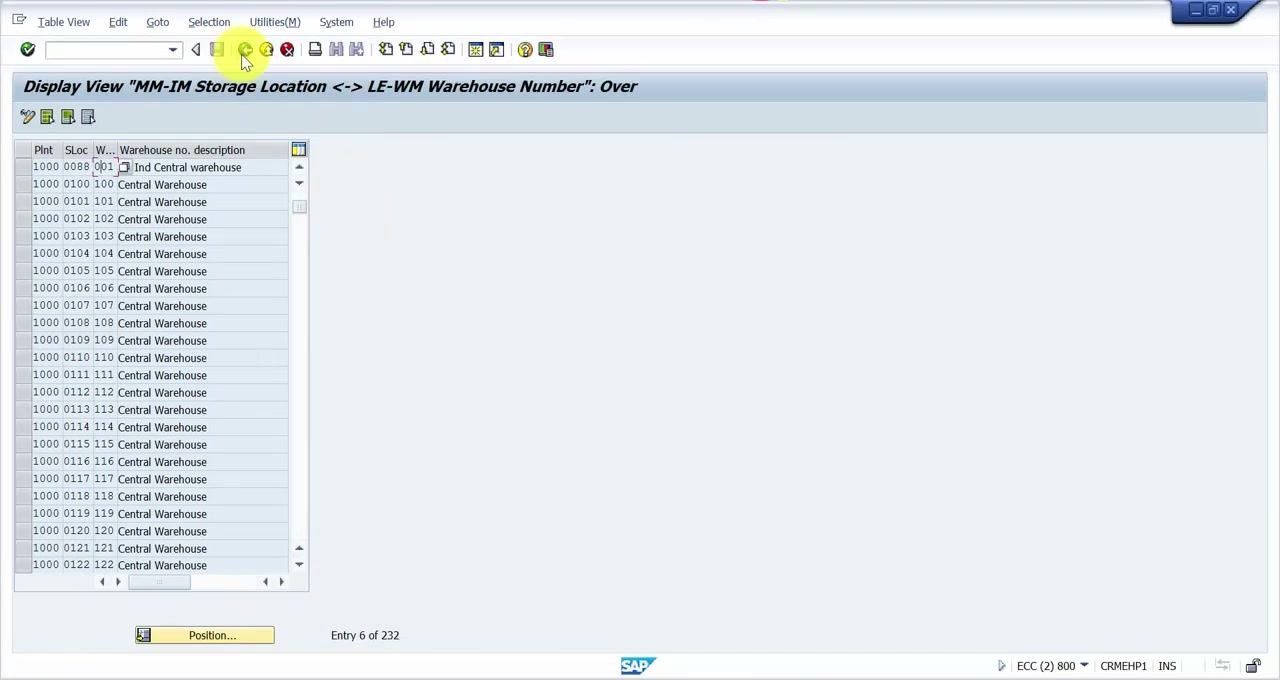
Step 20: Open the warehouse number assignment view
Open the screen titled Display View "MM-IM Storage Location <-> LE-WM Warehouse Number": Overview. It lists the existing assignments between plants, storage locations, and warehouse numbers. Each row contains these columns:
- Plnt: the plant code (for example,
1000). - SLoc: the storage location (for example,
0088). - Whse no.: the warehouse number (for example,
001). - Warehouse no. description: for example,
Ind Central warehouseorCentral Warehouse.
Use the scroll bar to browse the list, or click Position... to find a specific entry.
Step 21: Return to Maintain Table Views to change assignments
To change or add an assignment, return to the Maintain Table Views: Initial Screen. Enter the table or view name (for example, V_T320) in the Table/View field. Then choose the action you need:
- Click Display to view existing entries.
- Click Maintain to add or edit assignments.
- Use Transport or Customizing as your configuration process requires.
What's next
Linking a warehouse number to a plant and storage location integrates Warehouse Management (WM) with Inventory Management (IM) in SAP. Make sure you select the correct plant, storage location, and warehouse number for your business requirements. For detailed steps on creating or editing these assignments, refer to the next section of your training material.
Summary
You now know how to create a warehouse in SAP Warehouse Management using the standard copy method. You copied a reference warehouse number, declined the number range transport, and confirmed the Customizing request. You then edited the description, saved it under a new Customizing request, and verified the result in transaction SM30. Finally, you reviewed the assignment view used to link the warehouse to a plant and storage location.
Generation details: cost, quality tiers
Docsie billed 3,000 credits ($2.10) to analyze this 6-minute video at standard quality. The rewrite, template fill and Word/PDF exports were included. The same video at each quality tier:
| Quality | Frames sampled | Credits | Approx. cost |
|---|---|---|---|
| Draft | every 16-30 s | 1,500 | $1.05 |
| Standard (this guide) | every 8-15 s | 3,000 | $2.10 |
| Detailed | every 4-7 s | 6,000 | $4.20 |
| Ultra | every 1-3 s | 12,000 | $8.40 |
Credits priced at $0.70 per 1,000; plans include a monthly allowance. Enterprise customers on on-premise or bring-your-own-model deployments run this on their own inference and pay no per-video credits.
Generated by Docsie Video-to-Docs on 2026-11-15 from a 5-minute video. Screenshots are frames from the source video and belong to their creator, BHUPAL REDDY, whose original is embedded above. If you own this video and want the guide removed or credited differently, contact us and we will act within one business day.