
How to Create a Movement Type in SAP
This guide shows you how to create a movement type in SAP MM by copying a standard movement type. In this example, you create Z66 (Posting Inventory Without Purchase Order) from standard movement type 501 and make three fields mandatory. You then create a G/L account for it, post a goods receipt with the new movement type, and verify the result in the material document list.
Video: create movement types | create new movement type in sap mm | how to create movement type in sap mm by LEARN2WIN SAP | SAP Training & Placement | S4HANA (2024). All credit for the demonstration goes to the creator; watch the original on YouTube. The written guide below was generated from this video by Docsie. Creator? Request a change or removal.
This guide shows you how to create a movement type in SAP MM by copying a standard movement type. In this example, you create Z66 (Posting Inventory Without Purchase Order) from standard movement type 501 and make three fields mandatory. You then create a G/L account for it, post a goods receipt with the new movement type, and verify the result in the material document list.
Prerequisites
Before you start, make sure you have the following:
- A request to create movement type Z66: Posting Inventory Without Purchase Order, for example from a support ticket.
- The mandatory fields for Z66: Vendor, Text, and G/L Account.
- Access to the transactions used in this guide:
OMJJ,FS00, the Goods Receipt Other transaction, andMB51. - A plan to create a G/L account for this movement type.
Create the movement type
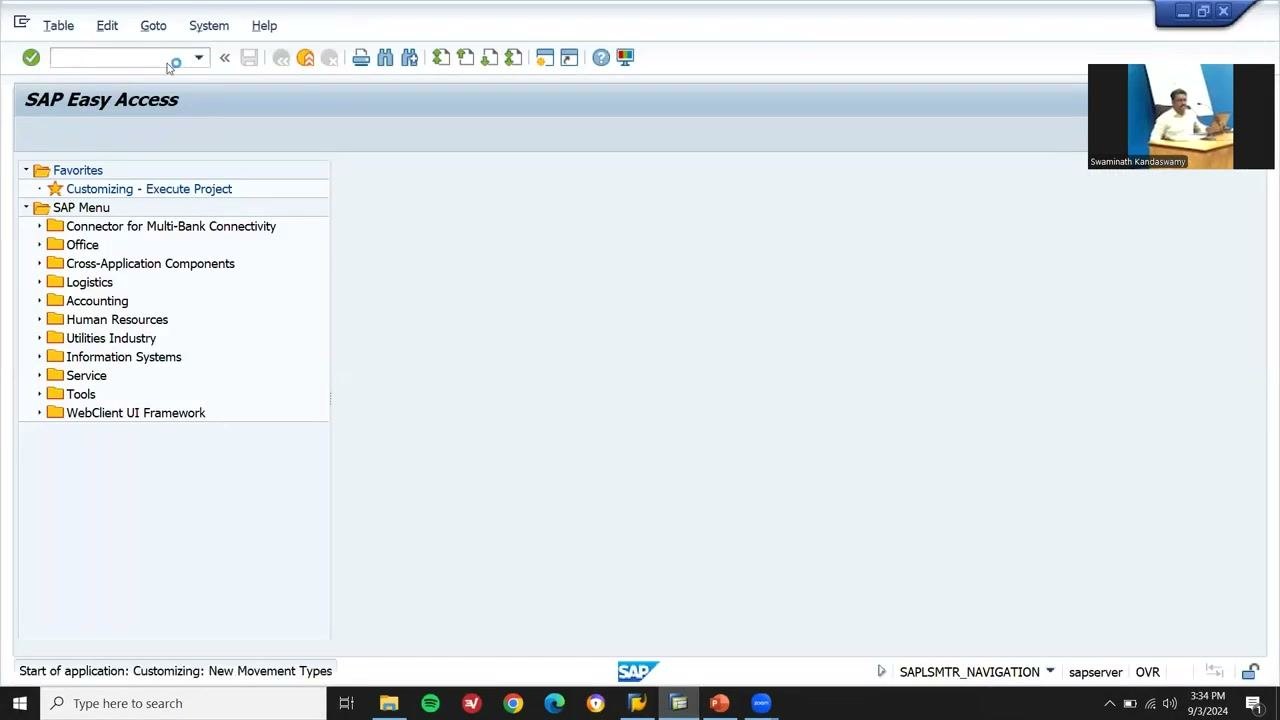
Step 1: Open the SAP Easy Access screen
Open SAP and make sure you are on the SAP Easy Access screen.
Step 2: Open transaction OMJJ and select Movement Type
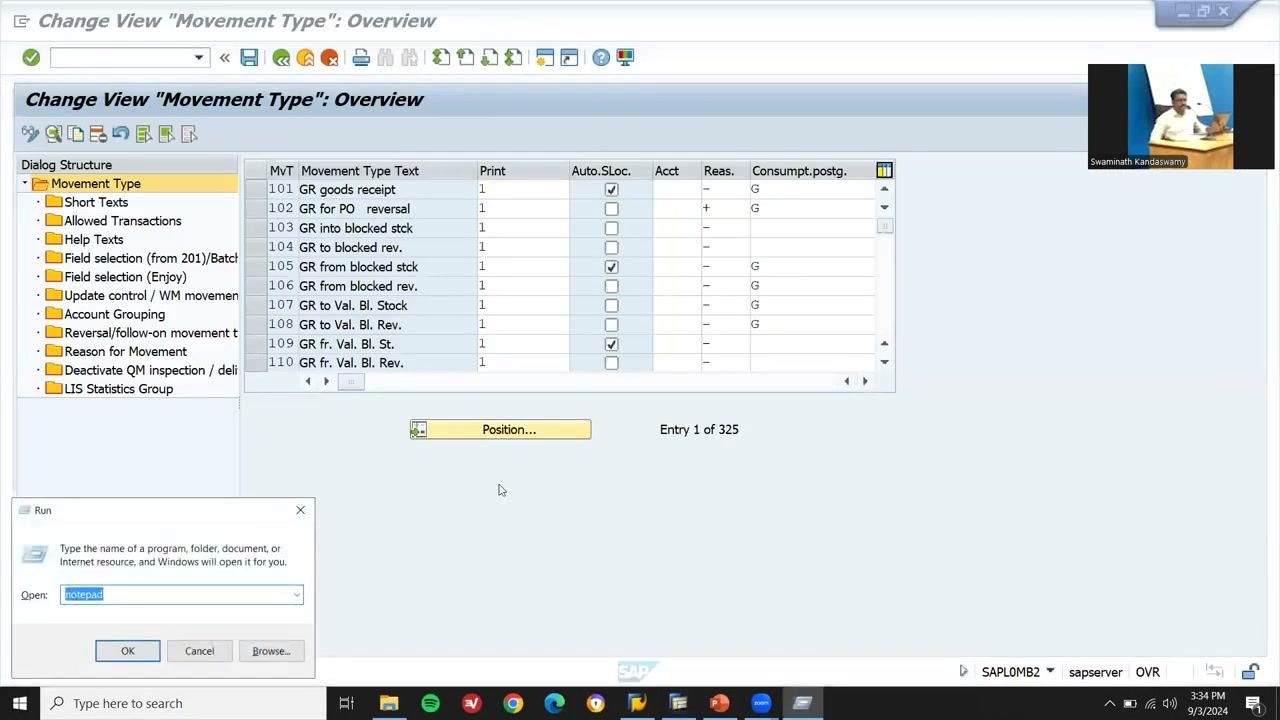
- In the command field, enter
OMJJand press Enter. - On the "View Cluster Editing: Initial Screen," make sure the Movement Type checkbox is selected in the Field Selection dialog.
- Click the green checkmark or press Enter to continue.
Step 3: Locate standard movement type 501
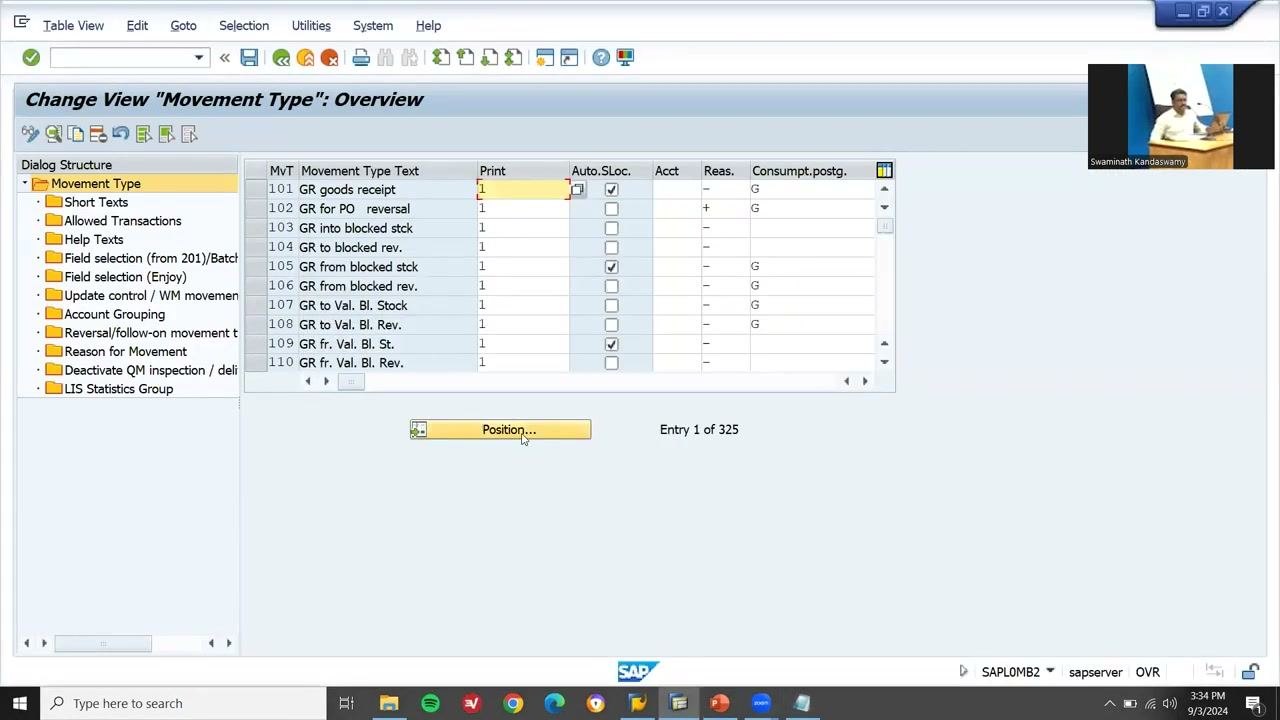
On the "Change View 'Movement Type': Overview" screen, find movement type 501 (Receipt w/o PO). This is the standard movement type for posting inventory without a purchase order. Use the Position button to find it quickly.
Step 4: Copy movement type 501 to create Z66
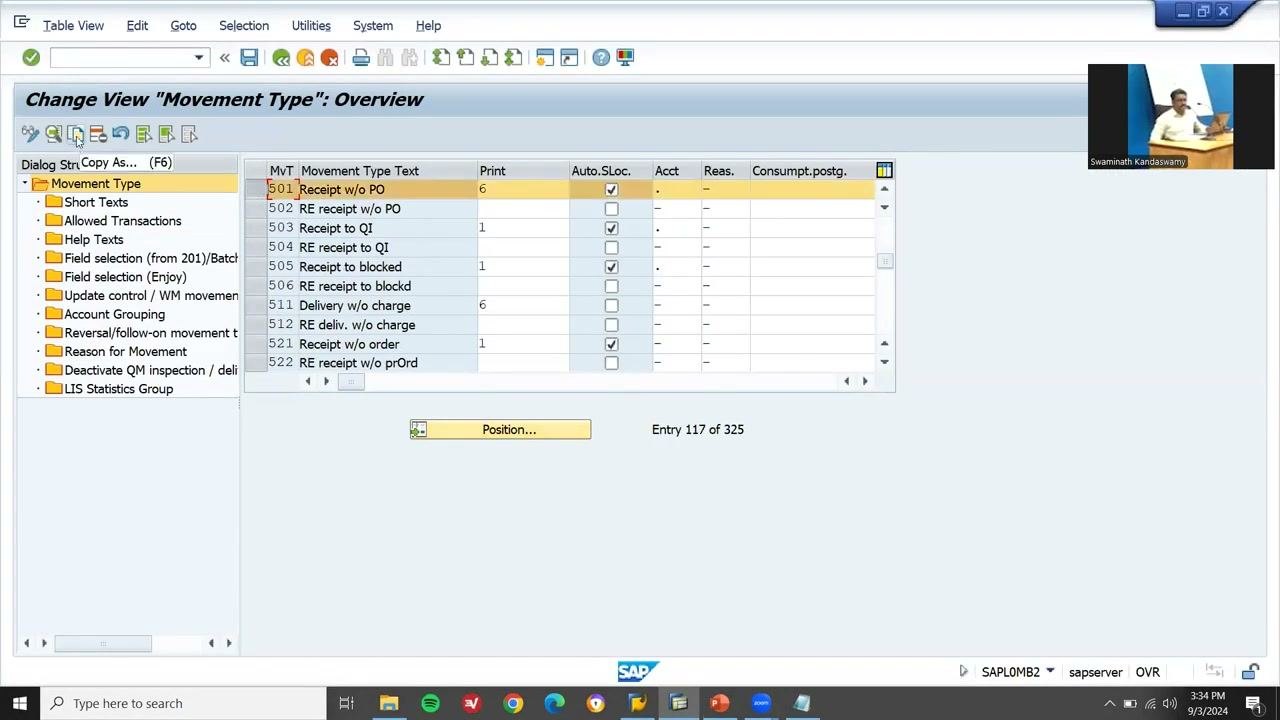
To create a movement type in SAP, copy the closest standard one.
- Select movement type 501 in the list.
- Click Copy As or press F6.
- In the dialog, enter the new movement type code Z66.
- Press Enter.
Step 5: Copy all dependent entries
When the "Specify object to be copied" dialog appears, select Copy All. This includes all dependent entries in the new movement type.
Step 6: Save the new movement type
Review the details for movement type Z66. Then press Ctrl+S or click the Save icon.
Configure field selection for Z66
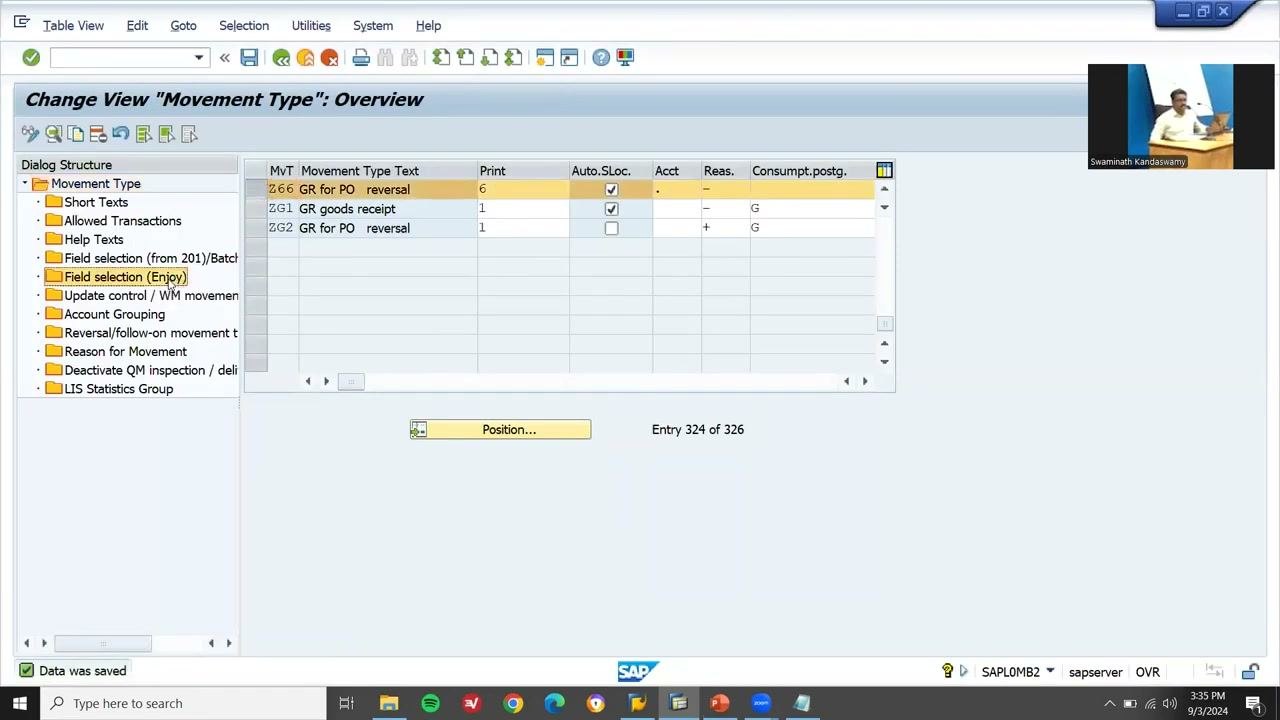
Step 7: Open Field selection (Enjoy)
- On the "Change View 'Movement Type': Overview" screen, find Field selection (Enjoy) in the Dialog Structure on the left.
- Double-click Field selection (Enjoy) to open the field selection overview for Z66.
Step 8: Set the mandatory fields
The "Change View 'Field selection (Enjoy)': Overview" screen lists these fields for Z66:
- KONTO (Account)
- KUNNR (Vendor)
- LIFNR (Vendor)
- SGTXT (Text)
- WEMPF (G/L Account)
Decide which fields are mandatory (Required Entry) and which are optional (Optional Entry). Set these fields to Required Entry:
- Z66 KUNNR (Vendor)
- Z66 SGTXT (Text)
- Z66 WEMPF (G/L Account)
Set the other fields to Optional Entry if they are not required. Then confirm that KUNNR, SGTXT, and WEMPF are all set to Required Entry.
Create the G/L account for Z66
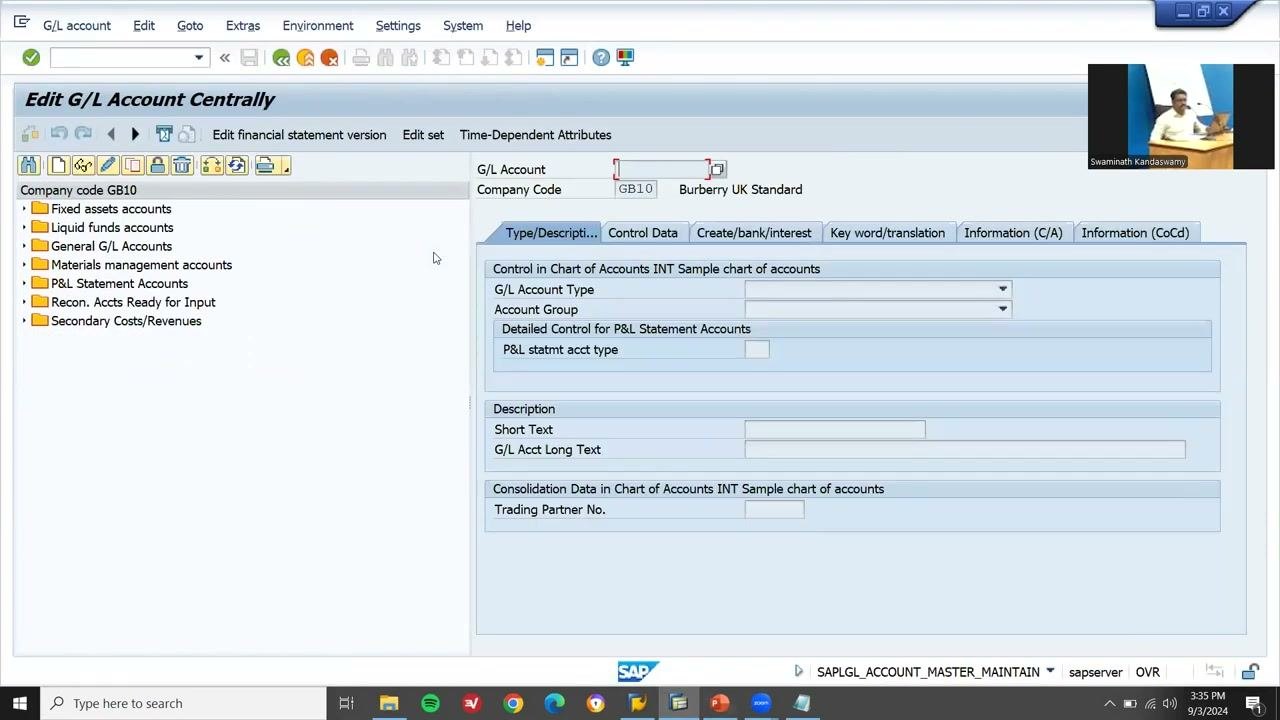
Step 9: Open FS00 and find a reference account
- Open transaction
FS00. - On the "Edit G/L Account Centrally" screen, make sure the correct company code is selected, for example GB10.
- In the left navigation pane, expand Materials management accounts.
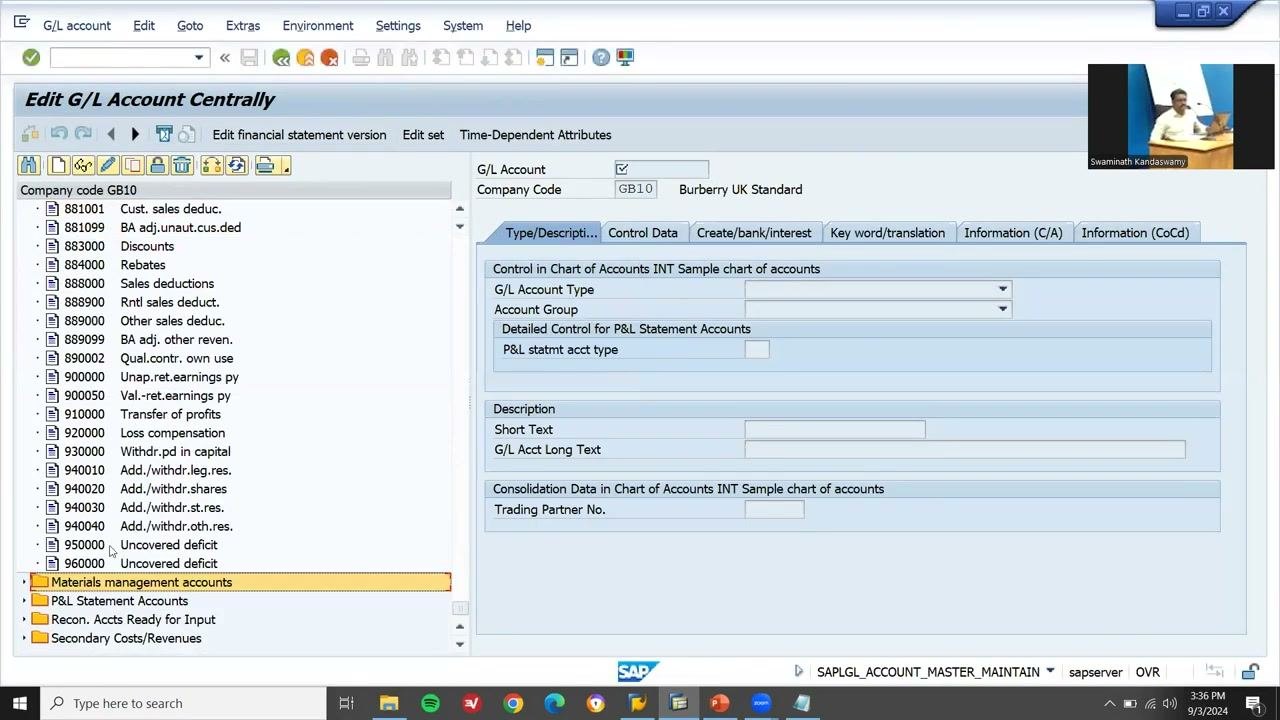
Step 10: Copy an existing raw material account
- Locate an existing raw material account, for example 300000 Raw material 1.
- Select the account and choose Copy As.
- In the "Copy G/L account" dialog, enter these values:
- Reference G/L acct: 300000
- Ref. company code: GB10
- G/L Account: 300006 (the new account number for Z66)
- Company Code: 300005 (if applicable)
- Click the green checkmark to proceed.
Step 11: Enter the new account details
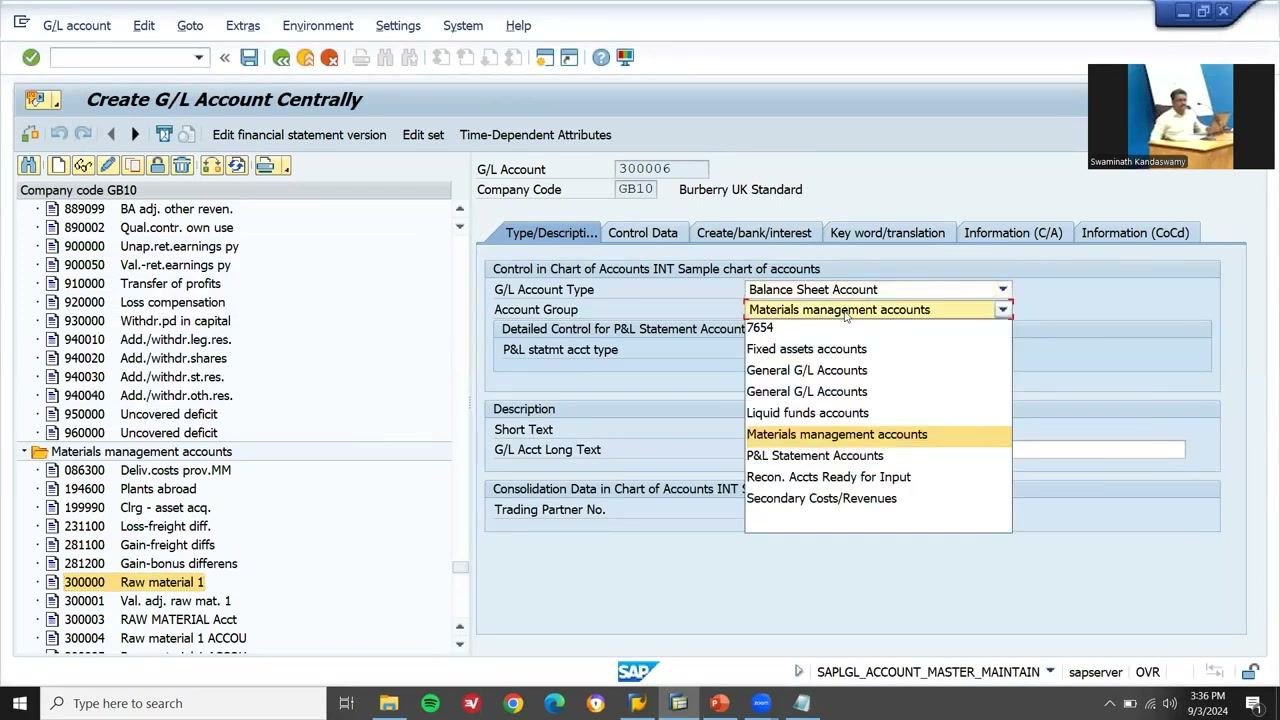
On the "Create G/L Account Centrally" screen, fill in the details for the new account:
- G/L Account: 300006
- Company Code: GB10
- Account Group: Materials management accounts
- G/L Account Type: Balance Sheet Account
- Short Text: Raw material for Z66 movement
- Long Text: Raw material for Z66 movement (or as required)
Fill in all other relevant fields according to your organization's requirements.
Step 12: Complete the Control Data tab
- Go to the Control Data tab.
- Enter Short Text: Raw material Z66 MVT.
- Enter G/L Acct Long Text: Raw material 1 Z66 MVT TYPE.
- Make sure G/L Account Type is Balance Sheet Account and Account Group is Materials management accounts.
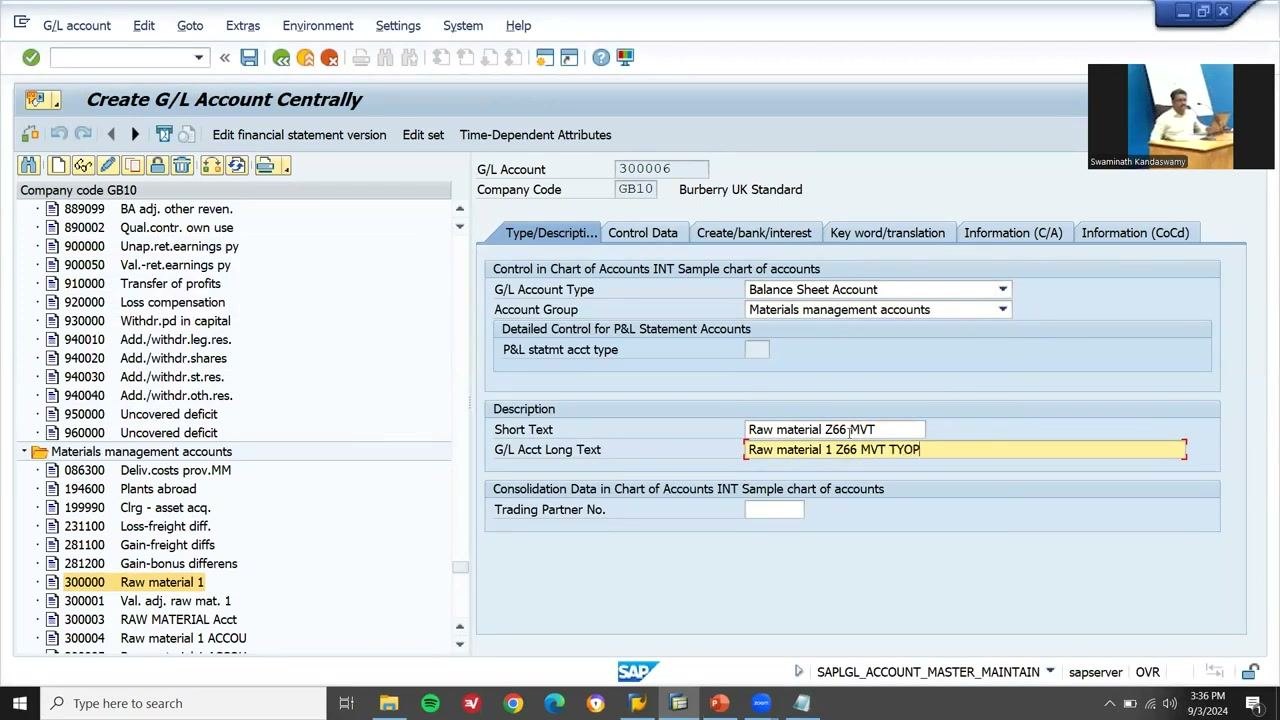
Step 13: Set the currency options
- Switch to the Create/bank/interest tab.
- Set Account Currency to GBP (British Pound).
- Select Balances in Local Crcy Only.
Leave other fields at their defaults unless your organization specifies otherwise.
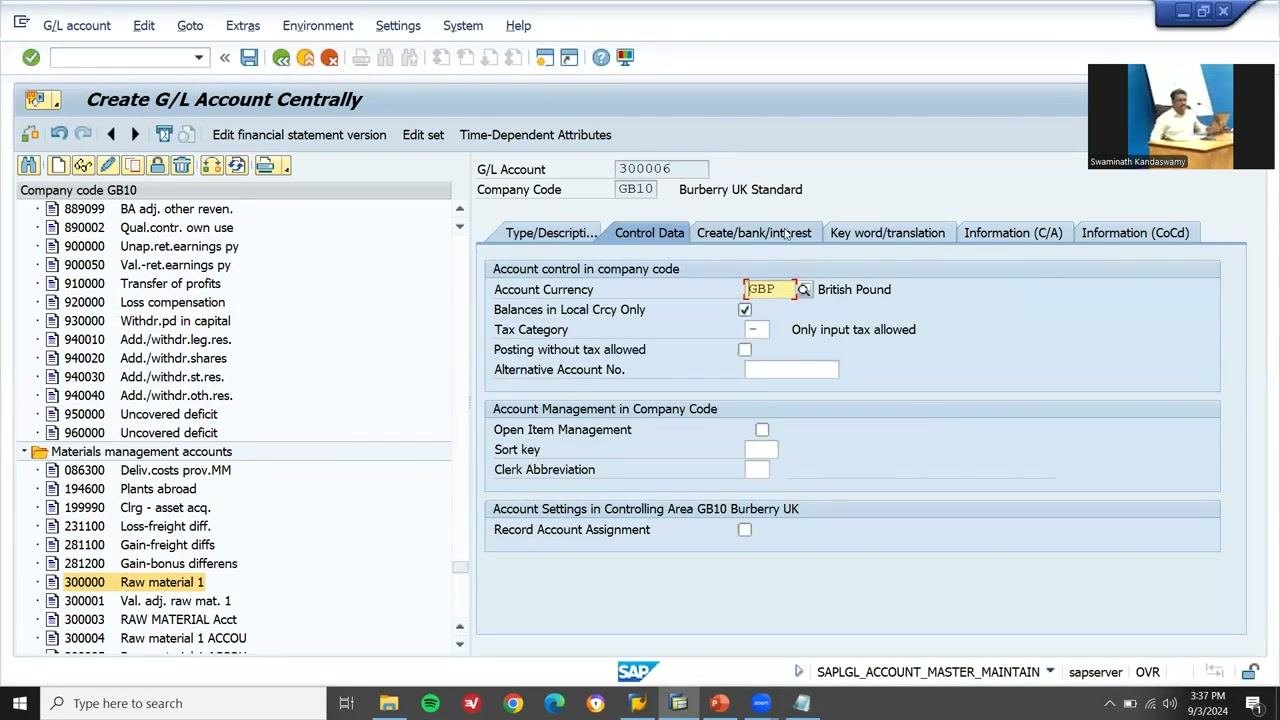
Step 14: Set the field status group and save
- On the Create/bank/interest tab, set Field status group to G006 (Material accounts).
- Select Post Automatically Only if required.
- Save the G/L account.
Step 15: Confirm the new account
Confirm that the new account (300006 Raw material Z66 MVT) appears under Materials management accounts in the account list. Then click the green checkmark or the save icon to finish and exit the G/L account creation screen.
Post a goods receipt with movement type Z66
Step 16: Start the goods receipt posting
- Open the "Goods Receipt Other - SAPL2W09" transaction.
- On the "Goods Receipt" screen, select "Other" as the document type.
- Enter these details:
- Document Date: 03.09.2024
- Posting Date: 03.09.2024
- Movement Type: Z66
- Plant: AMRITHA PLANT
- Storage Location: FIRST STOR LOC
- Quantity: 10 (EA)
- Material: BATCH MATERIAL
- Make sure "Receipt w/o PO" is checked and "Stock type" is set to "Unrestricted-Use".
- Click "Post" to attempt the posting.
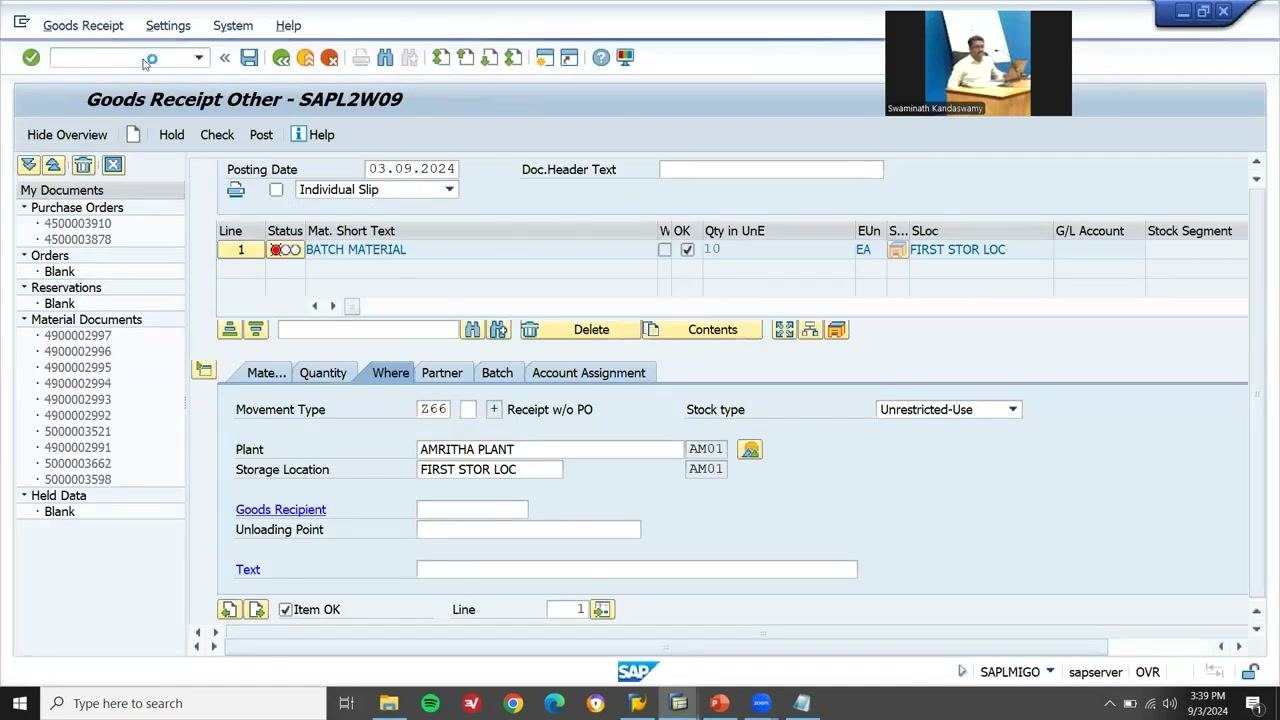
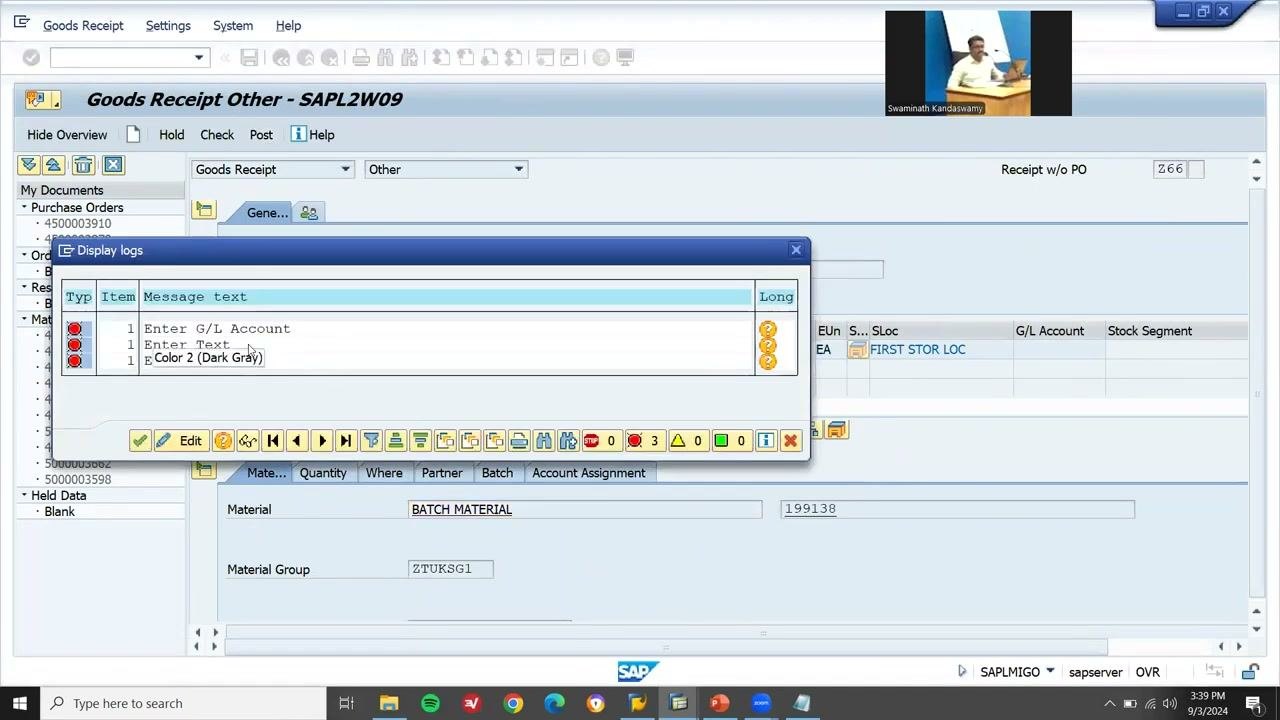
Step 17: Review the missing field messages
If required fields are missing, a "Display logs" window opens with error messages such as:
- "Enter G/L Account"
- "Enter Text"
- "Enter Vendor"
These messages confirm that the mandatory fields you configured for Z66 are enforced. Review them, then close the log window to return to the entry screen.
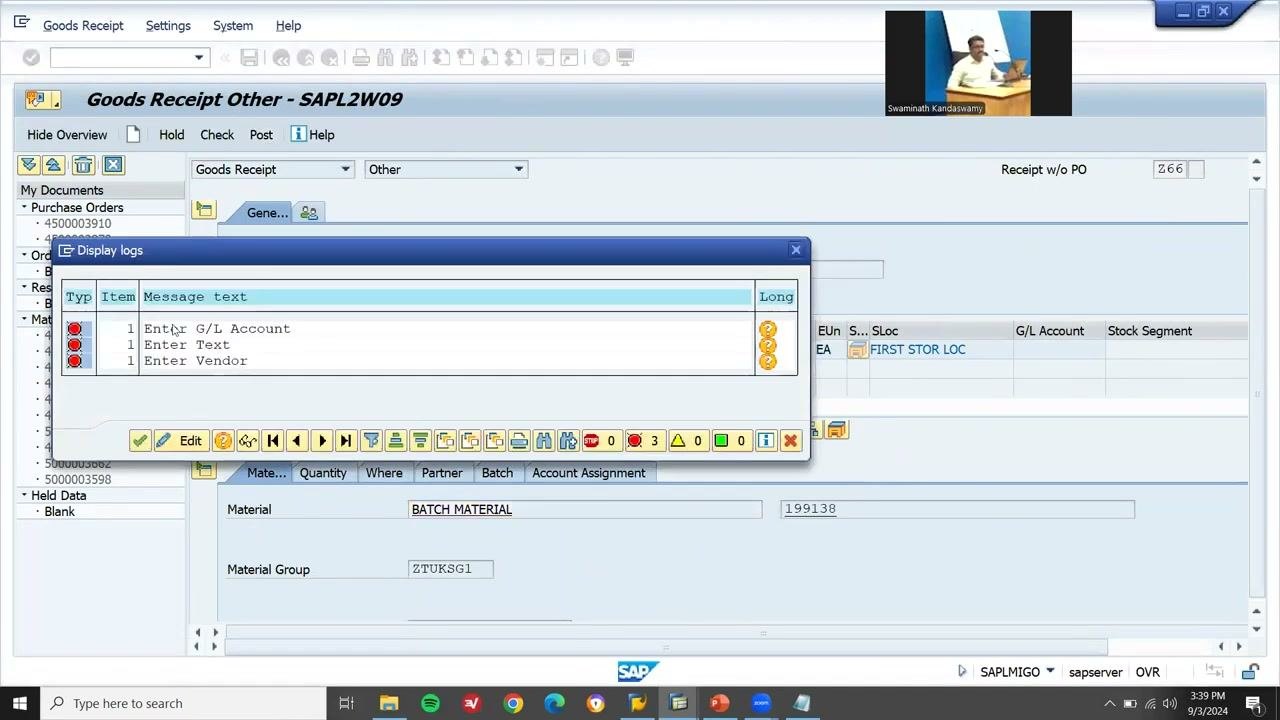
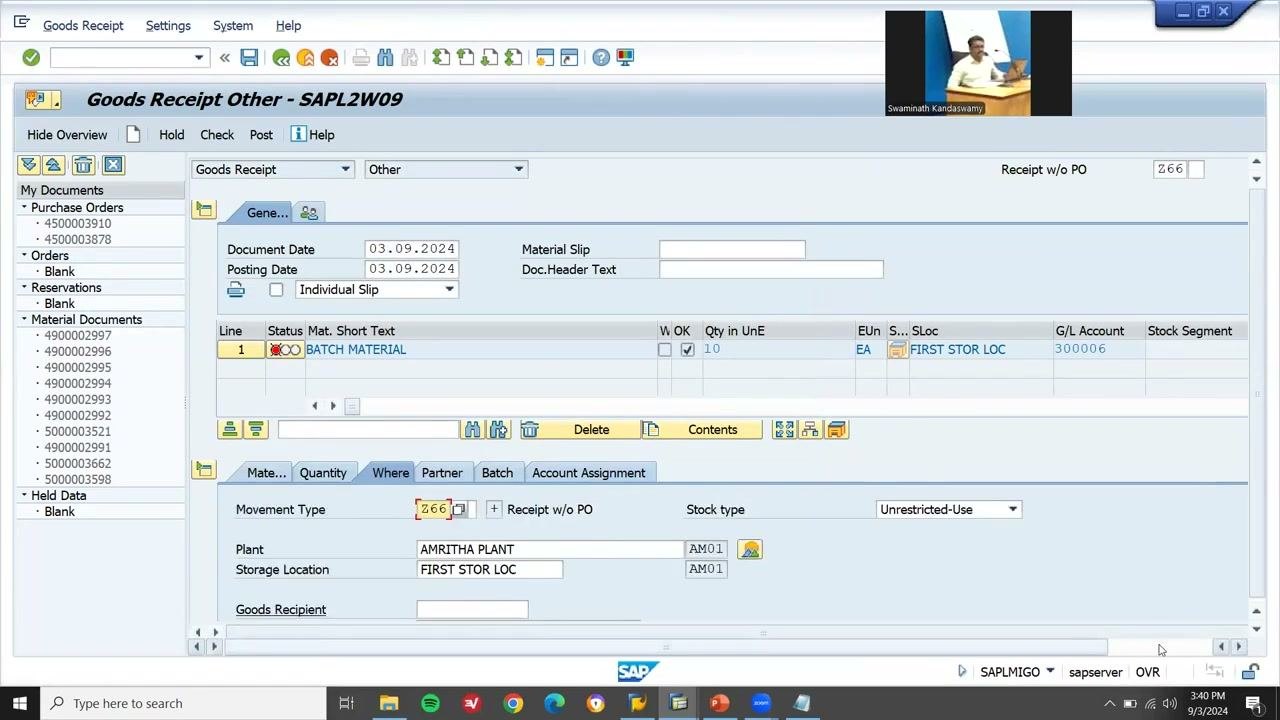
Step 18: Enter the G/L account
- Go to the "Account Assignment" tab.
- Enter the G/L account number 300006.
- Attempt to post again. If more errors appear, resolve them as indicated.
Step 19: Enter the vendor
- Go to the "Partner" tab.
- Enter the vendor IPO VENDOR with vendor number 100118.
- Make sure the vendor information is filled in the correct fields.
Step 20: Enter the text and post the document
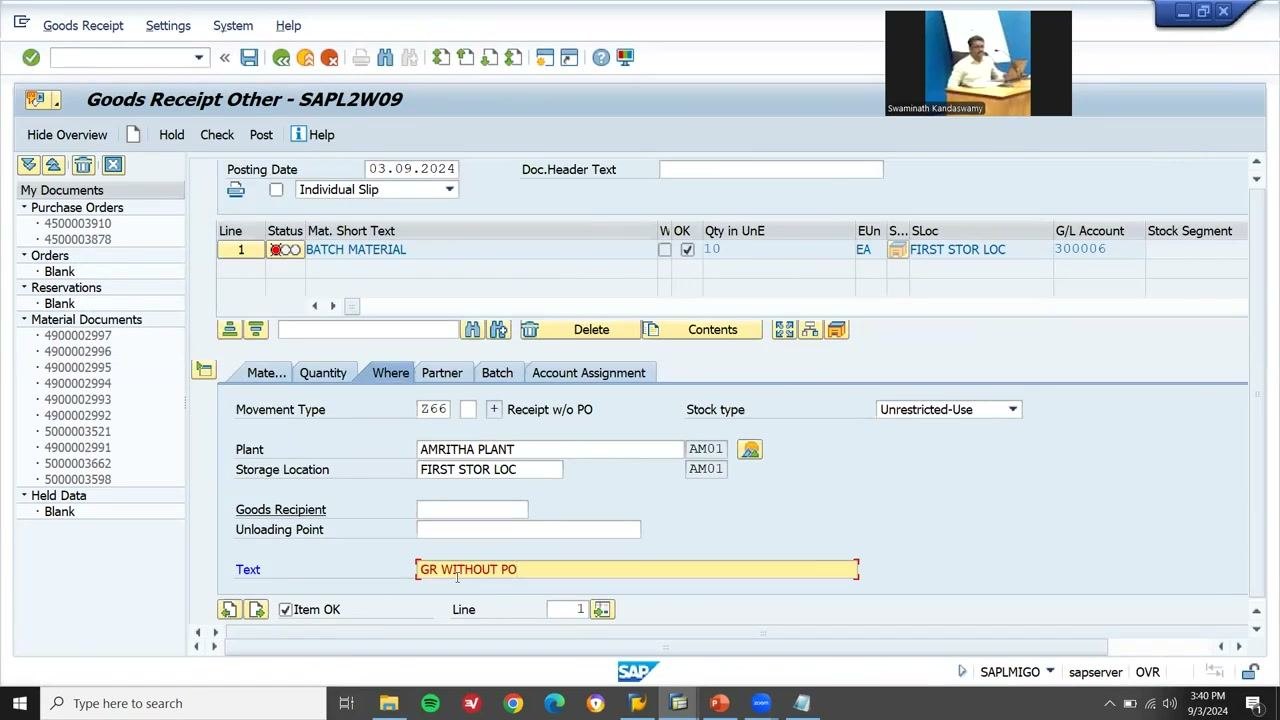
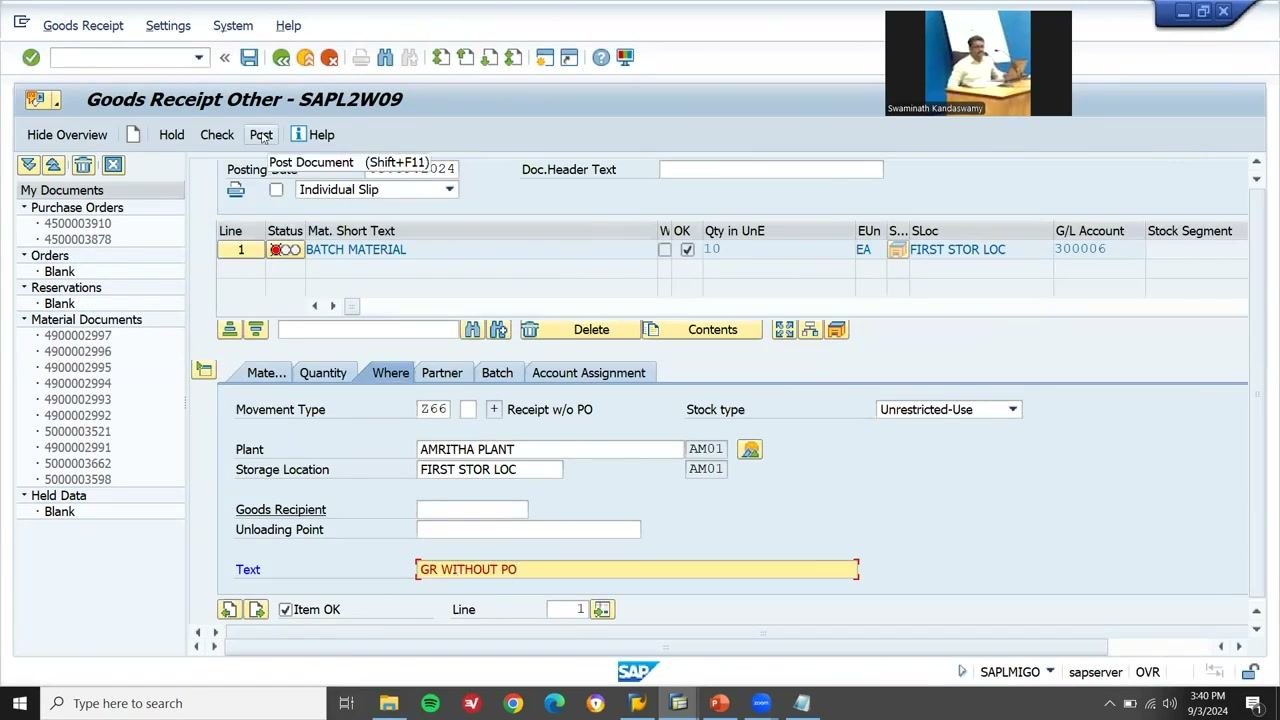
On the "Goods Receipt Other - SAPL2W09" screen, make sure all required fields are filled:
- Movement Type: Z66
- Plant: AMRITHA PLANT
- Storage Location: FIRST STOR LOC
- Quantity: 10 (EA)
- Material: BATCH MATERIAL
- G/L Account: 300006
- Vendor: IPO VENDOR (100118)
- Text: GR WITHOUT PO
Confirm that "Receipt w/o PO" is selected and "Stock type" is "Unrestricted-Use". Then click "Post" at the top of the screen.
Step 21: Confirm the document posting
After posting, a confirmation message appears at the bottom of the SAP window, for example "Material document 4900002998 posted". The entry fields reset, which indicates the document posted successfully.
Verify the posting in the material document list
Step 22: Open the Material Document List
In the command field at the top, enter /NMB51 and press Enter to open the Material Document List.
Step 23: Filter by material and movement type
- Enter Material: 199138.
- Enter Movement Type: Z66.
- Leave other fields blank unless you need further filtering.
- Make sure "Hierarchy List" is selected under Display Options.
- Click the "Execute" button (clock with green checkmark).
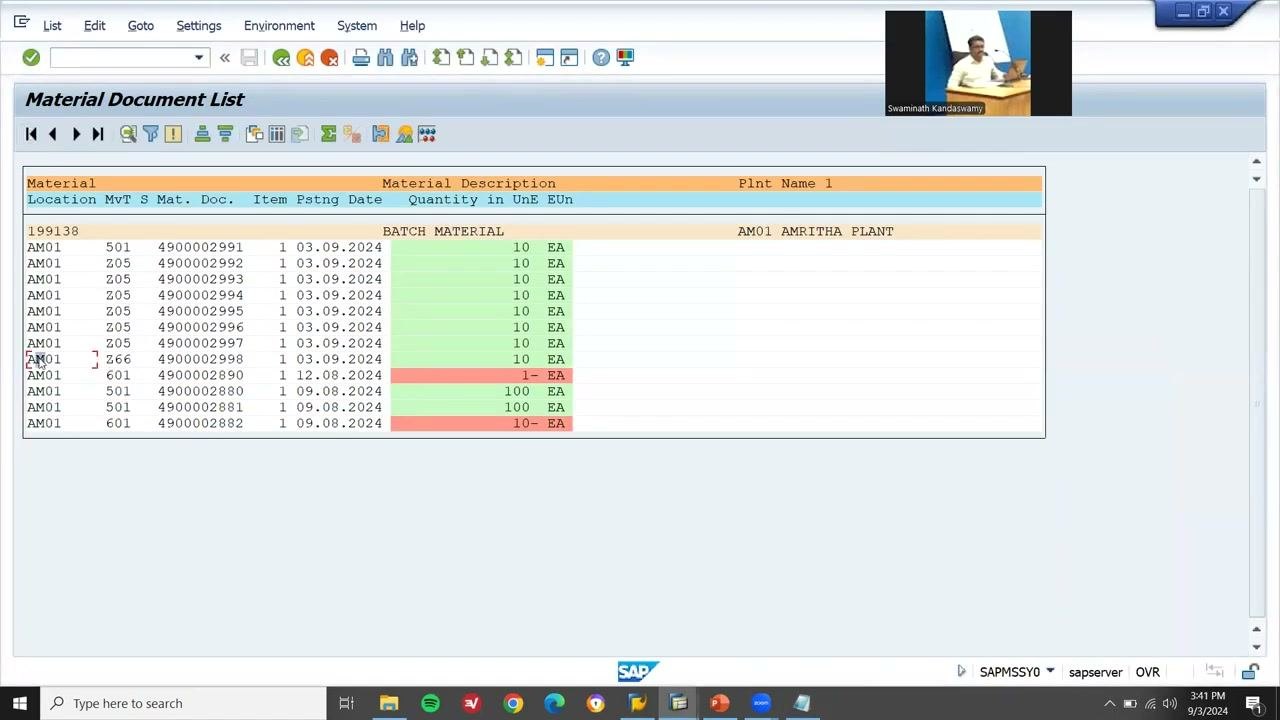
Step 24: Review the results
The results table lists all material documents that match your filter. Locate the entry with these values:
- Material: 199138 (BATCH MATERIAL)
- Movement Type: Z66
- Material Document Number: 4900002998
- Plant: AMRITHA PLANT (AM01)
- Quantity: 10 EA
- Posting Date: 03.09.2024
If your goods receipt appears in the list, the posting is complete.
Summary
You created movement type Z66 by copying standard movement type 501 with all dependent entries. You set Vendor, Text, and G/L Account as required entries and created G/L account 300006 for the movement type. You then posted a goods receipt without a purchase order and verified it in transaction /NMB51.
Keep these points in mind:
- Enter all required data, including the text "GR WITHOUT PO", before posting.
- Use the confirmation message to verify that the posting succeeded.
- Use
/NMB51to filter and review material documents by movement type and material. - Confirm that your posted document appears in the results list for audit and tracking.
What's next
Continue with further configuration or testing as required. You can trace any goods receipt (other) posting in SAP by its material document number and movement type.
Generation details: cost, quality tiers
Docsie billed 4,500 credits ($3.15) to analyze this 9-minute video at standard quality. The rewrite, template fill and Word/PDF exports were included. The same video at each quality tier:
| Quality | Frames sampled | Credits | Approx. cost |
|---|---|---|---|
| Draft | every 16-30 s | 2,250 | $1.57 |
| Standard (this guide) | every 8-15 s | 4,500 | $3.15 |
| Detailed | every 4-7 s | 9,000 | $6.30 |
| Ultra | every 1-3 s | 18,000 | $12.60 |
Credits priced at $0.70 per 1,000; plans include a monthly allowance. Enterprise customers on on-premise or bring-your-own-model deployments run this on their own inference and pay no per-video credits.
Generated by Docsie Video-to-Docs on 2026-11-15 from a 8-minute video. Screenshots are frames from the source video and belong to their creator, LEARN2WIN SAP | SAP Training & Placement | S4HANA, whose original is embedded above. If you own this video and want the guide removed or credited differently, contact us and we will act within one business day.