
How to Create a Cost Center in SAP
This guide walks you through how to create a cost center in SAP S/4HANA using transaction code KS01. You will learn how to set the correct controlling area, enter basic cost center data, assign a cost center category, link a profit center, and save your new cost center record.
Video: How to Create Cost Center | Tcode to Define Cost Center KS01 | SAP S4 HANA Controlling by Merit Vault MCQ. All credit for the demonstration goes to the creator; watch the original on YouTube. The written guide below was generated from this video by Docsie. Creator? Request a change or removal.
This guide walks you through how to create a cost center in SAP S/4HANA using transaction code KS01. You will learn how to set the correct controlling area, enter basic cost center data, assign a cost center category, link a profit center, and save your new cost center record.
Prerequisites
- Access to the SAP Easy Access main menu.
- Authorization to run transaction KS01.
- The correct controlling area, cost center ID, and validity dates for your organization.
- A profit center to associate with the cost center (recommended, though not mandatory).
Open the SAP Easy Access screen
Launch SAP and confirm you are on the SAP Easy Access main menu. Here you will see navigation menus such as User menu, SAP menu, SAP Business Workplace, along with a list of favorites and SAP menu folders.
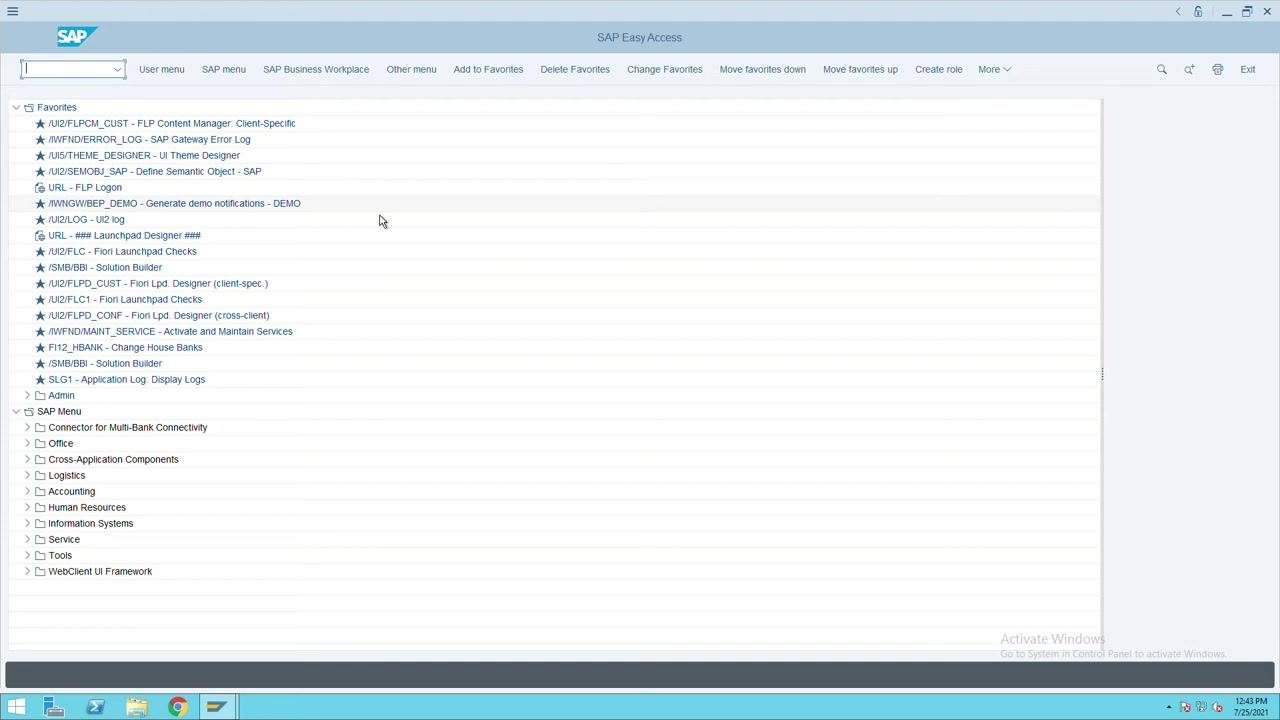
Navigate to transaction KS01
In the command field, enter KS01 and press Enter. This opens the Create Cost Center: Initial Screen.
Check the controlling area
On the Create Cost Center: Initial Screen, check the Controlling Area field. If the controlling area shown is incorrect (for example, it displays A000 instead of the required area), you will need to change it before continuing.
Change the controlling area (if needed)
Go to the top menu and select More > Extras > Set Controlling Area. A dialog box opens, allowing you to set the correct controlling area.
Enter the correct controlling area
In the Set Controlling Area dialog, enter 9001 as the controlling area, then click Continue to confirm.
Enter the cost center ID and validity dates
Back on the initial screen, enter the following:
- Cost Center:
Admin - Valid From:
01.01.2020 - To: defaults to
31.12.9999
Press Enter to proceed to the basic data screen.
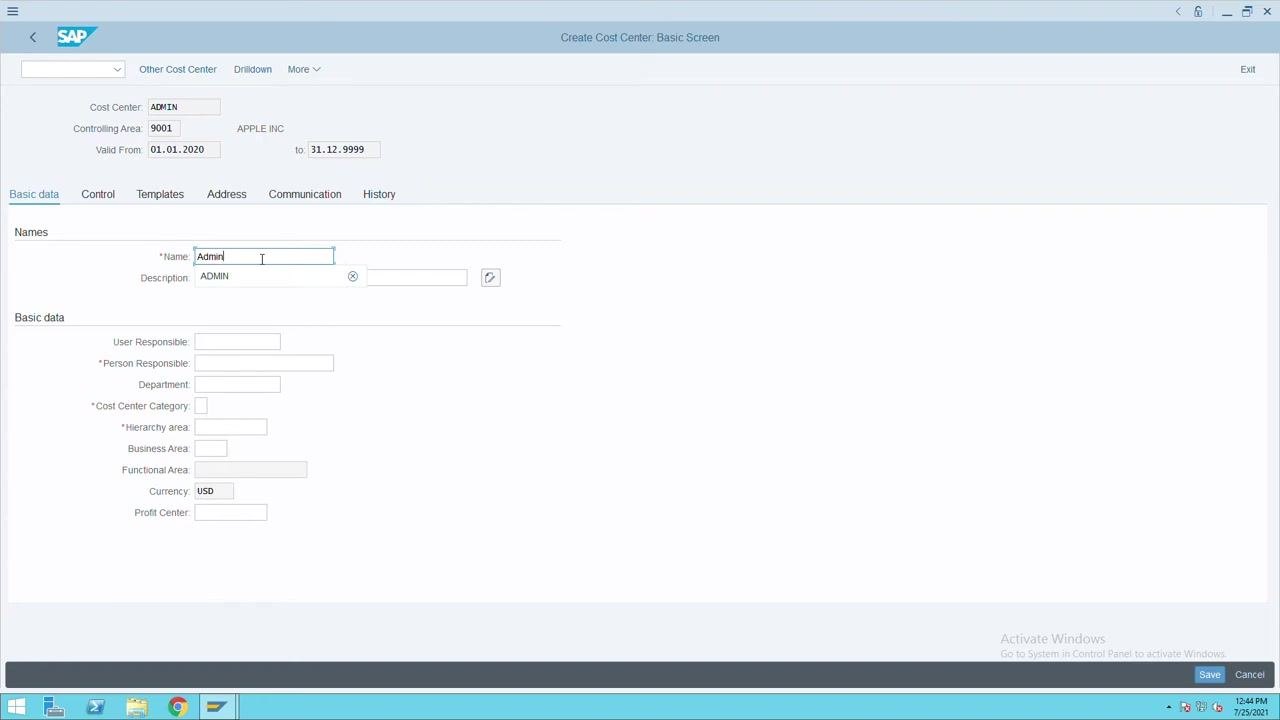
Enter basic data for the cost center
On the Create Cost Center: Basic Screen, fill in the following fields:
- Name:
Admin iphone10 - Description:
Admin iphone10 - Person Responsible:
Jack
You can also complete other fields as needed, such as Department or User Responsible.
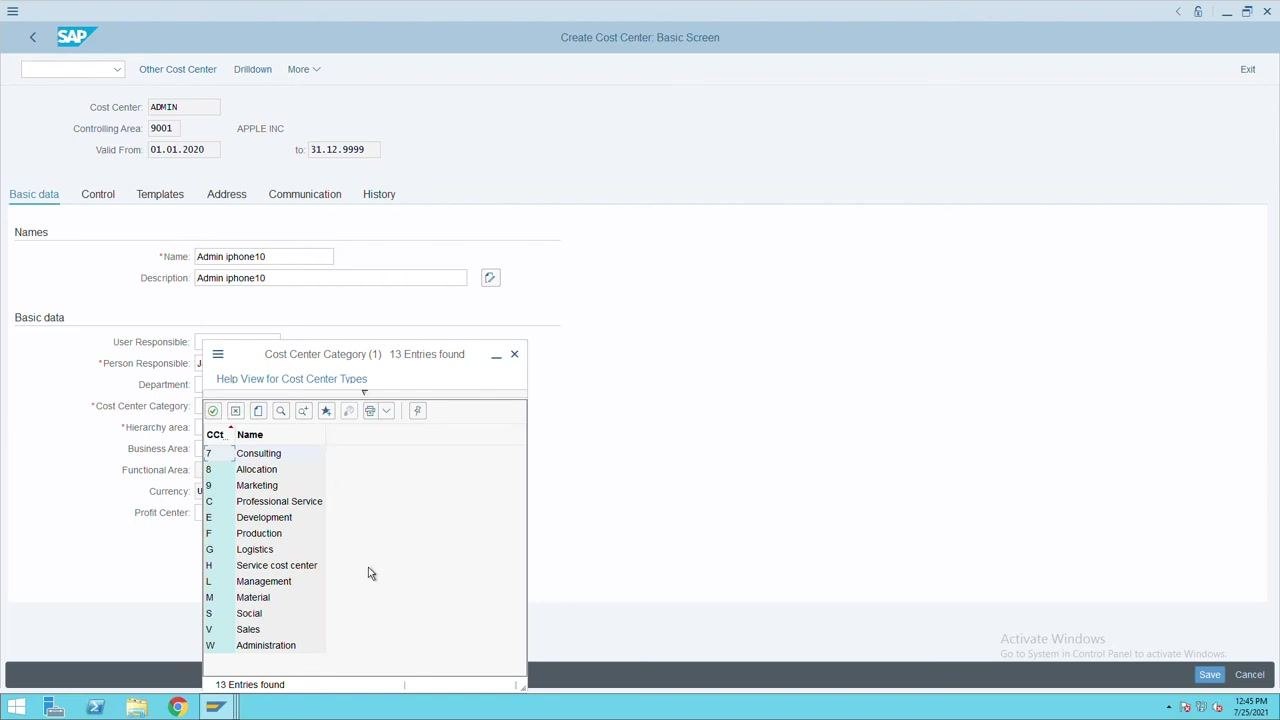
Select the cost center category
Click the search/help button next to the Cost Center Category field. A list of available cost center types appears. Review the categories and select the one most appropriate for your call center.
Choose the category
From the list, select Administration as the cost center category, since it best matches the admin call center you are creating.
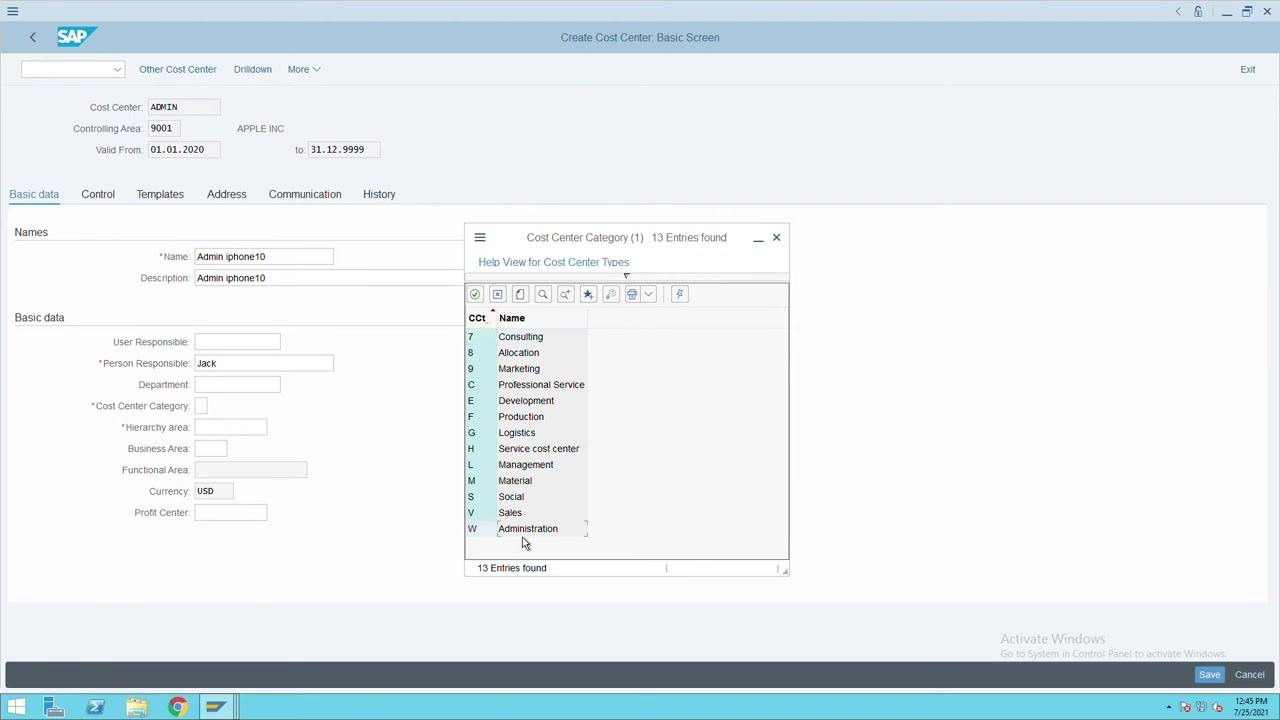
Complete additional fields
Fill in any other relevant fields based on your organization's requirements, including:
- Hierarchy Area
- Business Area
- Functional Area
- Currency (defaults to USD)
- Profit Center
Enter the hierarchy area (optional)
If your organization uses a specific hierarchy for this cost center, enter it in the Hierarchy area field — for example, APPLECOST. If you leave this field blank, SAP applies the standard hierarchy by default.
Assign a profit center
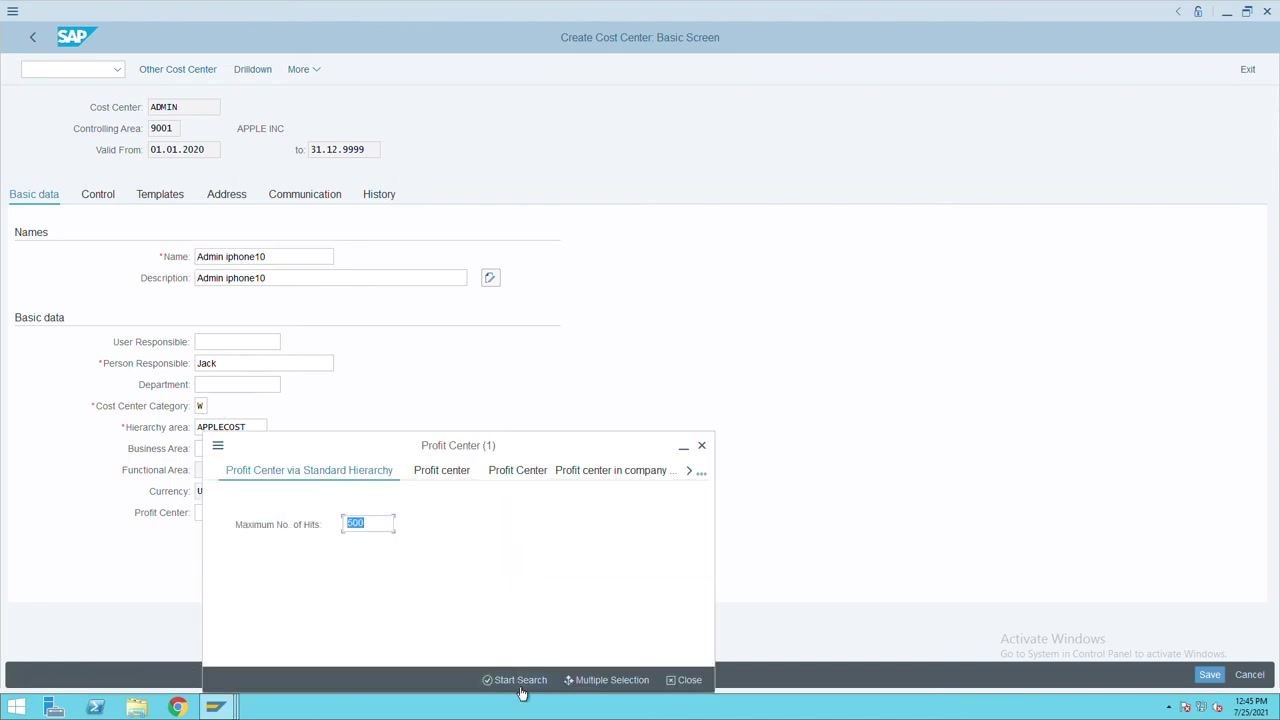
Although the Profit Center field is not mandatory, assigning one is recommended for better reporting and tracking. Since this cost center relates to iPhone 10, click the search/help button next to the Profit Center field to open the selection dialog.
Select the appropriate profit center
In the selection dialog, search for and select the profit center labeled IPHONE10. Confirm your selection so that IPHONE10 appears in the Profit Center field.
Review all entered data
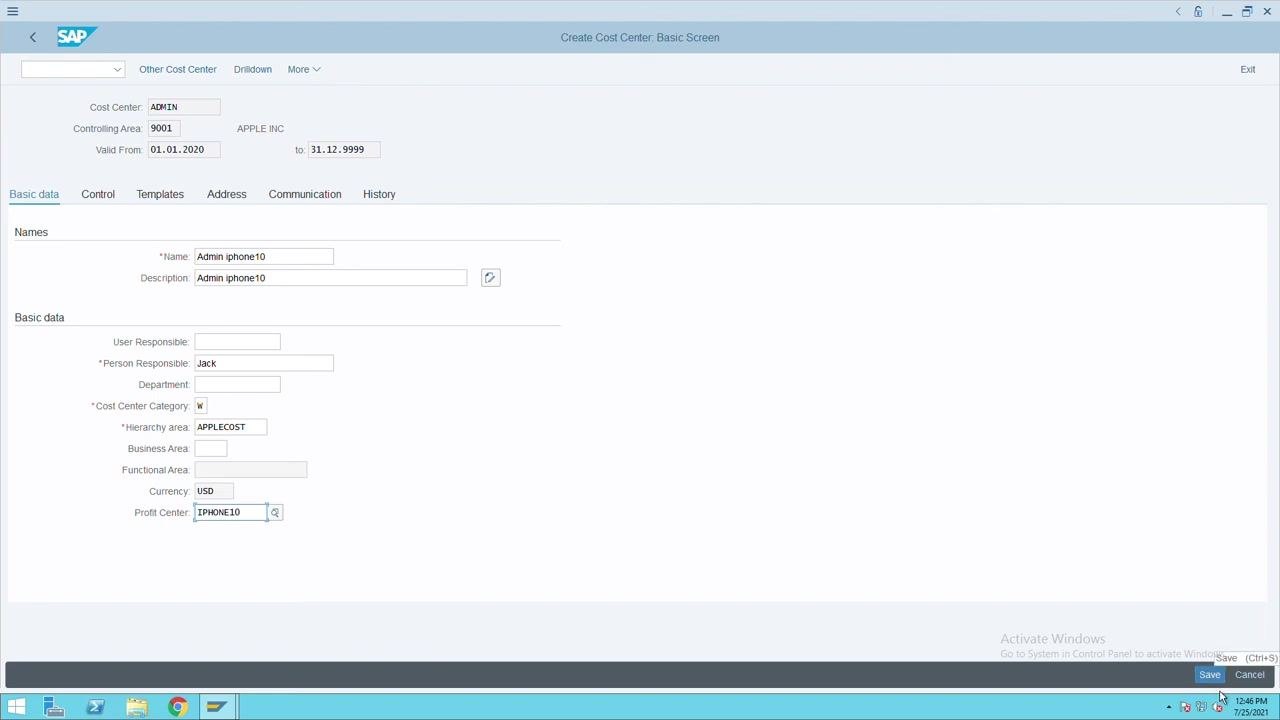
Before saving, confirm that all required and recommended fields are filled in correctly:
- Name:
Admin iphone10 - Description:
Admin iphone10 - Person Responsible:
Jack - Cost Center Category: Administration
- Hierarchy Area:
APPLECOST - Currency:
USD - Profit Center:
IPHONE10
Fill in any additional fields required by your organization.
Save the cost center
Click the Save button at the bottom right of the screen to create the cost center.
Confirm the cost center was created
After saving, the system returns you to the initial screen and displays a confirmation message at the bottom: "Cost center has been created."
Explore additional tabs (optional)
The Create Cost Center: Basic Screen includes additional tabs such as Control, Templates, Address, Communication, and History. You can navigate to these tabs to enter further details or configure advanced settings as needed.
Summary
By following these steps, you have successfully learned how to create a cost center in SAP S/4HANA, including setting the correct controlling area, entering basic data, selecting a cost center category, and assigning a profit center. Your cost center is now ready for use in organizational and reporting activities.
What's next
With your cost center created, you can use it to allocate costs, generate reports, and track performance within your organization. You may also want to explore the additional tabs on the Basic Screen, such as Control or Templates, to configure further settings for the cost center.
Generation details: cost, quality tiers
Docsie billed 1,500 credits ($1.05) to analyze this 3-minute video at standard quality. The rewrite, template fill and Word/PDF exports were included. The same video at each quality tier:
| Quality | Frames sampled | Credits | Approx. cost |
|---|---|---|---|
| Draft | every 16-30 s | 750 | $0.52 |
| Standard (this guide) | every 8-15 s | 1,500 | $1.05 |
| Detailed | every 4-7 s | 3,000 | $2.10 |
| Ultra | every 1-3 s | 6,000 | $4.20 |
Credits priced at $0.70 per 1,000; plans include a monthly allowance. Enterprise customers on on-premise or bring-your-own-model deployments run this on their own inference and pay no per-video credits.
Generated by Docsie Video-to-Docs on 2026-10-01 from a 2-minute video. Screenshots are frames from the source video and belong to their creator, Merit Vault MCQ, whose original is embedded above. If you own this video and want the guide removed or credited differently, contact us and we will act within one business day.