
How to Create a BOM in SAP CS01
A Bill of Material (BOM) is a master data element in the SAP Production Planning module that defines the components required to assemble a finished good. This guide walks you through how to create a BOM in SAP CS01, from understanding the BOM concept to entering components, adjusting header data, reviewing BOM status options, and managing BOM alternatives.
Video: How to Create BOM (Bill of Material) In SAP - PP Master Data CS01 by KH Zeeds. All credit for the demonstration goes to the creator; watch the original on YouTube. The written guide below was generated from this video by Docsie. Creator? Request a change or removal.
A Bill of Material (BOM) is a master data element in the SAP Production Planning module that defines the components required to assemble a finished good. This guide walks you through how to create a BOM in SAP CS01, from understanding the BOM concept to entering components, adjusting header data, reviewing BOM status options, and managing BOM alternatives.
Understanding the BOM concept
A Bill of Material links a finished good to the components used to assemble it. For example, a desktop computer is assembled from four main components: a CPU, a monitor, a keyboard, and a mouse. Combining these components produces the finished good — the desktop computer. In technical terms, the desktop computer is the finished good, while the CPU, monitor, keyboard, and mouse are its components. Note that a component, such as the CPU, can itself be a finished good if it is assembled from its own set of sub-components.
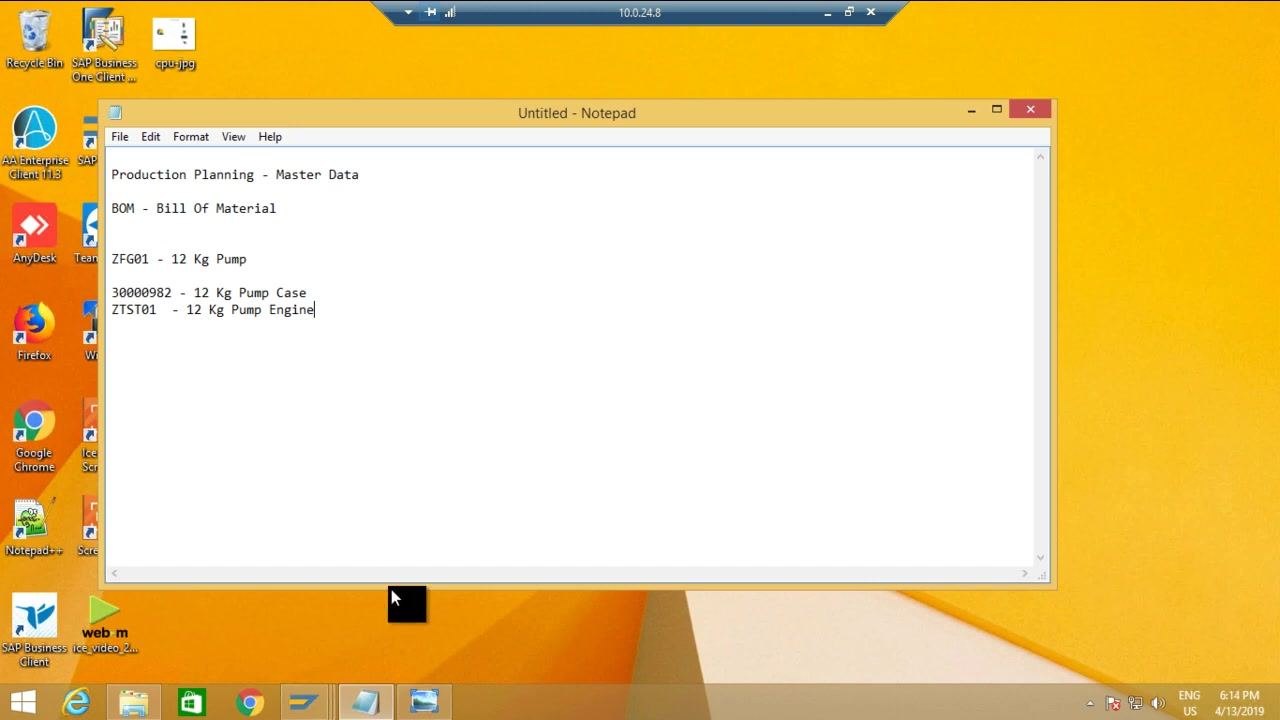
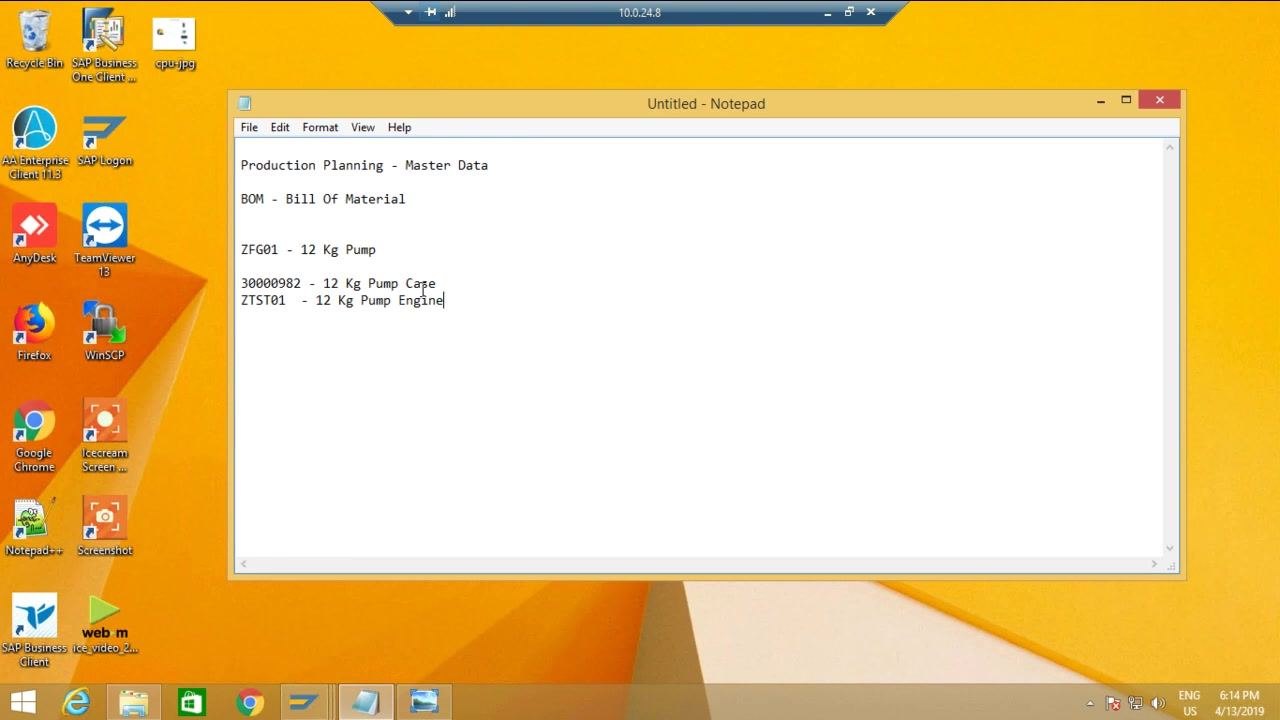
This guide applies the same concept to a new example: a 12 Kg Water Pump (code ZFG01), assembled from two components — a 12 Kg Pump Case (code 30000982) and a 12 Kg Pump Engine (code ZTST01). Assembling these two components creates the finished good, the 12 Kg Water Pump.
Prerequisites
Before you create the BOM, make sure you have the following information ready:
- Finished good material code: ZFG01 (12 Kg Pump)
- Component codes: 30000982 (12 Kg Pump Case) and ZTST01 (12 Kg Pump Engine)
- Plant code for your organizational setup (for example, 2900)
- Access to the SAP Easy Access screen with authorization to run transaction CS01
Creating a BOM using transaction code CS01
Step 1: Access the SAP Easy Access screen
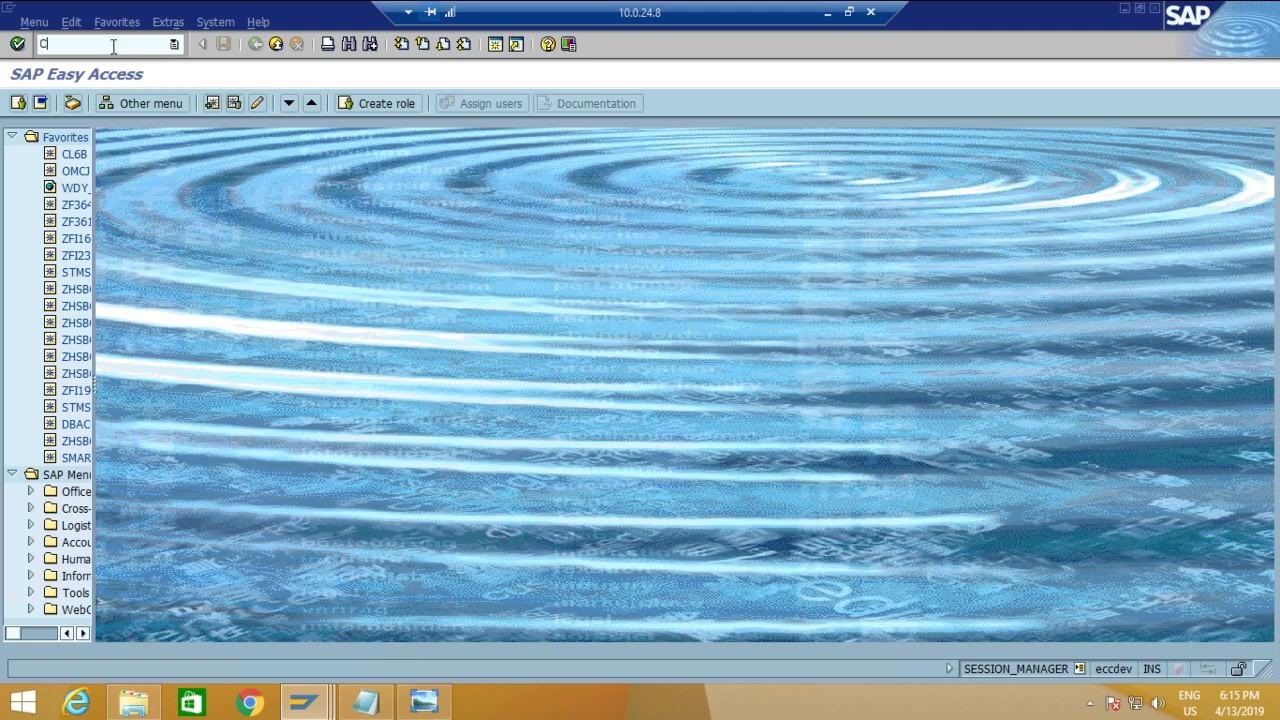
Make sure you are on the SAP Easy Access main screen. This screen displays the SAP menu, your favorites, and a command field at the top where you can enter a transaction code.
Step 2: Enter the BOM creation transaction code
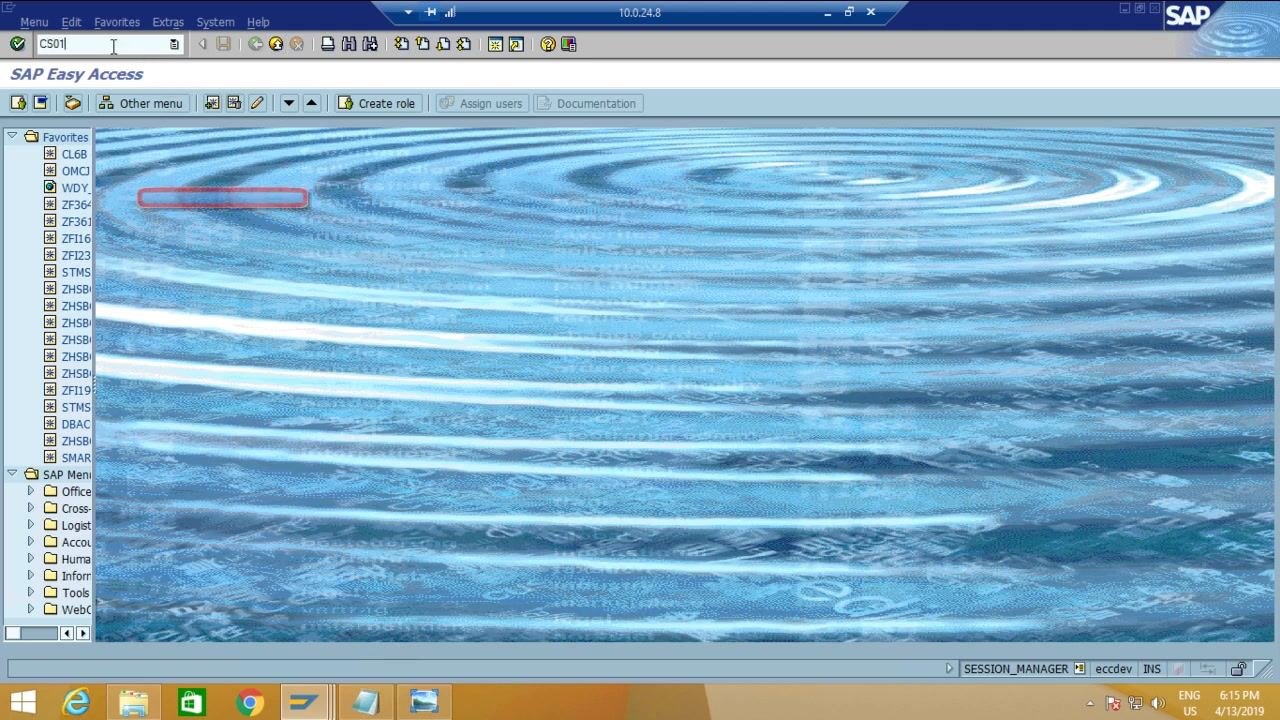
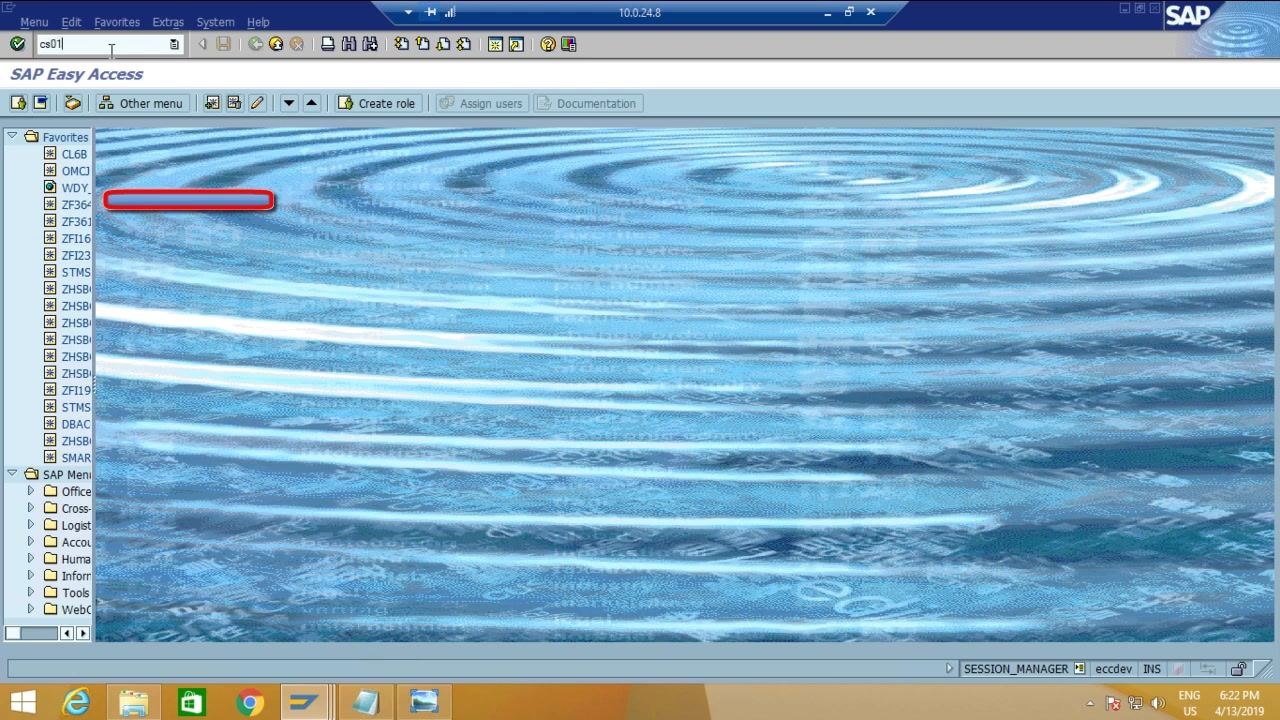
Click the command field at the top of the SAP Easy Access screen, type CS01 (the transaction code for BOM creation), and press Enter.
Step 3: Fill in the initial BOM creation screen
On the Create material BOM: Initial Screen, enter the following details:
- Material:
ZFG01(the finished good code for the 12 Kg Pump) - Plant:
2900(your plant code; confirm it matches your organizational setup) - BOM Usage:
1(Production)
Leave Alternative BOM blank unless you are creating an alternative BOM. Under Validity, leave Change Number blank unless you use engineering change management, set Valid From to 13.04.2019 (you can change this date if needed), and leave Revision Level blank unless your process requires it.
Step 4: Select the correct BOM usage type
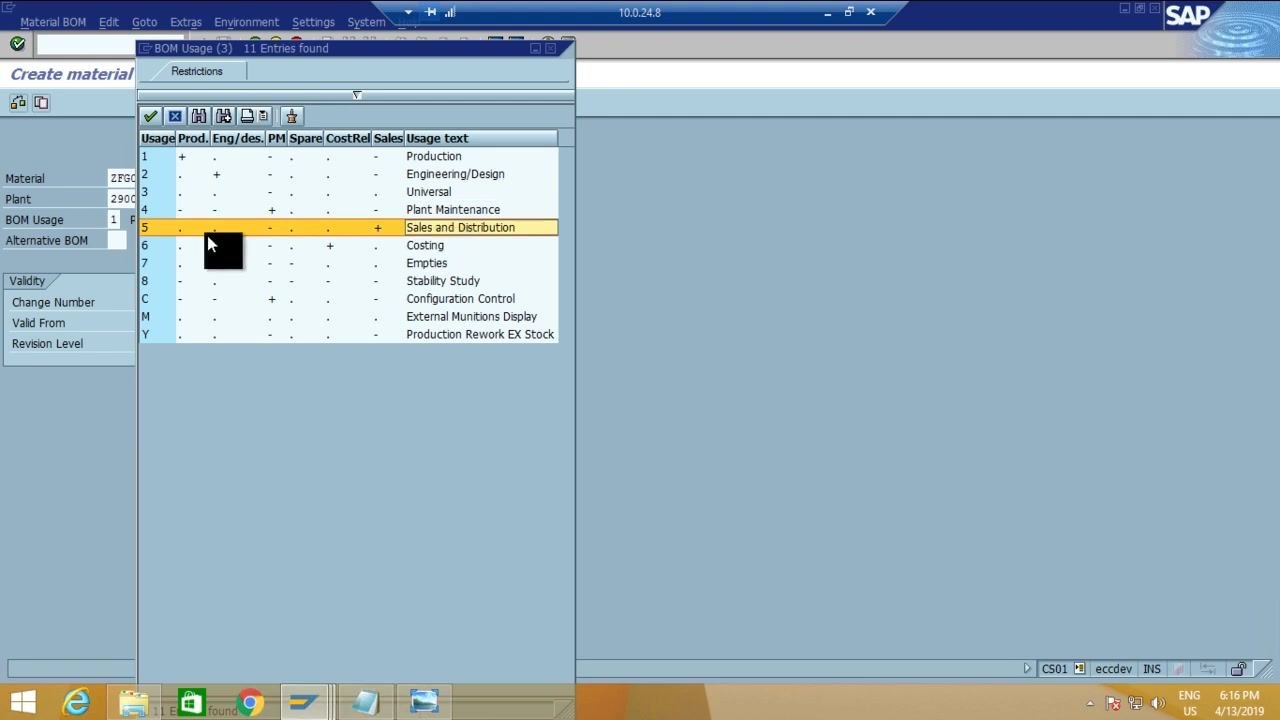
When you select BOM Usage, a list of options appears:
1– Production (for planned orders, production orders, or process orders)4– Plant Maintenance (for maintenance-related BOMs)5– Sales and Distribution (for sales order BOMs)6– Costing (for manufacturing cost analysis)- Other options include Engineering/Design, Universal, Empties, Stability Study, Configuration Control, and more
Select the usage type that matches your business requirement. For this example, choose 1 (Production).
Confirm the Valid From date before proceeding. The system uses today's date by default (for example, 13.04.2019), but you can change it. This date is critical, because production orders created before this date will not use this BOM.
Entering BOM components and adjusting header data
Step 5: Proceed to the BOM creation window
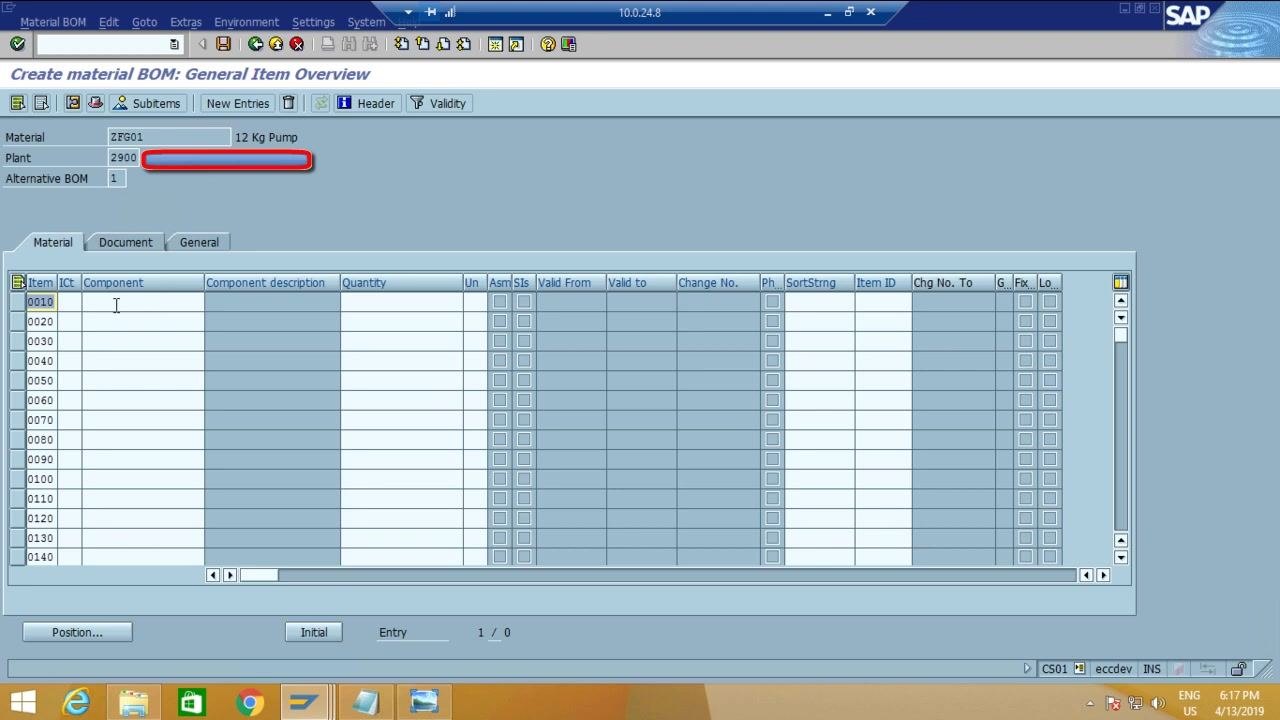
After confirming the Valid From date, press Enter. The system opens the BOM creation window where you can enter the components for the finished good.
Step 6: Enter the first component
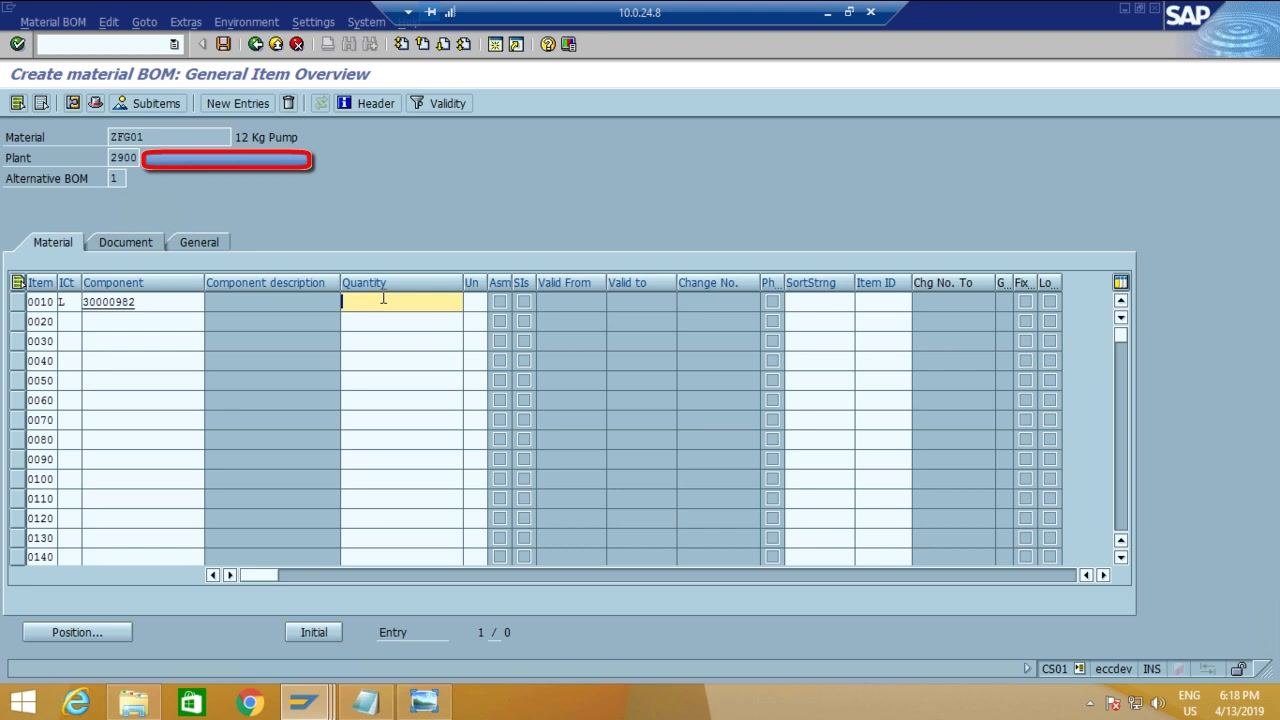
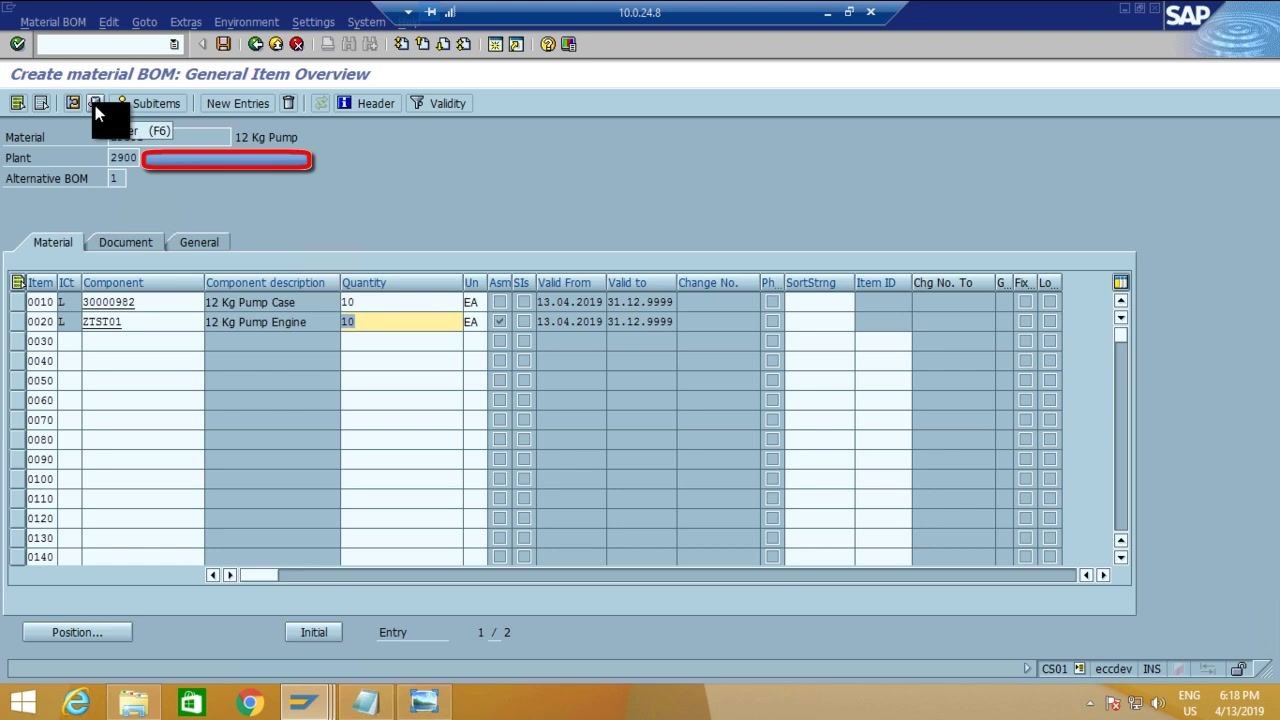
In the Component column of the first row (Item 0010), enter the component code 30000982. In the Item Category (Ict) column, enter L for a stock item (use N for non-stock items as needed). In the Quantity column, type 10 to specify 10 pieces of this component for the 12 Kg Pump.
Step 7: Enter the second component
Move to the next row (Item 0020), enter the component code ZTST01, set the Item Category (Ict) to L for a stock item, and enter the quantity as 10. The system automatically fills in the component description and other relevant fields.
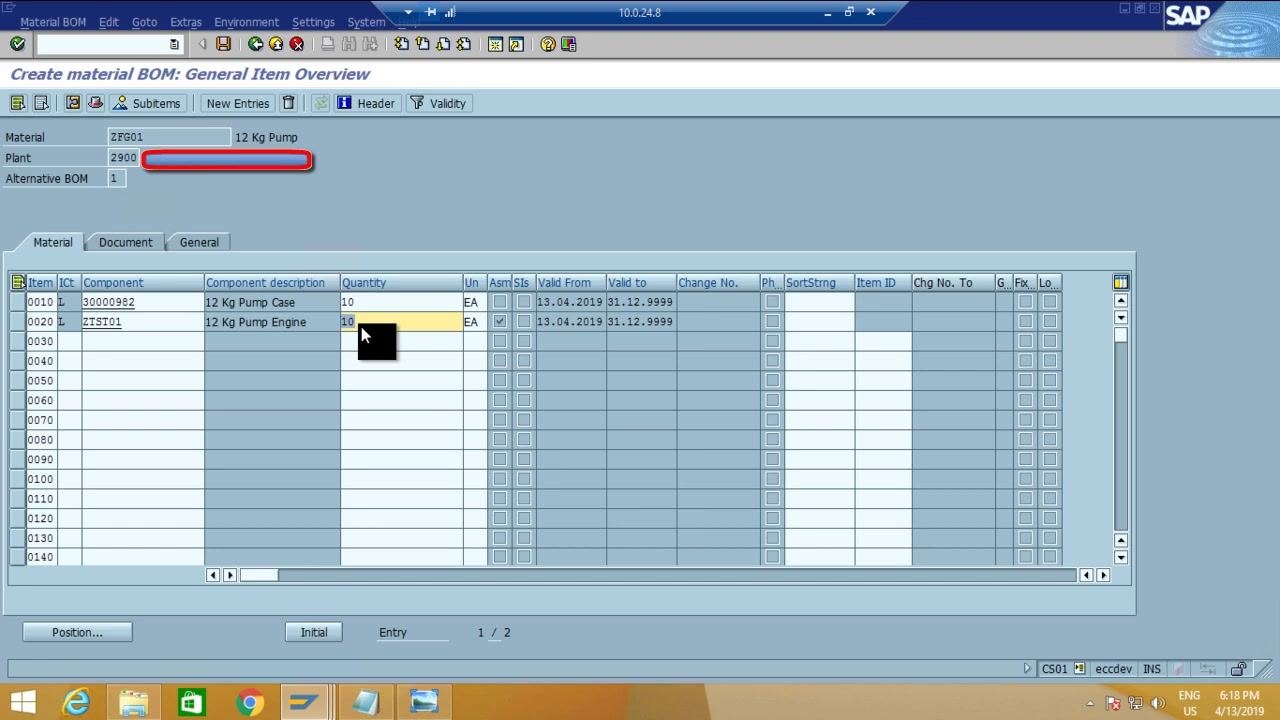
Review both components to confirm the quantities and descriptions are correct, and verify that the Valid From date for each component matches the BOM validity date (13.04.2019).
Step 8: Open the BOM header data
Click the Header icon (cap icon) at the top of the BOM item overview screen to open the BOM header data.
Step 9: Adjust the base quantity in the header
On the Header Overview screen, locate the Base quantity field under Quantity data. By default this is set to 1; change it to 10 so it matches the total quantity entered for each component. This ensures the BOM is defined for 10 units of the finished good.
Final review and saving the BOM
Step 10: Review the BOM header overview
On the Create material BOM: Header Overview screen, verify the following header details:
- Material:
ZFG01(12 Kg Pump) - Plant:
2900 - BOM:
INTERNAL - BOM Usage:
1 Production - Technical type:
Multiple BOM - Base quantity:
10 EA(Each) - Valid From:
13.04.2019 - BOM status:
1
Confirm that any other relevant fields, such as BOM text, Alt Text, and Authorization group, are filled as required for your organization, and double-check that the base quantity and valid-from date are correct.
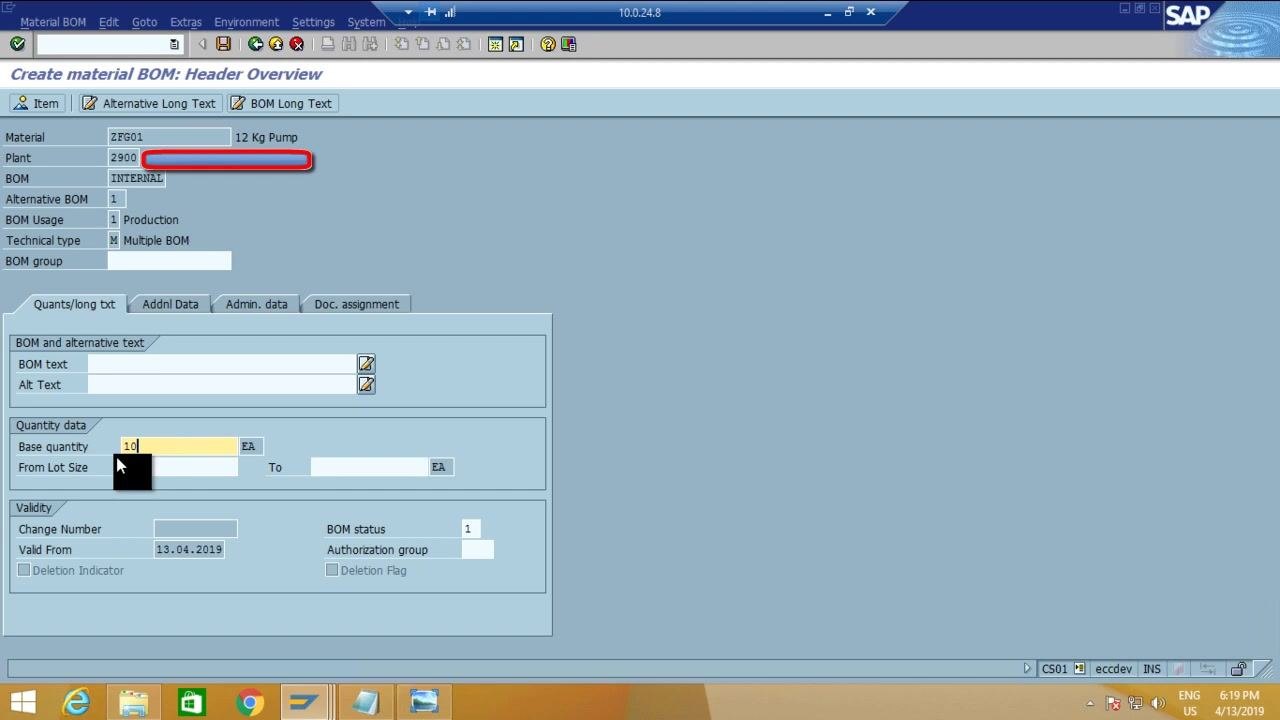
Before saving, review all tabs — Quants/long txt, Addnl Data, Admin. data, and Doc. assignment — for any additional required information, and confirm there are no missing or incorrect entries in the header or component details. Once everything is verified, click the Save icon (floppy disk) in the SAP toolbar and wait for the confirmation message. Record the BOM number generated by SAP for future reference and tracking.
Reviewing the BOM status options
Step 11: Review the BOM status options
On the Create material BOM: Header Overview screen, the right panel lists the available BOM statuses:
01– Active02– Inactive03– Active with history requirement
Checkboxes for various controls (MRP Explo, PlanOrd, Rel cstg, and others) appear alongside the description of each status. You can set a BOM to active, inactive, or active with history as needed.
Step 12: Navigate to the item overview
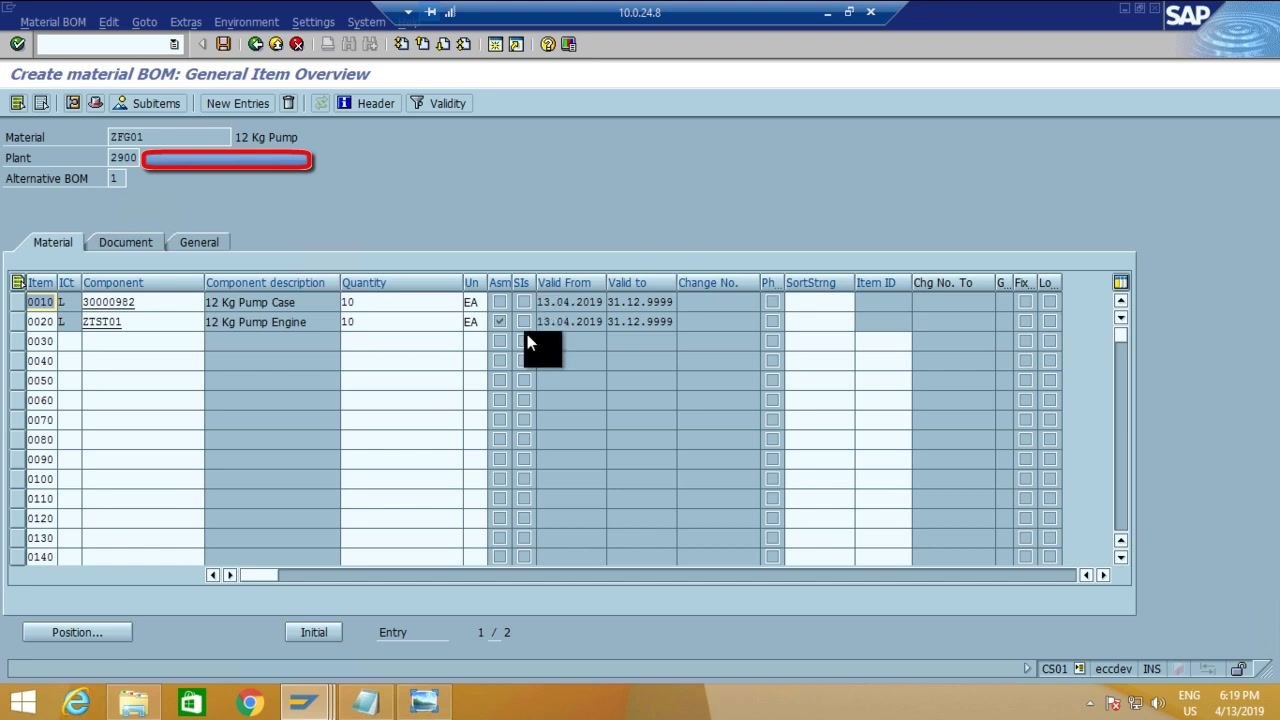
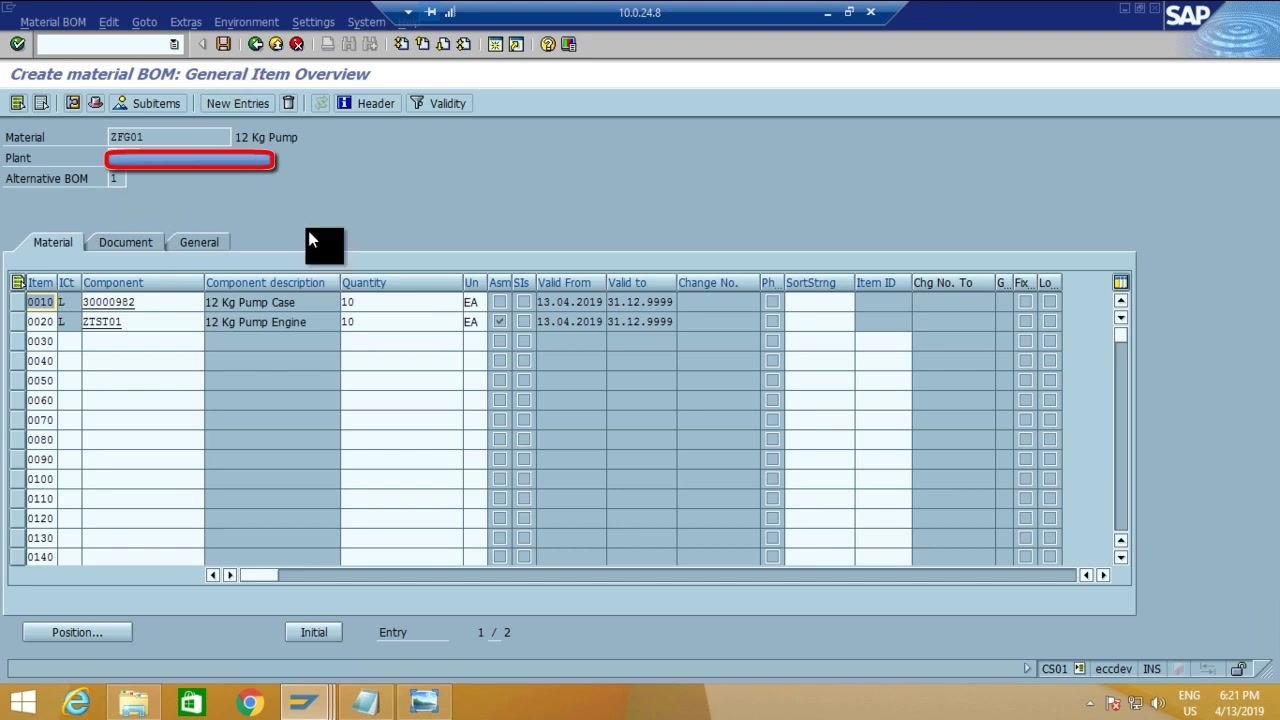
Click the Item overview tab to switch to the item details for the BOM. On the Create material BOM: General Item Overview screen, review the components for material ZFG01 (12 Kg Pump) at Plant 2900, Alternative BOM 1:
- 0010: 30000982, 12 Kg Pump Case, Quantity 10 EA, Valid From 13.04.2019, Valid To 31.12.9999
- 0020: ZTST01, 12 Kg Pump Engine, Quantity 10 EA, Valid From 13.04.2019, Valid To 31.12.9999
Additional empty rows are available for more components.
Step 13: Access and edit component details
Double-click the quantity field of a component (for example, the 12 Kg Pump Case) to open its detailed data. On the Create material BOM: Item: All data screen, review:
- BOM item: Item Number 0010, Component 30000982 (12 Kg Pump Case), Item Category 1 (Stock item)
- Quantity Data: Quantity 10 EA
- General Data: Options for Co-product, Recurs. allowed, AltItemGroup, and others
- MRP Data: Lead-time offset, Oper. LT offset, Distribution key, and others
Tabs are available for Basic Data, Status/Lng Text, Adminstr., and Document Assgmt.
Step 14: Set the recursive BOM option
If the component is also the header material (a recursive BOM), check the Recurs. allowed box in the General Data section. This indicates that the header component can appear as an item within its own BOM.
Step 15: Set costing relevancy for the component
In the same BOM item details screen, locate the CostingRelevancy field and click it to open the Indicator for Relevancy to Costing selection window. Choose the appropriate value:
- Not Relevant to Costing
- 50% Relevant to Costing
- 25% Relevant to Costing
- 75% Relevant to Costing
- 100% Relevant to Costing (X)
Select the value matching your business requirement, such as X for 100% relevant.
If you select "Not Relevant to Costing," the component is excluded from cost calculations. If you select a percentage, the component's cost is included in the BOM cost estimate at that proportion.
Step 16: Review the cost estimate
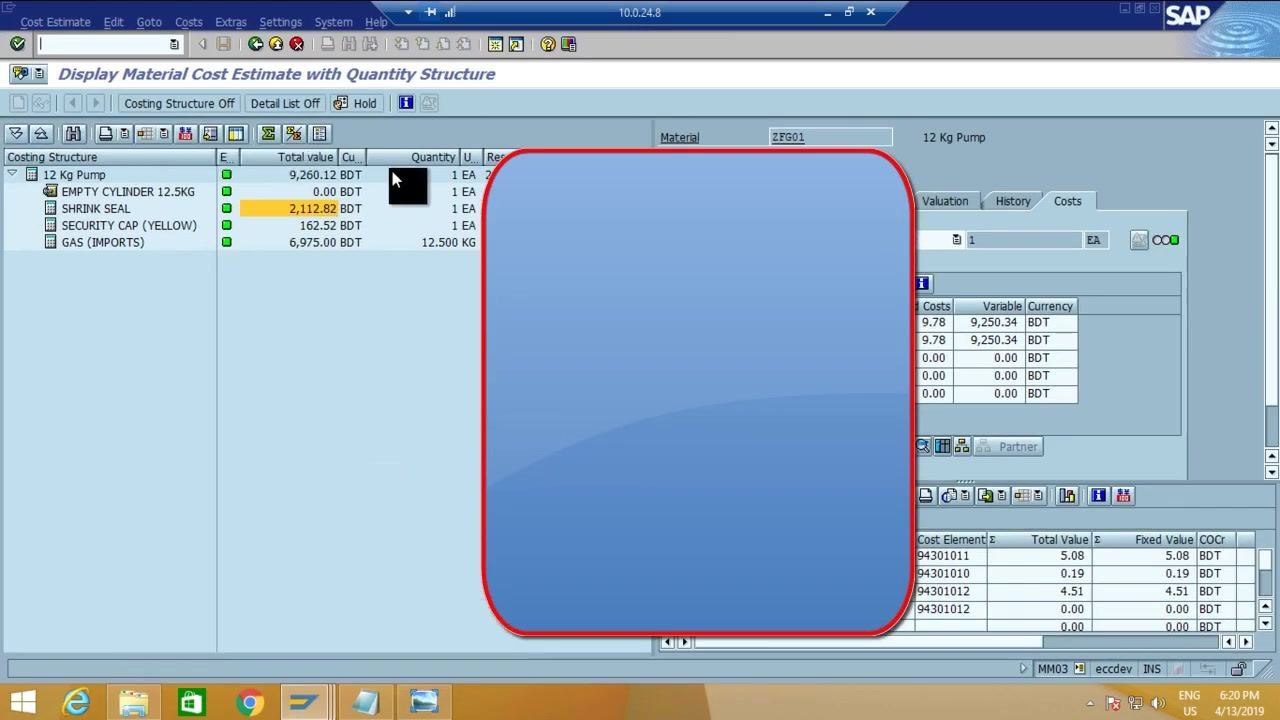
Open the Display Material Cost Estimate with Quantity Structure screen for material ZFG01 (12 Kg Pump) and review the cost breakdown for each component:
- EMPTY CYLINDER 12.5KG: 9,260.12 BDT
- SHRINK SEAL: 0.00 BDT
- SECURITY CAP (YELLOW): 2,112.82 BDT
- GAS (IMPORTS): 6,975.00 BDT
The right panel shows detailed cost elements, total value, fixed value, and currency. Use this screen to verify that your costing relevancy settings are reflected in the estimate.
Step 17: Review cost relevancy impact in the cost estimate
On the Display Material Cost Estimate with Quantity Structure screen, observe the cost breakdown again:
- EMPTY CYLINDER 12.5KG: 9,260.12 BDT
- SHRINK SEAL: 0.00 BDT
- SECURITY CAP (YELLOW): 162.52 BDT
- GAS (IMPORTS): 6,975.00 BDT
If you remove cost relevancy for a component, its cost field drops to zero in the estimate.
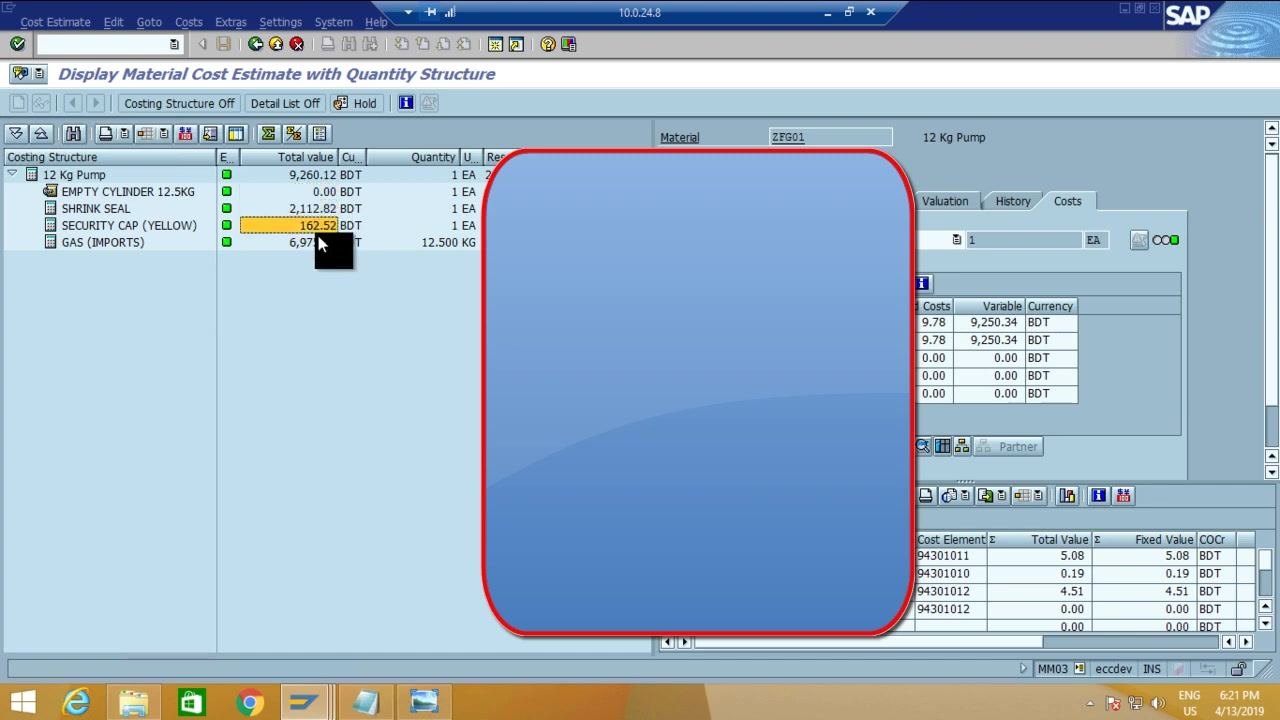
Step 18: Observe zero cost for non-relevant components
If cost relevancy is removed for a component, its cost displays as 0.00 BDT in the cost estimate, and the system excludes this component's cost from the total cost calculation for the BOM.
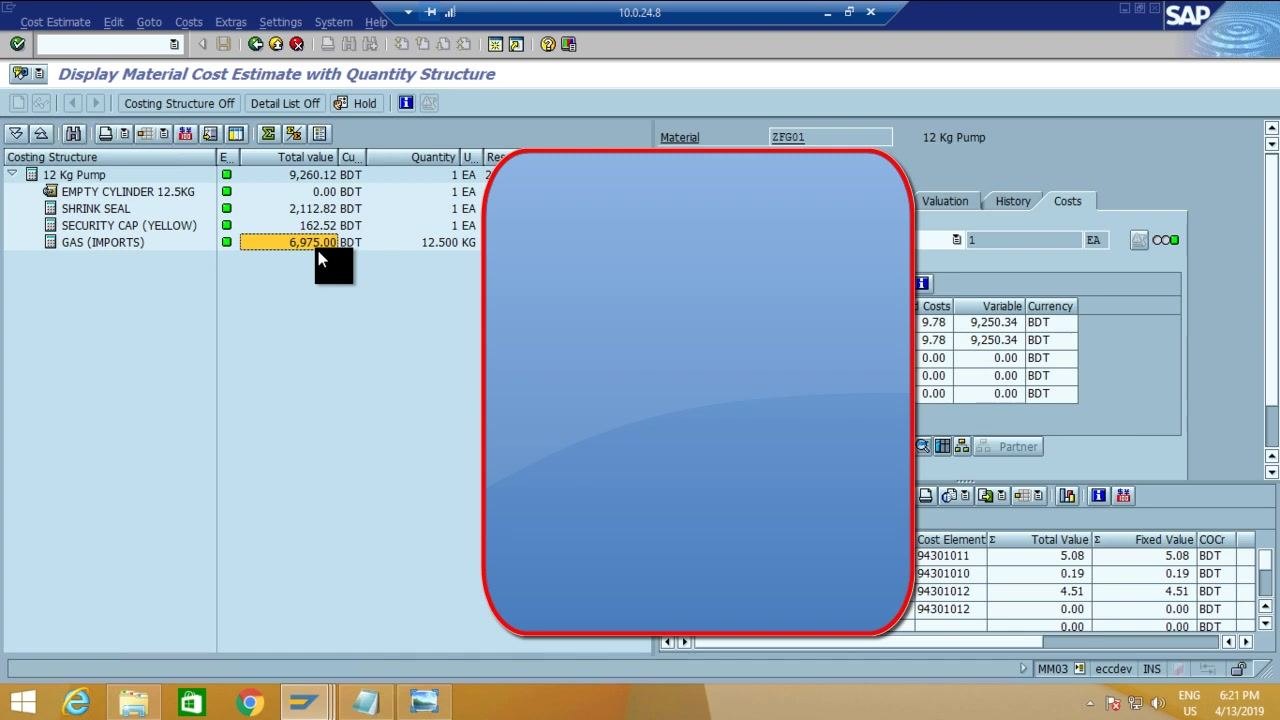
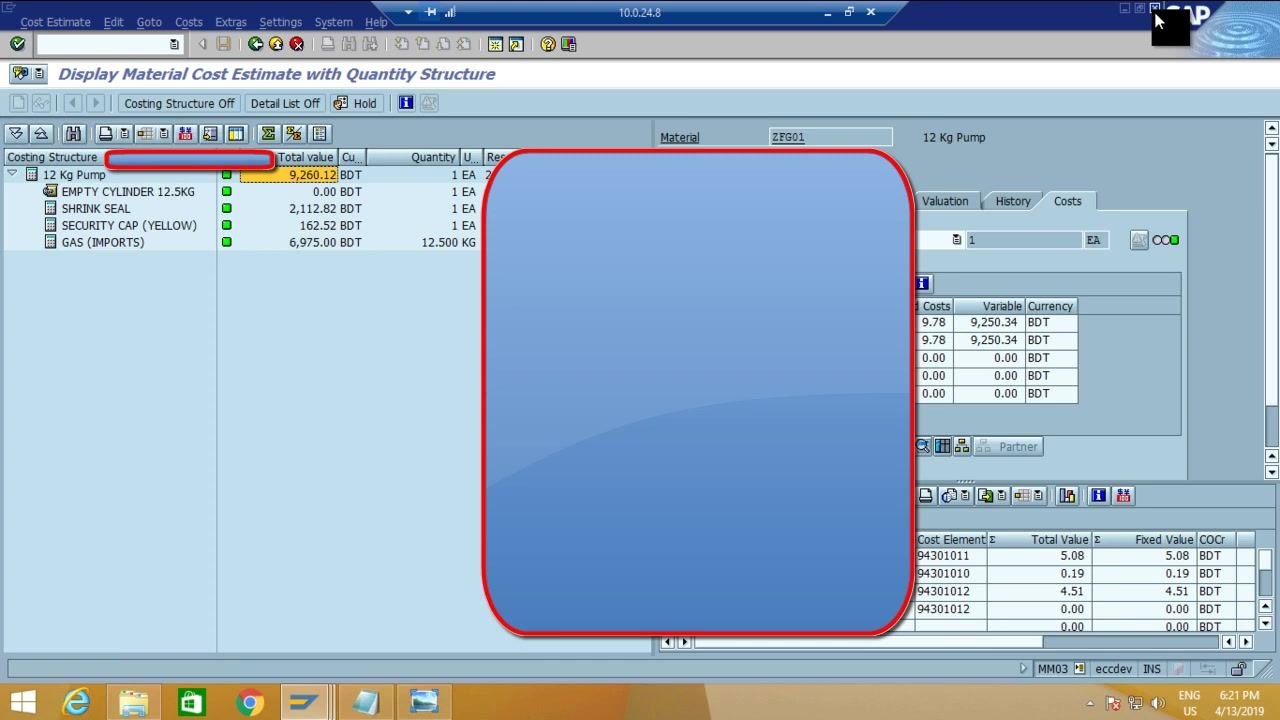
Step 19: Verify the total cost calculation
The total cost for the BOM appears at the top of the cost estimate screen (for example, 9,260.12 BDT). Only components marked as relevant to costing are included in this total.
Step 20: Save the created BOM
After entering all relevant data for the BOM and its components, return to the Create material BOM: General Item Overview screen to verify the material, plant, and listed components. Confirm that all required fields — component, quantity, and validity dates — are filled, then save the BOM to complete the creation process.
Copying an existing BOM
Step 21: Access the BOM creation screen for copying
To create a new BOM by copying an existing one, go to the Create material BOM: Initial Screen. Enter the material code (for example, ZFG01), the plant code, set BOM Usage to 1 (Production), and specify the validity date (for example, 13.04.2019).
Step 22: Navigate to the SAP Easy Access menu
From the SAP Easy Access screen, enter the transaction code CS01 in the command field to start BOM creation. The Favorites panel shows a list of frequently used transaction codes. Enter the material code for the finished product you want to create a BOM for.
Step 23: Enter BOM details for copying
On the Create material BOM: Initial Screen, enter the material (for example, ZFG01), plant, BOM usage (1 for Production), and validity date. If the BOM has a history requirement, enter the change number as prompted; the system may display a warning asking you to enter a change number.
Step 24: Use the Copy From function
When prompted, use the Copy From dialog to specify the source BOM to copy. Enter the source material (for example, ZFG01), plant, BOM usage, and alternative BOM number, then confirm the selection to proceed.
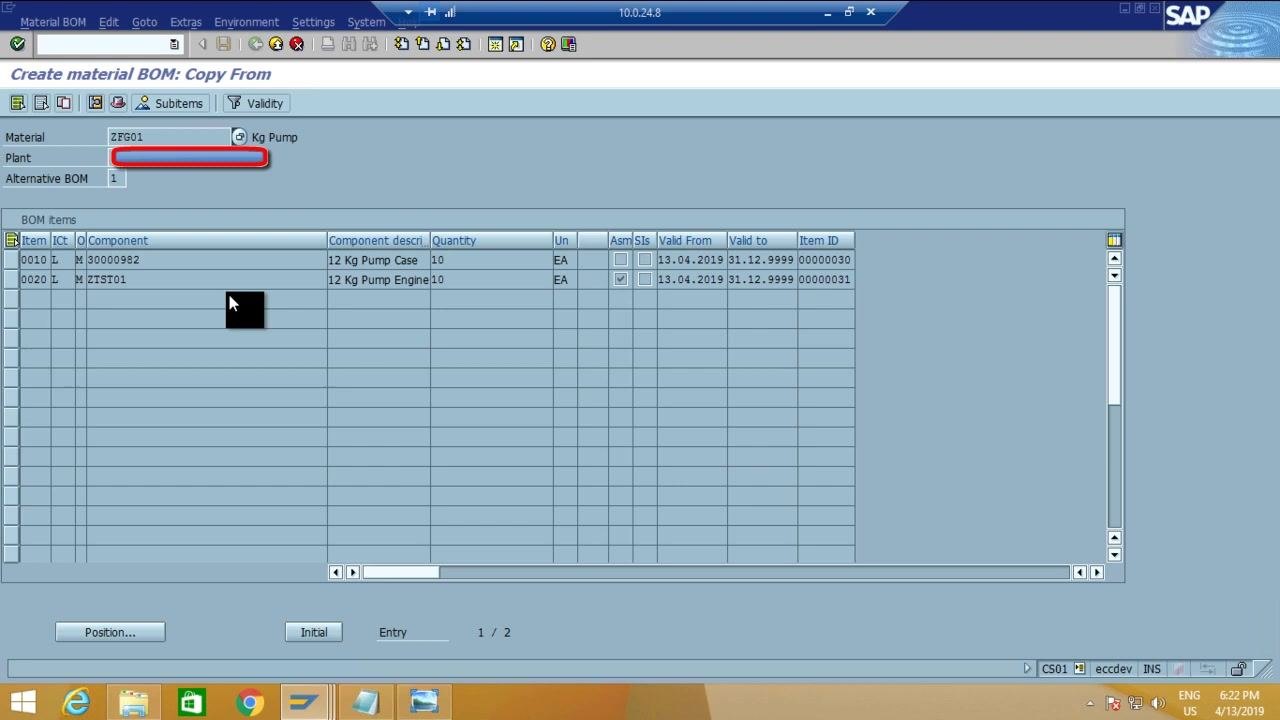
Step 25: Review and select BOM items to copy
On the Create material BOM: Copy From screen, review the list of BOM items available for copying:
- 0010: 30000982, 12 Kg Pump Case, Quantity 10 EA, Valid From 13.04.2019, Valid To 31.12.9999
- 0020: ZTST01, 12 Kg Pump Engine, Quantity 10 EA, Valid From 13.04.2019, Valid To 31.12.9999
Highlight the items you want to copy — you can select both or only the required items.
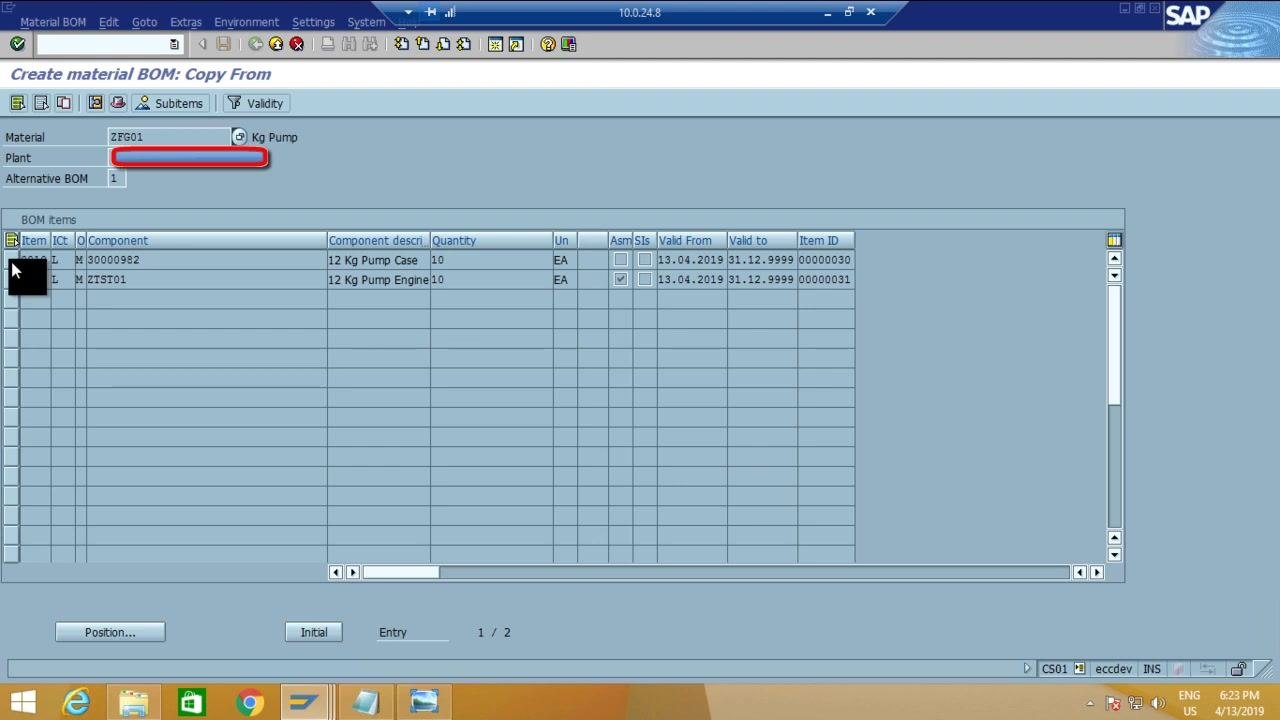
Step 26: Select and copy the required BOM items
Highlight the desired BOM item(s) by clicking the selection box next to each item. Select one item if that's all you need, or select both. Click Copy to bring the selected BOM items into the new BOM.
Understanding BOM alternatives and the assembly (ASM) indicator
Step 27: Save the newly created BOM
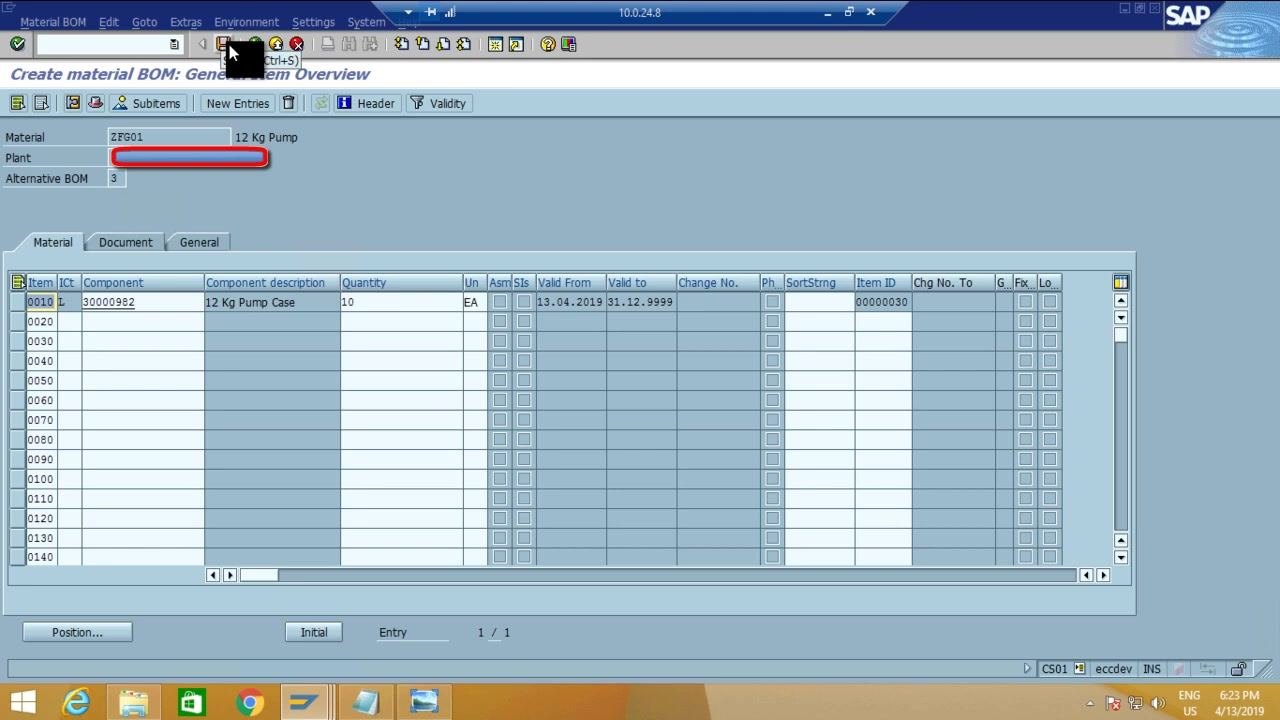
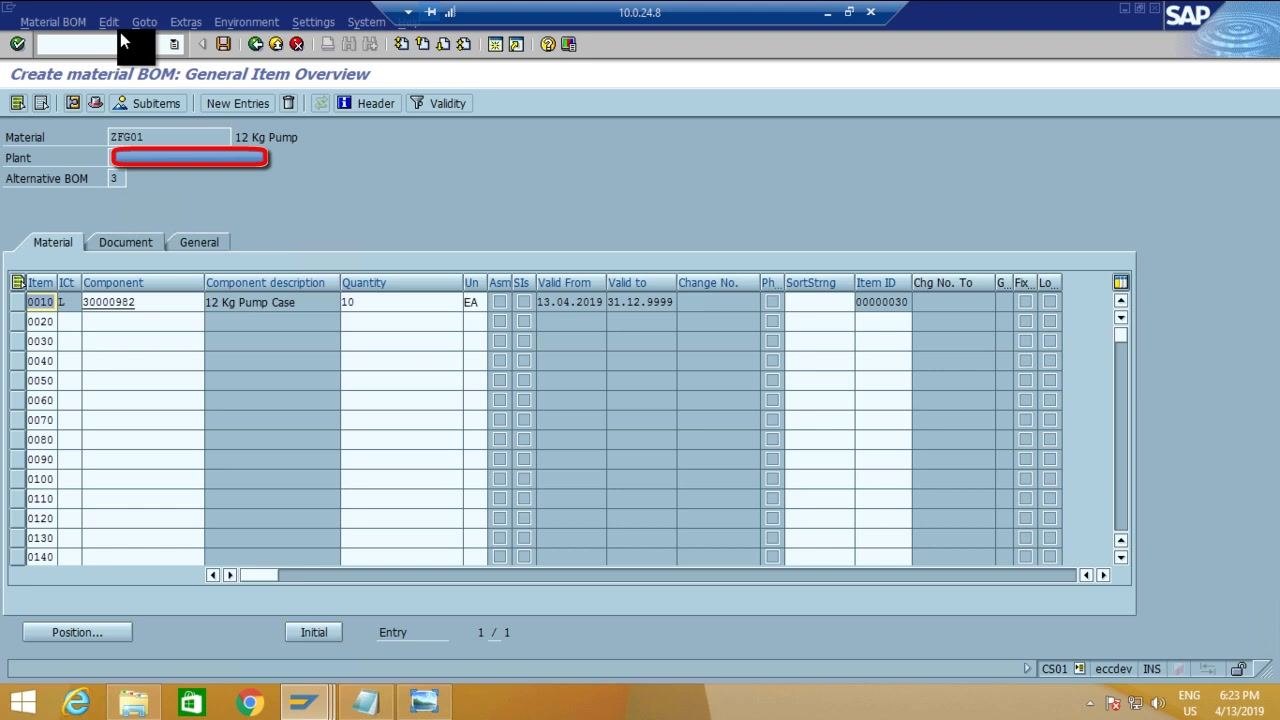
On the Create material BOM: General Item Overview screen, review the BOM details:
- Material: ZFG01 (12 Kg Pump)
- Alternative BOM: 3
- Component: 30000982 (12 Kg Pump Case), Quantity 10 EA, Valid From 13.04.2019, Valid To 31.12.9999
Click the save icon (diskette) at the top to save the BOM. This copy-and-adjust method is efficient when creating similar BOMs.
Step 28: Recognize existing BOMs in the system
The system lets you maintain multiple BOMs for the same material, so you can easily create and manage similar or alternative BOMs for a material that already exists.
Step 29: Understand the assembly (ASM) indicator
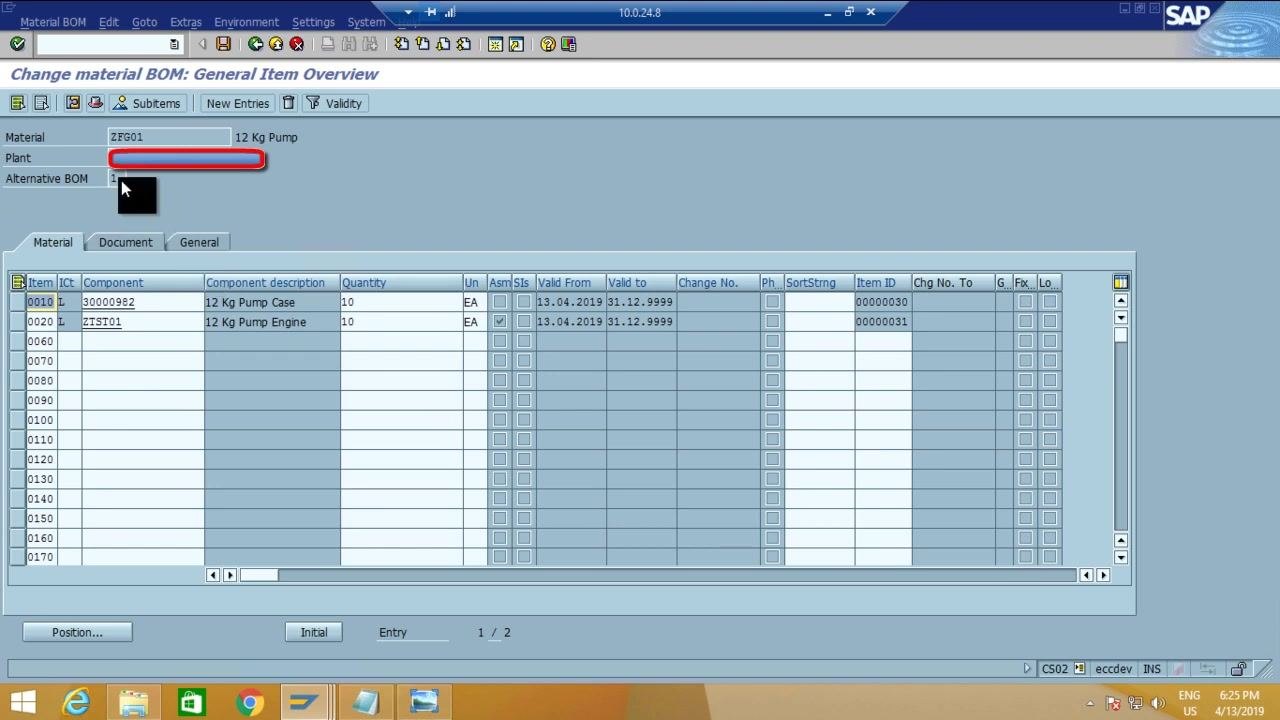
On the Change material BOM: General Item Overview screen, observe the ASM (Assembly) column. For component ZTST01 (12 Kg Pump Engine), the ASM checkbox is selected, which means this component itself has a separate BOM (a sub-assembly). This is useful for multi-level BOM structures, where a component is itself an assembly with its own BOM.
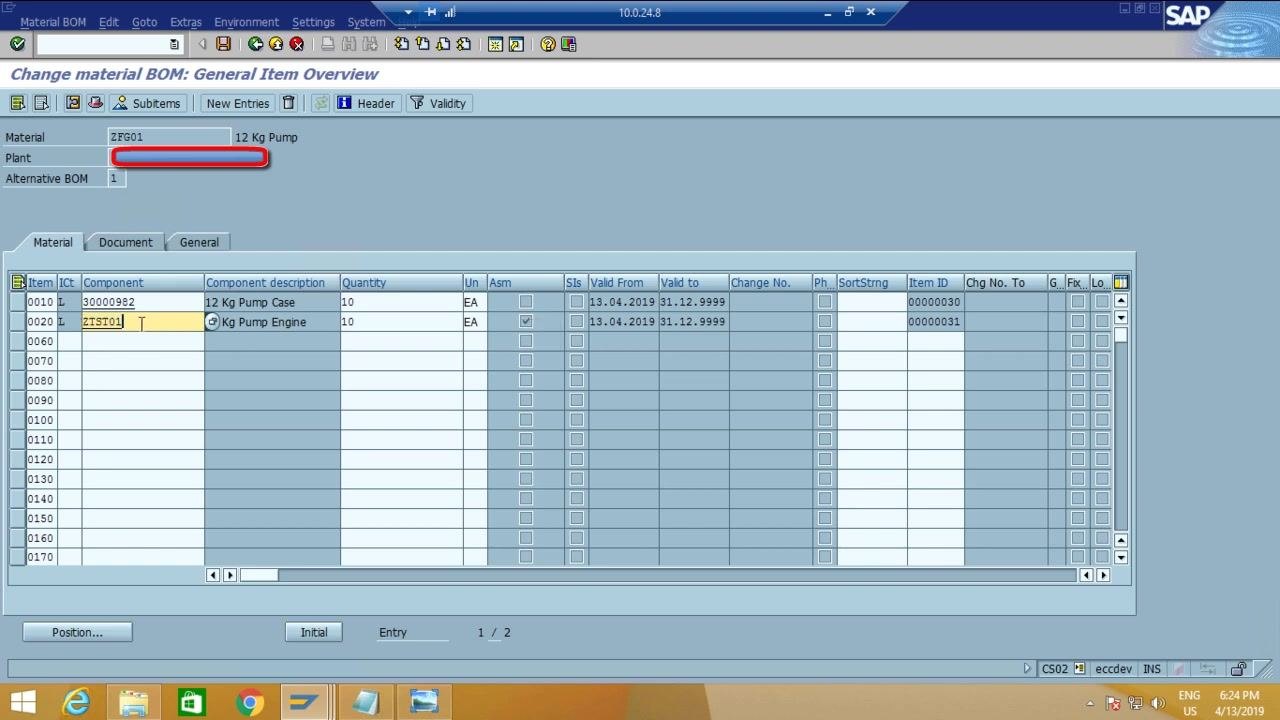
Step 30: Identify the purpose of the ASM indicator
The ASM checkbox being ticked for ZTST01 confirms it is an assembly with its own BOM. This visual cue helps you quickly identify which components are sub-assemblies.
Step 31: Create a BOM for a sub-assembly component
Open the SAP Easy Access screen and enter the transaction code CS01 in the command field to create a BOM for the sub-assembly component (for example, ZTST01). Reference your notes for the correct material and component codes:
- ZFG01 – 12 Kg Pump
- 30000982 – 12 Kg Pump Case
- ZTST01 – 12 Kg Pump Engine
Step 32: Enter BOM details for the sub-assembly
On the Create material BOM: Initial Screen, enter:
- Material: ZTST01
- BOM Usage: 1 (Production)
- Valid From: 13.04.2019
Use your notes to ensure correct entry of component codes and descriptions.
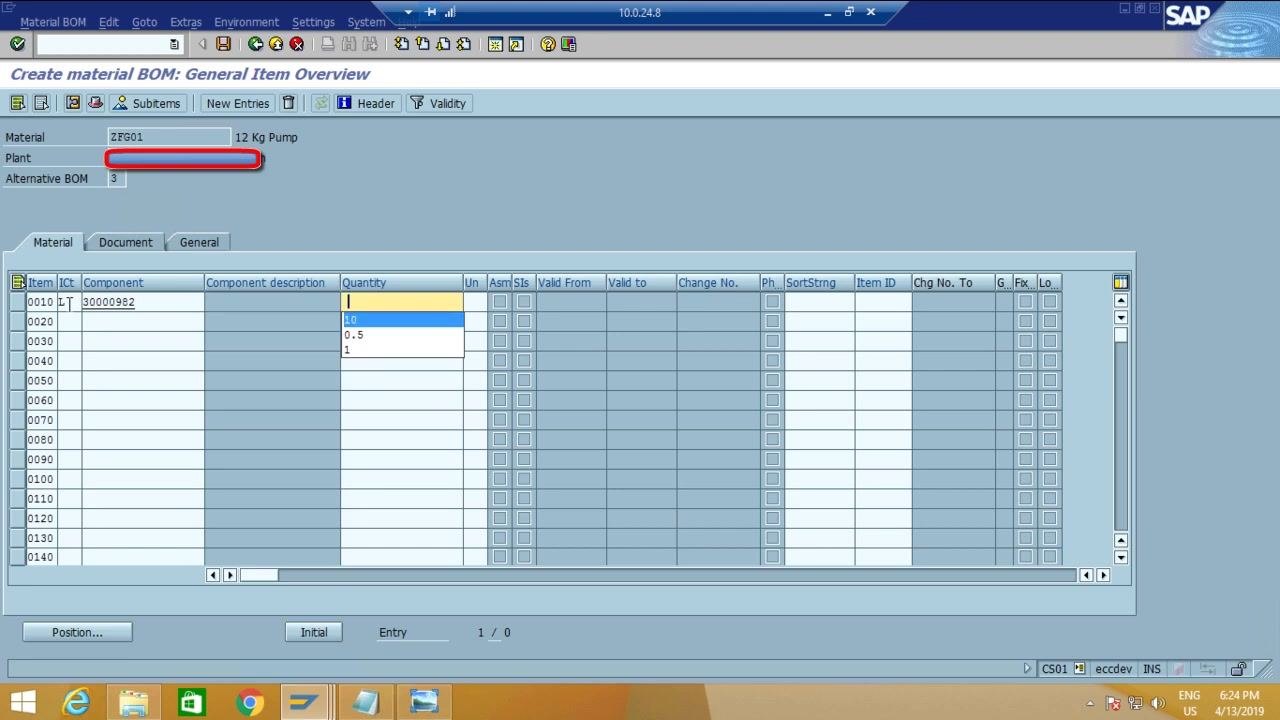
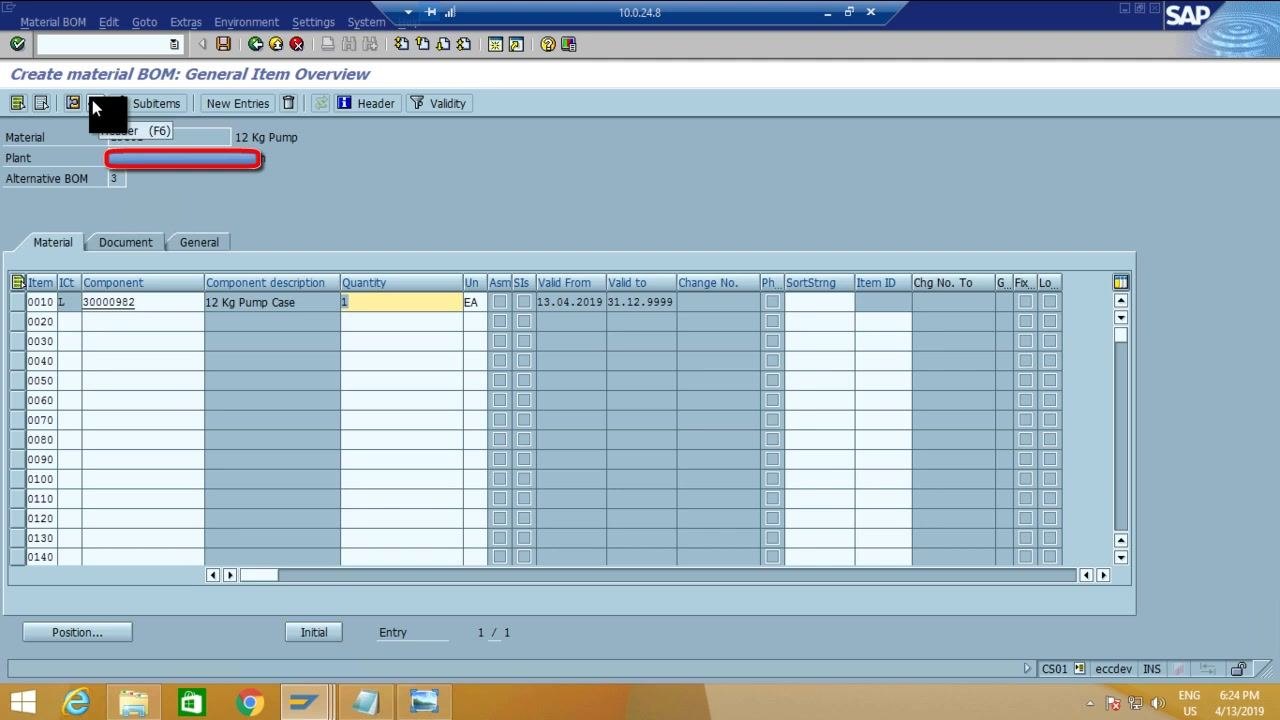
Step 33: Add components to the sub-assembly BOM
On the Create material BOM: General Item Overview screen for ZTST01, add the required component — for example, 30000982 (12 Kg Pump Case) with Quantity 1. Press Enter to confirm, then save the BOM for the sub-assembly.
Step 34: Review multiple BOM alternatives
Use transaction CS02 to display or change the BOM for your material (for example, ZFG01). Enter the material code and press Enter. The system displays all BOM alternatives for the material (for example, Alternative BOM 1 and 3). Each alternative BOM can have different components, quantities, or structures.
Step 35: Identify and manage BOM alternatives
On the Change material BOM: Alternative Overview screen, review the list of alternative BOMs for the material. Columns include:
- AltBOM (Alternative BOM number)
- BOM St (Status)
- Alternative Text (for easy identification)
- Base quantity, BUn (Base Unit), Valid From, Valid To
For example, AltBOM 1 has a base quantity of 20 EA valid from 13.04.2019, and AltBOM 3 has a base quantity of 1 EA valid from the same date. You can enter an Alternative Text to help distinguish between different BOM alternatives.
Production order creation and BOM component properties
Step 36: Create the production order and understand proportioning
When you create a production order in SAP, the system proportions component quantities according to the base quantity defined in the selected BOM alternative. Make sure you select the correct BOM alternative for your production order, since each alternative may have different base quantities and structures.
The BOM Status field controls BOM usage in production: you can set a BOM as Active, Inactive, or view its Activity History and Comments. For material ZFG01 (12 Kg Pump), two alternatives are available — Alternative 1 (base quantity 20 EA, valid from 13.04.2019) and Alternative 3 (base quantity 1 EA, valid from 13.04.2019).
Step 37: Navigate to the BOM item overview
From the BOM alternative overview, double-click the desired alternative to open the General Item Overview screen, where you can review and edit the list of components. For ZFG01, Alternative BOM 1, the components include 30000982 (12 Kg Pump Case, Quantity 10 EA) and ZTST01 (12 Kg Pump Engine, Quantity 10 EA, with the ASM indicator checked as a sub-assembly).
Step 38: Understand and set key BOM component properties
In the item overview, double-click the quantity field of a component to access its detailed settings:
- Recursive Allowed Indicator: Tick this if the header material is also used as a component (recursive BOM), for example for core products.
- Cost Relevancy:
Xmeans the component is 100% relevant for costing. You can also set it to 75%, 50%, 25%, or "not relevant." If set to "not relevant," the component's cost is excluded from the finished good's cost estimate.
Adjust these settings as needed for each component to ensure accurate production and costing.
Step 39: Review and edit BOM header data
Access the BOM header to review or update alternative BOM information, such as alternative text, status, and validity dates. This helps you distinguish between different BOM alternatives and manage their lifecycle.
Step 40: Return to the SAP Easy Access menu
After completing your BOM edits and reviews, return to the SAP Easy Access screen to continue with other SAP tasks or transactions.
What's next
Now that you know how to create a BOM in SAP CS01, you can:
- Use transaction CS02 to display or change existing BOMs and manage multiple alternatives.
- Set costing relevancy and recursive indicators on components to control cost estimates and multi-level structures.
- Create BOMs for sub-assembly components identified by the ASM indicator, building accurate multi-level BOM structures.
- Create production orders that proportion component quantities according to the base quantity defined in your selected BOM alternative.
Generation details: cost, quality tiers
Docsie billed 5,500 credits ($3.85) to analyze this 11-minute video at standard quality. The rewrite, template fill and Word/PDF exports were included. The same video at each quality tier:
| Quality | Frames sampled | Credits | Approx. cost |
|---|---|---|---|
| Draft | every 16-30 s | 2,750 | $1.92 |
| Standard (this guide) | every 8-15 s | 5,500 | $3.85 |
| Detailed | every 4-7 s | 11,000 | $7.70 |
| Ultra | every 1-3 s | 22,000 | $15.40 |
Credits priced at $0.70 per 1,000; plans include a monthly allowance. Enterprise customers on on-premise or bring-your-own-model deployments run this on their own inference and pay no per-video credits.
Generated by Docsie Video-to-Docs on 2026-10-01 from a 10-minute video. Screenshots are frames from the source video and belong to their creator, KH Zeeds, whose original is embedded above. If you own this video and want the guide removed or credited differently, contact us and we will act within one business day.