
How to Configure a Workflow in SAP
This guide shows you how to configure a workflow in SAP using the Workflow Builder (transaction SWDD). You create a workflow with a single activity step, define a standard task for it, and map the task to a business object method. You then accept the container elements and bindings, assign agents at step and task level, and save the workflow as a local object.
Video: How to create an SAP workflow - Create Task (Part 1 of 4) by Hai Wang (2010). All credit for the demonstration goes to the creator; watch the original on YouTube. The written guide below was generated from this video by Docsie. Creator? Request a change or removal.
This guide shows you how to configure a workflow in SAP using the Workflow Builder (transaction SWDD). You create a workflow with a single activity step, define a standard task for it, and map the task to a business object method. You then accept the container elements and bindings, assign agents at step and task level, and save the workflow as a local object.
Prerequisites
Before you start, make sure you have the following:
- Access to the SAP Easy Access screen, where you can launch transaction
SWDD. - The name of the business object type (for example,
FORMABSENC) that your task will run. The object type must exist in the SAP Business Object Repository. - A position or other agent to assign to the task. This example uses a position whose name contains the string "happy".
Start the Workflow Builder and create a workflow
Step 1: Open the Workflow Builder
- In the SAP Easy Access screen, enter transaction code
SWDDin the command field. You can also select SWDD - Workflow Builder under your Favorites.
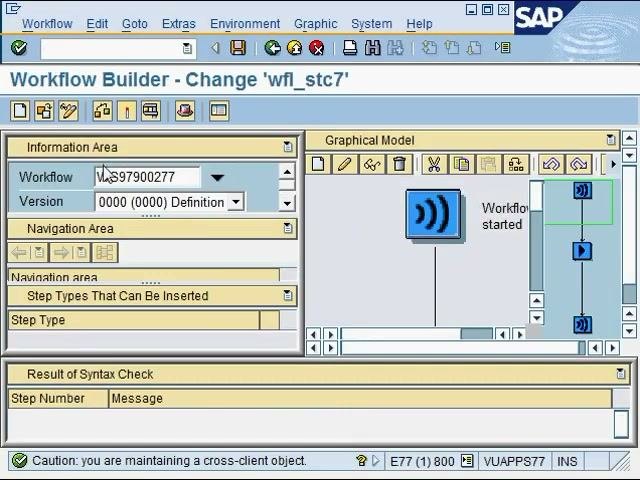
The Workflow Builder opens and displays the last workflow you worked on, so your initial screen may differ. The interface includes the Information Area, Navigation Area, Graphical Model, and Result of Syntax Check sections.
Step 2: Create a new workflow
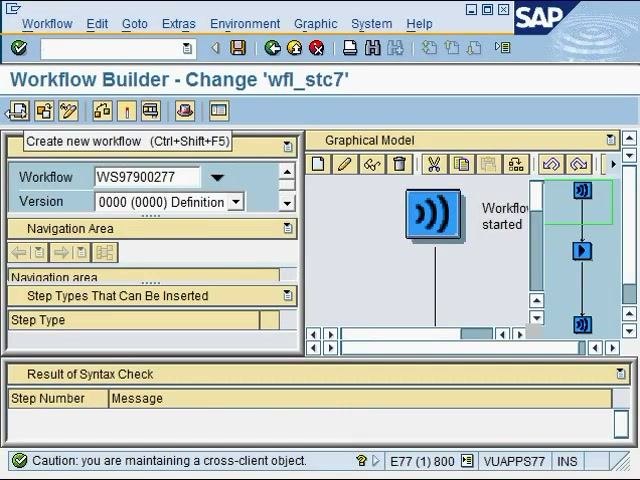
- In the Workflow Builder toolbar, click the Create new workflow icon, or press Ctrl+Shift+F5.
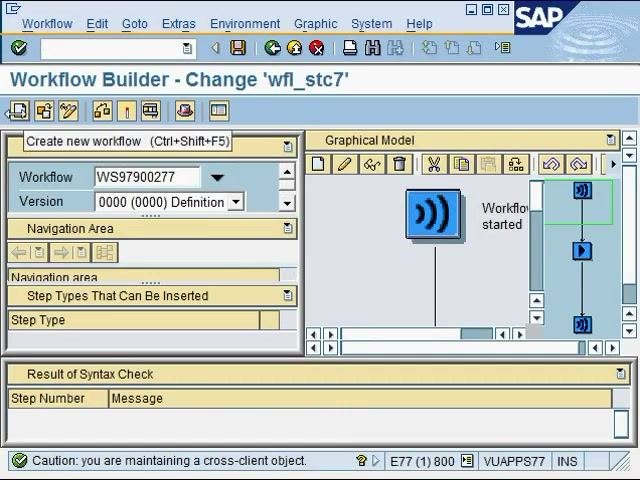
The system opens a new, unnamed workflow template.
Step 3: Adjust the Workflow Builder window (optional)
Resize or move the Workflow Builder window as needed so that all sections are visible.
Step 4: Review the basic workflow template
The new template contains three elements:
- A Workflow started step at the top.
- A Workflow completed step at the bottom.
- An undefined step in between, labeled Undefined - Double-click for new step.
Step 5: Locate the undefined step
In the graphical model, find the step labeled Undefined - Double-click for new step. This is where you define the first actionable step in your workflow.
Define the activity step
Step 6: Open the Step Selection dialog
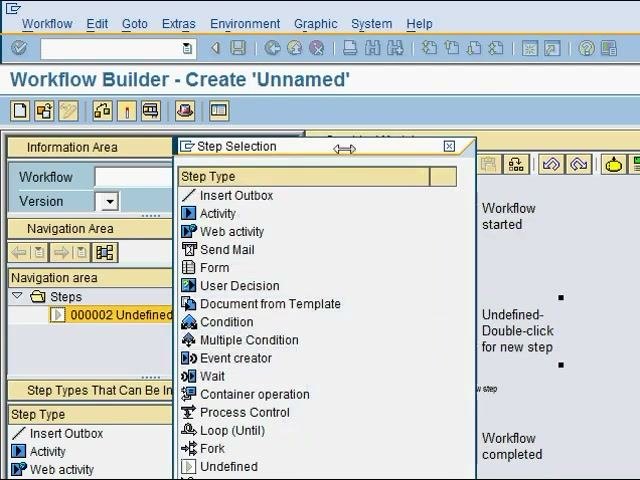
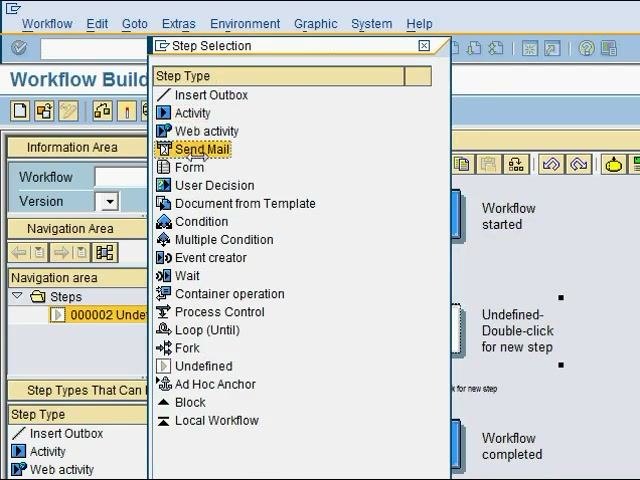
- Double-click the undefined step to open the Step Selection dialog.
- Review the available step types.
The step types include Insert Outbox, Activity, Web activity, Send Mail, Form, User Decision, Document from Template, Condition, Multiple Condition, Event creator, Wait, Container operation, Process Control, Loop (Until), Fork, Undefined, Ad Hoc Anchor, Block, and Local Workflow.
Step 7: Select Activity as the step type
- In the Step Selection dialog, click Activity to define the undefined step as an activity.
Step 8: Review the activity step configuration
The activity step configuration screen appears. Enter the required details:
- In the Task field, click the search icon to select or create a task.
- Optionally, specify agent assignment and background processing under Task Properties.
Step 9: Create a new task for the step
- Click the search icon next to the Task field.
- In the dropdown menu, select Create task.
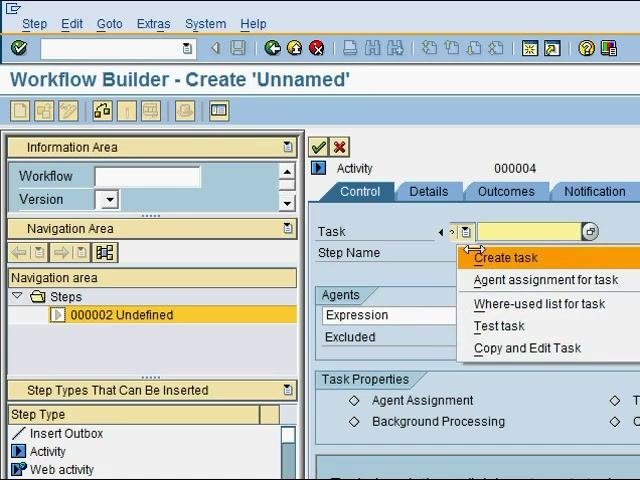
In SAP, a step and a task are distinct objects. Steps are workflow elements. Tasks are reusable objects that define what action is performed.
Create and configure the standard task
Step 10: Open the Standard Task: Create screen
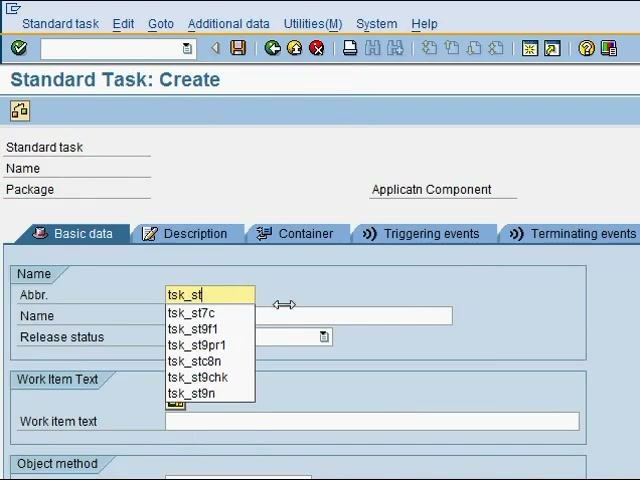
The Standard Task: Create screen appears. Use it to define the task's name, abbreviation, release status, work item text, and the object method it executes.
Step 11: Enter an abbreviation and name
- In the Abbr. field, enter a short, unique abbreviation. For example, type
tsk_st. - In the Name field, enter a descriptive name that follows your naming convention. For example, enter
Create Absence Form (st6).
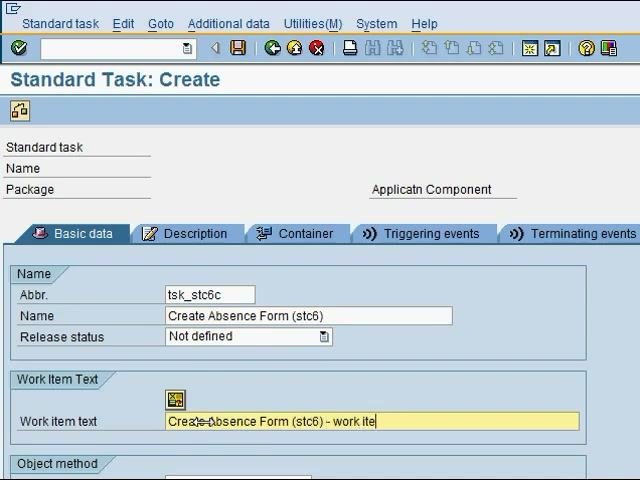
A consistent naming convention helps you identify and manage tasks later. The example screens later in this guide show the saved values tsk_stc6c and Create Absence Form (stc6).
Step 12: Check the release status
Make sure the Release status field is set appropriately. For new tasks, it may default to Not defined. You can update it later as needed.
Step 13: Enter the work item text
- In the Work item text field, enter a clear description. For example, type
Create Absence Form (st6) - work item.
This text appears in the workflow inbox of the business workplace. It helps users understand the purpose of the work item.
Step 14: Map the task to an object type
The Object method section is below the Work item text field. It determines the business logic that the workflow step performs.
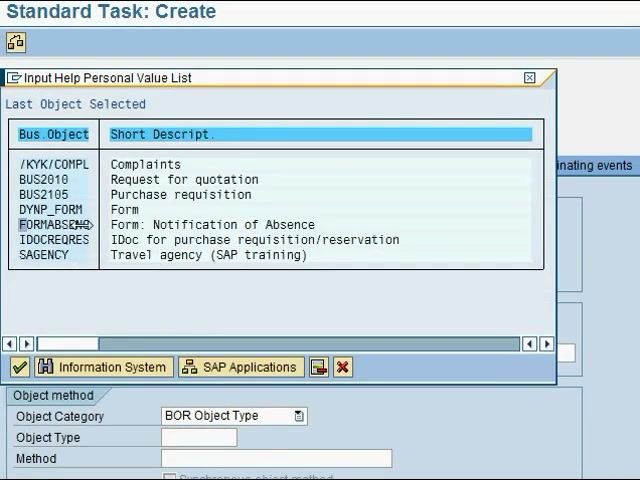
- In the Object method section, find the Object Type field. It may be blank.
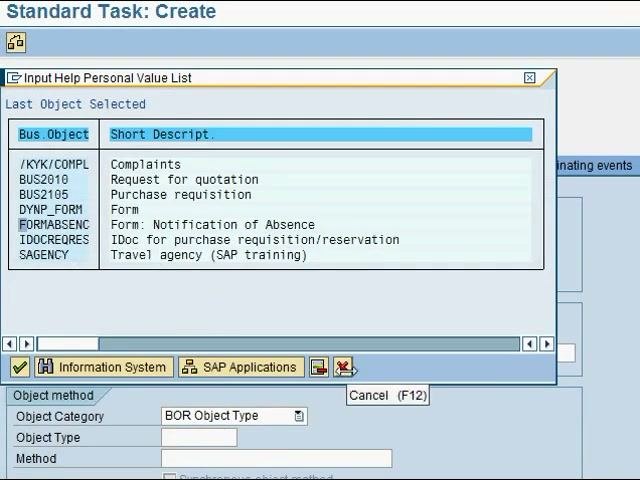
- Click the search icon next to the field to open the object selection dialog.
- If your object appears in the recent list (for example,
FORMABSENCfor "Form: Notification of Absence"), select it. - If the object is not listed, type its name (for example,
FORMABSENC) into the Object Type field.
If you are unsure of the object name, refer to SAP documentation or a separate tutorial on searching the Business Object Repository.
Step 15: Select the method for the object
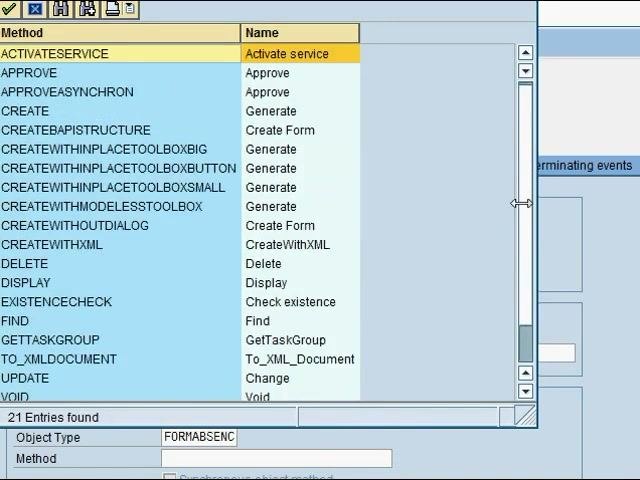
- Click the search icon next to the Method field.
- In the list of available methods for the object type, select the method that matches your requirement. For an absence form, select
CREATE.
The Method field now displays CREATE.
Step 16: Confirm the object type and method mapping
Verify the following values so the task runs the correct business logic:
- Object Category is
BOR Object Type. - Object Type is
FORMABSENC. - Method is
CREATE.
Step 17: Assign the task to a local package
When you save the task, SAP prompts you to assign a package for transport management. The Create Object Directory Entry dialog shows the fields Package, Person Responsible, Original System, and Original Language.
- For testing or development, click Local Object.
This assigns the task to a local package, so it is not transported to other SAP systems such as test or production.
Step 18: Review the object directory entry values
In this example, the dialog contains the following details:
- Object: R3TR PDTS 97909197
- Package: leave blank or select as appropriate
- Person Responsible: STANLEYCHAI
- Original System: E77
- Original Language: EN (English)
- Click Local Object to save the object locally.
Step 19: Review the standard task details
On the Standard Task: Change screen, verify and edit the task details. The example shows these values:
- Standard task: 97909197
- Abbr.: tsk_stc6c
- Name: Create Absence Form (stc6)
- Package: STMP
- Release status: Not defined
- Work item text: Create Absence Form (stc6) - work item
- Object Category: BOR Object Type
- Object Type: FORMABSENC
- Method: CREATE
Confirm container elements and bindings
Step 20: Review the proposed container elements
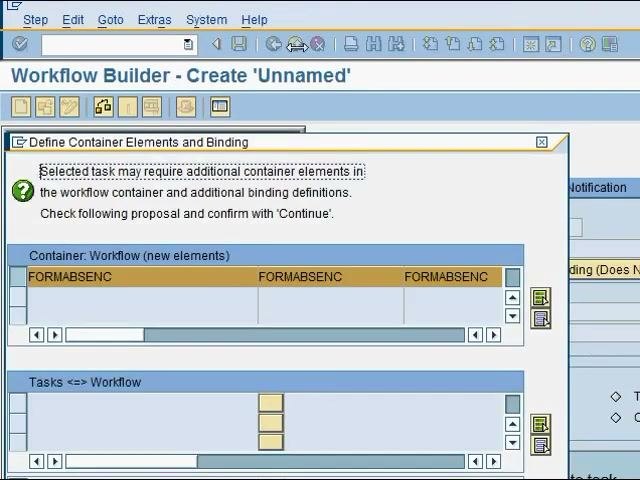
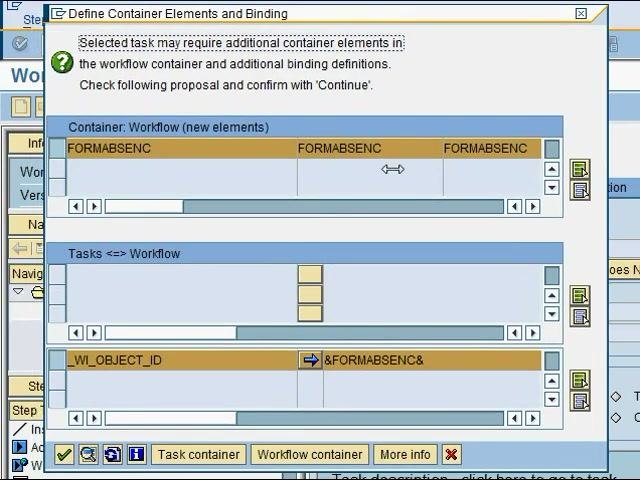
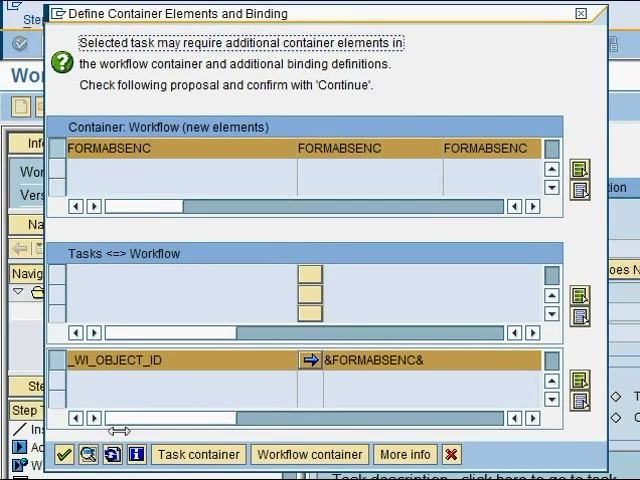
SAP then displays the Define Container Elements and Binding dialog. It shows this message: "Selected task may require additional container elements in the workflow container and additional binding definitions. Check following proposal and confirm with 'Continue'."
SAP detects the necessary container elements and bindings automatically and proposes new elements, such as FORMABSENC, for the workflow container. The Tasks <=> Workflow section shows mappings such as _WI_OBJECT_ID → &FORMABSENC&.
Step 21: Accept the default proposals
- Accept the default container elements and bindings that SAP proposes.
- Click Continue (the green checkmark).
Step 22: Verify the task creation
On the Workflow Builder - Create 'Unnamed' screen, confirm the following:
- The task has been created and has a Task ID, for example
TS97909197. - The step name is Create Absence Form (stc6).
- The step appears in the navigation area as 000002 Undefined.
Assign agents
Step 23: Assign an agent to the workflow step
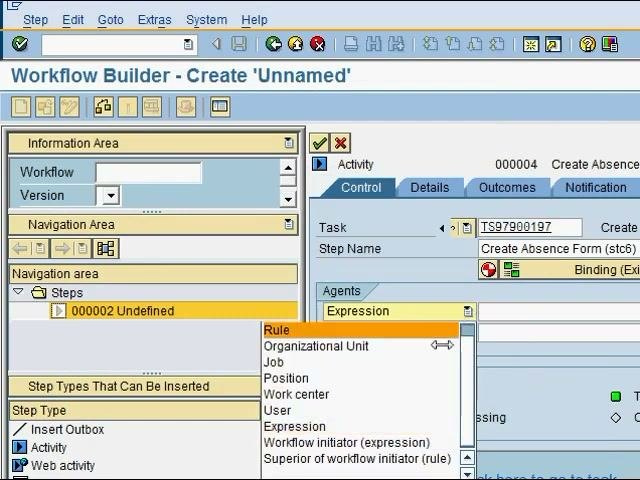
- In the navigation area, select the step.
- In the Agents section, click the field next to Expression.
- From the dropdown menu, select Workflow initiator (expression).
The dropdown offers these options: Rule, Organizational Unit, Job, Position, Work center, User, Expression, Workflow initiator (expression), and Superior of workflow initiator (rule). Selecting Workflow initiator (expression) assigns the workflow initiator as the agent for this step.
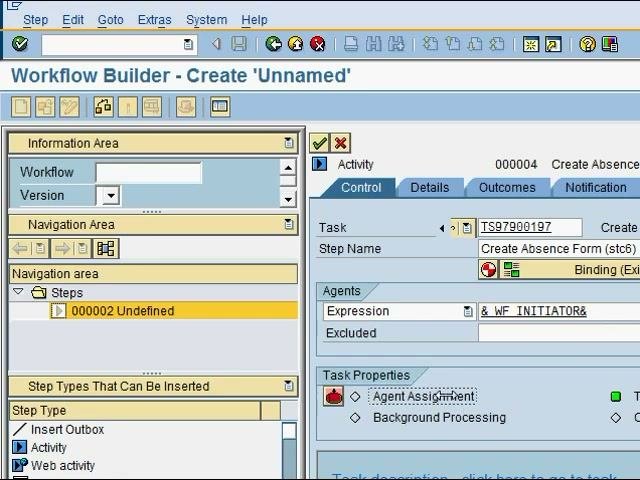
Step 24: Open the task-level agent assignment
- Under Task Properties, click Agent Assignment. This configures the agent assignment for the task itself, not only the workflow step.
The Standard task: Maintain Agent Assignment screen opens. It lists the task Create Absence Form (TS 97909197) and provides options for creating agent assignments and organizational assignments.
Step 25: Choose the agent type
- Click to create a new agent assignment.
- In the Choose agent type dialog, select Position.
- Click the green checkmark.
The dialog lists these agent types: Work Center, Role, Job, Organizational unit, Position, Task, and User.
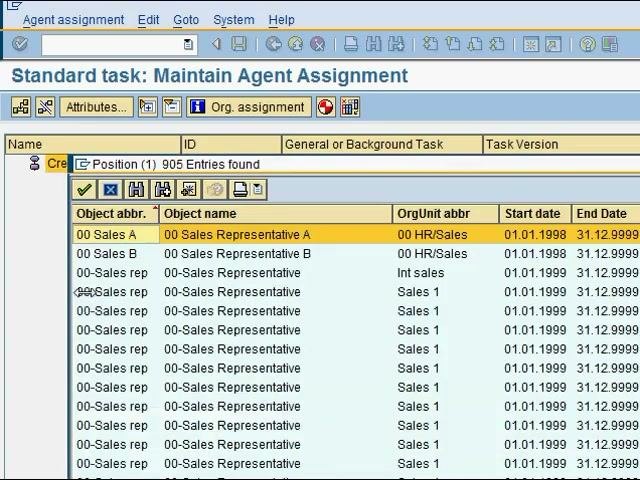
Step 26: Search for the position
The system lists the available positions, which can be a large number of entries (for example, 905 entries found). If you know a unique string in the position name, use it as a search term. In this example, the position name contains the string "happy".
- In the Choose Position dialog, enter
*happy*in the Search Term field. - Click the green checkmark or press Enter to run the search.
Step 27: Confirm the position assignment
If only one position matches the search term, SAP automatically selects it and assigns it as the agent for the task. The Standard task: Maintain Agent Assignment screen then shows the assigned position for Create Absence Form (TS 97909197).
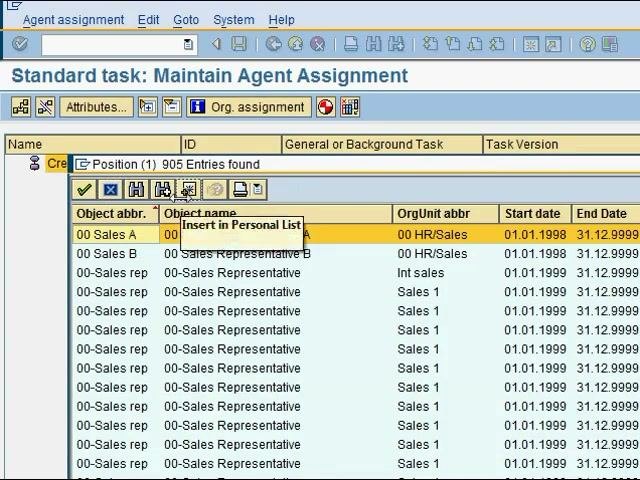
Step 28: Verify the assigned position and holder
Confirm the following on the Standard task: Maintain Agent Assignment screen:
- The position Sales Rep (Happy) (ID: S 50011283) is assigned as the agent for the task.
- Under this position, the holder Stanley Chai (US STANLEYC...) is listed. This is the user assigned to the position.
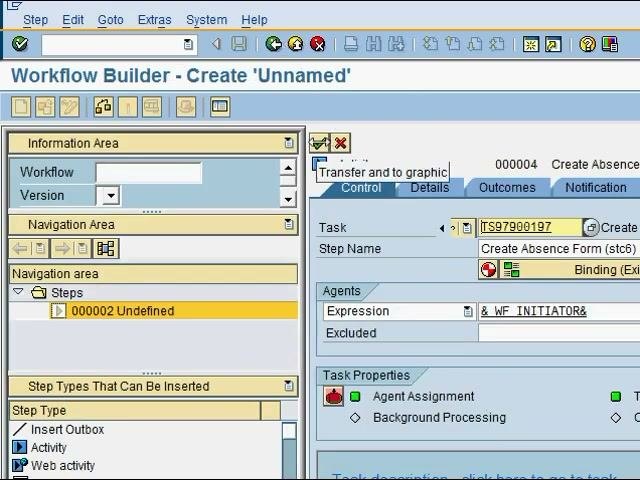
Save the workflow
Step 29: Return to the Workflow Builder and save
- Navigate back to the Workflow Builder - Create 'Unnamed' screen.
- Make sure the step 000002 Undefined is still selected in the navigation area.
- On the Details tab, confirm that the agent assignment and task details are correct.
- Click Save (the disk icon) in the toolbar.
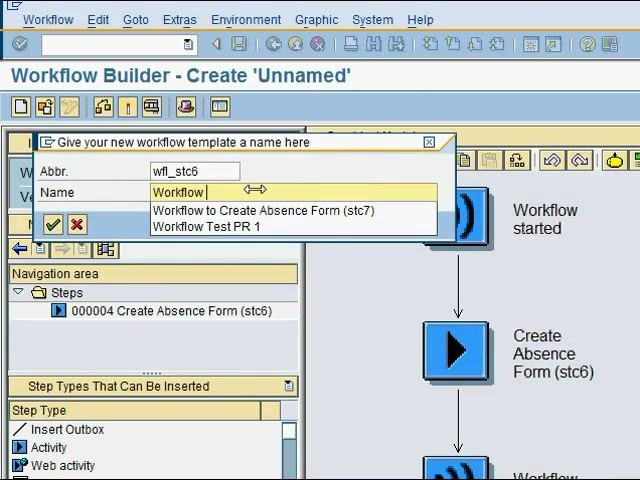
SAP prompts you for an abbreviation and a name for the new workflow template.
Step 30: Enter the workflow abbreviation and name
In the Give your new workflow template a name here dialog, enter the following:
- Abbr.:
wfl_stc6(the default value) - Name:
Workflow, or a suggestion such as "Workflow to Create Absence Form (stc7)" or "Workflow Test PR 1"
- Click the green checkmark to confirm.
Step 31: Confirm the object directory entry
In the Create Object Directory Entry dialog, review these attributes:
- Package: $TMP (the default local package)
- Person Responsible: STANLEYCHAI
- Original System: E77
- Original Language: EN English
- Click Local Object to save the workflow as a local object.
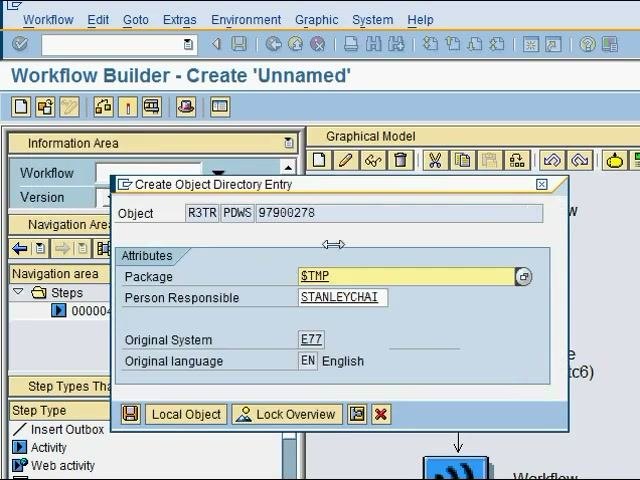
Step 32: Verify the workflow
After you save, the Workflow Builder - Change 'wfl_stc6' screen appears. Confirm the following:
- Your workflow (WS97900278) is listed with the correct version and steps, including 000004 Create Absence Form (stc6).
- The graphical model shows the sequence Workflow started → Create Absence Form (stc6).
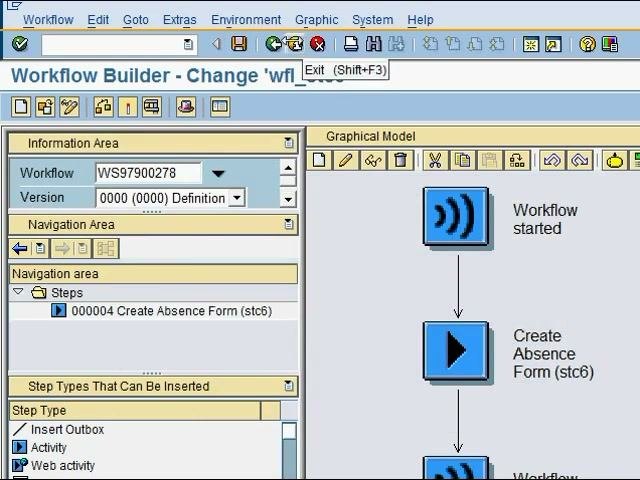
Summary
You now know how to configure a workflow in SAP from start to finish. You created a workflow with an activity step and defined a standard task mapped to the CREATE method of the FORMABSENC object type. You accepted SAP's proposed container elements and bindings, assigned agents at step and task level, and saved the workflow as a local object.
What's next
The workflow is ready for further testing or deployment. You can continue with further workflow configuration as needed.
Generation details: cost, quality tiers
Docsie billed 5,000 credits ($3.50) to analyze this 10-minute video at standard quality. The rewrite, template fill and Word/PDF exports were included. The same video at each quality tier:
| Quality | Frames sampled | Credits | Approx. cost |
|---|---|---|---|
| Draft | every 16-30 s | 2,500 | $1.75 |
| Standard (this guide) | every 8-15 s | 5,000 | $3.50 |
| Detailed | every 4-7 s | 10,000 | $7.00 |
| Ultra | every 1-3 s | 20,000 | $14.00 |
Credits priced at $0.70 per 1,000; plans include a monthly allowance. Enterprise customers on on-premise or bring-your-own-model deployments run this on their own inference and pay no per-video credits.
Generated by Docsie Video-to-Docs on 2026-11-15 from a 9-minute video. Screenshots are frames from the source video and belong to their creator, Hai Wang, whose original is embedded above. If you own this video and want the guide removed or credited differently, contact us and we will act within one business day.