
How to Use the Query Generator in SAP Business One
If you want to know how to use the query generator in SAP Business One, the Query Wizard is the tool to use. It gives you easy access to the database and a simple way to build user-defined reports. It guides you step by step through selecting tables and fields, adding a parameter, previewing results, and saving the query. You don't need SQL knowledge.
Video: Creating a query in SAP Business One by SAP Business One (2015). All credit for the demonstration goes to the creator; watch the original on YouTube. The written guide below was generated from this video by Docsie. Creator? Request a change or removal.
If you want to know how to use the query generator in SAP Business One, the Query Wizard is the tool to use. It gives you easy access to the database and a simple way to build user-defined reports. It guides you step by step through selecting tables and fields, adding a parameter, previewing results, and saving the query. You don't need SQL knowledge.
This guide builds a Business Partner query, adds a parameter for BP Type, and saves the query so you can run it again later.
Prerequisites
- You are logged in to SAP Business One as a user, for example Manager.
- You can reach the Query Wizard from the menu or toolbar.
Steps
Open the SAP Business One main screen
Confirm you are on the main screen. A navigation panel on the left lists modules such as Administration, Financials, Sales Opportunities, Sales - A/R, Purchasing - A/P, Business Partners, Banking, Inventory, Production, MRP, Service, Human Resources, and Reports.
A welcome message at the top reads "Welcome, Manager. You are in the home cockpit of OEC Computers." A search bar lets you look up operations, master data, and documents.
Launch the Query Wizard
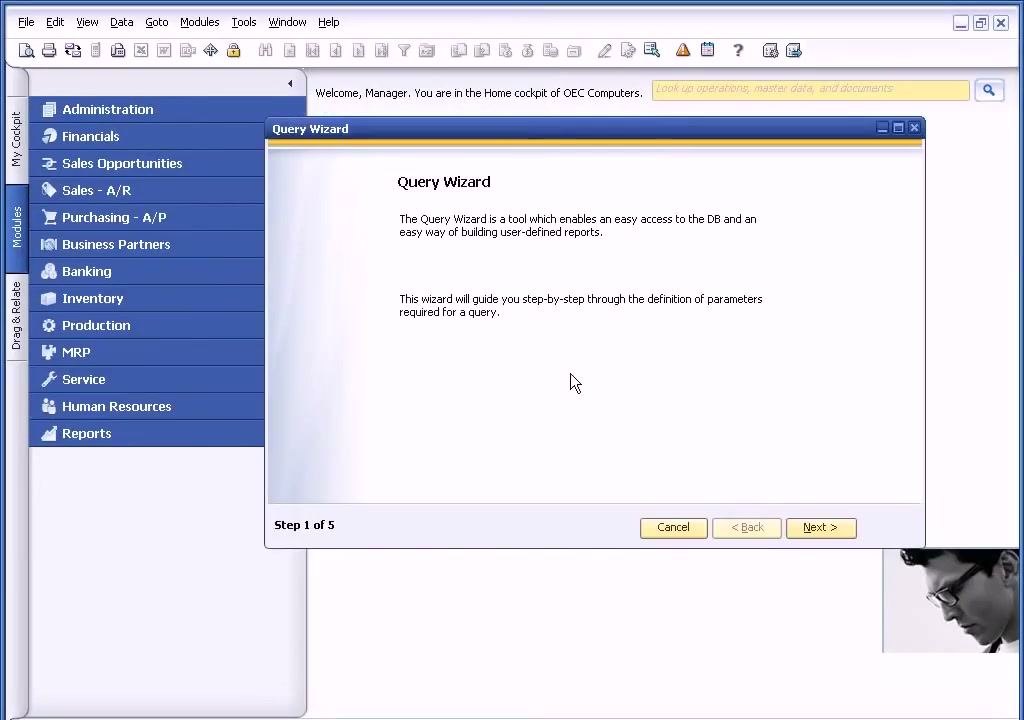
Locate the Query Wizard in the menu or toolbar and open it. The introduction screen explains that the wizard enables easy access to the database and an easy way to build user-defined reports. It also says the wizard guides you step by step through the parameters a query requires.
The wizard shows that you are on Step 1 of 5. Click Next > to continue.
Search for tables to include in the report
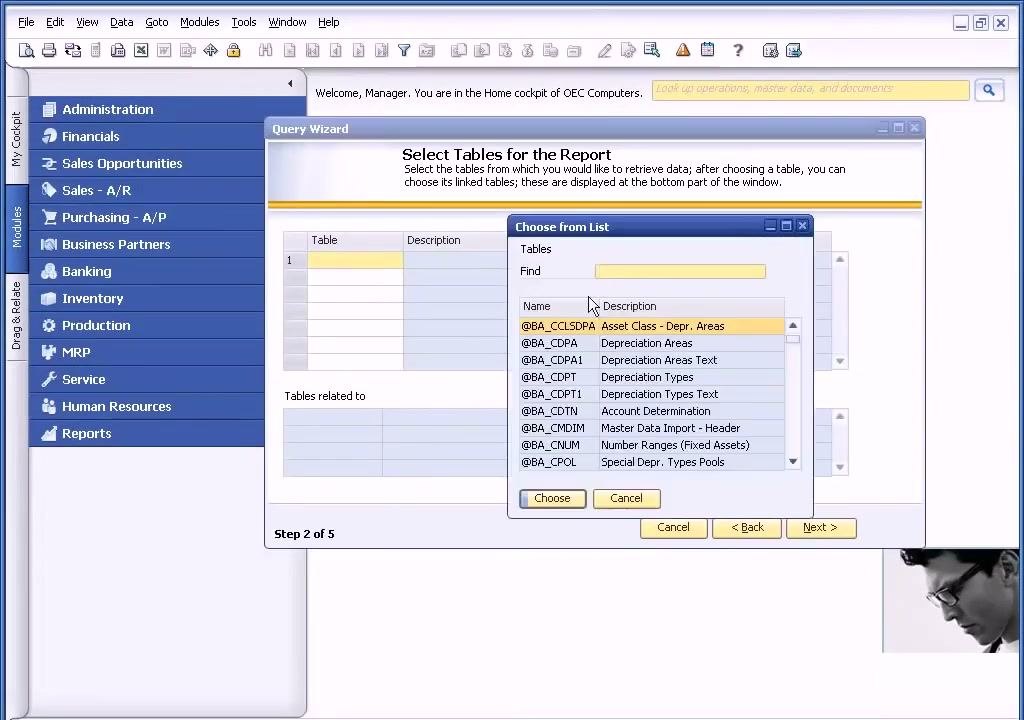
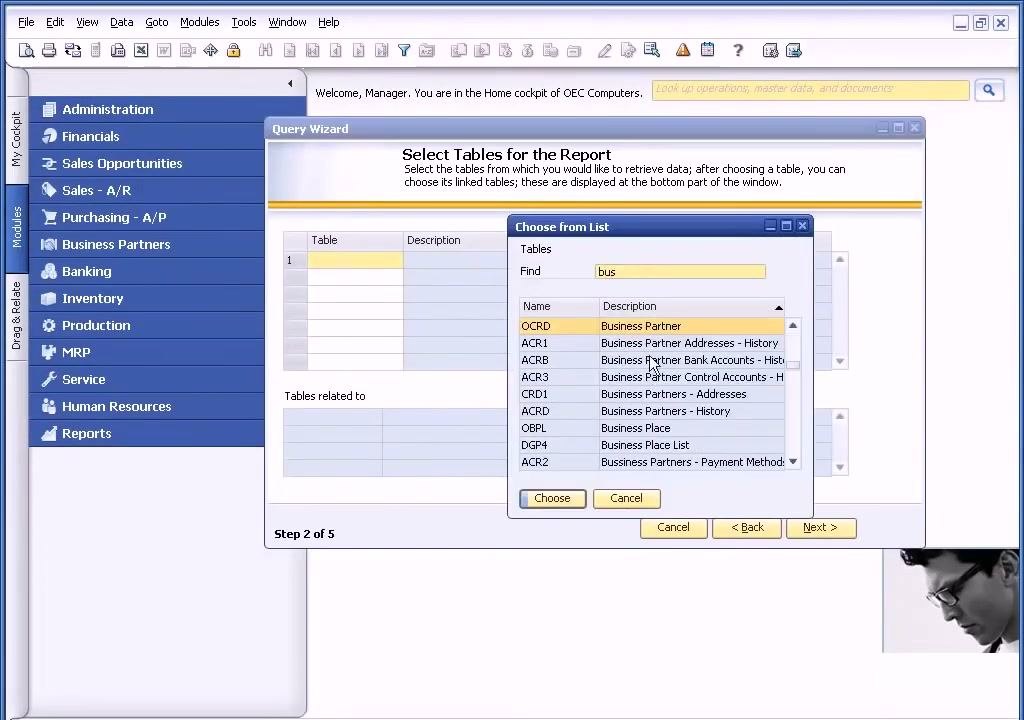
In Step 2 of 5, the wizard prompts you to select tables for your report. Open the "Choose from List" dialog. In the "Find" field, start typing the description of the table you need, for example "business partners". The list filters as you type and shows the matching tables.
Choose the Business Partner table
Find the table with the technical name OCRD and the description Business Partner, and select it. Below the list, the wizard displays related tables such as Business Partner Addresses, Bank Accounts, and Control Accounts.
Select fields for the report columns
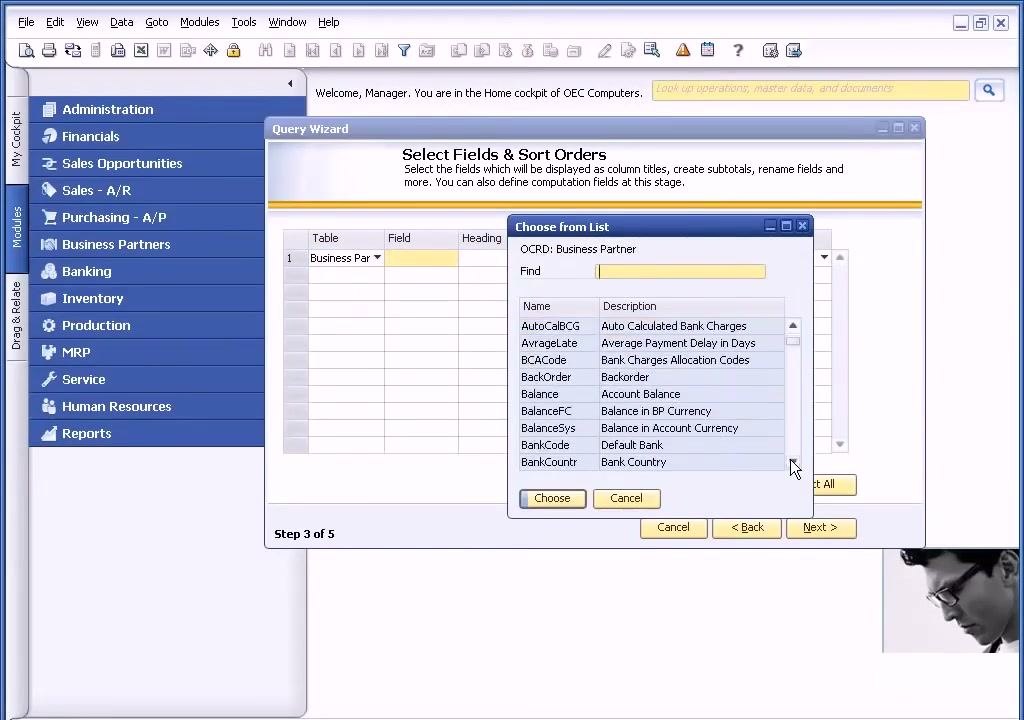
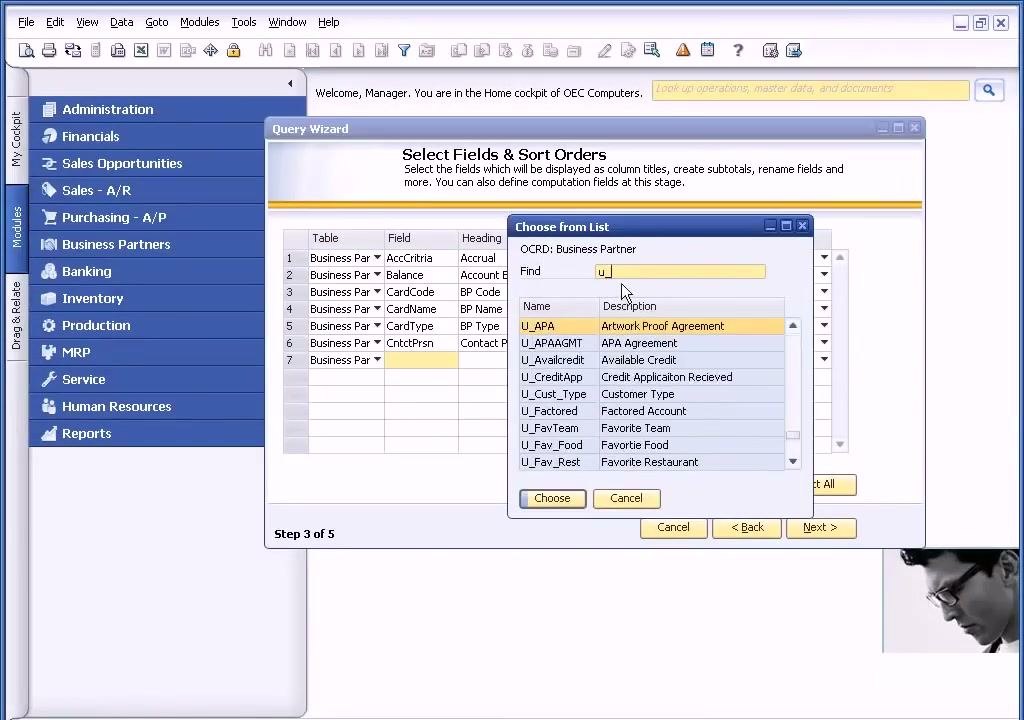
In Step 3 of 5, you select the fields to display as column titles. Open the "Choose from List" dialog for the Business Partner table and scroll through the available fields. Hold down the Control key to select several fields at once. This example uses:
- Balance (Account Balance)
- CardCode (BP Code)
- CardName (BP Name)
- CardType (BP Type)
- CntctPrsn (Contact Person)
Include user-defined fields
To add user-defined fields, type U_ in the "Find" field. The wizard performs a smart lookup and lists all user-defined fields, such as:
- U_APA (Artwork Proof Agreement)
- U_APAAGMT (APA Agreement)
- U_AvailCredit (Available Credit)
- U_CreditApp (Credit Application Received)
- U_Cust_Type (Customer Type)
- U_FavTeam (Favorite Team)
- U_Fav_Food (Favorite Food)
- U_Fav_Rest (Favorite Restaurant)
Select the user-defined fields you want in your report.
Switch to a related table and add its fields
To include fields from a related table such as Card Groups, open the drop-down menu in the "Table" column of the "Select Fields & Sort Orders" step. Change the table from "Business Partner" (OCRD) to "Card Groups" (OCRG).
Select the field you want from the Card Groups table, such as Group Name. Then click Next >.
Preview the query results
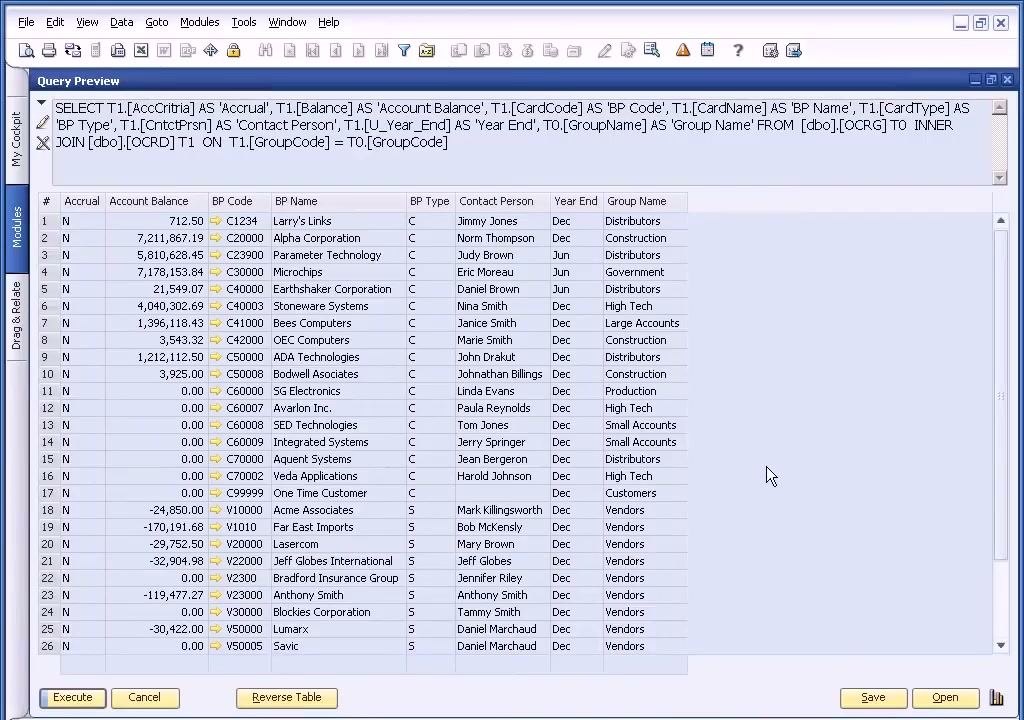
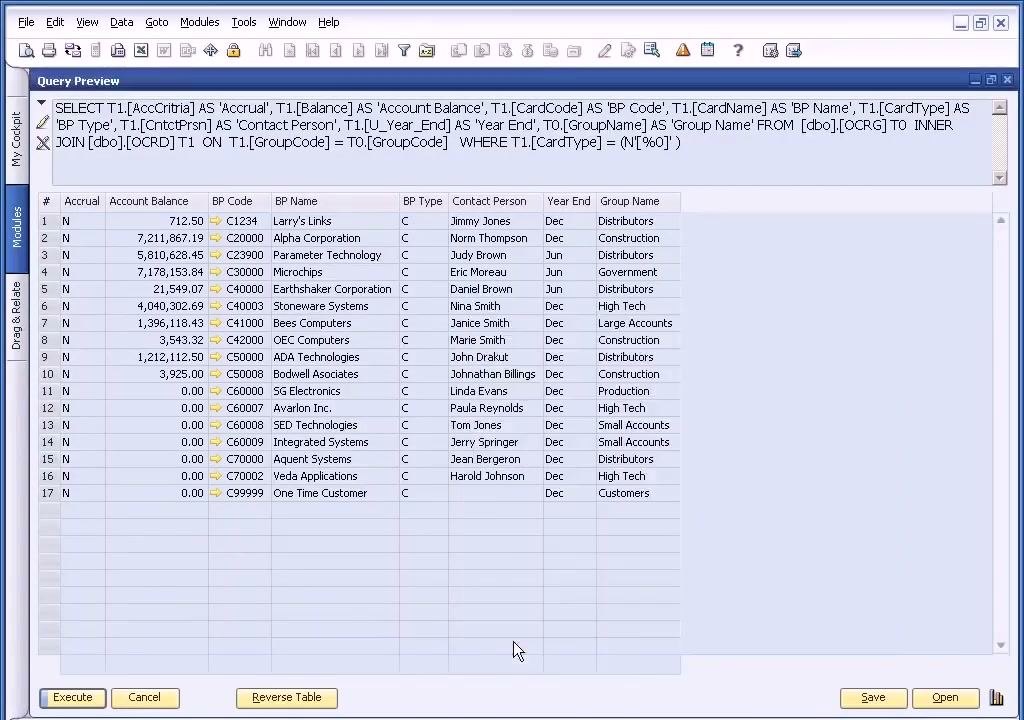
After you click Next > and Finish, the "Query Preview" window shows the raw data results. The columns include Accrual, Account Balance, BP Code, BP Name, BP Type, Contact Person, Year End, and Group Name.
The SQL statement the wizard generated appears at the top of the window. Scroll to view all returned records. If needed, click Reverse Table to change the order of the displayed data.
Add a parameter to filter the query
To filter results dynamically, for example by Business Partner type, click Back to return to the "Conditions and Relations" step. Then set up the condition:
- On the "Display Conditions" tab, select the OCRD (Business Partner) table.
- In the "Field" column, choose CardType (BP Type).
- Set "Condition" to Equal.
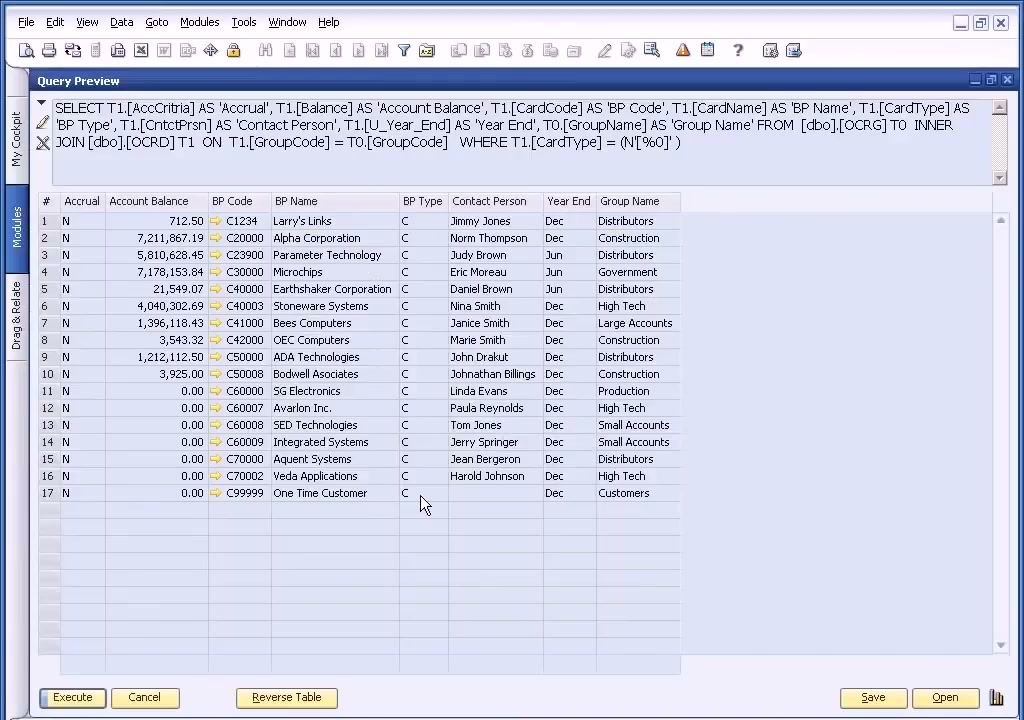
- In the "Field/Value" column, enter [%0]. This defines a parameter that prompts for input each time the query runs.
Review the generated SQL script
Go to the final step of the wizard. The "Query Wizard completed" screen displays the full SQL statement, including the BP Type parameter. Check that all fields and conditions are correct, then click Finish.
Run the query with a parameter
When you finish the wizard, the "Query - Selection Criteria" dialog appears. In the BP Type field, select a value:
- "C" for Customers
- "V" for Vendors
- "S" for Suppliers
- "L" for Leads
Click OK to run the query with that parameter.
View the filtered results and save the query
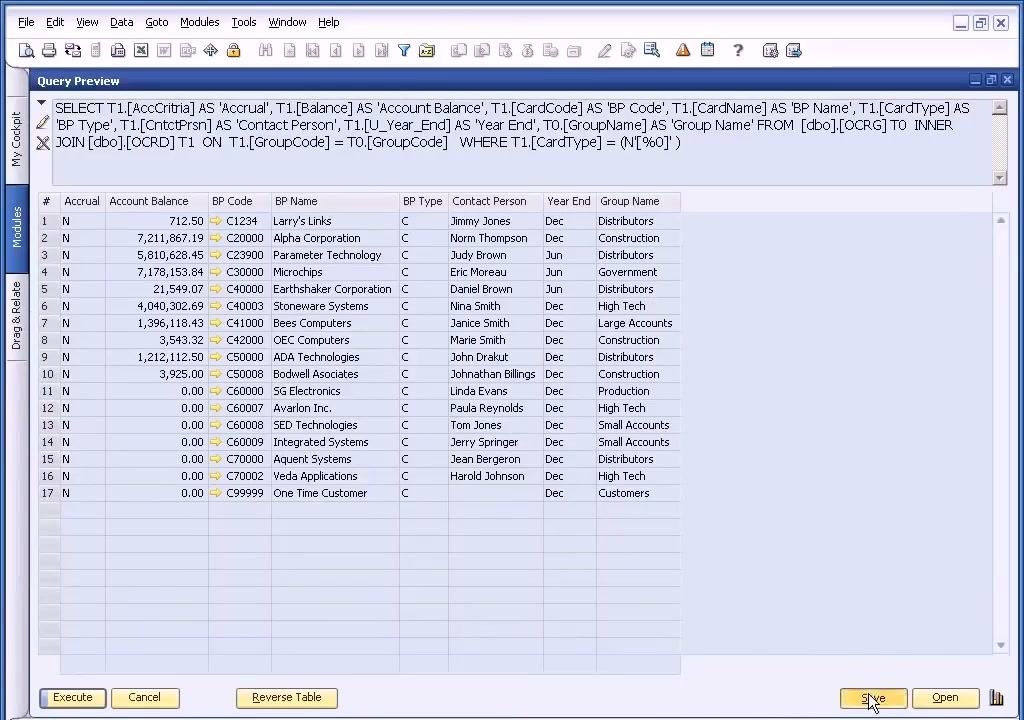
The "Query Preview" window now shows only the records that match the selected BP Type, for example Customers. Review the filtered results. To keep the query for future use, click Save.
Name and store the query
When prompted, choose the General folder to store the query. Enter a name, such as BP query (Business Partner query). Confirm to save the query.
Run the saved query later
To run the saved query again, follow these steps:
- Open the Query Manager from the toolbar.
- Go to the General folder.
- Select the BP query you saved.
- When prompted, enter a different BP Type, for example "V" for Vendors, and click OK.
The query runs and displays the data filtered by your parameter selection.
Summary
You now know how to use the query generator in SAP Business One. The Query Wizard lets you select tables, standard fields, and user-defined fields, and add related tables. You can preview results, add a parameter to filter dynamically, and save the query in the General folder. You can then run it again from the Query Manager with a different parameter, such as another BP Type, without writing SQL.
Generation details: cost, quality tiers
Docsie billed 2,500 credits ($1.75) to analyze this 5-minute video at standard quality. The rewrite, template fill and Word/PDF exports were included. The same video at each quality tier:
| Quality | Frames sampled | Credits | Approx. cost |
|---|---|---|---|
| Draft | every 16-30 s | 1,250 | $0.88 |
| Standard (this guide) | every 8-15 s | 2,500 | $1.75 |
| Detailed | every 4-7 s | 5,000 | $3.50 |
| Ultra | every 1-3 s | 10,000 | $7.00 |
Credits priced at $0.70 per 1,000; plans include a monthly allowance. Enterprise customers on on-premise or bring-your-own-model deployments run this on their own inference and pay no per-video credits.
Generated by Docsie Video-to-Docs on 2026-11-15 from a 4-minute video. Screenshots are frames from the source video and belong to their creator, SAP Business One, whose original is embedded above. If you own this video and want the guide removed or credited differently, contact us and we will act within one business day.