
How to Reverse a Journal Entry in SAP Business One
This guide shows you how to reverse a journal entry in SAP Business One. You review the entry, set a reversal date, update it, and run Reverse Transactions. You then confirm that the system created the reversal entry. The guide also explains what to do when you need to reverse an entry on the same date it was posted.
Video: SAP Business One Journal Entry Reverse Transaction by Vinod Kotiya (2019). All credit for the demonstration goes to the creator; watch the original on YouTube. The written guide below was generated from this video by Docsie. Creator? Request a change or removal.
This guide shows you how to reverse a journal entry in SAP Business One. You review the entry, set a reversal date, update it, and run Reverse Transactions. You then confirm that the system created the reversal entry. The guide also explains what to do when you need to reverse an entry on the same date it was posted.
Prerequisites
- You have access to SAP Business One and can open the Financials module.
- You have a journal entry that needs to be reversed.
- You plan to use a reversal date that differs from the original posting date. SAP Business One does not allow reversal of an entry on the same date.
Steps
Open the Journal Entry window
In the left navigation panel, select Financials > Journal Entry.
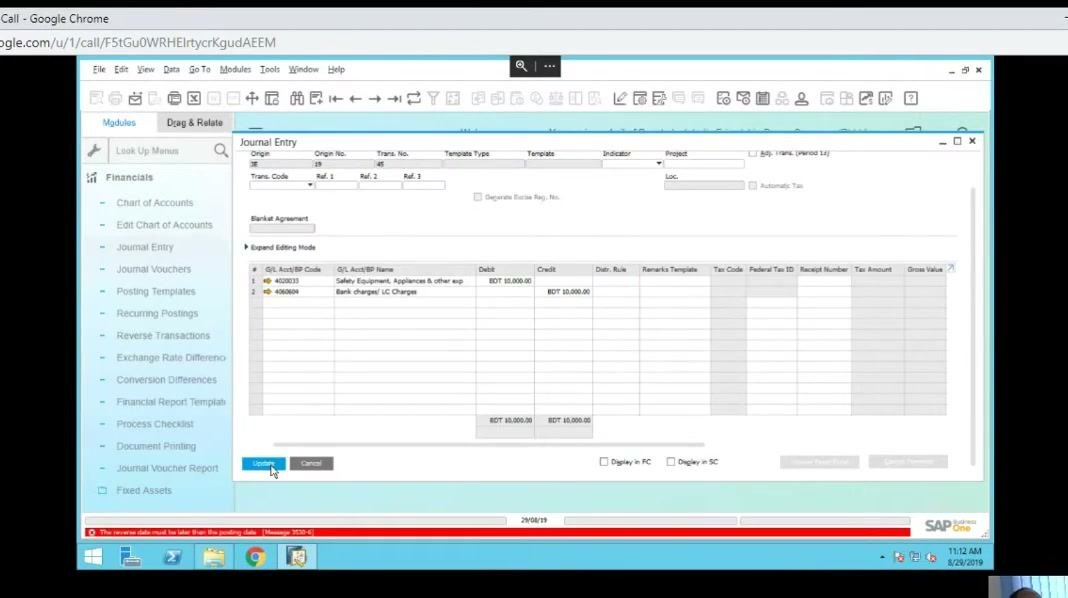
The Journal Entry window shows the Series, Number, Posting Date, Due Date, Doc. Date, and Remarks fields. Below them is a table for G/L accounts. In this example, the entry contains these lines:
- G/L account 4002033 (Safety Equipment, Appliances & other exp), Debit: BDT 10,000.00
- G/L account 4060404 (Bank charges/ LC Charges), Credit: BDT 10,000.00
Verify the reversal details
Before you reverse the entry, check that the details are correct:
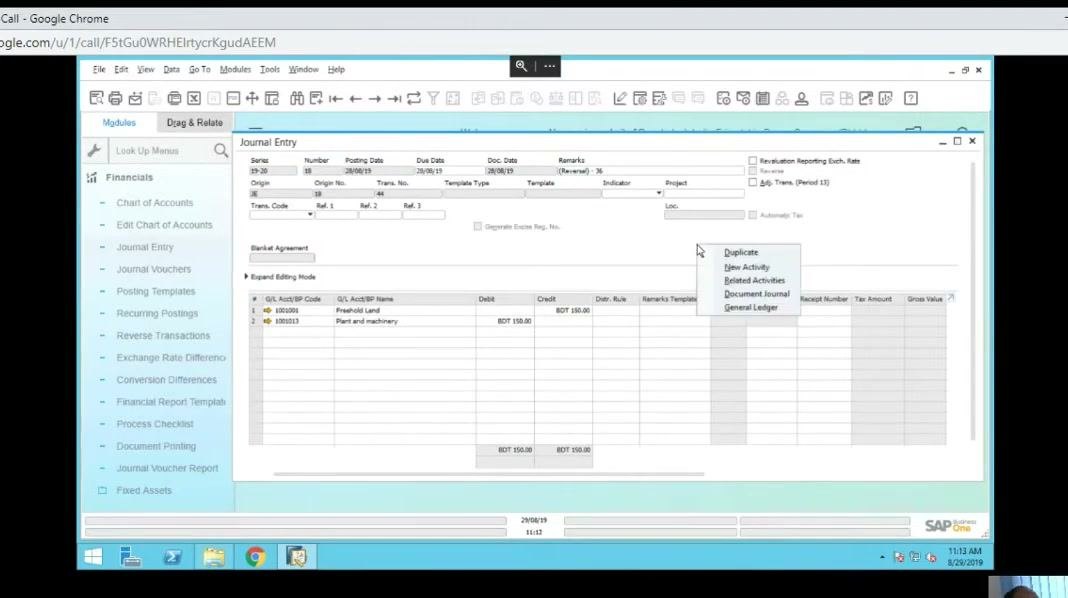
- The Remarks field contains the reversal reference, for example "(Reversal) - 36".
- The posting, due, and document dates are correct, for example 27/09/19.
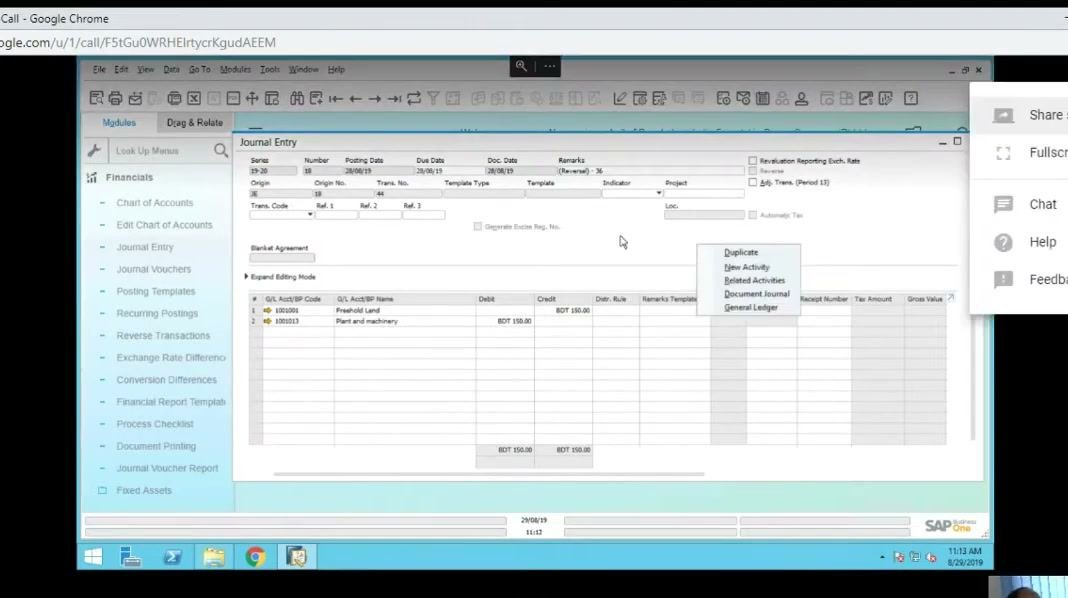
- The G/L accounts and amounts are correct. In this example, 1000101 (Freehold Land) and 1001013 (Plant and machinery) each show BDT 150.00 as a debit and a credit.
Set the reversal date
In the Journal Entry window, find the Reversal Date field at the top right. Enter or confirm the reversal date, for example 28/09/19. Make sure the Reverse checkbox is selected.
Update the journal entry
Click Update at the bottom left of the Journal Entry window to save your changes before you continue with the reversal. If SAP Business One shows a date or validation warning, resolve it first.
Select the transactions to reverse in Reverse Transactions
In the left sidebar, under the Financials module, click Reverse Transactions. The Reverse Transactions dialog box opens and lists the transactions that must be reversed today.
Each row shows these details:
- The transaction number, for example 48
- The original date, for example 27/08/19
- The reversal date, for example 28/08/19
- The value, for example BDT 10,000.00
Select the checkbox in the Revers. column for each transaction you want to reverse. The "Number of transactions to be canceled" field updates as you select. Then click Execute to run the reversal.
Exclude a transaction from the reversal (optional)
To leave a transaction out, clear the checkbox next to it in the Revers. column. The number of transactions to be canceled decreases.
Understand the same-day reversal restriction
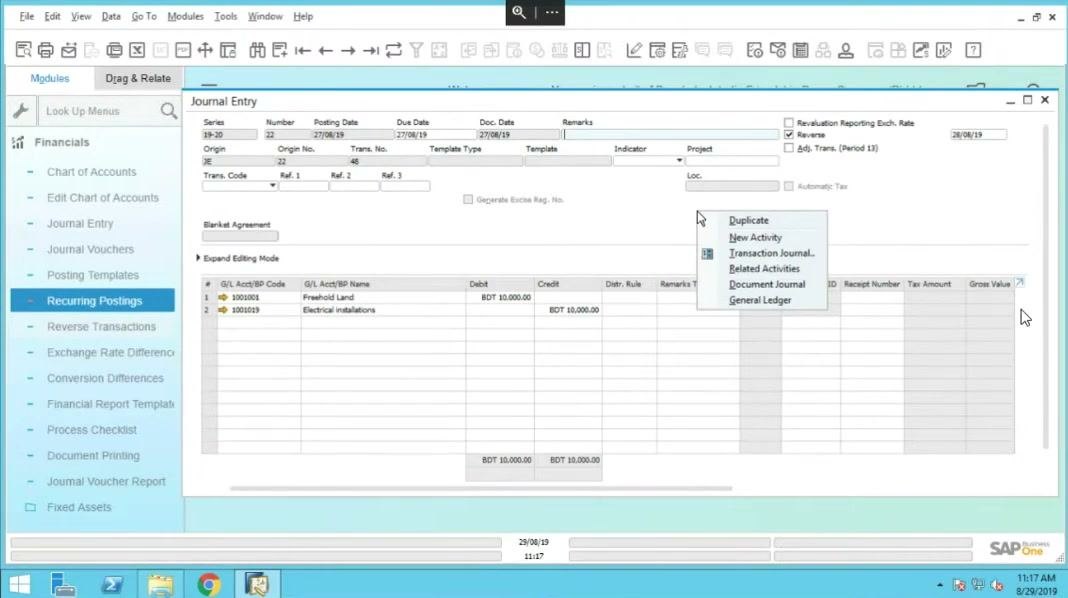
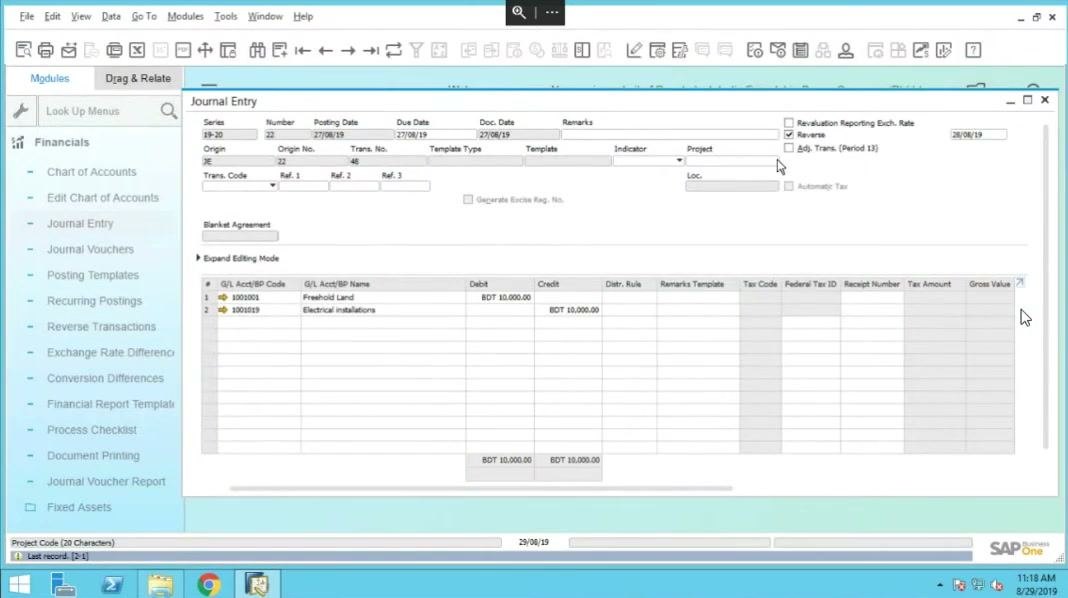
SAP Business One does not let you reverse a journal entry on the date it was posted. To see this restriction, open the Journal Entry window and enter these details:
- Series: 19-20
- Number: 22
- Posting Date, Due Date, Doc. Date: 27/09/19
- G/L Acct/BP Code: 1001001 (Freehold Land), Debit: BDT 10,000.00
- G/L Acct/BP Code: 1001019 (Electrical installations), Credit: BDT 10,000.00
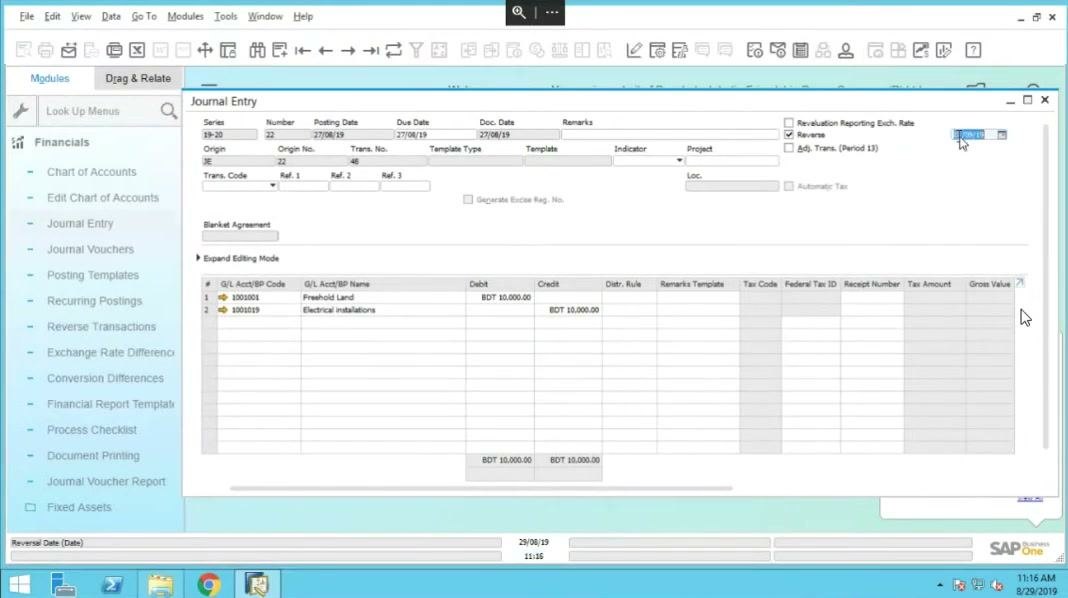
If you set the Reversal Date to the original entry date (27/09/19), the system does not allow it. The message reads: "System is not allow you the reversal of any entry of the same date."
Create a manual journal entry for a same-day correction
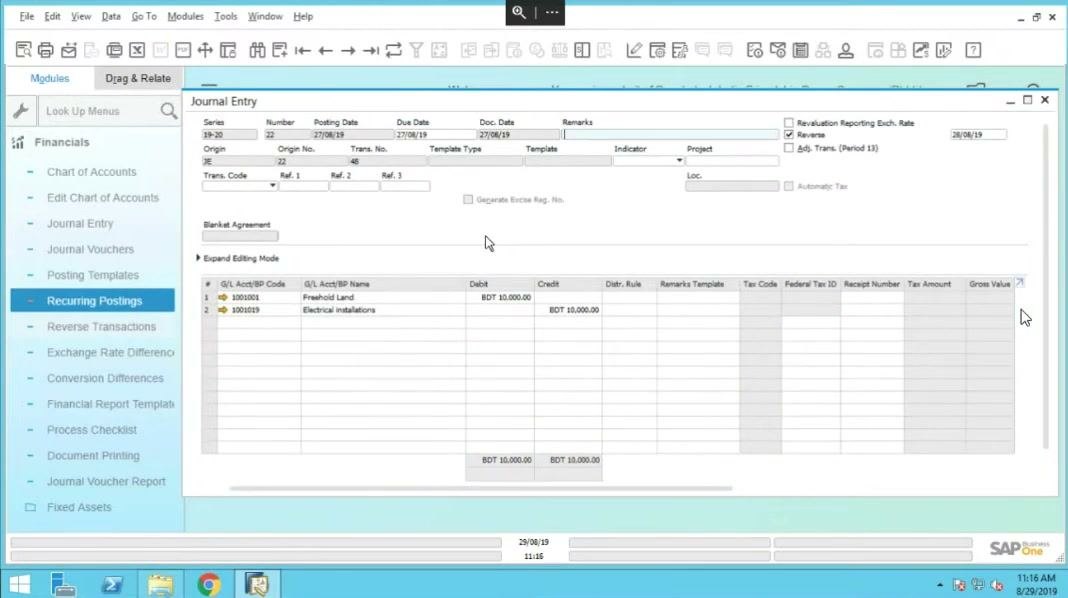
When the system blocks a same-day reversal, create a new journal entry manually to reverse the original transaction. In the Journal Entry window, enter these details:
- Series: 19-20
- Number: 22
- Posting Date, Due Date, Doc. Date: 27/09/19
- G/L Acct/BP Code: 1001001 (Freehold Land), Debit: BDT 10,000.00
- G/L Acct/BP Code: 1001019 (Electrical installations), Credit: BDT 10,000.00
In this example, Recurring Postings is highlighted in the left navigation panel.
Select accounts for the new journal entry
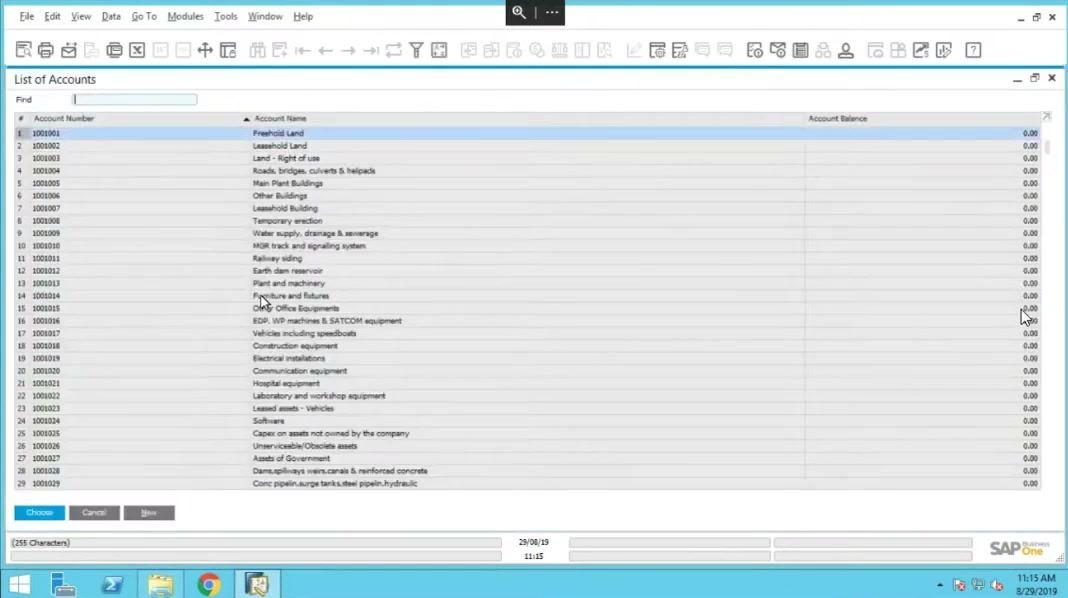
When you enter a new journal entry, the "List of Accounts" dialog appears. Browse or search for the account you need, for example:
- 1001001 (Freehold Land)
- 1001002 (Leasehold Land)
- 1001014 (Plant and machinery)
- 1001015 (Furniture and fixtures)
- 1001016 (Other Office Equipments)
Select the account and click Choose.
Confirm the reversal entry
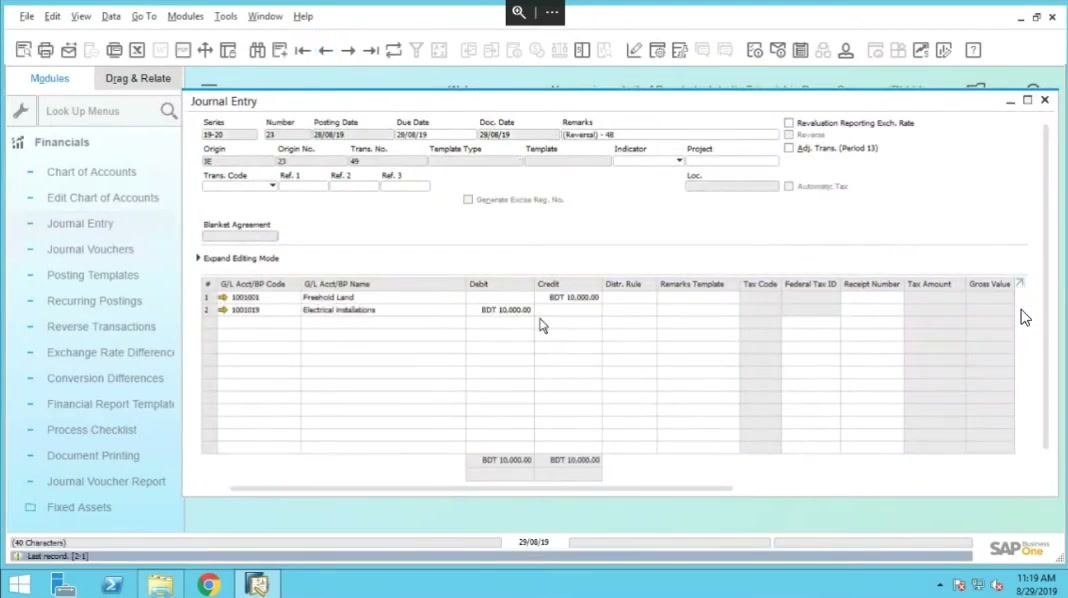
After you execute the reversal, the Journal Entry screen shows the reversed entry. In this example, the key fields are:
- Series: 19-20
- Number: 23
- Posting Date, Due Date, and Doc. Date: 28/08/19
- Remarks: "(Reversal) - 48", which links the entry to original transaction 48
The Reverse Transactions menu stays highlighted in the left sidebar. The entry lists these lines:
- G/L account 1000101, Freehold Land, Debit: BDT 10,000.00, Credit: BDT 10,000.00
- G/L account 1000159, Electrical installations, Debit: BDT 10,000.00, Credit: BDT 10,000.00
Check that the reversal mirrors the original transaction. The amounts should match the original values (BDT 10,000.00), and the G/L accounts should be the same. The posting, due, and document dates should reflect the reversal date (28/08/19). The remarks should indicate the reversal and reference the original transaction number.
Also review the lower section of the screen. Columns such as Remarks Template, Tax Code, Federal Tax ID, Receipt Number, Tax Amount, and Gross Value should be filled in as required, or left blank if they do not apply.
Check that no reversals remain
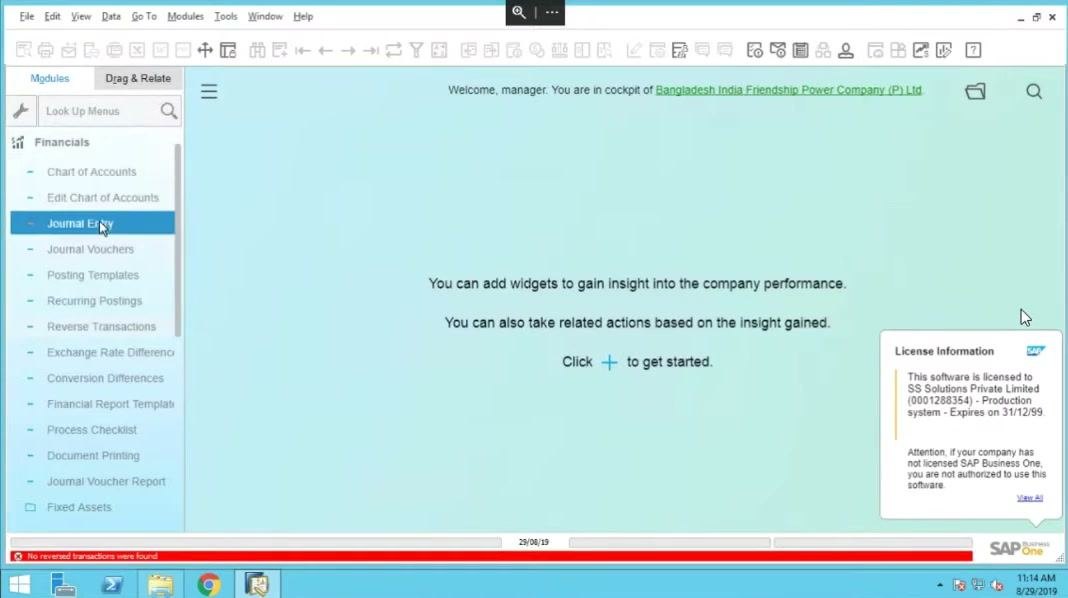
After the reversal runs, the main cockpit screen appears. In the left navigation panel under Financials, you can see options such as Chart of Accounts, Journal Entry, Posting Templates, and Reverse Transactions.
If no reversals are pending, a red message appears at the bottom of the screen: "No reversed transactions were found". This confirms that all required reversals have been processed. Because you are back on the main cockpit, the process is complete and the system is ready for further actions.
Summary
To reverse a journal entry in SAP Business One, review the entry and set a reversal date that differs from the posting date. Update the entry, then select and execute the transactions in Reverse Transactions. If you need a same-day correction, create a manual journal entry instead. Finally, confirm that the reversal entry mirrors the original and that the cockpit reports no remaining reversals.
What's next
- Return to Financials > Journal Entry to review the reversal entry and its remarks.
- Open Reverse Transactions again whenever you need to check for transactions that must be reversed.
Generation details: cost, quality tiers
Docsie billed 4,500 credits ($3.15) to analyze this 9-minute video at standard quality. The rewrite, template fill and Word/PDF exports were included. The same video at each quality tier:
| Quality | Frames sampled | Credits | Approx. cost |
|---|---|---|---|
| Draft | every 16-30 s | 2,250 | $1.57 |
| Standard (this guide) | every 8-15 s | 4,500 | $3.15 |
| Detailed | every 4-7 s | 9,000 | $6.30 |
| Ultra | every 1-3 s | 18,000 | $12.60 |
Credits priced at $0.70 per 1,000; plans include a monthly allowance. Enterprise customers on on-premise or bring-your-own-model deployments run this on their own inference and pay no per-video credits.
Generated by Docsie Video-to-Docs on 2026-11-15 from a 8-minute video. Screenshots are frames from the source video and belong to their creator, Vinod Kotiya, whose original is embedded above. If you own this video and want the guide removed or credited differently, contact us and we will act within one business day.