
How to Edit a Crystal Report in SAP Business One
This guide shows you how to edit a Crystal Report in SAP Business One. You open an existing layout from Report and Layout Manager, change a field in Crystal Reports, and preview the result with live data. You then save the file, import it back into SAP Business One, and set it as the default layout. The example edits the New Sales Order layout and corrects a text field.
Video: How-To Make Simple Edits To Already Existing Crystal Reports by Support One Inc. (2024). All credit for the demonstration goes to the creator; watch the original on YouTube. The written guide below was generated from this video by Docsie. Creator? Request a change or removal.
This guide shows you how to edit a Crystal Report in SAP Business One. You open an existing layout from Report and Layout Manager, change a field in Crystal Reports, and preview the result with live data. You then save the file, import it back into SAP Business One, and set it as the default layout. The example edits the New Sales Order layout and corrects a text field.
Prerequisites
Before you start, make sure you have the following:
- Access to SAP Business One and its Report and Layout Manager.
- Crystal Reports, which opens from Report and Layout Manager when you edit a layout.
- The database connection details Crystal Reports may ask for: server, user ID, and password.
- The parameter values for the preview. A Sales Order report uses a DocEntry and an ObjectId. This example uses DocEntry
1585and ObjectId17. - A test database with real sales order data, so you can check your changes.
Open the layout and edit the Crystal Report
Step 1: Open the SAP Business One main dashboard
Launch SAP Business One and wait for the main dashboard to load. The dashboard shows the modules and financial process shortcuts.
Step 2: Open Report and Layout Manager
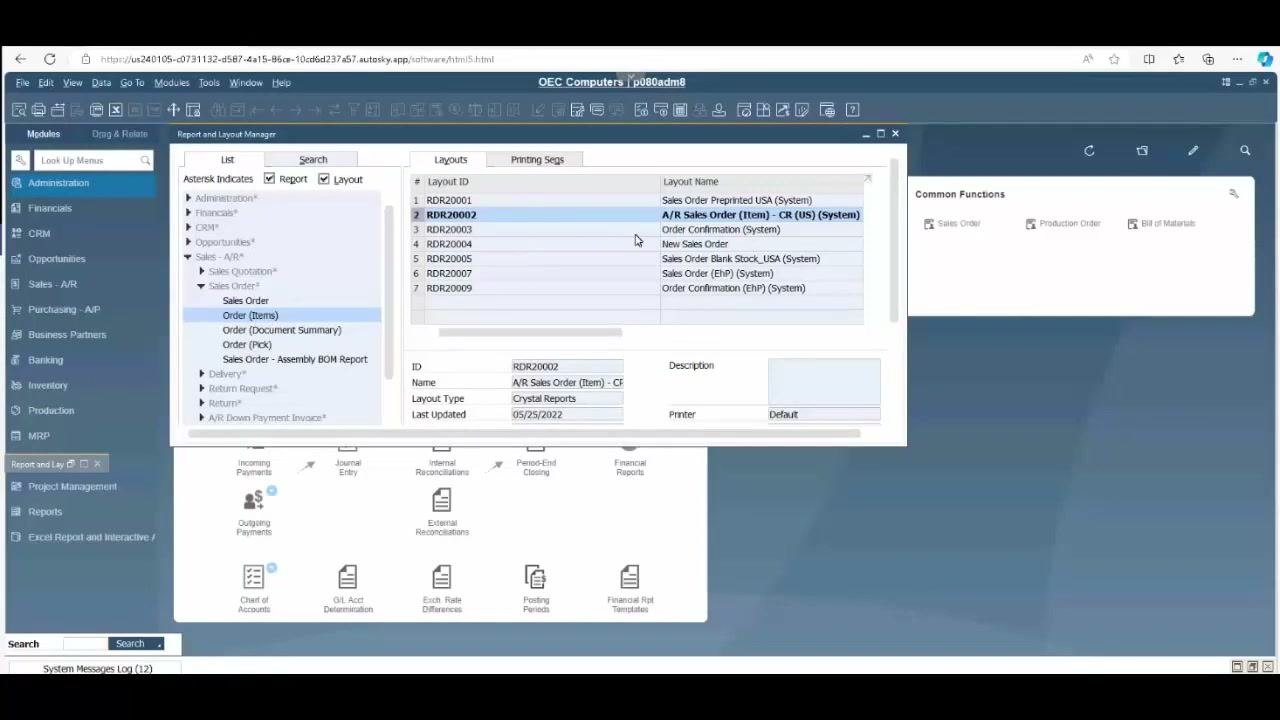
In the menu search bar, type Report and Layout Manager. Select Report and Layout Manager from the search results to open it.
Step 3: Select the layout to edit
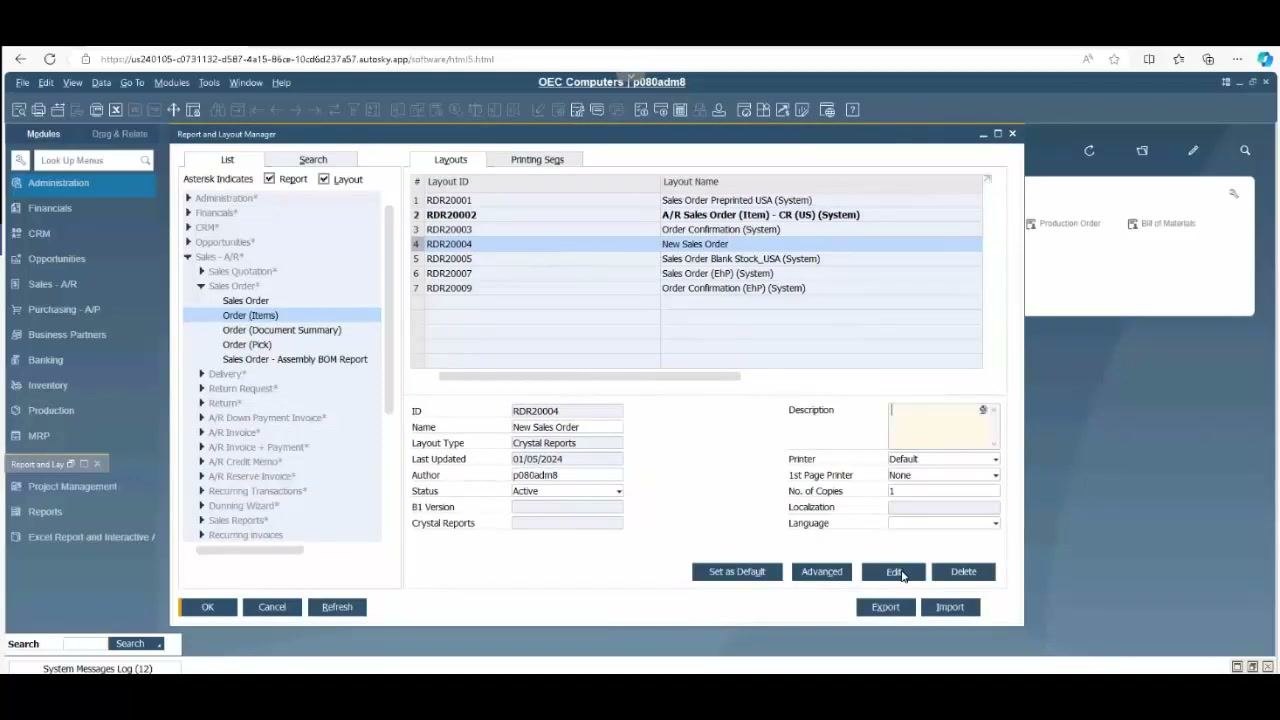
In the Report and Layout Manager window, expand Sales - A/R > Sales Order > Order (Items). In the list of layouts, select the layout you want to edit. In this example, select the layout with these values:
- Layout Name:
New Sales Order - Layout ID:
RDR20004
Step 4: Open the layout in Crystal Reports
With the layout highlighted, click Edit at the bottom of the window. SAP Business One launches Crystal Reports and loads the selected layout for editing.
Step 5: Review the layout
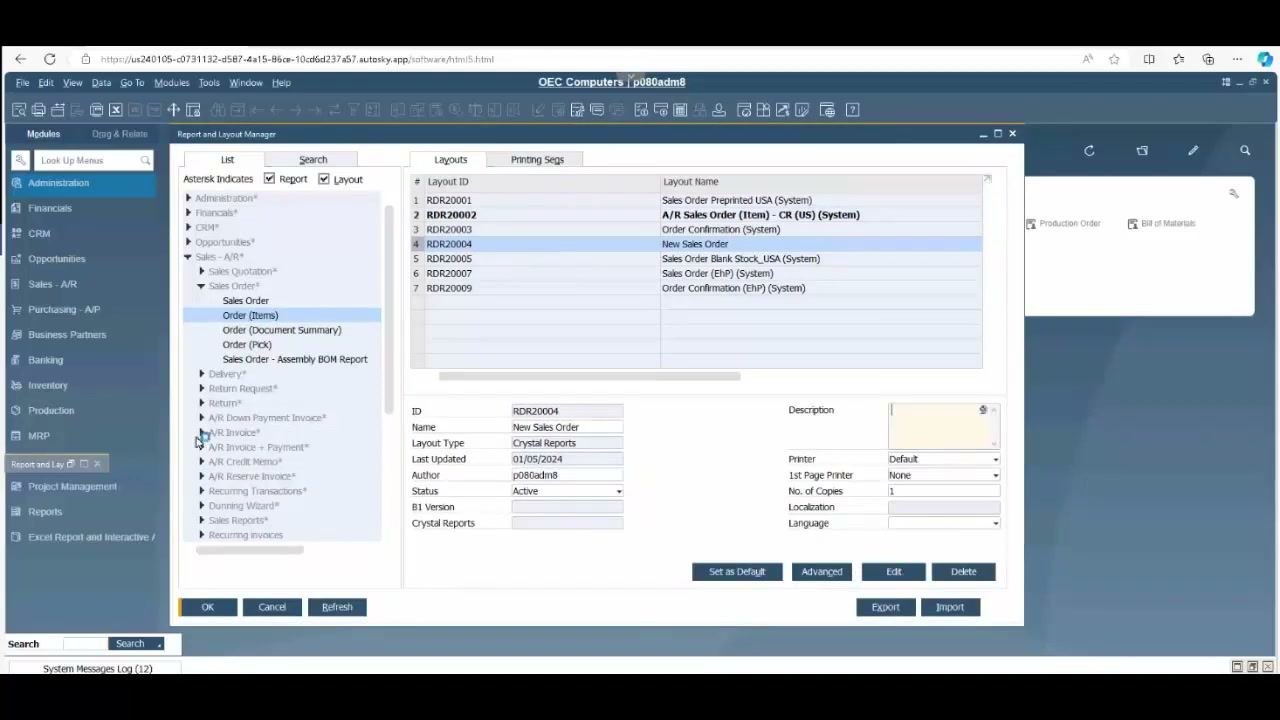
When Crystal Reports opens, review the layout. The top section is typically the header, and the fields shown depend on the report. In this example, locate the text field labeled INCORRECT TEXT HERE.
Step 6: Edit the field
Click the text object you want to change, in this example INCORRECT TEXT HERE. Type the correct label, for example CORRECT TEXT HERE. You can also delete the field or move it to a different section.
Step 7: Decide on further edits
Highlight any other text object or field you want to change or remove. Then use one of these options:
- To delete a field, select it and press the Delete key.
- To move a field, click and drag it to a different section of the layout.
In this example, keep the edited field as CORRECT TEXT HERE.
Preview the edited Crystal Report layout
Step 8: Refresh the report
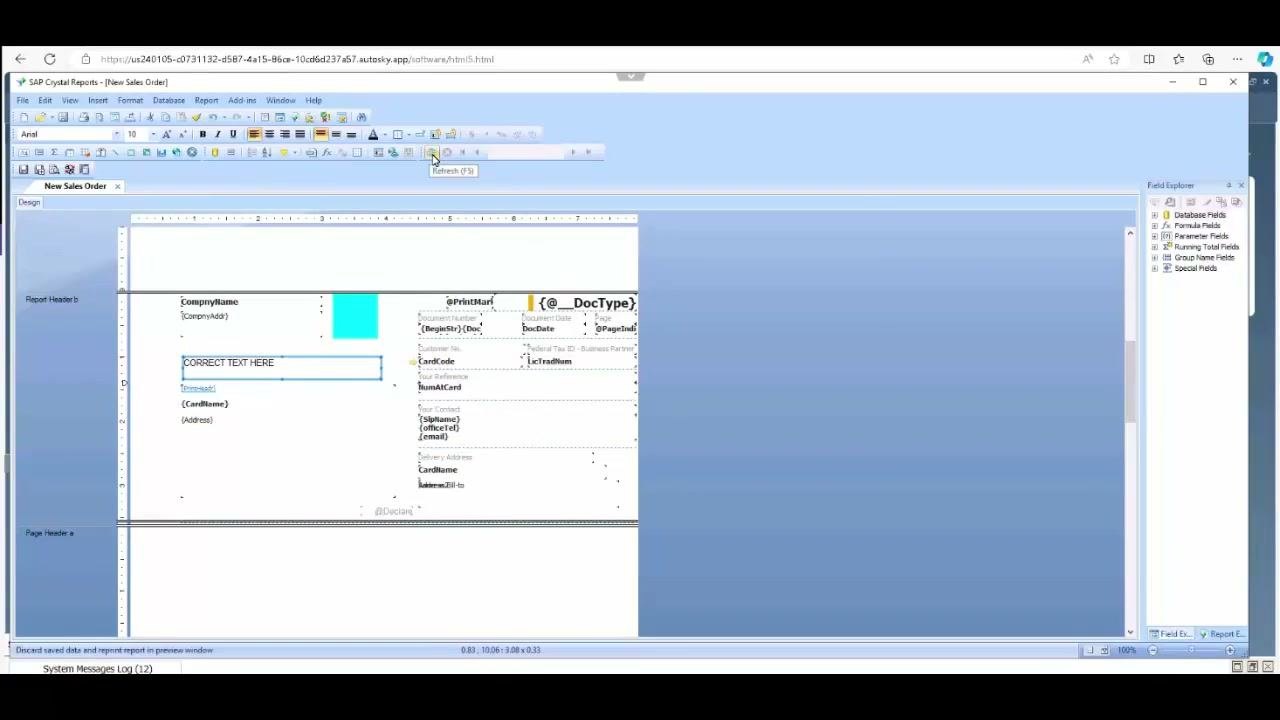
Find the Refresh button, which has a circular arrow icon, in the Crystal Reports toolbar. Click it to load the report with live data. You can also use the Preview option to see a preview of the report.
Step 9: Enter the report parameters
When prompted, enter the parameters for the report. For a Sales Order report, enter:
- DocEntry:
1585 - ObjectId:
17
Click OK to proceed.
Step 10: Enter the database connection details
If prompted, enter your database connection details:
- Server:
saphasupportone:30015 - User ID:
SYSTEM - Password: your password
Click OK or Finish to connect.
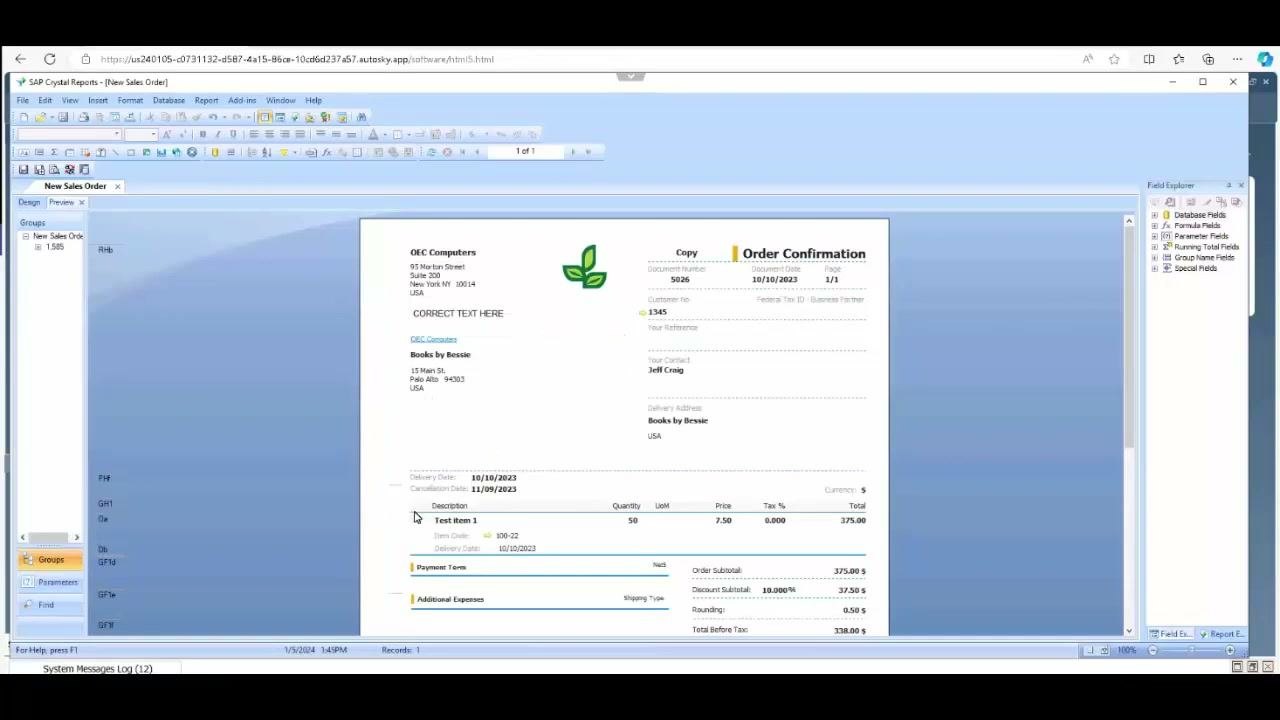
Step 11: View the report with live data
After the connection succeeds, the report refreshes and shows real data based on the parameters you entered. Verify that your change, such as the corrected text field, appears as expected.
Step 12: Check the preview
Confirm that the preview shows your changes and real sales order data from your test database. Use the preview to check the alignment, positioning, and overall appearance of your edits.
Save the edited Crystal Report and import it
Step 13: Save the edited layout
Save the layout as a file you can find easily:
- In the menu bar, click File.
- Select Save As....
- In the Save As dialog, choose an easy-to-find location, such as your Desktop.
- Enter a file name, such as
New Sales Order. - If you are told the file already exists, click Yes to replace it.
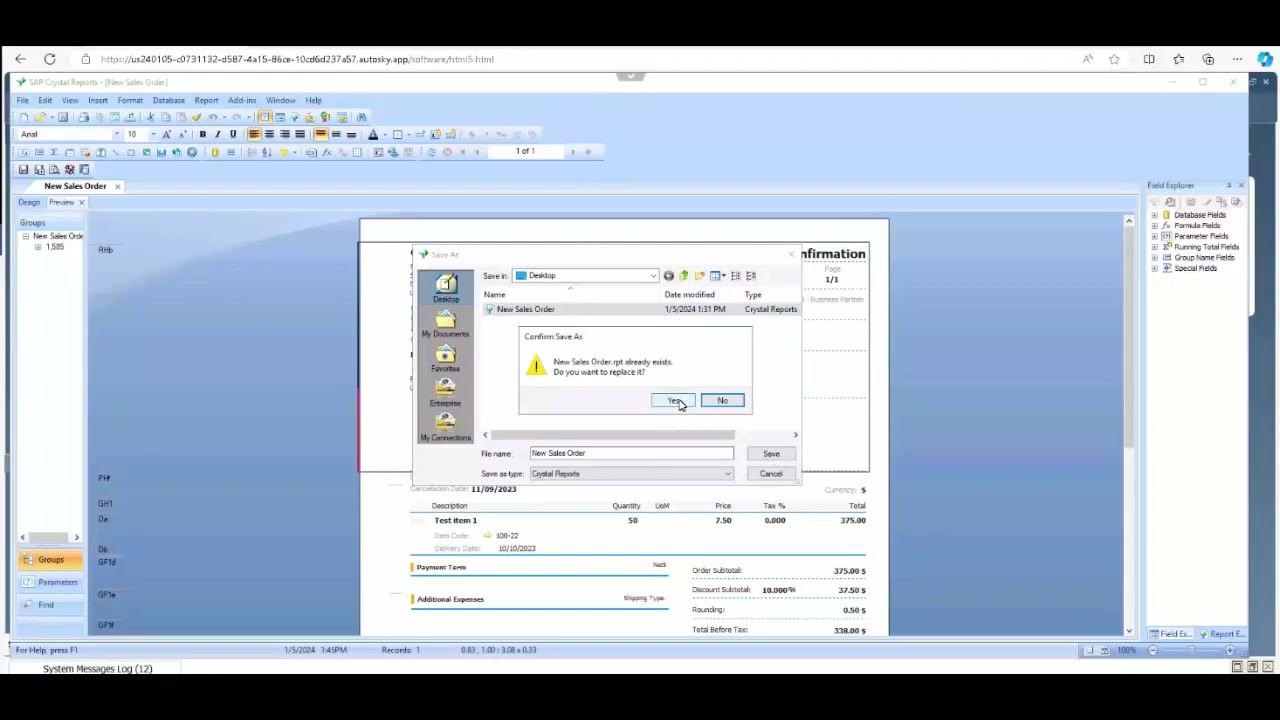
Step 14: Close the Crystal Report file
After saving, close the file in Crystal Reports. Make sure it is not open, because leaving it open can cause errors when you import it into SAP Business One.
Step 15: Return to Report and Layout Manager
Go to the SAP Business One main window. In the Modules panel, select Report and Layout Manager. Locate the relevant layout, for example New Sales Order.
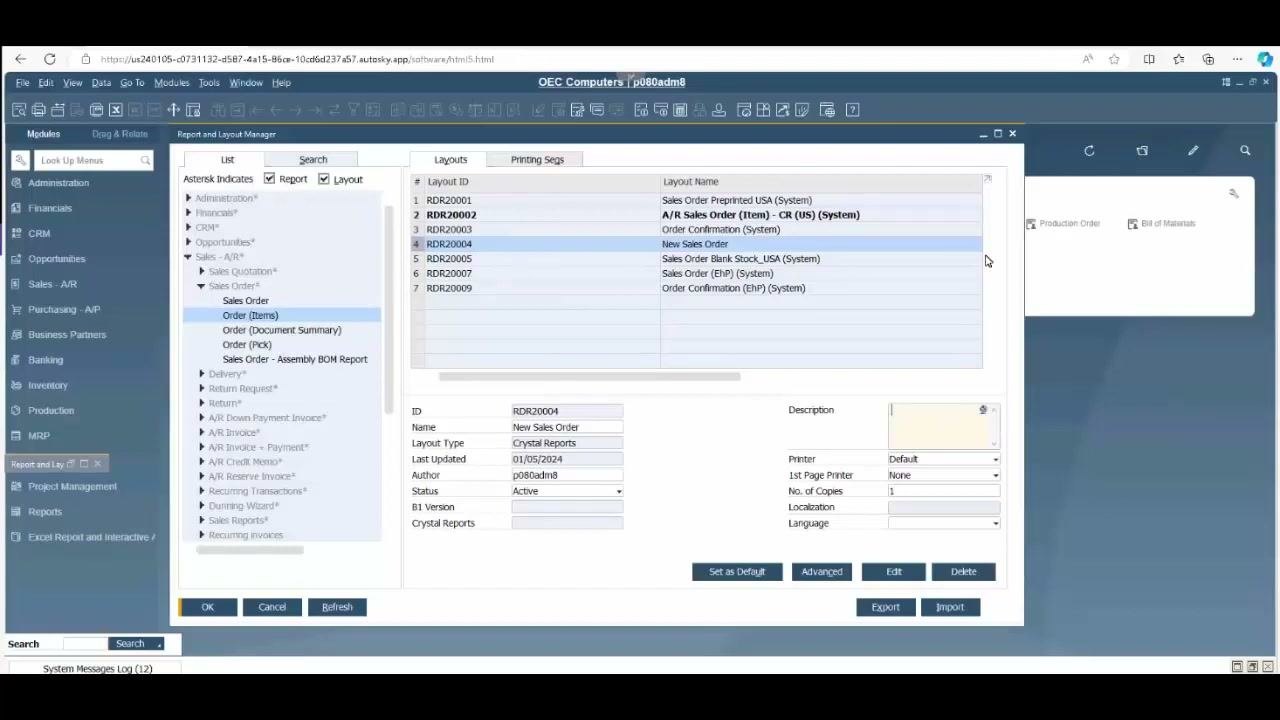
Step 16: Start the import
Click Import at the bottom of the Report and Layout Manager window. The Import Wizard launches and prompts you to select the file location.
Step 17: Select the layout file
In the Import Wizard, browse to the location where you saved the file, for example the Desktop. Select the file, such as New Sales Order.rpt, and click Open.
Step 18: Choose the content type
When prompted, select Layout as the content type. If you were importing a report instead, you would select Report and be prompted to assign it to a specific menu location in SAP Business One.
Step 19: Specify the document type
In the File Selection step, a dialog appears for you to select the document type. For a sales order layout, select the matching type, for example Sales Order. Click Choose to confirm.
Step 20: Handle a duplicate file name
If a file with the same name already exists, the RPT File dialog appears. In that dialog:
- Choose Rename.
- Enter the new name
New Sales Order 2. - Click OK to proceed.
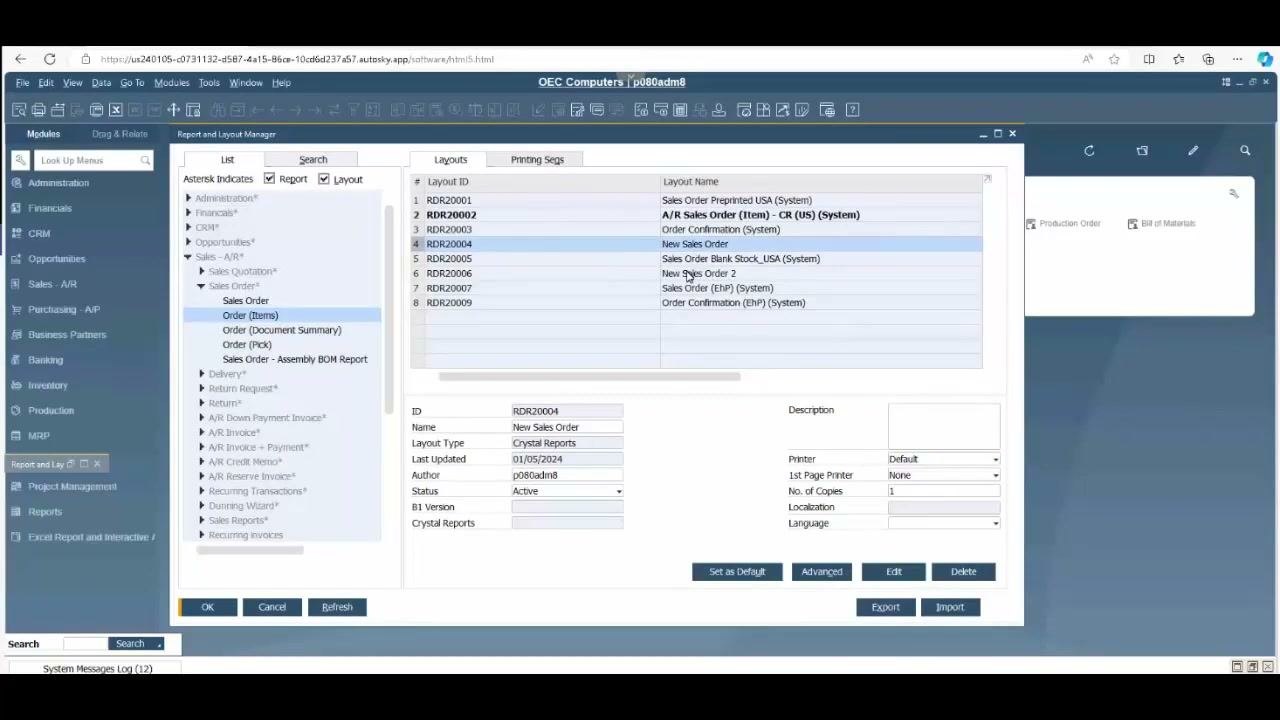
Manage the imported layouts
Step 21: Review the imported layouts
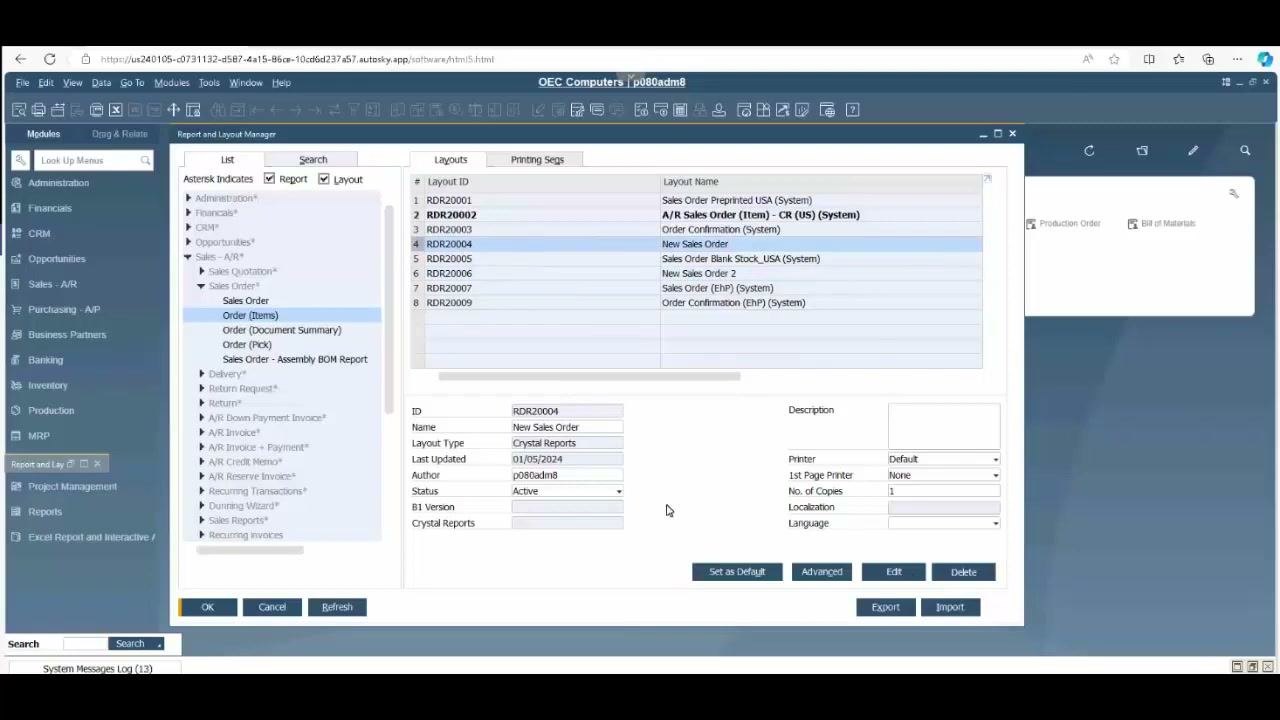
In Report and Layout Manager, the list shows both the old and new versions. In this example, New Sales Order (ID: RDR20004) and New Sales Order 2 (ID: RDR20006) are both visible.
Below the list, you see details for the selected layout. These include ID, Name, Layout Type, Last Updated, Author, Status, Printer, and Number of Copies. Click the layout you want, for example New Sales Order 2, and check that it is the correct version.
Step 22: Delete an old layout
To remove an old or unwanted layout, select it, for example New Sales Order. Then click Delete.
Step 23: Refresh the layout list
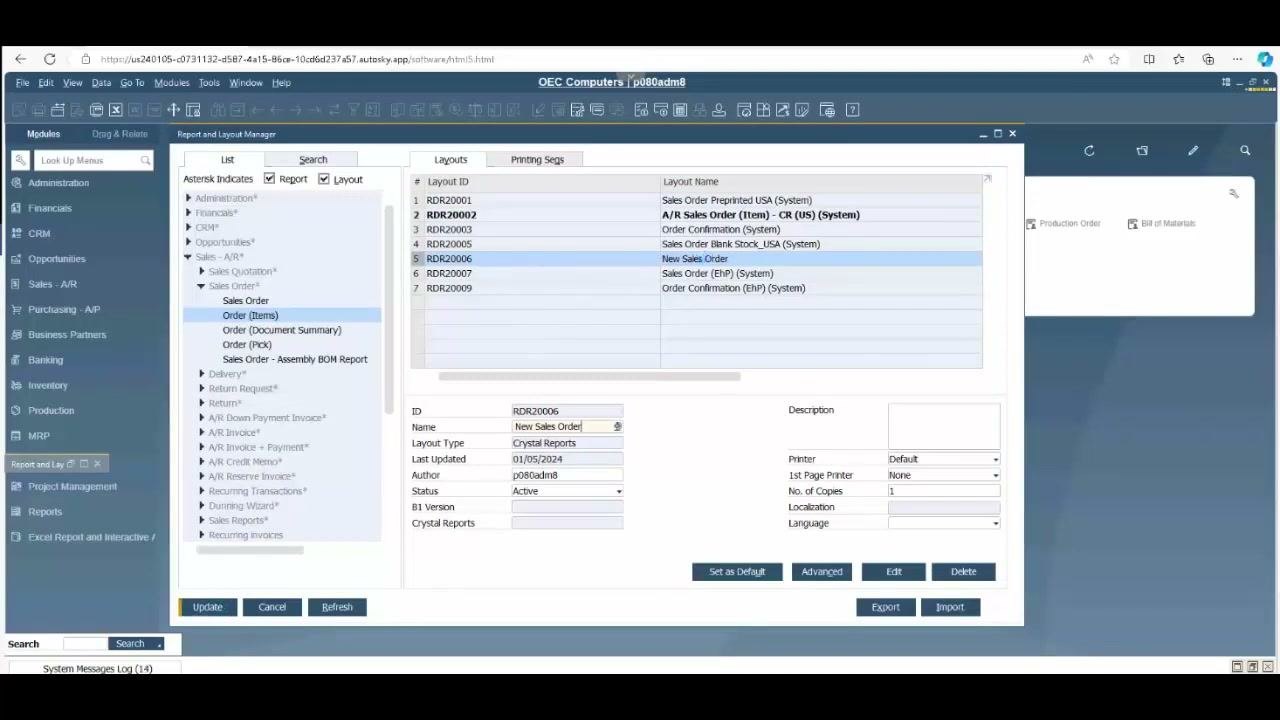
Click Refresh to make sure the deleted layout no longer appears in the list.
Step 24: Rename the new layout
To replace the old layout with the new version under the original name, rename the new one:
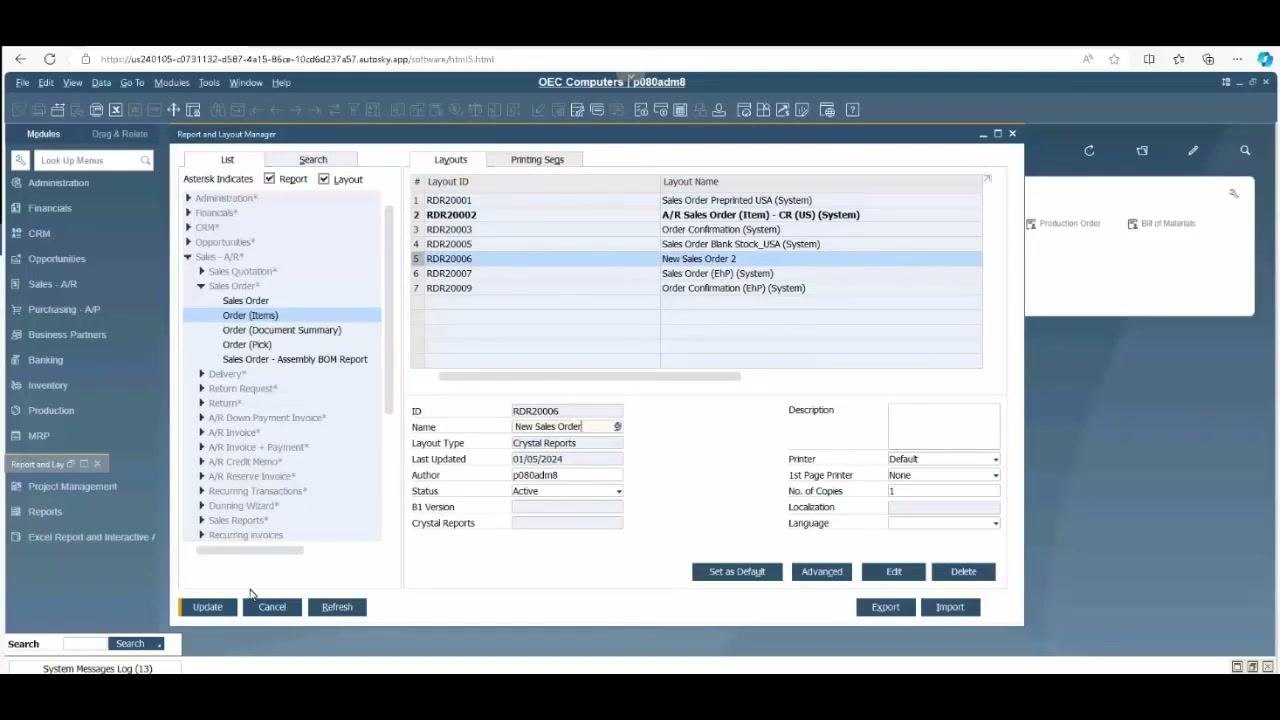
- Select New Sales Order 2 (ID: RDR20006).
- Change the Name field to
New Sales Order. - Click Update to save the change.
Test and set the layout
Step 25: Open a sales order to test the layout (optional)
Open any sales order in the system. Go to the File menu, then select Preview and Layouts to test the new layout with a real sales order.
Step 26: Choose the new layout
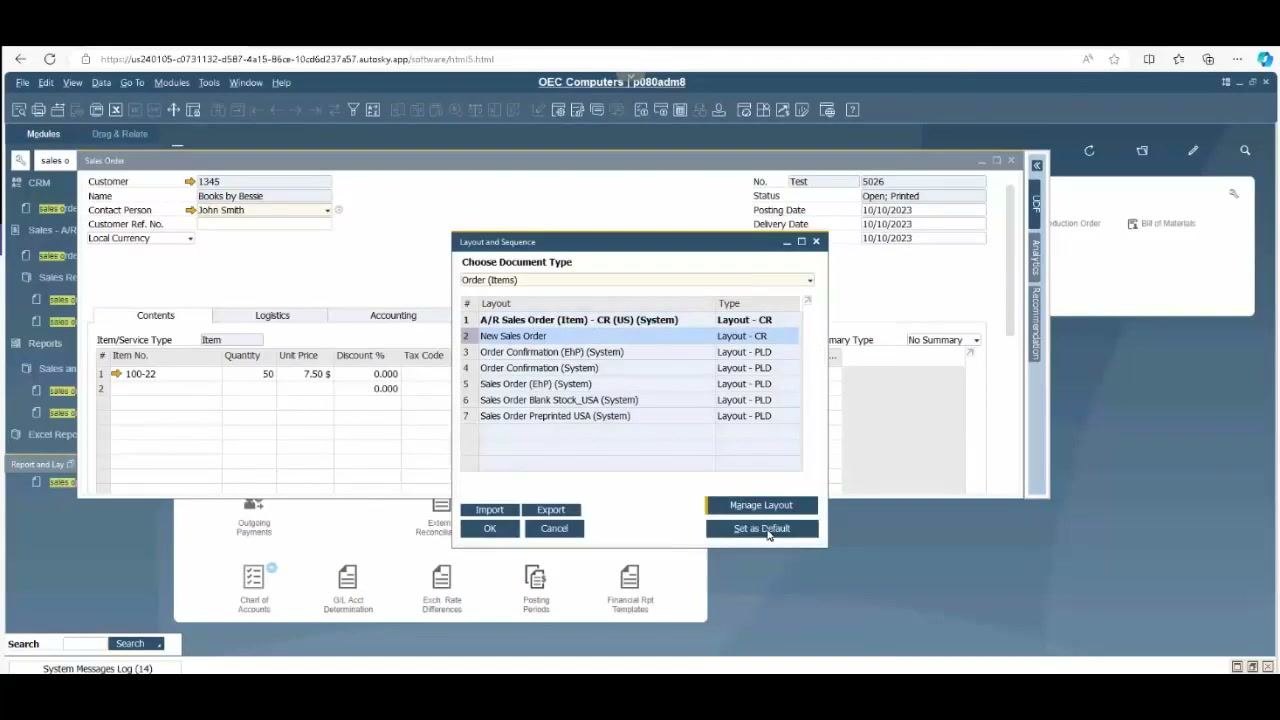
In the Sales Order window, open the Choose Layout dialog. Select New Sales Order from the list of available layouts and click OK.
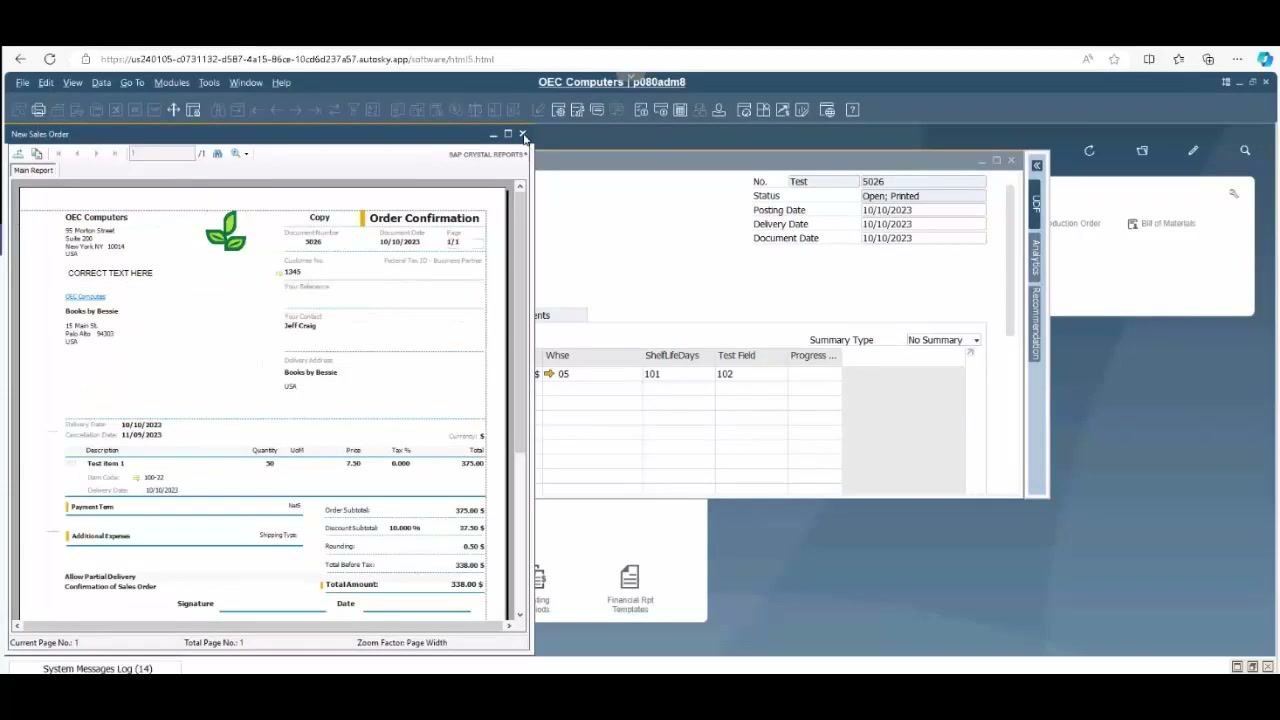
In this example, the sales order is for customer "Books by Bessie" (Customer No. 1345). It contains item 100-22, quantity 50, unit price $7.50, and a total of $375.00.
Step 27: Preview the sales order with the layout
After you apply the layout, a SAP Crystal Reports preview window opens. It shows the formatted sales order as an Order Confirmation.
Review the company information, customer details, item description, quantity, price, and totals. Make sure the layout shows all required fields and formatting.
Step 28: Set the layout as the default
To use the layout for future documents, select it in the Choose Document Type dialog, for example New Sales Order. Click Set as Default to make it the default for the selected document type. You can also click Manage Layout to edit or organize layouts further.
Step 29: Close the layout dialog
When you finish managing layouts, close the Choose Document Type dialog. You return to the main sales order screen, which stays open and shows the current order details and available actions.
Summary
You now know how to edit a Crystal Report in SAP Business One. You opened a layout from Report and Layout Manager, changed a field in Crystal Reports, and previewed it with live data. You then saved it, imported it, renamed it, tested it on a sales order, and set it as the default layout.
Generation details: cost, quality tiers
Docsie billed 4,500 credits ($3.15) to analyze this 9-minute video at standard quality. The rewrite, template fill and Word/PDF exports were included. The same video at each quality tier:
| Quality | Frames sampled | Credits | Approx. cost |
|---|---|---|---|
| Draft | every 16-30 s | 2,250 | $1.57 |
| Standard (this guide) | every 8-15 s | 4,500 | $3.15 |
| Detailed | every 4-7 s | 9,000 | $6.30 |
| Ultra | every 1-3 s | 18,000 | $12.60 |
Credits priced at $0.70 per 1,000; plans include a monthly allowance. Enterprise customers on on-premise or bring-your-own-model deployments run this on their own inference and pay no per-video credits.
Generated by Docsie Video-to-Docs on 2026-11-15 from a 8-minute video. Screenshots are frames from the source video and belong to their creator, Support One Inc., whose original is embedded above. If you own this video and want the guide removed or credited differently, contact us and we will act within one business day.