
How to Import Data with the Data Import Wizard in Salesforce
This guide walks you through how to import data with the Data Import Wizard in Salesforce, from preparing your CSV file to verifying that your accounts and contacts were successfully loaded. You'll learn how to format your source file, launch the wizard, map your fields, and confirm the results once the import completes.
Video: How to Import Accounts & Contacts w/ Data Import Wizard | Salesforce Support by Salesforce Support. All credit for the demonstration goes to the creator; watch the original on YouTube. The written guide below was generated from this video by Docsie. Creator? Request a change or removal.
This guide walks you through how to import data with the Data Import Wizard in Salesforce, from preparing your CSV file to verifying that your accounts and contacts were successfully loaded. You'll learn how to format your source file, launch the wizard, map your fields, and confirm the results once the import completes.
Prerequisites
- A CSV file containing the accounts and contacts you want to import, exported from Outlook, Excel, or any program that saves data in CSV format.
- Access to a spreadsheet editor, such as Microsoft Excel, to review and adjust the file before import.
- A Salesforce login at
login.salesforce.com. - Read and edit permissions for the Account object. If you don't have these permissions, contact your Salesforce system administrator.
Preparing your data for import
Before you open the Data Import Wizard, format your CSV file so Salesforce can read it correctly.
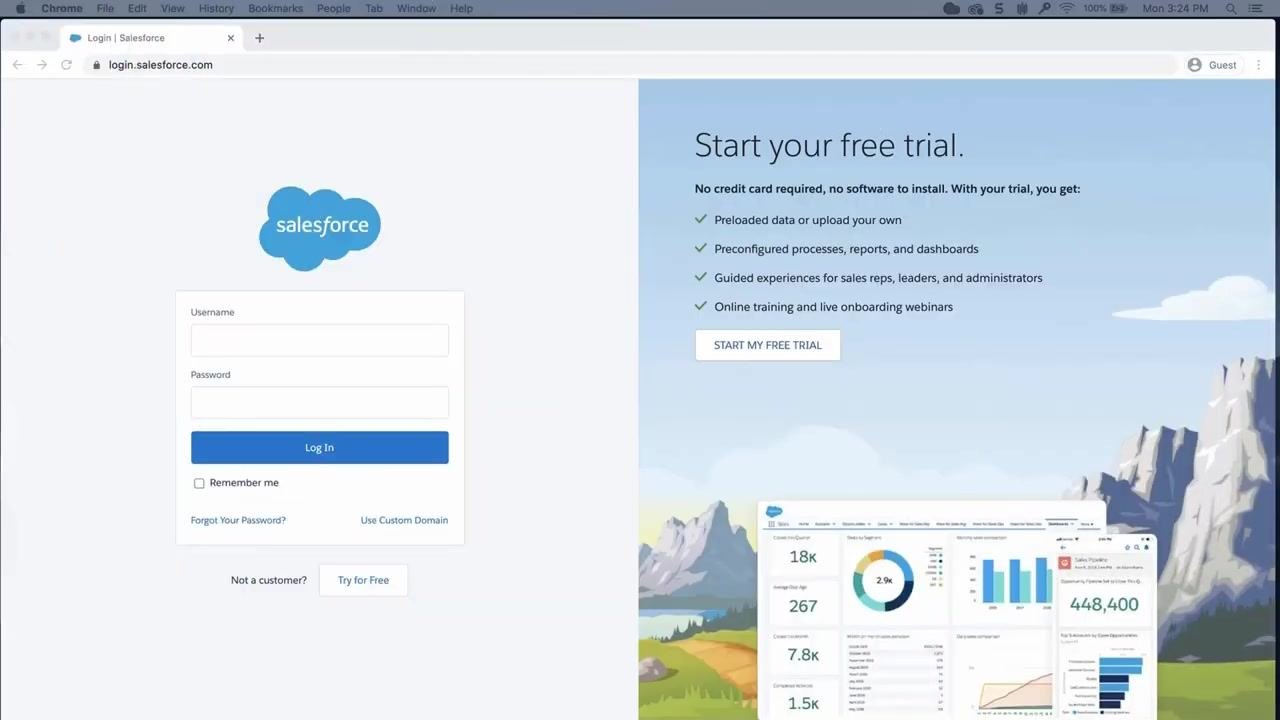
- Open your web browser and go to the Salesforce login page at
login.salesforce.com. The login screen shows fields for Username and Password, a Log In button, and options for Forgot Your Password?, Use Custom Domain, and Try for Free. The right side of the page promotes a free trial with preloaded data, preconfigured processes, guided experiences, and online training.
-
Obtain the CSV file containing the accounts and contacts you want to import. You can export this file from Outlook, Excel, or any program that saves data in CSV format.
-
Open the CSV file in a spreadsheet editor, such as Microsoft Excel.
-
Review the column headings in your file to make sure they match Salesforce field names. For example, rename FNAME to First Name and Contact Number to Phone, and adjust any other column names as needed.
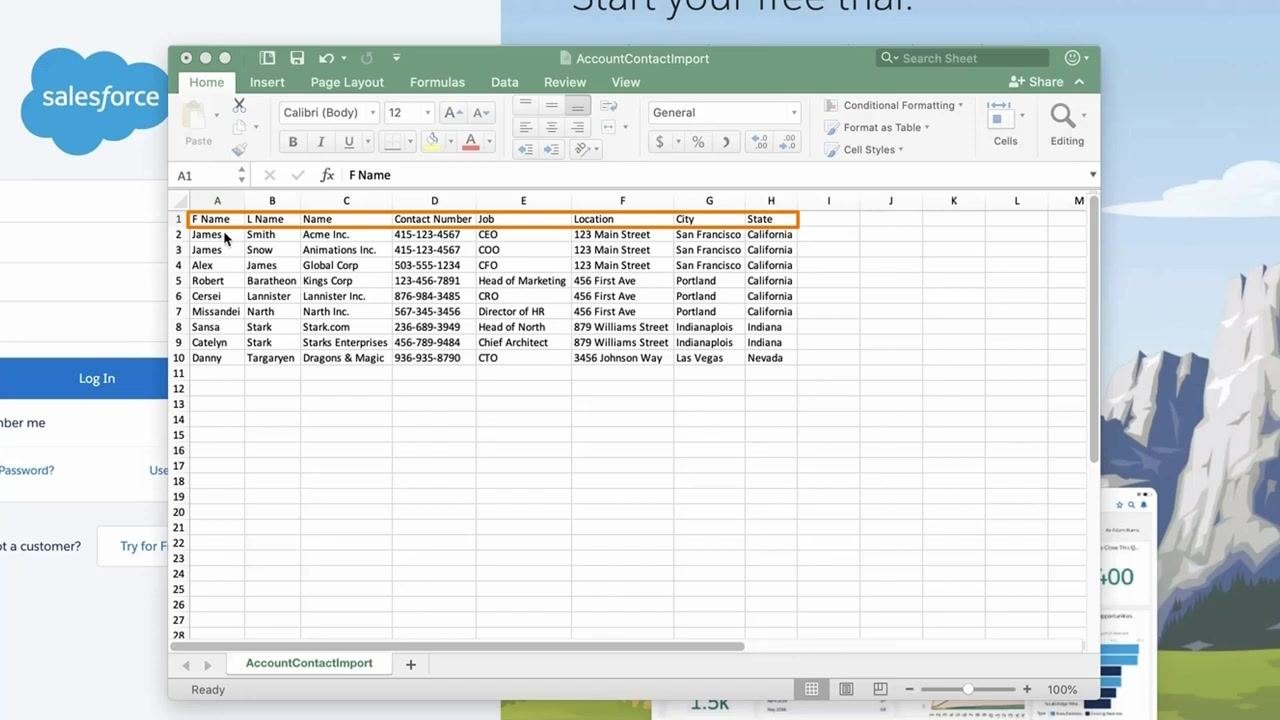
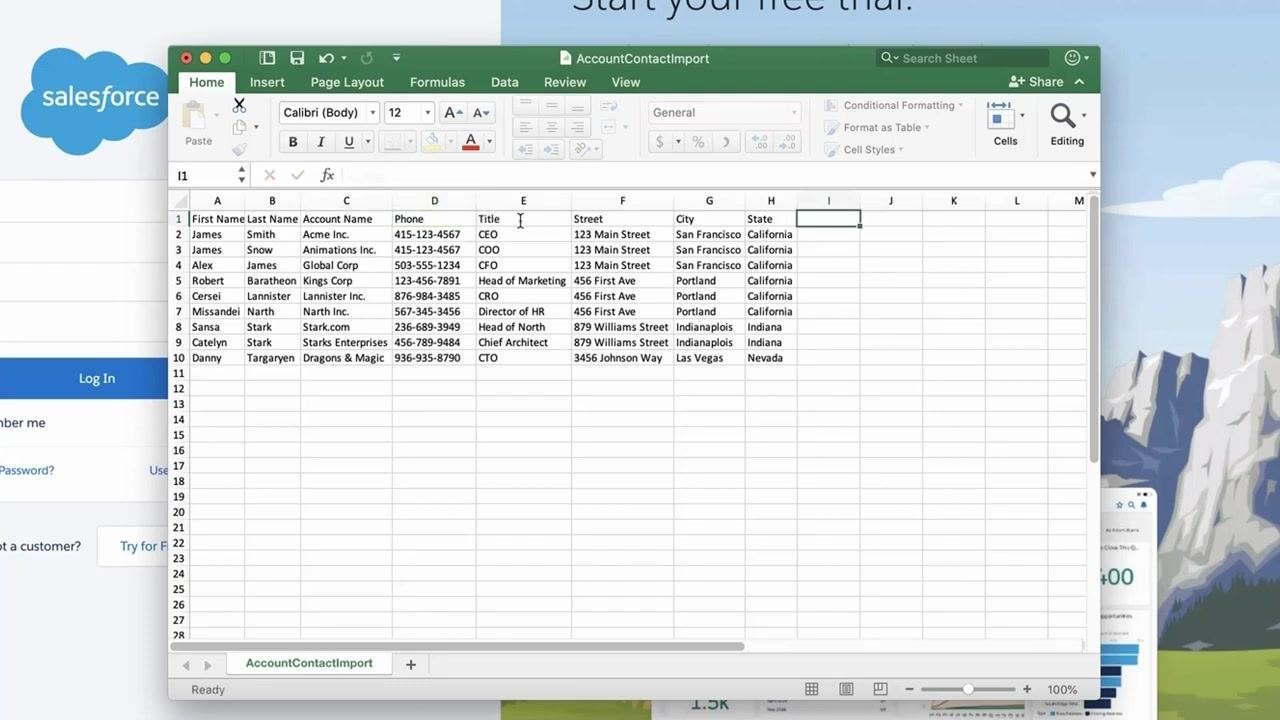
- Update the remaining column headings to match Salesforce fields:
- Change F Name to First Name
- Change L Name to Last Name
- Change Contact Number to Phone
- Change Job to Title
- Change Location to Street
- Confirm that other columns, such as Account Name, City, and State, already match Salesforce field names
-
Confirm that all required fields for Salesforce accounts and contacts are present in your CSV and that every row contains data for those fields. You can check required fields by opening an account record in Salesforce or clicking Edit on an account to see which fields are mandatory.
-
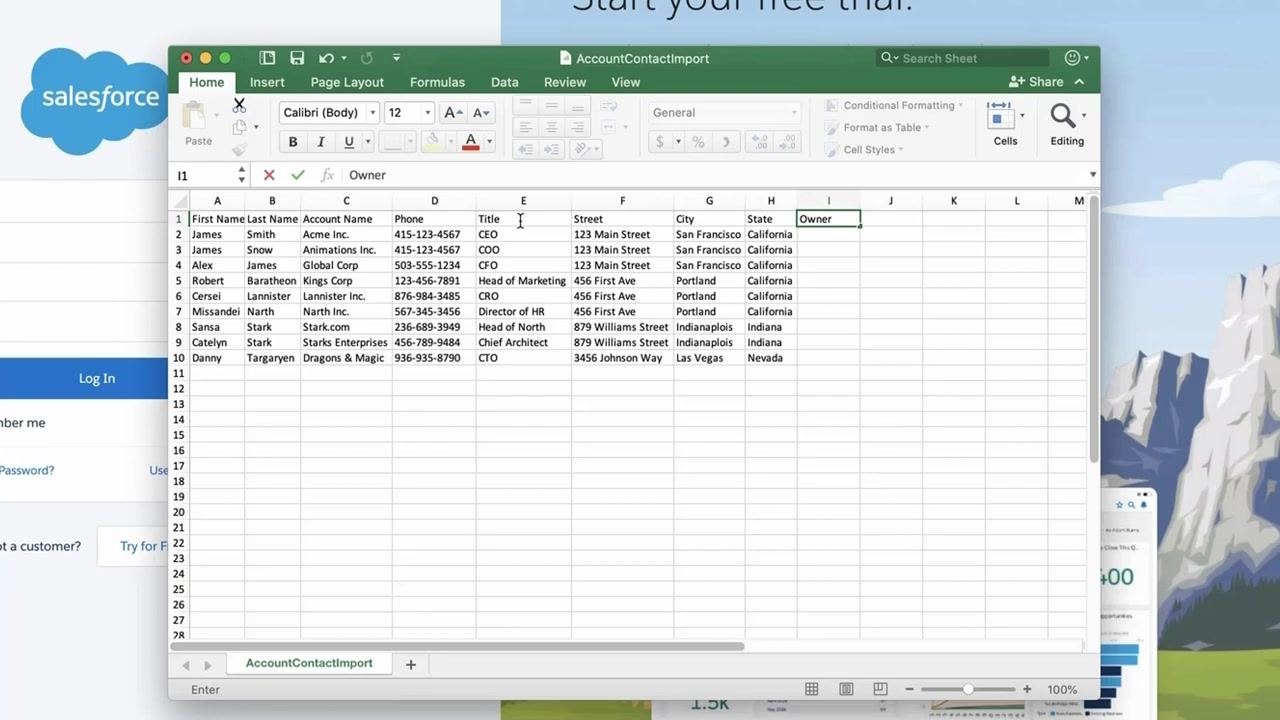
Add an Owner column to your CSV file. In this column, enter the owner's Salesforce username (for example,
jsmith@acme) or full name (for example,Joe Smith) for each account and contact. If you leave this column blank, the person performing the import becomes the owner by default.
Launching the Data Import Wizard
Once your CSV file is formatted, open the Data Import Wizard in Salesforce and upload it.
- In your CSV file, enter the username or full name of the owner for each record in the Owner column. For example, enter "Poe Dameron" for all records.
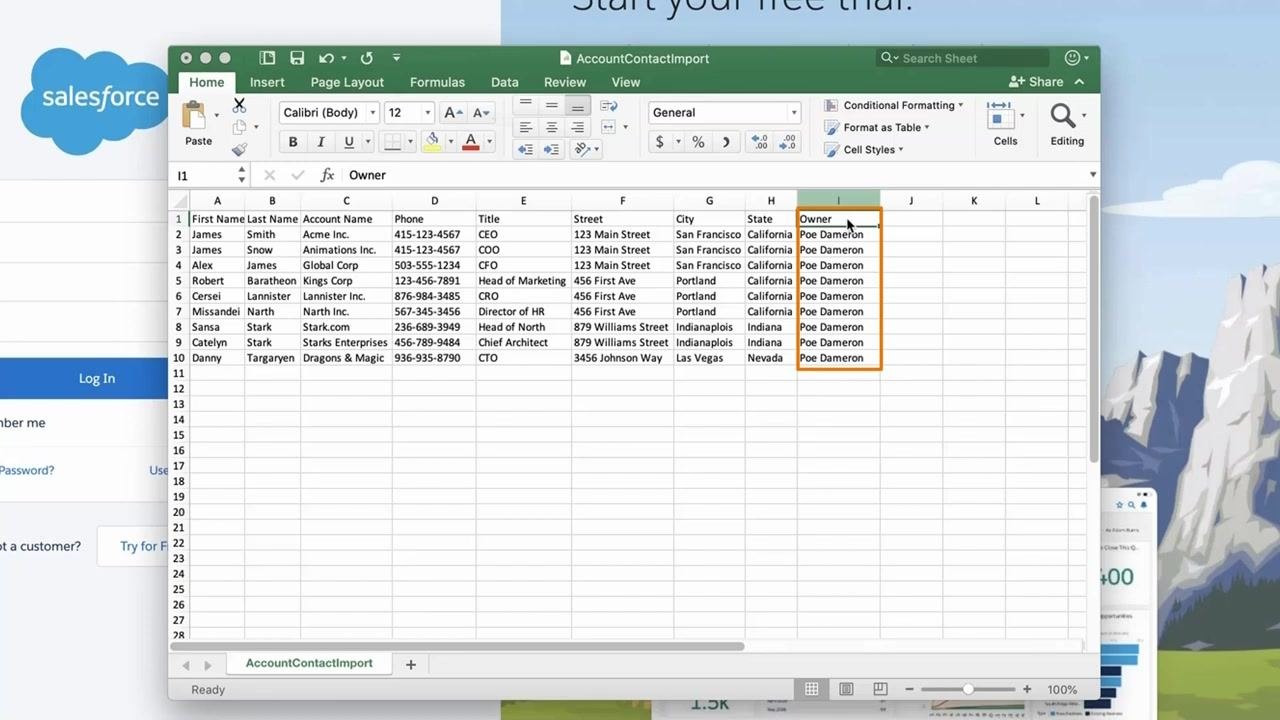
- Save the updated CSV file to your computer, making sure all changes are saved before you continue.
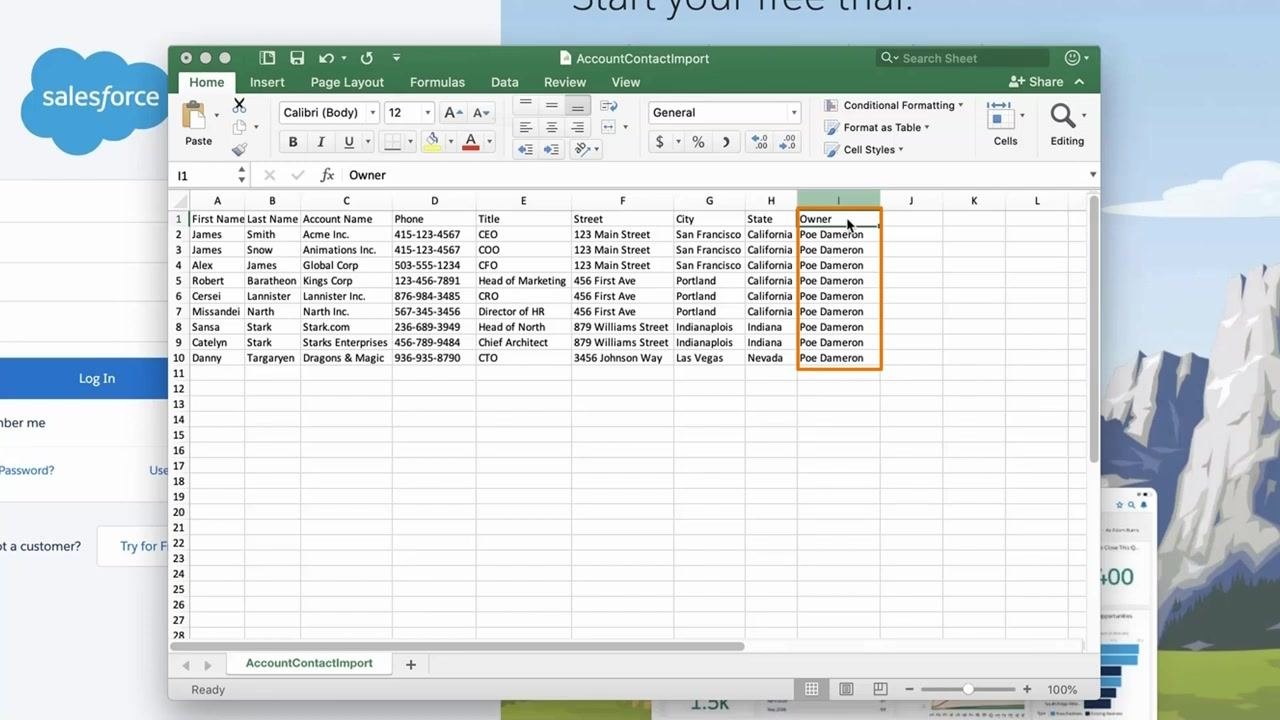
-
Log in to your Salesforce organization at
login.salesforce.com. -
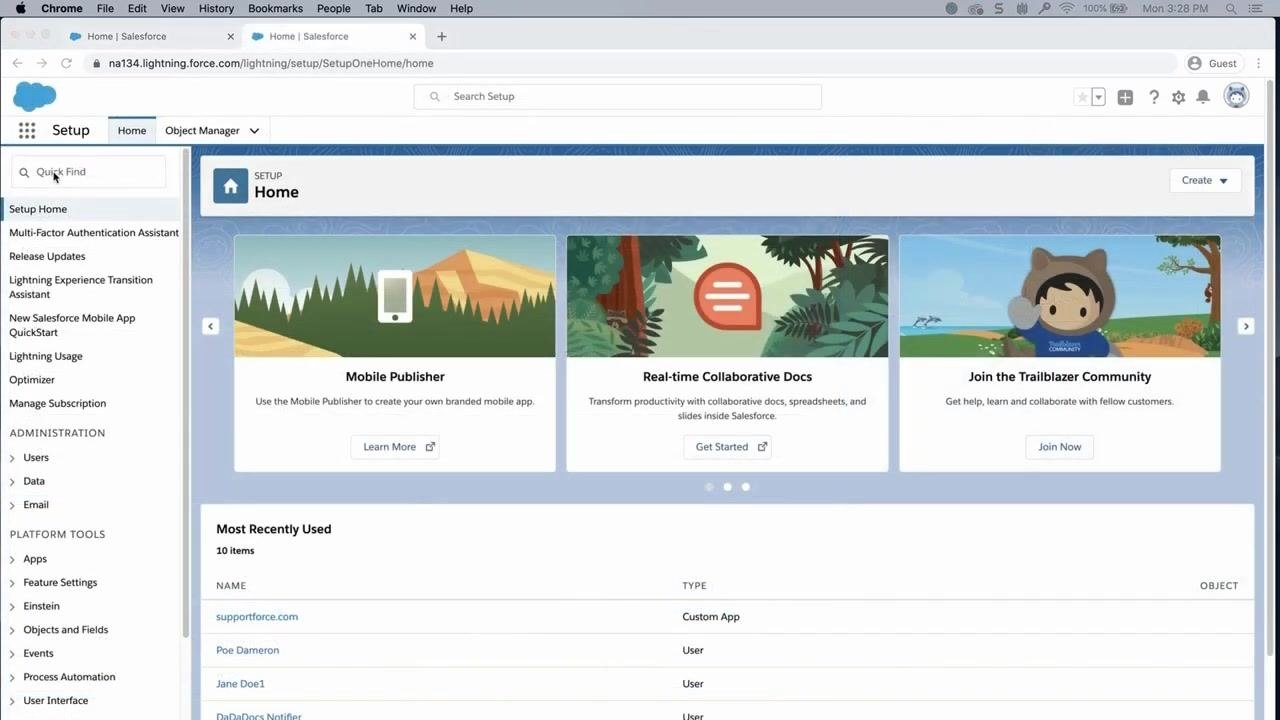
Click the gear icon (⚙️) in the upper right corner of the Salesforce interface.
-
Select Setup from the dropdown menu.
-
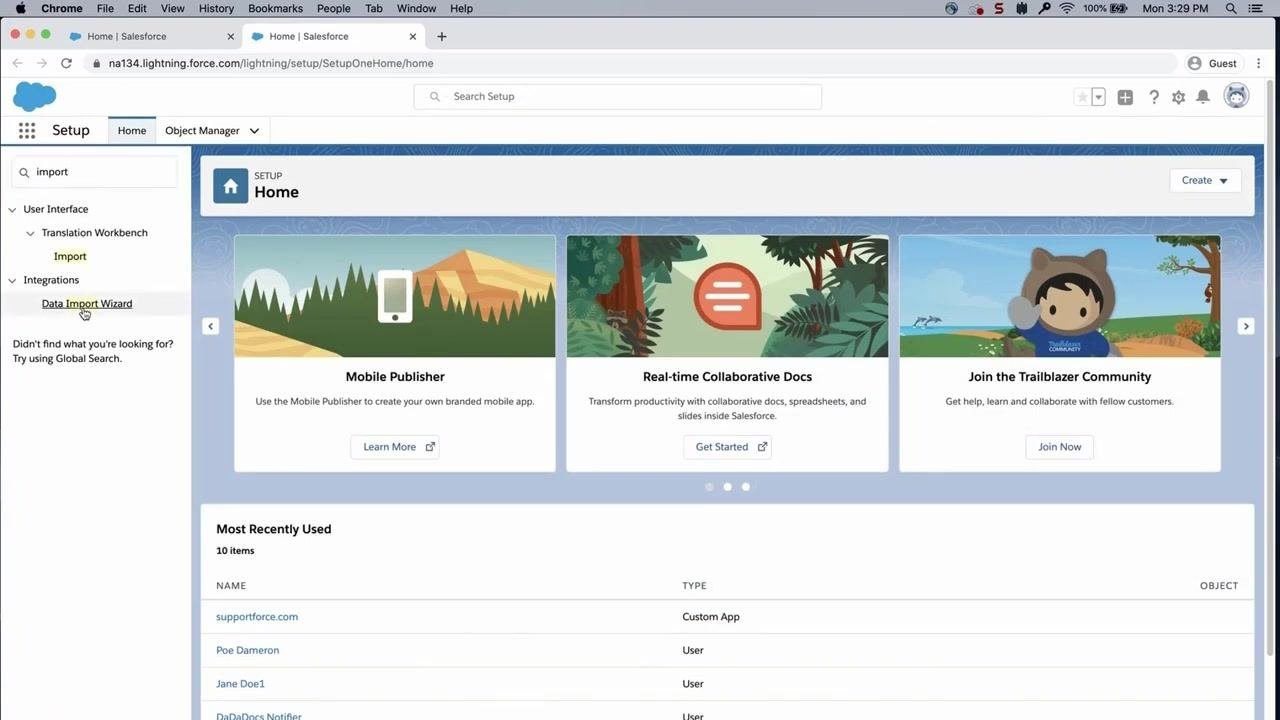
On the Setup page, locate the Quick Find search box in the left sidebar and type "import".
-
Click Data Import Wizard under the Integrations section.
-
On the Data Import Wizard page, scroll down and click Launch Wizard if prompted.
-
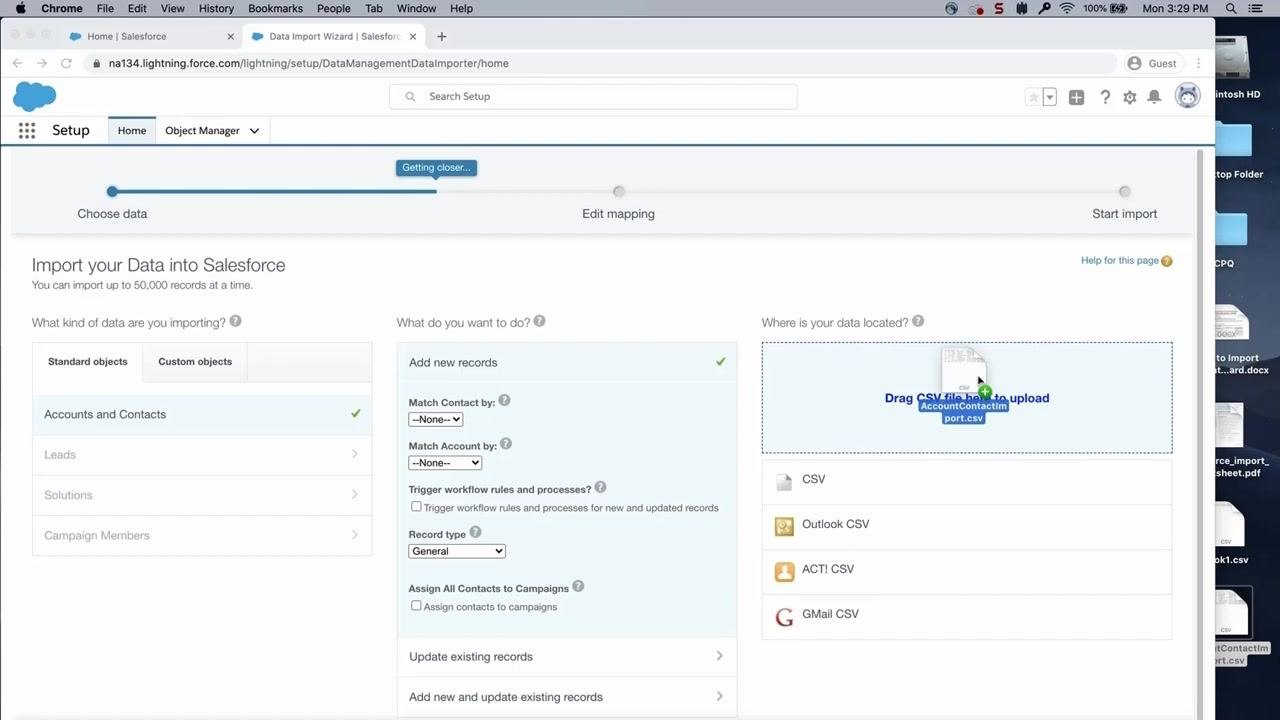
Under What kind of data are you importing?, select Accounts and Contacts on the Standard objects tab.
-
Under What do you want to do?, select Add new records.
-
Leave Match Contact by and Match Account by set to --None--, since you're adding new records rather than matching existing ones.
- Leave Trigger workflow rules and processes for new and updated records unchecked unless you specifically want workflow rules to run during the import.
-
Select the appropriate Record type from the dropdown menu, such as General or Default.
-
Leave Assign all contacts to a campaign unchecked unless you want to assign the imported contacts to a campaign.
-
Drag your saved CSV file (for example,
AccountContactImport.csv) into the Drag CSV file here to upload area. Alternatively, click the CSV category and use the file browser to navigate to and select your file. -
Leave Character Code set to its default value, such as ISO-8859-1 (General US & Western European, ISO-LATIN-1).
-
Confirm that Values Separated By is set to Comma.
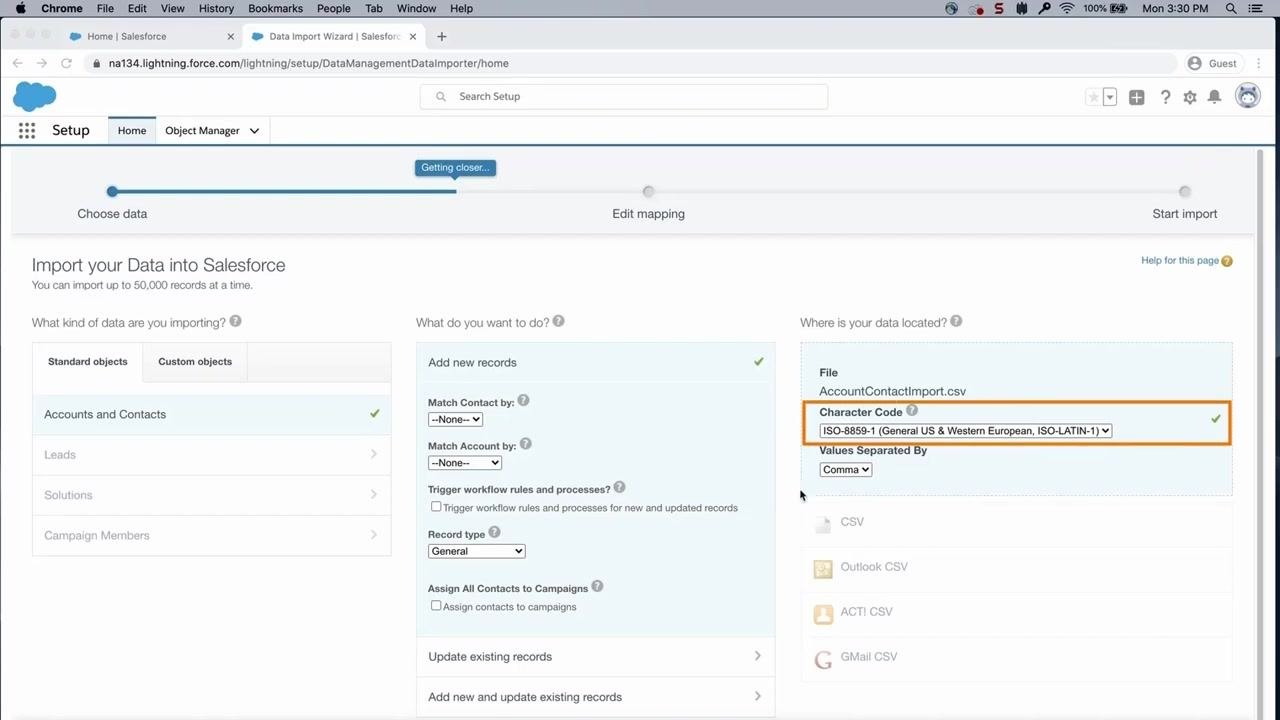
- Click Next to proceed to the mapping step.
Mapping fields and completing the import
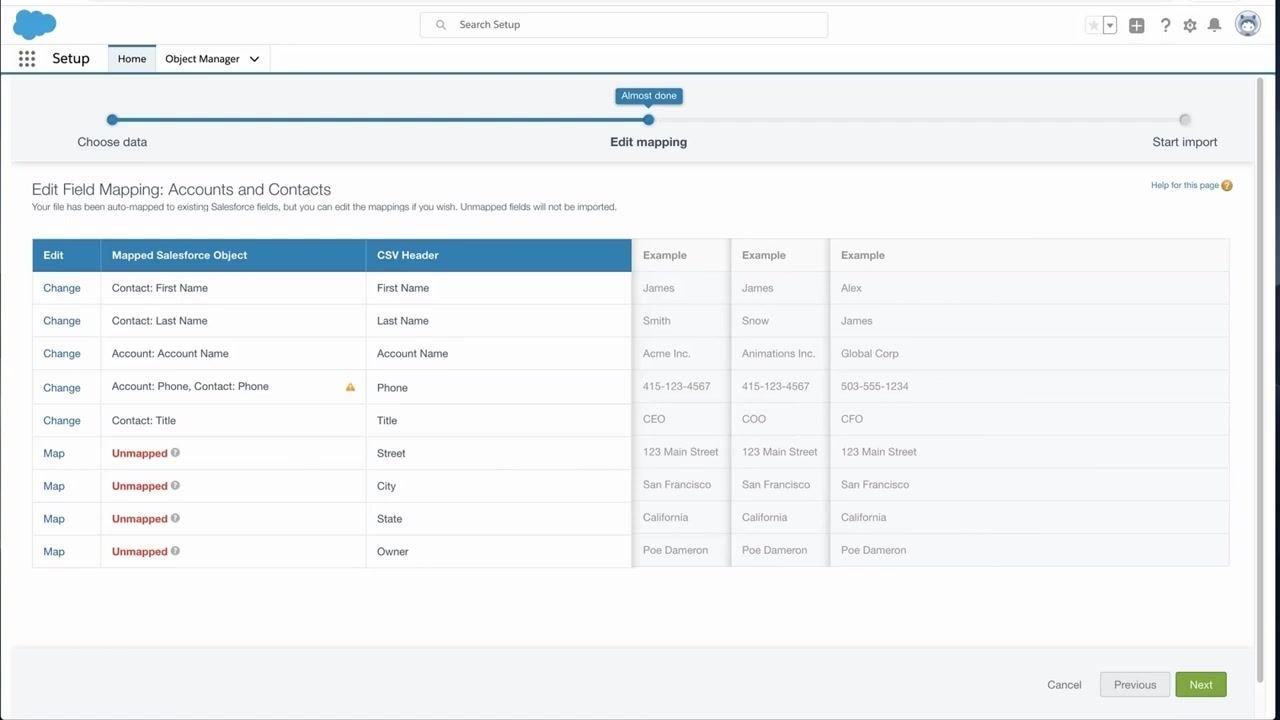
After you upload your file, the wizard attempts to map your CSV headers to Salesforce fields automatically. Review and complete any mappings before starting the import.
- Review the automatic field mappings. Any CSV header that isn't mapped automatically appears as Unmapped and will not be imported unless you map it manually.
-
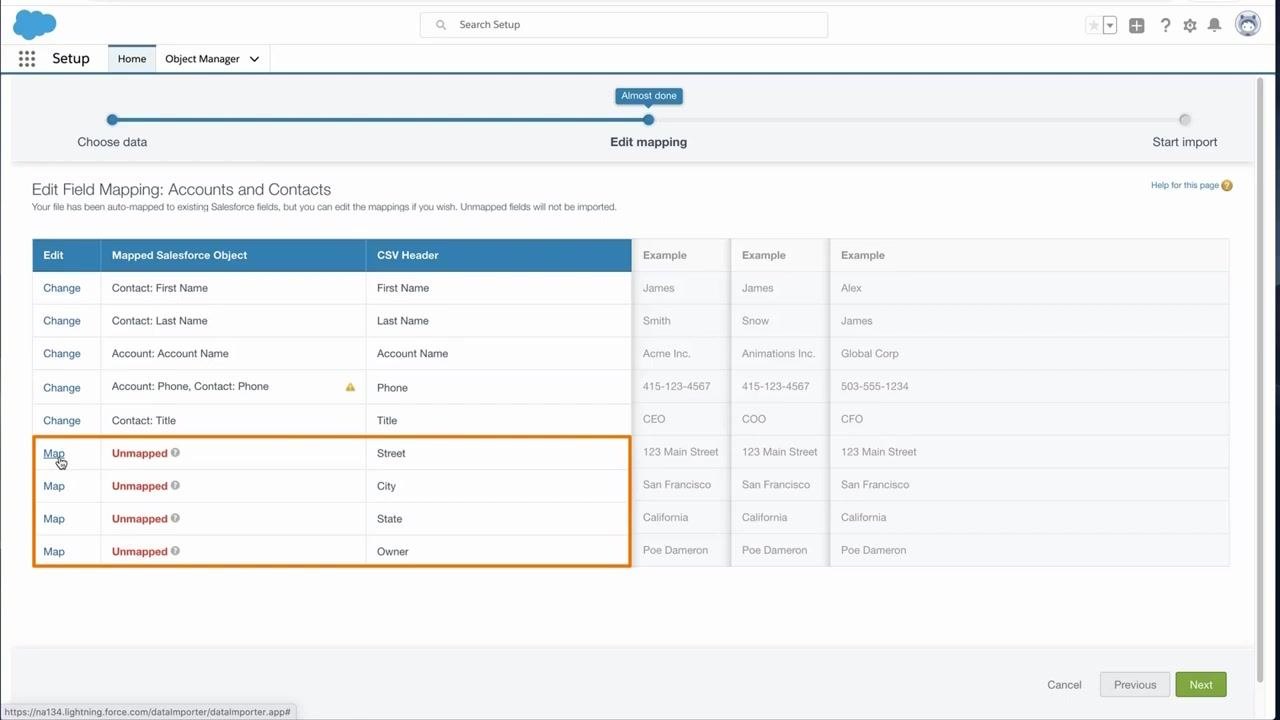
Scan the list of mapped and unmapped fields, and locate any fields marked Unmapped in the CSV Header column, such as Street, City, State, or Owner.
-
For each unmapped field, click Map to the left of the field name. For example, click Map next to Street.
-
In the mapping dialog, type the name of the Salesforce field you want to map to (for example, "Street"), then select the matching field from the list to complete the mapping.
-
Repeat this mapping process for each remaining unmapped field, such as City, State, and Owner.
-
To change a mapping the wizard performed automatically, click Change to the left of that field. For example, click Change next to Phone if you want to adjust or remove the mapping. In the dialog, delete any Salesforce fields you don't want mapped to that CSV header, then click Map to save your changes.
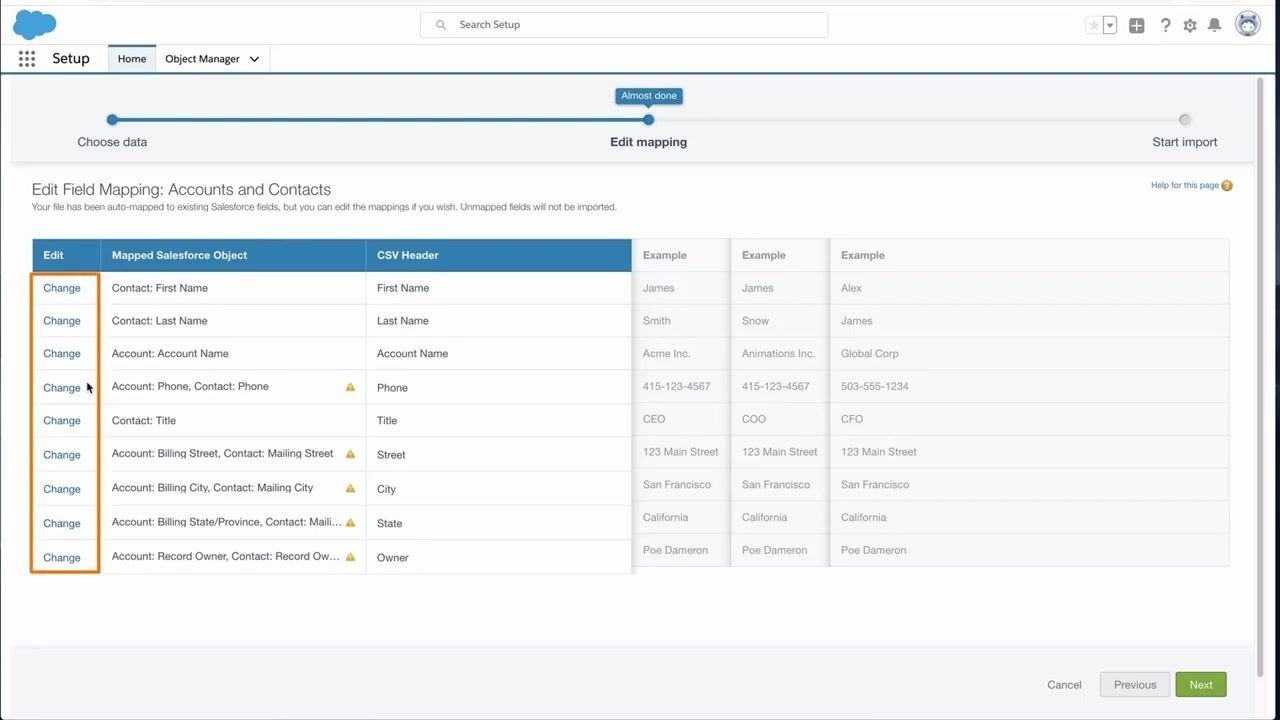
- Once all fields are mapped as desired, click Next to proceed.
- On the Review & Start Import page, confirm your selections, such as Accounts and Contacts and Add new records. Verify the number of mapped fields (for example, 9) and confirm that unmapped fields shows 0. Click Previous if you need to make changes, or click Start Import if everything is correct.
-
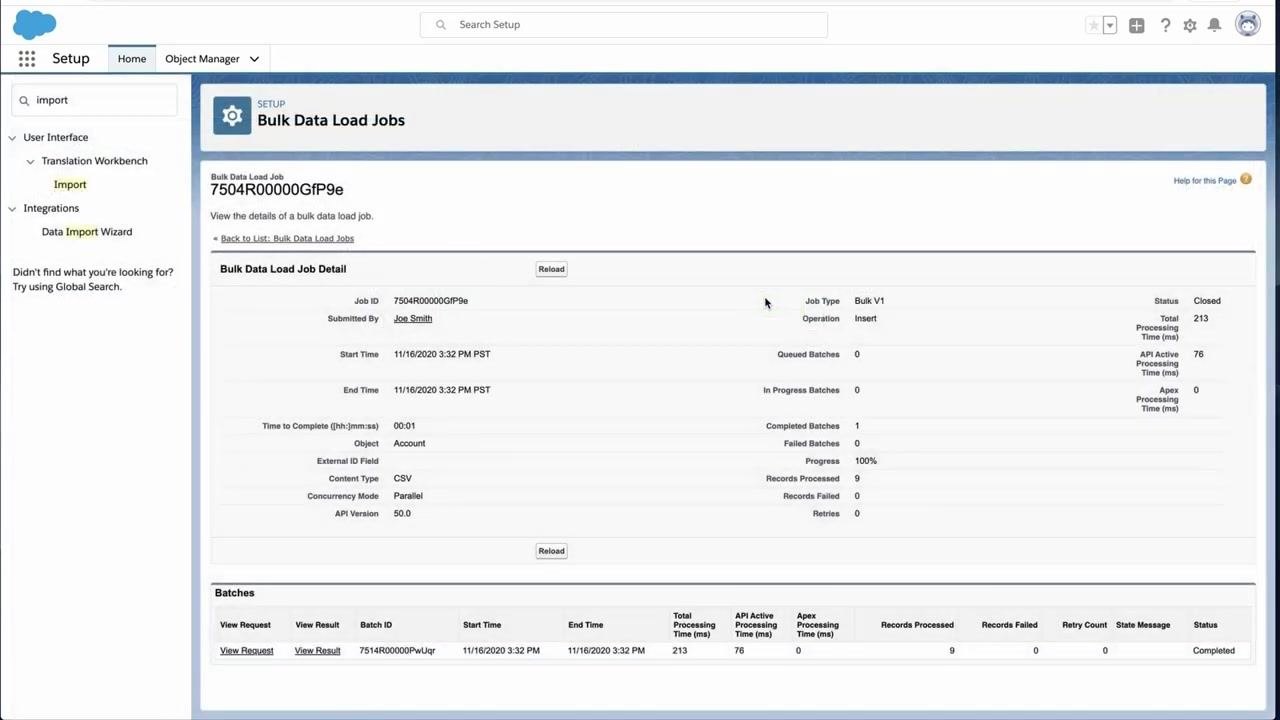
Wait for the Bulk Data Load page to appear. This page displays the status and details of your import job, including:
- Job ID
- Submitted By
- Start and End Time
- Object (for example, Account)
- Content Type (CSV)
- Records Processed (for example, 9)
- Records Failed (should be 0)
- Status (for example, Closed, Completed)
-
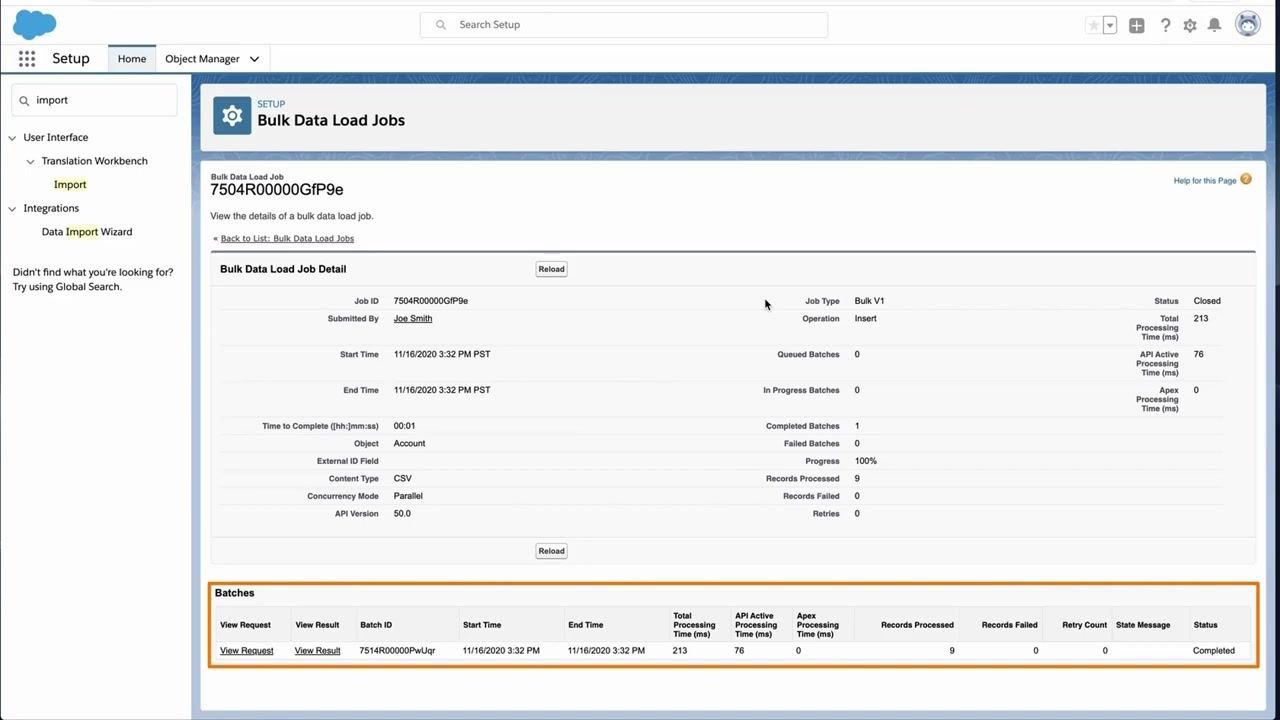
Review the Batches section at the bottom of the Bulk Data Load Jobs page. Click View Result to see detailed results for each batch, and confirm that the status reads Completed with the expected number of records processed.
Verifying imported records and permissions
After the import completes, confirm that your records appear correctly in Salesforce.
- Go to the Accounts tab. From the Setup Home screen, type "Account" into the search bar on the left, then select Accounts from the dropdown results.
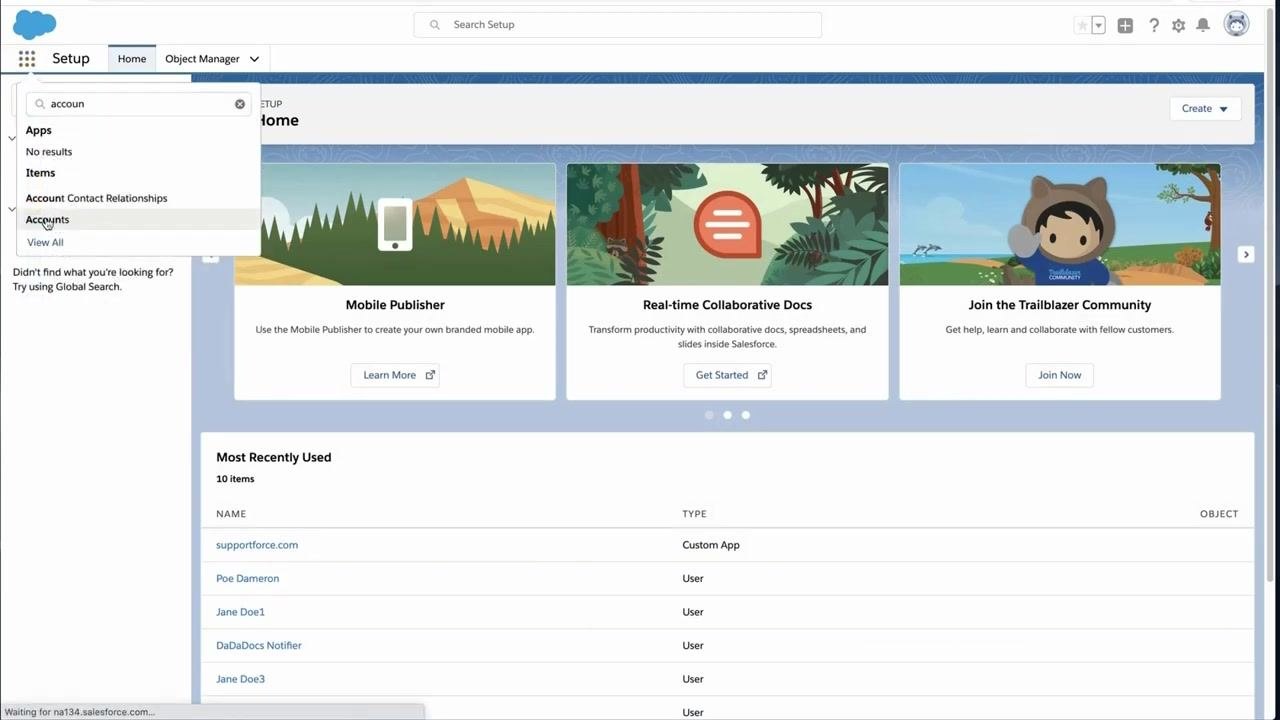
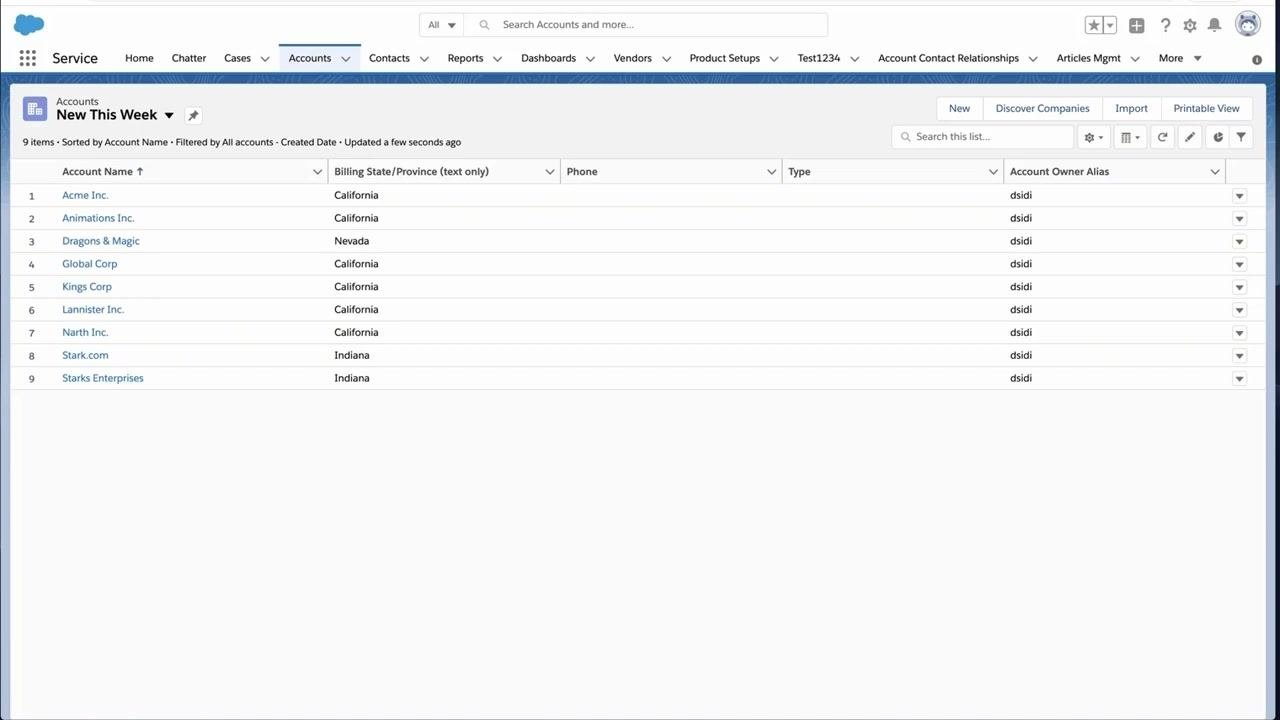
- In the Accounts section, select the New This Week list view to display account records created during the current week. Confirm that your newly imported records appear, for example:
- Acme Inc. (California)
- Animations Inc. (California)
- Dragons & Magic (Nevada)
- Global Corp (California)
- Kings Corp (California)
- Lannister Inc. (California)
- Narth Inc. (California)
- Stark.com (Indiana)
- Starks Enterprises (Indiana)
Also check that the Account Owner Alias matches the expected user, such as "dsidi".
-
Confirm you have read and edit permissions for the Account object, since these are required to follow these steps. If you lack these permissions, contact your Salesforce system administrator for assistance.
-
If you want to import records but don't have the required permissions, reach out to your system administrator to request access or to perform the import on your behalf.
What's next
- Visit help.salesforce.com for official documentation and troubleshooting guidance.
- Join the Trailblazer Community at trailblazer.salesforce.com to connect with other Salesforce users and experts.
By following these steps, you can confirm that your records were successfully imported into Salesforce, verify that you have the correct permissions, and know where to turn for further support.
Generation details: cost, quality tiers
Docsie billed 3,000 credits ($2.10) to analyze this 6-minute video at standard quality. The rewrite, template fill and Word/PDF exports were included. The same video at each quality tier:
| Quality | Frames sampled | Credits | Approx. cost |
|---|---|---|---|
| Draft | every 16-30 s | 1,500 | $1.05 |
| Standard (this guide) | every 8-15 s | 3,000 | $2.10 |
| Detailed | every 4-7 s | 6,000 | $4.20 |
| Ultra | every 1-3 s | 12,000 | $8.40 |
Credits priced at $0.70 per 1,000; plans include a monthly allowance. Enterprise customers on on-premise or bring-your-own-model deployments run this on their own inference and pay no per-video credits.
Generated by Docsie Video-to-Docs on 2026-10-01 from a 5-minute video. Screenshots are frames from the source video and belong to their creator, Salesforce Support, whose original is embedded above. If you own this video and want the guide removed or credited differently, contact us and we will act within one business day.