
How to Upload Specifications in Procore
This guide shows you how to upload specifications in Procore, from preparing your spec book to publishing and verifying the finished set. You prepare a searchable PDF, configure the Specifications tool, upload and process the file, review each section, and publish. Follow the steps in order to get accurate section numbers, descriptions, and revisions.
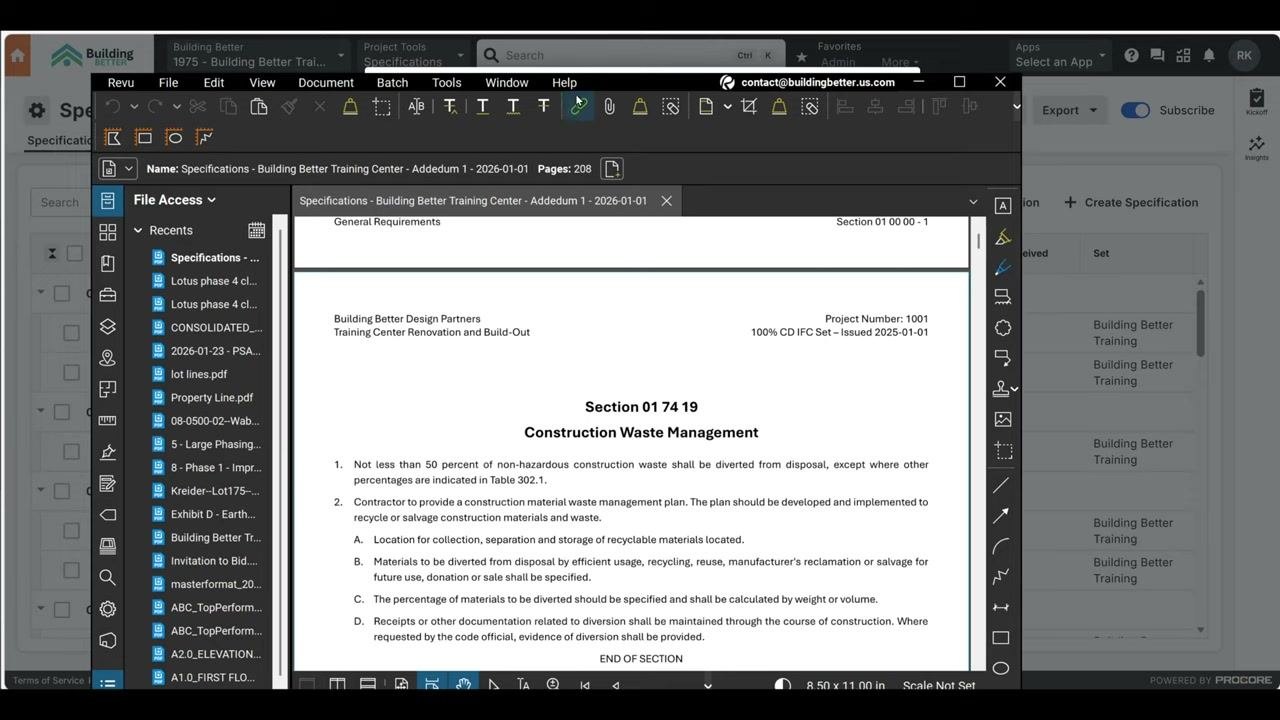
Video: The Right Way to Upload Specifications in Procore: A Step-by-Step Guide by Building Better | Ralph Kreider (2026). All credit for the demonstration goes to the creator; watch the original on YouTube. The written guide below was generated from this video by Docsie. Creator? Request a change or removal.
This guide shows you how to upload specifications in Procore, from preparing your spec book to publishing and verifying the finished set. You prepare a searchable PDF, configure the Specifications tool, upload and process the file, review each section, and publish. Follow the steps in order to get accurate section numbers, descriptions, and revisions.
Prerequisites
Before you upload specifications in Procore, confirm that you have the following:
- The entire spec book as a single PDF file.
- A text-searchable PDF. If you open the PDF and cannot search for text because it is only a scanned image, you need a searchable version.
- The project number and other relevant project information in the spec book.
- A clear spec section at the end of the document, with an "end of section" marker or similar indicator for each section.
- The latest and most complete version of the spec book.
- Bluebeam, if you need to run OCR or add markers yourself.
Avoid uploading specs that lack end-of-section markers, because they can cause problems during processing.
Prepare your spec book
Step 1: Confirm the spec book format
Confirm that the entire spec book is provided as one PDF file. Open the PDF and try to search for text. If you cannot, follow Step 2.
Step 2: Get a text-searchable PDF
If your PDF is not text-searchable, contact the design team and request the original, text-searchable version.
If the original is unavailable, use Bluebeam's batch tools to run OCR (Optical Character Recognition) on the PDF:
- Open the PDF in Bluebeam.
- Go to the batch tools and select the OCR function.
- Choose the document type Drawing Type Text Documents.
- Click OK and save the file.
- Let Bluebeam complete the OCR process. Procore attempts a secondary OCR if needed.
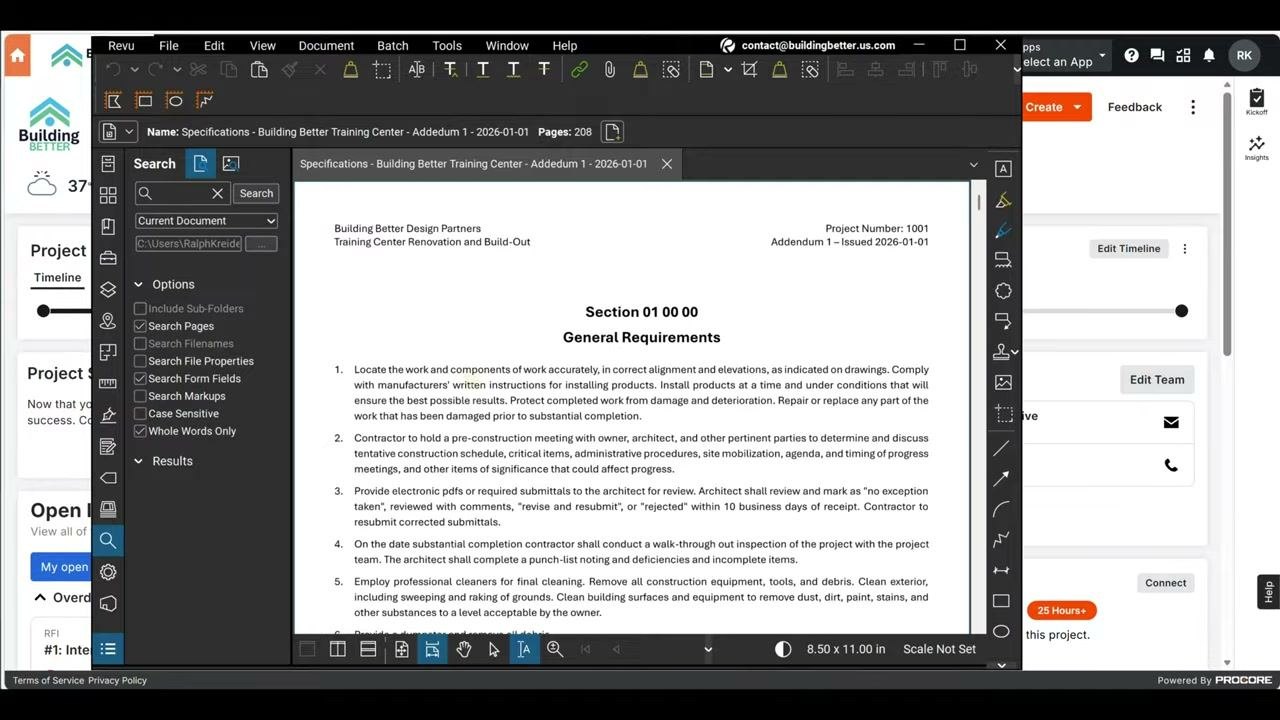
Step 3: Check the project information and section markers
Check that the spec book includes the project number and other relevant project information. Make sure there is a clear spec section at the end of the document. Verify that each section has an "end of section" marker or similar indicator.
Step 4: Add project and section markers in Bluebeam
- Open your spec book PDF in Bluebeam.
- Add the project number or other required markers, such as "End of Section," at the bottom right-hand corner of each section.
- Flatten the document so the markers are embedded and included in the upload.
Step 5: Double-check the spec book
Review the PDF to confirm that all updates and markers are present. Make sure you have the latest and most complete version before you continue.
Configure the Specifications tool
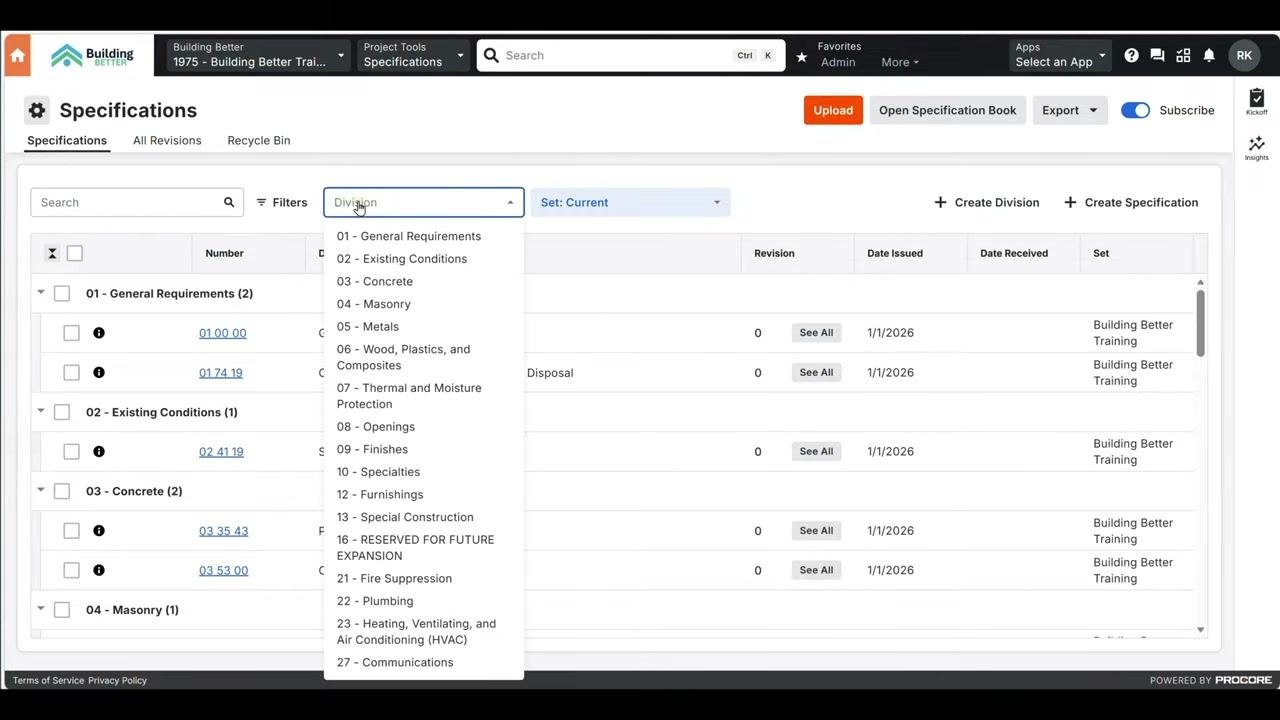
Step 6: Open the Specifications settings
- Navigate to your project in Procore.
- Select Project Tools, then choose Specifications.
- Click the configuration settings at the top left.
Review and update these options:
- Revision Number Ordering Scheme: Choose Letters first, then numbers or Numbers first, then letters, based on your design team's preference (for example, A, B, C, or 1, 2, 3, or R1, R2, R3).
- Enable Specifications by Area: Turn this on if your project has multiple buildings or phases and you need multiple sets with potentially different specs for each area. If you don't need it, leave it off.
- Specifications Subscribers: Add the team members who should receive notifications when new revisions or sets are uploaded.
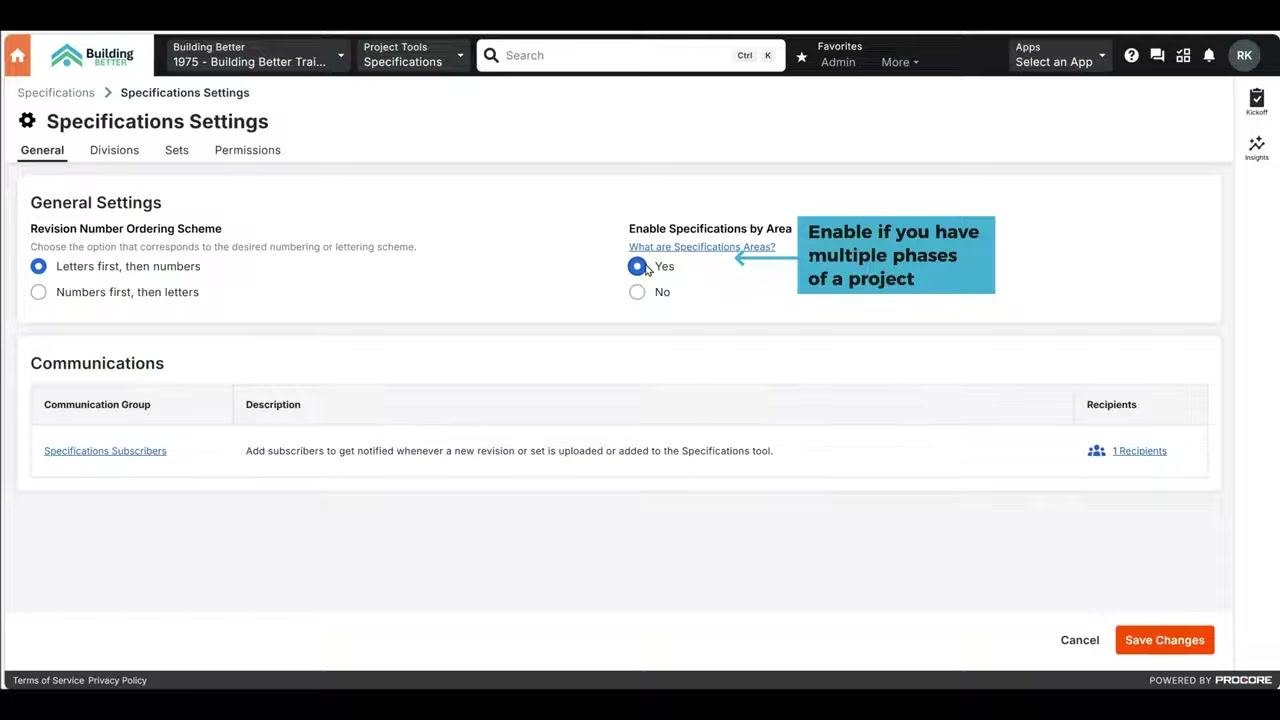
Step 7: Add recipients for specification updates
- Click Specifications Subscribers to open the Add Recipients dialog.
- Add all team members who should receive email notifications about specification updates.
- Click Add to confirm the recipients.
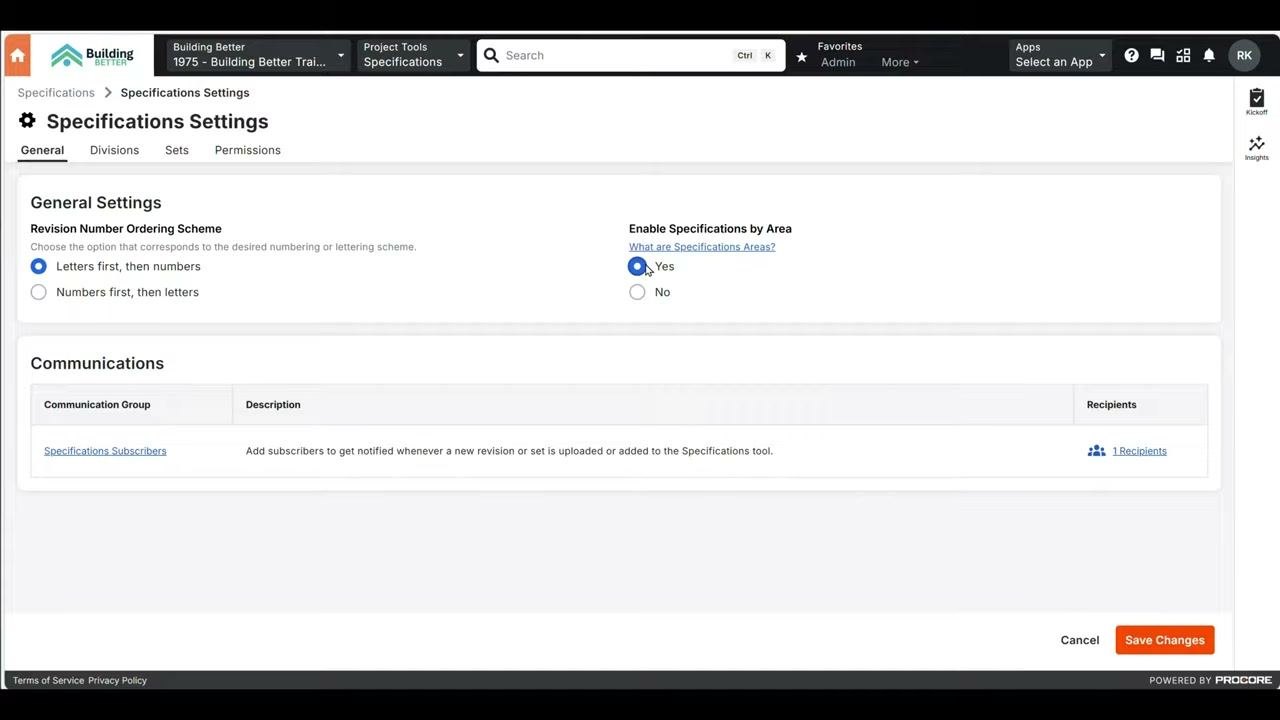
Step 8: Save your configuration
After you update all settings and add recipients, click Save Changes to apply your configuration.
Step 9: Review and edit specification divisions
Click the Divisions tab to view all your spec divisions. Edit existing divisions or add new ones to match your project's requirements.
Step 10: Manage specification sets
- Click the Sets tab to view and manage your specification sets.
- To add a new set, click + Add Set.
- Enter the set name and set date. For example, use the name
2025-01-01 - Building Better Training Academy - IFCwith a set date of 12/31/2024. - Click Save.
Upload your spec book
Step 11: Start the upload
On the Specifications page, find the orange Upload button at the top right. Click it to begin uploading your spec book.
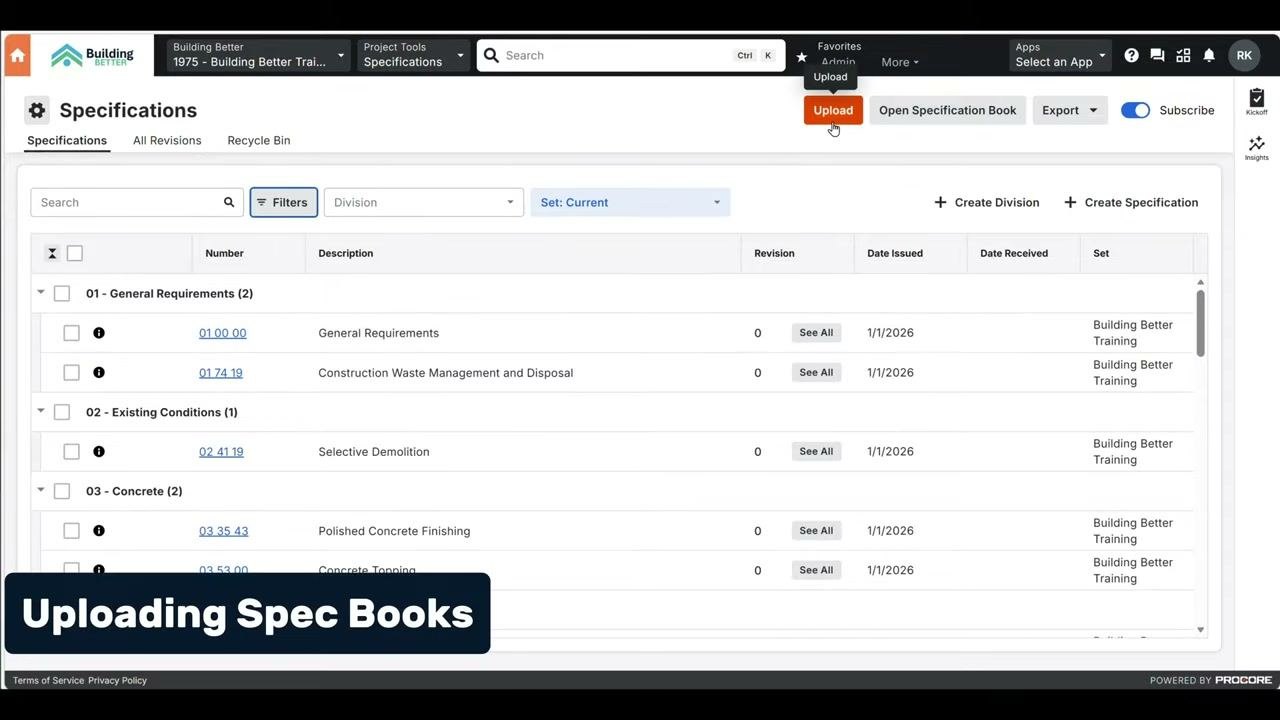
The Upload Specifications dialog opens, with an area labeled Attach Files or Drag & Drop.
Step 12: Attach your spec book PDF
Use either method to add your finalized spec book:
- Drag the PDF from your file explorer or desktop into the Attach Files or Drag & Drop area.
- Click Attach Files to browse for and select the file.
Once attached, the file name (for example, "Specifications - Building Better Training C...pdf") appears below the upload area.
Step 13: Create or select a specification set
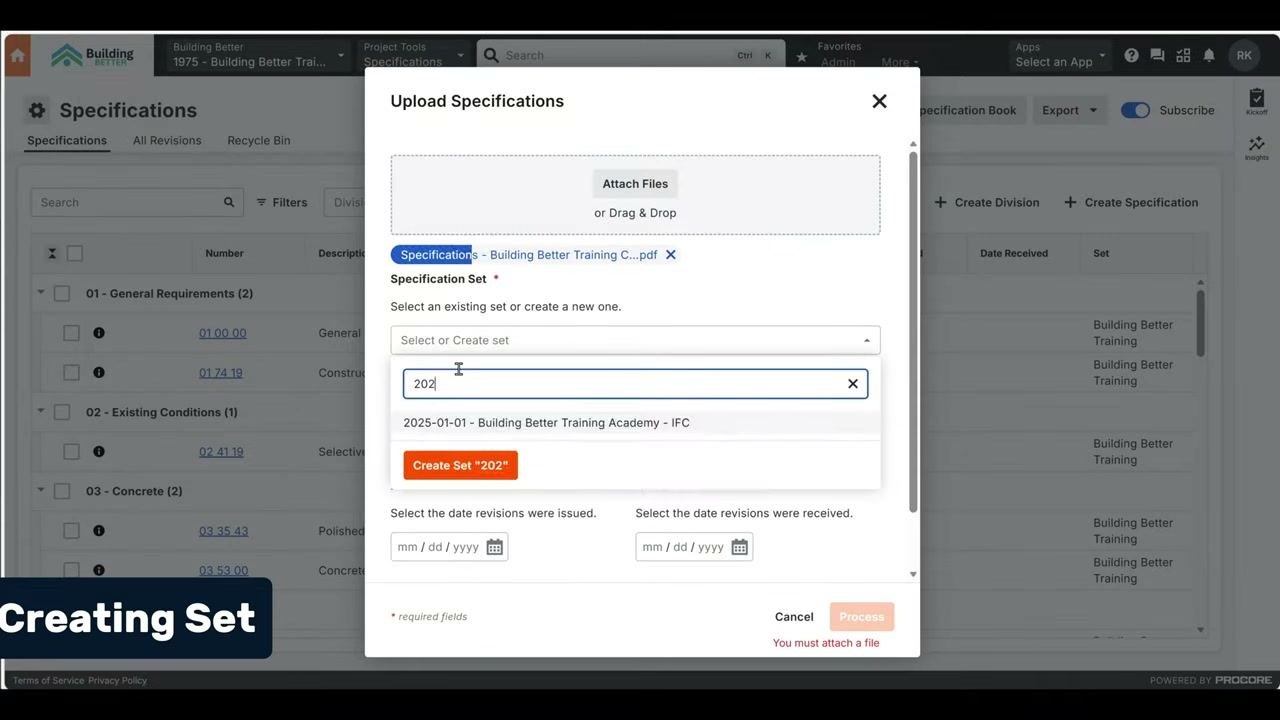
In the Specification Set field, select an existing set from the dropdown, or start typing to create a new one.
For a new set, use the naming convention of year, month, day, and project name. For example, enter 2025-01-01 - Building Better Training Academy - IFC. As you type, Procore prompts you to create a set with that name. Click the orange Create Set button to confirm.
Step 14: Add an addendum to the set name (if needed)
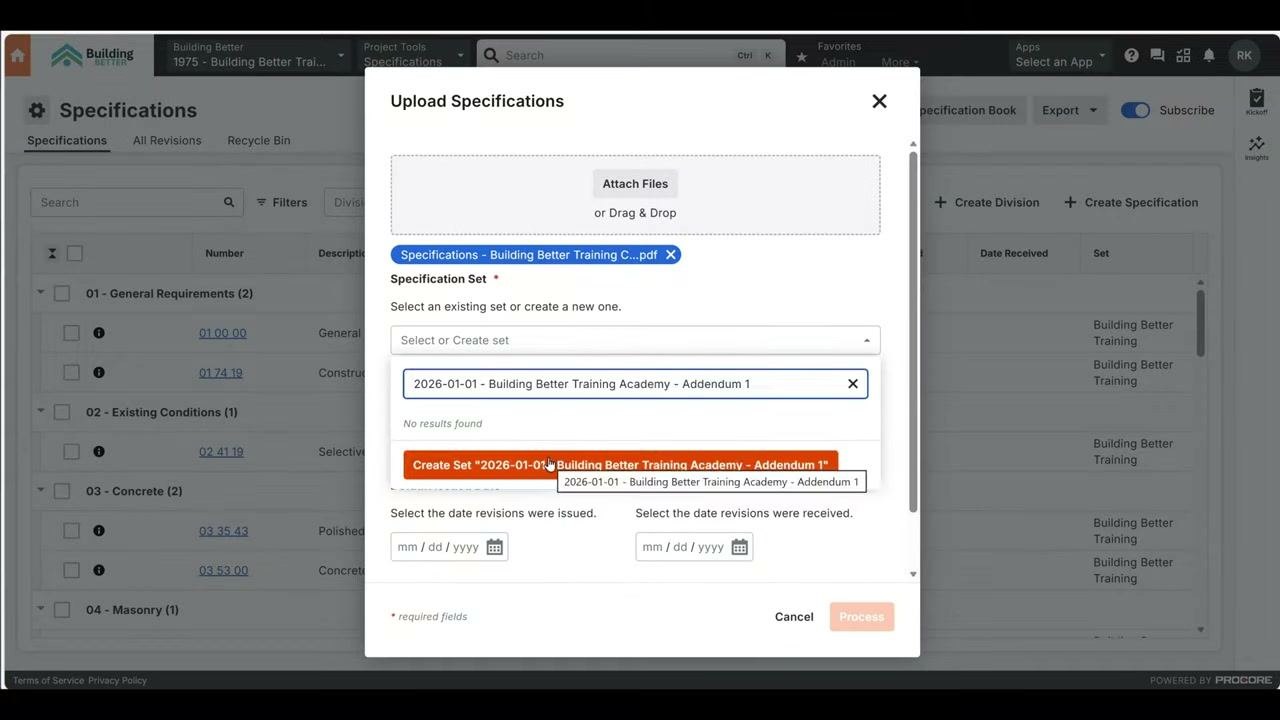
If you need to specify an addendum, append it to the set name. For example, enter 2026-01-01 - Building Better Training Academy - Addendum 1. Then click the orange button to create the set with that name.
Step 15: Enter the set date
Enter the date the architect issued the set of specifications. For example, enter 01/01/2026.
Step 16: Select the format
Choose MasterFormat, by CSI (USA/Canada) from the Format dropdown. This is the typical format.
Step 17: Enter default dates (optional)
If you have them, enter the Default Issued Date and Default Received Date for the specification revisions. If not, leave these fields blank.
Step 18: Expand Advanced Options (if needed)
Expand Advanced Options and complete the following fields as needed:
- Default Revision: Enter the revision number or letter for your set. For example, enter
1. - Number to Ignore: Enter any numbers that Procore should ignore as spec section numbers. This field is optional.
- Specifications Language: Select the language of your specifications. For example, choose
English.
Step 19: Process the upload
When all required fields are complete and your file is attached, click Process to upload your specification set. Wait for the upload to finish before you do anything else.
Processing time depends on the number and size of your files and may take 5–10 minutes.
Step 20: Open the processed specifications for review
When processing is complete, find your uploaded file in the Items to Review panel (for example, Specifications - Building Better Training...pdf). Click Review to begin reviewing the processed specifications.
Review specification sections
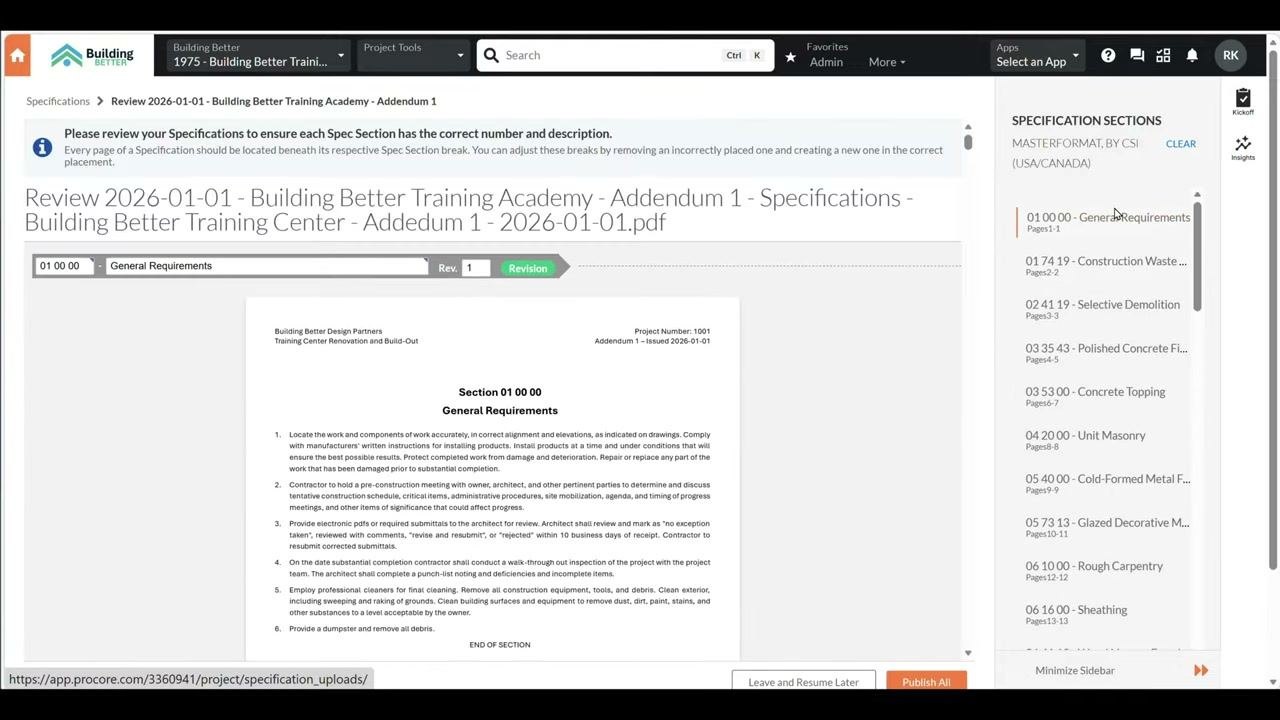
Step 21: Check each section for accuracy
In the Specification Sections panel, click each section to review its details. Confirm that the section number and description match the content in the document preview.
For example, click 01 74 19 - Construction Waste Management and Disposal and verify the number, title, and content. Repeat for each section, such as 01 00 00 - General Requirements, 02 41 19 - Selective Demolition, and 03 35 43 - Polished Concrete Finishing. Make sure the Revision number is correct (for example, Rev. 1) and the status is Revision.
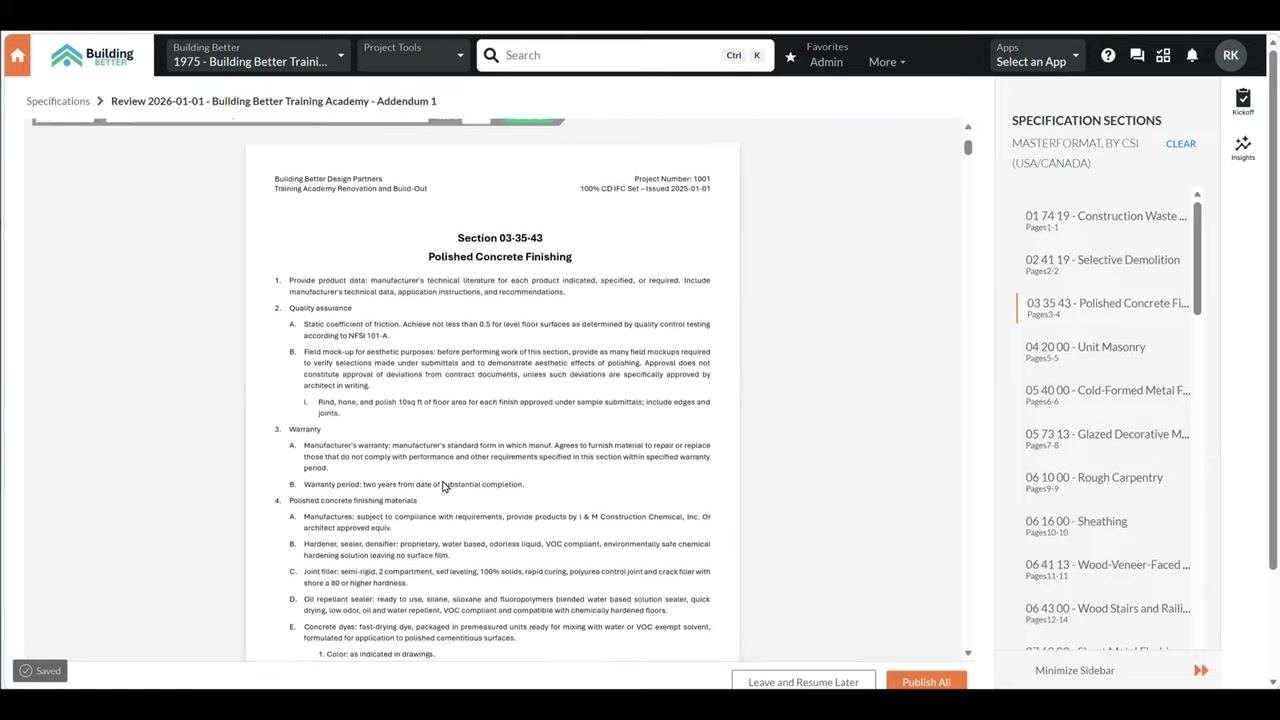
Step 22: Review section content
Go through each section line by line to check accuracy. For example, review "Section 03-35-43 Polished Concrete Finishing" for completeness and correctness. Confirm that all required details, such as product data, quality assurance, warranty, and materials, are present and accurate.
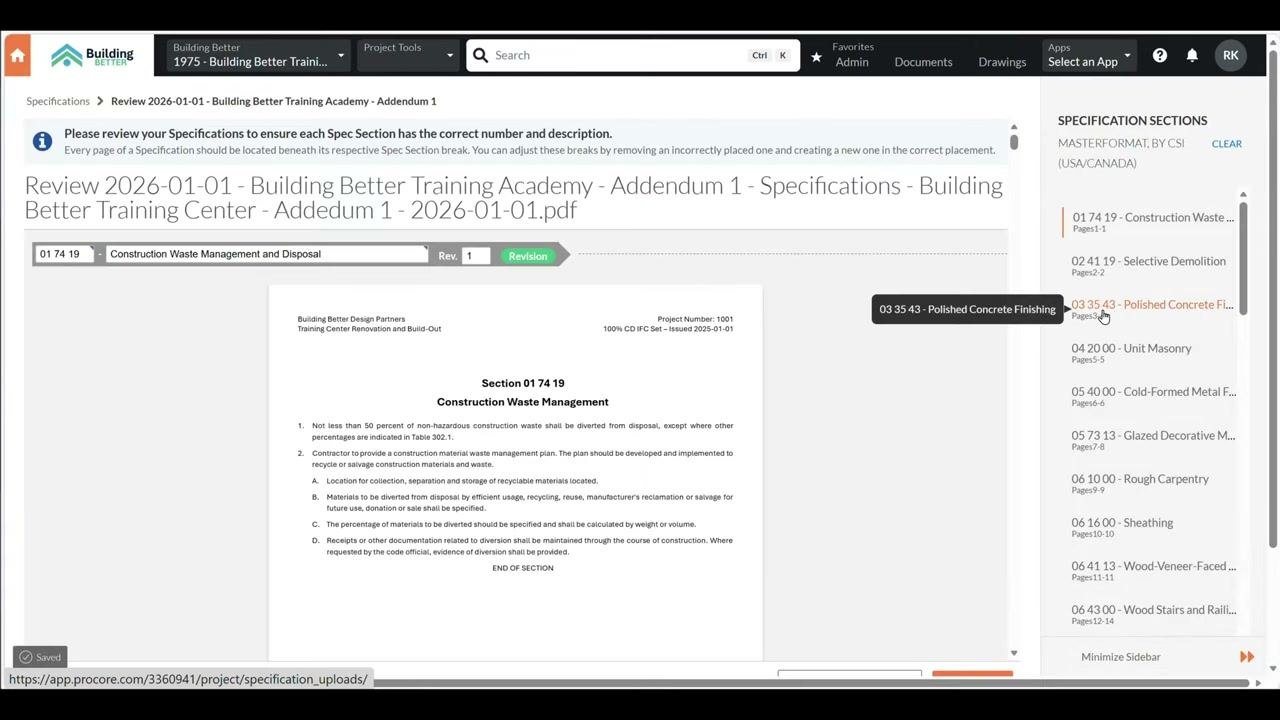
Step 23: Identify section break problems
Procore may add an extra section break or miss a needed one. Review the document preview to make sure each section starts and ends in the correct place. If a break is extra, remove it. If a break is missing, add one.
You can use Remove Break (the red "X" next to a section) or Add Break (the button on the left).
Step 24: Remove an incorrect section break
Click Remove Break (the red "X") next to the section that has an unnecessary break. Confirm the removal if prompted.
Step 25: Add a missing section break
- Click Add Break where a new section should begin.
- Assign the correct section number and title to the new break.
- Make sure the document preview updates to show the new section break.
Step 26: Fix section break errors
If a section has missing or incomplete information, such as a blank number or description, Procore highlights the error in red. For example, a section labeled "03" with revision "0" shows the message "Number cannot be blank, Description cannot be blank."
Use Remove Break (the red "X") to delete the incorrect break, or fill in the missing number and description. Make sure all sections have valid numbers and descriptions before you continue.
Publish the specifications
Step 27: Publish individual sections
After you confirm a section is correct, click its Publish button (for example, Publish "01 74 19 - Construction Waste Management and Disposal"). Wait for the section to publish before moving to the next. Repeat for each section, confirming accuracy before you publish.
Step 28: Pause or finish your review
If you need to stop partway, click Leave and Resume Later to return at another time. To finalize and publish the uploaded specifications, click Publish All.
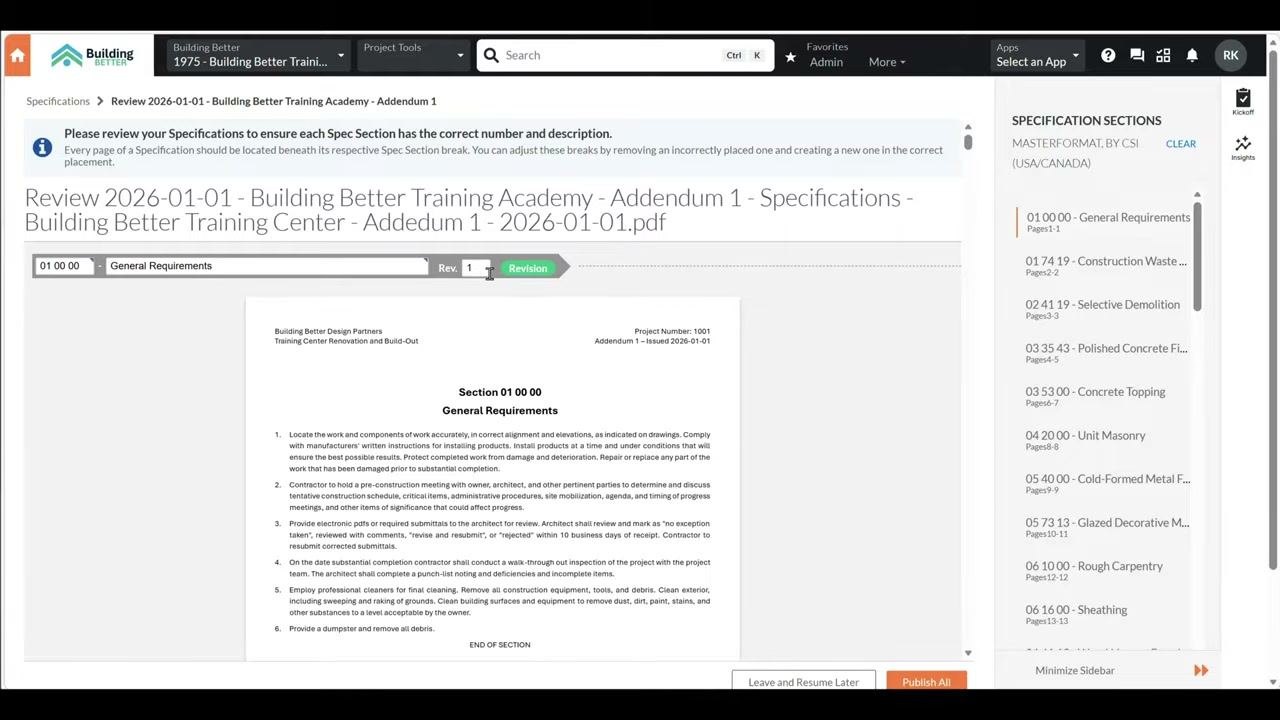
Step 29: Publish all sections
Once you have reviewed and corrected all sections, click Publish All at the bottom right of the screen. This publishes every section in the specification set at once. Review each section individually before you use this option to make sure everything is accurate.
Verify the published specifications
Step 30: Check the published set
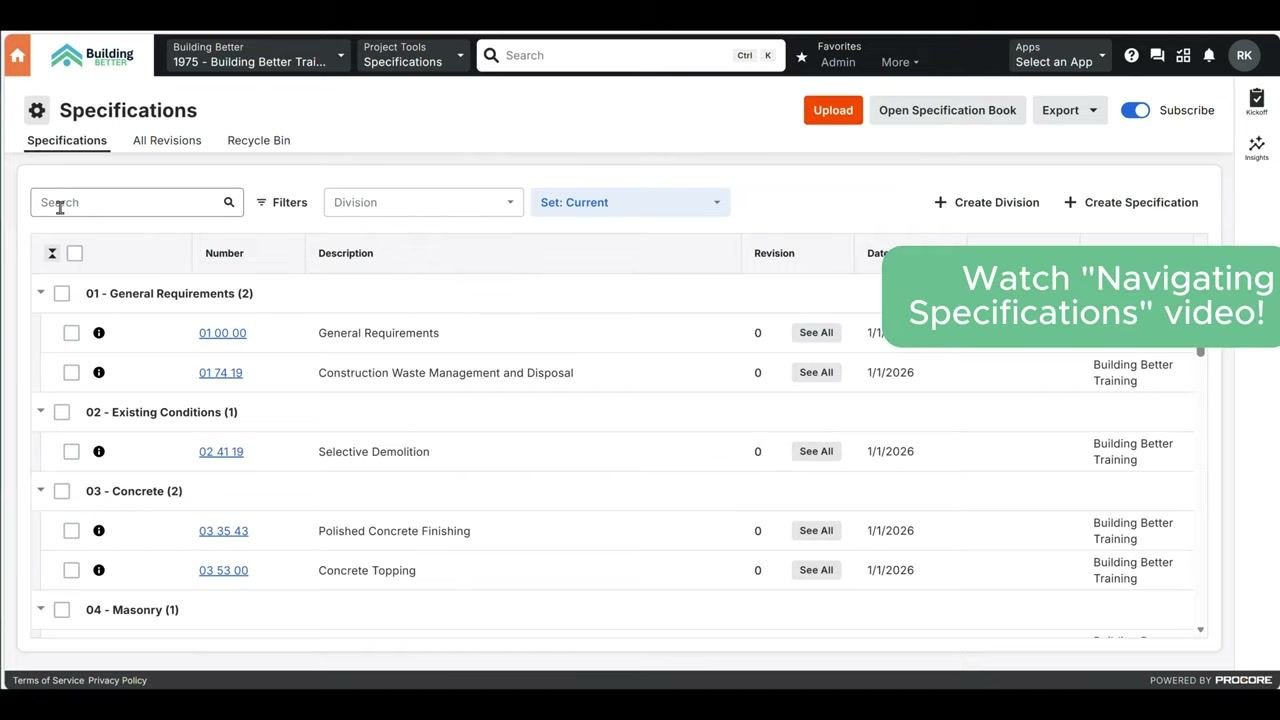
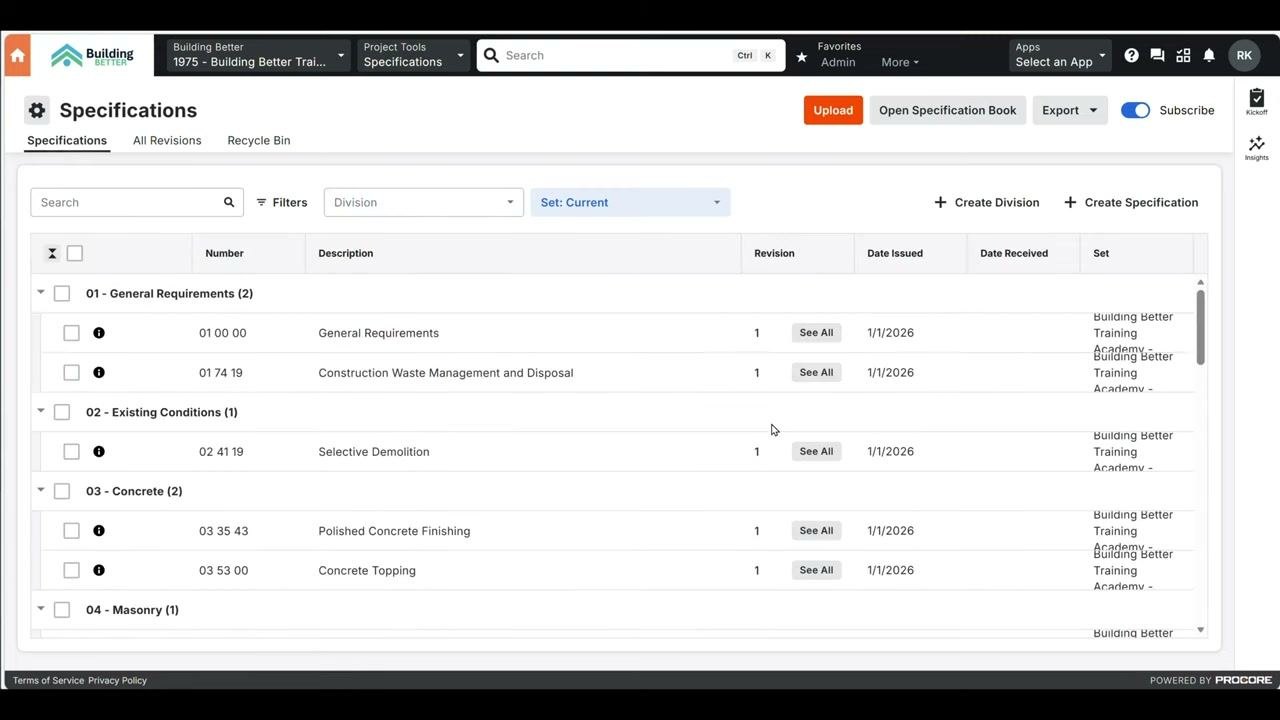
Go to the main Specifications dashboard. Confirm that each section is listed under the correct division with the correct number, description, and revision.
For example, "01 00 00 General Requirements," "01 74 19 Construction Waste Management and Disposal," "02 41 19 Selective Demolition," "03 35 43 Polished Concrete Finishing," and "03 53 00 Concrete Topping" should all show Revision 1 and the correct issue date (for example, 1/1/2026).
Step 31: Open individual sections
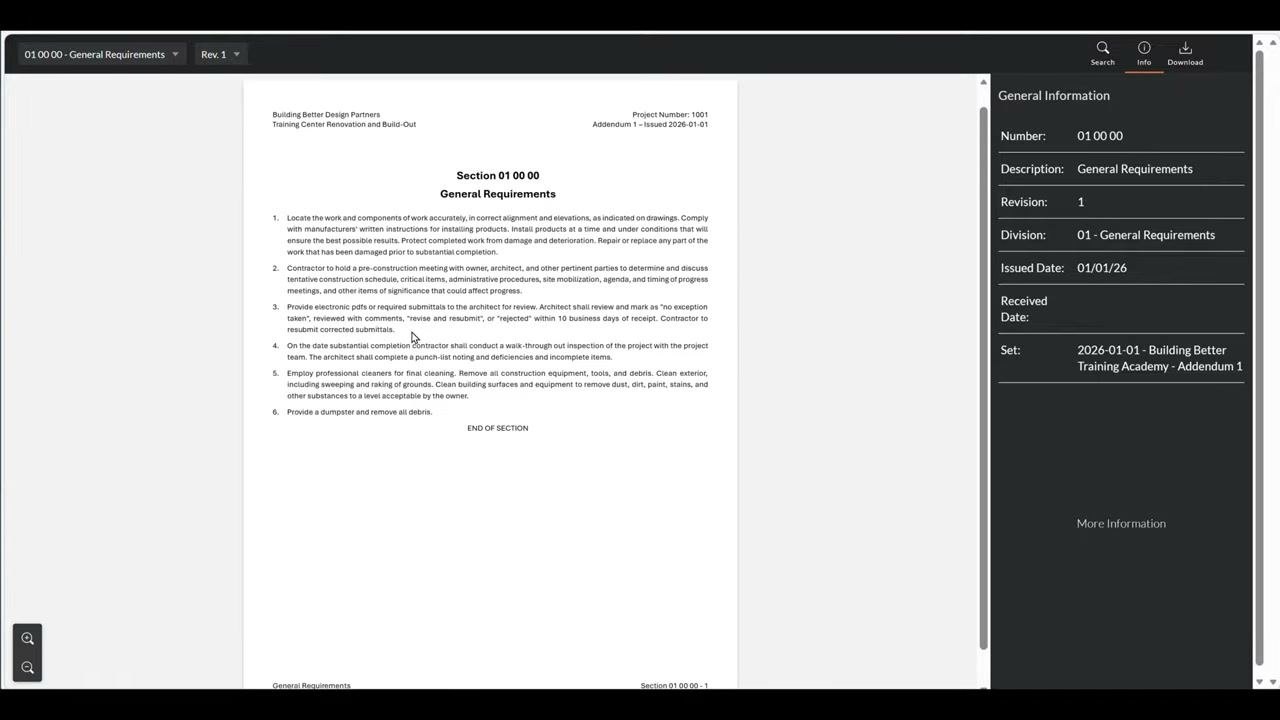
Click a section, such as "01 00 00 General Requirements," to open it. In the General Information panel on the right, verify the section number, description, revision, division, issued date, and set name. Make sure the document content matches the section title and requirements.
Step 32: Confirm reflow and formatting
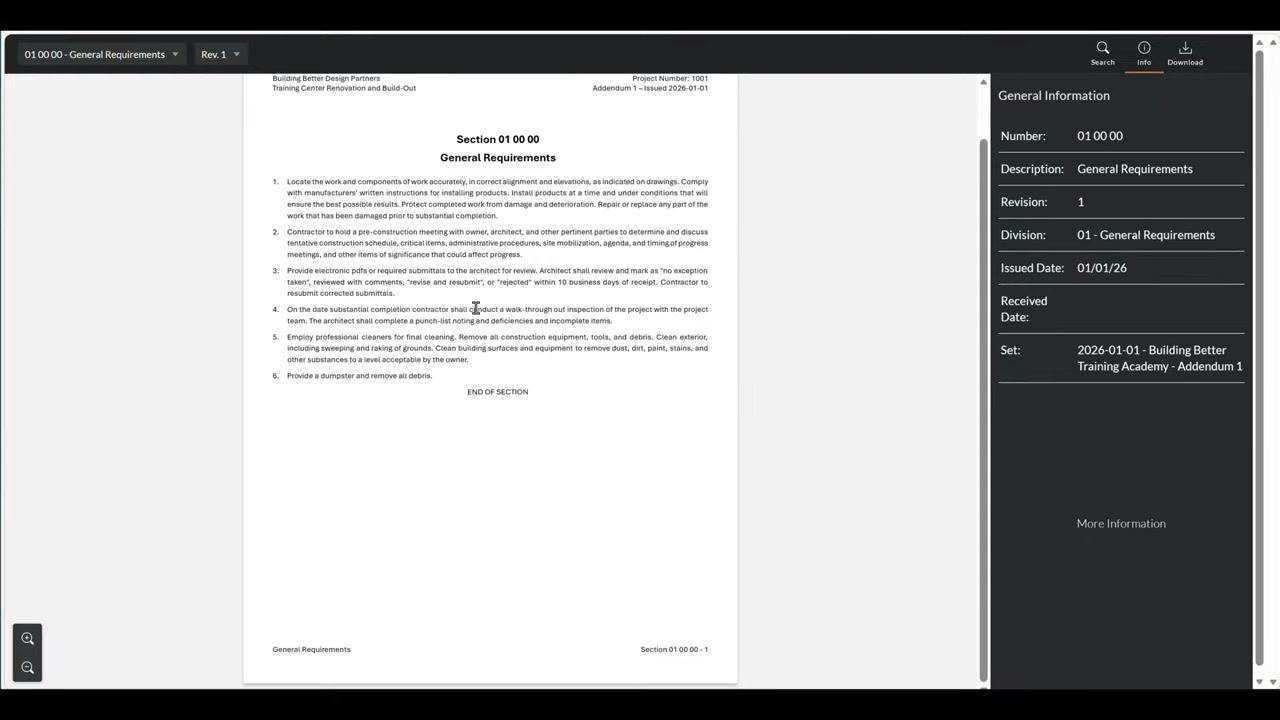
Review the document to make sure Procore has correctly reflowed and formatted the content. Check for proper alignment, section breaks, and completeness. If you find formatting issues, note them for correction or contact support as needed.
Navigate and manage your specifications
Step 33: Search and filter
On the Specifications page:
- Use the search bar at the top to search by title.
- Use the Division dropdown filter to jump to specific divisions.
- Click division headers to expand them and view all spec sections within each division.
Step 34: Create new divisions and specification sections
- Click + Create Division to add a new division.
- Click + Create Specification to add a new specification section within a division.
- Use the division filter to view and manage all available divisions, such as "01 - General Requirements," "02 - Existing Conditions," and "03 - Concrete."
Summary
You now know how to upload specifications in Procore: prepare a searchable, marked-up spec book, configure revision ordering and subscribers, upload and process the PDF, review and correct section breaks, and publish. Your Specifications tool is configured, your team is notified of updates, and your spec book is organized for easy navigation and future revisions.
What's next
- Review the published sections on the Specifications dashboard and note any formatting issues.
- Use search and the Division filter to find specific sections.
- Upload future revisions or addenda by creating a new set with the appropriate name, set date, and default revision.
Generation details: cost, quality tiers
Docsie billed 5,000 credits ($3.50) to analyze this 10-minute video at standard quality. The rewrite, template fill and Word/PDF exports were included. The same video at each quality tier:
| Quality | Frames sampled | Credits | Approx. cost |
|---|---|---|---|
| Draft | every 16-30 s | 2,500 | $1.75 |
| Standard (this guide) | every 8-15 s | 5,000 | $3.50 |
| Detailed | every 4-7 s | 10,000 | $7.00 |
| Ultra | every 1-3 s | 20,000 | $14.00 |
Credits priced at $0.70 per 1,000; plans include a monthly allowance. Enterprise customers on on-premise or bring-your-own-model deployments run this on their own inference and pay no per-video credits.
Generated by Docsie Video-to-Docs on 2026-11-15 from a 9-minute video. Screenshots are frames from the source video and belong to their creator, Building Better | Ralph Kreider, whose original is embedded above. If you own this video and want the guide removed or credited differently, contact us and we will act within one business day.