
How to Run NVision Reports in PeopleSoft
This guide shows you how to run nVision reports in PeopleSoft from Excel and from the PeopleSoft Internet Architecture (PIA) web interface. You open a layout and report request, run the report, and apply a custom cell style to the output. You then transfer layout files to the server, run the report on the web, and retrieve the result.
Video: Running nVision through Web / Styling Report - Demo - PeopleSoft nVision Tutorial (6/10) by PeopleSoft Channel (2020). All credit for the demonstration goes to the creator; watch the original on YouTube. The written guide below was generated from this video by Docsie. Creator? Request a change or removal.
This guide shows you how to run nVision reports in PeopleSoft from Excel and from the PeopleSoft Internet Architecture (PIA) web interface. You open a layout and report request, run the report, and apply a custom cell style to the output. You then transfer layout files to the server, run the report on the web, and retrieve the result.
Prerequisites
Before you begin, make sure you have the following:
- Microsoft Excel with the PeopleSoft nVision add-in.
- The layout file
demo_nPlosion.xnvon your local machine. - A PeopleSoft user ID and password for signing in to PIA.
- An SFTP client such as WinSCP, and credentials for the PeopleSoft server.
- Access to the PeopleSoft client directory
C:\PT856\bin\client\winx86on your local machine.
Run an nVision report from Excel
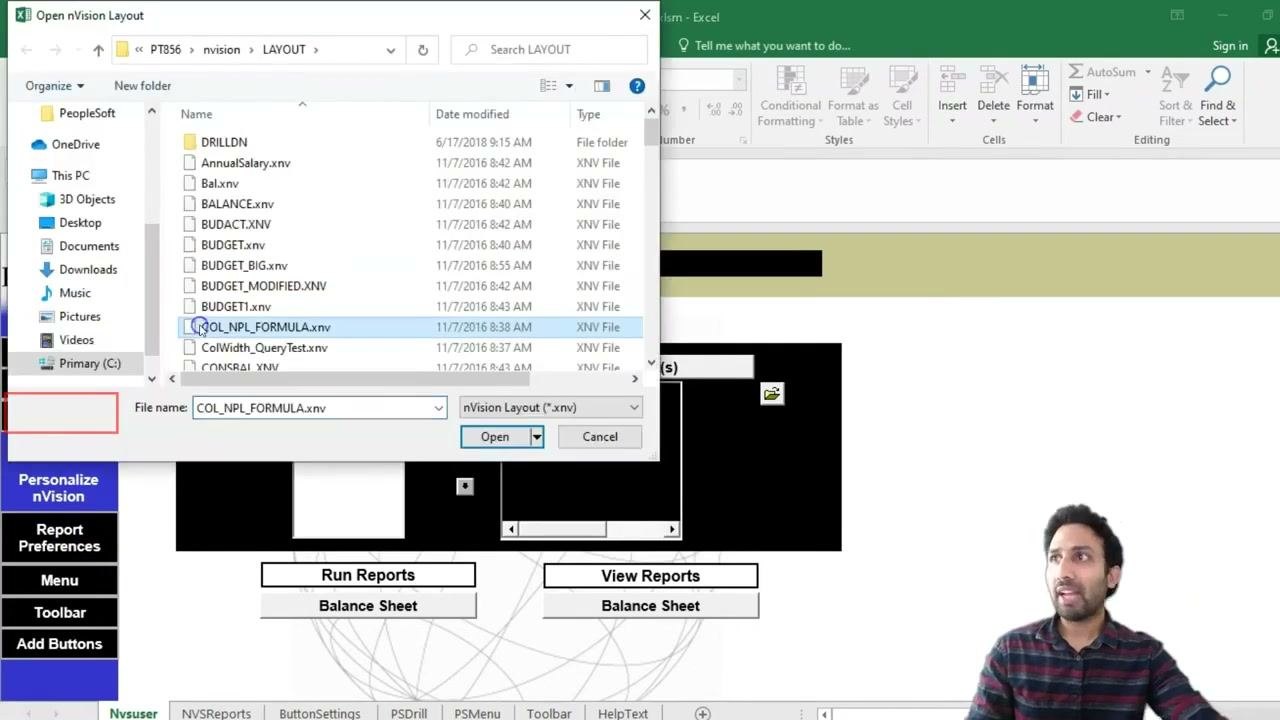
Step 1: Open the nVision report layout
- Launch Microsoft Excel.
- Go to the PeopleSoft nVision add-in interface.
- Click Open Layout in the nVision Actions menu.
- In the file dialog, select the layout file
demo_nPlosion.xnv. - Click Open to load the layout.
Step 2: Open the report request
- Go to the Add-ins tab in Excel.
- Select Report Request from the nVision menu.
- In the PeopleSoft nVision Report Request window, click Open.
- In the Open Report Request dialog, enter
US001for Business Unit andDEMO_N1for Report Name. - Click Get List to retrieve the available report requests.
- Select your report request from the list, and then click OK to load it.
Step 3: Run the report
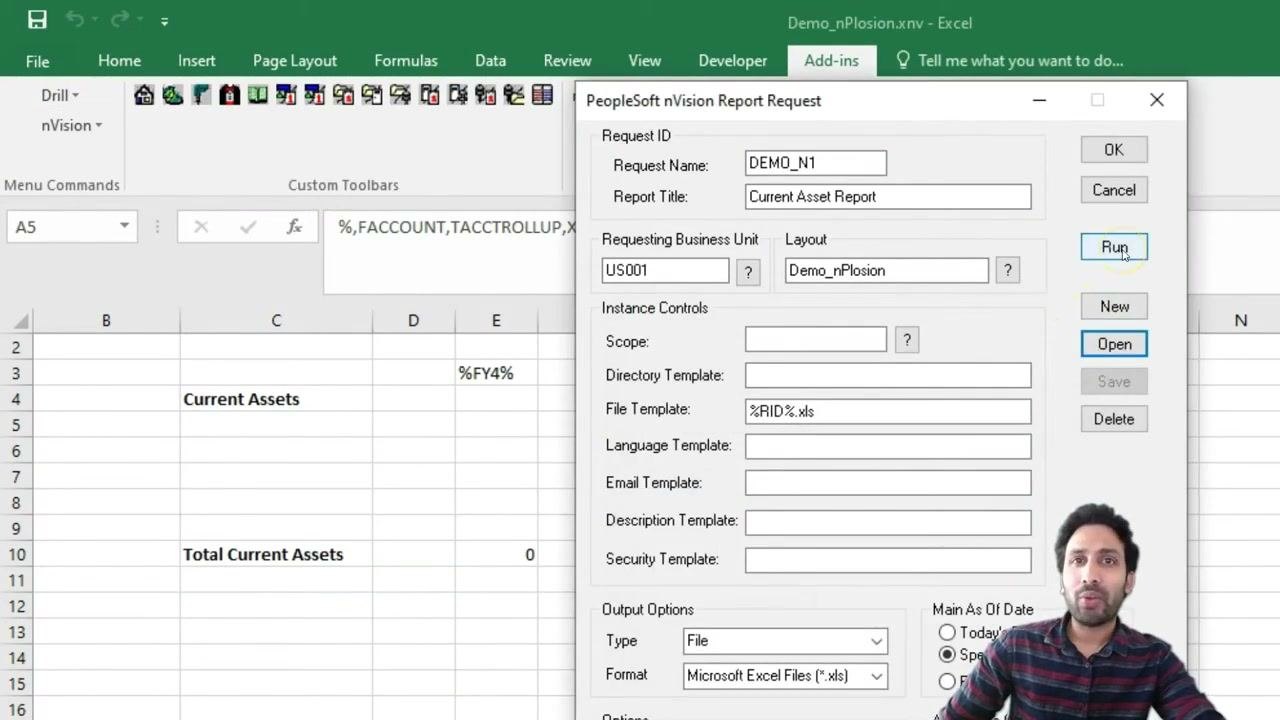
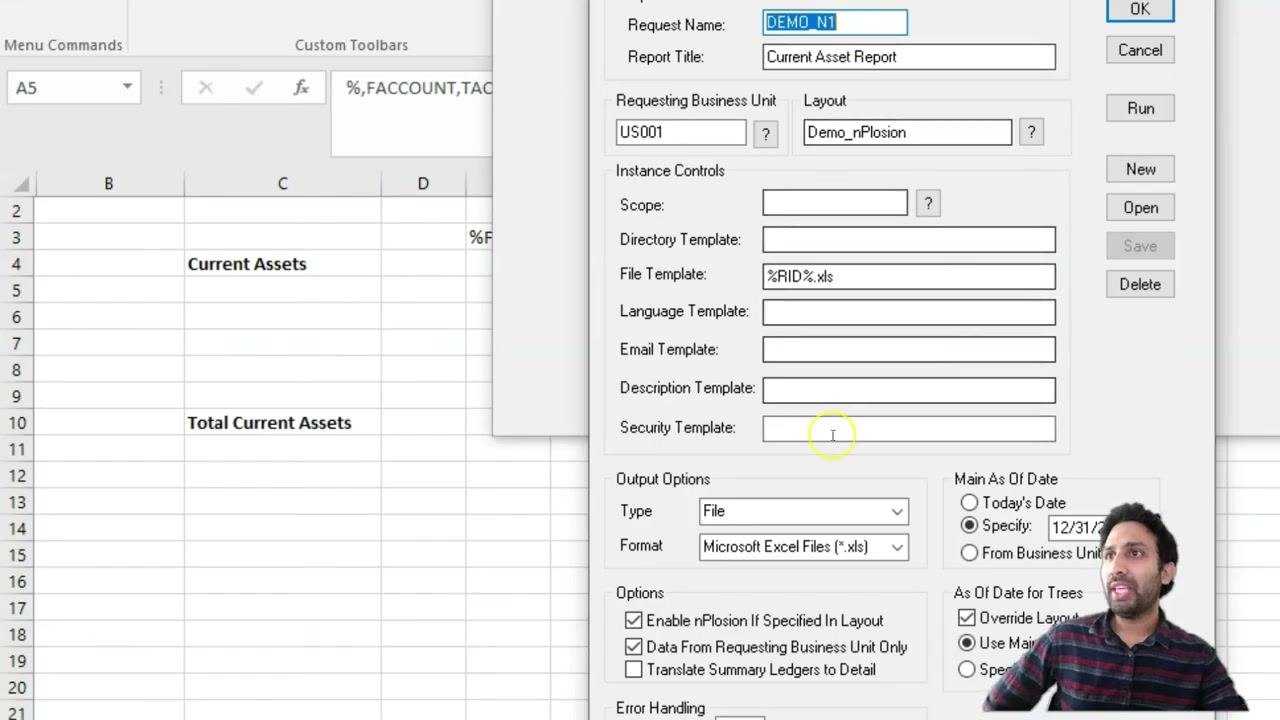
In the PeopleSoft nVision Report Request window, confirm the following values:
- Request Name: DEMO_N1
- Report Title: Current Asset Report
- Requesting Business Unit: US001
- Layout: Demo_nPlosion
Click Run to generate the report output.
Create and apply a custom cell style
Next, you improve the appearance of the report by adding a new style and colors to the rows. You create the style in Microsoft Excel and then point nVision to it.
Step 4: Go to the Home tab
- Make sure your nVision report layout is open in Excel.
- Click the Home tab in the Excel ribbon.
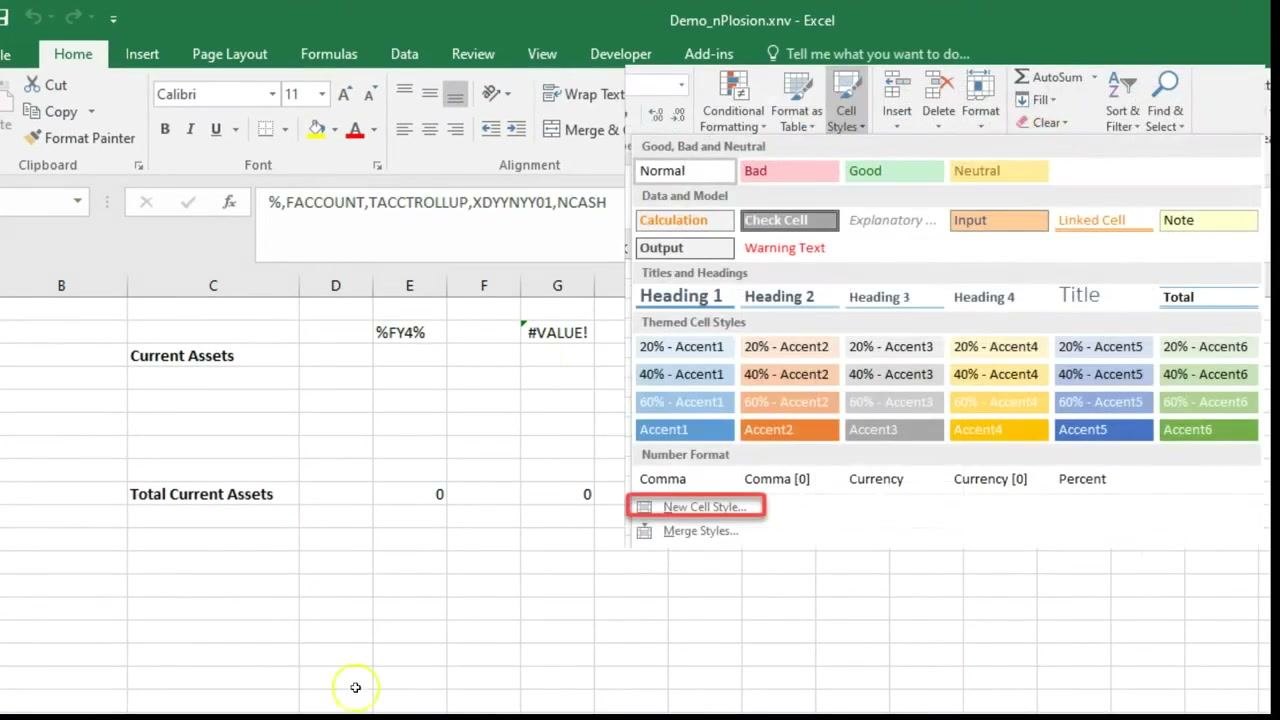
Step 5: Open the Cell Styles menu
- In the Styles group on the Home tab, locate Cell Styles.
- Click the small dropdown arrow on the right side of the Cell Styles button to expand the menu.
- At the bottom of the menu, click New Cell Style....
Step 6: Name the new style
In the Style dialog box, enter the style name Demo_Style1.
Step 7: Format the new style
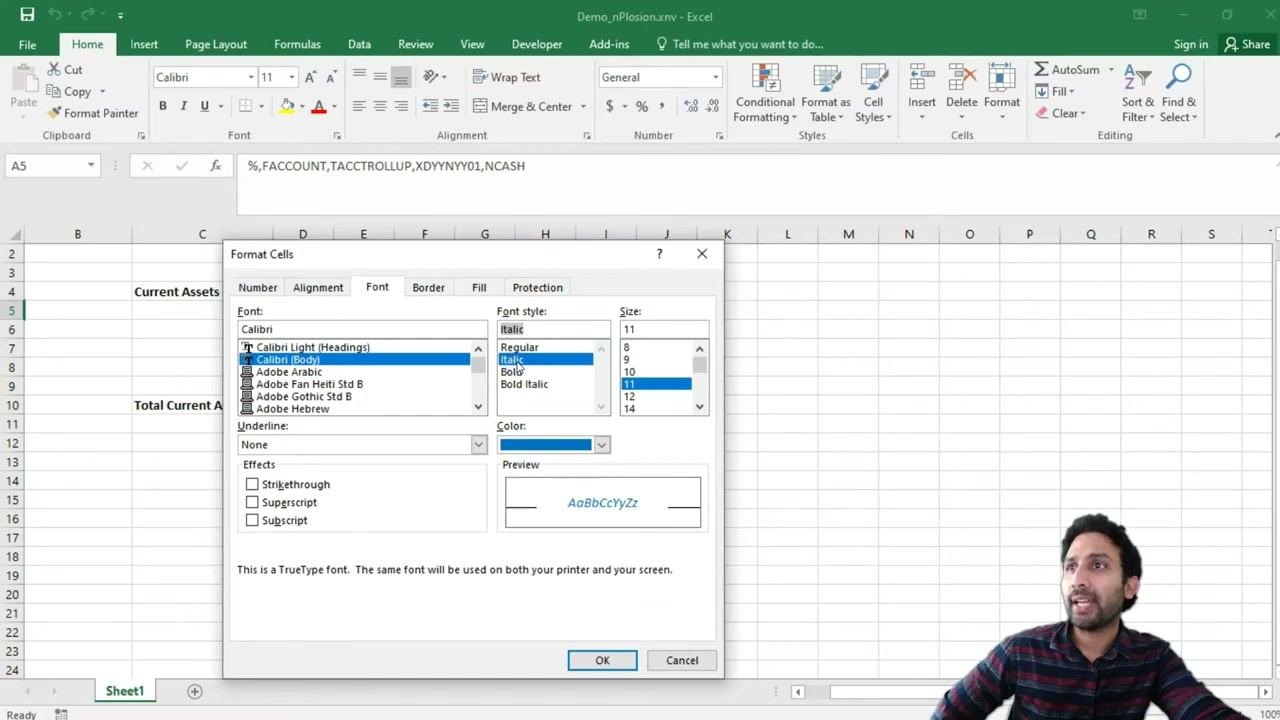
- In the Style dialog, click Format....
- In the Format Cells window, go to the Font tab.
- Change the font color to blue.
- Change the font style to Italic.
You can also adjust settings such as borders, background color, or alignment. This example changes only the font color and style.
Step 8: Confirm and save the style
- Click OK in the Format Cells window to apply your formatting choices.
- Click OK in the Style dialog to save the new style.
- Remember the style name
Demo_Style1, because you use it in the next steps.
Step 9: Save the layout
Save your Excel layout so the new style is available to nVision.
Step 10: Apply the style to uploaded rows
- Go to the Add-ins tab in Excel.
- Select nVision Layout Options from the nVision menu.
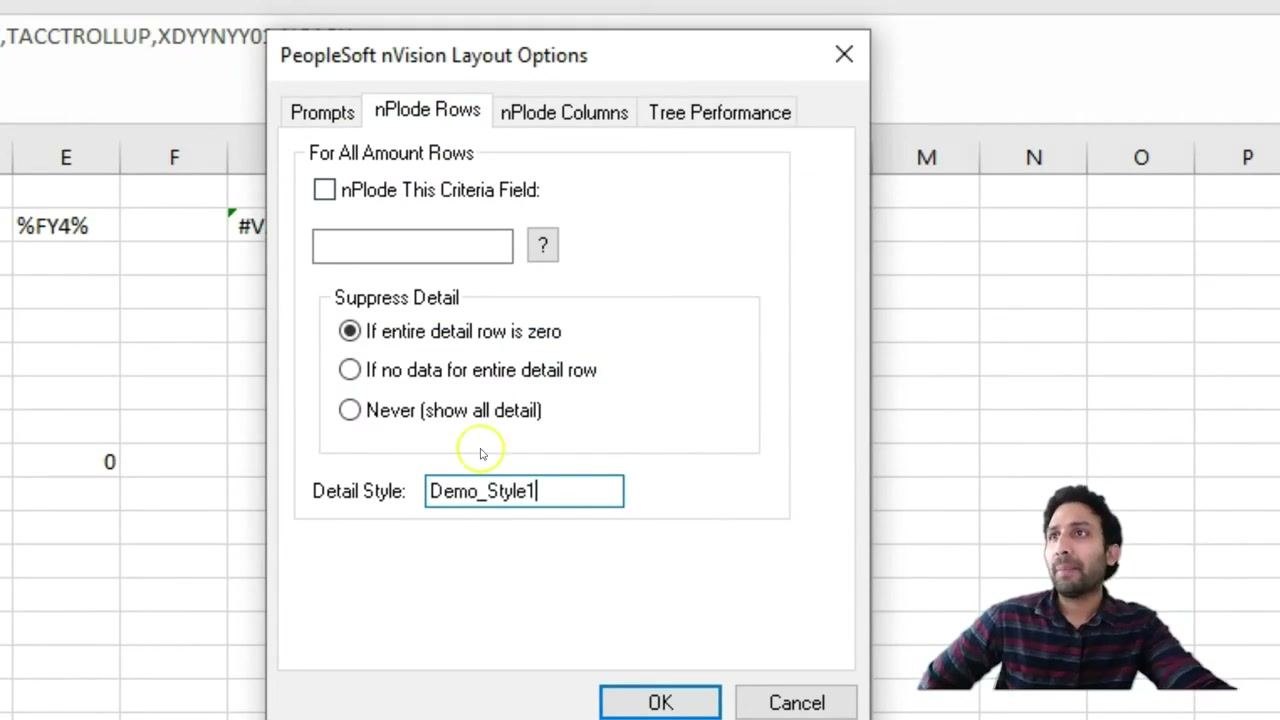
- In the PeopleSoft nVision Layout Options dialog, open the nPlode Rows tab.
- In the Detail Style field, enter
Demo_Style1. - Click OK to apply the style to your uploaded rows.
Step 11: Specify a style for uploaded columns (optional)
If your nVision layout has uploaded columns, you can style them the same way.
- In the PeopleSoft nVision Layout Options dialog, open the nPlode Columns section.
- Enter the style name in the Detail Style field for columns as needed.
- Click OK to confirm your settings.
Step 12: Save the layout again
Save your Excel layout so all style settings are kept for future report runs.
Step 13: Run the nVision report in Excel
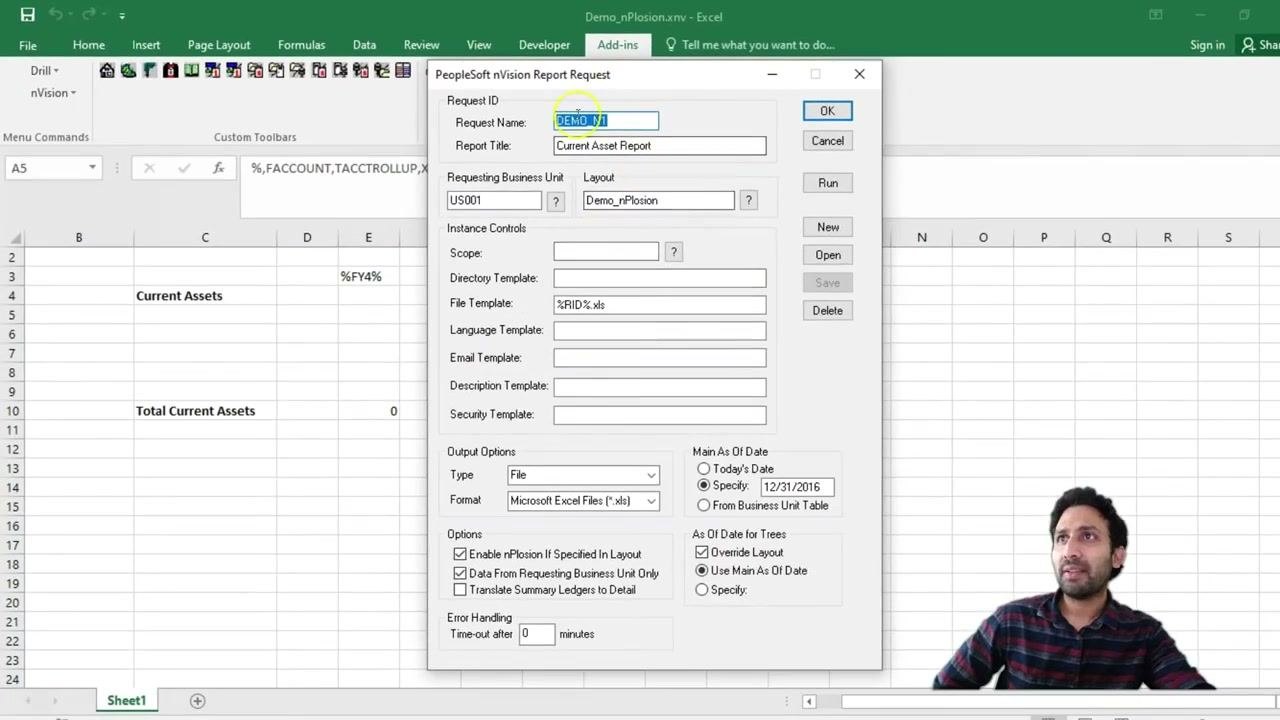
- Open the PeopleSoft nVision Report Request dialog.
- Confirm the following fields:
- Request Name: DEMO_N1
- Report Title: Current Asset Report
- Requesting Business Unit: US001
- Layout: Demo_nPlosion
- File Template: %RID%.xls
- Format: Microsoft Excel Files (*.xls)
- Main As Of Date: 12/31/2016
- Make sure all other options are set as your report requires.
- Click Run to execute the report.
Step 14: Verify the style in the output report
Review the generated Excel report to confirm that Demo_Style1 is applied to the appropriate rows and columns. The detail rows show blue, italicized text, as defined in your custom style.
Run nVision reports in PeopleSoft from the web interface (PIA)
Step 15: Understand report request persistence and sign in to PIA
When you save a report request in Excel, it is inserted into the PeopleSoft database. This lets you open and run the same request from the web interface (PIA). If the Save button is disabled, the request is already saved in the database.
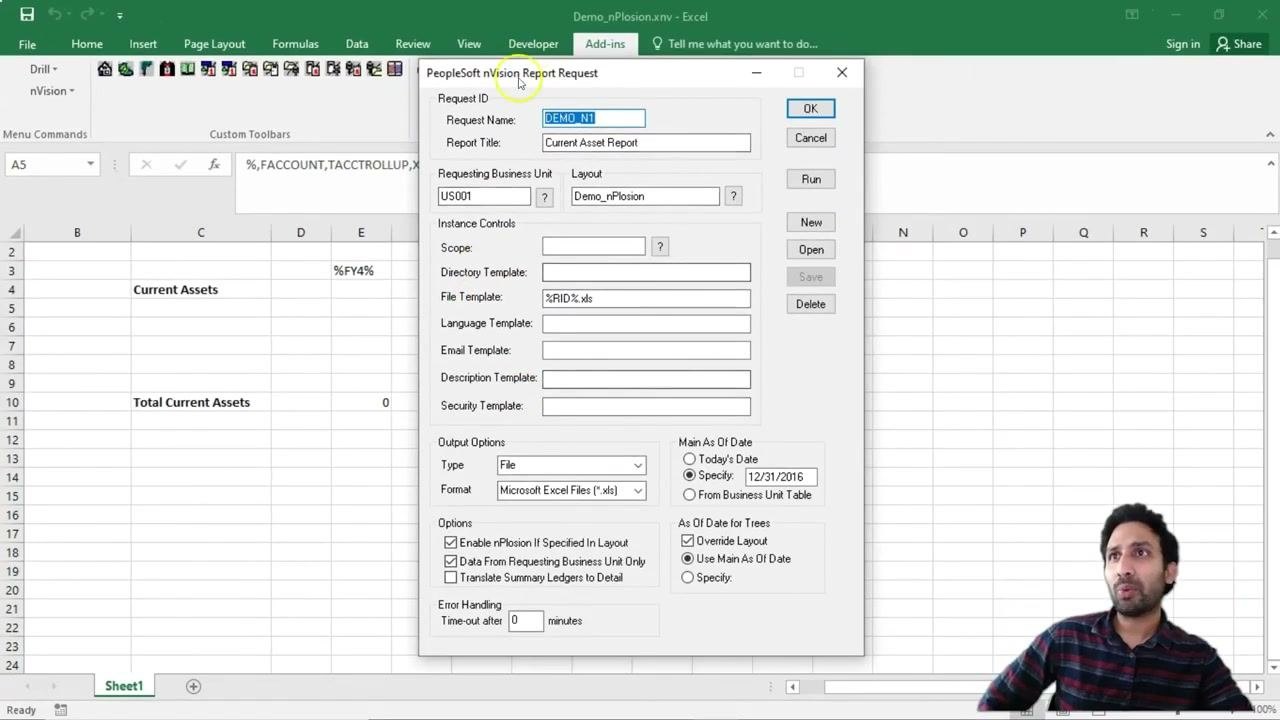
To sign in to PIA:
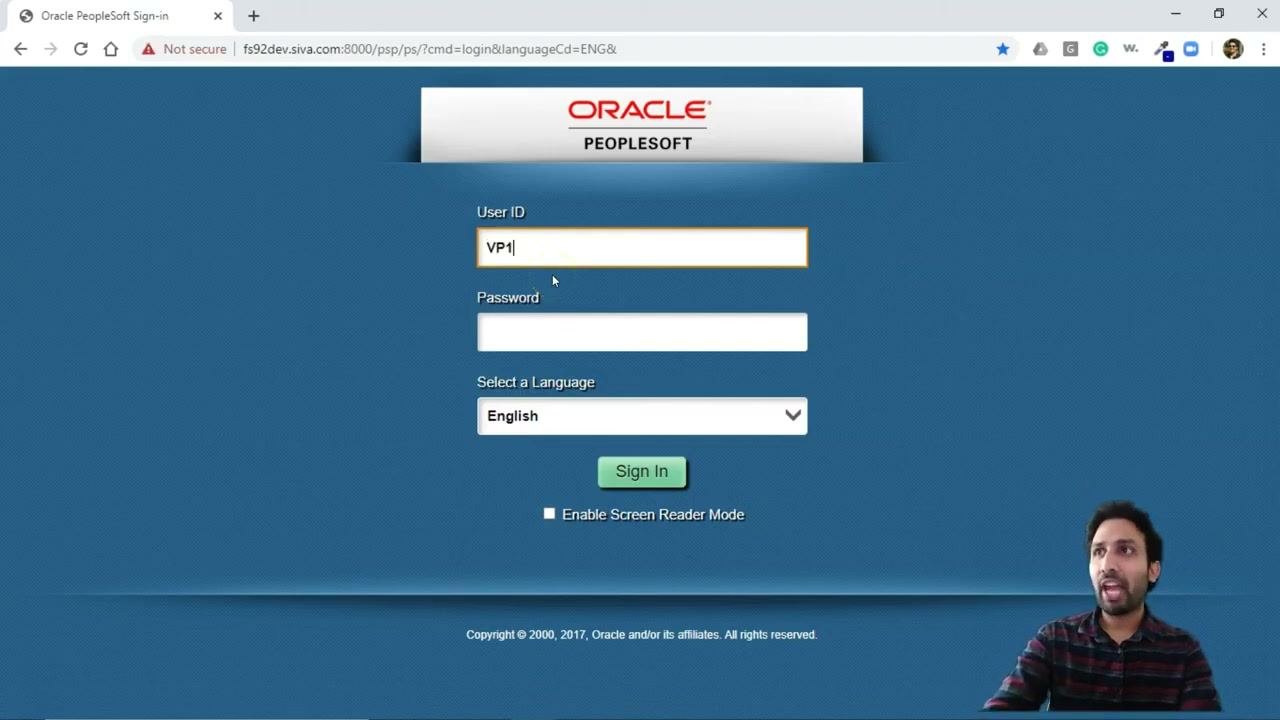
- Open your web browser and go to the PeopleSoft PIA login page. The example URL is
fs92dev.siva.com:8000/psp/ps/?cmd=login&languageCd=ENG&. - On the Oracle PeopleSoft Sign-in screen, enter your PeopleSoft user ID in User ID (the example uses
VP1). - Enter your PeopleSoft password in Password.
- In Select a Language, choose your language from the dropdown (the example uses
English). - Optionally, select Enable Screen Reader Mode if you need accessibility features.
- Click Sign In.
The browser address bar in this example shows "Not secure" because the connection uses HTTP, not HTTPS.
Step 16: Open the Report Request page
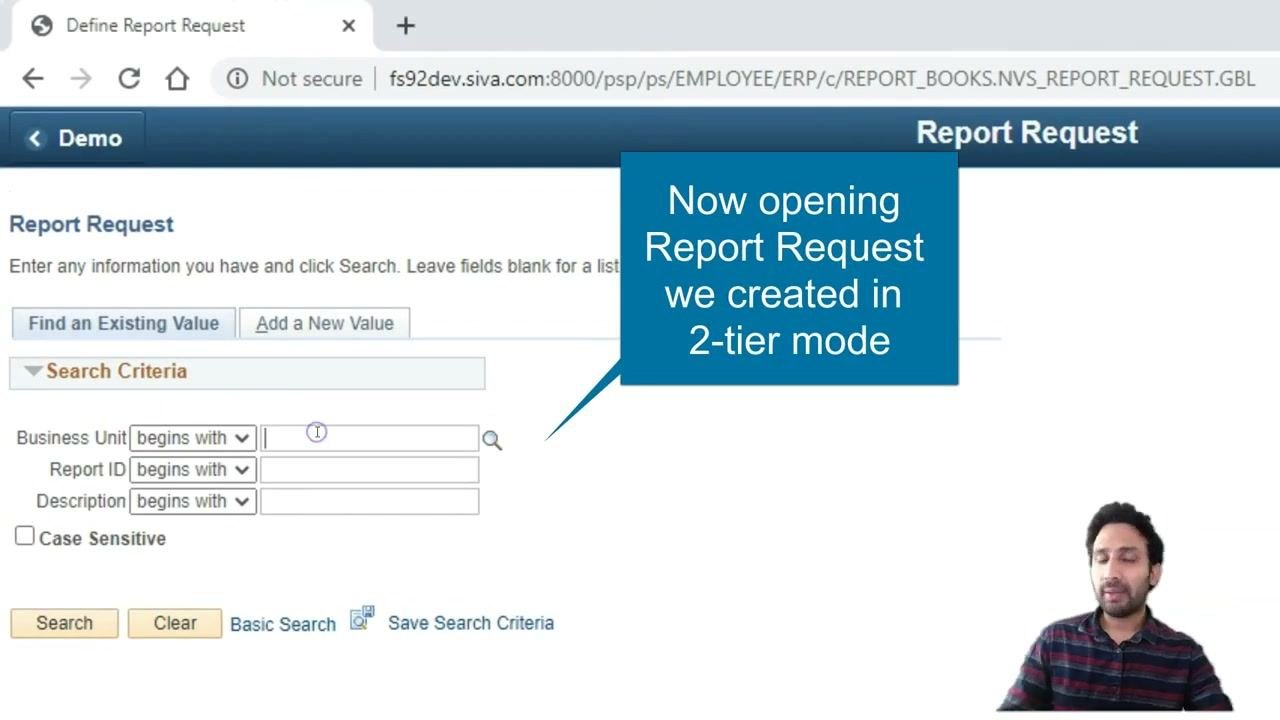
Open the Report Request page in your web browser. The page has two tabs: Find an Existing Value and Add a New Value.
Under Search Criteria, you can filter by Business Unit, Report ID, and Description. Each filter has a dropdown for the search type, such as "begins with". You can also make the search case sensitive.
Use the Search and Clear buttons to run or reset your search. The page also includes these links:
- Basic Search
- Save Search Criteria
- Find an Existing Value
- Add a New Value
Step 17: Review the report request and set the output type
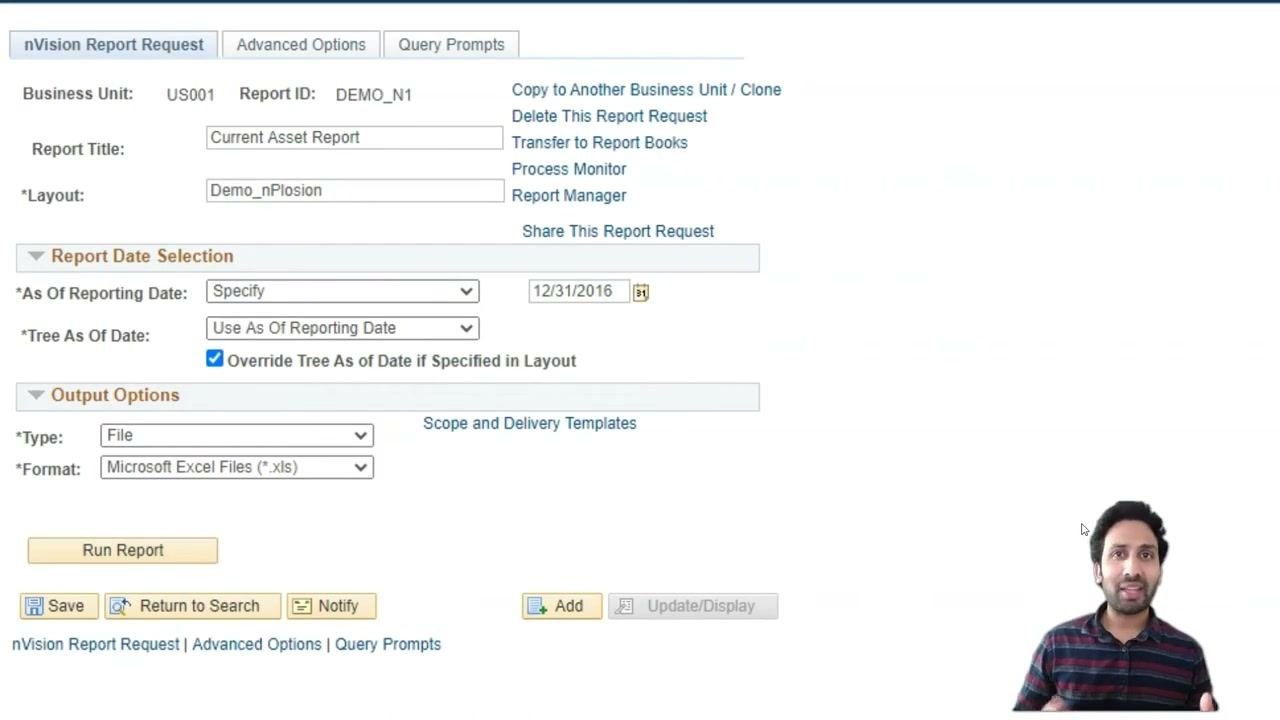
With the nVision Report Request tab active, review these key fields:
- Business Unit: US001
- Report ID: DEMO_N1
- Report Title: Current Asset Report
- Layout: Demo_nPlosion
Under Report Date Selection, the values are:
- As Of Reporting Date: Specify, 12/31/2016
- Tree As Of Date: Use As Of Reporting Date
- Override Tree As Of Date if Specified in Layout: selected
Under Output Options, the Type is File and the Format is Microsoft Excel Files (.xls). The page includes these action buttons: Run Report, Save, Return to Search, Notify, Add, and Update/Display. It also includes these links: Scope and Delivery Templates, nVision Report Request, Advanced Options, and Query Prompts*.
Set the output type according to how you run the request:
- Two-tier mode: When you run the report request from the two-tier client, set the output type to File.
- Web interface: When you run the same request from the web interface, always set the output type to Web.
If you don't set the correct output type, you may get errors or inaccessible output.
Step 18: Choose the output type and run the report
- Click the Type dropdown under Output Options. The available options are Email, File, Printer, Web, and Window. The current selection is File.
- In the web interface, change the Type from File to Web.
- Make sure all other parameters are set as your report requires.
- Open the report request in the interface you want (web or two-tier), and confirm the output type: File for two-tier, Web for the web interface.
- Click OK to submit the report request for processing.
Step 19: Monitor the process
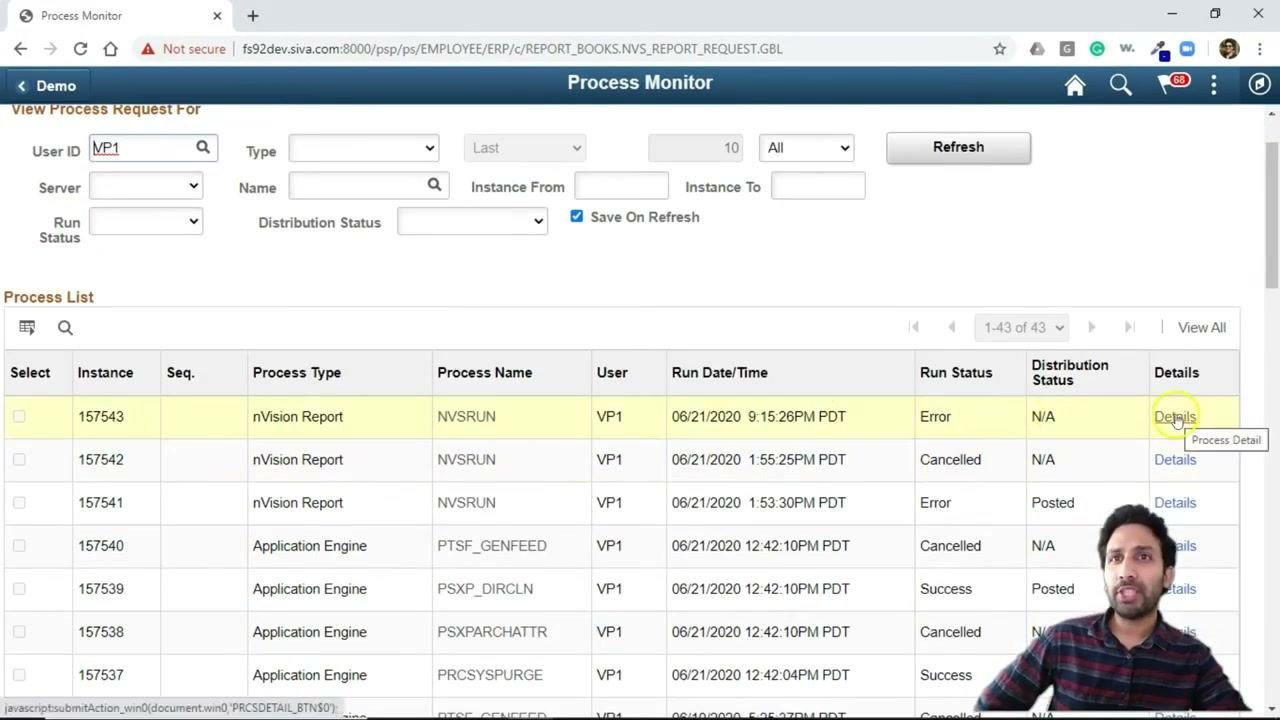
- After you submit the report, go to the Process Monitor page.
- In the Process List, find your process by Instance, Process Type (nVision Report), Process Name (NVSRUN), User (VP1), and Run Date/Time.
- Check the Run Status column for the result, such as Error, Cancelled, or Success.
- If the status is Error, click Details for more information.
Step 20: Review the message log
- In the Process Detail window, confirm these values:
- Instance: 157543
- Name: NVSRUN
- Run Status: Error
- Type: nVision Report
- Description: nVision Report
- Server: PRCS5244
- Under Actions, click Message Log to view the error details.
- In the Message Log, review the messages: "File not found: DEMO_NPLOSION.xnv" and "Successfully posted generated files to the report repository".
Use these messages to diagnose missing files or configuration issues. In this example, the layout file isn't on the server yet. The next sections show you how to transfer it.
Transfer layout files to the PeopleSoft server
Step 21: Review the local nVision directory paths
By default, nVision stores layouts locally. To run reports on the web, you must transfer these layouts to the PeopleSoft server. The same directory paths must be mirrored or referenced on the server.
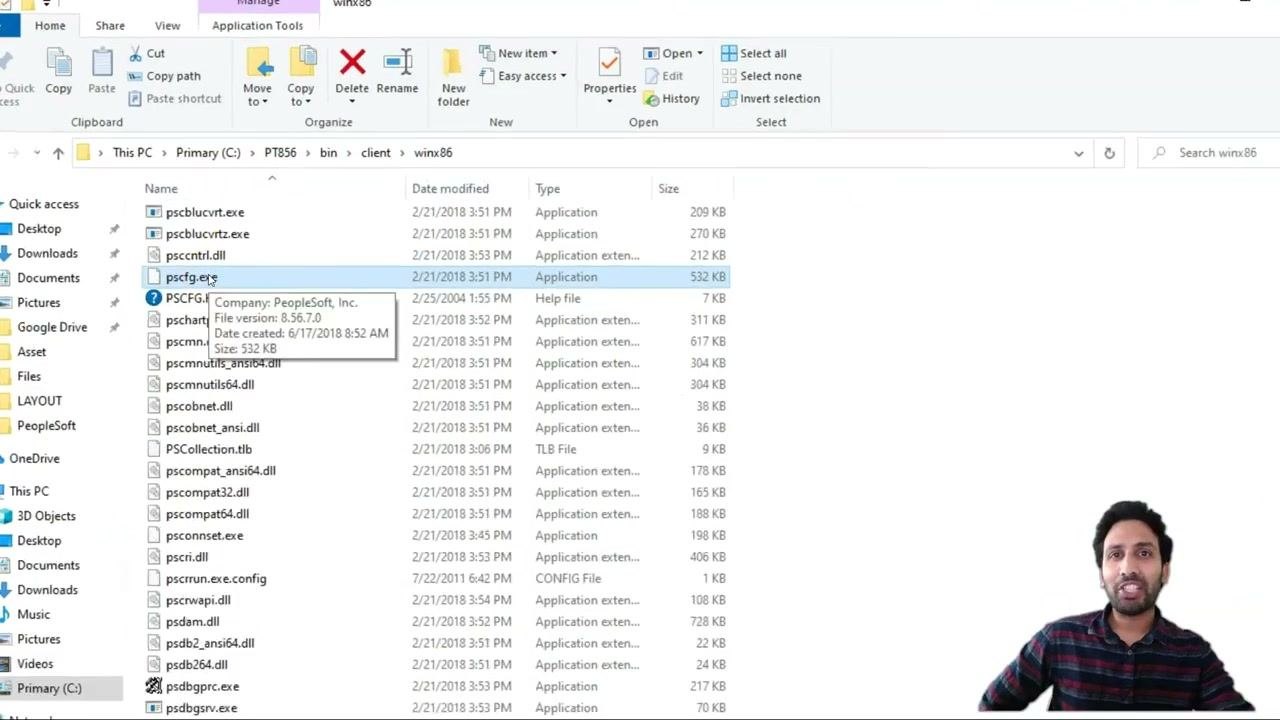
- On your local machine, go to
C:\PT856\bin\client\winx86. - Locate the executable
pscfg.exe. The folder also contains various PeopleSoft DLLs and executables.
- Double-click
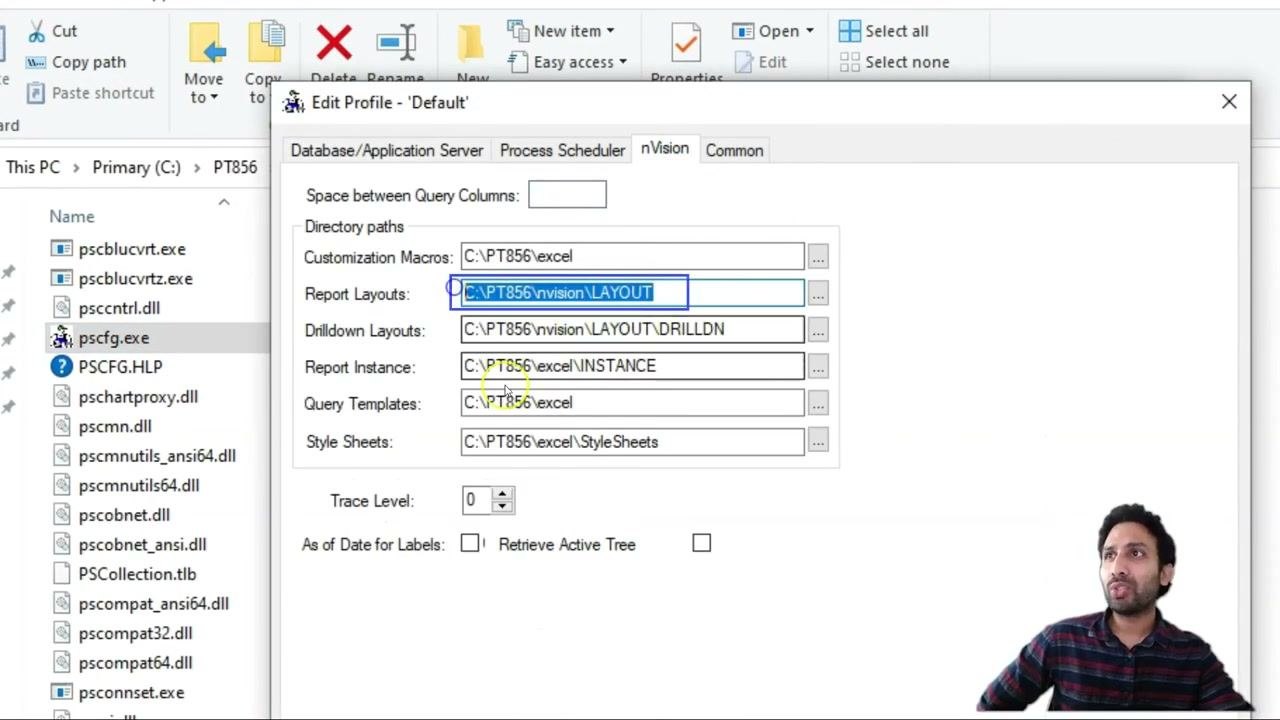
pscfg.exeto open the Edit Profile - 'Default' window. - Go to the nVision tab.
- Review and note the following directory paths:
- Customization Macros:
C:\PT856\excel - Report Layouts:
C:\PT856\nvision\LAYOUT - Drilldown Layouts:
C:\PT856\nvision\LAYOUT\DRILLDN - Report Instance:
C:\PT856\excel\INSTANCE - Query Templates:
C:\PT856\excel - Style Sheets:
C:\PT856\excel\StyleSheets
- Customization Macros:
These paths show where nVision expects to find layouts and related files locally.
Step 22: Connect to the server with an SFTP client
- Open an SFTP client such as WinSCP.
- Select the correct saved session, or enter the details manually:
- File protocol: SFTP
- Host name:
192.168.56.101 - Port number:
22 - User name:
psadm1
- Enter the appropriate password.
- Click Login to connect.
Step 23: Browse to the nVision layout directory on the server
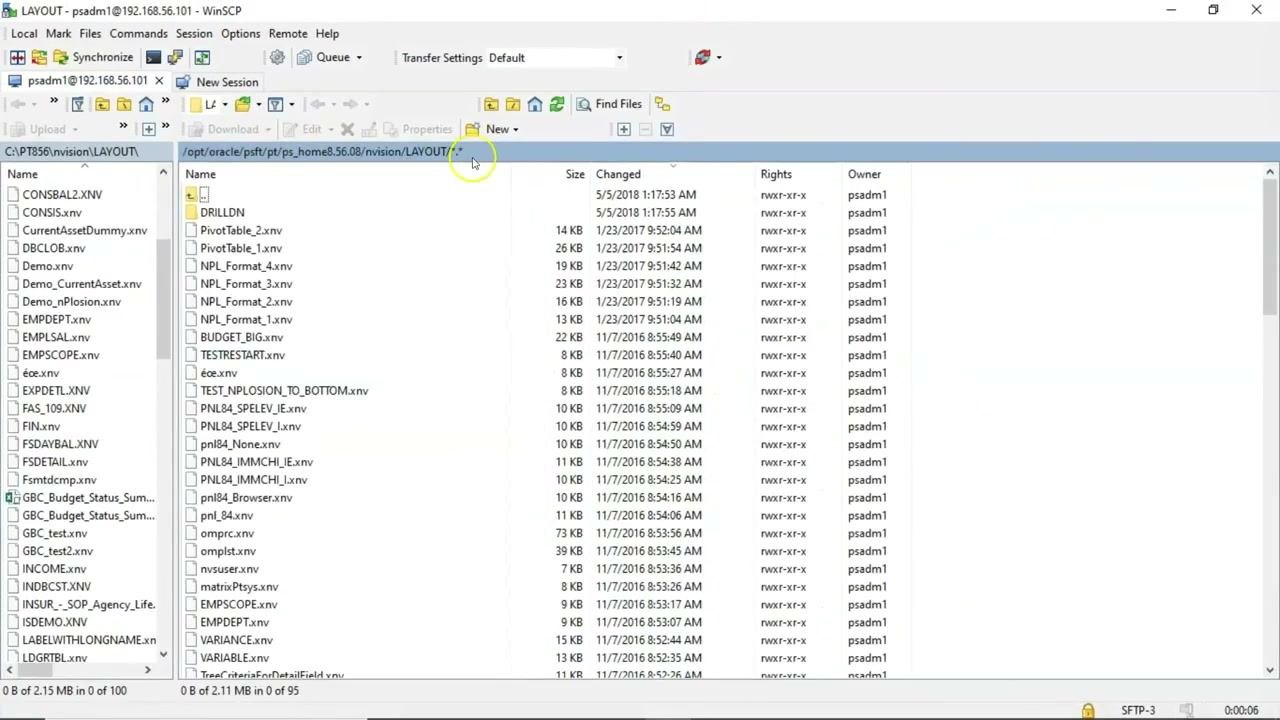
Once you are authenticated, browse to /opt/oracle/psft/pt/ps_home8.56.08/nvision/LAYOUT/. All nVision layouts must reside here for web-based report execution.
The directory listing shows multiple .xnv layout files with their sizes, modification dates, permissions, and owner (psadm1).
Then check both panes in the SFTP client:
- The left pane shows your local directory,
C:\PT856\nvision\LAYOUT\. - The right pane shows the server directory,
/opt/oracle/psft/pt/ps_home8.56.08/nvision/LAYOUT/.
Make sure both panes are set to the correct paths before you transfer files.
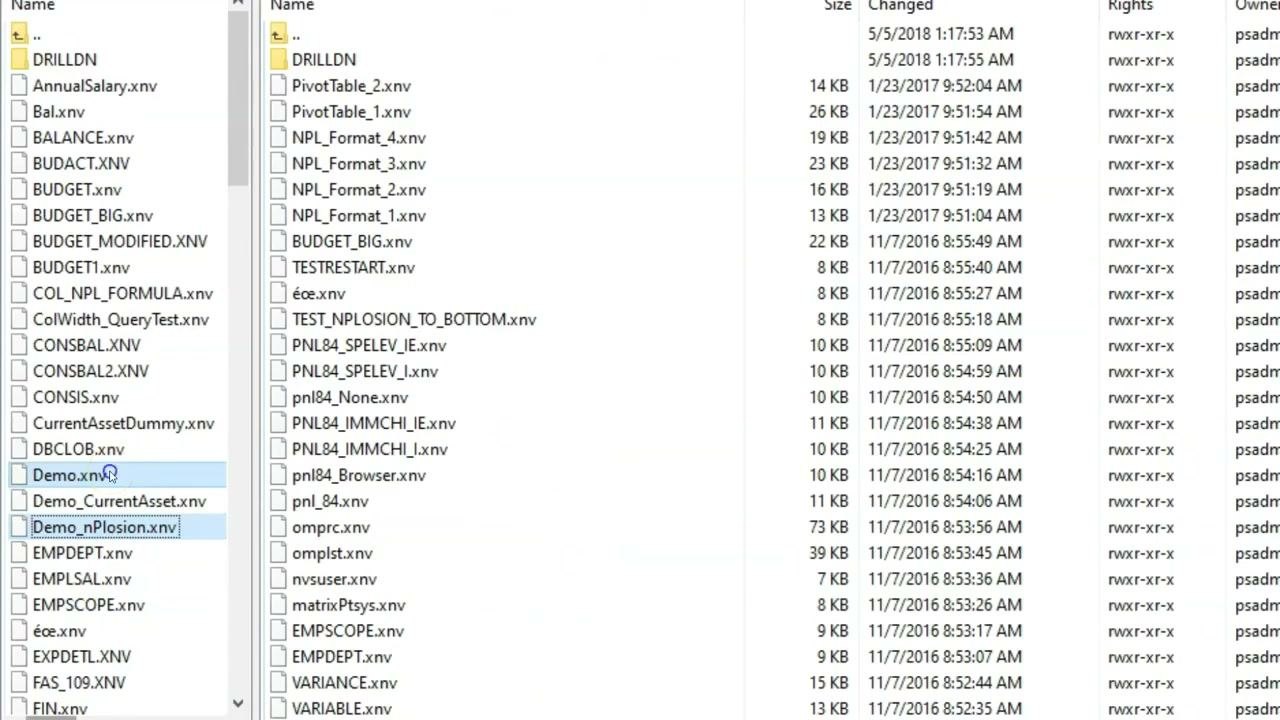
Step 24: Transfer the layout files
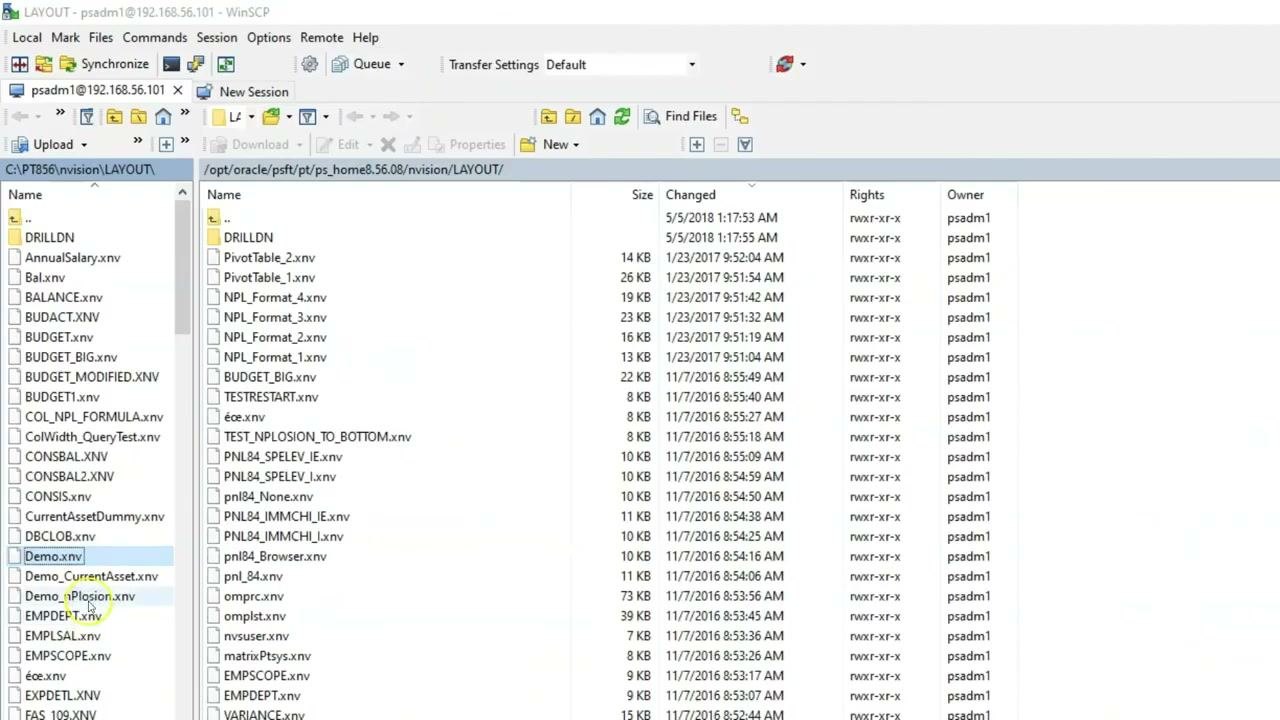
- In the local directory pane, select the layout files to transfer, for example
Demo.xnvandDemo_nPlosion.xnv. - Drag and drop the selected files from the local pane to the server pane.
The files are copied to the server's nVision layout directory.
Step 25: Confirm the transfer
After the transfer, check that the layout files appear in the server directory listing. Both Demo.xnv and Demo_nPlosion.xnv should be present. This makes the layouts available to nVision reports you run on the web.
Step 26: Make sure layout file names are uppercase
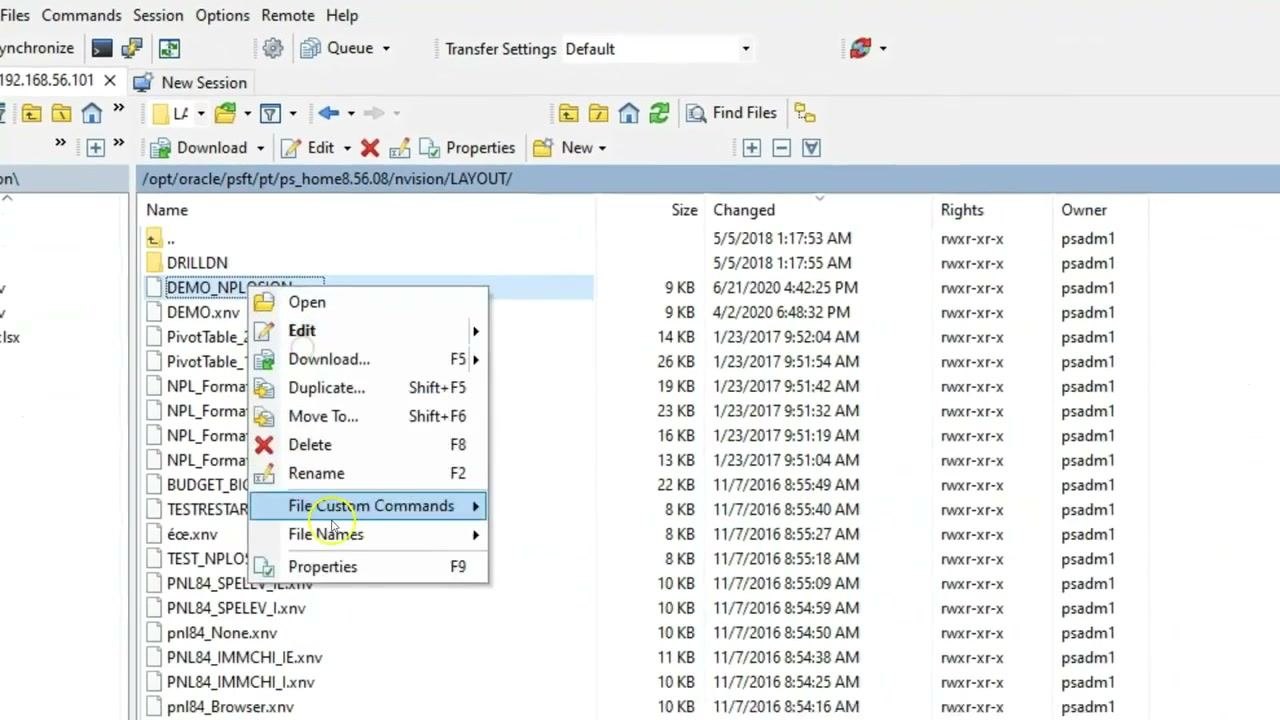
The nVision process on PeopleSoft servers is case-sensitive. It expects layout file names in uppercase, for example DEMO_NPLOSION.XNV instead of Demo_nPlosion.xnv.
In WinSCP, check that DEMO_NPLOSION.xnv and DEMO.xnv are present in /opt/oracle/psft/pt/ps_home8.56.08/nvision/LAYOUT/.
Step 27: Update file permissions for the layout files
- In the server directory, right-click the layout file, for example
DEMO_NPLOSION.xnv. - Select File Custom Commands or Properties from the context menu.
- In the properties dialog, make sure the following values are set:
- Owner:
psadm1 - Group:
oinstall - Permissions: Owner (Read, Write, Execute), Group (Read, Execute), Others (Read, Execute)
- Octal value:
0755
- Owner:
- Click OK to apply the changes.
Check nVision directory settings on the process scheduler
Step 28: Check the nVision settings in the configuration file
- Open the
psprcs.cfgconfiguration file on the process scheduler server. - Locate the
[nVision]section. - Verify these directory settings:
DrillDownDir=%PS_APP_HOME%/NVISION/LAYOUT/DRILLDN:%PS_HOME%/NVISION/LAYOUT/DRILLDNInstanceDir=%PS_SERVDIR%/NVISION/INSTANCELayoutDir=%PS_HOME%/NVISION/LAYOUT
- Make sure these paths match the actual locations of your layout files.
Step 29: Edit the configuration file
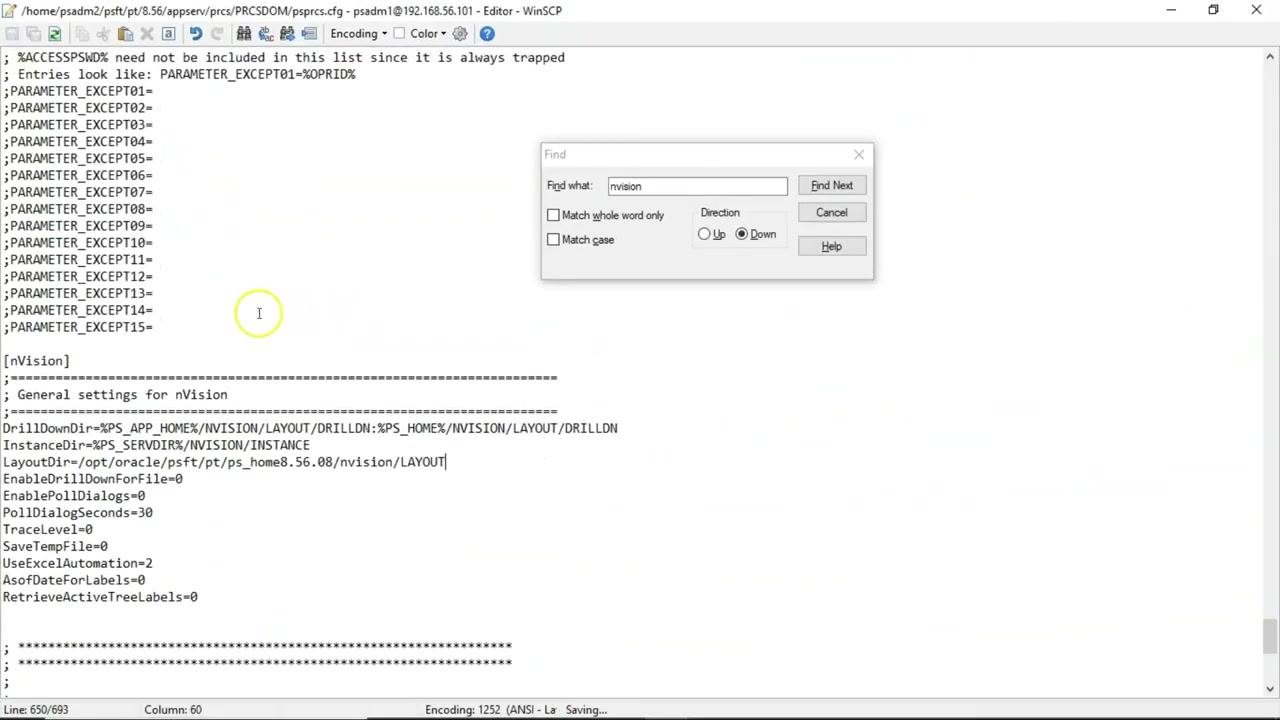
- Open the configuration file at
/home/psadm2/psft/pt/8.56/appserv/prcs/PRCSDOM/psprcs.cfg. You can use an editor such as WinSCP to access and modify it. - Locate the
[nVision]section. - Make sure the following parameter is set:
LayoutDir=/opt/oracle/psft/pt/ps_home8.56.08/nvision/LAYOUT - Save the file.
Run the nVision report on the web and retrieve the output
Step 30: Run the report request with the Web output type
- Go to the nVision Report Request page and enter these details:
- Business Unit: US001
- Report ID: DEMO_N1
- Report Title: Current Asset Report
- Layout: DEMO_NPLOSION
- Under Report Date Selection, set As Of Reporting Date to Specify and enter
12/31/2016. - Set Tree As Of Date to Use As Of Reporting Date. The Override Tree As of Date if Specified in Layout checkbox is selected.
- Under Output Options, set Type to Web and Format to Microsoft Excel Files (*.xls).
- Click Run Report.
Step 31: Monitor the run in Process Monitor
- Confirm that the process type is nVision Report and the process name is NVSRUN.
- Verify that Run Status is Success and Distribution Status is Posted.
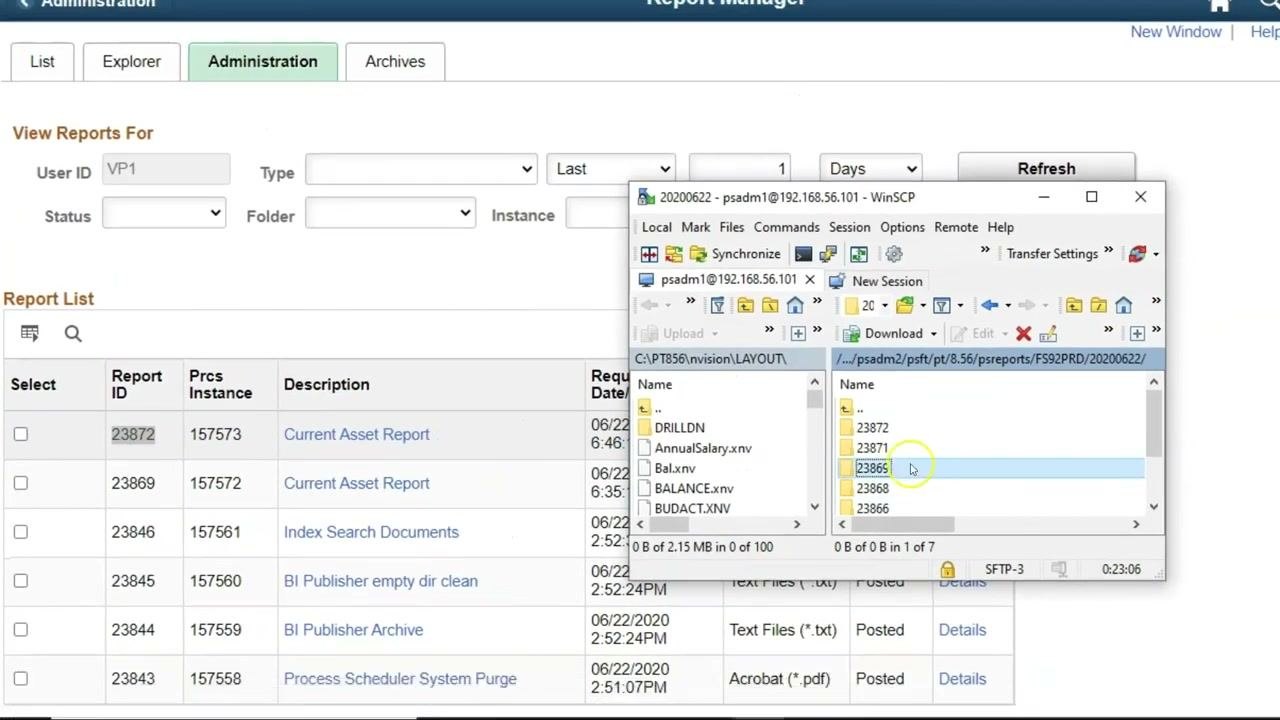
- Note the Instance number for reference, for example 157573.
Step 32: Open the report output in Report Manager
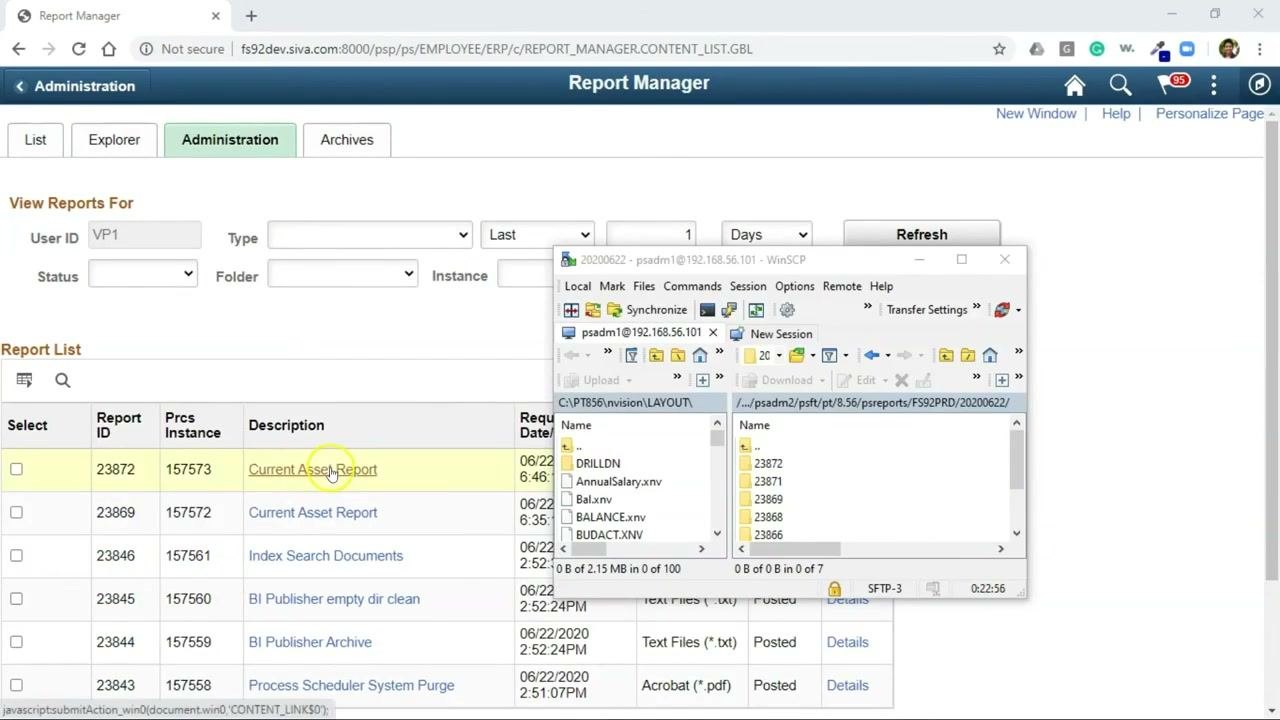
- Go to Report Manager under the Administration tab.
- In the Report List, find your report:
- Report ID: 23872
- Description: Current Asset Report
- Format: Microsoft Excel Files (*.xls)
- Status: Posted
- Click the Details link to see more information or download the report.
Step 33: Retrieve the report directly from the server if needed
If you can't access the report through the web interface, retrieve it from the server.
- Use a tool like WinSCP to connect to the server.
- Go to
/psadm2/psft/pt/8.56/psreports/FS92PRD/20200622/23872/. - Locate the output file, for example
DEMO_N1.xlsx.
Step 34: Open the report output in Excel
Open the output file, for example DEMO_N1.xlsx, in Microsoft Excel. The report includes a Current Assets section with account numbers, descriptions, and values for 2016 and 2015. Example values:
- USBNK - Disbursements Account: -1785 (2016), -300 (2015)
- USBNK - Collections Account: 100 (2016), 34800 (2015)
- Total Current Assets: 201948.1 (2016), 5048198 (2015)
Summary
You now know how to run nVision reports in PeopleSoft from Excel and from the web. You opened a layout and report request, created and applied a custom cell style, and ran the report in both interfaces. You also transferred layout files to the server, set the Web output type, and checked the results in Process Monitor and Report Manager.
Always verify your output type and directory settings to avoid process failures.
What's next
- Apply different styles to uploaded rows or columns in the nPlode Rows and nPlode Columns tabs of the nVision Layout Options dialog.
- Transfer additional layout files to
/opt/oracle/psft/pt/ps_home8.56.08/nvision/LAYOUT/, and check their uppercase names and0755permissions. - Use the Process Monitor Message Log to troubleshoot any future nVision run that ends in Error.
Generation details: cost, quality tiers
Docsie billed 6,000 credits ($4.20) to analyze this 12-minute video at standard quality. The rewrite, template fill and Word/PDF exports were included. The same video at each quality tier:
| Quality | Frames sampled | Credits | Approx. cost |
|---|---|---|---|
| Draft | every 16-30 s | 3,000 | $2.10 |
| Standard (this guide) | every 8-15 s | 6,000 | $4.20 |
| Detailed | every 4-7 s | 12,000 | $8.40 |
| Ultra | every 1-3 s | 24,000 | $16.80 |
Credits priced at $0.70 per 1,000; plans include a monthly allowance. Enterprise customers on on-premise or bring-your-own-model deployments run this on their own inference and pay no per-video credits.
Generated by Docsie Video-to-Docs on 2026-11-15 from a 11-minute video. Screenshots are frames from the source video and belong to their creator, PeopleSoft Channel, whose original is embedded above. If you own this video and want the guide removed or credited differently, contact us and we will act within one business day.