
How to Run a Query in PeopleSoft
This guide shows you how to run a query in PeopleSoft Campus Solutions using Query Viewer in ctcLink. You will find a query, set filters, run it, review the results, and export the data. You will also learn how to save favorite queries, use lookups for filter values, search with Advanced Search, filter queries by folder, and understand query access requirements.
Video: How to Run a PeopleSoft Query by Clark College (2020). All credit for the demonstration goes to the creator; watch the original on YouTube. The written guide below was generated from this video by Docsie. Creator? Request a change or removal.
This guide shows you how to run a query in PeopleSoft Campus Solutions using Query Viewer in ctcLink. You will find a query, set filters, run it, review the results, and export the data. You will also learn how to save favorite queries, use lookups for filter values, search with Advanced Search, filter queries by folder, and understand query access requirements.
Prerequisites
Before you begin, confirm the following:
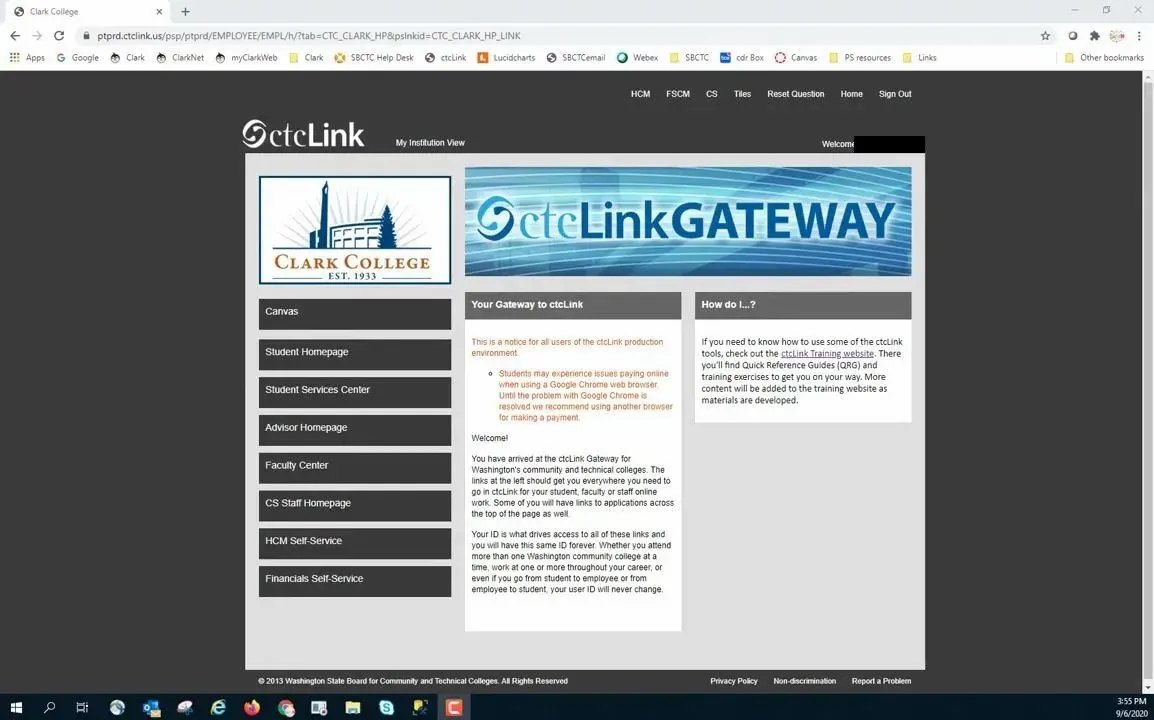
- You are logged in to the ctcLink Gateway and see the Clark College and ctcLink Gateway banners.
- You can see the menu options at the top of the page (HCM, FSCM, CS, and so on).
- You have access to the pillar (functional area or data group) that the query belongs to.
- You have the permissions required for any sensitive data the query contains.
Access Campus Solutions
Open the ctcLink Gateway
- Open your web browser and go to the ctcLink Gateway page.
- Make sure you are logged in and can see the Clark College and ctcLink Gateway banners.
- Confirm that the menu options appear at the top of the page (HCM, FSCM, CS, and so on).
Select the Campus Solutions pillar
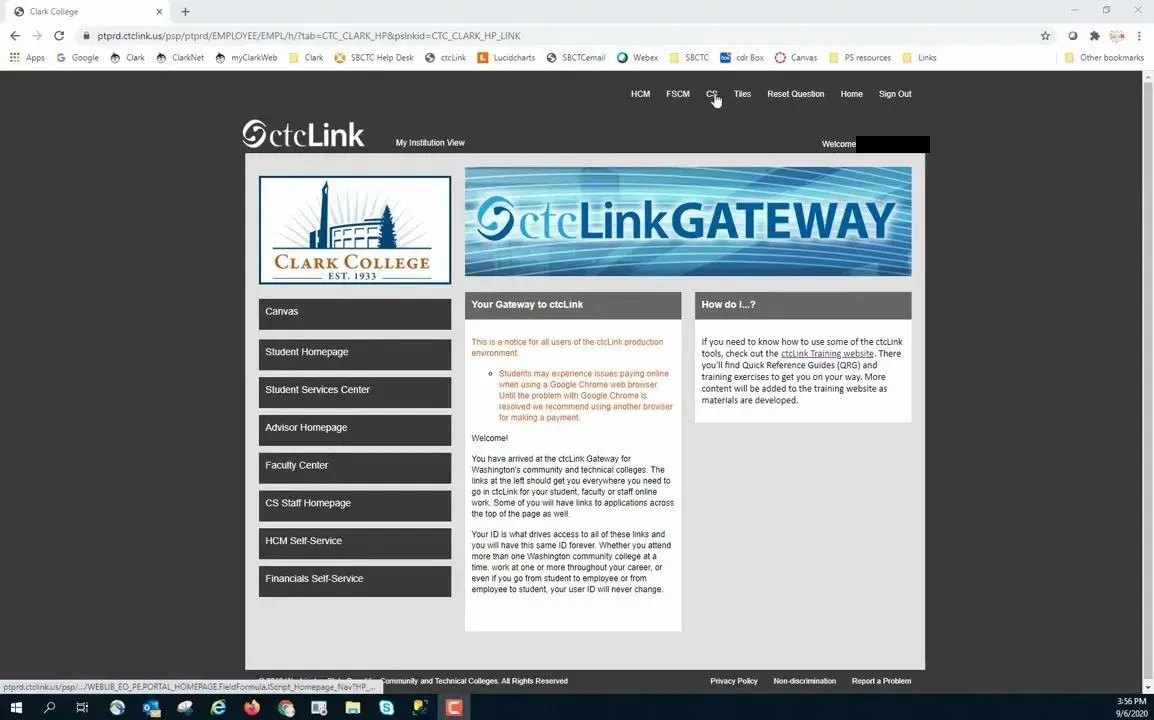
In the top navigation bar, click CS (Campus Solutions). This takes you to your Campus Solutions homepage.
Navigate to Query Viewer
- In the NavBar menu, click Navigator.
- Scroll down the list and select Reporting Tools.
- Under Reporting Tools, select Query, then Query Viewer.
The navigation path is NavBar > Reporting Tools > Query > Query Viewer.
Run the query
Search for the query you want to run
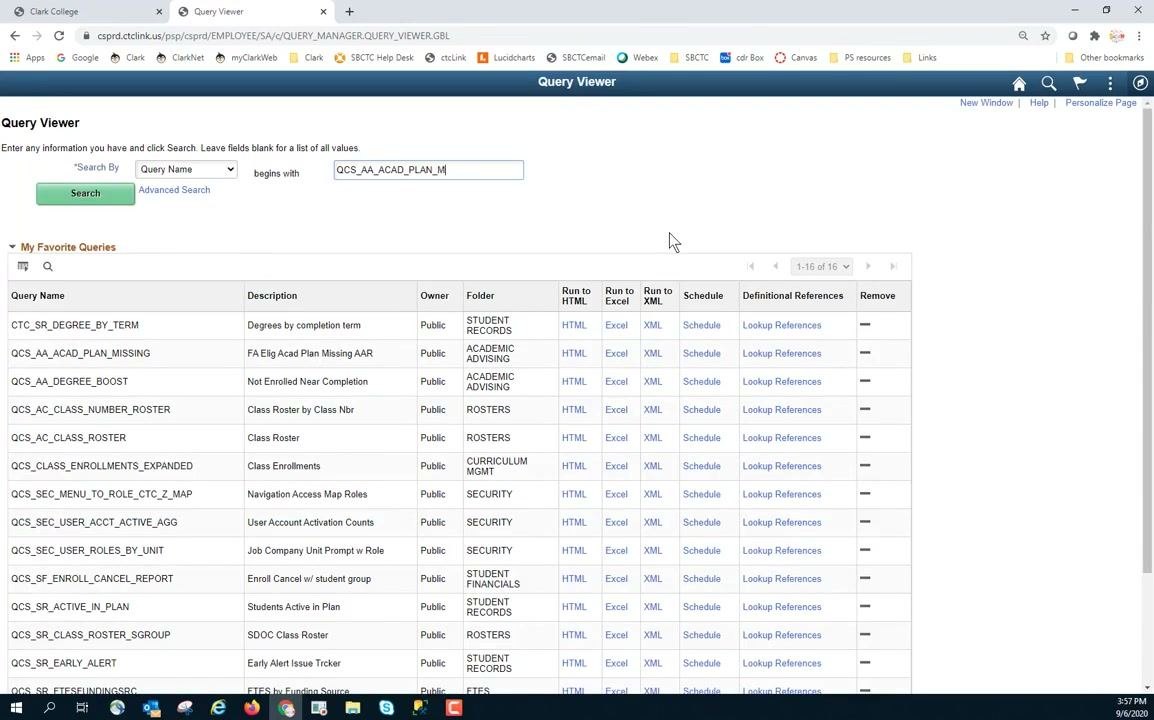
- On the Query Viewer screen, make sure Search By is set to Query Name.
- Enter the name of the query in the search box. For example, type
QCS_AA_ACAD_PLAN_MISSING. - Click the green Search button.
Select an output option to run the query
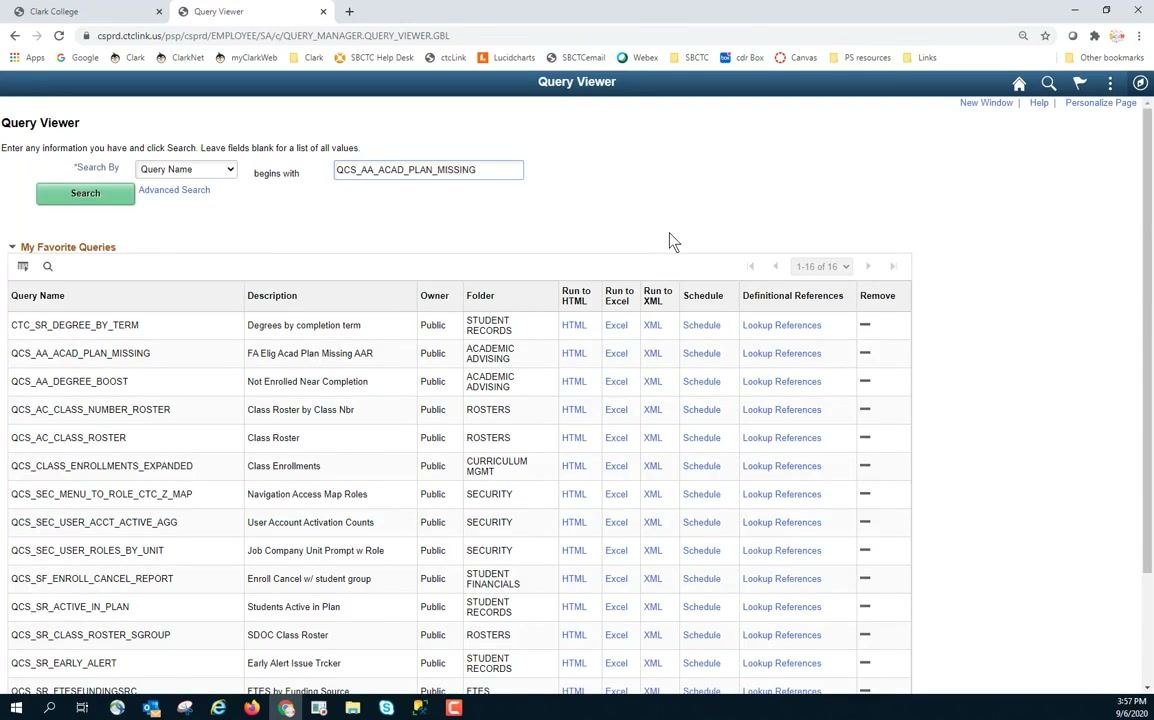
In the search results, find your query (for example, QCS_AA_ACAD_PLAN_MISSING). You have several options for running it:
- Click HTML to view the results on your screen.
- Click Excel to download the results as an Excel file.
- Click XML to download the results as an XML file.
- Click Schedule if the query is large and needs more time to process.
For this example, click HTML to run the query and view the results on your screen.
Filter the query by institution and aid year
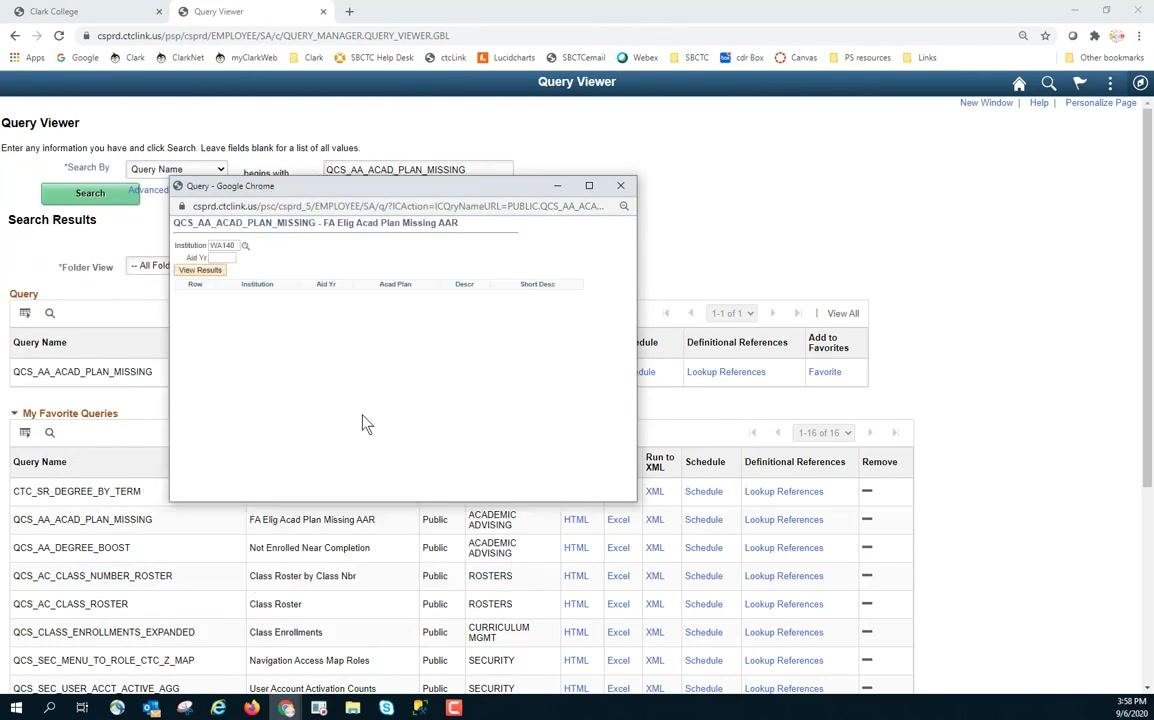
On the query filter screen, find the fields available for filtering, such as Institution and Aid Year. Then enter your values:
- In the Institution field, enter
WA140(Clark College's code). - In the Aid Yr field, enter
2021.
Run the query with your filters
Click View Results to run the query with your filters. A spinning circle icon appears in the upper right of the results window while the query processes. The time required depends on the amount of data being retrieved.
Review the query results
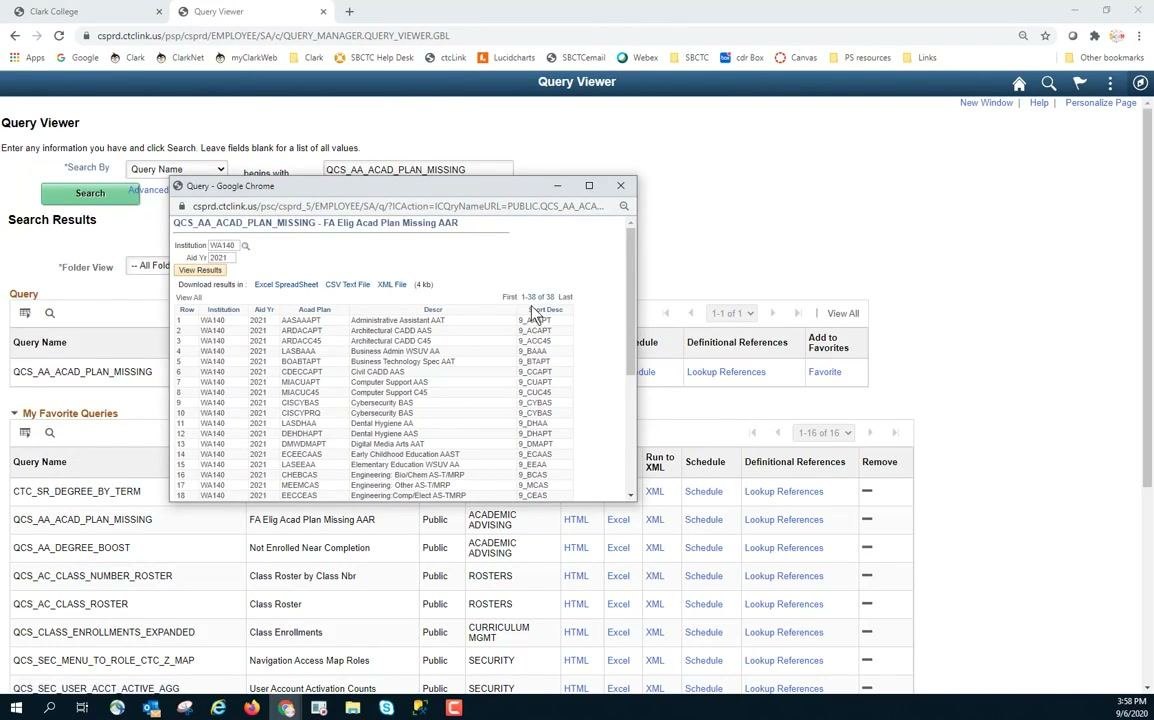
When processing is complete, review the results in the window. The results appear in a table with columns such as Institution, Aid Yr, Acad Plan, Descr, and Short Descr.
At the top right of the results, check the range of records displayed (for example, "First 1-38 of 38 Last"). If there are more records, you see options to move through additional pages (for example, "1-38 of 500"). Use the First and Last links or the page numbers to move through the results.
Export the results
To save the results, click the Excel Spreadsheet link at the top of the results window. You can also choose CSV Text File or XML File if you prefer those formats. After you click Excel Spreadsheet, a file download appears at the bottom of your browser window.
Open and save the exported file
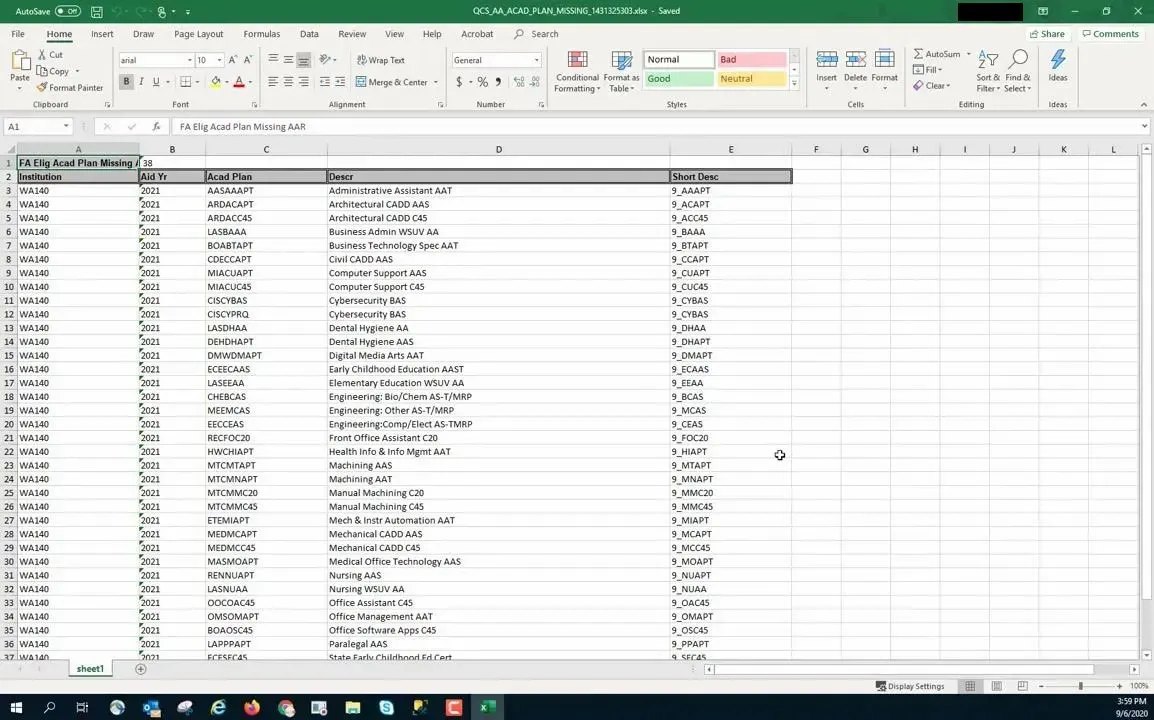
- Click the downloaded file (for example,
QCS_AA_ACAD_PLAN_MISSING.xlsx) at the bottom of your browser. - Select Open to view the results in Excel.
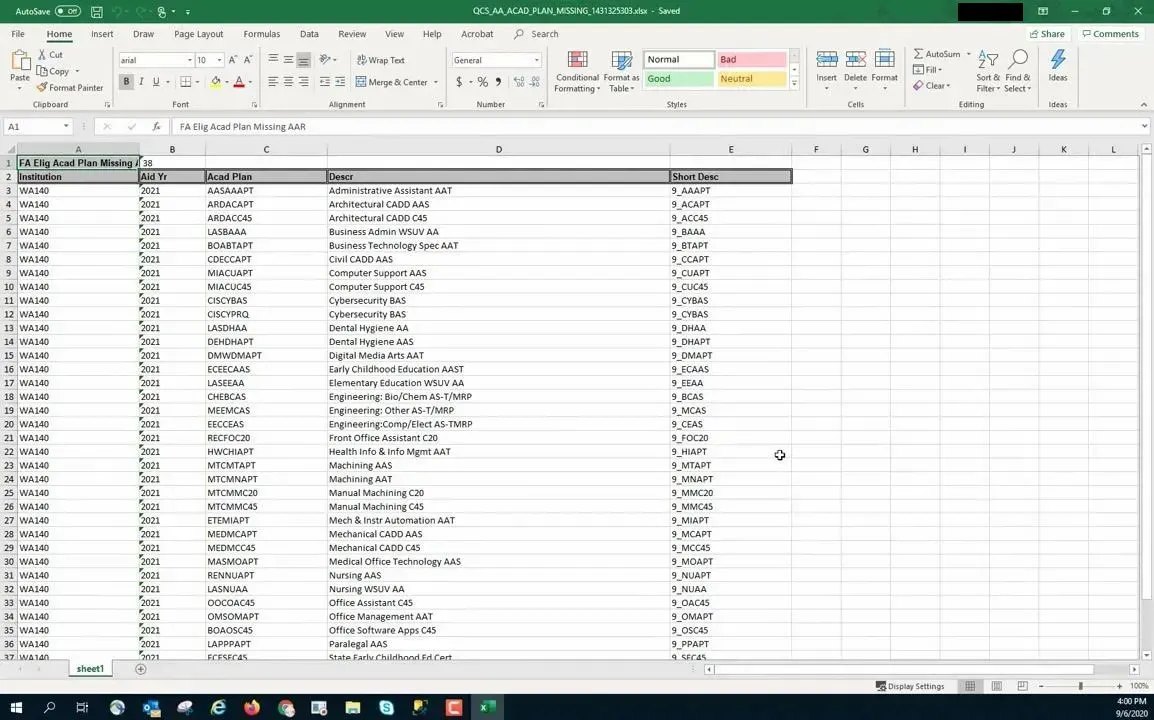
- Review your data in Excel.
- Use File > Save As in Excel to save the file to your preferred location on your computer.
Save sensitive data securely
If your exported query results contain student or employee information, do not save the files to your local hard drive. Save sensitive files to a secure, shared network location, as your institution's data security policies require. When you finish with your query and exported file, close Excel and any open files to maintain data privacy.
Exit Query Viewer when you are done
Click the "X" in the upper right corner of the browser tab or window to exit Query Viewer. This returns you to the previous menu or your main dashboard.
Save and reuse favorite queries
Add a query to your favorites
If you plan to run a specific query regularly, add it to your favorites for quick access. In the Query Viewer results list, find the query you want to favorite. Then click the Favorite link in the Add to Favorites column next to the query name.
Access and run a favorite query
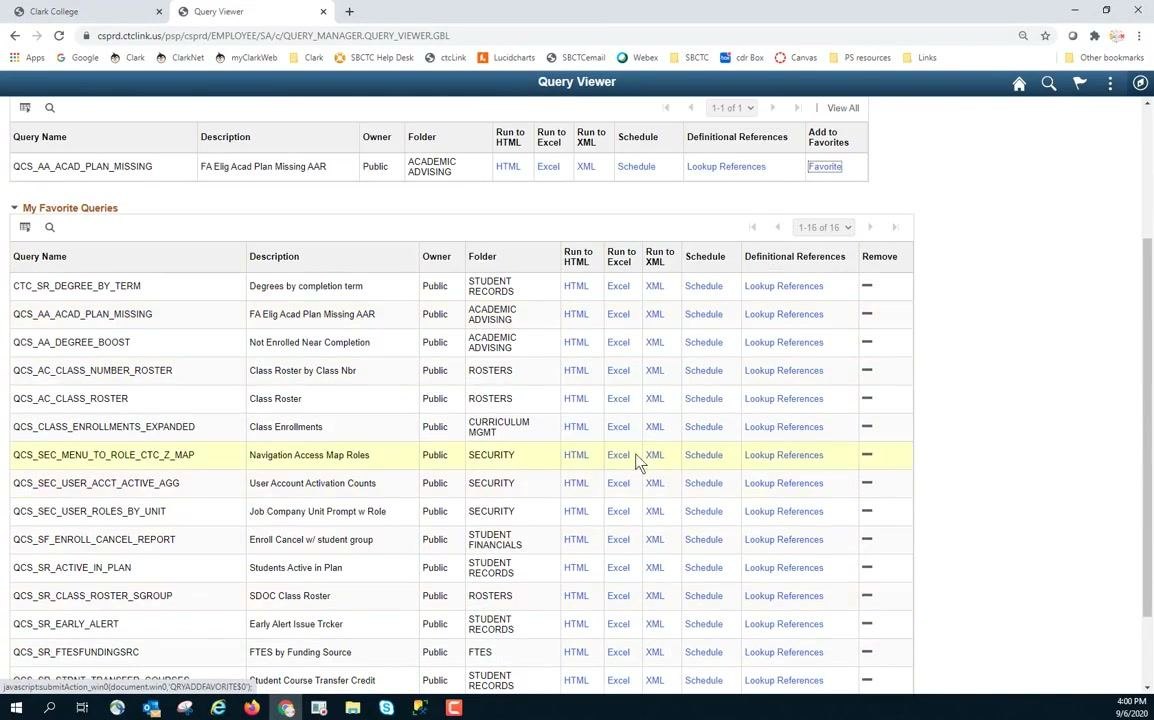
Your favorite queries appear in the My Favorite Queries section below the main search area. To run one, click the output format you want (HTML, Excel, or XML) next to the query name. You do not need to use the search fields above to find or run these queries.
Run a favorite query and use lookup for filter values
- Click the output format (for example, Excel) for your favorite query to open the filter window.
- For Institution, enter
WA140. - For Term, enter the term code (for example,
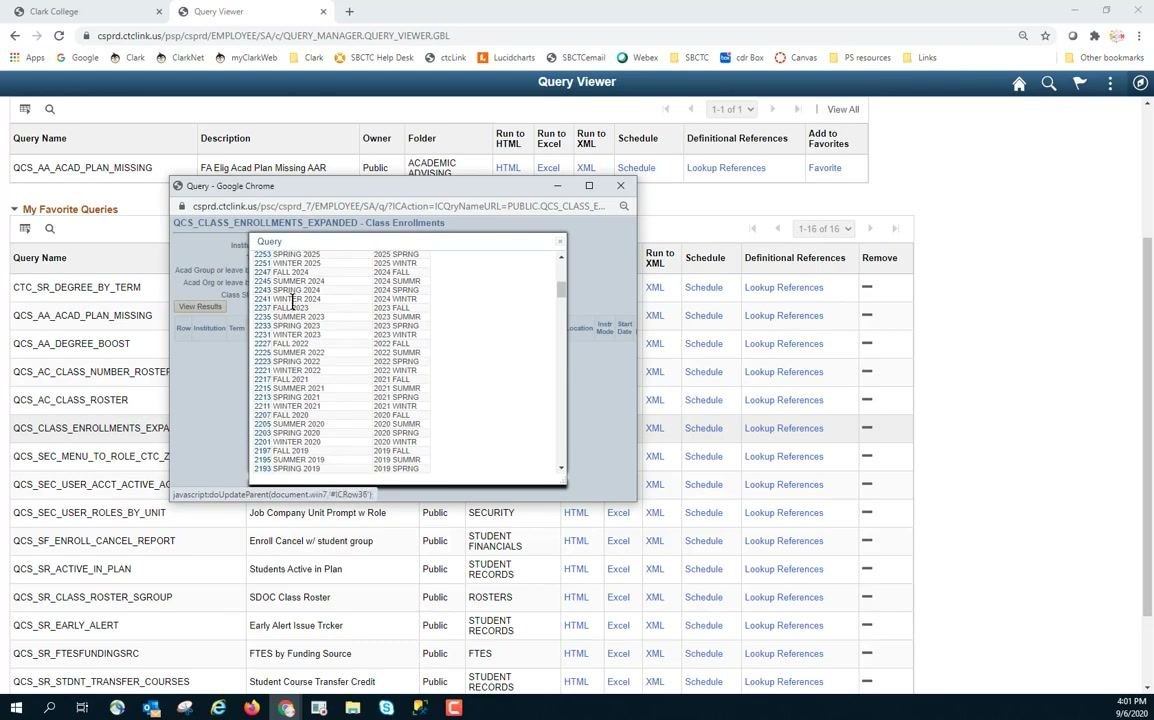
2207for Fall 2020). If you do not remember the code, click the lookup icon next to the field. - In the lookup window, search or scroll to find the correct term (for example, "2207 FALL 2020") and select it.
(Optional) Use lookup for academic group or organization
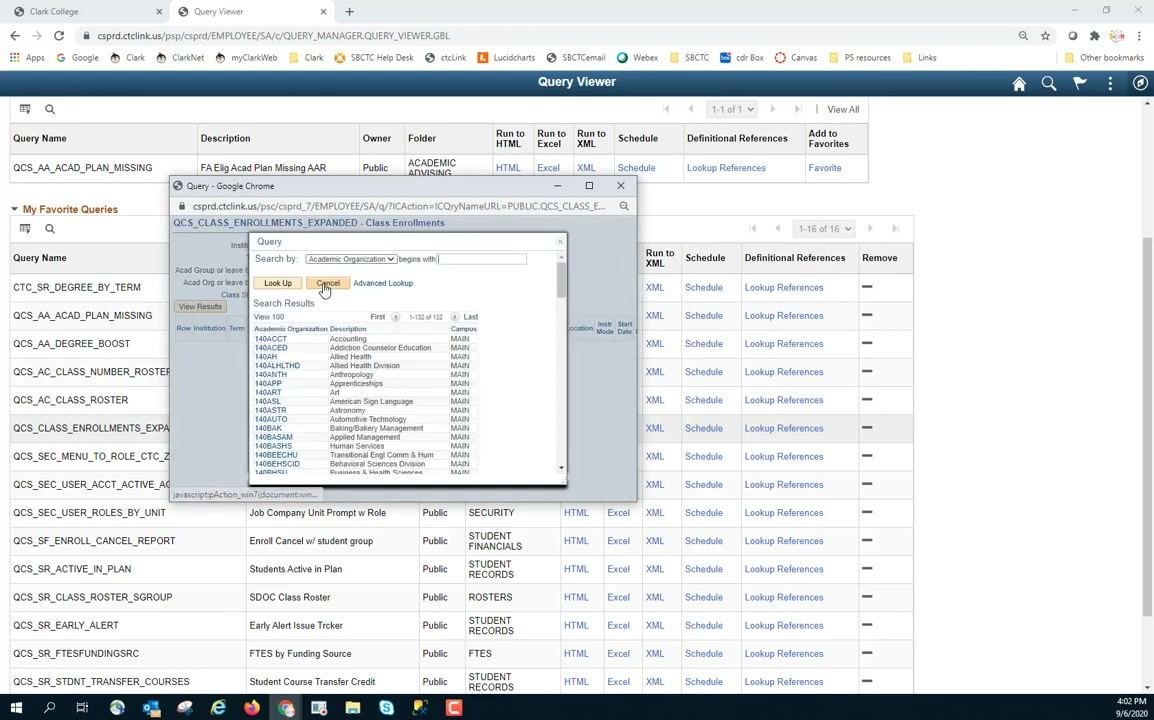
You can enter an Academic Group, or leave it blank for broader results. To select an Academic Organization, click the lookup icon next to the field. In the lookup window, search or scroll to select the organization you want, or leave the field blank to include all.
Filter by class status
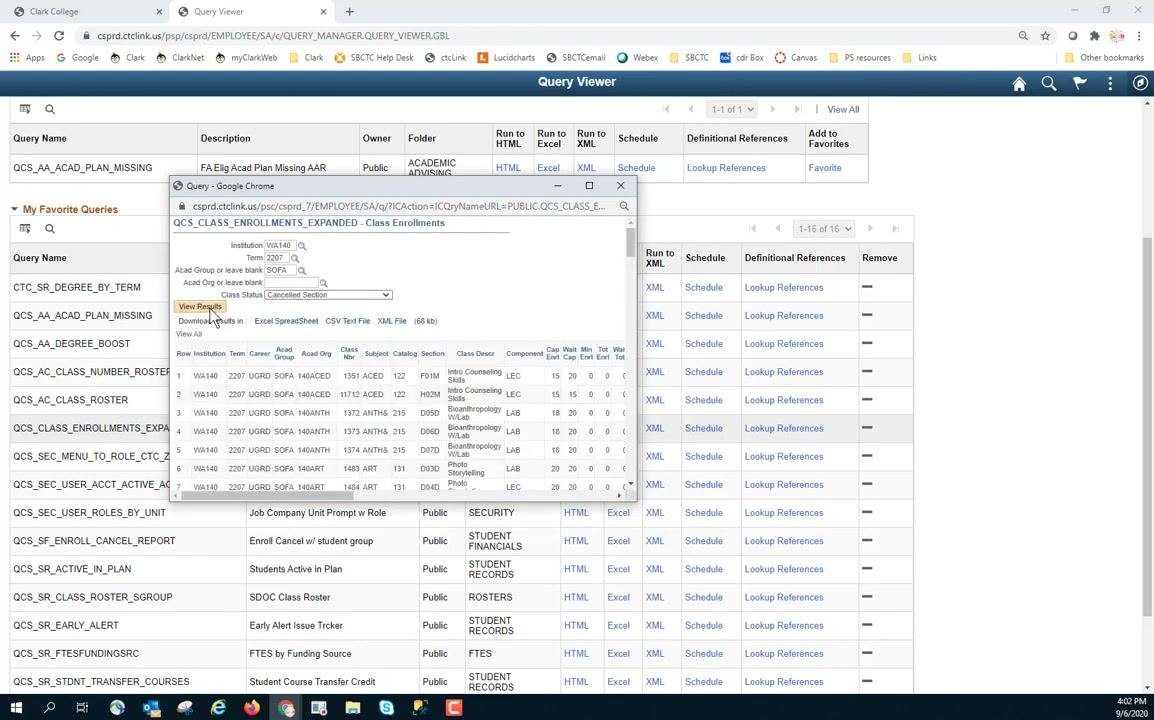
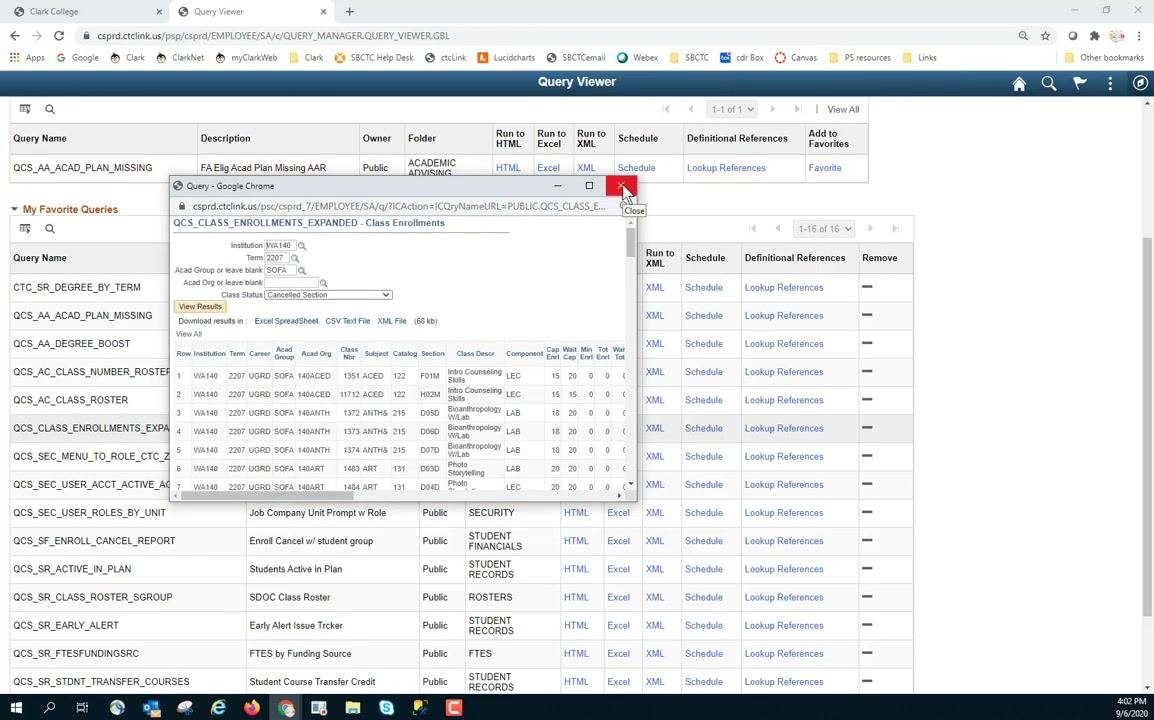
In the filter window, use the Class Status dropdown to select a specific status. For example, select Cancelled Section if you want to view only cancelled classes.
View and export the filtered results
- After you enter your filter criteria, click View Results.
- Review the results, which match your filters (for example, Institution: WA140, Term: 2207, Academic Org: SOFA, Class Status: Cancelled Section).
- Download the results in your preferred format (Excel Spreadsheet, CSV Text File, or XML File) using the links provided.
Use Advanced Search to find a query
Close the current query window
If a query window is open (such as "QCS_CLASS_ENROLLMENTS_EXPANDED - Class Enrollments"), click the red "X" button in the upper right corner of the popup window to close it. This returns you to the main Query Viewer screen.
Open Advanced Search
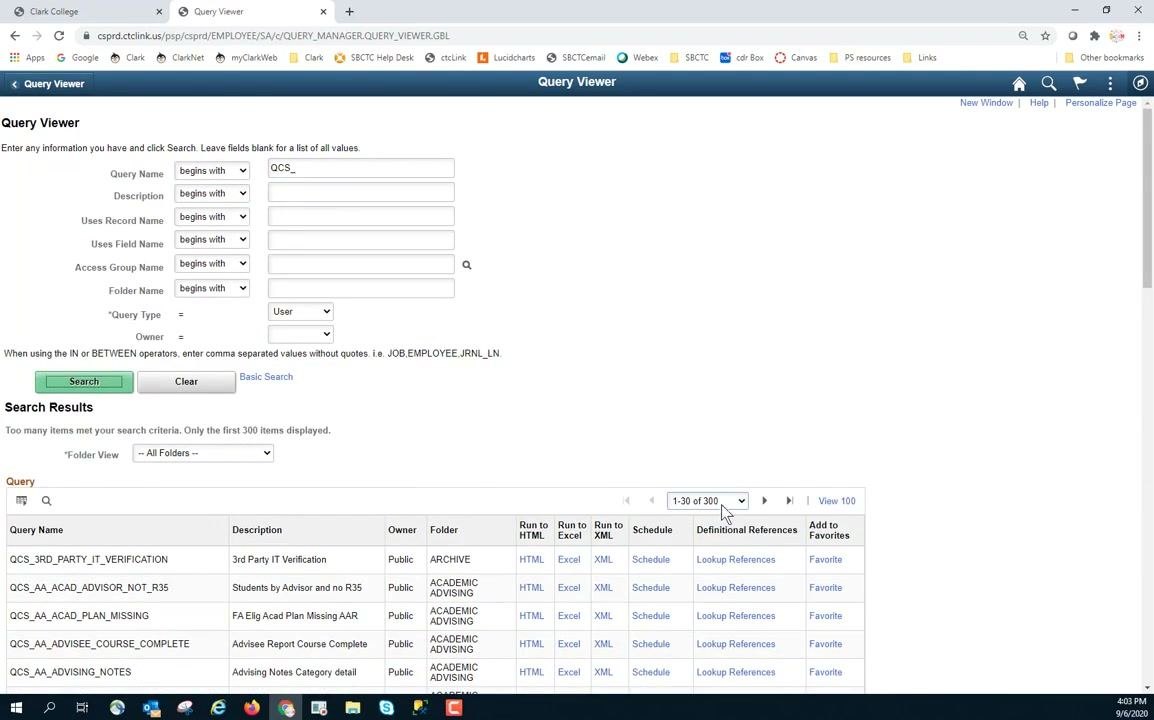
On the Query Viewer page, find the Search By dropdown and the Search button. Click the Advanced Search link below the Search button to expand additional search options.
The page displays multiple fields for narrowing your search: Query Name, Description, Uses Record Name, Uses Field Name, Access Group Name, Folder Name, Query Type, and Owner.
Enter search criteria to narrow down queries
- In the Query Name field, enter
QCS_to filter for queries that begin with this prefix. - Leave the other fields blank, or adjust them to refine your search further.
- Click the green Search button.
Understand search result limits
If your search returns more than 300 results, only the first 300 are displayed. This message appears: "Too many items met your search criteria. Only the first 300 items displayed." Use the dropdown at the bottom of the results to view different sets of 30 results at a time.
Refine your search further
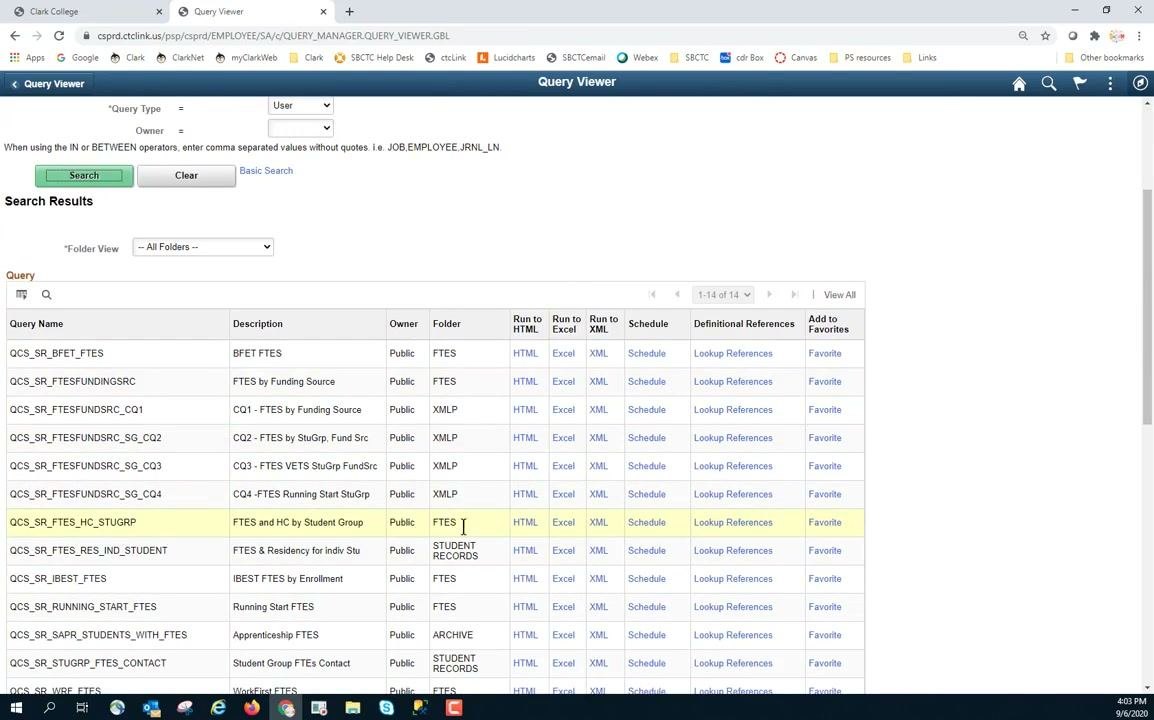
To reduce the number of results, use additional fields such as Description or Uses Record Name. For example, enter a value in the Description field to filter for queries whose descriptions begin with a specific term.
Select a specific query to run
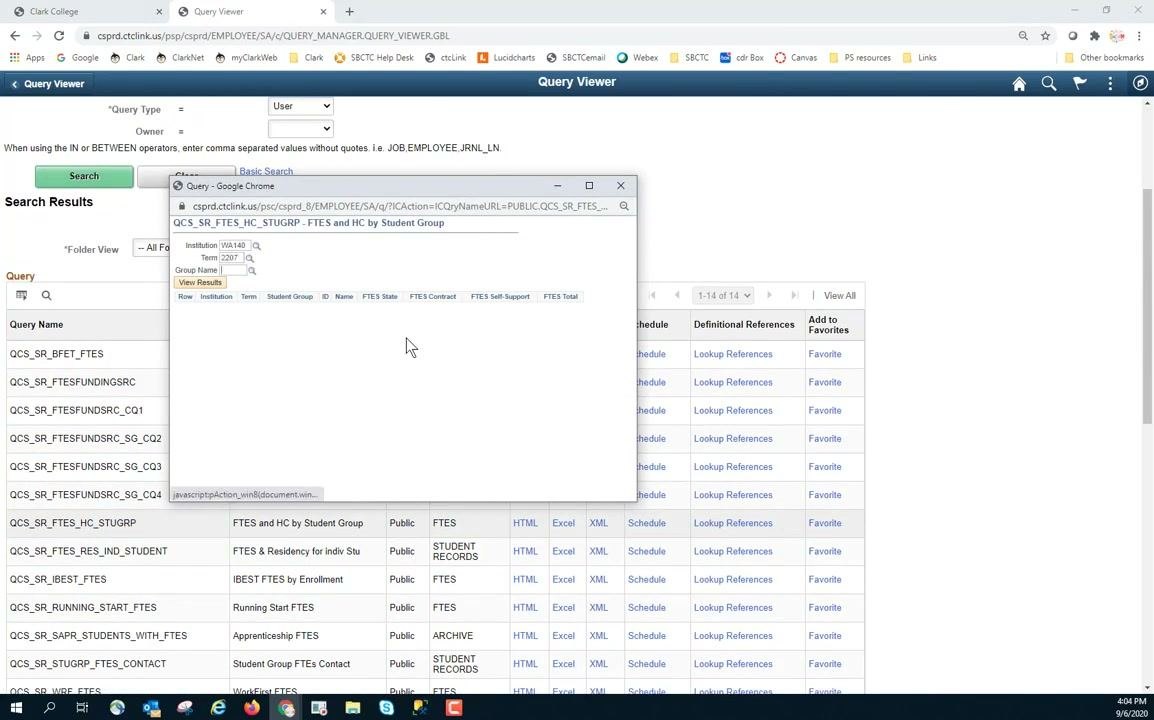
Identify the query you want, such as "QCS_SR_FTES_HC_STUGRP – FTES and HC by Student Group." Click the query name to open its parameters window.
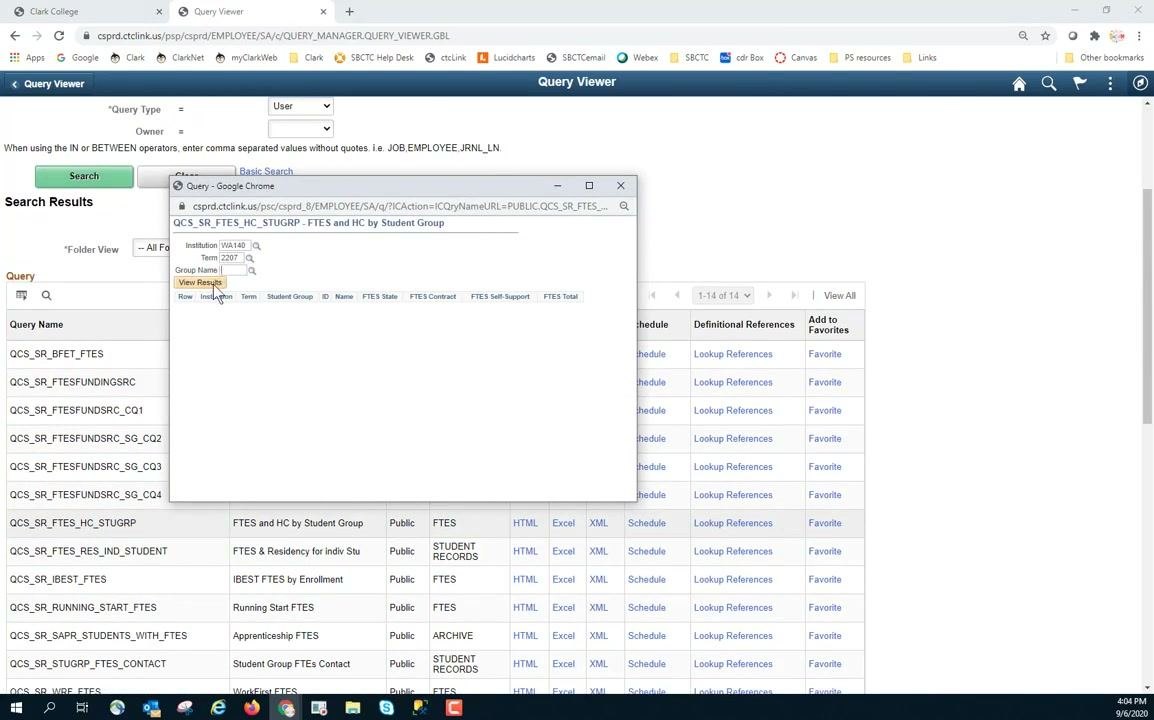
Enter the required parameters
In the popup window, enter the required parameters:
- Institution:
WA140 - Term:
2207 - Group Name: leave blank to see what happens when a required field is omitted
Click View Results to try to run the query.
If a required field such as Group Name is blank, the system highlights it in red and displays a message that the field is required. Enter a value in the required field to continue.
Look up a required parameter value
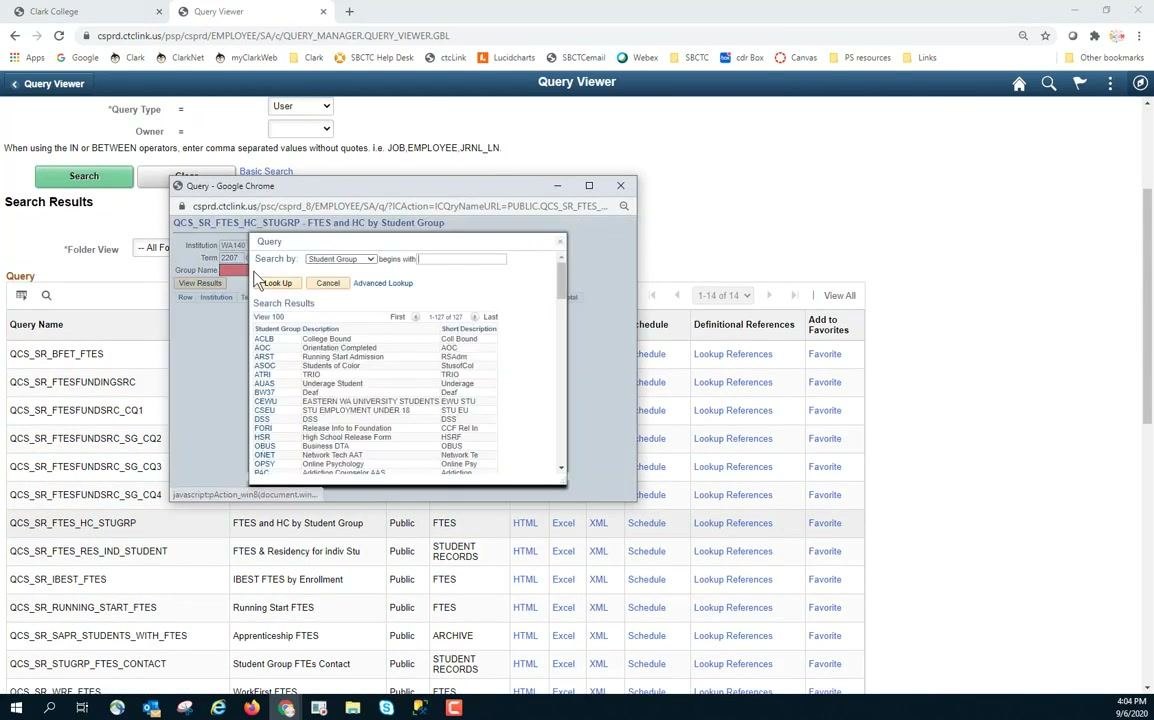
- If you do not know the value for a parameter such as Group Name, click the magnifying glass icon next to the field to open a lookup window.
- In the lookup window, use the Search by dropdown to select the appropriate category (for example, Student Group).
- Click Look Up to display a list of available values.
- Review the list and select the value you need.
Enter the selected parameter and run the query
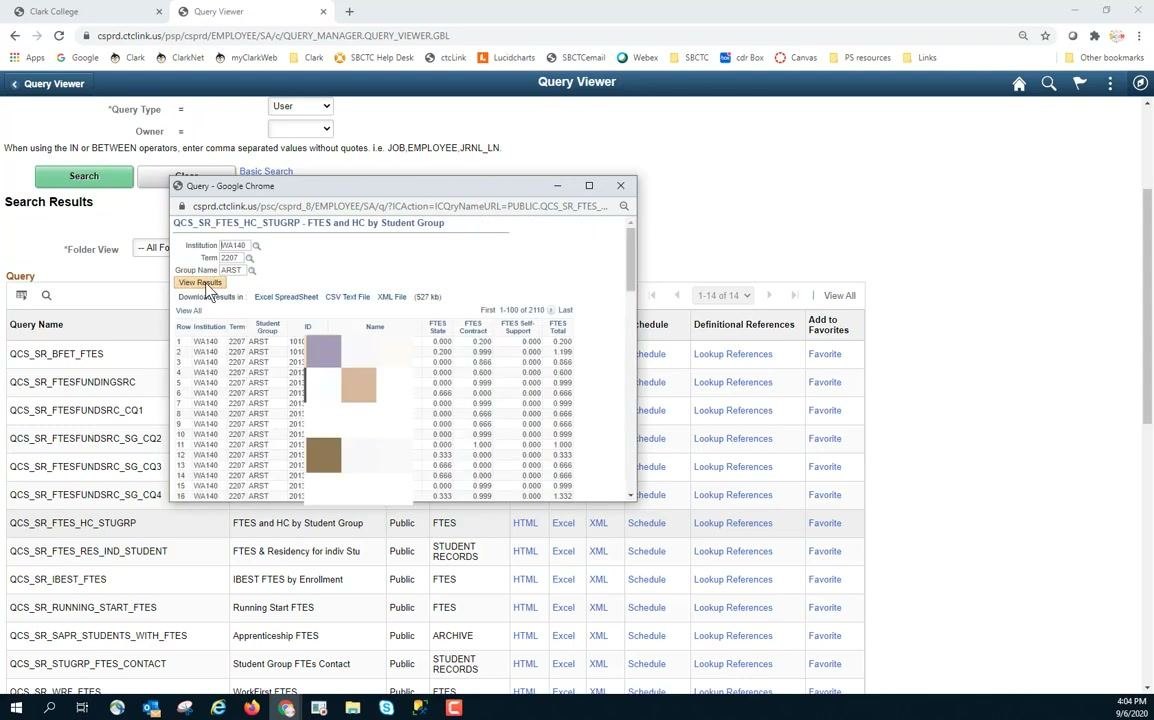
After you identify the correct value (for example, ARST), enter it in the Group Name field. Click View Results to run the query. The results window displays data for the selected parameters, including columns such as Institution, Term, Group Name, and various FTES statistics.
Close the query results window
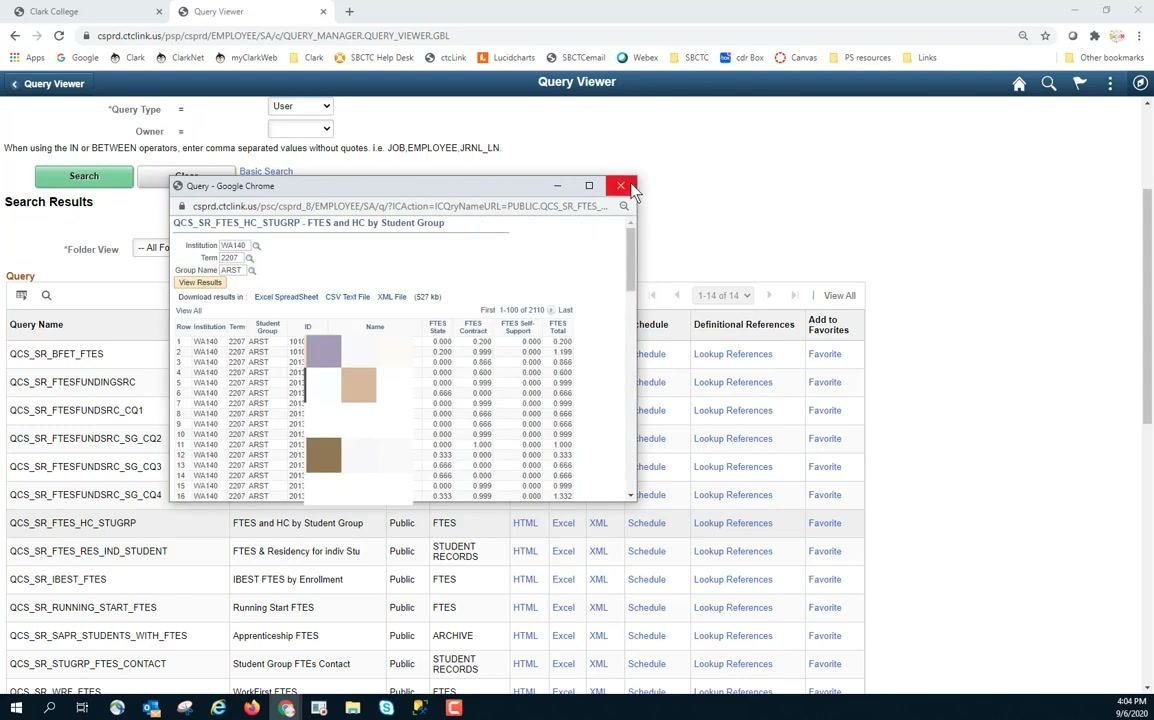
After you review or export the results, click the red "X" in the upper right corner to close the popup window.
Filter queries by folder name
Use Advanced Search to filter by folder
On the Query Viewer page, use the Advanced Search fields to refine your search. For example, to find FTES-related queries, enter:
- Query Name: begins with
QCS_ - Description: contains
FTES - Folder Name: leave blank or specify as needed
Click Search to display matching queries.
Filter queries by folder name
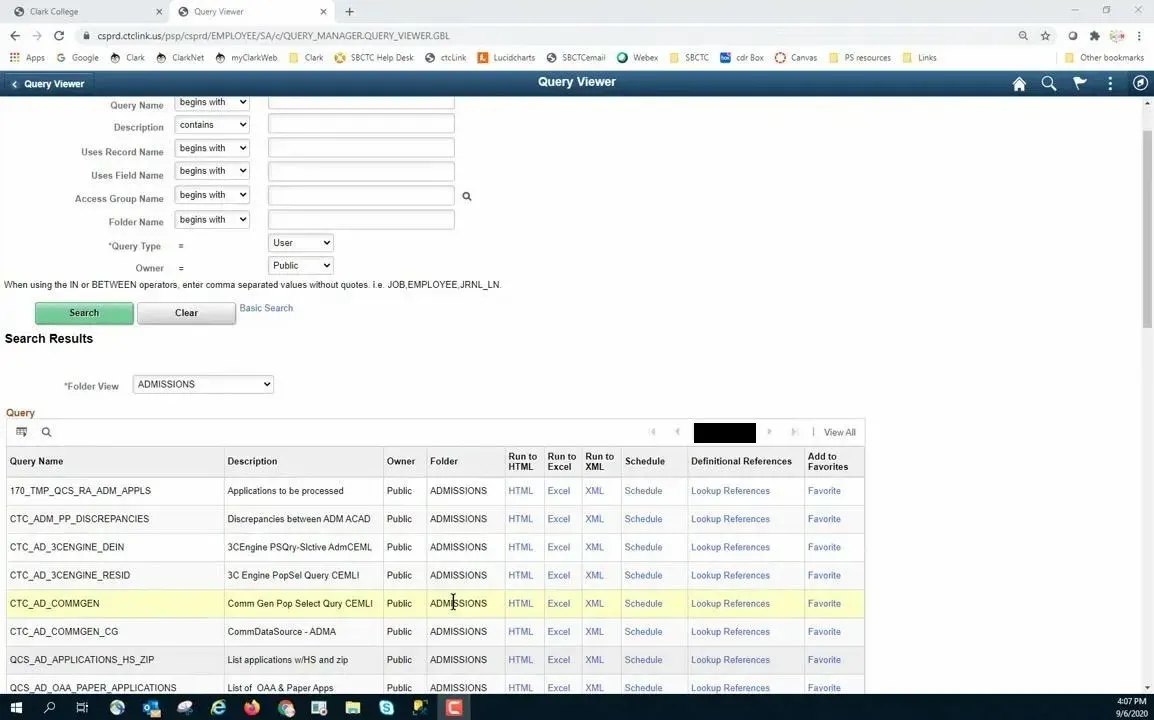
To search within a particular folder, enter the folder name (for example, ADMISSION) in the Folder Name field. Click Search to display all queries in that folder that match your other criteria.
Review the search results
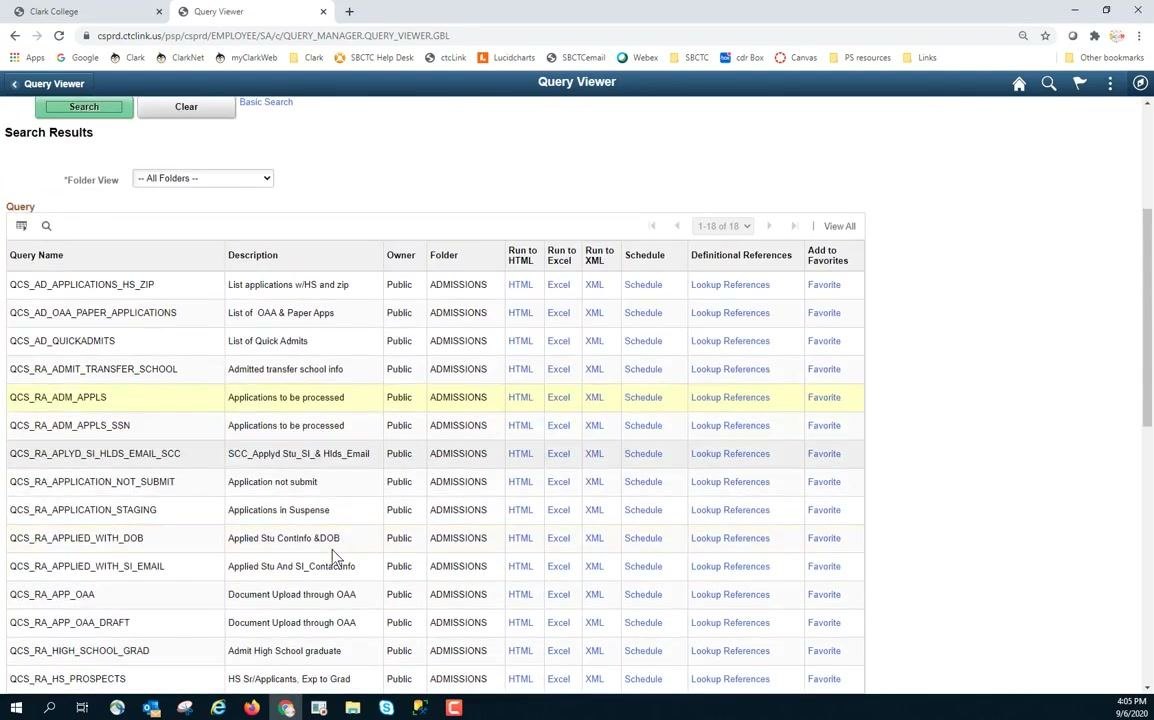
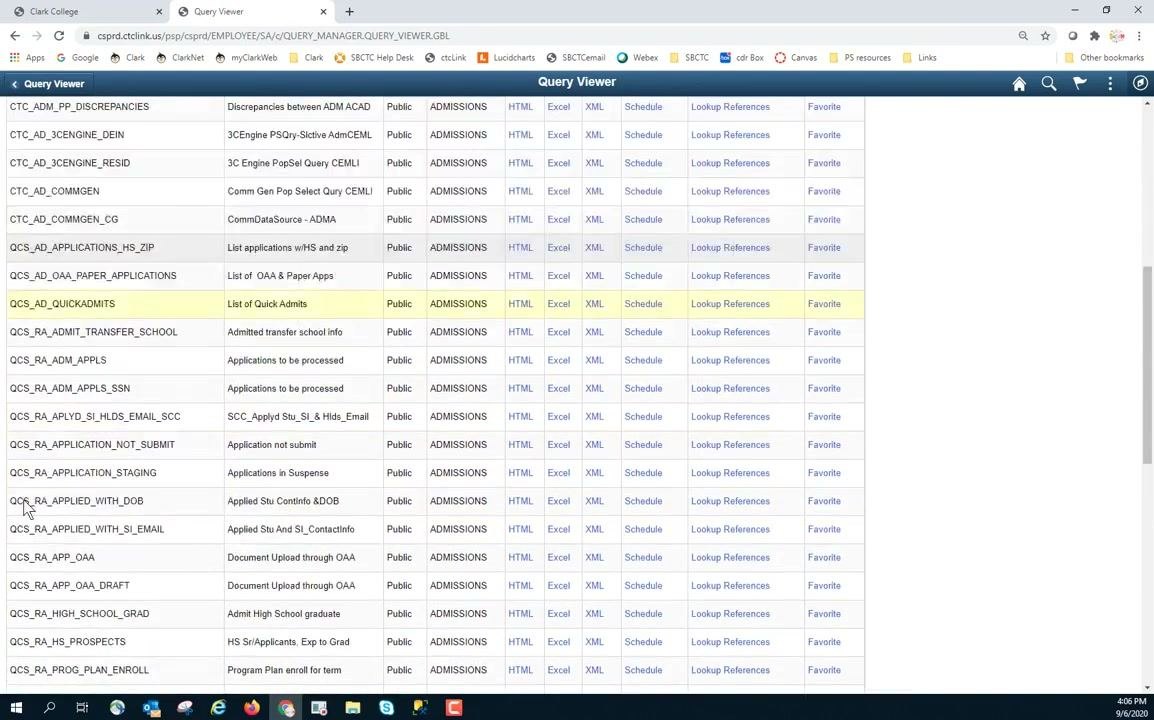
The results show only the queries that meet all your criteria. For example, you see queries in the ADMISSIONS folder with names that begin with "QCS_". If you remove the "QCS_" filter and search only by folder, all queries in that folder are displayed.
Queries with a prefix such as "170_" come from another college (for example, the 170 college). Depending on your permissions, these queries may be available for reference or use.
All listed queries have "Public" as the owner, which means they are accessible to all users with appropriate permissions. There are no private queries in this context. All are shared within the institution.
Understand query access requirements
Confirm you have access to the query's pillar
Make sure you have access to the pillar (functional area or data group) associated with the query you want to view. Your permissions and the data security settings in PeopleSoft determine your access to a query. If you do not have access to the required pillar, you cannot view or run queries associated with that data group.
Recognize data grouping and security
Sensitive data, such as Social Security Numbers, is grouped and protected within the system. Only users with explicit permissions can access queries that contain sensitive information.
If a query contains restricted data, only authorized users can run it and view the results. Without the necessary permissions, you cannot access or run queries that require access to sensitive data.
Summary
You now know how to run a query in PeopleSoft Query Viewer and what to do with the results. You can:
- Find a query by name and run it in HTML, Excel, or XML format.
- Filter a query by values such as Institution, Aid Year, Term, and Class Status.
- Export results as an Excel spreadsheet, CSV text file, or XML file.
- Save sensitive data to a secure shared location.
- Add queries to your favorites.
- Use lookups to find required parameter values.
- Use Advanced Search to narrow queries by name, description, or folder.
- Identify queries from other colleges and understand query ownership.
- Understand how pillar access and data security affect the queries you can run.
What's next
- Add the queries you run most often to My Favorite Queries for quick access.
- Use Advanced Search with the Query Name, Description, and Folder Name fields to discover other queries.
- If you cannot access a query, check that you have access to its pillar and the permissions its data requires.
Generation details: cost, quality tiers
Docsie billed 5,000 credits ($3.50) to analyze this 10-minute video at standard quality. The rewrite, template fill and Word/PDF exports were included. The same video at each quality tier:
| Quality | Frames sampled | Credits | Approx. cost |
|---|---|---|---|
| Draft | every 16-30 s | 2,500 | $1.75 |
| Standard (this guide) | every 8-15 s | 5,000 | $3.50 |
| Detailed | every 4-7 s | 10,000 | $7.00 |
| Ultra | every 1-3 s | 20,000 | $14.00 |
Credits priced at $0.70 per 1,000; plans include a monthly allowance. Enterprise customers on on-premise or bring-your-own-model deployments run this on their own inference and pay no per-video credits.
Generated by Docsie Video-to-Docs on 2026-11-15 from a 9-minute video. Screenshots are frames from the source video and belong to their creator, Clark College, whose original is embedded above. If you own this video and want the guide removed or credited differently, contact us and we will act within one business day.