
How to Create an ESS Job in Oracle Fusion
This guide shows you how to create an ESS job in Oracle Fusion that accepts a parameter for a BI (Business Intelligence) report. You will start from an existing data model and report that were previously set up without parameters, modify the underlying SQL to accept a bind variable, create the job definition, and then schedule and run the job with a mandatory parameter value. By the end of this guide, you will be able to create an ESS job in Oracle Fusion that passes a user-supplied parameter through to a BI Publisher report.
Video: Oracle Fusion #34: Create Custom ESS Job with Parameter for BIP Reports by Technical Talk's. All credit for the demonstration goes to the creator; watch the original on YouTube. The written guide below was generated from this video by Docsie. Creator? Request a change or removal.
This guide shows you how to create an ESS job in Oracle Fusion that accepts a parameter for a BI (Business Intelligence) report. You will start from an existing data model and report that were previously set up without parameters, modify the underlying SQL to accept a bind variable, create the job definition, and then schedule and run the job with a mandatory parameter value. By the end of this guide, you will be able to create an ESS job in Oracle Fusion that passes a user-supplied parameter through to a BI Publisher report.
Prerequisites
- Access to an Oracle Fusion instance with permissions to edit BI Publisher data models and reports.
- An existing data model and report already set up for an ESS job (without parameters), such as
ESS_JOB_DMandESS_JOB_LAYOUT. - Access to Setup and Maintenance to manage Enterprise Scheduler job definitions.
- Access to Scheduled Processes to schedule and run the job.
Step-by-step instructions
Locate the existing data model and report
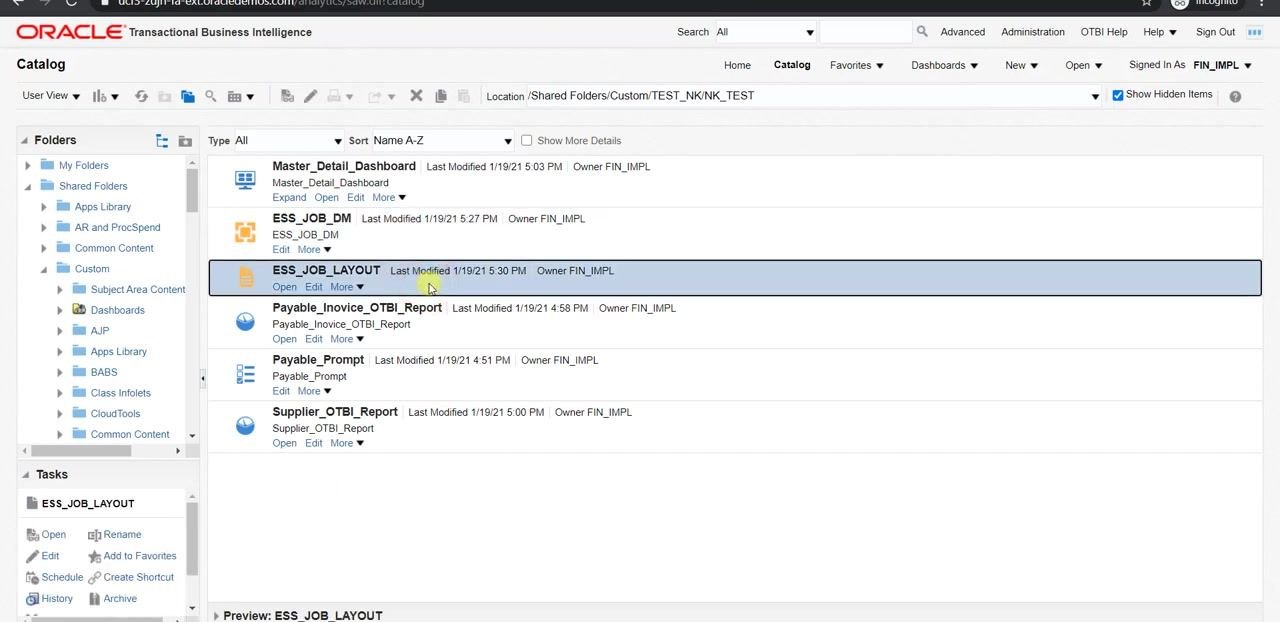
In the Oracle Fusion Catalog page, find the data model and report that were previously created for your ESS job. You will reuse this data model and modify it to include a parameter instead of a hard-coded value.
Edit the data model
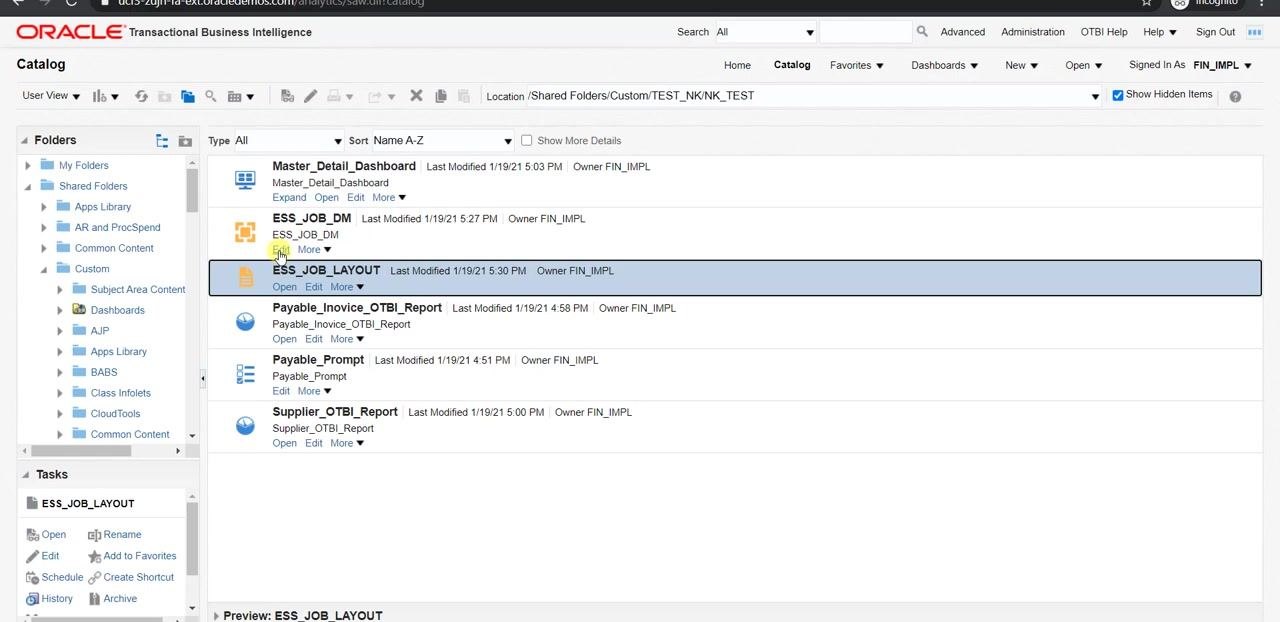
Click on the data model (for example, ESS_JOB_DM) and select Edit. This opens the SQL query used by the data model so you can modify it.
Replace the hard-coded value with a bind variable
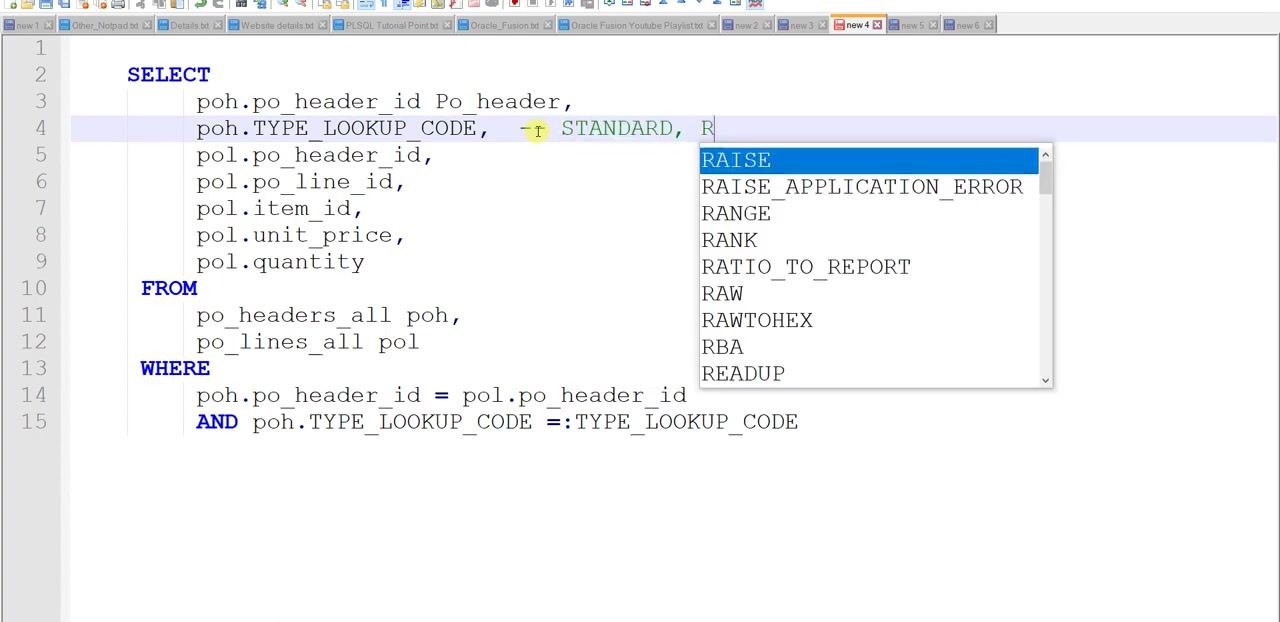
Open the SQL query in your editor and locate any hard-coded value, such as a specific PO number (for example, a.segment1 = 162352). Replace this hard-coded value with a bind variable for the parameter you want to pass:
- Replace:
AND a.segment1 = 162352 - With:
AND poh.TYPE_LOOKUP_CODE = :TYPE_LOOKUP_CODE
This change allows the ESS job to accept different values for TYPE_LOOKUP_CODE at runtime.
Document the accepted parameter values
Add a comment in the SQL query to indicate the possible values for the parameter, for example -- STANDARD, RFQ, PLAN, BLANKET. This comment helps users understand which values can be passed for TYPE_LOOKUP_CODE.
Paste the updated query and generate the parameter
Copy the updated SQL query from your editor and paste it into the SQL Query section of the data set (for example, ESS_JOB_DM) in the Oracle Fusion Data Model editor. Click OK to save the changes.
The system prompts you to generate a parameter for the bind variable you added (for example, :TYPE_LOOKUP_CODE). Check the checkbox to confirm parameter creation, then click OK to finalize it.
Set the parameter as mandatory and add a display label
In the Oracle BI Data Model editor, locate the parameter you created (for example, TYPE_LOOKUP_CODE). If you want a default value, enter it in the Default Value field; otherwise leave it blank.
Check the Mandatory checkbox to make the parameter required, then enter PO_TYPE in the Display Label field to clearly indicate its purpose. Confirm that Parameter Type is set to Text and Data Type is set to String.
Save the data model
Click the Save icon in the Data Model editor to save your changes, and confirm that the parameter is now mandatory and correctly labeled.
Test the report from the catalog
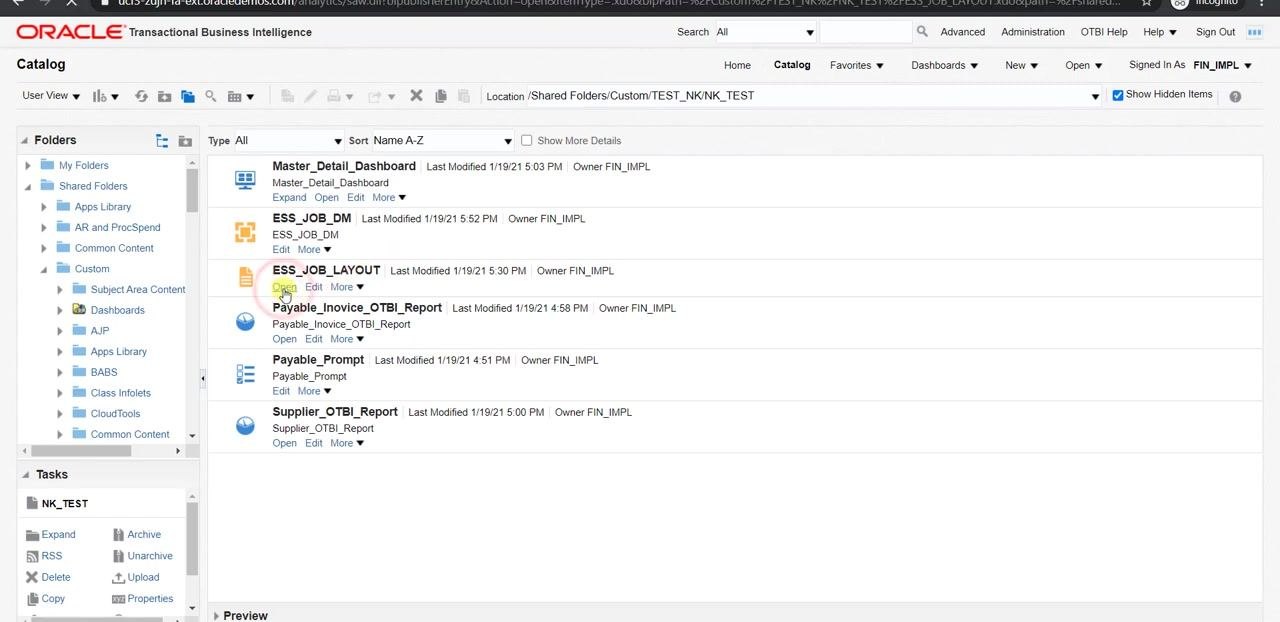
Navigate back to the Oracle BI Catalog, locate your report layout (for example, ESS_JOB_LAYOUT), and click Open to run it. Because the parameter is now mandatory and no value has been provided, a warning dialog appears stating "One or more mandatory parameters are empty." Click OK to dismiss the warning.
Enter a value for the mandatory parameter and run the report
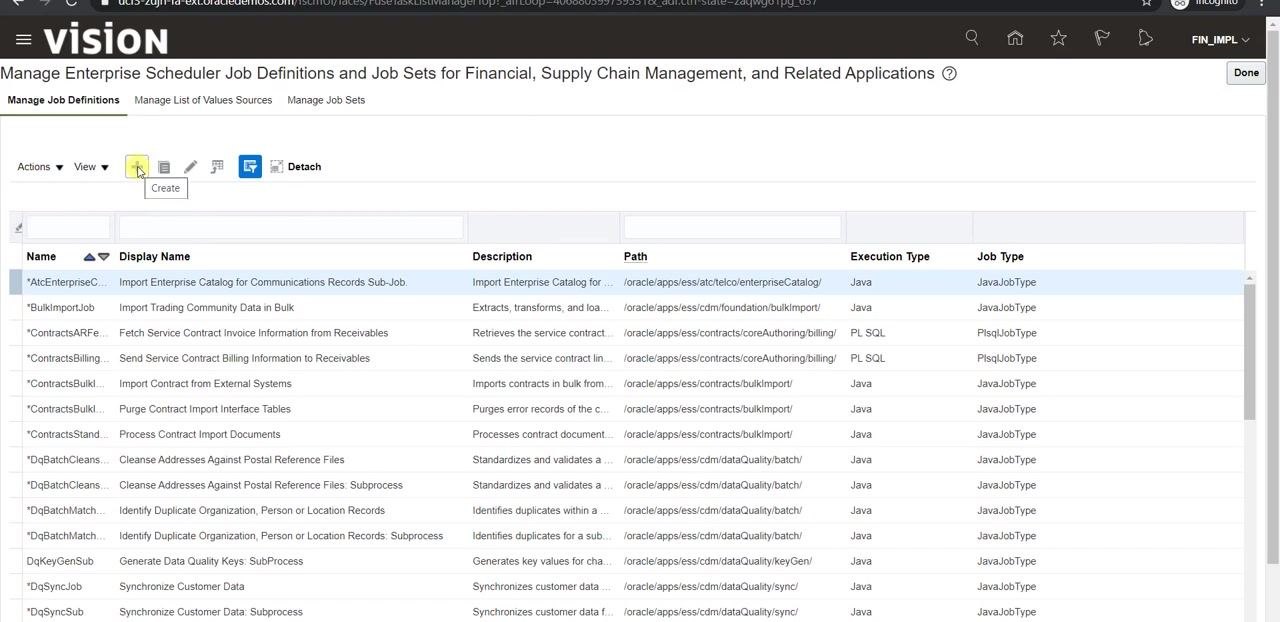
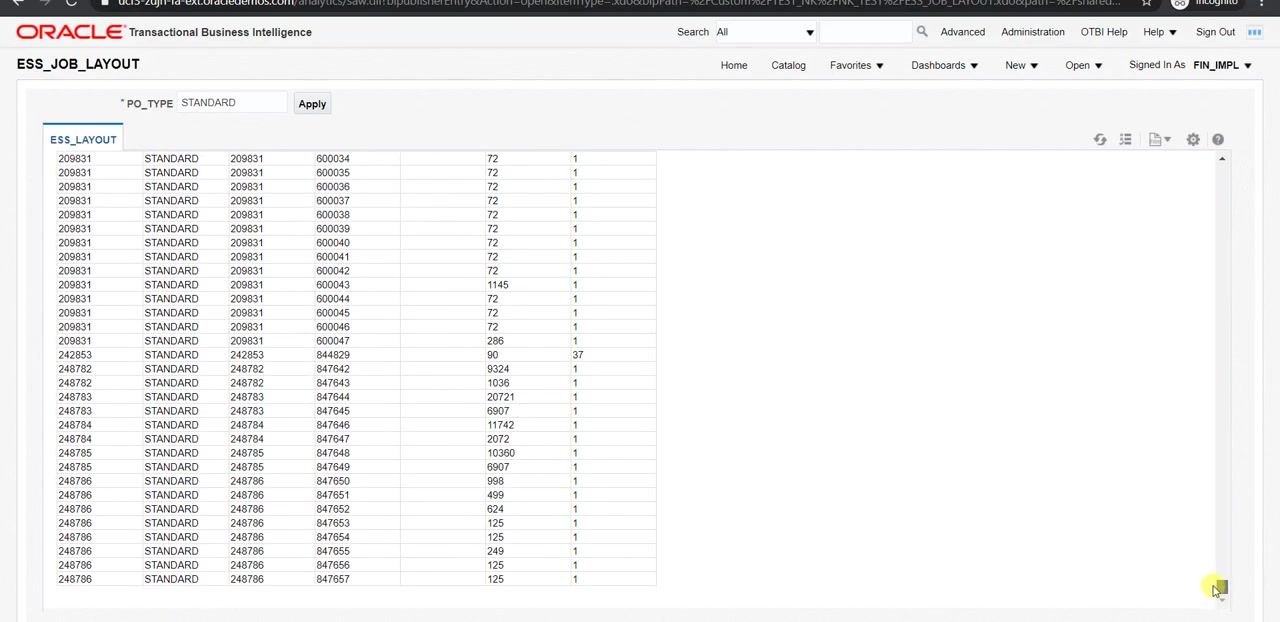
In the parameter input field labeled *PO_TYPE, enter a valid value (for example, STANDARD), then click Apply to run the report with that value. The report begins processing, and a message such as "Processing... To cancel, click here" is displayed.
Navigate to the job definitions setup task
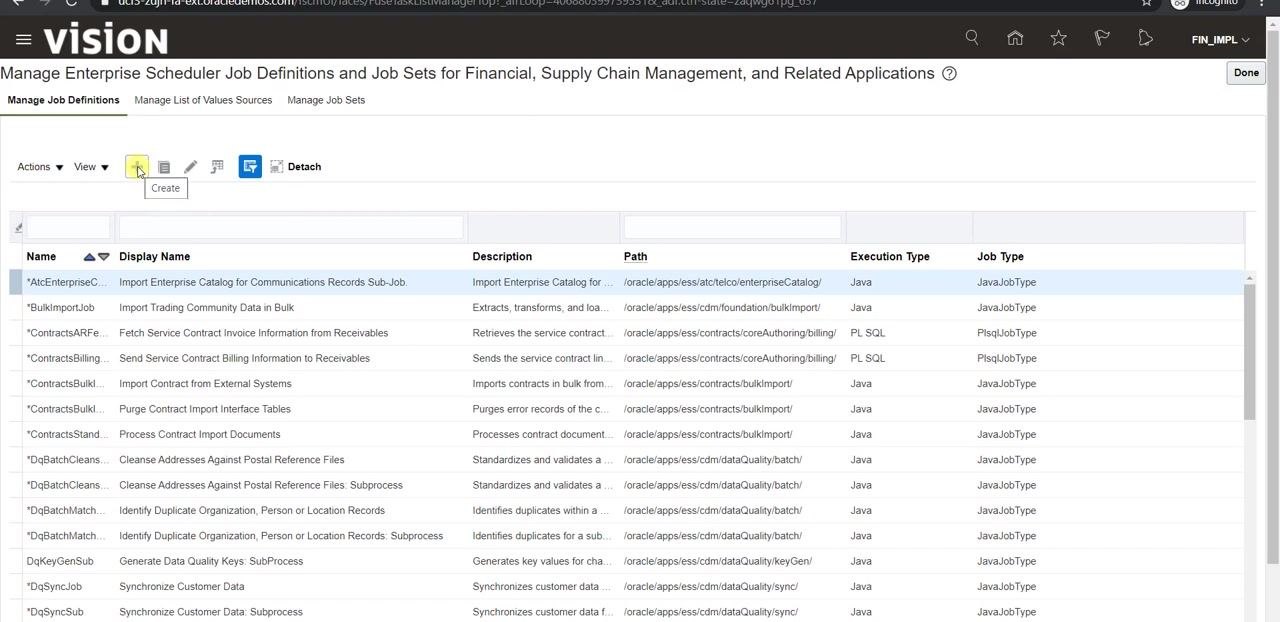
While the report is processing, open a new tab and go to the Oracle Fusion home page. Go to Setup and Maintenance, click the book icon to access setup tasks, then click Search in the right-hand panel. Enter keywords such as manage enterprise or job, and select Manage Enterprise Scheduler Job Definitions and Job Sets for Financial Supply Chain Management and Related Applications from the results.
Create a new job definition
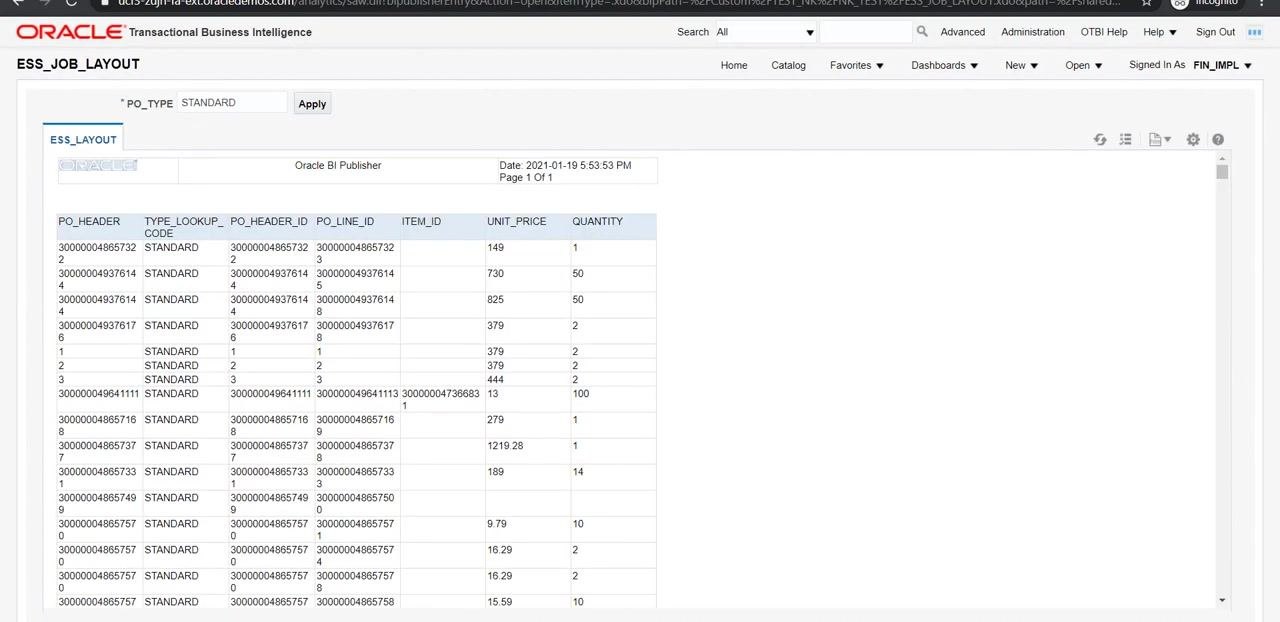
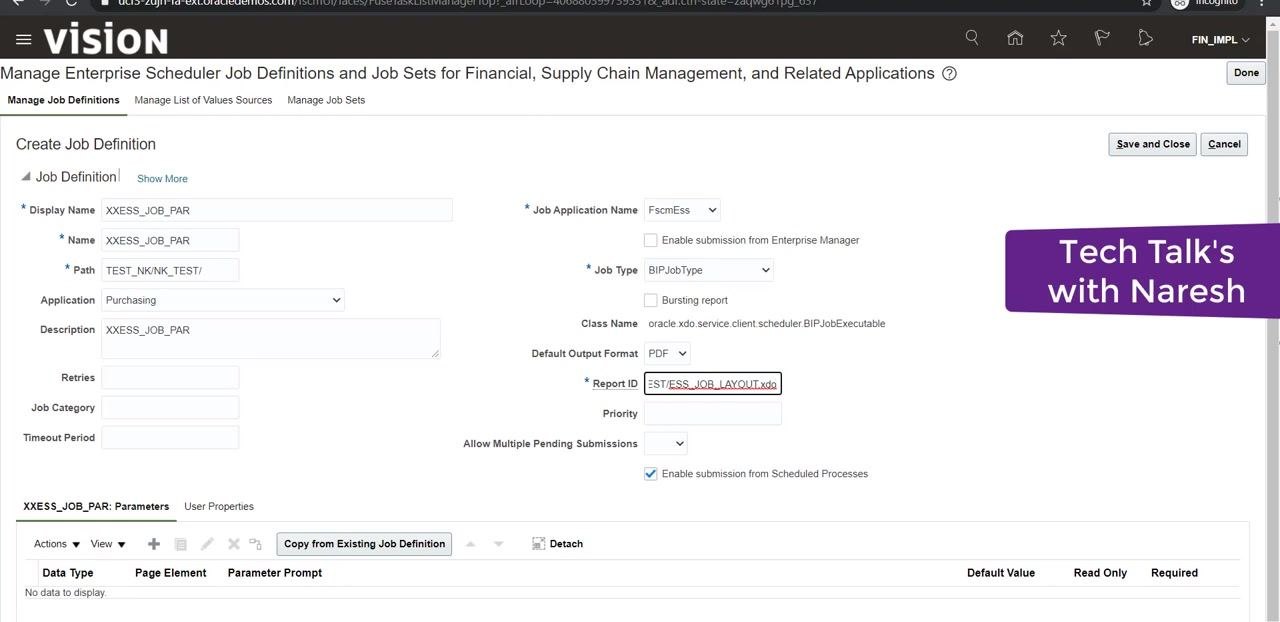
On the Manage Job Definitions tab, click the + (Create) icon to start a new ESS job definition. In the Create Job Definition screen, enter XXESS_JOB_PAR in both the Display Name and Name fields, using the XX prefix to indicate a custom job and alphanumeric characters only (no spaces) for the Name field.
Enter the display name and name
In the Create Job Definition screen, enter XXESS_JOB_PAR as both the Display Name and the Name.
Specify the report path
In the Path field, enter the report path, for example TEST_NK/NK_TEST/. This path should point to the location of your BI report.
Select the application and enter remaining details
In the Application dropdown, select Purchasing since this job is based on the Purchasing application. Also complete the following fields:
- Description: enter
XXESS_JOB_PAR(the same as the display name, for clarity). - Job Application Name: select
FscmEss.
Choose the job type and output format
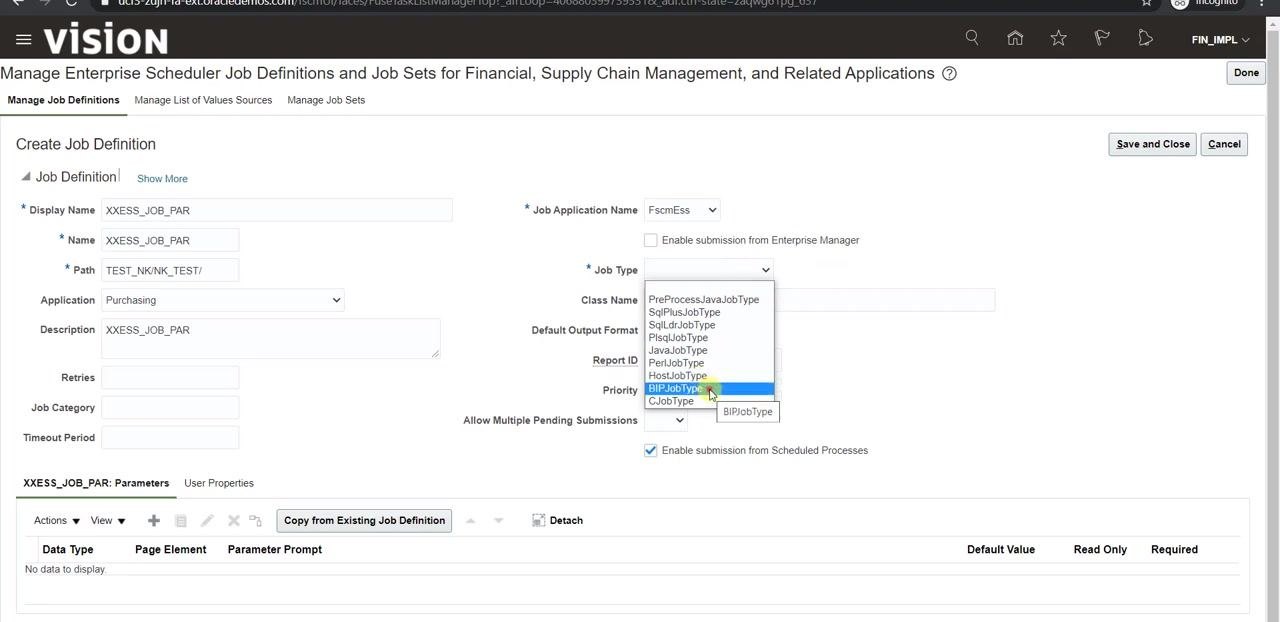
In the Job Type dropdown, select BIPJobType for BI Publisher jobs. In the Default Output Format dropdown, select PDF or another format as required.
Enter the report ID
In the Report ID field, enter the report ID for your BI report, for example /TEST/ESS_JOB_LAYOUT.xdo. Copy this value from your BI report details.
Leave other fields, such as Retries, Job Category, Timeout Period, and Priority, at their default values unless you have specific requirements. Make sure Enable submission from Scheduled Processes is checked.
Add a parameter to the job definition
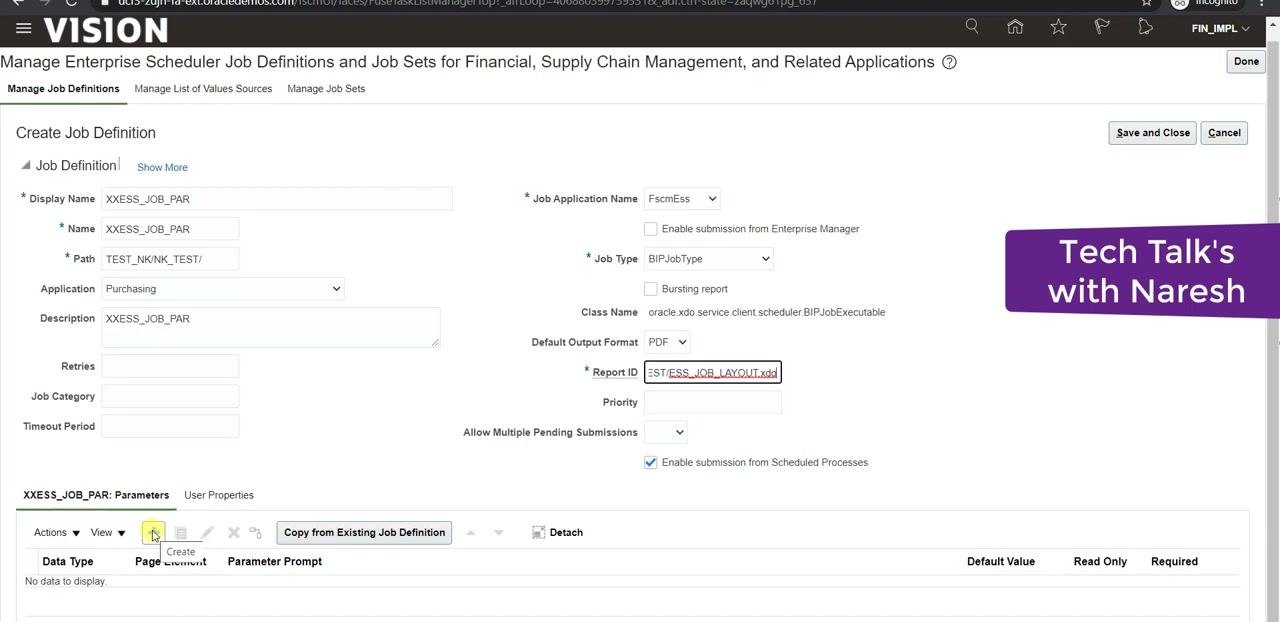
Scroll to the Parameters section at the bottom of the Create Job Definition screen, and click the + (Create) icon to add a new parameter for your job.
Define the parameter details
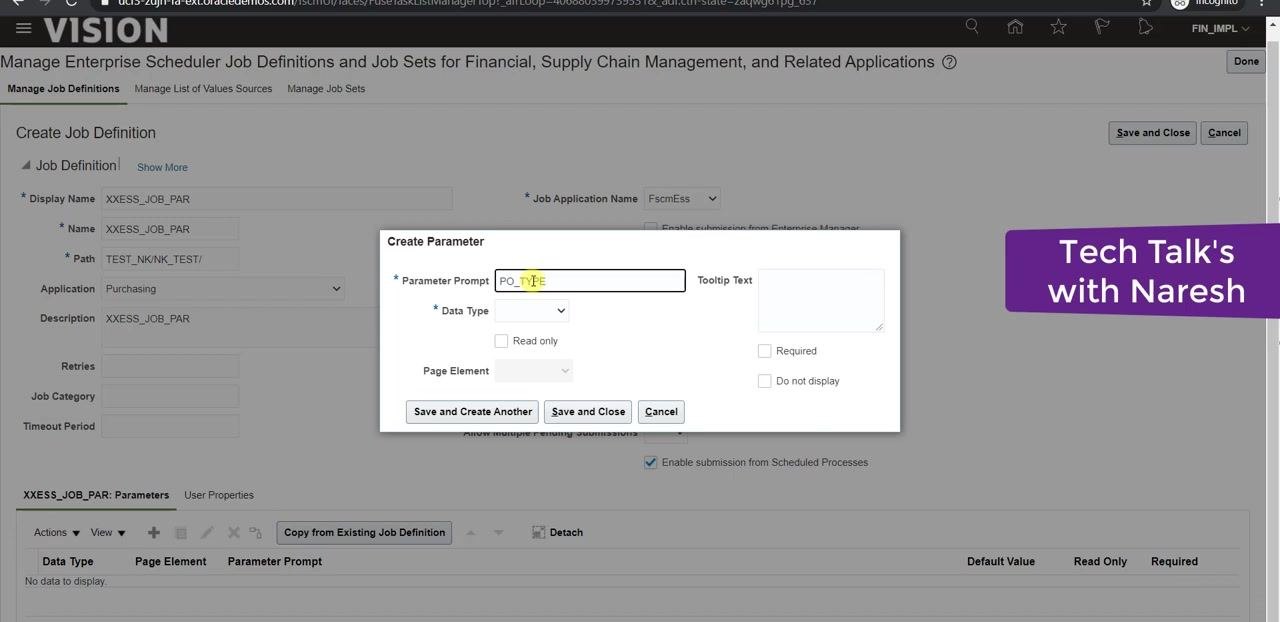
In the Create Parameter dialog, configure the parameter as follows:
- Parameter Prompt: enter
PO_TYPE. - Data Type: select
String. - Tooltip Text: optional; leave blank unless you want to provide additional guidance.
- Read only: leave unchecked unless the parameter should not be editable.
- Page Element: leave blank or select as required for your use case.
- Required: check this box if the parameter must be provided when running the job.
- Do not display: leave unchecked unless you want to hide this parameter from the user interface.
Click Save and Create Another if you need to add more parameters, or Save and Close to finish.
Configure the parameter as mandatory with guidance text
Reopen or continue configuring the PO_TYPE parameter with the following settings:
- Tooltip Text: enter
STANDARD, RFQ, PLANNED, BLANKET etcso users know which values are acceptable. - Required: check this box to make the parameter mandatory.
- Page Element: select
Text boxfrom the dropdown. - Leave Default Value blank unless a default is needed.
- Leave Read only and Do not display unchecked unless specifically required.
Click Save and Close to add the parameter to the job definition.
Review the generated report output
After the parameter is applied, the system generates report output based on the supplied value (for example, PO_TYPE = STANDARD). The output displays columns such as PO_HEADER, TYPE_LOOKUP_CODE, PO_HEADER_ID, PO_LINE_ID, ITEM_ID, UNIT_PRICE, and QUANTITY.
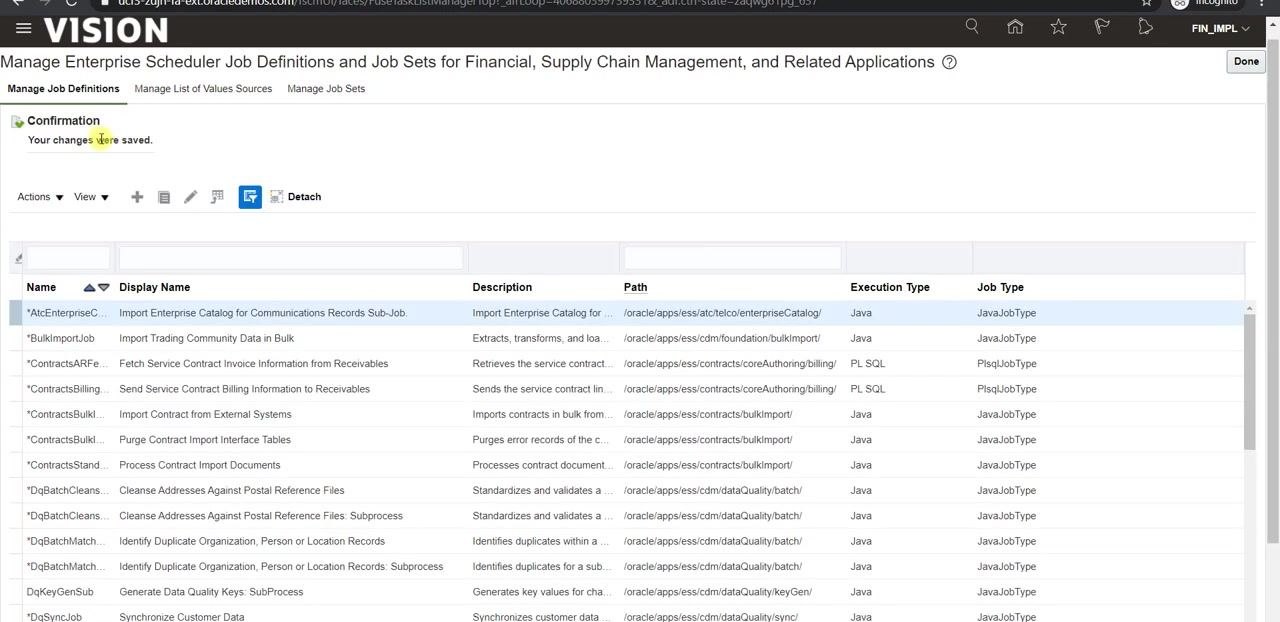
Confirm the job definition is saved
Look for the confirmation message "Your changes were saved" on the Manage Job Definitions screen, then click Done in the upper right corner to exit the job definition screen.
Schedule a new process
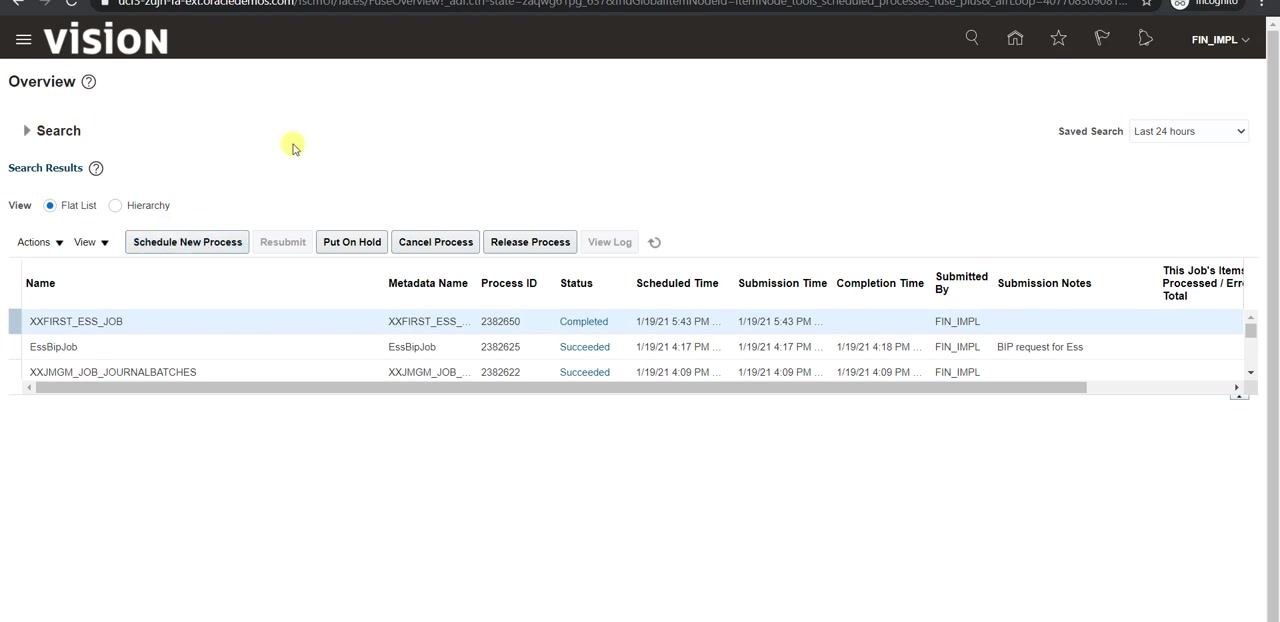
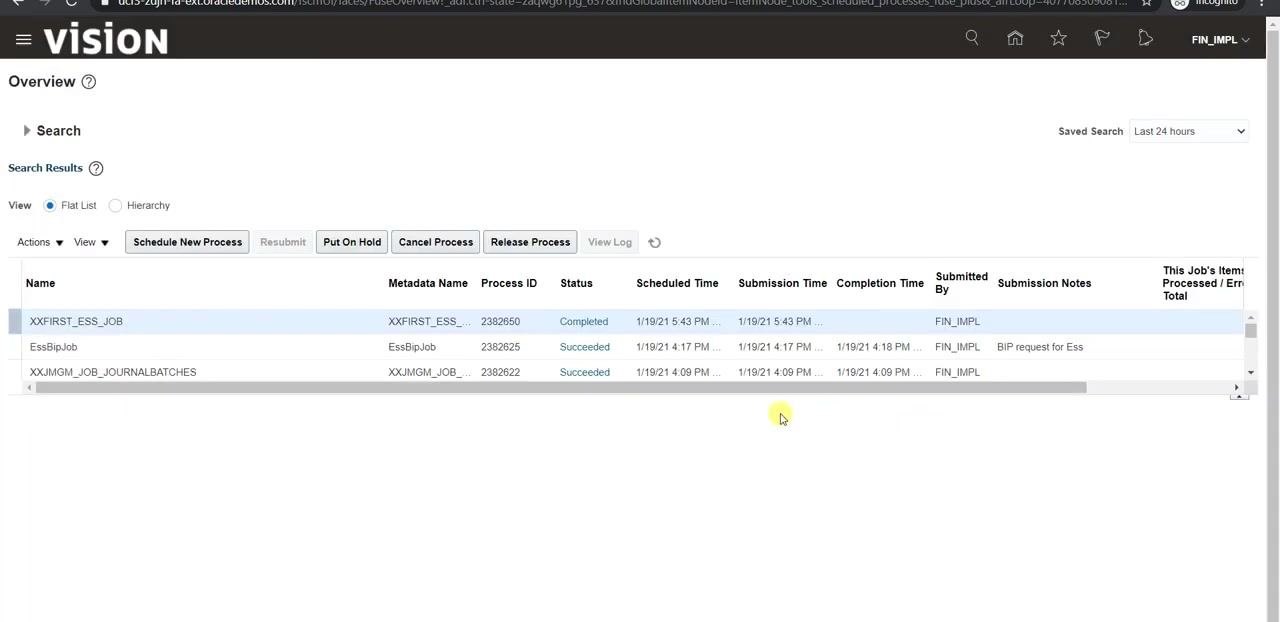
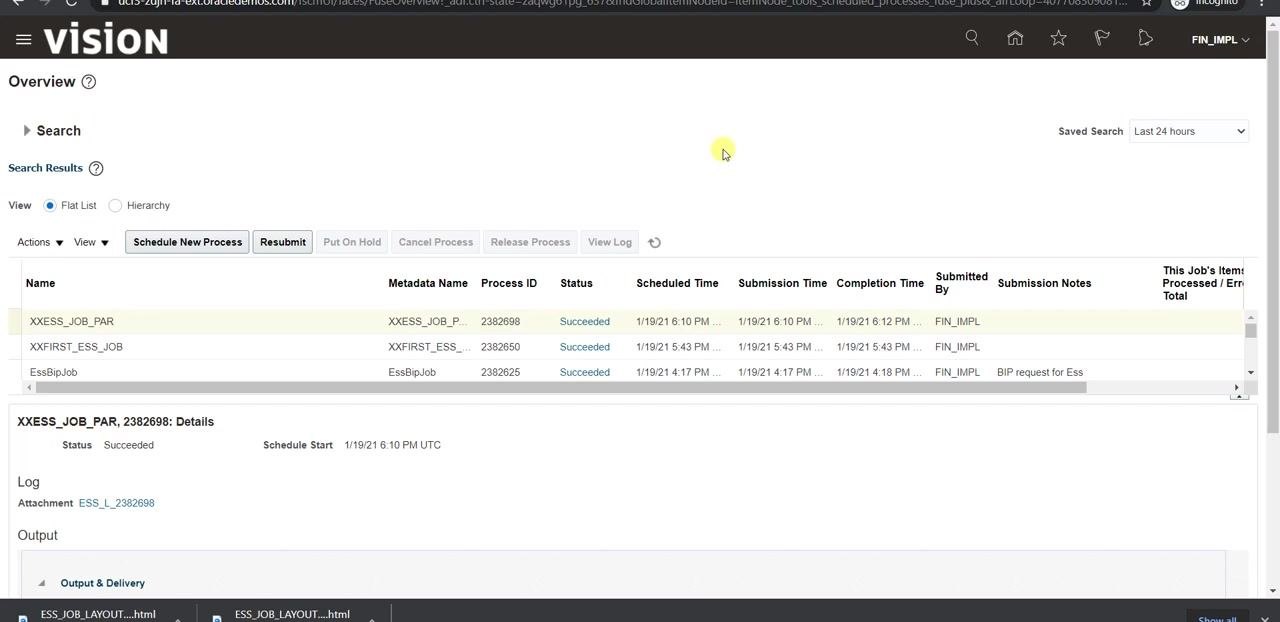
On the Scheduled Processes screen, you see a list of previously scheduled jobs with columns for Name, Metadata Name, Process ID, Status, Scheduled Time, Submission Time, Completion Time, Submitted By, Submission Notes, and other details. Click Schedule New Process at the top of the job list.
Select the job name
In the Schedule New Process dialog, make sure Type is set to Job. In the Name field, enter XXESS_JOB_PAR; the Description field auto-populates with the same value. Click OK to proceed.
Enter the mandatory parameter value
In the Process Details dialog, under Basic Options, locate the parameter labeled * PO_TYPE (the asterisk indicates it is mandatory). Begin typing STANDARD in the field; a tooltip appears showing the valid values STANDARD, RFQ, PLANNED, BLANKET etc.
Submit and monitor the job status
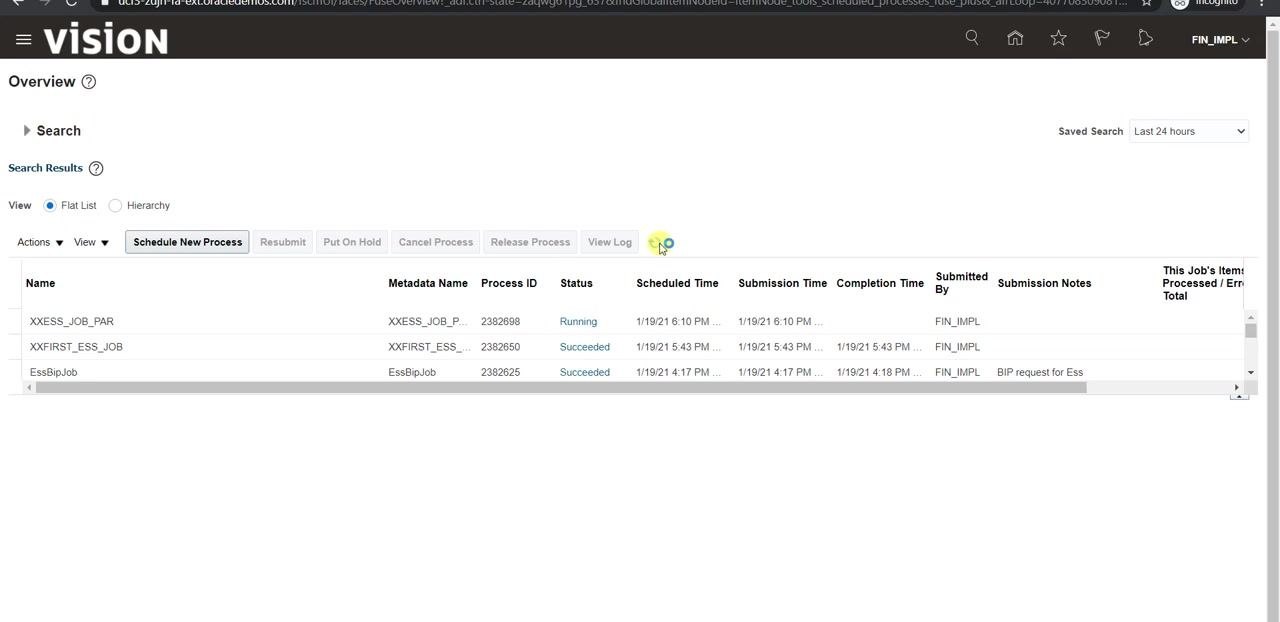
After entering the required parameter, click Submit at the top of the dialog. The job appears in the list with the status "Running." Click the Refresh button (the circular arrow icon) to update the job status.
Confirm the job succeeded
Continue refreshing the list until the status of XXESS_JOB_PAR changes to "Succeeded."
View the job output and log details
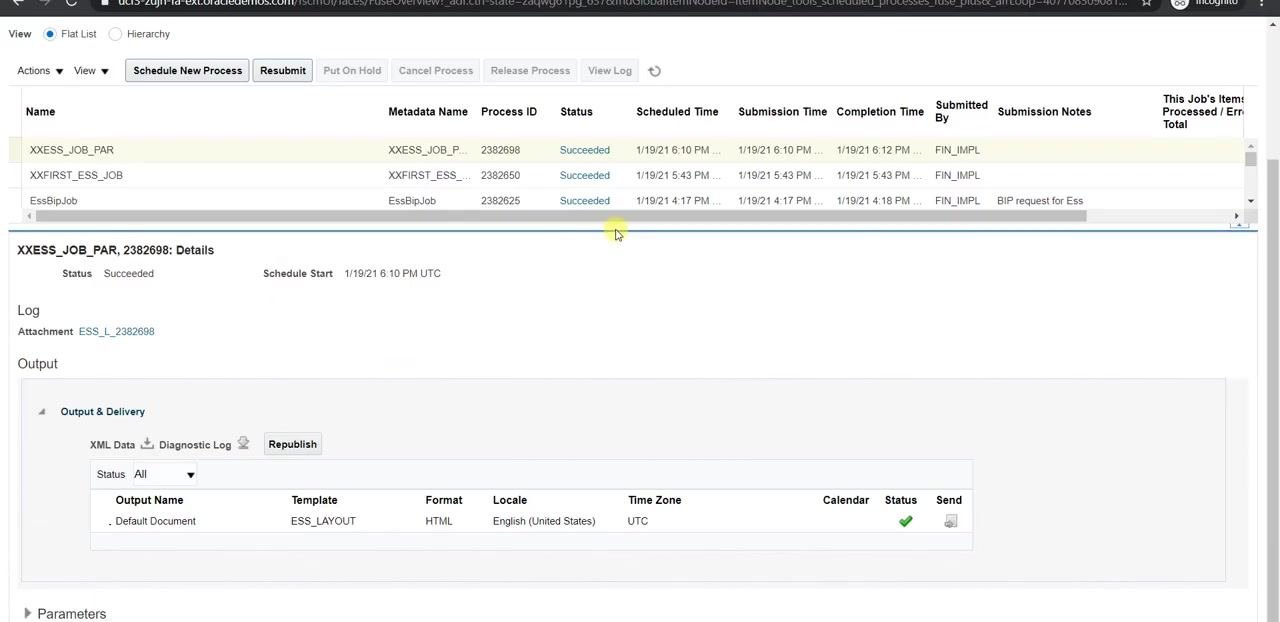
Click the Succeeded status link for the XXESS_JOB_PAR job. The details pane opens below, showing:
- Status: Succeeded
- Schedule Start: date and time of execution
- Log: link to the log file (for example,
ESS_L_2382698) - Output & Delivery: Output Name, Template (ESS_LAYOUT), Format (HTML), Locale (English United States), Time Zone (UTC), and Status.
Download the output report
In the Output & Delivery section of the job details pane, click the output file link (for example, the file name under Output Name) to download the report in the specified format (HTML). The downloaded file typically opens in your default browser or can be saved for review.
Review the output report
Open the downloaded HTML report to verify the results. The report displays data according to the parameter you entered (for example, PO_TYPE = STANDARD). Review the columns and data to confirm accuracy and completeness.
Review the job log (optional)
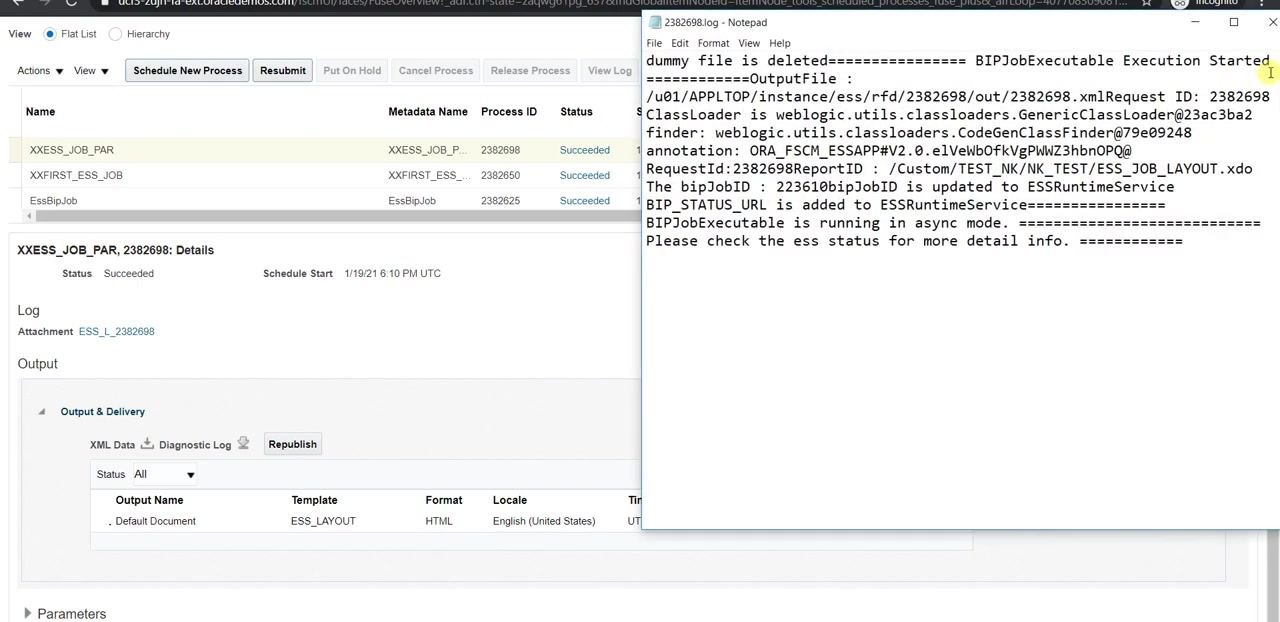
In the job details pane, click the log file link (for example, ESS_L_2382698) to download and open the log file. The log file provides technical details about the job execution, including file paths, job IDs, and status messages. Use this log for troubleshooting if the job did not complete as expected.
Return to the Scheduled Processes overview
You can view the list of all scheduled jobs, their statuses, and details at any time by navigating back to the Scheduled Processes screen.
Summary
You have now created an ESS job in Oracle Fusion that accepts a mandatory parameter and used it to run a parameterized BI report. Along the way, you:
- Modified a data model's SQL query to replace a hard-coded value with a bind variable.
- Generated and configured a mandatory parameter with a display label and tooltip guidance.
- Created a job definition, specified its path, application, job type, and report ID, and attached the parameter.
- Scheduled the job, submitted it with a valid parameter value, and monitored it until it succeeded.
- Downloaded and reviewed both the output report and the job log for validation.
What's next
To handle more advanced parameter scenarios, you can explore configuring parameters as value sets or using lookups, which allow users to select from predefined values instead of typing free text.
Generation details: cost, quality tiers
Docsie billed 5,000 credits ($3.50) to analyze this 10-minute video at standard quality. The rewrite, template fill and Word/PDF exports were included. The same video at each quality tier:
| Quality | Frames sampled | Credits | Approx. cost |
|---|---|---|---|
| Draft | every 16-30 s | 2,500 | $1.75 |
| Standard (this guide) | every 8-15 s | 5,000 | $3.50 |
| Detailed | every 4-7 s | 10,000 | $7.00 |
| Ultra | every 1-3 s | 20,000 | $14.00 |
Credits priced at $0.70 per 1,000; plans include a monthly allowance. Enterprise customers on on-premise or bring-your-own-model deployments run this on their own inference and pay no per-video credits.
Generated by Docsie Video-to-Docs on 2026-10-01 from a 9-minute video. Screenshots are frames from the source video and belong to their creator, Technical Talk's, whose original is embedded above. If you own this video and want the guide removed or credited differently, contact us and we will act within one business day.