
How to Create a Supplier in Oracle Fusion
This guide shows you how to create a supplier in Oracle Fusion Procurement. You add the supplier's profile, address, and contact, then submit the profile change request and confirm its approval. After approval, you create a site for the supplier, configure its purchasing and receiving settings, and assign site locations. The example uses a supplier named Dell Supplier.
Video: Creating of Suppliers In Oracle Fusion by Oracle ERP, Finance HCM & SCM Insights (2022). All credit for the demonstration goes to the creator; watch the original on YouTube. The written guide below was generated from this video by Docsie. Creator? Request a change or removal.
This guide shows you how to create a supplier in Oracle Fusion Procurement. You add the supplier's profile, address, and contact, then submit the profile change request and confirm its approval. After approval, you create a site for the supplier, configure its purchasing and receiving settings, and assign site locations. The example uses a supplier named Dell Supplier.
Prerequisites
Before you begin, make sure you have:
- Access to the Oracle Fusion application and its Procurement module.
- The supplier's name, business relationship, and tax organization type.
- The address and contact details you want to add to the supplier.
Create the supplier profile
Step 1: Open the Procurement module
- Log in to the Oracle Fusion application.
- On the main dashboard, click the menu icon (three horizontal lines) in the upper left corner.
- Select Procurement.
The Procurement dashboard shows widgets such as In Process, Expired, Recent Activity, and Requiring Attention. The right sidebar lists actions under Requisitions, Orders, Agreements, Deliverables, and Supply Base.
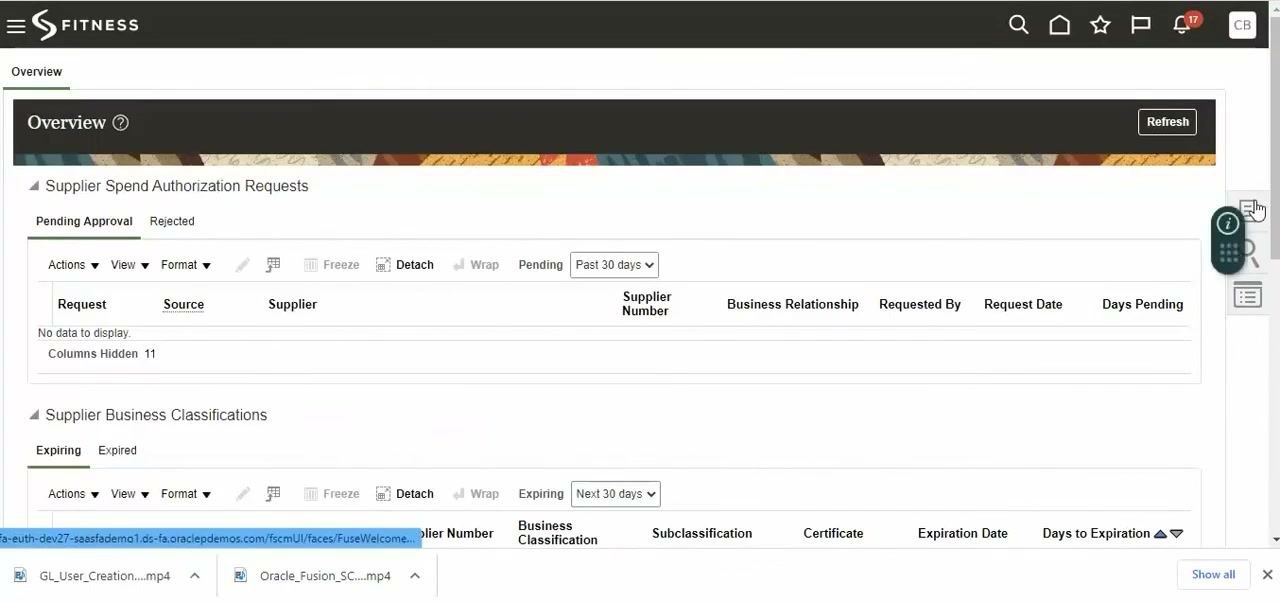
Step 2: Select Create Supplier
- In the right sidebar, open the menu under Supply Base.
- Select Create Supplier.
The other options in this menu are Manage Suppliers, Register Supplier, Manage Supplier Registration, Import Suppliers, and Merge Suppliers.
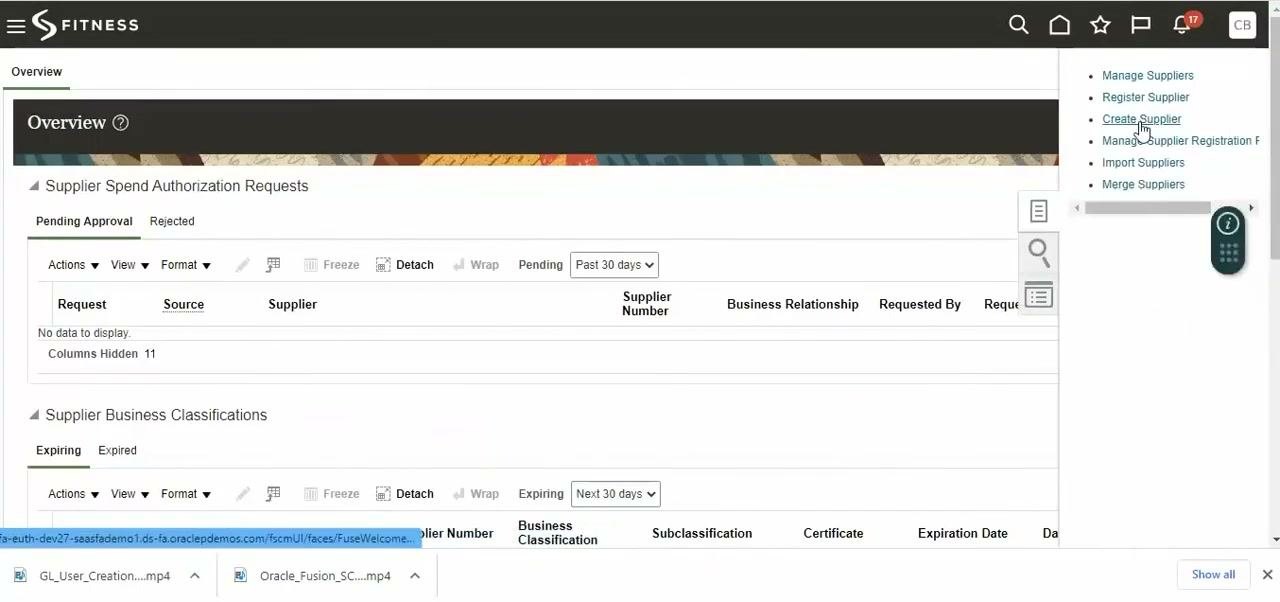
Step 3: Enter the supplier details
In the Create Supplier dialog box, enter the following:
- Supplier: Dell Supplier
- Business Relationship: Spend Authorized
- Tax Organization Type: Corporation
As you type the supplier name, a list of matching supplier names and locations may appear. Select the appropriate entry if needed.
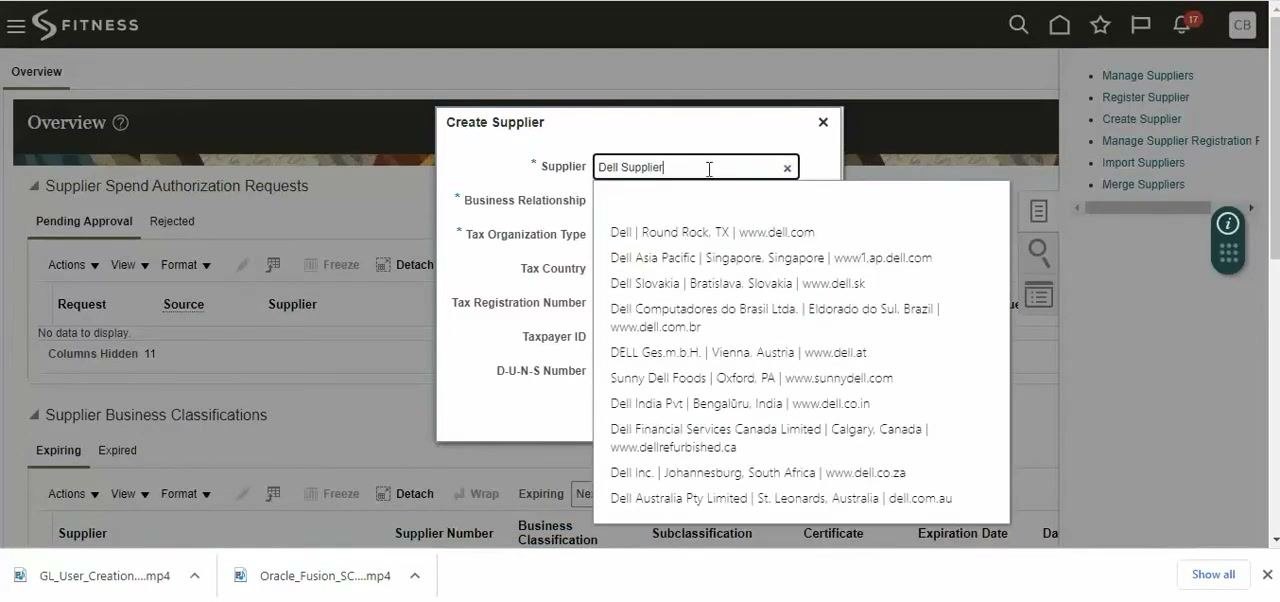
Step 4: Confirm the required fields and create the supplier
- In the Tax Organization Type list, select Corporation.
- Check that Supplier is Dell Supplier, Business Relationship is Spend Authorized, and Tax Organization Type is Corporation.
- Click Create.
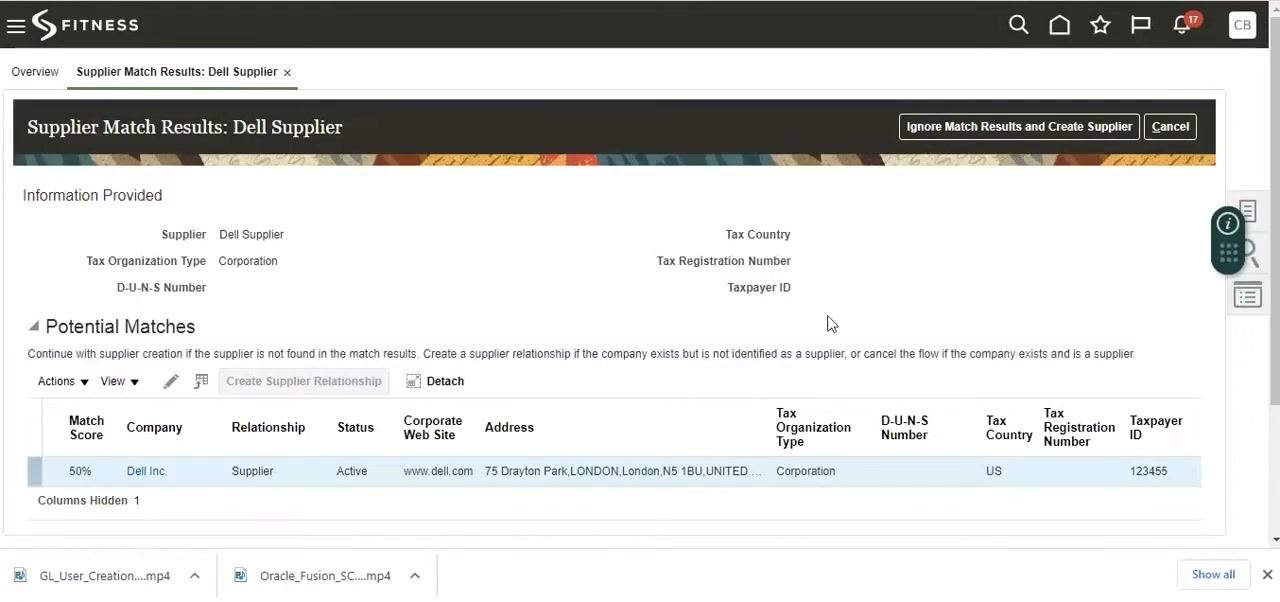
Step 5: Handle potential duplicate suppliers
If the system finds a possible match, the Supplier Match Results screen appears. In this example, an existing supplier named Dell Inc. matches. It is Active, uses www.dell.com, is a Corporation in the US, and has Taxpayer ID 123455.
Review the Potential Matches section. If you are certain the supplier is new and not a duplicate, click Ignore Match Results and Create Supplier.
Add an address and a contact
Step 6: Start the supplier address
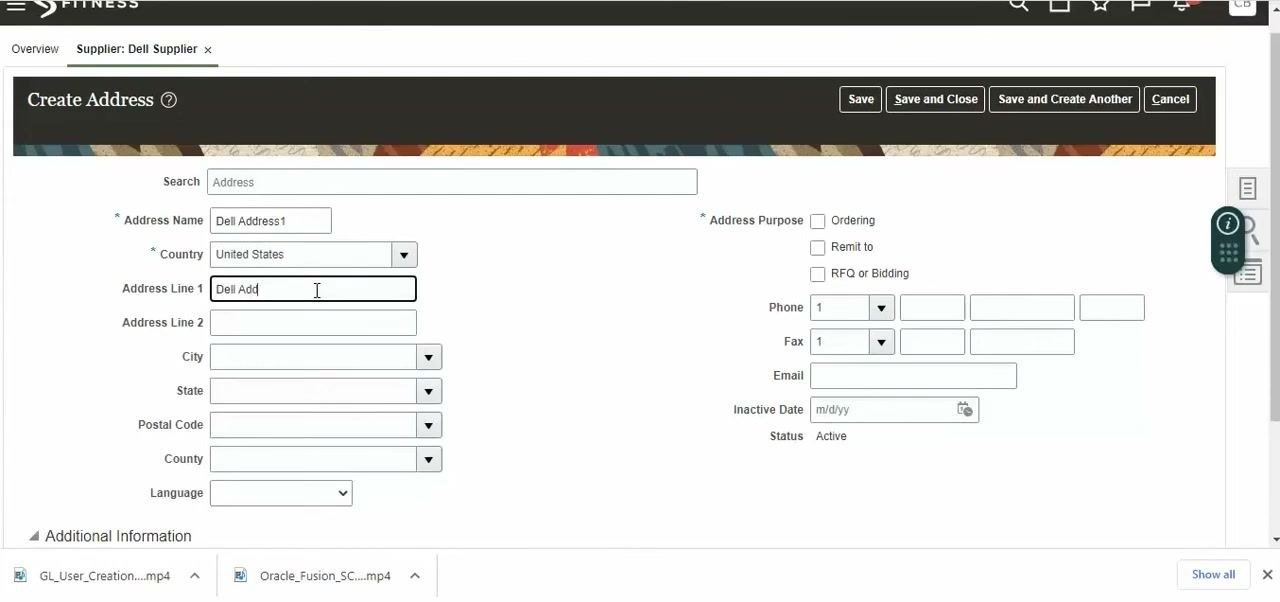
On the Create Address screen, enter:
- Address Name: Dell Address1
- Country: United States
Leave Address Line 1, Address Line 2, City, State, Postal Code, County, and Language blank for now. The right side of the form has Address Purpose checkboxes (Ordering, Remit to, RFQ or Bidding) and fields for Phone, Fax, Email, Inactive Date, and Status (Active). The buttons at the top right are Save, Save and Close, Save and Create Another, and Cancel.
Step 7: Complete the address details and save
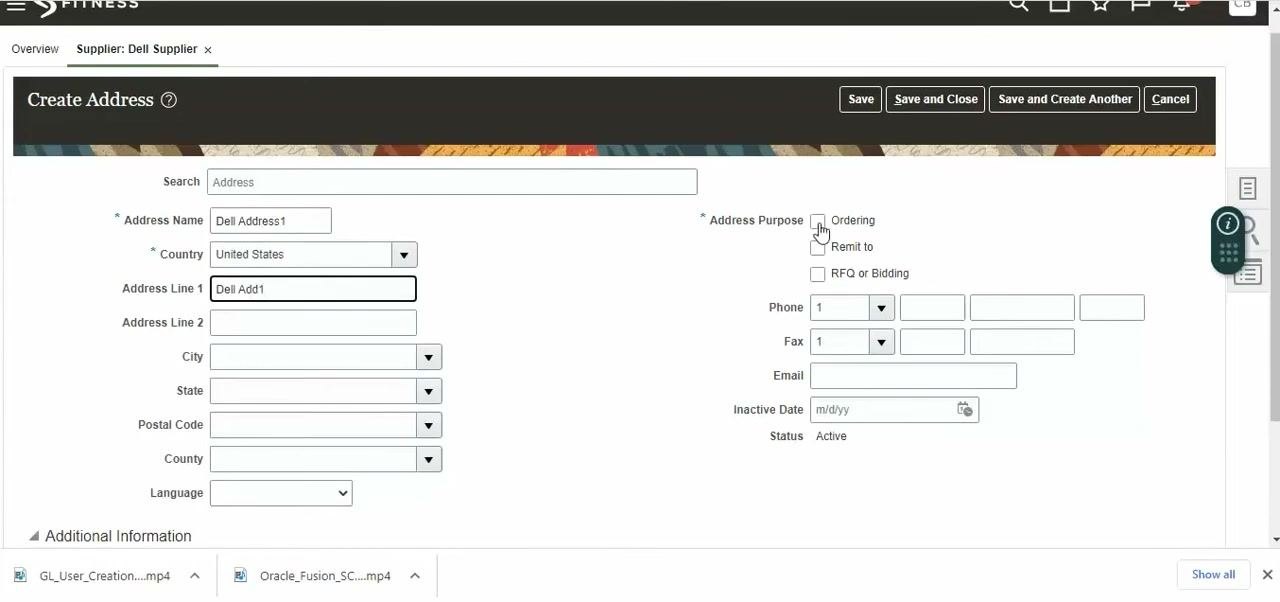
- In Address Line 1, enter Dell Add1.
- Under Address Purpose, select Ordering.
- Check that Address Name is Dell Address1 and Country is United States.
- Leave the other fields blank unless you need to add information.
- Click Save and Close to save the address and return to the supplier profile.
Step 8: Open the Contacts tab
- On the Edit Supplier: Dell Supplier screen, go to the Contacts tab.
- Click the + (Add) icon to create a new contact.
Step 9: Enter the contact details
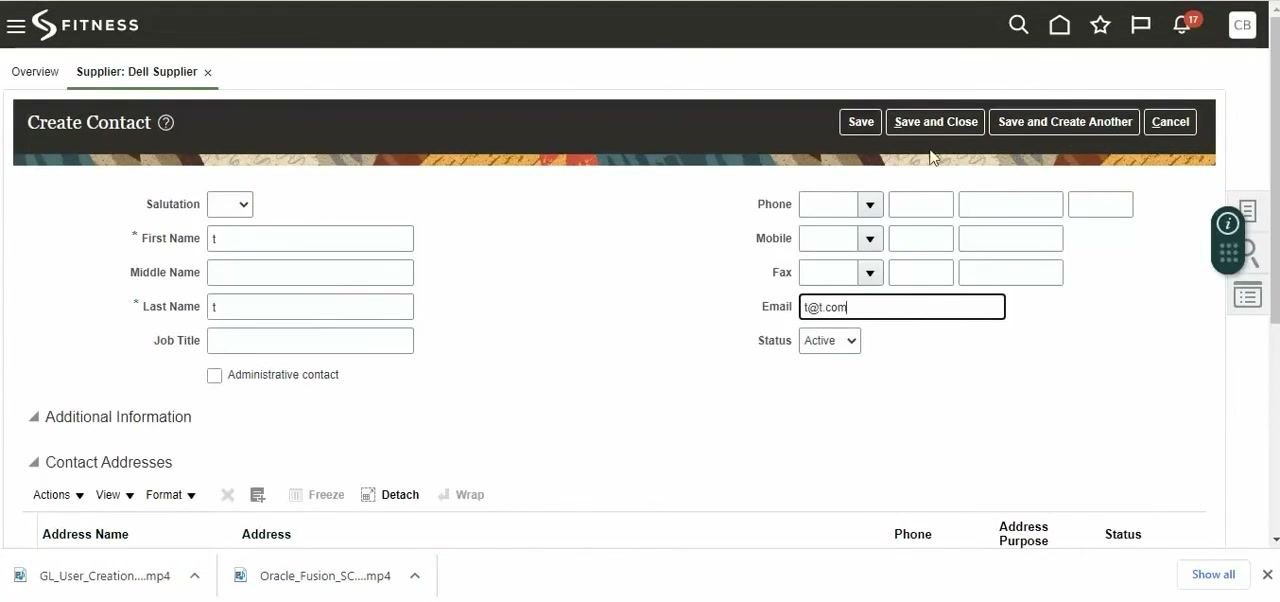
In the Create Contact form, enter:
- First Name: t
- Last Name: t
- Email: @t.com
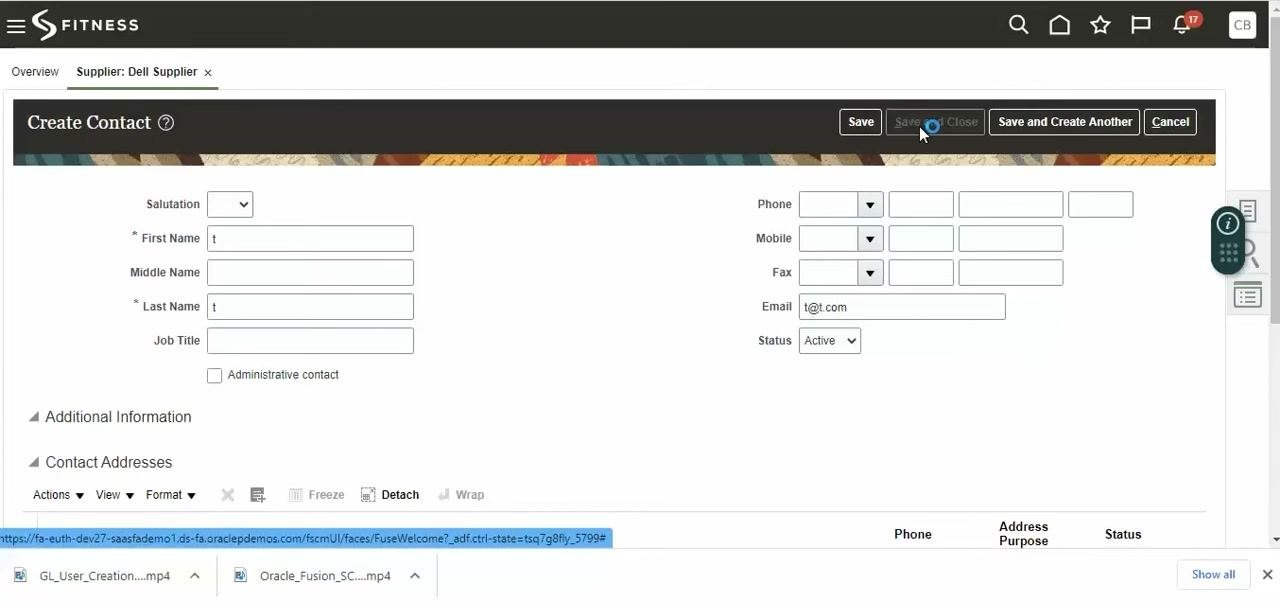
Leave Middle Name and Job Title blank. Status is Active by default. You can leave the phone, mobile, fax, and administrative contact fields blank unless you need them. Click Save and Close.
Step 10: Confirm the contact was saved
A dialog box states "Your changes were saved." Click OK. The new contact (t, t, @t.com, Active) now appears on the Contacts tab.
Step 11: Finish and exit the supplier editing screen
- Review the contact information on the Contacts tab to make sure it is correct.
- Click Cancel to exit the supplier editing screen. You can also use Save or Submit, depending on your organization's process.
Always verify address and contact details before saving.
Submit and approve the supplier profile changes
Step 12: Acknowledge the profile change request
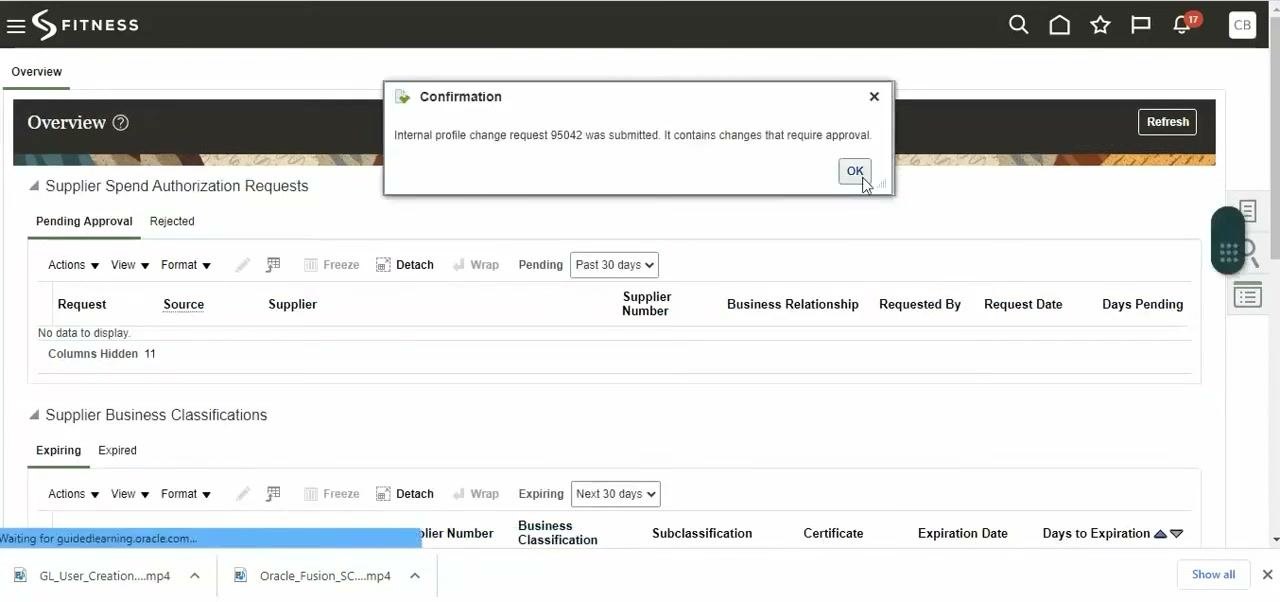
After you finalize the address and contact details, a confirmation dialog appears. It reads: "Internal profile change request 95042 was submitted. It contains changes that require approval." Click OK.
Step 13: Open Manage Suppliers
- From the main navigation, open the supplier management options.
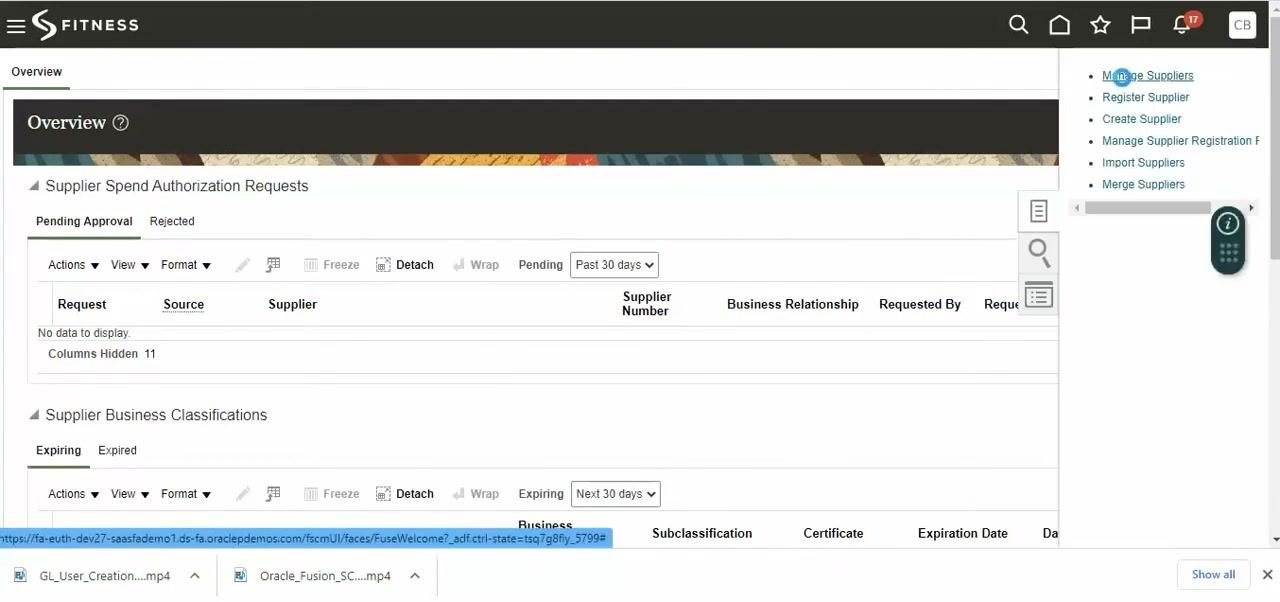
- Click Manage Suppliers in the right-side menu to view all suppliers.
The Supplier Spend Authorization Requests and Supplier Business Classifications sections are visible, but no pending requests are listed.
Step 14: Search for the supplier
- On the Manage Suppliers screen, enter Dell Supplier in the Keywords field.
- Click Search.
- In the results, find Dell Supplier (Supplier Number 1544).
- Hover over the supplier name to see the tooltip "A profile change request is pending for this supplier."
Step 15: Open the supplier for editing
- Select Dell Supplier in the search results.
- Click the Edit icon (pencil) to open the supplier profile.
Step 16: Review the supplier profile and click Edit
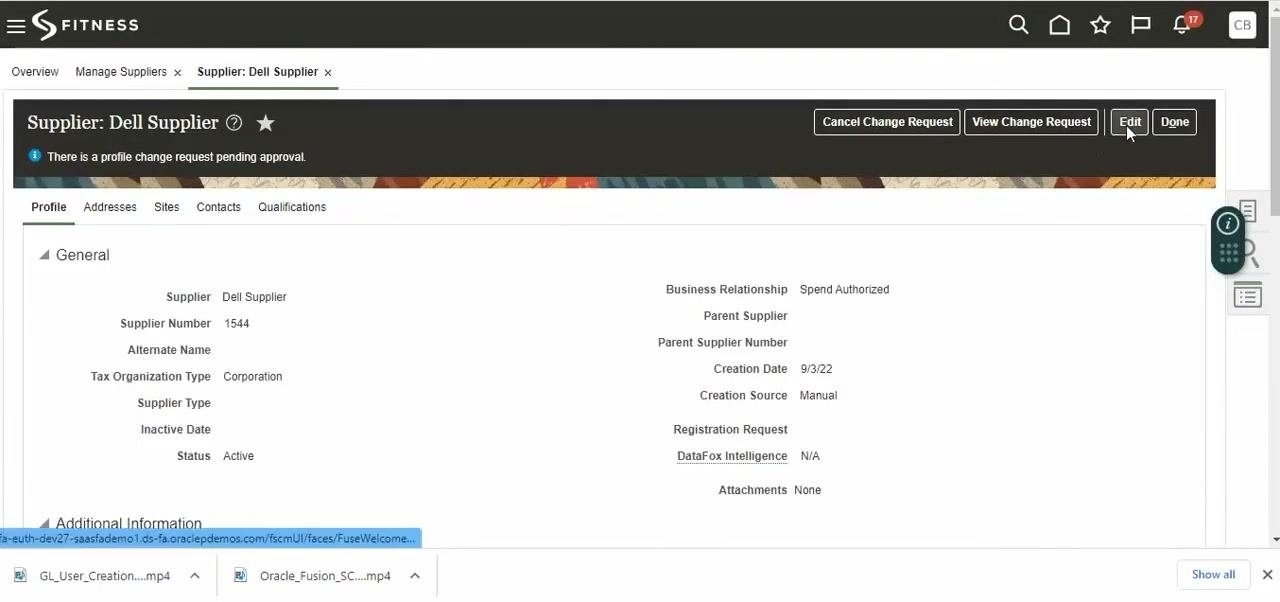
The Supplier: Dell Supplier page opens. A banner at the top reads "There is a profile change request pending approval." The general information shows:
- Supplier Name: Dell Supplier
- Supplier Number: 1544
- Business Relationship: Spend Authorized
- Status: Active
- Creation Date: 9/3/22
Click Edit in the top right to enter edit mode.
Step 17: Check the Sites tab
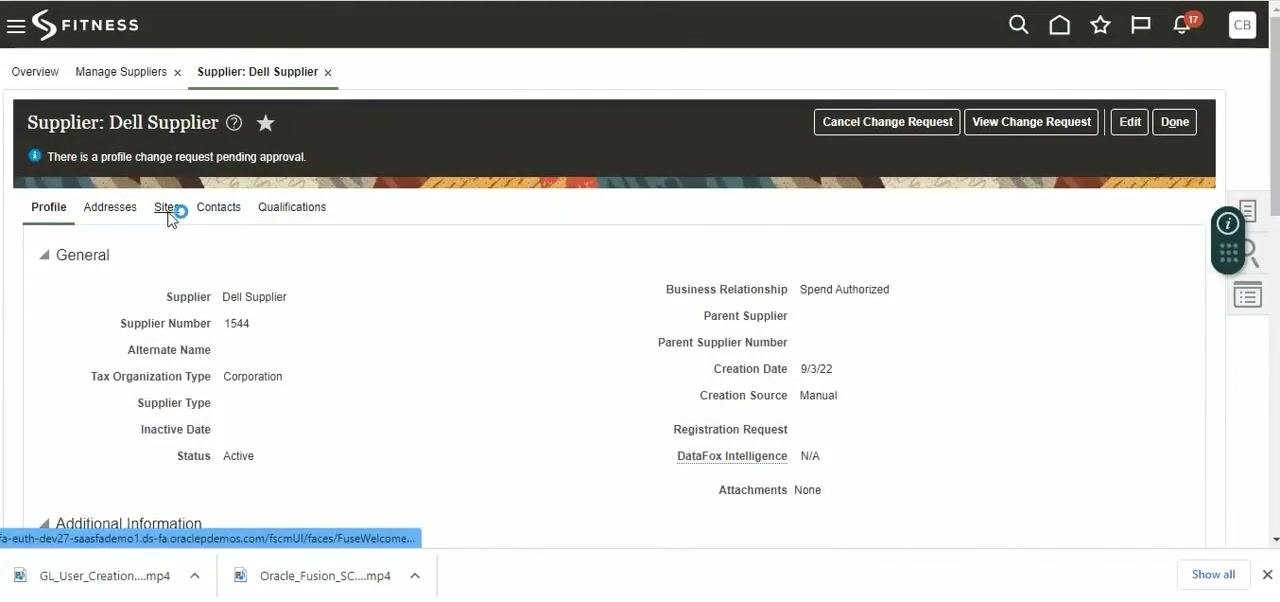
Click the Sites tab. It shows columns for Procurement BU, Site, Address, Site Purpose, Alternate Pay Site, Attachments, and Status. No sites are listed for this supplier yet.
Step 18: Enter edit mode and submit the changes
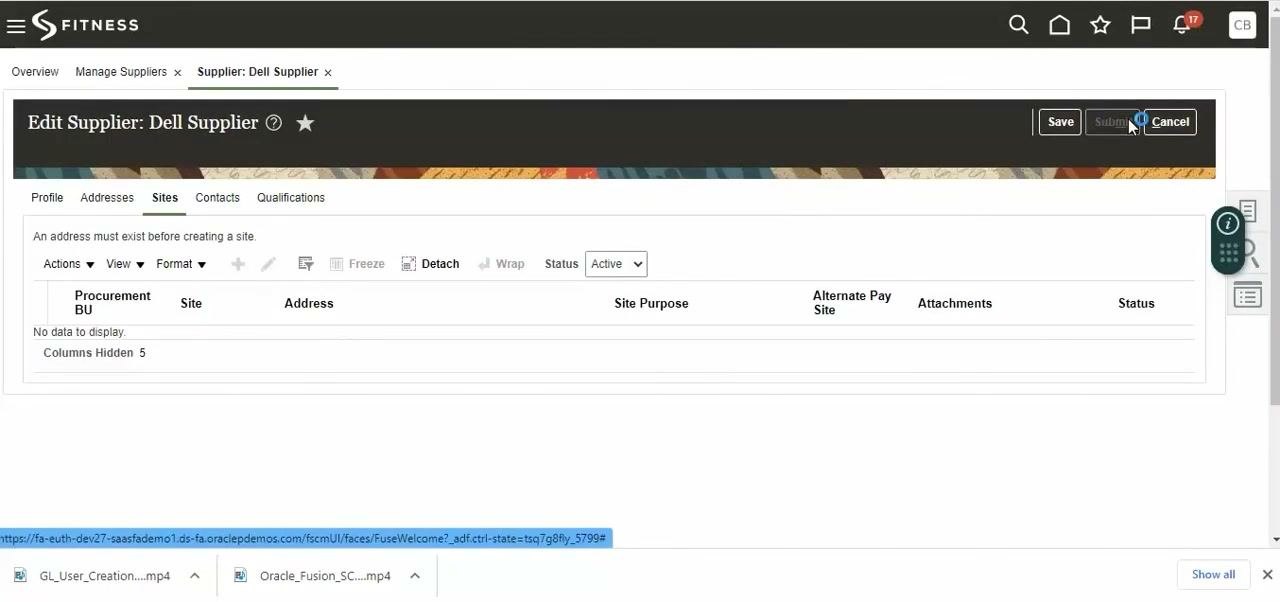
- Click Edit in the top right. The Edit Supplier: Dell Supplier screen opens.
- Notice that the Sites tab is still empty and shows the note "An address must exist before creating a site."
- After you verify all information, click Submit to send the profile changes for approval.
The top right of this screen offers Save, Submit, and Cancel. If Submit is disabled, make sure all required fields are completed. Wait for the system to process the submission.
Step 19: Monitor the approval status
- Return to the Manage Suppliers screen.
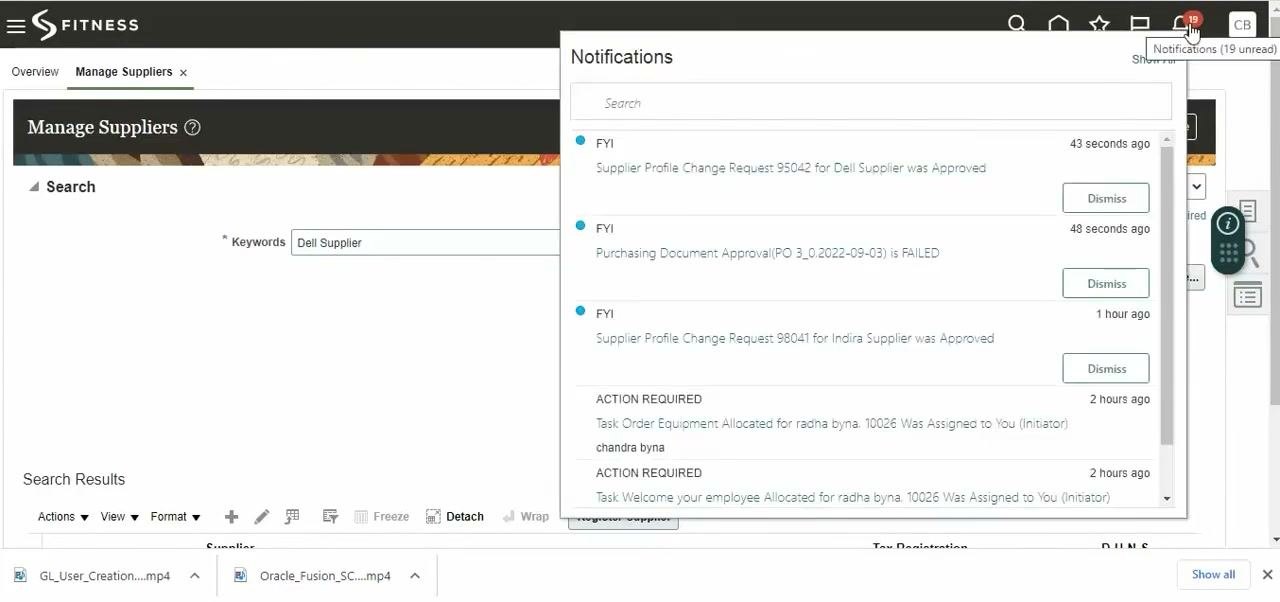
- Click the Notifications icon (bell) in the top right.
- Look for the notification "Supplier Profile Change Request: 95042 for Dell Supplier was Approved."
Confirm that the request is approved before you continue. Only proceed with additional supplier setup, such as creating sites, after approval.
Step 20: Open the approval notification
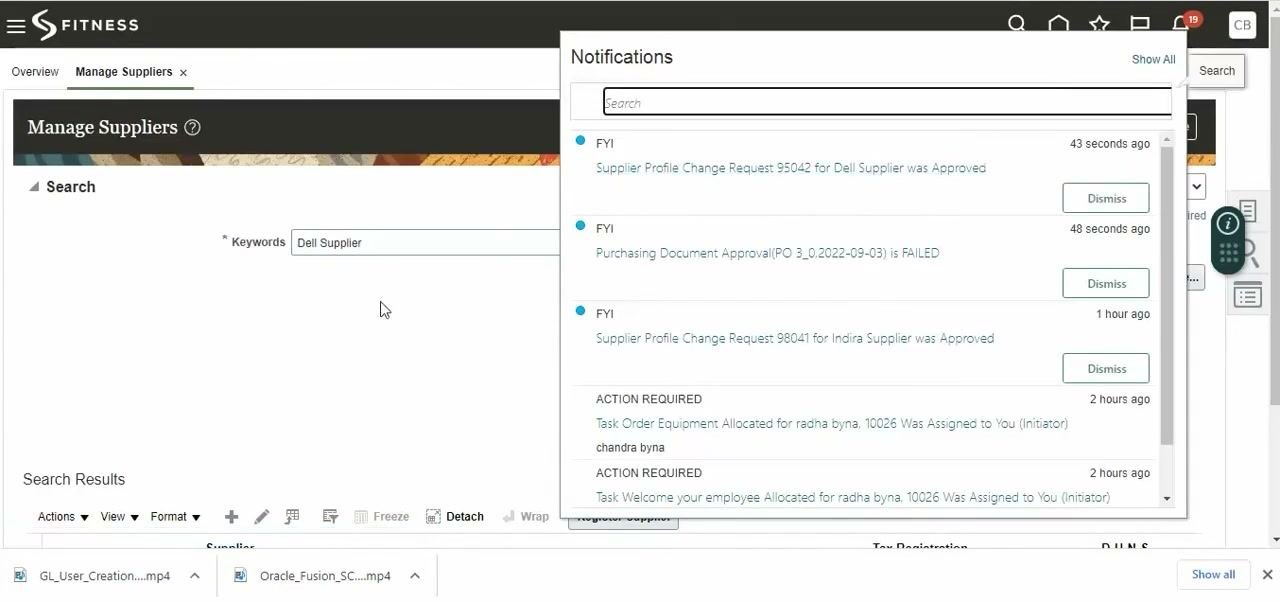
In the Notifications panel, find the FYI entry "Supplier Profile Change Request 95042 for Dell Supplier was Approved." Other notifications may also appear, such as:
- "Purchasing Document Approval (PO 3_0, 2022-09-03) is FAILED"
- "Supplier Profile Change Request 98041 for Indira Supplier was Approved"
- Action required tasks for equipment allocation and employee onboarding
Click the Dell Supplier notification to open and review its details. Check the full details to make sure no additional actions are required. You can dismiss notifications to keep the panel organized.
Create a site for the supplier
Step 21: Return to the supplier profile and click Edit
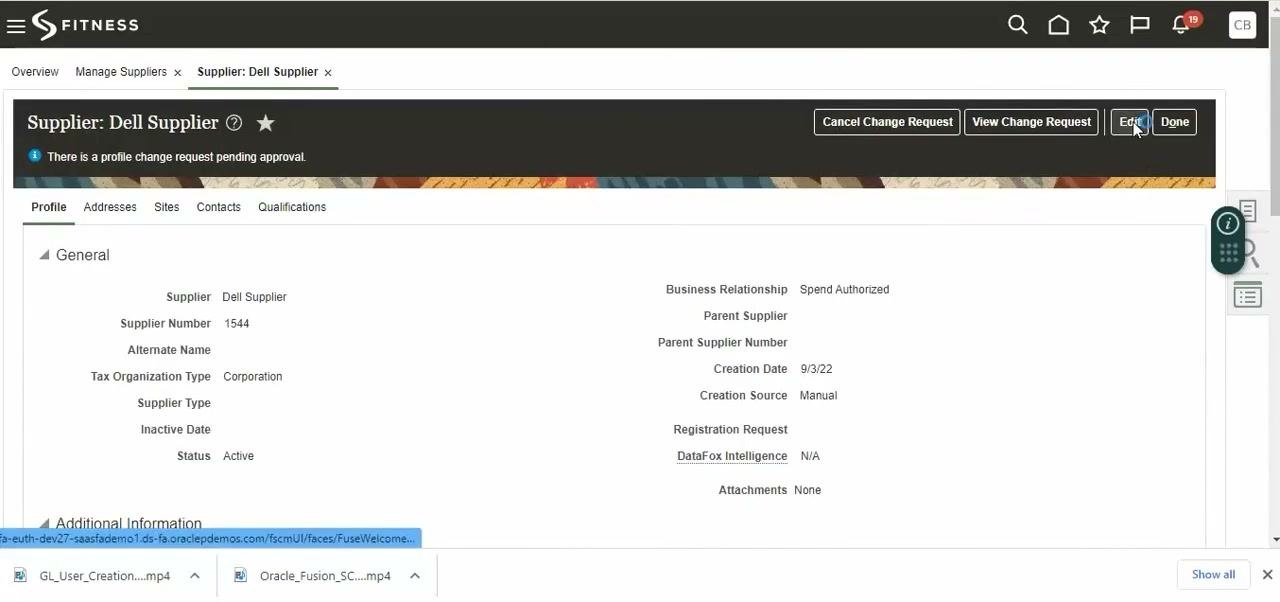
- Confirm you are on the Supplier: Dell Supplier screen.
- Review the supplier details: Supplier Number 1544, Status Active, and Business Relationship Spend Authorized.
- The action buttons at the top right are Cancel Change Request, View Change Request, Edit, and Done. Click Edit.
Step 22: Dismiss any application error
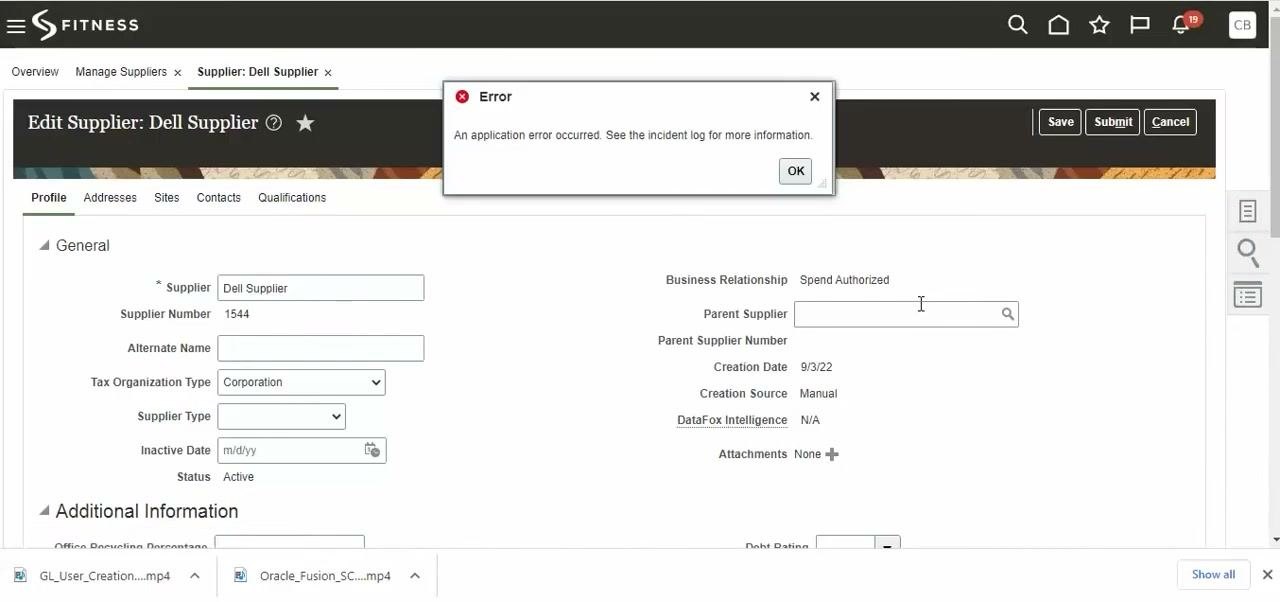
If an error dialog says "An application error occurred. See the incident log for more information," click OK.
You should then be on the Edit Supplier: Dell Supplier screen, where fields such as Supplier, Supplier Number, and Tax Organization Type are editable.
Step 23: Enter the site details
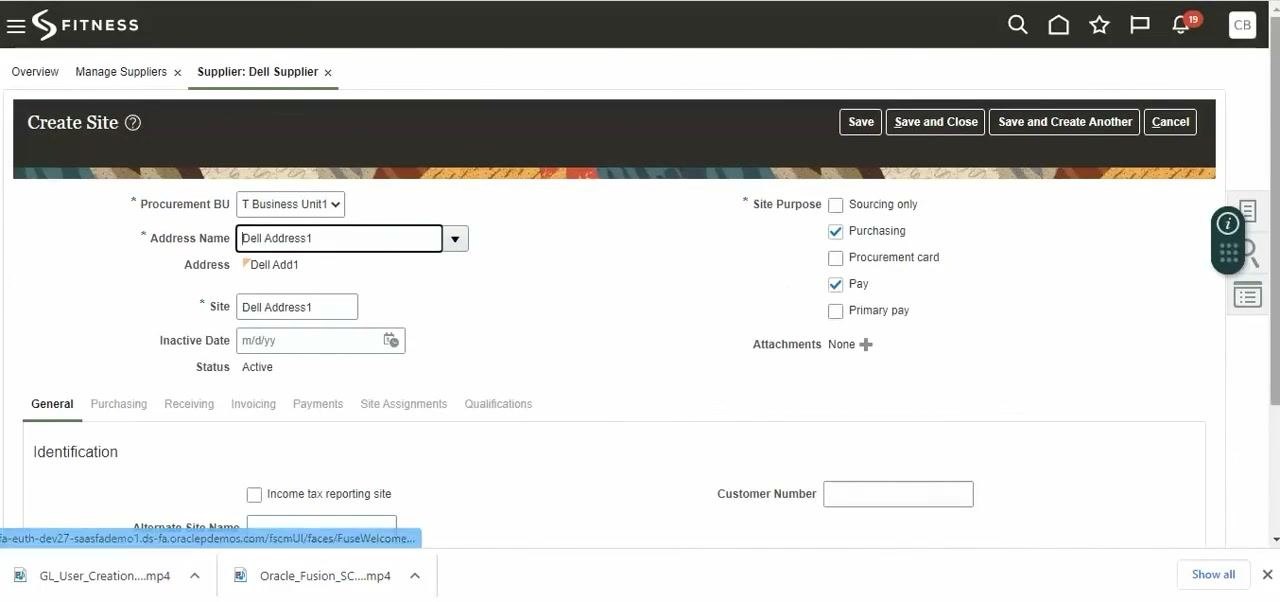
Go to the Sites tab and click Create Site. On the Create Site screen, enter:
- Procurement BU: T Business Unit1
- Address Name: Dell Address1
- Address: Dell Add1
- Site: Dell Address1
- Inactive Date: Leave blank if the site is active.
- Status: Active
- Site Purpose: Select Purchasing and Pay. Leave Sourcing only, Procurement card, and Primary pay unselected.
The available buttons are Save, Save and Close, Save and Create Another, and Cancel.
Step 24: Save the site
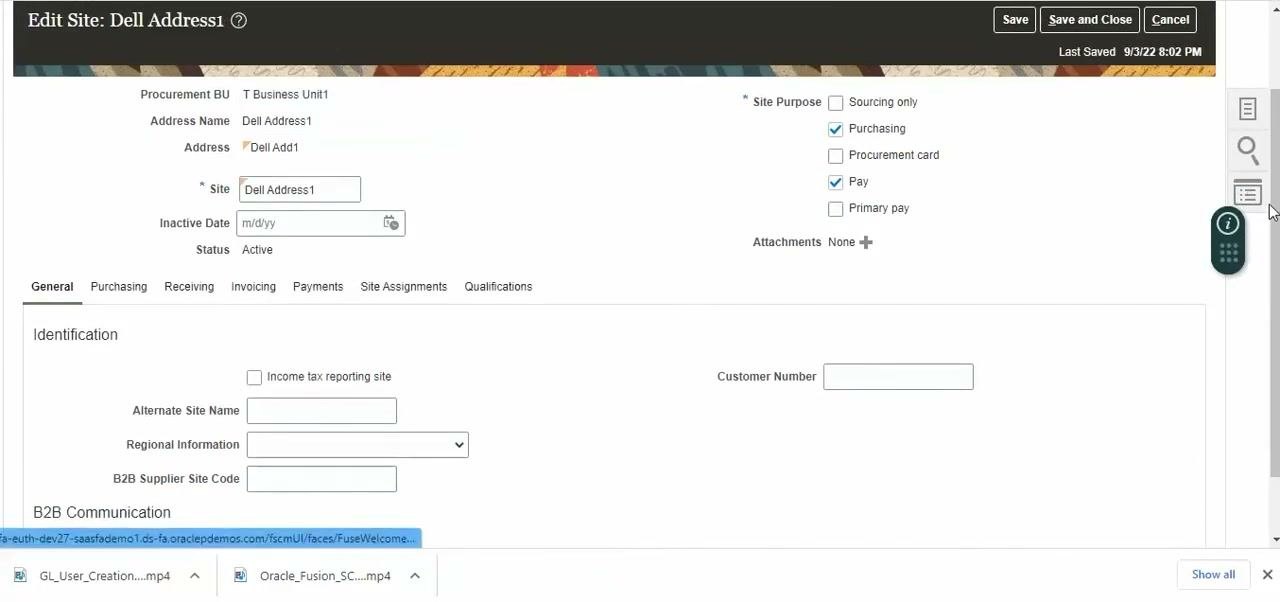
Click Save. If you want to finish and exit the site creation screen, click Save and Close instead. After you save, the site details remain visible and editable.
Step 25: Set the shipping method on the Purchasing tab
- Click the Purchasing tab to configure purchasing settings for the site.
- Under Freight, open the Shipping Method list.
- Select the option you need: FedEx, Air, or FedEx 2day.
The tab also includes a Communication Method list and other controls.
Step 26: Set the FOB terms
In the Freight section, open the FOB list and select Origin. The list also includes Destination, Shipping Point, EXW, FCA, and others.
Step 27: Configure the Receiving tab
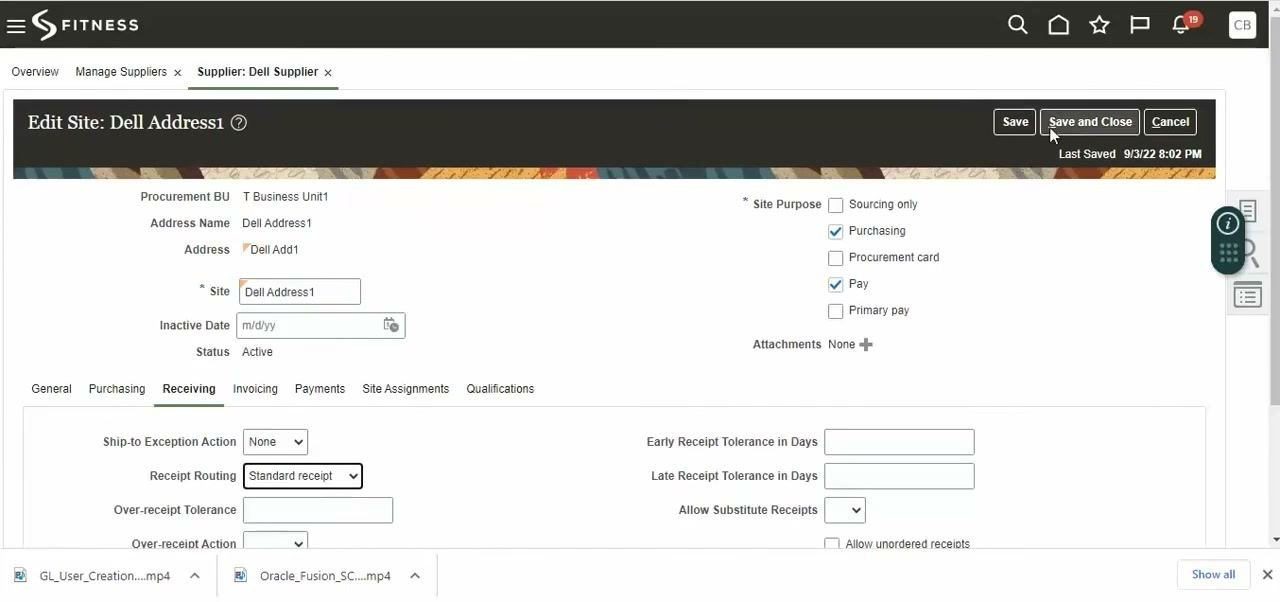
Click the Receiving tab and set the following fields as needed:
- Ship-to Exception Action: Select the appropriate action, for example None.
- Receipt Routing: Select Standard receipt.
- Over-receipt Tolerance: Enter a value if required.
- Over-receipt Action: Select an action if needed.
- Early Receipt Tolerance in Days: Enter a value if required.
- Late Receipt Tolerance in Days: Enter a value if required.
- Allow Substitute Receipts: Select as needed.
- Allow unordered receipts: Select if applicable.
- Receipt Date Exception: Select an option if required.
Step 28: Open the Site Assignments tab
Click the Site Assignments tab to continue configuring the site.
Step 29: Review the site and its assignments
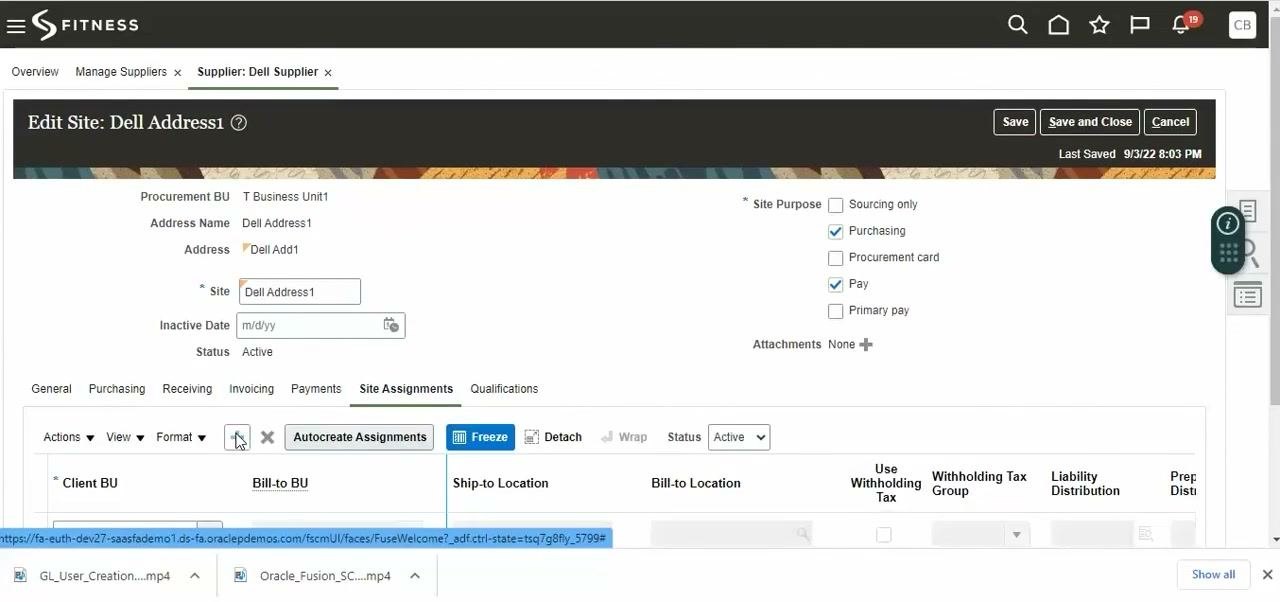
- On the Edit Site: Dell Address1 screen, make sure the Site Assignments tab is selected.
- Confirm the site fields: Procurement BU is T Business Unit1, Address Name is Dell Address1, Address is Dell Add1, Site is Dell Address1, and Status is Active.
- Confirm that Purchasing and Pay are selected, and that Sourcing only, Procurement card, and Primary pay are not.
- In the Site Assignments section, find the table with columns for Client BU, Bill-to BU, Ship-to Location, Bill-to Location, Use Withholding Tax, Withholding Tax Group, Liability Distribution, and others.
- Click the Format button (flash icon) to adjust the table or paste copied data as needed.
Step 30: Select the ship-to location
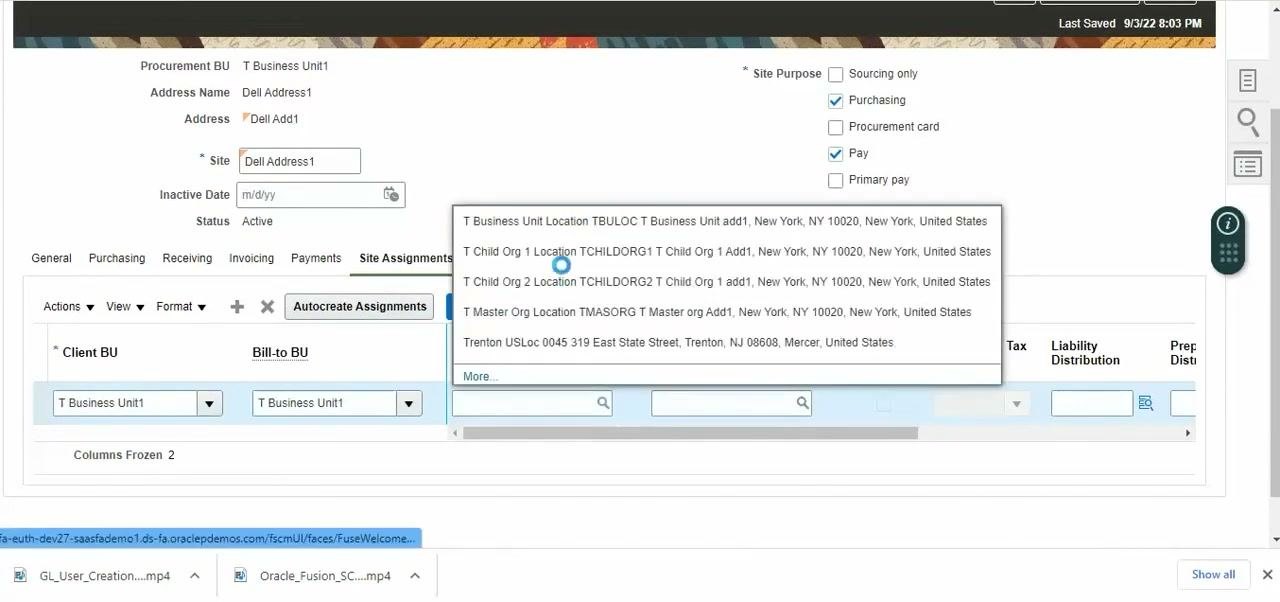
- In the Ship-to Location field, click the search icon or list.
- Select T Child Org 1 Location (TCHILDORG1 T Child Org 1 Add1, New York, NY 10020, New York, United States).
Step 31: Copy the ship-to location value
With T Child Org 1 Location selected in Ship-to Location, right-click or use a keyboard shortcut to copy the value.
Step 32: Paste the value into Bill-to Location
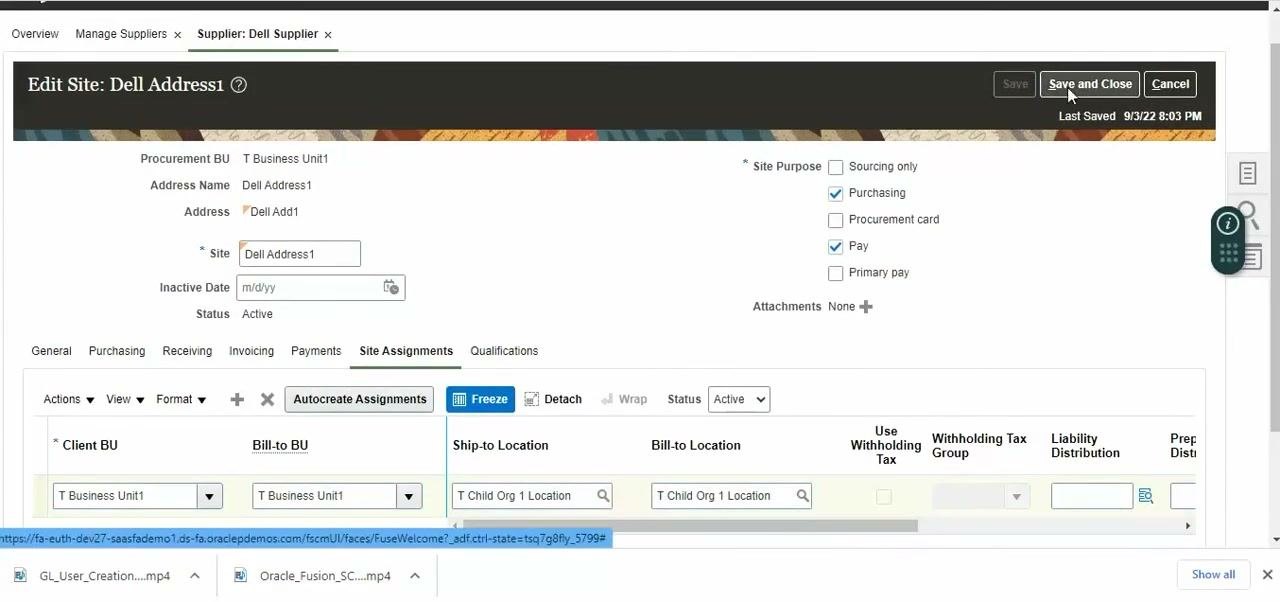
- Click the empty Bill-to Location field.
- Paste T Child Org 1 Location into the field.
Step 33: Save and close the site
Click Save and Close at the top right of the Edit Site: Dell Address1 screen. This saves your changes and exits site edit mode.
Step 34: Confirm the changes were saved
- When the dialog "Your changes were saved" appears, click OK.
- On the supplier's Sites tab, verify that the new site, Dell Address1, is listed with the status Active.
Summary
You now know how to create a supplier in Oracle Fusion. You created Dell Supplier, added an address and a contact, submitted the profile change request, and confirmed its approval in your notifications. You then created a site, set its purchasing and receiving options, assigned its ship-to and bill-to locations, and saved your changes.
Follow your organization's procurement process for any steps that come after this setup.
Generation details: cost, quality tiers
Docsie billed 4,000 credits ($2.80) to analyze this 8-minute video at standard quality. The rewrite, template fill and Word/PDF exports were included. The same video at each quality tier:
| Quality | Frames sampled | Credits | Approx. cost |
|---|---|---|---|
| Draft | every 16-30 s | 2,000 | $1.40 |
| Standard (this guide) | every 8-15 s | 4,000 | $2.80 |
| Detailed | every 4-7 s | 8,000 | $5.60 |
| Ultra | every 1-3 s | 16,000 | $11.20 |
Credits priced at $0.70 per 1,000; plans include a monthly allowance. Enterprise customers on on-premise or bring-your-own-model deployments run this on their own inference and pay no per-video credits.
Generated by Docsie Video-to-Docs on 2026-11-15 from a 7-minute video. Screenshots are frames from the source video and belong to their creator, Oracle ERP, Finance HCM & SCM Insights, whose original is embedded above. If you own this video and want the guide removed or credited differently, contact us and we will act within one business day.