
How to Create a Sandbox in Oracle Fusion
A sandbox in Oracle Fusion gives you a safe, isolated space to make customizations—such as changing the application logo, adding custom fields, or reorganizing navigation—without affecting your live environment. This guide walks you through how to create a sandbox in Oracle Fusion, configure it with the right tools, apply appearance and structure changes, and publish your work so it becomes available to all users.
Video: Oracle Fusion #48: Creation of SANDBOX & it's uses by Technical Talk's. All credit for the demonstration goes to the creator; watch the original on YouTube. The written guide below was generated from this video by Docsie. Creator? Request a change or removal.
A sandbox in Oracle Fusion gives you a safe, isolated space to make customizations—such as changing the application logo, adding custom fields, or reorganizing navigation—without affecting your live environment. This guide walks you through how to create a sandbox in Oracle Fusion, configure it with the right tools, apply appearance and structure changes, and publish your work so it becomes available to all users.
Prerequisites
- Access to an Oracle Fusion instance with the appropriate privileges to create and manage sandboxes.
- You should be logged in and viewing the Oracle Fusion home page before starting.
What a sandbox is used for
The Sandbox feature in Oracle Fusion lets you make additional customizations to your instance in an isolated area. Typical use cases include changing the logo displayed in the application header, adding custom fields to forms or pages, and performing other UI or configuration changes safely before rolling them out to everyone.
Navigating to the sandbox window
- Log in to your Oracle Fusion instance and confirm you are on the home page. The home page displays a welcome message, navigation menus, and quick action tiles. The main menu bar includes options such as Customer Data Management, Tools, Configuration, My Enterprise, Partner Management, and Planning.
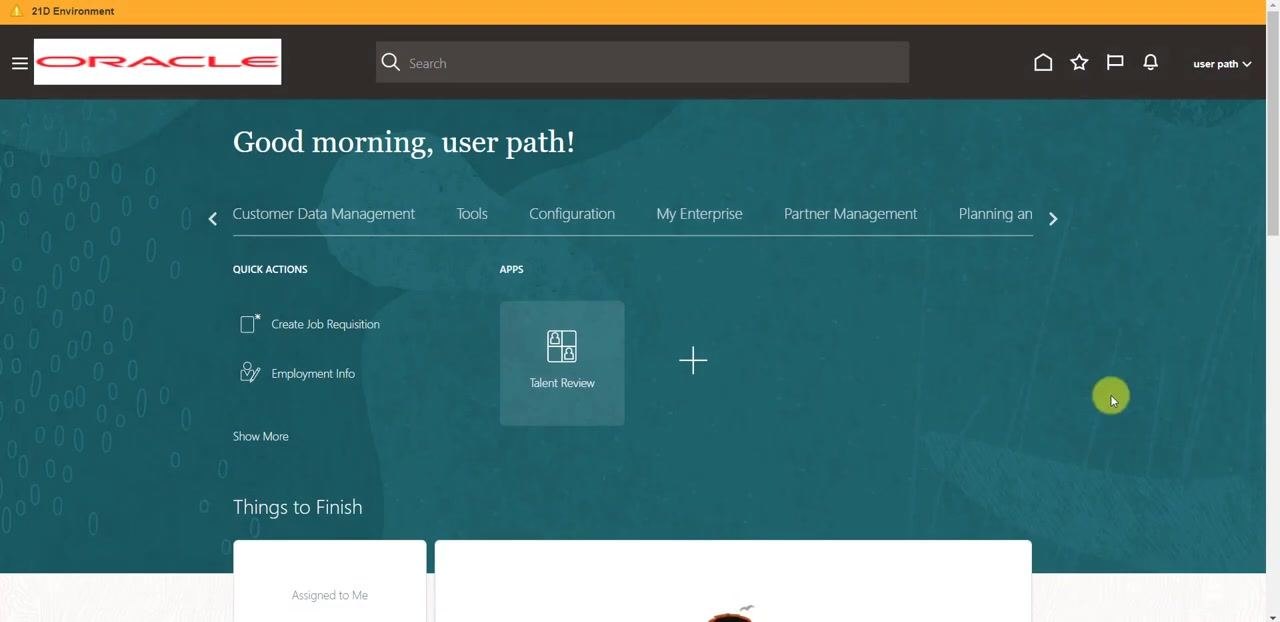
- Access the Sandbox window using one of two methods:
- Click the Configuration menu option in the top menu, then select Sandbox (or Sandboxes) from the submenu.
- Click the Navigator icon (three horizontal lines) in the top-left corner, scroll to the Configuration section in the expanded menu, and click Sandboxes.
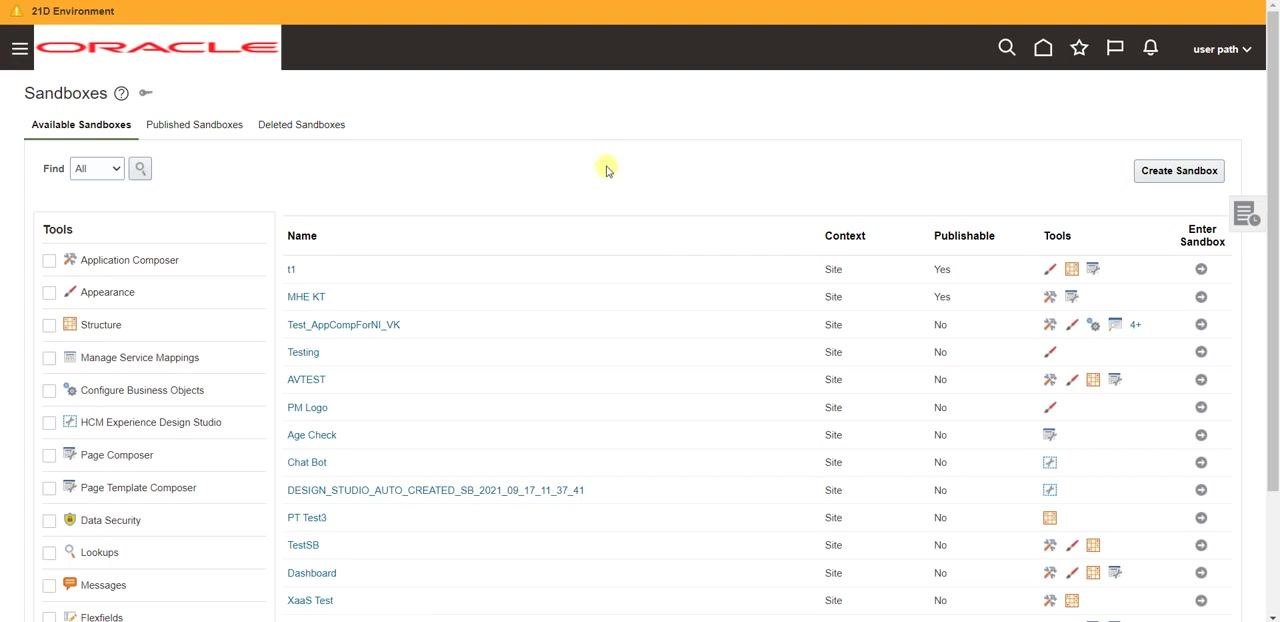
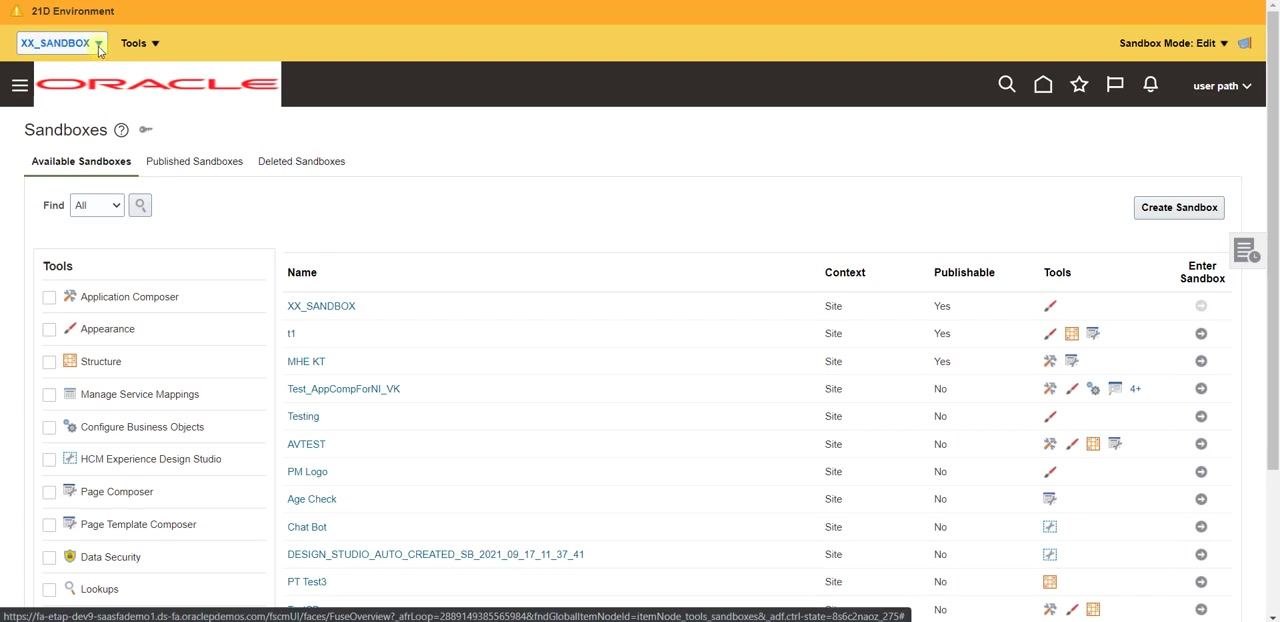
- Click Sandboxes to open the Sandbox management window. This window lists available sandboxes, published sandboxes, and deleted sandboxes, with columns for Name, Context, Publishable status, Tools, and an Enter Sandbox action. A Create Sandbox button lets you start a new sandbox.
Creating and entering a new sandbox
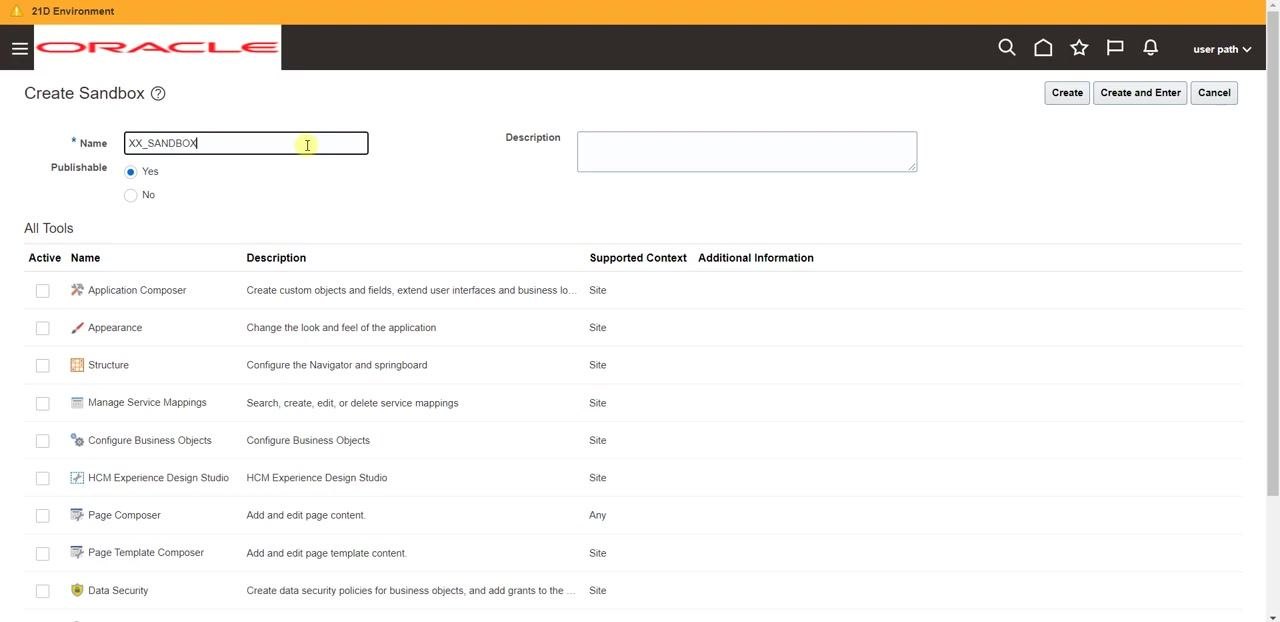
- On the Sandbox management window, click the Create Sandbox button on the right side of the screen. This opens the Create Sandbox form, where you define the new sandbox's properties.
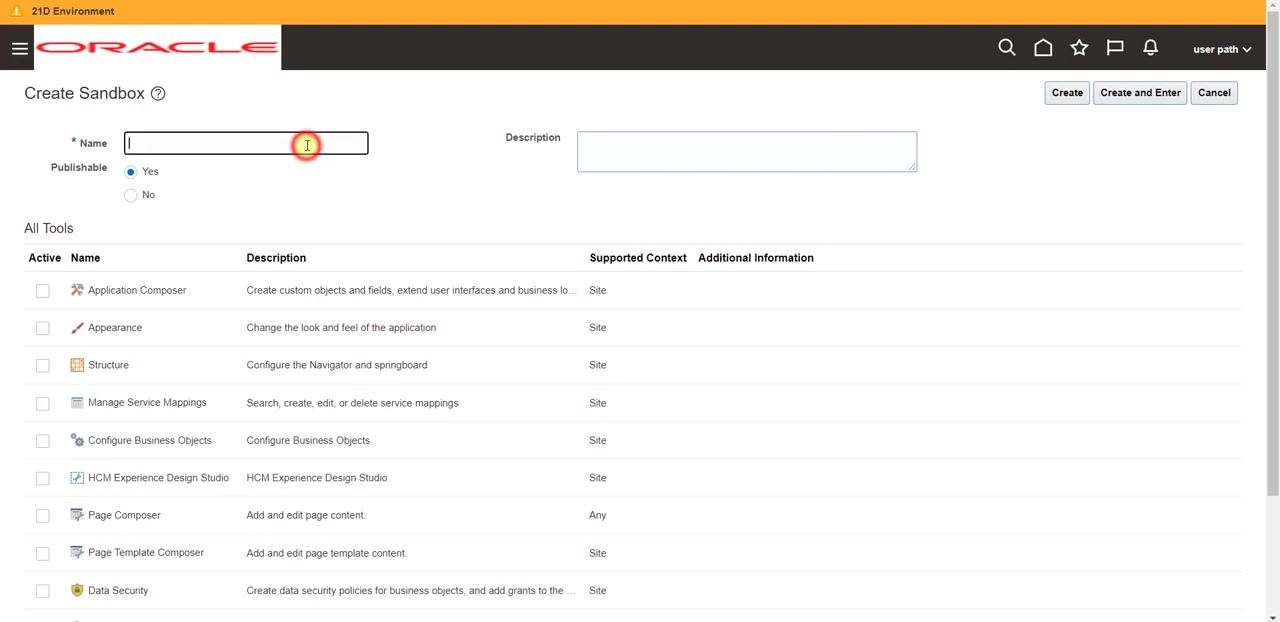
- In the Name field, type
XX_SANDBOX. In the Description field, enter the same value,XX_SANDBOX.
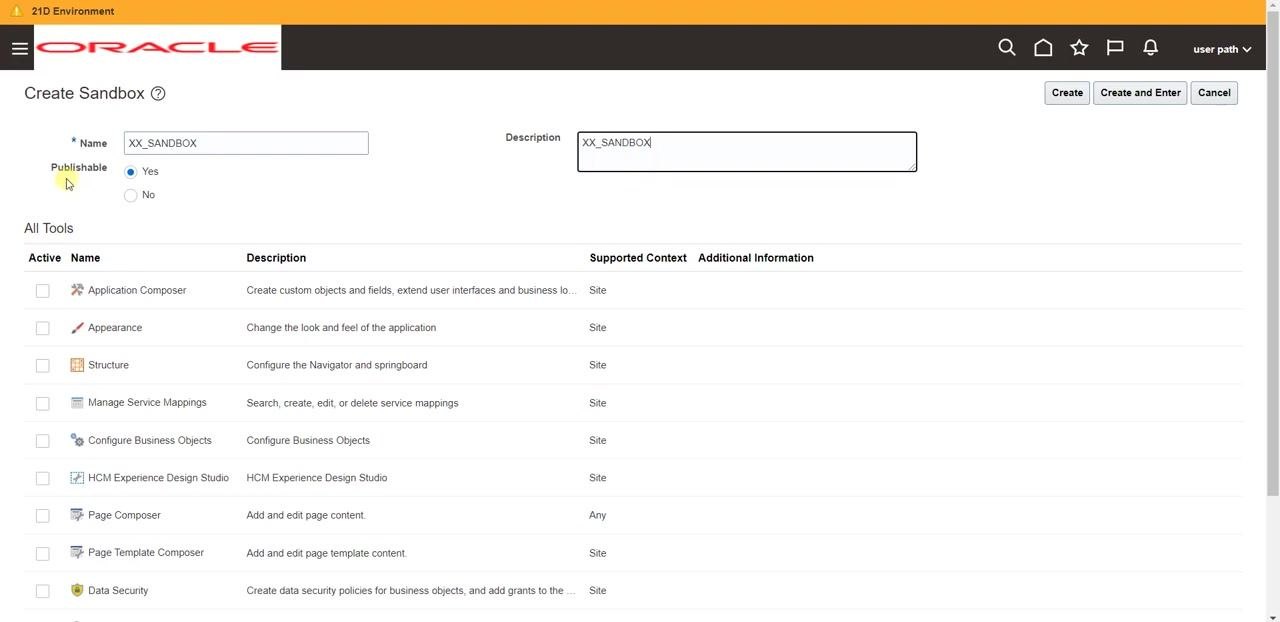
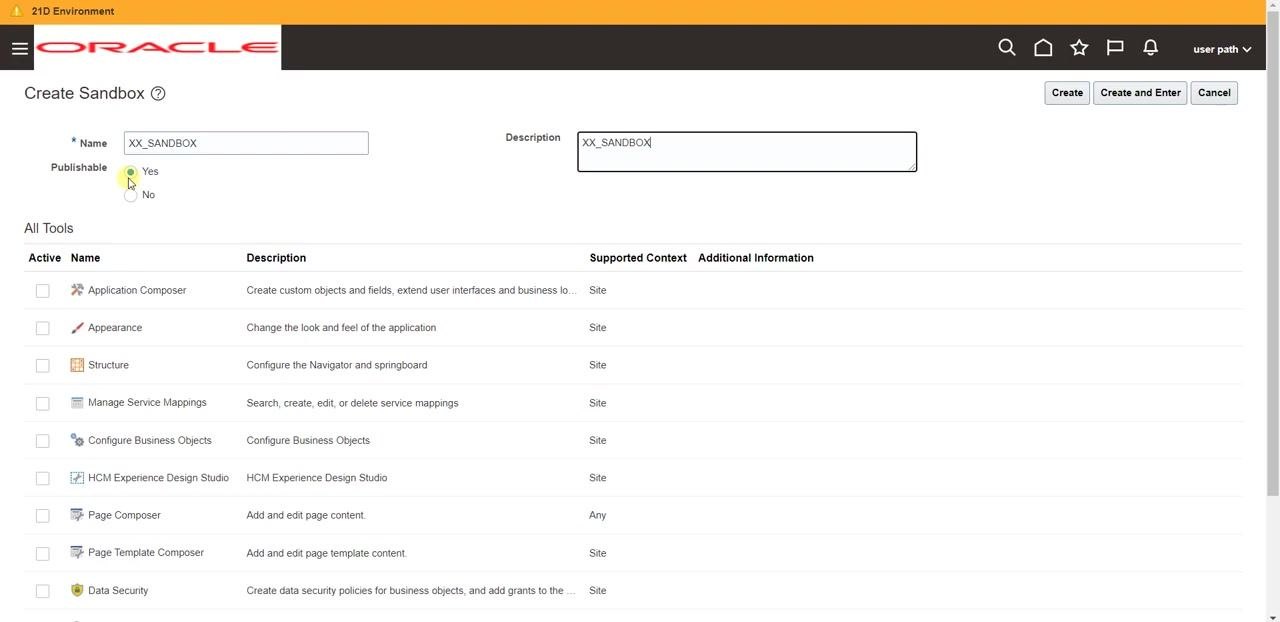
- Under the Publishable section, select Yes. This means any changes you make in this sandbox can later be published to the main Oracle Fusion instance.
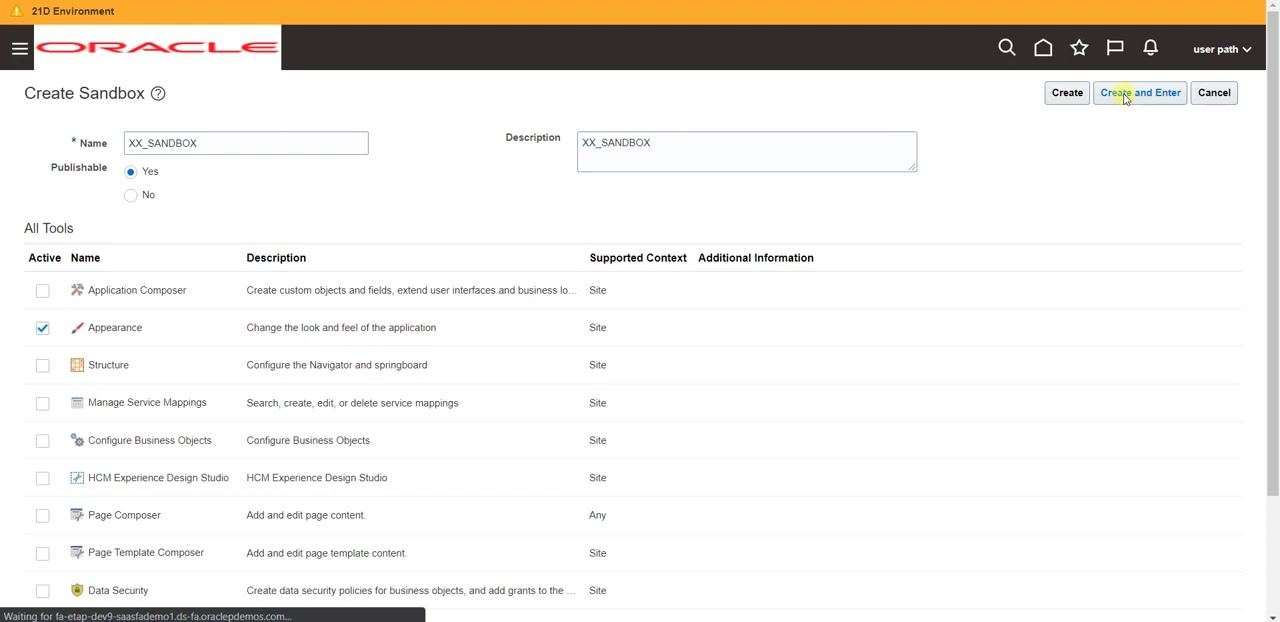
- In the All Tools list, check the box next to Appearance to enable appearance-related customizations, such as changing the look and feel of the application.
- Click Create and Enter at the top right of the form. This both creates the sandbox and immediately places you inside it for customization.
- Confirm you have entered the new sandbox. The sandbox name (
XX_SANDBOX) now appears in the yellow bar at the top of the screen, and the Sandbox management window listsXX_SANDBOXwith its context set to Site and publishable status Yes.
- Click the sandbox name (
XX_SANDBOX) in the yellow bar or in the list to view more details. From here you can also see options to Leave Sandbox, Publish, or view Sandbox Details.
Adding more tools to the sandbox
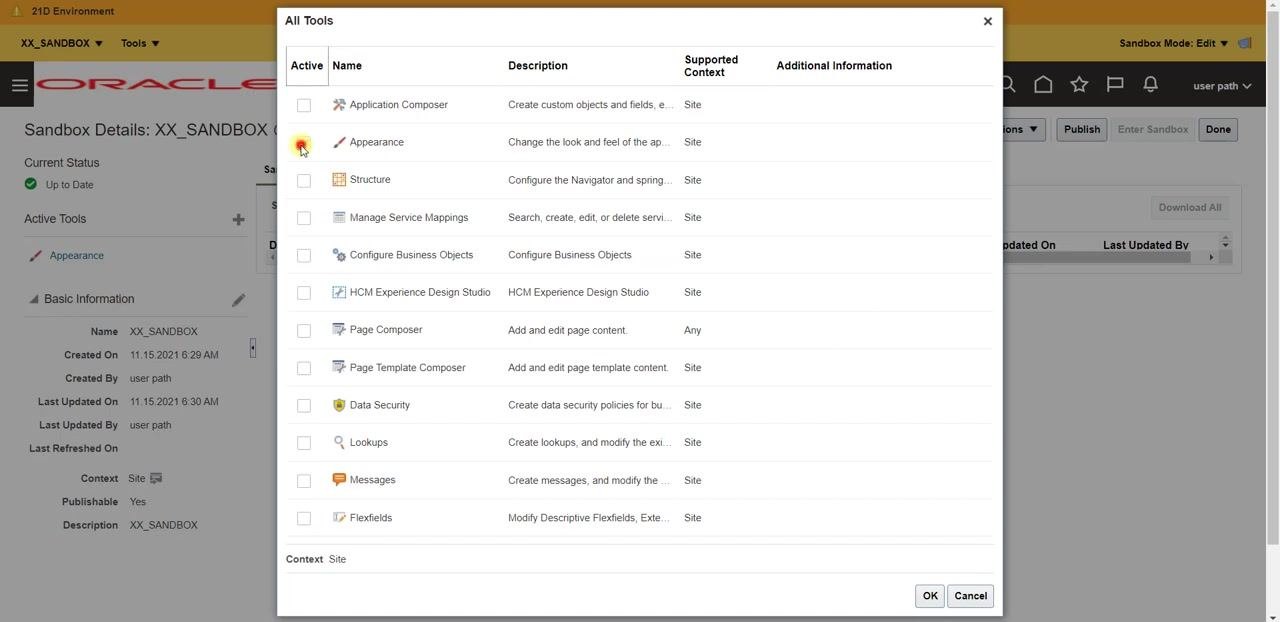
- On the Sandbox Details: XX_SANDBOX window, click the Tools dropdown and select Add to open the All Tools dialog.
-
In the All Tools dialog, note that Appearance is already checked and disabled, since it was added previously. Other tools, including Structure and Application Composer, are available for selection.
-
Check the box next to Structure to enable it for your sandbox. The Structure tool allows you to configure the Navigator and springboard settings.
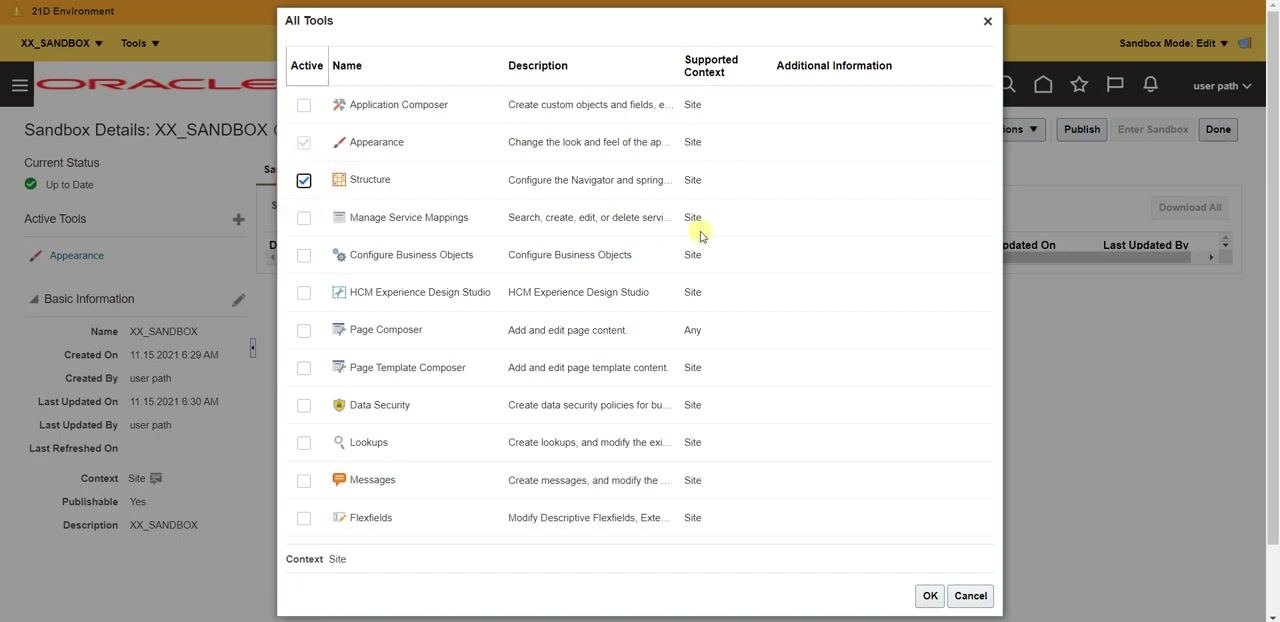
- Click OK at the bottom right of the All Tools dialog to add the selected tools. Your sandbox now has two functionalities: Appearance and Structure.
Customizing the appearance in the sandbox
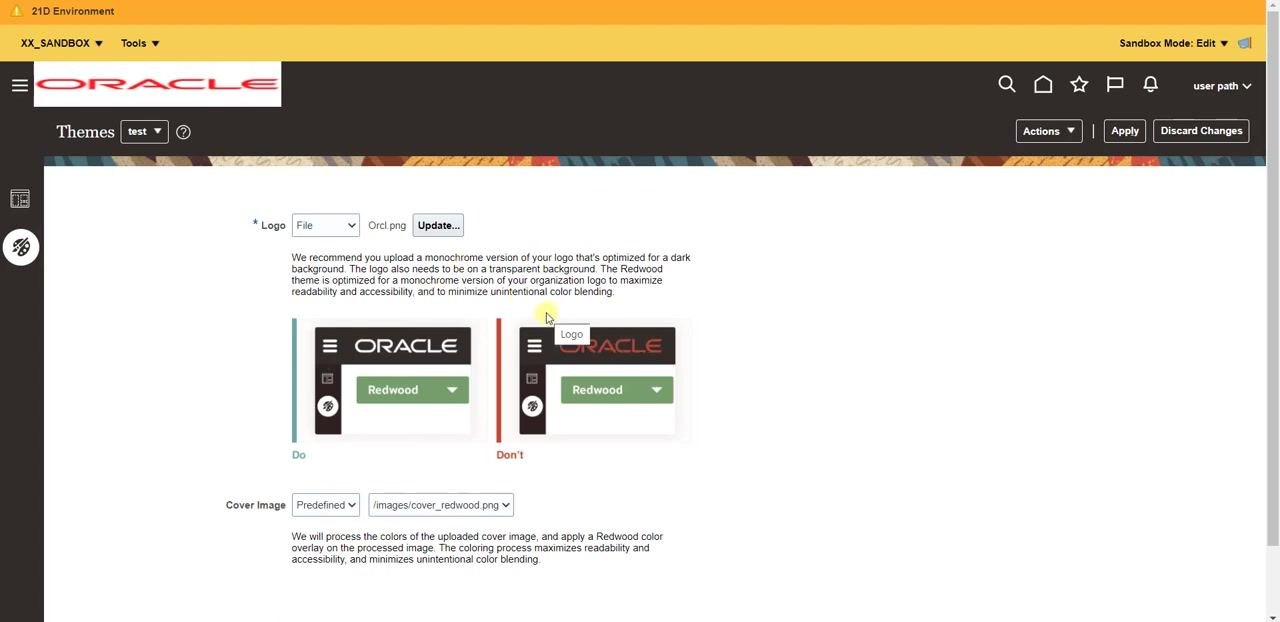
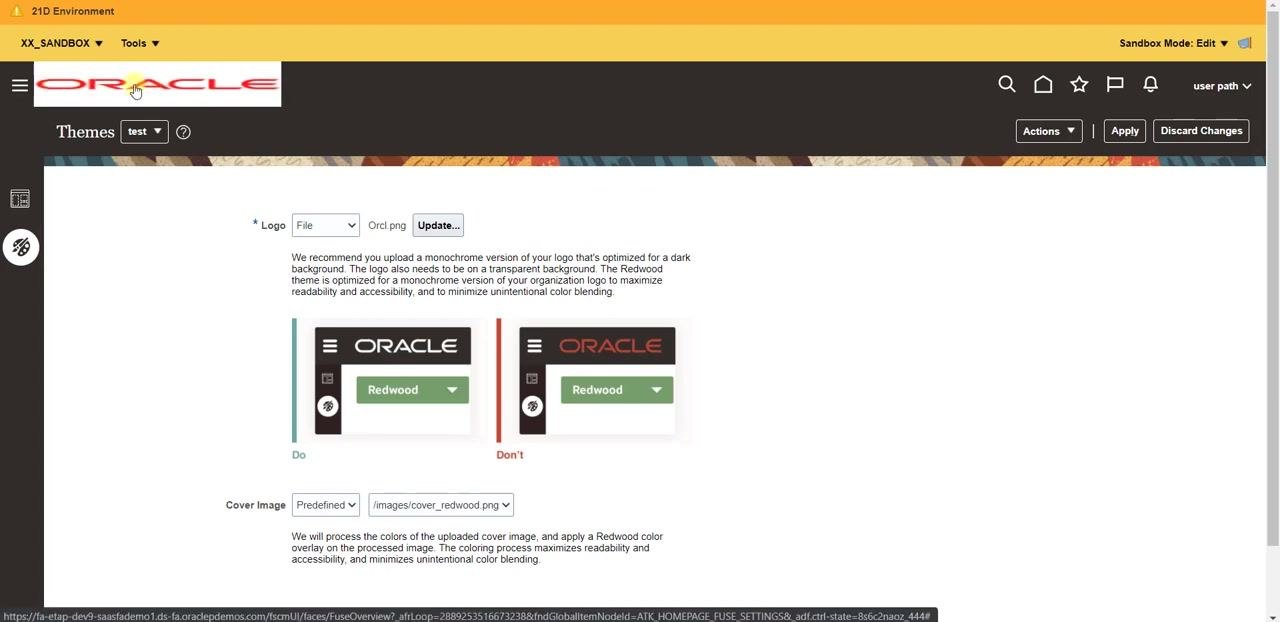
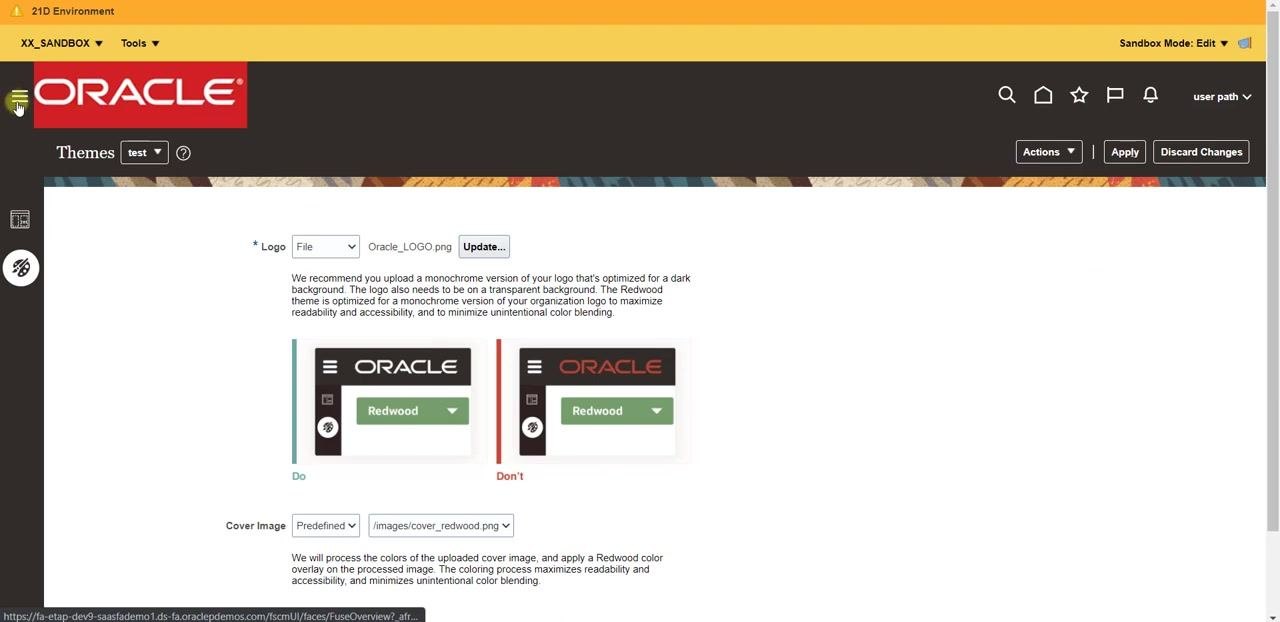
- In the sandbox environment, navigate to the Themes section. Here you can change the logo and cover image for your application. The current logo file is displayed (for example,
Orcl.png) next to an Update... button, along with guidance for uploading a monochrome logo optimized for dark backgrounds and example "Do" and "Don't" images.
-
Review the current settings. The Logo field shows the current file (for example,
Orcl.png), and the Cover Image field is set to a predefined image (for example,/images/cover_redwood.png). -
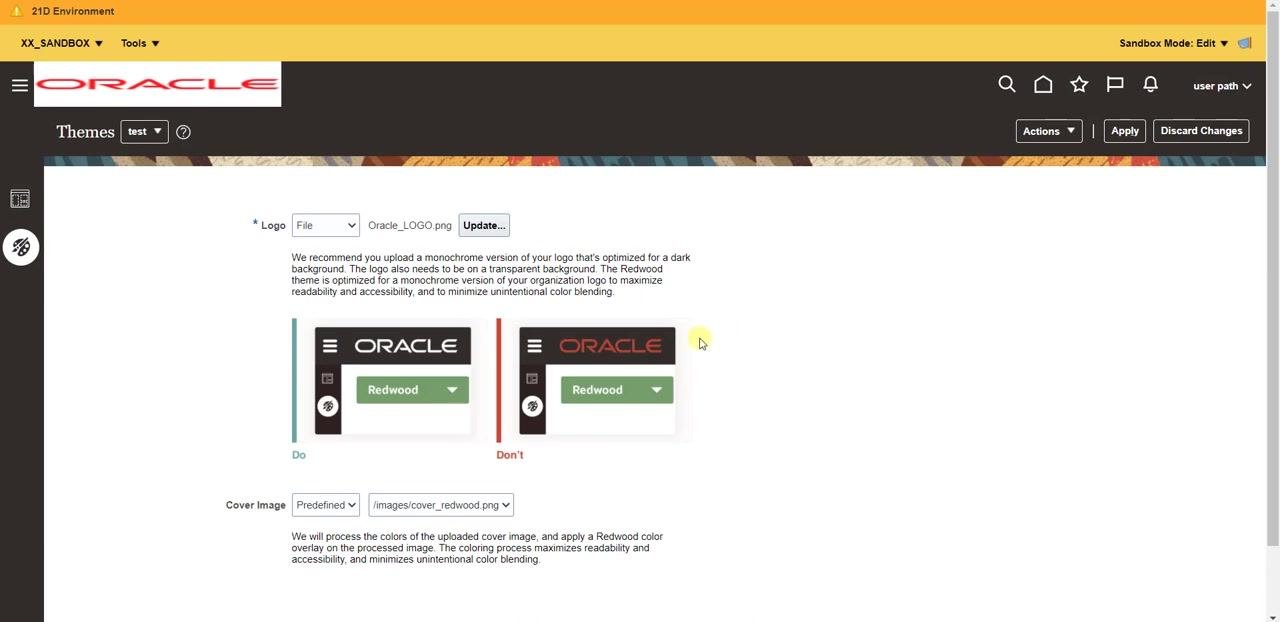
Click the Update... button next to the Logo field, select your desired image file (for example,
Oracle_LOGO.png) from your computer, and double-click the image to upload it. The new file name appears in the Logo field. -
Click Apply at the top right of the Themes section to preview your changes. Wait for the system to process and load the new logo.
- Confirm the new logo (for example,
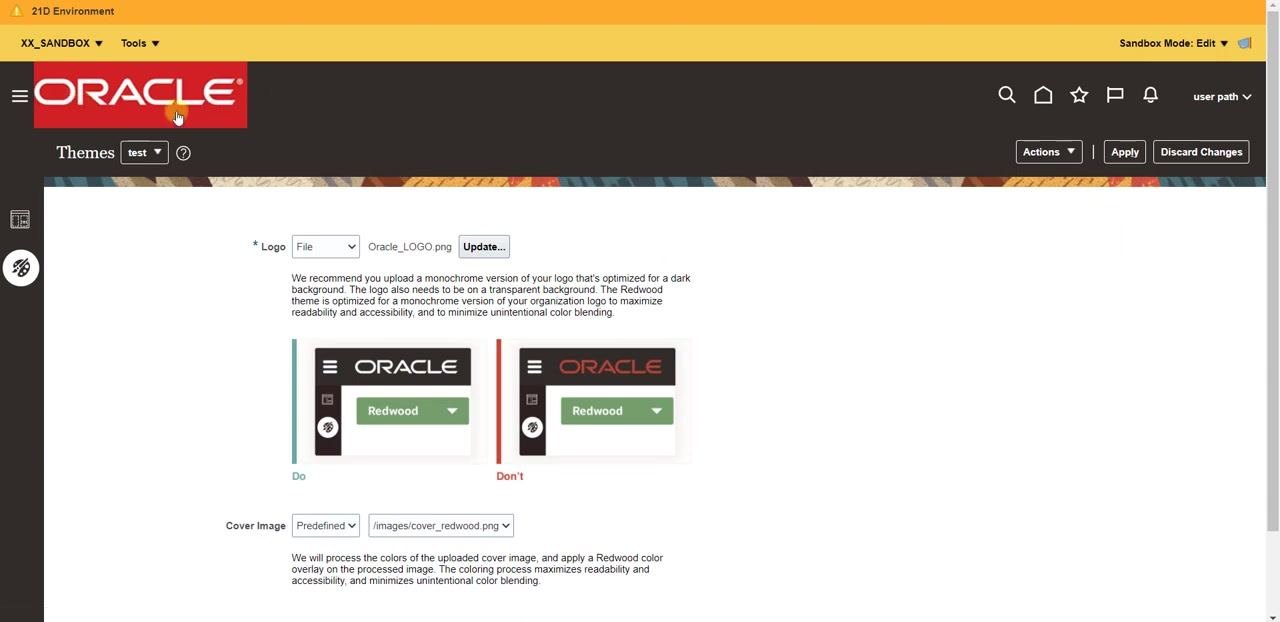
Oracle_LOGO.png) now appears in the application header. These changes are temporary and only visible within the current sandbox session until published.
Deleting an appearance change in the sandbox
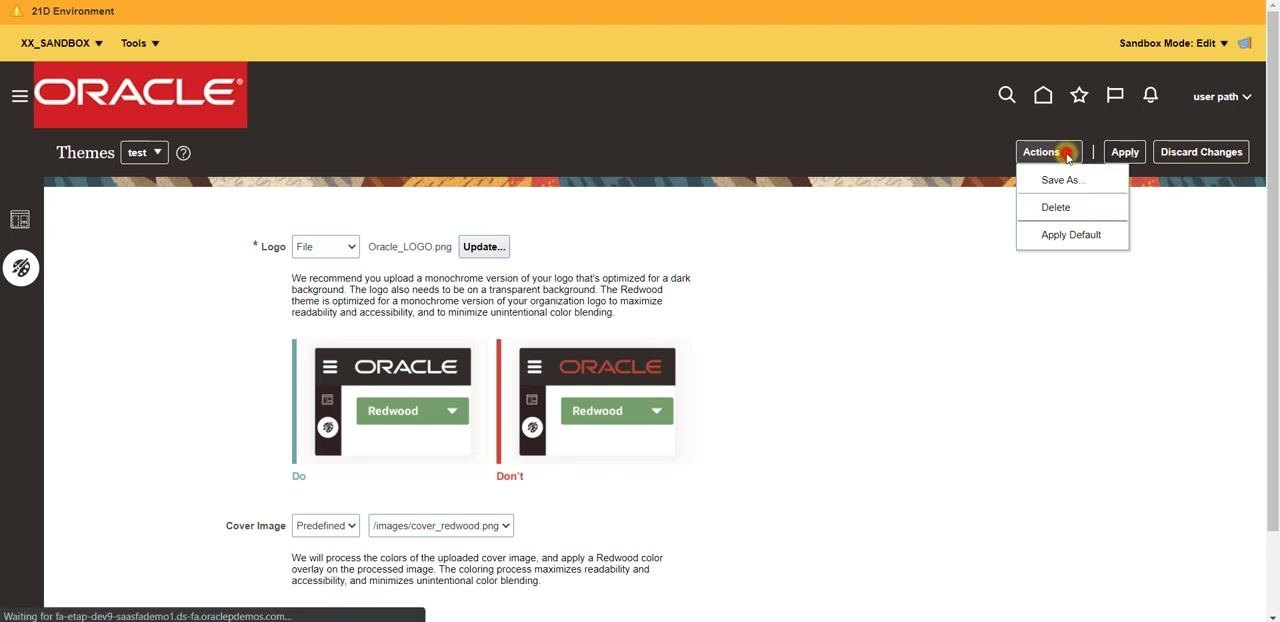
- In the Themes section, click the Actions dropdown button in the upper right and select Delete to remove the current appearance.
Returning to the home page and navigating modules
-
Confirm that your sandbox (for example,
XX_SANDBOX) is active and visible in the environment header, then click the Oracle logo or the home icon to return to the main dashboard. -
Use the horizontal navigation bar to browse available modules, such as Benefits Administration, Subscription Management, Contract Management, Order Management, and Supply. Click the right arrow or a module name to reveal additional modules.
Managing sandbox details and structure
- Click the sandbox name (for example,
XX_SANDBOX) in the header to open the Sandbox Management page, and review the list of available sandboxes, including Name, Context, Publishable status, and available tools.
-
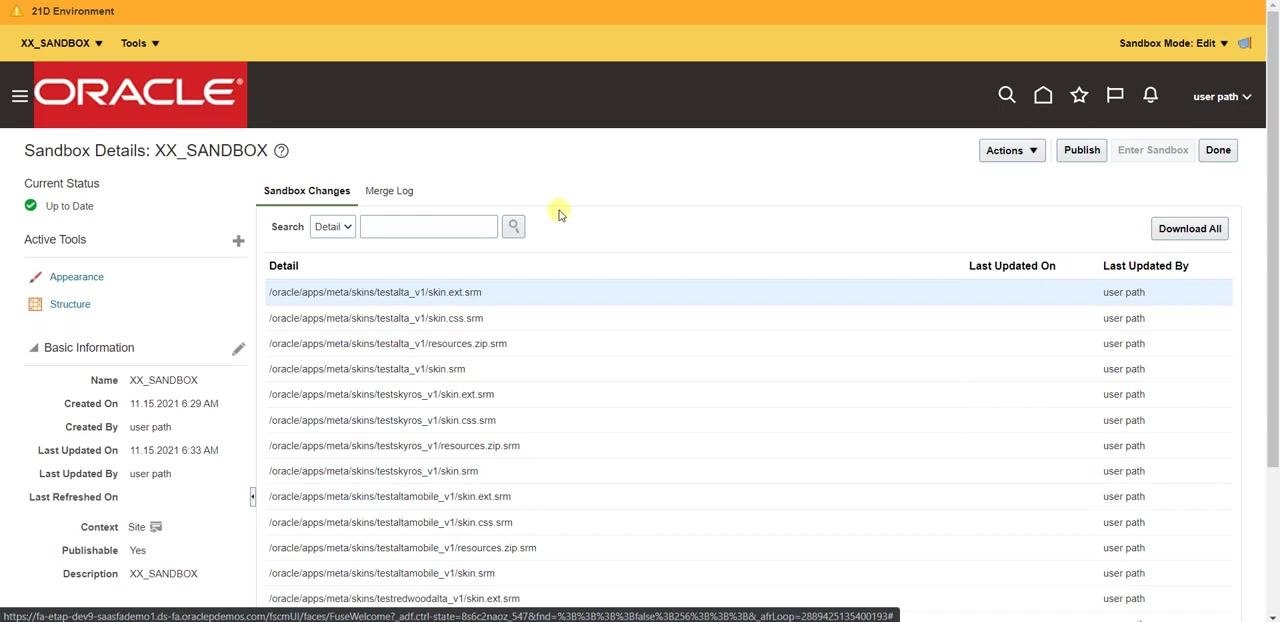
On the Sandbox Details page, verify the current status (for example, Up to Date), review the list of active tools (Appearance, Structure) and the log of recent changes, and use the Actions or Publish buttons as needed.
-
Select the Structure tool from the active tools list to view the Navigation Configuration page, which lists all navigation groups and modules, such as Supplier Portal, Payables, Projects, Grants Management, and General Accounting.
Creating a navigation group
-
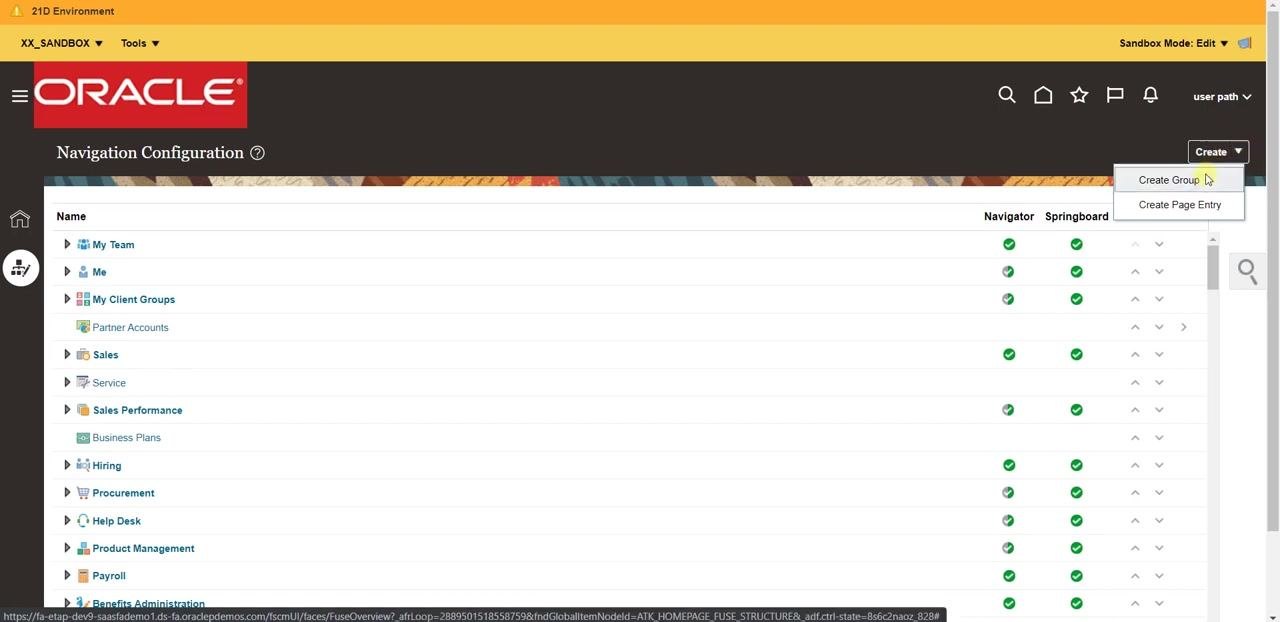
Click the Create dropdown button in the upper right of the Navigation Configuration page and select Create Group.
-
In the Create Group dialog, enter
XX_Reportin the Name field, click the icon selector to choose an icon, set Show on Navigator to Yes, and click OK to confirm.
Adding a custom report page entry
- In the Select: Page Entry Icon dialog, review the available icons, click on the one you want, and click OK to confirm your selection.
-
Confirm the Create Group form shows Name: XX_Report, your selected icon, and Show on Navigator: Yes, then click Save and Close to create the group and return to the Navigation Configuration page.
-
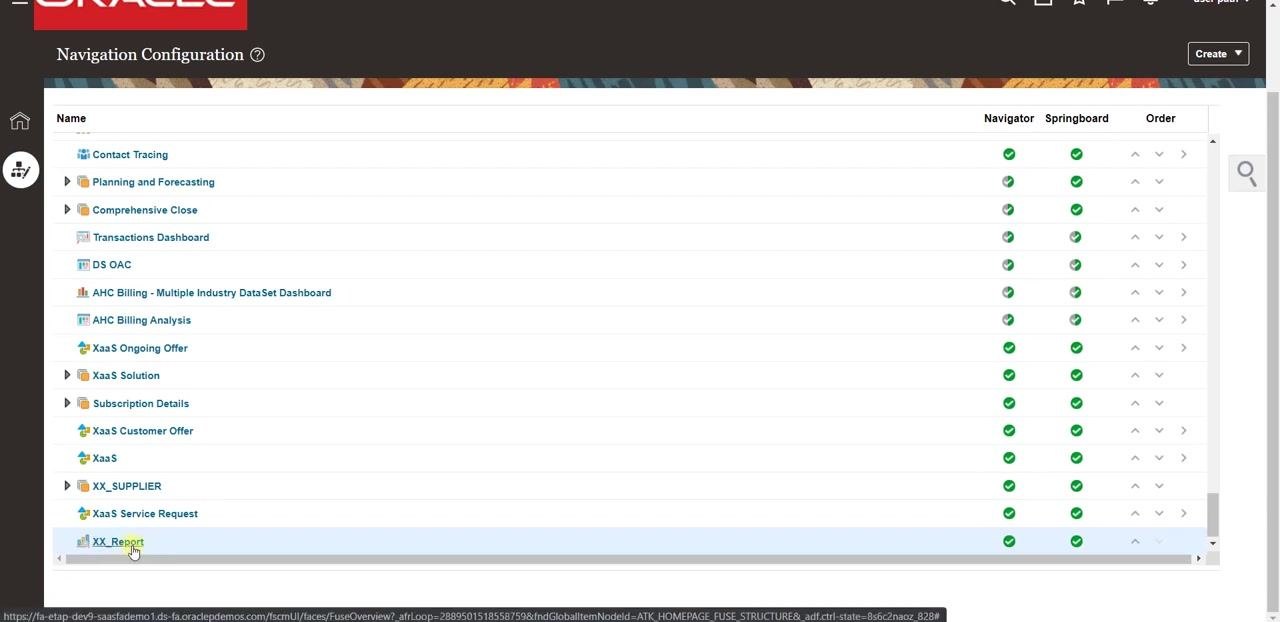
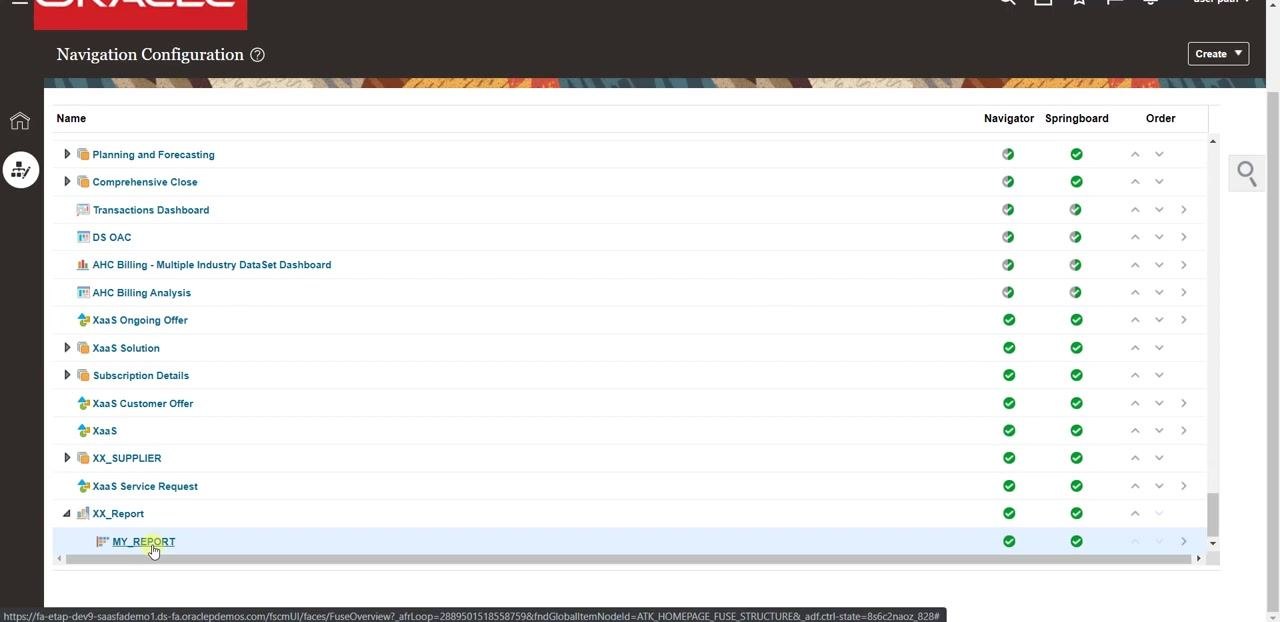
On the Navigation Configuration page, scroll to the bottom of the list and confirm that XX_Report now appears as a new group. Click on XX_Report to select it for further configuration.
-
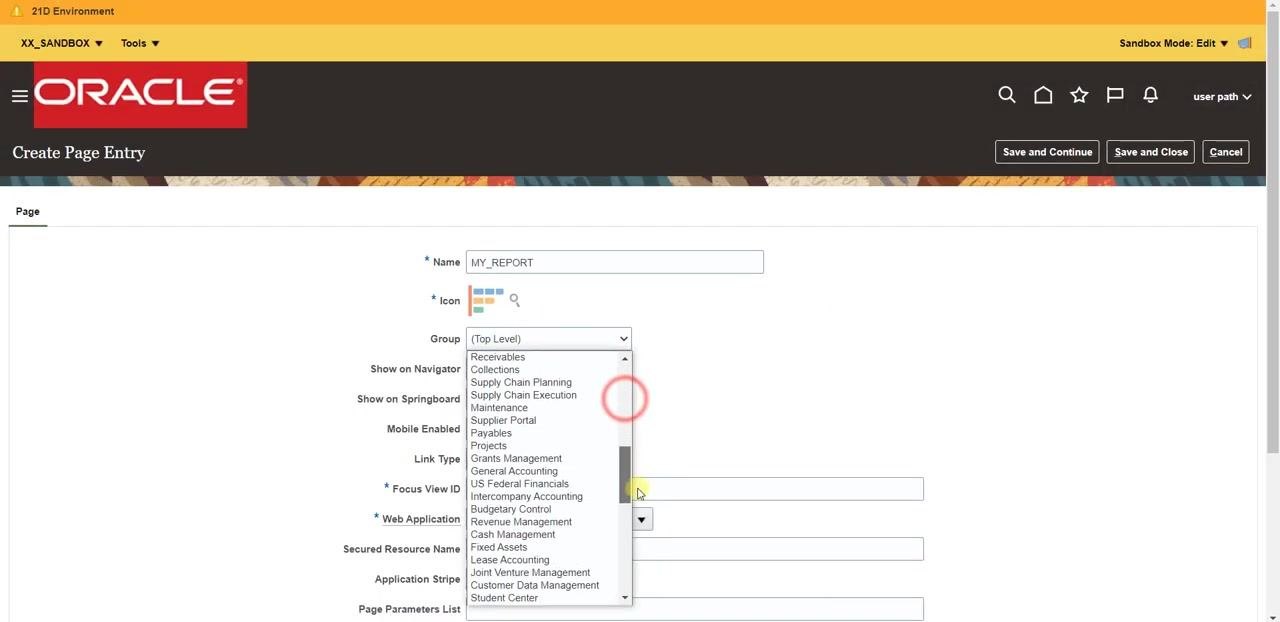
Click the Create dropdown button in the upper right and select Create Page Entry to add a new page entry under the XX_Report group.
-
In the Create Page Entry form, enter
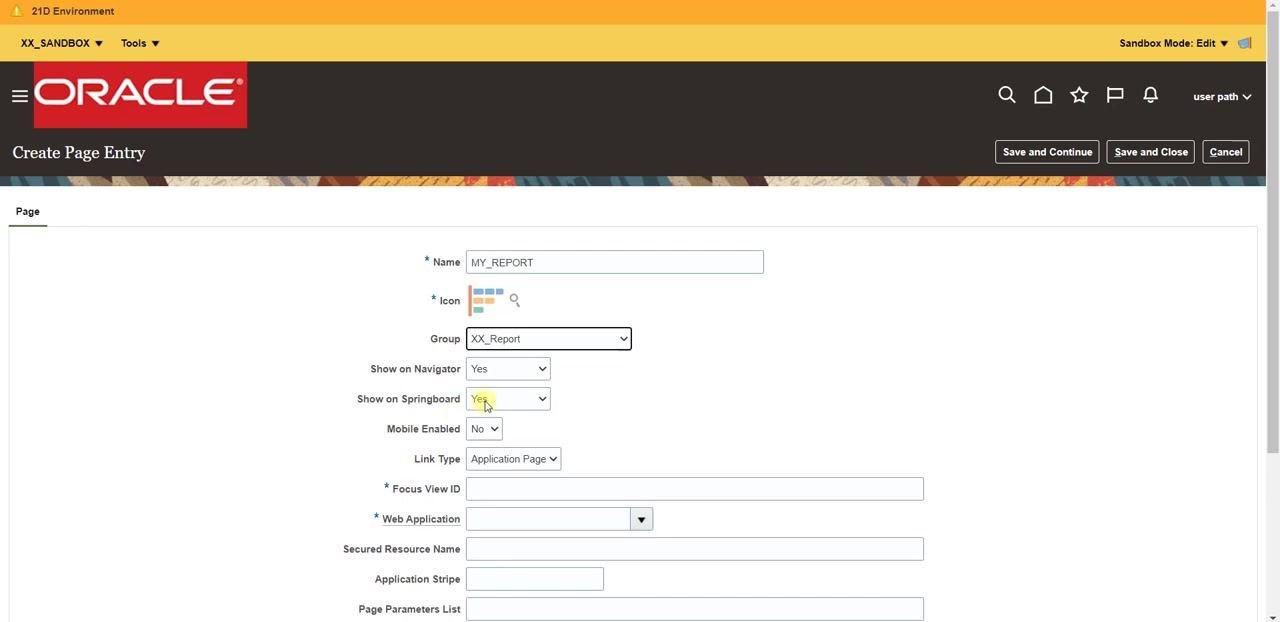
MY_REPORTin the Name field, choose an icon, and leave Group as (Top Level), Show on Navigator as Yes, Show on Springboard as Yes, Mobile Enabled as No, and Link Type as Application Page for now—these will be adjusted in the next steps. -
In the Group dropdown, scroll and select XX_Report to assign the page entry to the group you created.
-
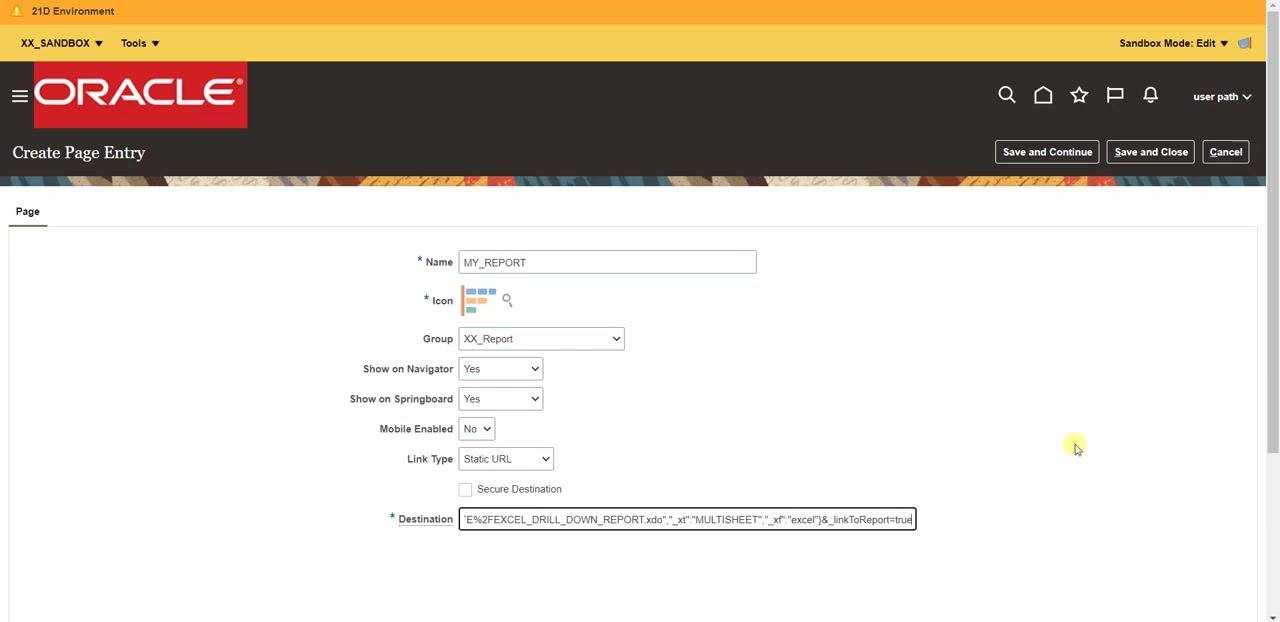
Confirm Show on Navigator, Show on Springboard are set to Yes and Mobile Enabled is set to No. In the Link Type dropdown, select Static URL to link this entry to a custom report URL.
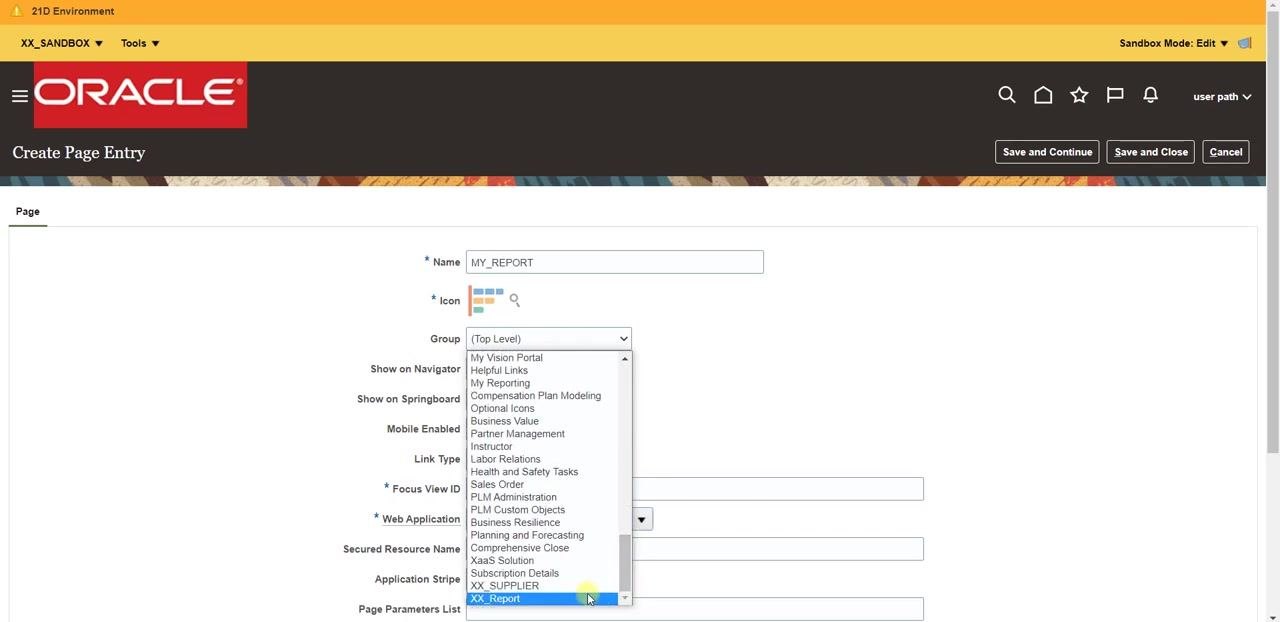
- In the Destination field that appears after selecting Static URL, you will enter the full URL of your custom report in a later step.
Linking and verifying the custom report
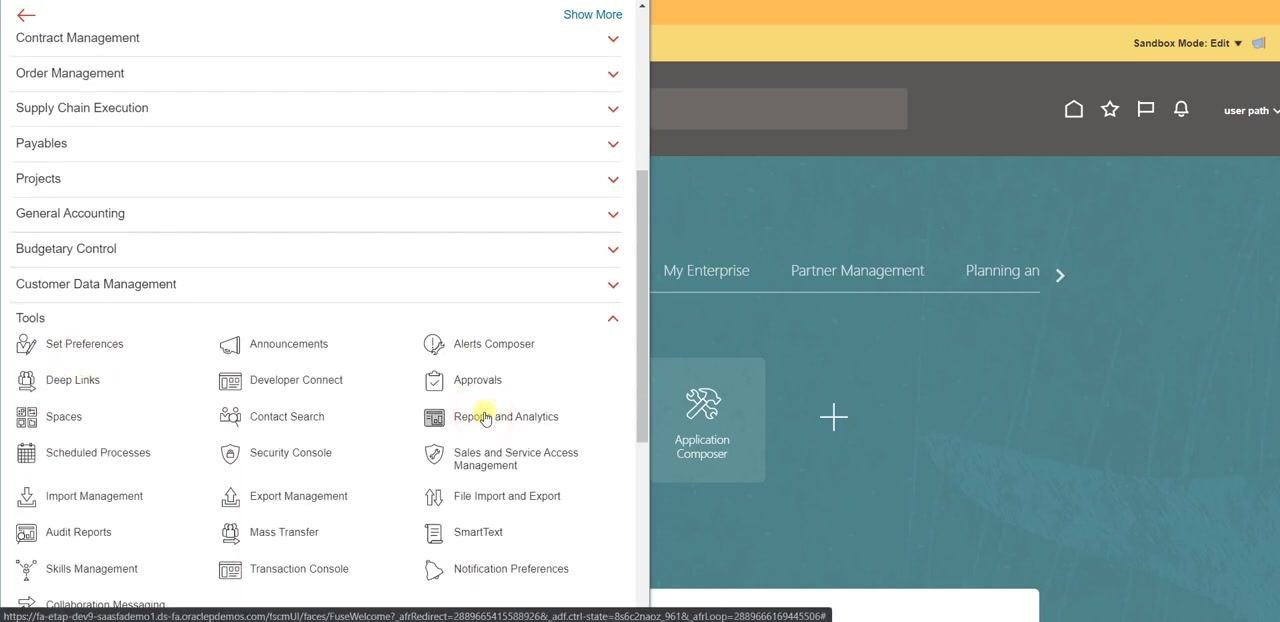
- Open the Oracle Cloud navigation menu, scroll to the Tools section, and hover over Reports and Analytics. The screen shows a split view with the navigation menu on the left and the Oracle Cloud homepage on the right.
-
Click Reports and Analytics in the Tools section. You are redirected to the Oracle Transactional Business Intelligence (OTBI) interface.
-
In the OTBI interface, locate your report (for example, EXCEL_DRILL_DOWN_REPORT), click the Export dropdown in the report's menu, hover over Share Report Link, and select Current Page from the submenu. This generates a shareable URL for the current report page.
-
Copy the generated report URL for use in the custom page entry configuration.
-
Return to the Create Page Entry form in Oracle Cloud and paste the copied URL into the Destination field. Confirm the remaining settings: Name: MY_REPORT, your selected icon, Group: XX_Report, Show on Navigator: Yes, Show on Springboard: Yes, Mobile Enabled: No, Link Type: Static URL, and Destination containing the pasted report URL. Click Save and Close to finalize the entry.
- Return to the Navigation Configuration page, scroll to the bottom of the list, and confirm that MY_REPORT now appears under the XX_Report group with Navigator and Springboard enabled.
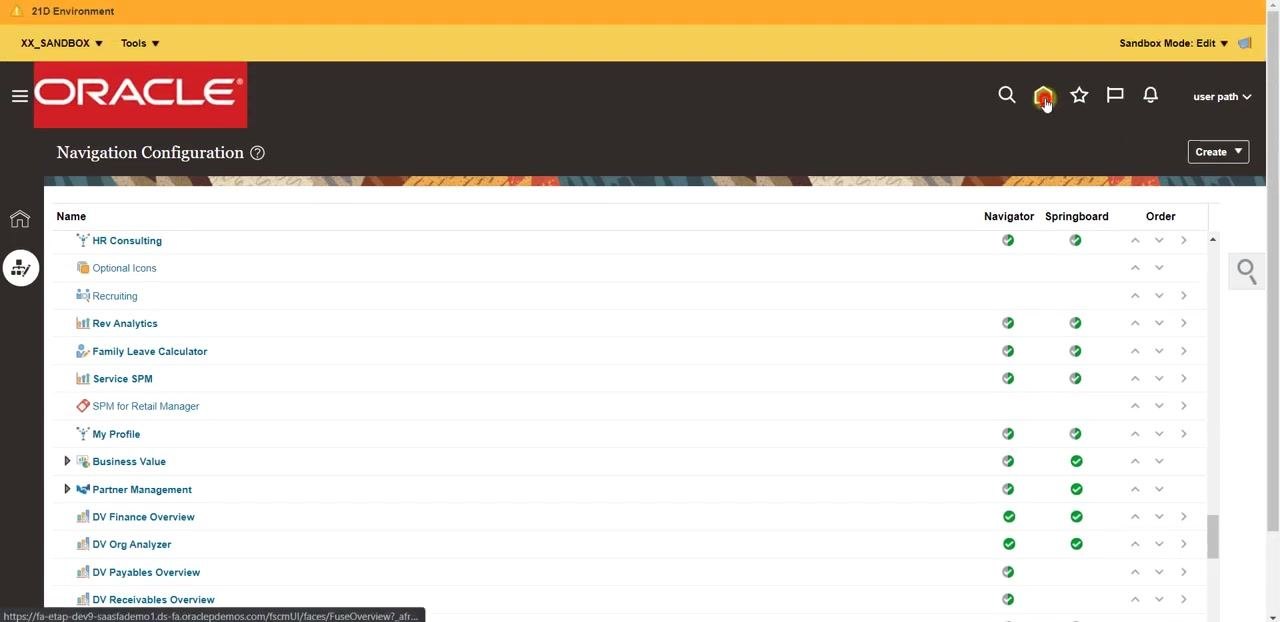
- Click the home icon or navigation button to return to the Oracle Cloud homepage, then click the Navigator icon in the top bar to open the navigation menu.
-
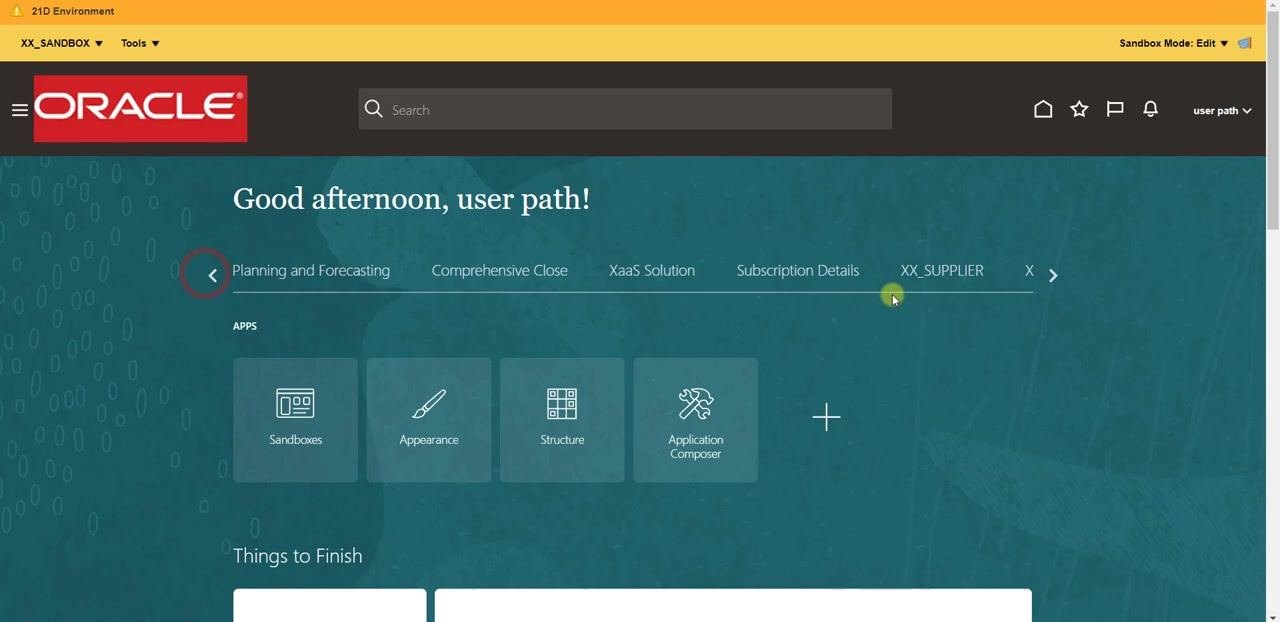
In the navigation bar at the top of the homepage, use the arrow to scroll through available groups and locate the XX_Report group.
-
Under the XX_Report group, find the MY_REPORT tile and click on it to launch the custom report.
-
To make the new navigation and report entry available to all users, click the Publish button, typically found in the navigation or configuration area, and confirm by clicking Yes in the confirmation dialog. This applies your navigation changes system-wide.
Publishing and managing sandboxes
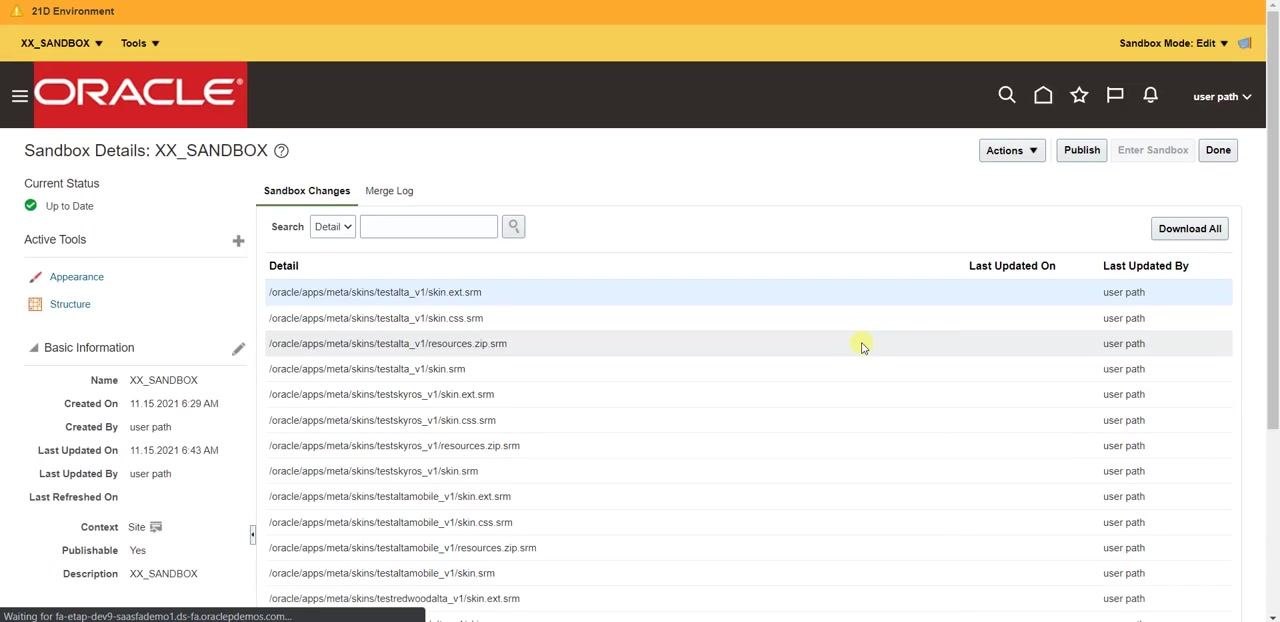
- On the Oracle Cloud home page, confirm the top bar displays your environment name and Sandbox Mode: Edit, and that the active sandbox is labeled XX_SANDBOX. Click the dropdown next to XX_SANDBOX in the yellow bar to view options: Sandbox Detail, Publish, and Leave Sandbox.
-
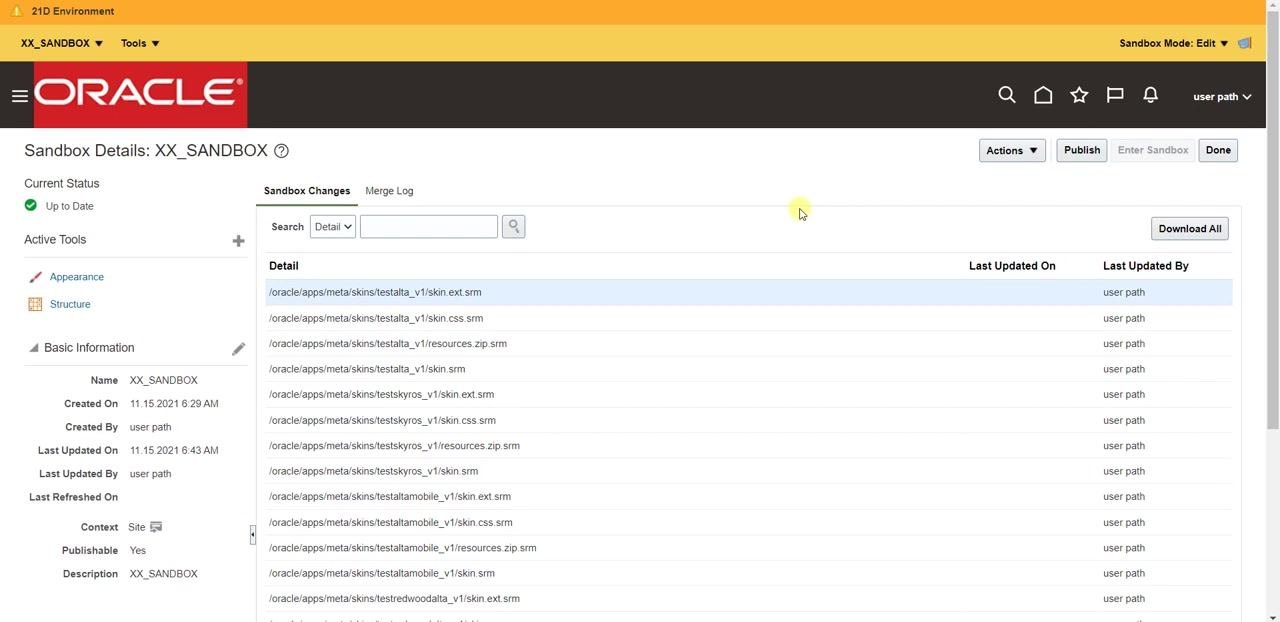
If prompted to continue, click Yes on the confirmation dialog. You are redirected to the Sandbox Details: XX_SANDBOX window, where you can view the status (Up to Date), active tools, and a list of changes made, including files and resources updated along with timestamps and the user who made each change. Use Actions for more options and Publish to finalize changes.
-
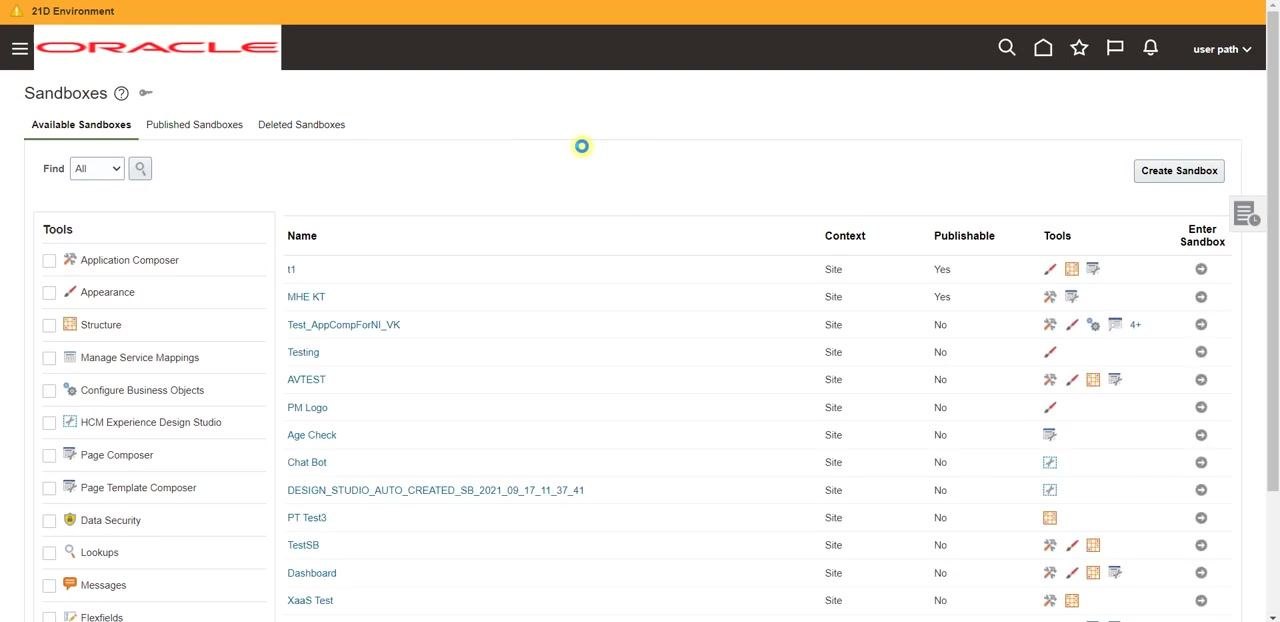
After publishing, you are redirected to the Sandboxes overview page, which lists all available sandboxes, their context (for example, Site), whether they are publishable, and available tools. A loading indicator may appear while the page refreshes.
-
If a warning dialog appears stating that you can no longer use the sandbox because it is either published, deleted, or exited, and that you will be redirected to the home page, click OK to proceed.
- After exiting the sandbox, confirm you are on the Oracle Cloud home page and that the XX_Report and MY_REPORT apps are visible, indicating your changes have been applied. The navigation bar displays options such as Customer Data Management, Tools, Configuration, My Enterprise, and Partner Management.
- To manage or delete a sandbox, click the Configuration tab in the navigation bar and select the Sandboxes app.
-
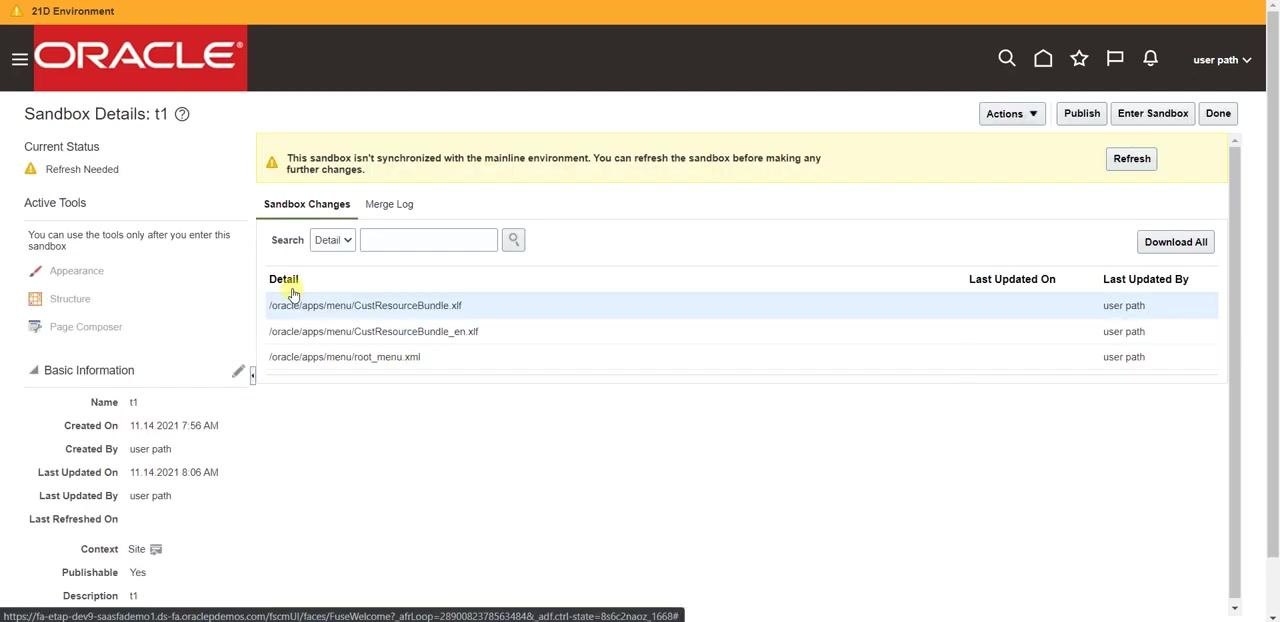
In the Sandboxes section, locate the sandbox you want to delete (for example,
t1) and click its name to open the details. The Sandbox Details page shows the status, active tools, and a list of changes; a yellow warning may indicate the sandbox is not synchronized with the mainline environment. To delete, click the Actions dropdown and select Delete. -
If you do not want to delete the sandbox, navigate away or click Done to return to the previous screen without deleting it.
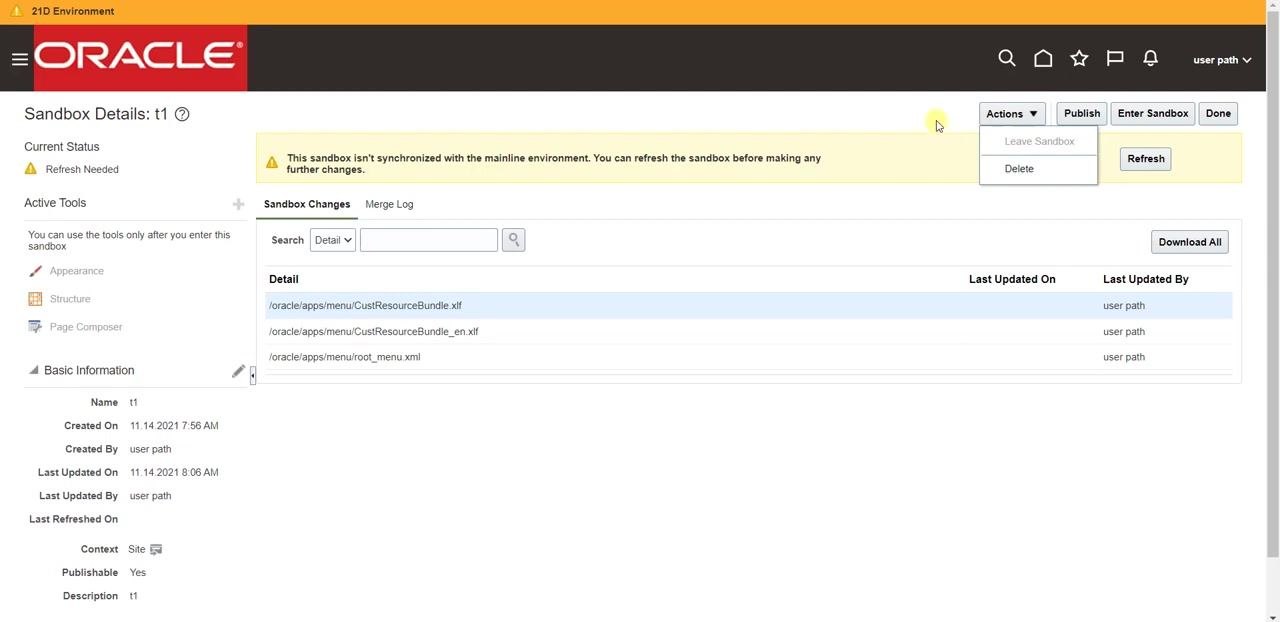
Note: Always confirm before deleting a sandbox, as this action cannot be undone. Use the Publish option to finalize and apply changes from a sandbox to your environment.
Customizing home page apps and tools
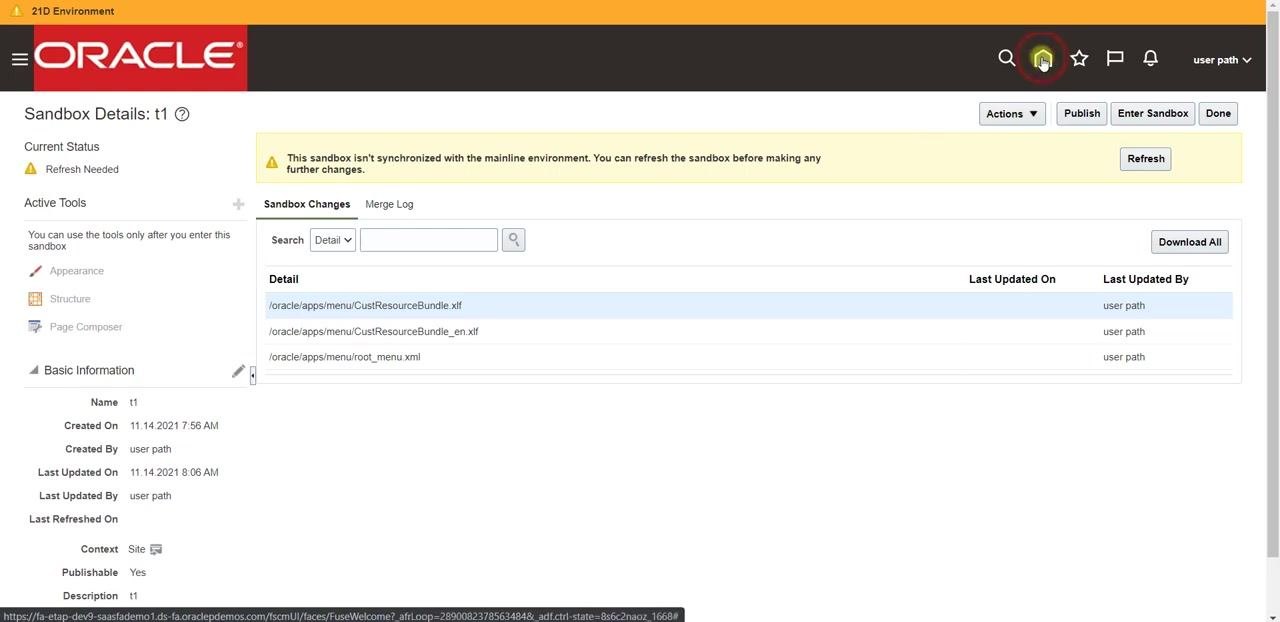
- On the Sandbox Details: t1 page, verify the current status. If you see a yellow warning stating that the sandbox isn't synchronized with the mainline environment, click Refresh before making further changes. Review the list of changed files under Sandbox Changes, and check the Basic Information section for details such as Name, Created On, Last Updated On, and Context.
-
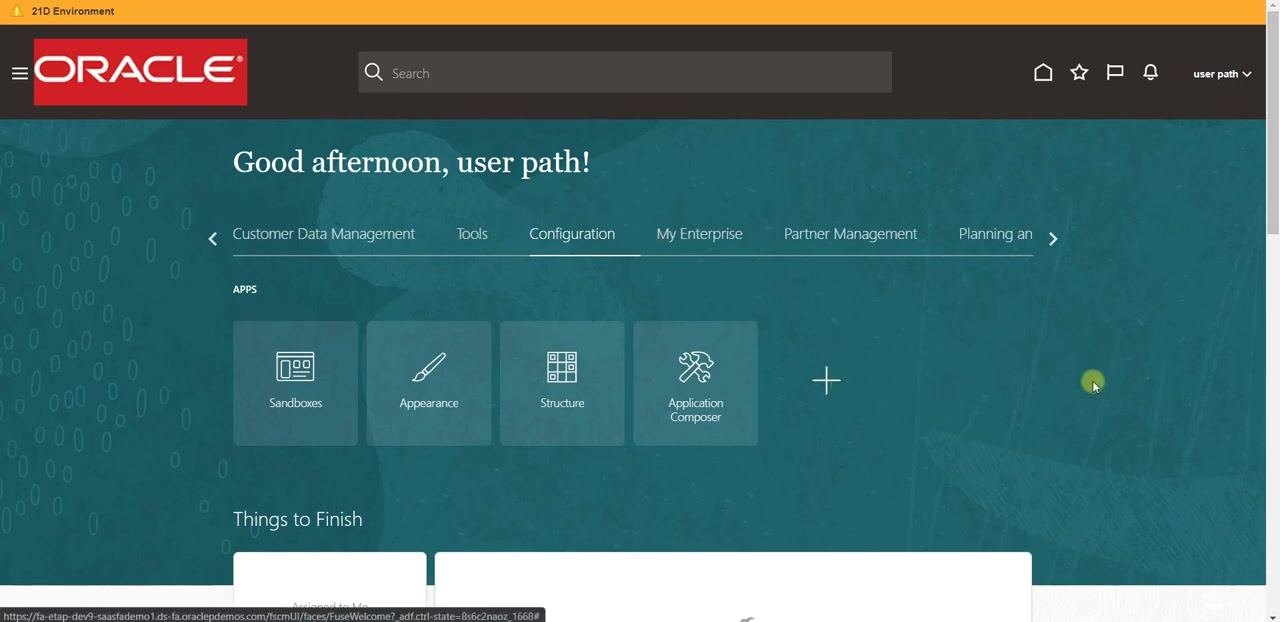
Navigate back to the home page. The navigation bar includes Customer Data Management, Tools, Configuration, My Enterprise, and Partner Management. Under Configuration, confirm the presence of app tiles: Sandboxes, Appearance, Structure, and Application Composer, and locate the plus (+) icon to add more apps.
-
Click the plus (+) icon in the APPS section to open the app selection page. The Apps page displays sections such as My Team and Me, each with a list of available modules and checkboxes, including Personal Information, Connections, Pay, Career and Performance, Benefits, Job Openings, Directory, Journeys, Time and Absences, Learning, and Opportunity Marketplace.
-
Scroll through the list to find additional sections such as Procurement (for example, Purchase Requisitions, Suppliers, My Receipts) and Help Desk. Check or uncheck boxes to control which functionalities are visible—for example, ensure Households is checked under Me to make it visible.
- In the Configuration section, check or uncheck apps such as Sandboxes, Appearance, Business Objects, Migration, Structure, and Application Composer. For example, check Migration so it appears on your home page.
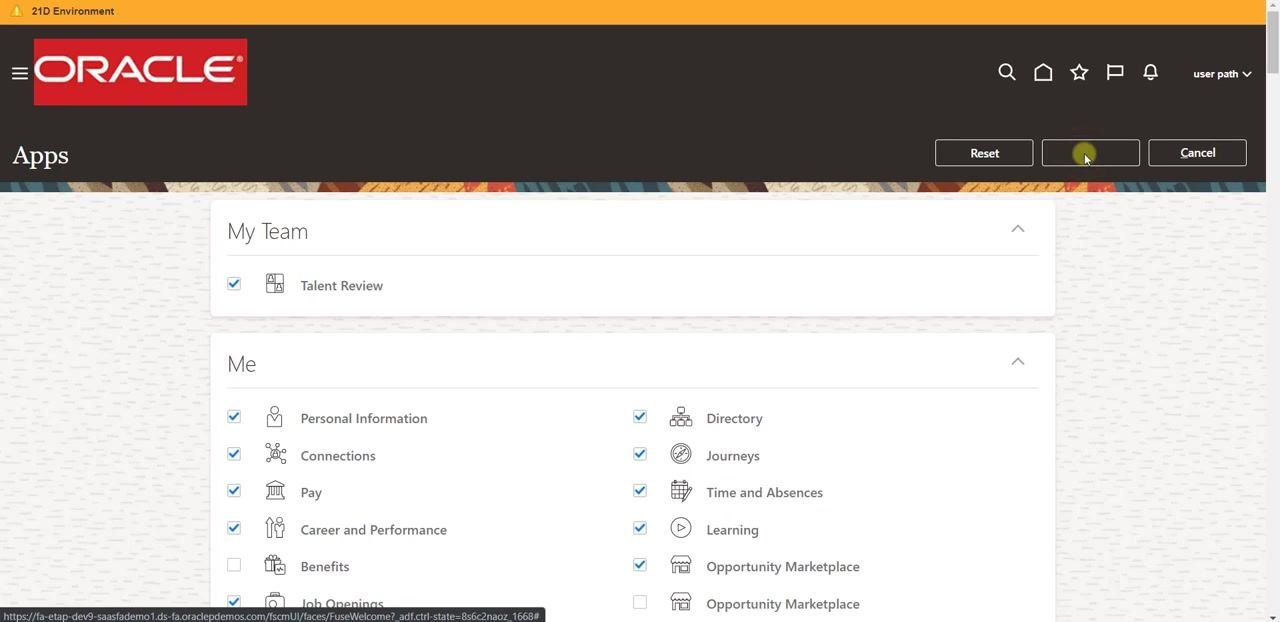
- After making your selections, click Save and Close at the top right of the page to apply your changes. The system updates your home page to reflect the new set of visible apps.
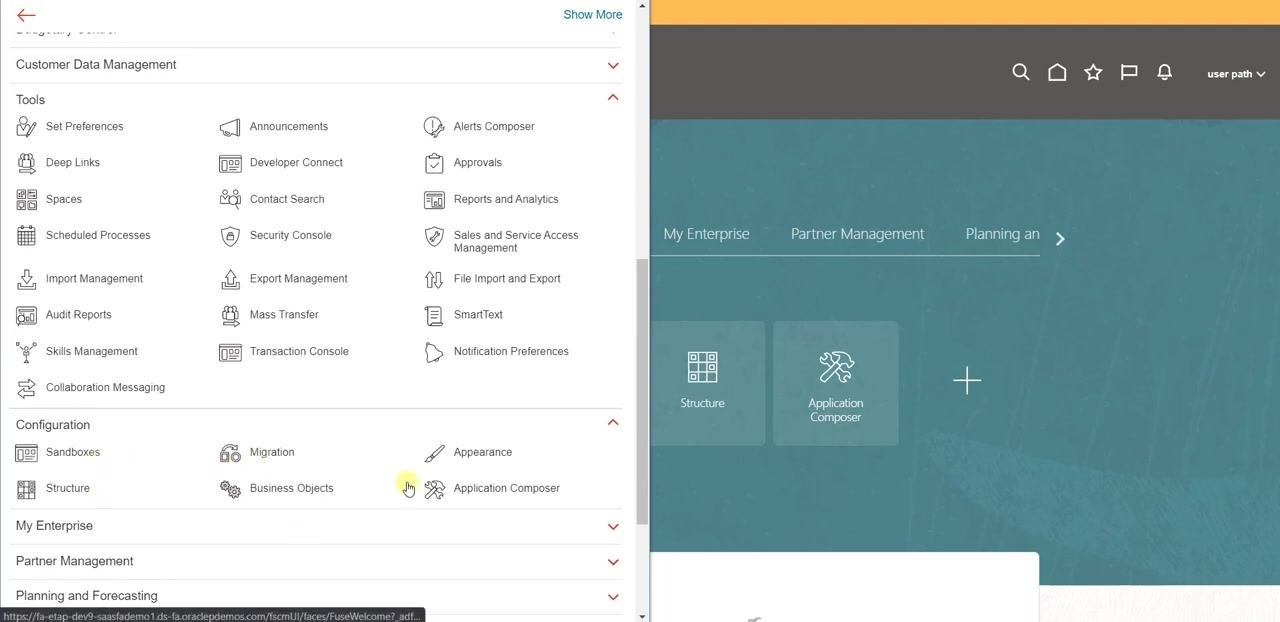
- Return to the home page and confirm that the newly selected apps (for example, Migration) now appear alongside existing ones such as Sandboxes, Appearance, Structure, and Application Composer. The number of visible apps should match the number of checked boxes in the configuration.
Verifying the final home page layout
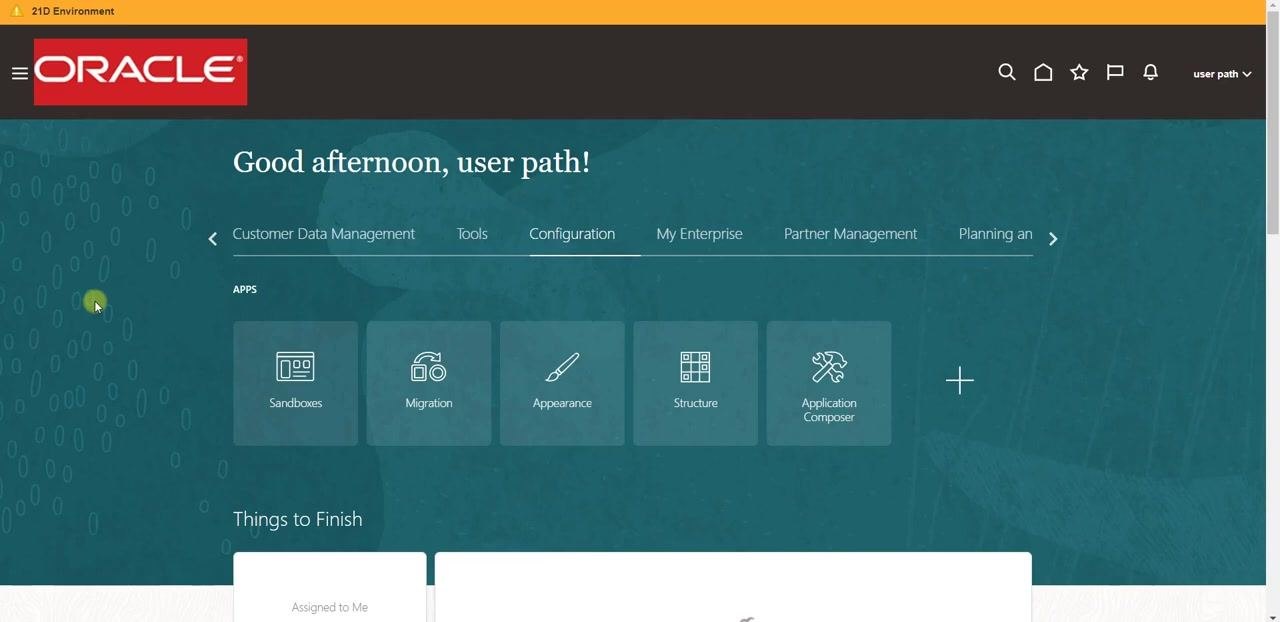
- Confirm you are on the Oracle Cloud home page, with the Oracle logo and environment indicator visible in the header, and the greeting message displayed at the top. Verify that the navigation bar includes Customer Data Management, Tools, Configuration (selected), My Enterprise, Partner Management, and Planning. Under the Configuration tab, confirm the APPS section lists Sandboxes, Migration, Appearance, Structure, Application Composer, and the plus (+) icon for adding more apps. Check that the Things to Finish section is visible below the app tiles, with cards such as Assigned to Me.
What's next
With your sandbox created, customized, and published, you can continue to explore the Sandboxes, Migration, Appearance, Structure, and Application Composer tiles to make further configuration changes. If you need to adjust visible apps again, use the plus (+) icon to add or remove modules, or return to the Sandbox Management page to create, enter, or delete additional sandboxes as your customization needs evolve.
Generation details: cost, quality tiers
Docsie billed 7,000 credits ($4.90) to analyze this 14-minute video at standard quality. The rewrite, template fill and Word/PDF exports were included. The same video at each quality tier:
| Quality | Frames sampled | Credits | Approx. cost |
|---|---|---|---|
| Draft | every 16-30 s | 3,500 | $2.45 |
| Standard (this guide) | every 8-15 s | 7,000 | $4.90 |
| Detailed | every 4-7 s | 14,000 | $9.80 |
| Ultra | every 1-3 s | 28,000 | $19.60 |
Credits priced at $0.70 per 1,000; plans include a monthly allowance. Enterprise customers on on-premise or bring-your-own-model deployments run this on their own inference and pay no per-video credits.
Generated by Docsie Video-to-Docs on 2026-10-01 from a 13-minute video. Screenshots are frames from the source video and belong to their creator, Technical Talk's, whose original is embedded above. If you own this video and want the guide removed or credited differently, contact us and we will act within one business day.