
How to Create a Purchase Order in Oracle Fusion
This guide walks you through how to create a purchase order in Oracle Fusion, from navigating to the Procurement module through adding line items, submitting the order for approval, and verifying its status. Follow each step in order to complete the process successfully.
Video: Create Purchase Order in Oracle Fusion | Purchase Order in Oracle Fusion by Fox Oracle Apps Solutions. All credit for the demonstration goes to the creator; watch the original on YouTube. The written guide below was generated from this video by Docsie. Creator? Request a change or removal.
This guide walks you through how to create a purchase order in Oracle Fusion, from navigating to the Procurement module through adding line items, submitting the order for approval, and verifying its status. Follow each step in order to complete the process successfully.
Prerequisites
Before you begin, make sure you have the following:
- Access to the Oracle Fusion application with Procurement permissions
- Knowledge of the relevant Business Unit, supplier, and buyer information for your order
- Item codes or descriptions for the goods you plan to order (or access to the item search function)
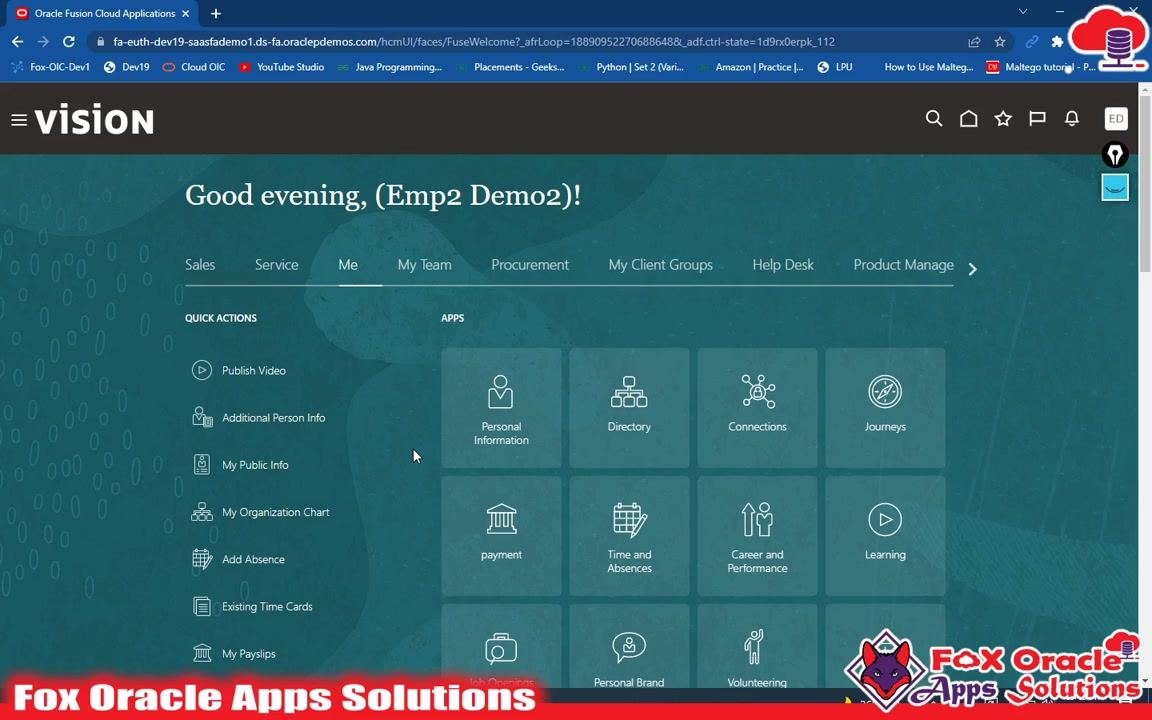
Navigate to the Procurement tab
Log in to the Oracle Fusion application. On the main dashboard, locate the top navigation bar and click the Procurement tab to access procurement-related functions.
Access the Purchase Orders section
Within the Procurement tab, find the Purchase Orders option among the available apps and click it to proceed.
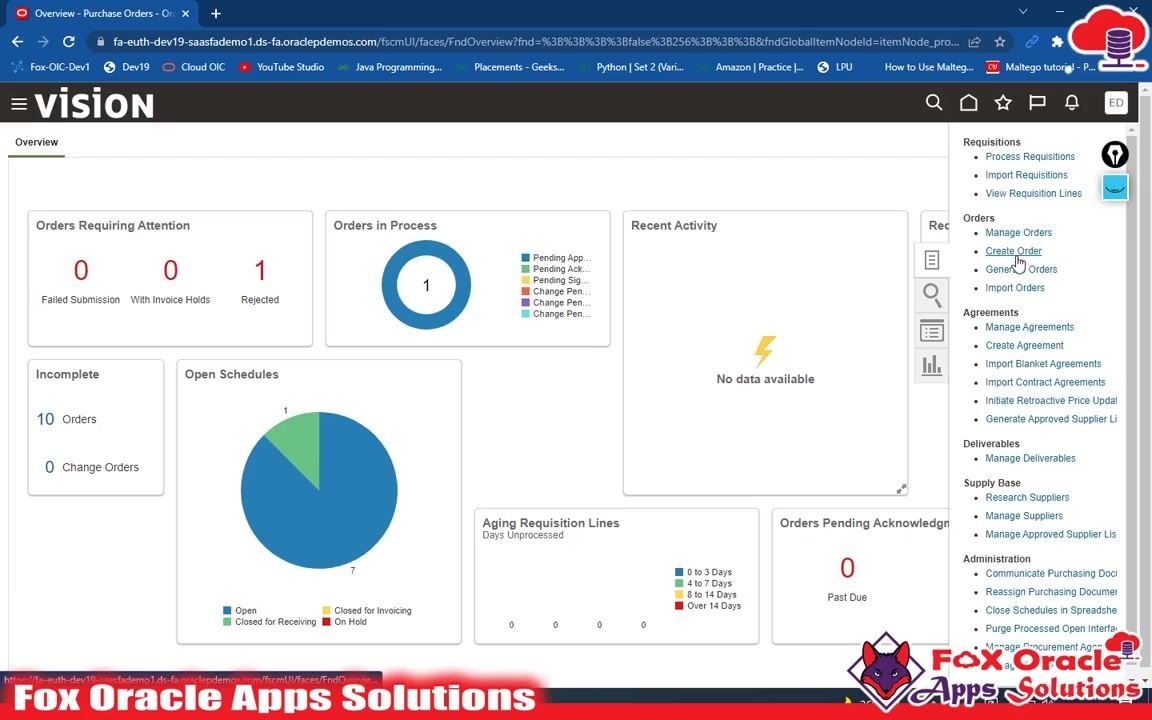
Review the Purchase Orders Overview
The system displays the Purchase Orders Overview dashboard. Review the available widgets, such as Orders Requiring Attention, Orders in Process, Recent Activity, Requisition Lines, Incomplete Orders, Open Schedules, Aging Requisition Lines, and Orders Pending Acknowledgment. No action is required here other than confirming you are in the correct section.
Start creating a new purchase order
On the right side of the screen, locate the Tasks panel. Under the Orders section, click Create Order to begin.
Fill in the Create Order form
A Create Order dialog box appears. Enter or select the following details:
- Style: Purchase Order (default)
- Procurement BU: the appropriate Business Unit (for example, US1 Business Unit)
- Requisitioning BU: the corresponding Business Unit (for example, US1 Business Unit)
- Supplier: start typing and select the supplier (for example, Lee Supplies)
- Supplier Site: the supplier site (for example, Lee US1)
- Supplier Contact: the contact (for example, Lee, Ryan)
- Default Ship-to Location: the delivery location (for example, Seattle)
- Sold-to Legal Entity: the legal entity (for example, US1 Legal Entity)
- Currency: the currency (for example, USD)
- Buyer: the buyer (for example, Demo2, Emp2)
Click Create to proceed.
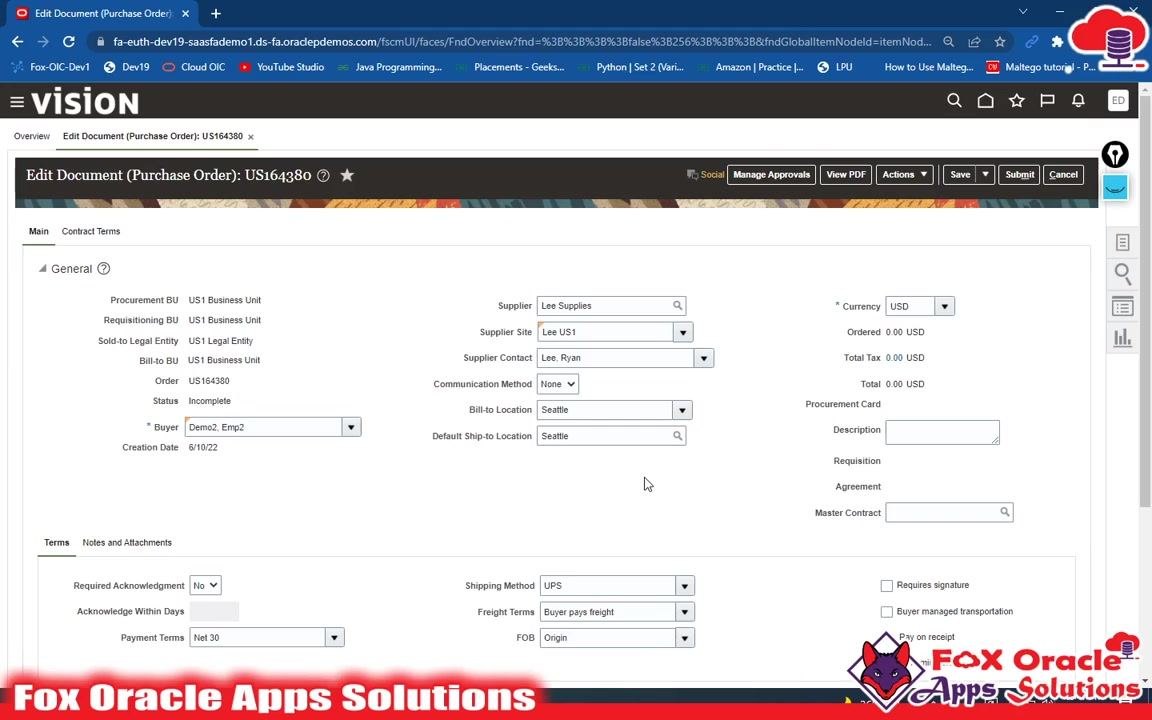
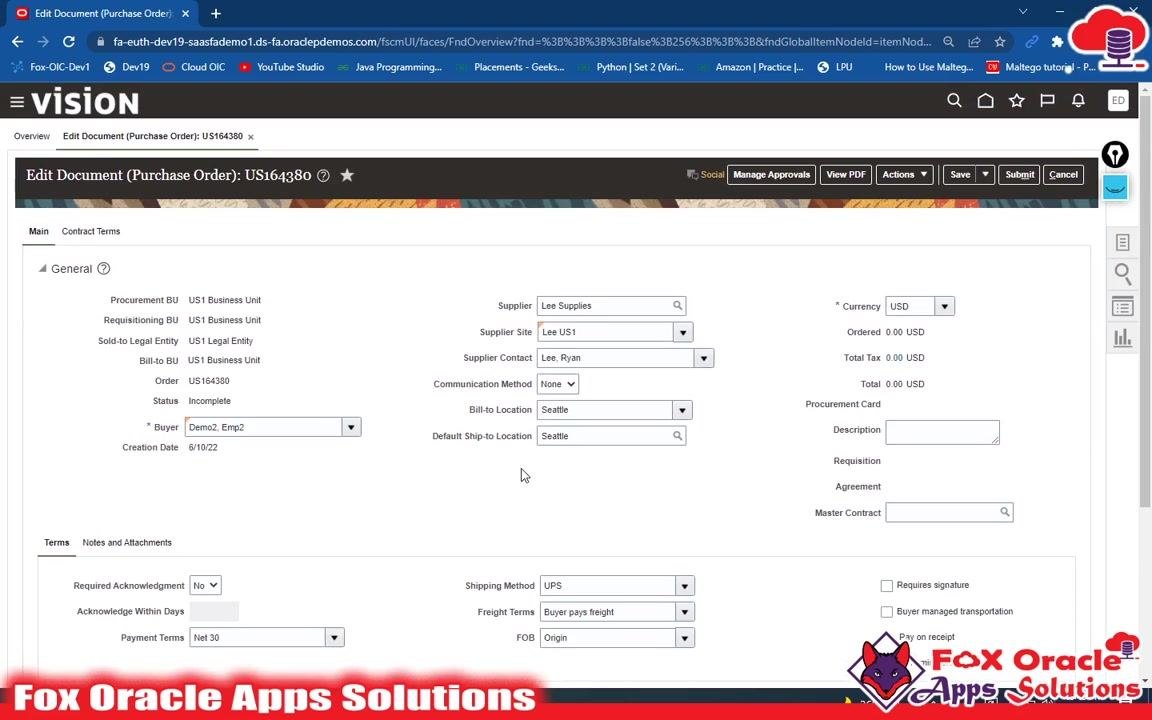
Review the purchase order details
The system opens the Edit Document (Purchase Order) page with the General section populated based on your earlier entries:
- Procurement BU: US1 Business Unit
- Requisitioning BU: US1 Business Unit
- Sold-to Legal Entity: US1 Legal Entity
- Bill-to BU: US1 Business Unit
- Order: auto-generated (for example, US164380)
- Status: Incomplete
- Buyer: Demo2, Emp2
- Creation Date: for example, 6/10/22
- Supplier: Lee Supplies
- Supplier Site: Lee US1
- Supplier Contact: Lee, Ryan
- Communication Method: None
- Bill-to Location: Seattle
- Default Ship-to Location: Seattle
- Currency: USD
Fill in any additional fields as required, such as Description, Requisition, Agreement, Master Contract, and Procurement Card. Under the Terms section, set:
- Required Acknowledgment: No
- Payment Terms: Net 30
- Shipping Method: UPS
- Freight Terms: Buyer pays freight
- FOB: Origin
You can also select checkboxes for Requires signature, Buyer managed transportation, and Pay on receipt as needed.
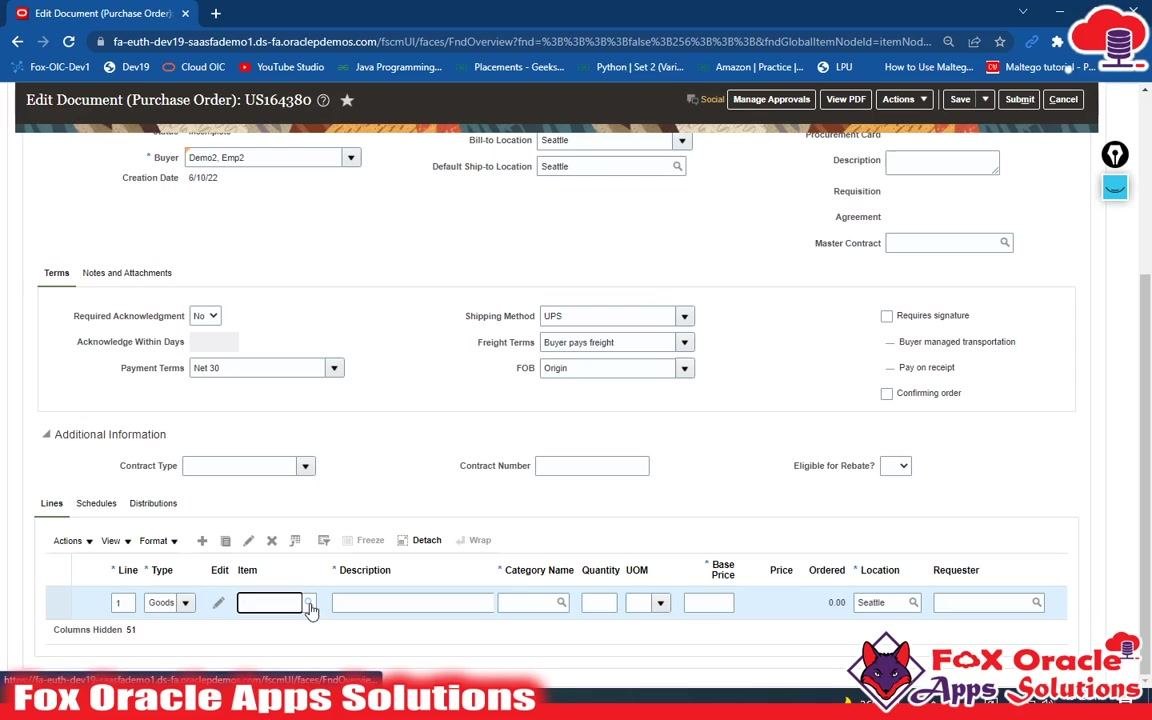
Add an item to the purchase order
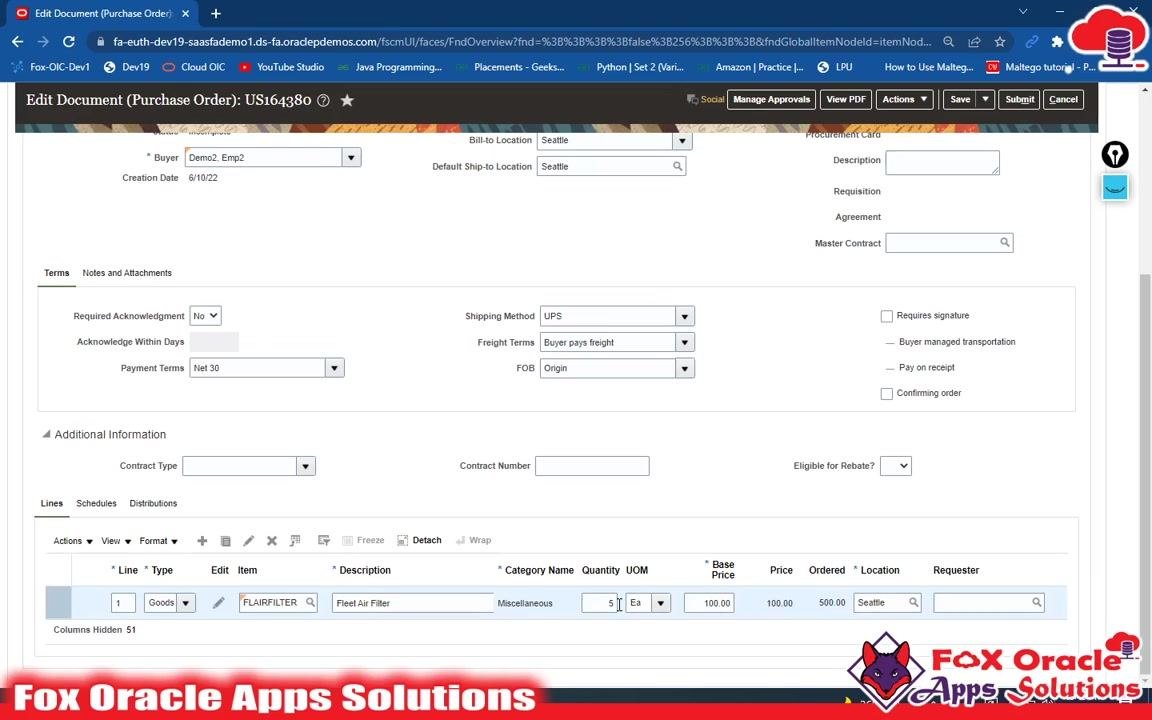
On the Edit Document (Purchase Order) page, scroll down to the Lines section. In the first line, under the Item column, click the search icon to select an item. If you do not remember the item code, use the search icon to open the Search and Select: Item dialog.
Search for and select the item
In the Search and Select: Item dialog, perform a blind search or enter search criteria as needed. Review the list of available items (for example, Air Handler, CM4800136, FLAIRFILTER, FLGASTANK), select the desired item (for example, FLAIRFILTER – Fleet Air Filter), and click OK to confirm your selection.
Enter quantity and base price
In the Quantity field, enter the required quantity (for example, 5). In the Base Price field, enter the price per unit (for example, 100). The system automatically calculates the Order Price (for example, 5 x 100 = 500). The Requester field is optional and can be left blank.
Set the delivery schedule for the item
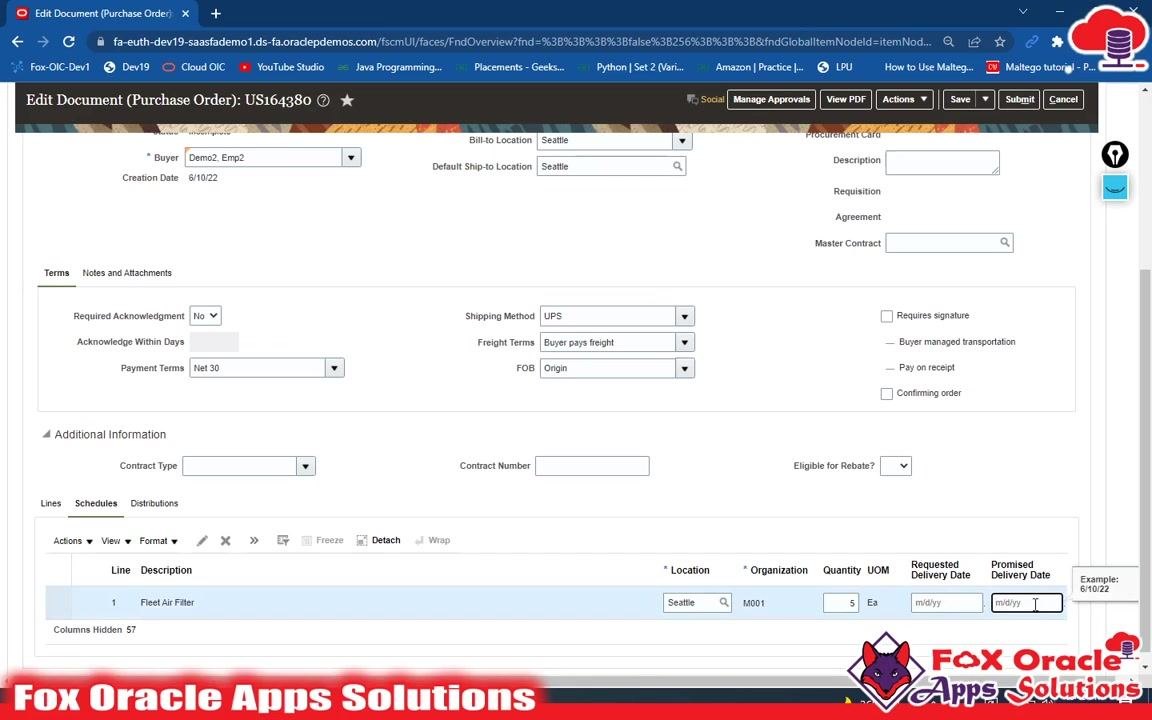
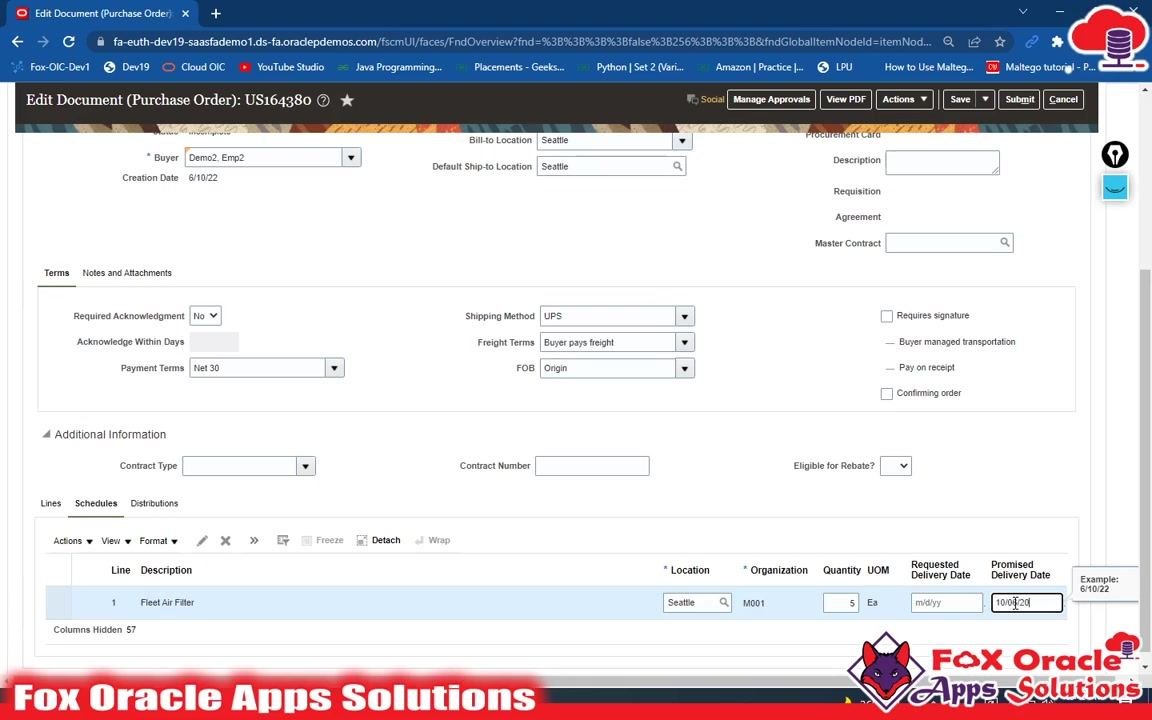
Click the Schedules tab below the Lines section. Confirm the Location (for example, Seattle), Organization (for example, M001), Quantity (for example, 5), and UOM (for example, Ea) in the schedule line. Enter either the Requested Delivery Date or the Promised Delivery Date—one of these is mandatory. For example, enter the Promised Delivery Date as 10/06/2022.
Review distribution details (optional)
On the Edit Document (Purchase Order) page, you can review the Distributions tab for additional allocation or accounting details. If no changes are needed, you can proceed without editing this section.
Save or submit the purchase order
Ensure all required fields are completed, including Buyer, Supplier, Item, Quantity, Price, and Delivery Dates. At the top right of the page, you have two options:
- Click Save to save your progress and submit later
- Click Submit to send the purchase order for approval immediately
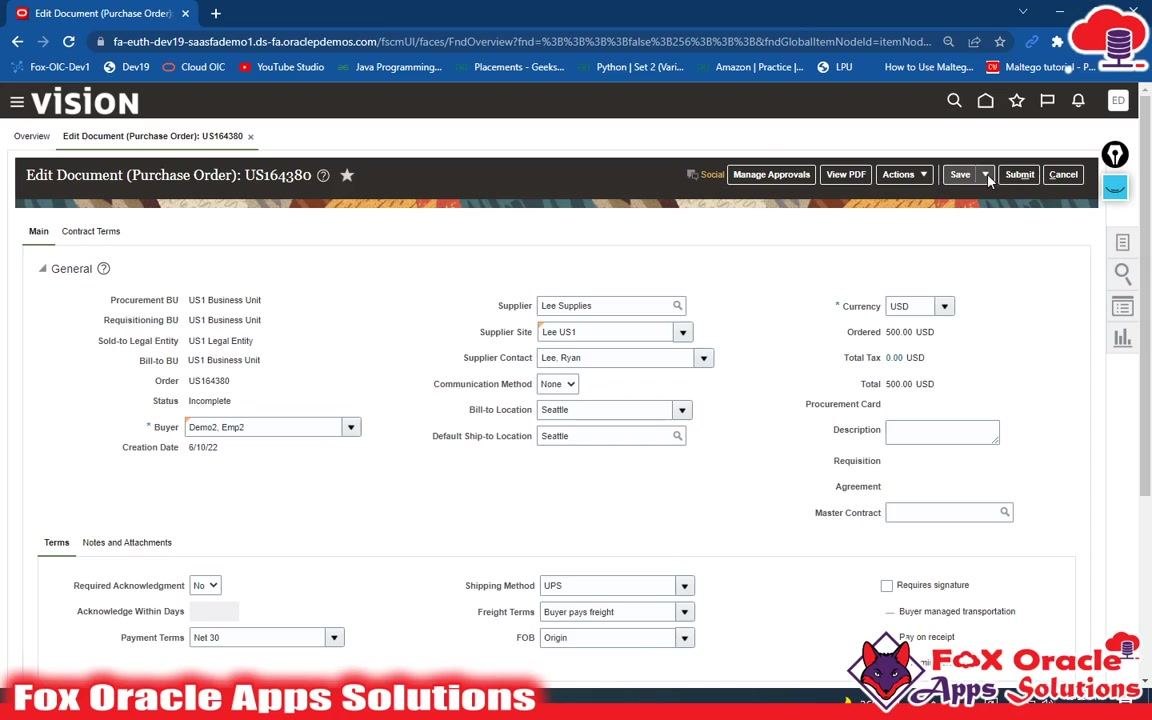
Confirm submission
After clicking Submit, if all mandatory fields are filled, a confirmation pop-up appears showing the purchase order number (for example, US164380) and confirming that the document was submitted for approval. Click OK to proceed. Note or copy the purchase order number for future reference.
Once submitted, the purchase order status becomes Approval Required, and the order routes to the designated approver(s). After approval, the status changes to Open. When the status is Open, you can proceed to receive items against the purchase order.
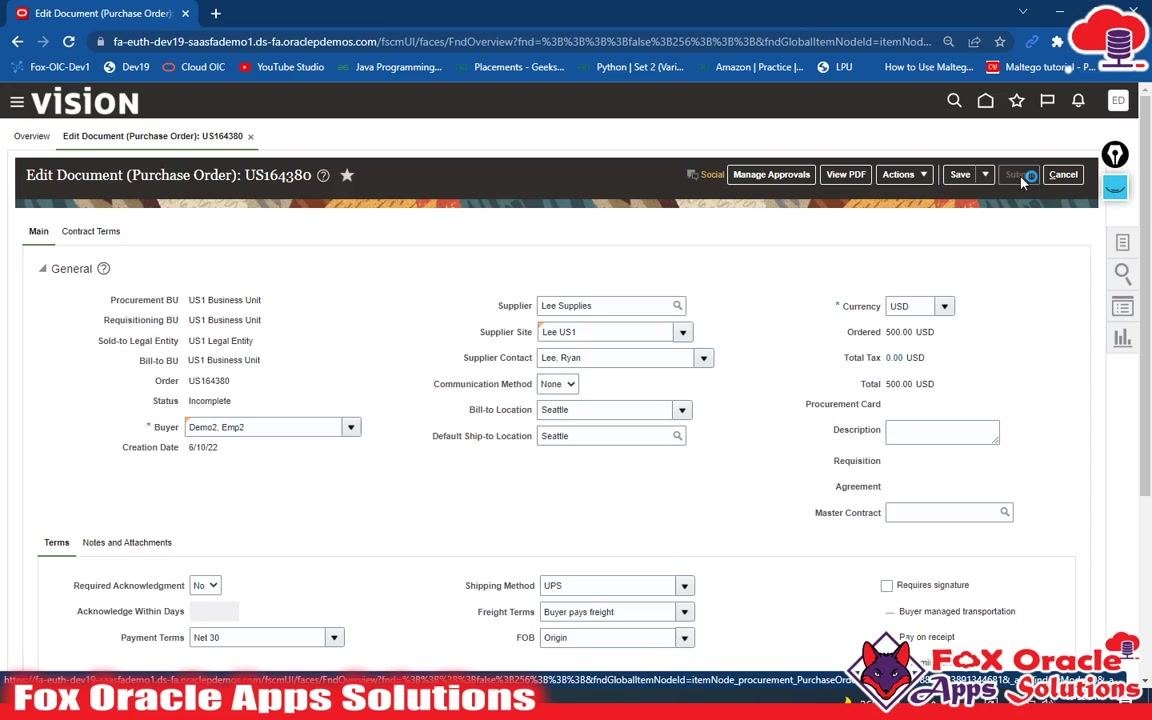
Navigate to Manage Orders
From the main dashboard, open the right-side menu under Orders and click Manage Orders to search for and track your purchase order.
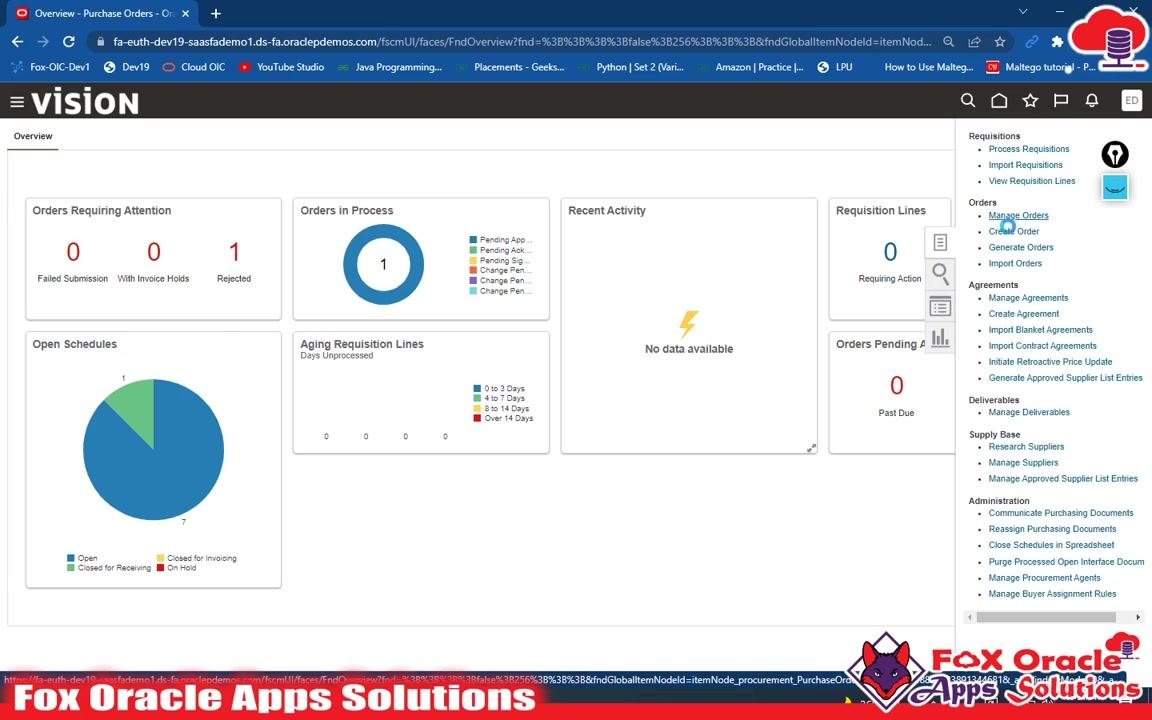
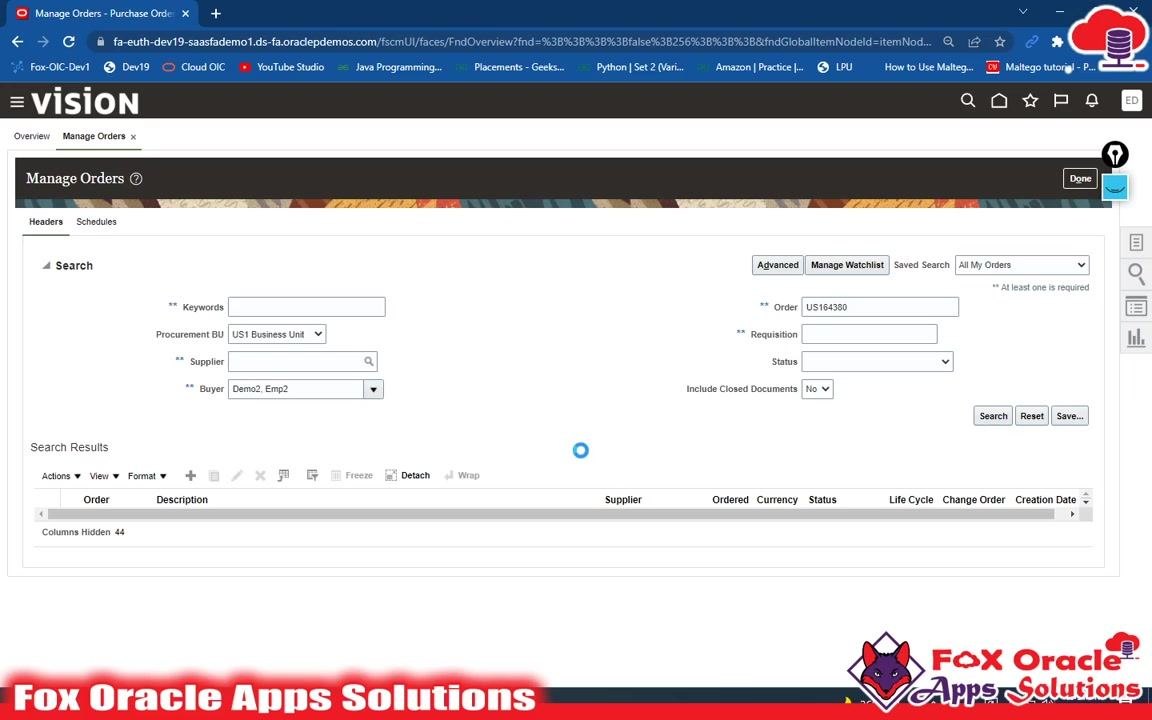
Search for your purchase order
In the Manage Orders screen, enter your purchase order number (for example, US164380) in the Order field. Ensure Procurement BU is set to US1 Business Unit (or your relevant business unit), and confirm the Buyer field matches your user (for example, Demo2, Emp2). Click Search to locate your purchase order.
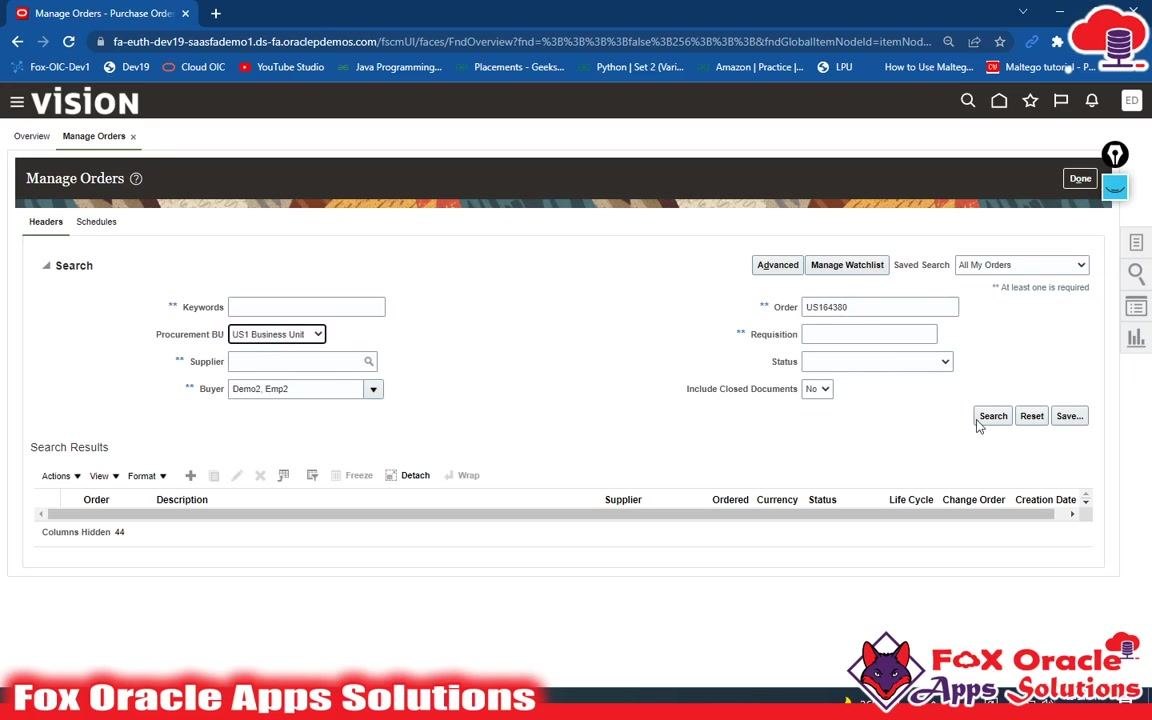
Wait for search results
After clicking Search, the system retrieves your purchase order. A loading indicator may appear briefly while the system processes your request.
Review the search results and confirm status
Once results are displayed, locate your purchase order in the list and confirm the following details:
- Order: US164380 (clickable link)
- Supplier: Lee Supplies
- Ordered: 500.00
- Currency: USD
- Status: Open
- Creation Date: 6/10/22
Ensure the Status column shows Open, which indicates the order is approved and ready for receiving. If the status is not Open, wait for approval or check with your approver.
Summary
You have now learned how to create a purchase order in Oracle Fusion, covering the full workflow:
- Navigating to the Procurement tab and the Purchase Orders section
- Creating a new order and completing the General and Terms details
- Adding line items, setting quantity and price, and defining the delivery schedule
- Submitting the order for approval and confirming submission
- Searching for and verifying the order status through Manage Orders
Key values used in this example included Item FLAIRFILTER (Fleet Air Filter), Quantity 5, Base Price 100, an auto-calculated Order Price of 500, Location Seattle, and a Promised Delivery Date of 10/06/2022.
What's next
Once your purchase order status shows Open, it is ready for receiving. Proceed to the next guide to learn how to receive items against your purchase order.
Generation details: cost, quality tiers
Docsie billed 3,000 credits ($2.10) to analyze this 6-minute video at standard quality. The rewrite, template fill and Word/PDF exports were included. The same video at each quality tier:
| Quality | Frames sampled | Credits | Approx. cost |
|---|---|---|---|
| Draft | every 16-30 s | 1,500 | $1.05 |
| Standard (this guide) | every 8-15 s | 3,000 | $2.10 |
| Detailed | every 4-7 s | 6,000 | $4.20 |
| Ultra | every 1-3 s | 12,000 | $8.40 |
Credits priced at $0.70 per 1,000; plans include a monthly allowance. Enterprise customers on on-premise or bring-your-own-model deployments run this on their own inference and pay no per-video credits.
Generated by Docsie Video-to-Docs on 2026-10-01 from a 5-minute video. Screenshots are frames from the source video and belong to their creator, Fox Oracle Apps Solutions, whose original is embedded above. If you own this video and want the guide removed or credited differently, contact us and we will act within one business day.