
How to Create a Descriptive Flexfield in Oracle Fusion
This guide walks you through how to create a descriptive flexfield in Oracle Fusion, from understanding the underlying segment types to defining global segments, building context-sensitive segments, deploying the flexfield, and confirming that it behaves correctly in a Functional Area Catalog. Descriptive flexfields let you add configurable fields to setup and transaction screens without being tied to any single module, so the steps below apply broadly across Oracle Fusion Applications.
Video: How to Create Descriptive Flexfield (DFF) in Oracle Fusion Cloud by apps2fusion. All credit for the demonstration goes to the creator; watch the original on YouTube. The written guide below was generated from this video by Docsie. Creator? Request a change or removal.
This guide walks you through how to create a descriptive flexfield in Oracle Fusion, from understanding the underlying segment types to defining global segments, building context-sensitive segments, deploying the flexfield, and confirming that it behaves correctly in a Functional Area Catalog. Descriptive flexfields let you add configurable fields to setup and transaction screens without being tied to any single module, so the steps below apply broadly across Oracle Fusion Applications.
Prerequisites
Before you begin, make sure you have the following:
- Access to an implementation project that includes the Manage Catalog Descriptive Flexfields task.
- Familiarity with the general concept of flexfields in Oracle applications.
- Appropriate security access to edit descriptive flexfield segments and deploy changes.
Understanding flexfield types
Oracle applications use two main types of flexfields:
- Key Flexfields — specific to each module. For example, the General Ledger module uses the "Accounting Key Flexfield," while the Purchasing module previously used the "MCAT Flexfield" (now deprecated). Each module has its own unique key flexfield.
- Descriptive Flexfields — not tied to any specific module. They are global and can appear on various setup and transaction screens across most, but not all, areas of the application.
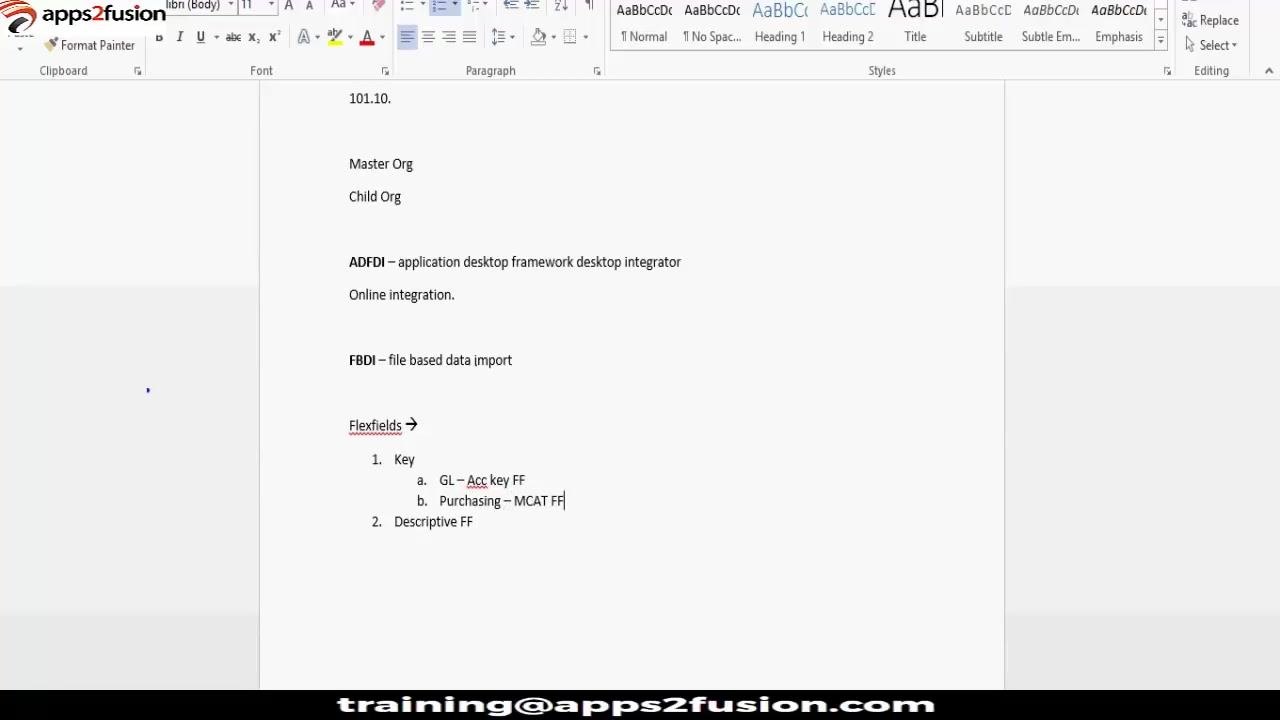
Both flexfield types relate directly to the screens you interact with while working in Oracle applications.
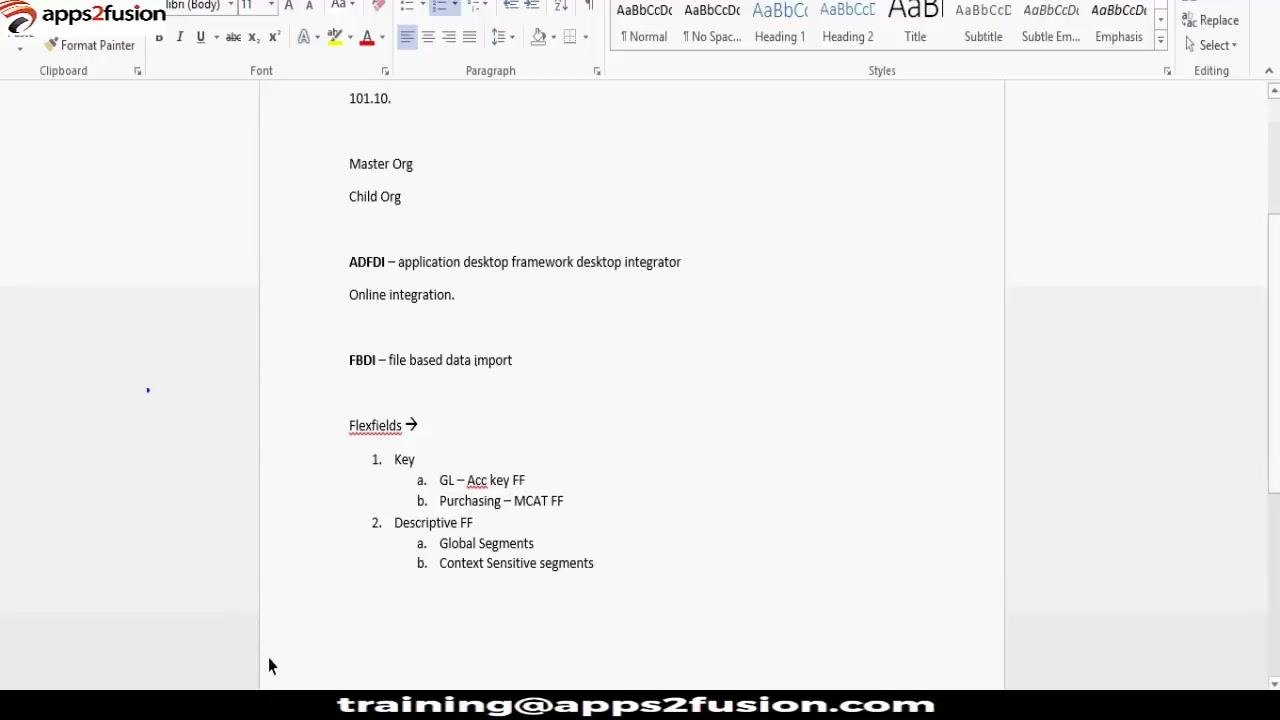
Descriptive flexfields themselves contain two types of segments:
- Global Segments — always visible on the flexfield, regardless of any other selections.
- Context Sensitive Segments — appear or change dynamically based on the value selected in a context field (a list of values).
Step-by-step: Create a descriptive flexfield
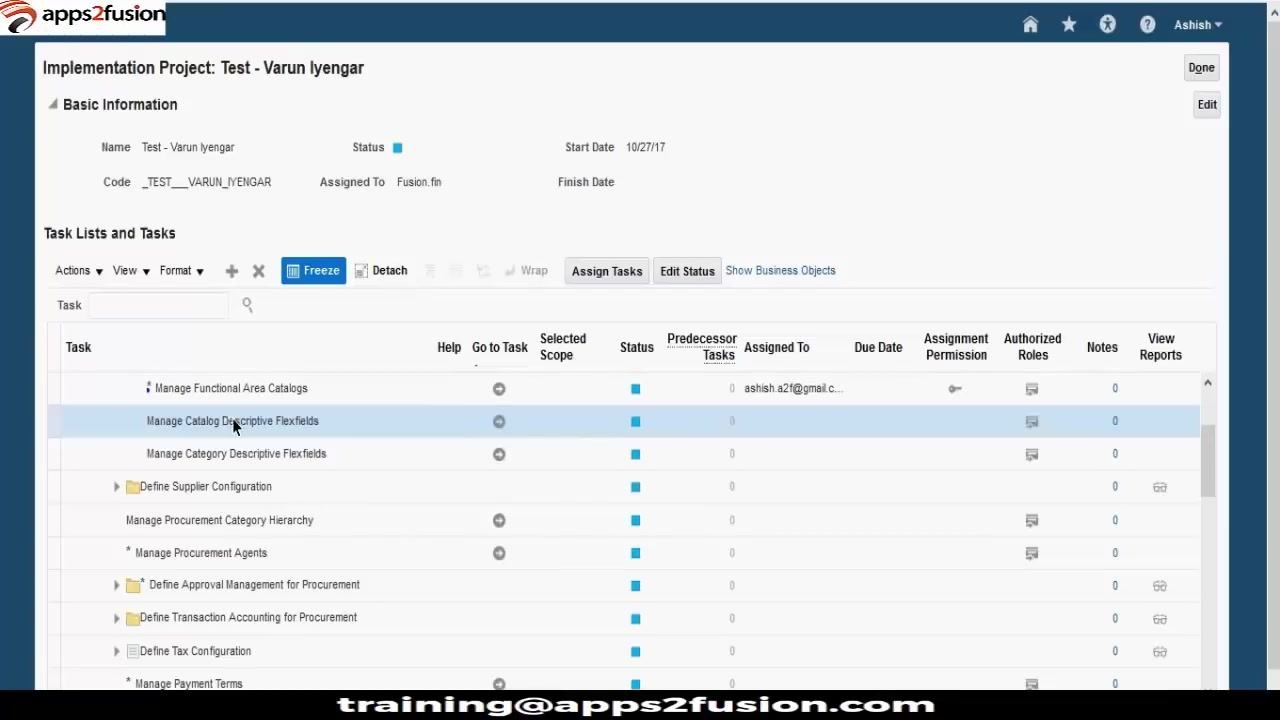
Open the Manage Catalog Descriptive Flexfields task
In your implementation project, locate and select the Manage Catalog Descriptive Flexfields task from the project task list.
Review the configuration screen
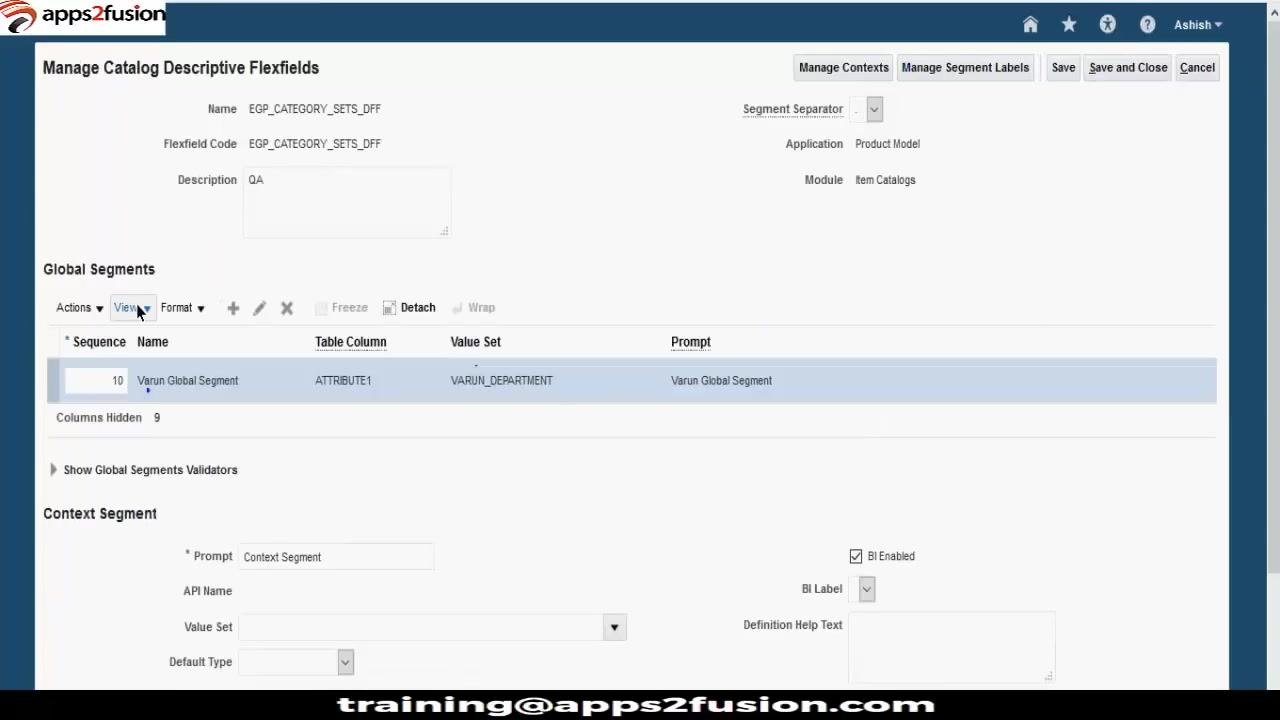
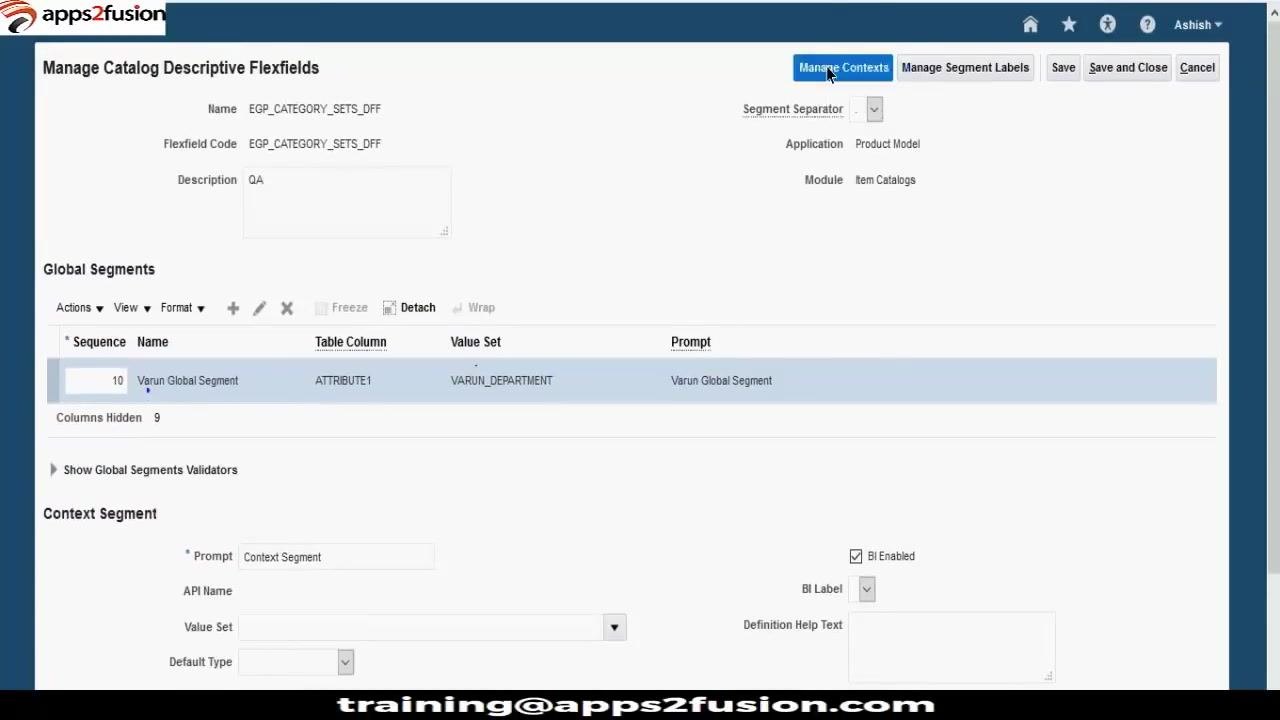
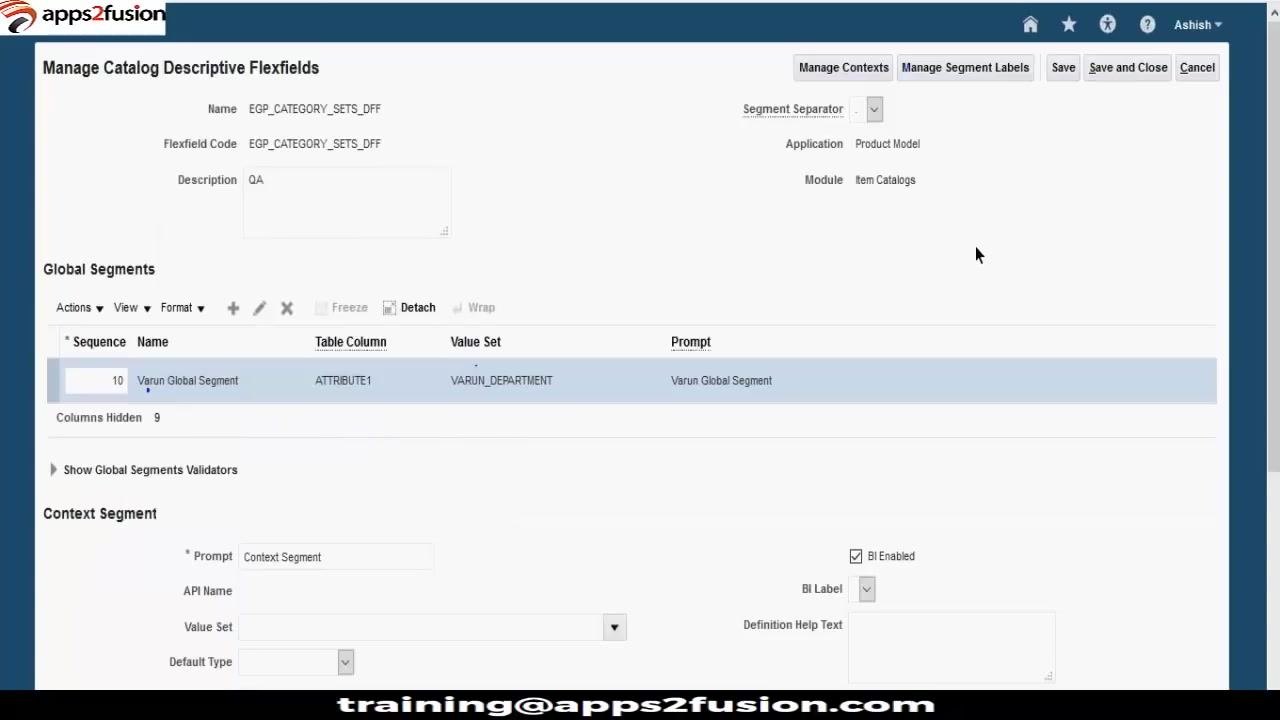
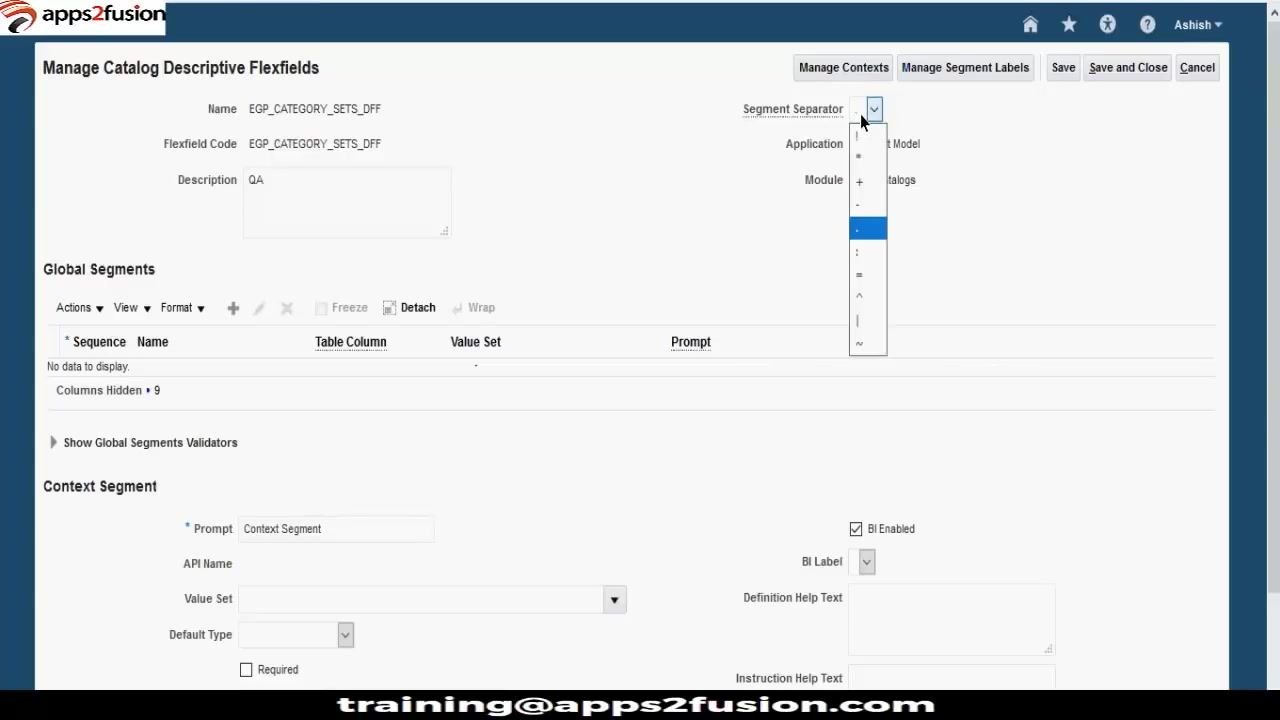
The Manage Catalog Descriptive Flexfields screen opens, displaying fields for Name, Flexfield Code, and Description, along with the Global Segments and Context Segment sections where you define and edit segments.
Confirm the flexfield details and segment areas
Verify the flexfield details at the top of the screen:
- Name: EGP_CATEGORY_SETS_DFF
- Flexfield Code: EGP_CATEGORY_SETS_DFF
- Description: QA
- Application: Product Model
- Module: Item Catalogs
Below these details, you see the two main configuration areas: Global Segments (for segments always shown) and Context Segment (for segments that depend on a context value).
Create a new global segment
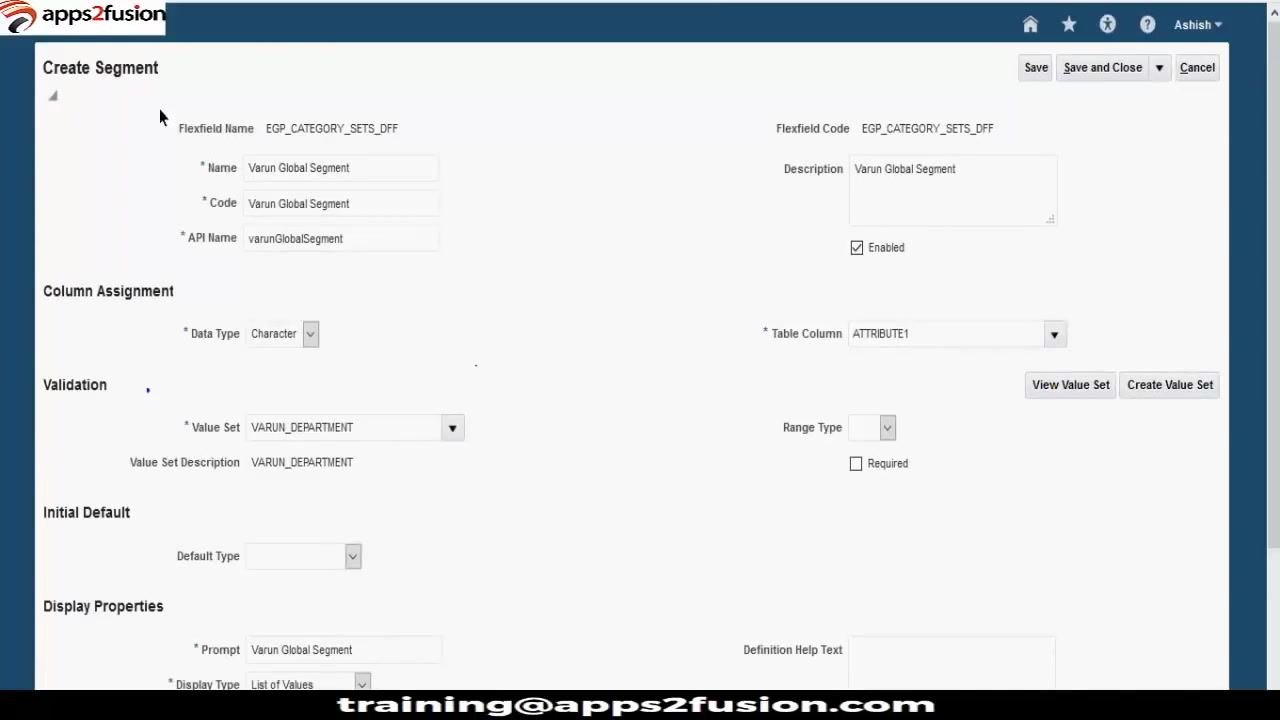
Click the + (Add) button in the Global Segments section to begin defining a new segment. Enter the following details:
- Name: Varun Global Segment
- Code: Varun Global Segment
- API Name: varunGlobalSegment
- Description: Varun Global Segment
- Enabled: Checked
Then click the Data Type dropdown and select Character.
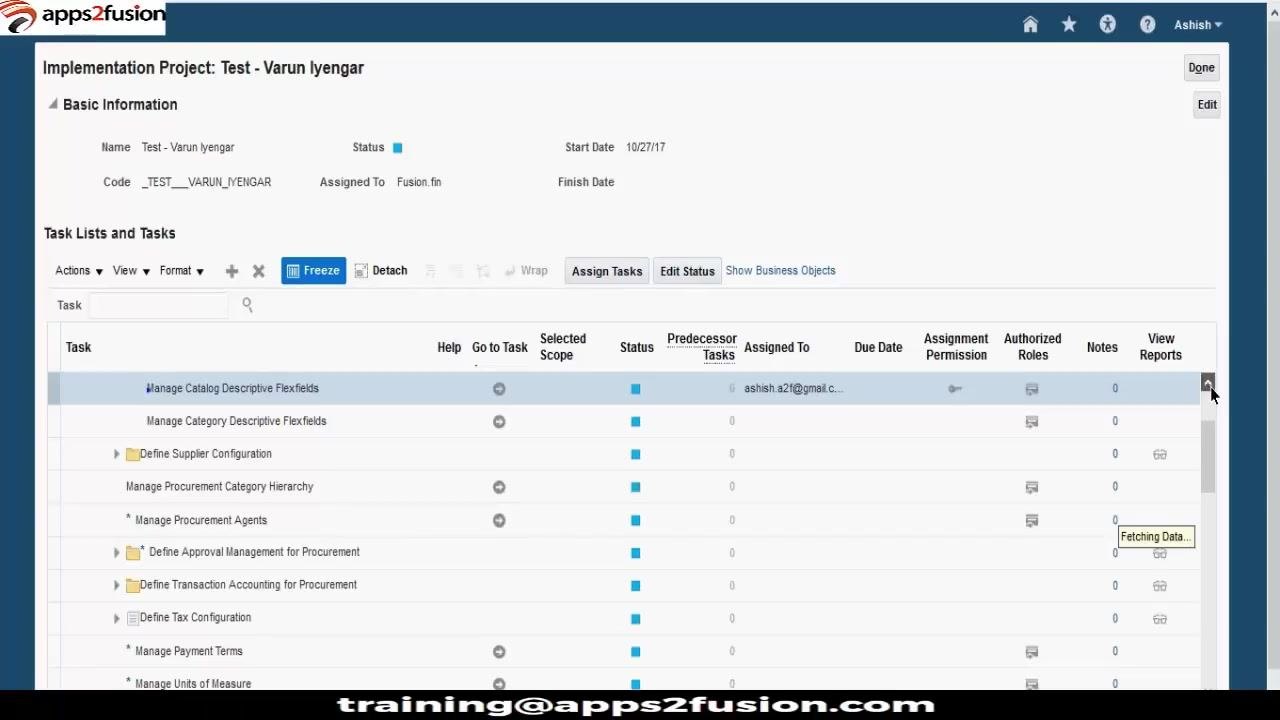
Assign the backing table column
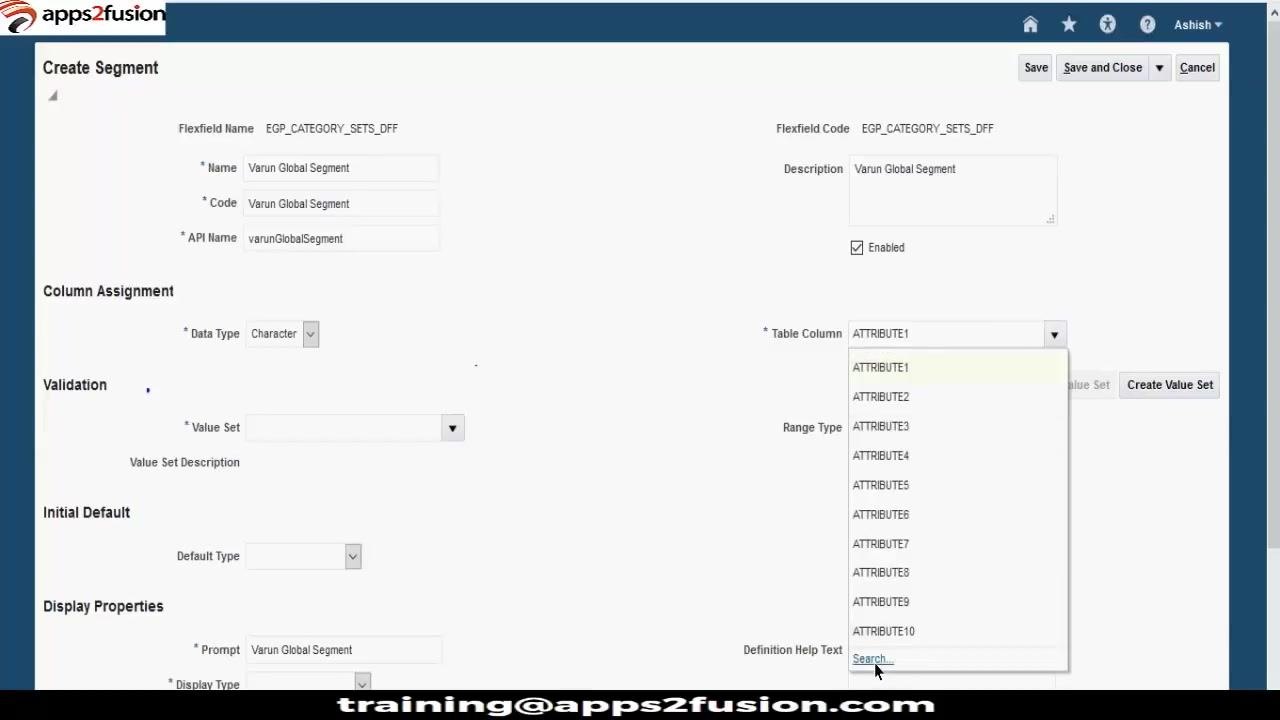
Click the Table Column dropdown and select ATTRIBUTE1 from the list of available columns. These columns (ATTRIBUTE1, ATTRIBUTE2, and so on) correspond to fields in the backend database table where the segment's data is stored.
If you prefer to search for a column, use the Search and Select: Table Column dialog, which lists ATTRIBUTE1 through ATTRIBUTE10, all of type VARCHAR2.
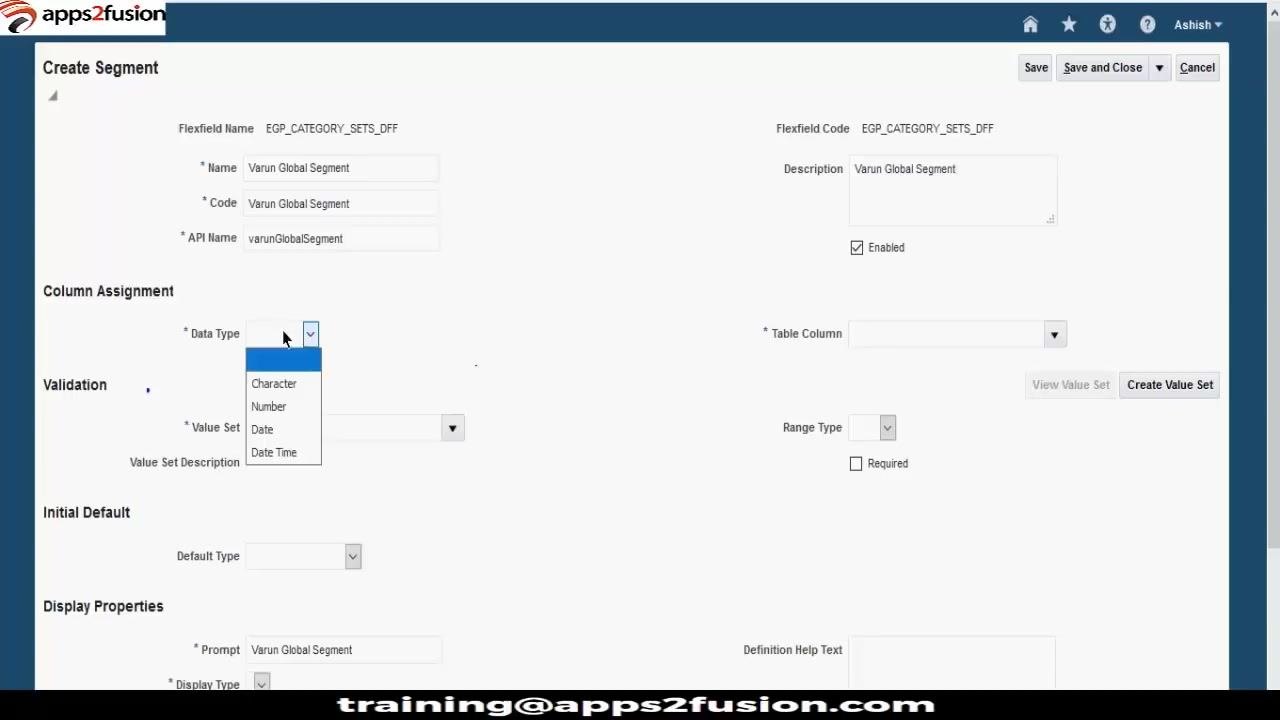
Review the completed global segment
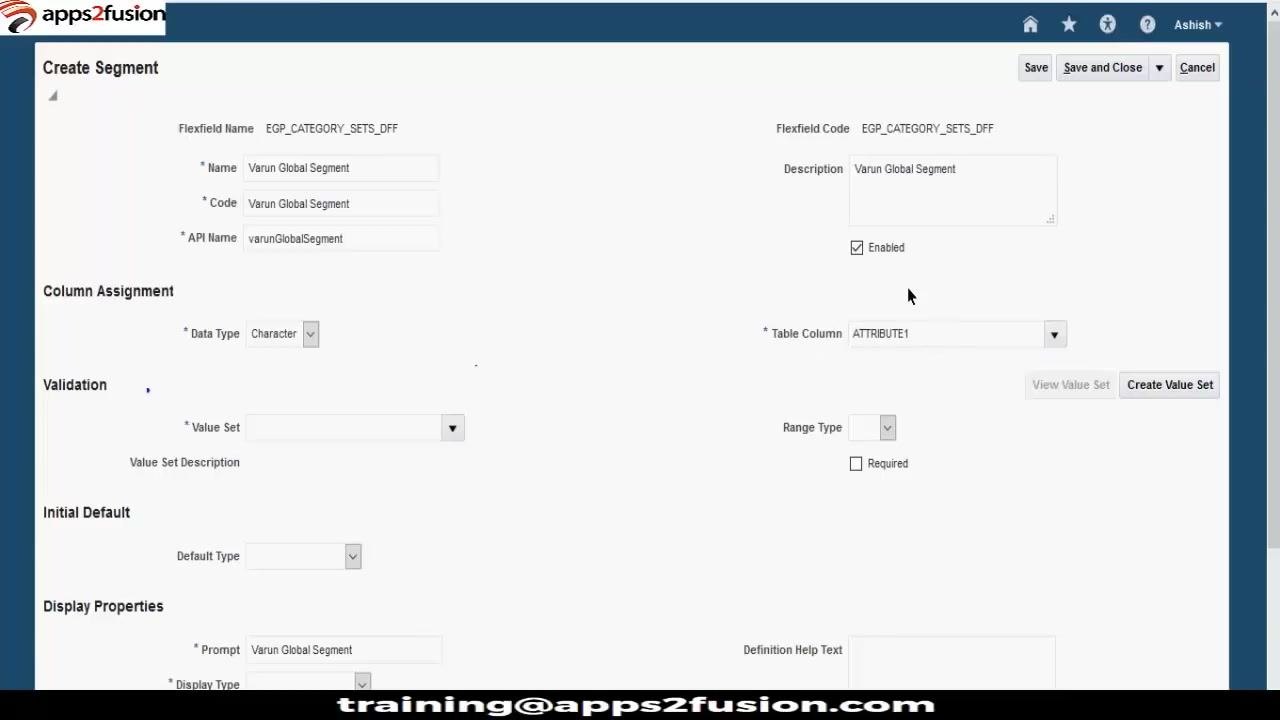
Confirm that all fields are set correctly before moving on: Name, Code, API Name, and Description are all "Varun Global Segment," Enabled is checked, Data Type is Character, and Table Column is ATTRIBUTE1. A Value Set dropdown is available for the next step.
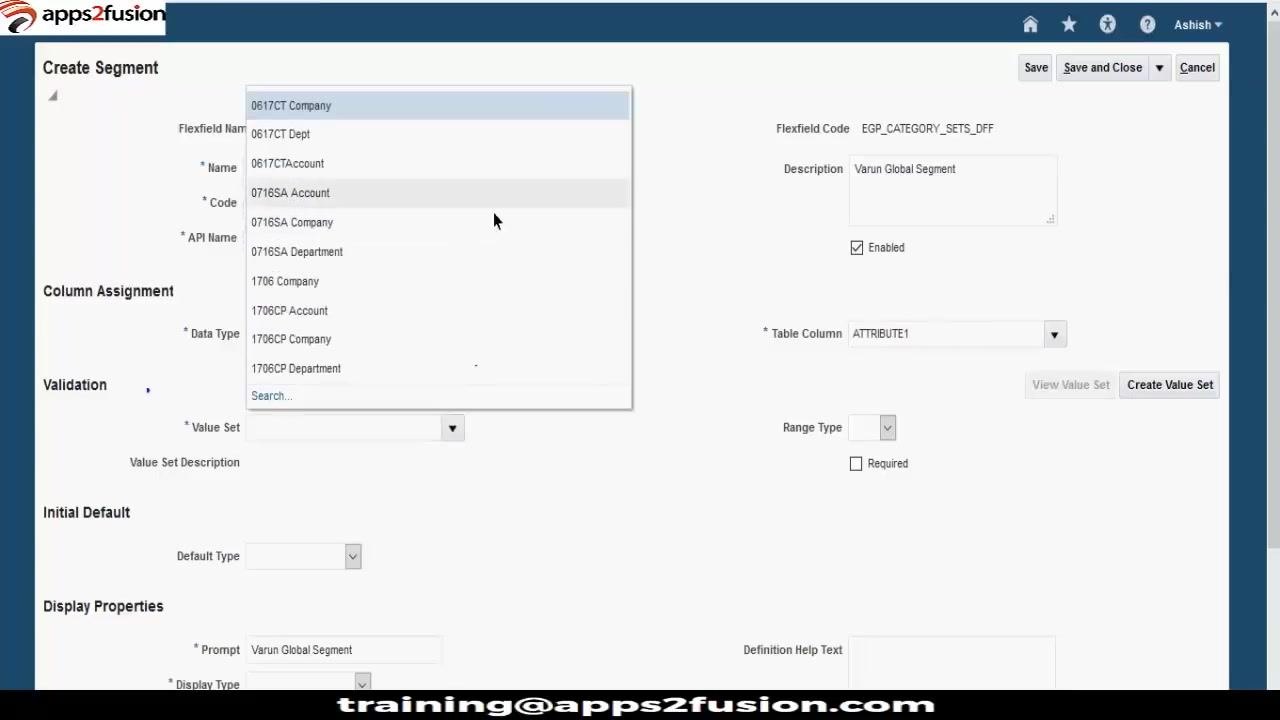
Attach a value set to the segment
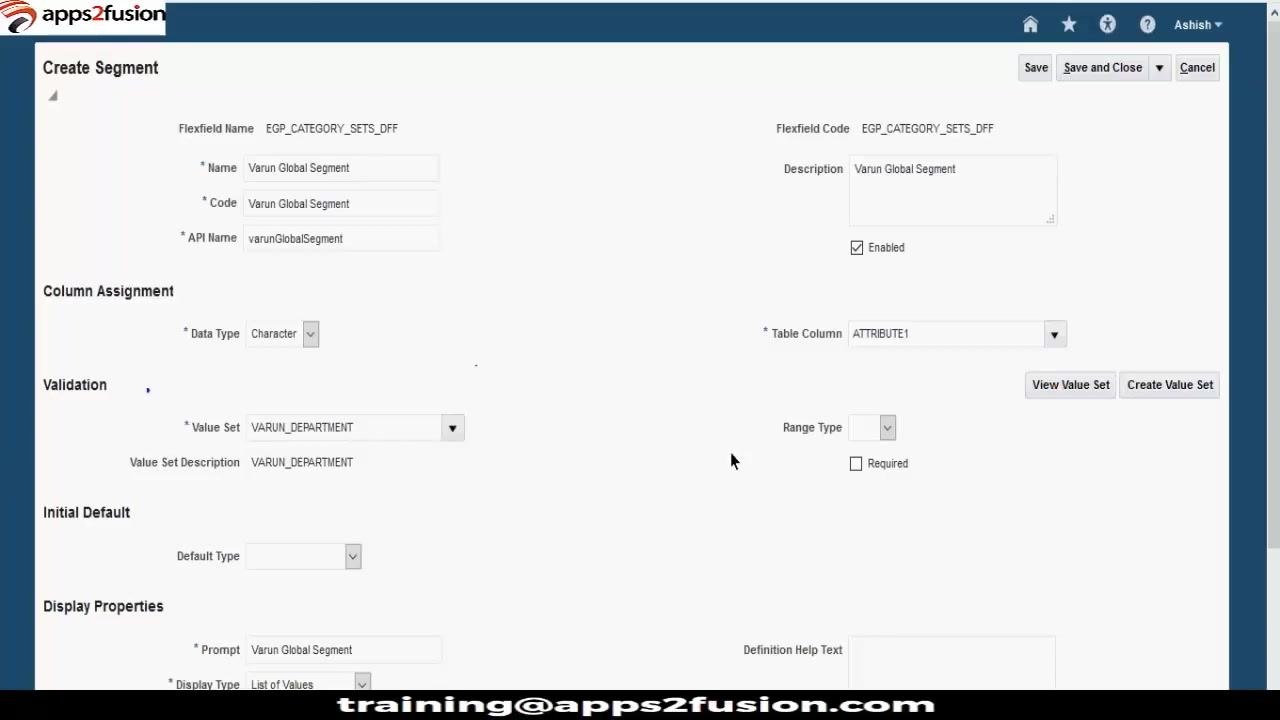
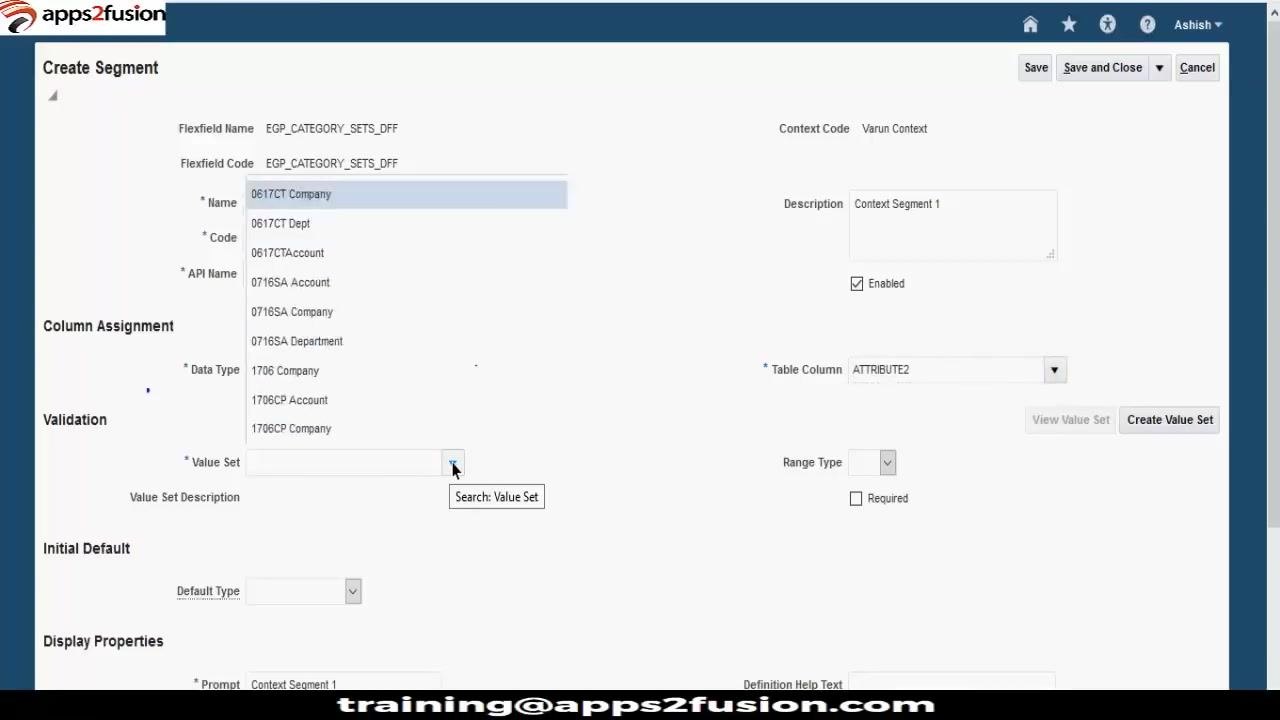
A value set in descriptive flexfields works the same way as in the chart of accounts — it defines the list of valid values users can enter for a segment. In the Validation section of the Create Segment screen, click the Value Set dropdown. Search for a value set (for example, "Varun") to filter the list, and select the appropriate one, such as VARUN_DEPARTMENT.
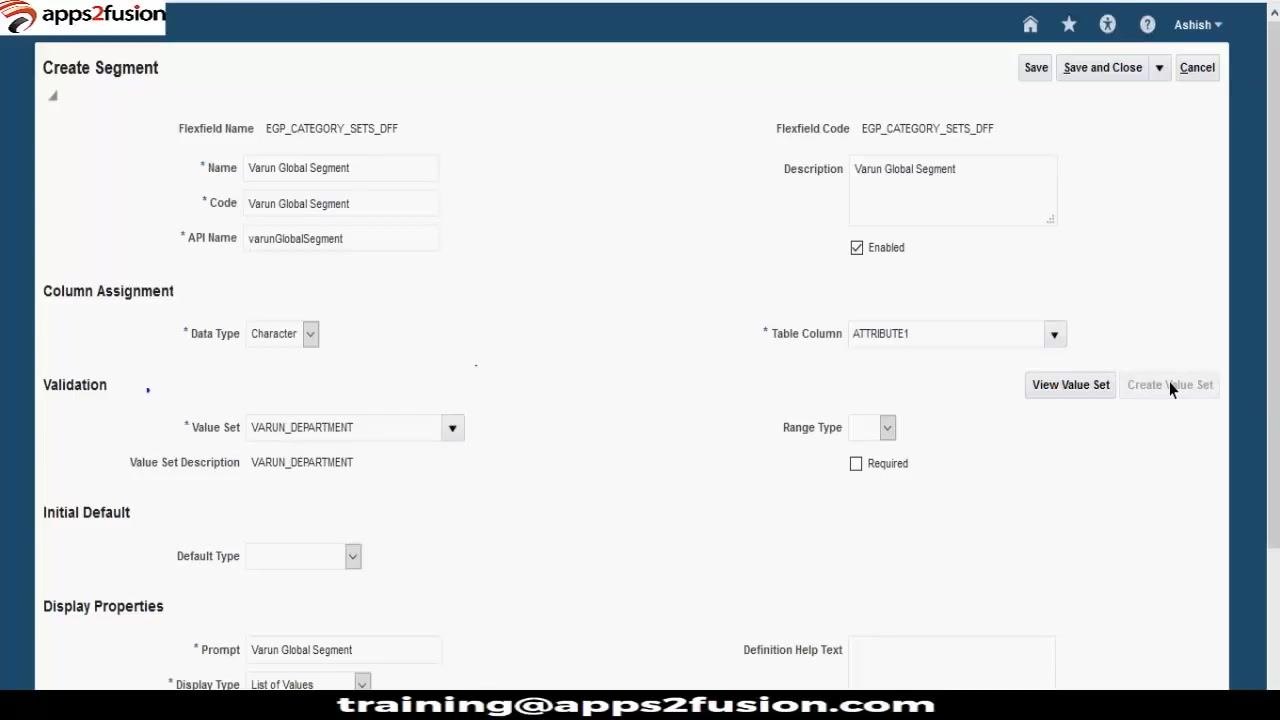
If no suitable value set exists, click Create Value Set and enter the required details: Code, Description, Module, Validation Type (Independent/Dependent), and Data Type (Character), then add the allowed values. For this example, the existing value set VARUN_DEPARTMENT is reused.
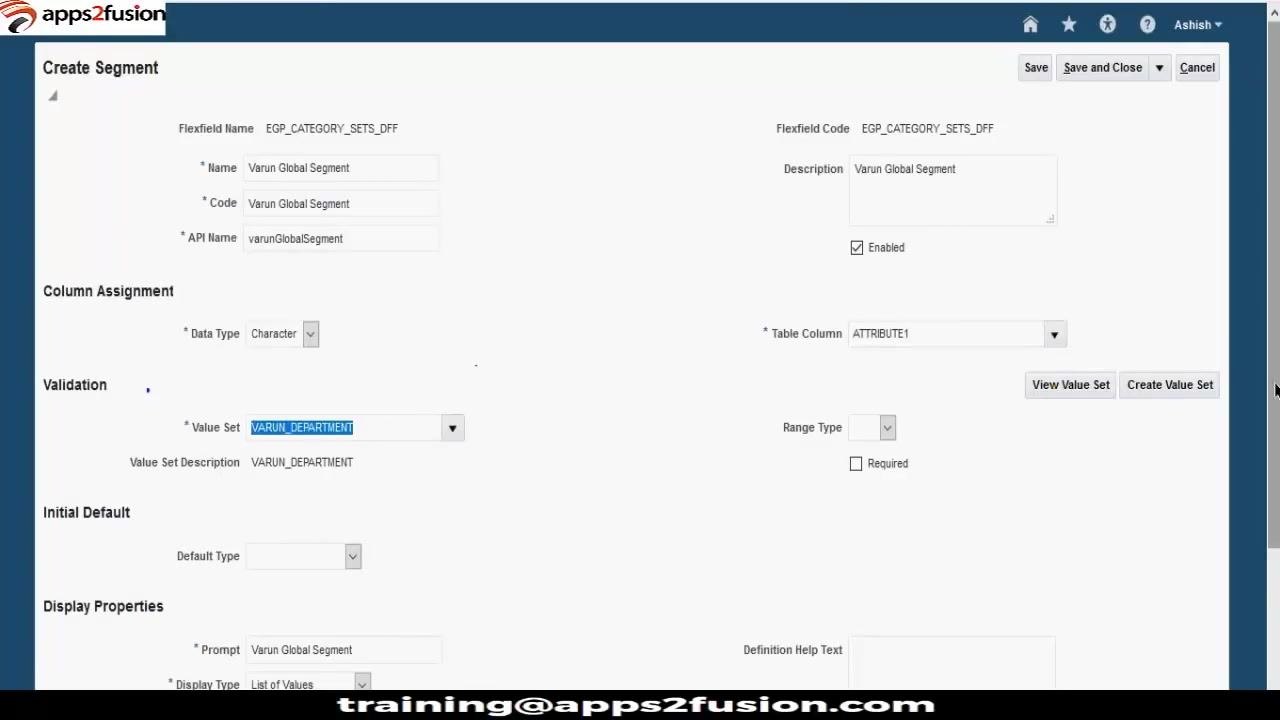
Confirm the attached value set
After selecting the value set, confirm that the Value Set field displays VARUN_DEPARTMENT and that the Value Set Description also shows VARUN_DEPARTMENT.
Mark the segment as required (if needed)
In the Validation section, check the Required box if this segment must always have a value before a record can be saved.
Set a default value (optional)
In the Initial Default section, choose a Default Type from the dropdown — options include Constant, Groovy Expression, or SQL — and enter a Default Value if needed. Leave it blank if no default is required.
Configure display properties
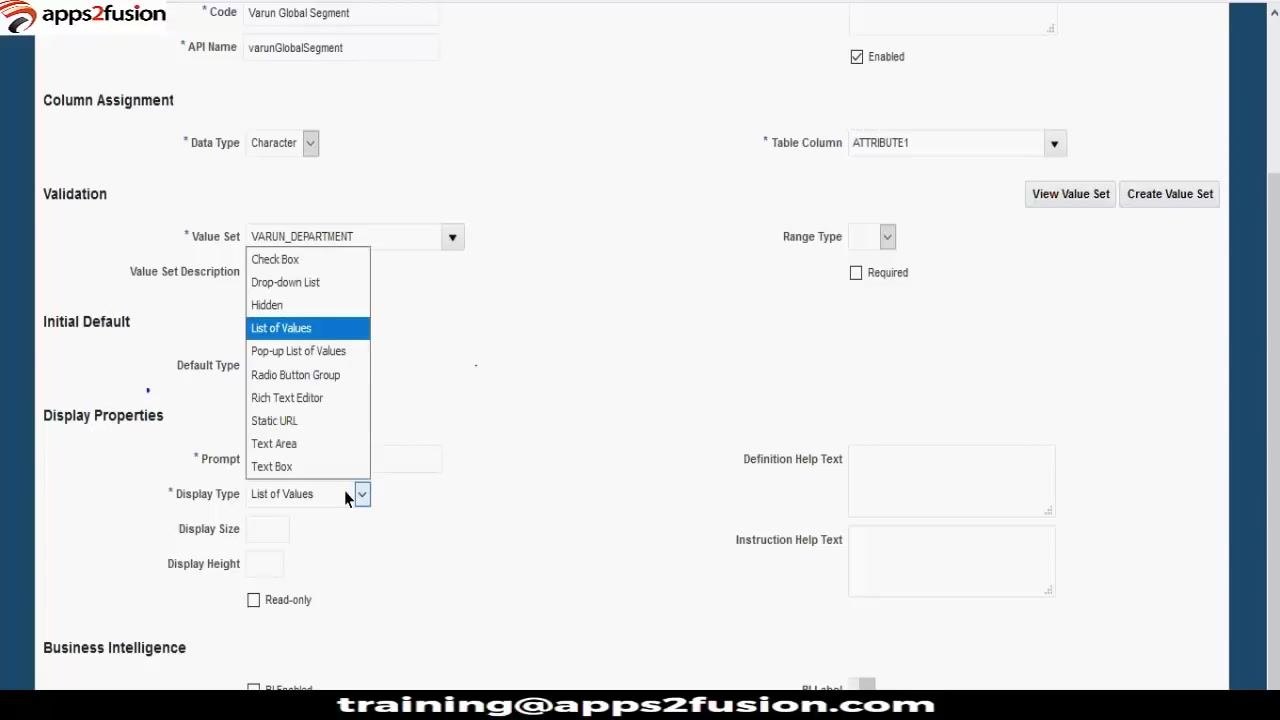
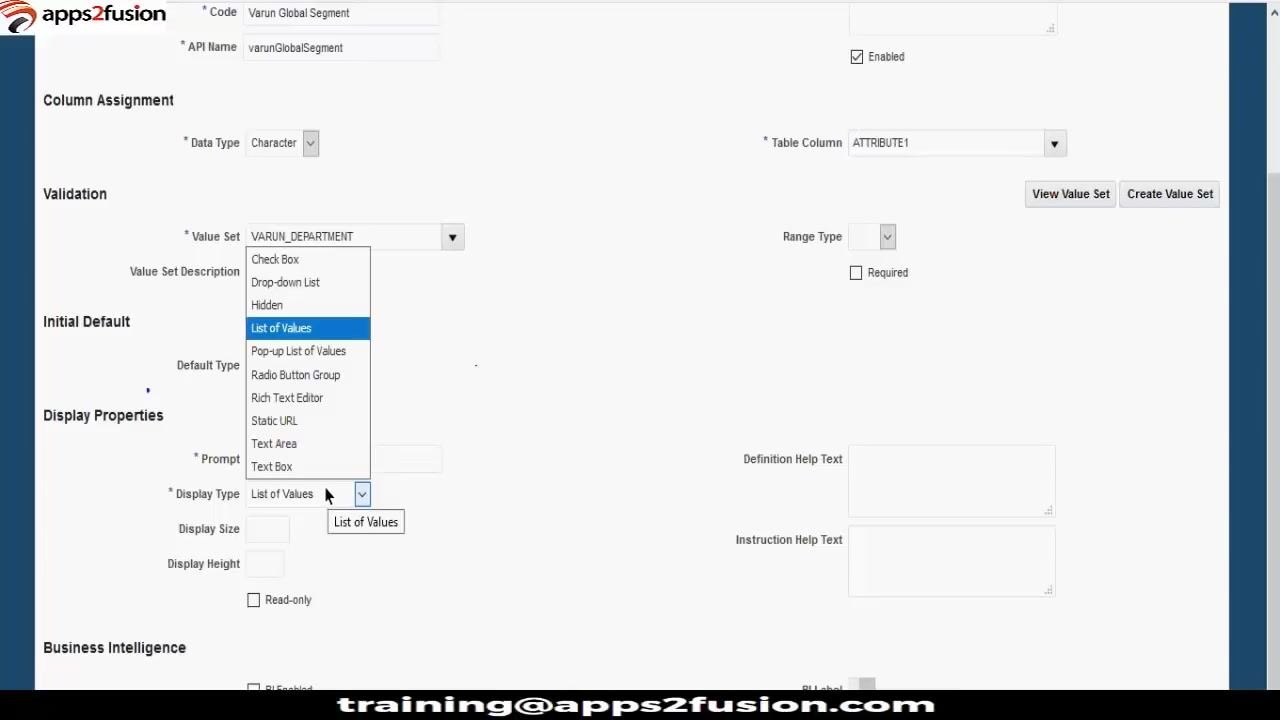
In the Display Properties section, set the Prompt (for example, "Varun Global Segment") and choose the Display Type. Options include List of Values, Text Box, Check Box, and Drop-down List, among others. Select List of Values to present a predefined list of values to users.
Use a free text field instead (optional)
If you want the segment to accept free-form text rather than a predefined list, select Text Box as the Display Type.
Enable BI reporting for the segment
Review the complete segment configuration: Flexfield Name, Flexfield Code, Name, Code, API Name, Description, and the Enabled checkbox (checked). Under Column Assignment, Data Type is Character and Table Column is ATTRIBUTE1. Under Validation, Value Set is VARUN_DEPARTMENT and the Required checkbox is available. Under Display Properties, Prompt is "Varun Global Segment" and Display Type is List of Values.
Look for the BI Enabled option in the display properties or related section. If you want this segment to be available in Business Intelligence tools and reports, check BI Enabled. Leave it unchecked if you do not want the segment available for BI reporting.
Before saving, confirm that Enabled is checked, Value Set and Display Type are correct, Required is set according to your business needs, and the Prompt and other display properties are clear.
Save and close the segment
Ensure all required fields are filled, then click Save and Close at the top right of the segment configuration screen to save your changes and exit the segment editor.
Review the global segments list
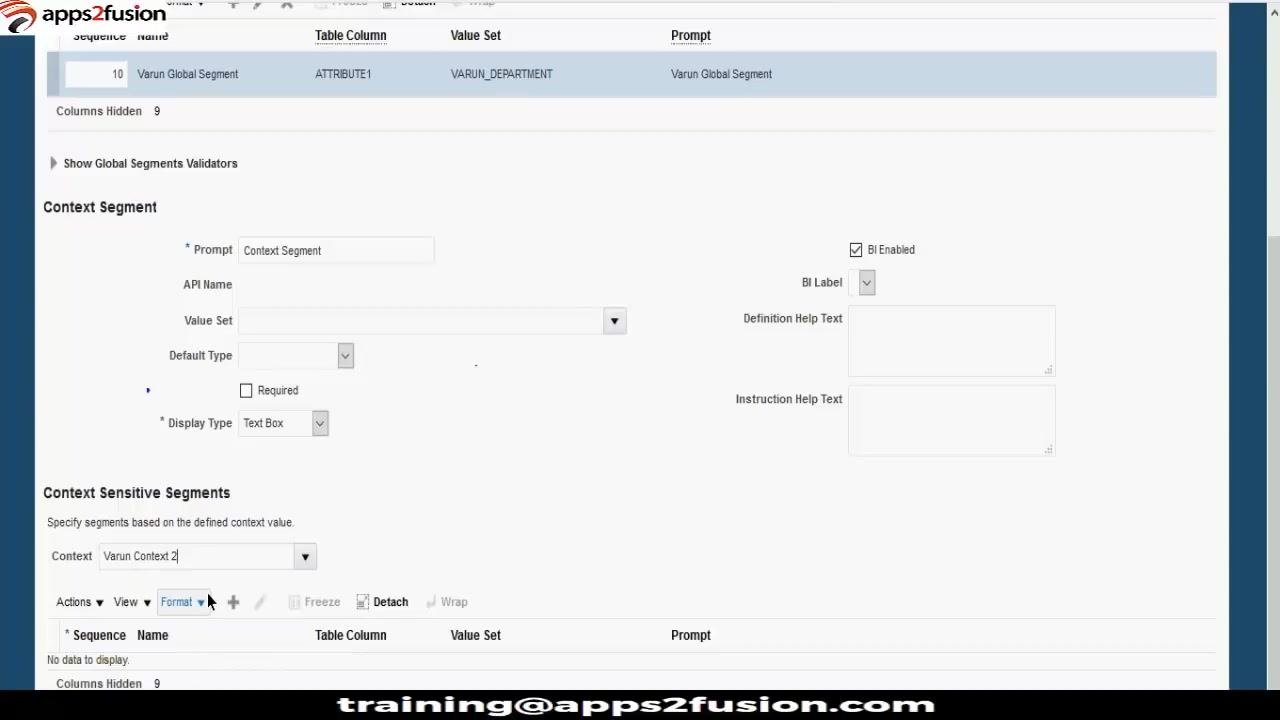
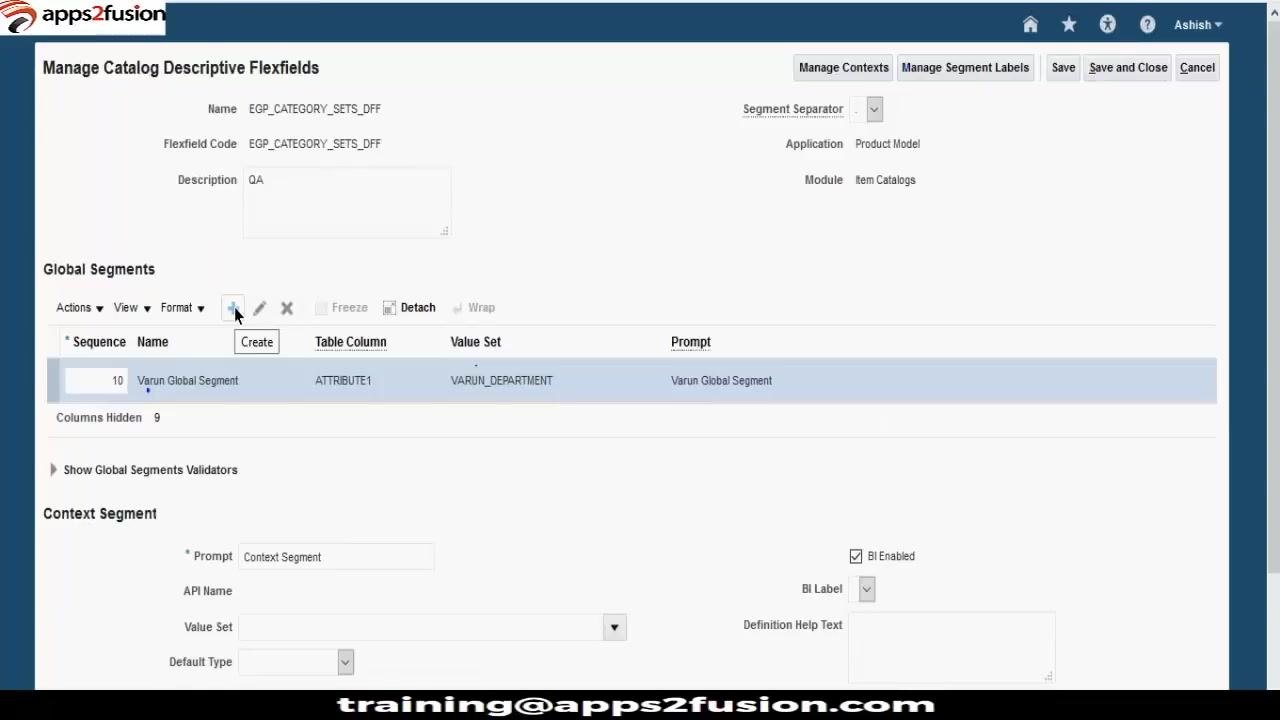
On the Manage Catalog Descriptive Flexfields screen, locate the Global Segments section and confirm that your new segment ("Varun Global Segment") appears in the list with its associated Table Column (ATTRIBUTE1) and Value Set (VARUN_DEPARTMENT). Use the View dropdown or other toolbar options to adjust the display as needed.
Add another global segment
Click the Create (plus) button above the Global Segments list to open a new segment creation form.
Assign a table column to the new segment
Fill in the required fields (Name, Code, API Name), then under Column Assignment, click the Table Column dropdown and select the next available attribute, such as ATTRIBUTE2 or ATTRIBUTE3.
Search for a specific column type
If you need a particular data type, such as number, date, or timestamp, click Search in the Table Column dropdown. The Search and Select: Table Column dialog lists available columns by name and type, including ATTRIBUTE_NUMBER1, ATTRIBUTE_DATE1, and ATTRIBUTE_TIMESTAMP1.
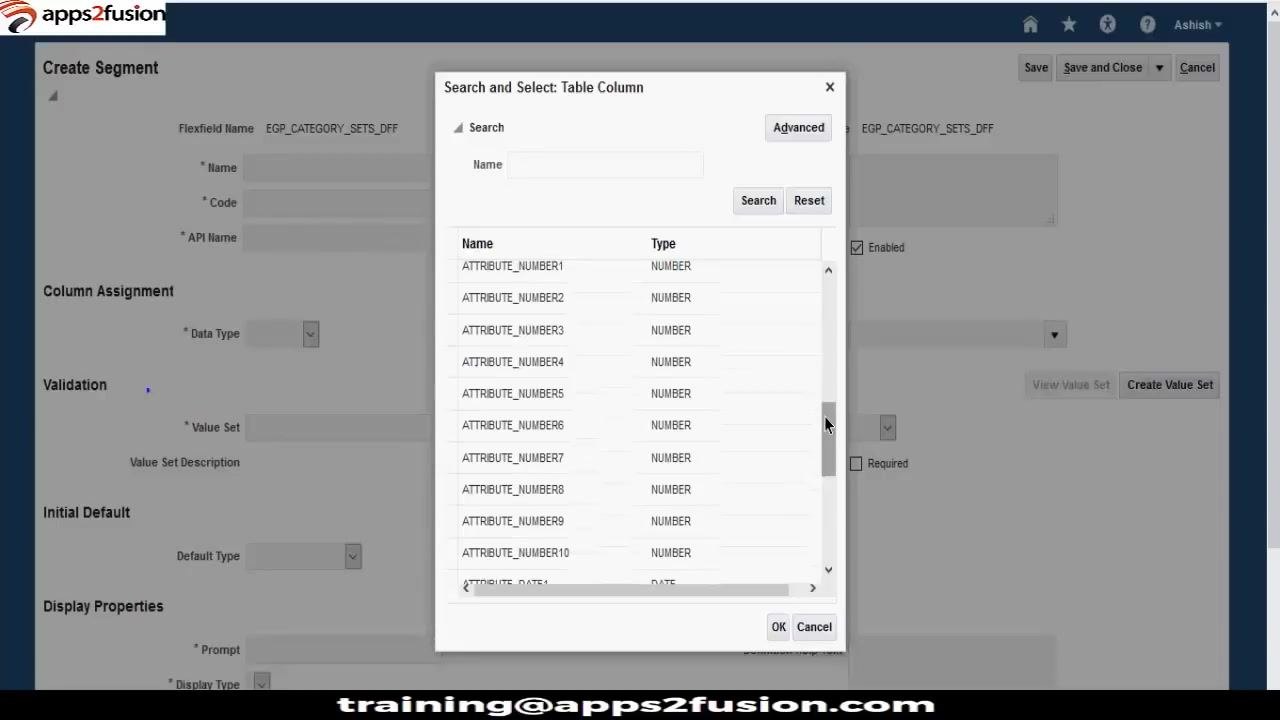
Select a date or timestamp column
Scroll through the list to locate columns of type DATE or TIMESTAMP. There are five available timestamp columns (ATTRIBUTE_TIMESTAMP1 through ATTRIBUTE_TIMESTAMP5). Select the desired column and click OK to assign it to your segment.
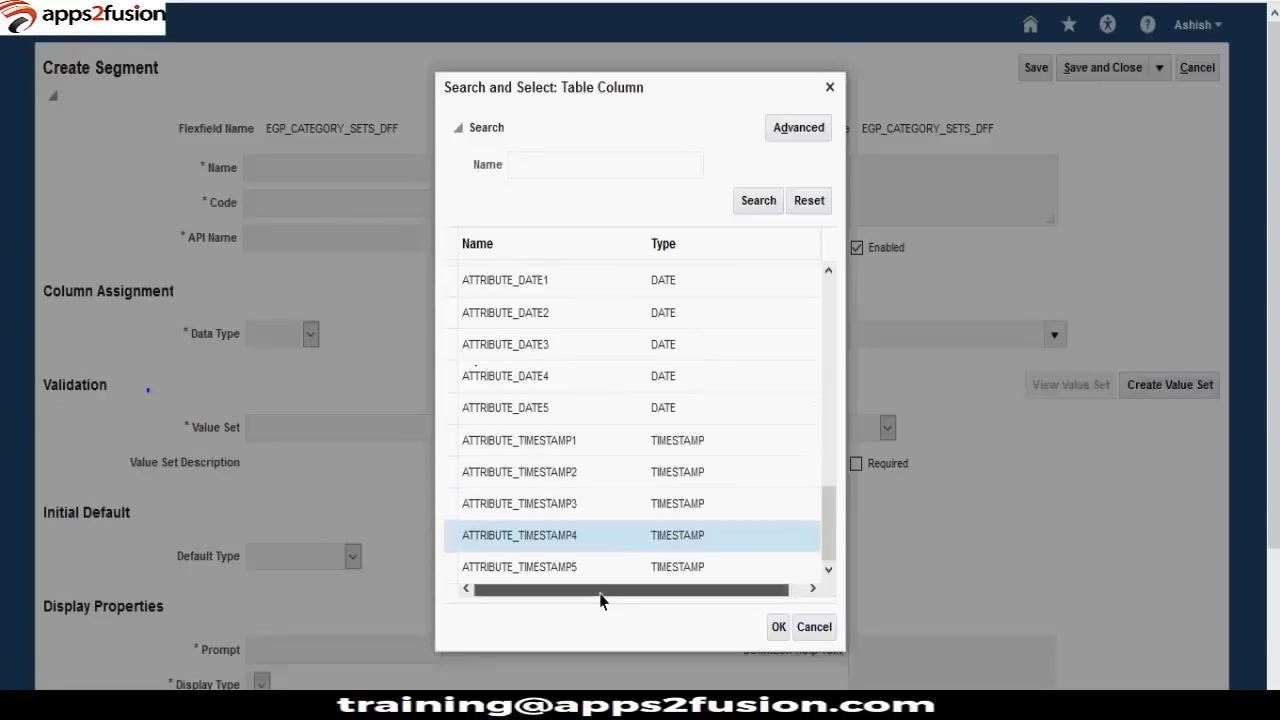
Review the full list of available columns
The dialog also lists VARCHAR2 and NUMBER columns, such as ATTRIBUTE12, ATTRIBUTE15, and ATTRIBUTE_NUMBER1. Depending on your environment, you may find 15 VARCHAR2 columns plus 5 timestamp columns, for a total of 20 columns. Select the appropriate column and confirm your selection.
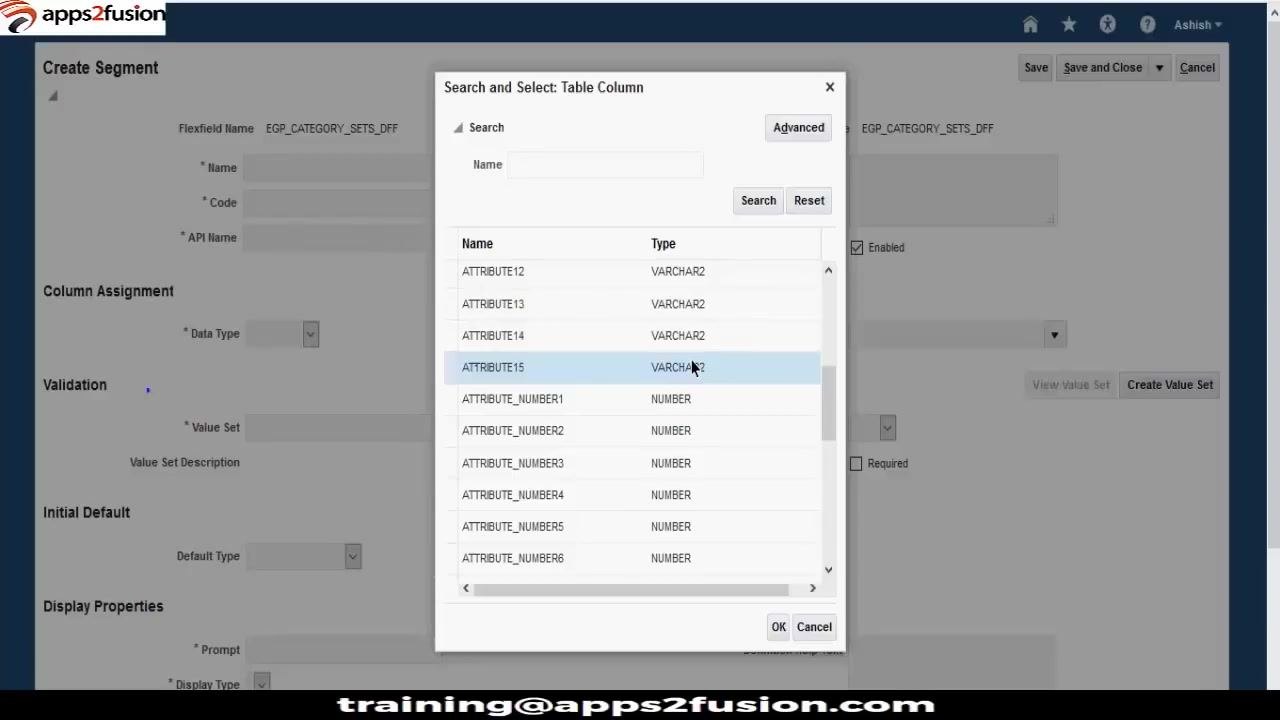
Understand the benefit of context-sensitive segments
Creating a context-sensitive segment lets you define many more fields, since each context can have its own set of segments. The Manage Catalog Descriptive Flexfields screen displays both the Global Segments and Context Segment areas, with fields for Prompt, API Name, Value Set, Default Type, and BI Enabled.
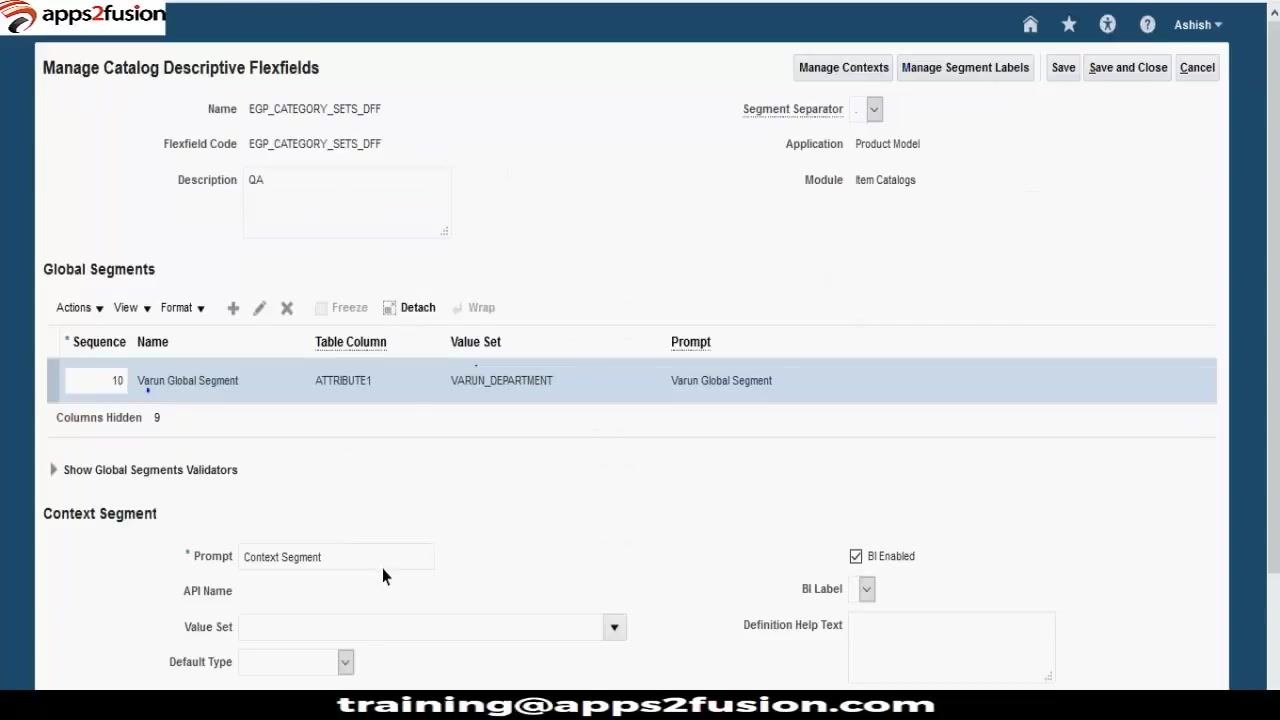
Open Manage Contexts
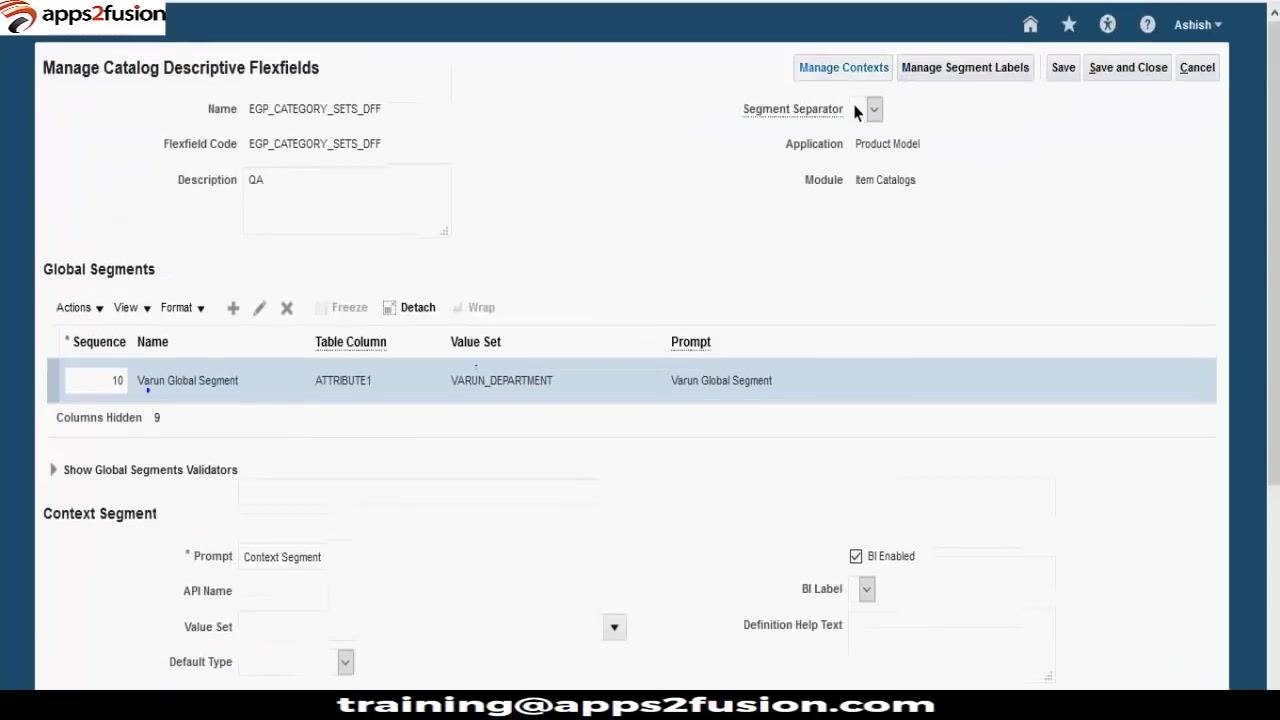
Click the Manage Contexts button at the top right of the Manage Catalog Descriptive Flexfields screen to open the context management interface, where you can define new contexts.
Create a new context
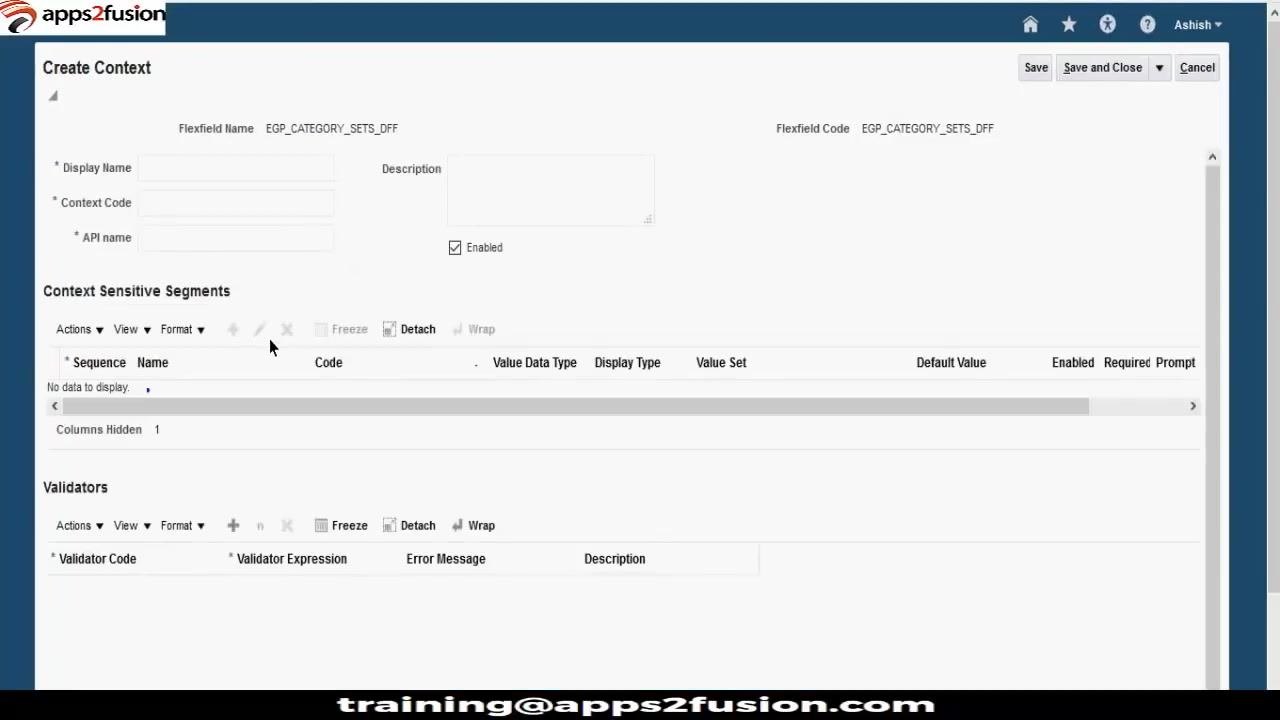
In the Create Context screen, click the Create (plus) button in the Context Sensitive Segments section to add a new context. The form includes fields for Display Name, Context Code, API Name, and Description, with the Enabled checkbox checked by default.
Enter context details and save
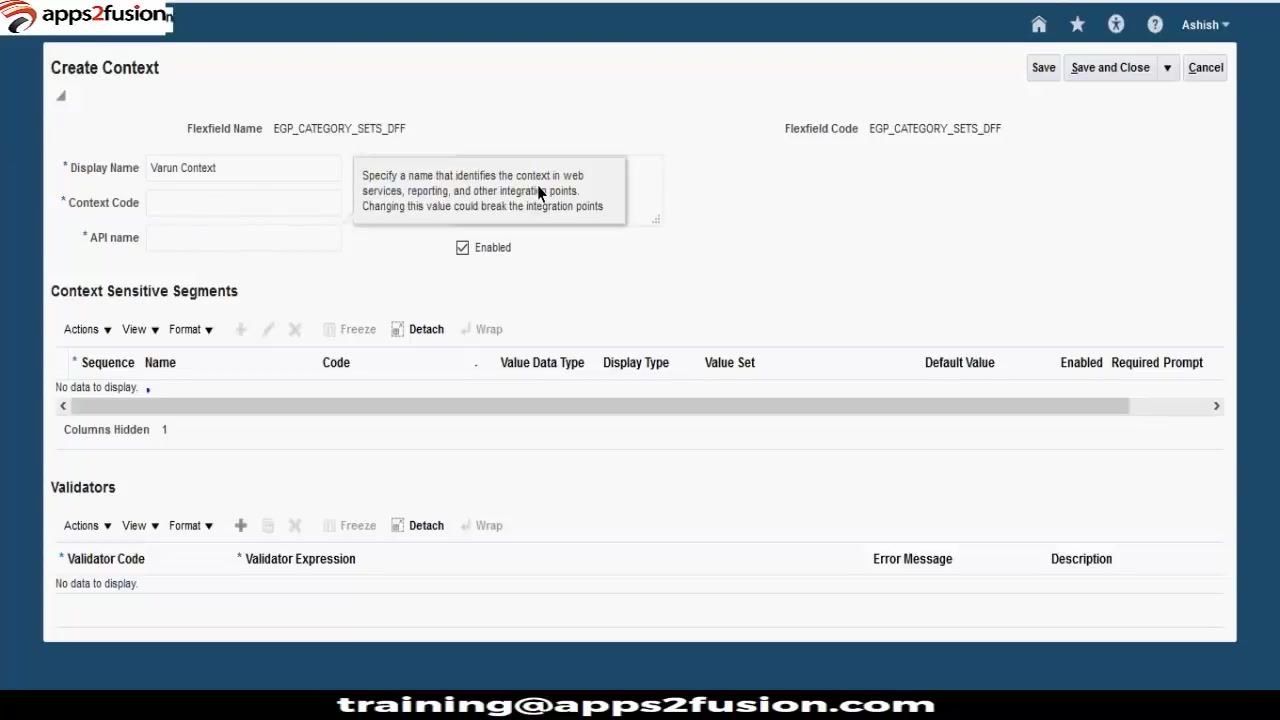
Fill in the following fields:
- Display Name: Varun Context
- Context Code: Varun Context
- API Name: VarunContext
- Description: Varun Context
Ensure Enabled is checked, then click Save or Save and Close.
Add a segment to the context
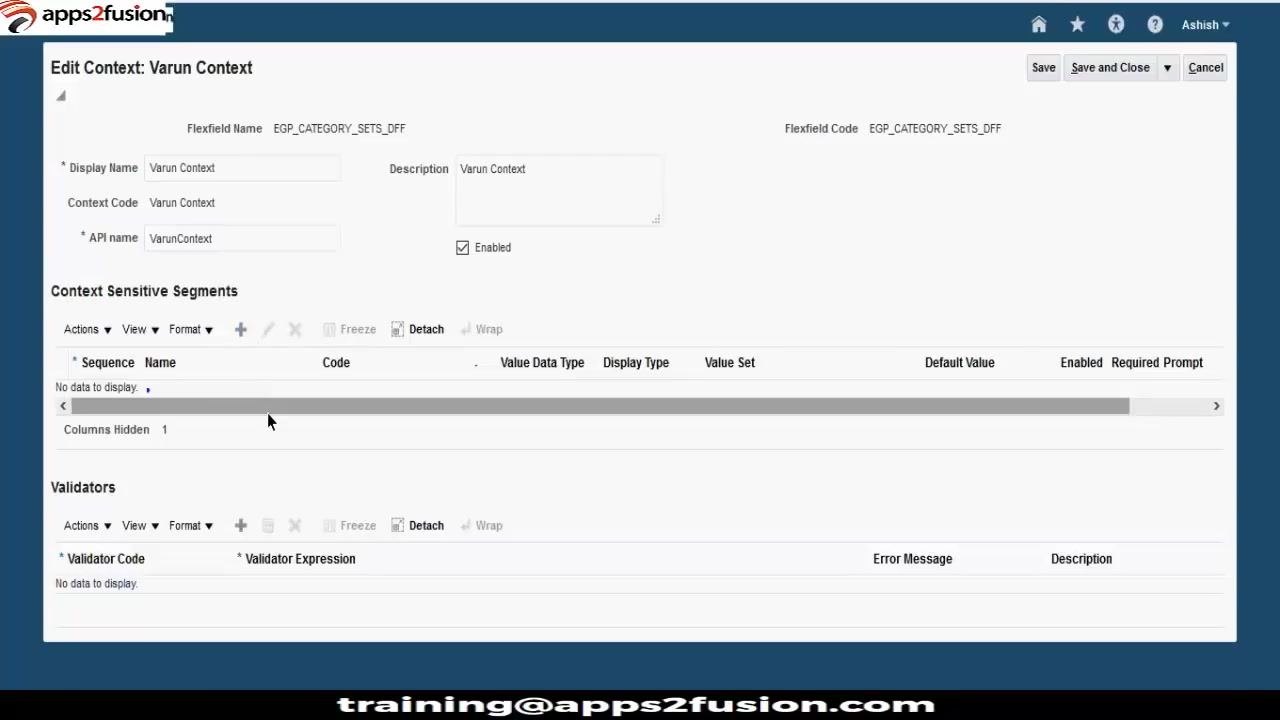
In the Edit Context: Varun Context screen, click the Create (plus) button in the Context Sensitive Segments section to open the Create Segment form for the new context.
Configure the context-sensitive segment
Enter the following details:
- Name: Context Segment 1
- Code: Context Segment 1
- API Name: contextSegment1
- Description: Context Segment 1
Under Column Assignment, set Data Type to Character and Table Column to ATTRIBUTE2. Under Validation, set Value Set to VARUN_DEPARTMENT. Ensure Enabled is checked, and set other properties such as Prompt and Required as needed.
Review the configured segment
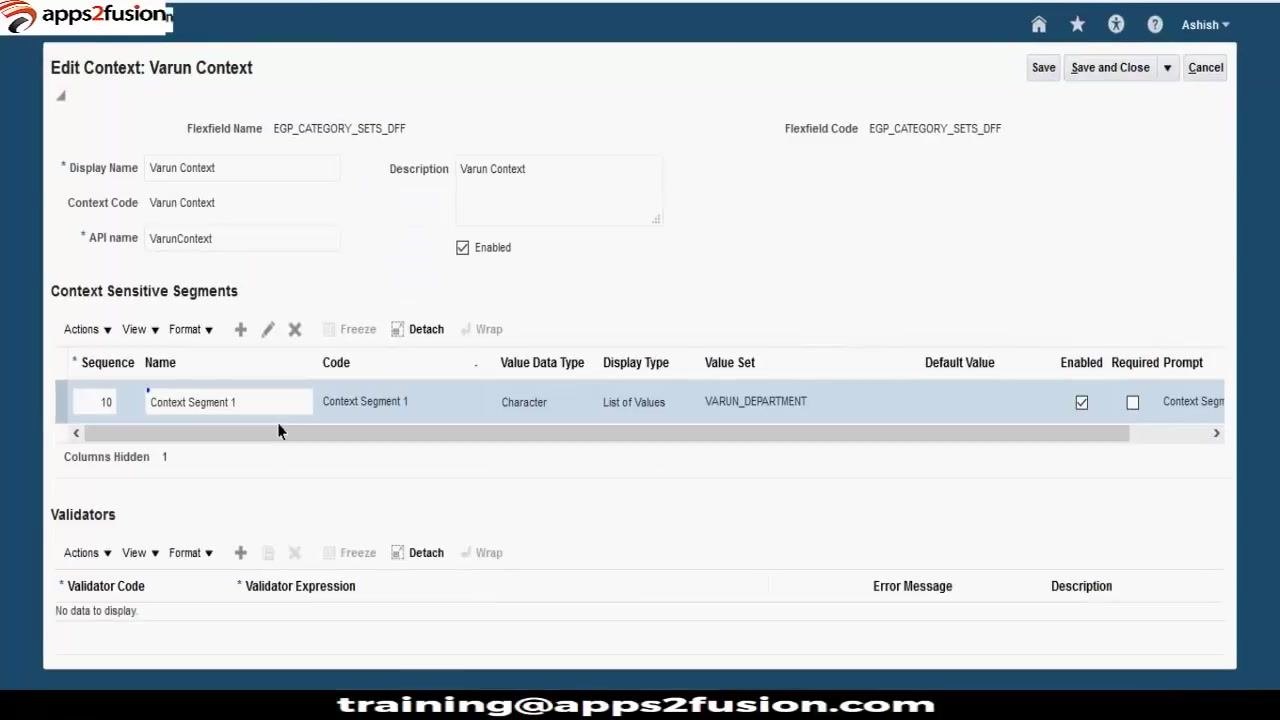
After saving, the Edit Context: Varun Context screen lists the new segment under Context Sensitive Segments, confirming Name, Code, Value Data Type (Character), Display Type (List of Values), Value Set (VARUN_DEPARTMENT), Enabled status, and Prompt ("Context Segment 1"). Only one segment is configured under this context at this point.
Save and close the context
Review the context and segment details, then click Save and Close at the top right to finalize and exit the context configuration.
Create a second context
Begin defining a new context in the Create Context screen. The fields for Display Name, Context Code, API Name, and Description start empty, with Enabled checked by default and no context-sensitive segments listed yet.
Fill in the details for this second context:
- Display Name: Varun Context 2
- Context Code: Varun Context 2
- API Name: VarunContext2
- Description: Varun Context 2
Ensure Enabled is checked.
Add a segment to the second context
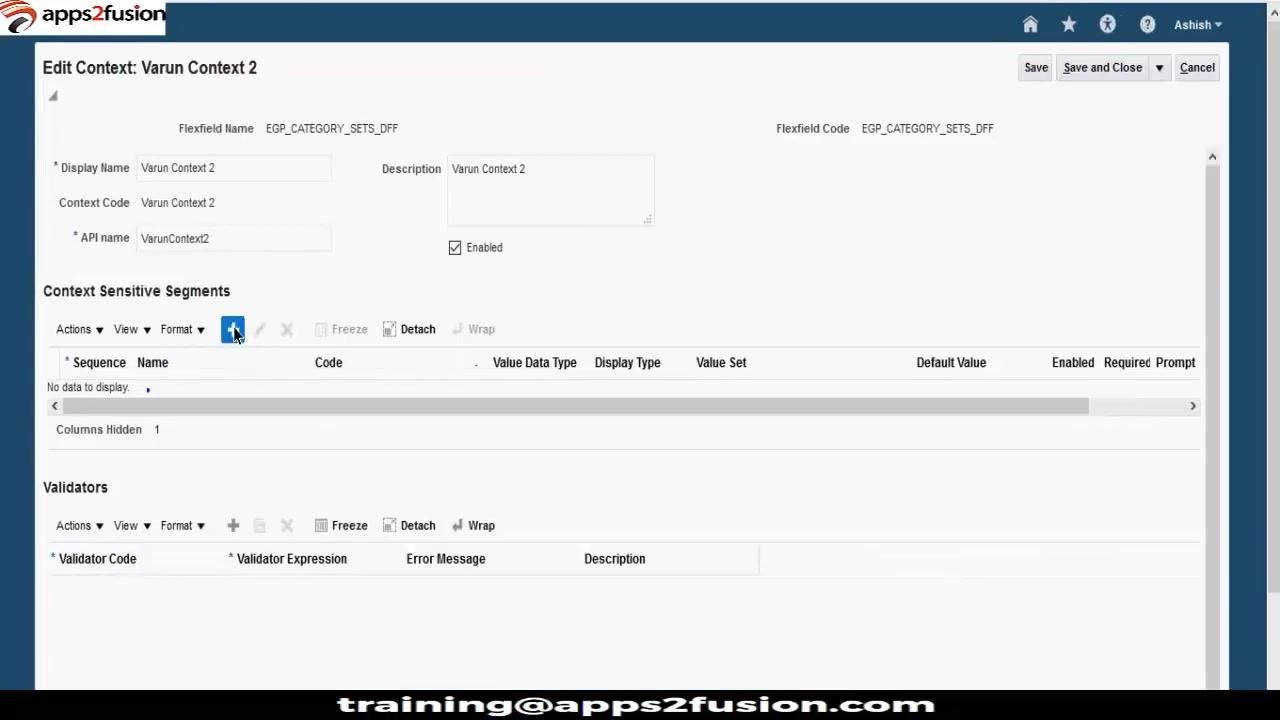
In the Edit Context: Varun Context 2 screen, click the Create (plus) button in the Context Sensitive Segments section to add a new segment.
Set the data type for the new segment
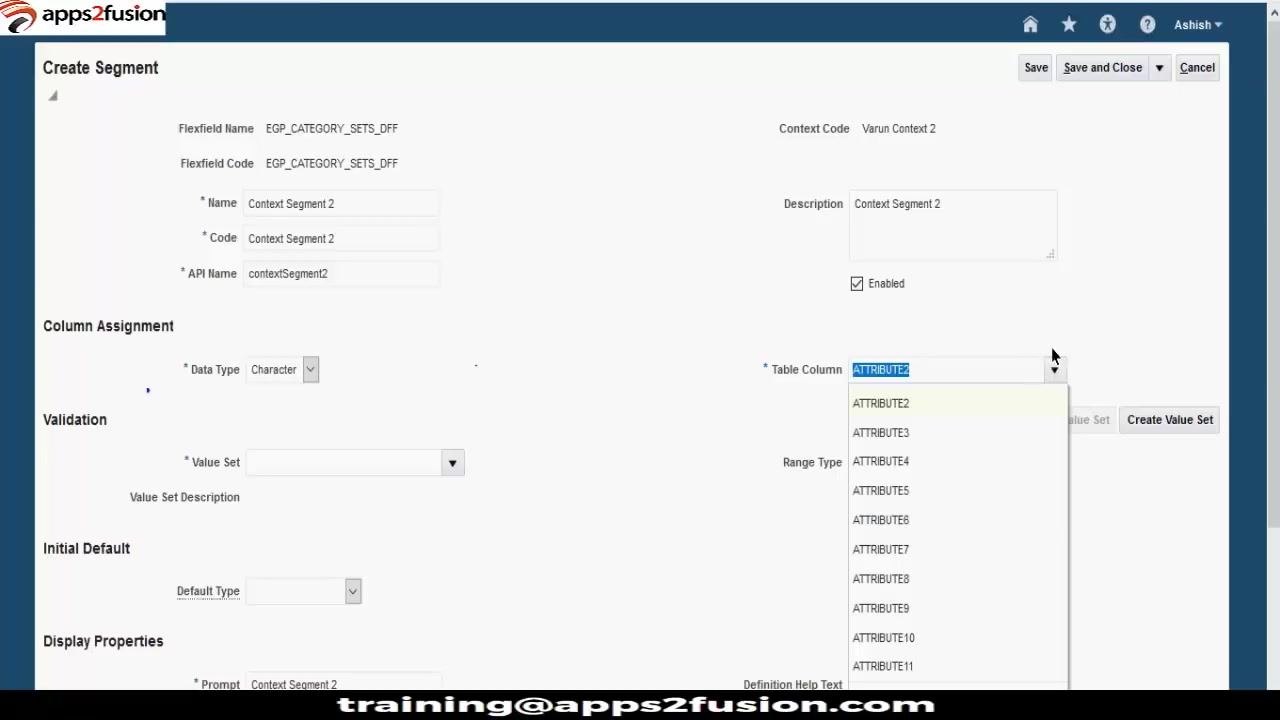
Enter the following details:
- Name: Context Segment 2
- Code: Context Segment 2
- API Name: contextSegment2
- Description: Context Segment 2
Under Column Assignment, click the Data Type dropdown and select Character.
Review available table columns
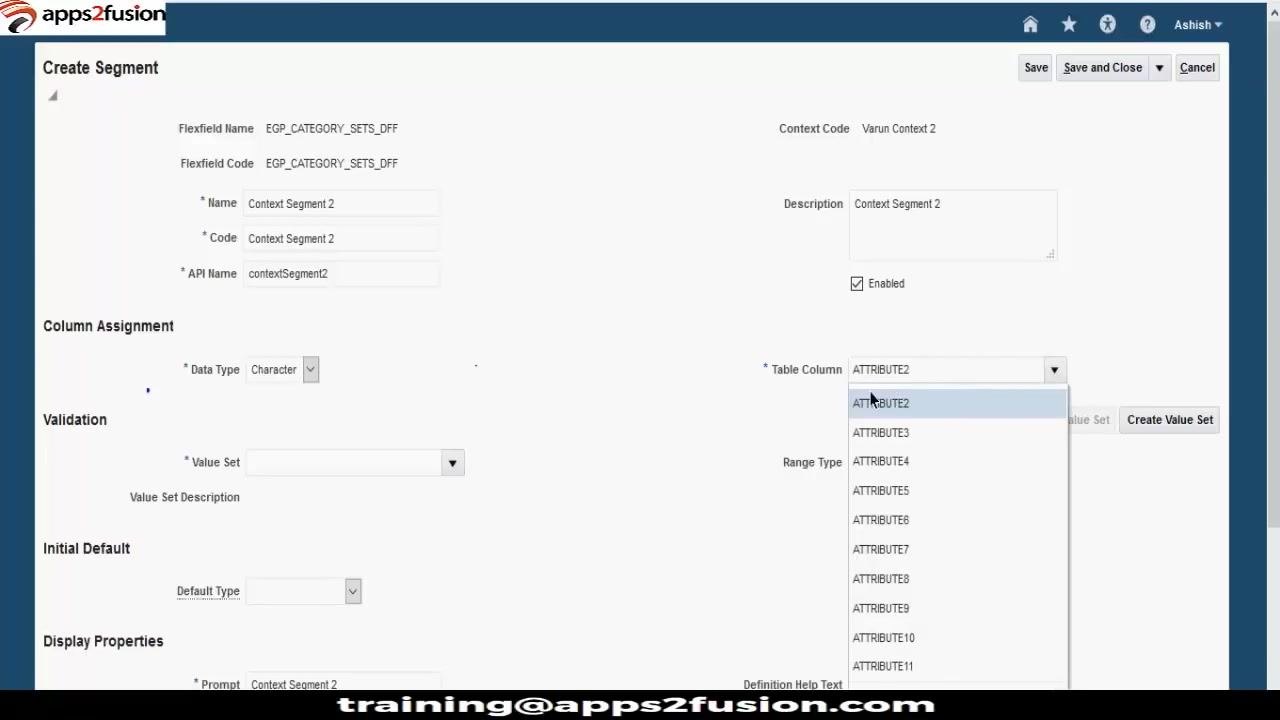
Click the Table Column dropdown to assign a storage column for this segment. The dropdown displays available columns, including ATTRIBUTE2, ATTRIBUTE3, and ATTRIBUTE4. Note that ATTRIBUTE2 is available for selection even though it was used in a previous context.
Understand context-specific storage
The system allows the same table column (such as ATTRIBUTE2) to be used across multiple contexts, because context-sensitive segments store values against their specific context rather than globally. Selecting ATTRIBUTE2 for Context Segment 2 will not conflict with its use in another context.
As a best practice, use context-sensitive segments to maximize your available fields. Each context can reuse the same attribute columns without overlap, since values are stored per context — this helps you avoid exhausting your available table columns.
Review the second context before deployment
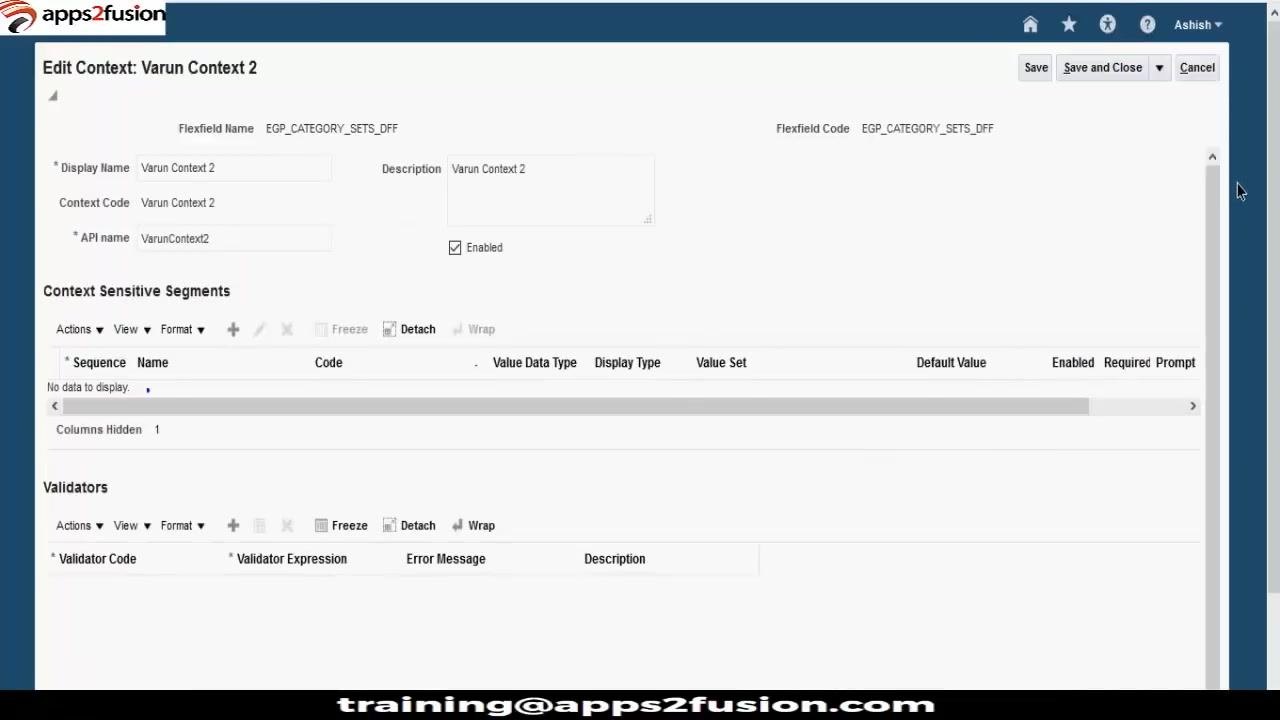
Open the Edit Context screen for the descriptive flexfield and confirm the following details:
- Flexfield Name: EGP_CATEGORY_SETS_DFF
- Flexfield Code: EGP_CATEGORY_SETS_DFF
- Display Name: Varun Context 2
- Description: Varun Context 2
- Context Code: Varun Context 2
- API Name: VarunContext2
Ensure Enabled is checked. At this stage, no context-sensitive segments or validators are shown yet.
Review the global segments list again
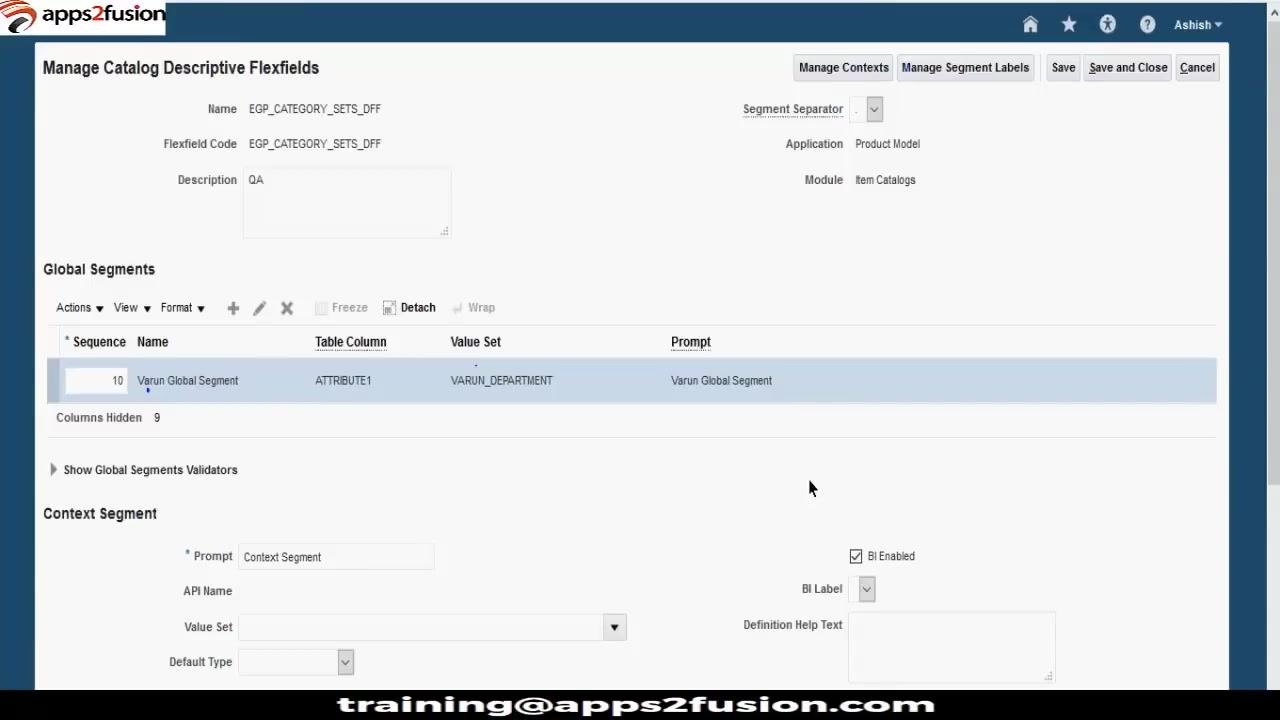
Navigate to the Manage Catalog Descriptive Flexfields screen and confirm the global segment is present:
- Sequence: 10
- Name: Varun Global Segment
- Table Column: ATTRIBUTE1
- Value Set: VARUN_DEPARTMENT
- Prompt: Varun Global Segment
The context segment section should display Prompt: "Context Segment," Display Type: Text Box, and BI Enabled: checked, with no value set or API name defined yet.
Verify the segment save operation
Confirm that the segment configuration is saved and that the global segment and context segment remain visible as previously configured.
Access Manage Contexts again
Click the Manage Contexts button at the top of the Manage Catalog Descriptive Flexfields screen to review your context-sensitive segments.
Confirm context segment display
Ensure that both the context segment and global segment display correctly, confirming that the setup is complete and accessible.
Deploy the flexfield
After configuration, deploy the flexfield. Wait for the deployment confirmation dialog, which displays:
- Message: Deployment completed successfully. Start a new session of the runtime application to view changes.
- Entity Usages Processed: 3 of 3
- Flexfield Metadata Validation: 0 Errors, 4 Warnings
Click OK to close the confirmation dialog.
Verify the task in the implementation project
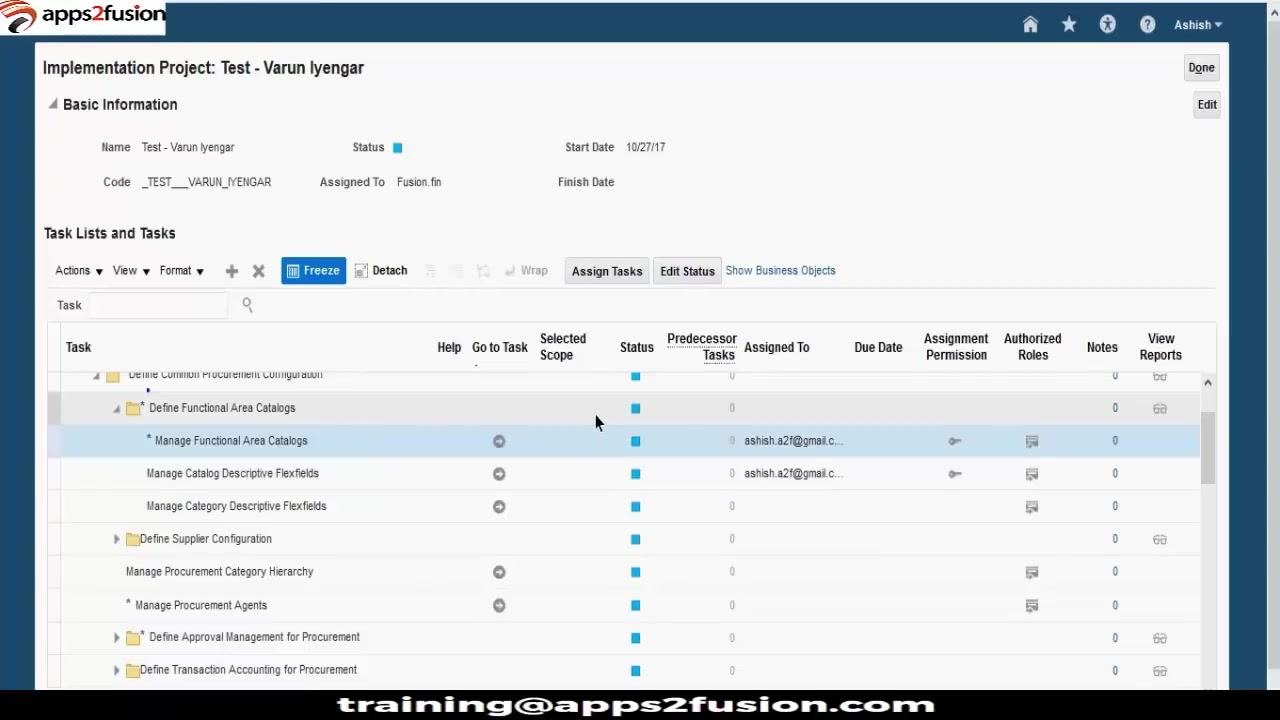
Return to the implementation project or catalog management screen and locate the Manage Catalog Descriptive Flexfields task to confirm the descriptive flexfield configuration is assigned and visible in the task list.
Verify the descriptive flexfield in a Functional Area Catalog
Once deployed, confirm that your configured descriptive flexfield and its value sets appear and function correctly in the application.
Access the implementation project task list
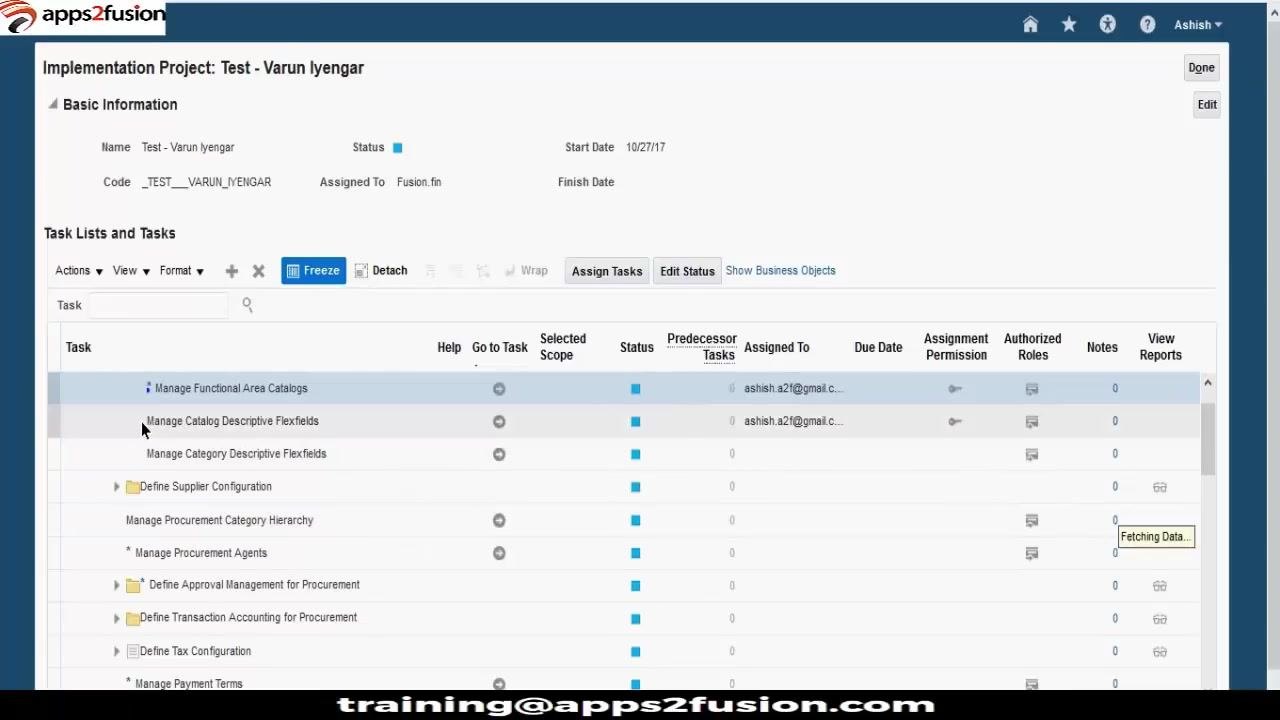
Open the Implementation Project screen for the project named Test - Varun Iyengar and review the Task Lists and Tasks section. Identify the tasks Manage Functional Area Catalogs, Manage Catalog Descriptive Flexfields, and Manage Category Descriptive Flexfields, confirming each is assigned and visible with the correct status.
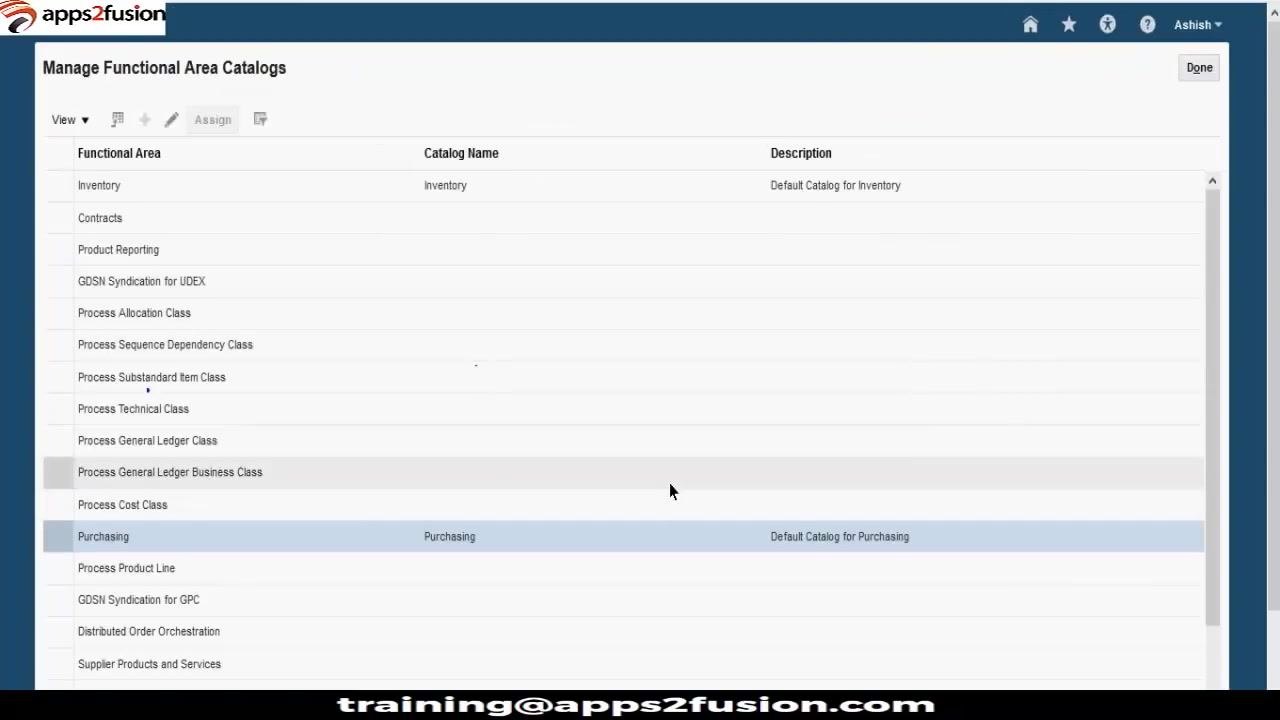
Navigate to Manage Functional Area Catalogs
Select the Manage Functional Area Catalogs task. The screen displays a list of functional areas, catalog names, and descriptions, for example:
- Inventory – Catalog Name: Inventory, Description: Default Catalog for Inventory
- Purchasing – Catalog Name: Purchasing, Description: Default Catalog for Purchasing
Edit the Purchasing functional area catalog
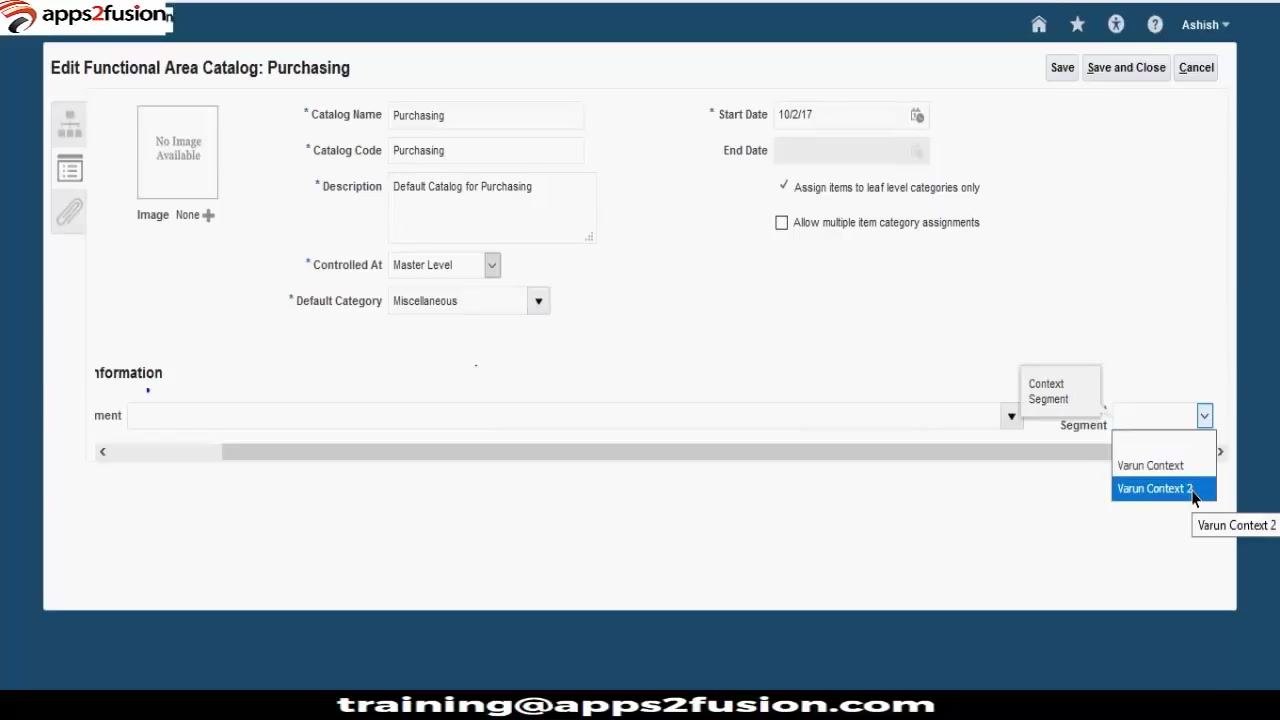
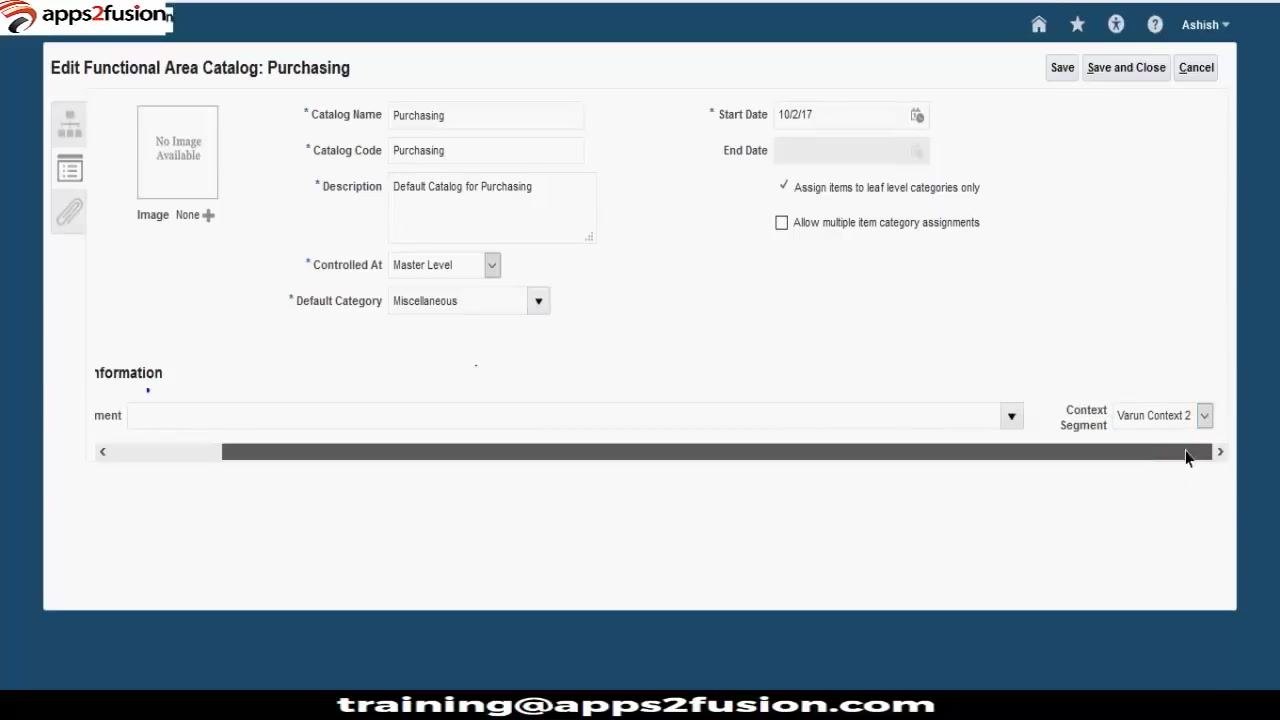
Click the Purchasing row to open the Edit Functional Area Catalog: Purchasing screen. Review the catalog details: Catalog Name (Purchasing), Catalog Code (Purchasing), Description (Default Catalog for Purchasing), Controlled At (Master Level), Default Category (Miscellaneous), and Start Date (10/2/17).
Under Additional Information, locate the Varun Global Segment field and click the dropdown arrow to view the list of values, which are sourced from the VARUN_DEPARTMENT value set: 000 No Dept, 100 Finance, 200 HR, 300 Purchase, 400 Sales, and 999 All Department.
Verify the context segment dropdown
In the same screen, click the Context Segment dropdown on the right to view available context segments. Confirm that both Varun Context and Varun Context 2 are available, then select Varun Context 2 to activate its context-sensitive segment.
Observe field behavior based on context
After selecting Varun Context 2, the relevant context-sensitive field appears and is ready for data entry based on the selected context.
Switch between contexts and value sets
Switch back to Varun Context in the Context Segment dropdown. The corresponding field for Varun Context appears. Click its dropdown to view the same department value set as before, confirming the value set is shared across contexts.
If a context-sensitive field is set as required during configuration, you must enter a value before saving or proceeding. This enforces data integrity and the business rules defined in the flexfield setup.
Return to the functional area catalog list
After verifying the behavior, return to the Manage Functional Area Catalogs screen and confirm that all changes are saved and the catalog list is updated.
Final review of the implementation project
Review the implementation project task list
Return to the Implementation Project: Test - Varun Iyengar screen. Review the Basic Information (Name: Test - Varun Iyengar, Code: _TEST___VARUN_IYENGAR, Assigned To: Fusion.fin, Start Date: 10/27/17) and the Task Lists and Tasks section, which lists Manage Functional Area Catalogs, Manage Catalog Descriptive Flexfields, Manage Category Descriptive Flexfields, Define Supplier Configuration, Manage Procurement Category Hierarchy, and Define Approval Management for Procurement.
Each task shows columns for Help, Go to Task, Selected Scope, Status, Predecessor Tasks, Assigned To, Due Date, Assignment Permission, Authorized Roles, Notes, and View Reports. Confirm tasks are assigned and their statuses are up to date, using the Freeze button to lock the task list view if needed.
Confirm the task list is complete
Ensure all tasks and their statuses are clear and understandable. At this point, the project setup and descriptive flexfield verification are finished, with no further actions required on this screen.
Summary
You have now created a descriptive flexfield in Oracle Fusion, including:
- Defining a global segment (Varun Global Segment) with an attached value set, validation, default, and display properties.
- Enabling BI reporting for the segment as needed.
- Creating two context-sensitive segments (Context Segment 1 under Varun Context, and Context Segment 2 under Varun Context 2), each mapped to a table column and reusing shared value sets.
- Deploying the flexfield and confirming a successful deployment with 0 errors.
- Verifying that the global and context segments appear and function correctly in the Manage Functional Area Catalogs screen, including correct dropdown behavior for the VARUN_DEPARTMENT value set and the ability to switch between contexts.
What's next
With your descriptive flexfield deployed and verified, consider reviewing the Manage Category Descriptive Flexfields task listed in your implementation project to extend similar configurations to category-level data. You can also continue to add further global or context-sensitive segments as your business requirements grow, keeping in mind that context-sensitive segments allow you to reuse attribute columns across different contexts without running out of available fields.
Generation details: cost, quality tiers
Docsie billed 7,000 credits ($4.90) to analyze this 14-minute video at standard quality. The rewrite, template fill and Word/PDF exports were included. The same video at each quality tier:
| Quality | Frames sampled | Credits | Approx. cost |
|---|---|---|---|
| Draft | every 16-30 s | 3,500 | $2.45 |
| Standard (this guide) | every 8-15 s | 7,000 | $4.90 |
| Detailed | every 4-7 s | 14,000 | $9.80 |
| Ultra | every 1-3 s | 28,000 | $19.60 |
Credits priced at $0.70 per 1,000; plans include a monthly allowance. Enterprise customers on on-premise or bring-your-own-model deployments run this on their own inference and pay no per-video credits.
Generated by Docsie Video-to-Docs on 2026-10-01 from a 13-minute video. Screenshots are frames from the source video and belong to their creator, apps2fusion, whose original is embedded above. If you own this video and want the guide removed or credited differently, contact us and we will act within one business day.