
How to Create an Item in Oracle EBS
This guide explains how to create an item in Oracle EBS (Oracle E-Business Suite) in the Master Organization. You open the Master Items screen, enter the item number and description, and set attributes across the item tabs. These include Inventory, Purchasing, Receiving, Planning, Order Management, Invoicing, and Service.
Video: Create Item in Master Organization - Oracle Inventory by Oracleappscommunity (2012). All credit for the demonstration goes to the creator; watch the original on YouTube. The written guide below was generated from this video by Docsie. Creator? Request a change or removal.
This guide explains how to create an item in Oracle EBS (Oracle E-Business Suite) in the Master Organization. You open the Master Items screen, enter the item number and description, and set attributes across the item tabs. These include Inventory, Purchasing, Receiving, Planning, Order Management, Invoicing, and Service.
Prerequisites
- Access to the Oracle E-Business Suite application and the Inventory responsibility menu.
- The values your organization uses for the item, such as the organization, item number, description, and the accounts and tolerances that apply to your business process.
Open the Master Items screen
- Open the Oracle E-Business Suite application.
- In the Navigator window, expand Inventory > Items > Master Items.
- Click Master Items, then click Open.
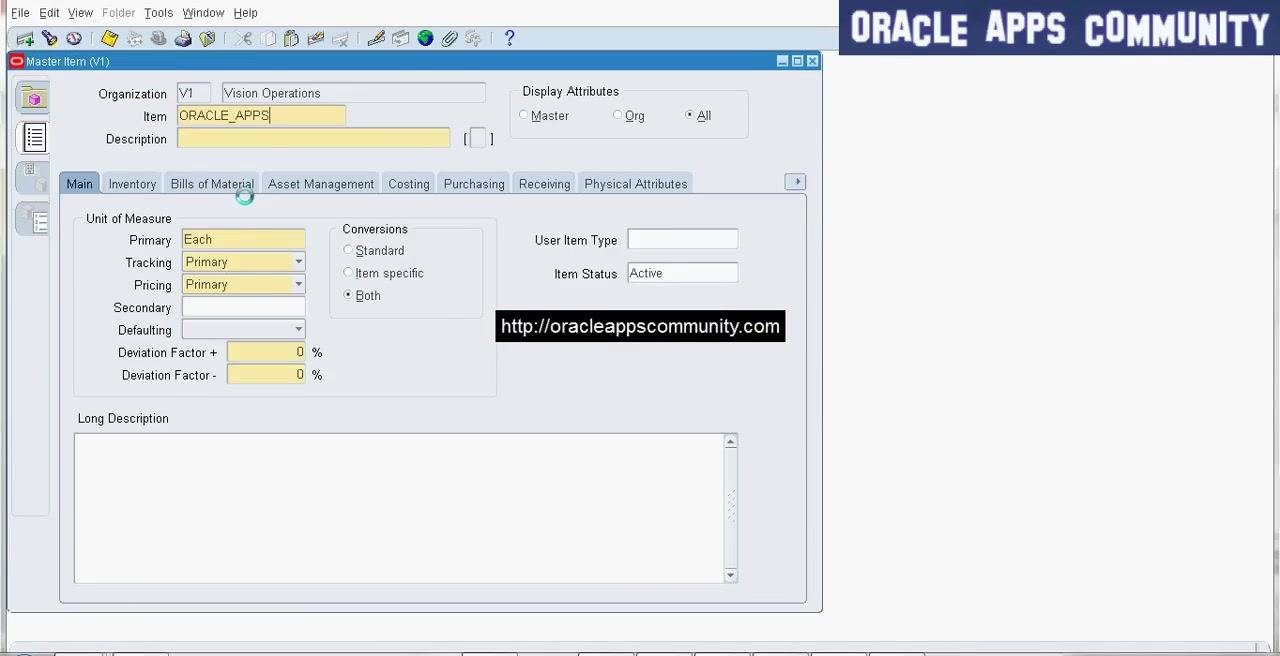
Enter the item number and description
In the Master Item form, enter the following details to create an item in Oracle EBS:
- Organization: V1 (Vision Operations)
- Item: ORACLE_APPS
- Description: Oracle Apps Community
Make sure the fields are filled as shown.
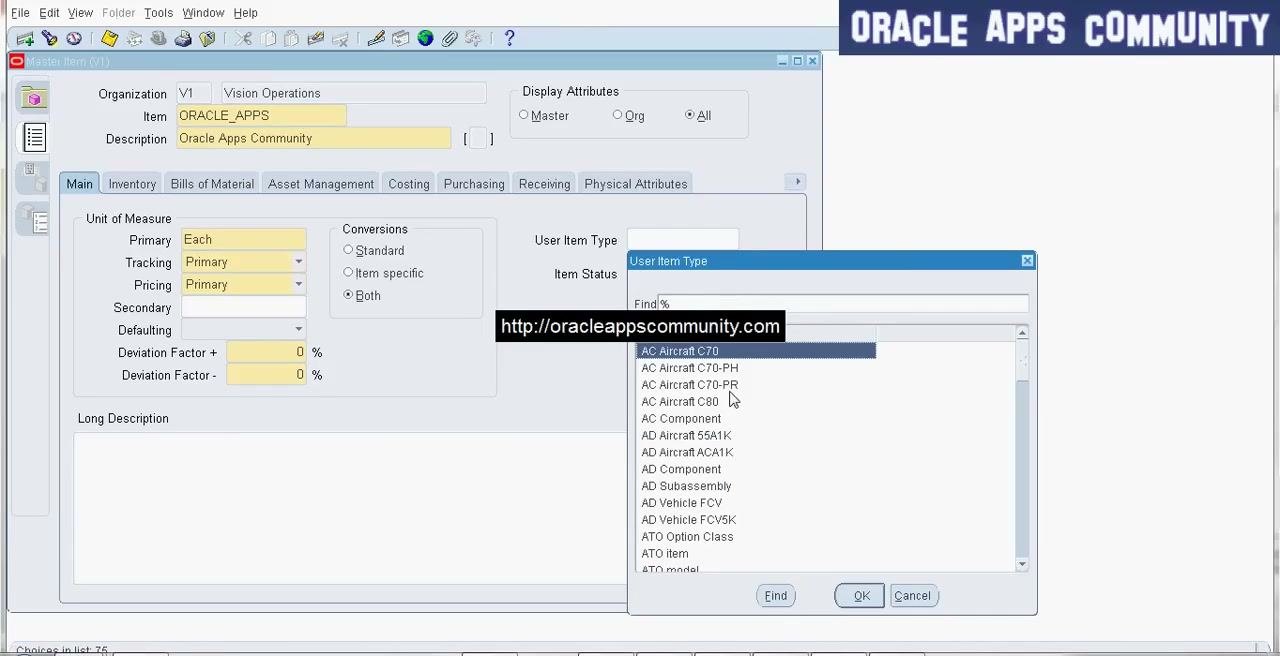
Set the unit of measure and user item type
- On the Main tab, under Unit of Measure, set Primary to "Each".
- Set Tracking to "Primary".
- Set Pricing to "Primary".
- Next to User Item Type, click the search icon.
- In the User Item Type pop-up, select the appropriate type (for example, "AC Aircraft C70", or the type you require).
- Click OK to confirm your selection.
- Make sure Item Status is set to "Active".
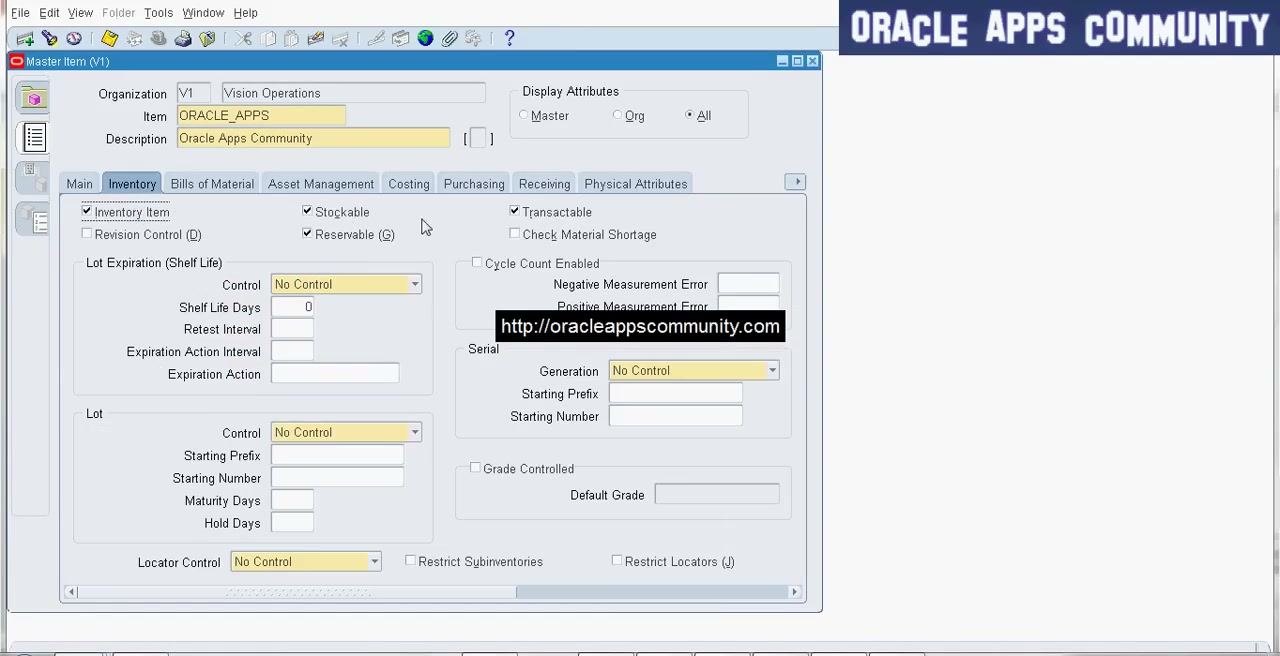
Set the inventory attributes
Switch to the Inventory tab and set the following attributes as needed:
- Inventory Item: Checked
- Stockable: Checked
- Reservable: Checked
- Transactable: Checked
- Lot Expiration (Shelf Life): Set Control to "No Control", or as required
- Lot: Set Control to "No Control", or as required
- Serial: Set Generation to "No Control", or as required
Adjust other fields, such as Shelf Life Days and Retest Interval, to match your requirements.
Set the Bill of Materials attributes
Go to the Bills of Material tab. Configure the BOM attributes your item needs, following your organization's standards.
Set the costing attributes
- Click the Costing tab.
- Enter or verify the required costing information. Fields may include Costing Enabled, Inventory Asset Value, and Costing Method.
- Complete all costing-related fields according to your organization's standards.
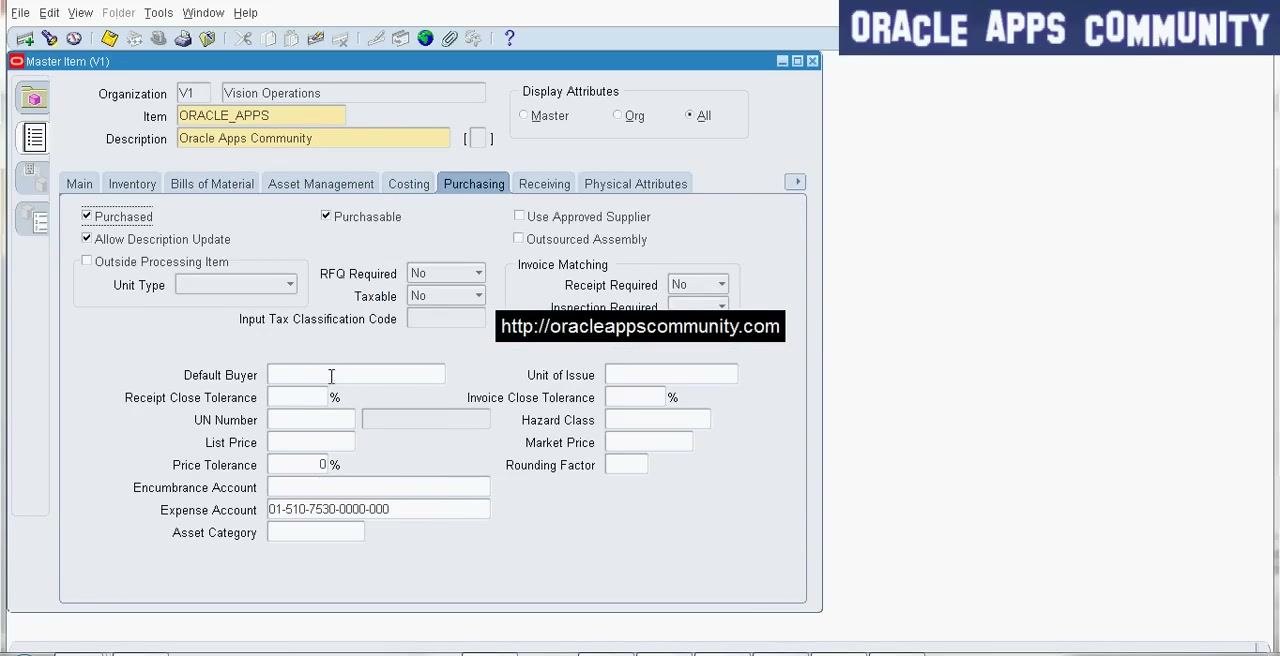
Set the purchasing attributes
Click the Purchasing tab and set the following fields as needed:
- Purchased: Checked
- Purchasable: Checked
- Allow Description Update: Checked
- Use Approved Supplier: Checked, if required
- Outsourced Assembly: Checked, if applicable
- RFQ Required: "No", or as required
- Taxable: "No", or as required
- Invoice Matching: Select "Receipt Required" and "Inspection Required" as needed
- Default Buyer: Enter the buyer's name or code, if applicable
- Receipt Close Tolerance and Invoice Close Tolerance: Enter a percentage, if required
- UN Number, List Price, Price Tolerance, Hazard Class, Market Price, Rounding Factor: Enter values according to your business process
- Encumbrance Account: Enter or verify the account (for example, 01-510-7530-0000-0000)
- Expense Account: Enter or verify the account
- Asset Category: Enter, if applicable
Review all fields for completeness.
Set the receiving attributes
Click the Receiving tab and set the following controls:
- Receipt Date Controls – Action: "Warning"
- Receipt Date Controls – Days Early: 100
- Receipt Date Controls – Days Late: 100
- Overreceipt Quantity Control – Action: Set as required
- Overreceipt Quantity Control – Tolerance: Enter a percentage, if required
- Valid Transactions: Set Allow Substitute Receipts, Allow Unordered Receipts, and Allow Express Transactions as required
- Receipt Routing: Select as required
- Enforce Ship-To: Enter a value, if required
- Receiving Subinventory: Enter a value, if required
Make sure all receiving fields follow your organization's policies.
Set the physical attributes
- Click the Physical Attributes tab.
- Enter the physical characteristics of the item. Fields may include dimensions, weight, and volume.
- Complete all required fields according to your business process.
Set the general planning attributes
Click the General Planning tab and set the following fields:
- Inventory Planning Method: "Not Planned", or as required
- Subcontracting Component: Set as required
- Planner: Enter the planner name or code, if applicable
- Make or Buy: "Buy", or as required
- Min-Max Quantity: Enter Minimum and Maximum values as needed
- Order Quantity: Enter Minimum and Maximum values as needed
- Source: Set Type (for example, Inventory, Supplier, or Subinventory), Organization, and Subinventory as required
- Safety Stock: Set Method to "Non-MRP Planned", or as required, then set Bucket Days and Percent as needed
- Order Modifiers: Enter Fixed Order Quantity, Fixed Days Supply, and Fixed Lot Multiplier as required
Review all planning fields for accuracy.
Set the MPS/MRP planning attributes
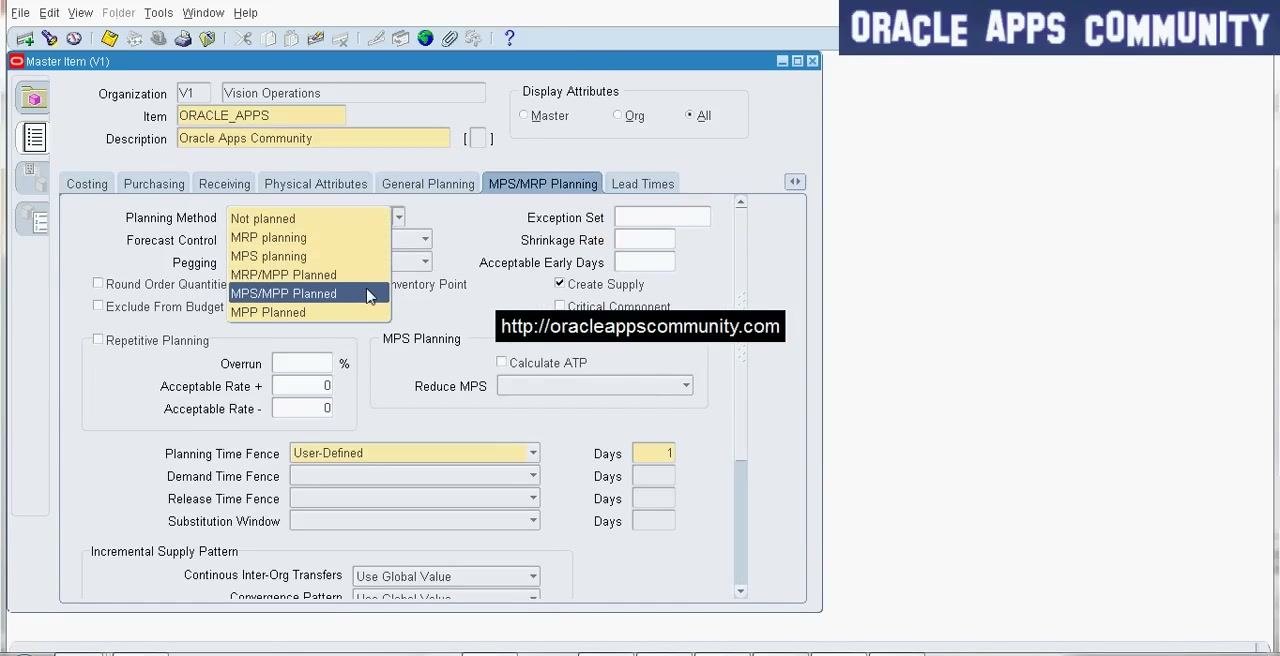
Click the MPS/MRP Planning tab and set the following fields:
- Planning Method: Select "MPS/MPP Planned", or as required
- Forecast Control: Set as required
- Pegging: Set as required
- Other fields: Enter values for Overrun, Acceptable Rate, Exception Set, Shrinkage Rate, Acceptable Early Days, Create Supply, Critical Component, Planning Time Fence, Demand Time Fence, Release Time Fence, and Substitution Window, according to your planning process
The Planning Method list offers Not planned, MRP planning, MPS planning, MRP/MPP Planned, MPS/MPP Planned, and MPP Planned.
Set the lead time attributes
Click the Lead Times tab and enter the lead time values for the item:
- Preprocessing Lead Time
- Processing Lead Time
- Postprocessing Lead Time
- Cumulative Manufacturing Lead Time
- Cumulative Total Lead Time
Complete all lead time fields according to your organization's requirements.
Set the Work in Process attributes
Click the Work In Process tab. Enter or verify the WIP-related attributes:
- Build in WIP
- Supply Subinventory
- Supply Locator
- WIP Supply Type
Complete all required fields according to your business process.
Set the order management attributes
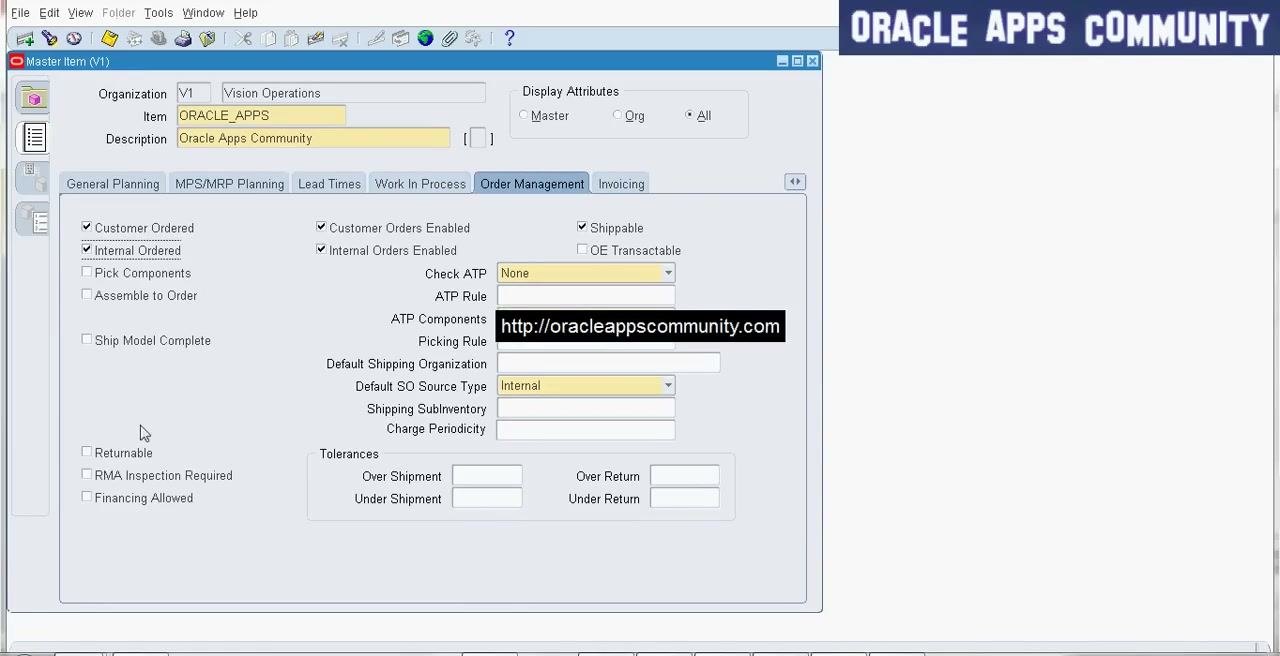
Click the Order Management tab and set the following fields as needed:
- Customer Ordered: Checked if customers can order the item
- Customer Orders Enabled: Checked if the item is enabled for customer orders
- Shippable: Checked if the item can be shipped
- Internal Ordered: Checked if the item can be ordered internally
- Internal Orders Enabled: Checked if the item is enabled for internal orders
- OE Transactable: Checked if the item can be transacted in Order Entry
- Pick Components, Assemble to Order, Ship Model Complete: Checked, if applicable
- Check ATP: "None", or as required
- ATP Rule, ATP Components, Picking Rule: Enter, if applicable
- Default Shipping Organization: Enter, if applicable
- Default SO Source Type: "Internal", or as required
- Shipping Subinventory and Charge Periodicity: Enter, if applicable
- Returnable: Checked if the item can be returned
- RMA Inspection Required: Checked, if required
- Financing Allowed: Checked, if applicable
- Tolerances: Enter values for Over Shipment, Under Shipment, Over Return, and Under Return as required
Review all order management fields for completeness.
Set the invoicing attributes
Click the Invoicing tab and enter the attributes your business process requires:
- Invoice Enabled
- Invoiceable Item
- Tax Classification Code
- Invoicing Rule
- Accounting Rule
- Revenue Account
Make sure all invoicing fields follow your organization's standards.
Set the service attributes
Click the Service tab and set the following fields as needed:
- Service Request: Enter, if applicable
- Enable Contract Coverage: Checked if a contract covers the item
- Enable Defect Tracking: Checked if defect tracking is required
- Enable Provisioning: Checked if provisioning is required
- Track in Installed Base: Checked if the item should be tracked in the installed base
- Create Fixed Asset: Checked if the item should create a fixed asset
- Instance Class: Select as required
- Service Contracts: Enter Contract Item Type, Duration, Duration Period, and Template as required
- Debrief and Charges: Enter Recovered Part Disposition, Enable Service Billing, and Billing Type as required
Complete all required service fields according to your organization's process.
Review the remaining tabs and save the item
Review other tabs, such as Asset Management and Web Option, and set attributes as your organization's item creation standards require. Validate your entries, then save the item record before you exit the form.
Summary
You now know how to create an item in Oracle EBS in the Master Organization. You opened Master Items, entered the item number and description, and set the unit of measure and user item type. You then configured the attributes on each tab your business process requires. Complete and validate all required fields before you save the item.
Generation details: cost, quality tiers
Docsie billed 2,500 credits ($1.75) to analyze this 5-minute video at standard quality. The rewrite, template fill and Word/PDF exports were included. The same video at each quality tier:
| Quality | Frames sampled | Credits | Approx. cost |
|---|---|---|---|
| Draft | every 16-30 s | 1,250 | $0.88 |
| Standard (this guide) | every 8-15 s | 2,500 | $1.75 |
| Detailed | every 4-7 s | 5,000 | $3.50 |
| Ultra | every 1-3 s | 10,000 | $7.00 |
Credits priced at $0.70 per 1,000; plans include a monthly allowance. Enterprise customers on on-premise or bring-your-own-model deployments run this on their own inference and pay no per-video credits.
Generated by Docsie Video-to-Docs on 2026-11-15 from a 4-minute video. Screenshots are frames from the source video and belong to their creator, Oracleappscommunity, whose original is embedded above. If you own this video and want the guide removed or credited differently, contact us and we will act within one business day.