
How to Create an Internal Sales Order in Oracle EBS
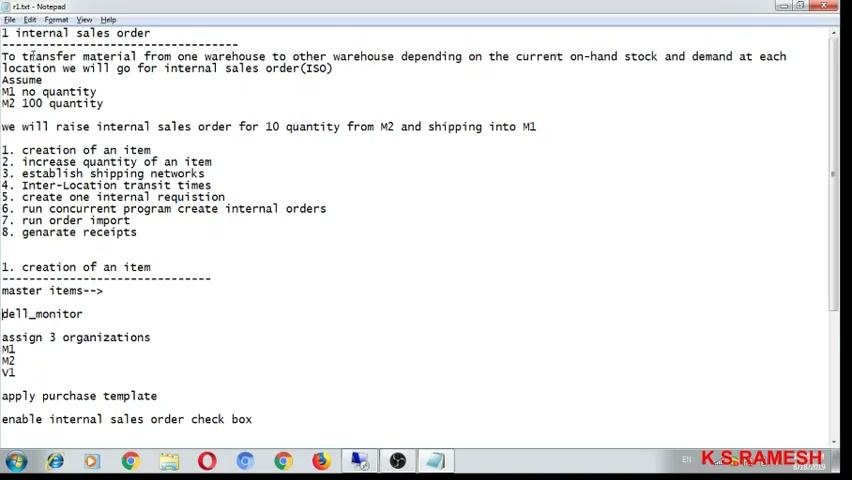
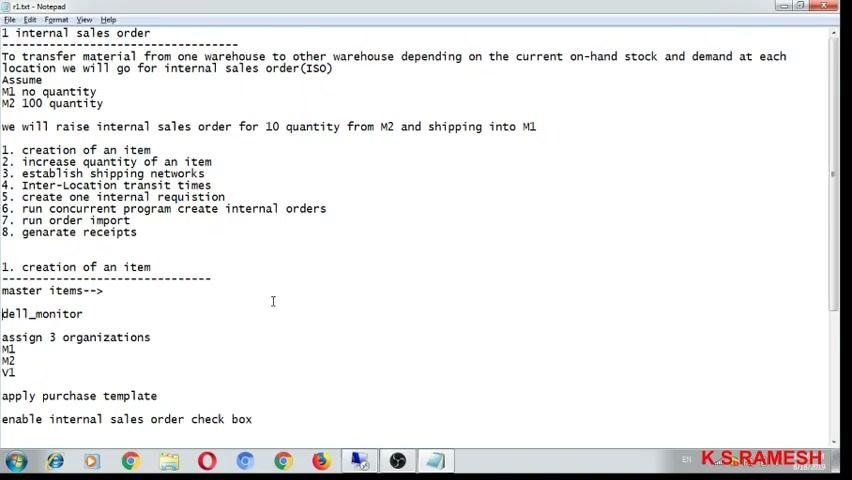
This guide shows you how to create an internal sales order in Oracle EBS to move material between warehouses based on on-hand stock and demand at each location. For example, if organization M1 has no quantity and M2 has 100, you can initiate an internal sales order to move stock from M2 to M1.
Video: Internal sales order in oracle apps by Ramesh K S (2019). All credit for the demonstration goes to the creator; watch the original on YouTube. The written guide below was generated from this video by Docsie. Creator? Request a change or removal.
This guide shows you how to create an internal sales order in Oracle EBS to move material between warehouses based on on-hand stock and demand at each location. For example, if organization M1 has no quantity and M2 has 100, you can initiate an internal sales order to move stock from M2 to M1.
You create and set up an item, increase its quantity in the source organization, enter its cost, and create an internal requisition. You then run the concurrent programs that create and import the internal order, release it for picking, and generate the receipt.
Prerequisites
Before you begin, make sure you have the following:
- Access to the Item Master form, Inventory, and Purchasing in Oracle Applications.
- Access to the Order Management Super User responsibility.
- Two organizations to move stock between. This guide uses M1 (Seattle Manufacturing) and M2 (Boston Manufacturing).
- A SQL editor such as Toad for Oracle, if you want to verify requisition and order status in the database.
Internal sales order process overview
The internal sales order process involves these stages:
- Creation of an item
- Increasing item quantity
- Establishing shipping networks
- Setting inter-location transit times
- Creating an internal requisition
- Running the concurrent program to create internal orders
- Running order import
- Generating receipts
Set up the item for internal orders
Step 1. Create a new item in the Item Master
Open the Item Master form in Oracle Applications and enter these details:
- Organization: M1 (Vision Operations)
- Item: d_item
- Description: d_item
Make sure Item Status is set to Active.
Step 2. Apply the Purchased Item template
In the item creation window, use the Copy From function and select the template Purchased Item. Click Apply, and then click Done to use the predefined template for the item.
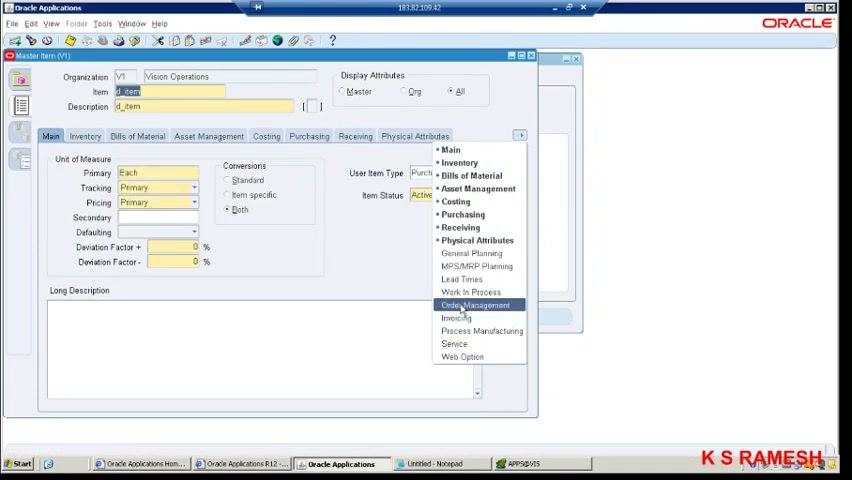
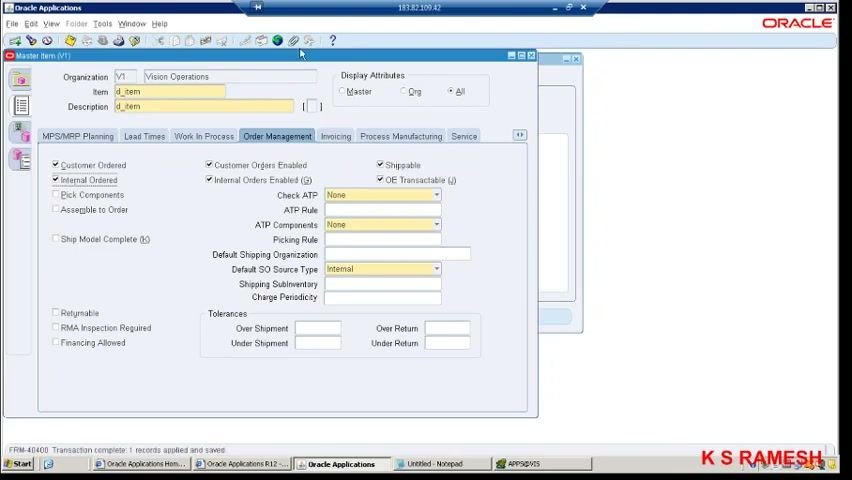
Step 3. Enable the internal order options
Go to the Order Management tab and enable these checkboxes:
- Internal Ordered
- Internal Orders Enabled
Set Default SO Source Type to Internal, and then save the item record.
Step 4. Assign the item to both organizations
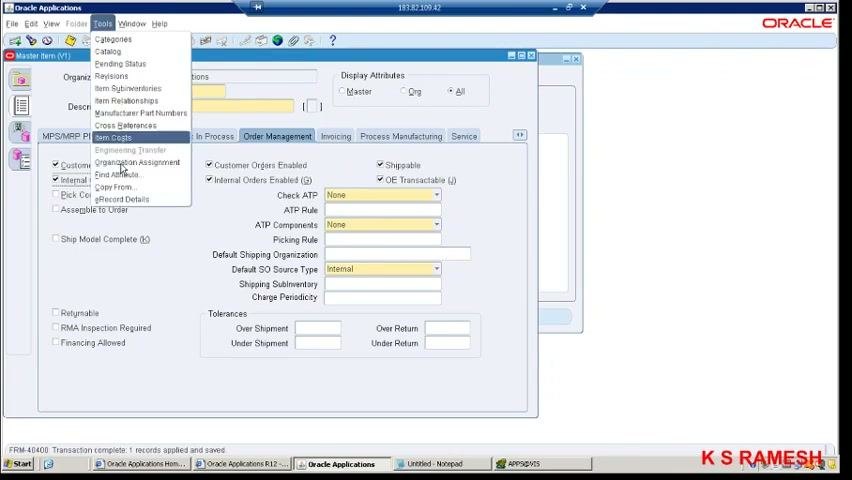
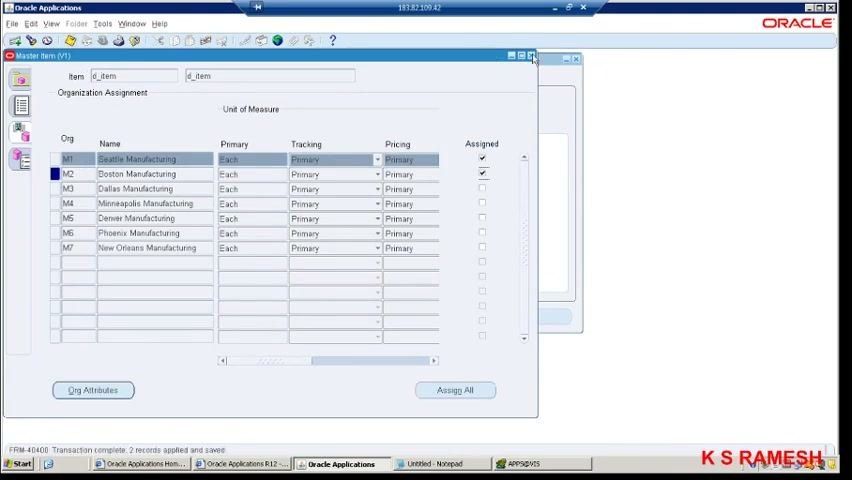
In the Item Master, select Tools > Organization Assignment. In the Organization Assignment window, locate M1 (Seattle Manufacturing) and M2 (Boston Manufacturing). Select the Assigned checkbox for both, and then click Save to confirm the assignments.
Increase the item quantity in organization M2
Step 5. Switch to organization M2
Open the Organizations selection window. Select M2 (Boston Manufacturing), or the relevant code for your M2 organization, and click OK to switch your working context to M2.
Step 6. Open Miscellaneous Transaction
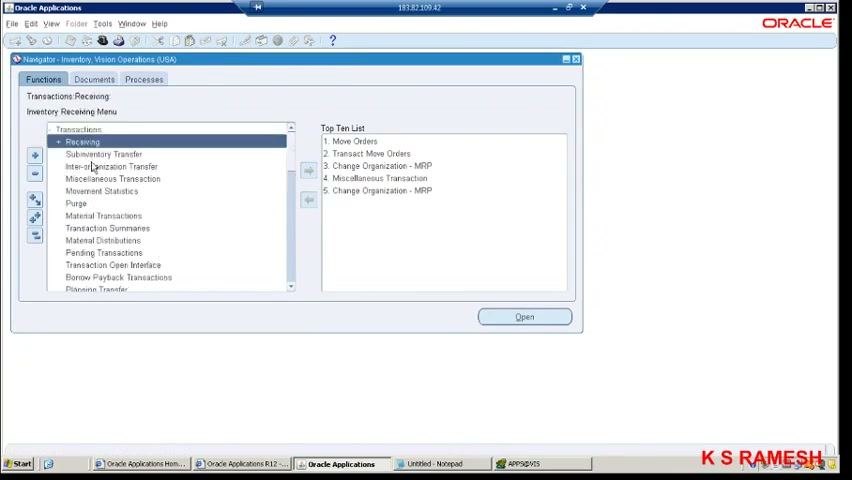
In the Inventory menu, expand Transactions and select Miscellaneous Transaction. Click Open to proceed.
Step 7. Start a miscellaneous receipt
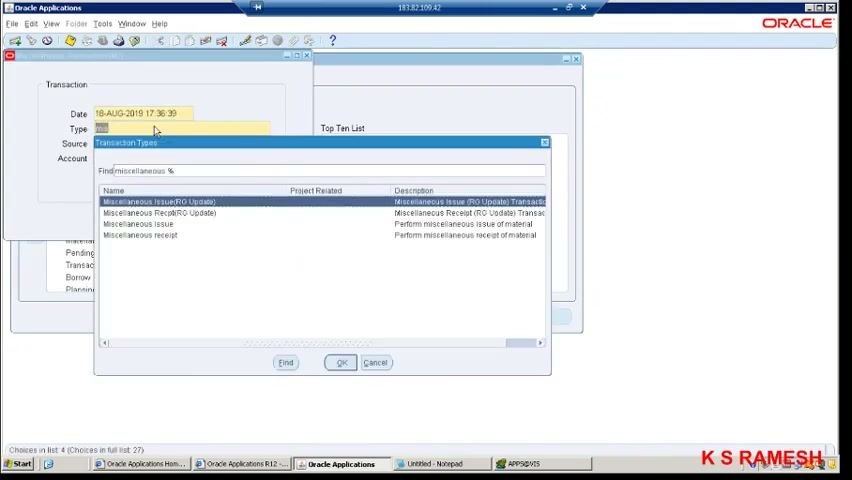
In the Transaction window, set the transaction type to Miscellaneous Receipt. Confirm the transaction date and type, and then click OK to continue.
Step 8. Enter the transaction line details
In the Miscellaneous Receipt (M2) window, enter these details:
- Item: d_item
- Subinventory: FG (or as appropriate for your setup)
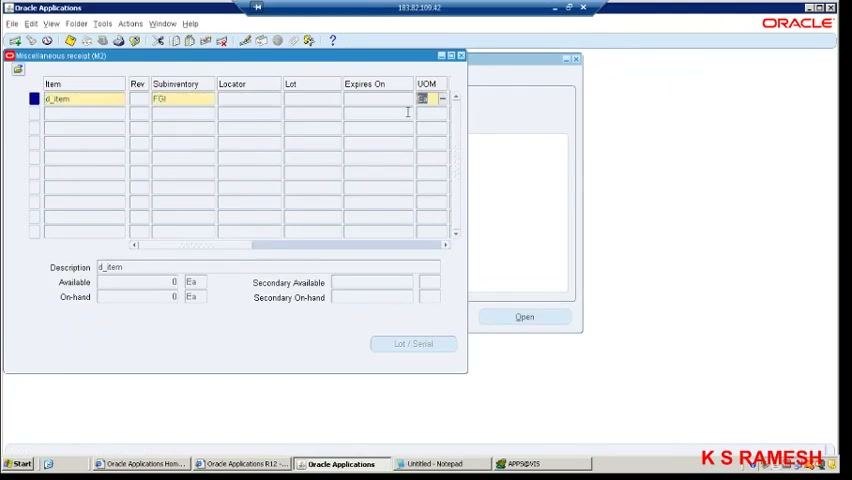
Step 9. Specify the quantity and save
Enter the quantity to receive. This example uses 500. If prompted, fill in any additional required fields, such as Account, Location, Reason, or Reference. Click Save to complete the transaction and increase the on-hand quantity of d_item in M2.
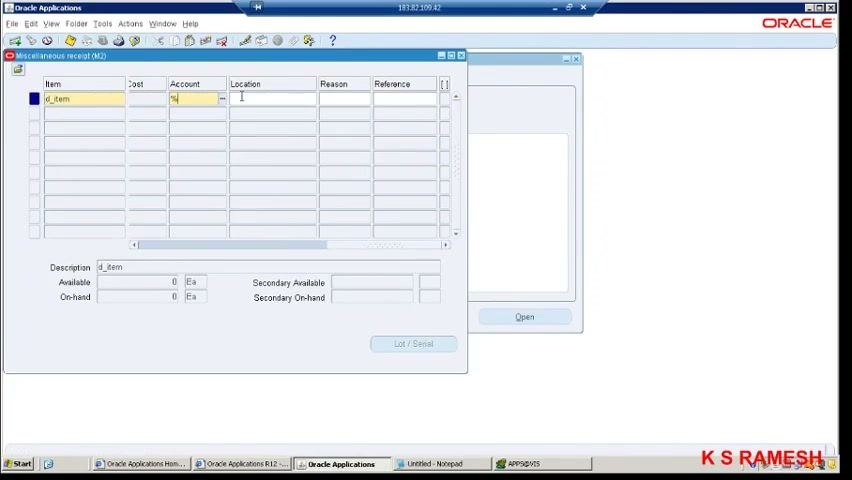
Step 10. Verify the transaction
Make sure the transaction is saved and the on-hand quantity for d_item in M2 is updated.
You have now increased the quantity of d_item in organization M2 using a miscellaneous receipt. This prepares the item for transfer to another warehouse as part of the internal sales order process.
Create the item cost and the internal requisition
Step 11. Switch to the appropriate responsibility
In the Oracle Applications main window, open the Responsibilities dialog. Select the responsibility relevant to purchasing or inventory operations, for example Payables, Vision Operations (USA). Click OK to confirm.
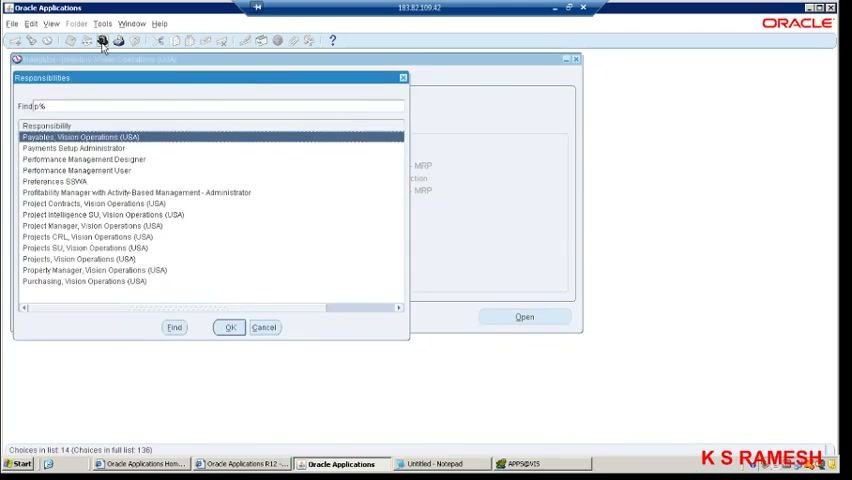
Step 12. Select the organization
In the Organizations dialog, select the organization where you will create the item cost, for example SMO - Patel R&D Org. Click OK to confirm.
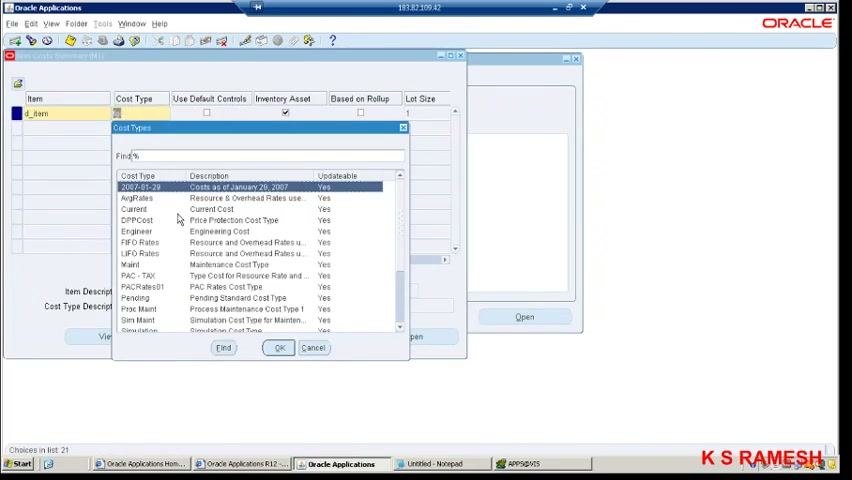
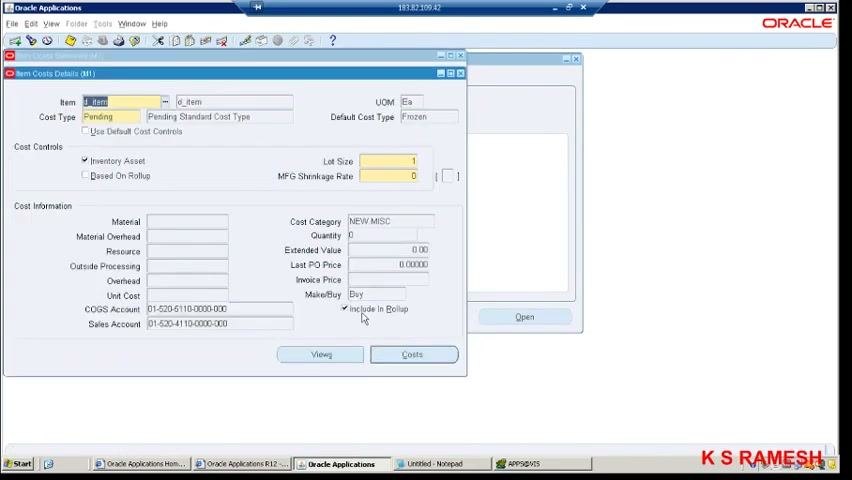
Step 13. Open the Item Cost Details window
In the Item Cost Details window, make sure your item (for example, d_item) is selected. Click the Cost Type field to open the Cost Types dialog.
Step 14. Choose the cost type and enter the material amount
In the Cost Types dialog, select the appropriate cost type (for example, Pending) and click OK. In the Item Cost Details window, under Cost Information, enter Material: 200. Click Costs or Save to record the material amount.
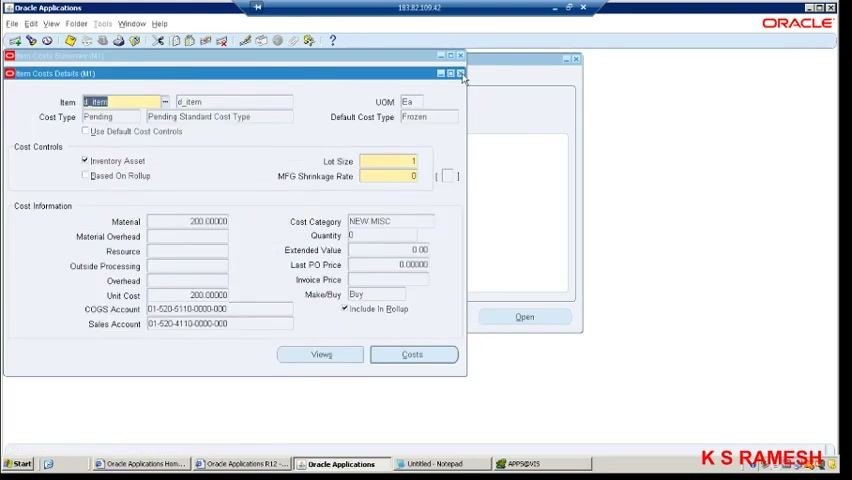
Step 15. Verify and save the item cost
Review the cost information and make sure the Material amount is 200. Confirm that the cost type is Pending and the default cost type is Frozen. Click the close button (X) to exit the Item Cost Details window.
Step 16. Navigate to Requisitions
In the Navigator window, under your selected responsibility, expand Requisitions. Select Requisition Summary or the relevant requisition function, and click Open to proceed.
Step 17. Review the requisition line for your internal sales order
In the Requisitions - New window, verify that all required fields for the internal requisition line are filled correctly:
- Operating Unit: Vision Operations
- Type: Internal Requisition
- Status: Incomplete
- Preparer: Stock, Ms. Pat
- Currency: USD
- Item: d_item
- Category: MISC.MISC
- Description: d_item
- UOM: Each
- Quantity: 10
- Destination Type: Inventory
- Requester: Stock, Ms. Pat
- Organization: Vision Operations
- Source: Inventory
Make sure all yellow-highlighted (mandatory) fields are populated and the Lines tab is active with all line details visible. Double-check that the Source and Organization fields match the intended inventory transfer.
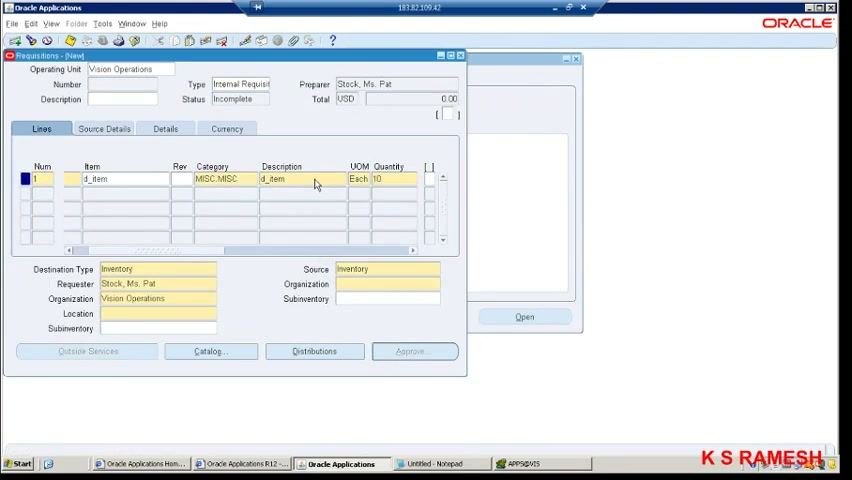
You have now entered and reviewed the internal requisition line. Continue to save, submit, or further process the requisition as your workflow requires.
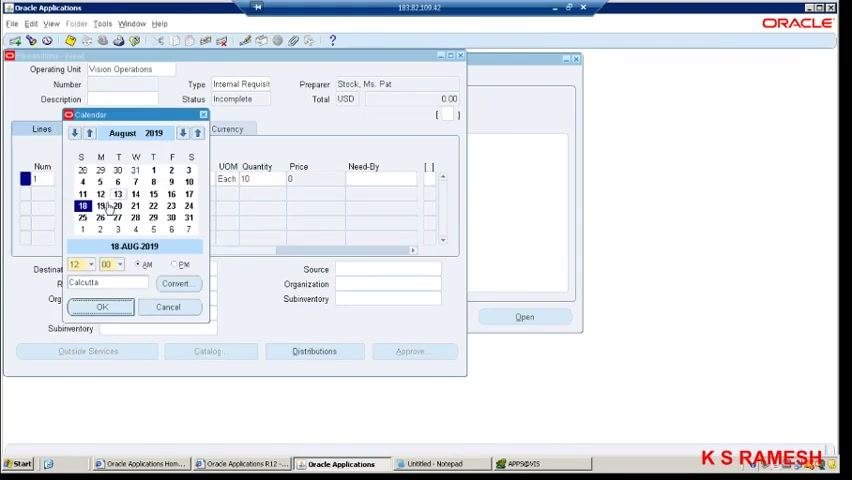
Step 18. Set the Need-By date
Select the Calendar icon to open the date picker for the Need-By field. In the calendar popup, select 18-AUG-2019 and set the time to 12:00 AM. Click OK to confirm the date and time.
Step 19. Update the organization and location fields if required
If required, update these fields:
- Organization: Seattle Manufacturing
- Location: M1 - Seattle Mfg
- Subinventory: FGI
- Source: Inventory
- Organization (Source): Seattle Manufacturing
Step 20. Submit the requisition for approval
When all details are confirmed and correct, click the Approve... button at the bottom right of the window. The status updates to indicate the requisition is waiting for approval. You can check the approval status in the backend if necessary.
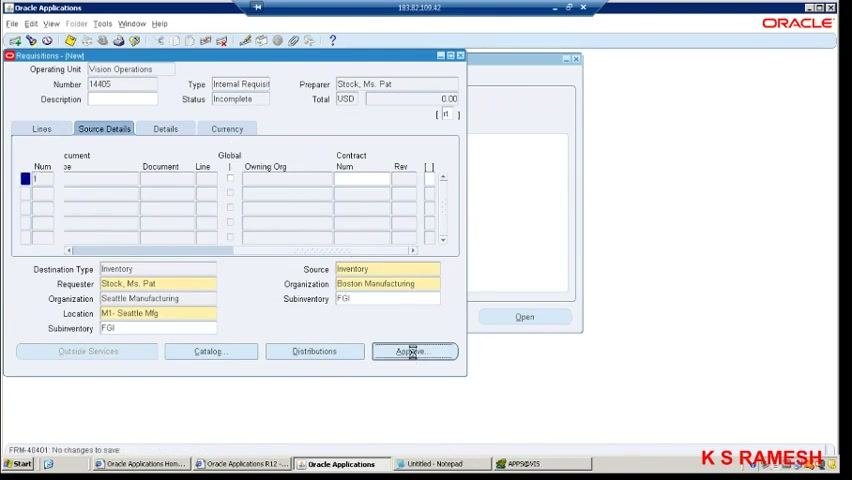
The key data entered for the requisition is:
- Need-By Date: 18-AUG-2019, 12:00 AM
- Destination Type: Inventory
- Requester: Stock, Ms. Pat
- Organization: Seattle Manufacturing (or Boston Manufacturing, depending on your context)
- Location: M1 - Seattle Mfg
- Subinventory: FGI
- Source: Inventory
Continue to monitor the approval status as required.
Monitor approval and create internal orders
Step 21. Verify the requisition in the database
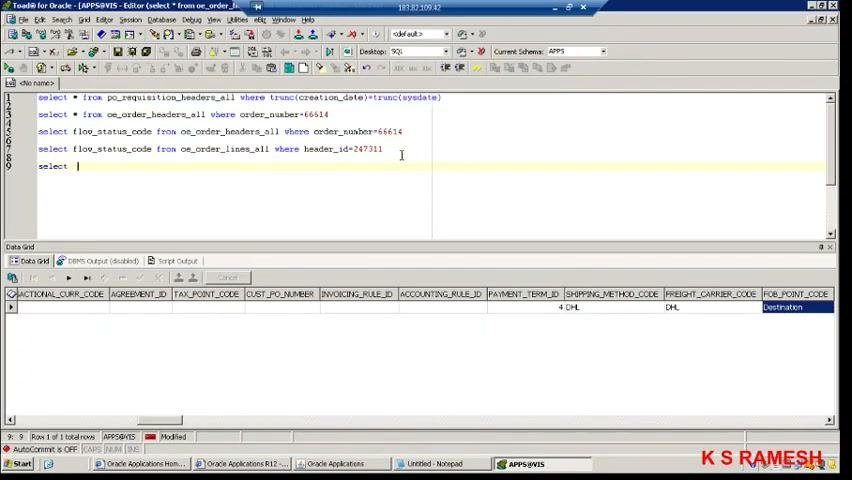
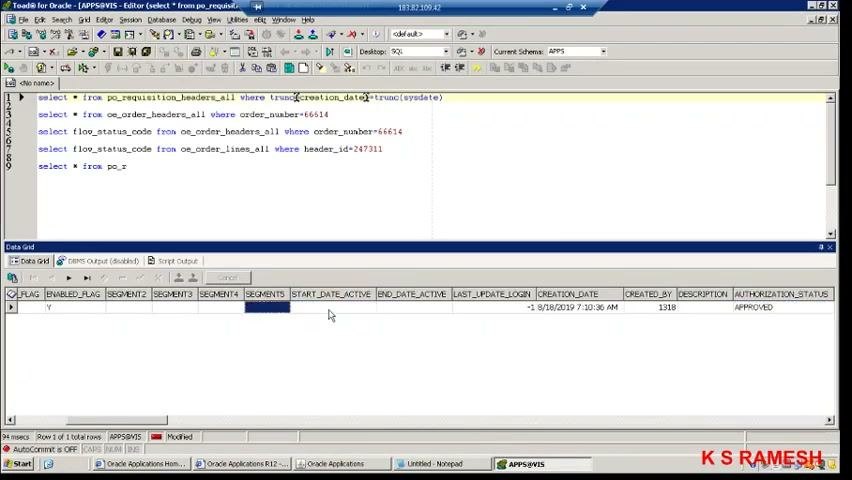
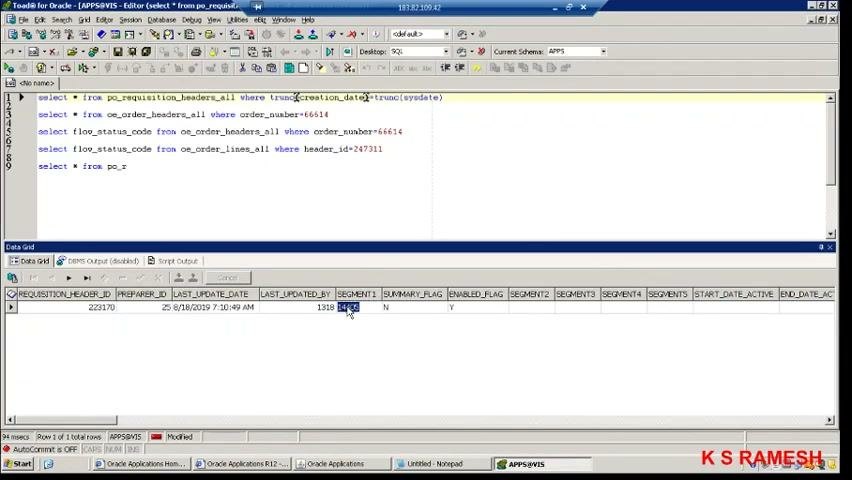
Open Toad for Oracle or your SQL editor. Run these queries to check the status of your requisition and related orders:
select * from po_requisition_headers_all where trunc(creation_date)=trunc(sysdate);select * from oe_order_headers_all where order_number=66614;select flow_status_code from oe_order_headers_all where order_number=66614;select flow_status_code from oe_order_lines_all where header_id=247311;
Review the results in the data grid below the query editor. To investigate requisition details further, start a new query such as select * from po_r....
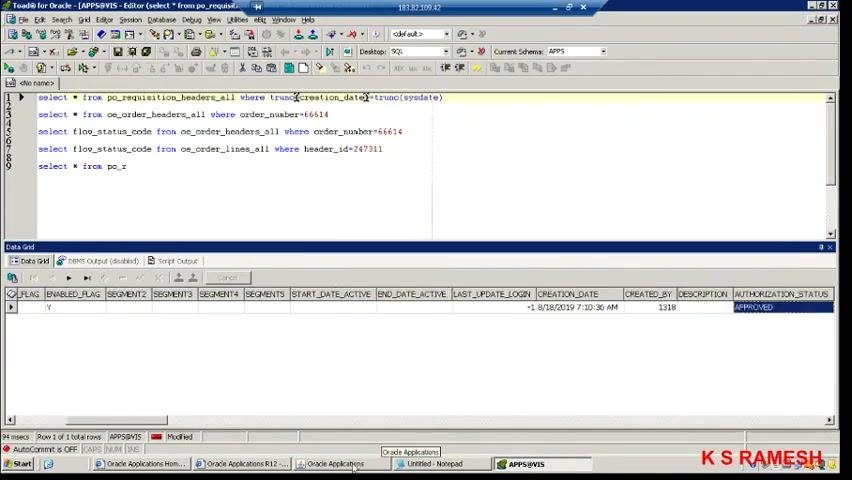
Step 22. Verify the authorization status
Check the AUTHORIZATION_STATUS column in the requisition header data. Make sure the status is APPROVED, which confirms the requisition was approved.
Step 23. Run the Create Internal Orders request
In the Run this Request... dialog, enter Create Internal Orders as the Name. Use the search or dropdown to locate and highlight Create Internal Orders under the Purchasing application. Click OK to proceed.
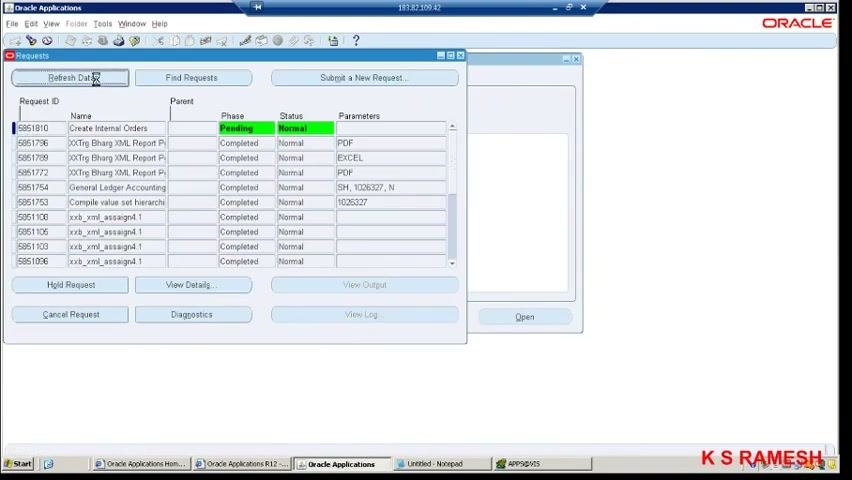
Step 24. Monitor the concurrent request status
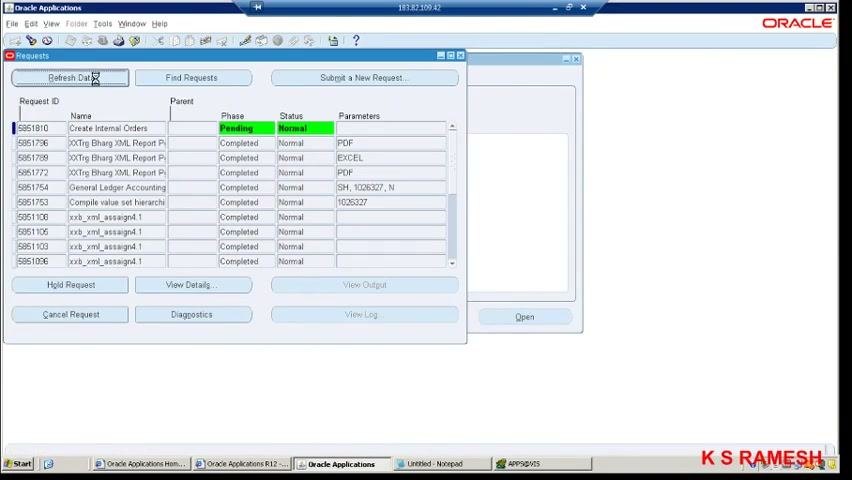
In the Requests window, locate your submitted request (for example, Request ID 5951810, Name: Create Internal Orders). Check these columns:
- Phase: Pending
- Status: Normal
- Parameters: as set during submission
Click Refresh Data periodically to update the status.
Step 25. Wait for the request to complete
Keep refreshing the data until Phase changes to Completed and Status remains Normal. This confirms the Create Internal Orders request has finished processing.
Import the internal orders
Step 26. Open the Import Orders function
Make sure you are in the Order Management Super User responsibility. In the Navigator window, expand Orders, Returns and scroll to locate Import Orders. Highlight Import Orders and click Open to proceed.
In the Order Import Request window, confirm that you are in the correct function. Then begin a new request for importing orders.
Step 27. Enter the order import parameters
In the Run this Request... dialog, set these parameters:
- Name: Order Import
- Operating Unit: Vision Operations (select from the dropdown list)
- Order Source: Internal
- Order Reference: 14405
- Validate Only?: No
- Instances: 4
- Change Sequence #: 4
- Trim Trailing Blanks: No
- Validate Descriptive Flexfield: Yes
Double-check all values for accuracy, and then click OK to submit the request.
Step 28. Monitor the order import request
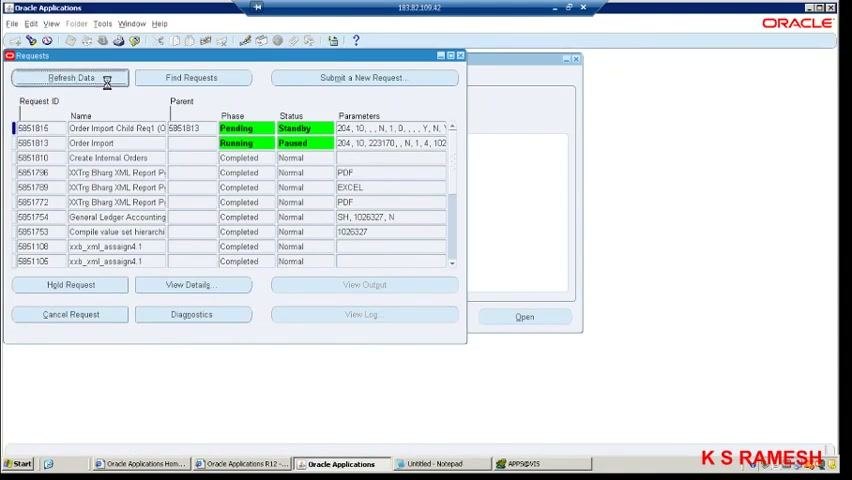
The Requests window opens and shows the status of your submitted request. Locate your request in the list (for example, Request ID 5951813, Name: Order Import). Check these columns:
- Phase: Pending
- Status: Standby
- Parameters: as set during submission
Click Refresh Data periodically to update the request status.
Step 29. Wait for the import to complete
Keep refreshing until Phase changes to Completed and Status is Normal. This confirms the order import finished successfully.
Step 30. Verify the imported order in the database (optional)
If required, switch to your SQL editor (for example, Toad for Oracle). Run queries to confirm the internal order was imported and is present in the relevant tables. Review the returned data and make sure the order reference and other details match your submission.
In this section, you navigated to Import Orders, entered the required parameters, submitted and monitored the concurrent request, refreshed the status until completion, and optionally verified the imported order in the database.
Step 31. Find the imported internal sales order
Open the Find Orders/Quotes window and enter the details to search for the imported order. For example, enter 1448 in the Requisition Number field. Click Find to search for the order.
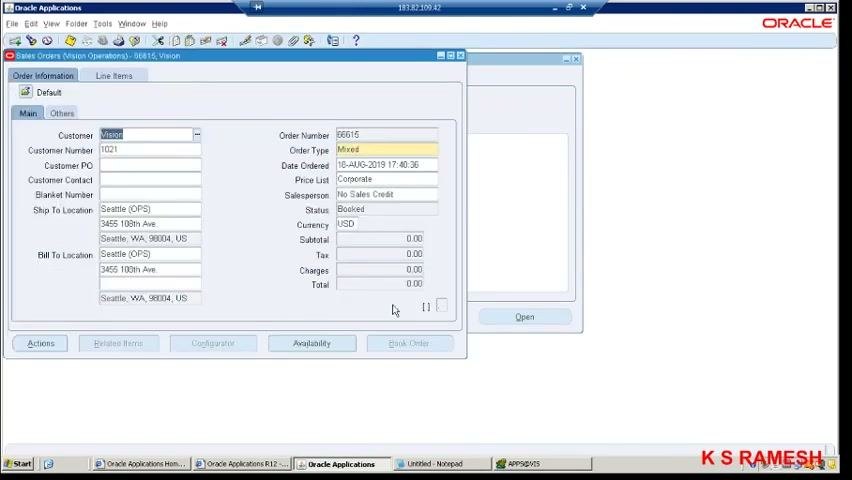
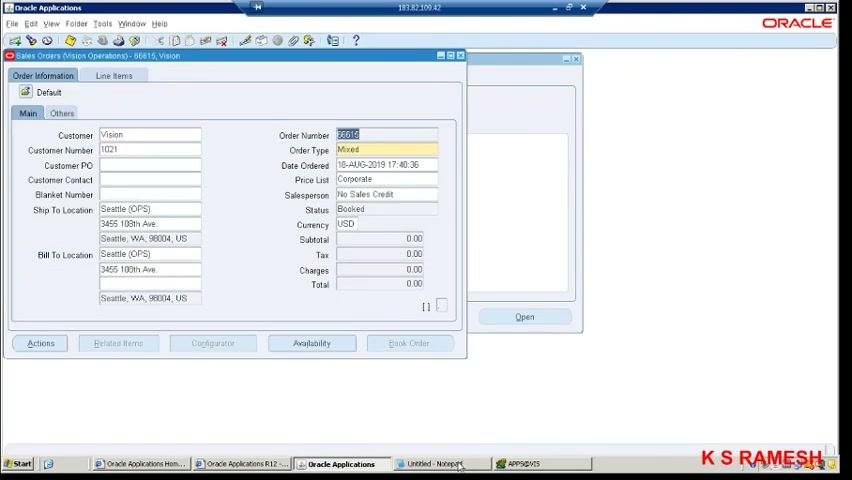
Step 32. Review the order details
In the Sales Orders window, confirm the order information:
- Customer: Vision
- Customer Number: 1021
- Order Number: 66616
- Order Type: Mixed
- Date Ordered: 18-AUG-2019 17:40:36
- Price List: Corporate
- Salesperson: No Sales Credit
- Status: Booked
- Bill To Location and Ship To Location: Seattle (OPS), 3456 130th Ave, Seattle, WA, 98034, US
- Charges and Totals: All 0.00 USD
Release sales orders for picking
Step 33. Set the release rules
Go to the Release Rules window to set the release criteria for the order. Select the appropriate Picking Rule from the list (for example, Standard). Confirm the order is listed as Unreleased, and then click OK to proceed.
Step 34. Review the shipping and release criteria
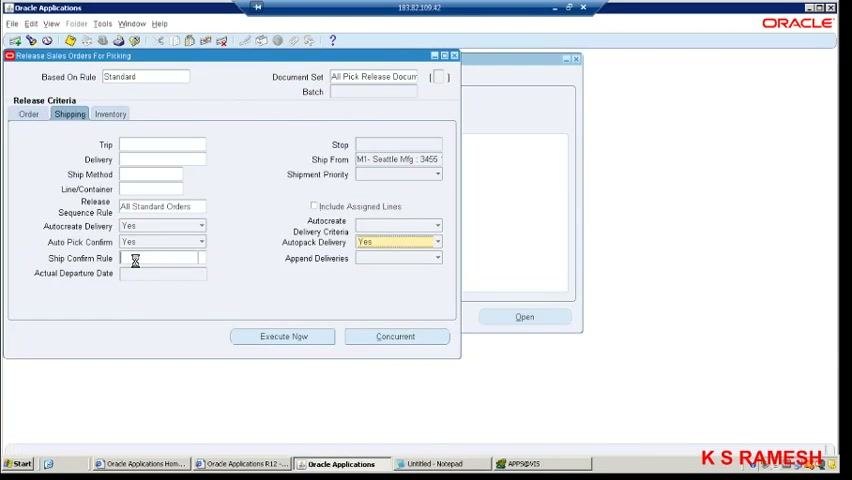
In the Release Sales Orders for Picking window, make sure these settings are in place on the Shipping tab:
- Based On Rule: Standard
- Delivery: blank or as required
- Ship From: M1 - Seattle Mfg: 3465
- Autocreate Delivery: Yes
- Auto Pick Confirm: Yes
- Ship Confirm Rule: blank or as required
- Autopack Delivery: Yes
Enable the auto-ship and auto-pick options.
Step 35. Update the Actual Departure Date
Enter 18-AUG-2019 17:46:06 in the Actual Departure Date field. Switch the Ship From location to M2 - Boston: 393 Berke as required. If instructed, confirm that Autopack Delivery is set to No.
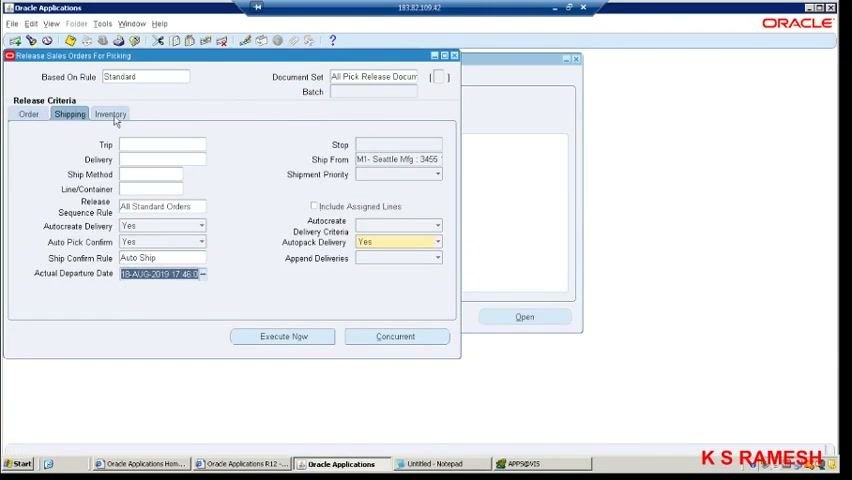
Step 36. Set Autopack Delivery and prepare to execute
If required, set Autopack Delivery to Yes. Make sure the following are set before you execute the release:
- Delivery Criteria: Across Orders
- Autopack Delivery: Yes
- Append Deliveries: blank or as required
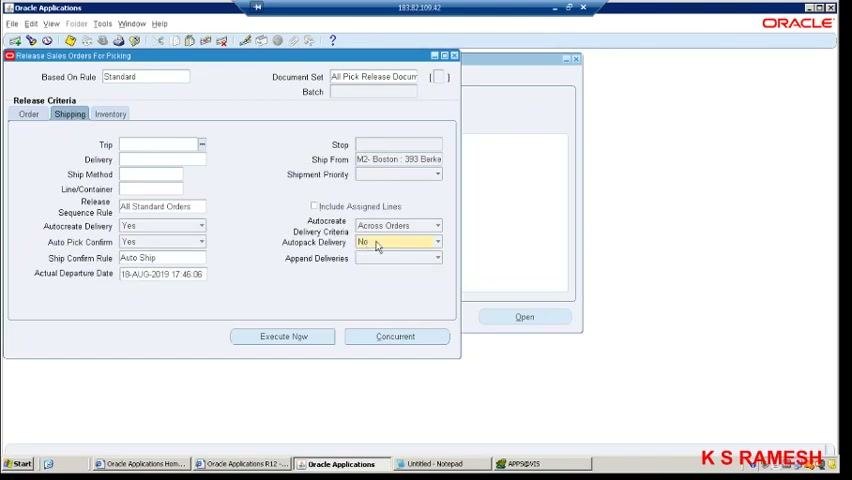
Step 37. Execute the release
Click Execute Now to release the sales order for picking and shipping.
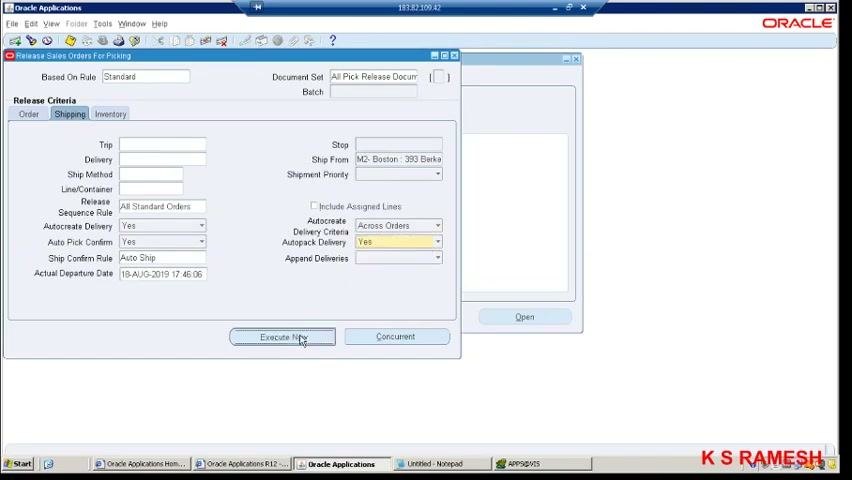
Step 38. Address any system warnings
If a warning appears, such as "APP-WSH-231033: Pick Release Online has ended with a Warning. Please check the Shipping Exceptions Report for further details", click OK to acknowledge it. Review the Shipping Exceptions Report if you need more information.
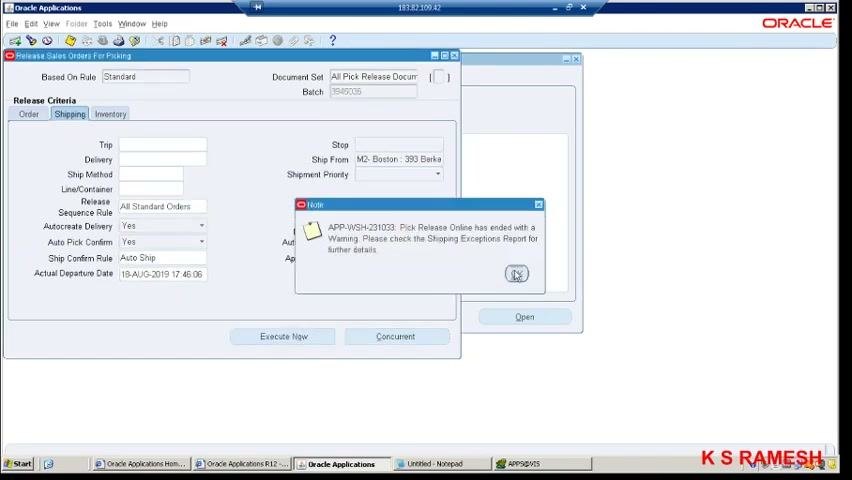
Generate receipts and verify on-hand quantity
Step 39. Open Receiving
In the Navigator - Purchasing, Vision Operations (USA) window, select Receiving > Receipts. Click Open to proceed.
Step 40. Find the expected receipt
In the Find Expected Receipts window, set these fields:
- Operating Unit: Vision Operations
- Source Type: All
- Requisition: the relevant requisition number (for example, 14404)
Fill in other fields as needed, such as Purchase Order, Supplier, and Receiving Location.
Enter 14404 in the Requisition field and click Find to search for the expected receipt.
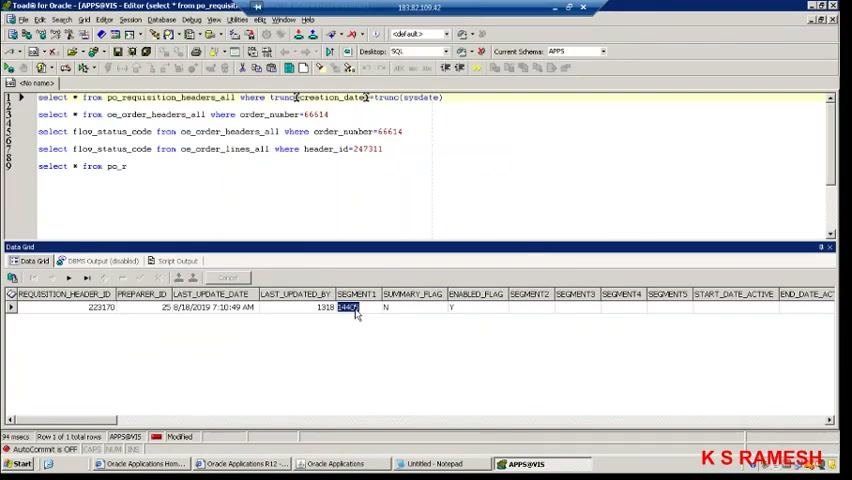
Step 41. Handle cases where no records are found
If an error such as "APP-PO-14024: No records meet your search criteria" appears, review the cause and action:
- Cause: No records match your search criteria.
- Action: Re-enter your search criteria with fewer or different parameters.
Click OK to dismiss the error dialog.
Step 42. Review the receipt line details
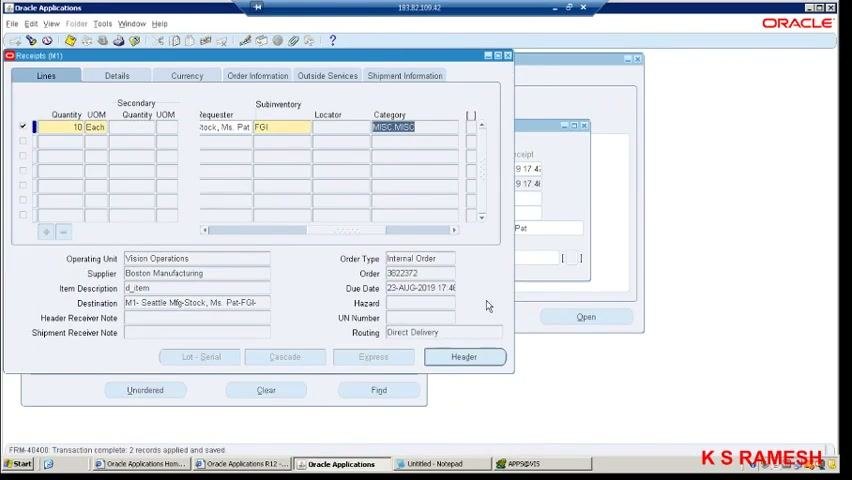
The Receipts window displays the Lines tab with these columns:
- Quantity: 10 Each
- Secondary Quantity UOM: blank
- Requester: Stock, Ms. Pat
- Subinventory: FGI
- Locator: blank
- Category: MISC.MISC
The lower section shows:
- Operating Unit: Vision Operations
- Supplier: Boston Manufacturing
- Order Type: Internal Order
- Order: 3622372
- Due Date: 23-AUG-2019 17:46
- Destination: M1 - Seattle Mfg-Stock, Ms. Pat-FGI
- Routing: Direct Delivery
Step 43. Confirm the receipt and shipment dates
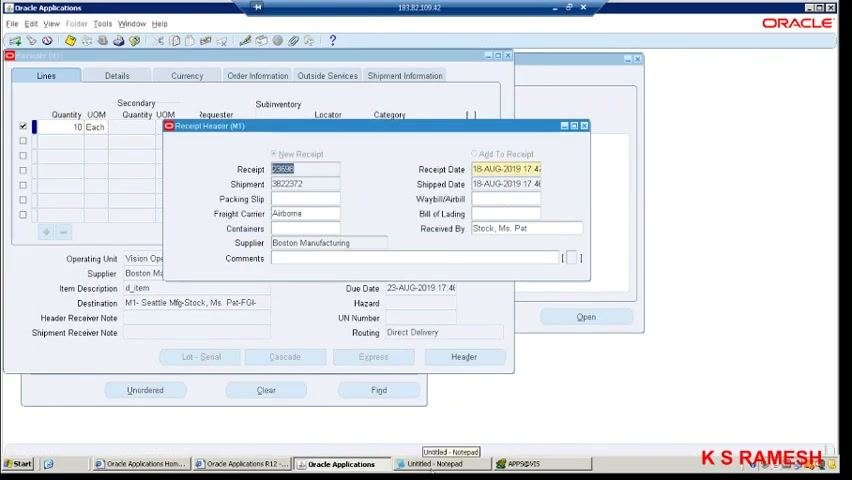
In the Receipt Header (M1) window, verify these values:
- Receipt Date: 18-AUG-2019 17:46
- Shipped Date: 18-AUG-2019 17:46
- Shipment: 3622372
- Supplier: Boston Manufacturing
- Received By: Stock, Ms. Pat
You can get the receipt number from this window.
Step 44. Open On-hand Quantity
In the Navigator - Inventory, Vision Operations (USA) window, select Transactions > On-hand Availability > On-hand Quantity. Click Open to proceed, and then check the on-hand quantity for the item.
Step 45. Query the item
In the Query Material window, enter these values:
- Organization: M1 (Seattle Manufacturing)
- Subinventory: as required
- Item/Revision: d_item
- View By: Location
Click Find to search for the item.
Step 46. Review on-hand quantity in the Availability window
The Availability window displays:
- Material Location: On-hand
- Organization: M1
- Item/Revision: d_item
- Total Quantity (Primary): 10 Ea
- Available to Reserve (Primary): 10 Ea
- Available to Transact (Primary): 10 Ea
This confirms that the 10 units received are now available in inventory.
Summary
You have now completed the process to create an internal sales order in Oracle EBS. You set up d_item for internal orders, assigned it to M1 and M2, and increased its quantity in M2 with a miscellaneous receipt. You then entered its cost, created and approved an internal requisition, ran Create Internal Orders, and imported the order with Order Import. Finally, you released the order for picking, generated the receipt, and confirmed the 10 received units in M1's on-hand quantity.
What's next
- Check the Shipping Exceptions Report if Pick Release ended with a warning.
- Use the database queries from Step 21 and Step 30 to continue monitoring requisition and order status.
- Repeat the process with a different item or quantity to transfer more stock between warehouses.
Generation details: cost, quality tiers
Docsie billed 7,500 credits ($5.25) to analyze this 15-minute video at standard quality. The rewrite, template fill and Word/PDF exports were included. The same video at each quality tier:
| Quality | Frames sampled | Credits | Approx. cost |
|---|---|---|---|
| Draft | every 16-30 s | 3,750 | $2.62 |
| Standard (this guide) | every 8-15 s | 7,500 | $5.25 |
| Detailed | every 4-7 s | 15,000 | $10.50 |
| Ultra | every 1-3 s | 30,000 | $21.00 |
Credits priced at $0.70 per 1,000; plans include a monthly allowance. Enterprise customers on on-premise or bring-your-own-model deployments run this on their own inference and pay no per-video credits.
Generated by Docsie Video-to-Docs on 2026-11-15 from a 14-minute video. Screenshots are frames from the source video and belong to their creator, Ramesh K S, whose original is embedded above. If you own this video and want the guide removed or credited differently, contact us and we will act within one business day.