
How to Create an AP Invoice in Oracle EBS
This guide shows you how to create an AP invoice in Oracle EBS using the Invoice Workbench in Oracle Payables. You enter the invoice header and line details, add an expense distribution, validate the invoice, create draft accounting, and review the resulting journal entry. The example uses supplier ABC Tech, invoice number ABC1, and an amount of 2,000.00 USD.
Video: How to Create an Invoice in Oracle AP by Oracle Ebiz and Fusion Videos (2017). All credit for the demonstration goes to the creator; watch the original on YouTube. The written guide below was generated from this video by Docsie. Creator? Request a change or removal.
This guide shows you how to create an AP invoice in Oracle EBS using the Invoice Workbench in Oracle Payables. You enter the invoice header and line details, add an expense distribution, validate the invoice, create draft accounting, and review the resulting journal entry. The example uses supplier ABC Tech, invoice number ABC1, and an amount of 2,000.00 USD.
Prerequisites
Before you begin, make sure you have:
- Access to Oracle Applications with the Payables responsibility.
- The vendor (trading partner) name, supplier number, and supplier site from the invoice.
- The invoice date, invoice number, and total invoice amount.
- The date on which you want the invoice to be accounted (the GL date) and the payment currency.
- The ship-to location and the expense account for the invoice line.
Open the Invoice Workbench
Step 1: Log in with the Payables responsibility
- Open Oracle Applications.
- Select the Payables responsibility from the list.
Step 2: Navigate to invoice entry
- In the Navigator window, expand Invoices.
- Select Entry, and then select Invoices to open the Invoice Workbench.
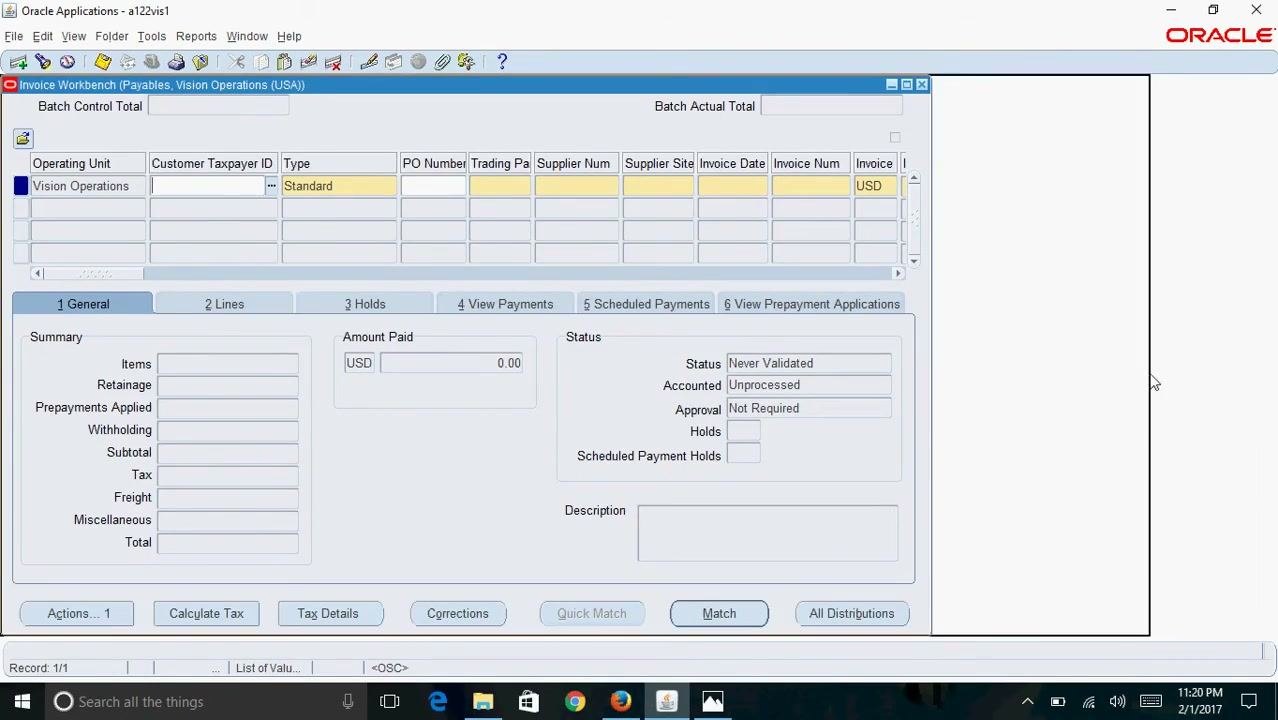
The Invoice Workbench window opens and displays the fields for invoice entry.
Enter the invoice header
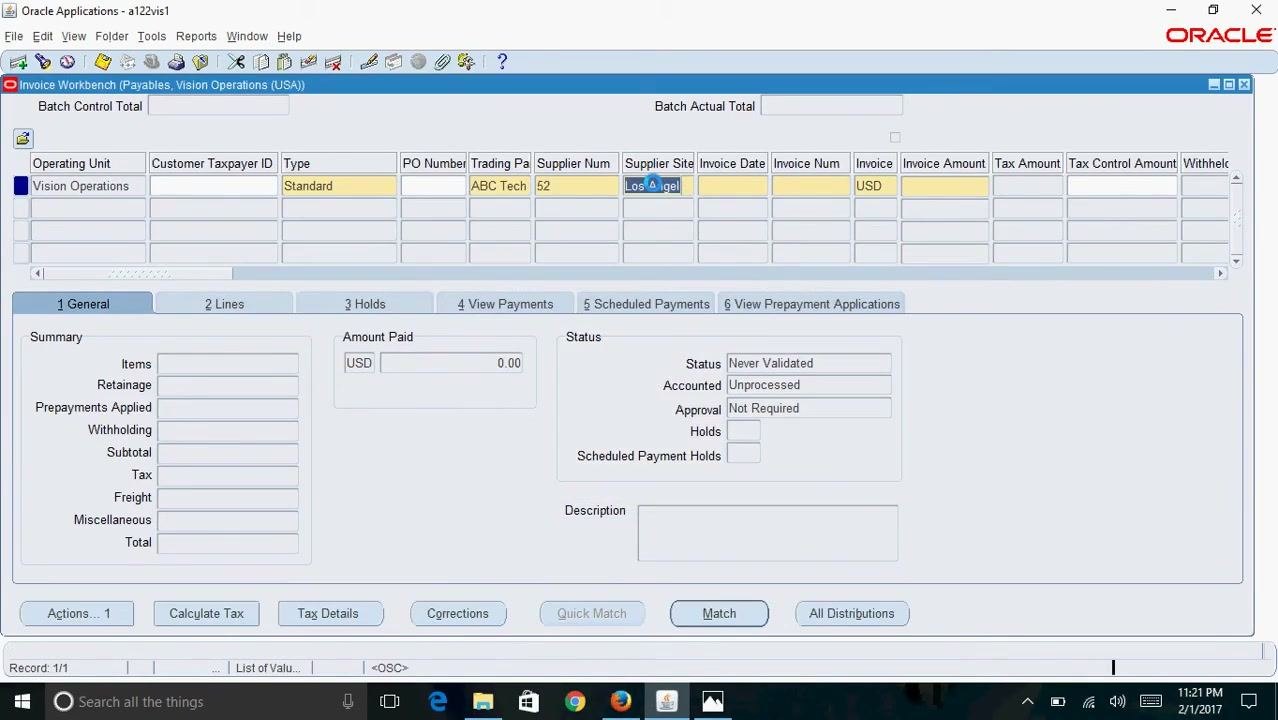
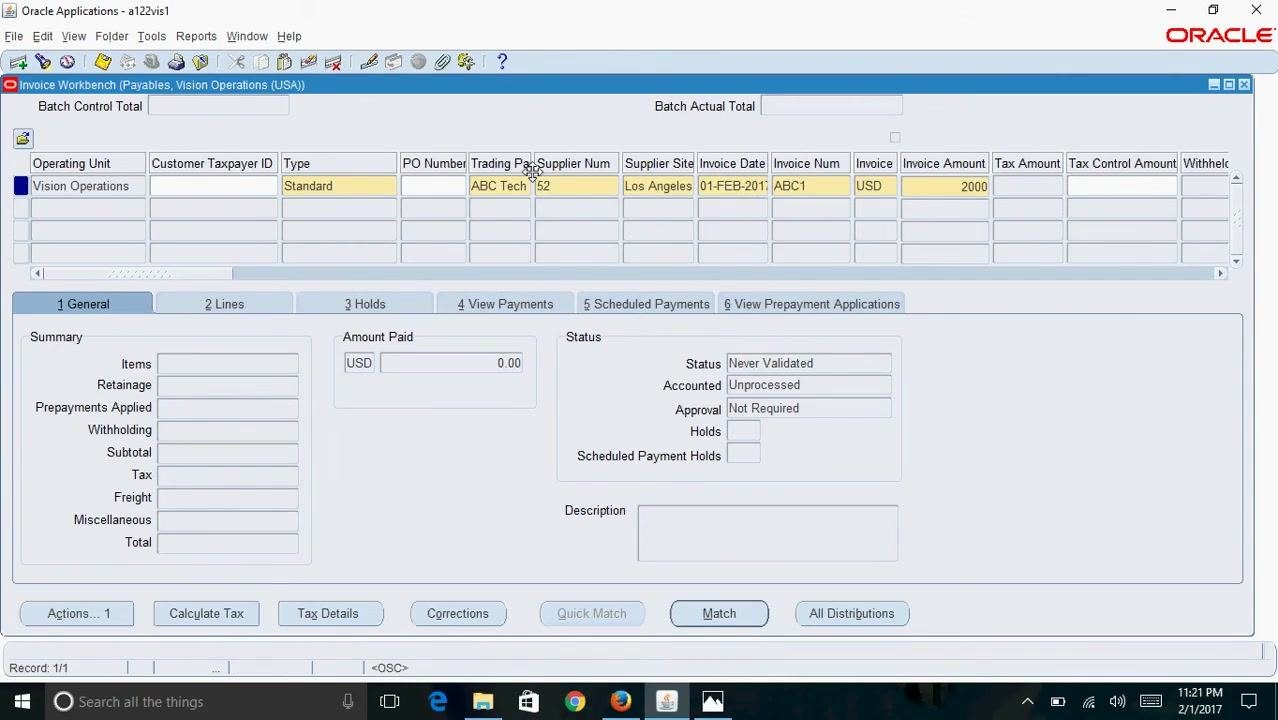
Step 3: Enter the trading partner, supplier number, and supplier site
- In the Trading Partner field, enter the vendor from whom you received the invoice. For example, enter
ABC Tech. - In the Supplier Num field, enter the supplier number. For example, enter
52. - In the Supplier Site field, enter the vendor address. For example, enter
Los Angeles.
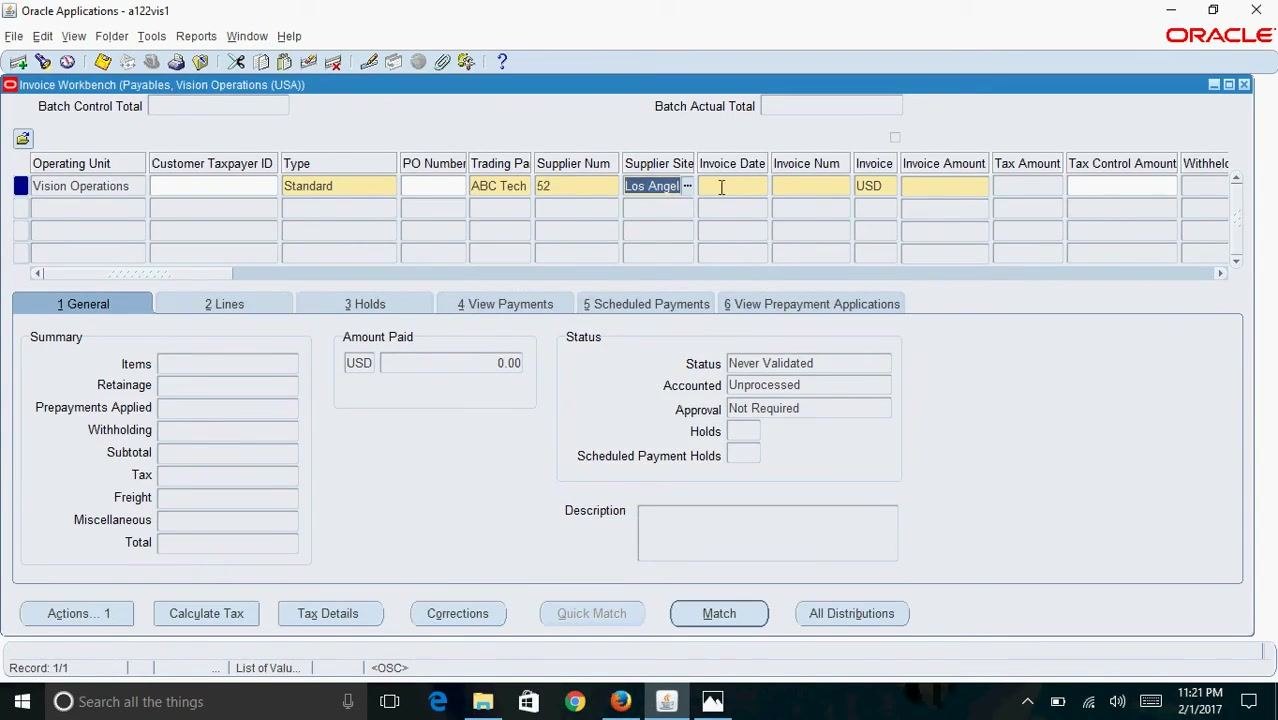
Step 4: Enter the invoice date
In the Invoice Date field, enter the date printed on the invoice copy. For example, enter 01-FEB-2017.
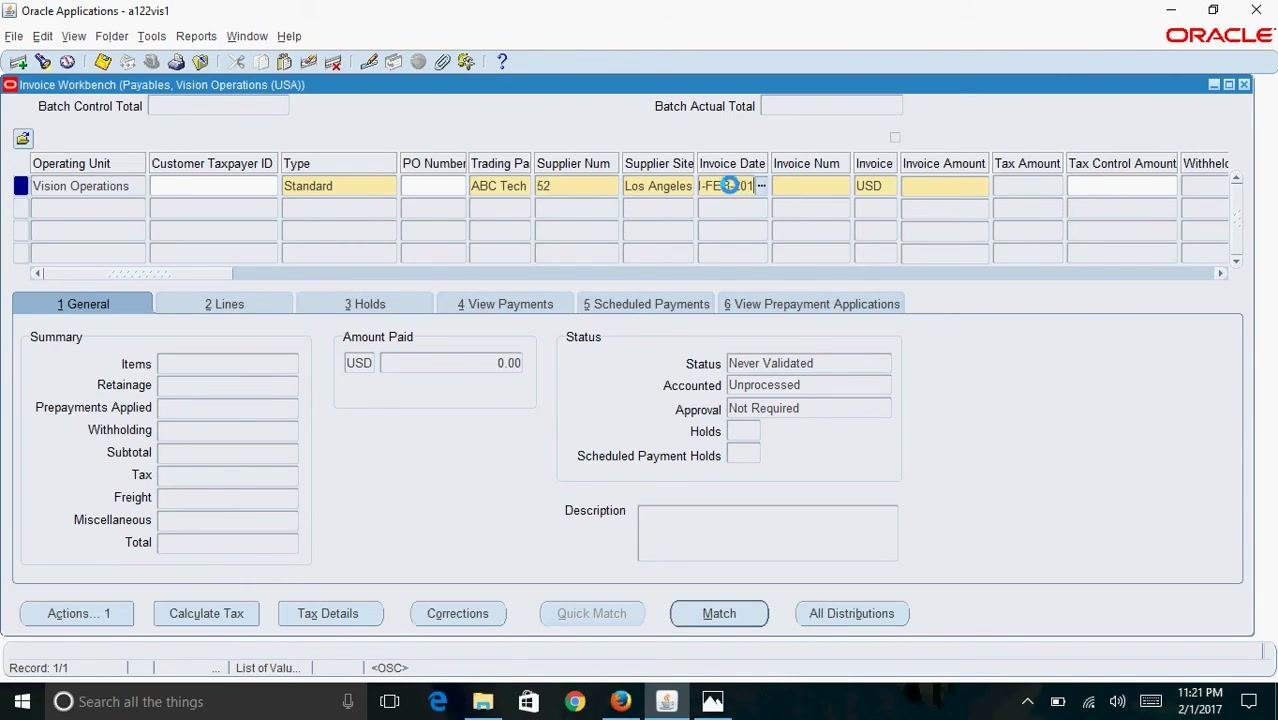
Step 5: Enter the invoice number
In the Invoice Num field, enter the invoice number as it appears on the invoice. For example, enter ABC1.
Step 6: Enter the invoice amount
In the Invoice Amount field, enter the total amount of the invoice. For example, enter 2,000.00.
Step 7: Enter the GL date and payment currency
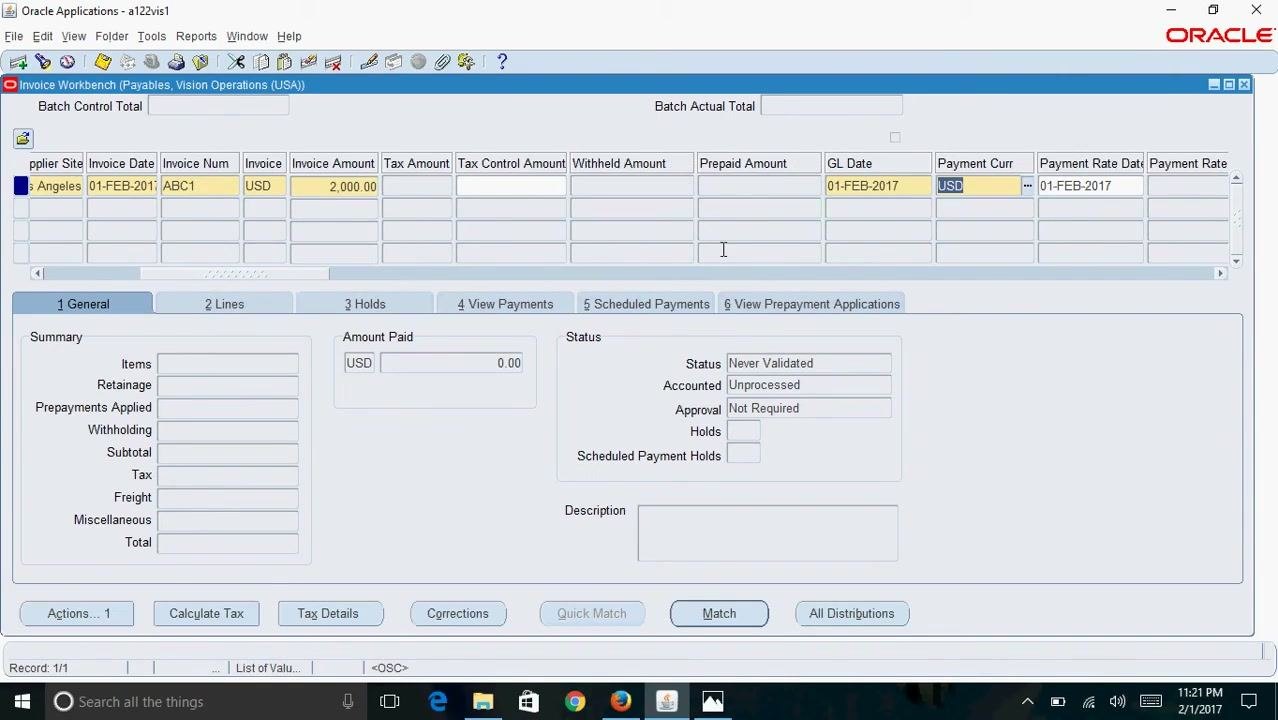
- In the GL Date field, enter the date on which you want the invoice to be accounted in the system. For example, enter
01-FEB-2017. - In the Payment Curr field, enter the payment currency. For example, enter
USD.
Step 8: Review the optional fields
Review the other header fields, such as payment terms and payment method. Most of these fields are optional, so fill them in as needed.
Enter the invoice line and distribution
In R12, invoice lines sit between the invoice header and the distributions. This differs from 11i, which had only an invoice header and distributions. Each invoice line can have its own amount, GL date, ship-to location, and distribution details.
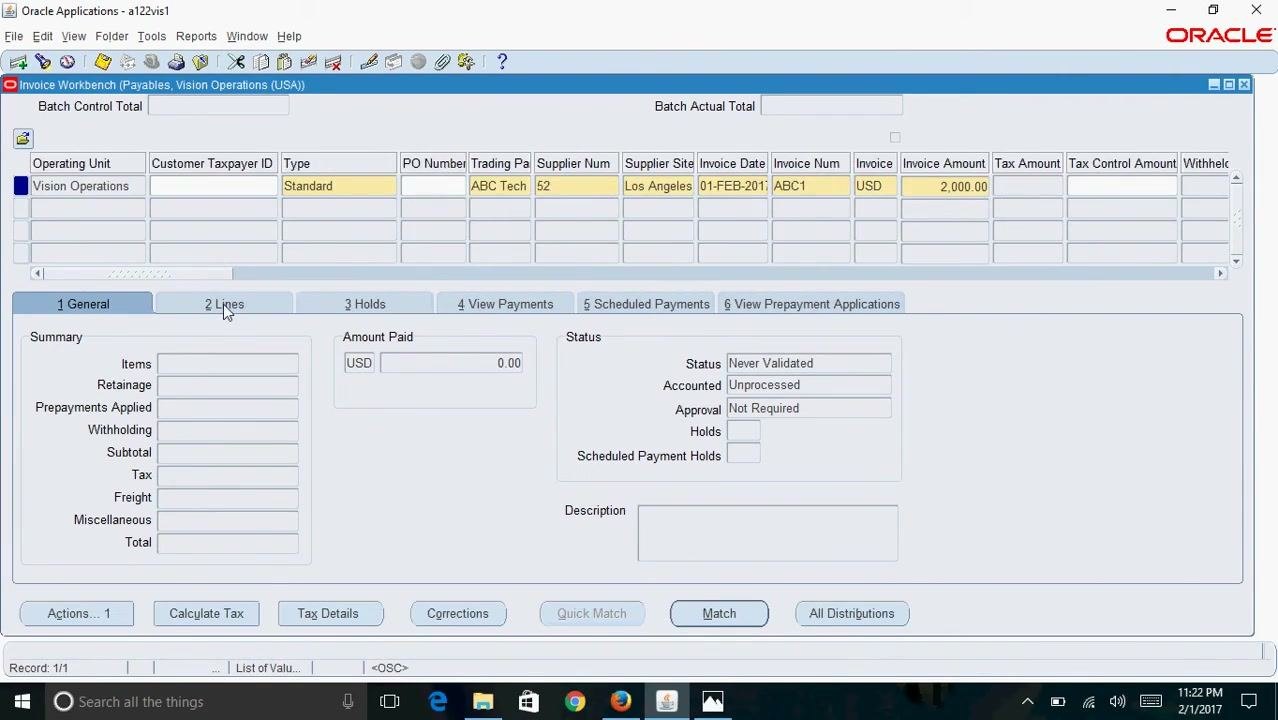
Step 9: Open the Lines tab and enter the line amount
- Click the 2 Lines tab.
- Enter the amount for the line item. For example, enter
2,000.00.
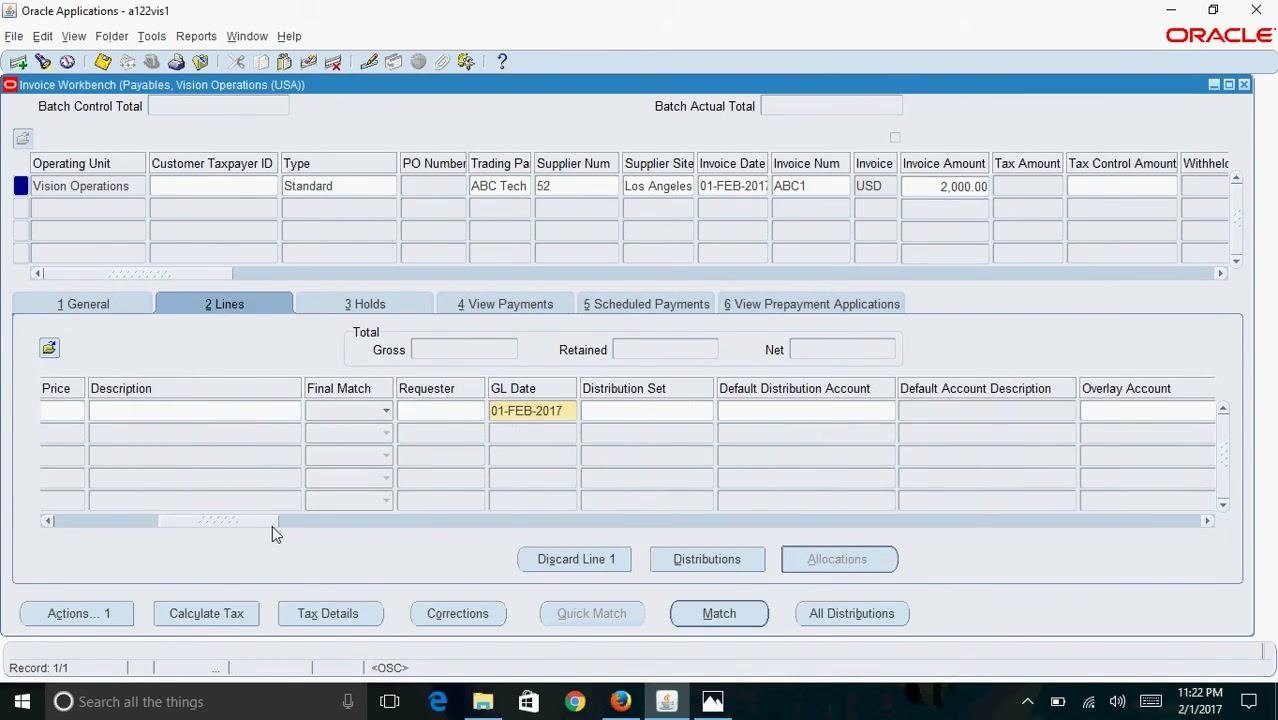
Step 10: Confirm the line GL date
Make sure the GL Date is filled in for the invoice line. This field is mandatory and defaults from the header GL date. For example, confirm that 01-FEB-2017 appears.
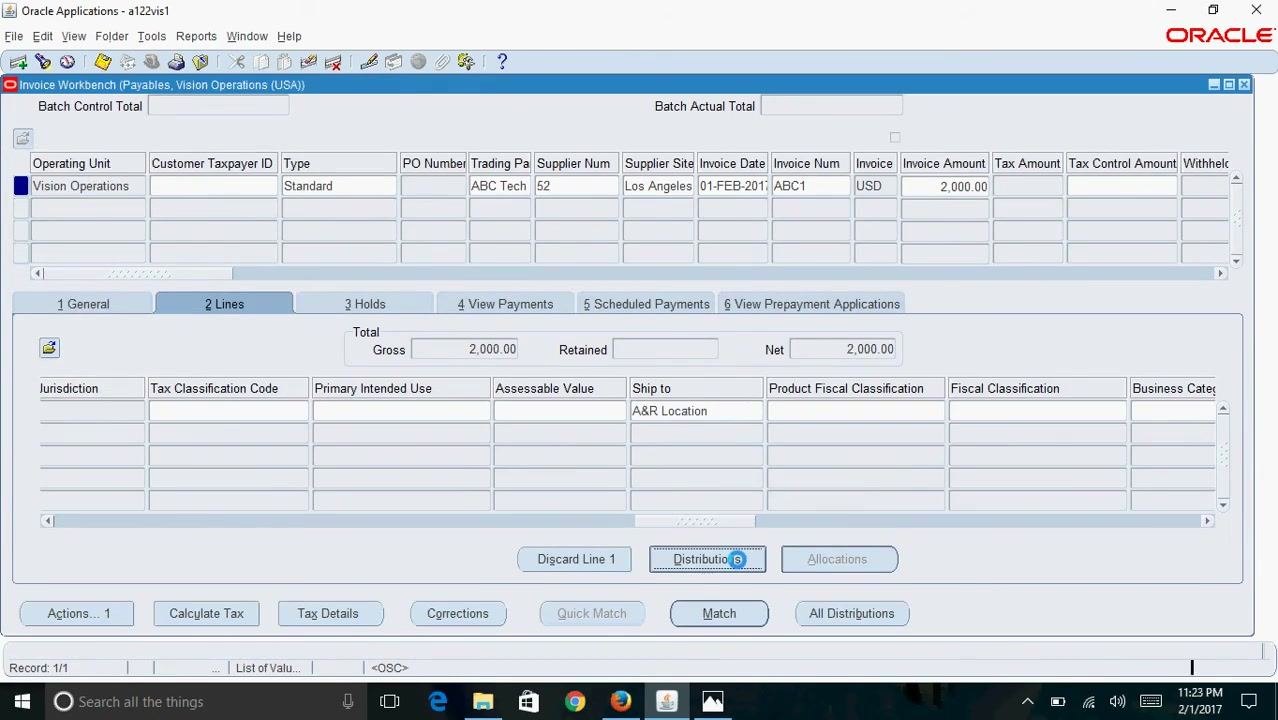
Step 11: Select the ship-to location
- Click the list of values (LOV) button next to the Ship to field.
- Choose the location where the vendor shipped the goods or services. For example, select
A&R Location. - Click OK to confirm.
Verify that the selected location appears in the Ship to field for the invoice line.
Step 12: Enter the expense account in Distributions
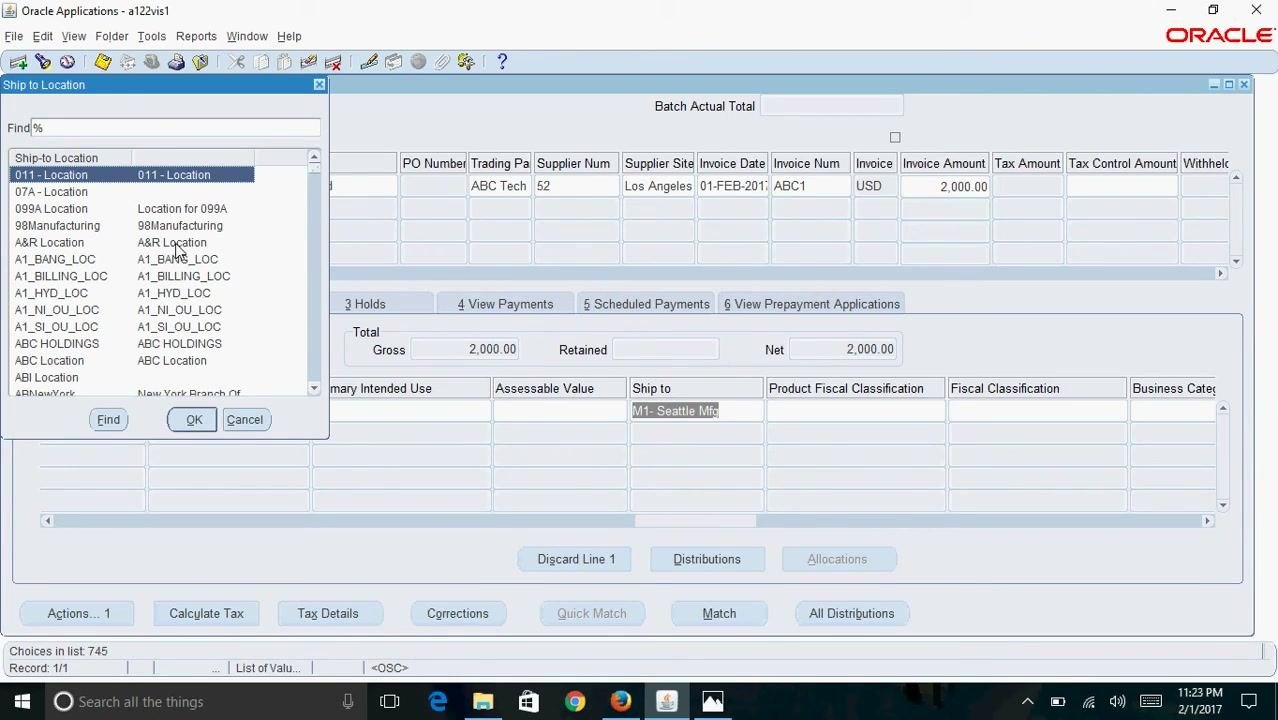
- Click the Distributions button to open the distributions window for the invoice line.
- Use the LOV to search for the expense account. For example, search for
%post%to find a postage account. - Select the account. For example, select
01-000-7510-0000-000for postage. - Click OK to confirm the account.
Step 13: Check and save the distribution
- Make sure the distribution line shows the correct amount, GL date, and account. In this example, the amount is
2,000.00, the GL date is01-FEB-2017, and the account is01-000-7510-0000-000. - Confirm that the status at the bottom of the window reads "Transaction complete: 2 records applied and saved."
Step 14: Return to the General tab
- Close the distributions window.
- Click the General tab to return to the main invoice entry screen.
Validate the invoice and create accounting
Step 15: Validate the invoice
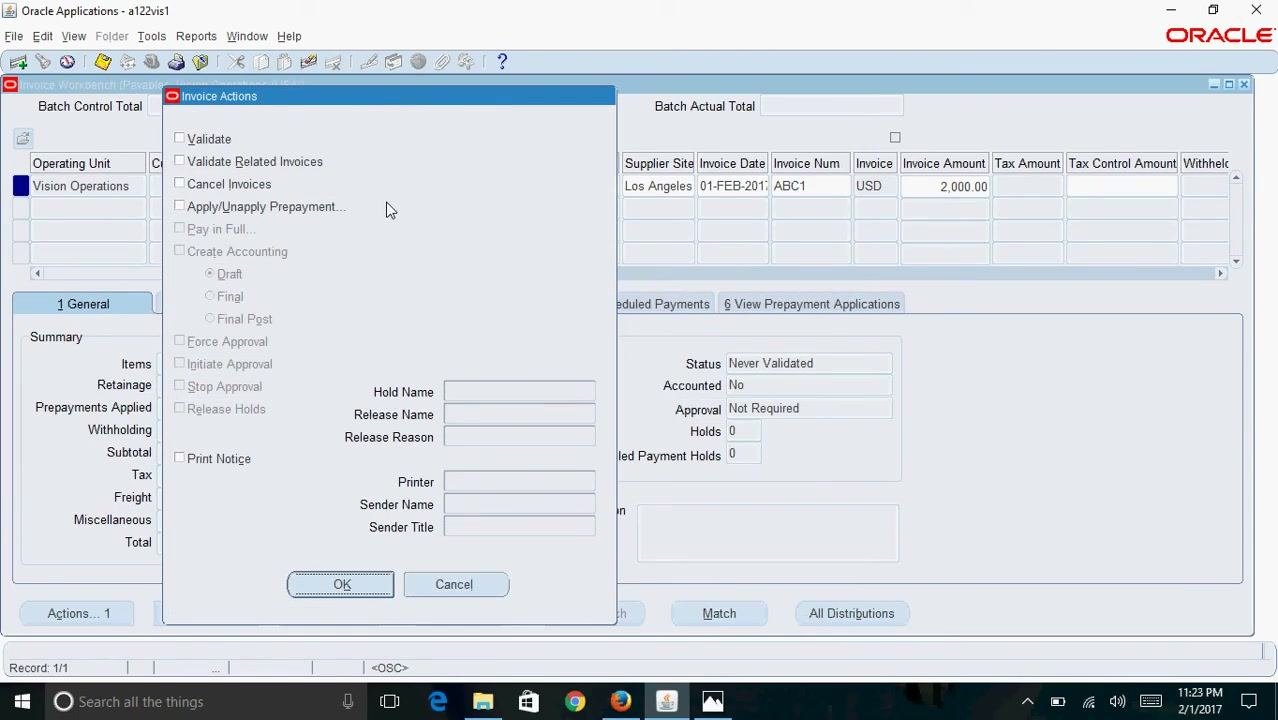
After you create the invoice, its status is "Never Validated" and the Accounted status is "No". You must validate the invoice before you can create accounting.
- Click the Actions button at the bottom left of the Invoice Workbench.
- In the Invoice Actions window, select the Validate checkbox.
- Click OK.
Step 16: Confirm the invoice is validated
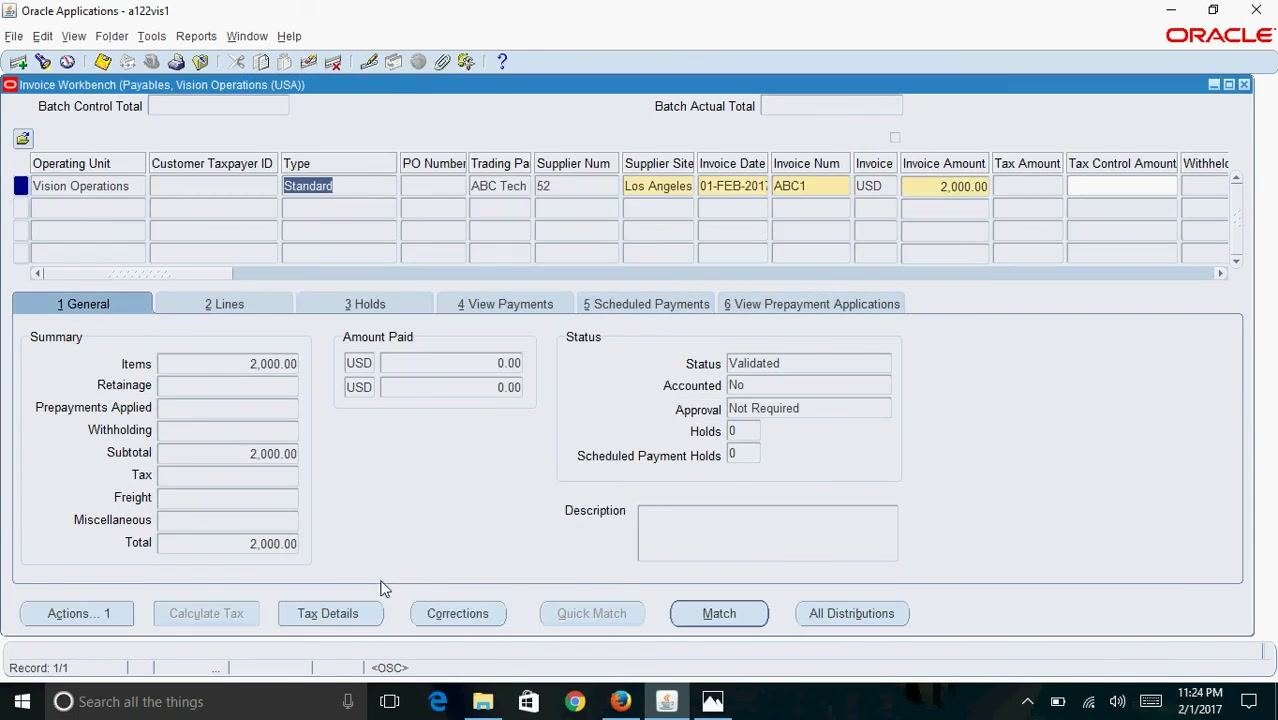
Verify that the Status field now displays "Validated". The Accounted status remains "No" at this stage.
Step 17: Create accounting in draft mode
- Click the Actions button again.
- In the Invoice Actions window, select the Create Accounting checkbox.
- Choose an accounting mode. For this example, select Draft.
- Click OK.
The accounting modes are:
- Draft: Lets you review and modify distributions before finalizing.
- Final: Locks distributions so that no further changes are allowed.
- Final Post: Creates accounting and transfers the invoice to the General Ledger.
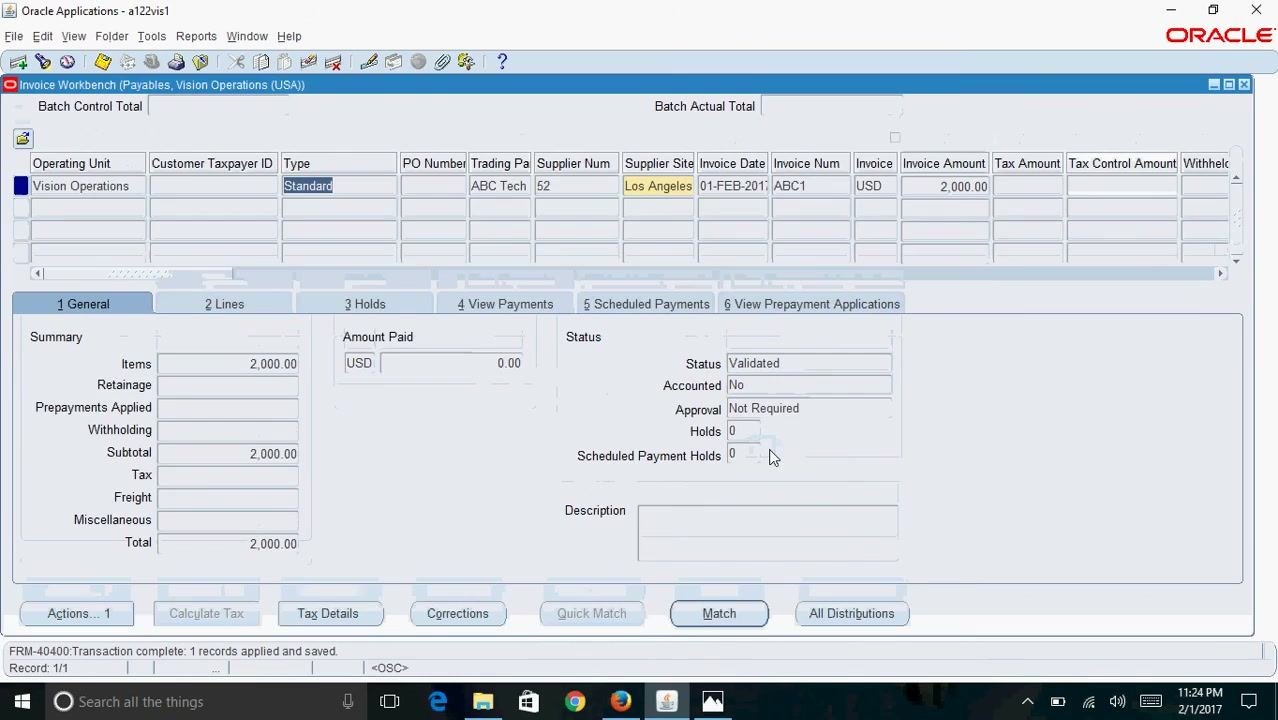
Step 18: Verify the result of draft accounting
After you run draft accounting, the Accounted status is still "No" because the accounting is not final. The invoice status remains "Validated".
View the accounting and journal entry
Step 19: Open View Accounting
- From the menu, select Reports > View Accounting.
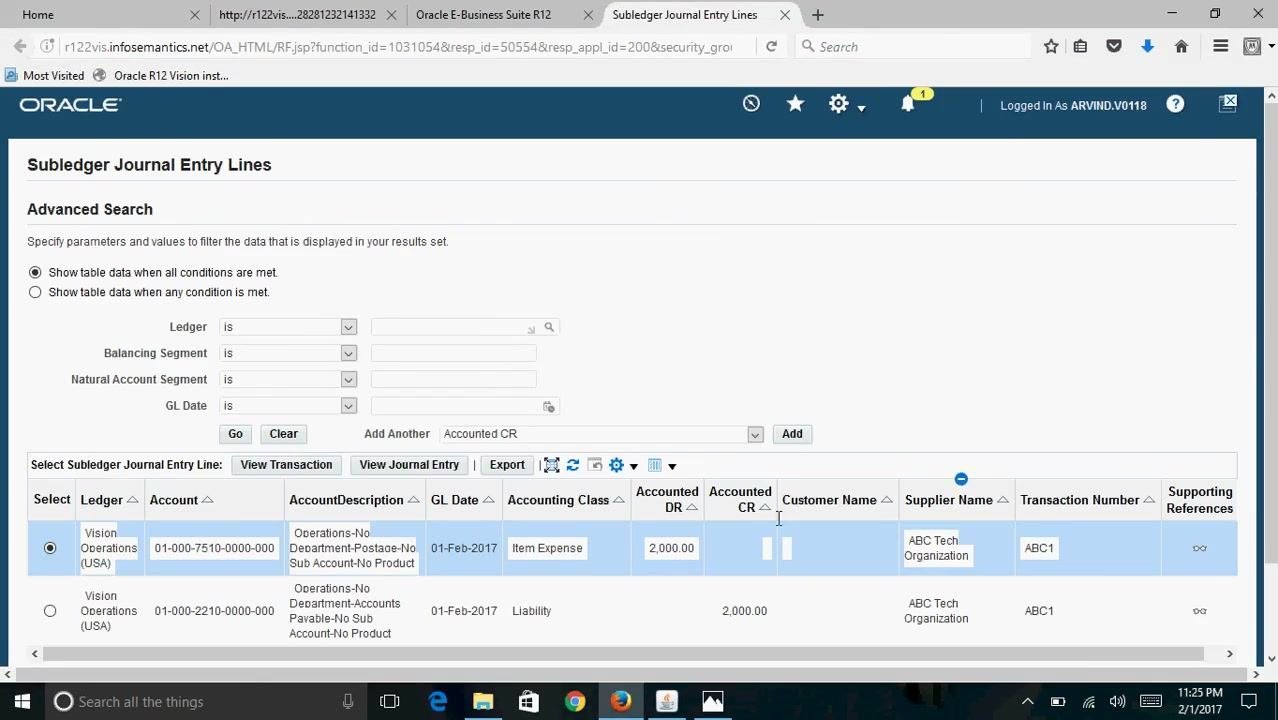
- A web page opens and displays the Subledger Journal Entry Lines.
- Click View Journal Entry to see the detailed accounting lines.
Step 20: Review the journal entry details
Confirm the following details in the journal entry:
- Account 01-000-7510-0000-000 (Item Expense) is debited for 2,000.00 USD.
- Account 01-000-2210-0000-000 (Liability) is credited for 2,000.00 USD.
- GL Date: 01-FEB-2017.
- Supplier Name: ABC Tech Organization.
- Invoice Number: ABC1.
- Invoice Amount: 2,000.00 USD.
Make sure the accounted debit and credit amounts match the invoice total.
Review the final invoice status
Step 21: Check the completed invoice in the Invoice Workbench
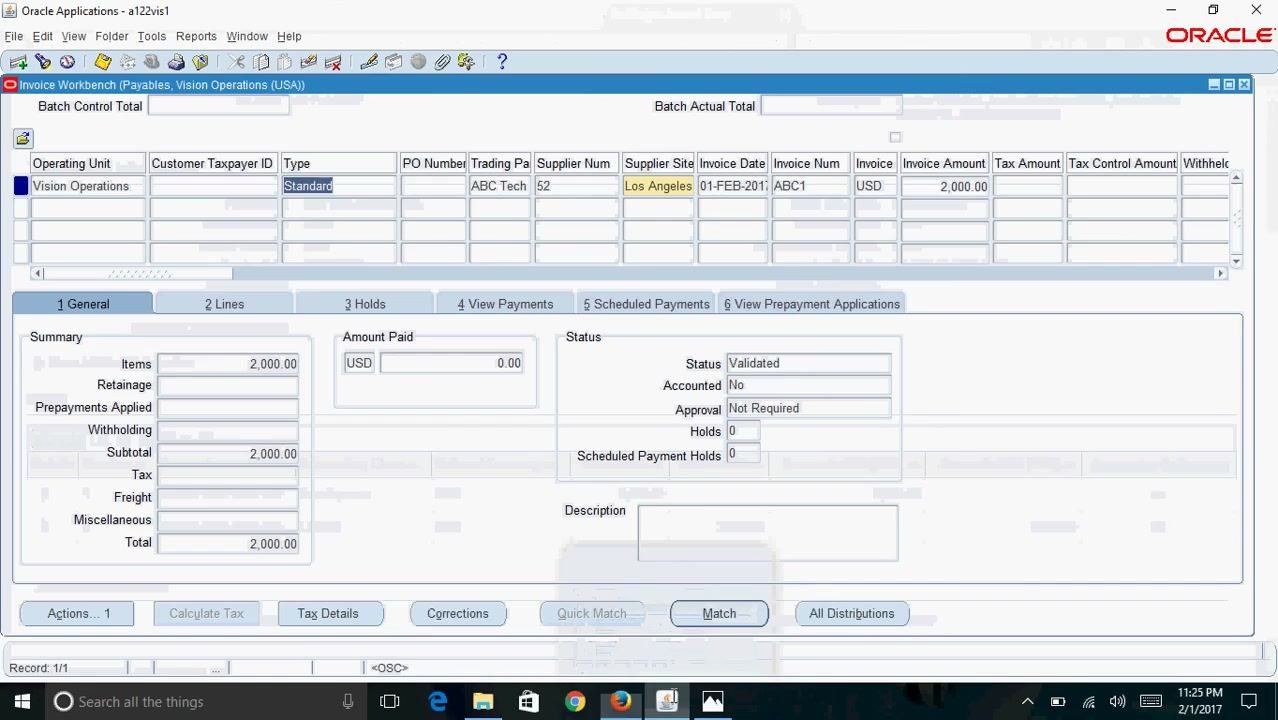
Return to the Invoice Workbench and confirm the key details of the completed invoice:
- Operating Unit: Vision Operations
- Supplier Name: ABC Tech
- Supplier Site: Los Angeles
- Invoice Date: 01-FEB-2017
- Invoice Number: ABC1
- Invoice Amount: 2,000.00 USD
- Status: Validated
- Accounted: No, because only draft accounting was performed
- Approval: Not Required
- Amount Paid: 0.00 USD
- Summary: Items = 2,000.00, Subtotal = 2,000.00, Total = 2,000.00
Make sure all information matches your source documents and organizational requirements.
What's next
Save your work and close the Invoice Workbench if you have completed all necessary entries. For further actions, such as final accounting, posting to the General Ledger, or making payments, follow your organization's standard operating procedures.
Summary
You now know how to create an AP invoice in Oracle EBS using Oracle Payables R12. You entered the header details (vendor, invoice number, amount, and GL date), added an invoice line with a ship-to location and expense distribution, validated the invoice, created draft accounting, and reviewed the journal entry. The invoice remains "Validated" and not yet accounted until you run final accounting.
Generation details: cost, quality tiers
Docsie billed 3,000 credits ($2.10) to analyze this 6-minute video at standard quality. The rewrite, template fill and Word/PDF exports were included. The same video at each quality tier:
| Quality | Frames sampled | Credits | Approx. cost |
|---|---|---|---|
| Draft | every 16-30 s | 1,500 | $1.05 |
| Standard (this guide) | every 8-15 s | 3,000 | $2.10 |
| Detailed | every 4-7 s | 6,000 | $4.20 |
| Ultra | every 1-3 s | 12,000 | $8.40 |
Credits priced at $0.70 per 1,000; plans include a monthly allowance. Enterprise customers on on-premise or bring-your-own-model deployments run this on their own inference and pay no per-video credits.
Generated by Docsie Video-to-Docs on 2026-11-15 from a 5-minute video. Screenshots are frames from the source video and belong to their creator, Oracle Ebiz and Fusion Videos, whose original is embedded above. If you own this video and want the guide removed or credited differently, contact us and we will act within one business day.