
How to Create a Subinventory in Oracle EBS
This guide shows you how to create a subinventory in Oracle EBS (Oracle Applications). You first review the existing subinventories, then define a new one with its parameters, locator control, sourcing, and accounts.
Video: INV Defining Subinventories, Oracle Applications Training by Larry Sherrod (2012). All credit for the demonstration goes to the creator; watch the original on YouTube. The written guide below was generated from this video by Docsie. Creator? Request a change or removal.
This guide shows you how to create a subinventory in Oracle EBS (Oracle Applications). You first review the existing subinventories, then define a new one with its parameters, locator control, sourcing, and accounts.
Subinventories are logical groupings within your inventory. Each subinventory can contain stock locators, which in turn hold your inventory items. Typical subinventories include raw material, stores, and finished goods. They organize inventory into coarse groups, so the subinventory name tells you what type of material is stored there.
Prerequisites
- Access to the Inventory module in Oracle Applications.
- An organization to work in. The examples use Seattle Manufacturing (M1).
- The default cost group, account codes, and locator and sourcing requirements for the new subinventory.
Review existing subinventories
Step 1: Open the On-hand Quantity window
- Open Oracle Applications and go to the Inventory module.
- In the Navigator, find the On-hand, Availability section.
- Select On-hand Quantity to view item on-hand quantities.
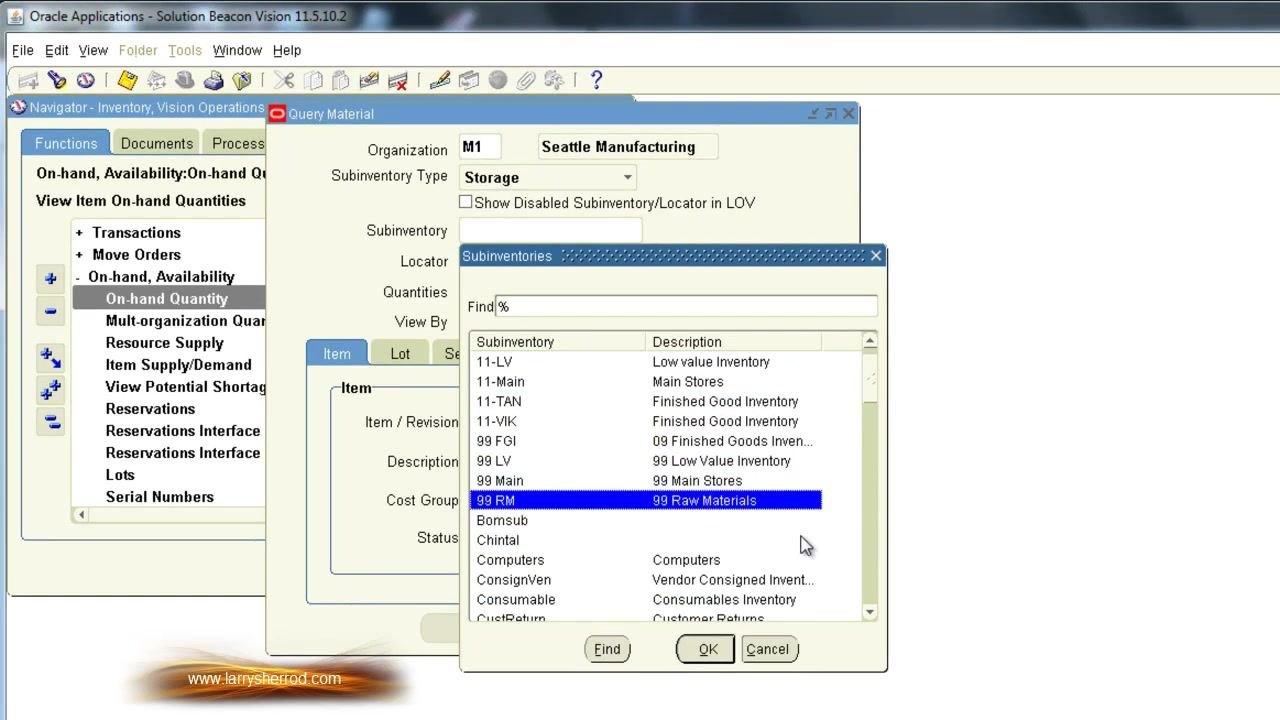
Step 2: Check the Query Material window
In the Query Material window, confirm the following:
- Organization is set to
M1(Seattle Manufacturing). - Subinventory Type is set to
Storage.
You can use the Subinventory field to filter or search for specific subinventories.
Step 3: Open the Subinventories list of values
Click the Subinventory field to open the Subinventories list of values (LOV). The list shows subinventory codes and descriptions, such as:
- 11-LV: Low value Inventory
- 11-Main: Main Stores
- 11-TAN: Finished Good Inventory
- 99 FGI: 99 Finished Goods Inventory
- 99 LV: 99 Low Value Inventory
- 99 Main: 99 Main Stores
- 99 RM: 99 Raw Materials
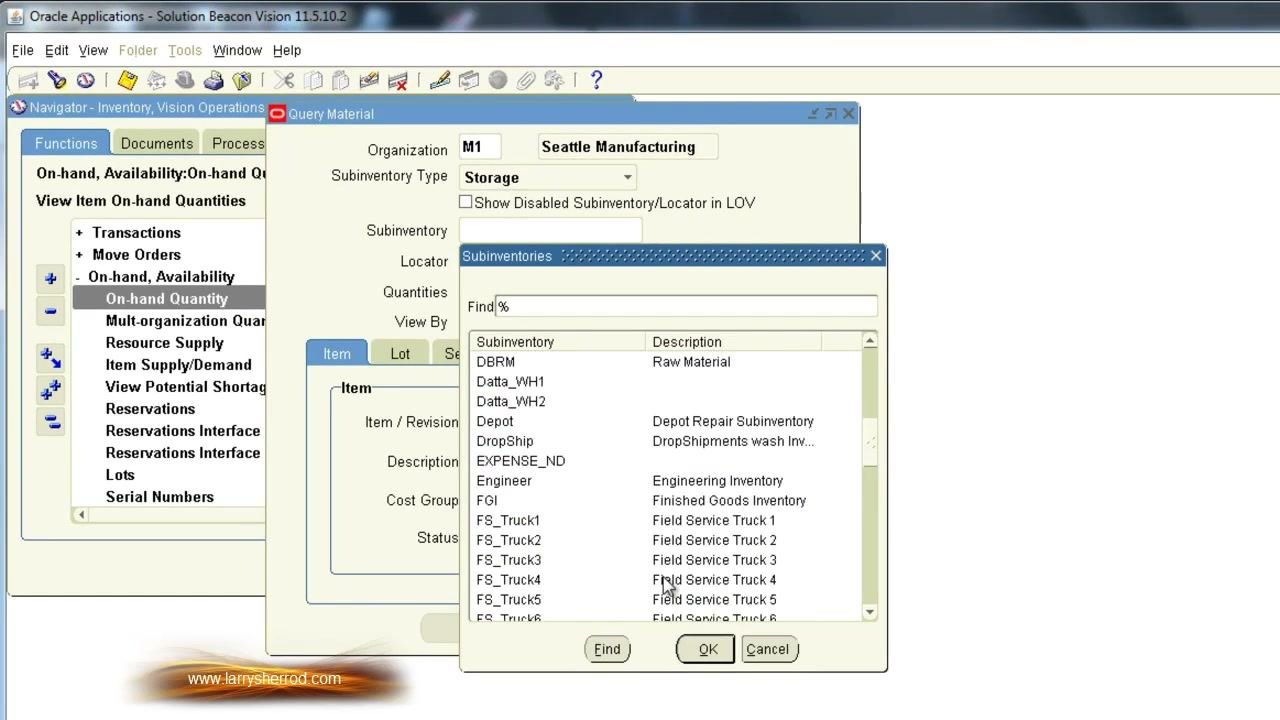
Step 4: Scroll to see more subinventories
Scroll through the list to see additional entries, such as:
- DBRM: Raw Material
- Datta_WH1: Warehouse 1
- Depot: Depot Repair Subinventory
- Engineer: Engineering Inventory
- FGI: Finished Goods Inventory
- FS_Truck1-6: Field Service Trucks 1-6
Open the Subinventories form
Step 5: Query all subinventories
- From the Inventory screen, go to Setup > Organizations > Sub-inventories. This opens the Subinventories form, where you can view, create, or edit subinventories.
- Press Control + F11 to run a query.
The Subinventories Summary window lists all subinventories for the organization. It shows columns for Name, Description, Status, and Default Cost Group. For example:
- 09 FGI: Finished Goods Inventory, Status: Active, Default Cost Group: CG-1163
- 11-FGI: Finished Good Inventory, Status: Active, Default Cost Group: CG-1163
- 11-LV: Low value Inventory, Status: Active, Default Cost Group: CG-1163
Step 6: Open an existing subinventory to see its settings
Select a subinventory in the summary list and click Open. The details screen shows the values you can set or modify:
- Name, Status (for example, Active), Description, Default Cost Group (for example, CG-1163), and Type (for example, Storage)
- Parameters such as Quantity Tracked, Asset Subinventory, Locator Control, and Nettable
- Lead Times (Pre-Processing, Processing, Post-Processing)
- Sourcing details (Type, Organization, Subinventory)
The Locators button lets you manage stock locators for the subinventory.
Create the subinventory
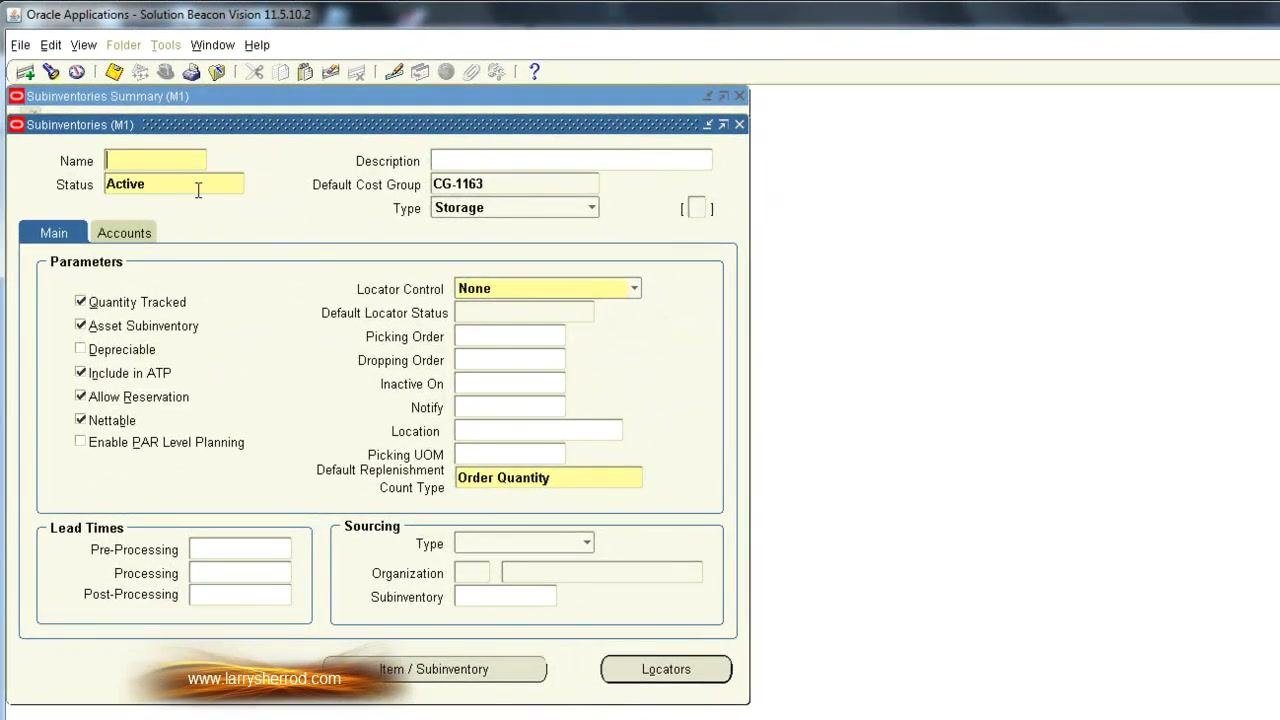
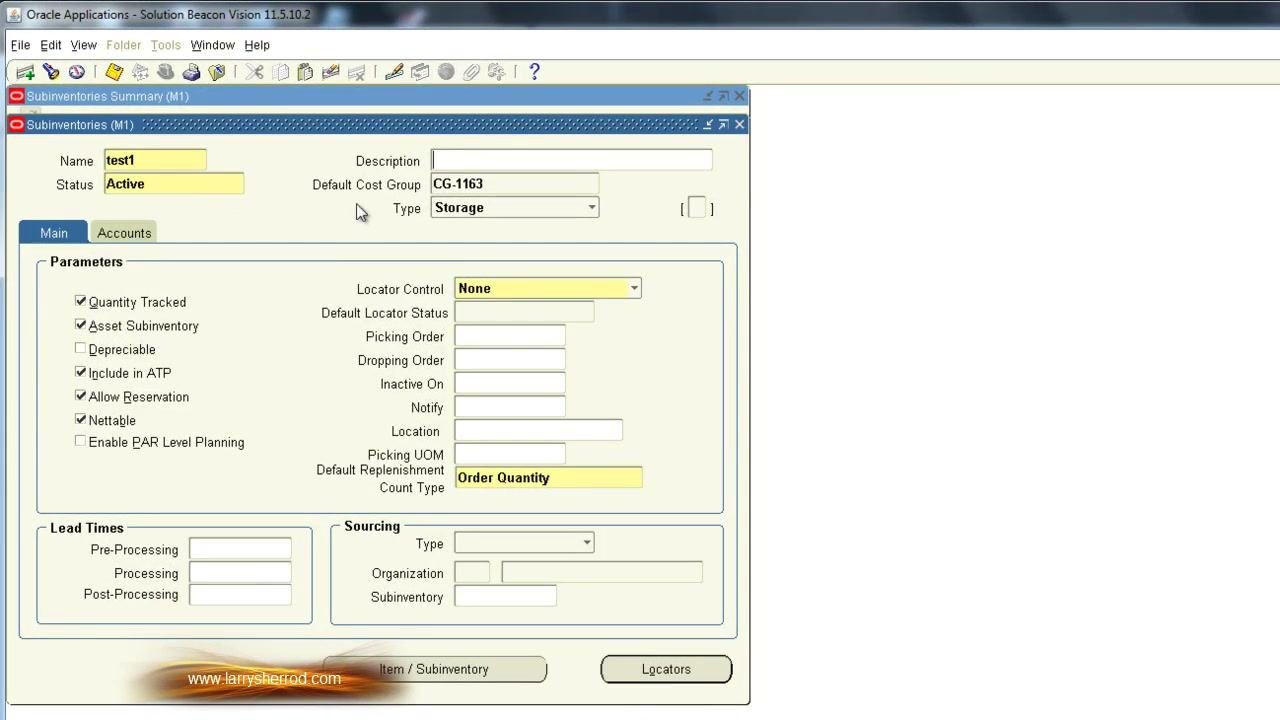
Step 7: Create a new subinventory in Oracle EBS and enter the basics
- Click the New icon on the toolbar.
- In the Name field, enter a unique value (for example,
test1). - Set Status to
Active. - Enter a Description if you want one.
- Assign a Default Cost Group (for example,
CG-1163). - Set Type to
Storageor another appropriate value.
Step 8: Review the parameters
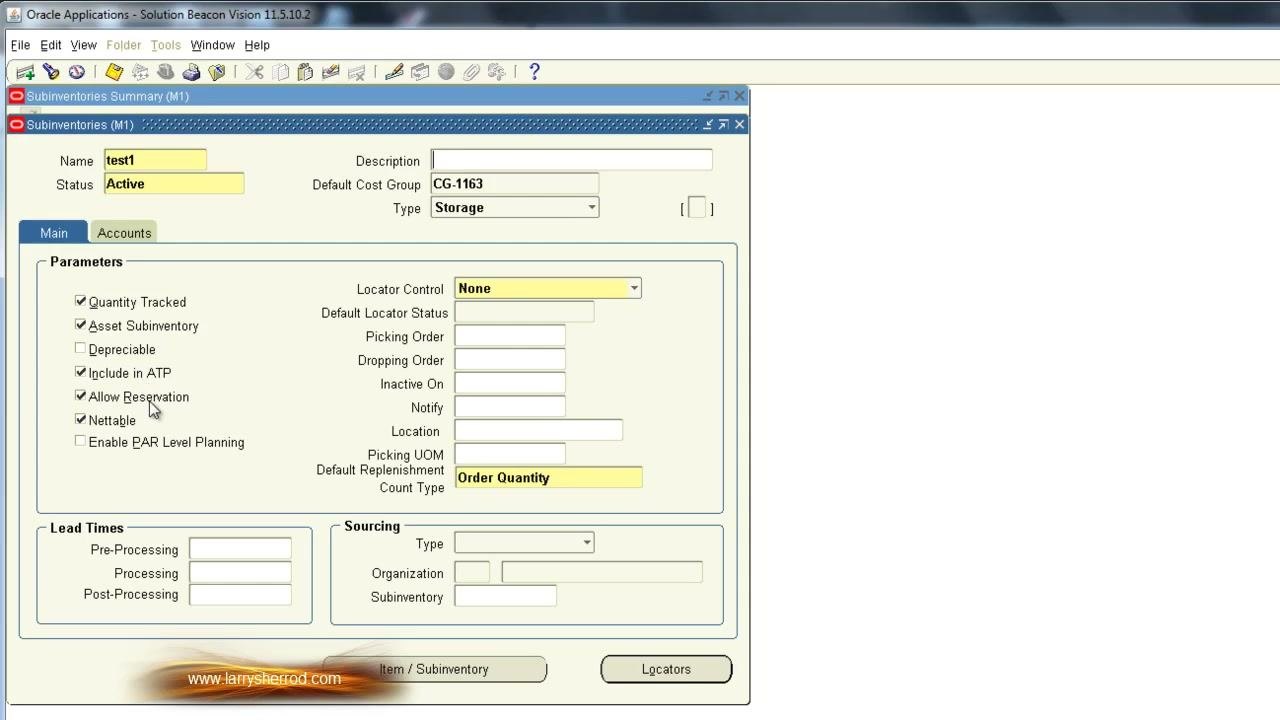
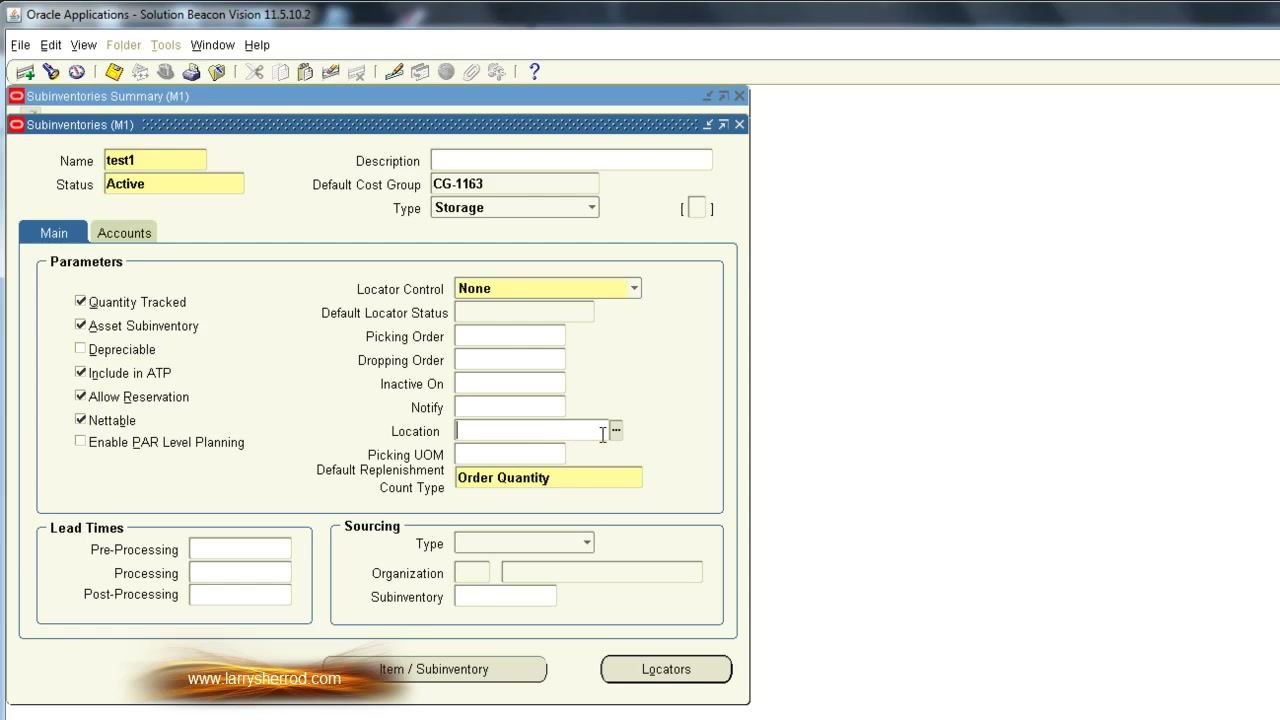
Many fields default in automatically. Review and adjust these Parameters as needed:
- Quantity Tracked: Enables tracking of item quantities in this subinventory.
- Asset Subinventory: Indicates that items in this subinventory are inventory assets on your books. The material is included in your inventory asset account.
- Depreciable: Select this if the subinventory contains depreciable items.
- Include in ATP: Includes the material in Available to Promise (ATP) calculations.
- Allow Reservation: Allows reservations for sales orders. If a sales order requires material to be reserved, you must enable this setting.
- Nettable: Makes the material in this subinventory available for MRP (Material Requirements Planning).
- Enable PAR Level Planning: Enables PAR level planning for this subinventory.
Step 9: Choose a locator control option
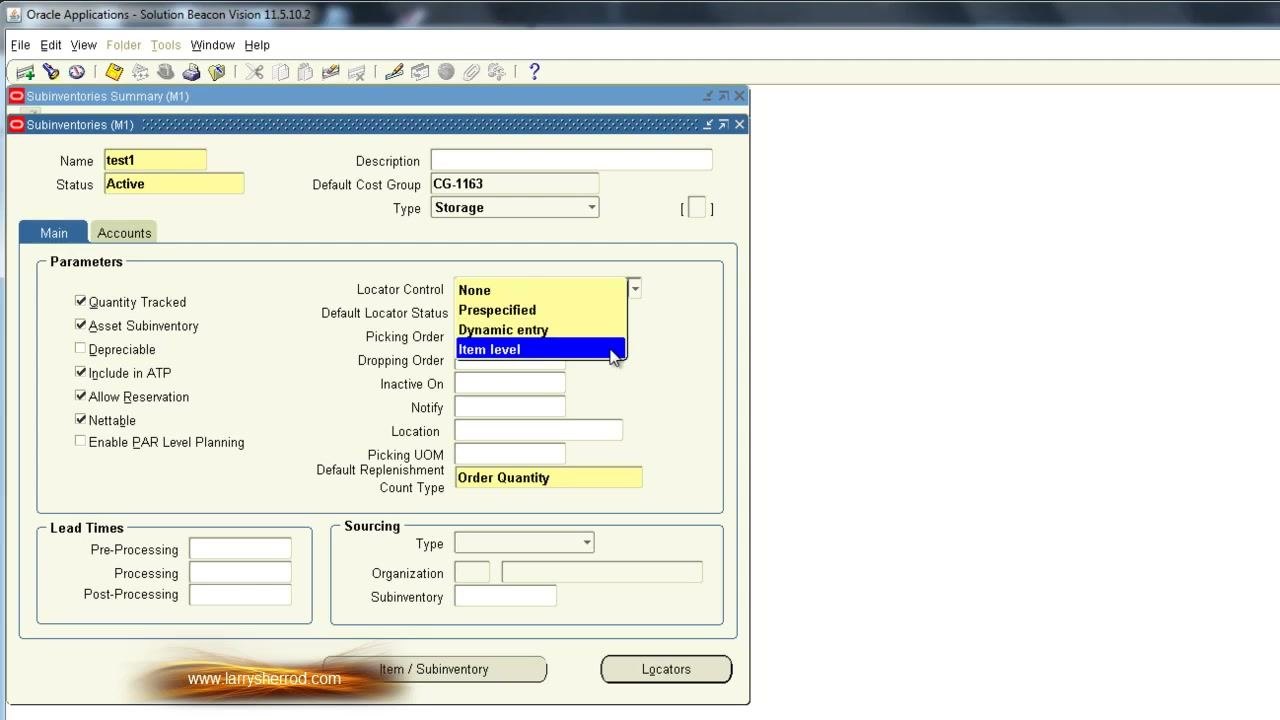
The Locator Control dropdown determines how stock locators are managed for the subinventory. The options are:
- None: No locator control. This is a non-typical setting, often used for material that is questionable, not available for planning, or not used in manufacturing (for example, MRB subinventories).
- Prespecified: Uses a predefined list of stock locators associated with the subinventory.
- Dynamic entry: You enter stock locators as you perform transactions.
- Item level: Locator control is managed at the item level, not at the subinventory level.
Select the option that matches your inventory management requirements.
Step 10: Handle the locator control warning
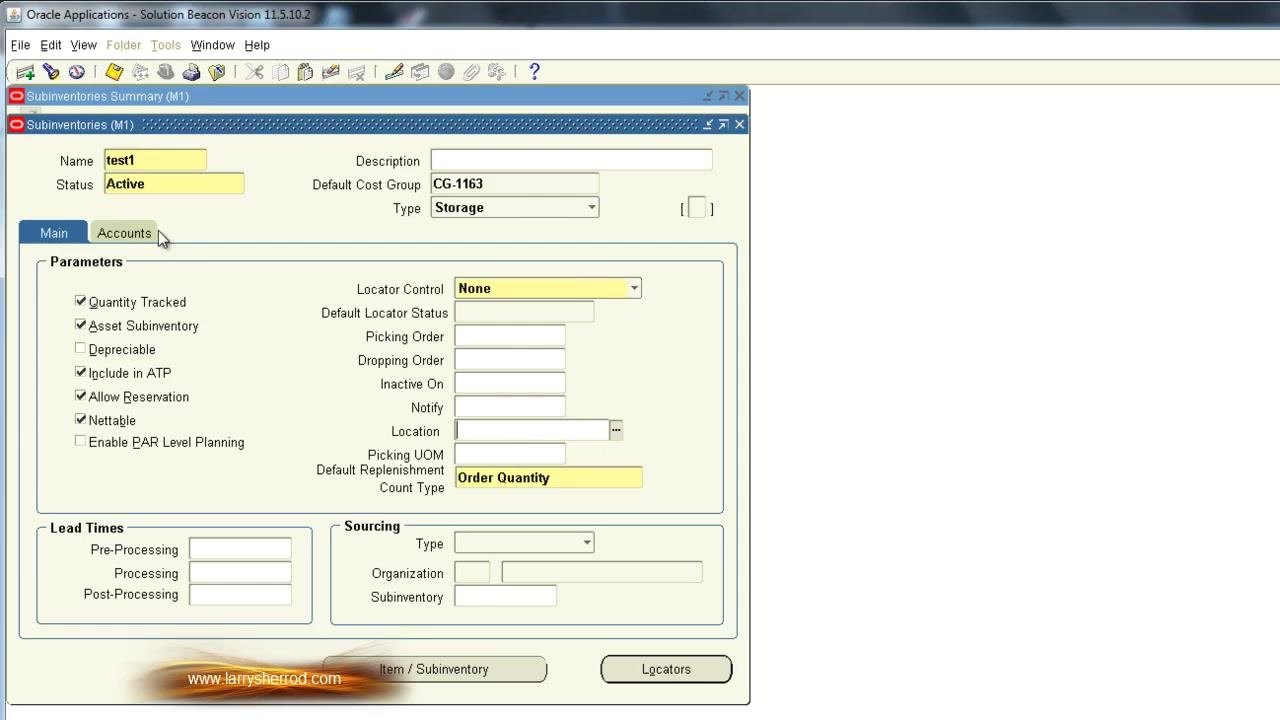
If you need to associate locators, return to the Main tab and set Locator Control to the value you want (for example, Pre-specified).
If no locator control exists for the subinventory, a warning appears with the message "No locator control exists for this subinventory." Click OK to acknowledge it.
Step 11: Fill in optional fields and assign a location
Fill in any of these optional fields that you need:
- Default Locator Status
- Picking Order
- Dropping Order
- Inactive On
- Notify
- Location
- Picking UOM
- Default Replenishment Count Type (for example,
Order Quantity)
Use the Location field to specify a physical address for the subinventory. This is commonly used for consignment subinventories (supplier or customer consignment), or to give the storage area a physical address. Enter a location, or click the search button (...) to select an existing one.
Step 12: Set lead times
If lead times apply, enter values for Pre-Processing, Processing, and Post-Processing.
Step 13: Configure sourcing
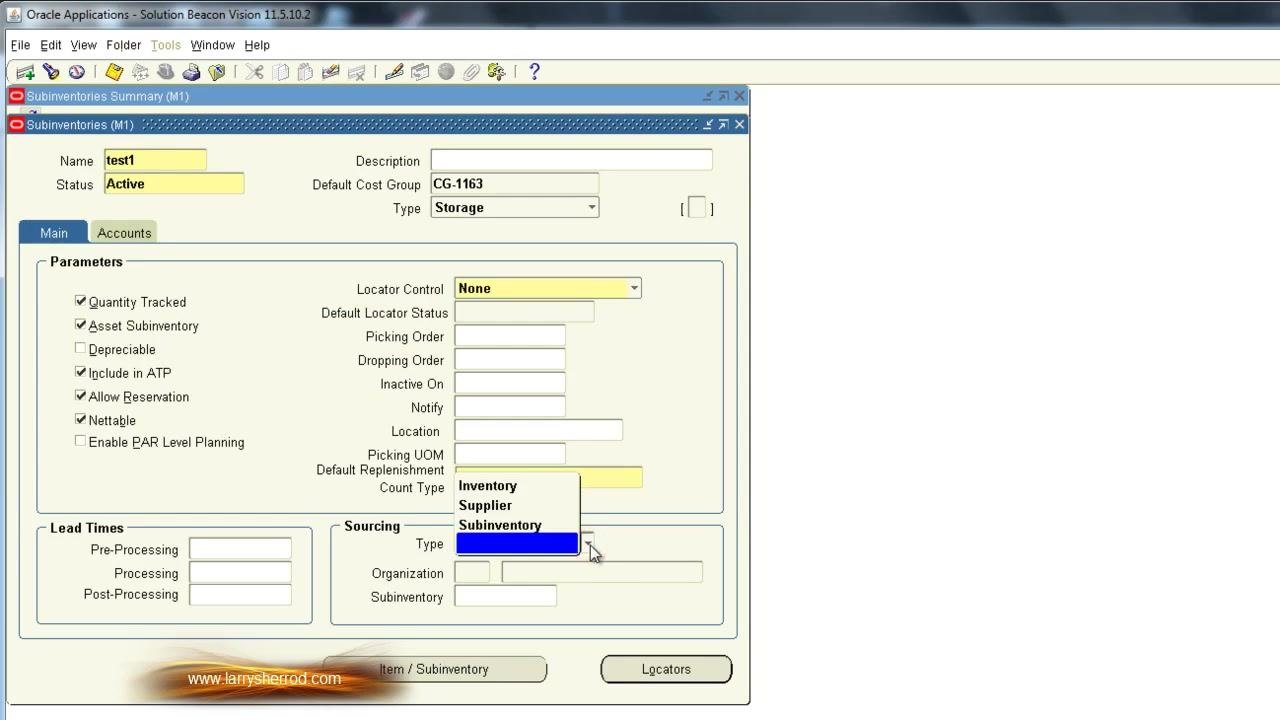
- On the Main tab, find the Sourcing section.
- Open the Type dropdown and select
Inventory,Supplier, orSubinventory. - If you source from another inventory, supplier, or subinventory, fill in the Organization and Subinventory fields as needed.
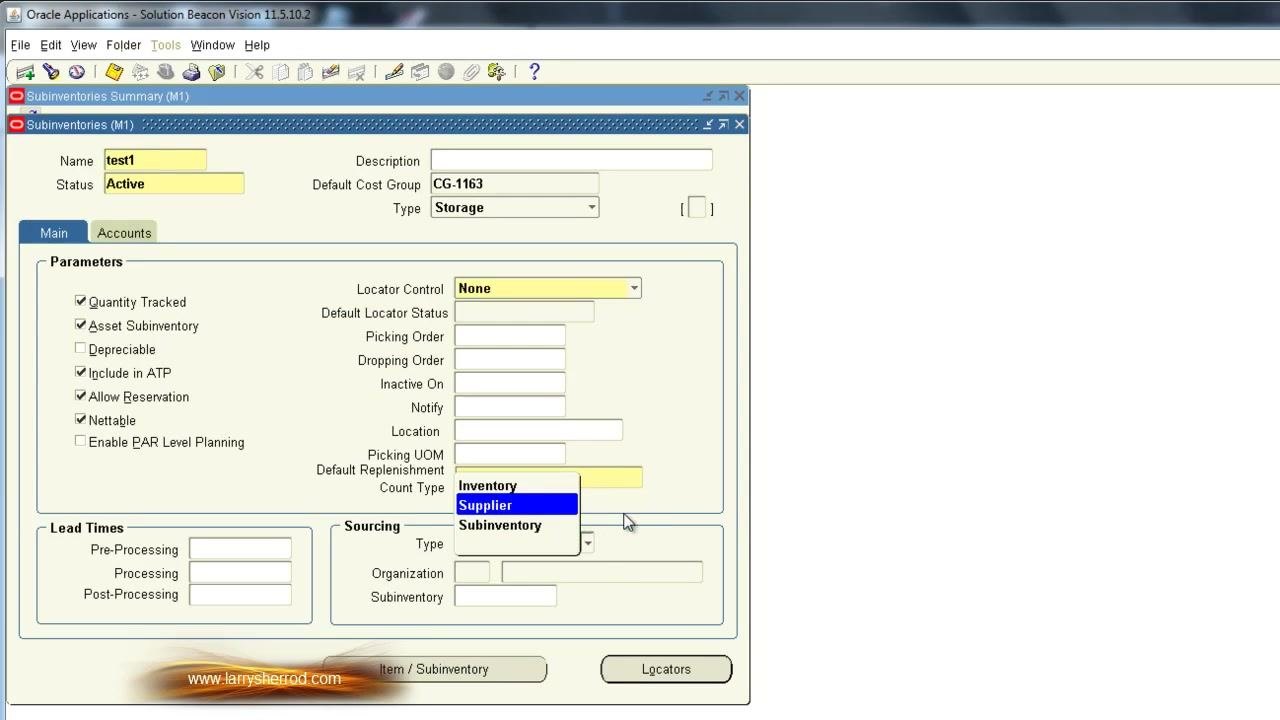
Step 14: Confirm the sourcing selection
Confirm your sourcing selection (for example, Supplier). Then complete all the fields that your sourcing choice requires.
Step 15: Set the subinventory accounts
Click the Accounts tab, then enter or verify the account codes. The example values are:
- Material:
01-000-1410-0000-000 - Outside Processing:
01-000-1450-0000-000 - Material Overhead:
01-000-1420-0000-000 - Overhead:
01-000-1430-0000-000 - Resource:
01-000-1440-0000-000 - Expense:
01-520-7530-0000-000 - Encumbrance: Leave blank unless required.
Step 16: Manage stock locators
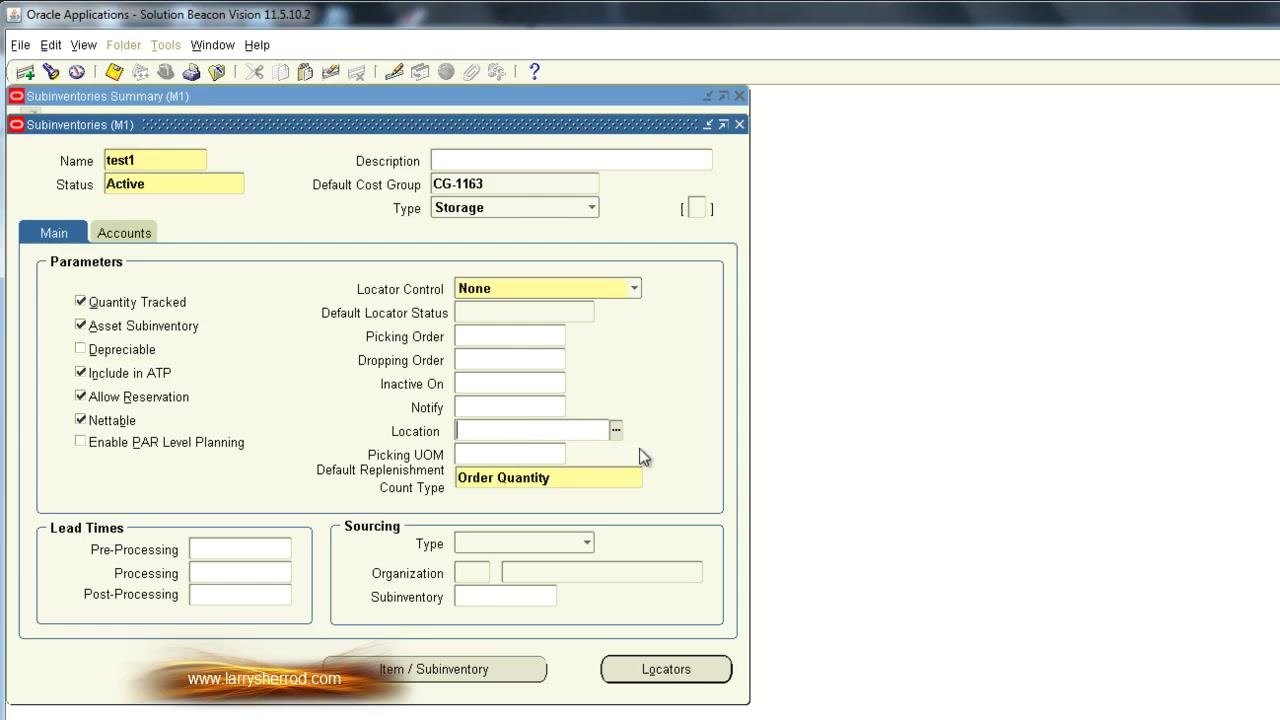
To manage stock locators for the subinventory, click the Locators button at the bottom right of the form.
Step 17: Review and save
- Make sure you completed all required fields: Name, Status, Default Cost Group, Type, Parameters, Locator Control, and Location (if applicable).
- Check that the Nettable and Locator Control settings match your planning and operational needs.
- Save the subinventory record to apply your changes.
Summary
You reviewed the existing subinventories, opened the Subinventories form at Setup > Organizations > Sub-inventories, and created a new subinventory. You set its name, status, cost group, type, parameters, locator control, location, lead times, sourcing, and accounts, then saved the record.
What's next
- Use the Locators button to define and manage stock locators for your new subinventory.
- Review advanced configuration options and best practices for subinventory management.
Generation details: cost, quality tiers
Docsie billed 3,500 credits ($2.45) to analyze this 7-minute video at standard quality. The rewrite, template fill and Word/PDF exports were included. The same video at each quality tier:
| Quality | Frames sampled | Credits | Approx. cost |
|---|---|---|---|
| Draft | every 16-30 s | 1,750 | $1.22 |
| Standard (this guide) | every 8-15 s | 3,500 | $2.45 |
| Detailed | every 4-7 s | 7,000 | $4.90 |
| Ultra | every 1-3 s | 14,000 | $9.80 |
Credits priced at $0.70 per 1,000; plans include a monthly allowance. Enterprise customers on on-premise or bring-your-own-model deployments run this on their own inference and pay no per-video credits.
Generated by Docsie Video-to-Docs on 2026-11-15 from a 6-minute video. Screenshots are frames from the source video and belong to their creator, Larry Sherrod, whose original is embedded above. If you own this video and want the guide removed or credited differently, contact us and we will act within one business day.