
How to Create a PO from a Requisition in Oracle EBS
This guide shows you how to create a PO from a requisition in Oracle EBS (Oracle E-Business Suite). You find an existing requisition in the Buyer Work Center, add it to the Document Builder, select a supplier, and create the purchase order. You then add a second item, submit the order for approval, and review the approved order as a PDF.
Video: Oracle Training - Create Purchase Order from Requisition in Oracle E-Business Suite R12 (1080p - HD) by Yemi Onigbode (2010). All credit for the demonstration goes to the creator; watch the original on YouTube. The written guide below was generated from this video by Docsie. Creator? Request a change or removal.
This guide shows you how to create a PO from a requisition in Oracle EBS (Oracle E-Business Suite). You find an existing requisition in the Buyer Work Center, add it to the Document Builder, select a supplier, and create the purchase order. You then add a second item, submit the order for approval, and review the approved order as a PDF.
The examples use requisition 14409 for a DVD Burner 8X and the supplier Corporate Express Office Supply.
Prerequisites
Before you begin, make sure you have:
- An Oracle E-Business Suite username and password.
- Access to the Purchasing responsibility.
- An existing requisition to convert. This guide uses requisition number 14409.
Create the purchase order from the requisition
Step 1: Log in to Oracle E-Business Suite
- Enter your username and password on the login screen.
- Select the Purchasing responsibility from the available options.
Step 2: Open the Requisitions page in the Buyer Work Center
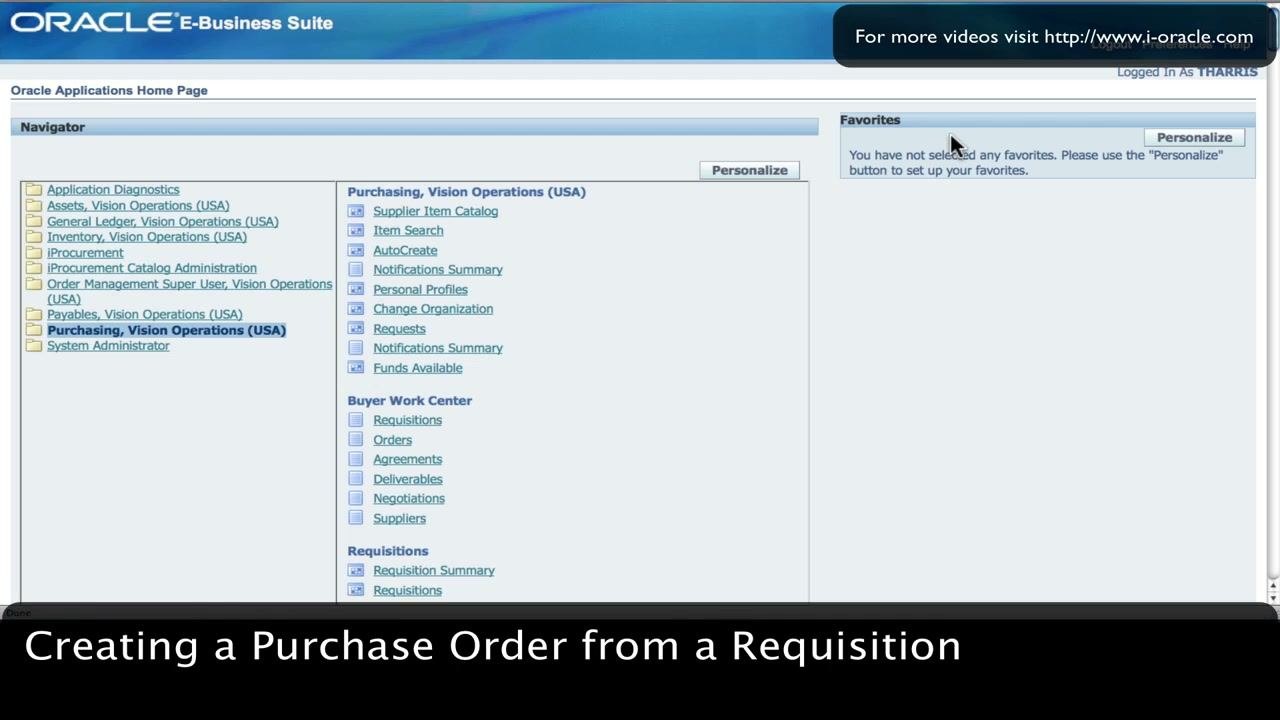
- On the Oracle Applications Home Page, locate the Navigator panel.
- Click Purchasing, Vision Operations (USA) to expand the menu.
- Under Buyer Work Center, select Requisitions.
Step 3: Search for the requisition
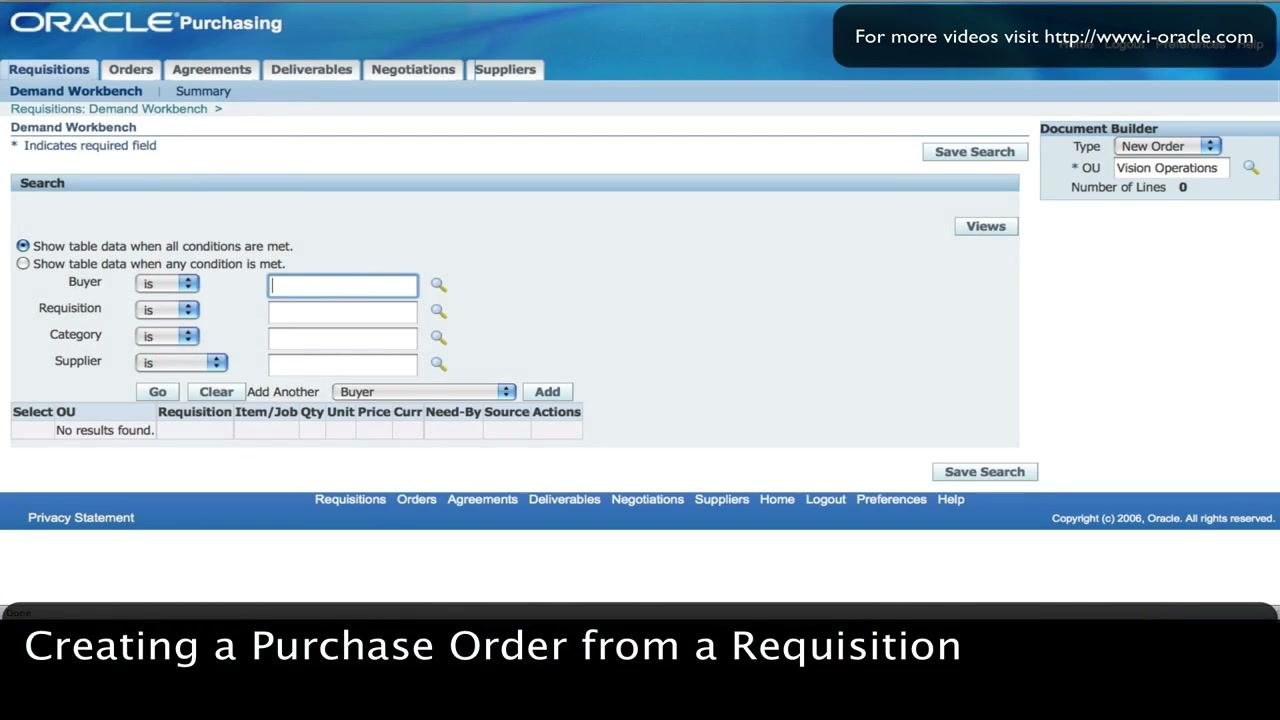
- On the Demand Workbench screen, find the Search section.
- In the Buyer field, enter your name if it isn't filled in automatically (for example, "Harris, Mr. Tony").
- In the Requisition field, enter the requisition number 14409.
- Click Go.
Step 4: Select the requisition line and add it to the Document Builder
Review the search results. In this example, the requisition line shows:
- Requisition: 14409
- Item/Job: DVD-B100 (DVD Burner 8X)
- Quantity: 1 Each
- Unit Price: 500 USD
- Need-By Date: 15-Mar-2010
Select the check box next to the requisition line, then click Add to add it to your Document Builder.
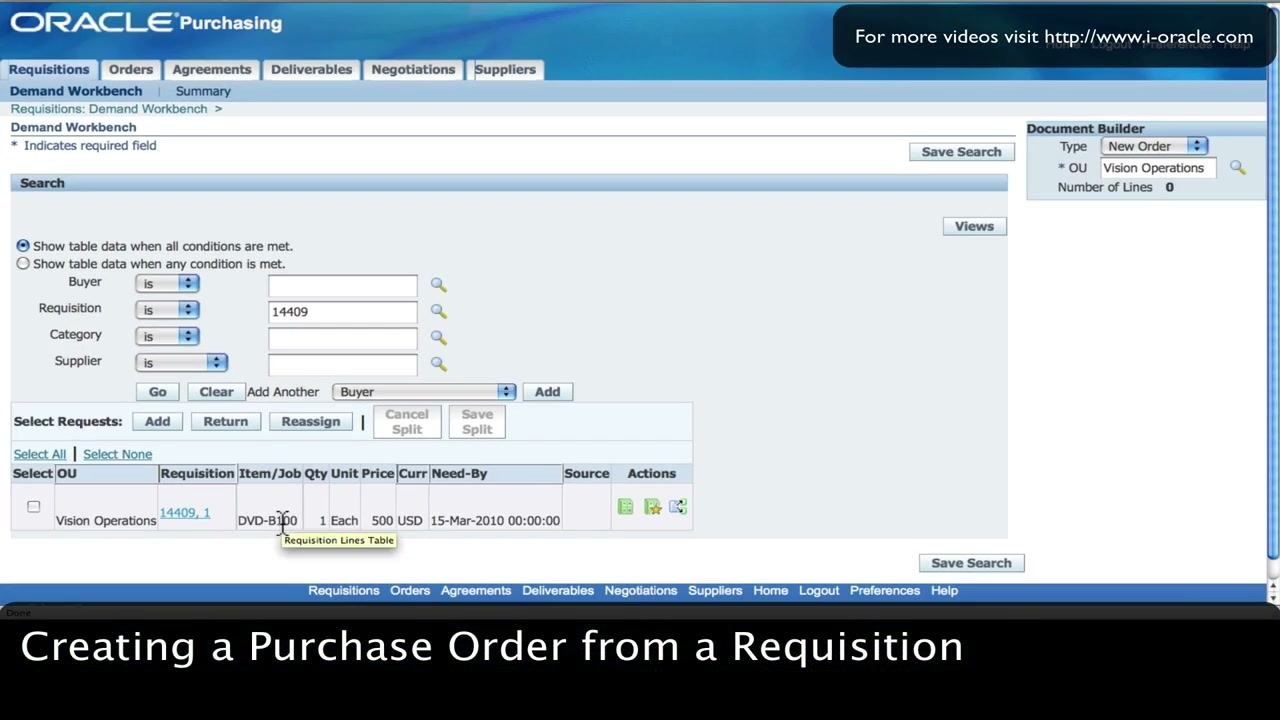
On the right side, check the Document Builder panel. It should show:
- Type: New Order
- OU: Vision Operations
- Recently Added Items: DVD Burner 8X, 1 Each, 500.00 USD
Step 5: Select the supplier
-
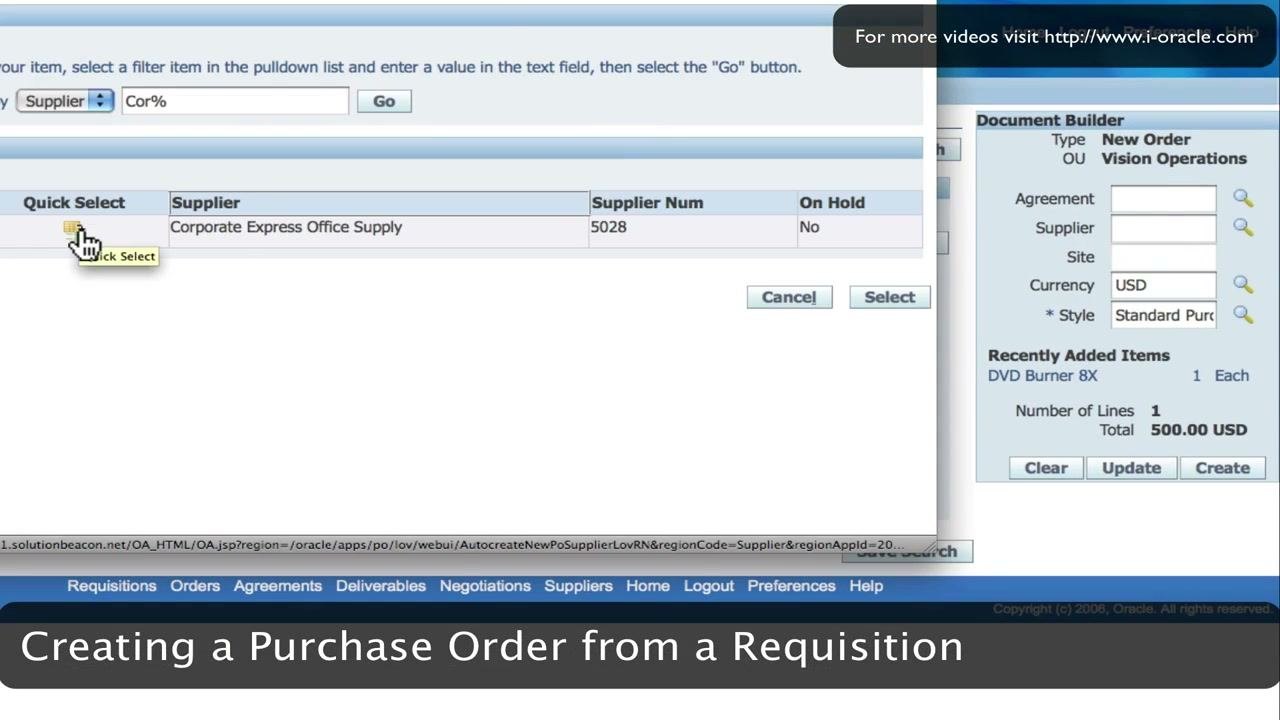
In the Document Builder, click the search icon next to the Supplier field.
-
In the supplier search window, set the filter to Supplier.
- Enter Cor% in the search field to find suppliers that start with "Cor".
- Click Go.
- Find Corporate Express Office Supply in the results.
- Click the Quick Select icon next to the supplier name.
Step 6: Confirm the supplier and site details
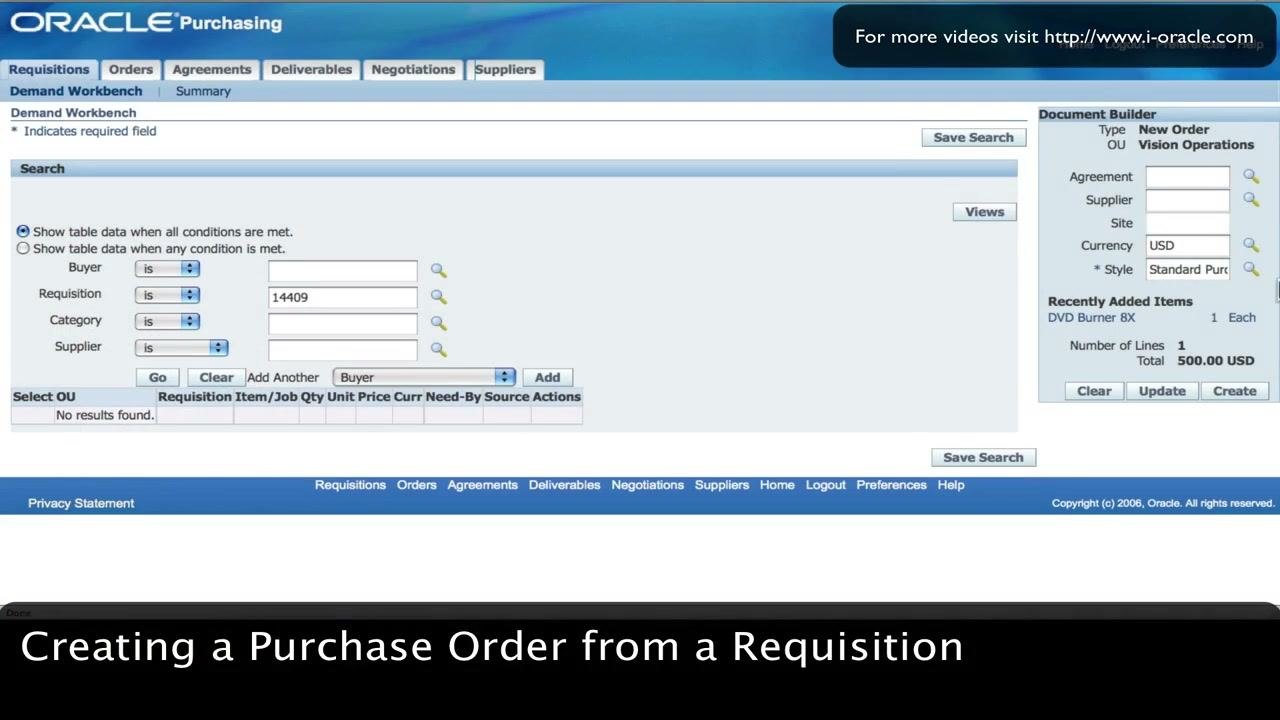
Back in the Document Builder, check that:
- The Supplier field shows "Corporate Express".
- The Site field is filled in automatically (for example, "CEOS").
- The Currency is "USD".
- The Style is "Standard Purchase".
Step 7: Create the purchase order
- Review all the details in the Document Builder panel for accuracy.
- Click Create to start creating the purchase order.
Add another item to the purchase order
Step 8: Review the purchase order header
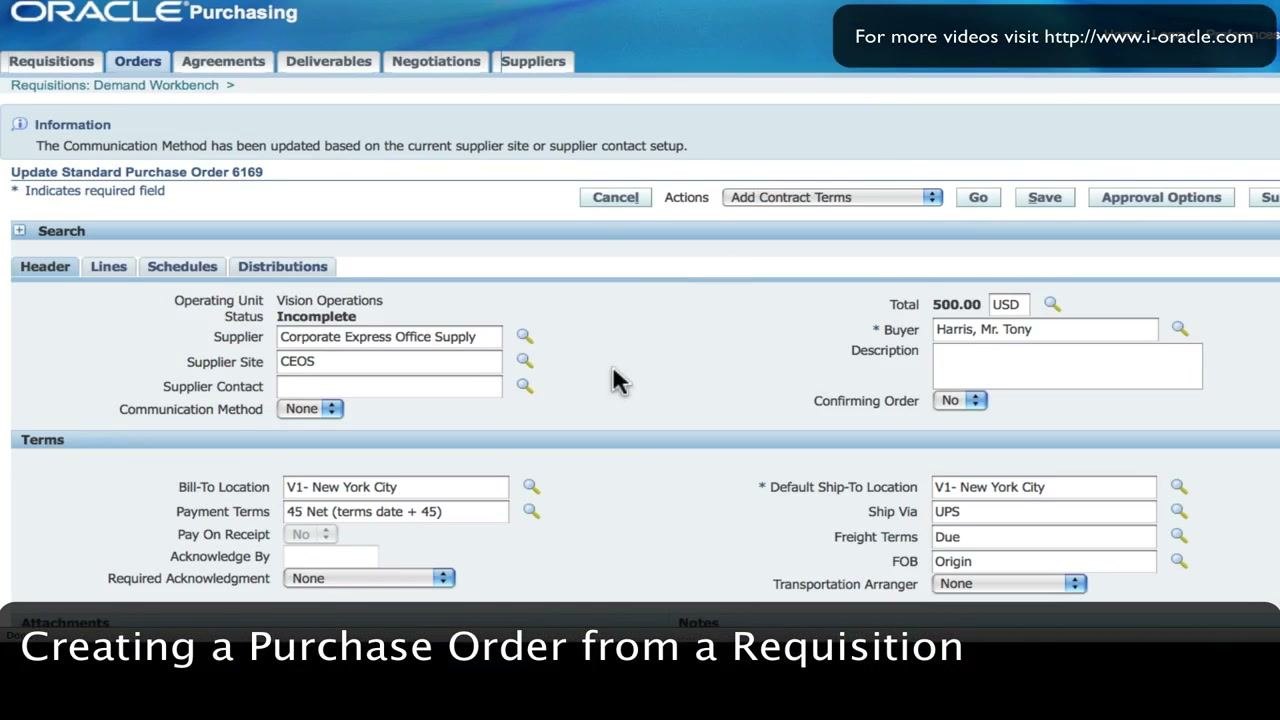
Confirm the following header details:
- Operating Unit: Vision Operations
- Status: Incomplete
- Supplier: Corporate Express Office Supply
- Supplier Site: CEOS
- Buyer: Harris, Mr. Tony
- Total: 500.00 USD
- Bill-To Location: V1 - New York City
- Payment Terms: 45 Net (terms date + 45)
- Default Ship-To Location: V1 - New York City
- Ship Via: UPS
- Freight Terms: Due
- FOB: Origin
Update any additional header or delivery details as needed.
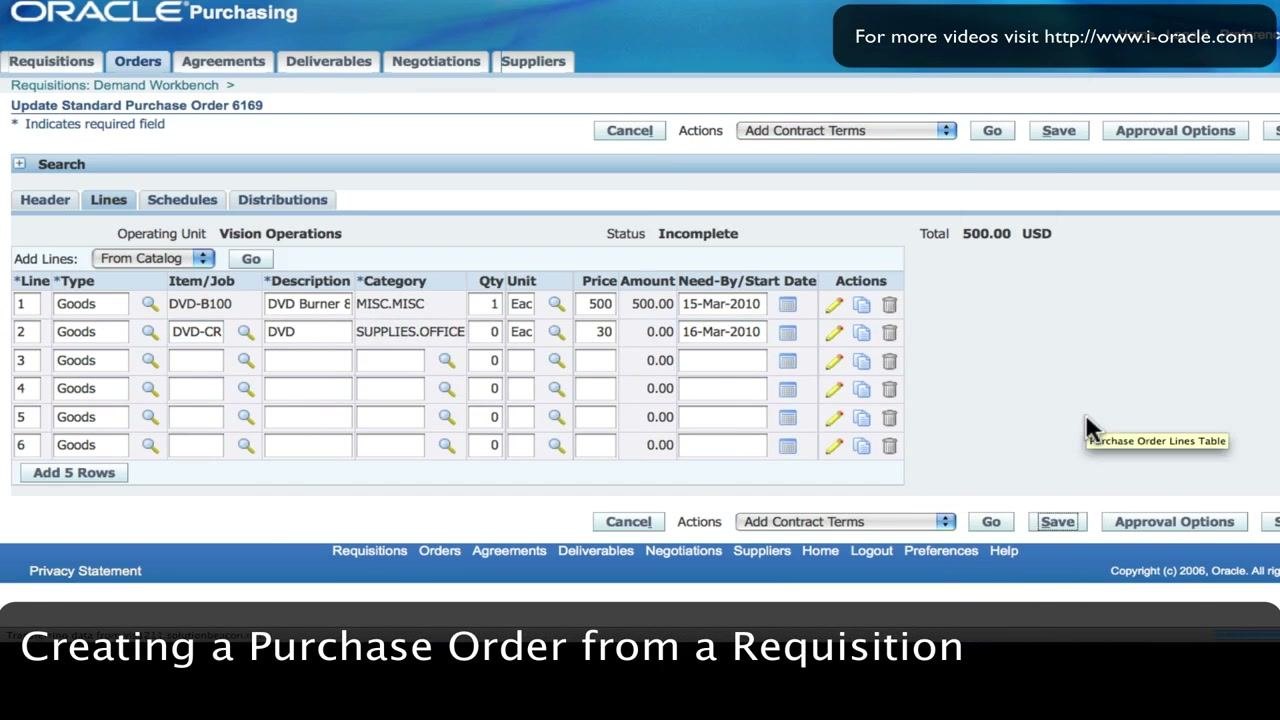
Step 9: Open the Lines tab and add blank rows
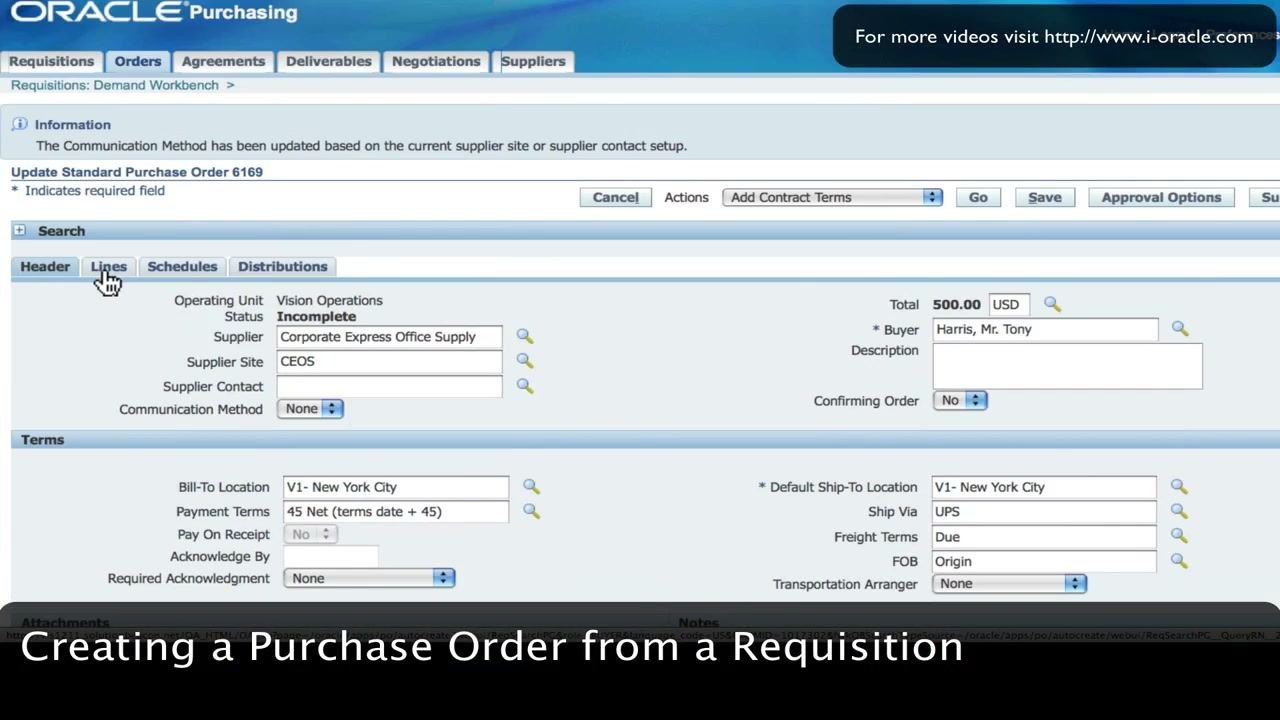
- Click the Lines tab to view and manage the items on your purchase order.
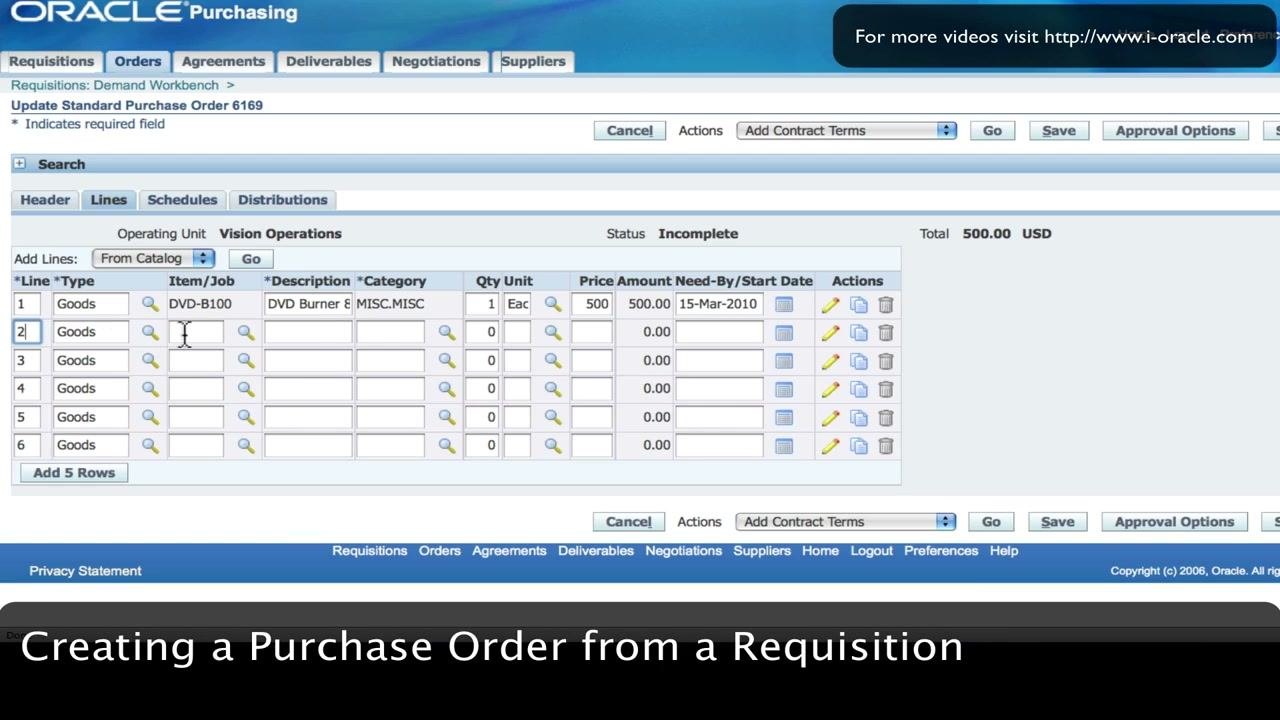
- Review the existing line for DVD-B100 (DVD Burner 8X).
- Click Add 5 Rows to insert five blank lines for new items.
Step 10: Find and select the new item
- On the new blank line (Line 2), click the search icon in the Item/Job field.
- Enter DVD-% to find all items that start with "DVD".
- Click Go.
- In the results, find DVD-CR (Description: DVD).
- Click the Quick Select icon next to DVD-CR to add it to the line.
Step 11: Edit the description (optional)
The Description field defaults to "DVD" for the new item. Overwrite it if you need a custom description.
Step 12: Enter the need-by date, quantity, and price
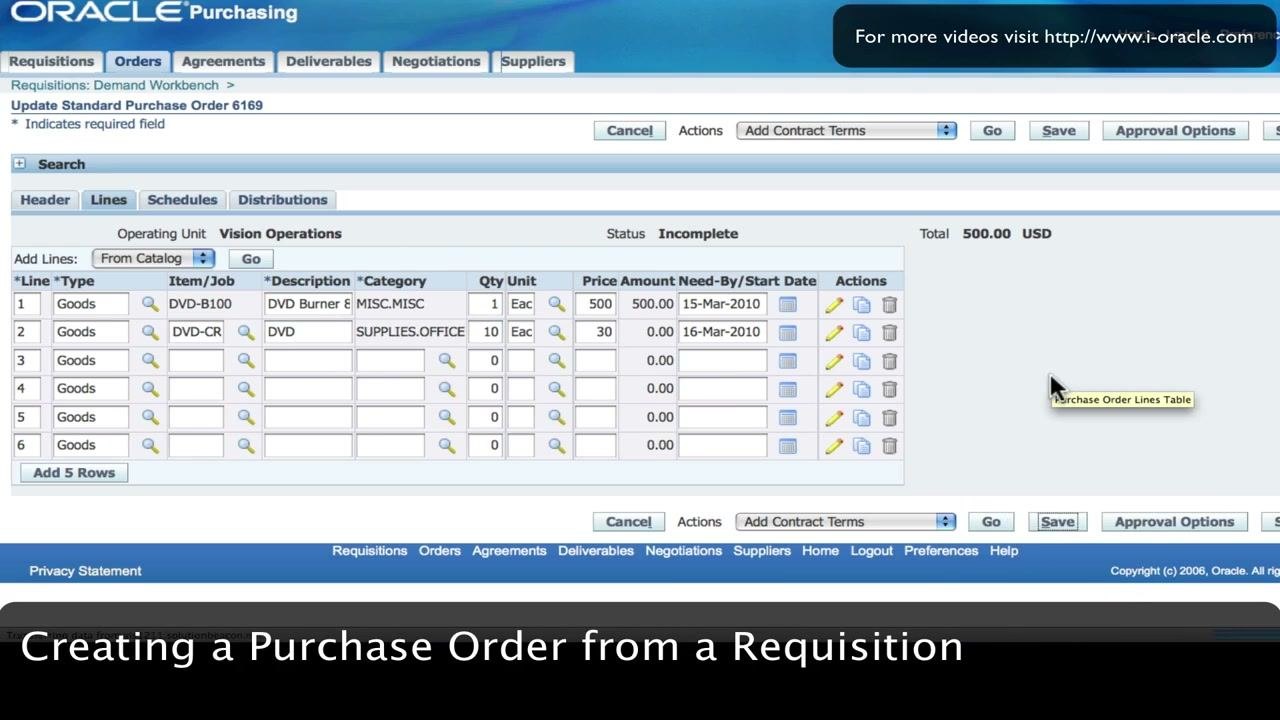
- In the Need-By/Start Date field for the new item, enter 16-Mar-2010.
- In the Qty field, enter 10.
- In the Unit field, make sure the value is Each (Eac).
- In the Price field, enter 30 if it isn't filled in automatically.
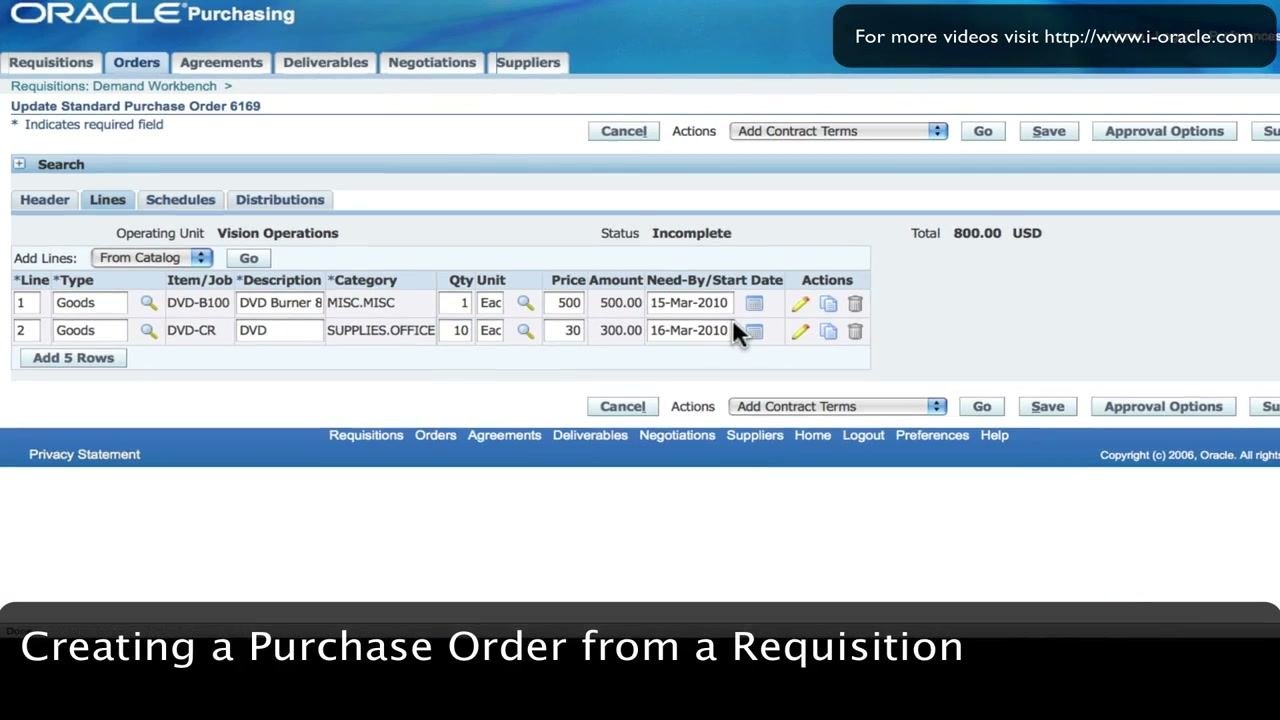
Step 13: Save the purchase order lines
Click Save to update the purchase order with the new item and its details. The Lines tab now shows two items: DVD Burner 8X (1 Each, $500, 15-Mar-2010) and DVD (10 Each, $30, 16-Mar-2010).
Submit the purchase order and review it
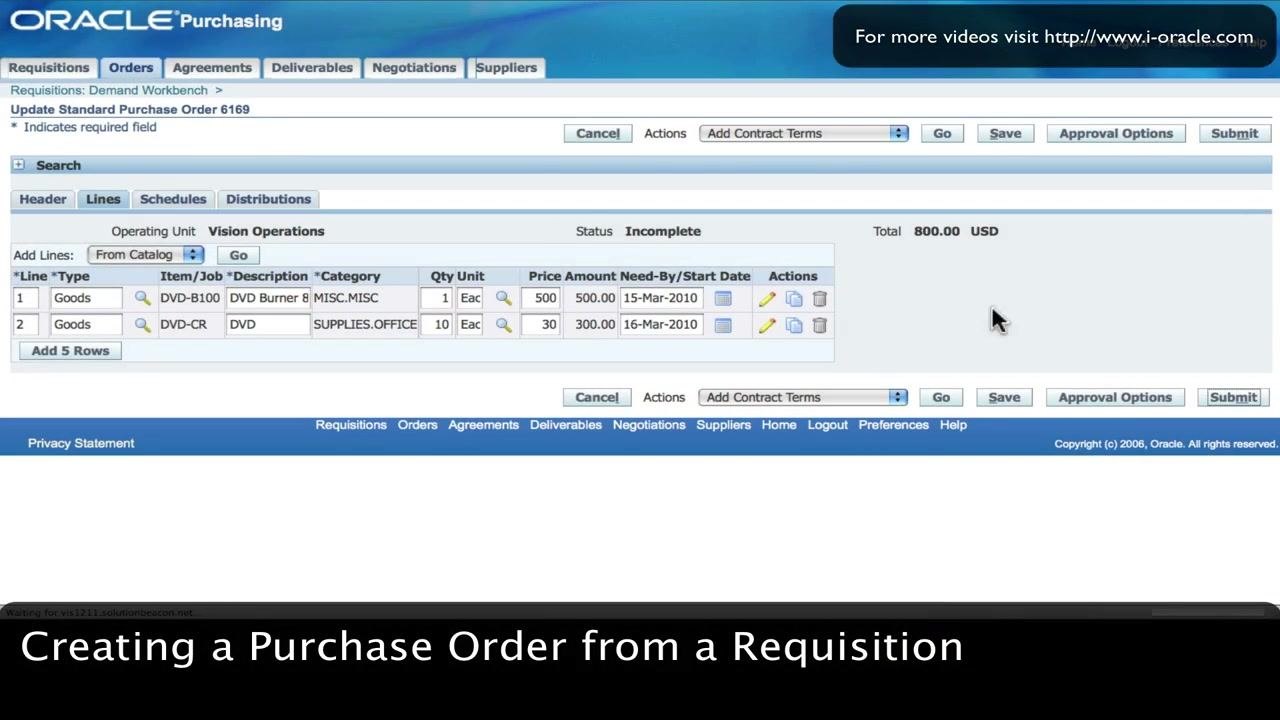
Step 14: Submit the purchase order for approval
- Check the total amount. It should now include all added items (in this example, 800.00 USD).
- Note the Purchase Order Number shown on the screen (in this example, 6169).
- Click Submit to send the purchase order for approval.
A confirmation message appears: Standard Purchase Order 6169 has been submitted for approval. You are then redirected to the Demand Workbench or a similar summary or search screen.
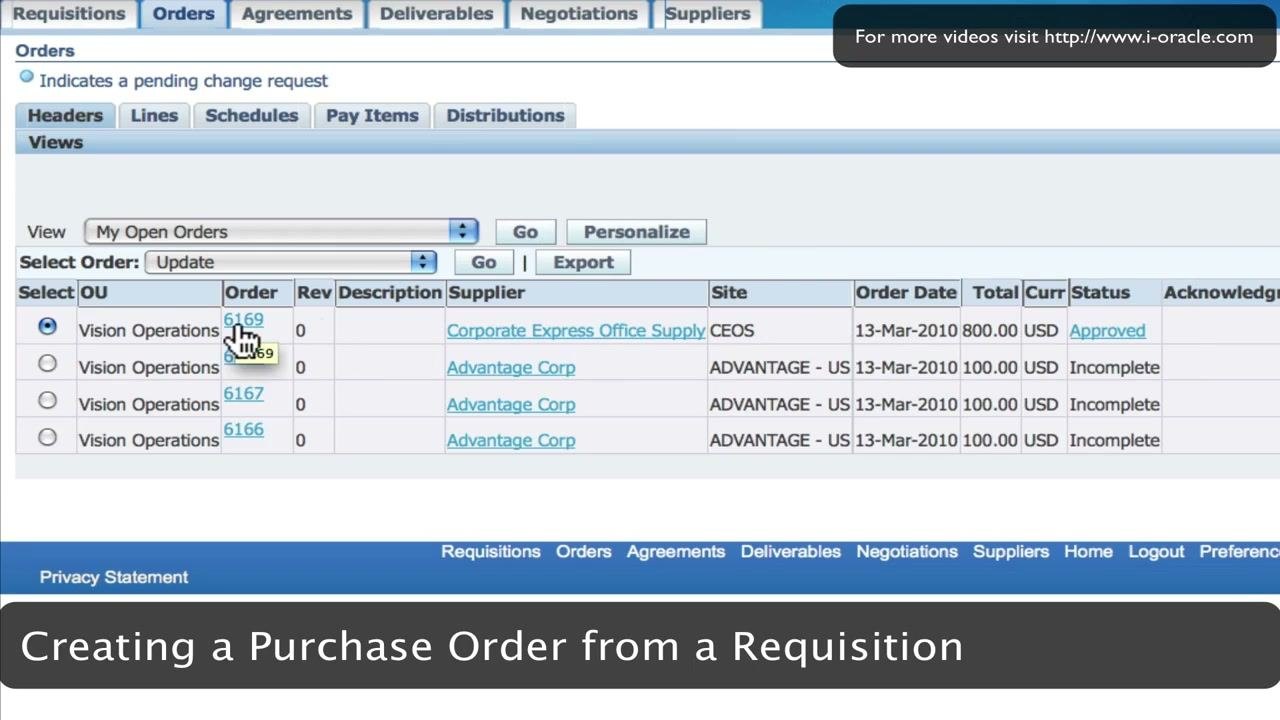
Step 15: Open your orders
- Click the Orders tab or the My Orders button.
- In the View dropdown, select My Incomplete Orders to see orders that aren't approved yet, or My Open Orders to see approved and active orders.
- Click Go to refresh the list.
Step 16: Find the purchase order and check its status
- Find your purchase order in the list (in this example, Order 6169).
- Confirm that the Status is Approved and the Total matches the amount you expect (in this example, 800.00 USD).
- Click the order number to open the order details.
Step 17: View the order details and generate a PDF
On the order details screen, review the line items, quantities, prices, and delivery dates. The Actions dropdown gives you these options:
- View Acknowledgments
- View Acquisition Cost
- View Action History
- View Change History
- View Invoices
- View PDF
Select View PDF from the Actions dropdown, then click Go to generate a PDF version of the purchase order.
When prompted, choose the PDF viewer you want to use (for example, Adobe Acrobat Pro) and click OK to open the document.
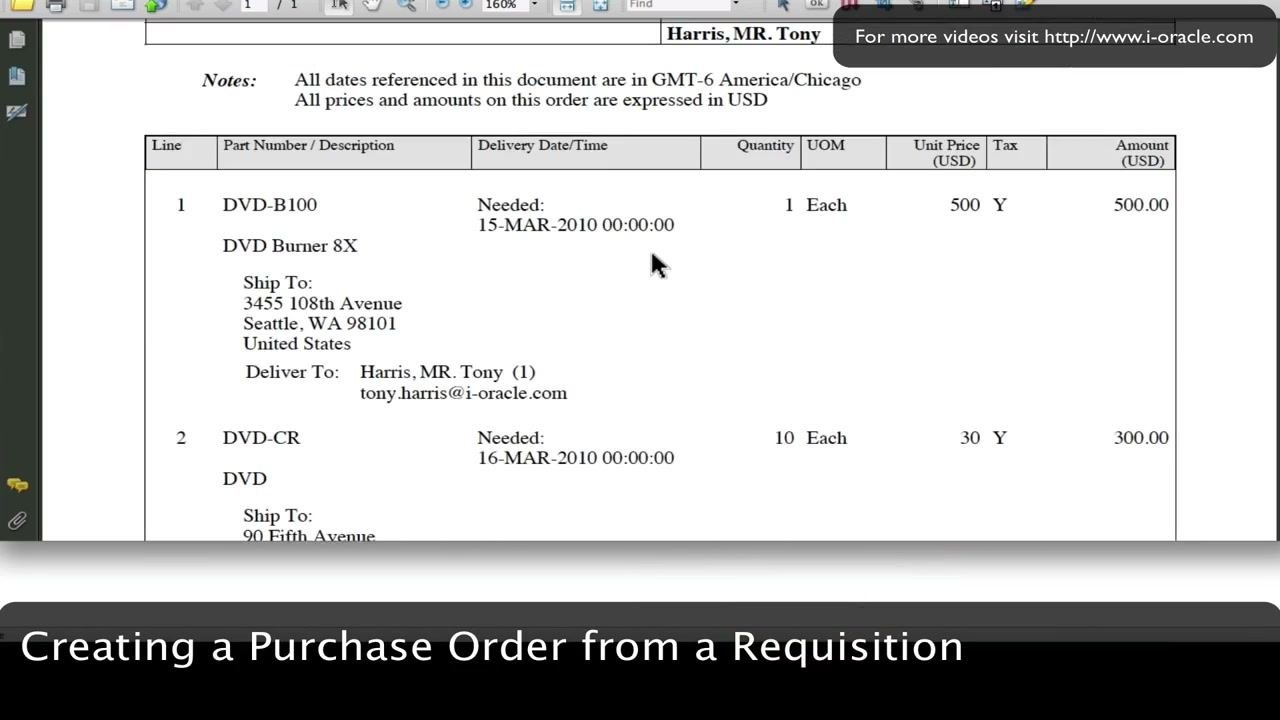
Step 18: Review the purchase order PDF
Check the PDF for these details:
- Line items (for example, DVD-B100 and DVD-CR)
- Descriptions (for example, DVD Burner 8X and DVD)
- Delivery dates (for example, 15-MAR-2010 and 16-MAR-2010)
- Quantities and unit prices (for example, 1 Each at $500 and 10 Each at $30)
- Shipping and delivery addresses
- Buyer information (for example, Harris, MR. Tony)
Confirm that all information is correct before you take further action.
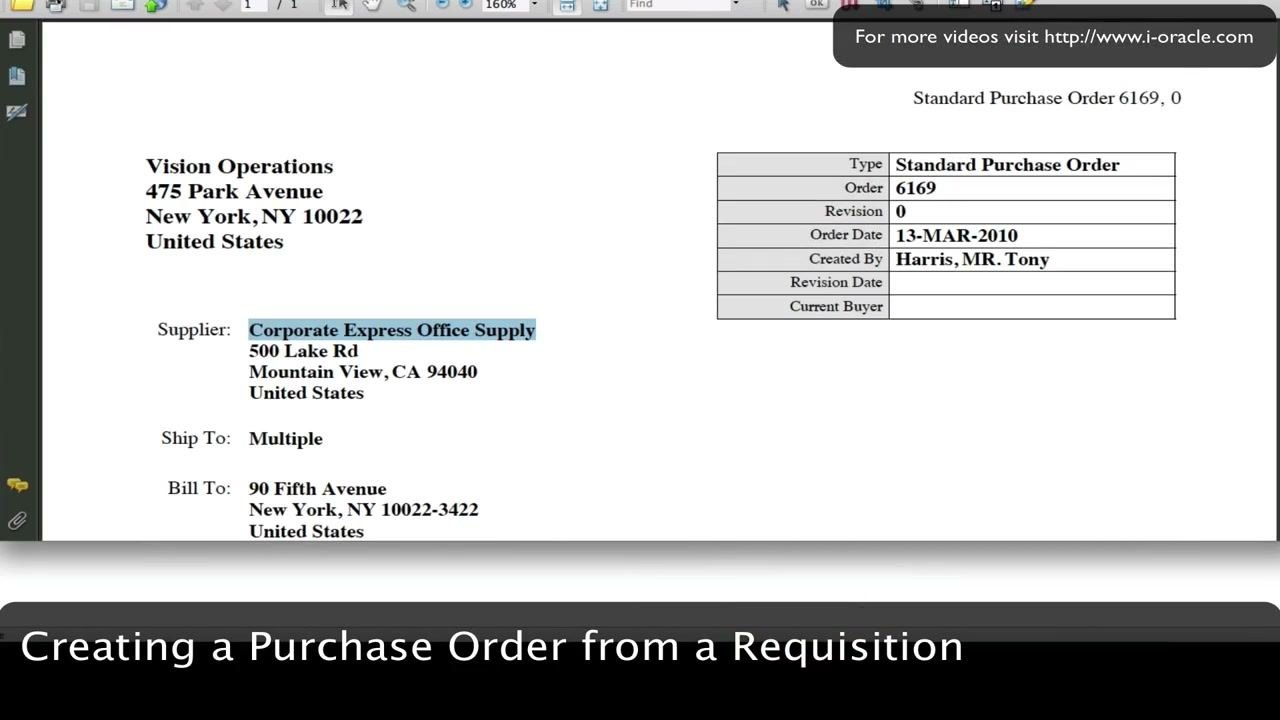
Step 19: Verify the PDF header, supplier, and order information
Check the top section of the PDF:
- Company name and address: Vision Operations, 475 Park Avenue, New York, NY 10022, United States
- Supplier information: Corporate Express Office Supply, 500 Lake Rd, Mountain View, CA 94040, United States
- Ship To: Multiple (if you specified multiple delivery locations)
- Bill To: 90 Fifth Avenue, New York, NY 10022-3422, United States
Then check the summary table:
- Type: Standard Purchase Order
- Order Number: 6169
- Revision: 0
- Order Date: 13-MAR-2010
- Created By: Harris, MR. Tony
- Revision Date: blank if the order hasn't been revised
- Current Buyer: blank if not specified
Make sure the order number and date match your records.
Step 20: Save or print the PDF and finish
- Save the PDF to your local drive or a secure network location for record-keeping.
- If required, print a copy for physical filing or to send to the supplier.
- Close the PDF viewer when you finish.
Summary
You now know how to create a PO from a requisition in Oracle EBS. You found requisition 14409, added it to the Document Builder, selected the supplier, and created the purchase order. You then added a second line, submitted the order for approval, confirmed its Approved status, and reviewed a PDF copy.
What's next
Return to Oracle E-Business Suite or your procurement system to continue with additional tasks, such as tracking order fulfillment or managing invoices.
Generation details: cost, quality tiers
Docsie billed 3,000 credits ($2.10) to analyze this 6-minute video at standard quality. The rewrite, template fill and Word/PDF exports were included. The same video at each quality tier:
| Quality | Frames sampled | Credits | Approx. cost |
|---|---|---|---|
| Draft | every 16-30 s | 1,500 | $1.05 |
| Standard (this guide) | every 8-15 s | 3,000 | $2.10 |
| Detailed | every 4-7 s | 6,000 | $4.20 |
| Ultra | every 1-3 s | 12,000 | $8.40 |
Credits priced at $0.70 per 1,000; plans include a monthly allowance. Enterprise customers on on-premise or bring-your-own-model deployments run this on their own inference and pay no per-video credits.
Generated by Docsie Video-to-Docs on 2026-11-15 from a 5-minute video. Screenshots are frames from the source video and belong to their creator, Yemi Onigbode, whose original is embedded above. If you own this video and want the guide removed or credited differently, contact us and we will act within one business day.