
How to Create a Ledger in Oracle EBS
This guide shows you how to create a ledger in Oracle EBS, starting with the groundwork a ledger depends on. You build an accounting flexfield structure with segments and value sets, assign flexfield qualifiers, and compile the flexfield. You then enter segment values, review calendar period types and currencies, and gather the four components you need to define the ledger.
Video: How to Create Ledgers in General Ledger Part 1 - Oracle E-Business Suite R12.2.x by Yemi Onigbode (2010). All credit for the demonstration goes to the creator; watch the original on YouTube. The written guide below was generated from this video by Docsie. Creator? Request a change or removal.
This guide shows you how to create a ledger in Oracle EBS, starting with the groundwork a ledger depends on. You build an accounting flexfield structure with segments and value sets, assign flexfield qualifiers, and compile the flexfield. You then enter segment values, review calendar period types and currencies, and gather the four components you need to define the ledger.
Prerequisites
Before you begin, make sure you have the following:
- A login to Oracle E-Business Suite.
- Access to the General Ledger responsibility.
- Your chart of accounts requirements, including the segments you plan to use (this guide uses Company, Department, Account, Products, and Spare).
- Your calendar and currency requirements, which you review in later steps.
Open the General Ledger responsibility
Step 1: Log in and select the General Ledger responsibility
- Log in to Oracle E-Business Suite.
- From the navigator, select your General Ledger responsibility.
Step 2: Open the key flexfield segments setup
From the navigator, expand Setup > Financials. This menu lets you define flexfields, calendars, ledger sets, access sets, and document sequences.
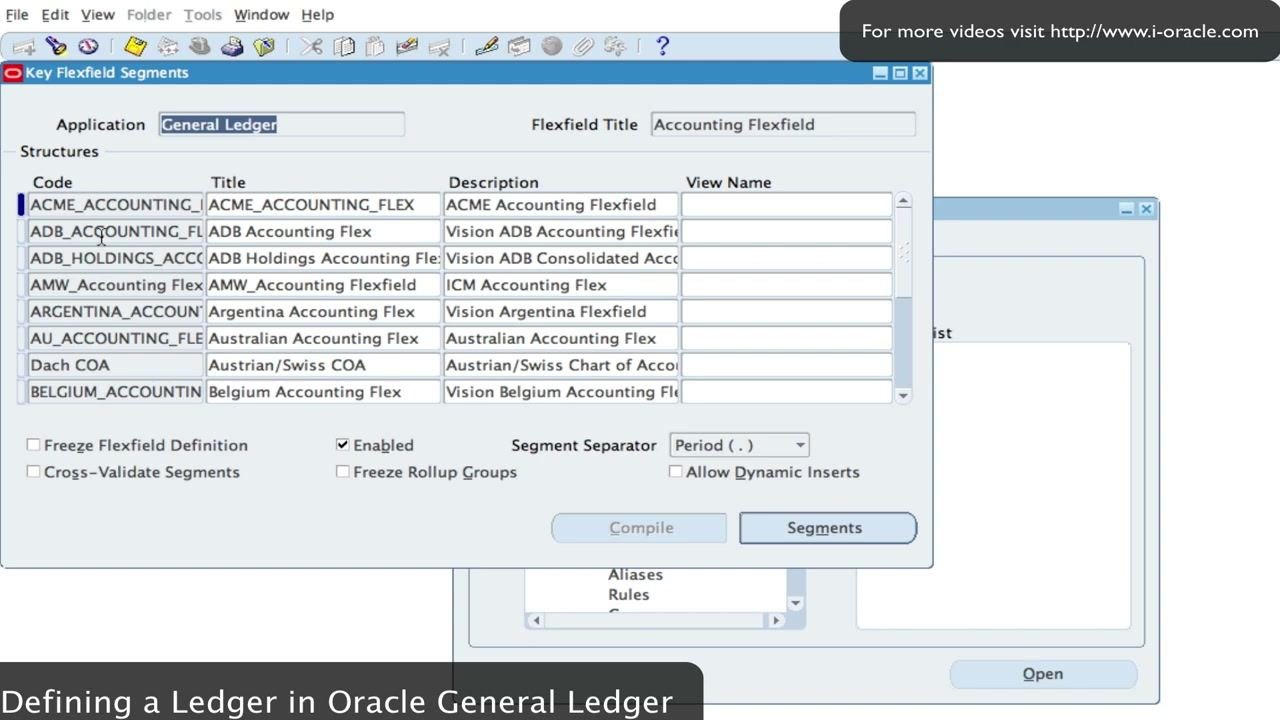
In the Setup > Financials menu, select the option to manage key flexfield segments for the General Ledger application. Then open the Key Flexfield Segments window.
Create the accounting flexfield structure
Step 3: Create a new accounting flexfield structure
In the Key Flexfield Segments window, click to add a new line in the Structures table. Enter the following details:
- Code:
YO_ACCOUNTING_FLEX - Title:
YO_ACCOUNTING_FLEX - Description:
Yemi Accounting Flexfield(replace with your company name if you like)
Then make sure these options are set:
- Enabled: checked
- Segment Separator:
Period (.)
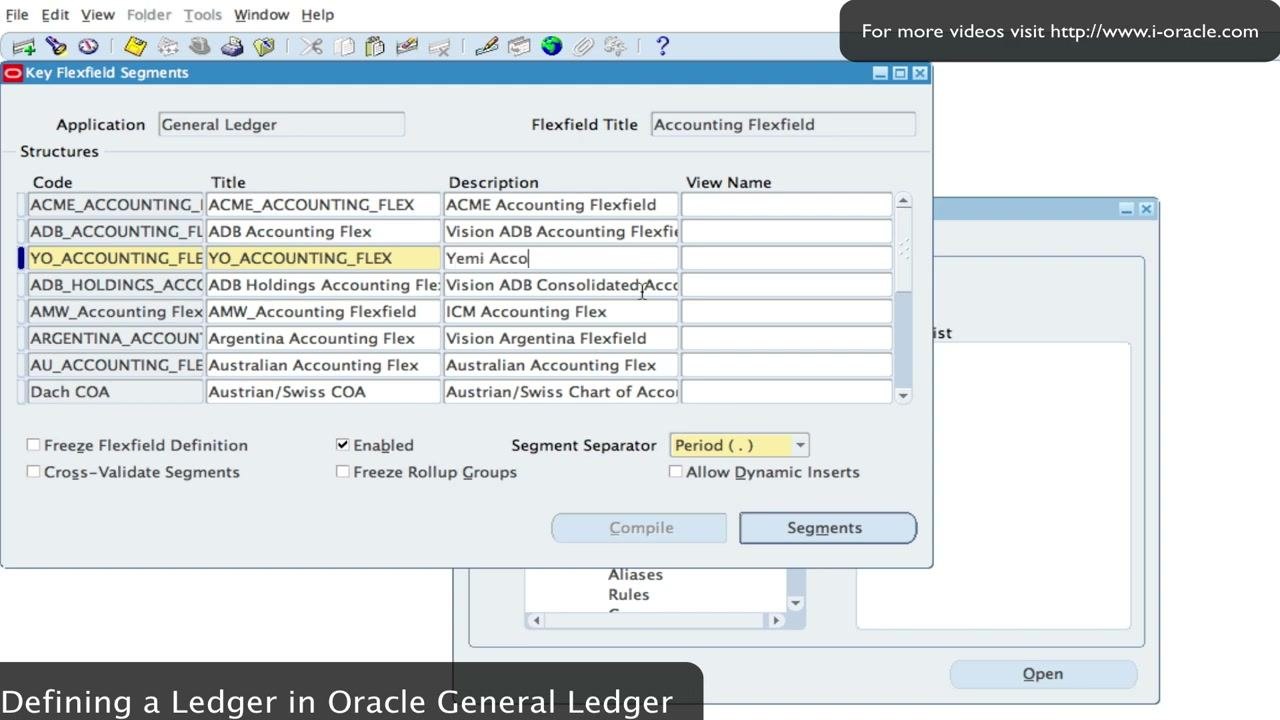
Step 4: Add segments and create a value set for the Company segment
Add five segments to your flexfield structure:
- Company
- Department
- Account
- Products
- Spare (for future use or flexibility)
Select New to add the first segment. Enter these details for the Company segment:
- Name:
Company - Column:
SEGMENT1 - Number:
1 - Prompts > List Of Values: change from
CompanytoCO - Prompts > Window:
Company - Sizes > Display Size:
25 - Sizes > Description Size:
50 - Sizes > Concatenated Description Size:
25
Make sure Enabled, Displayed, Indexed, and Required are all checked.
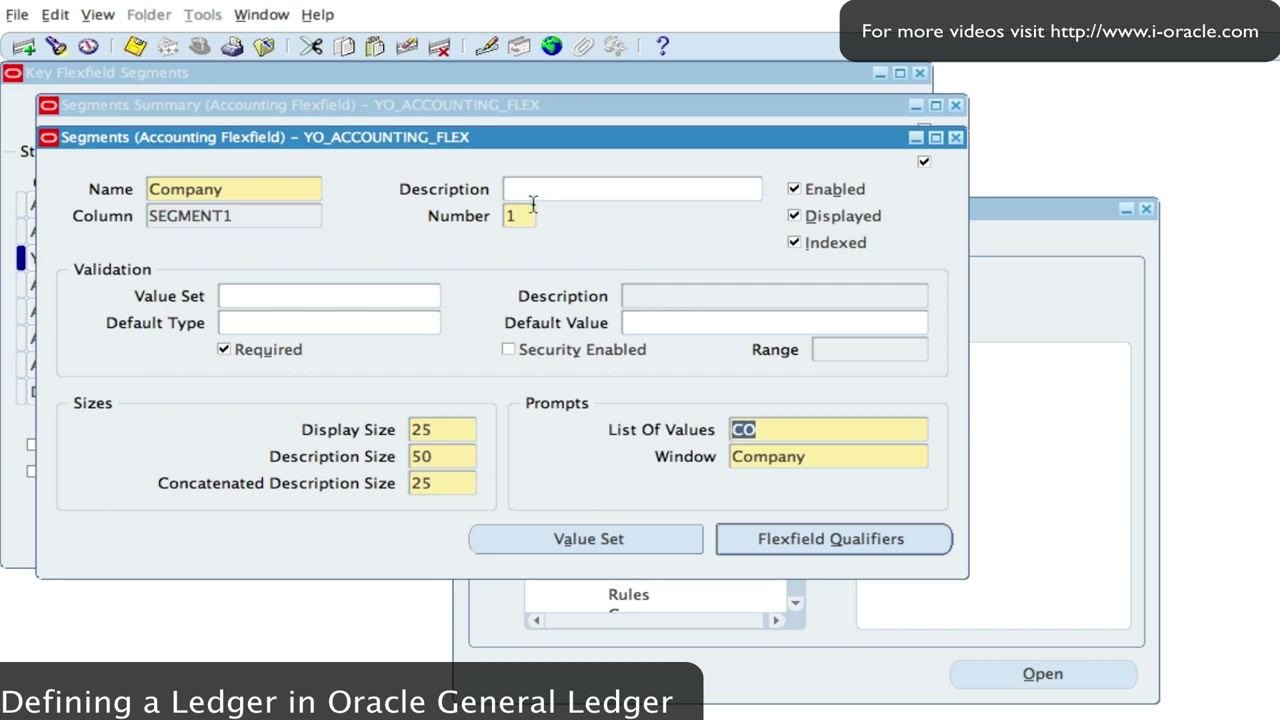
Save your changes and exit the form.
Next, navigate to the Value Set form and click Value Set to open the Value Sets window. Create a new value set with these details:
- Value Set Name:
YO_Company - Description:
Yemi's Company - List Type:
List of Values - Security Type:
Non-Hierarchical Security(you can chooseNo SecurityorHierarchical Securityas needed) - Format Type:
Char - Maximum Size:
2 - Uppercase Only (A-Z): checked
- Right-justify and Zero-fill Numbers (0001): checked, so that entering
1displays as01 - Validation Type:
Independent
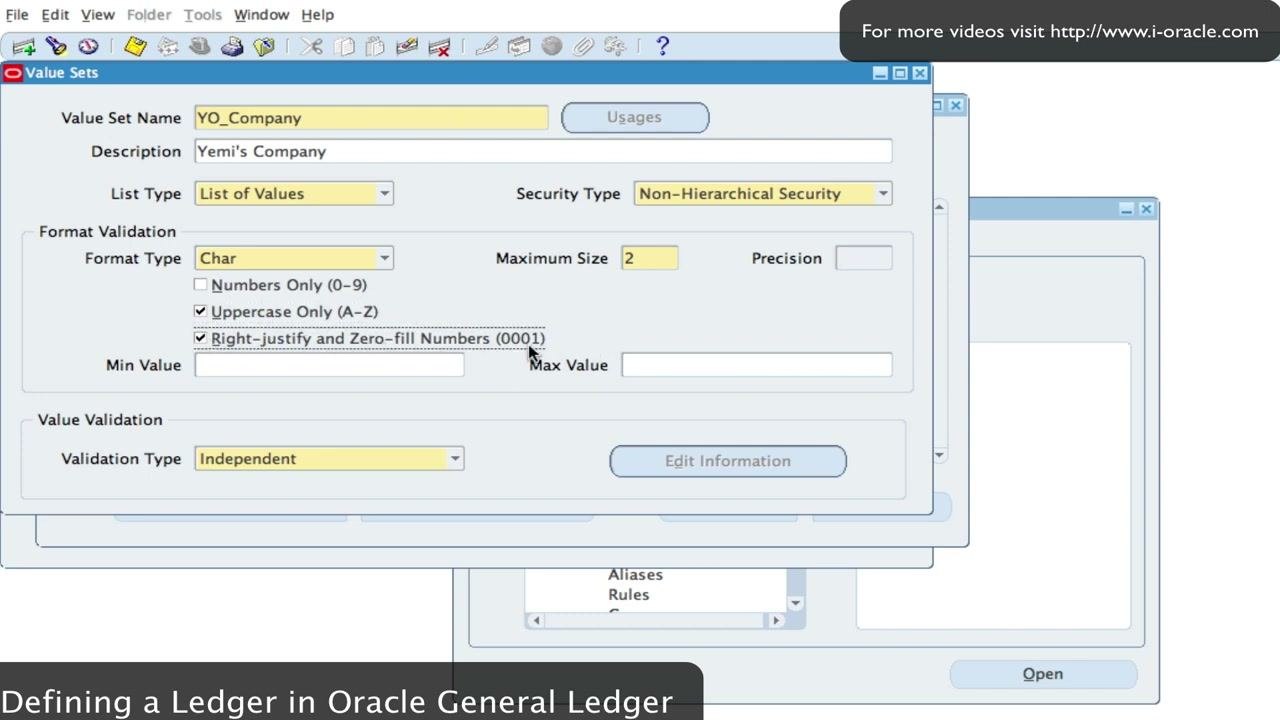
You use this value set for your Company segment. It enforces two-character, uppercase company codes that are zero-filled as needed, such as 01 and 02.
Define value sets for the remaining segments (Department, Account, Products, and Spare) according to your chart of accounts requirements.
Step 5: Finalize the value set and assign it to the Company segment
Review the value set configuration for the Company segment:
- Value Set Name:
YO_Company - Description:
Yemi's Company - List Type:
List of Values - Security Type:
Non-Hierarchical Security - Format Type:
Char - Maximum Size:
2 - Uppercase Only (A-Z): checked
- Right-justify and Zero-fill Numbers (0001): checked
- Numbers Only (0-9): leave unchecked to allow alphanumeric values
- Min Value / Max Value: leave blank unless you want to restrict the range of values
- Validation Type:
Independent
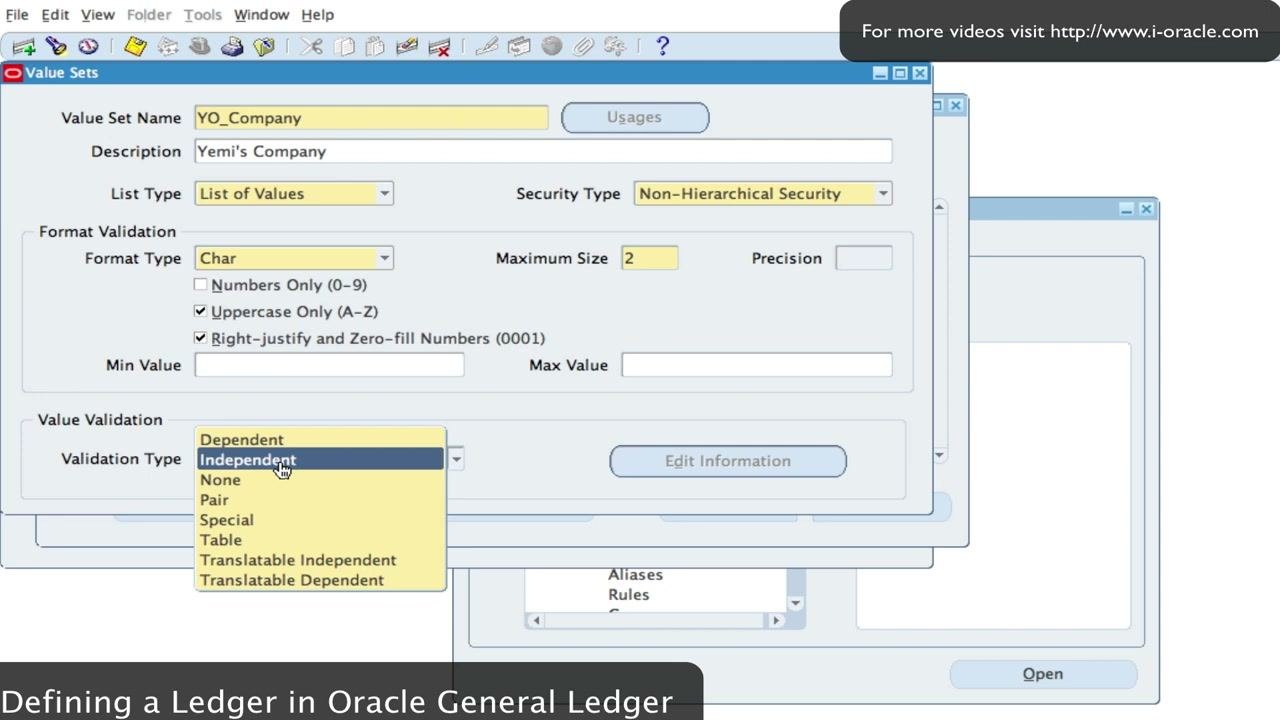
Leave the validation type as Independent unless you need a different one. Your business requirements may call for Dependent, None, Pair, Special, Table, Translatable Independent, or Translatable Dependent.
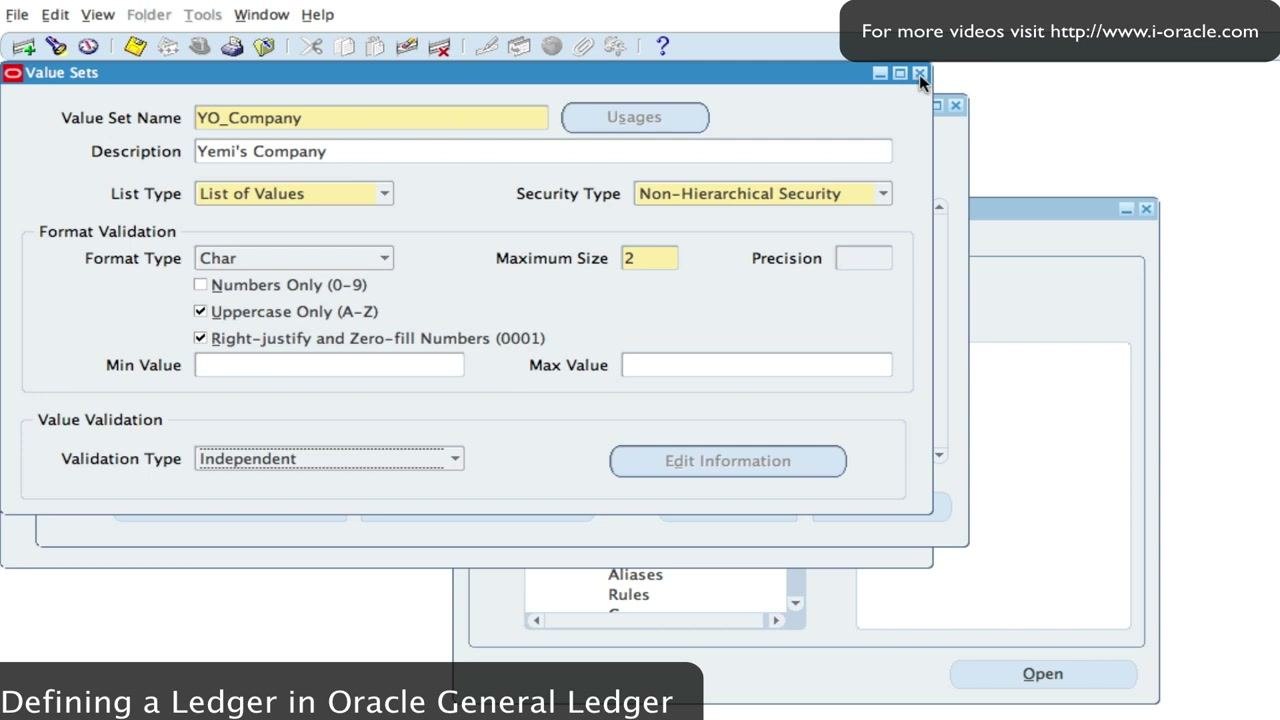
Save the value set to complete its creation.
Now assign the value set to the Company segment:
- Return to the Key Flexfield Segments window.
- In the row for the Company segment, click the Value Set field.
- In the Value Sets search window, enter
YO%in the Find field to locate your value set quickly. - Select
YO_Companyfrom the search results. - Click OK to assign the value set to the Company segment.
If your configuration requires it, you can also specify a flexfield qualifier for the segment at this point.
Proceed to define and assign value sets for the remaining segments (Department, Account, Products, and Spare) according to your chart of accounts requirements.
Assign flexfield qualifiers
Step 6: Open the flexfield qualifiers for your segments
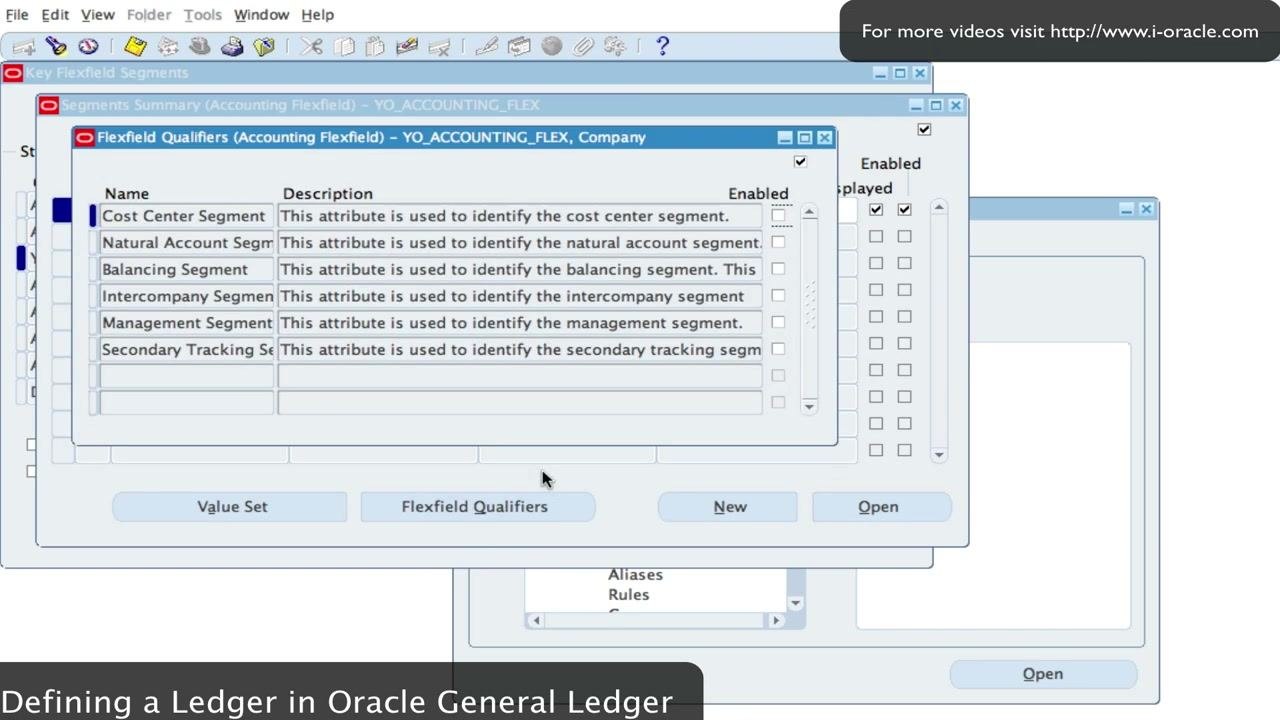
Open the Segments Summary (Accounting Flexfield) window for your structure, for example YO_ACCOUNTING_FLEX. This window lists all defined segments for your accounting flexfield, such as Company, Department, Account, Product, and Spare.
Click Flexfield Qualifiers to assign qualifiers to each segment. The Flexfield Qualifiers (Accounting Flexfield) window appears and shows these qualifiers:
- Cost Center Segment
- Natural Account Segment
- Balancing Segment
- Intercompany Segment
- Management Segment
- Secondary Tracking Segment
Each qualifier has a description and an Enabled checkbox.
Step 7: Assign the Balancing Segment qualifier
- Select the segment where you want your debits and credits to balance, for example Company.
- In the Flexfield Qualifiers window, check Enabled for Balancing Segment.
This ensures the selected segment is used for balancing entries.
Step 8: Save your changes and close the Flexfield Qualifiers window
Click the save icon or use the menu to save. Then close the Flexfield Qualifiers window to return to the Segments Summary.
Step 9: Repeat the process for other segments
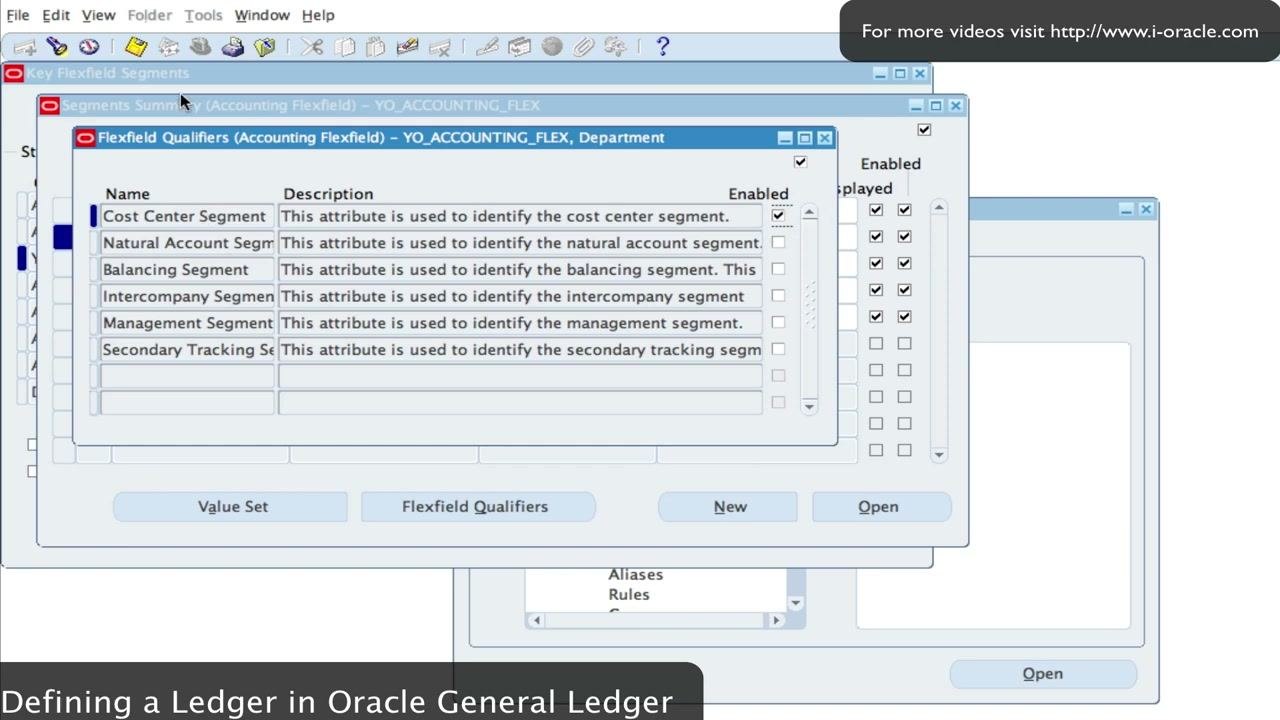
Select another segment and click Flexfield Qualifiers. For example, select the Department segment and enable the Cost Center Segment qualifier.
Step 10: Review the segments summary
Review the Segments Summary to make sure every segment has the correct qualifier. An example configuration looks like this:
- Company: Balancing Segment
- Department: Cost Center Segment
- Account: Natural Account Segment
- Product: no qualifier
- Spare: no qualifier
Enable dynamic inserts and freeze the flexfield
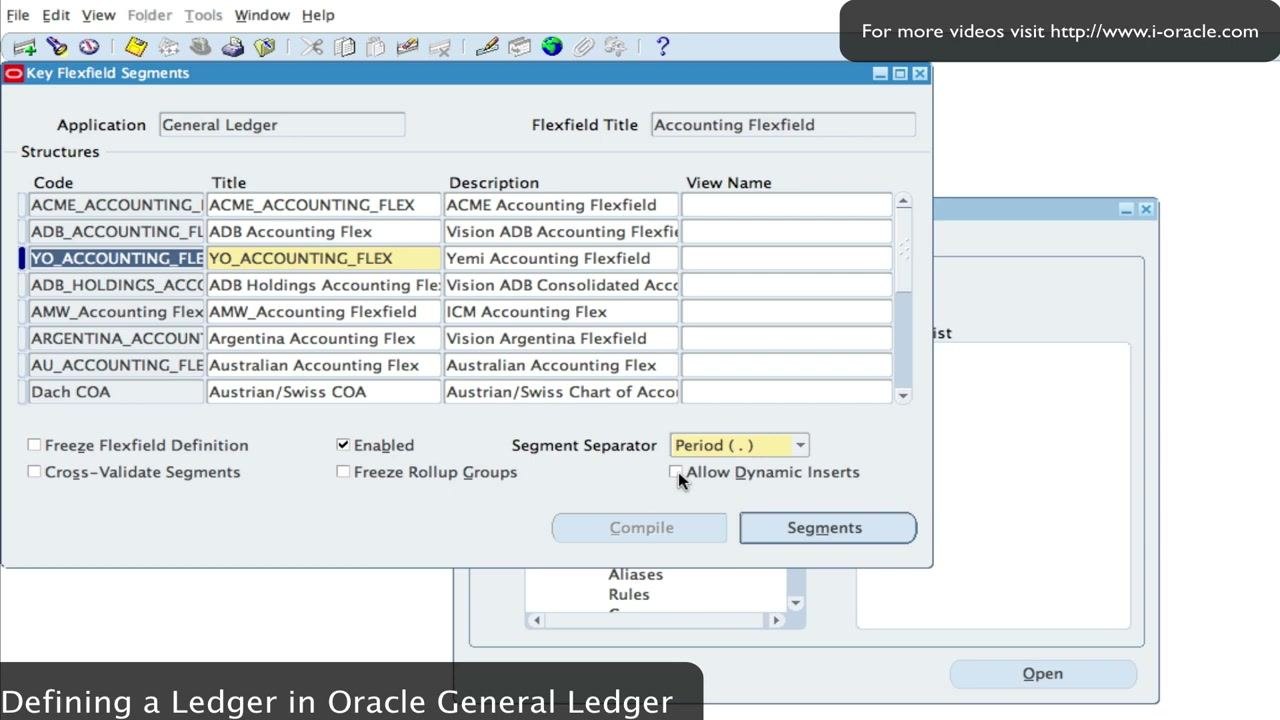
Step 11: Allow dynamic inserts for the key flexfield segments
Return to the main Key Flexfield Segments window and confirm that your structure (for example YO_ACCOUNTING_FLEX) is selected.
Then set the segment separator and enable dynamic inserts:
- Set Segment Separator to
Period (.). - Check Allow Dynamic Inserts to permit automatic creation of new account combinations.
Step 12: Save your configuration
Click the save icon or use the menu to save your changes.
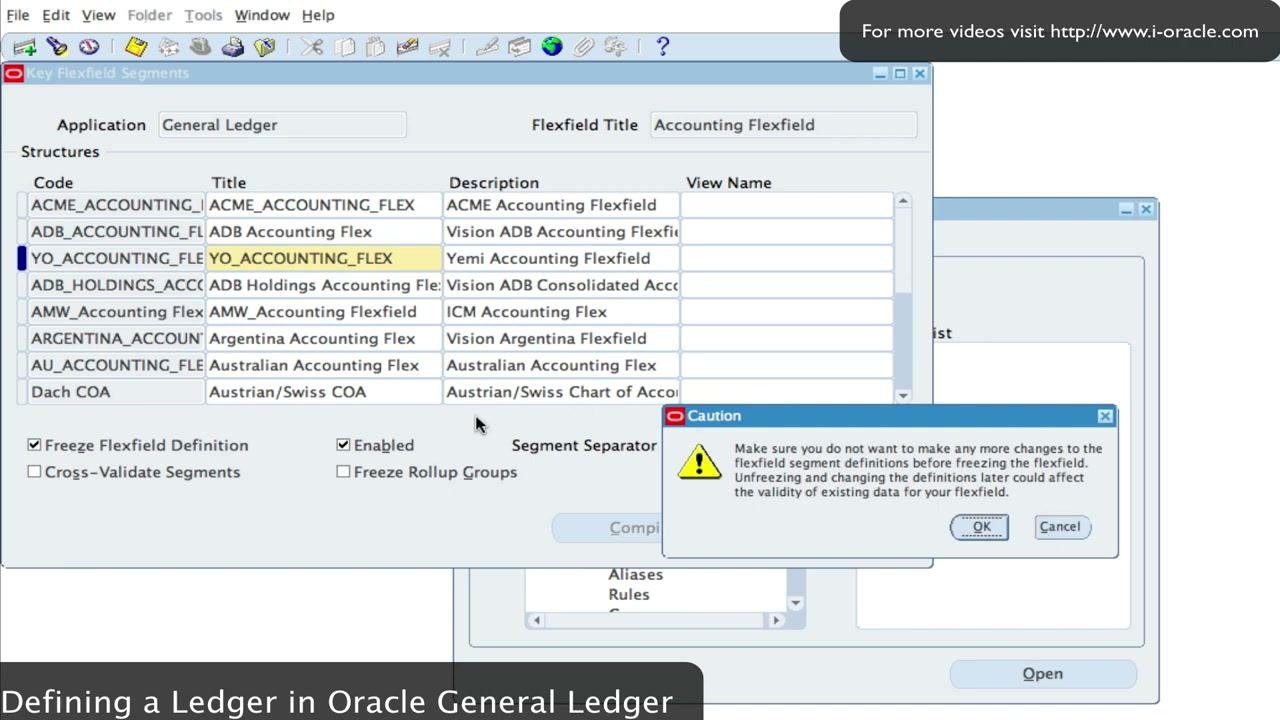
Step 13: Freeze the flexfield definition
- Check Freeze Flexfield Definition.
- Read the caution dialog. It warns that unfreezing and changing definitions later could affect existing data.
- Click OK to confirm and freeze the definition.
Step 14: Review your structure and settings
Check the following:
- Enabled is checked.
- The segment separator is set to
Period (.). - Allow Dynamic Inserts is checked.
- The structure is frozen and ready for use.
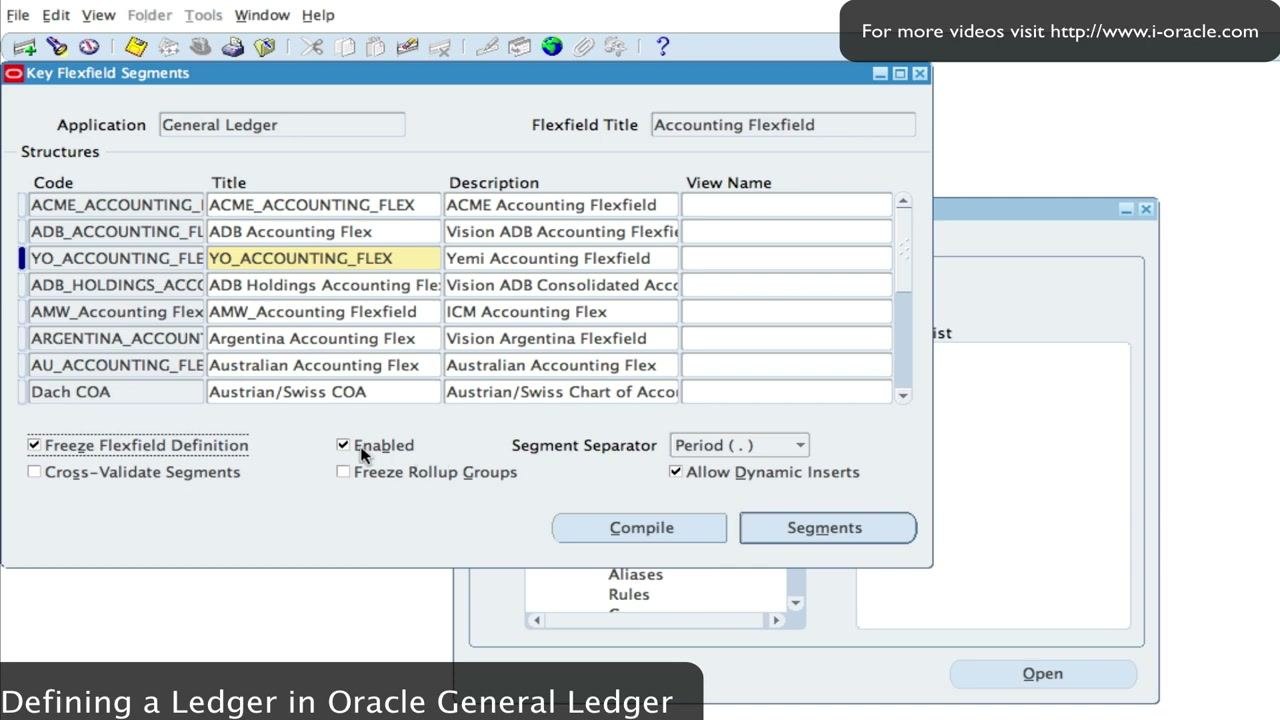
You have now assigned flexfield qualifiers, set up your segment structure, enabled dynamic inserts, and frozen the flexfield definition in Oracle General Ledger.
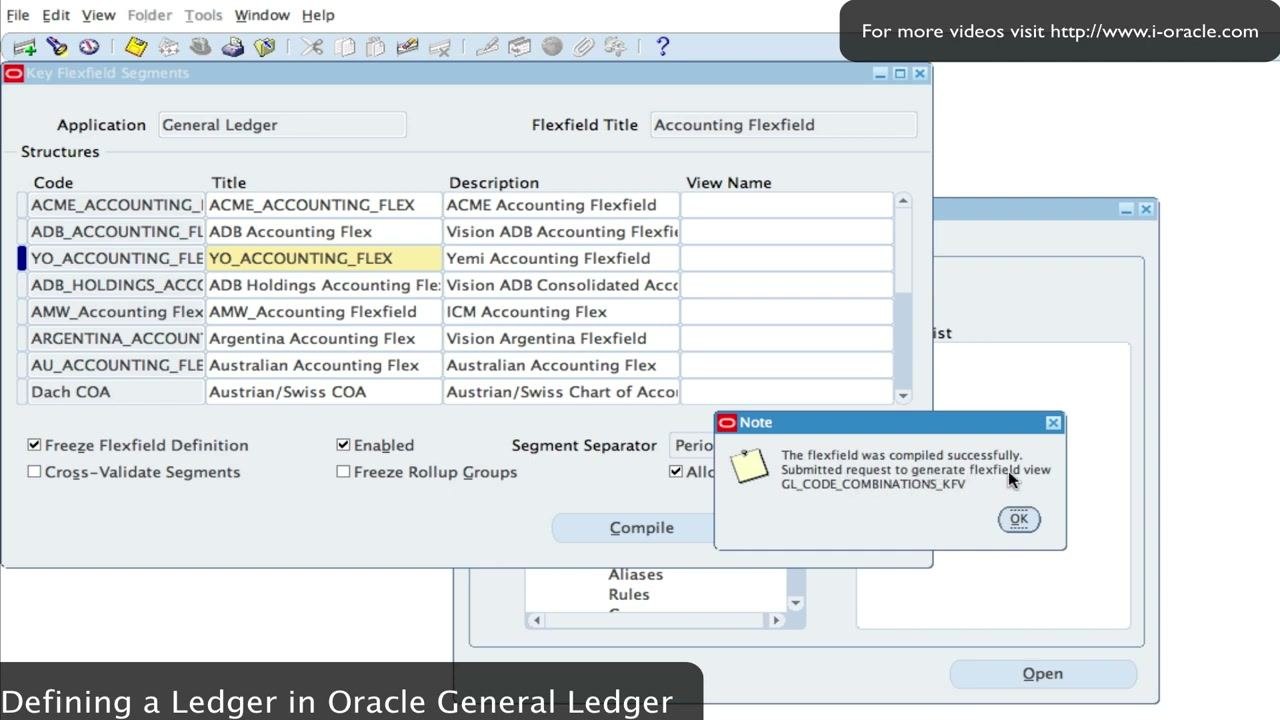
Step 15: Compile the flexfield
- After freezing the flexfield definition, click Compile in the Key Flexfield Segments window.
- Wait for the confirmation dialog to appear.
- In the Note dialog, verify the message: "The flexfield was compiled successfully. Submitted request to generate flexfield view GL_CODE_COMBINATIONS_KFV."
- Click OK to close the dialog.
Enter segment values
Step 16: Open the Find Key Flexfield Segment window
- In the Setup: Financials section, select the option to define flexfield values.
- In the Find Key Flexfield Segment window that appears, make sure Key Flexfield is selected as the search method.
- Prepare to enter search criteria for your flexfield segment.
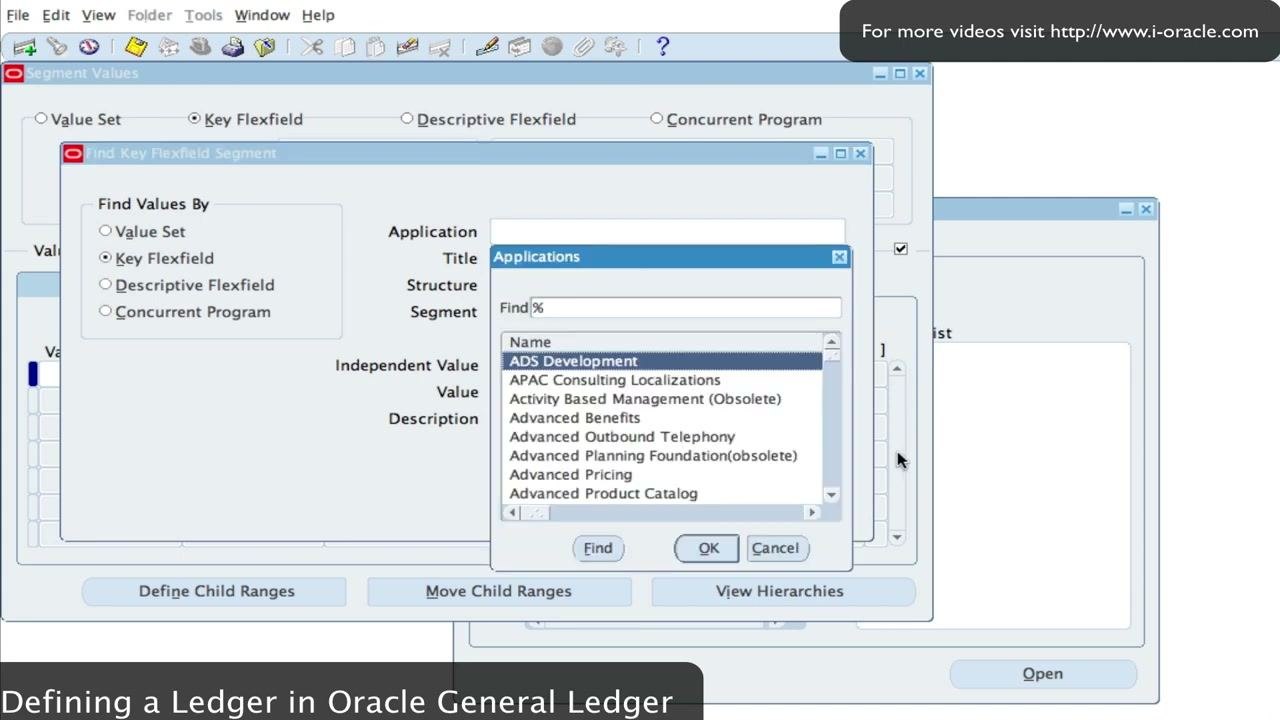
Step 17: Select General Ledger as the application
- Click the list of values (LOV) button next to the Application field.
- In the Applications popup, scroll or search for
General Ledger. - Select
General Ledgerand click OK.
Step 18: Select YO_ACCOUNTING_FLEX as the structure
- In the Structure field, click the LOV button.
- In the Key Flexfield Structures popup, scroll or search for
YO_ACCOUNTING_FLEX. - Select
YO_ACCOUNTING_FLEXand click OK.
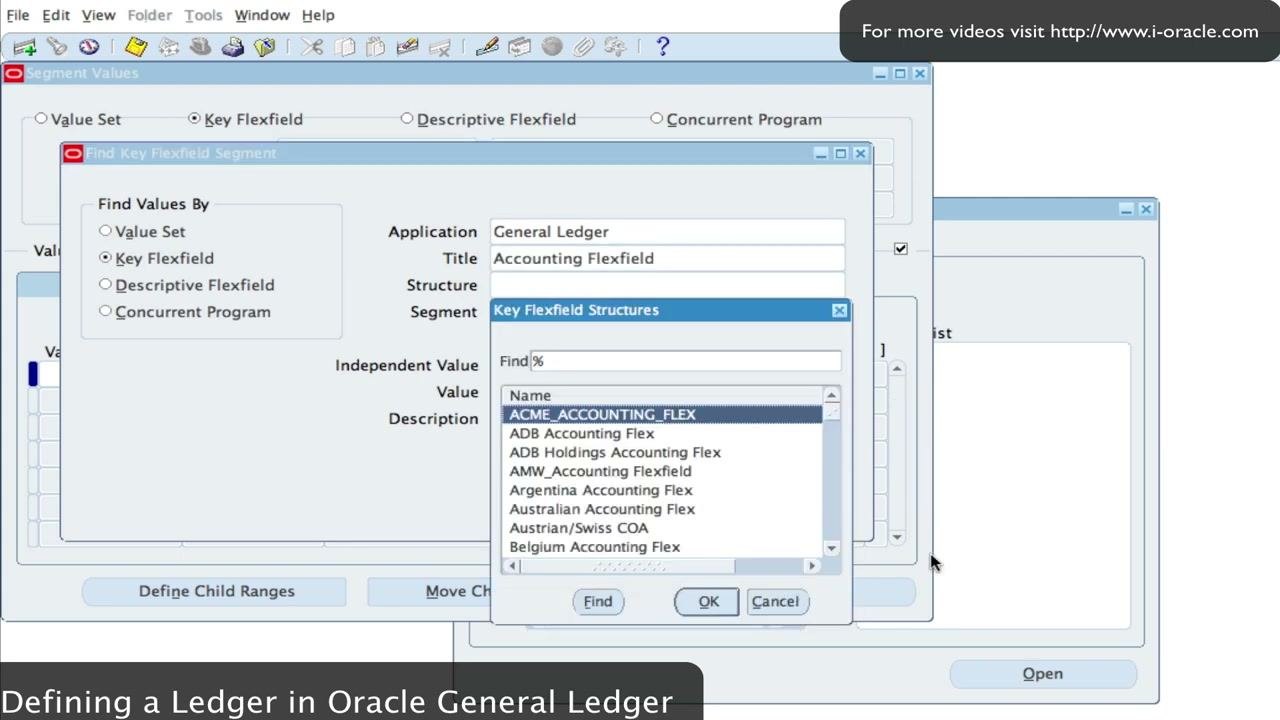
Step 19: Find the Company segment values
In the Find Key Flexfield Segment window, confirm these values:
- Application: General Ledger
- Title: Accounting Flexfield
- Structure: YO_ACCOUNTING_FLEX
Leave the Segment field blank to review all segments, or enter Company to focus on the Company segment. Click Find to display the segment values.
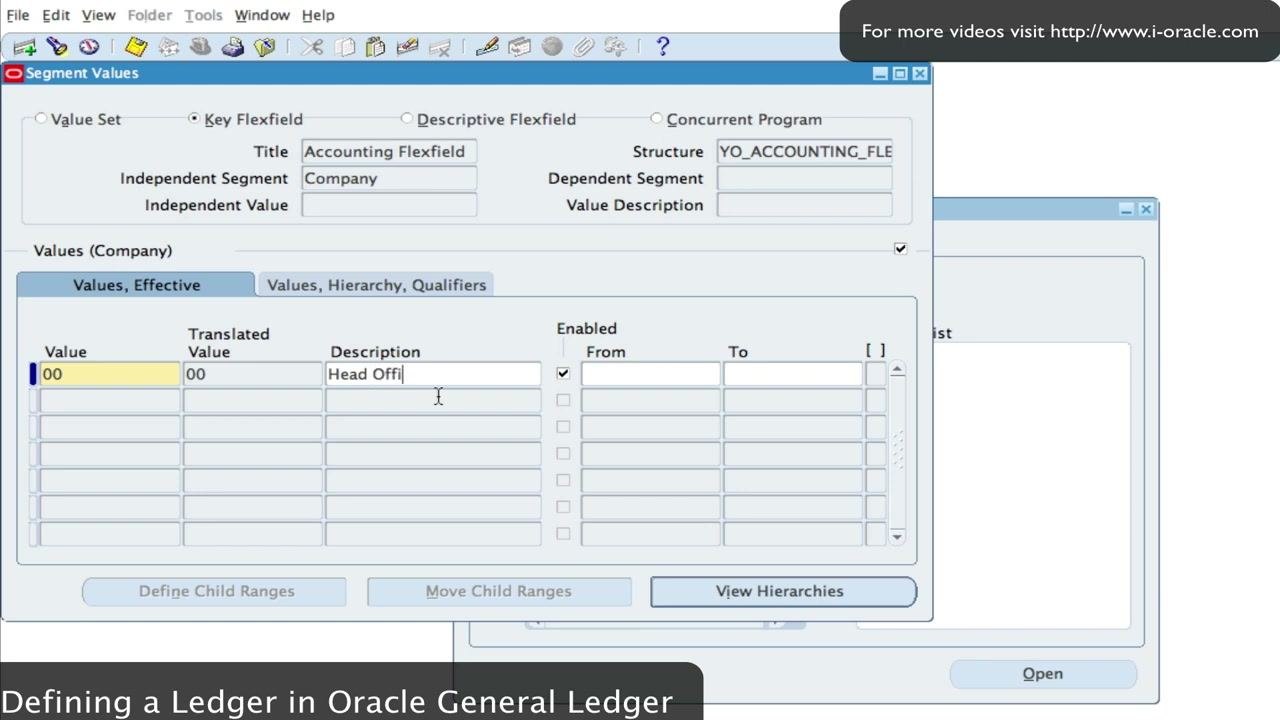
Step 20: Add the first value for the Company segment
In the Segment Values window, make sure of the following:
- Title: Accounting Flexfield
- Structure: YO_ACCOUNTING_FLEX
- Independent Segment: Company
In the Values (Company) section, enter this row:
- Value:
00 - Translated Value:
00 - Description:
Head Office - Enabled: checked
Press Tab or Enter to move to the next row.
Step 21: Add more company values
In the next row, enter:
- Value:
01 - Translated Value:
01 - Description: an appropriate description
- Enabled: checked
Continue adding values for each company you need.
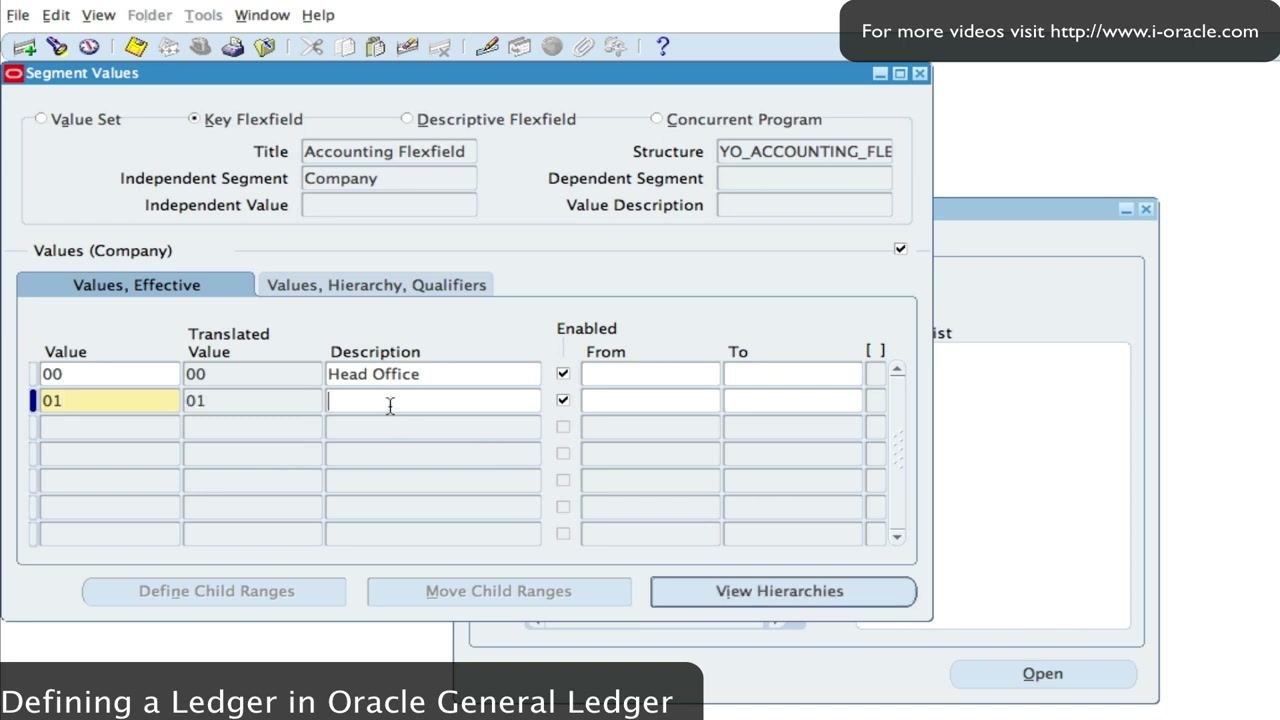
You have now compiled your flexfield, opened the segment value definition screens, and begun entering company segment values for your accounting flexfield structure in Oracle General Ledger.
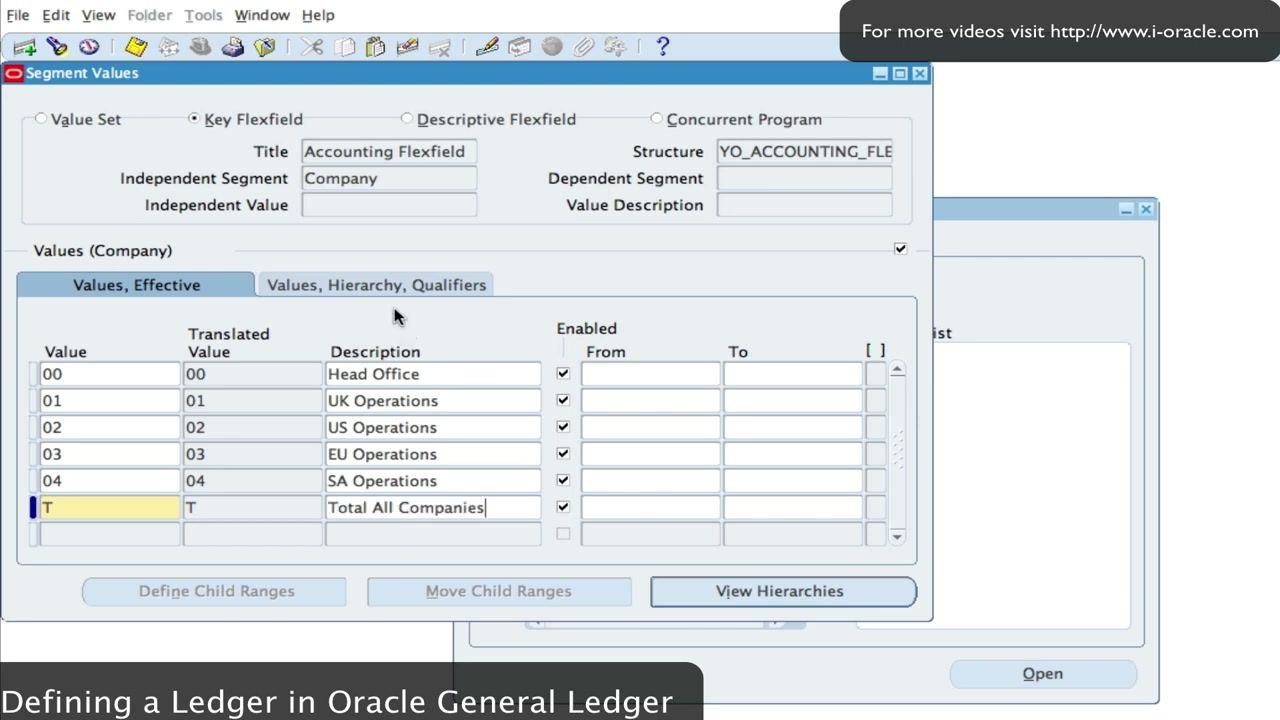
Step 22: Add a Total All Companies value
In the Segment Values window for the Company segment, enter a new row with these details:
- Value:
T - Translated Value:
T - Description:
Total All Companies - Enabled: checked
This value represents a summary, or parent, for all company values.
Step 23: Set Total All Companies as a parent in the hierarchy
- Click the Values, Hierarchy, Qualifiers tab.
- In the row for value
T, check the Parent box to designate it as a parent value.
This lets the T value act as a grouping or summary for all company values.
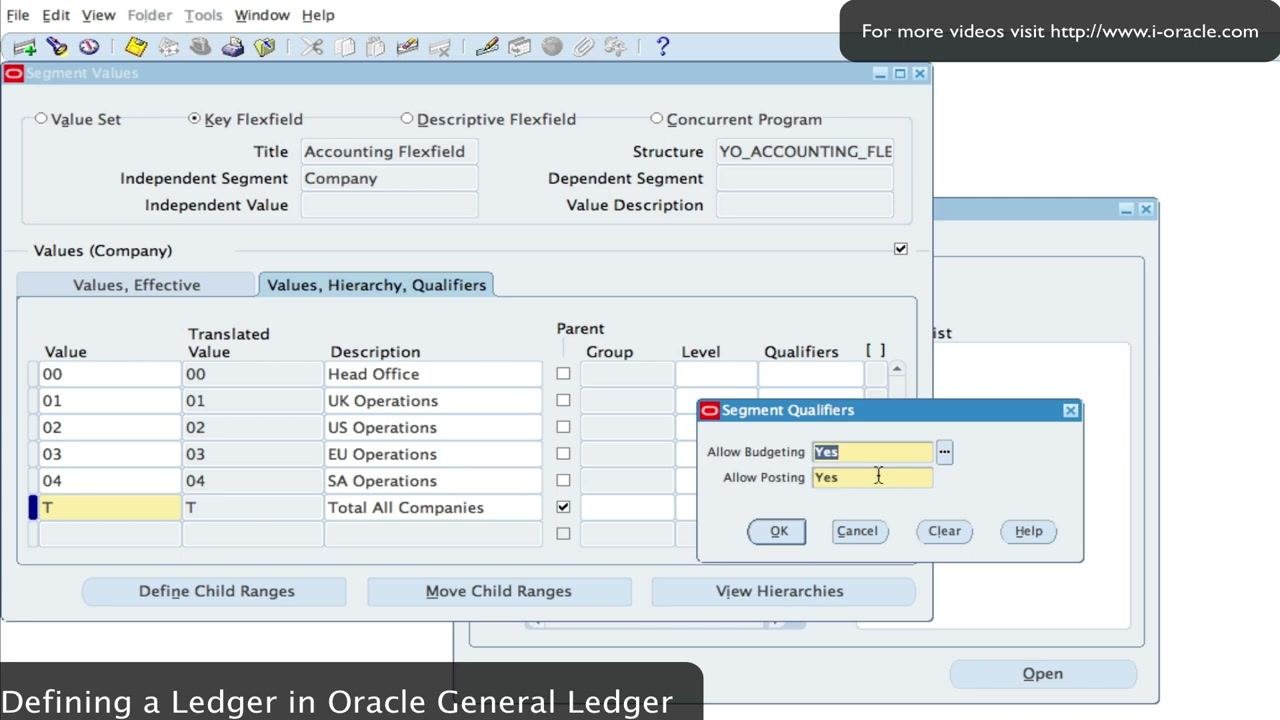
Step 24: Assign segment qualifiers to Total All Companies
- In the Qualifiers column for the
Tvalue, click to open the Segment Qualifiers dialog. - Set Allow Budgeting to
No. - Set Allow Posting to
No. - Click OK to save the qualifiers.
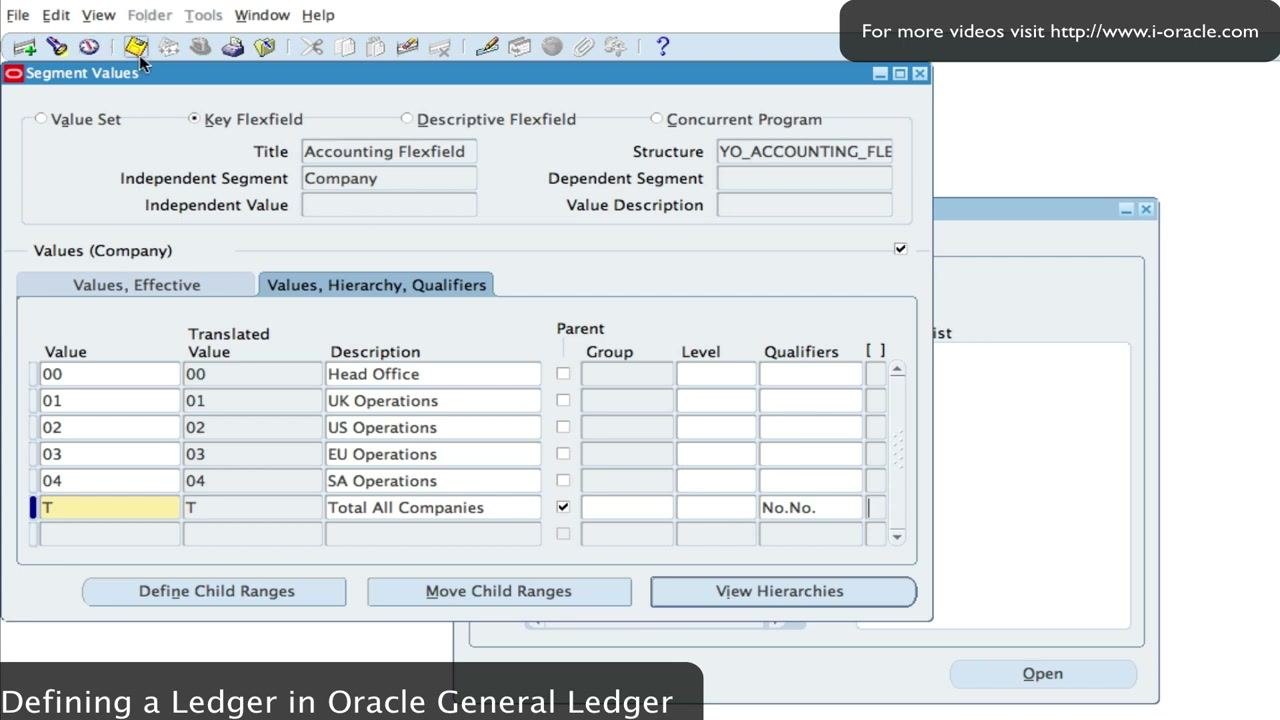
Step 25: Save the Company segment values
Click the Save icon (diskette) in the toolbar, or use the appropriate menu option, to save your entries. Confirm that the T value now appears as a parent with No.No. in the Qualifiers column.
Step 26: Begin entering values for the Department segment
Switch to the Department segment by selecting it in the Segment Values window. In the Values (Department) section, begin entering department values as needed. For example, enter Value 0 and fill in the remaining details as required.
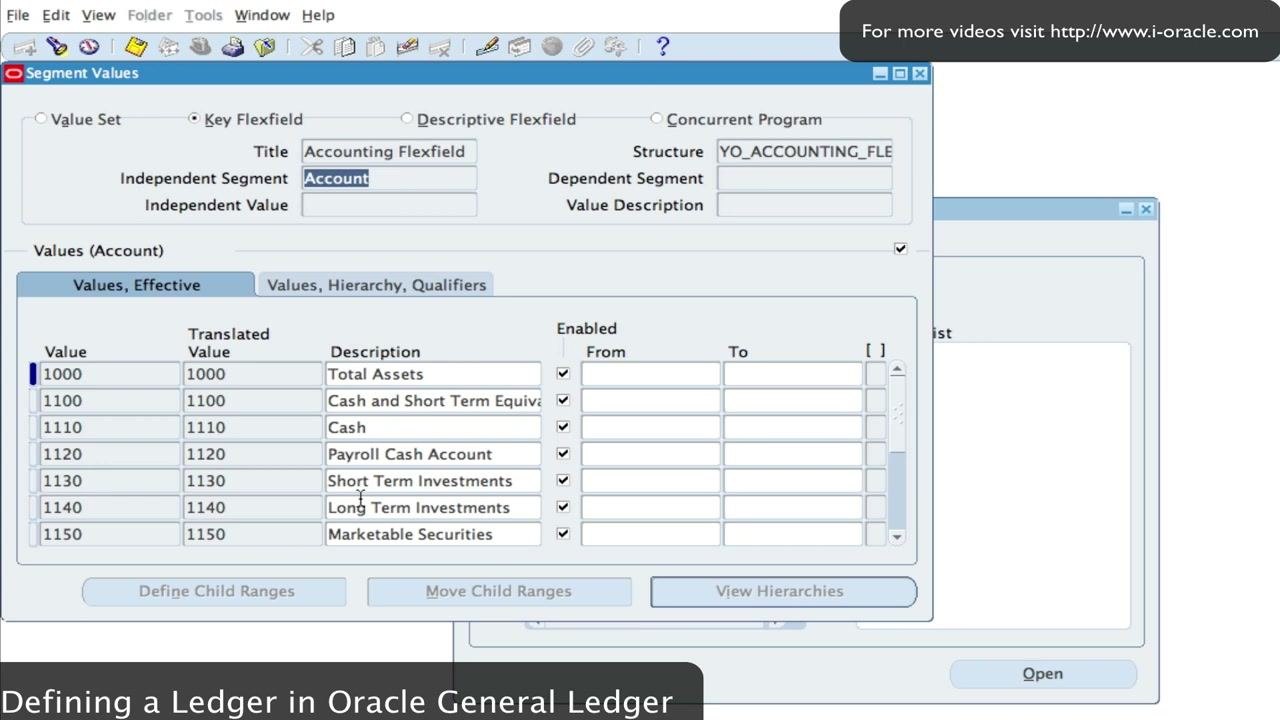
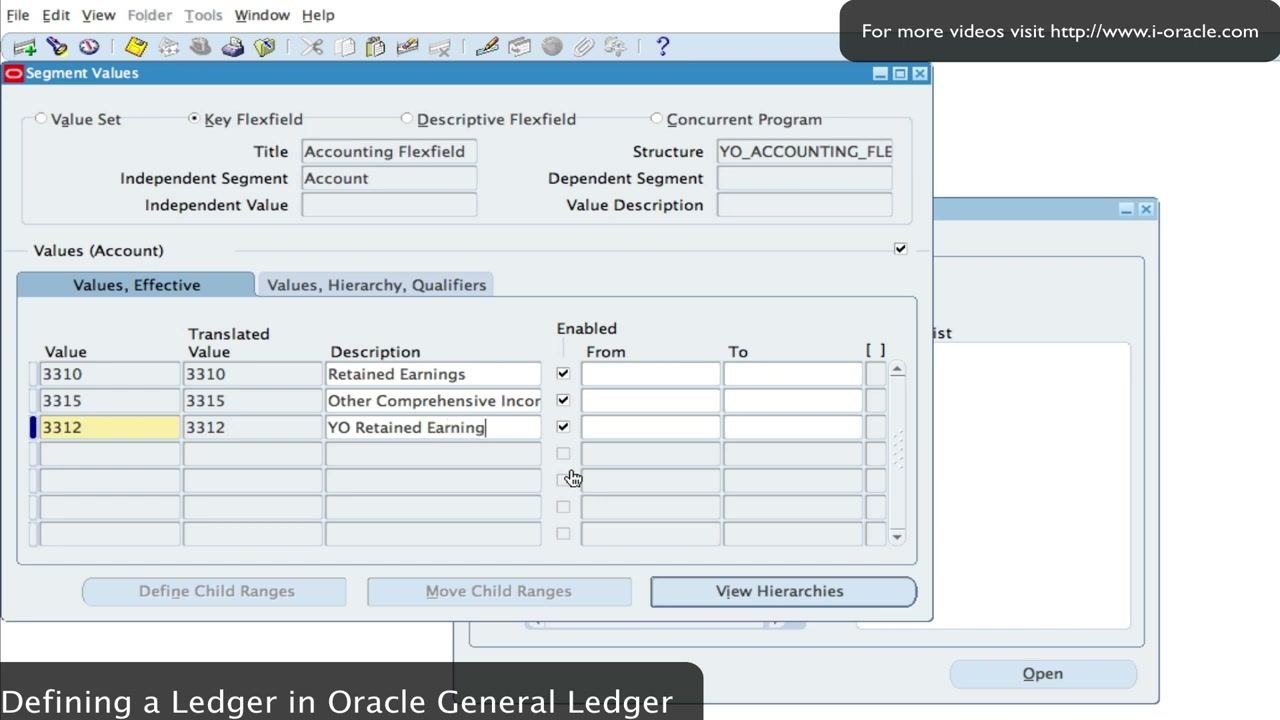
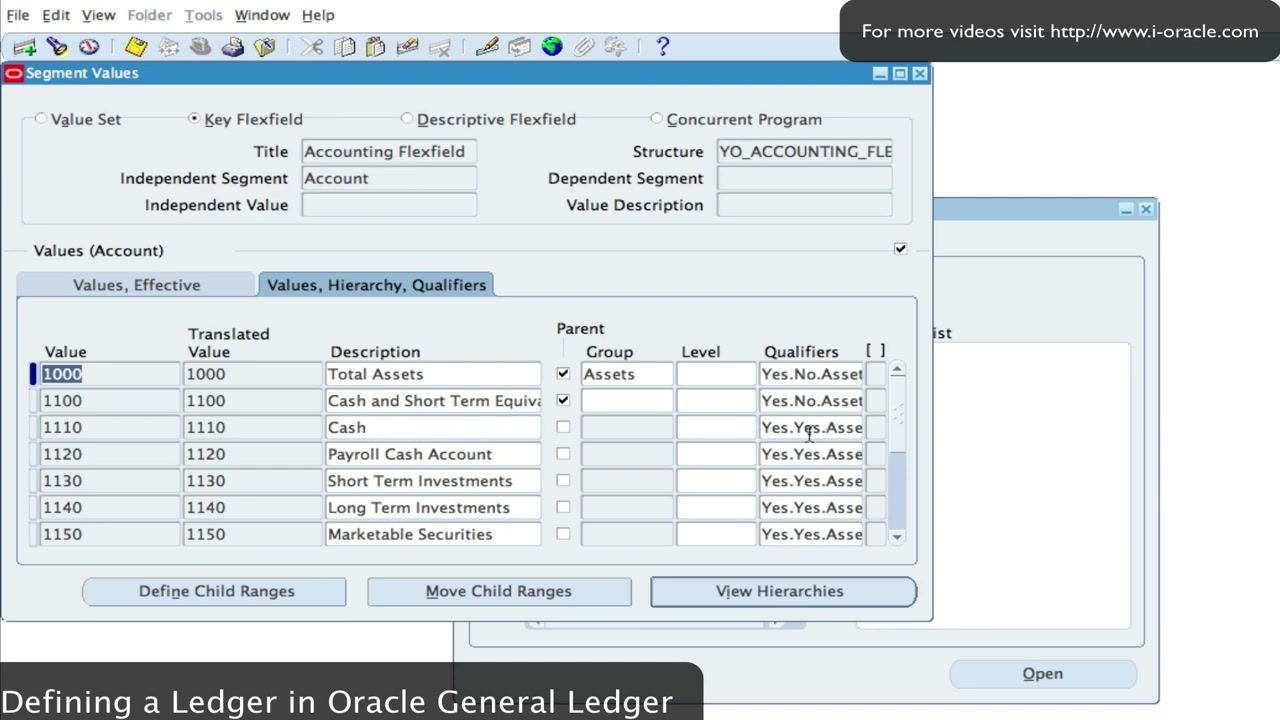
Step 27: Open the Account segment values
Open the Segment Values window in Oracle General Ledger. The window shows options for Value Set, Key Flexfield, Descriptive Flexfield, and Concurrent Program. Check the following:
- The Title is
Accounting Flexfield. - The Structure is
YO_ACCOUNTING_FLEX. - The Independent Segment is
Account. - The Values, Effective tab is selected.
The Values (Account) section lists existing account values, translated values, descriptions, and enabled status. Example values include:
- 1000: Total Assets
- 1100: Cash and Short Term Equiv
- 1110: Cash
- 1120: Payroll Cash Account
- 1130: Short Term Investments
- 1140: Long Term Investments
- 1150: Marketable Securities
Step 28: Enter new account values
Add the following rows in the Values (Account) section:
- Value
3310, Translated Value3310, DescriptionRetained Earnings, Enabled checked - Value
3315, Translated Value3315, DescriptionOther Comprehensive Income, Enabled checked
Leave additional rows blank for further entries.
Step 29: Add another account value
Enter Value 3312, Translated Value 3312, and Description YO Retained Earnings. Make sure the Enabled checkbox is selected for this new value.
Step 30: Set the segment qualifiers and account type
Open the Segment Qualifiers dialog for the newly added value (3312). The dialog shows these settings:
- Allow Budgeting:
Yes - Allow Posting:
Yes - Account Type:
Expense(this needs to change) - Reconcile:
No - Third Party Control Account:
No
Now change the account type. In the Account Type selection dialog, choose Ownership/Stockholder's Equity, then click OK to confirm.
Step 31: Search for revenue accounts
- Open the Find Values dialog.
- Enter your search range in the From and To fields. The example uses From
4000and To3310. - Leave the hierarchy fields (Parent, Group, Level) blank.
- Click Find to search for revenue accounts within the range.
You can now add account values, set segment qualifiers, and search for specific account types in Oracle General Ledger.
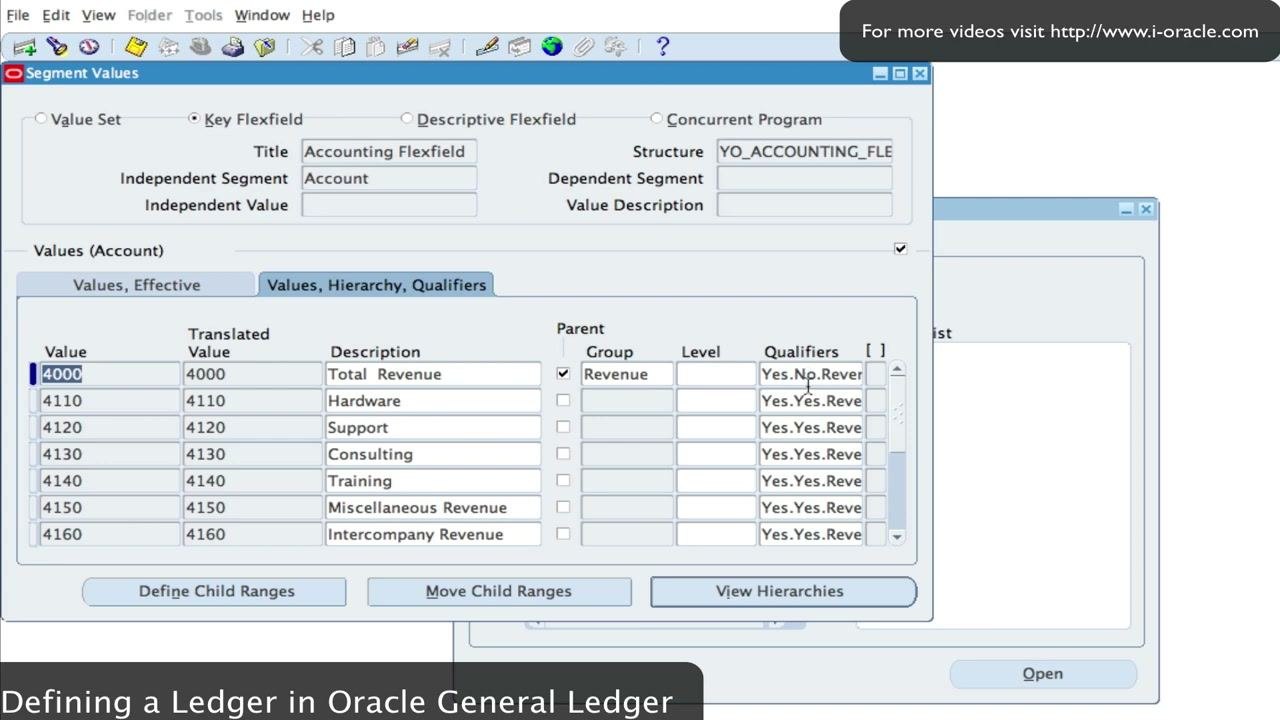
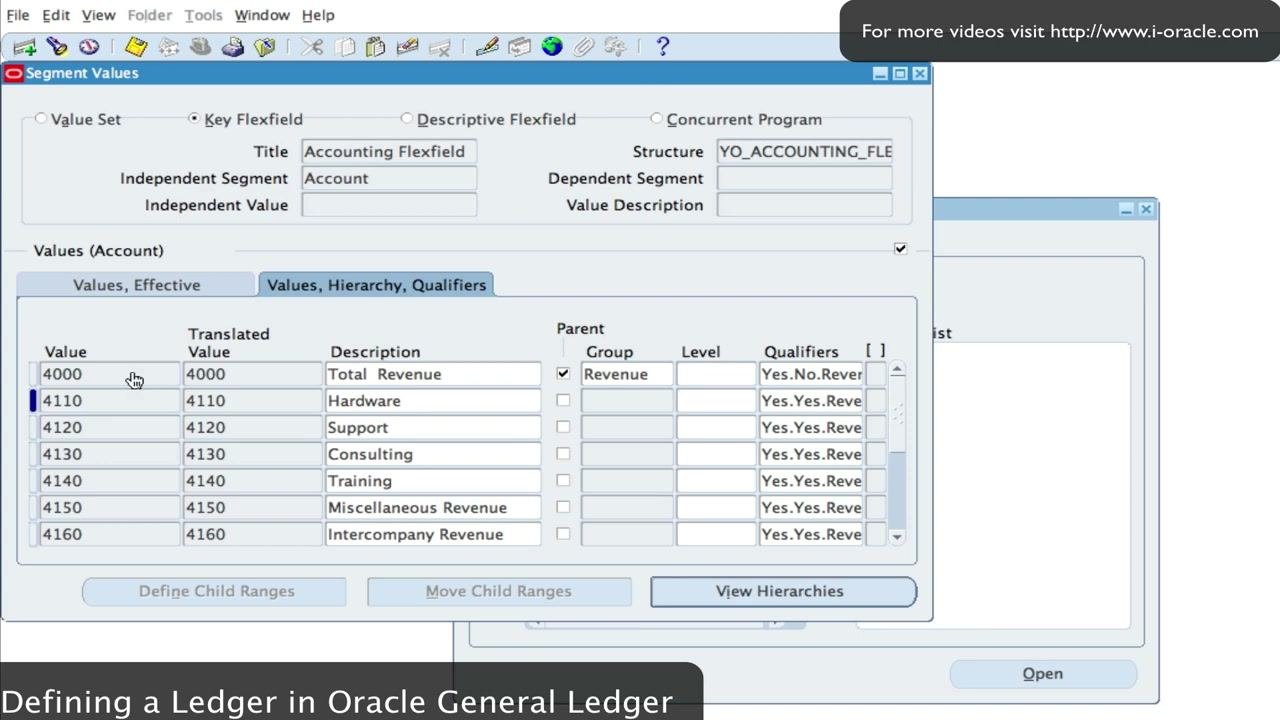
Step 32: Review revenue account values and qualifiers
- In the Segment Values window, make sure the Key Flexfield and Accounting Flexfield options are selected.
- Confirm that the Structure is
YO_ACCOUNTING_FLEXand the Independent Segment isAccount. - Switch to the Values, Hierarchy, Qualifiers tab.
- Review the revenue account values and their details, listed below.
- Use the scroll bar to view additional values if necessary.
The revenue values and their qualifiers are:
- 4000: Total Revenue, Parent: Revenue, Qualifiers: Yes, No, Revenue
- 4110: Hardware, Qualifiers: Yes, Yes, Revenue
- 4120: Support, Qualifiers: Yes, Yes, Revenue
- 4130: Consulting, Qualifiers: Yes, Yes, Revenue
- 4140: Training, Qualifiers: Yes, Yes, Revenue
- 4150: Miscellaneous Revenue, Qualifiers: Yes, Yes, Revenue
- 4160: Intercompany Revenue, Qualifiers: Yes, Yes, Revenue
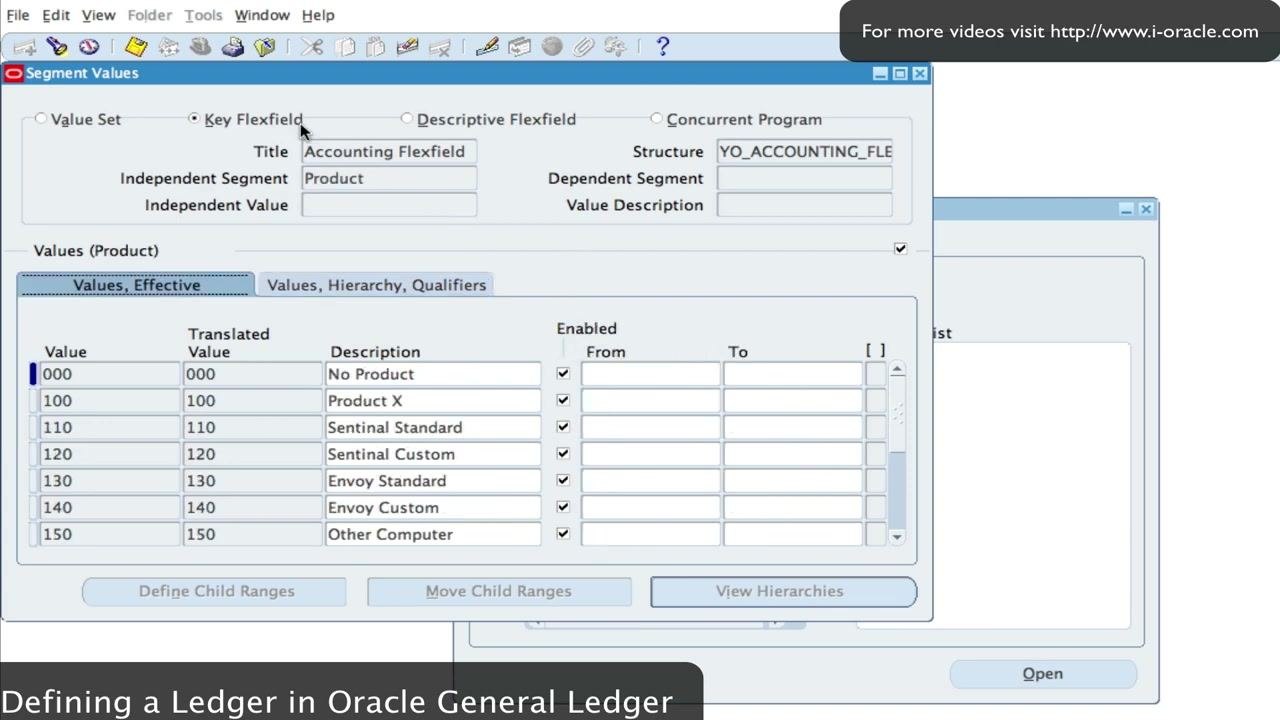
Step 33: Review the Product segment values
In the Segment Values window, change the Independent Segment to Product. Review the list under Values (Product):
- 000: No Product, Enabled: checked
- 100: Product X, Enabled: checked
- 110: Sentinal Standard, Enabled: checked
- 120: Sentinal Custom, Enabled: checked
- 130: Envoy Standard, Enabled: checked
- 140: Envoy Custom, Enabled: checked
- 150: Other Computer, Enabled: checked
Make sure all relevant product values are enabled.
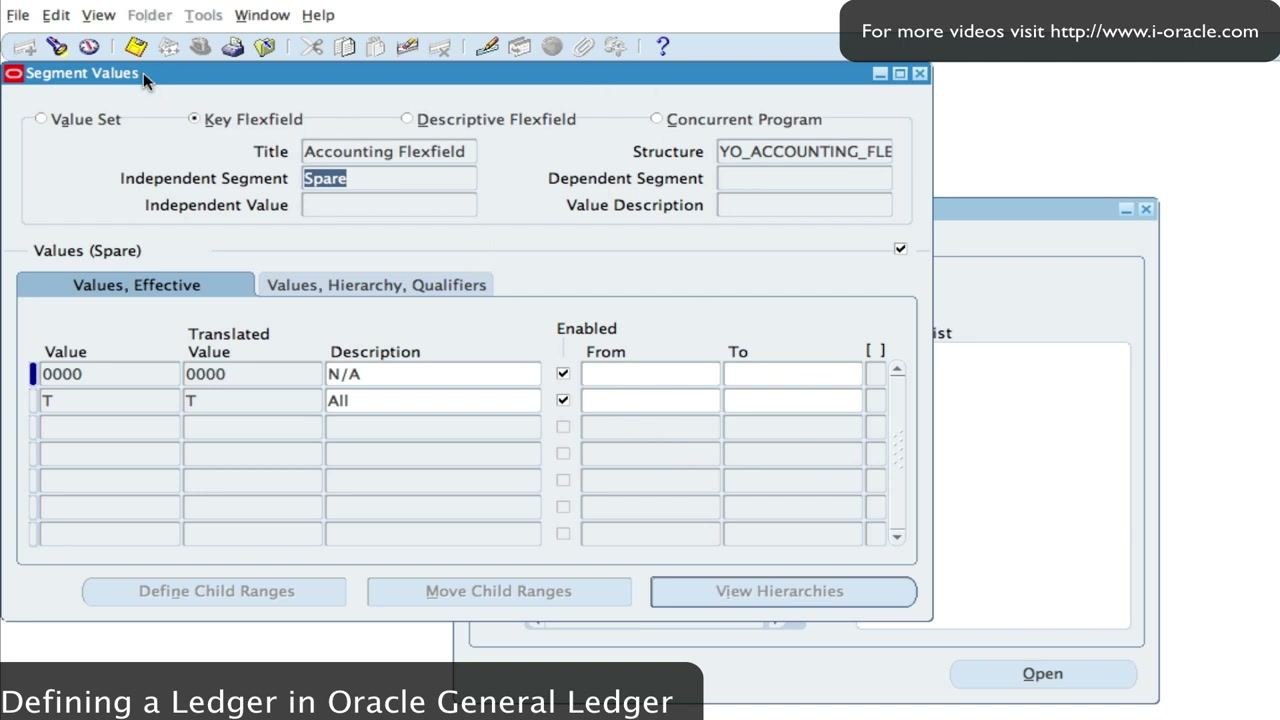
Step 34: Review the Spare segment values
In the Segment Values window, change the Independent Segment to Spare. Review the list under Values (Spare):
- 0000: N/A, Enabled: checked
- T: All, Enabled: checked
Additional rows are available for further entries.
Review calendars and currencies
Step 35: Open the calendar period types
Open the Navigator – General Ledger, Vision Operations (USA) window. In the Functions tab, expand this menu path:
Setup > Financials > Flexfields, Calendars, Ledger Sets, Access Sets, and Document Sequences
Highlight Setup under Financials to access further configuration options.
Next, expand Setup > Financials > Calendars > Types and open the Period Types window. The window has these columns:
- Period Type
- Periods per Year
- Year Type
- Description
Use the menu bar to access the Edit and View menus for additional options. Prepare to search for period types, such as month.
Step 36: Search for period types
In the Period Types window, open the View menu and select Find... to start a search. The window displays available period types, including Calendar Month, Fiscal Month, Half Month, Month, Month 14, and Month 15.
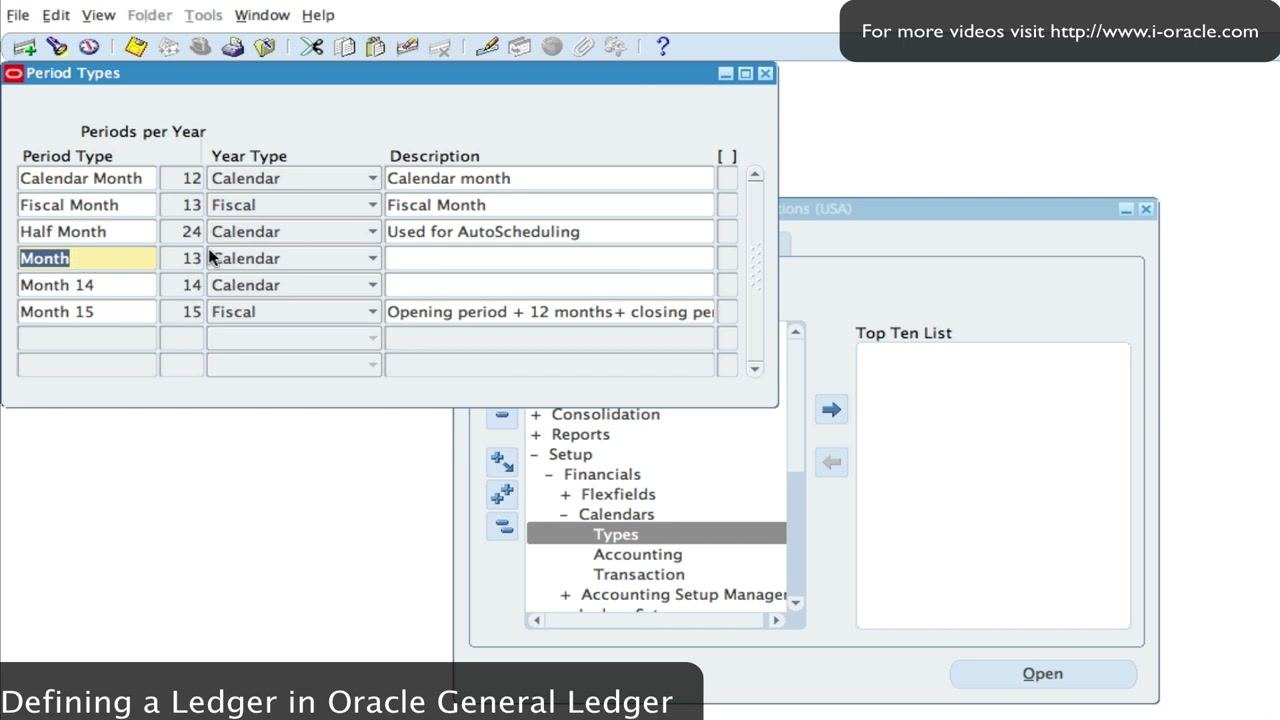
Step 37: Select the 13-period calendar month for the ledger
In the Period Types window, locate the row with these values:
- Period Type: Month
- Periods per Year: 13
- Year Type: Calendar
- Description: blank, or as needed
Highlight this row to select it for use in the ledger setup.
Step 38: Review the period types and confirm your calendar selection
Review the available period types for your ledger setup. The window shows these details:
- Calendar Month: 12 periods/year, Year Type: Calendar, Description: Calendar month
- Fiscal Month: 13 periods/year, Year Type: Fiscal, Description: Fiscal Month
- Half Month: 24 periods/year, Year Type: Calendar, Description: Used for AutoScheduling
- Month: 13 periods/year, Year Type: Calendar
- Month 14: 14 periods/year, Year Type: Calendar
- Month 15: 15 periods/year, Year Type: Fiscal, Description: Opening period + 12 months + closing period
Make sure the correct period type is selected for your ledger.
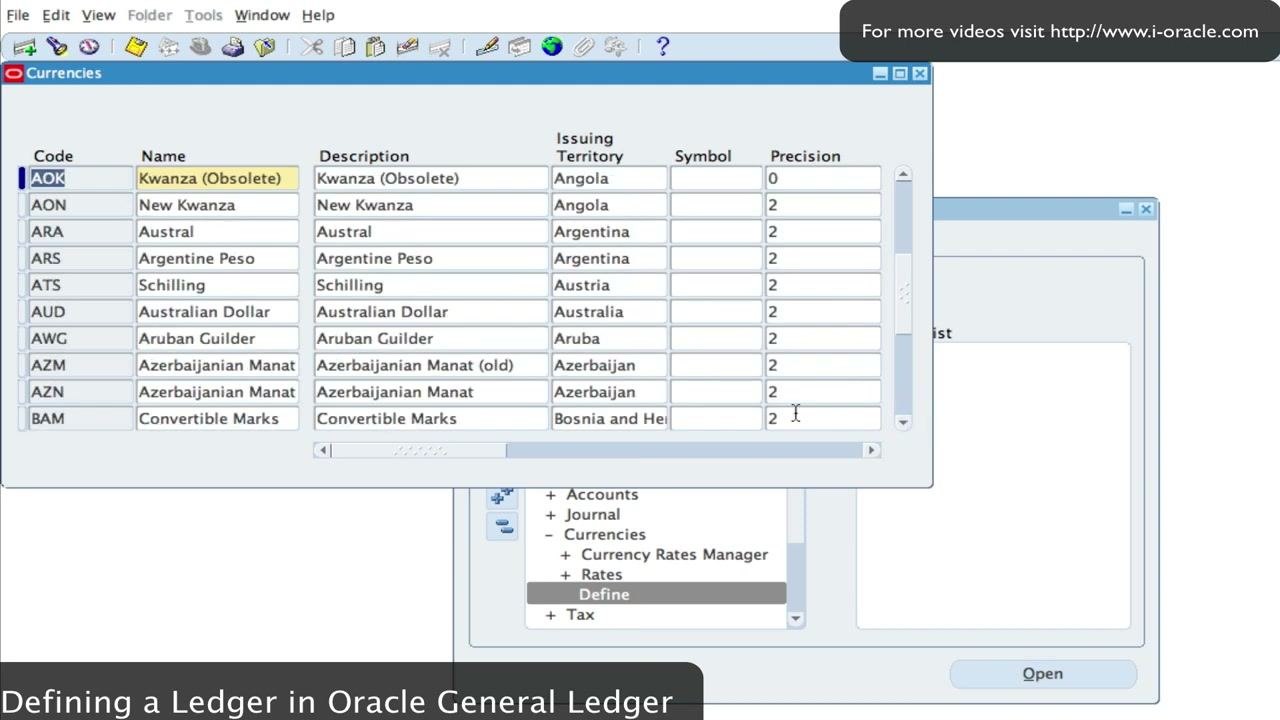
Step 39: Open and review the currency definitions
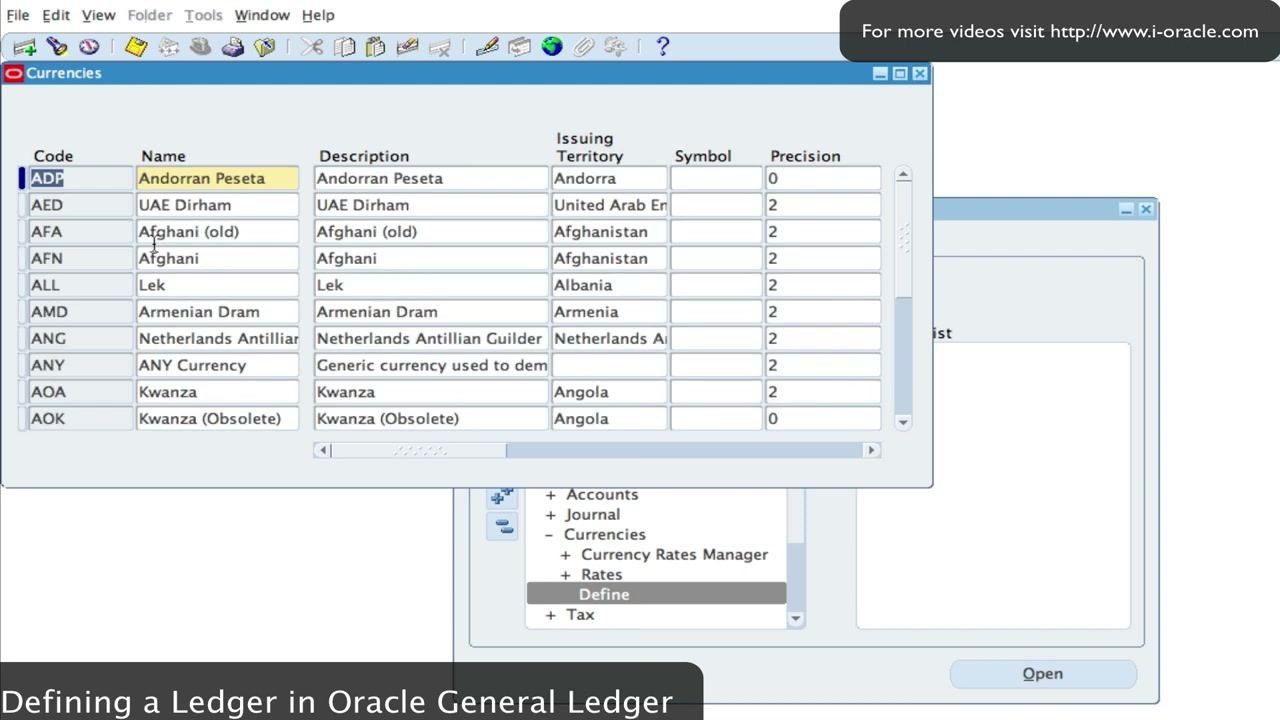
In the Navigator – General Ledger, Vision Operations (USA) window, expand Setup. Under Setup, expand Financials and then Currencies. Select Define under Currencies to view or modify currency definitions.
In the Currencies window, review the list of all currencies defined in the system. Each currency shows these columns:
- Code (for example, ADP, AED, AFA, AFN, ALL, AMD, ANG, ANY, AOA, AOK)
- Name (for example, Andorran Peseta, UAE Dirham, Afghani (old), Afghani, Lek, Armenian Dram, Netherlands Antillian Guilder, ANY Currency, Kwanza, Kwanza (Obsolete))
- Description
- Issuing Territory
- Symbol
- Precision
Use the scroll bar to view additional currencies. Further entries include:
- AOK: Kwanza (Obsolete), Angola, Precision: 0
- AON: New Kwanza, Angola, Precision: 2
- ARA: Austral, Argentina, Precision: 2
- ARS: Argentine Peso, Argentina, Precision: 2
- ATS: Schilling, Austria, Precision: 2
- AUD: Australian Dollar, Australia, Precision: 2
- AWG: Aruban Guilder, Aruba, Precision: 2
- AZM: Azerbaijanian Manat (old), Azerbaijan, Precision: 2
- AZN: Azerbaijanian Manat, Azerbaijan, Precision: 2
- BAM: Convertible Marks, Bosnia and Herzegovina, Precision: 2
Confirm that all the currencies you need are present and correctly defined.
Step 40: Review currency effective dates and enabled status
In the Currencies window, review the Effective Dates section for each currency. Check the From and To dates to determine each currency's validity period. Verify that the Enabled checkbox is selected for active currencies. Example entries:
- AOK: Kwanza (Obsolete), To: 12-AUG-1994, Enabled: unchecked
- AON: New Kwanza, Enabled: checked
- ARS: Argentine Peso, Enabled: checked
- ATS: Schilling, To: JAN-1999, Enabled: checked
- AZM: Azerbaijanian Manat (old), To: 31-DEC-2006, Enabled: unchecked
Make sure only valid, current currencies are enabled for use.
Prepare to define the ledger
Step 41: Gather the four C's before you create a ledger in Oracle EBS
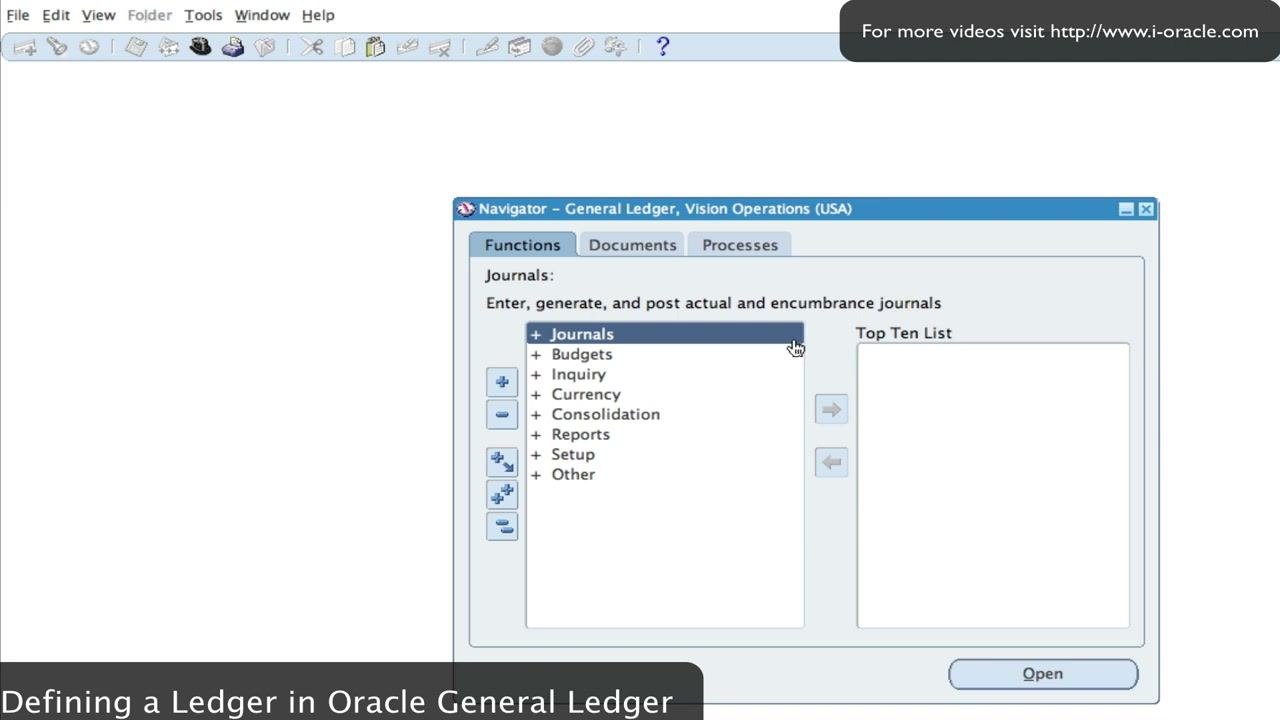
Return to the Navigator – General Ledger, Vision Operations (USA) window. The main navigation menu is displayed with Journals highlighted. Make sure you have this information ready:
- Chart of accounts structure
- Currency, as reviewed in the previous steps
- Calendar, as reviewed in the previous steps
Defining a ledger in Oracle General Ledger requires four key components, often called the "four C's":
- Chart of Accounts (structure)
- Currency
- Calendar
- Accounting Convention (recently added as the fourth C)
Gather and review all four components before you proceed.
Summary
You built the accounting flexfield structure and its segments, created and assigned a value set, and assigned flexfield qualifiers. You enabled dynamic inserts, froze and compiled the flexfield, and entered segment values for the Company, Department, Account, Product, and Spare segments. You also reviewed calendar period types and currencies. You now have the four C's in hand to create a ledger in Oracle EBS.
What's next
With the chart of accounts structure, currency, calendar, and accounting convention ready, you can move on to defining the ledger itself in Oracle General Ledger.
Generation details: cost, quality tiers
Docsie billed 7,500 credits ($5.25) to analyze this 15-minute video at standard quality. The rewrite, template fill and Word/PDF exports were included. The same video at each quality tier:
| Quality | Frames sampled | Credits | Approx. cost |
|---|---|---|---|
| Draft | every 16-30 s | 3,750 | $2.62 |
| Standard (this guide) | every 8-15 s | 7,500 | $5.25 |
| Detailed | every 4-7 s | 15,000 | $10.50 |
| Ultra | every 1-3 s | 30,000 | $21.00 |
Credits priced at $0.70 per 1,000; plans include a monthly allowance. Enterprise customers on on-premise or bring-your-own-model deployments run this on their own inference and pay no per-video credits.
Generated by Docsie Video-to-Docs on 2026-11-15 from a 14-minute video. Screenshots are frames from the source video and belong to their creator, Yemi Onigbode, whose original is embedded above. If you own this video and want the guide removed or credited differently, contact us and we will act within one business day.