
How to Create a Credit Memo in NetSuite
This guide shows you how to create a credit memo in NetSuite — known in the system as a Vendor Credit or Bill Credit — and how to apply it against open vendor bills. You'll walk through filling out the Bill Credit form, choosing between automatic and manual application, and reviewing the vendor's updated balance after the credit is applied.
Video: NetSuite Tutorial: How to Create and Apply a Vendor Credit by BSP - Award Winning Oracle NetSuite Partner. All credit for the demonstration goes to the creator; watch the original on YouTube. The written guide below was generated from this video by Docsie. Creator? Request a change or removal.
This guide shows you how to create a credit memo in NetSuite — known in the system as a Vendor Credit or Bill Credit — and how to apply it against open vendor bills. You'll walk through filling out the Bill Credit form, choosing between automatic and manual application, and reviewing the vendor's updated balance after the credit is applied.
Prerequisites
- Access to the Vendors menu in NetSuite, including the Accounts Payable submenu.
- An existing vendor with one or more open (unpaid) bills that the credit will offset.
- The reference number, amount, and reason (memo) for the credit you want to record.
- Knowledge of which expense account the original bill was posted to, so the credit memo can match it.
Overview
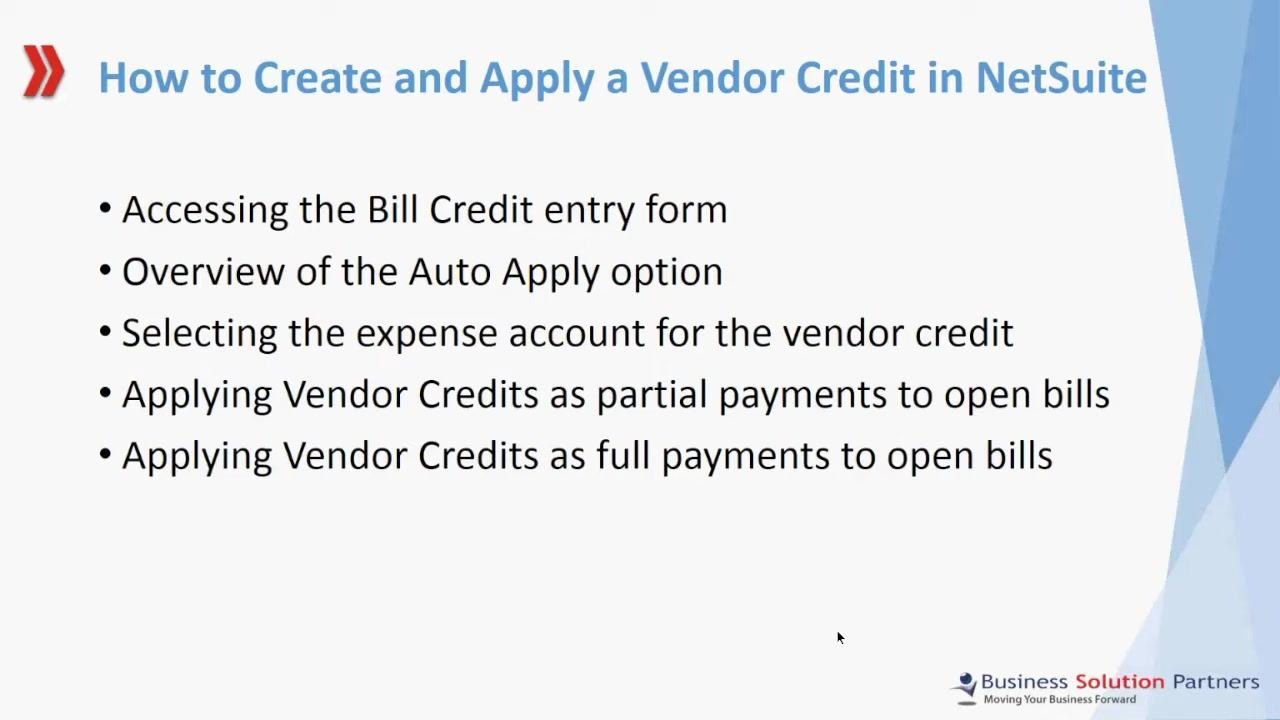
This process covers:
- Accessing the Bill Credit entry form
- Understanding the Auto Apply option
- Selecting the expense account for the vendor credit
- Applying vendor credits as partial or full payments to open bills
Step-by-step instructions
Open the Bill Credit entry form
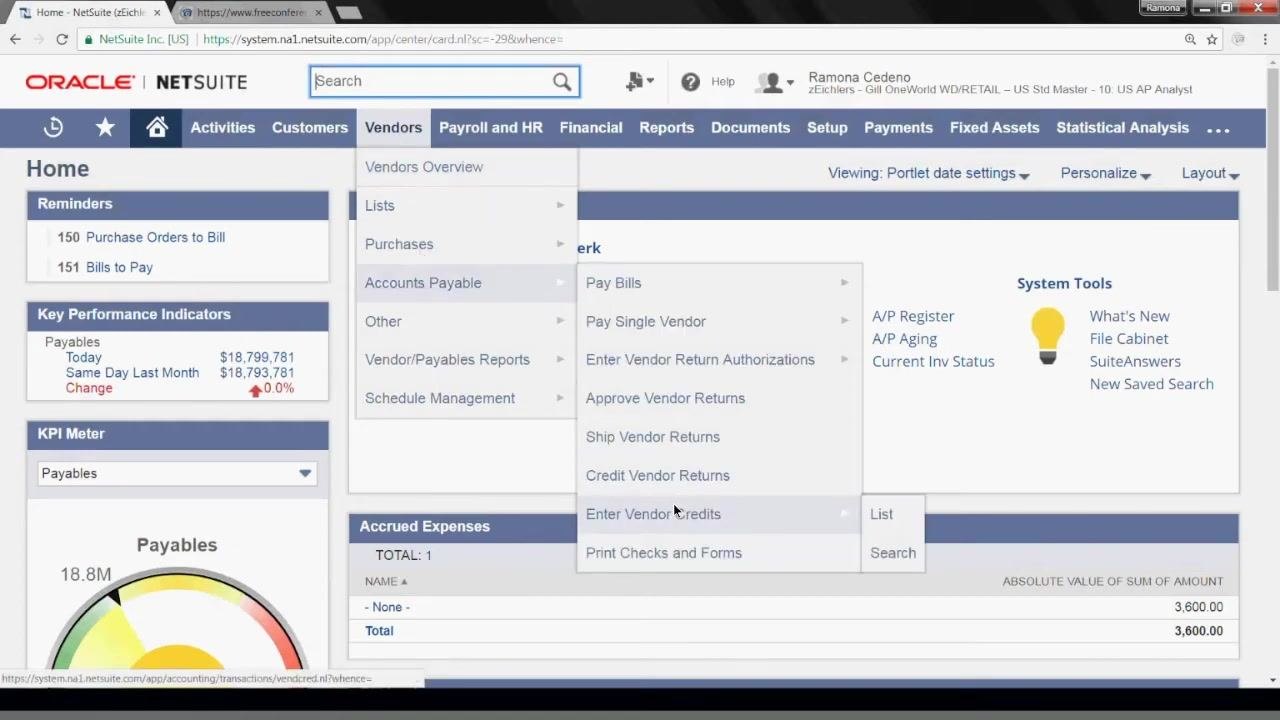
From the NetSuite home dashboard, go to the top navigation menu and select Vendors. Hover over Accounts Payable, then click Enter Vendor Credits from the dropdown menu.
Enter the vendor credit's core details
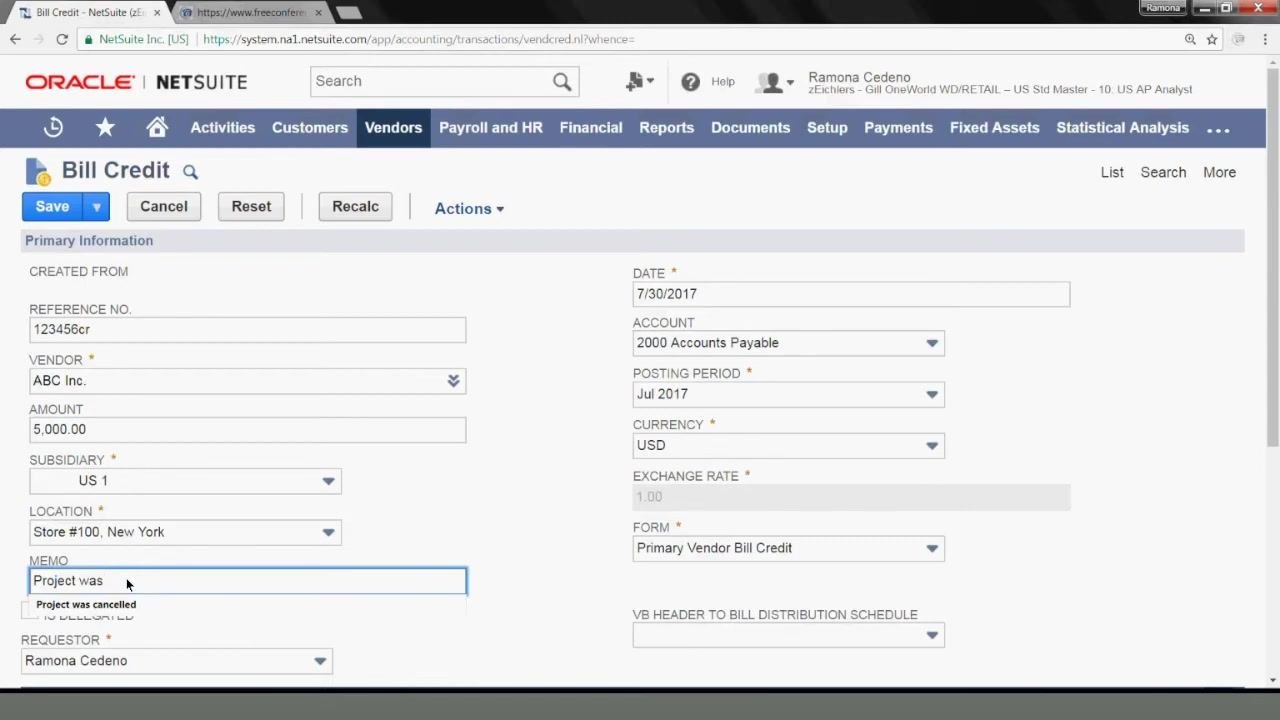
In the Reference No. field, enter the credit's reference number (for example, 123456CR). In the Vendor dropdown, select the vendor (for example, ABC Inc.). In the Amount field, enter the credit amount (for example, 5,000.00).
In the Subsidiary dropdown, select the appropriate subsidiary (for example, US 1). Only one subsidiary may appear here if the vendor was created for a single subsidiary or if you only have access to that subsidiary.
Select the location
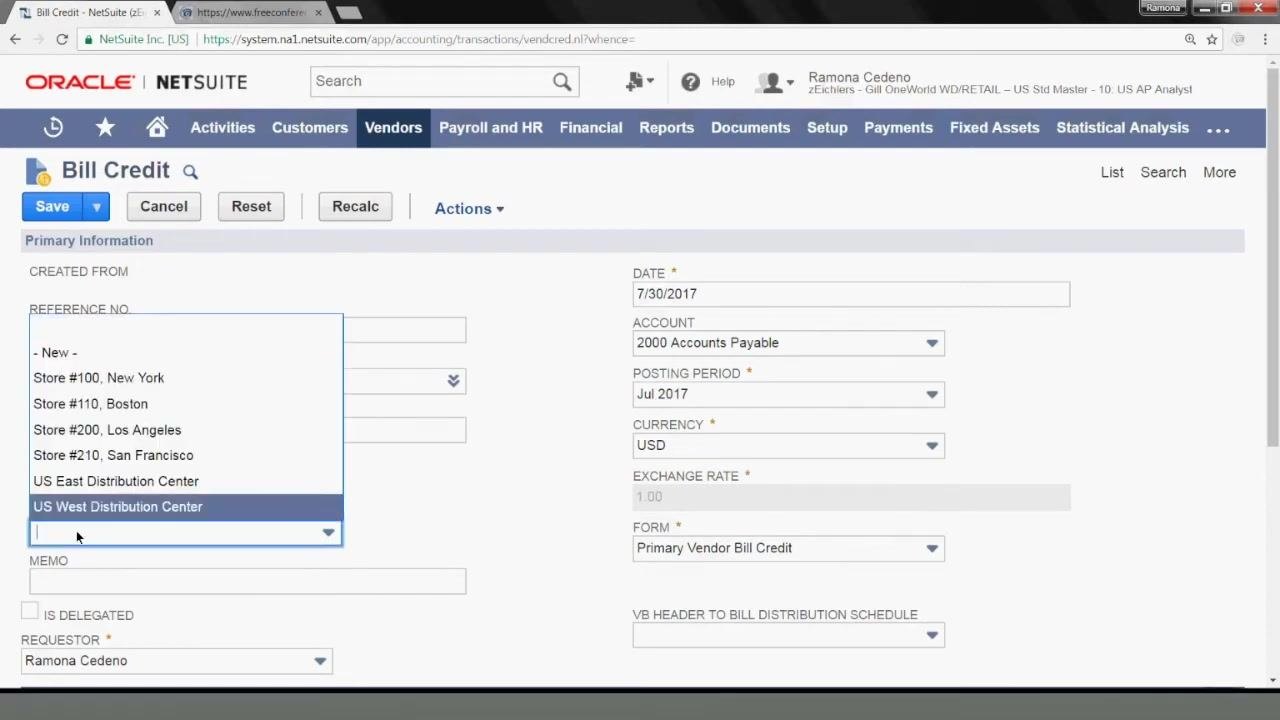
In the Location dropdown, select the appropriate location for this transaction, such as Store #100, New York.
Add a memo explaining the credit
In the Memo field, enter a short explanation for the credit, such as Project was cancelled.
Confirm the remaining header fields
Before moving to the expense details, confirm the following fields are set correctly:
- Date matches the date of the credit (for example,
7/30/2017) - Account is set to
2000 Accounts Payable - Posting Period matches the date entered (for example,
Jul 2017) - Currency is
USD - Exchange Rate is
1.00 - Form is set to
Primary Vendor Bill Credit - Requestor displays your name
Use the credit memo to offset a bill that has not yet been paid. This removes the outstanding bill amount from NetSuite's records once applied.
Enter the expense account details
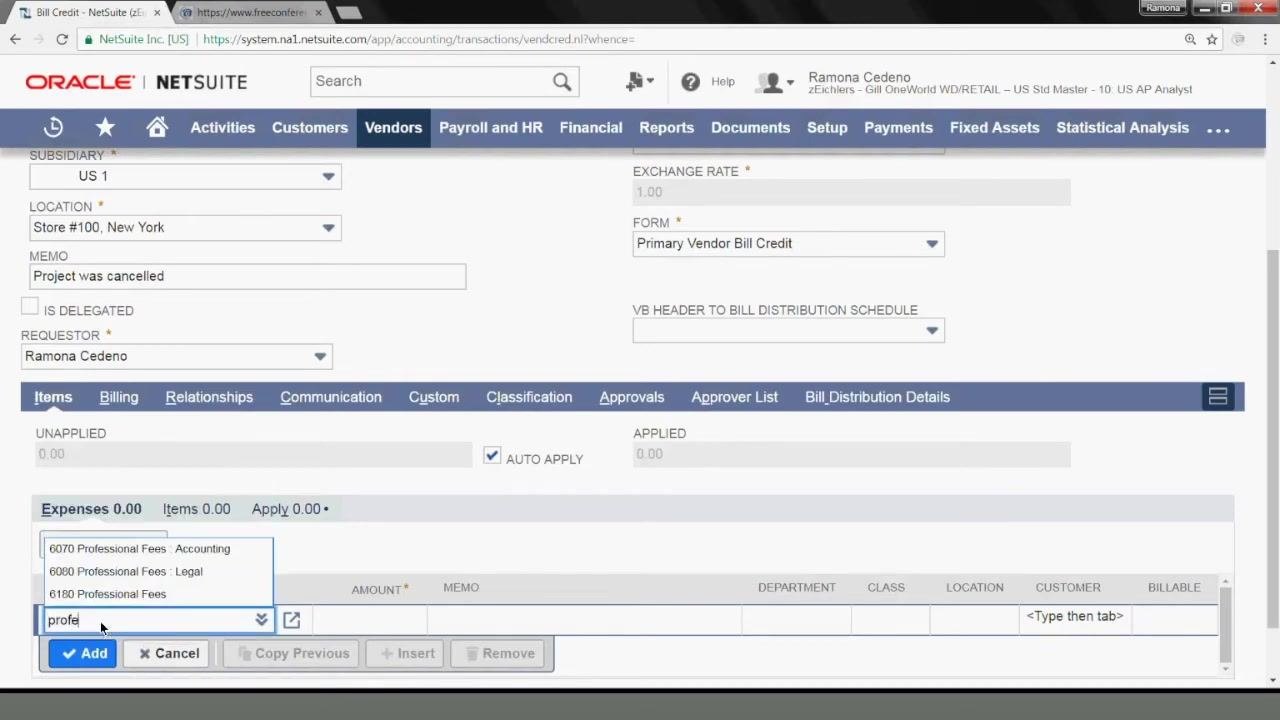
In the Expenses section, confirm the Account field defaults to 2000 Accounts Payable, the Posting Period matches the credit date, and Currency and Exchange Rate are correct.
In the Account field under Expenses, enter or select the account that matches the original bill (for example, 6180 Professional Fees). Enter the Amount (for example, 5,000.00) and repeat the same Memo used earlier.
Configure the Auto Apply option
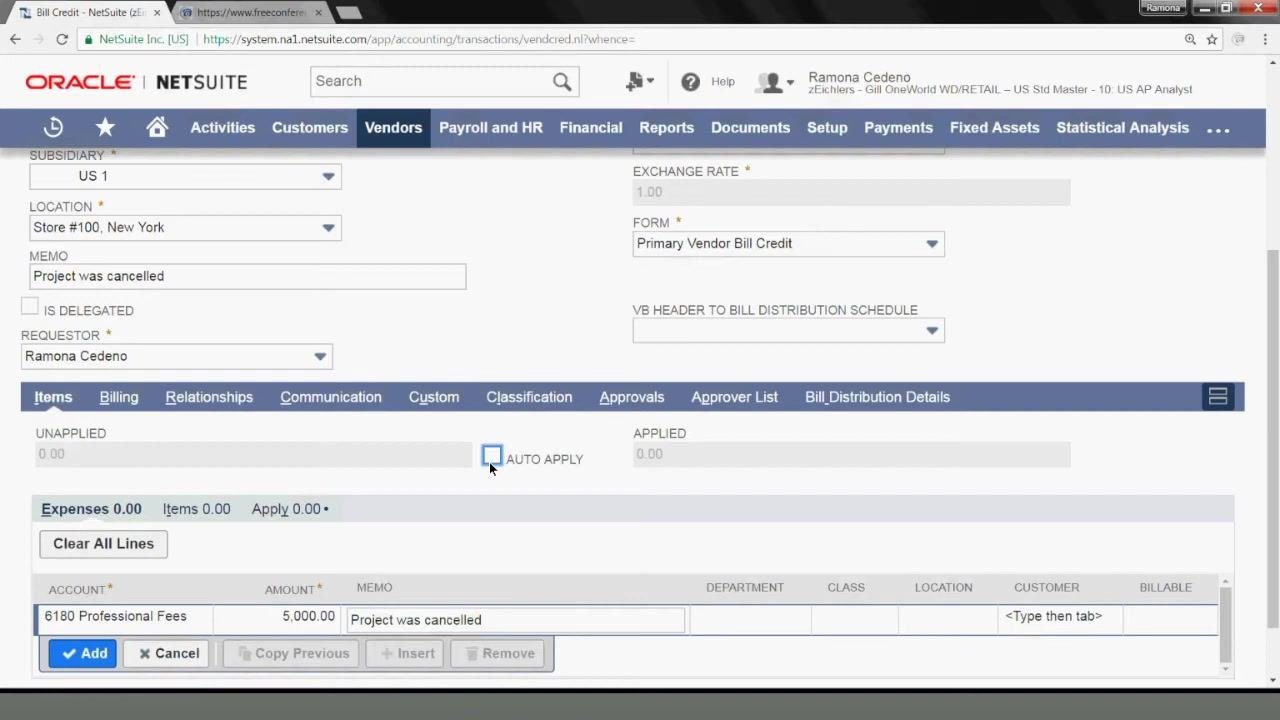
Locate the Auto Apply checkbox in the Expenses section. By default, this box may be checked — if so, NetSuite automatically applies the credit memo to the vendor's oldest outstanding bills.
If you want to choose which invoices receive the credit manually, uncheck Auto Apply.
Save the vendor credit
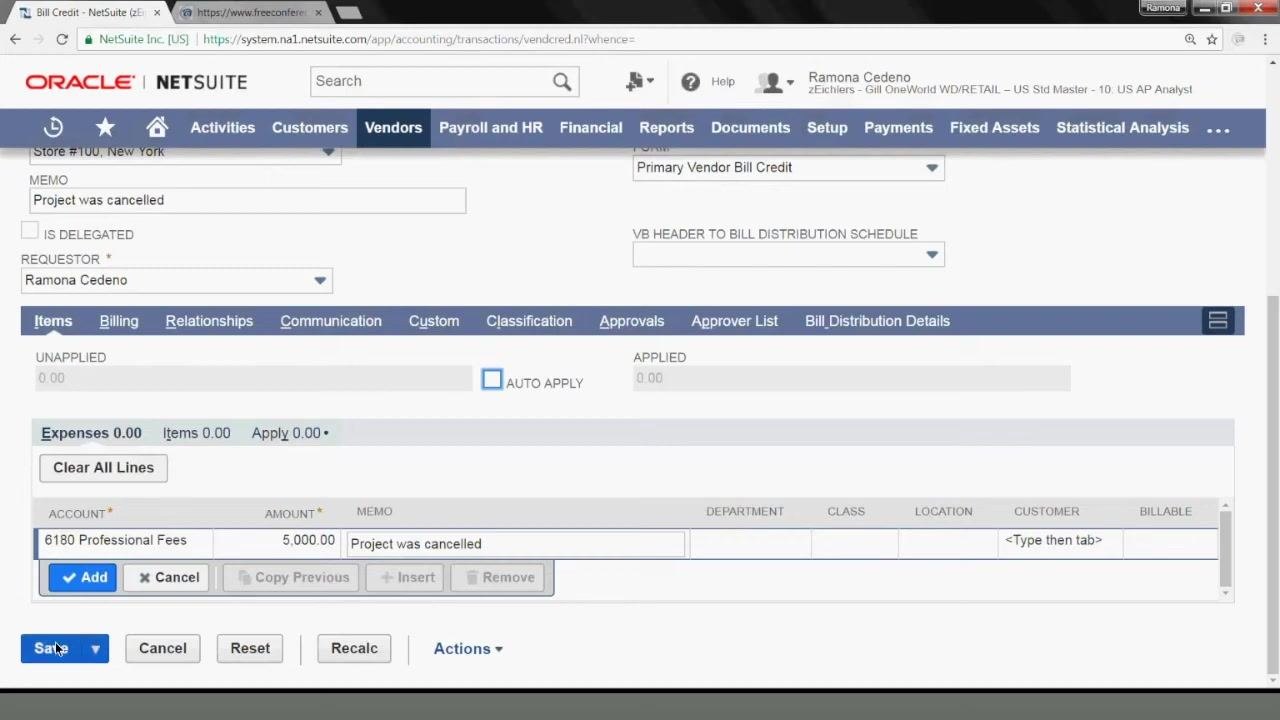
Once all fields are complete and confirmed, click Save at the bottom of the form.
Verify that the bill credit was created
After saving, a confirmation message appears indicating the transaction was successfully saved. The Bill Credit summary displays the reference number, vendor, amount, subsidiary, location, memo, account, posting period, currency, and exchange rate you entered.
This bill credit is now ready to be used to clear open invoices for the vendor.
Review the vendor's open balance
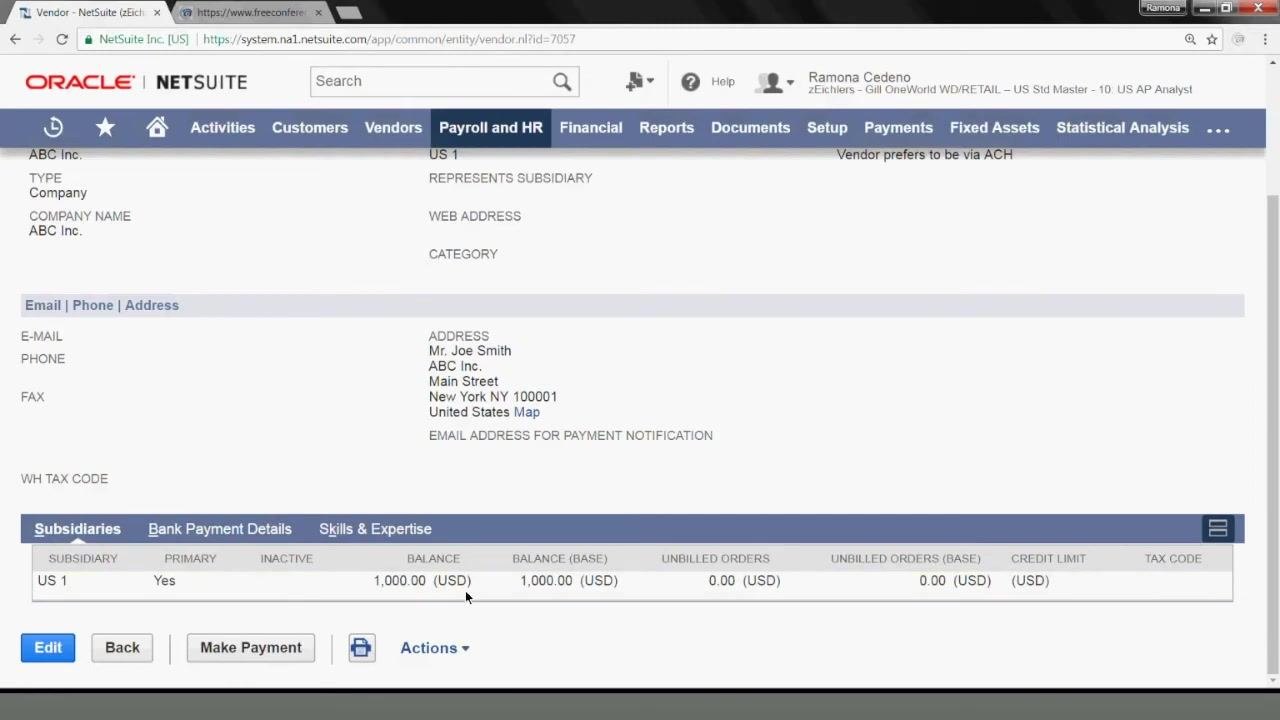
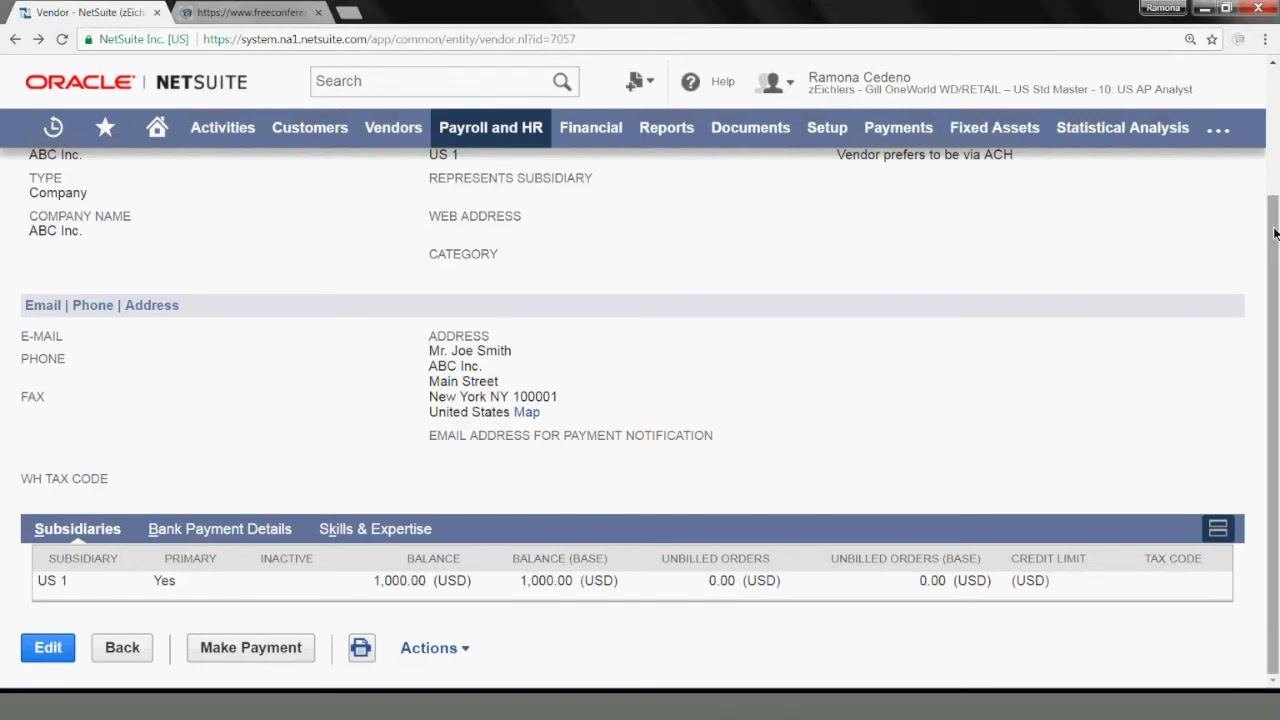
Scroll down on the vendor summary page to review the open balance. For example, after applying a $5,000.00 credit against a $5,000.00 bill and a $1,000.00 bill, the open balance updates to $1,000.00.
You can verify this by reviewing the Subsidiaries section, which shows the vendor's balance, and by cross-checking outstanding bills against the APA agent report or the vendor's transaction history.
Start the payment application
On the vendor summary page, click Make Payment to begin applying the vendor credit to the vendor's open bills.
Apply the credit to fully offset one bill
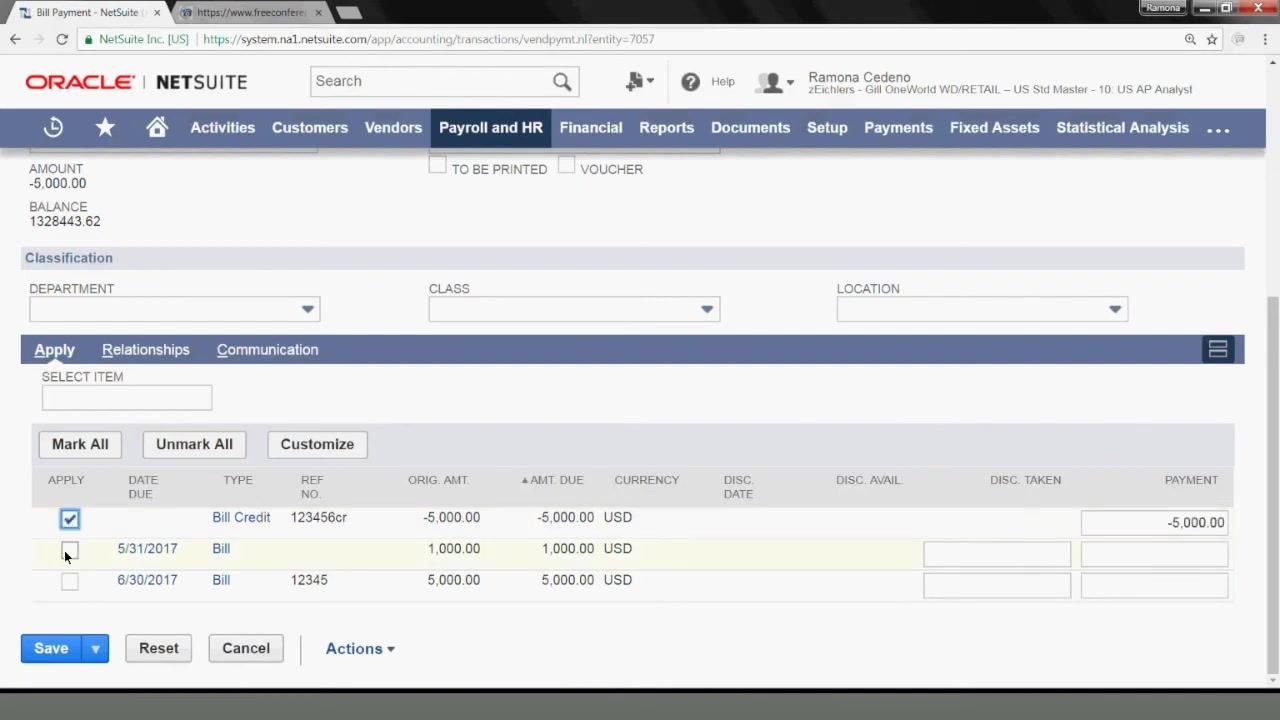
On the Bill Payment screen, under the Apply tab, you'll see the bill credit and the vendor's open bills listed together. To fully offset a bill:
- Check the box next to the Bill Credit and the matching bill.
- Confirm the payment amount for the bill credit is negative (for example,
-5,000.00) and the payment amount for the bill is positive and equal (for example,5,000.00).
This clears the matching bill in full using the vendor credit.
Alternative: split the credit across multiple bills
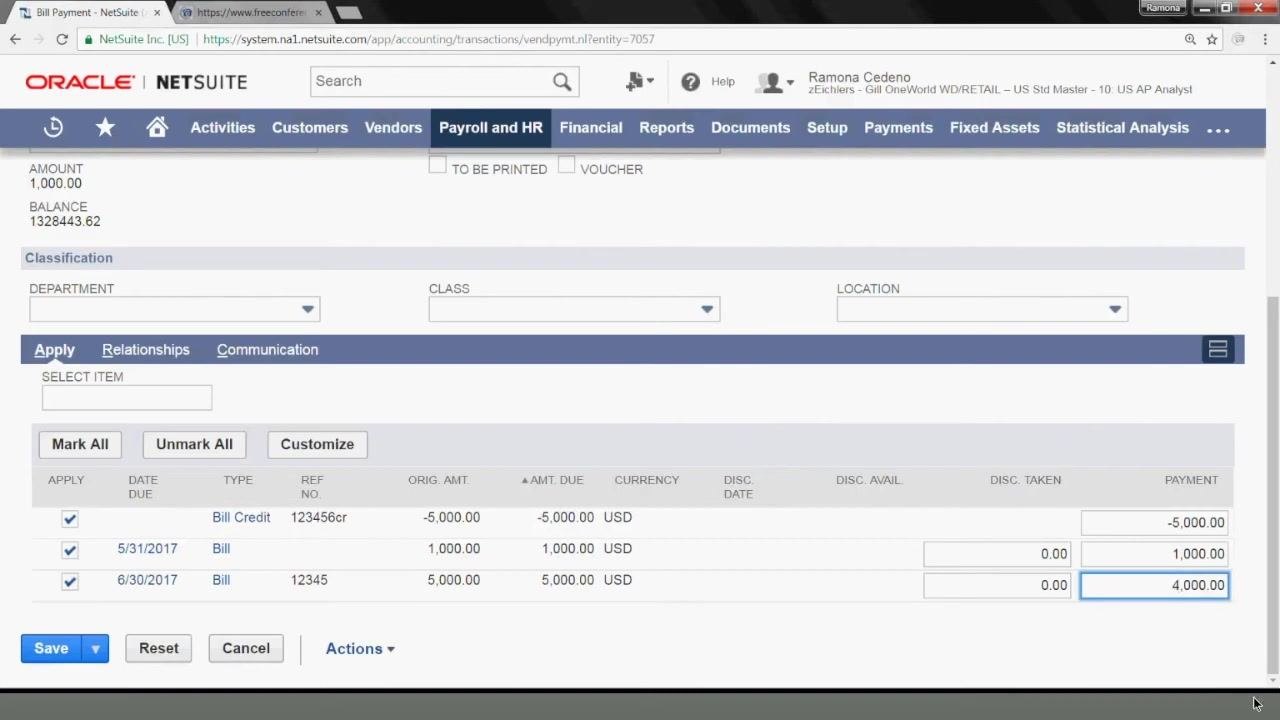
If you want to use one vendor credit to clear a smaller bill and partially clear a larger one:
- Check the boxes next to the Bill Credit, the smaller bill, and the larger bill.
- Set the payment amount for the smaller bill to its full amount (for example,
1,000.00). - Set the payment amount for the larger bill to the remaining credit (for example,
4,000.00). - Confirm the bill credit's payment amount still reflects the full credit (for example,
-5,000.00).
This fully clears the smaller bill and applies the remaining credit to the larger bill, leaving any uncovered balance open.
Finalize and save the payment application
Review the Apply tab one more time to confirm the payment amounts for each transaction, including the bill credit and every selected bill. The screen also offers Mark All, Unmark All, and Customize options to help you select transactions.
When the amounts are correct, click Save to finalize the bill payment.
Confirm the transaction was saved
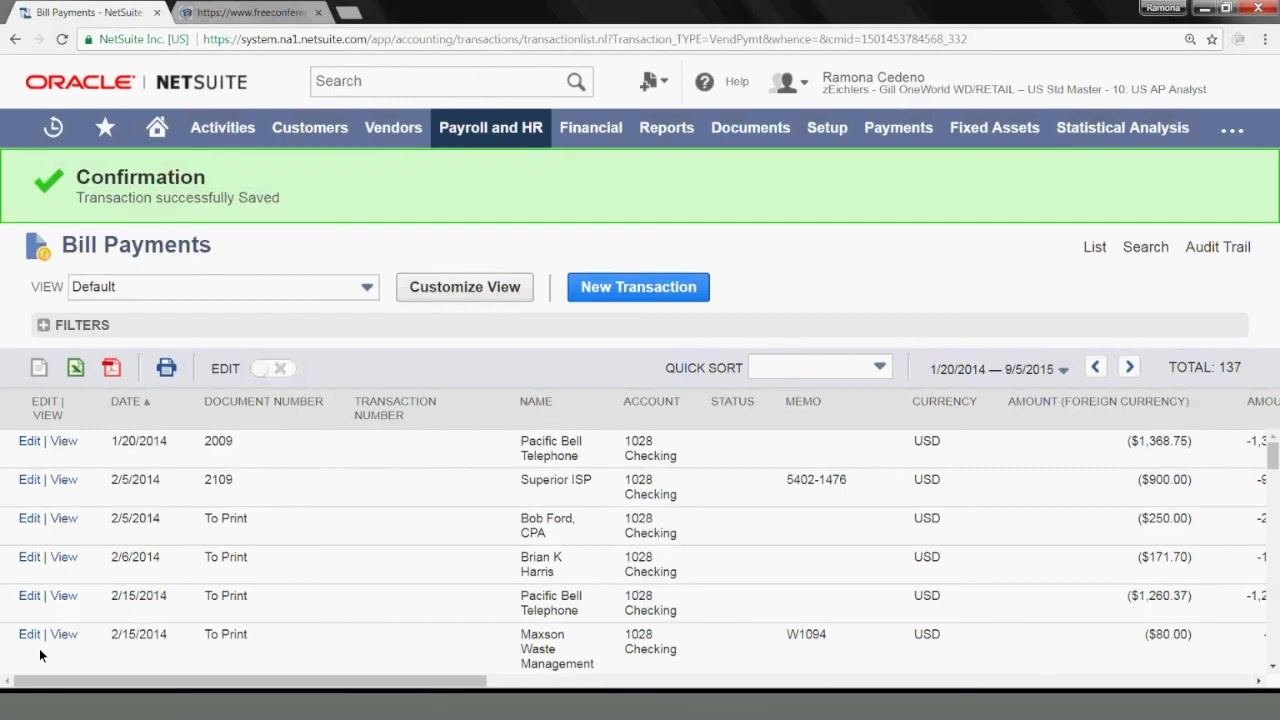
After saving, a green "Confirmation: Transaction successfully Saved" banner appears at the top of the Bill Payments list. The list shows columns for Edit/View, Date, Document Number, Transaction Number, Name, Account, Status, Memo, Currency, and Amount, so you can confirm your transaction was recorded.
Checking your results
After processing, run your AP Aging report to confirm that only the remaining open invoice amount appears — in this example, $1,000.00. This confirms that the credit memo and any partial payments were applied correctly.
What's next
- If any balance remains on the vendor's account, repeat the payment application steps to apply additional credits or payments as needed.
- Review the vendor's open balances periodically to keep records accurate after applying a credit memo.
Getting support
If you have questions about pending payments or managing transactions in NetSuite, you can reach out through the following channels:
- Website: http://www.bspny.com/
- Email: sales@bspny.com
- Phone: 855.977.7100
- Blog: http://www.bspny.com/blog
- Twitter: @BSPNY
- Facebook: BSPNY Facebook
- LinkedIn: Business Solution Partners LinkedIn
Generation details: cost, quality tiers
Docsie billed 3,500 credits ($2.45) to analyze this 7-minute video at standard quality. The rewrite, template fill and Word/PDF exports were included. The same video at each quality tier:
| Quality | Frames sampled | Credits | Approx. cost |
|---|---|---|---|
| Draft | every 16-30 s | 1,750 | $1.22 |
| Standard (this guide) | every 8-15 s | 3,500 | $2.45 |
| Detailed | every 4-7 s | 7,000 | $4.90 |
| Ultra | every 1-3 s | 14,000 | $9.80 |
Credits priced at $0.70 per 1,000; plans include a monthly allowance. Enterprise customers on on-premise or bring-your-own-model deployments run this on their own inference and pay no per-video credits.
Generated by Docsie Video-to-Docs on 2026-10-01 from a 6-minute video. Screenshots are frames from the source video and belong to their creator, BSP - Award Winning Oracle NetSuite Partner, whose original is embedded above. If you own this video and want the guide removed or credited differently, contact us and we will act within one business day.